C2s - Smartphone Realme - Free user manual and instructions
Find the device manual for free C2s Realme in PDF.

User questions about C2s Realme
0 question about this device. Answer the ones you know or ask your own.
Ask a new question about this device
Download the instructions for your Smartphone in PDF format for free! Find your manual C2s - Realme and take your electronic device back in hand. On this page are published all the documents necessary for the use of your device. C2s by Realme.
USER MANUAL C2s Realme
realme Smartphone ColorOS 6 User Guide
Content
- Welcome to ColorOS 6....6
- Safety Information......6
- Get started 9
3.1. Quick Look....9
3.1.1.ColorOS 6 Features....9
3.1.2. Sleep/Wake Button 11
3.1.3. Menu, Home, and Return Buttons 12
3.1.4. Volume Buttons....15
3.1.5. Micro-USB Port....17
3.1.6. Headset Jack....18
3.1.7. SIM and SD Cards 18
3.1.8. Accessories that Came with realme Phone....19
3.1.9. Charging the Battery 21
3.1.10. Gesture & Motion 22
3.1.11. Key Combinations....26
3.1.12. Status Icons ....27
3.2. Configuration Settings....29
3.2.1. Fingerprint, Face and Passcode....29
3.2.2. Set Up Other Mail and Calendar Accounts....37
3.2.3. Transfer Data from the Old Phone to realme Smartphone 38
3.2.4. Date and Time 43
3.2.5. Language and Region 46
3.2.6. Connect to the Internet....47
3.2.7. Dual SIM & Cellular Network 48
- What's new in ColorOS 6....50
4.1 Control Center....50
4.2 Notification Center....50
4.3 Volume Setting Look ....51
4.4 Game Space 2.0....53
4.5 New Look on Apps....58
4.6 Bigger Fonts, Enough Spacing ....59
4.7 Smart & Convenient has Been Divided Into Smart Service and Convenience Aid ..60
4.8 Added 2 Options on your Preferred Key Layout on the Navigation Keys....61
4.9 A More Organized Photo Album 62
4.10 Take Screenshot Without Disturbing your Game....63
4.11 Added Home Screen Mode....64
4.12 Static and Live Wallpaper....65
4.13 VOOC 3.0....66
4.14 Smart Assistant Upgrade....66
4.15 Hyper Boost....68
4.16 Smart Sidebar....69
5. Basics....74
5.1 Use Apps....74
5.2 Share from Apps....77
5.3 One-click Cleanup....78
5.4 Lock the Running Background Apps....80
5.5 View, Zoom In and Out....80
5.6 Convenience Aid....82
5.6.1. Navigation Keys....82
5.6.2. Assistive Ball....87
5.7. Change the Screen Orientation....89
5.8. Split-screen....89
5.9. Take and Edit a Screenshot....92
5.10. Control Center, Notification, and Status Bar 95
5.11. Search....98
5.12. Text....99
5.12.1. Add or Change Keyboard Languages....99
5.12.2. Type, Edit, and Delete Text....101
5.12.3. Prediction....103
5.12.4. Voice Typing 105
5.12.5. TouchPal for realme....107
5.13. Sound, Vibration, and System Feedback....109
5.14. Charge and Monitor the Battery 110
5.15. Location Service 112
5.16. Use the phone internationally ....114
5.17. Power Saver....115
6. Personalize your realme Phone....119
6.1. ColorOS 6 Device Name ......119
6.2. Personalize the Home Screen....120
6.2.1. Organize the Home Screen....120
6.2.2. Home Screen Widgets & Transition Effects....124
6.3. Change the Wallpaper....127
6.4. Lock Screen Magazine....129
6.5. Adjust the Screen Brightness and Color Temperature 131
6.6. Change Auto-lock Time 132
6.7. Change the Font Size....133
6.8. Keyboard and Input Method....133
6.8.1. Customize the Look of the Keyboard 133
6.8.2. Keyboard Layout....134
6.8.3. Trends....137
6.8.4. Keyboard General Settings....137
6.9. Set up Startup Manager....139
6.10. Clone Apps ....140
6.11. Manage Default App 141
6.12. Gesture & Motion 141
6.13. Preset Device On/Off Time or Automatic On/Off 145
6.14. App Display in Full-screen 146
7. Apps ....147
7.1. Phone 147
7.1.1 Make and Answer Phone Calls....147
7.1.2. Conference Calls....153
7.1.3. Block Calls....153
7.1.4. Emergency Calls ......156
7.1.5. Emergency SOS....157
7.1.6. Carrier's Call Settings....161
7.5. Message 162
7.5.1. Send and Receive Messages....162
7.5.2. Customize Message Settings....164
7.6. Contacts....167
7.6.1. Add a Contact....167
7.6.2. Edit and Delete a Contact....169
7.6.3. Import and Export Contacts....171
7.6.4. SIM Contacts 173
7.6.5. Manage Contacts....175
7.6.6. Back Up your Contacts ....177
7.6.7. VIP Contacts 178
7.7. Phone Manager....179
7.7.1. Scan and Optimize the Phone 179
7.7.2. Clean Up Storage....180
7.7.3. Privacy Permissions....182
7.7.4. Virus Scan....185
7.7.5. Payment Protection....185
7.7.6. Routine Test....186
7.7.7. Frequently Used Functions....188
7.8. Weather....190
7.9. Camera....194
7.9.1. Take Photos....194
7.9.2. Take a selfie 202
7.9.3. Shoot video 206
7.9.4. Camera Settings 210
7.10. Photos 212
7.10.1. Photos Overview 212
7.10.2. Albums 212
7.10.3. Stories / Memories....217
7.10.4.People....219
7.10.5. View and use photos and videos....221
7.10.6. Edit photos and videos....226
7.11. Music....229
7.11.1. Music....229
7.11.2. Change sort mode....231
7.11.3. Scan local songs....231
7.12. Videos....232
7.13. Clock....234
7.13.1. Set Alarm Clocks....234
7.13.2. Add and view clocks for locations around the world 236
7.13.3. Use the Stopwatch 239
7.13.4. Set the timer .....240
7.14. Files 244
7.14.1. File Manager....244
7.14.2. Clean Up Storage....247
7.14.3. Remotely Manage Phone Files....248
7.14.4.Private Safe....249
7.15. Calculator 251
7.16. Sound Recording 254
7.16.1. Recorder....254
7.16.2. Manage recordings....256
7.17. Compass....257
7.18. Chrome....258
7.18.1. Search the web....258
7.18.2. Browse the web....260
- Safety & Privacy....262
8.1. Device security 262
8.1.1. Lock Screen password ....262
8.1.2. Smart Lock....264
8.1.3. Payment protection....265
8.1.4. Set up a SIM card lock....266
8.1.5. Virus Scan....267
8.1.6. Pseudo Base Station Blocking....268
8.1.7. Protect Personal Information 268
8.2. Device administration 270
8.2.1. Allow and install apps from unknown sources....270
8.2.2. App permissions....270
8.2.3. Hide Home Screen icon....271
8.2.4. Kids Space....273
8.2.5. Block unwanted calls and messages 275
8.2.6. Find my device....277
8.3. Privacy....280
8.3.1. Location Service 280
8.3.2. Join User Experience Project....281
8.3.3. Privacy Protecting and Security Warning 282
8.4. Advanced....283
8.4.1. Screen pinning....283
8.5. App Encryption....285
- Share Internet connection and files....288
9.1.1. Tether your phone's Internet connection....288
9.2. Share Files 291
9.2.1. Wireless file sharing 291
9.2.2. Wired file sharing....295
9.2.3. Share from apps....296
- Restart, update, back up, and restore....297
10.1. Restart the phone....297
10.2. Update ColorOS software....298
10.3. Back up and restore the phone....300
10.3.1. Back up your phone ....300
10.3.2. Restore data on your phone....301
10.3.3. Reset the phone 304
- Barrier-free....305
11.1. TalkBack....305
11.2. Magnification Gestures....307
11.3. Press Power Button to End Call....308
- Safety, handling, and support 309
12.1. Health & Safety 309
12.1.1. Using Environment....309
12.1.2. Battery Safety 310
12.1.3. Charger Usage Notes....311
12.1.4. Traffic Safety....312
12.2. Maintenance and Repair 312
12.2.1. Phone Cases 312
12.2.2. Screen Protector....313
12.2.3. Maximize battery life and lifespan 313
12.2.4. Keep Clean....314
12.2.5. Keep dry and solve water damage 314
12.2.6. Use connectors, ports, and buttons....315
12.2.7. Other information....315
12.3. FCC Compliance Statement....316
1. Welcome to ColorOS 6
Welcome

natural_image
Abstract blue spiral shape resembling a stylized number 6 (no text or symbols)ColorOS
2. Safety Information
Read through the following information carefully. Failure to follow these safety precautions could result in danger or illegal activities.

Safe Startup
Do not switch on the device when phone use is prohibited or when it may cause interference or danger.

Traffic Safety First
Traffic safety is always of first importance. Use of phones and headphones while driving a vehicle or riding a bicycle is not recommended and is illegal in some areas. Obey and follow all related local laws.

Switching off Device at Gas Stations
Turn off your phone when in any area with a potentially explosive atmosphere, such as gas stations or any other fueling area. Sparks in such areas could cause an explosion or fire, resulting in serious injury or even death.

Switching off Device When On Board an Airplane
Wireless devices might be prohibited while in the air in some countries or regions. Obey all related local laws and turn off your phone or switch to airplane mode.

Switching off Device near Medical Equipment
Hospitals or healthcare facilities might use radio-frequency-sensitive equipment. Obey the relevant rules and regulations.

Switching off Device at Blasting Areas
To avoid interfering with blasting operations, turn off your phone when in a "blasting area" or in areas posted "Turn off two-way radio." Obey all signs and instructions.

Radiation
Nearly every electronic device gives off radiation. Mobile phone use does not increase the risk of getting brain cancer or other head tumors. Its effect in humans is negligible.

Interference
Nearly every electronic device is susceptible to interference for external sources if inadequately shielded or designed. As a result, your phone may cause interference with other devices.

Temperature
Operate your phone in a place where the temperature is always between 10^ C to 45^ C. Using or storing your phone in a too hot or too cold environment might damage the battery, or even cause your phone to short-circuit or burn.

Proper Usage
Use your phone appropriately. Do not touch the antenna area unnecessarily when
the phone is turned on. Do not drop, disassemble, crush, bend, deform, puncture, incinerate, or insert foreign objects into your phone.

Qualified Maintenance and Service
Never attempt to repair or modify the phone yourself. If your phone has any hardware or software failure, do not use it until you take it to an authorized service provider. Do not disassemble or root your phone yourself, otherwise the warranty service will be terminated immediately.

Batteries, Chargers and other Accessories
Do not dismantle the built-in lithium-ion battery of your device. Use only the batteries, chargers and other accessories authorized by realme, for third-party accessories might cause damage or danger.

Waterproofness
Your device is not waterproof. Do not use your device in rain, or other wet locations.

Avoiding Hearing Damage
Permanent hearing loss may occur if the receiver, speakerphone, headphones, or earpieces are used at high volume. You can adapt over time to a higher volume of sound that may sound normal but can be damaging to your hearing. Set the volume to a safe level to protect your hearing.

Avoiding Eyestrain
Your device's screen color and brightness might have a different degree of stimulation to your eyesight. Long-term viewing of your phone in normal or darker environments will damage your eyesight. When watching video or reading text on your phone, avoid prolonged use, take breaks and turn on eye protection mode to prevent eyestrain.

Glass Parts
The outside cover of your phone's screen, front/rear camera and flash is made of glass. This glass could break if your phone is dropped on a hard surface or receives a substantial impact. Do not attempt to touch or clean the broken glass. Stop using
your phone until the glass is replaced by an authorized service provider.

Connecting to Other Devices
Before connecting to other devices, carefully read the user manual for more detailed, accurate and safety instructions. Do not connect to incompatible products.

Being Aware of Laser Safety
If your phone supports laser focusing, carefully read the user manual before using it. Failure to follow instructions might lead to harmful radiation exposure. To prevent direct exposure to laser beam, do not attempt to open your phone's outer shell, or avoid keeping close contact with laser light.
3. Get started
3.1. Quick Look
3.1.1.ColorOS 6 Features
New look, Best experience
Easy on the eyes. Smartest features as of yet. A new look. A more bold and intuitive icons to make browsing fun and exciting. Moving forward to greatness.
A more intuitive user interface
ColorOS 6 has been created with style in mind. Changing the entire look of the user interface has been one of the main upgrades so each feature, app, or function will have its own charm. You can have fun just by tinkering your realme phone. You will definitely notice a better looking Setting, Volume, Notification Bar, app icons, fonts for numbers on the dial pad and more!
New Fonts, Better spacing
We don't want you to miss or strain your eye when you are navigating or browsing the settings on the phone or when looking on your contacts. The fonts are bigger and there are enough space for each so your eyes won't miss any detail.
Control Center
Easy to see its bigger icons. Added more colors to categorize each feature. It's a lot easier to look for the feature that you would want to enable and disable.
Notification Center
You may now hide those notifications just by choosing Unimportant Notifications so you will have a cleaner and spacious look on the screen.
Volume Setting Look
Changing volumes is now more intuitive with its bigger icon. Your finger easily fits to adjust volumes of ringtone, media, and alarm. It's also beside the volume buttons so it's not that hard to miss.
Riding Mode
Safety is non-negotiable. We always make sure the wellbeing of our users either by driving motorcycle or when they do their favorite hobby like cycling. If this is enabled, incoming calls will be muted so you won't be tempted to check your phone while on the road.
Home Screen Mode
You can now choose how you want your apps displayed on your Home Screen. You can choose between Standard mode and drawer mode.
Static and Live Wallpapers
Amazing Wallpapers to choose from. More than the Static Wallpaper which has variations of sophistication. You can also choose to have a Live Wallpaper running on the background.
VOOC 3.0
Charge in a flash. It's faster and dependable.
Hyper Boost
Best gaming experience. More stable but at the same time helps you save power as well.
Functions for buttons and combination keys
3.1.2. Sleep/Wake Button
The Wake/Sleep button on the right side of your phone has a number of different uses.
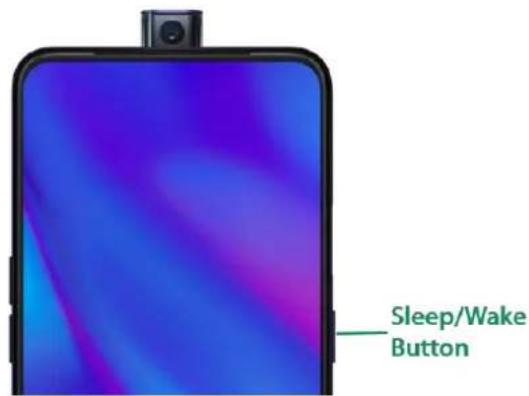
text_image
Sleep/Wake ButtonWhen the phone is on
Wake or lock the screen: With the phone is powered on, press the Wake/Sleep button once and it will wake the phone up to the point that you can see the Lock Screen, like the clock and any notifications that are setup to display there. When the phone screen is awakened, pressing this button will blacken the screen and lock the phone.
Take a screenshot: Press and hold the Sleep/Wake and Volume Down buttons at the same time and your phone will take a picture of whatever is displayed on the screen. Click the screenshot, and then choose to a take a long screenshot, send, edit or delete the screenshot. If you save the screenshot, you can view it on Photos.
End a call: Go to [Settings] > [Additional Settings] > [Accessibility] and turn on [Power Button Ends Call], then you can press the Sleep/Wake button to end phone calls.
Turn off the phone: Press and hold the Sleep/Wake button for a few seconds, whether the phone is on the Lock Screen or Home Screen, it will ask you to slide down to power off the device.
Force restart the phone: Press and hold the Sleep/Wake and Volume Up buttons for about 10 to 12 seconds until your device is turned on. View force restart your phone.
Wake up Google Assistant (Siri): Press and hold the Sleep/Wake and Volume Up buttons for about 0.5 seconds to wake up Google Assistance. View Waking Up Google Assistant.
When the phone is off
Turn on the phone: Press and hold the Sleep/Wake button for a few seconds until you see the realme logo.
Force Restart the phone: Press and hold the Sleep/Wake and Volume Up buttons until your device is turned on. View force restart your phone.
Enter Recovery Mode: Press and hold the Sleep/Wake and Volume Down buttons at the same time to enter Recovery Mode.
3.1.3. Menu, Home, and Return Buttons
An upgrade with the on-screen virtual navigation keys which also offers fast and fluid gestures to operate your phone. You can change the order of the virtual keys, and set them to appear only when needed to free space on the screen.
Enable virtual navigation keys. Virtual navigation keys are default on. If you want to enable them manually, go to [Settings] > [Convenience Aid] > [Navigation Keys] and click Virtual Keys.
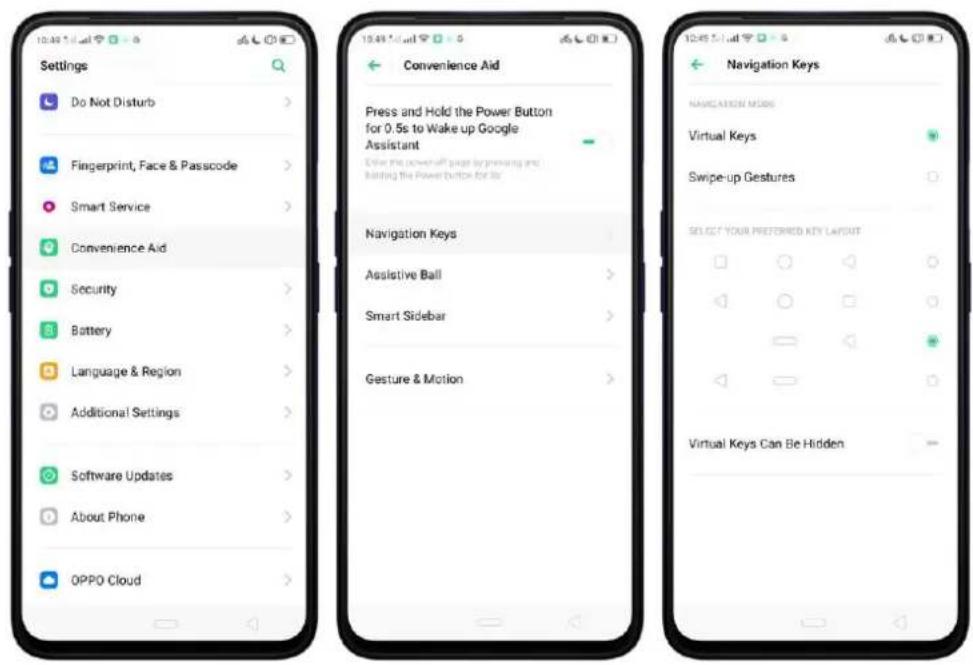
text_image
Settings Do Not Disturb Fingerprint, Face & Passcode Smart Service Convenience Aid Security Battery Language & Region Additional Settings Software Updates About Phone OPPO Cloud 10:45 L-mail 10:45 L-mail 10:45 L-mail 10:45 L-mail 10:45 L-mail 10:45 L-mail 10:45 L-mail 10:45 L-mail 10:45 L-mail 10:45 L-mail 10:45 L-mail 10:45 L-mail 10:45 L-mail 10:25 L-mail 10:25 L-mail 10:25 L-mail 10:25 L-mail 10:25 L-mail 10:25 L-mail 10:25 L-mail 10:25 L-mail 10:25 L-mail 10:25 L-mail 10:25 L-mail 10:25 L-mail 10:25 L-mail 19:45 L-mail 19:45 L-mail 19:45 L-mail 19:45 L-mail 19:45 L-mail 19:45 L-mail 19:45 L-mail 19:45 L-mail 19:45 L-mail 19:45 L-mail 19:45 L-mail 19:45 L-mail 19:45 L-mail 19:25 L-mail Convenience Aid Press and Hold the Power Button for 0.5s to Wake up Google Assistant Use the power off page by pressing and binding the Power Button for it Navigation Keys Assistive Ball Smart Sidebar Gesture & Motion Navigation Keys NAVIGATION MODE Virtual Keys Swipe-up Gestures SELECT YOUR PREFERRED KEY LAYOUT Virtual Keys Can Be HiddenChange the order of virtual navigation keys. The keys follow the typical order for realme: Recent, Home, and Return from left to right. If you are left-handed, you can change them to the Return-Home-Recent order.

text_image
Navigation Keys NAVIGATION MODE Virtual Keys Swipe-up Gestures SELECT YOUR FREEFERED KEY LAYOUTHide the virtual navigation keys. When you launch a full-screen app, the keys will be hidden when you click ▼, and can be brought back with a simple swipe:
- When in portrait mode, swipe up from the bottom.
- When in landscape mode, swipe from the bottom to the left.

text_image
Help me catch the naughty cat ! OK DRAW A BOX Help me catch the naughty cat !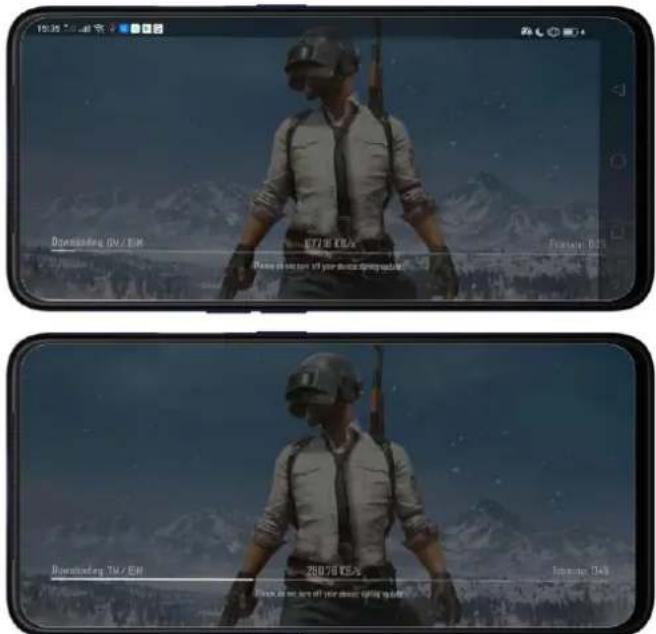
text_image
Downstanding 0% / 0% 877.0 KB Game still at home of your device spring outlook Downstanding 0% / 0% 250.0 KB Game still at home of your device spring outlookManually hide the virtual navigation keys. To set the keys to appear only when needed, go to [Settings] > [Convenience Aid] > [Navigation Keys] and enable Virtual Navigation Keys Can Be Hidden. Then you can click on the left-lower corner of the screen to hide the keys, and swipe from the bottom to reveal them.

text_image
Navigation Keys NAVIGATION MODE Virtual Keys Swipe-up Gestures SELECT YOUR PREFERRED KEY LAYOUT Virtual Keys Can Be Hidden
text_image
Help me catch the naughty cat! OKImmersive navigation background. The system set multiple colors for the navigation background to match the color scheme of the popular apps. The background color is default white, and it will become translucent or immersive when you open some of the third-party apps.
text_image
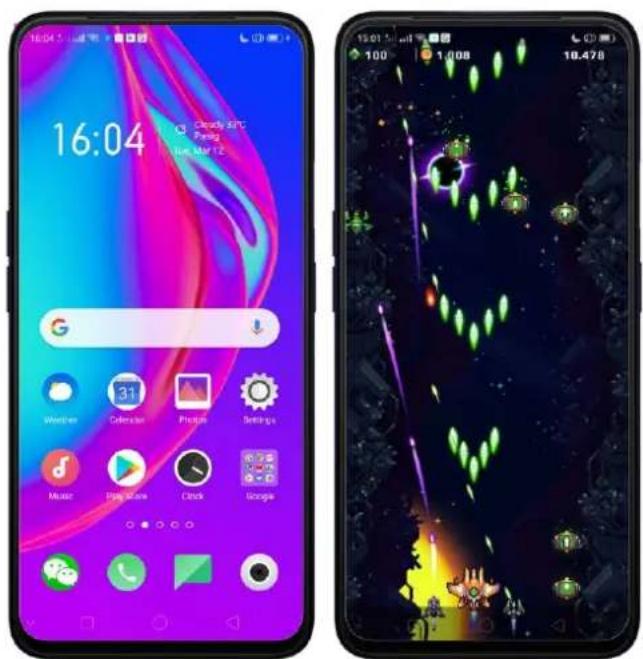
16:04 Cloudy GPC Pang Tue, Mar 12 Weather 31 Calendar Picture Settings Music Play Now Clock Google 100 1.008 18.4283.1.4. Volume Buttons
Volume buttons give you easy access to adapt over time to a proper volume of sound. It refers not simply ringer or media, the phone also keeps track of the volume level separately in headphone, microphone, and speaker.
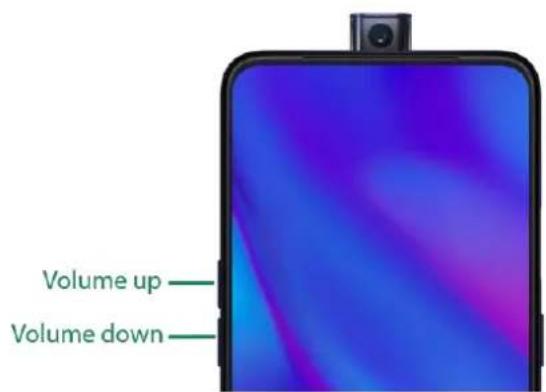
text_image
Volume up Volume downMedia volume: When listening to music, videos and phone calls, use the buttons on the side of the phone to adjust the volume.
Ringer volume: Use the Volume buttons to control the volume for the ringer and alerts. When you press and hold the Volume down button, your phone will switch to silent mode.
Alarm volume: Use the Volume buttons to set the volume for alarm. The alarm still plays a sound when the phone is in silent mode.
Call volume: When making or receiving phone calls, use the volume buttons to adjust the volume of the call.
* You can also adjust the volume (except call volume) in [Settings] > [Sound & Vibration].

text_image
Settings Wi-Fi Bluetooth Other Wireless Connections Notifications & Status Bar Display & Brightness Home Screen & Lock Screen Magazine Sound & Vibration Do Not Disturb Fingerprint, Face & Passcode Smart Service Convenience Aid Security Sound & Vibration Vibrate Vibrate When Ringing Vibrate When Silent Silent VOLUME Video Volume Ringer volume Alarm Volume Default Volume Button Adjustment Select the default volume adjustment type for the Volume button Media Volume* You can also adjust it on your phone screen. See New Volume Button Settings
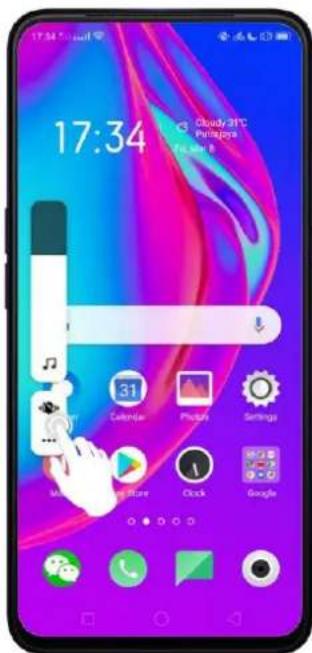
text_image
17:34 Cloudy 31°C Pazifikaya @.a.e. B Calendar Photos Settings Mobile Blue Clock GoogleControlling the camera: Volume buttons can also be used to control your camera. Go to [Settings] > [System Apps] > [Camera] > [Volume Button] and set up the volume buttons for Shutter or Zoom.
3.1.5. Micro-USB Port
Micro-USB port is the connector on the bottom of your device where your battery charger connects. It also doubles as the data port, which lets you transfer data to and from a personal computer or other USB devices. Plug the cable in the port to charge or transfer data.
Notice:
- Repeated connecting and disconnecting of your cable can cause the port to wear out, resulting in a poor connection to your cable.
- Never force a connector into the port, for that might cause damage.
3.1.6. Headset Jack
The headset jack is an audio socket that accepts a 3.5mm audio plug. Plug your headset in the jack to listen to music, videos and phone calls. Do not force a mismatched headset into the jack for that might cause damage.
3.1.7. SIM and SD Cards
SIM card
* Insert the SIM card before turning on your phone. If you hold a new SIM card, you might need to wait until it is activated by the carrier before you can use it.
A SIM card is provided by your carrier and is used to activate your phone's mobile network. Because it has a small amount of memory, the SIM card not only enables communications between two persons but stores information such as phone numbers, security data and more. When using the mobile network, you need to pay charges. To avoid high charges, you can shop data plans with your carrier, or shop international data roaming plans when traveling abroad.
Insert the SIM card: Most realme Smartphones support Dual SIM. You can choose to insert one or two.
- Insert the card needle into the hole outside the card tray to pop it open.
- Pull out the card tray and place SIM card(s) on it.
- Put the card tray back in as the same orientation that you removed it.
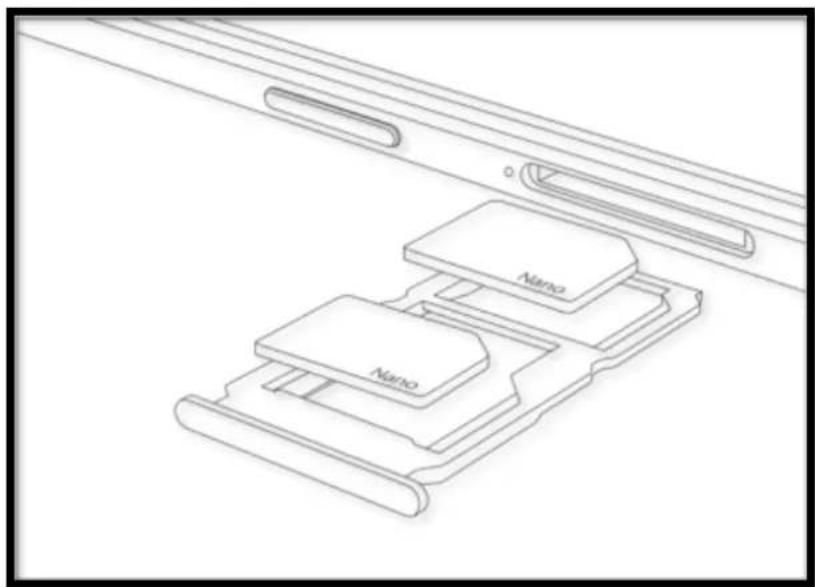
natural_image
Technical line drawing of a device with two labeled components (Nano) arranged in a layered structure (no text or symbols beyond labels)Remove the SIM card: Remove the card(s) in the same way that you insert it (them).
SD card
The SD card is a way to store and transfer images, music, video, and other data. You can insert a SD card in your phone to expand phone's memory.
SIM1, SIM2 and SD cards share the same card tray. Insert your SD card in the same way that you insert the SIM card(s).
3.1.8. Accessories that Came with realme Phone
Along with the handset, USB Connecting cable, Power adapter, SIM card tool, and Phone case.
Notice: All photos shown are for illustration purpose ONLY. Actual products may vary due to product enhancement.
USB Connecting cable: Use the cable to connect your phone to the computer to charge and transfer files, or use it with the power adapter to charge.

natural_image
Coiled white USB cable with a green connector (no text or symbols visible)Power adapter: Connect the power adapter to your phone using the included cable, then plug it into a standard power outlet to charge the phone.

natural_image
Two white electronic devices with black leads, one square and one rectangular, shown against a white background (no text or symbols visible)SIM card tool: Use to pop out the SIM card tray.

natural_image
Simple grayscale illustration of a curved, elongated object resembling a stylized oenise or lens (no text or symbols)Phone Case: Use to protect against drops and shock damage on the corners and rear of your phone.
natural_image
Blank white smartphone case with rounded corners and a small rectangular top (no text or symbols)3.1.9. Charging the Battery
How to charge the battery:

natural_image
Diagram showing three connected devices: a smartphone, a laptop, and a smartphone with cable (no text or symbols)Note: All photos shown are for illustration purpose ONLY. Actual products may vary due to product enhancement.
Charge with the jack: Connect adapter to your phone using the USB cable, then plug it into a standard power outlet to charge the phone.
Connect to a computer to charge: Use the cable to connect your phone to the computer to charge. Your phone will charge slowly if you connect it to the computer.
Charge with Power Bank: Connect Power Bank to your phone, and your phone will be charged wherever you go. It is an absolute necessity if you are a frequent traveler.
Charging Notice:
-
Charge the phone with the original charging accessories (including adapter, cable and power bank).
-
It is recommended to charge your phone in a place where the temperature is between 15^ C to 40^ C. Extreme ambient temperatures will affect flash charging system.
realme smartphone is designed to understand gestures. You can use gestures such as tap, draw, and slide to operate on your phone.
To set up complex gestures for specific functions, go to [Settings] > [Convenience Aid] > [Gesture & Motion]

text_image
Settings Display & Brightness Home Screen & Lock Screen Magazine Sound & Vibration Do Not Disturb Fingerprint, Face & Passcode Smart Service Convenience Aid Security Battery Language & Region Additional Settings 16:26 5:41:41 16:26 5:41:41 16:26 5:41:41 Convenience Aid Press and Hold the Power Button for 0.5c to Wake up Google Assistant Drive the power of a page by pressing and holding the power button for its. Navigation Keys Assistive Ball Smart Sidebar Gesture & MotionScreen-off Gestures
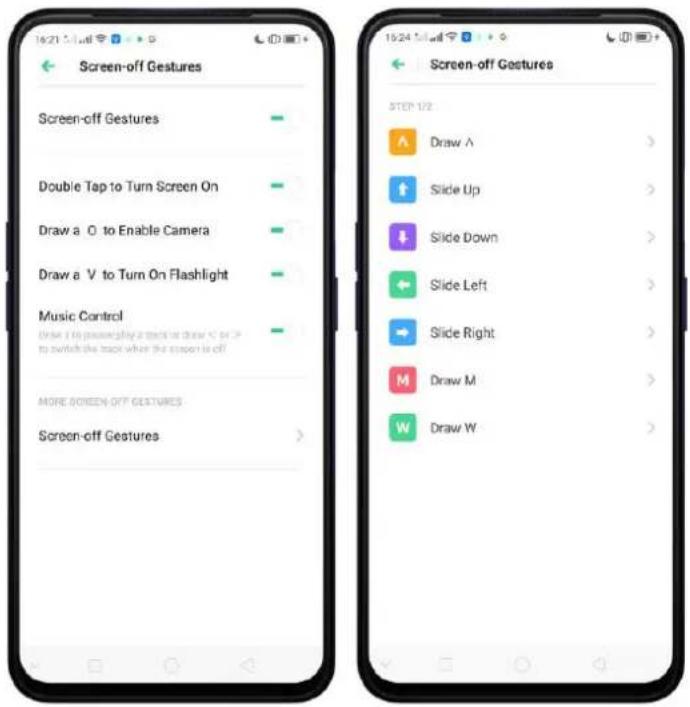
To set up screen-off gestures, you need to turn it on first.
Double tap to turn screen on: Turn it on to wake up your locked screen by double-clicking the screen.
Draw O to start camera: When turn it on, you can draw O on the locked screen to open Camera app.
Draw V to open torchlight: When turn it on, you can draw V on the locked screen to open the torchlight.
Music control: When turn it on, you can draw || to pause/play a track, or draw < or > to switch the track when the screen is off.
Add more screen-off gestures: You can Draw ^, Slide up, Slide down, Slide left, Slide right, Draw M and Draw W. Choose one to unlock the phone, call someone or start an app.
text_image
Screen-off Gestures Screen-off Gestures Double Tap to Turn Screen On Draw a O to Enable Camera Draw a V to Turn On Flashlight Music Control Draw a V to Powerplay a Back to Draw < or > to switch the back when the stop is off MORE SCREEN-OFF GESTURES Screen-off Gestures Screen-off Gestures STEP 1/2 Draw A Slide Up Slide Down Slide Left Slide Right Draw M Draw W3-Finger Gesture
Take a screenshot. Swipe down the screen with three fingers.
Use Split-screen. Under the interface of an app, swipe up the screen with three fingers to enter split-screen mode.

text_image
18:03 Moderate in 24/97: Push 7th Mar 2Motion
The motion-sensing technology makes your phone response to motion.
Smart call
Auto call when placing to the ear: Before you can use auto call, you need to set the default SIM card for calling. Go to a contact detail, call detail, message conversation or info interface, put the phone near your ear and your phone will automatically call that specific person.
Auto answer when phone near the ear: This function lets your phone to answer any incoming calls automatically when putting the phone near your ear.
Mode Switching during calls: Use it to automatically switch from speaker to receiver when you put the phone near your ear during phone calls.
Flip to mute incoming calls: Use it to silence the ringer by turning the phone over on a table or other flat surfaces.

text_image
Smart Call Auto-call When Pinching Phone is Near Ear Auto-answer When Phone is Near Ear Mode Switching During Calls Automatically switches audio from speaker to listen when the phone is held near user Flip to Mute Incoming CallsRaise to turn on Screen
Screen will automatically turn on without waking it up just by merely raising the phone.

text_image
Gesture & Motion Screen-off Gestures Enable the role of gestures for each operation when the screen is off. Smart Call OTHERS Raise to Turn On Screen 3-Finger Screenshot Stop down with how flowers to quickly take a screenshotTake selfies
Open Camera app and switch to the front camera. Use hand gesture towards the camera, once the camera captures that, it will take a photo automatically after two seconds. You can change your pose and expression within this two seconds.
3.1.11.Key Combinations
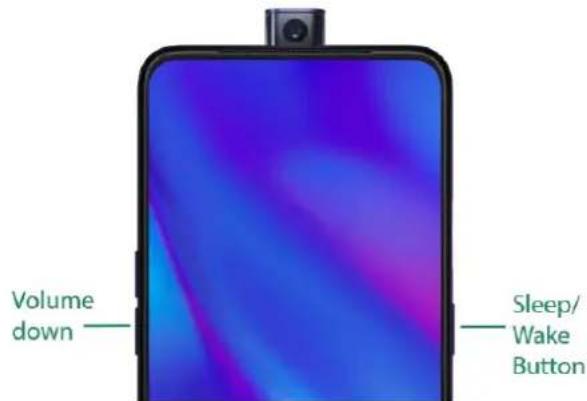
Generally, you can use two buttons of your phone to generate a specific result. The common key combinations include:
When phone is on
Press and hold the Power and Volume Down buttons: Your phone will take a screenshot for the current page. To take a long screenshot, click the screenshot, then click Longshot.
text_image
Volume down Sleep/ Wake ButtonPress and hold the Power and Volume Up buttons: If the phone isn't responding, press and hold the button combination for at least eight seconds to force restart your phone.
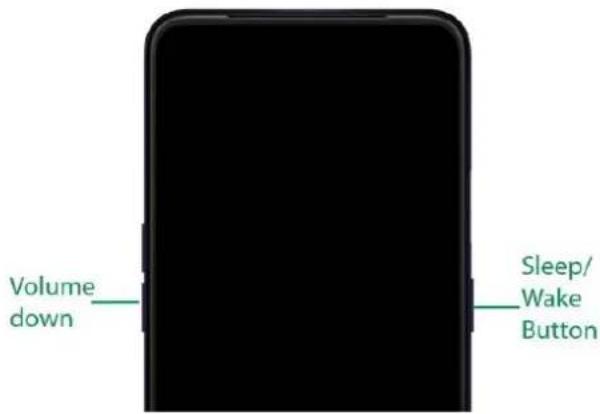
When phone is off
Press and hold the Power and Volume Down buttons: Phone will enter Recovery Mode, which helps to update the system, wipe data, and check disk and more.
text_image
Volume down Sleep/ Wake ButtonPress and hold the Power and Volume Up buttons: Phone will be force restarted. Press and hold the two buttons until your phone is turned on.
3.1.12. Status Icons
The icons in the status bar at the top of the screen give information about your realme smartphone:
| Status icon | What it means | |
| ..|| | Mobile network signal | Shows whether you're in range of operator's network and can make and receive calls. The more bars, the stronger the signal. |
| ↑ | Airplane Mode | Shows that airplane mode is on. Phone's wireless communication abilities are disabled. |
| 4G/4G+ | LTE/LTE-A | 4G network is available, including LTE and LTE-A. Your phone can connect to the Internet over that network. |
| 3G/H+ | UMTS/WCDMA | 3G UMTS network is available. Your phone can connect to the Internet over that network. |
E


| EDGE /GSM | EDGE (GSM) network is available. Your phone can connect to the Internet over that network. |
| Wi-Fi | Shows that your phone is connected to a Wi-Fi network. The more bars, the stronger the signal. See Connect to Wi-Fi. |
| Call Forwarding | Call forwarding is turned on. |
| VPN | You're connected to a network using VPN. |
| Quiet Time | Quiet Time is turned on. |
| Portrait orientation lock | Phone screen is locked in portrait orientation. |
| Alarm | An alarm is set up on your phone. |
| Bluetooth | Bluetooth is on, or your phone is connected to a Bluetooth device. |
| Bluetooth | Bluetooth Tethering is on. |
| Silent | Silent Mode is on. |
| Vibrate when silent | Phone vibrates when Silent mode is on. |
| HD Voice | Your phone is on a voice call over VoLTE. |
| Wireless Display | Wireless projector is connected. |
| Location Service | Location Service is on. |
| No service | Your phone has no signal. |
| Power Saving | Power Saving Mode is on. |
| LOGG-ING | Get a log for testing |
| Message | Message notification | |
| VoLTE | Voice over LTE | Your operator's VoLTE service is available. HD Voice works to make your calls. |
| Game acceleration | Optimize the game display configuration to fully utilize hardware resource | |
| International Roaming | Your phone is using International Data Roaming. | |
| Kids space | Addiction prevention | |
| Payment protection | Payment environment detection |
3.2. Configuration Settings
3.2.1. Fingerprint, Face and Passcode
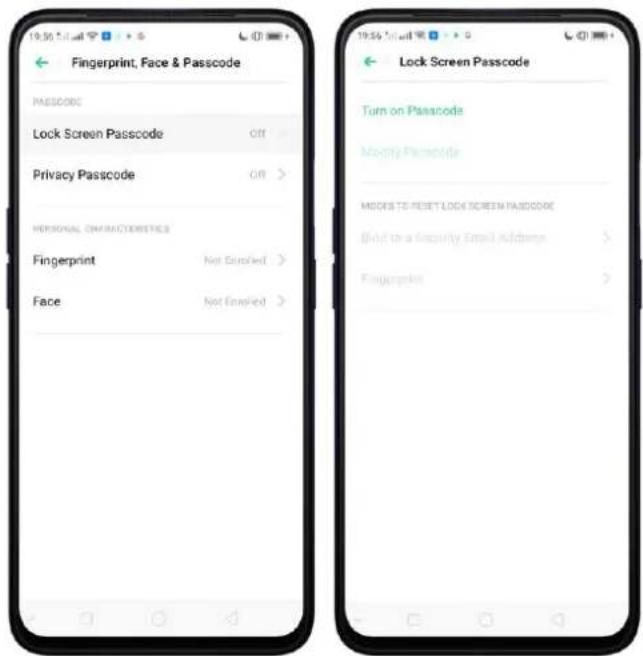
Setting a lockscreen passcode, privacy passcode, and face ID on your device are security measures that all users should take. Follow these steps to set a passcode that will be needed to unlock your phone and access the information stored on it.
Use a Lock Screen passcode on your realme phone Set the Lock Screen Passcode
- Go to [Settings] > [Fingerprint, Face & Passcode], enter [Lock Screen Passcode], click [Turn on Passcode].
- You'll be prompted to enter a 6-digit numeric code. If you want to use other passcode types, Click Other Encryption Methods.
text_image
Fingerprint, Face & Passcode PASSCODE Lock Screen Passcode Gift > Privacy Passcode Gift > PERSONAL CHARACTERISTICS Fingerprint Not Enabled > Face Not Enabled > Lock Screen Passcode Turn on Passcode Modify Passcode MODES TO RESET LOCK SCREEN PASSCODE Blind to a Security Email Address > Fingerprint >-
Choose from four types of passcodes:
-
Pattern Code: Allows you to draw a pattern with at least four dots connected.
- 4-Digit Numeric Passcode: Allows you to set a numbers-only passcode that contains four characters.
- 4-16 Digit Numeric Passcode: Allows you to set a numbers-only passcode that contains four to sixteen characters.
-
4-16 Digit Alphanumeric Passcode: Allows you to set a passcode that contains four to sixteen numbers and/or letters as your preference.
-
Draw your pattern or enter your passcode.
-
Re-draw or re-enter your pattern or passcode to confirm it and activate it.
Change the passcode
- Go to [Settings] > [Fingerprint, Face & Passcode], enter your passcode then click [Modify Passcode].
- Draw or enter your current pattern or passcode.
Draw or enter your new pattern or passcode. If you want to use other passcode types, click Other Encryption Methods at the bottom of the screen.
Re-draw or re-enter your pattern or passcode to confirm it and activate it.
Turn off the passcode
-
Go to [Settings] > [Fingerprint, Face & Passcode], enter your passcode then click [Disable Passcode].
-
Draw or enter your current pattern or passcode to confirm.
View more details in How to Set a lockscreen passcode with your realme phone
Privacy Passcode
When this is turned on, the validation will be used for all privacy features such as App Lock and Private Safe.
- Manage Privacy Passcode: Go to [Settings] > [Fingerprint, Face & Passcode] > [Privacy Passcode] then click Turn on Privacy Passcode create an encryption code, then set or customize a security question, then click Done. Note: The security question can be used to reset the passcode.

text_image
Privacy Passcode PASSCODE MANAGEMENT Turn on Privacy Passcode Modify Privacy Passcode METHOD FOR RESETTING PASSCODE Modify the Security Question Bird Security Email Address Association (PHP ID) PRIVACY FEATURES App Lock Private Sale About "Privacy Passcode!" 1. The privacy passcode is actual in the ability of your base source storage - http://www.bio.com/communities (105) and is preferred from theft or double-force destinations. 2. When Privacy Passcode is any, fully passcode will be most for replication in Apps. Every shoes Custom Question What is the name of one of your teachers? What is your mother's name? What is your father's name? What is the name of your high school? What is the name of your favorite restaurant? Custom Question- Change or turn off privacy passcodes: Go to [Settings] > [Fingerprint, Face & Passcode] > [Privacy Passcode] enter the encryption code then click [Turn off Privacy Passcode] or [Modify Privacy Passcode].
- Modify the security questions: Go to [Settings] > [Fingerprint, Face & Passcode] > [Privacy Passcode] enter the encryption code click [Modify the Security Questions] enter the encryption code again then set or customize a new security question, click Done.
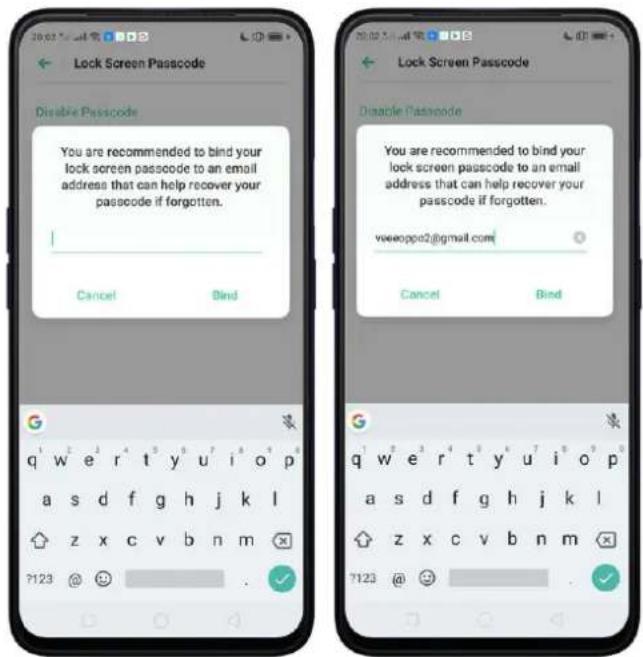
- Bind security email address: The email used will be able to retrieve the privacy passcode: Go to [Settings] > [Fingerprint, Face & Passcode] > [Privacy Passcode] enter the encryption code click [Bind Security Email Address] enter the encryption code again then enter email address, click Use.
- Update bind security email address: Go to [Settings] > [Fingerprint, Face & Passcode] > [Fingerprint, Face & Passcode] enter the encryption code click [Bind
Security Email Address] click Change Email Address then enter the encryption code again, enter the new email address, click Use.
text_image
Lock Screen Passcode Disable Passcode You are recommended to bind your lock screen passcode to an email address that can help recover your passcode if forgotten. Cancel Bind Lock Screen Passcode Disable Passcode You are recommended to bind your lock screen passcode to an email address that can help recover your passcode if forgotten. veeoppo2@gmail.com Cancel Bind 7123 @ 😊 . ✓Use a fingerprint on your realme phone
Before you can add a fingerprint, you need to create a passcode for your realme phone. You can use fingerprints for:
Unlocking the phone from the Lock Screen.
- Go to [Settings] > [Fingerprint, Face & Passcode], click [Add a Fingerprint].
- Follow the on-screen instructions, placing your finger gently on the Home button until your fingerprint is recorded.

text_image
Place Your Finger on the Sensor Place the edge of your Finger on the Fingerprint button and then move it away when you feel vibration. Repeat this step. Ingredients are asked for the security module of the finger and cannot be allowed by the options in steps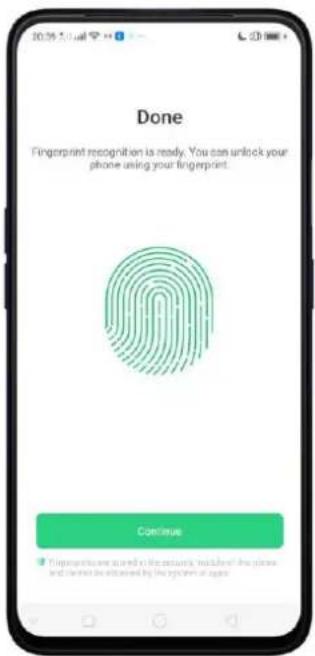
text_image
Done Fingerprint recognition is ready. You can unlock your phone using your fingerprint. Continue Disapprove are cured by necessity, include the system and shared as obtained by the system or age.Repeat step 1 and 2 for as many fingers as you like.
Delete or Rename a fingerprint
- Go to [Settings] > [Fingerprint, Face & Passcode], click the fingerprint you've added.
- Enter a name for your fingerprint or click [Delete Fingerprint].

text_image
Edit Fingerprint Finger 1 Delete Fingerprint q w e r t y u i o p a s d f g h j k l z x c v b n m 7123 , 😊 .Reset Passcode methods
When you forgot your Lock Screen passcode, there are two ways you can recover it.

text_image
Select a Method to Reset Look Screen Passcode Reset Using Fingerprint Reset Using Email Cancel- Reset Using Fingerprint. Just click on Forgot Passcode at anytime, and put the correct finger on the fingerprint button. Note: You must have enrolled a fingerprint to use this method.

text_image
Input your fingerprint or passcode 1 2 3 4 5 6 7 8 9 0 Emergency Call Book Reset Passcode Using Fingerprint Cancel Please put the correct finger on the fingerprint button and keep it stillPlace your finger on the fingerprint sensor, then enter your new passcode and confirm it.
- Reset Using Email. When you have forgotten your lockscreen passcode and you also haven't enrolled face recognition or for some reason, it did not work, you can still reset the password as long as you have bounded your security email address at the initial phase of password creation. See bind security email address.
How to reset password using bind email:
- Enter the email address that you have bounded on the phone, then enter the verification code that was sent thru your email, click Done. Now you can set a new lockscreen passcode for your phone.
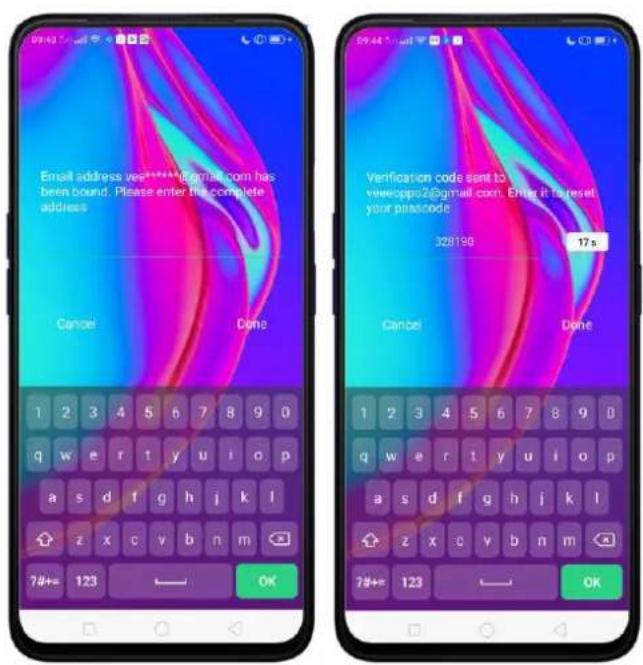
text_image
Email address vee2019@gmail.com has been bound. Please enter the complete address Cancel Done Verification code sent to vee2019@gmail.com. Enter it to reset your postcode 328190 17s Cancel Done 1 2 3 4 5 6 7 8 9 0 q w e r t y u i o p a s d f g h j k l z x c v b n m 7#+= 123 OK 1 2 3 4 5 6 7 8 9 0 q w e r t y u i o p a s d f g h j k l z x c v b n m 7#+= 123 OKEnroll a Face on your realme phone
Before you can add a face you need to create a passcode for your realme phone. You can use face for:
- Unlocking the phone from the Lock Screen.
- Encrypting apps
- Protecting files
Enroll a face
- Go to [Settings] > [Fingerprint, Face & Passcode], click [Face].

text_image
Settings Sound & Vibration Do Not Disturb Fingerprint, Face & Passcode Smart Service Convenience Aid Security Battery Language & Region Additional Settings Software Updates About Phone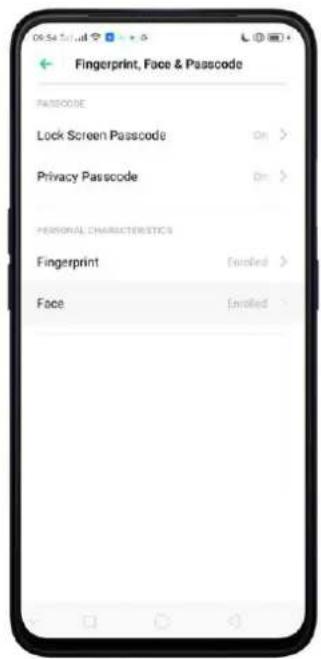
text_image
Fingerprint, Face & Passcode PASSCODE Lock Screen Passcode On > Privacy Passcode On > PERSONAL CHARACTERISTICS Fingerprint Enrolled > Face Enrolled >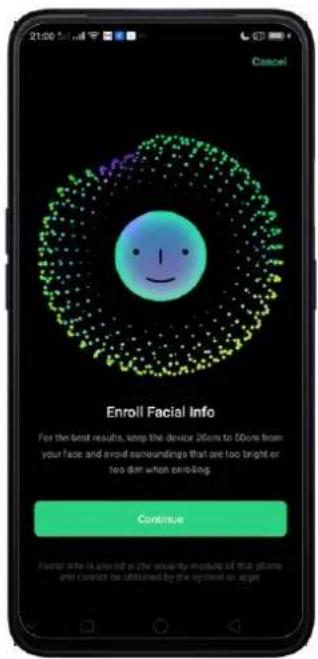
text_image
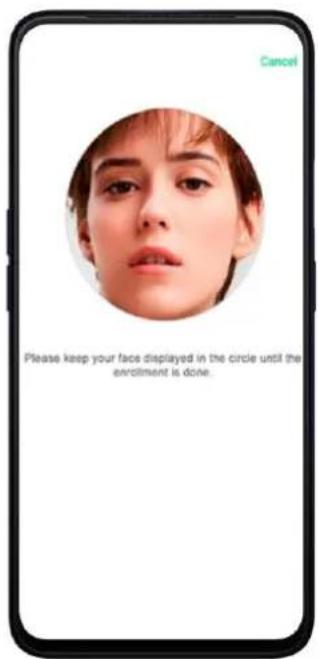
21:00 Cancel Enroll Facial Info For the best results, keep the device 260ms to 500ms from your face and avoid surroundings that are too bright or too dark when enrolling. Continue Facial info is heard in the priority encoding of their phones and correct be obtained by the system or image.- Follow the on-screen instructions. To get the ideal effect, keep the phone 20-50cm away from your face and position your whole face in the circle until the enrollment is done. Avoid very bright or dim environment when enrolling your face.
text_image
Cancel Please keep your face displayed in the circle until the enrollment is done.
text_image
Cancel Face Recognition is ready, you can unlock the phone with your faceDelete Enrolled Faces
Go to [Settings] > [Fingerprint, Face & Passcode], click [Delete Enrolled Face]. Use Face for screen unlocking, App Lock and File Safe. Go to [Settings] > [Fingerprint, Face & Passcode] > [Use Face to], then turn on the features you want to use.
View more details in Add and use a fingerprint on your realme Smartphone.
Note: Not all phone's running on ColorOS 6 supports fingerprint. It still depends on the design of the phone.
3.2.2. Set Up Other Mail and Calendar Accounts
if you want to use other mail and calendar apps, add the accounts to your phone to let the apps associated with those accounts sync with your phone.
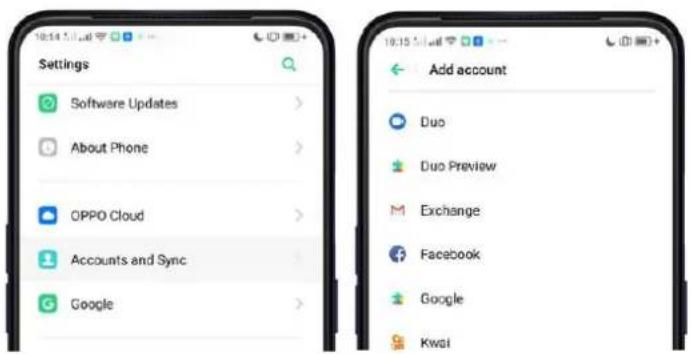
Set up an account. Go to [Settings] > [Accounts and Sync], then click [Add Account].
Repeat the steps for as many accounts as you like.
text_image
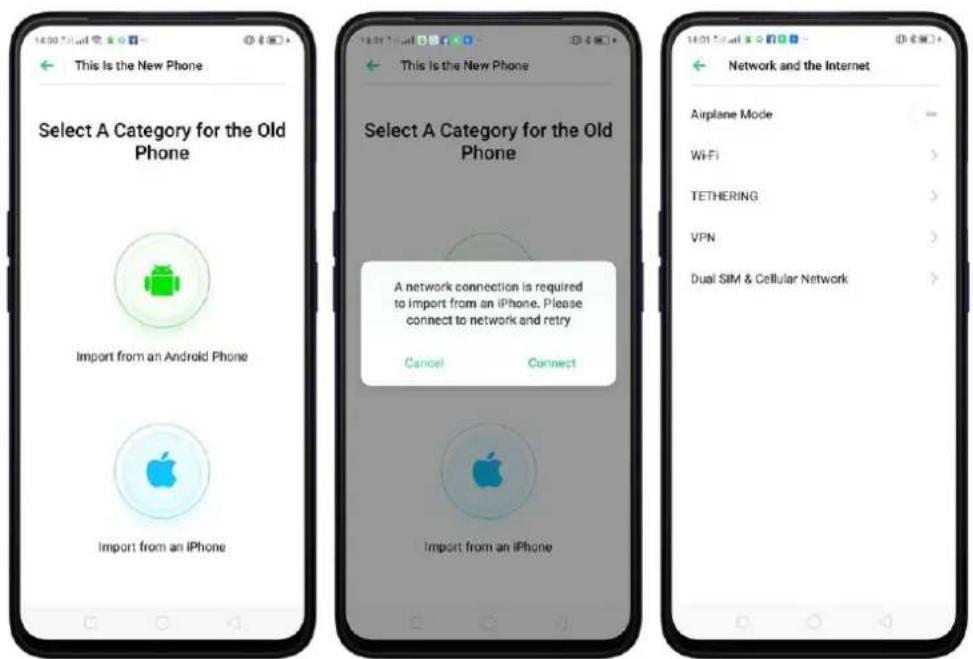
Settings Software Updates > About Phone > OPPO Cloud > Accounts and Sync > Google > Add account Duo Duo Preview Exchange Facebook Google Kwai3.2.3. Transfer Data from the Old Phone to realme Smartphone
You can transfer over all of your data - with no risk or loss of quality, using Clone Phone. With Clone Phone, you don't need to leave any of your data behind with your previous device. Take it all with you in three easy steps:
From an iPhone to an realme Phone
- On your device, go to [Tools] > [Clone Phone], then select "This is the new phone" and "Import From an iPhone". Connect your phone to the Internet when promoted.
text_image
This is the New Phone Select A Category for the Old Phone Import from an Android Phone Import from an iPhone This is the New Phone Select A Category for the Old Phone A network connection is required to import from an iPhone. Please connect to network and retry Cancel Connect Import from an iPhone Network and the Internet Airplane Mode Wi-Fi > TETHERING > VPN > Dual SIM & Cellular Network >- Sign in the iCloud account of your old iPhone. Enter the Apple ID verification code you received on your iPhone or in the SMS and start computing cloud data.

text_image
Import from an iPhone Sign In to the iCloud of the iPhone Apple ID Passcode Sign In Import From an iPhone Apple ID Two-Factor Authentication Please enter verification code Please enter the Apple ID verification code you received on your iPhone Authentication Import From an iPhone Computing Cloud Data... Please don't disconnect or switch the network and stay on the current screen Contacts 0 Entries, 0.008 Photos 0 Phones, 0.008From an Android Phone to an realme Phone
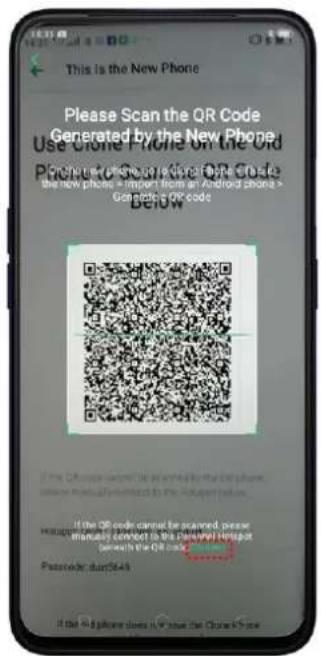
- On your device, go to [Tools] > [Clone Phone], then select "This is the new phone" and "Import from an Android Phone".
- On your old phone, click [Clone Phone] from the Home Screen, select "This is the old phone" and scan the QR Code generated by the new phone to start cloning.

text_image
This Is the New Phone Use Clone Phone on the Old Phone to Scan the QR Code Below If the QR code cannot be scanned by the old phone, phone internally submitted to the Historic Service. Hotspot: OPPO_CPH1969.co.aggink Passcode: ggk6478 If the old phone does not have the Clone Phone app/My app to install This Is the Old Phone Transfer All the Contents of This Phone to the New Phone Including: Contacts, Messages, and Call History Photos, Videos, Music and Documents System Data including Settings, Clock, etc. Apps and App Data Except for app data that cannot be used on the new phone Start Cloning Manually Select the Data to Be Cloned This Is the Old Phone Transferring Please stay on the current screen, keep Wi-Fi on, and put it as close as possible to the new phone 0% Contacts Messages Call History Pictures Videos Music Documents System Data Clock and others 0/25 Apps and App Data App not compatible with the new phone are excluded Stop Cloning PhoneYou can also select the data (Personal Data, System Data, Applications, Storage Data) to be cloned by clicking "Manually Select the Data to be Cloned."
- Enter the Lock Screen password to continue.
If the QR code cannot be scanned
If scanning QR won't work, you may manually connect to a hotspot and transfer data still. To do this, open Clone Phone app on both phones then click "Connect", you'll notice that a pop-up will SAY "Personal Hotspot Activated", click on it and find the Hotspot name on the Wi-Fi setting and enter the password then you can start transferring files.
text_image
This is the New Phone Please Scan the QR Code Generated by the New Phone Use QR Phone on the Old Procedure or Scan QR Code the new phone will install this on Android phone > Go inside QR code Below If the QR code cannot be scanned by the old phone please manually download to the Android phone. If the QR code cannot be scanned, please we go to a manual contact to the partial email port to reach the QR code. Password: but5649 If the ID phone does not have the Cloud Phone.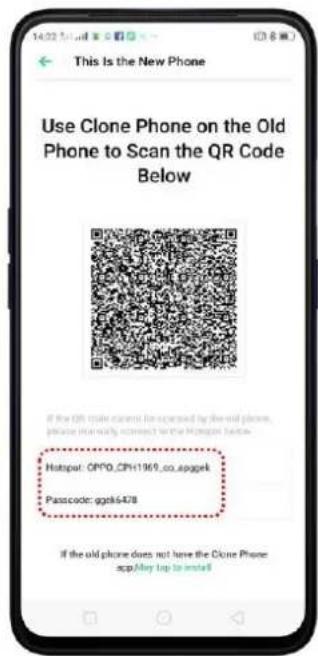
text_image
14:02 Mail off This Is the New Phone Use Clone Phone on the Old Phone to Scan the QR Code Below If the QR code cannot be accessed by the old phone, please在此向导, correct or no access to the original (before Hotspot: QRPO_CPI+1969.co.spggek Passcode: ggk6478 If the old phone does not have the Clone Phone: scp,May tap to install
text_image
Personal Hotspot Enable Your Personal Hotspot When turned off, your internet connection will be stored and more data and power may be consumed. This will automatically turn off after 10 minutes when no device is connected. Personal Hotspot Settings Name: OPPO_CPH1992_at_splits Passcode: Kine8061 Connection Management 0 devices connected Instructions 1. Select "OPPO_CPH1992_at_splits" under the "WiFi" settings on your computer or other devices. 2. Enter password when prompted.If old phone doesn't have a Clone phone
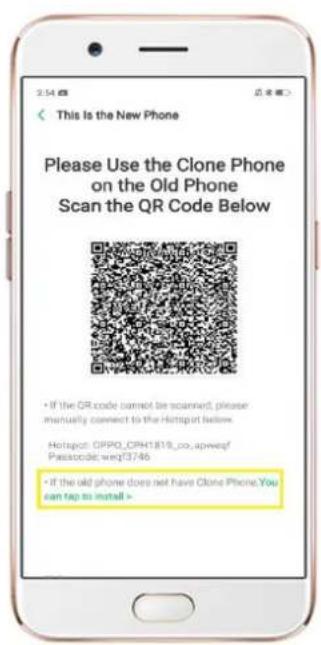
- Click You can tap to install> and it will direct you to a web browser or open a browser from your phone and go to the website: i.clonephone.coloros.com/download. (Note: this only works when you open it using your mobile phone. This will not open on your computer).
text_image
This Is the New Phone Please Use the Clone Phone on the Old Phone Scan the QR Code Below • If the QR code cannot be scanned, please manually connect to the Hotspot below. Hotspot: GRPO.CPH1819.co.apweq/ Passcode.wrgf3746 • If the old phone does not have Clone Phone.You can tap to install >
text_image
https://clonephone-coloros.com/download https://clonephone-coloros.com/downloe https://clonephone-coloros.com/download- Once you have entered the link above, it will prompt you to download the Clone Phone downloader APK file under the Download folder. You may change the folder path if you wish just click "Change the directory" then Click "Save".
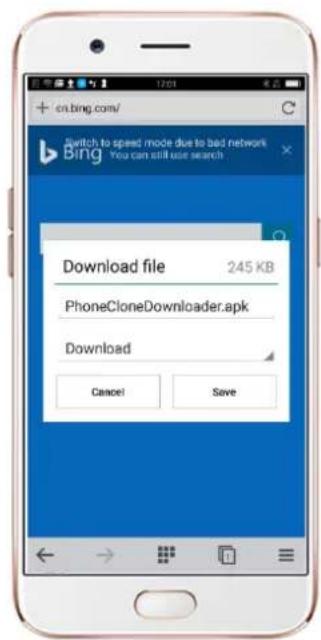
text_image
en.bing.com/ Switch to speed mode due to bad network Bing You can still use search Download file 245 KB PhoneCloneDownloader.apk Download Cancel Save- Once download is done. On your Home Screen, go to the notification panel for the downloaded file or go to Files/File Manager and click "APK" folder or whichever folder you chose to save the file. Tap on "PhoneCloneDownloaded.apk" file then click on "Install".

text_image
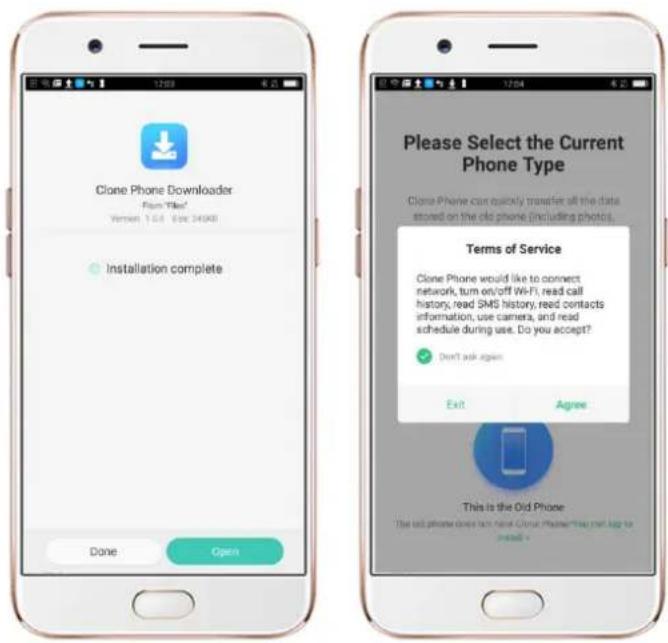
Files Audio Videos Photos Documents APK ZIP Bluetooth Messenger WhatsApp All files Available 45.47GB > Clean FTP File safe Installed Edit PhoneCloneDownloader.apk China iPhone Download 241KB Version... Install all Spin- After installation has been completed, click "Done" and you can now start to transfer files.
text_image
Clone Phone Downloader From 'file' Version: 1.0.4 - file: 240KB Installation complete Done Open Please Select the Current Phone Type Clone Phone can quickly transfer all the data stored on the old phone (including photos. Terms of Service Clone Phone would like to connect network, turn on/off Wi-Fi, read call history, read SMS history, read contacts information, use camera, and read schedule during use. Do you accept? Don't ask again Exit Agree This is the Old Phone The old phone does not make Cloud Phone that can log to install +Note: The duration of the Clone Phone process depends on how big the data you are going to transfer. Please patiently wait before it is completely transferred.
3.2.4. Date and Time
Knowing the time and date is crucial to keeping on schedule. If you want to set the date and time display on your device, or if you're out of synch or need a time update, just start with step 1 as below.
- Go to [Settings] > [Additional Settings] > [Date & Time], click it.

text_image
Additional Settings Storage Date & Time Keyboard & Input Method SECURITY STATUS Google Play Protect Asian planned yesterday at 21:37 Find My Device Security update March 8 2019 Search Download Management User Guide Automatic On Off
text_image
10:35:57 AM Date & Time 24-Hour Format Automatically set Date & Time Time Zone Philippine Standard Time GMT+05/09 Home Screen World Clock Widget Which time is on, an additional world version will be displayed on the Home System. Dual Clock You have been on. Both the time of your residence and calendar will be displayed on the Second Screen or Home Screen Clock Widget when you are just in your daily residence. Place of Residence Not Added > Display Dual Clock Clock Screen Home Current Clock Widget >- 24-Hour Format. Switch from 12-hour or a 24-hour format optionally.
- Automatically Set Date and Time. Enable [Automatically Set Date and Time] if you want to use the data given by your network provider or your GPS, or you can set the time yourself if you prefer. See step 4.
-
Set Manually. You can manually set the time and date. To do so, disable [Automatically Set Date and Time], and then:
-
Select your time zone. Click [Time Zone] and select the location you would like to adjust your time to.
- Change the date and time. You will see the date and time appear under the current time zone. Drag your finger across each column to change the date and time. Scroll wheels will appear to allow you to change the date and time simultaneously.

text_image
10:35:5am Date & Time 24-Hour Format Automatically set Date & Time Time Zone Philippine Standard Time GMT 08:00 Set Time May 13, 2019 10:35 Tue, Mar 12 02 34 Today 10 35 Thu, Mar 14 11 36 Home Screen World Clock Widget When turned on, all the added world clocks will be displayed on the home screen. Dual Clock When saved as, both the time of your reader and copyright (day) will be displayed on the Book Business or higher Screen Clock holiday whether you are not in your day of Wednesday.- Time Zone. Provides the time zone of your current location.
- Home Screen World Clock Widget. When enabled, all the world clocks will be displayed on the Home Screen.
- Place of Residence. This is where you add your city of residence.
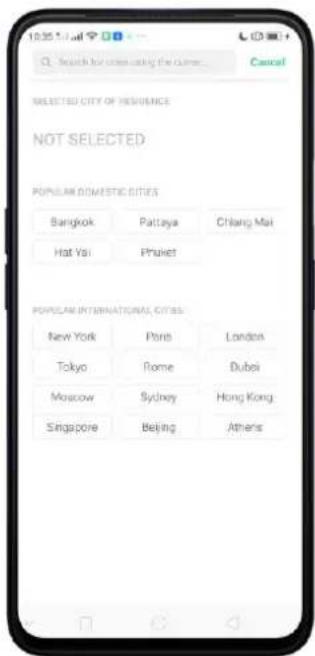
text_image
SELECTED CITY OF RESIDENCE NOT SELECTED POPULAR DOMESTIC CITIES Bangkok Pattaya Chiang Mai Hat Yai Phuket POPULAR INTERNATIONAL CITIES New York Poria London Tokyo Rome Dubei Moscow Sydney Hong Kong Singapore Beijing Athens-
Dual Clock. When enabled, both your residence and current city time will be displayed on the Lock Screen or Home Screen clock widget if you are not in your city of residence.
-
Display Dual Clock. This is where you choose if dual clock will be shown on the Lock Screen or Home Screen clock widget or both.
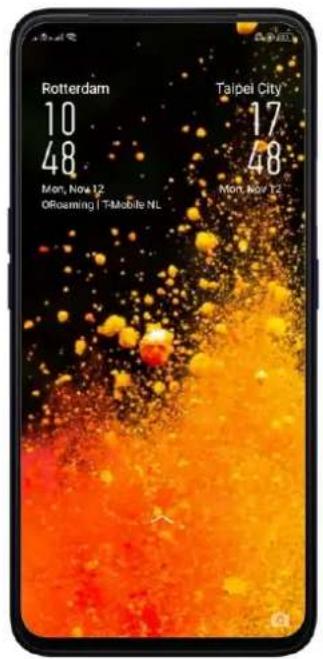
text_image
Rotterdam 10 48 Mon, Nov 12 ORoaming | T-Mobile NL Taipei City 17 48 Mon, Nov 123.2.5. Language and Region
Your device offers you an easy access to configure it to display information in another language. If you want to change its language to yours, or if you've relocated to a new country, you can change language and region by following a few easy steps.
- Go to [Settings] > [Language & Region]
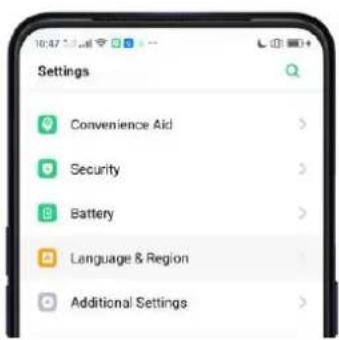
text_image
Settings Convenience Aid > Security > Battery > Language & Region > Additional Settings >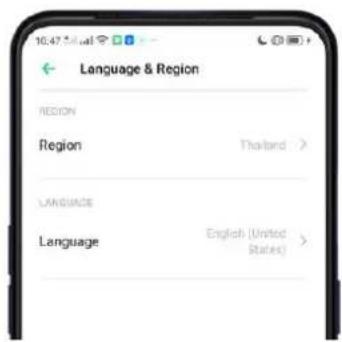
text_image
Language & Region REGION Region Thailand > LANGUAGE Language English (United States)- Find your desired region. Click Region and change the region you want to use.
3. Find your desired language.
- Click [Language], you will see a list of languages. Scroll down to find the language you wish to use.
- Select your desired language and click "Done." A confirmation message will appear at the bottom of your screen. Confirm the change by clicking "Change to ____." Then your realme phone will be in the new desired language.

text_image
Region Thailand Algeria Argentina Australia Bahrain Bangladesh Belgium Cambodia China Colombia Denmark Egypt France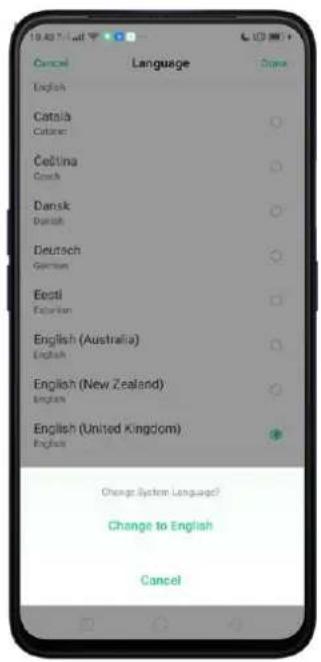
text_image
Cancel Language Done English Catala Catala Cetina Coach Dansk Danish Deutsch German Eesti English English (Australia) English English (New Zealand) English English (United Kingdom) English Change System Langued? Change to English Cancel3.2.6. Connect to the Internet
Your device connects to the Internet whenever necessary, using a Wi-Fi connection or mobile network.
Wi-Fi connection
- Go to [Settings] > [Wi-Fi], or swipe down from the top of your screen to open Control Center, then tap 📤. The detected Wi-Fi networks will be displayed.
- Tap the Wi-Fi network you want to connect to.
- Fill in the password if required.
Mobile data connection
Go to [Settings] > [Dual SIM & Cellular Network] and enable [Mobile Data], or swipe down from the top of your screen to open Control Center, then tap 11.
Note: Enabling the mobile networks connection may result in extra cost. Check with your mobile network service carrier.
3.2.7. Dual SIM & Cellular Network
To check SIM Info and Settings. Click [Settings] > [Dual SIM & Cellular Network] then click a SIM Slot where you want to Manage.
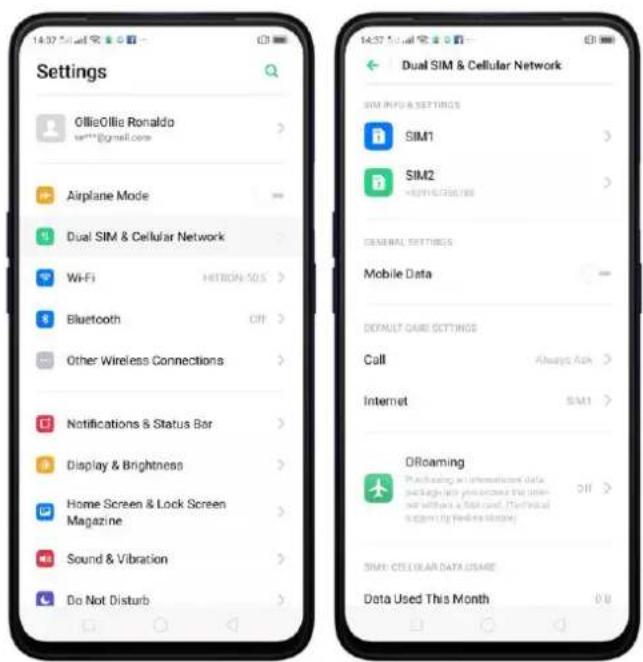
text_image
Settings Ollie Ollie Ronaldo setTM@gmail.com Airplane Mode Dual SIM & Cellular Network WiFi HITRON-50S Bluetooth OFF > Other Wireless Connections Notifications & Status Bar Display & Brightness Home Screen & Lock Screen Magazine Sound & Vibration Do Not Disturb Dual SIM & Cellular Network SIM INFO & SETTINGS SIM1 SIM2 +39167856788 GENERAL SETTINGS Mobile Data DEFAULT CARD SETTINGS Call Always Ask > Internet SIM1 > DROaming Plicating an information card package last year unless the user- with a SIM card. (The initial e.g. by We's website) OFF > SURE: CTE CLEAR DATA USAGE Data Used This Month 0.0SIM Info and settings. Can change SIM Card name and set SIM Card number. You can enable Data Roaming. Choose your preferred network type as well as edit Access Point Name. Click Carrier to automatically select your SIM's carrier.
General Settings: If you want to use Mobile data, toggle to green.
Default Card Settings. For Call. You can set if what SIM will make calls or choose Always ask so you will be given options as to which one you would like to use. Click from Call Back History to use the numbers called by a SIM slot for call backs. For Internet. You can choose the default SIM for Data connection.
ORoaming. Purchase an international data package without any need of a SIM card. You will see data packages and can order in advance before you leave for your trip abroad. Note: International credit card and PayPal are accepted payment methods.

text_image
ORoaming Data Package Orders Beginner's guide Current & NEIGHBORING COUNTRIES/REGIONS Philippines From $150.00 Indonesia From $150.00 Hong Kong, China From $150.00 COMMON ACROSS REGIONS EU 36 Bundle From $120.00 SG&MY&TH Bundle From $150.00 ASIA
text_image
France Inactive days can be reflected, original automatic refund PAY BY DATA USAGE at Western Unbranded. France 1 GB 10 Days Full range of high-speed data $558.00 Buy at Western Unbranded. France 500 MB 3 Days Full range of high-speed data $269.00 Buy at Western Unbranded. France 100 MB 1 Days Full range of high-speed data $166.00 Buy PAY BY DAY at Western Unbranded. France Data Daily 300 GB high-speed data $130.00 Day BuyCellular Data Usage. Check the data use for this month, manage the start date for data usage statistics, and manage the daily data reminder to control your data usage and not be overcharged.

text_image
Start Date for Data Usage Stats Monthly (day 1) Monthly (day 2) Monthly (day 3) Monthly (day 4) Monthly (day 5) Monthly (day 6) Monthly (day 7) Monthly (day 8) Monthly (day 9) Monthly (day 10) Monthly (day 11) Monthly (day 12) Monthly (day 13)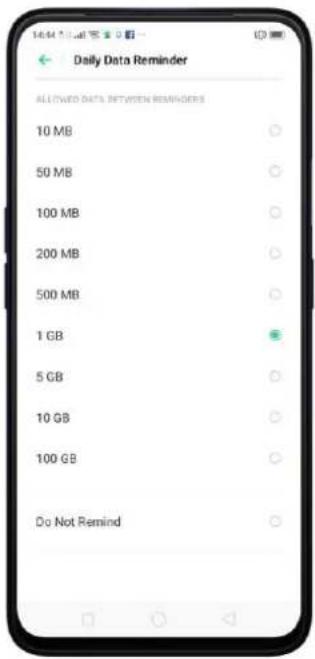
text_image
Daily Data Reminder ALLTWO DATA BETWEEN REMINDERS 10 MB 50 MB 100 MB 200 MB 500 MB 1 GB 5 GB 10 GB 100 GB Do Not RemindNetwork Connection Control & Data Saving. Check what apps and features are using Wi-Fi & Mobile Network. Enable Data so apps in the background will not be able to use mobile data.
4. What's new in ColorOS 6
4.1 Control Center
Easy to see its bigger icons. Added more colors to categorize each feature. It's easier to look for the feature that you would want to enable and disable.
Open Control Center. Swipe down from the very top of any screen (except the notch at the top center of the display). You'll see the shortcuts listed on top, and notifications below. To know more about this feature, View Control Center.
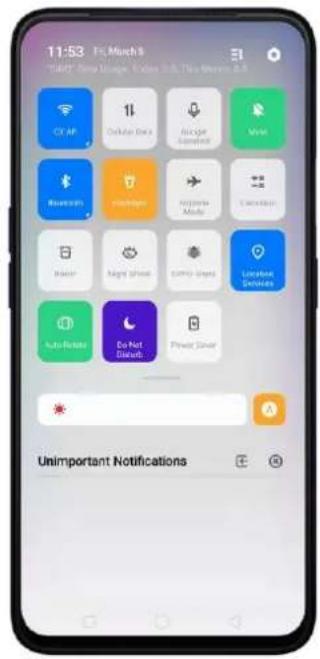
text_image
11:53 F:\Much\B "Start" Copy Orange, Open O.D. The More It CR AP Outlier Data Air Spin Satellite Mint Research Mobile Accuracy Mode Cancellation Power Night Shift Comfy Shift Located Services Auto-Rocket Do Not Breakt Power Server Unimportant Notifications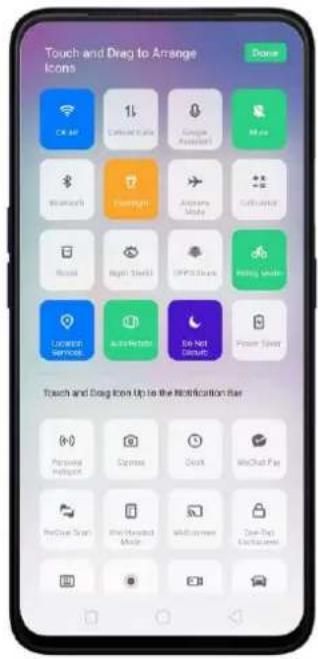
text_image
Touch and Drag to Arrange Icons Done OK UP 1% Google Assistant Mio Miscarls Treadings Anansi Mode Cathusion Rscals Night Skells OPPS Cars Rearing Tools LUXED Software Auto Web So Not Done Power Twist Touch and Drag Icon Up to the Notification Bar Personal Portion Express Clock WebChat Pay PreCrow Scan One Powered Music Multi-Channel One Tag Electronics4.2 Notification Center
You may now hide those notifications just by choosing Unimportant Notifications so you will have a cleaner and spacious look on the screen.
Hide Notifications: Click on ☐ to hide notifications. To unhide notifications click ☑ then click ☒ if you want to erase all notifications.

text_image
15:37 Fri March 9 "Riding Mode" is On Only allowed calls can be connected; all informative alerts are mailed by default. End "Riding Mode" Screen Recording The screen recording file has been saved Tap to view Google Play Store > 25 9 apps updated
text_image
15:37 Fri March 8 WHAT DO NOT USE PAPER O: This month is a CX-XP 11 C:\Users\Shay Single\Analog\proj Main Bluetooth PlayHigh Explorer Mode Calculator Unimportant Notifications4.3 Volume Setting Look
Changing volumes is now more intuitive with its bigger icon. Your finger easily fits to adjust volumes of ringtone, media, and alarm. It's also beside the hard volume buttons so it's not that hard to miss.
To change volumes for the ringtone, media, or alarm, press first either the Volume Up or Volume Down button so the volume setting will show. Then you may swipe up and down to manage the volume.

text_image
Volume up— Volume down— 17:34 Cloudy 2PC Push games Volume up Volume downManage the Volume settings for Media, Ringtone, and Alarm.
If you want to change the volumes for Media, Ringtone, or Alarm just click on

so you will each setting.
text_image
17:34 Cloud210 Bottages May 5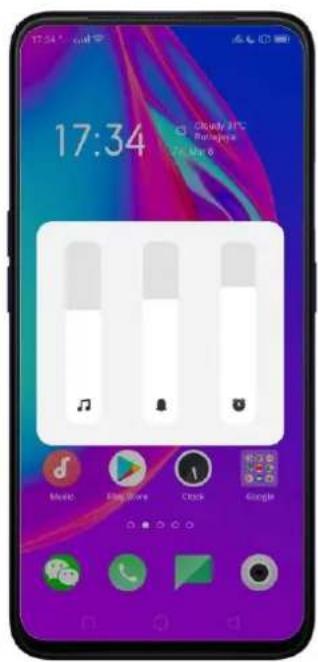
text_image
17:34 Cloudy 8PC Bulganda Get Up 8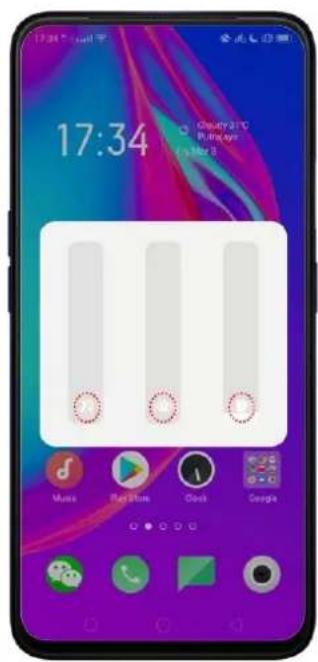
text_image
17:34 Cherry 2.1°C Purality 15 Mar 8Note: Clicking the media icon will automatically put it on silent mode except for the Alarm.
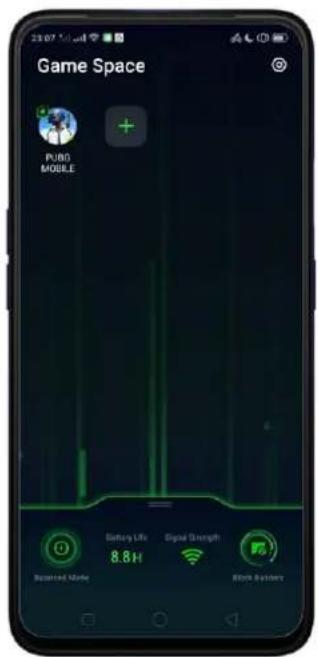
4.4 Game Space 2.0
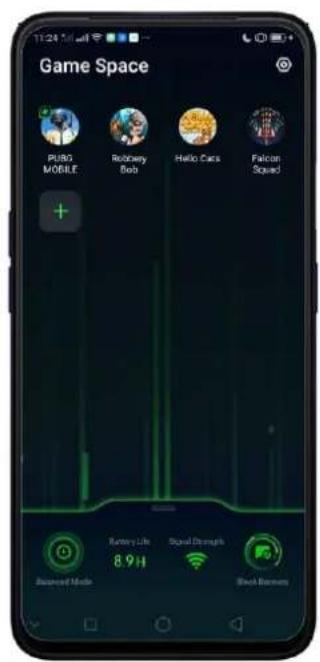
Manage your games. Whenever you install a game, the game space will determine that it is a game application and is integrated into the game space, and the relevant game optimization function is enabled for the game.
text_image
Game Space PUBG MOBILE Battery Life 8.8H Signal Strength Spotted Mode Network SystemTo show Game Screen on Home Screen. Go to [Settings] > [Game Space] > [Game Space on Home Screen]. (Note: Disabling Game space on the Home Screen means Game Space app will not show any more on the Home Screen).
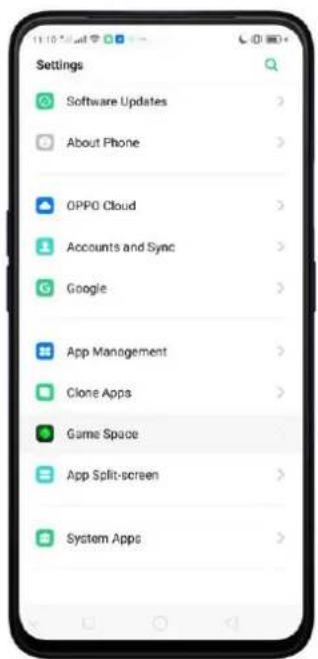
text_image
Settings Software Updates About Phone OPPO Cloud Accounts and Sync Google App Management Clone Apps Game Space App Split-screen System Apps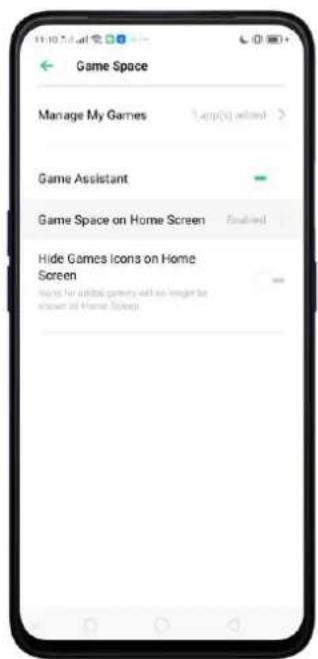
text_image
Game Space Manage My Games Game Assistant Game Space on Home Screen Enabled Hide Games Icons on Home Screen Where for initial games will be targeted by shown at Home Screen
text_image
Phone Manager Game Manager Music Party Game Manager Game Manager Game Manager Game Manager Game Manager Game Manager Game Manager Game Manager Game Manager Game Manager Game Manager Game Manager Game Manager Game Manager Game Manager Game Manager Game Manager Game Manager Game Manager Game Manager Game Manager Game Manager Game Manager Game Manager Game Manager Game Manager Game Manager Game Manager Game Manager Game Manager Game Manager Game Manager Game Manager Game ManagerWhen you want to quickly add games that you have already downloaded but scattered around your Home Screen, go to the Game Space App on the Home Screen, click + to add games that you've downloaded then toggle to green the game that you want to transfer to Game Space.
text_image
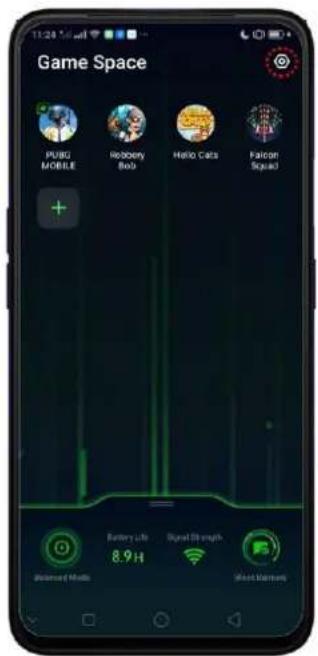
Game Space PUBO MOBILE Recovery Bob Hello Cars Falcon Squad + Battery Life 8.9H Signal Strength Block Barriers
text_image
Add More Games Hello Cats iReader Kwai Lazada Add this app to Game Space? Game Space can apply its features and settings to this app after it is added. Cancel Add Robbery Bob WeSing Wowmat 微信电话本To remove Games, press and hold the game that you want to be deleted and choose Remove From Games if you are sure to delete it, click UNINSTALL. You can only remove games one at a time when doing on the Game Space app.

text_image
Game Space PUB MO App Info Delete Remove from Game Spa... Falcon Squad Battery Life 9.0H Signal Strength Reserved Mode Stock Embers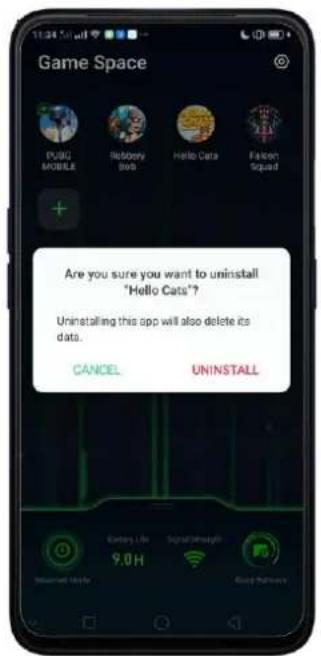
text_image
Game Space PUBG MOBILE Robbery Labs Hello Cata Falcon Squad Are you sure you want to uninstall "Hello Cats"? Uninstalling this app will also delete its data. CANCEL UNINSTALL Galaxy Life SignalWeight 9.0H My own Mode Easy PathwayYou can also go to [Settings] > [Game Space] > [Manage my games] > [Add More Games] if you want to add to remove games from Game Space.

text_image
Manage My Games Game engine supported Inventives gaming preferences through custom organization of both the games and your phones. Added Games and Assets PUBG MOBILE Robbery Bob Hello Cats Falcon Squad Add More Games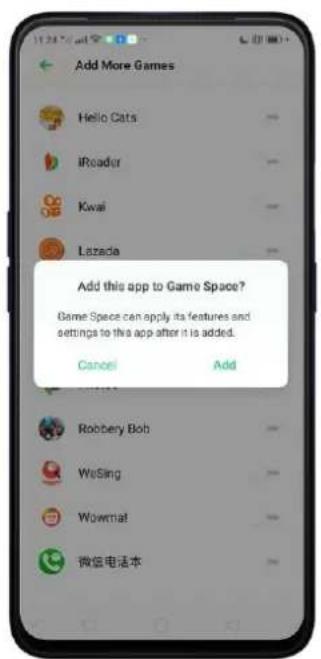
text_image
Add More Games Hello Cats iReader Kwai Lazada Add this app to Game Space? Game Space can apply its features and settings to the app after it is added. Cancel Add Robbery Bob Wosing Wowmat 微信电话本For quick shortcut to Game Space settings, click 📷 on the top-right corner of the Game Space app.
text_image
Game Space PUBG MOBILE Robbery Bob Hello Cata Falcon Squad Battery Life 8.9H Signal Strength Social Media Social Network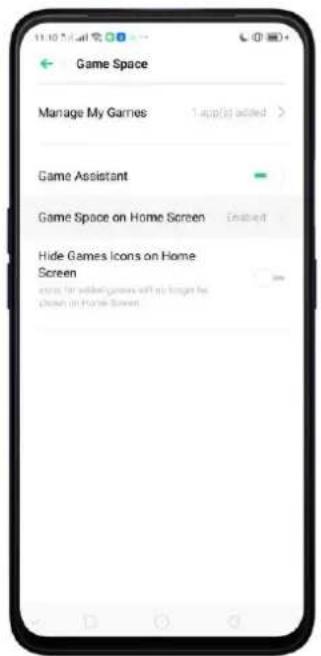
text_image
Game Space Manage My Games 1 app(s) added > Game Assistant Game Space on Home Screen Enabled Hide Games Icons on Home Screen Describe the added games will no longer be Choose on Home ScreenGame Space Settings
- Manage My Games. When you want to add or remove games on Game Space.
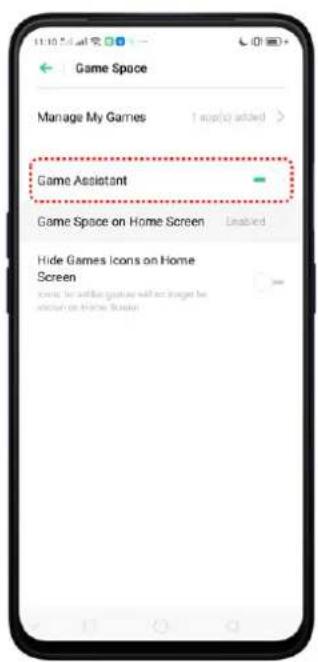
- Game Assistant. This will enable Smart Sidebar to show on the side when you are playing games.
text_image
Game Space Manage My Games Game Assistant Game Space on Home Screen Hide Games Icons on Home Screen
text_image
100 1.008 No Netflix... Reput Call Play AFK Gamehome: Screen File... WebChat Messages
text_image
09167366788 Philippines Hey man, how's the game going? SMS Messages• Game Space on you Home Screen.
- Hide Games Icons on Home. Icons for added games will not show any more on the Home Screen
• Game Engine Supported. Phone will smartly auto-detect if a game can be supported by Game Engine. This improves gaming performance through
custom optimization of both the game and your phone. A game with icon means it is supported by Game Engine.


text_image
Manage My Games Game engine supported Improves gaming performance through custom optimization of both the game and your phones. Added Games and Apps PUBG MOBILE Robbery Bob Hello Cats Falcon Squad Add More GamesOther Features of Game Space 2.0
• Shows Battery Life.
• Shows the Signal Strength of the network you are connected to.
• Performance Mode. Just click 📋 to show modes.
√ High Performance – Improves image quality of games, but power consumption may increase.
√ Balanced Mode – Balances performance and power consumption.
√ Lower Power Consumption Mode – Lower game image quality for longer gaming duration.
- Manage Calls, Messages, & Notifications. Click 📄 to manage the calls, messages, and notifications while playing.
√ Ignore Calls – Block calls during gaming.
√ Block Banners – Block banners during gaming.
√ Block Calls and Banners – Ignore calls and banners during gaming.
√ Show Calls and Banners – Receive incoming calls and show banner notifications during gaming sessions.

text_image
Game Space FUBG MOBILE High Performance Balance Mode Low Power Consumption Battery Life Signal Strength 8.8H Blended Mode Block Banners Ignore Calls Block Banners Block Calls and Banners Show Calls and Banners4.5 New Look on Apps
Clock, Calculator, Weather, Music and other apps have never looked this hip and cool. Same functions but just better looking.

text_image
00:28 Tokyo 16:28 Paris 23:28 Beijing 17:28 Cairo
text_image
Pasig 27°C Clear Today Mon 23 09 01 07 03 Sunny Sunny Sunny Sunny Sunny 37°C 24°C 28°C 36°C 24°C 24°C / 33°C
text_image
Search local songs Tracks Artists Albums Playlists Anne-Morie - Perfect To Me -Offici... Unknown artist Unknown album Michael Bublé - Love You Anymor... Unknown artist Unknown album Kiarra L. Is A Bad Word (Lyrics) Unknown artist Unknown album Lewis Capaldi - Bruices (Audio) 1 Unknown artist Unknown album Zara Larsson - Ruin My Life (Lyric... Unknown artist Unknown album Laur - There's No Way (Lyrics) ft... Unknown artist Unknown album Major Lazer - Blow that Smoke (fe... Unknown artist Unknown album Kygo - Happy Now (Lyrics) ft. San... Unknown artist Unknown album Jess Glynne - Thursday (Lyrics) Unknown artist Unknown album Laurv & Troye Given...4.6 Bigger Fonts, Enough Spacing
We don't want you to miss or strain your eye when you are navigating or browsing the settings on the phone or when looking on your contacts. The fonts are bigger and there are enough space for letters and numbers so it's a lot easier to type and your eyes won't miss any detail.
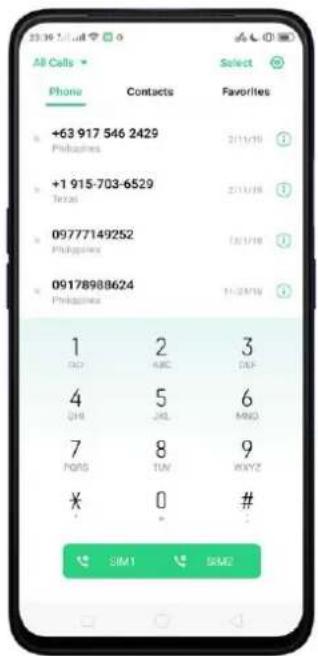
text_image
All Calls Phone Contacts Select +63 917 546 2429 Philippines +1 915-703-6529 Texas 09777149252 Philippines 09178988624 Philippines 1 2 3 DAY ABC DUF 4 5 6 ORI JRL MBD 7 8 9 HANS TUN WXYZ ¥ 0 # SIM1 BMO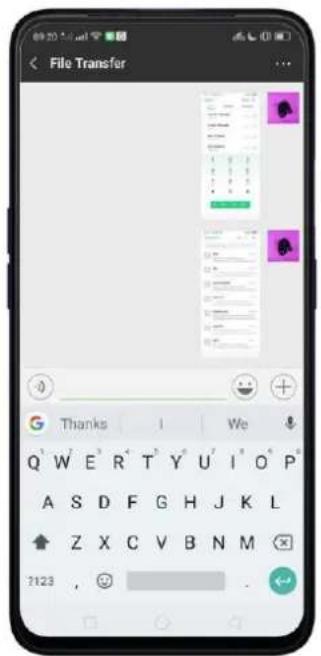
text_image
< File Transfer Thanks 1 We Q W E R T Y U I O P A S D F G H J K L Z X C V B N M 7123 ,4.7 Smart & Convenient has Been Divided Into Smart Service and Convenience Aid
To easily categorize functions, Smart & Convenient has been separated for easy navigation and filtering of options.
To go to Smart Service, click [Settings] > [Smart Service].
To go to Convenience Aid, click [Settings] > [Convenience Aid].

text_image
Settings Sound & Vibration Do Not Disturb Fingerprint, Face & Passcode Smart Service Convenience Aid Security Battery Language & Region Additional Settings Software Updates About Phone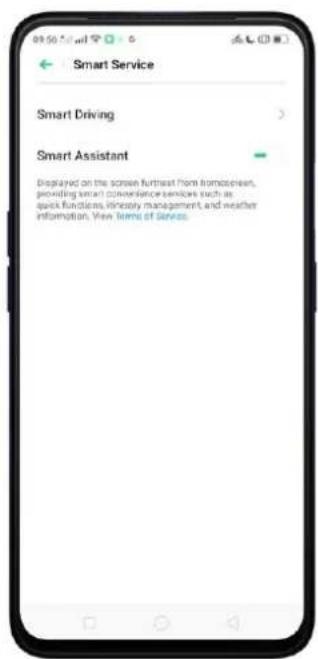
text_image
Smart Service Smart Driving > Smart Assistant Displayed on the screen further from Tomcaters, providing smart convenience services such as quick functions, primarily management, and weather information. View Items of Service.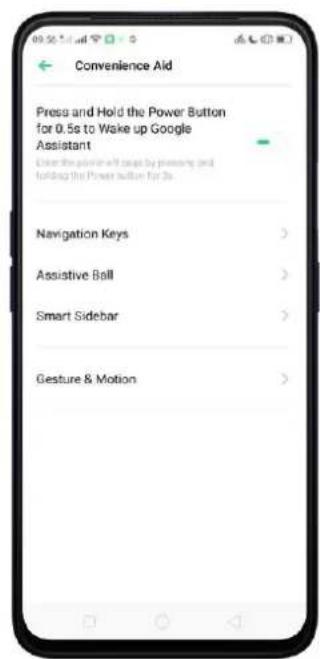
text_image
Convenience Aid Press and Hold the Power Button for 0.5s to Wake up Google Assistant Check the position will be based by planning and holding the Power button for 2s Navigation Keys > Assistive Ball > Smart Sidebar > Gesture & Motion >4.8 Added 2 Options on your Preferred Key Layout on the Navigation Keys
The added two options still give the same functions. The blank area once pressed or swiped up would still serve its function. See Convenience Aid
To change the Navigation Keys, click [Settings] > [Convenience Aid] > [Navigation Keys] then choose your preferred key layout.

text_image
Navigation Keys NAVIGATION MORE Virtual Keys Swipe-up Géstures SELECT YOUR PREFERRED KEY LAYOUT Virtual Keys Can Be Hidden
text_image
10:14 Sound 30°C Pang as Mar 124.9 A More Organized Photo Album
Smartly recognizes the type of media on your album and categorizes it. Categorizing it in a tab manner is easy on the eye and more convenient to search. It is a lot easier to filter and search pictures and videos. GIF has even been added. See Album

text_image
00:04 Mail Time Place: People Photos Albums Memories People Location Media Type Videos 173 GIF 1 Continuous Shooting 16 Pano 2 Time-Lapse 3 Recently Deleted >
text_image
Continuous Shooting Select 16 photos4.10 Take Screenshot Without Disturbing your Game
You can now take a screenshot while gaming without a pause or the screenshot picture popping up since screenshot will show a notification that it was done. You can tap the notification to view it or do it later.
Note: Old way of taking screenshot is still available in some instances.

text_image
Screenphoto at home. Tap to View: 0.173 战4.11 Added Home Screen Mode
You can now choose modes for your Home Screen. To go choose the Home Screen mode, go to [Settings] > [Home Screen & Lock Screen Magazine] > [Home Screen Mode] then choose which one you like best.
Standard mode. All installed apps are displayed on the main screen.
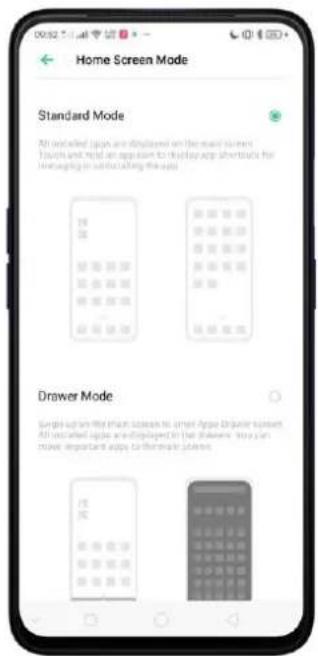
text_image
Home Screen Mode Standard Mode All installed Japan are scheduled on the board window. Touch and mail can appear to display app shortcuts for Managing to constructing the apps. Drawer Mode Single-up will then show that smart games deliver screen All installed apps are displayed in the library. You can move important apps to this make your own.
text_image
09:53 @ 27.0 Panda 16 Mar 15Drawer Mode. All installed apps are displayed in the Apps Drawer screen. You need to swipe up on the main screen to enter Apps Drawer screen. See Home Screen & Lock Screen Magazine
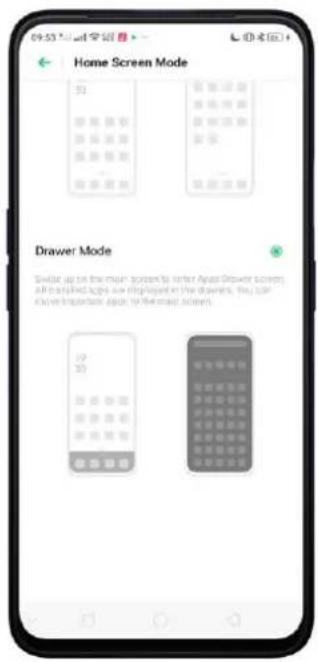
text_image
Home Screen Mode 33 Drawer Mode Snider up on the main screen to refer Asian Drawer screens. All installed apps are displayed in the drawers, you can know important again to the next screen.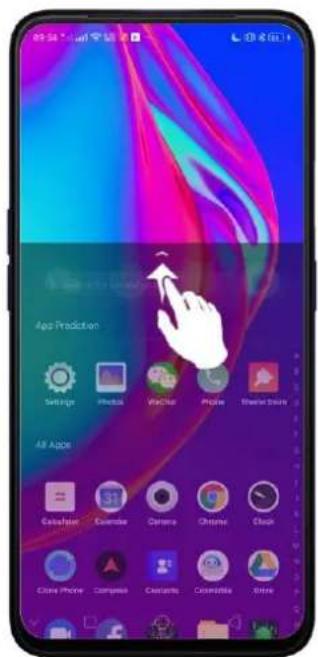
text_image
Age Prediction Savage Modular Visual Picture Streamer Style AR Apple Catalyst Excessive Camera Chrome Clock Close Phone Compass Camera Cosmetics Chrome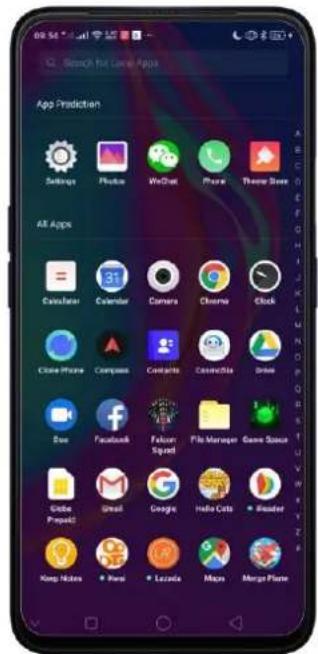
text_image
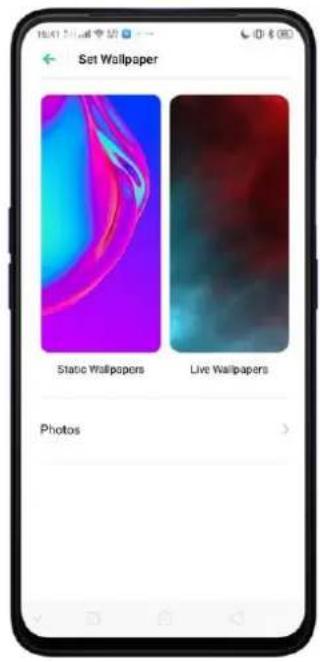
09:54:12:11 Search for Local Apps App Prediction Settings Photos WinChat Phone Theme Save AR Apps Calculator Calculator Camera Chrome Clock Cube Phone Compass Contacts CinemaData Drive Doc Facebook Fellow Squad File Manager Game Status Globe Project Great Google Hello Cuts Reader Keep Notes None Lezada Moon Merge Plane4.12 Static and Live Wallpaper
Amazing Wallpapers to choose from. More that the Static Wallpaper which has variations of sophistication you also have the Live Wallpaper.
Change the wallpaper. Go to [Settings] > [Home Screen & Lock Screen Magazine]. Scroll to the end of the page, then click [Set wallpaper]. You can also quickly change you wallpaper by pinching your fingers together on the Home Screen.
text_image
Set Wallpaper Static Wallpapers Live Wallpapers Photos
text_image
15:02 Google PC Wang The Man
text_image
15:29 Sunkey HTC Feng This May 144.13 VOOC 3.0
VOOC 3.0 is faster than VOOC flash charging. What can you do in 20 minutes? A fully charged realme phone. That. Fast.

text_image
VOGCO Flash Charge4.14 Smart Assistant Upgrade
Smart Assistant has been given a new look and now has a category for some features. It categorizes into Mine, Recommended, Life, and Convenience.
To enable/disable Smart Assistant on the Home Screen. Go to [Settings] > [Smart Service] and turn on [Smart Assistant]. Or swipe right from the left
edge of the Home Screen, then click [Turn on Smart Assistant].
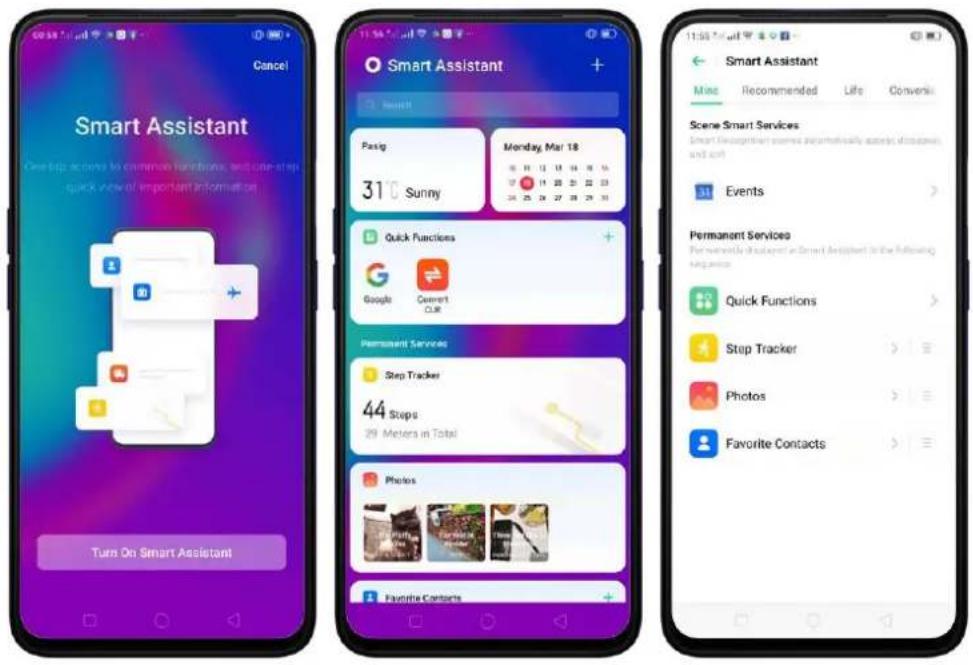
To manage the features on your Smart Assistant, click + and check the features you can enjoy and manage them.
- Quick Functions. Provides you with quick access to apps. Click Add More Apps, then choose an app. You can open the app directly by clicking its icon on Smart Assistant.
• Weather. Provides you with Weather conditions of your current location. - Steps Tracker. Keeps track of your daily steps and distance covered. Click Step Tracker to enable.
• Events. Keeps track of all your events in the Calendar app. - Favorite Contacts. Let's you make call with one tap. Click on Favorite Contacts, to enable then your favorite contacts will show.
- Photos. You can have a quick view of your latest photo album. Click Photos to enable.
Scene Smart Services. Scene Smart Services recognizes the important events happening on your calendar on a daily basis. If there are events happening on your calendar, it will automatically sort, appear, and disappear events.

text_image
Smart Assistant + Search Paog 29°C Cloudy Monday Mar 18 10 11 12 13 14 15 16 17 18 19 20 21 22 23 24 25 26 27 28 29 30 Quick Functions Google Current CUI Sleep Smart Services All Services (1) > Events 21:00 Attend a birthday party 22:00 In 17 minutes 22:00 Have a massage 23:00 In 1 hr(s) 17 min(s) Permanent Services Stop Tractor 189 Strips 125 Meters in Total4.15 Hyper Boost
Hyper Boost is a new technology that aims in improving the system of your phone. If you are a gamer then you will enjoy a better gaming experience. This will also work with some of the apps on your phone. Hyper Boost makes your phone perform better but saves battery. How awesome is that? On your Game Space app, choose High Performance so you can use Hyper Boost technology.
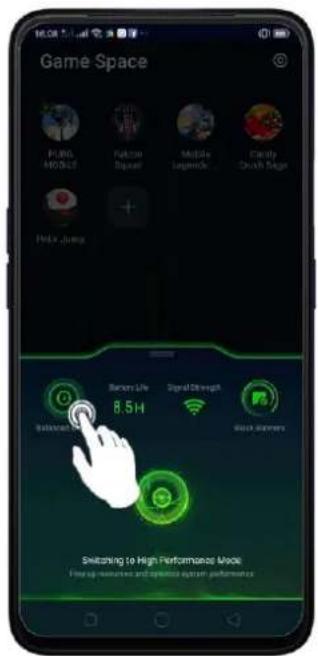
text_image
Game Space PILK MOOLED RATCOM SQAPEL MOLIKE LEMONSO CLARLY DAVIH SAGA HELIX JUANG 8.5H Battery Life Signal Strength Switch followers Switching to High Performance Mode Free up resources and open access system performance
text_image
Game Space PUBO MOBILE Falcons Squad Mobile Legends... Candy Crush Saga Hello Jump Battery life 8.5H Signal strength high performance Power markets4.16 Smart Sidebar
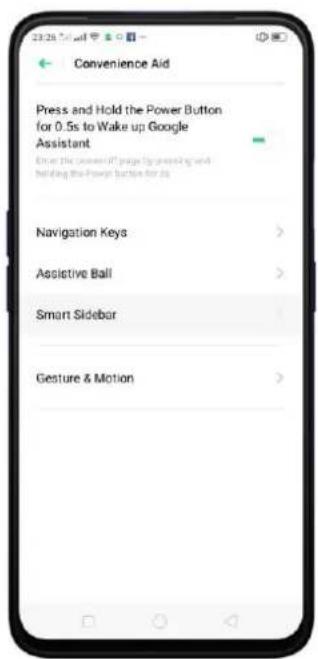
Have quick access with your favorite apps and tools. This enables you to switch between apps, transfer files, reply messages, or take screenshots when playing a game or watching a video.
To enable Smart Sidebar, go to [Settings] > [Convenience Aid] > [Smart Sidebar] > toggle [Smart Sidebar] to green to enable.
text_image
23:26:54 Convenience Aid Press and Hold the Power Button for 0.5s to Wake up Google Assistant Enter the Power off page for pressing and holding the Power Button for its Navigation Keys Assistive Ball Smart Sidebar Gesture & Motion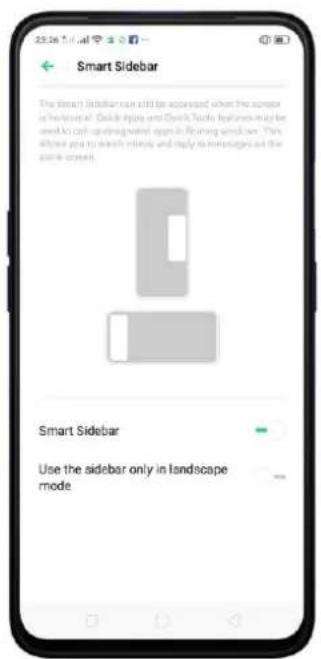
text_image
Smart Sidebar The Smart Sidebar can still be accessed when the scope is hierarchical. Quick Apple and Docto Tools features may be used to call up a single window screen in repeating windows. This allows you to search engine and reply to messages on the same screen. Smart Sidebar Use the sidebar only in landscape modeOnce enabled, you'll be able to see a white vertical line on the side right side of your phone. Slightly swipe it to the left and the Smart Sidebar will show.

text_image
23:33 Clear7% Shang May 18
text_image
23:32 G File Comics... Camera Screenlist ScreenRe... Messages Facebook YouTube AddManaging Smart Sidebar
- If the Smart Sidebar is full, long press the Quick tools or the Quick Apps area for you to be able to manage or edit what will show on your Smart Sidebar. (Note: Long pressing the camera area will not work since you can't add anything here)
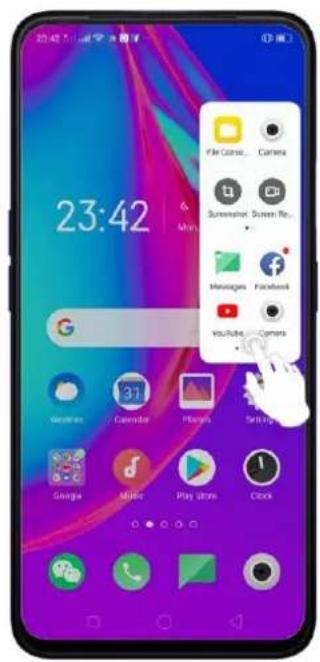
text_image
23:42 23:42 File Camera... Camera Screenshot Screen Re... Messages Facebook YouTube Camera
text_image
Quick Tools Quick Apps App Customer Font WeChat Other Apps Screemther Sproon R... Find My Do... File Maps... Facebook Rg... Game Box... Delete Google Music Play Stars Clock Adding Limit reached- If the Smart Sidebar is not full, click on + to add tools or apps then click each one of them. You can click Done or just click anywhere on the Home Screen for changes to be made. If you want to remove app/s
just click
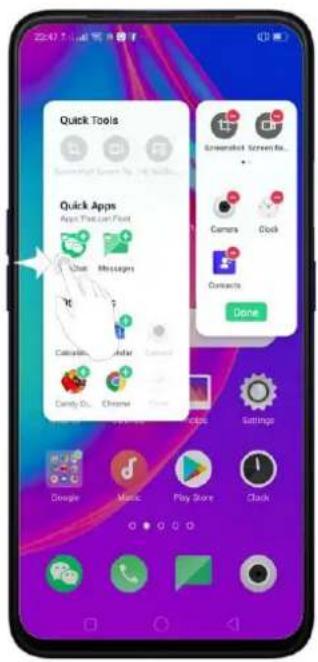
text_image
Quick Tools Quick Apps Apps Free Can Print Chat Messages Calcite Audio Carry Do Chrome Screenshot Screen Kit... Camers Clock Contacts Done Settings Google Music Play Store Clock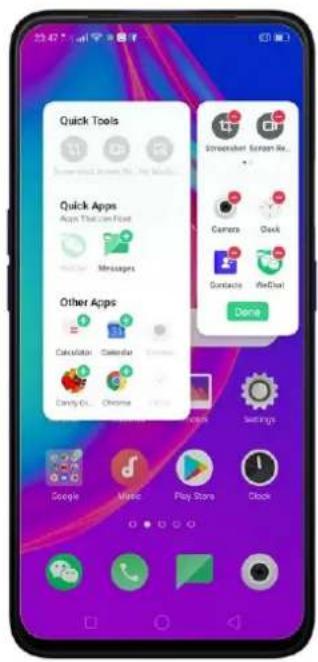
text_image
Quick Tools Sensorsheet Screen Air... Quick Apps Apps That can Find Messages Other Apps Calculator Calendar Dating OIL Chrome Actions Settings Google Music Play Store ClockThe tools and apps available for Smart Sidebar
-
Quick tools. There are 3 available slots and tools to choose from. You can add them all or just choose the one you like to show.
-
Screenshot
- Screen Recording
- No Notifications

text_image
Quick Tools Seasonshop Buren Po., No Mobile... Quick Apps App's Today From! Other Apps Calendar Camera Candy One Chrome Game- Quick Apps. Quick Apps has been divided into two: Apps that can float and other apps. As long as the app supports the floating feature then it will show on the floating apps.
- Other Apps. Other Apps will show all apps that are on your phone. However, you can only add 18 apps on the Smart Sidebar. You will be notified "Adding limit reached" if Quick Apps slot is full. Choose the one that you frequently use.
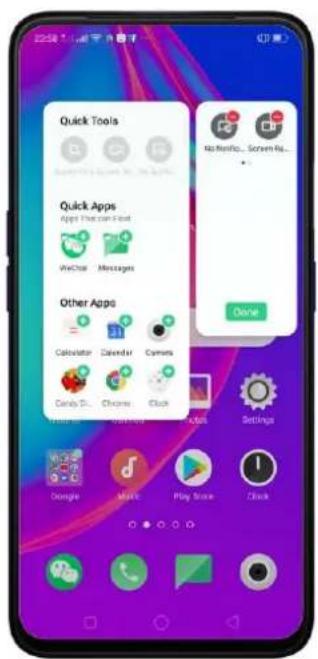
text_image
Quick Tools Quick Apps Apps What can I get! WeChat Messages Other Apps Calculator Calendar Cyms Canopy DS Chrome Quick Done Settings Google Music Play Store Quick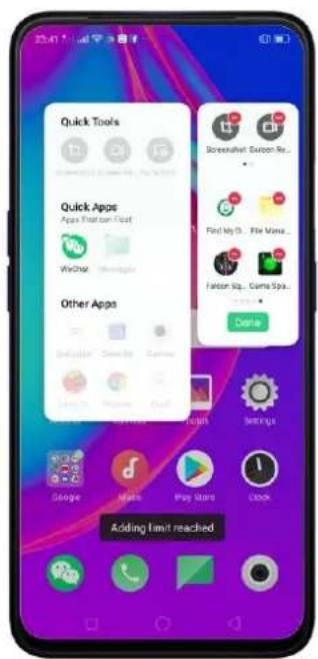
text_image
Quick Tools Quick Apps Apps Platform Post WeChat Other Apps Screenshot: Coupon Re... Find My Go... File Music... Fation Sq... Game Spa... Delete Adding limit reachedSmart game sidebar/Game Assistant. Enjoy your games and at the same time check and reply messages or posts on your social media. Never be left behind even when enjoying your games.

Move or transfer the position of the Smart Sidebar from right to left side or vice versa. Press and hold the Smart Sidebar icon and drag it to the other side. You may put it on a higher or lower position.

text_image
00:08 Close 25.00 Sun, Max 1% G 31 Calendar Playbox Settings Google Apple Play Store Clock
text_image
00:08 6. Clear/75: 12:00 Ea, Mar 15
text_image
00:08 Go China TV3 Store! Tas Mar 195. Basics
5.1 Use Apps
Open apps
The Home Screen shows all the apps on your phone. Click any application icons to get started.
Apps will show the number of messages pending to be read in red on the Home Screen icon.
If you're using Swipe Gestures, see Navigation Gestures.
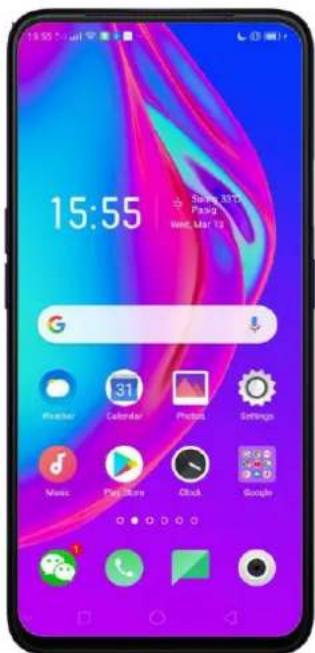
text_image
15:55 Google ASTP Policy week, Mar 13Quick Actions
Press and hold an app icon to bring up "Quick Actions," which offers shortcuts to specific features within that app. When the menu appears, click the shortcut you would like to use, then the app will open directly to that feature.
For example, go to your Home Screen and press and hold on the icon for the Camera app, you'll see a mini menu that lets you jump straight to Portrait Shooting, Beauty Selfie, Video Recording, or the App Info page.
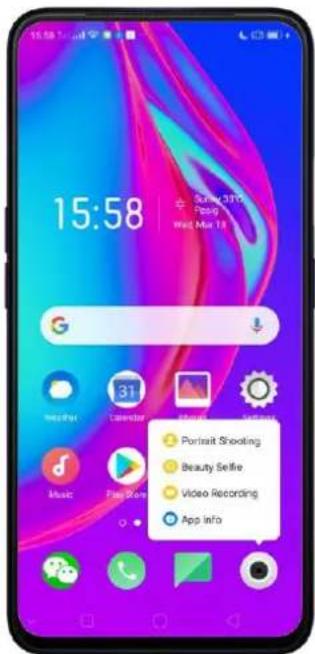
text_image
15:58 Sun 3172 Posig Wed, Mar 18 G 31 Music Play Store Portrait Shooting Beauty Selfie Video Recording App InfoSwitch between apps
Clicking Menu button on the bottom left would bring up a menu for apps that you were in. Swipe left or right to see more. To switch to another app, click it.

text_image
18:03 G Meister Calendar Photos Settings Music Play Now Clock Tools Facebook Falcon 1Close apps
Click Menu button on the bottom left, and then:
- Close an app: Swipe the app up to the top edge of the screen.
- Close all apps: Click ✗ to clean up the list.
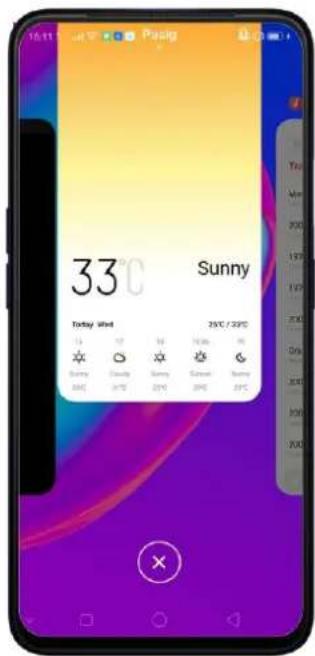
text_image
16:11 Peng 33°C Sunny Today Wind 25°C / 20°C Sun Sun Sun Sun Sun Sun Sun Sun Sun Sun Sun Sun Sun Sun Sun Sun Sun Sun Sun Sun Sun Sun Sun Sun Sun Sun Sun Sun Sun Sun Sun Sun Sun Sun Sun Sun Sun Sun Sun Sun Sun Sun Sun Sun Sun Sun Sun Sun Sun Sun Sat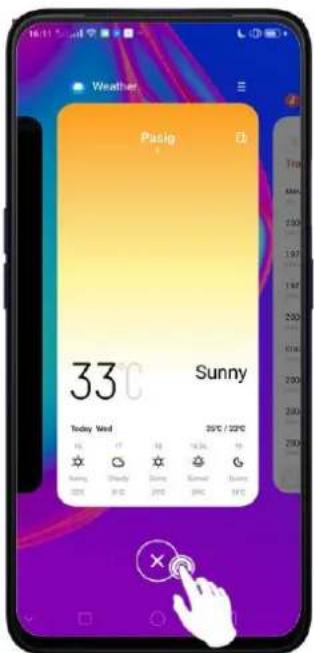
text_image
Weather Pasig 33°C Sunny Today Wind 25°C / 20°C 16 17 18 19 20 21 22 23 24 25 26 27 28 29 30 31 32 33 34 35 36 37 38 39 40 41 42 43 44 45 46 47 48 49 50 51 52 53 54 55 56 57 58 59 60 61 62 63 64 65 66 67 68 69 70 71 72 73 74 75 76 77 78 79 80 81 82 83 84 85 86 87 88 89 90 91 92 93 94 95 96 97 98 99 1005.2 Share from Apps
In addition to sharing your information from the Files app, you can also share from many other apps on your device.
Share from apps. In many apps, you can click Send or 📋 to choose how to share your information. The choices vary depending on the app you're using. Additional options may appear if you've downloaded apps with multiple sharing options.
Take the Photos app as an example, click 📋 and you'll see all the sharing options.
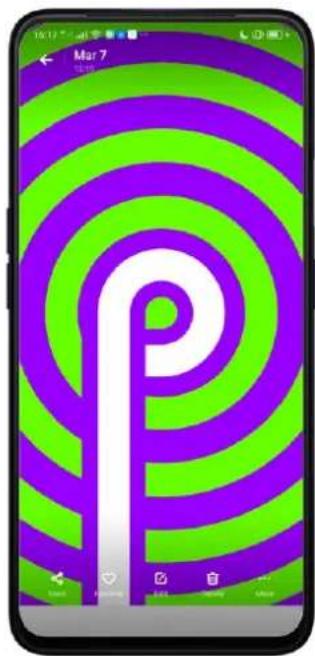
text_image
Mar 7 10:39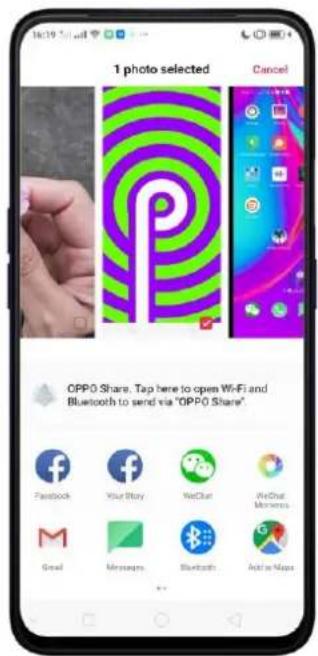
text_image
1 photo selected Cancel CPP0 Share. Tap here to open Wi-Fi and Bluetooth to send via "OPPO Share" Facebook Your Story WeChat WeChat Messages Goal Messages Bluetooth Add a Maps...
5.3 One-click Cleanup
One-click cleanup option helps you to make your phone perform steadily and faster.
Stop background apps. Click Menu button > ✗ to close all active apps. If you want to close a specific app, swipe it up.
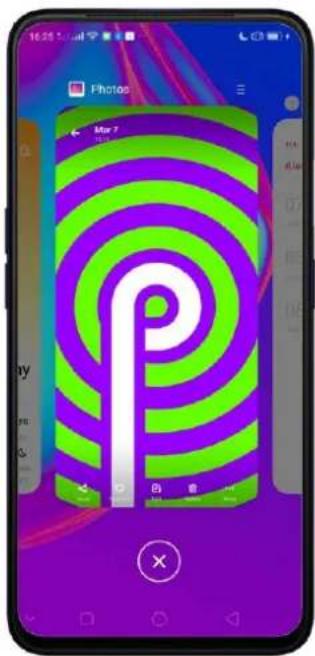
text_image
16:25 5:00 Photos Max 2 My me & ×Clean-up & Accelerate. Click Phone Manager on the Home Screen, then click [Clean Storage]. Scan and delete all kinds of junk files. You can also delete the app data and other unnecessary files, such as photos, audio, videos, and documents.

text_image
Phone Manager Theme Store FVDD MC BEE File Manager Sonic Space Move Party Facebook YouTube Swiss iControl Copyrights
text_image
81 Optimize Clean Up Storage Privacy Deminations Virus Scan Payment Protection Routine Rest Documentation
text_image
Clean Storage Available on phone 13.6 GB / 64.0 GB in total sufficient storage available you can delete wireless files Clear recommendations Safe to Clean 115 MB / 115 MB > Clear all APP DATA WeChat Cleaner All app cache data 3.45 GB > CATEGORIES/ED FILES Photo Cleaner5.4 Lock the Running Background Apps
If you want some apps to be always connected and reachable, do the following:
Lock an app. Click Menu button to reveal your open apps, then click 🔒, notice that a lock appears on the upper-left corner of the app. Repeat the action for other apps.
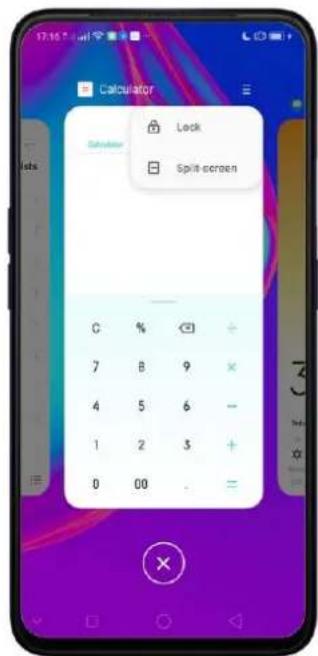
text_image
Calculator Solder Lock Split-screen C % + 7 B 9 × 4 5 6 - 1 2 3 + 0 00 . =5.5 View, Zoom In and Out
Use the touchscreen to interact directly with what is displayed on your phone's screen.
View items. Drag up or down to scroll. You can also drag some screens in any direction, such as webpages. Flick to scroll quickly. You can wait for the scrolling to come to a stop, or touch anywhere on the screen to stop it immediately.

text_image
Camera Select 17:22:5am 10:00:00 10:00:00 10:00:00 10:00:00 10:00:00 10:00:00 10:00:00 10:00:00 10:00:00 10:00:00 10:00:00 10:00:00On some screens such as Settings and Contacts page, double-click the status bar to quickly scroll to the top.
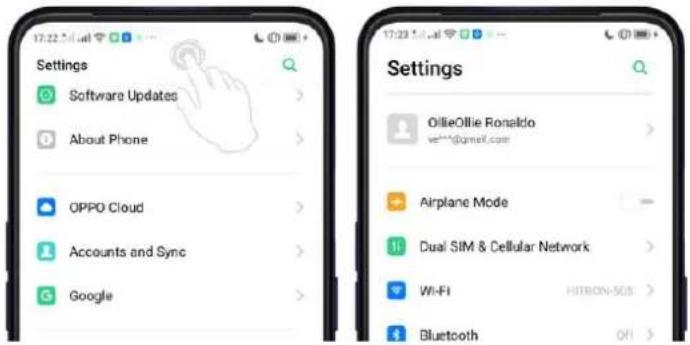
text_image
Settings Software Updates About Phone OPPO Cloud Accounts and Sync Google Settings OllieOllie Ronaldo ve***@qmsf.com Airplane Mode Dual SIM & Cellular Network Wi-Fi HITRON-5GS BluetoothZoom in and out. When viewing photos, maps, or web pages, you can zoom in and out. Pinch your fingers together or apart. For photos and web pages, you can double-click to zoom in, then double-click again to zoom out. For maps, double-click to zoom in and click once with two fingers to zoom out.

natural_image
Smartphone displaying a photo of blooming pink cherry trees in an urban setting (no text or symbols visible on the image itself)
natural_image
Black-and-white photo of a person climbing a cherry blossom tree, no visible text or symbols
natural_image
Smartphone displaying a white abstract shape against a blooming pink cherry blossom tree (no text or symbols visible)5.6 Convenience Aid
5.6.1. Navigation Keys
The virtual navigation keys appear at the bottom of every screen and can be hidden when not in use. You can also arrange the order of "Back" and "Recent" depending on your preference.
To switch between navigation keys and gestures, go to [Settings] > [Convenience Aid] > [Navigation Keys].
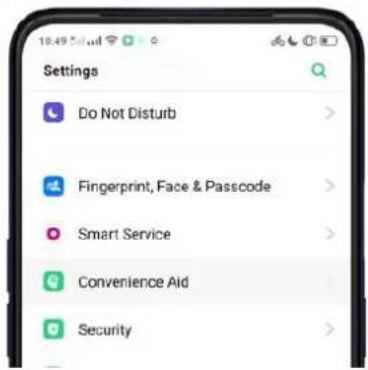
text_image
Settings Do Not Disturb Fingerprint, Face & Passcode Smart Service Convenience Aid Security
text_image
10:49:51.mil Convenience Aid Press and Hold the Power Button for 0.5s to Wake up Google Assistant Enter the power-all days by pressing and holding the Power button for 2s. Navigation Keys Assistive Ball Smart SidebarVirtual Key Navigation
Enable virtual key navigation. Virtual key navigation is the default setting. If you want to enable it manually, click Virtual Key Navigation.
Change the order of virtual navigation keys. The keys follow the typical order for realme: Menu, Home, and Return from left to right. If you are left-handed, you can
change them to the Return-Home Menu order.
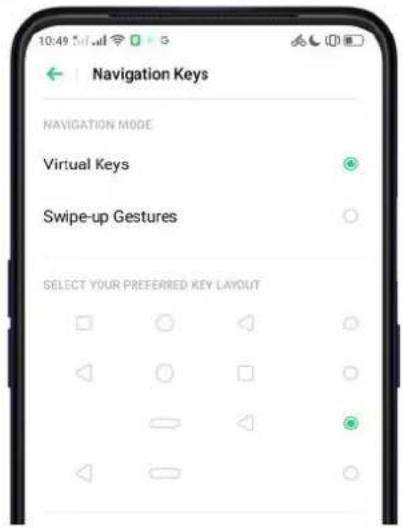
text_image
Navigation Keys NAVIGATION MODE Virtual Keys Swipe-up Gestures SELECT YOUR PREFERRED KEY LAYOUTHide the virtual navigation keys. When you launch a full-screen app, the keys will automatically hide, and can be brought back with a simple swipe:
- When in portrait mode, swipe up from the bottom.
- When in landscape mode, swipe from the bottom to the left.

natural_image
Two smartphone models shown from front and side views, each displaying a 48 MP logo on its screen (no text or symbols on the devices themselves)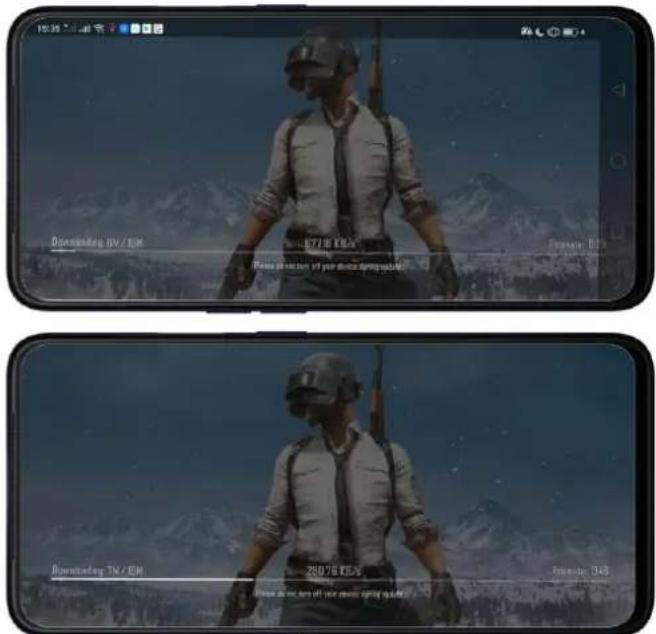
text_image
Downstanding 0% / 0% ESTI 15% / 0% Figure 0.3 Downstanding 7% / 0% ESTI 15% / 0% Figure 0.3 Downstanding 7% / 0% ESTI 15% / 0% Figure 0.3Manually hide the virtual navigation keys. To set the keys to appear only when needed, turn on Virtual Navigation Keys Can Be Hidden. Then you can click ▼ on the left-lower corner of the screen to hide the keys, and swipe from the bottom to reveal them.

text_image
Navigation Keys NAVIGATION MORE Virtual Keys Swipe-up Gestures SELECT YOUR PREFERRED KEY CAYOUT Virtual Keys Can Be HiddenSwipe-up Gesture Navigation
Four kinds of new swipe-up navigation gestures are added to your phone, and you
can choose one that suits you most.
Use swipe-up navigation gestures. Go to [Settings] > [Convenience Aid] > [Navigation Keys] and click [Swipe-up Gesture Navigation].

text_image
18:11:5:4:4 Convenience Aid Press and Hold the Power Button for 0.5s to Wake up Google Assistant Enter the powerwall page by premenging and w/oing the Power button for 3s. Navigation Keys Assistive Ball Smart Sidebar Gesture & Motion 18:11:5:4:4:4 Navigation Keys NAVIGATION MODE Virtual Keys Swipe-up Gestures SELECT YOUR PREPARED GESTURE LAYOUT 1. Back at Both Sides Swipe-up to Go Back Swipe Up to Go to Home Window Swipe Up to Go to Very Perfect Styles 2. Simple Gestures Swipe Up to Go to home Swipe Up and Roll to View 18:11:5:4:4:4 Navigation Keys Sanger Up to View Network Tasks Sanger Up to Go to Home Window Sanger Up to Go to Back 4. Back on the Left Sanger Up to Go Back Sanger Up to Go to Home Window Sanger Up to View Recent Tasks Hide Gesture Guide Bar Mistouch Prevention For low-gesture navigation when the play is in full seconds landscape model, sweep up next to bring up the guide bar and then switch up again.Back at both sides. Swipe up from the left or right bottom to return to upper page, swipe up from the middle bottom to get to the Home Screen, and swipe up from the middle bottom and pause 1 second to view recent tasks.
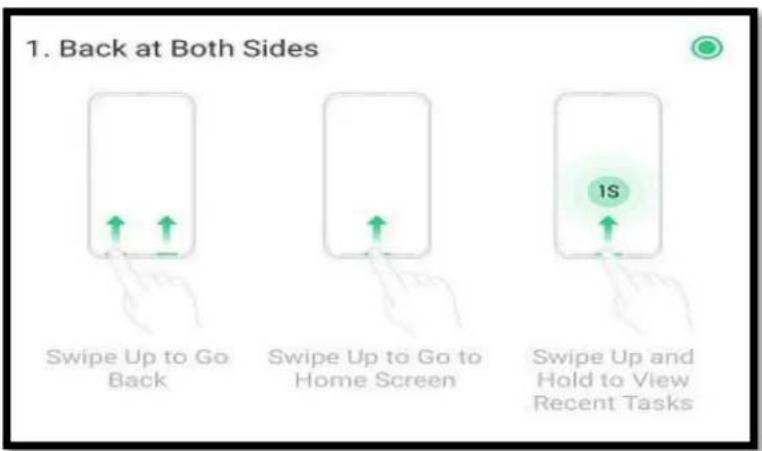
text_image
1. Back at Both Sides Swipe Up to Go Back Swipe Up to Go to Home Screen Swipe Up and Hold to View Recent TasksSimple gestures. Swipe up from the middle bottom to get to the Home Screen, and swipe up from the middle bottom and pause 1 second to view recent tasks.
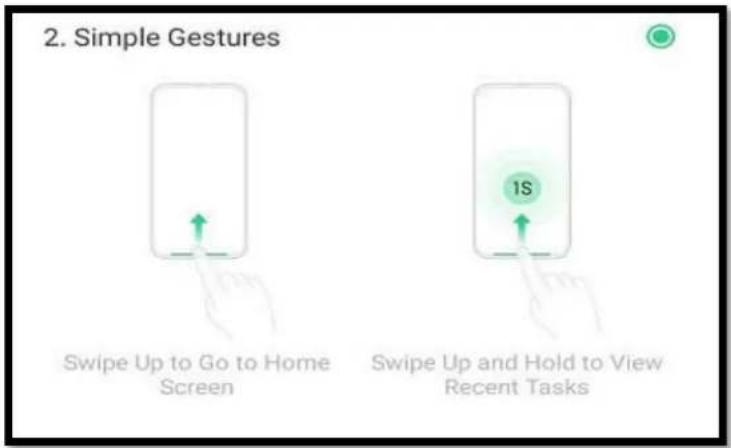
text_image
2. Simple Gestures Swipe Up to Go to Home Screen 1S Swipe Up and Hold to View Recent TasksBack on the right. Swipe up from the left bottom to view recent tasks, swipe up from the middle bottom to get to the Home Screen, and swipe up from the right bottom to return to upper page.
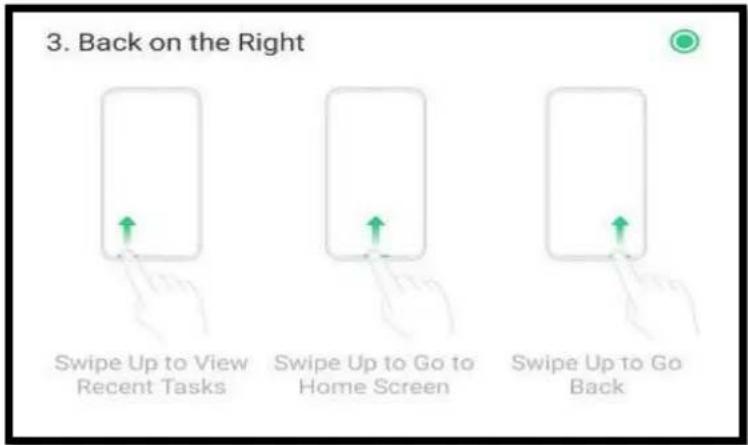
text_image
3. Back on the Right Swipe Up to View Recent Tasks Swipe Up to Go to Home Screen Swipe Up to Go BackBack on the left. Swipe up from the left bottom to return to upper page, swipe up from the middle bottom to get to the Home Screen, and swipe up from the right bottom to view recent tasks.
text_image
4. Back on the Left Swipe Up to Go Back Swipe Up to Go to Home Screen Swipe Up to View Recent TasksHide Gesture Guide Bar. Gesture Guide Bar is the translucent line at the bottom of the screen, which allows you to quickly distinguish the left, middle, and right swipe-up regions. To hide the guide bar, turn on [Hide Gesture Guide Bar].
Prevent mistakenly touching. Turn on [Mistouch Prevention]. To use gesture navigation when the app is in Landscape Mode, you need to swipe up to bring up the guide bar first, then swipe up again in the same area.
5.6.2. Assistive Ball
Applying the Assistive Ball feature provides options to access several regular phone features through the touchscreen, rather than the tactile buttons. It enables you to use the virtual navigation keys with just one finger, and also open the notification center, take a screenshot, and more. When you perform gestures that are difficult for you, Assistive Ball can help.

text_image
12:00:5M Google 31 Calendar Clock Preipher SetStage Music Video Phone File Manager Tips Phone Manager Phone Store Play Store Google Tools Google 31 Calendar Clock Preipher SetStage Music Video Phone File Manager Tips Phone Manager Phone Store Play StoreAssistive Ball lets you perform a wide range of features:
• Return to upper page
- Go to the Home Screen
• View recent tasks
• Open Notification Center
- Lock the screen
• Enter One-hand Mode
• Take a screenshot
To configure the Assistive Ball menu, go to [Settings] > [Convenience Aid] > [Assistive Ball], then choose one operation mode:
Gesture Operations. You can assign different actions like single tap, double tap, or touch and hold. For example, assign "Home" to "Touch and hold", then you can long press the Assistive Ball to go to the Home Screen.

text_image
Assistive Ball Assistive Ball Drag the Assistive Ball in move its positive. OPERATION MODE Gesture Operations Tap Menu GESTURE OPERATIONS Tap Double-tap Touch and Hold 60% 100% TRANSFERENCE OF THE ASSISTIVE BALL WHEN GUIANG 60% 100% Hide Ball Automatically in Full Screen Back Home Multimounting Notification Center Lockscreen One-Handed Mode Screenshot NoneTap Menu. There are five shortcuts for enabling different features in Tap Menu. Click a shortcut and change the option to the one you preferred. On any screen, click the Assistive Ball to pop up the shortcut menu.

text_image
18:44 Assistive Ball Assistive Ball Drag the Assistive Ball to move its position. OPERATION MODE Gesture Operations Tap Menu Touch the hour you want to change: Back Screenset Multi-Blending Lockscreen Home Custom Menu Back Used Hedge Used Multidocking Used Notification Center Lockscreen Used One-Handed Mode Screenshot 18:44When Assistive Ball is on, you can hold the floating button and pull it around the screen to any location to get it out of the way or make it more accessible.
Adjust the transparency of the Assistive Ball when not in use. Go to [Settings] > [Convenience Aid] > [Assistive Ball], then drag the slider.
Hide the Assistive Ball automatically in full screen. Go to [Settings] > [Convenience Aid] > [Assistive Ball] and turn on [Hide Ball Automatically in Full screen]. To reveal the Assistive Ball, swipe down from the top of the screen.
5.7. Change the Screen Orientation
Your device supports portrait and landscape screen orientations. Every time you shift your hands, the screen rotates.
text_image
August AUG 11 - 17 AUG 18 - 24 AUG 25 - 31 September 2019 SEP 1 - 7 SEP 5 - 14 SEP 15 - 21 SEP 22 - 28 SEP 29 - OCT 5 October 2019
text_image
20:30 Aug S M T W T F S 4 5 6 7 8 9 105.8. Split-screen
The split-screen mode allows you to divide the screen into two areas, with each area showing a different scene at the same time. Now you can watch a movie and chat with friends at the same screen.

text_image
09167366788 Philippines Hey man, how's the game going? Sending... SMS Messages
text_image
09167366788 Philippines Hey man, how's the game going? Banning... #MU Messages
natural_image
Close-up of a foldable smartphone with visible lens and screen (no text or symbols)Use Split-screen. Go to [Settings] > [App Split-screen], then turn on [App Split-screen] and [Swipe up with 3 Fingers for Split-screen]. There are four methods to enter Split-screen mode:
Note: Both apps need to support Split-screen function. Your phone will alert you if the app doesn't support that.
- Under the interface of an app, swipe up the screen with three fingers to enter split-screen mode.

natural_image
Illustration of a hand holding a smartphone with a green finger icon and upward arrow (no text or symbols)- Under the interface of an app, press and hold the Multitask button to enter split-screen mode.
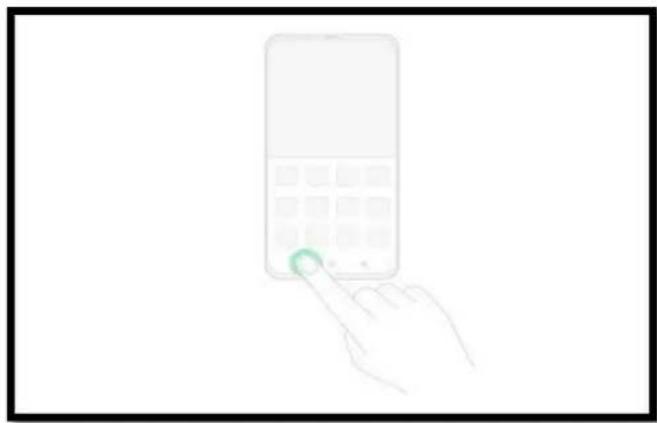
natural_image
Hand holding a smartphone with a green circular button on the left (no text or symbols visible)- In recent tasks screen, swipe down a task card, then click the "Spilt-screen" button to enter split-screen mode.
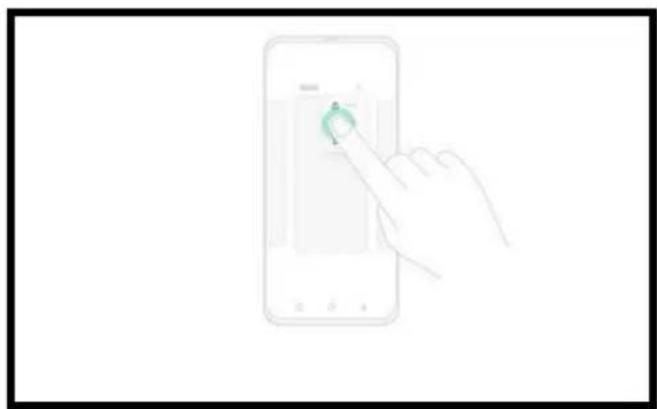
natural_image
Illustration of a hand interacting with a smartphone displaying a green circular button (no text or symbols)- When you use an app in landscape mode and receive a message from other apps, click "Split-screen Reply" to enter split-screen mode.
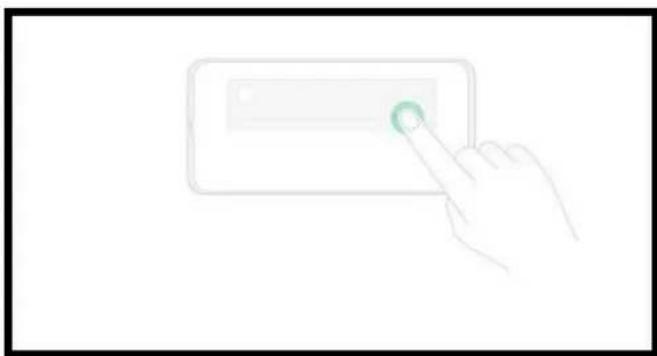
natural_image
Hand interacting with a touchscreen device (no text or symbols visible)5.9. Take and Edit a Screenshot
You can capture the screen on your realme smartphone using the following ways:
Capture the current page
- Press and hold the Power and Volume Down buttons for about 2 seconds, the screen will briefly flash white, and you'll hear a shutter sound if your phone's sound is on.

text_image
18:03 Volume down Sleep Wake Button- Gesture Screenshot: Go to [Settings] > [Convenience Aid] > [Gesture & Motion] and turn on [3-Finger Screenshot]. Then swipe down the screen with three fingers to take a screenshot.
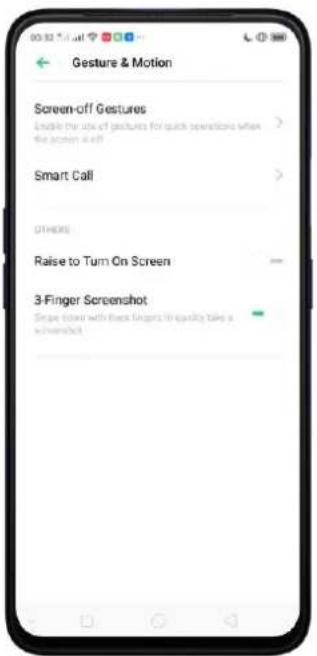
text_image
Gesture & Motion Screen-off Gestures Enable the use of gestures for quick operations when the action is off Smart Call OTHERS Raise to Turn On Screen 3-Finger Screenshot Simple down with these fingers in quickly take a screenshot
text_image
18:03 Amperately my iOS! Parle... No May 2Capture a long screenshot
You can easily take longer and scrolling screenshot with simple clicks. Long screenshot allows you to take scrolling screenshot of your conversations on messaging apps or a full webpage.
To capture long screenshots:
- Press and hold the Power and Volume Up buttons for about 2 seconds, or swipe down the screen with three fingers to take a screenshot of the current page.
- Click the screenshot, click Long Screenshot, then scroll the page up or down and stop whenever you want to.
- Click Done to generate a long screenshot. The image is saved in the Photos app.
Edit a screenshot
After you've taken a screenshot, click it, then click Edit. You can use the fancy new markup features to optimize it instantly, such auto-enhance, crop & rotate, filters, stickers, and more. Choose your options by clicking √ then click Done to save your changes.

text_image
Settings Airplane Mode Dual DIM & Cellular Network WiFi Bluetooth Other Wireless Connections Neatifications & Status Bar Display & Brightness Home Screen & Lock Screen Magazine Sound & Vibration Do Not Disturb
text_image
Send Edit Delete
text_image
Settings Software Updates About Phone ON/O Cloud Accounts and Sync Google App Management Close Apps Game Space App Split Screen System Apps Auto when on Crawl & Rotate Filter Stickers Delete Down CancelUse a Marker Pen
After you've taken a screenshot, click it, then click Marker Pen. You can highlight a word or write a note on the image. Click Done to save your changes. (Note: Marker pen is only available in red color).
text_image
Settings Notifications & Status Bar Display & Brightness Home Screen & Lock Screen Magazine Sound & Vibration Ire Not Details Fingerprint, Face & Passcode Smart Service Convenience Aid Security Battery Language & Region Additional Settings
text_image
Settings Nettoostera & Status Bar Display & Brightness Home Screen & Lock Screen Magazine Sound & Vibration Do Not Clusters Fingerprint, Race & Polyscope Smart Servicer Consensus Aid Security Battery Language & Region Additional Settings5.10. Control Center, Notification, and Status Bar
Control Center
Control Center gives you instant access to the most frequently used features and allows you to view recent and earlier notifications with just a swipe. You can open Control Center from anywhere on your phone from any app or screen, even from the Lock Screen.
text_image
Touch and Drag to Arrange ICON18 Done HTRON-502 Delaware Base Google Microsoft Teams Myos Bloomset Famidnet Arcane Maths Elicative Bread Night Shift ZEPD Share Riding Video Location Services Auto Tools Bo Net Elects Power Bars Touch and Drag Icon Up to the Notification Bar Personal/Global Commerce Deep WiChat Pay RealChat Email One-Texted Units AI/Zipack Multi-modalOpen Control Center. Swipe down from the very top of any screen (except the notch at the top center of the display). You'll see the shortcuts listed on top, and notifications below.
Customize the shortcuts. By default, the phone will list ten shortcuts when you open Control Center. Swipe down the screen to show other shortcuts.
To change or rearrange the shortcuts, click 📄 on the top, then hold down and
drag an icon to your preferred position. To save your changes, click Done
Control the brightness. Drag the slider to adjust the brightness of the screen. When you drag the slider, other parts of Control Center will be temporarily hidden.

text_image
01:08 High power consumption G Windows 31 Calendar Phones Settings Music Play Music Clock GoogleNotifications
View all notifications. Swipe down from the very top to view recent notifications.
Open the app to respond. Click a notification to go to the related app.
When phone screen is locked, swipe the notification to the right. You may need to enter your passcode.
Dismiss notifications. Swipe the notification to the left, then click Delete. To
dismiss all notifications, click ✕.

text_image
01:14 Thu, March 14 "DATA" Data Labels: Tending 0 16, Thu, March 16 HOTCH SET 11 Calendar Times Google Microsoft Bluetooth Flashbox Apache Microsoft SendChat Notification Center Call Management 3 I missed call CALL BACK Send SMS Messages How are you mean? Mark as Head Delete Message
text_image
01:14 Thu, March 14 @Wt: www.iesp, Friday 8th, Thu Moors 2d HITCHAI SOS 11 Cable Date Google Refresher Music Bluetooth Playright Airplane Meier Caloustris Notification Center Send SMS Messages → 28 How are you man? Mask us Read Delete MessageManage your notification settings. Swipe the notification to the left, click Settings, or go to [Settings] > [Notification & Status Bar] > [Manage Notifications].
Select an app from the list to customize whether new notifications from that app appear on the Lock Screen or notification bar, display a banner, play a sound or vibrate, or whether show icon badges on the Home Screen. You can also allow ringing for notifications when Do Not Disturb is on.
text_image
Manage Notifications Manage notifications request management the notification postoperated all users of Excel APP. You can also provide the notification method for most of these users. Battery Notification Bar > Calculator Notification Bar > Calendar Notification Bar, Status Bar, Lockscreen, Bad.. Call Management Notification Bar, Status Bar, Lockscreen, Bad.. Camera Notification Bar, Lockscreen Chrome Notification Bar, Status Bar, Lockscreen Clock Notification Bar, Badge Clone Phone Notification Bar, Status Bar, Lockscreen, Bad.. Compass Notification Bar
text_image
Camera Allow Notifications Once turned off, notifications from this site will not be displayed on the notification box or back screen. Set As Unimportant Notifications After it is classified, unimportant notifications will not be stored or available and/or are mostly the unimportant multiscale outlet of the notification panel. Display on Status Bar Display on Lockscreen Display Show Home Screen Icon Badge Don't Show Badge Display at the Top of the Screen After instructions, a menu page can add them all aspects. Ringtone Vibrate- Allow notification bar in Lock Screen. Go to [Settings] > [Notification & Status Bar] and turn its slider to green. A notification will prompt you even if your screen is locked.
- Show data usage at the top of the notification bar. Go to [Settings] > [Notification & Status Bar] and turn its slider to green. Your daily and monthly data usage will display at the top of the notification bar.
Status Bar
Status icons are displayed on the status bar, indicating, for instance, wireless connectivity, the battery status and time.
Display or hide battery percentage, network speed, and notification prompt mode. Go to [Settings] > [Notification & Status Bar], and switch the sliders to green.
text_image
10:12 AM Notifications & Status Bar Manage Notifications STATUS BAR Battery Percentage Show Real-time Network Speed Notification Prompt Mode Notification icon Notification Prompt Mode Notification icon Number of Notifications No Prompt5.11. Search
Find specific apps, contacts, messages, or quickly search the Internet.
Search with realme phone. Swipe down on any page of the Home Screen. Do not start swiping at the very top of the screen - that will open the Notification Center instead. Type in your search query, then click a search result on the list to open it.

text_image
Screenshot of a mobile app interface showing three smartphone screens: a chat app with icons, a search bar with 'GoWiFi' text, and an application menu with 'Facebook' and 'Falcon Squad' apps.Close Search. You can either Click "Cancel", press the Return button, or swipe up the "Back" gesture that you have set.
5.12. Text
5.12.1. Add or Change Keyboard Languages
If you need to type a foreign language on your realme phone, you can do so by adding and changing the input language:
Add installed languages. Go to [Settings] > [Additional Settings] > [Keyboard & Input Method] > [TouchPal] > [Languages], then tick the languages to use.
You can also add languages as you type. Click Ⓗ > [Add language] and tick the languages to use.
text_image
How are you man? SMS Messages
text_image
Switch language by Griping on spacebar Mixed language Input Product candidates from the secondary Language Installed languages English ■ QWERTY English (UK) ■ QWERTY 拼音 ■ QWERTY 笔画 ■ QWERTY man1wu ■ QWERTY Available languages 手写 Click to download
text_image
How are you man? Languages English PHONE/AD FULL T+ Add Language...Download available languages. Click to download the language pack. You'll see the language in Installed languages list when the download is completed.

text_image
Languages Español Click to download Español (Latina) Click to download Español (US) Click to download Euskara Click to download Français Click to download Français (Belgique) Click to download Français (Canada) Click to download Français (Suisse) Click to download Gaeige
text_image
Languages Español Downloading... Español (Latina) Click to download Español (US) Click to download Euskara Click to download Français Click to download Français (Belgique) Click to download Français (Canada) Click to download Français (Suisse) Click to download Gaeilge
text_image
Languages Español QWERTY Spanish(+R) mānīnw QWERTY Available languages 手写 Click to download 五笔 Click to download 注音 Click to download 倉頡 Click to download 速成 Click to download Afrikaans Click to download5.12.2. Type, Edit, and Delete Text
Type text
Click a text field to pop up the keyboard, then click the letter to type.
Type capital letters. realme smartphone is auto-capitalizing the first letter of a sentence, or you can click ↑ to type capital letters.
Turn on Caps Lock. Double-click 🔊. A line will appear under the arrow if you have done this correctly.

text_image
New Message Cancel Recipient: SMS Messages 2021.08.09 12# Q W E R T Y U I O P A S D F G H J K L Z X C V B N M 12#Enter numbers, punctuation, or symbols. Click 12#. To type alternate characters, touch and hold a key, then slide to choose one of the options.

text_image
New Message Cancel Recipient: 3 S&M1 Send S&M2 Send T. a a a a a u i o p a s d f g h j k l z x c v b n m 12# aEdit text
Select text. Touch and hold the target text, or double-click the target text to select. Drag the control points on either side of the highlighted word to select more or less text, or click [Select all] to highlight all of the text.
You can cut, copy, paste or share your text.
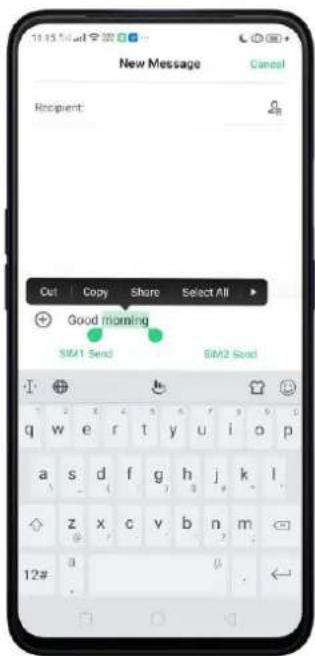
text_image
11:15 PM New Message Cancel Recipient: Out Copy Share Select All Good morning SIM1 Send SIM2 Send 12#Delete text
Click ✗ to delete the selected text or characters before the cursor.
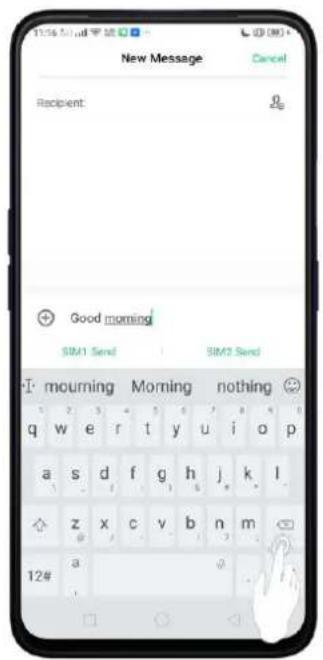
text_image
New Message Cancel Recipient: Good morning SIM1 Send SIM2 Send morning morning nothing 12#5.12.3. Prediction
Prediction feature lets you to enter text with ease and without errors.
Go to [Settings] > [Additional Settings] > [Keyboard & Input Method] > [TouchPal] > [Prediction].
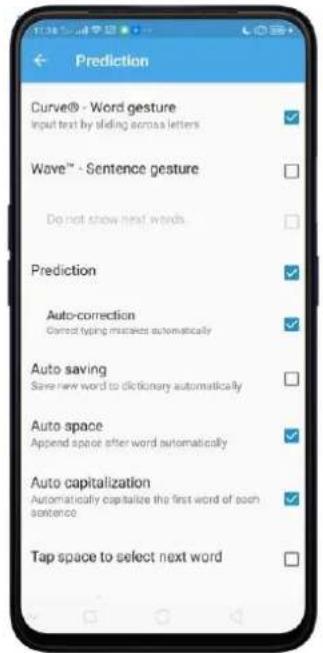
text_image
Prediction Curve® - Word gesture Input text by sliding across letters Wave™ - Sentence gesture Do not show next words Prediction Auto-correction Correct typing mistakes automatically Auto saving Save new word to dictionary automatically Auto space Append space after word automatically Auto capitalization Automatically capitalize the first word of each sentence Tap space to select next wordUse TouchPal Curve to input text simply by swiping across the keyboard, from one
letter to another.
Use Wave – Sentence gesture to input commonly used phrases/sentences.

text_image
11:41 Mail New Message Cancel Recipient: Good m SIM1 Send SIM2 Send I- morning m me q w e r t y u i o p me my morning a s d f g h j k l m z x c v b n m 12#Predict text. While you type, the keyboard predicts your next word, and offer suggestions before you finish typing. Click the word or the spacebar to select
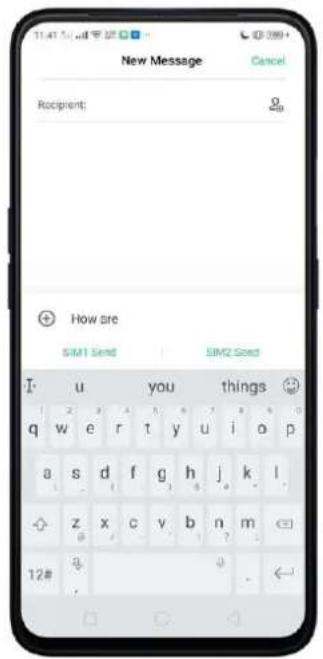
text_image
New Message Cancel Recipient: Go How are SIM1 Send SIM2 Seed I u you things 😊 q w e r t y u i o p a s d f g h j k l z x c v b n m 12# a .Correct spelling automatically. The keyboard will automatically check and correct the spelling of the text.
Auto-saving new words, adding space, and capitalizing. As you type, the keyboard will also automatically save new words to the dictionary, add space after a
word and capitalize the first word of each sentence.
Predict emojis. As you type, the keyboard predicts what emoji comes next.
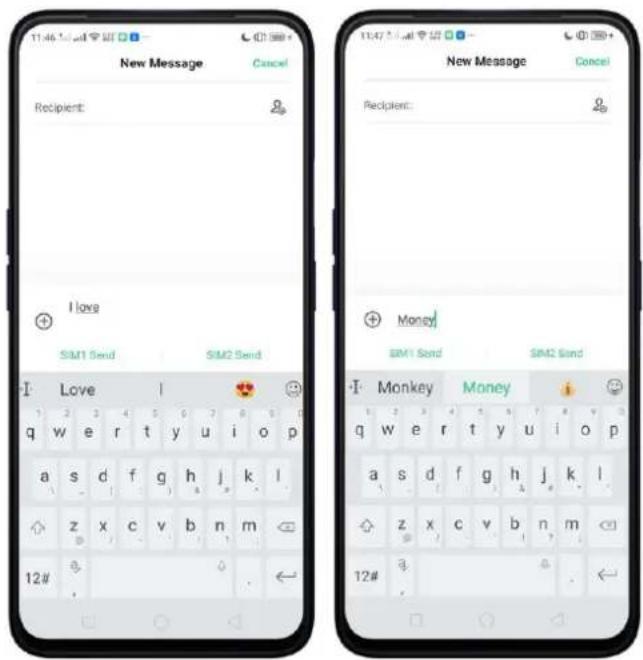
text_image
New Message Cancel Recipient: I love SIM1 Send SIM2 Send Love 1 2 3 4 5 6 7 8 9 10 q w e r t y u i o p a s d f g h j k l z x c v b n m 12# Money SIM1 Send SIM2 Send Monkey Money q w e r t y u i o p a s d f g h j k l z x c v b n m 12#Contextual prediction. The keyboard will suggest what it thinks are the most likely words based on what you're typing.
Import contact names. The names of your contacts will be added to user dictionary. Learn from messages. Let the keyboard learn from your conversations and predict words you use most.
User dictionary. ClickEdit user words, then add your own words into the dictionary so that they appear in the word prediction fields when typing. You can also back up or restore your dictionary to or from the SD card, or rebuild, or clear your dictionary.
When you're connected to the Internet, you can use the built-in microphone to speak the text instead of typing it.
Start voice typing. Touch and hold the space bar on the bottom of the screen, or
click ⏻ > [Voice], then speak.

text_image
New Message Delete: SMS Messages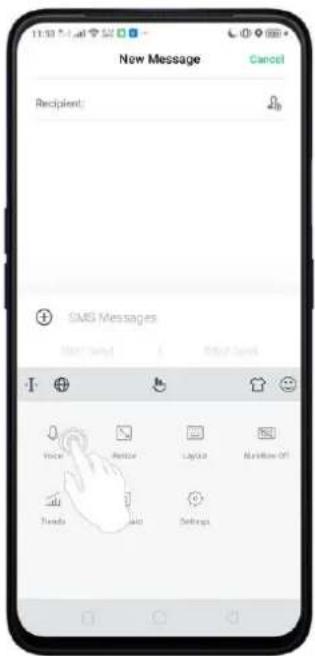
text_image
New Message Cancel Recipient: SMS Messages OK/Cancel Help/Cancel Voice Apply Language Preview Off Trends Next SettingsPause voice typing. Click the microphone icon to pause/continue dictating the words. Click ✗ to quit voice typing.

text_image
New Message Cancel Recipient: SMS Messages TRY saying something Google
text_image
New Message Cancel Recipient: SMS Messages Tap to speak Try again GoosSelect input languages. Click 🎨 on the panel, or go to [Settings] > [Additional Settings] > [Keyboard & Input Method] > [Google voice typing] > [Languages]. Select your preferred languages. To select a primary language, touch and hold the language.
Insert and delete text. To insert or delete text, click to place the insertion point first.
Click ✗ to the right of the microphone icon to delete text.
To enable voice input while offline: Click 🎨 on the panel to manage [Offline speech recognition].
5.12.5. TouchPal for realme
TouchPal Keyboard is the default keyboard on realme smartphones. You can use it to enter text by tapping on the keys or swiping across the keyboard, from one letter to another. Besides its basic typing features, TouchPal has introduced some
innovations. Click 📄 on the on-screen keyboard to get more information.
Multiple themes available. You can dress up the keyboard with various themes or customize the keyboard by yourself.

text_image
Flame HOME THEME FONT GAME DICTION New Hot Recommend Neon Purple Seasons Fantasy Top Selected Theme Noon Sweet Love Panda Balloons FREE Simple Kiota Gold Street Art Graffiti FREE New Message Cancel Recipient: SMS Messages 12# Q W E R T Y U I O P A S D F G H J K L Z X C V B N M FREE Lobster FREE Berner Basssschrift 2 FREE Merriweather FREE Parisish FREE Happy Monkey FREE Federant FREE Pompiere FREE Dila Sweet FREE Edda FREE Stardos Stencil FREE Alice FREE Merriweather FREEEmojis and stickers. TouchPal has multiple Emojis and stickers and can predict what Emoji comes next.
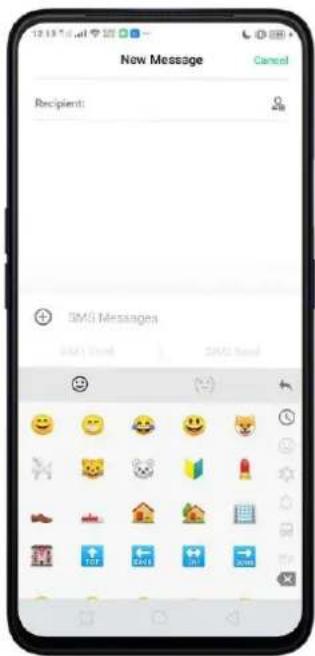
text_image
New Message Cancel Recipient: SMS Messages OK OK SMS Status SMS StatusIntelligent input. With TouchPal Curve ^® , you can type by sliding from letter to letter instead of tapping. Advanced technologies such as Contextual Prediction, Auto correction, and User Dictionary also make typing faster. See Prediction.
Clip board. It allows you to type a long string of text by entering a shorter string. Create a keyboard shortcut for a word, phrase, or sentence. Whenever you type a specific shortcut, it will replace those letters with a predefined piece of text.

text_image
09167366788 Hello! Hey man...how's the game going? Sending... SMS Messages CREATE NEW Swipe left or right to delete Long press to edit & lock
text_image
Hey man...how's the game going? SMS Messages Clip Board All Copy Select > Cut Home End Paste5.13. Sound, Vibration, and System Feedback
Set your device to sound or vibrate for incoming calls, messages, or other notifications, and let your phone send sound or haptic feedbacks on key clicks.
Set your phone to vibrate. Go to [Settings] > [Sound & Vibration]. Separate controls let you set your phone to vibrate in ring mode, silent mode, or both.
Turn ringing on or off. Toggle the [Silent] slider to green or white. You can also
Swipe down from the top of the screen to open the Control Center, then click to mute.

text_image
13:21 Sound & Vibration Sound & Vibration Vibrate Vibrate When Ringing Vibrate When Silent Silent VOLUME Wells Volume Sugar Volume Water Volume Default Volume Button Adjustment Select the default volume adjustment type for the volume Button Media Volume 13:22 Thu, March 14 "Shift" Data Usage, Today 6.0, "This Memory 6.0" MOTION SEE Cohlar Data Single Assistant Usafe Solutions Flaminger Airplane Mode Decision Notification Center iPhone Manager WeChat has taken up 2.54 GB of memory Clean the wireless files for WeChat to run smooth... USD Debugging Charging via USB Top to see movie options TouchPad Simple Necis Gold downloaded. TouchPad Safely backup your wordsAdjust the ringer, media and alarm volume. Drag the control point left or right. Change ringtones for incoming calls, messages, and other notifications. In addition to the default ringtones, you can create ringtones using your own audio files.

text_image
SIM1 Ringtone CUSTOM Select From Files PHONE RINGTONE Pure Memories PlaygroundTurn system feedback on or off. Toggle the sliders to green or white. When Vibrate on Touch is on, your phone vibrates when you touch the Menu, Home, and Return buttons.
To temporarily silence incoming calls and alerts (without vibrations), see Quite Time.
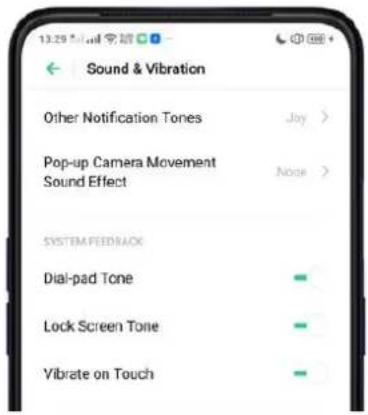
text_image
13:29 Sound & Vibration Other Notification Tones Joy > Pop-up Camera Movement Sound Effect Note > SYSTEM FEEDRACK Dial-pad Tone Lock Screen Tone Vibrate on TouchReal Sound Technology. Real Original Sound Technology is jointly developed by Dirac Research AB and realme. It delivers original sound in full fidelity and creates a spatial three-dimensional sound arena to provide you with a listening experience that's just like being at a live performance. Plug in the headphones then select a scene you want the sound to change to.
Headphones Monitor. When turned on, you can enjoy a live karaoke experience in real-time through your headphones.
Turn off the default headphones monitor function in the karaoke app to avoid sound problems.
5.14. Charge and Monitor the Battery
realme smartphones are equipped with a non-removable, lithium-ion rechargeable battery. Do not attempt to open your phone. Charge the phone using the cable and USB power adapter that's included when you purchased it.
Charge the battery. Connect your phone to a standard power outlet or a Power Bank.
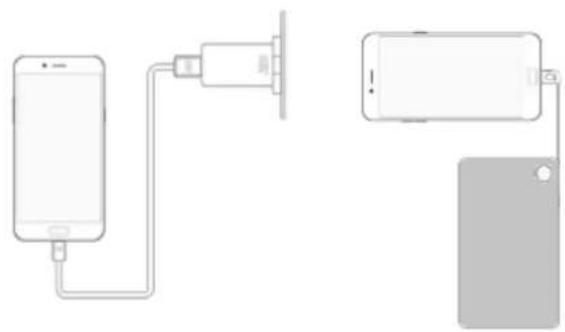
natural_image
Diagram showing two devices connected by a cable, one with a plug and the other with a plug (no text or symbols)Charge the battery and transfer files. Connect your phone to a computer.
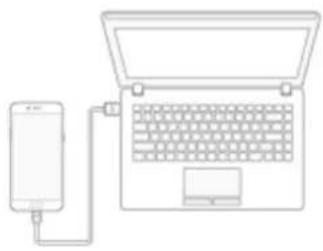
natural_image
Line drawing of a laptop connected to a smartphone via a cable (no text or symbols)Note:
* All photos shown are for illustration purpose ONLY. Actual products may vary.
* Rechargeable batteries have a limited number of charge cycles and may eventually need to be replaced. The realme smartphone battery is not user replaceable; it can only be replaced by an authorized service provider. Removing the battery yourself will void your warranty and might cause damage to your phone.
Show percentage of battery in the status bar. Go to [Settings] > [Notification & Status Bar] and turn on [Battery Percentage]. Or go to [Settings] > [Battery] and turn on [Show battery percentage on status bar].

text_image
13:22:57 AM Notifications & Status Bar Manage Notifications > STATUS BAR Battery Percentage Show Real-time Network Speed Notification Prompt Mode Notification issues > NOTIFICATION BAR Allow Notification Bar in Lockscreen Show Data Usage at the Top of the Notification Bar Grounded NAV based data uses in this current black remote Others Turn On Screen for Notifications When turned off, the screen will not automatically light on except for incoming data (IMG) messages and other lockcreen notifications.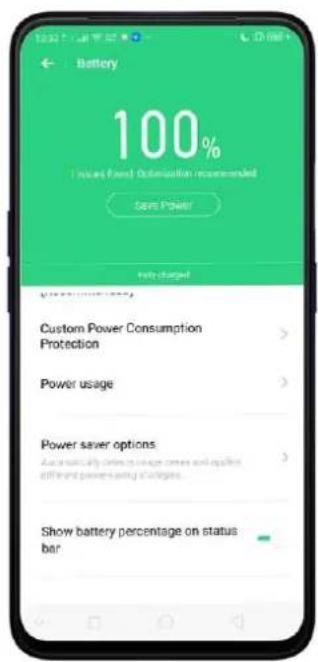
text_image
Battery 100% Insurs Fixed Substation Recommended Save Power! Help charged Custom Power Consumption Protection Power usage Power saver options Automatically reducing voltage costs and applies different power-saving strategies. Show battery percentage on status barView detailed battery info listed for each app. Go to [Settings] > [Battery] > [Power usage].

text_image
Battery 100% Standard World. Optimization recommended Save Power Fully charged (Use not allowed) Custom Power Consumption Protection Power usage Power saver options Automatically silver or gray power and supplies different power saving strategies Show battery percentage on status bar
text_image
Power usage Today Yesterday 2 Days Ago WeChat System Launcher Photos Camera Wi-Fi Smart Driving Falcon Squad Google PUBG MOBILE5.15. Location Service
Apps like Maps, Weather, and Compass must know your exact position before it can provide accurate services and results.
Turn on Location Service. Swipe down from the top of the screen to open Control Center, then click 🔒. You can also go to [Settings] > [Google] > [Location] and toggle the slider to green.
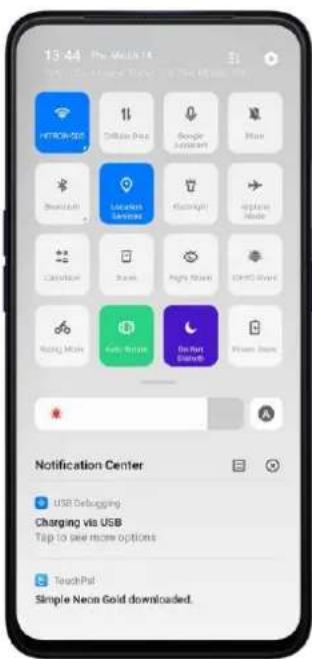
text_image
13:44 The Mail 14 HITROW-SEC Cellular Price Google support More Swedish Location Services Rightward Apache Inside Carbohydr Share Right Market Other World Racing More Help More To Next Search Power Store Notification Center USB Debugging Charging via USB Tap to see more options Touch-Put Simple Neon Gold downloaded.
text_image
Google Devices Google Fit Google Pay Google Play Instant Location Nearby Restore contacts Search, Assistant & Voice Security Set up nearby device Set up your work profile Smart Lock for Passwords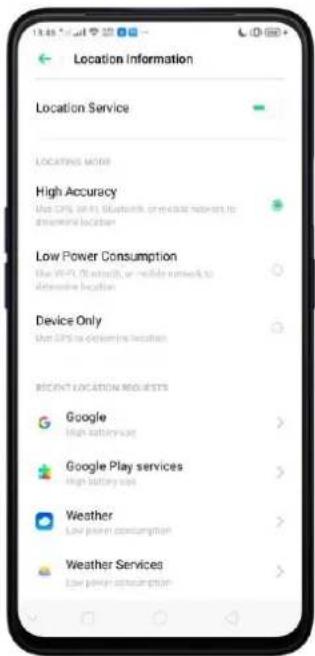
text_image
Location Information Location Service Locations notes High Accuracy Use OPX to play Bluetooth or wireless networks to appropriate location Low Power Consumption Use WiFi (Bluetooth, or Mobile network) to appropriate location Device Only Use GPS to determine location Recent LOCATION REQUESTS Google High battery cost Google Play services High battery cost Weather Low power consumption Weather Services Low power consumptionYou can choose from three types of positioning modes, which differ in accuracy and battery drain:
- High accuracy (GPS, Wi-Fi, Bluetooth, and mobile network).
- Battery saving (Wi-Fi, Bluetooth and mobile network).
- Device only (GPS).
A history of recent location requests. You'll see a list of apps that have requested location. Click an app to enter the App info page that allows you to manage the app directly.
Positioning Control
Apps that use GPS in the background. Allows the app to use GPS in the background when enabled. Keeping background GPS of the apps active may drain the battery significantly.
Scan. Allows you to scan Wi-Fi and Bluetooth to improve location Accuracy
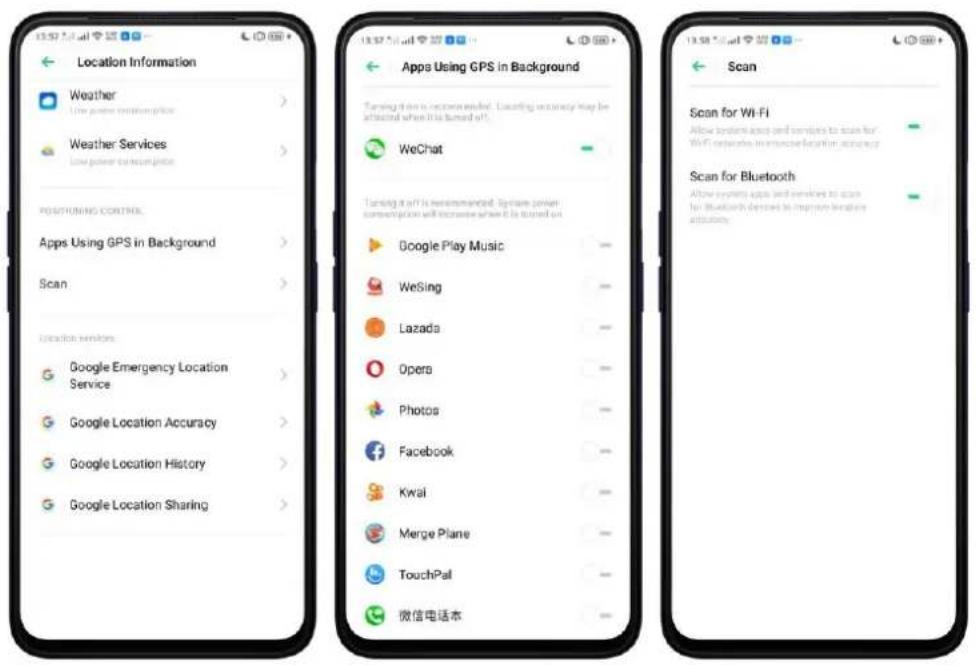
text_image
Location Information Weather Low power communication Weather Services Low power communication POSTONING CONTROL Apps Using GPS in Background Scan Location services Google Emergency Location Service Google Location Accuracy Google Location History Google Location Sharing Apps Using GPS in Background Turning this is recommended. Locating security may be affected when it is turned off. WeChat Turning it off is recommended. System power communication will increase when it is turned off Google Play Music WeSing Lazada Opera Photos Facebook Kwai Merge Plane TouchPal 微信电话本 Scan Scan for Wi-Fi Allow system access and services to scan for Wi-Fi networks in interactive location accuracy Scan for Bluetooth Allow system access and services to scan for Bluetooth devices to improve wireless accuracyGoogle Location service
Use Google Location History to retrace your steps. Google Location History will customize search results for location and search history.
Use Google Location Sharing to share your locations with friends and contacts in real time.
5.16. Use the phone internationally
When you travel overseas, stay connected to friends and family while traveling - without paying more than you have to. Follow these suggestions.
Unlock your phone. Call your wireless operator and ask if your phone needs to be unlocked. In order to prevent being overcharged, call the Customer Service Center to get the unlock code.
Shop international data roaming plans with your operator. Consult your operator or visit online websites to check roaming plans and fees that are mostly used in the country or region that you will visit.
Buy or rent local Nano SIM cards. You can buy or rent SIM cards for most of the countries and regions. Learn more from travel guides and websites related to the country or region.
Use Wi-Fi. Turn off global roaming on your phone and head to a Wi-Fi hotspot, such as those in hotel lobby, or local cafes.
5.17. Power Saver
Power Saver helps increase battery life by turning off or limiting certain features, for example, turning off some background apps to pause background syncing, turning off Vibrate on Touch, and dimming the screen. Using Power Saver can give you at least extra 30 minutes to use the phone.
Turn on Power Saving. The phone will let you know when your battery level goes down to 20%, and again at 10%, and will ask you to turn on Power Saving. The battery indicator is on the top right corner will turn yellow while Power Saving is enabled.

text_image
Less than 20% of battery power remaining. Turn on "Deep Power Down"? When "Deep Power Down" is turned on: 1. Background apps will be closed to pause the background auto-sync function, 2. The screen brightness will be reduced. 3. Vibrate on Touch will be turned off. You can turn it off in "Settings - Battery - Deep Power Down" or in the "Notification Box" Do not turn on On
text_image
10:43 Q: 2023 27:00 Play Star Pill Mar 15To manually turn on or off Power Saving Mode at any time, swipe down from the top of your screen to open Control Center, then click 📋. You can also go to [Settings] > [Battery] and enable Super High Power Efficiency which reduces screen brightness, auto-screen off every 15 seconds, & disables background sync.

text_image
14:05 The March 14 Taket - Data Google, Taker O'D. This Memory is a HITRON-3DS Cellular Data Google Analytics Arts Bluetooth Location Services Chrome Analog Devices Calculator Music Night World Digital Shaps Picking Mode Alta, ReRank Do Not Listen Power Save Notification Center You're the Simple Neon Gold downloaded. You're the Safely backup your words Tap to backup & sync acropay devices
text_image
Battery 100% Issues fixed Optimization recommended SAVE POWER Improved design: 1 mini 23 hours 25 minutes Super High Power Efficiency Office "Select Power Driver" is turned on the system add street covers background agips, push the background Auto sync function, reduce image brightness, and turn off Wireless on Switch Reduce screen brightness Auto Screen Off timeout adjusted to 15 seconds Disable background sync Storet Power ResetNote: Your phone will automatically disable Power Saving when you charge it up to 80%. Power Saving is always temporary and only lasts until the next proper charge. Optimize the power of your battery and manage those apps and settings that used up the most power. Know how to save more power so you can use it especially when it is most needed.
To enable Smart Power Saver, go to [Settings] > [Battery] > toggle [Smart Power Saver (Recommended)] to green to enable.

text_image
Battery 100% (I issues lost. Optine/cool/wear recommended) Save Power Connected pages 1 Days 23 Hours 26 minutes Smart Power Saver (Recommended) Power usage Power saver options Automatically benefit users and applies different power saver strategies Show battery percentage on status barWhen Optimization is needed
When issue or issues are found, then it will prompt you that optimization is recommended. Just click on Save Power and check those that needed optimization, click Extend Battery Life, and then click Done when finished. (Note: Expected usage will be shown but this still depends on the usage and running apps on the background).

text_image
Battery 99% I show full operation recommended Save Power Expected usage 1 step 22 hours 45 minutes Smart Power Saver (Recommended) Power usage Power saver options Automatically draws a usage custom and applies different power-saving strategies Show battery percentage on status bar
text_image
Save Power I project found. Optimization recommended Power consumption Turn off GPS Optimized Items Turn off power-draining apps now Optimized Prevent auto-launch of power-draining apps Optimized Disable background running Optimized Extend Battery Life 2.8 Gain(s)
text_image
Save Power My status found: Help 5-6 Optimized Items Turn off power-draining apps now Optimized Turn off GPS Optimized Prevent auto-launch of power-draining apps Optimized Disable background running Optimized DoneOther Power Saving features
- Power usage. Shows the apps that are consuming the most power. Click Power usage to give lists from Today, Yesterday or 2 days ago.

text_image
Power usage Today Yesterday 2 Days Ago WeChat 33.7% > System Launcher 22.18% > Photos 11.63% > Camera 10.54% > Wi-Fi 7.55% > Smart Driving 7.54% > Falcon Squad 1.26% > Google 8.6% > PUBG MOBILE 6.54% >- Power Saver options. Can automatically detect each usage and applies different power saving strategies.

text_image
14:20 AM Power saver options Sleeping Mode This feature can sense when you might be sleeping and then switch to Low Power mode to make your phone more power efficient.- Show battery percentage on the status bar. If you want to see how much battery is left just enable this feature by toggling [Show battery percentage on the status bar] to green to enable.

text_image
Battery 100% I change found. Optimal bar is recommended Save Power Fully charged Custom Power Consumption Protection Power usage Power sever options A power normally offers active users and applies official power saving strategies. Show battery percentage on status bar6. Personalize your realme Phone
6.1.ColorOS 6 Device Name
If you scan for a Wi-Fi Direct or Bluetooth connection with your phone, your device name will display on the target devices.
Change device name for Wi-Fi and Bluetooth. Go to [Settings] > [About Phone]. You can also change the device name when you enable Bluetooth or Wi-Fi Direct.

text_image
About Phone Device Name OPPO F11 Plus > Model CFH1969 ColorOS Version V6.0 Android Version 9 Processor Octa Core RAM 5.00 GB Device Storage 13.1 GB (Analysis) 62.6 GB (Loss) Version CFH196REK_11_A.03 Baseband Version M_V3_P10_M_V3_P10 Kernel Version 4.4.145 Android Security Patch Level February 5, 2019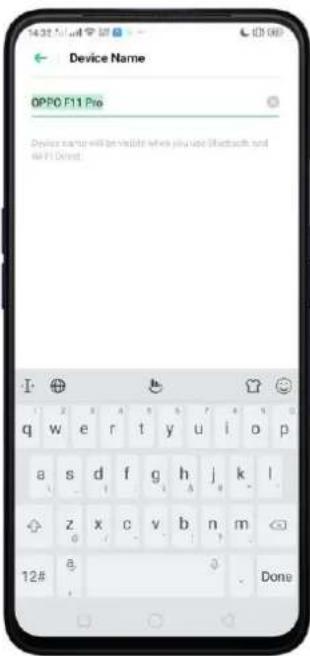
text_image
Device Name OPPO F11 Pre Device name will be visible when you use Bluetooth and all F11 Direct. 12# Done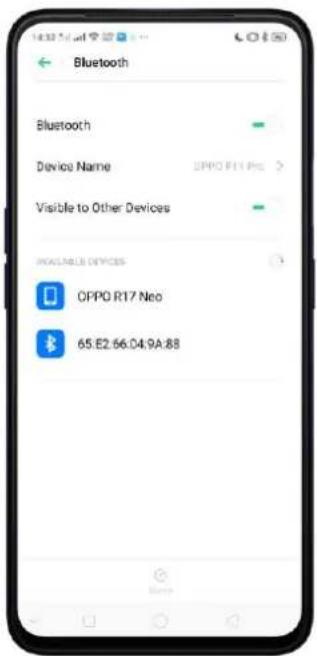
text_image
Bluetooth Bluetooth Device Name OPPO R17 Neo Visible to Other Devices AVAILABLE DEVICES OPPO R17 Neo 65.E2:66.04.9A:886.2. Personalize the Home Screen
6.2.1. Organize the Home Screen
From the Home Screen, you can access all your apps and widgets. To keep everything in order, you can organize your Home Screen to make it more manageable and keep it looking neat.
Add or Remove a Home Screen page
Add a Home Screen page. Swipe to the rightmost screen and drag an app or widget off the screen to the right.
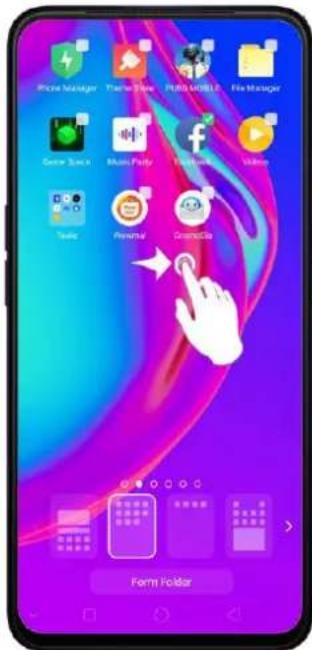
text_image
Mobile Manager File Manager Search Scene Music Popularity Video Tools Personal ComicBox Form FolderRemove a Home Screen page. Drag all the apps and widgets on a Home Screen page to another page. The empty Home Screen page will be automatically deleted.
Group apps
You can put apps in folders, which can keep your Home Screen neat or help to organize similar apps.
Create a folder. Tap and hold an app until the icons start wiggling. Drag one of the apps into the other, and lift your finger when the first app seems to merge into the second one. Add more apps by dragging them in.
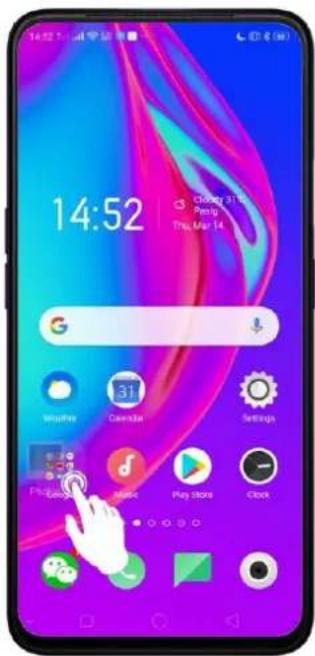
text_image
14:52 Closing 37.8 Peng Thu, May 14. G Winuhe Caiyuan Settings Play Store ClockEdit the folder's name. When you first create a folder, your phone assigns a suggested name to it. To edit the name, tap on the text.

text_image
Tools Camera Recorder Compass Calculator Close Phone One-Step LockscreenRearrange apps and folders
realme smartphone has set a default arrangement for users, but you can still rearrange the apps and folders to fit how you use your phone.
Remove apps from a folder. Tap the folder, then tap and hold an app until the icons start wiggling. Drag the app out of the folder and into the Home Screen.
Delete a folder. Drag all the apps out of the folder and into the Home Screen, and the folder will disappear.
Rearrange apps. Tap and hold on an app until the icons start wiggling. Drag and drop the app icon to a new location. To save your changes, press the Home or Return button.
Note: Icons will be aligned to the left automatically.
Move the icon to a new screen. Drag the icon of the screen to the right and let it go when the new page appears.
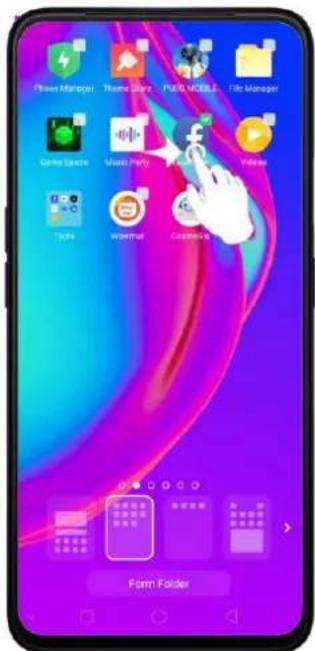
text_image
Phone Manager Phone Manager PUB, MOBILE... File Manager Game Space Music Party Facebook Video Tools Wordmail Cookies Form Folder6.2.2. Home Screen Widgets & Transition Effects
You can give yourself a fancy Home Screen with a highly-detailed set of widgets, for example, clock, weather, battery or mail widgets. You can also use them to tweak notifications, alarms and other options. In other words, there's considerably more here than just widgets. You can also change the transition effect on your phone, which is the style in which you slide the Home Screen right or left.
Manage Home Screen
Add a widget. Pinch your fingers together, then click [Widgets]. You'll see all available widgets. Touch, hold and drag one widget to the screen. Make sure there is enough space for that widget.

text_image
15:02 Mobile 8°C 46:00 Thu Mar 14 G 31 Calendar Windows Settings Google Click Widgets Wallpapers Effects Settings Open 微信笔记本 Radio Skibie People Play Button X Read ↑ Lattice Snacking MyBlock 15:09 Thu Mar 14 Cloudy 31°C 17:30 AM 19 35 Click added Word Click Added Click 4:13 Tokyo 16:09 Taiwan 1:00 Manila 15:09 Taiwan 15:09 Thu Mar 14 Samsung 32°C Phone Manager Theme Cluster FUSE HANDLE File Manager Game Space Music Party Eccoscape Windows Brady Mountar Cannabis Tokyo 16:09 Manila 15:09 TerryMove a widget. Touch and hold a widget for about 2 seconds, then drag it around. Delete a widget. Click ✗ the upper left corner of the widget or just click on Remove notification that will appear.
Customize transition effect
Set up transition effect. Pinch your fingers together, then click [Effects].
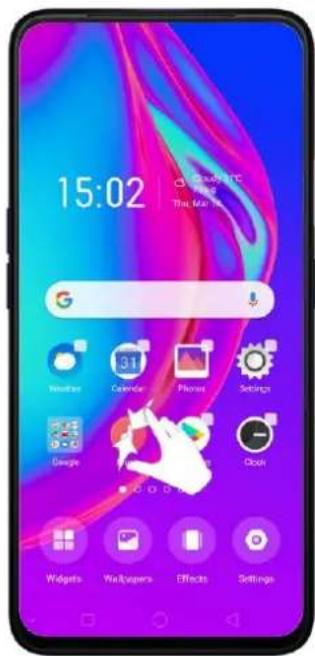
text_image
15:02 Google Time Man Insulator 31 Calendar Phone Settings George Cloud Widgets Wallpapers Effects Settings
text_image
15:03 Google PC Ping You're like it.Preview and choose an effect. Click a transition effect and it will show the preview effect. You can choose one from the five options:
- Default Mode
- Cube Slide
- Flipping Slider
- Card Effect
- Tilting Mode
Quick change of Wallpapers Customize
Choose Wallpapers. Pinch your fingers together, then click [Wallpapers].
text_image
15:02 My Baby It's The Man Who
text_image
15:29 Google Valuation 31 Calendar Phone Settings Google Music Play Stor ClickQuick Shortcut to Home Screen and Locks Screen Magazine
Home Screen and Lock Screen Magazine. For a quick shortcut, click [Settings].
text_image
15:02 This Map
text_image
Home Screen & Lock Screen Ma... HOME SCREEN Home Screen Mode Standard Mode > Home Screen Layout 4x6 > LOCK SCREEN MAGAZINE Lock Screen Magazine > Set Theme > Set Wallpaper >6.3. Change the Wallpaper
ColorOS 6 has amazing Wallpapers to choose from.
Change the wallpaper. Go to [Settings] > [Home Screen & Lock Screen Magazine].
Scroll to the end of the page, then click [Set wallpaper].
You now have an option of Static Wallpapers and Live ones. You can also make your Photos as a wallpaper. Note: You can quickly change your wallpaper by pinching your fingers together.

text_image
Set Wallpaper Static Wallpapers Live Wallpapers Photos
text_image
15:02 Google 31 Coffee Bar Physics Settings Google Clock Pickets Veriagenos Effects Settings
text_image
15:29 G Weather 31 Calendar Physics Settings Google Music Play Show ClockDownload online wallpapers. Click Wallpaper, then click Download more. You can also click Theme Store on the Home Screen directly to find more.

text_image
Wallpapers Edit System Wallpapers Apply Apply Apply Flowing Light And C... Light Of Flush Violet... Blue Light Of Folar... Apply Apply Apply Light Purple Blue Space Dark Blue Download More
text_image
15:44 SoLd Theme name/style/color/designer Official Wallpaper Rank Topic Popular Recommendations 16:32 07:06 I Just Like To Study Blank Zooking-off size 1 20:13 Themes Mailboards My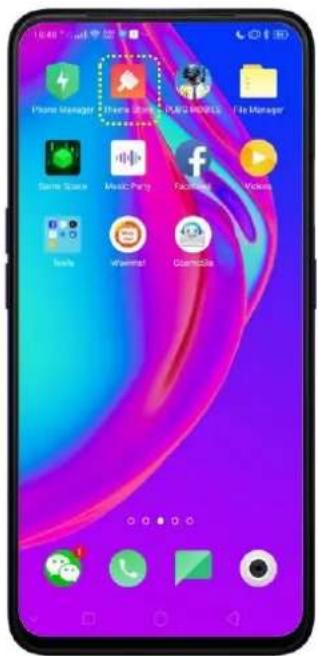
text_image
Phone Manager Theme Room PARK MANUALS File Manager Same Search Music Party Facebook Vehicles Tools vWormad CommerceUse your own photos. Click Photos, then select your favorite image from the photo gallery.

text_image
Select Album Camera 24M Screenshots 2420 Last 30 Days 372 WeChat 63 SMARTAN CODE Messenger No. 825/1997/1998 Instagram 336.4.Lock Screen Magazine
You can let your Lock Screen's wallpaper to switch to a new picture every time you wake up your phone, lessening the likelihood of you getting bored with the same look.
Turn on Lock Screen Magazine. Go to [Settings] > [Home Screen & Lock Screen Magazine] and turn on [Lock Screen magazine].
Update Using Mobile data. By default update will only be done via Wi-Fi. Disabling this is recommended to avoid consuming data.
Current Resource Date. Update from time to time to have the most recent Lock Screen magazines.
Help and Feedback. When you want to write any feedback about Lock Screen magazine.
What's new in ColorOS 6!
Choose modes for your Home Screen. To go choose the Home Screen mode, go to [Settings] > [Home Screen & Lock Screen Magazine] > [Home Screen Mode] then choose which one you like best.
Standard Mode. All installed apps are displayed on the main screen.
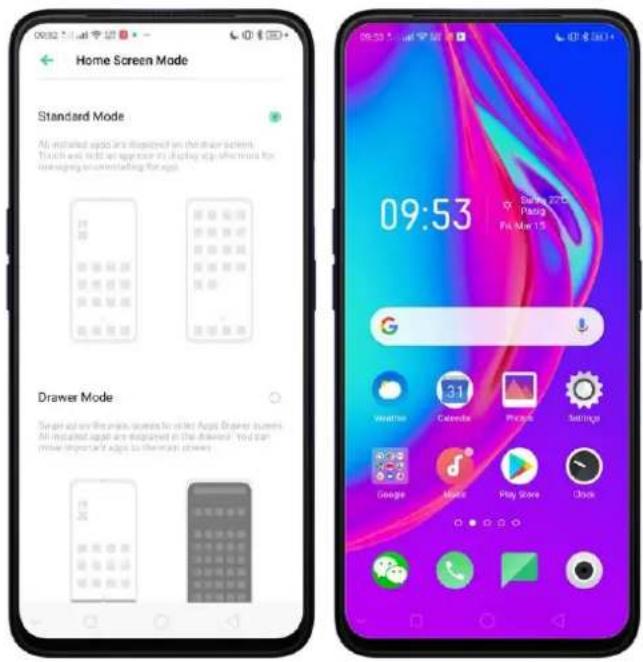
text_image
Home Screen Mode Standard Mode All installed apps are displayed on the main screen. Touch-in held an app on the display app features for managing to untitled through. Drawer Mode Scan out on the main screens to order Apps Drawer users All installed apps are displayed in the main screen. You can move important apps to the main screen.Drawer Mode. All installed apps are displayed in the Apps Drawer screen. You need to swipe up on the main screen to enter Apps Drawer screen.
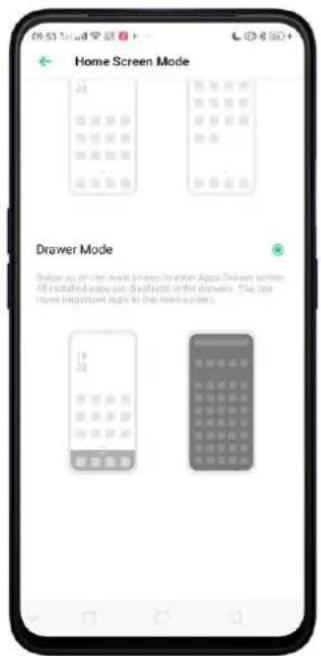
text_image
Home Screen Mode Drawer Mode Help us on the main screen to enter Apple Drawers within All installed apps are displayed in the towns. You can manage important apps to the towns you.
text_image
App Predictors Settings Phone WeChat Phone Stone Box All Apps Clock Phone Compress Correction Customize Drive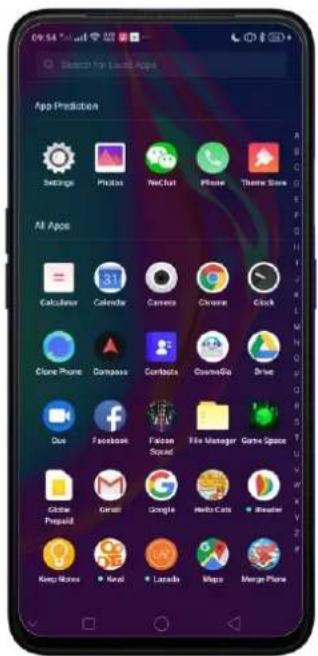
text_image
09:54 Search for Last Apps App Prediction Settings Photos NetChat Phone Theme Store All Apps Calculator Calendar Camera Chrome Clock Clone Phone Compass Contacts CosmosGA Drive Duo Facebook Falcon Squad File Manager Game Space Global Prepaid Geral Google Media Cars Breaker Keep More Kevoi Larada Maps Merge PlaneLock Screen. Not only that you have amazing Lock Screen magazines, but right now you can like it by clicking 🤖 and you can read about the image by clicking More.
text_image
THE CREEK REPUBLICA HOW A COOK MICHIGER WE I CAN BE IT'S BIG LXXX VISPHERE IT YOUR LIFE!
natural_image
Scenic view of a historic European city at sunset, featuring a river, bridges, and traditional buildings (no visible text or symbols)
text_image
The Czech Republic Has A Cool Nickname Ding Marmain Don't feel: You can still call it the Czech Republic If you really, really want to. But the Czech government asks that you use "Czechia" (instead). The name switch was a move to hopefully make it easier for 'competents and sports teams, among others. To represent the country internationally (and, possibly, for farm to tweet about 10)" according to a write-up on Atlas Obscura.6.5. Adjust the Screen Brightness and Color Temperature
Protect your eyes and adjust color temperature according to your preference. Reducing screen brightness can also help to conserve battery life.
Adjust the screen brightness. Swipe up from the bottom of the screen to
open Control Center, then drag ⚙. Or go to [Settings] > [Display & Brightness], then drag the slider.
text_image
01:08 High power consumptions Weather 31 Caleres People Settings Music Play Music Clock Google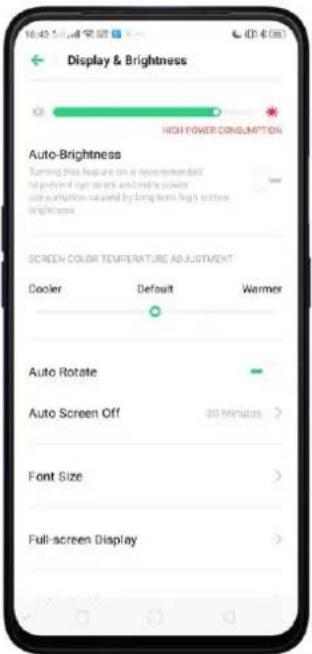
text_image
Display & Brightness HIGH POWER CONCLUSION Auto-Brightness Turning this feature on is discontinued is pushed by high screen and write a power consumption caused by long-term high screen brightness. SCREEN COLOR TEMPERATURE ADJUSTMENT Cooler Default Warmer Auto Rotate Auto Screen Off 30 Minutes Font Size Full-screen DisplaySet realme phone to adjust screen brightness automatically. Open Control
Center, then click A or go to[Settings] > [Display & Brightness], then toggle the
Auto-Brightness slider to green. If Auto-Brightness is on, your phone adjusts the screen brightness for current light conditions using the built-in ambient light sensor.
Use Night Shield. Go to [Settings] > [Display & Brightness] > [Night
Shield]. Drag the control point to adjust color temperature. The warmer you set your screen, the less blue light will be emitted from the display. When you use the realme phone at night, you can turn on Night Shield to cut down on eye strain and the sleeplessness you might get.
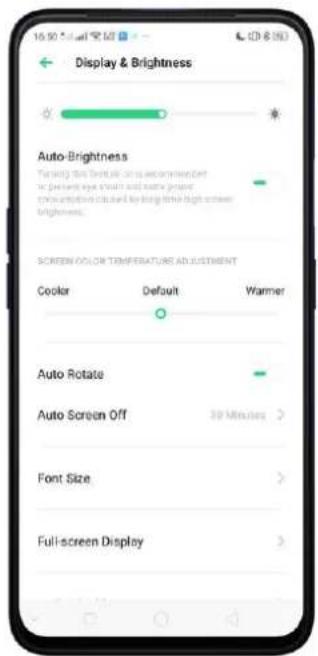
text_image
Display & Brightness Auto-Brightness Forward too default on a recommend in previous age chain and some proper production caused by being too high screen brightness. SCREEN COLOR TEMPERATURE ADJUSTMENT Cooker Default Warmer Auto Rotate Auto Screen Off 30 Minutes Font Size Full-screen Display
text_image
Night Shield Turn on Night Shield to reduce What Light From the window. When generating eye offers Scheduled Time Enable Now SCREEN COLOR TEMPERATURE ADJUSTMENT Cooler Default Warmer Adjust to fit your sound eye protection effect DISPLAY EFFECT Display in Color Display in Black and White Comfortable Nighttime Reading Turn on Display in Color to prevent your eye while matching the color of the worker, creating a white6.6. Change Auto-lock Time
By default, your device locks automatically after 30 seconds. To modify this, change the time yourself.
Change auto-lock time. Go to [Settings] > [Display & Brightness] > [Auto Screen off]. Options range from 15 seconds to 30 minutes.
Tip: The longer your display, the more the battery drains.
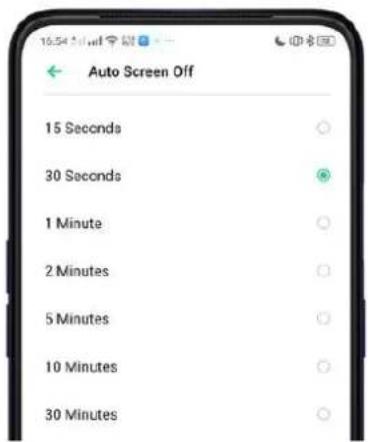
text_image
Auto Screen Off 15 Seconds 30 Seconds 1 Minute 2 Minutes 5 Minutes 10 Minutes 30 Minutes6.7. Change the Font Size
Change the font size according to your preference.
Change the font size. Go to [Settings] > [Display & Brightness] > [Font Size]. Drag the slider to the left or right to shrink or enlarge sample text, then you'll see your new text size immediately applied to the menu text in the upper-left corner of the screen. Tip: This will not affect the size of your icon text.
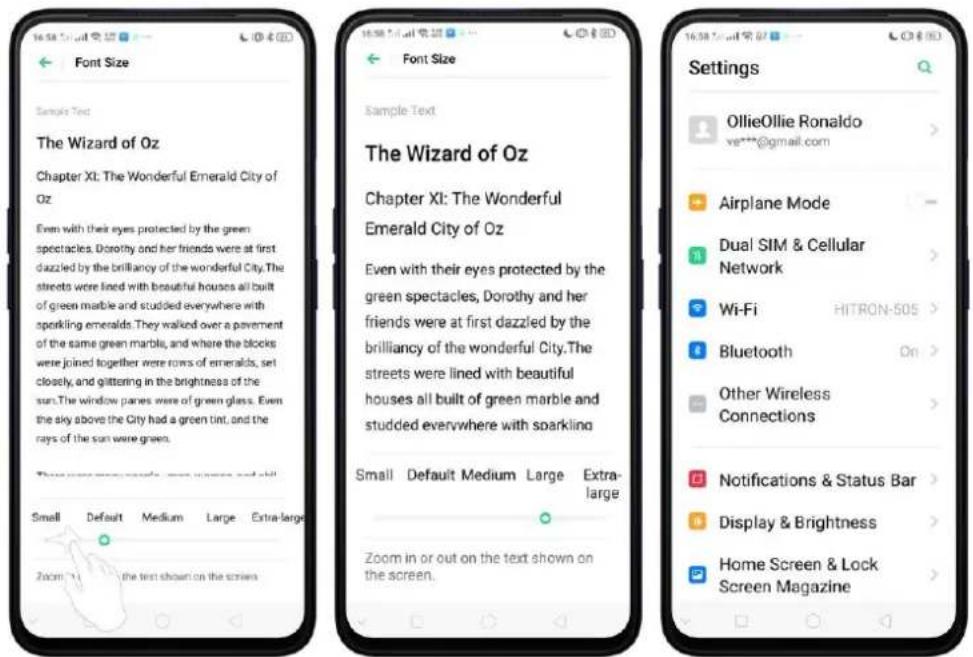
text_image
16:58:1000 Font Size Sample Text The Wizard of Oz Chapter XI: The Wonderful Emerald City of Oz Even with their eyes protected by the green spectacles, Dorothy and her friends were at first dazzled by the brilliancy of the wonderful City. The streets were lined with beautiful houses all built of green marble and studded everywhere with sparkling emeralds. They walked over a pavement of the same green marble, and where the blocks were joined together were rows of emeralds, set closely, and glittering in the brightness of the sun. The window panes were of green glass. Even the sky above the City had a green tint, and the rays of the sun were green. Sample Text The Wizard of Oz Chapter XI: The Wonderful Emerald City of Oz Even with their eyes protected by the green spectacles, Dorothy and her friends were at first dazzled by the brilliancy of the wonderful City. The streets were lined with beautiful houses all built of green marble and studded everywhere with sparkling emeralds. Small Default Medium Large Extra-large Zoom in or out on the text shown on the screen. Settings OllieOllie Ronaldo ve***@gmail.com Airplane Mode Dual SIM & Cellular Network Wi-Fi HITRON-505 Bluetooth On > Other Wireless Connections Notifications & Status Bar > Display & Brightness > Home Screen & Lock Screen Magazine6.8. Keyboard and Input Method
6.8.1. Customize the Look of the Keyboard
Make your own keyboard by customizing the font and appearance.
Go to [Settings] > [Additional Settings] > [Keyboard & Input Method] > [TouchPal for realme] > [Look & Feel].
Adjust the size of candidate words. Click [Candidate Size], then drag the control point to change font size to small, normal or large.
Customize keyboard appearance. Click [Candidate Size], or click 🤒 on the on-screen keyboard > [Resize], then drag the control arrow to adjust keyboard height, width, and position.

text_image
Candidate size A Touchpad Touchp TouchPal q w e r t y u i o p a s d f h j k l ◇ z x c v q m 12#
text_image
New Message Cancel Recipient SMS Messages OK Cancel Yes No Looped NewFlow Off Friends Help Back Helps6.8.2. Keyboard Layout
In addition to the default keyboard style, the undocked, one-handed, and split keyboard, your screen makes typing with both thumbs a breeze. You can use "Undock" feature to position the keyboard anywhere on screen, or narrow the keyboard with one-handed mode, or split the keyboard in half.
To change the keyboard layout, click 🤨 on the on-screen keyboard, then click Layout.
• Normal keyboard. The default keyboard layout on your phone.
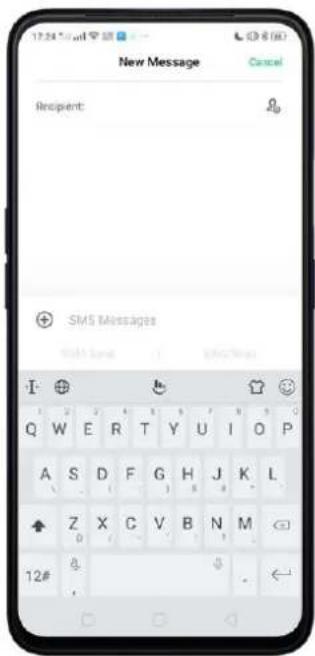
text_image
New Message Cancel Recipient: SMS Messages 12# 8- Undocked keyboard. The keyboard becomes suspended and can be moved around on the screen. Click 🔒 to drag the keyboard to wherever on the screen that is most comfortable or convenient to you.
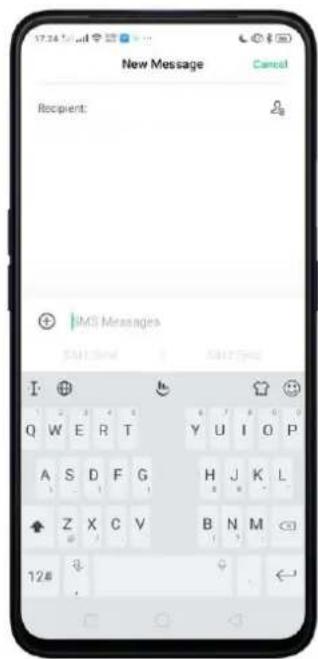
text_image
New Message Cancel Recipient: + |MCI Messages SUI1 New SUI2 New I Q W E R T Y U I O P A S D F G H J K L Z X C V B N M 12#• One-handed keyboard. Shrink the keyboard so you can type with one hand
easily. Click ☐ or ▶ to adjust the keyboard left or right, depending on your preferred hand usage.

text_image
New Message Cancel Recipient: OK ZIP SMS Messages Body Text SMS Email I Q W E R T Y U I O P A S D F G H J K L Z X C V B N M 12# 0
text_image
12:24:5:41 完成 New Message Cancel Recipient: 0 OK EMS Messages OK OK OK OK- Split keyboard. The keyboard will divide into two sections for easy thumb typing.

text_image
New Message Cancel Recipient: SMS Messages Q W E R T Y U I O P A S D F G H J K L Z X C V B N M <0 12#6.8.3.Trends
With TouchPal's Trends feature, you can download the buzzwords, change the keyboard theme and font, and get the latest headlines and games.
Get the latest trends. Click 🤒 on the on-screen keyboard, then click Trends.
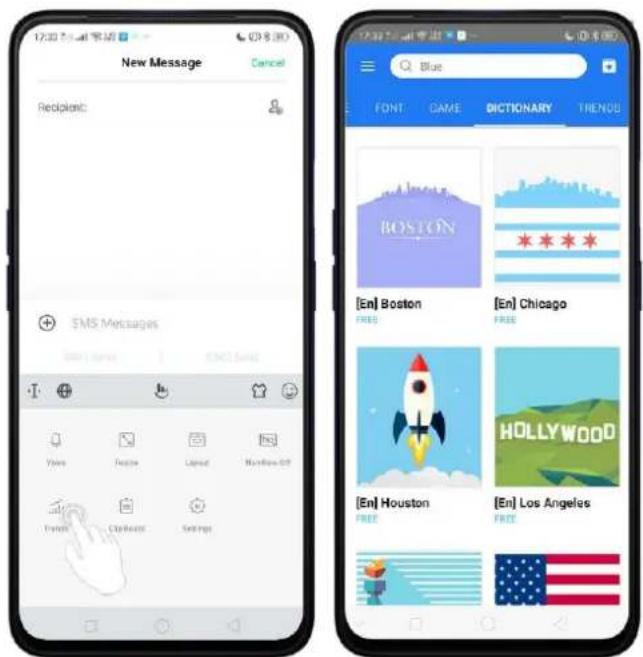
text_image
12:30 AM New Message Cancel Reciplant: SMS Messages [En] Boston FREE [En] Chicago FREE HOLLYWOOD [En] Houston FREE [En] Los Angeles FREE6.8.4. Keyboard General Settings
Your phone is preloaded with TouchPal Keyboard. You can change the keyboard settings directly on your phone. click 🔊 on the on-screen keyboard, then click [Settings] > [Look & Feel].

text_image
Look & Feel Keypress popup Normal Key long-press delay 300 ms Sound & Vibration Keypress sound Volume: Mutad Keypress vibration Keypress vibration duration: Off Candidates Candidate Size Customize keyboard height, width and position Classic style candidates Show more than 3 candidates on top Advanced Expand textbox to full screen In landscape mode, expand textbox to maximum, fiding the rest of the screen| Setting | Effect |
| Keypress popup | A popup bubble displays when you click a key. |
| Key long-press delay | Adjust the long-press delay time ranging from 200ms to 1000ms. |
| Keypress sound | Adjust the key press sound, or use the system volume. |
| Keypress vibration | Adjust the key press vibration duration, or use the system default setting. |
| Candidate Size | Change the size of candidate words, and adjust keyboard height, width, and position.See Customize the look of the keyboard. |
| Classic style candidate | Show more than three candidate words on top. |
| Expand textbox to full screen | Keyboard opens as full screen in landscape mode. |
| Expand textbox to full screen | Keyboard opens as full screen in landscape mode. |
6.9.Set up Startup Manager
Startup Manager helps you to manage system startup entries. You can choose what apps to start first when your phone boots up to meet your using habits.
* Too many self-starting apps may cause a low startup or operating speed.
Set up Startup Manager. Click Phone Manager on the Home Screen, then click [Privacy Permissions] > [Startup Manager]. Toggle the sliders to white if you don't want to start apps when phone boots up.

text_image
17:46:50 AM Prize Manoo Theme Store PUBI MOBILE File Manager Game Space Smart Party Apache Video Tools Wormar CosmoSia 81 OpenUp Clean Up Storage Privacy Permissions Wise Scan Payment Protection Routine Test Access Helped Startup Manager Blocking Records It is recommended that you turn the following settings on. You may not be able to retain messages when these settings are locked off. CosmoSia Startup on best and in background allowed Duo Startup on best and in background allowed Facebook Startup on best and in background allowed WeChat Startup on best and in background allowed It is recommended that you turn the following settings off. The system will manage the data power when these settings are turned on. Drive Startup on best and start up in background allowed Falcon SquadTip: For apps that receive real-time messages, such as Facebook, Messenger, WhatsApp, and Twitter, it is best to allow them running in the background.
View the apps that had been blocked from starting in the background. Click Blocking Records.
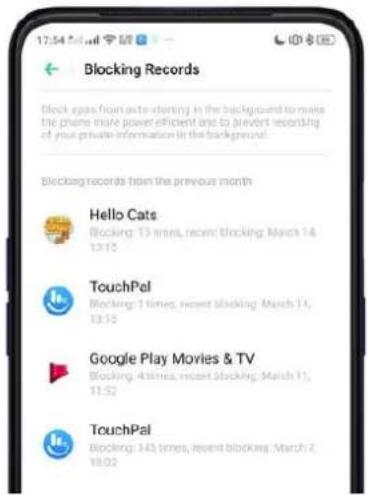
text_image
Blocking Records Block space from active planting in the background to make the phone more power efficient and to prevent recording of your private information in the background. Blocking records from the previous month Hello Cats Blocking: 13 times, recent blocking: March 14, 12:15 TouchPel Blocking: 1 times, recent blocking: March 14, 13:15 Google Play Movies & TV Blocking: 4 times, recent blocking: March 11, 11:52 TouchPal Blocking: 145 times, recent blocking: March 2, 18:026.10. Clone Apps
Clone Apps allows an app to run two accounts on a single phone.
To turn on [Clone Apps], go to [Settings] > [Clone Apps], choose an app and turn on [Enable App Cloning]. A new copy of this app will be generated on the homescreen after Clone Apps is enabled. This copy and its original app can run simultaneously without affecting each other.
- "Clone Apps" works only if both the app itself and the phone supports it. If a cloned app does not work properly, it means that the function or operation is not supported by the app or phone.
- "Clone Apps" currently does not support data transfer between a cloned app and a computer.
- "Clone Apps" currently does not support to run more than two app clones simultaneously.

text_image
Clone Apps Facebook WeChat Enable "Clone Apps" Enable App Cloning Rename Cloned App Facebook(Claims) Facebook Facebook(Claims) 3. "Clone Apps" requires the support of both the app itself6.11. Manage Default App
What is Default App? If you've installed two different applications that essentially do the same thing, for example, Google Chrome and Firefox Web Browser, you'll likely be presented with a pop-up menu when trying to open a web page, asking you which application you'd like to complete the action with. You can manage your default app and never be bothered when performing that action again.
Manage Default App. Go to [Settings] > [App Management] and click [Default App]. Take [Browser] as an example, there are three apps and you can choose one of them to be the default one. You are suggested to use the original apps to get the best performance.

text_image
App Management Default App APP LIST CosmoSia Duo Facebook Eldence Sound Default App Assistive App and Voice Input Homesc screen Messages Phone Browser Camera System Default System Default System Default System Default No Default (Always Ask) Browser Chrome Opera No Default (Always Ask)6.12. Gesture & Motion
Gestures
realme smartphone is designed to understand gestures. You can use gestures such as tap, swipe, drag, and spread to operate your phone.

natural_image
Four hand icons showing a blue square button with finger pressing, followed by a star icon and a double-headed arrow (no text or symbols)To set up complex gestures for specific functions, go to [Settings] > [Convenience Aid] > [Gesture & Motion].
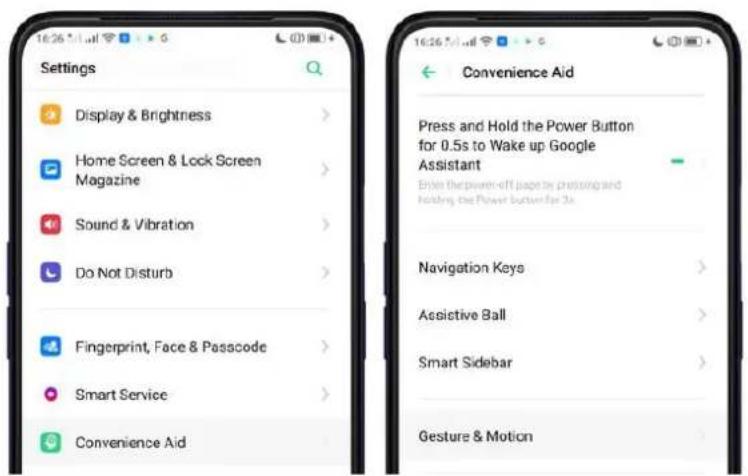
text_image
Settings Display & Brightness Home Screen & Lock Screen Magazine Sound & Vibration Do Not Disturb Fingerprint, Face & Passcode Smart Service Convenience Aid 16:26:54:11:00 16:26:54:11:00 16:26:54:11:00 Convenience Aid Press and Hold the Power Button for 0.5s to Wake up Google Assistant Brize the power off juice by pressing and holding the Power button for 3s Navigation Keys Assistive Ball Smart Sidebar Gesture & MotionScreen-off Gestures
To set up screen-off gestures, you need to turn it on first.
Double tap to turn screen on: Turn it on to wake up your locked screen by double-clickiing on the screen.
Draw O to start camera: When on lock or sleep mode, you can draw O on the locked screen to open Camera app.
Draw V to open torchlight: When on lock or sleep mode, you can draw V on the locked screen to open the torchlight.
Music control: When on lock or sleep mode, you can draw || to pause/play a track, or draw < or > to switch the track when the screen is off.
Add more screen-off gestures: Other 7 options are Draw ^, Slide up, Slide down, Slide left, Slide right, Draw M and Draw W. Choose one to unlock the phone, call someone or start an app.
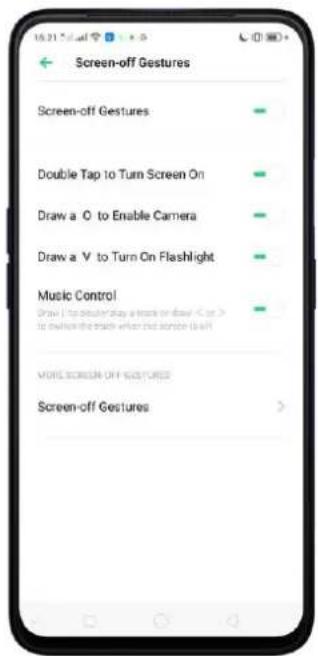
text_image
Screen-off Gestures Screen-off Gestures Double Tap to Turn Screen On Draw a O to Enable Camera Draw a V to Turn On Flashlight Music Control Draw a V to enable the play a track on flash < 50 > to render the track when the second is off More screen-off gestures Screen-off Gestures
text_image
Screen-off Gestures STEP 1/2 Draw A Slide Up Slide Down Slide Left Slide Right Draw M Draw W3-Finger Gesture
Take a screenshot. Swipe down the screen with three fingers.
Use Split-screen. Under the interface of an app, swipe up the screen with three fingers to enter split-screen mode.
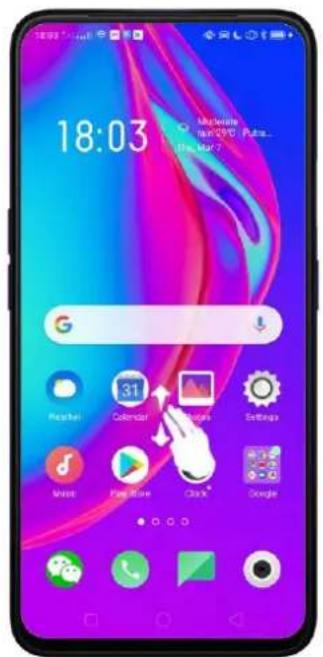
text_image
18:03 Macronate for QPO Push... For Mar 7Motion
The motion-sensing technology is used in realme smartphone. Use it to let your phone response to motion.
Smart call
Auto call when place at the ear: Before you can use auto call, you need to set the default SIM card for calling. Go to a contact detail, call detail, message conversation or info interface, put the phone near your ear and your phone will automatically call that specific person.
Auto answer when near the ear: This function lets your phone to answer any incoming calls automatically when putting the phone near your ear.
Switch from speaker for calls: Use it to automatically switch from speaker to receiver when you put the phone near your ear during phone calls.
Flip to mute incoming calls: Use it to silence the ringer by turning the phone over on the table or other flat surfaces.

text_image
Smart Call Auto-call When Placing Phone to Ear Available on Contact Details, Call Details, and Message Conversations convicts. Auto-answer When Phone is Near Ear Mode Switching During Calls Automatically switches audio from speaker to receiver when the phone is held near your ear Flip to Mute Incoming CallsMistouch Prevention Mode
Turn it on to prevent incorrect operations if the Lock Screen is covered.
Take selfies
Open Camera app and switch to the front camera. Click 📷 at the upper right corner to open the setting of the camera then enable Gesture to Take Photo. Pose
the same hand gesture towards the camera, once the camera captures that, it will take a photo automatically after two seconds. You can change your pose and expression within this two seconds.
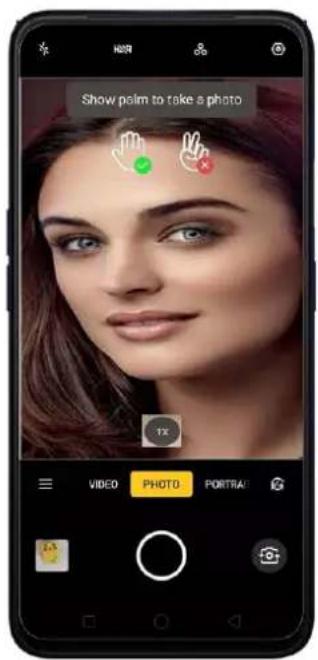
text_image
Show palm to take a photo VIDEO PHOTO PORTRAI
text_image
Camera Photo Ratio 43 > Timer Off > Touch to Take a Photo Gesture to Take Photo Volume Button Starter > Grid Shutter Sound Location Flip Selfie All Geese Recognition Watermark6.13. Preset Device On/Off Time or Automatic On/Off
The feature helps you to automatically turn on or off your realme smartphone at the scheduled time you specify – for example, you can fall asleep while listening to your favorite music without having to worry about turning off your phone. It also gives you different ways to schedule the events for your needs, such as daily, weekly and only once.
Turn on Device ON/OFF Preset. Go to [Settings] > [Additional Settings] > [Automatic On/Off], then toggle the sliders to green as needed.

text_image
Additional Settings Download Management > User Guide > Automatic On/Off > Device & Privacy > SIM Toolkit >
text_image
Automatic On/Off PRESET POWER ON 07:00 Every Day AUTO-POWER OFF 23:00 Every DaySet when to turn on or off the phone automatically. Click the time, drag your finger across each column to change the time, then click Save.
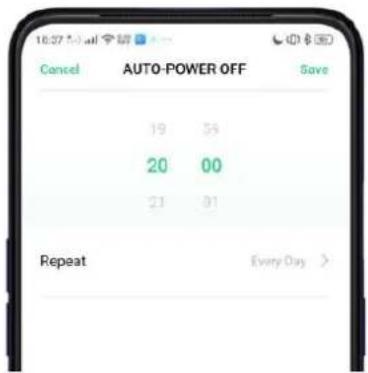
text_image
16:37 50 all Cancel AUTO-POWER OFF Save 19 54 20 00 21 81 Repeat Every Day >Repeat the event on certain days. Click the time, click Repeat, and then choose the days.

text_image
Repeat Every Sunday ✓ Every Monday ✓ Every Tuesday ✓ Every Wednesday ✓ Every Thursday ✓ Every Friday ✓ Every Saturday ✓6.14. App Display in Full-screen
Adjust your app layouts. Go to [Settings] > [Display & Brightness] > [Full-screen Display] toggle the sliders to green if you want the apps to display in full-screen. Or you can open an app, then click "Tap full-screen display." App will restart when you turn on this feature.

natural_image
Exterior view of a modern office building (no signage)Note: Turning on "Full-screen display" will improve your experience, but it may cause display issues due to incompatibility or other reasons.
7. Apps
7.1. Phone
7.1.1 Make and Answer Phone Calls
Make a call
To make a call and talk to your friends, you can manually enter a phone number on the dialer, choose a number on your Contacts or Favorites, or click one of the recent calls.
Note: The signal indicator at the upper-left corner of the screen shows whether you're in range of your operator's network and can make and receive calls. The more bars, the stronger the signal.
Dial the number you want to call. Click Phone, click the keypad to enter the number, then choose the SIM you want to make a call (if you are 2 SIM cards). Click ✗ if you made a mistake. You can also copy a phone number and open the keypad, then click the number to paste it to the keypad.
Besides, if you're not sure what the exact phone number is, you can quickly search the contact by dialing the numbers that contain the contact's name or initial letters on the keypad. For example, if you want to call Ollie, click "655" and you'll see the

text_image
Phone Contacts Favorites Create New Contact Save to Existing Contact 1800 01 1 2 3 QQ ABC DEF 4 5 6 GHI JKL MND 7 8 9 PONS TUV WXYZ * 0 # SIM1 SIM2 Phone Contacts Favorites Office WIND/700408 655 1 2 3 QQ ABC DEF 4 5 6 GHI JKL MND 7 8 9 PONS TUV WXYZ * 0 # SIM1 SIM2contact.
Call someone on your contacts list. Click Contacts and choose a contact, then click the phone number to make a call. You can also use Search feature to find a contact, see Search.
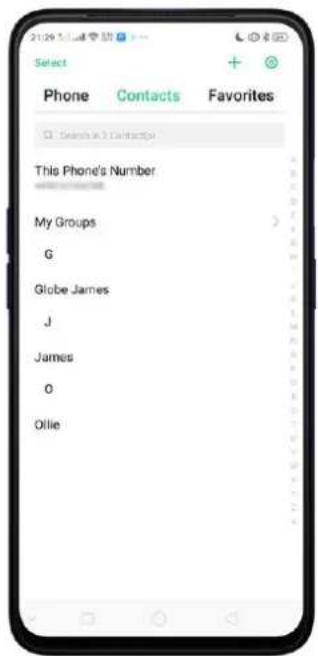
text_image
Select Phone Contacts Favorites Search in 3 Contacts This Phone's Number My Groups G Globe James J James O Ollie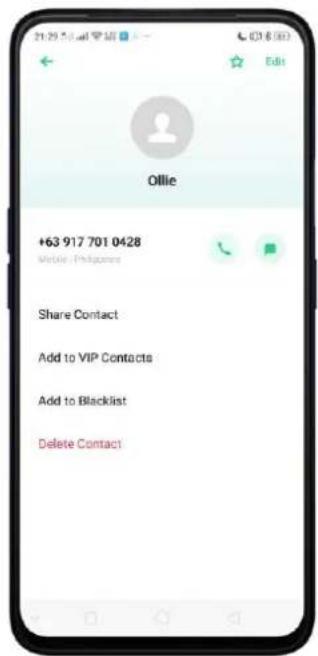
text_image
+63 917 701 0428 Online Philippines Share Contact Add to VIP Contacts Add to Blacklist Delete ContactCall someone on your favorites list. Click Favorites and choose a contact. To add favorites, click +.
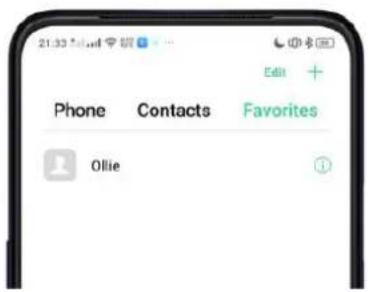
text_image
21:33 Phone Contacts Favorites OllieCall someone you've recently called or who has recently called you. Click
Phone, and you'll see the recent calls. Click a number to make the call. Click ⓘ to get more info about the call, or the caller. Click "All" to see all, only missed, or only blocked calls.

text_image
2023年5月 All Calls Phone Contacts Favorites Ollie 0417 798 0428 +63 917 546 2429 First points +1 915-703-6529 Texas 09777149252 First points 1 2 3 GQ ABC DEF 4 5 6 GM JUL MMG 7 8 9 PORS TUV WXYZ ¥ 0 # SM1 GMC
text_image
Ollie Outgoing Not Connected Missed Range for 15s +63 917 701 0428 Mobile (Philippines) Share Contact Add to VIP Contacts Add to Blacklist Delete Call Log(s)
text_image
All Calls All Calls Missed Calls Blocked Calls Philippines +1 915-703-6529 Notes 09777149252 Philippines 1 2 3 GND NAD SNU 4 5 6 JNJ XL NAD 7 8 9 PCBS RUY WUKZ * 0 # OK OK #Answer or reject a call
When someone calls you, your phone rings and displays the caller's information, if available.
Answer a call. Click Answer. If the phone is locked, click Slide up to answer.
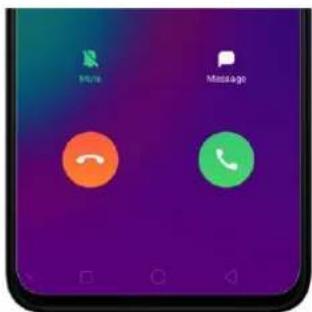
text_image
Mobile Message
text_image
Reject Slide up to answer Message- If you're listening through the headset, you can click the mic button to answer.
Silence a call. Click Mute, or press the Sleep/Wake button or either of the volume buttons once to stop the phone from ringing or vibrating.
Reject a call. Click Reject, or press the Sleep/Wake button twice quickly.
Respond with a text message instead of answering. Click Message, then choose a reply or click Customize to reply with your own words. To create your own default replies, go to [Settings] > [System Apps] > [Call] > [Respond with SMS]. Click a reply and edit the message.
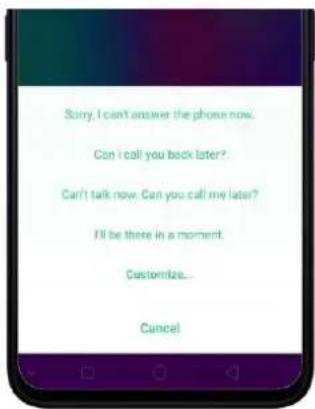
text_image
Sorry, I can't answer the phone now. Can I call you book later? Can't talk now. Can you call me later? I'll be there in a moment. Customize... CancelWhile you're on a call
While on a call, call options will show up on your screen.

text_image
21:43 Sel. All Ollie 00:27 780 S### Philippines 15:00:01 Hold Add Call Multi Speaker ReloadTo
Do this
Get contact info.
Click Contacts.
Put a call on hold.
Click Hold.
Mute the microphone.
Click Mute. The caller can't hear you when you are on mute, but you can still hear the caller. Click Mute again to cancel it.
Activate Speakerphone.
Click Speaker.
Use the dial pad to enter information. Click Dial pad.
Make a second call during a call.
Click Add call and make a second call. The first call will be put on hold. Click the phone number to switch back to the first call and put the second call on hold. Click Merge calls to merge the two calls, so all three of you can talk and hear each other. See Conference calls.
Respond to a second call, do one of the following:
• To reject the call, click Reject.
• To hold the first call and answer the new call, click Answer.
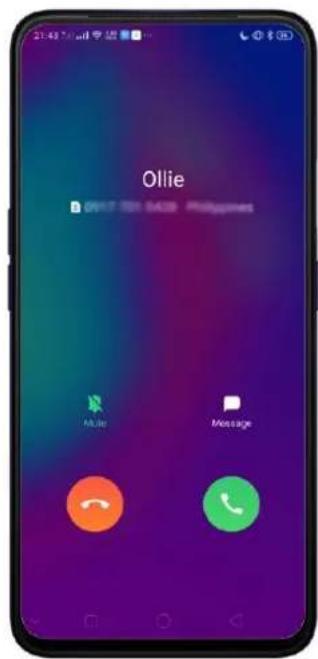
text_image
21:43 AM Ollie DR17 10 SACS Philippines Multi MessageUse other features while on a call. Click the Home button or swipe up the middle bottom to return home and still do other things. Click the green status bar on the top of the screen to return to the call.
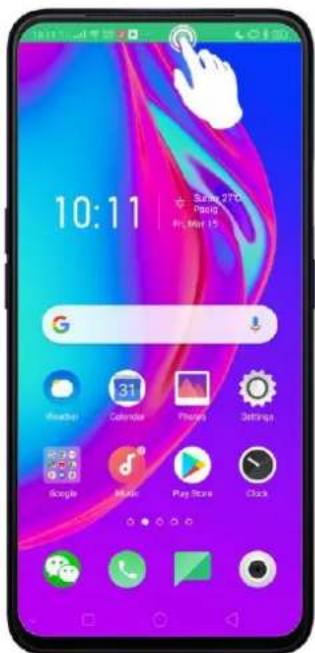
text_image
10:11 Sun 270 mail Hi Mar 157.1.2. Conference Calls
A conference call lets you talk to more than one person at a time. You can merge up to six calls including the host for a phone conference.
Note: Please contact your network operator to activate conferencing services first. Make a conference call. Do the following:
- Make a call.
- Tap Add Call and make another call. The first call will be put on hold.
- Tap Merge calls. The calls are merged onto one line and everyone can hear each other.
- Repeat the second and third steps to add more calls to the conference.
7.1.3. Block Calls
Block feature helps prevent unwanted phone calls. You can also add numbers to Block calls. Go to [Settings] > [System Apps] > [Call] > [Block] > [Call Blocking], or go to [Settings] > [Security] > [Anti-harassment/Fraud]. Click [Block Calls], you'll see several options available for blocking incoming calls:
• Block All Incoming Calls
• Block Unknown Incoming Calls
• Block Unknown Numbers by Location of Origin
• Block One-ring Incoming Calls
• Block Calls from Hidden Numbers

text_image
Call Blocking SIM 1 SIM 2 You can view all blocked calls by following "Blocked Calls" In a bit named 'Too to How' Block All Incoming Calls Block Unknown Incoming Calls Block One-ring Incoming Calls Block Calls from Hidden Numbers
text_image
Security SOS Emergency SOS HAPPAGMENT AND FRUIT PREVENTION Anti-harassment/Fraud Smart SMS Message Pseudo Base Station Blocking Bluetooth 1 Pase Save Station PRIVACY PROTECTION App Encryption Kid Space Private Safe OTHER SECURITY FEATURES Secure Keyboard The system automatically switches to the OPPO Secure Keyboard which you are opening sensitive information such as passwords. OPPO Secure Keyboard does not record your input, connected to the following, or autotargetable order. This version has had your input is not backed.You can also click on the contact and add them to blacklist to block specific phone numbers from calling.

text_image
Ollie +63 917 701 0428 Share Contact Add to VIP Contacts Add to Blacklist Delete ContactNote: The unknown number refers to an unsaved real phone number, and your phone is able to show its number and location; while the hidden number means the caller's number or location is not accessible.
Manage blocking of calls per SIM. While on the Call Blocking screen, you can click SIM2 and you will have an option "Rule for SIM1 Use" as a default. You may customize it by toggling to white.
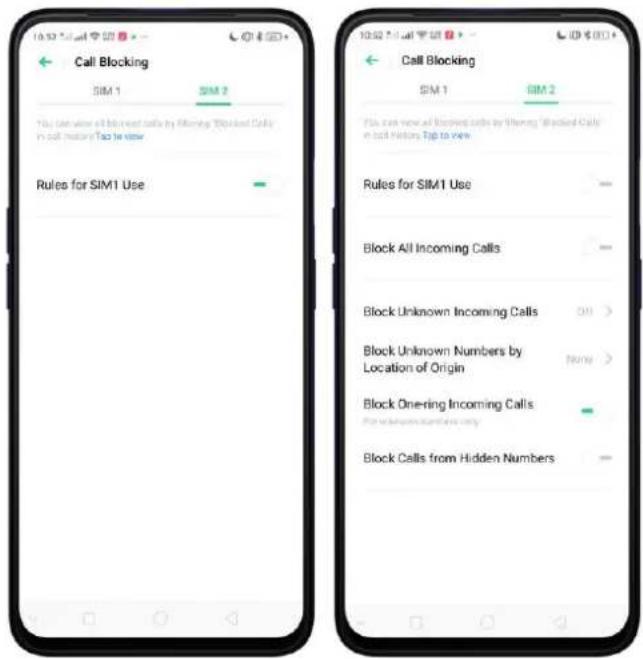
text_image
Call Blocking SIM 1 SIM 2 You can view all blocked calls by Slaming "Blocked Call" in all history. Top to view Rules for SIM1 Use Call Blocking SIM 1 SIM 2 You can view all blocked calls by Slaming "Blocked Call" in all history. Top to view Rules for SIM1 Use Block All Incoming Calls Block Unknown Incoming Calls ON > Block Unknown Numbers by Location of Origin None > Block Onering Incoming Calls Block Calls from Hidden NumbersAdd a contact or a phone number to the blacklist. Click Phone, then click Contacts. Choose a contact, then click Add to Blacklist. You can also go to Go to [Settings] > [System Apps] > [Call] > [Block] > [Blacklist] click Add, or go to [Settings] > [Security] > [Anti-harassment/Fraud] > [Blacklist] click Add, then Enter Number or Select Number.

text_image
10:59 AM 安装 Edit Ollie Share Contact Add to VIP Contacts Add to Blacklist Delete Contact Anti-harmassment/Fraud Call Blocking Block warning calls by side Block Messages Block messages by side Blacklist You must receive any call or what messages from blacklisted members. Whitelist Calls and messages from who impacted members will not be blocked! Block Notifications Show All Blocked Call Notifications Blacklist No black lists nonusers Enter Number Select Number CancelYou can also add contacts or phone numbers to the whitelist, which calls and messages from these numbers will not be blocked.
7.1.4. Emergency Calls
What is emergency Number?
Emergency numbers are numbers of emergency services which provide immediate help during Medical emergency, Threat to life, Fire, Accidents.
In many countries, the public telephone network has a single emergency telephone number (sometimes known as the universal emergency telephone number or occasionally the emergency services number) that allows a caller to contact local emergency services for assistance.
You can make an emergency call even if you do not have a SIM card installed on your realme smartphone.
Make an emergency call. Click Phone, click keypad and dial the number, then click

. If your phone is locked with a passcode, click Emergency Call, then dial the emergency number.
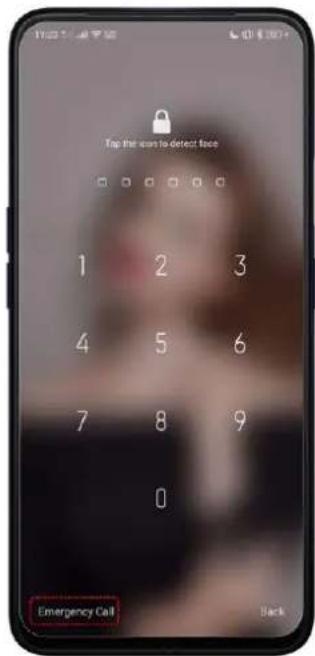
text_image
Tap the sun to detect face 1 2 3 4 5 6 7 8 9 0 Emergency Call Back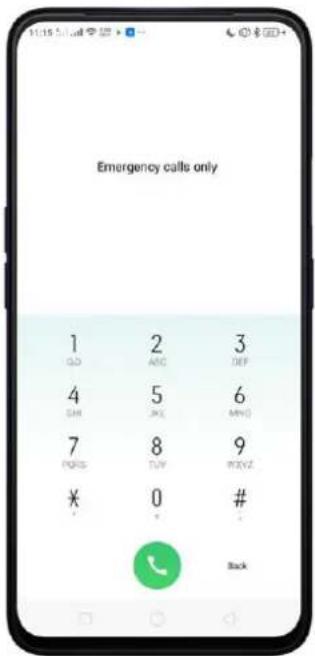
text_image
Emergency calls only 1 2 3 OLD ANC DEF 4 5 6 SHI SHO MHO 7 8 9 PORTS TUY BXYZ * 0 # Back7.1.5. Emergency SOS
Emergency SOS is a feature that helps you dial emergency numbers and send out SOS messages quicker and more conveniently when in time of need or other fortuitous events.
To use the Emergency SOS feature, go to [Settings] > [Emergency SOS] > Read terms and conditions > [Agree] or [Cancel] if you don't accept the terms & conditions.

text_image
11:19 AM Security SOS Emergency SOS HOMASMENT AND FREE PREVENTION Anti-harassment/Fraud Block 1 SMS Message Pseudo Base Station Blocking Blocked 1 Safe Base Station PRIVACY PRODUCTION App Encryption Kid Space Private Safe OTHER SECURITY FEATURES Secure Keyboard The system is automatically switches to the OPIO Secure Keyboard when you are entering a reliable information such as password. OPIO secu Emergency SOS 1. "Emergency SOS" is a feature aimed to help you make emergency calls and send out SOS messages more conveniently 2. When "Emergency SOS" is enabled, you can try to fail the emergency number by repeatedly processing down the Power button for 5 times. 3. You can set up your emergency contacts in "Emergency SOS - Emergency Contact Number" My Emergency Contacts'. Following an SOS call to your emergency contact, you can choose to send the emergency contact an SOS message that can contain your location, scene pictures taken by the front and rear cameras, and some recording. 4. When you move over 200m in one minute, your new location will be updated to your emergency contacts. 5. To stop sending your updated locations to your emergency contact continuously, you can tap the status bar and disable "Emergency SOS". 6. Note: Whether your SOS messages can be cancel or add it. AgreeTo add emergency number/s. Click [Emergency Numbers] then click ^+ .
Add Emergency Contact. You can choose from the list on your contacts, click Add. You can add up to 3 contacts. Emergency numbers specific on your region is also pre-added.
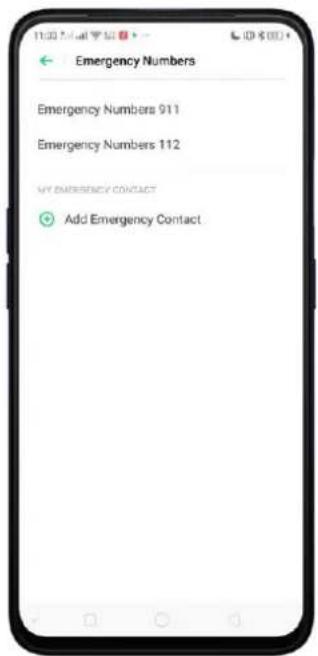
text_image
Emergency Numbers Emergency Numbers 911 Emergency Numbers 112 MY EMERGENCY CONTACT Add Emergency Contact
text_image
Emergency Numbers Emergency Numbers 911 Emergency Numbers 112 MY EMERGENCY CONTACT Ollie +630177018428 Add Emergency ContactTo delete or change the emergency contacts, just click ☑ then click Delete Contacts.

text_image
Emergency Numbers Emergency Numbers 911 Emergency Numbers 112 My Emergency Contact ○ Offie ● Add Emergency Contact Delete Contacts CancelPress the Power Button Repeatedly for Emergency Call. Toggle [Press the Power Button Repeatedly For Emergency Call] to enable pressing the power button 5 times in succession to initiate an SOS emergency call.
Make an emergency call. Just press the power button 5 times in succession.

text_image
Emergency SOS Emergency Numbers Press the Power Button Repeatedly for Emergency Call Press the power button & links to location when to include an Mio emergency call. Auto Dial the Default Number When initiating an emergency call with the Power button your phone will call the default number you can also contact them. Send SOS Message After an Mio emergency call, you can call to My EMERGENCY CONTACT at SIDS (exchange that moves your current location.
text_image
18:03 Moderate in DVD - Putra... May 2—Press 5x
Auto Dial the Default Number. Toggle [Auto Dial the Default Number] to green and a 3 second countdown will be enabled. A 3S countdown starts once you initiate an SOS emergency call. If nothing takes place during the countdown, the default number will be called.
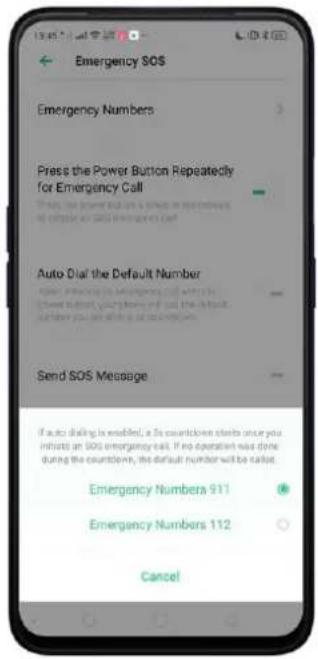
text_image
Emergency SOS Emergency Numbers Press the Power Button Repeatedly for Emergency Call Auto Dial the Default Number Send SOS Message If auto driving is enabled, a 3x countclone starts once you initiate an SOS emergency exit. If no operation was done during the countclone, the default number will be called. Emergency Numbers 911 Emergency Numbers 112 CancelSend SOS Message. Send pictures and audio recordings. Toggle [Send Pictures of Surroundings] or [Send a 5s Audio Recording of the Surroundings] to enable. (Note: These two will only show after enabling Send SOS Message).

text_image
Emergency SOS Emergency Numbers Press the Power Button Repeatedly for Emergency Call Press the power button 3 timed at substation to include an 50% emergency dial. Auto Dial the Default Number When initiating an emergency call with the Power button, your phone will call the default number you will offer a 2x resolution. Send SOS Message Send Pictures of Surroundings Send a 5s Audio Recording of the Surroundings After an SOS emergency call, you can send to MY EMERGENCY CONTACT on SOS message that sends your current locationMy Emergency Contact. After an SOS emergency call, you can send to MY EMERGENCY CONTACT an SOS message that shows your current location.
Note: Please note that sending SOS message accurately still depends on your location, environmental factors, network connectivity, if GPS is available and the conditions of you and your emergency contact's devices (including but not limited to battery level). Also, SOS messages might generate additional charges. Please contact your carrier for details.
Privacy concerns. Once Emergency SOS is activated, this will automatically be permitted to:
- Access your location.
- Read, write, or delete external storage.
- Read your phone status.
- Take photos.
- Record sounds.
- Read your contacts.
7.1.6. Carrier's Call Settings
Your device includes several calling features such as Call Forwarding, Call Waiting, Voicemail, and more.
Set up calling features. Go to [Settings] > [System Apps] > [Call] > [Carrier Call Settings].
- Voicemail: When you're away or can't get to the phone, your Voicemail does the answering for you. Callers can leave recorded audio messages to you, and you can view, listen to, and manage the messages.
- Fixed Dialing Numbers: Add numbers to the FDN list, and when activated, FDN restricts outgoing calls to only those numbers listed, or to numbers with certain prefixes.
- Call Forwarding: An incoming call will be redirected to another telephone
number where the desired called party is able to answer. Notice that appears on the status bar.

- Call Barring: Certain types of outgoing calls (such as international calls) and/or incoming calls will be restricted.
- Additional Settings: Includes your SIM number/s and Call Waiting where when enable makes you hear short beeps if someone calls you while you're on a call.
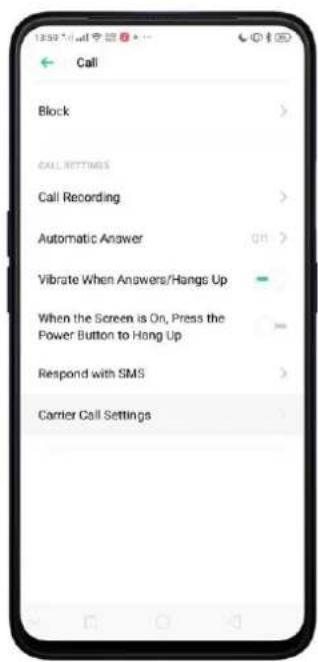
text_image
Call Block CALL SETTINGS Call Recording Automatic Answer Vibrate When Answers/Hangs Up When the Screen is On, Press the Power Button to Hang Up Respond with SMS Carrier Call Settings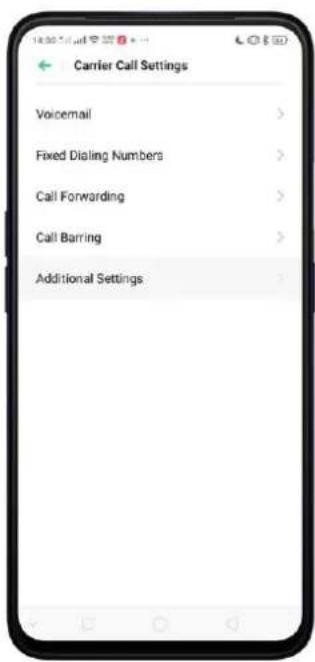
text_image
Carrier Call Settings Voicemail > Fixed Dialing Numbers > Call Forwarding > Call Barring > Additional Settings >
text_image
SIM2 My Number I can do you know. I will wait for an outgoing member in coming fields Call Waiting Done up call, mostly from it there is an incoming call7.5.Message
7.5.1. Send and Receive Messages
You can send and receive text messages anytime you're in range of the cell network. Depending on your phone plan, you may be charged for messages you send or receive.
Send a new message. Click +, then enter a phone number or name. Contacts matching what you've typed will appear below. You can also use the Call app then click Contacts and choose a contact from your contacts list. Type a message then choose the SIM you want to send it or click 🏠 if you only put one SIM.
Tip: As you type, click ⊕ next to the text field to add an attachment.
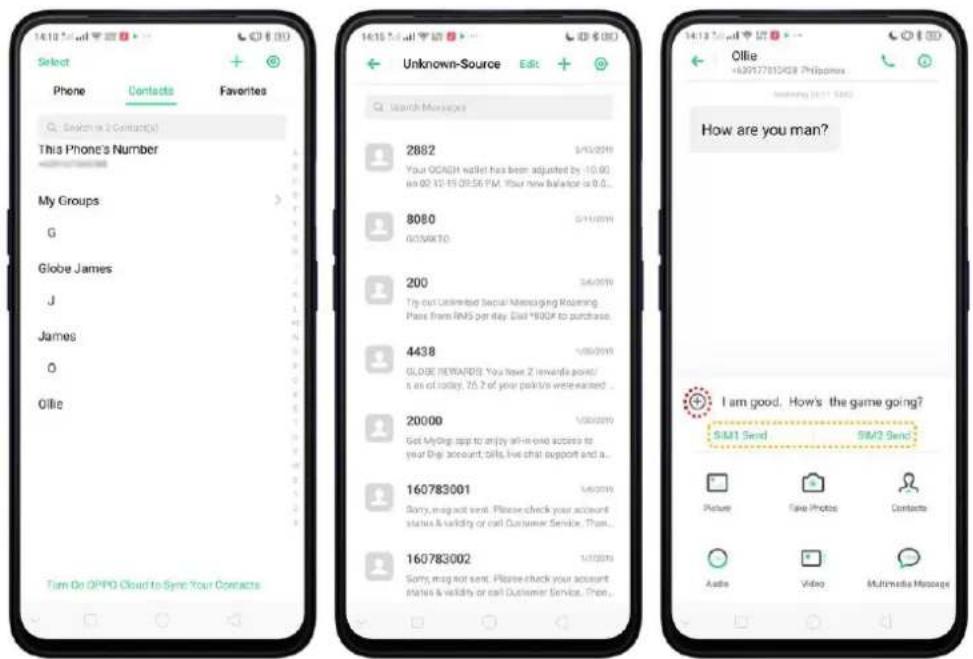
text_image
Select Phone Contacts Favorites This Phone's Number My Groups G Globe James J James O Ollie Tam On OPPO Cloud to Sync Your Contacts Unknown-Source Edit Search Messages 2882 5/03/2016 Your OCACH wallet has been adjusted by 10.90 as 02 12:15 09:56 PM. Your new Balance is 0.0... 8080 5/11/2016 GO/SM410 200 5/6/2016 Try out Unlimited Social Messaging Newing Pass from RMS per day Dial 100% to purchase... 4438 5/05/2016 GLOBE REVAIDS: You have 2 rewards point/ s as of today, 75.2 of your patients were earned ... 20000 5/05/2016 Got My Dog app to enjoy all-in-one success to your Dog account, Skills live chat support and a... 160783001 5/6/2016 Sorry, may not send. Please check your account status & validity or call Customer Service. Then... 160783002 5/17/2016 Sorry, may not send. Please check your account status & validity or call Customer Service. Then... Ollie +39177813438 Philippines Interesting (4:11: SMO) How are you man? I am good. How's the game going? SIM1 Send SIM2 Send Picture Case Photos Contacts Audio Video Multimedia MessageSend a message to multiple people. Click +, then enter multiple recipients, or click Contacts and tick all contacts you wish to include in the group message, then click Add.
Read and reply to a new message. Click the notification after scrolling the Control Center. When phone screen is locked, just unlock phone and go to the message app.
Read and type your reply then choose the SIM you want to send it or click if you only put one SIM.

text_image
14:27 Fri March 13 "BVI" (BlackChange, Wiley P.S. The March 8) HTTPS-NS Cellular Data Single Address Mobile Bluetooth Local Services Bluetooth Anyone Store * Notification Center Music Charlie Puth - Unknown store Messages Home Ollie Hey that! Google Play Store Disabled app "Robbery Bob" may be harmful OPPO Share
text_image
14 26 Fri, Mar 15 No service | GLOBE Messages 10w Ollie Hey man Google Play Store 12h Disabled app "Robbery Bob" may be harmfulTip: The Messages icon on the Home Screen shows the total number of unread text messages you have.
text_image
14:37 Disney 29 Pang Fri. Mar 15Delete conversations from the Messages list. Click Edit, tick the conversations and
clickDelete. You can also delete any reply in the conversation by long pressing any reply
then you'll be given options and one is to delete.

text_image
Select All 2 Selected Cancel DIGI Reaming Tips: To call Malaysia, that HDI-Malaysian No. > op: HD162CH5078. To put DIGI If you need any assistance while travelling, other DIGI Hidylins at 125# (free hot first 9 mins), and AutoLoadMAX Enjoy unlimited calls and tests to ALL NITWO/BOCS = 150MB for surfing for 1 day just MIAA-T1 To all passengers, please direct all metal objects, cell phones, too tips and other electric DIGIRewards Add for 35B (24 hours)! Visit 78Box; Shell KX Man:MyNews.com/Patience_Mees/Giant-ago DIGIBOS BMO 9% internet specially for you this year and from Bco Of Surploc. Buy now @ http://bmo/ Ollie How are you man? Copy Store Outputs Favorites Mess Hey man SMS Messages How are you man? Ollie Ollie How are you man?7.5.2. Customize Message Settings
The Messages settings menu lets you control options for your text and MMS messages including message limits, displays, notifications, and more. Go to [Settings] > [System Apps] > [Messages].
Block messages. Click [Anti-Harassment] > [Block Messages].
Keywords for Spam Messages. Customize and enter the keywords for spam messages.
Block Messages from Unknown Numbers. To block all unknown messages, toggle the slider to green.
Note: When Block Messages from Unknown Numbers is turned on, you might miss important verification text messages, as well as messages from people who you know, but are not on your contact list.

text_image
15:04:12:12 Anti-Harassment Call Blocking Remove incoming cards by June Block Messages Block messages by June Blacklist You want to remove any cards and messages from blacklist numbers. Whitelist Calls and messages from subscribed members will not be blocked Block Notifications Show All Blocked Call Notifications Spam Message Keywords Add Keywords Separately Keynotes using removed Cancel Add Block Messages SIM 1 SIM 2 Were all blocked messages by selecting "Blocked messages" in Messages Tag to View. Block Messages from Unknown Numbers When turned on all messages, then these from your contacts will be blocked.Note: You may apply same rule or customize blocking messages for SIM2 if you are using two SIM Cards.
Manage Messages settings. To display notifications of new messages, turn on [Notification Management] > [Allow Notifications]. You can customize whether new notifications from Messages appear on the Lock Screen or status bar, display at the top of the screen, play a sound or vibrate. You can also allow ringing for notifications when Do Not Disturb is on.

text_image
Messages Allow Modification Show home screen notifications from the app and it is displayed on the website or to write accounts. Show Home Screen Icon Badge Number Badge > CATEGORIES Message Notification Notification Bar, Status Bar, Status Bar, Status Bar, Status Bar, Status Bar, Status Bar, Status Bar, Status Bar, Status Bar, Status Bar, Status Bar, Status Bar, Status Bar, Status Bar, Status Bar, Status Bar, Status Bar, Status Bar, Status Bar, Status Bar, Status Bar, Status Bar, Status Bar, Status Bar, Status Bar, Status Bar, Status Bar, Status Bar, Status Bar, Status Bar, Status Bar, Status Bar, Status Bar, Status Bars, SMS messages Notification Bar, Status Bar, Status Bar, Status Bar, Status Bar, Status Bar, Status Bar, Status Bar, Status Bar, Status Bar, Status Bar, Status Bar, Status Bar, Status Bar, Status Bar, Status Bar, Status Bar, Status Bar, Status Bar, Status Bar, Status Bar, Status Bar, Status Bar, Status Bar, Status Bar, Status Bar, Status Bar, Status Bar, Status Bar, Status Bar, Status Bar, Status Bar, Status Bar Message Notification Set As Underimportant Notifications when a log update corresponds to the following: will be designed for which what is not required to the following is allowed to access any account of the notifications. Display on Status Bar Display on Lockscreen Display at the Top of the Screen After blocking is further picked up and then disordered. Ringtone Vibrate Allow Notification Alerts Under Do Not Disturb When "Alert to Remove Notifications" is turned up under Do Not Disturb the age notification is allowed to complete status bar.Display received messages in pop-up window. The phone will automatically pop up a window with the content of the message. You can close the window or reply
to the message directly.
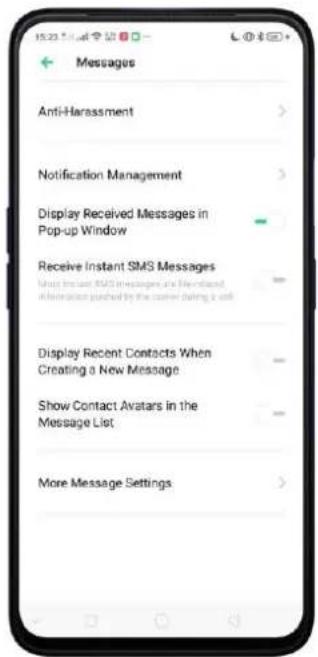
text_image
Messages Anti-Harassment Notification Management Display Received Messages in Pop-up Window Receive Instant SMS Messages Use Instant SMS messages and Membered information pushed by the corner during a soft Display Recent Contacts When Creating a New Message Show Contact Avatars in the Message List More Message Settings
text_image
15:20 CBe What are you doing now? 1/1 15:20 SN2 Close Reply Welcome Calendar Photos Settings Google Music Play Store CloudReceive instant SMS messages. Toggle the slider to green if you want to receive life-related messages pushed by your operator during a call.
Display recent contacts when sending a message and show contact's portrait in the Message list. Toggle the sliders to green.
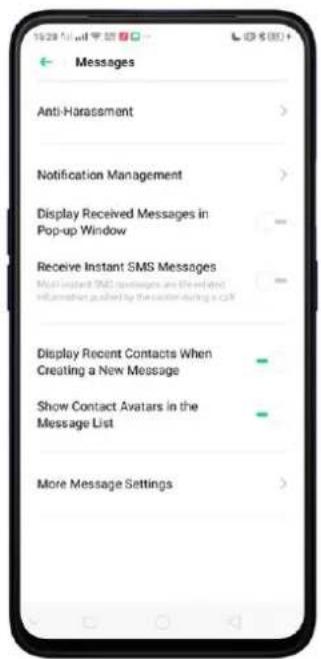
text_image
19:28 PM Messages Anti-Harassment Notification Management Display Received Messages in Pop-up Window Receive Instant SMS Messages Multi-constant SMS messages are the related information pushed by the custom during a CUI Display Recent Contacts When Creating a New Message Show Contact Avatars in the Message List More Message Settings
text_image
New Message Cancel Recipient: Password Contact: QBe SMS Messages 12# Done
text_image
All Messages Edit + Search Messages Ollie What are you doing new? Unknown-Source Hey isn't how's the game going? GoWiFi 753263 is your verification code. Use in 16 minutes. BDO-ONLINE Your One-Time Password (OTV) is 264884, please enter within 5 minutes. Call BDO Caps... Yahoo 27110 (in your Yahoo verification code BPI BPI: A friendly reminder - To continue enjoying banking convenience, please maintain the regu... GLOBE 3/3 subscribed ensure yourself connected to Music before using the promo. Enjoy your trialCustomize advanced settings. Click [More Message Settings], then set up more SMS, MMS, system, and emergency alert related settings.
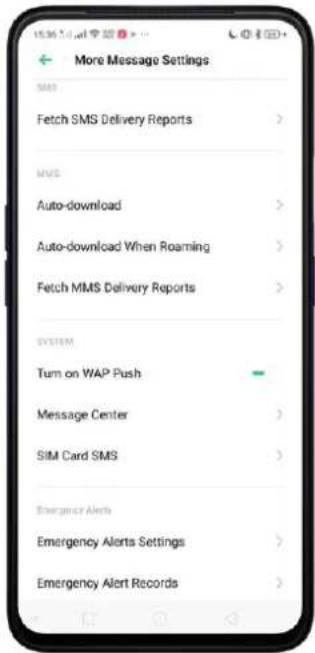
text_image
More Message Settings SMS Fetch SMS Delivery Reports > MMS Auto-download > Auto-download When Roaming > Fetch MMS Delivery Reports > SYSTEM Turn on WAP Push Message Center > SIM Card SMS > Emergency Alerts Emergency Alerts Settings > Emergency Alert Records >7.6. Contacts
7.6.1. Add a Contact
Add a new contact. Open Call app then click Contacts, click +, enter the contact information. You can customize ringtone as well as add more information for each contact.

text_image
14:19:51 Select Phone Contacts Favorites Search in 2 Contacts(s) This Phone's Number My Groups G Globe James J James O Ollie Turn On DPPO Cloud to Sync Your Contacts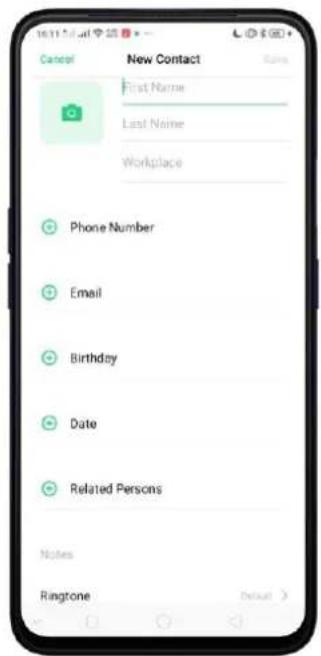
text_image
16:11 Mail Cancel New Contact First Name Last Name Workplace Phone Number Email Birthday Date Related Persons Notes Ringtone Default >
text_image
Add More Info Cancel Name Prefix Middle Name Name Suffix Phonetic name IM Address Nickname WebsiteAdd a contact from a number entered using the keypad. Click Phone app and enter a number, then click Create New Contact and enter the contact information, or click Add to Existing Contact and choose a contact that is already saved.
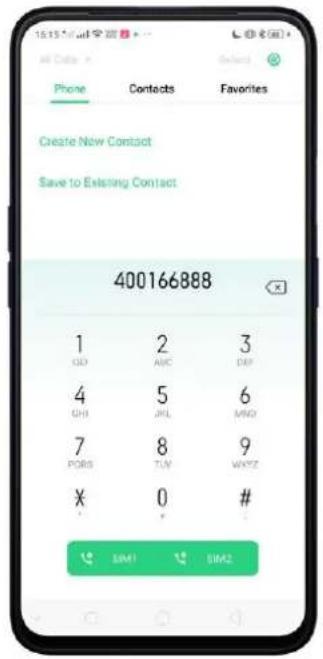
text_image
15:15 AM All Dates Phone Contacts Favorites Create New Contact Save to Existing Contact 400166888 1 2 3 GD AHC DFP 4 5 6 GHI JHL MHO 7 8 9 PORTS TLM WXYZ X 0 # SIM1 SIM2Add a recent caller's information to your contacts. Click Phone app, and you'll see the recent calls. Click ⓘ, then click Create New Contact or Add to Existing Contact.

text_image
Missed Calls Phone Contacts Favorites Ollie 097771492 1 2 3 GO ABC OKY 4 5 6 GHSJKL MNC 7 8 9 PORS{TUV WVXZ * 0 # SIM1 SIM2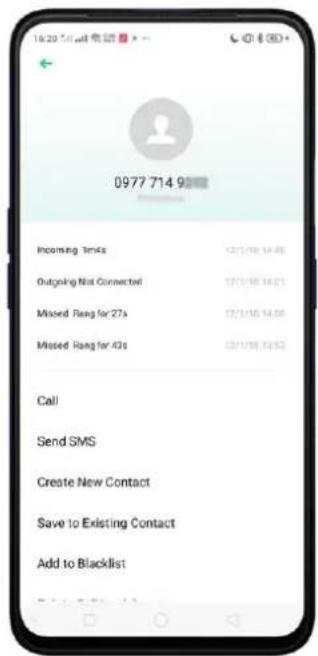
text_image
16:20 PM email 0977 714 9 Incoming 3ms Outgoing Not Connected Missed Rang for 27s Missed Rang for 43s Call Send SMS Create New Contact Save to Existing Contact Add to Blacklist7.6.2. Edit and Delete a Contact
You can make changes on your contacts.
Edit a contact's phone number, address, and other information. Click Contacts and choose a contact, then tap Edit, once done just click Save.
- To add an item - such as an Email address or phone number, click + next to the item.
• To delete an item, click ⊖ next to it.

text_image
Ollie Outgoing Not Connected Incoming 34s Outgoing 9s Incoming 11s Missed Rang for 11s All Call Logs +63 917 701 0428 Inside Philippines Share Contact Add to VIP Contacts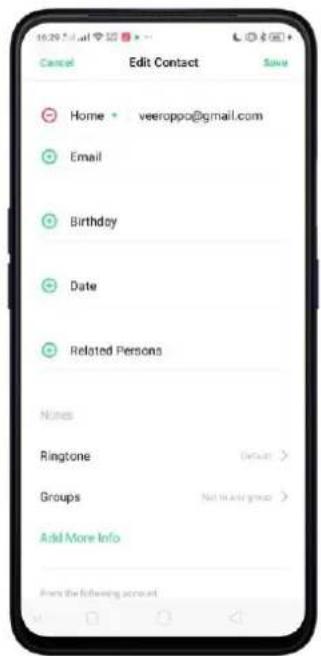
text_image
Home • veeroppo@gmail.com Email Birthday Date Related Persons Notes Ringtone Groups Add More Info From the following account
text_image
1629 Email 专递 Cancel Edit Contact Ollie Last Name Workplace Mobile +63 917 701 0428 Work Number Phone Number Email Birthday Date Related PersonsAdding contacts to favorites. Click and contacts will added to Favorites.
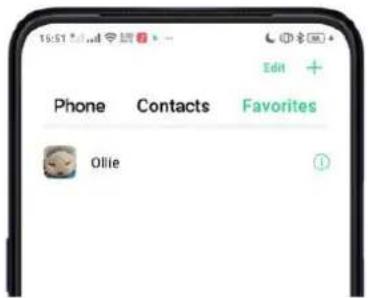
text_image
15:51 Edit + Phone Contacts Favorites OllieAssign a photo to a contact or change a contact's photo.
- Click , or click the existing photo.
- Click Take Photo to use the camera to take a picture, or click Select a Photo and select an existing photo, or click Delete Photo to delete the photo.
- Drag to region to crop the photo, then click Done.
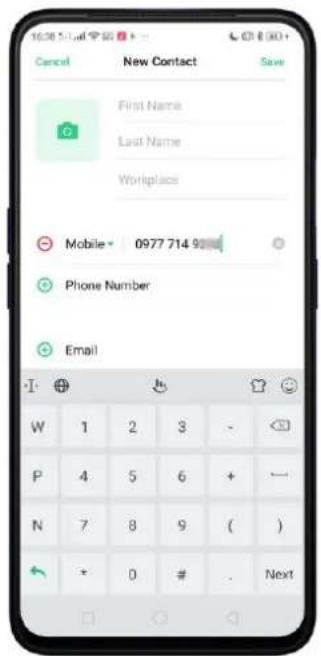
text_image
16:00:54 Cancel New Contact Save First Name Last Name Workplace Mobile 0977 714 9 Phone Number Email W 1 2 3 - P 4 5 6 + - N 7 8 9 ( ) + 0 # . Next
text_image
Edit Contact Ollie Last Name Workplace Mobile - +63 917 701 0428 Phone Number Email Take Photo Select a Photo Delete Photo Cancel
text_image
Crop DoneDelete a contact. Click Delete Contact on the Contact Details page or Scroll to the bottom of the contact information and click Delete Contact.
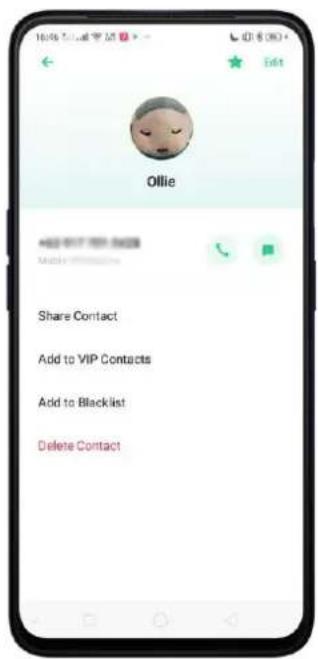
text_image
Ollie Add to VIP Contacts Share Contact Add to VIP Contacts Add to Blacklist Delete Contact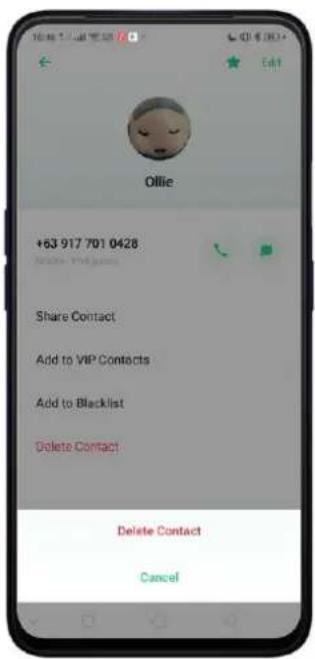
text_image
Ollie +63 917 701 0428 Share Contact Add to VIP Contacts Add to Blacklist Delete Contact Delete Contact Cancel7.6.3. Import and Export Contacts
You can import/export contacts from/to the phone storage or your SIM card. If you have contacts stored on your old phone, you can transfer them through Bluetooth from that phone. If there are repeat contacts, the phone will automatically merge them when you import contacts.
Import contacts. Go to [Settings] > [System Apps] > [Contacts] > [Import/Export Contacts].
- Import from storage. Save the imported contacts to your phone.
- Import from other phones. Import the contacts stored on other phones to your realme phone through Bluetooth.

text_image
Contacts Import/Export Contacts > SIM Card Contacts > Show Contact's Profile Picture CONTACTS MANAGEMENT Contacts to Display > Sort by First Name > View Contact Names as First Name First > Merge Duplicate Contacts > Manage Contacts >
text_image
Import from Storage Select the destination account to import contacts from the storage device. Phone: Personal contact(s) Google HospStatus@gmail.com No contact
text_image
Import from Another Phone Select the Other Phone Type Use Bluetooth to import the contacts from other phone to this phone iPhone Android PhoneExport Contacts. Export your contacts to the phone storage. Contacts you export are saved as .vcf file. You can click Change path if you want to change the folder or create a new folder for your contacts to be saved and exported.
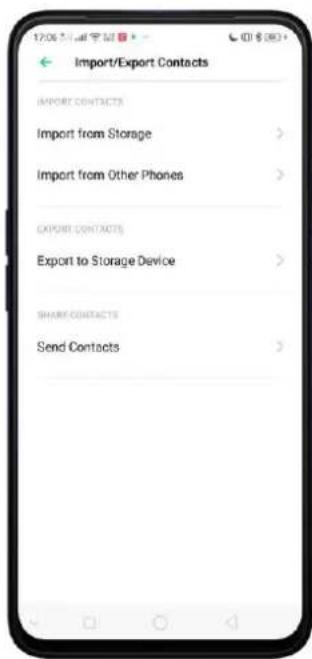
text_image
Import/Export Contacts IMPORT CONTACTS Import from Storage > Import from Other Phones > EXPORT CONTACTS Export to Storage Device > SHARE CONTACTS Send Contacts >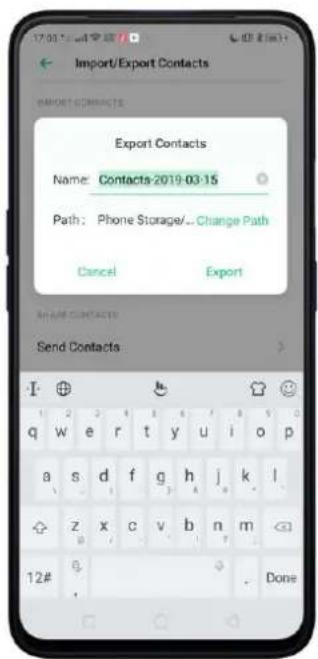
text_image
Import/Export Contacts Export Contacts Name: Contacts-2019-03-15 Path: Phone Storage/... Change Path Cancel Export Send Contacts: T ⊕ & # q w e r t y u>i pivot a s d f g h j k,l z x c v b n m 12# . Done
text_image
Change Path 350 0 items / Mar 12, 2019 Android 3 items / Mar 7, 2019 Backup 0 items / Mar 7, 2019 backups 0 items / Mar 12, 2019 baidu 1 item / Mar 12, 2019 Bluetooth 350 items / Mar 7, 2019 ColorOS 30 items / Mar 15, 2019 DCIM 4 items / Mar 7, 2019 documents 1 item / Mar 7, 2019 Download 20 items / Mar 2, 2019 New PostsetImport/export SIM card contacts. Go to [Settings] > [System Apps] > [Contacts] >

[SIM Card Contacts], click Export or Import, then tick the contacts and move them to either SIM or phone.

text_image
SIM2 * *1.43# B Bal Inquiry E Emergency # G GT Cust Svc R Reload Roaming Hotline $ Share-A-Load Simon Kide Oh Import Export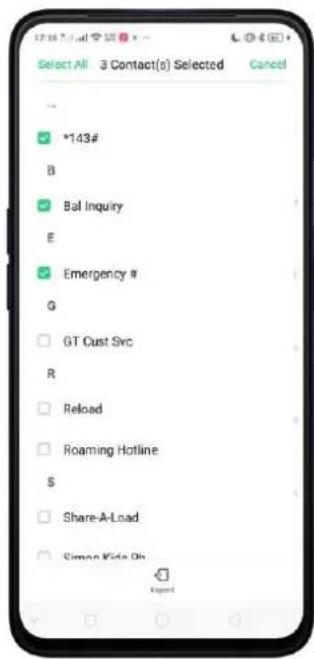
text_image
Select All 3 Contact(s) Selected Cancel *143# B Bal Inquiry E Emergency # G GT Cust Src R Reload Roaming Hotline S Share-A-Load Siman Kids Oh
text_image
3 Contact(s) Selected Globe James J James O Ollie7.6.4.SIM Contacts
You can add, edit, delete, import, and export SIM contacts directly on your realme smartphone. Go to [Settings] > [System Apps] > [Contacts] > [SIM Card Contacts]. Add a SIM contact. Click +, then enter the contact information and click Save.
text_image
SIM Card Contacts SELECT SIM CARD SIM1 SIM2 10.23197246788
text_image
SIM1 No Contacts Hunt Soto
text_image
Cancel New Contact Save Name: Mobile | Number Mobile | Number Storage Location 1 2 3 4 5 6 7 8 9 10 11 12# Q W E R T Y U I O P A S D F G H J K L ↑ Z X C V B N M 12# 8 . NextEdit and delete a SIM contact. Click a contact, then click Edit. Click Delete Contact to delete the contact.
text_image
Ollie +63 917 701 0428 Mobile: Philippines Share Contact Add to VIP Contacts Add to Blacklist Delete ContactDelete chosen SIM contacts all at the same time. Click Select on the upper-right
回
corner, tick the contacts you don't want anymore and click Delete.
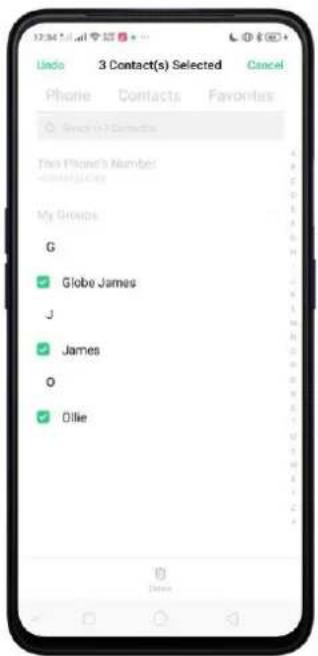
text_image
32:34:51:41 Undo 3 Contact(s) Selected Cancel Phone Contacts Favorites ○ Send to Connection This Phone's Number -Connects My Groups G ✓ Globe James J ✓ James O ✓ OllieDisplay SIM contacts on the Contacts list. You need to import SIM contacts to your phone. See Import and export contacts.
7.6.5.Manage Contacts
Contacts allows you to easily save and edit contact information, including names, numbers, addresses, and more. To make your contacts more organized and available, do the following:
Add a new contact. Click Phone on the Home Screen, click Contacts, and then click
+ . The contact will be saved to your phone storage.
Modify existing contacts. If you want to add details to an existing account, click the account then edit.
Import or export contacts. Go to [Settings] > [System Apps] > [Contacts], then select the import/export path.
Contacts to Display. Go to [Settings] > [Contacts] then click Contacts to Display. To only show contacts with numbers, toggle the slider to green. You can also click a category of contacts that you want to display. Click Customize to select contacts by group.

text_image
17:00 GMT 9 AM Contacts Import/Export Contacts SIM Card Contacts Show Contact's Profile Picture CONTACTS MANAGEMENT Contacts to Display Sort by First Name Import/Export Contacts IMPORT CONTACTS Import from Storage Import from Other Phones EXPORT CONTACTS Export to Storage Device SHARE CONTACTSMerge duplicate contacts. Click Merge duplicate contacts. The phone will automatically merge contacts with the same name.
Manage contacts. Manage contacts without name or number, or quickly remove invalid numbers, click [Manage Contacts].

text_image
Manage Contacts Unnamed Contacts None > Contacts Without Number None > Delete Special Characters from Numbers Remove Numbers Longer Than 25 DigitsSend Contacts. Go to [Settings] > [System Apps] > [Contacts] > [Import/Export Contacts] > [Send Contacts]. All contacts stored on your phone will be shared.
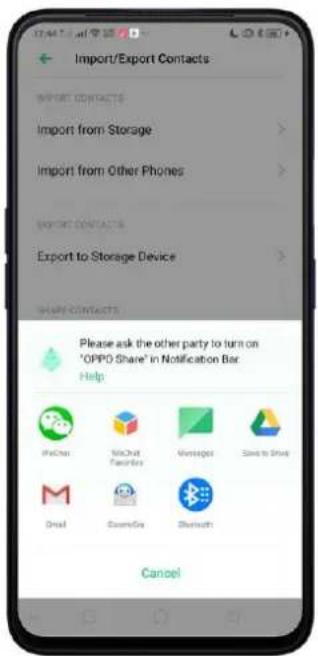
text_image
Import/Export Contacts IMPORT CONTACTS Import from Storage Import from Other Phones EXPORT CONTACTS Export to Storage Device Share contacts Please ask the other party to turn on "OPPO Share" in Notification Bar Help MacChat MacChat Favorites Messages Send to Drive Send ScanMe Bluetooth CancelBackup your contacts. Go to [Settings] > [Additional Settings] > [Back up & reset] > [Backup & Restore] > [Create New Backup]. View Back up your realme smartphone.
7.6.6. Back Up your Contacts
We use our phone on a regular basis and it is best to back up contacts so that you can easily restore them or use them on another device.
Use the built-in backup tool. Go to [Settings] > [Additional Settings] > [Back up and reset], then click [Backup and Restore]. Back up your contacts. You need to make a copy of the existing backup file and move it to another storage device.

text_image
Back Up & Restore No Backup Records Create new backup Backup Backup is Successful Site: MD - Types of Data Contacts Messages Call History System Data Click and others App (Excluding Data) Backup is Successful Done Back Up & Restore Select BACKUP RECORD March 15, 17:52 : Phone Storage MD: MD - Styles of data 1. Backup of application data is currently not supported to ignore data. Helpful. 2. Missing data or missing groups and settings will Alter the hardware in your PC. Please store (Path Phone Storage - Backup). Therefore, stop the backup data to exit and storage in your PC before performing these operations to avoid updates. Create new backupExport contacts. Export your contacts to your SIM card or a folder on your phone. See Import and export contacts.
7.6.7.VIP Contacts
When you put the phone into Silent mode, or when you set the phone to block calls and notifications using Quiet Time, Game Acceleration, or Anti-harassment, you can add certain contacts to VIP Contacts, which will allow them to override the phone settings and have their calls come through and ring.
Add contacts to VIP Contacts. Go to Contacts, select a contact, and then click Add to VIP Contacts.

text_image
Ollie +63 917 701 0428 Mobile Philippines Share Contact Add to VIP Contacts Add to Blacklist Delete Contact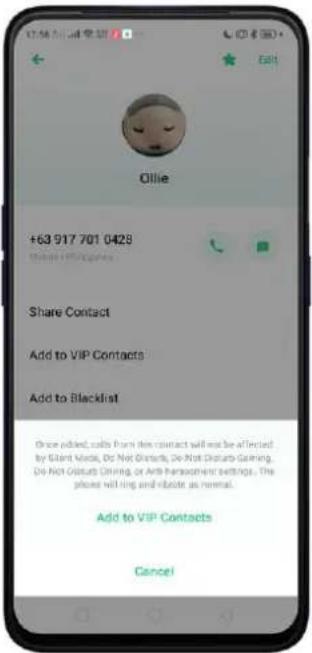
text_image
Ollie +63 917 701 0428 Share Contact Add to VIP Contacts Add to Blacklist Once added, calls from this contact will not be attracted by Silent Music, Do Not Disturb, Do Not Disturb Gaming, Do Not Disturb Dining, or Arts Restaurant settings. The phone will ring and rotate as remote. Add to VIP Contacts Cancel7.7.Phone Manager
7.7.1. Scan and Optimize the Phone
Regularly optimizing your device can make it perform steadily and faster.
Automatic optimization items. Go to [Phone Manager], the system will start scanning your phone automatically. After the scan is over, click [Optimize], then click [One Touch Optimization]. You can also select the items that you want to optimize optionally.

text_image
4:31 Phone Manager Three Topics PUDS MC INET File Manager Game Space Music Party Facebook Tricolor Tune Webcast CustomGo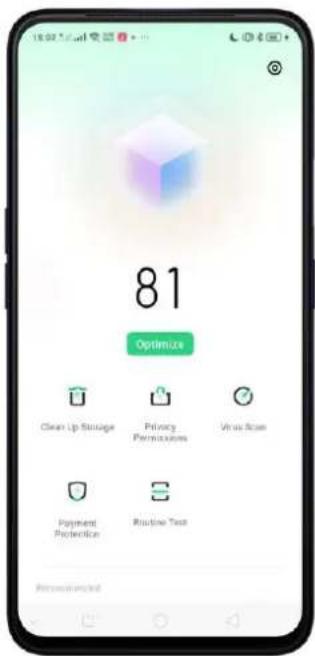
text_image
81 Optimize Clean Up Storage Privacy Permissions Virus Scan Payment Predecessor Routine Test Recommended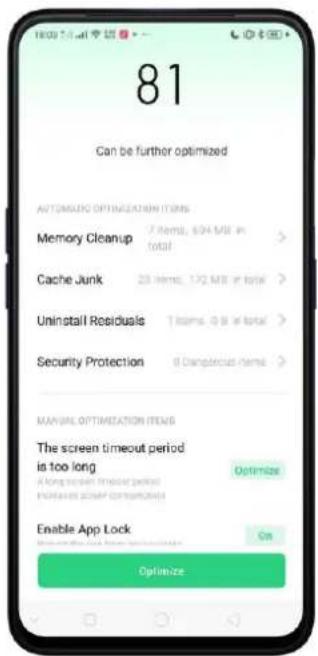
text_image
81 Can be further optimized AUTOMATIC OPTIMIZATION ITEMS Memory Cleanup 7 items, 634 MB in total > Cache Junk 25 items, 172 MB in total > Uninstall Residuals 1 items, 0.8 in total > Security Protection 6 Disruptive Items > MANUAL OPTIMIZATION ITEMS The screen timeout period is too long Optimize Enable App Lock On OptimizeManual optimization items. Click the green button on the right side of each item, respectively, then do as the phone prompts.
7.7.2. Clean Up Storage
Clean Up Storage. Use Clean Up Storage to quickly detect and remove hidden temp (temporary folders or files), cookie and cache files generated by inner calculations and data exchanges to free up more storage space. You can also quickly browse and delete unnecessary user files.
Click Clear all to delete all kinds of junk files. You can also choose files to be deleted.
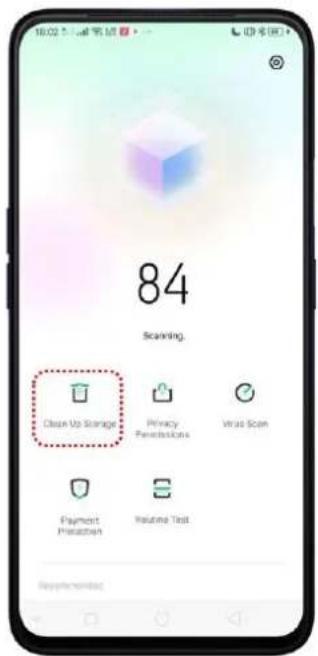
text_image
10:02 84 Scanning. Clean Up Storage Privacy Permissions Virus Scan Payment Request Routine Test Recommended
text_image
Clean Storage Available on phone 12.3 GB / 64.0 GB in total Sufficient storage available, you can delete available files Clearcap recommended Safe to Clean 6.7 MB / 6.7 MB > Clear all APP DATA WeChat Cleaner > All app cache data 8.64 GB > CAT14G0825B FILES Photo Cleaner >Delete app data. Click All app cache data, select the apps that has caches, then click Delete. The action cannot be undone.

text_image
All app cache data 1.12 GB selected 7:30:08 to find 2 items to be closed certify WeChat 603 MB TouchPal 21.2 MB Google Play Store 15.6 MB Residual Files 15.0 MB Browser 408 KB 微信电话本 181 KB Theme Store 772 KB Google Play Music 38.0 Delete 1.12 GBFor some commonly used instant-messaging apps like WeChat and WhatsApp, the Phone Manager provides separate entries for you to clean up their files. See Frequently Used Functions.
Free up more storage space. You can delete your unnecessary files on the phone, including photos, audio, videos, and documents.
7.7.3. Privacy Permissions
Privacy Permissions. Use Privacy permissions feature to manage app permissions, protect your privacy, and manage apps that start when phone boots up. Click Phone Manager, then click Privacy Permissions.

text_image
84 Scanning. Clean Up Storage Privacy Permissions Virus Scan Payment Protection Routine Test Recommended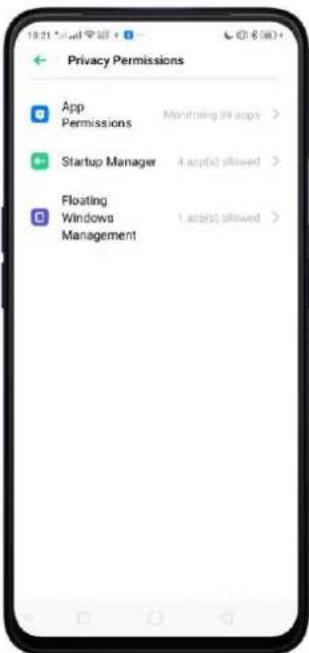
text_image
Privacy Permissions App Permissions Monitoring 34 apps > Startup Manager 4. app(s) allowed > Floating Windows Management 1. app(s) allowed >Manage the App permissions. Open Phone Manager, then click Privacy Permissions. You can go through each permission or app on your phone and, with full control, accept, decline or limit each permission of apps according to your requirements.

text_image
18:33:547 App Permissions Permissions Apps Phone Make a Call 2 Apps > read phone state 14 Apps > Call History Read Call History 2 Apps > Write or Delete Call History 2 Apps > Contacts Read Contacts 10 Apps > Write or Delete Contacts Information 8 Apps > SUs Read SMS 6 Apps > Read SMS 5 Apps >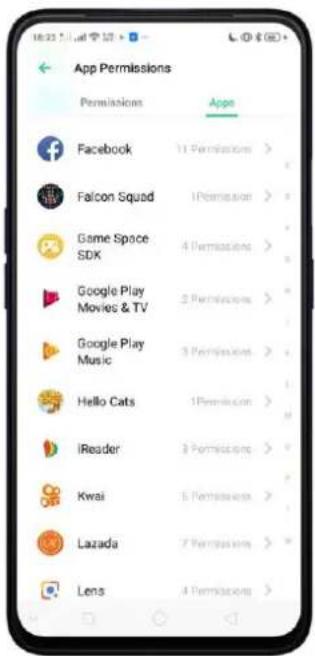
text_image
App Permissions Permissions Apps Facebook 11 Permissions > Falcon Squad 1 Permission > Game Space SDK 4 Permissions > Google Play Movies & TV 2 Permissions > Google Play Music 3 Permissions > Hello Cats 1 Permission > iReader 3 Permissions > Kwai 5 Permissions > Lazada 7 Permissions > Lens 4 Permissions >Click [Set Individual Permission] to view and set more detailed permissions.
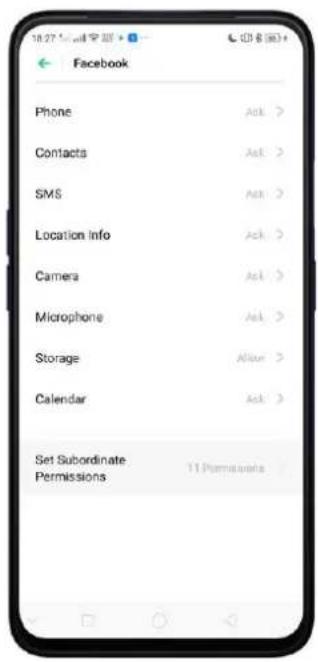
text_image
Facebook Phone Contacts SMS Location info Camera Microphone Storage Calendar Set Subordinate Permissions Ask > Ask > Ask > Ask > Allow > Ask > 11 Permissions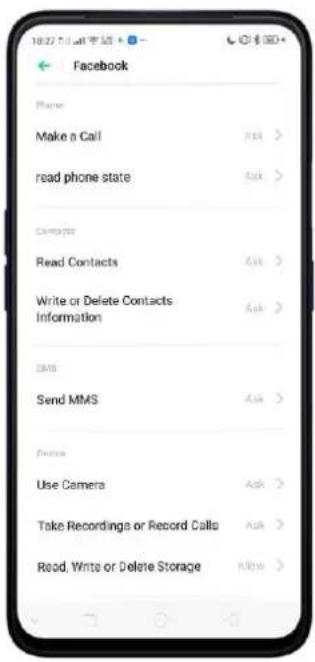
text_image
Facebook Phone Make a Call Read phone state Carrots Read Contacts Write or Delete Contacts Information EMS Send MMS Options Use Camera Take Recordings or Record Calls Read, Write or Delete StorageAllow apps to start when phone boots or in background. Click Startup Manager. Toggle the app slider to green if you want an app running in the background. See Set up Startup Manager.
To view the apps that had been blocked from starting in the background, click
Blocking Records.

text_image
Startup Manager Blocking Records It is recommended that you turn the following settings off. You may not be able to receive messages when their settings are turned off. CosmoSia Startups on launch and/or background allowed Duo Startups on launch and/or background allowed Facebook Startups on launch and/or background allowed WeChat Startups on launch and/or background allowed It is recommended that you turn the following settings off. The system will continue these users when these settings are turned off. Drive Startups on launch and/or startup on background allowed Falcon Squad
text_image
Blocking Records This image from a video sharing in the background is to make the private expert power efficient and to prevent messaging of your privacy information on the background. Blocking records from the previous month Hello Cats Booking: 18 times recent blocking March 16, 20:19 TouchPal Booking: 1 times, select blocking March 14, 18:15 Google Play Movies & TV Booking: 4 times, second blocking March 17, 11:32 TouchPal Booking: 14 times, second blocking March 2, 18:03Enable floating windows. Toggle the App slider to green so your app message will be displayed in the floating window for easy viewing and use. (Note: Only for apps which can support Floating window feature.)

text_image
Floating Windows Management Facebook Google Play Music Hello Cats iReader Opera Photos TouchPal TouchPal WeChat WeSing 微信电话本7.7.4.Virus Scan
Virus Scan. For better security, you can regularly scan and remove potential and actual threats on your phone.
Scan for virus. Click Phone Manager, then click Virus Scan. Wait for the scan to complete. If threats were found, remove them; if not, you will see a message that says your phone is in a good state.
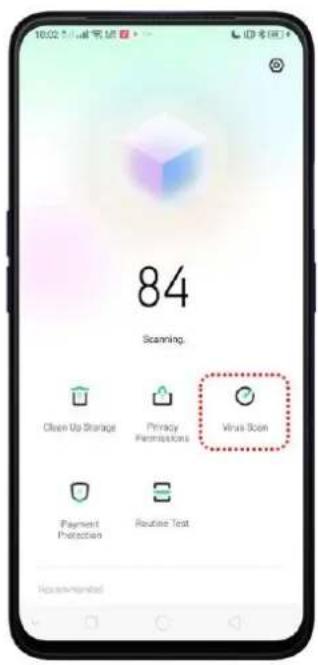
text_image
10:02 PMI 84 84 Scanning. Clean Up Storage Privacy Permissions Virus Shock Payment Protection Routine Text Recommendated
text_image
16:42:50 AM 3% Scanning /storage/emulated/IO/Backup/App/com. access._company.android.info/immunisator Iraq Supported by Ohio 369 Malicious Apps 0 items scattered Malicious Files 41 items scattered Stop Scanning7.7.5. Payment Protection
While you shop online, your realme phone will provide protection for the mobile transactions, such as detecting the security of system, captcha, and the app itself. Set up payment protection for apps. Open Phone Manager, then click Payment Protection. You can also go to [Settings] > [Security] and click [Payment Protection].
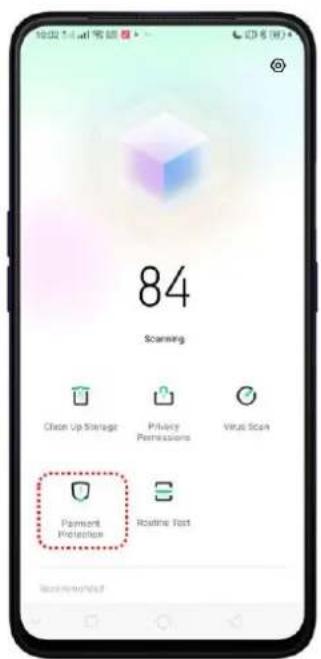
text_image
84 Scanning Clean Up Storage Privacy Permissions Virus Scan Payment Protection Routine Text Recommended
text_image
Security SYSTEM SECURITY Permissions > Floating Windows > Personal Information Protection > Find My Device Retractory Alert/Firebox Payment Protection > Bos Emergency SOS > HARNESSMENT AND FREED PROTECTION Anti-harassment/Fraud Bened DTC Message > Pseudo Base Station Blocking Bened 1 Lake Drive Station > PRINACY PROTECTION
text_image
Payment Protection Environment: Security NO PAYMENT THREADS View I APPS ARE GUARDED BY PAYMENT PROTECTION WeChat7.7.6. Routine Test
Phone Manager allows you to diagnose common phone problems and find solutions to quickly deal with them.
text_image
84 Scanning. Open Up Storage Privacy Permissions Virus Scan Payment Protection Solution Test
text_image
Routine Test OPPO F11 Pro CPU: Data empty RAM: 100 GB Storage: 12.5 GB (Run Test) (SAL Test/Total) Records Run TestRoutine Test. Click [Phone Manager] > [Run Test], select the items you want to detect, then click [Start Detection].
• Auto Detection Items: including phone memory, SIM card(s), and system
version. The phone will automatically complete the detection.
- Manual Detection Items: including sensors, connections, battery and charging, physical keys, screen, camera, audio, and vibration. During the detection, you need to operate the phone as per onscreen instructions.
text_image
Comprehensive Test The following contents will be detected. Excluded due to exemplified E-mailues Auto Detection Tools Memory SIM System version Manual Detection Items Sensors Connection test Bluetooth, GPS and Wi-Fi connections are retained Battery & Charging Progging of charger required Keys Screen Start DetectionThe phone will list all the test results of the system and intuitively display the abnormal items. Click the abnormal item to view the solution your phone offers.
text_image
Detection Results 1 abnormal items found Connecting and write service for processing Testing is recommended 1 abnormal item 4 kinds items 31 nearest items 1 &2 nearest items Abnormal Items Gravity Sensor Error All text results Memory NAM 2.94 GB / 6.04 GB Storage 12.9 GB / 64.9 GB SIM Just identification 2 rows Does SIM 1 have any signal Since Close SIM 2 has any signal Yes Signed networks of SIM ? Strong System version System version Log to Date SensorsDetection records. Click [Records] and you can view all the detection records.
text_image
Records March 15, 19:02 | Latest Abnormal items found >7.7.7.Frequently Used Functions
In Phone Manager, you can quickly clear your downloads and junk files of the apps which are used frequently, such as WeChat, WhatsApp, and more.

text_image
81 Optimize Clean Up Storage Privacy Permissions Virus Icon Payment Protection Routine Text Back are neededWhatsApp Cleaner
Clear cache and junk files. Click [Clear Now] button to clear the cache files generated when the app was in use.
Clear other app files. You can delete the app files to free up the phone storage, including pictures, videos, audio, voice messages, and files. Select an option, click Select to select the files, then click Delete.
WeChat Cleaner
Cache Junk Files. Click [Clean up now] button to clear the cache files generated when the app was in use.
text_image
WeChat Cleaner WeChat can be cleaned 2.65 GB Cleaning up immediately WeChat focus or recommended! Cache Junk Files Only cache files: The website wwwChat.net.au 1.96 KB be affected Clean up now Pictures and Videos of WeChat Moments Can be replaced by imported after being cleaned Clean up nowPictures and Videos of WeChat Moments. Click pictures, videos, emojis, voice, and received file. For example choose pictures and videos or emojis you want to delete, then click Delete. The deleted files can be reloaded via internet after being cleaned.

text_image
Pictures and Videos of WeChat Mo... Pictures Videos All the time Total 16.3 MB All the time Half a year ago 3 months ago 1 month ago Most recent month Delete 10.3 MB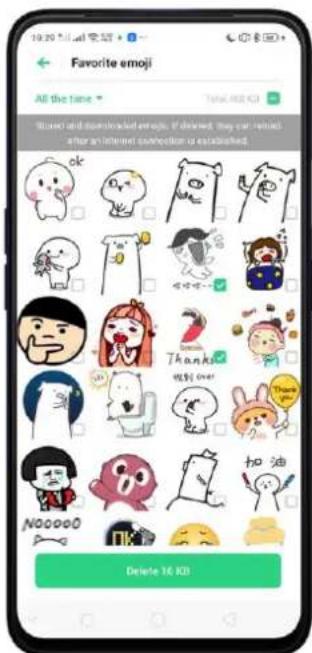
text_image
Favorite emoji All the time Total: 100 KB Used will download emoji if deleted, they can be used after an internet connection is established. Ok Thank No more over! Thank No more over! No more over! No more over! No more over! No more over! No more over! No more over! No more over! No more over! No more over! No more over! No more over! No more over! No more over! No more over! No more over! No more over! No more over! No more over! No more over! No more over! No more over! No more over! No more over! No more over! No more over!Clear low-resolution pictures from chats. Click [Clear up now] button to clear the red packet pictures, thumbnails, icons, and other pictures. You can to delete from the most recent month, 1 month, 3 months ago, half a year ago or the whole time you've used it.
You can select all by clicking □ or manually choose the files.

text_image
WeChat Cleaner Low-resolution chat pictures 21.4 MB Clean up now Chat pictures 2.00 MB > Chat videos 273 MB > Favorite emoji 468 KB > Voice 93 KB > Received files 369 MB >
text_image
Low-resolution chat pictures All the time + Total 2.4 MB All the time Half a year ago 3 months ago 1 month ago Most recent month Delete $5.4 MBNote: These kinds of files cannot be recovered after cleaning.
7.8.Weather
Click Weather from the Home Screen to see the latest weather conditions and forecasts for the city of your choice, including the current temperature, hourly forecasts for the next 24 hours, and up to 15-days of forecast information. You can store multiple cities for quick access.
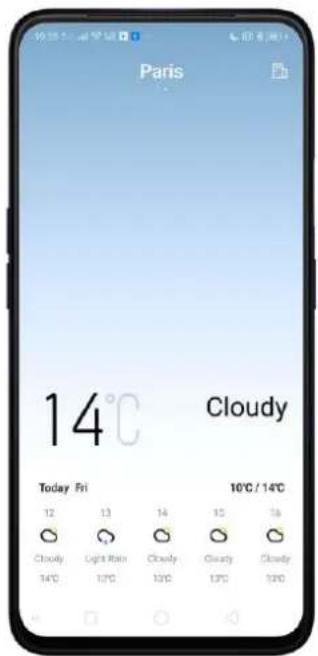
text_image
Paris 14°C Cloudy Today Fri 12 13 14 15 16 Cloudy Light Rain Cloudy Clarity Cloudy 14°C 17°C 13°C 13°C 12°C 10°C / 14°C
text_image
19:55 °C / dwt Paris Today HI 12 13 14 15 16 Cloudy Light Rain Cloudy Cloudy Cloudy 14°C 13°C 17°C 18°C 19°C Today 3/16 3/17 3/18 3/19 14°C 16°C 17°C 18°C 19°C 10°C 8°C 2°C 0°C 0°C 15 Day weather forecast > 12°C Temperature Felt 16 km Weekday Very Weak URLook at your local weather. Open Weather app and your phone will find your current location using the Location Services. Scroll down to see more details, including humidity, visibility, and more.
View the hourly forecast. Swipe the hourly display left or right. It also provides you the time of sunrise and sunset.
Get daily forecast for 15 days. The phone shows the forecast information for the upcoming five days. Click 15 Day weather forecast > to get extended forecasts on your browser.
Add a city. Click 📄, then click +. Enter a city name, then click Search. You can also choose on the default cities that are already provided.
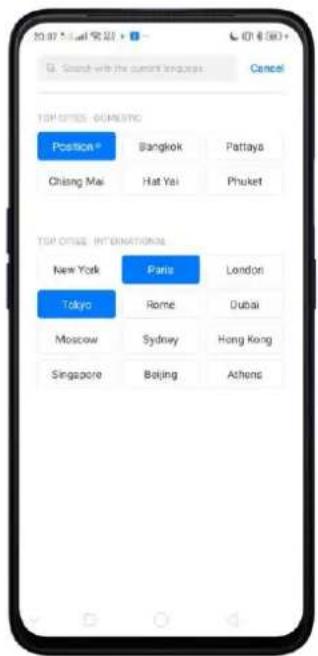
text_image
TGP OFFICE - GOMESTIC Positiona® Bangkok Pattaya Chiang Mai Hat Yai Phuket TGP OFFICE - INTERNATIONAL New York Paris London Tokyo Rome Dubai Moscow Sydney Hong Kong Singapore Beijing Athens
text_image
20:07:54 电话 + City Management Pasig® 29°C City Paris 14°C City Tokyo 11°C CitySwitch to another city. Swipe left or right. The number of dots below the city name shows how many cities are stored.
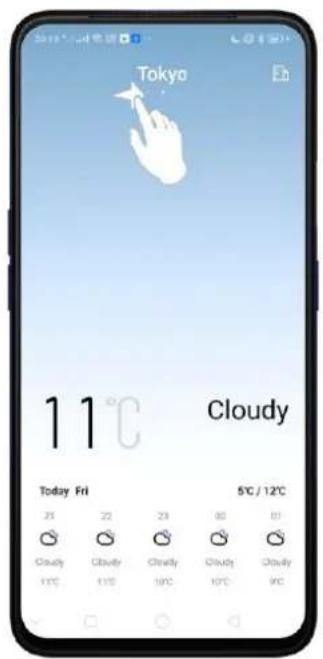
text_image
Tokyo 11°C Cloudy Today Fri 25 22 29 30 31 Cloudy Cloudy Cloudy Cloudy Cloudy 5°C / 12°CDelete a city. Click 📄, long press on the city, then click Delete, or click Edit, click next to a city, then click Delete. Select All if you want to delete everything, Undo if you change your mind then click Done.
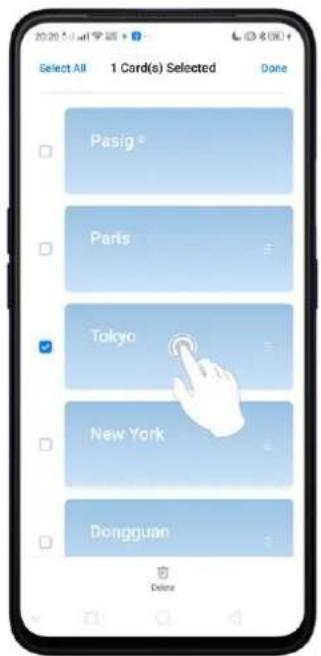
text_image
Select All 1 Card(s) Selected Done Pasig Paris Tokyo New York Dongguan Delete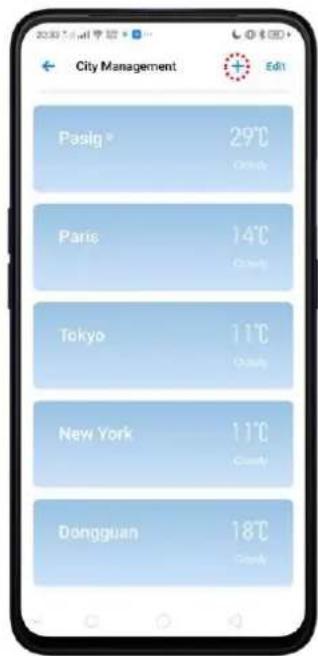
text_image
City Management Pasig 29°C Paris 14°C Tokyo 11°C New York 11°C Dongguan 18°C Edit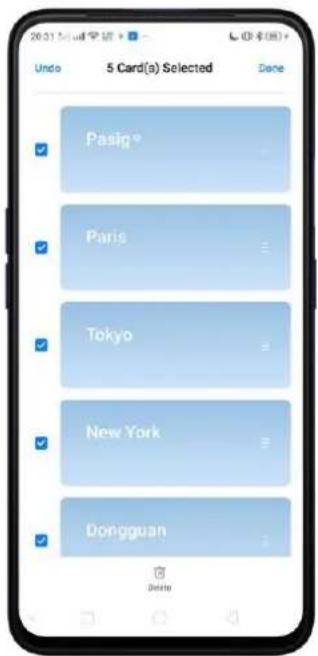
text_image
20:31 Mail 审通 5 Card(s) Selected Done Pasig Paris Tokyo New York Dongguan DeleteReorder cities. Click 📄, long press the city or click Edit, then touch and drag icon next to a city up or down on the list. Note: Makes sure your finger touches the drag icon else the city won't move.

text_image
20:46 AM Select All Select Weather Card Done Pasig® Pans Dongguan Tokyo New YorkChoose Fahrenheit or Celsius. Go to [Settings] > [System Apps] > [Weather] > [Temperature unit].

text_image
Temperature Unit Celsius/°C Fahrenheit/°F7.9. Camera
7.9.1. Take Photos
You can use the cameras to take pictures and videos.
Open Camera. Click Camera icon. To quickly get to the camera, touch Camera icon on the Lock Screen and swipe up.

text_image
Camera Photo Ratio 4:3 > Timer Off > Touch to Take a Photo Gesture to Take Photo Volume Button Shutter > Grid Shutter Sound Location Flip Selfie AI Scene Recognition Watermark Photo Ratio 4:3 1:1 Full Screen 4:3 (Ultra HD) 48.00 Min Does Not support Zoom, Chrome Book, HDD, Files, Security AI Scene Recognition, Capture in ShootingChoose a photo mode. Choose a photo mode. Click Photo, then click 📷 on the top-right corner to choose a photo ratio. The default is 4:3.

natural_image
Yellow Pikachu figurine with green ears and blue hat, displayed on a smartphone screen (no text or symbols on the figure itself)
natural_image
Smartphone screenshot showing a Pikachu figurine with green hat and blue ear, displayed in a photo editing app interface (no readable text on the figurine itself)
text_image
HOT PHOTO POSTALYou can choose Square 4:3, 1:1, or full screen photos or 4:3 (Ultra HD)
Switch the cameras. Click
Take a photo. Aim your camera at the subject and click 📄.
Zoom in or out. The camera captures full-resolution video and stills at 1x and 2x zoom. To quickly switch, toggle 1x or 2x. You can also pinch the screen to zoom in and out or press and hold the zoom number until a line comes out and adjust it by dragging to left or right.

natural_image
Yellow Pikachu figurine with green and red features, displayed on a smartphone screen (no text or symbols on the figure itself)
natural_image
Poksumus figurine displayed on a smartphone screen, no text or symbols visible in the image itself.
text_image
HDR 22X VIDEO PLAY PORTRAITTurn the flash on or off. Click 📄, then click On or Off. When you click Auto, your phone will automatically detect lighting conditions and determine if flash is necessary. When you click Fill Light, your phone will use the built-in flash as the fill light.
Turn HDR on or off. Click HDR, then click On, Off or Auto. When HDR (high dynamic range) is on, photos take multiple exposures of the same scene and then combine them to create a better looking, more detailed image.
Turn on Chroma Boost. Click 📄. To add more color to your picture.
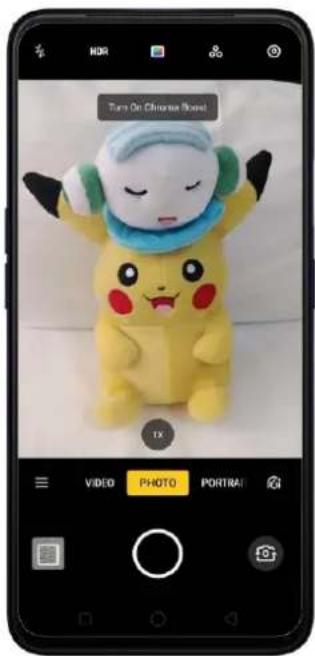
text_image
Turn On Chrome Store! 1X VIDEO PHOTO PORTRAIUse the capture timer. Capture timer gives you enough time to take a picture. Click
the top-right corner to go to Camera settings, then choose timer at 3s or 10s. To
touch screen and take a photo, click 📷 again then toggle [Touch to Take a Photo] to green to enable.

text_image
Camera Photo Ratio 4% Timer 10% Touch to Take a Photo GoGLge to Take Photo Volume Button Shutter Grid Shutter Sound Location Flip Sselfie AI Scene Recognition Watermark Timer Off 3s 10s 8Use Beauty Mode. Click 📄 then you drag AI to adjust the skin tone, enhance facial features, and make other minor changes you want on your subject.
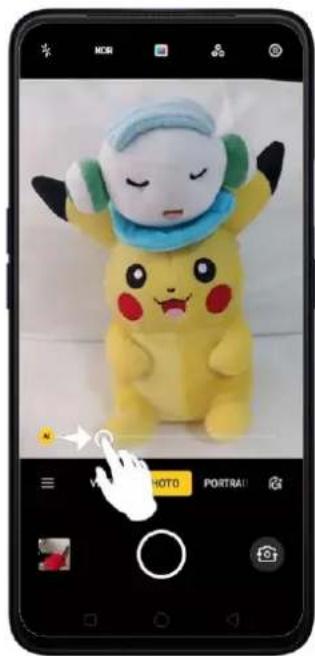
natural_image
Yellow Pikachu figurine with green and red features, displayed on a smartphone screen (no text or symbols on the figure itself)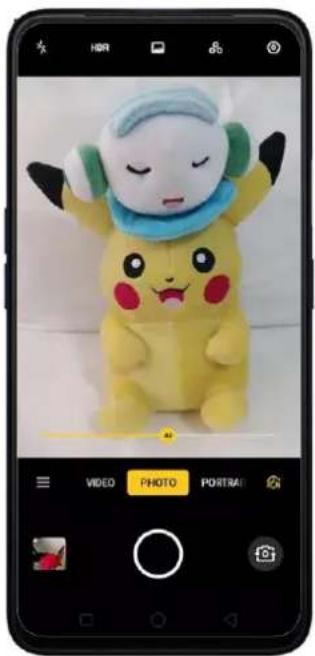
natural_image
Yellow Pikachu figurine with green and blue accents, displayed on a smartphone screen (no text or symbols on the figure itself)Add a filter. You can apply a filter before you take a photo. Click 📋 then you'll see a series of filter options, with each one showing a preview of what it will look like when applied to your photo. Click the filter you want to use. Switch to ORIGINAL to remove the filter.
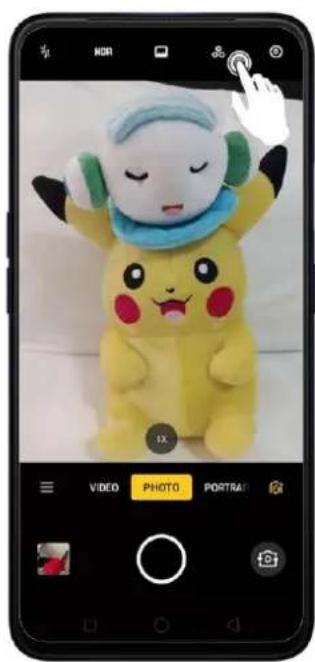
natural_image
Poksumia mascot displayed on a smartphone screen, no visible text or symbols in the image itself.
natural_image
Poksumus plush toy with a smiling face and blue hat, displayed on a smartphone screen (no text or symbols visible)Take a panorama photo. Click ☐ then choose PANO.
- With the rear cameras, click the Shutter button, then move the phone slowly and steadily across the subject you want to capture. Click the button again when you've got your full photo.

text_image
NIGHT PANO EXPERT TIME-LAPSE SLO-MO Google Lens VIDEO PHOTO PORTRAI
natural_image
Yellow Pikachu character wearing a blue surgical cap and green hat, sitting on a smartphone screen (no text or symbols visible)- With the front camera, click the Shutter button and you'll hear a "Ding" sound. Rotate the phone left or right until the phone sounds again. The photo will be taken automatically.

natural_image
Poksumus plush toy with green earband and blue helmet, displayed on smartphone screen (no text or symbols on the toy itself)Use Expert mode. EXPERT Mode allows you to take more professional-looking photos. Click ☐ then choose EXPERT, then you can adjust camera's white balance, exposure compensation, ISO, shutter speed, and more. (Note. Expert mode is only available when taking pictures using the rear camera).

text_image
1X Exptures WB AF EV 1:00 1/160s AUTOTake Portrait photo. Click Portrait to take a picture that focuses more on you and you can choose some filters as well.

natural_image
Yellow Pikachu figurine with a blue hat and green earband, displayed on a smartphone screen (no text or symbols on the figure itself)Take night scene photo. To take better pictures at night, choose NIGHT.
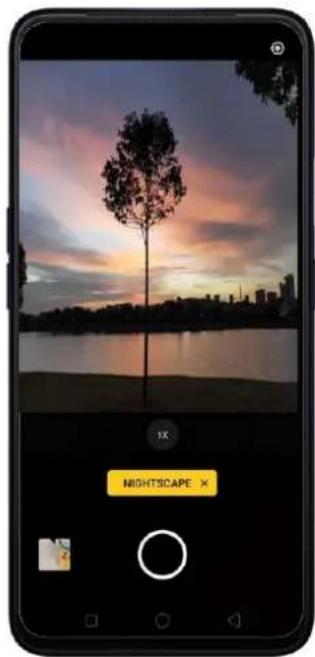
text_image
1X MIGHTSCAPE X
text_image
MIGHTSCAPE XUse Google Lens. Analyze what your camera sees and it will give you results in real time. It will tell you what the image is or give you links to understand it better. Tap on the image so it will be analyzed.

text_image
NIGHT PANO EXPERT TIME LAPSE SLO MD Google Lens VIDEO PHOTO PORTRAY
text_image
Google Lens What can Lens do? Copy Text Try phone numbers, dates, and adherence Search Similar Products Try clothing and furniture Identify Plants and Animals Try flowers and dog breeds Discover Books & Media Try books, movies, music albums, and video games Scan Codes Try barcodes and OR radles
text_image
Not sure. These results might help. Poncho Pikachu Plus... piazoeapan.com POKEMON BATTLE... qay.comNote: You need internet connection for this to work.
Take Burst shots. Choose Photo, touch and hold the Shutter button, and you'll see an onscreen count rapidly rise, which shows the number of photos you're taking. Lift
your finger to stop. To select the photos you want to keep, click on the image, click
, select the best photo you want, then click Done. Maximum photos that can be
taken in burst shot is 20.
text_image
Smartphone screenshot showing a Pikachu mascot with camera settings and a hand cursor clicking a button.
natural_image
Yellow Pikachu figurine with green and red accents, sitting on a white surface (no text or symbols visible)
text_image
Cancel Select photos to save Done 17:00 15:00 14:00 13:00 12:00 11:00 10:00 9:00 8:00 7:00 6:00 5:00 4:00 3:00 2:00 1:00 0:00 9:30 10:30 11:30 12:30 13:30 14:30 15:30 16:30 17:307.9.2. Take a selfie
To switch to the front-facing camera, click screen.

on the lower-right corner of the
text_image
HDR VIDEO PHOTO PORTRAITurn the flash on. Click 📄, then click if you want to activate it or have it in Auto mode. A white screen at full brightness is used as front-facing flash.
text_image
VIDEO PHOTO PORTSARTurn Front 3-HDR on or off. Click HDR, then click Off, On or Auto. When capturing images in bright sunlight or shade, front 3-HDR helps you to adjust the ratio of light to dark in the photo and make your subject look better.
text_image
HDR HDR VIDEO PHOTO PORTRAIUse the capture timer. Capture timer gives you enough time to take a picture. Click the top-right corner to go to Camera settings, then choose timer at 3s or 10s. To touch screen and take a photo, click 📷 again then toggle [Touch to Take a Photo] or [Gesture to Take Photo] to green to enable.

text_image
Show palm to take a photo 1X VIDEO PHOTO PORTRAI
text_image
Camera Photo Ratio Timer Touch to Take a Photo Gesture to Take Photo Volume Button Shutter Grid Shutter Sound Location Flip Selfie 4/Scene Recognition WatermarkChoose a photo mode. Click 📷 on the top-right corner to go to Camera settings, then choose 4:3, 1:1, or full screen photos or 4:3 (Ultra HD)
text_image
HDR VIDEO PHOTO PORTRAT Photo Ratio 4:3 1:1 Full Screen 4:3 (Ultra HD) All 3D. MP: Does Just support Doors. Photo name: Dress HDR Image, Beauty/ All Science Biography, Connected ShootingAdd a filter. You can apply a filter before you take a photo. Click 📁 then you'll see a series of filter options, with each one showing a preview of what it will look like when applied to your photo. Click the filter you want to use. Switch to ORIGINAL to remove the filter.

text_image
Mobile app screenshot showing facial close-up with adjustment controls and image thumbnailsUse Beauty Mode. Click 📄. The built-in beauty filter will automatically adjust the skin tone, enhance facial features, and make other minor changes to your appearance.
text_image
HDR VIDEO PHOTO PORTRAI HDR 1X• Use Natural: Click AI. This will take a picture filter-free.
- Choose Custom beauty: Choose from smooth skin, thinner face, smaller face, chin, bigger eyes, smaller nose, touch up, or 3D. Click Reset if you want to start over.
7.9.3. Shoot video
With Camera you can shoot video, including time-lapse and 10s short videos. Press
to pause and click to play.
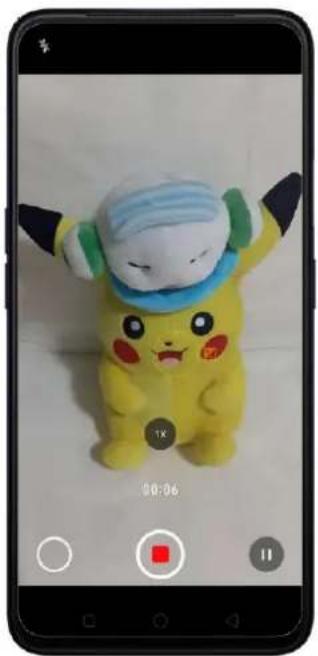
natural_image
Yellow Pikachu figurine with a blue hat and green earband, sitting on a smartphone screen (no text or symbols on the figure itself)Record a video. Choose Video, then click the Record button, or press either volume button, to start and stop recording. You can choose between 720, 720P, 1080P. Just click 📷 on the top-right corner to go to Camera settings.
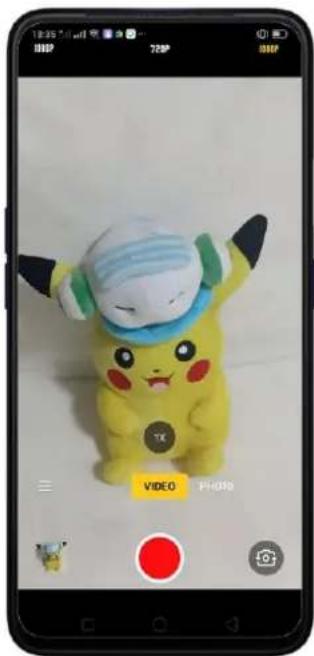
text_image
18:35 7:00 AM 8:00 PM 7:20 PM 8:00 PM VIEGO PHOTO
text_image
Camera Volume Button Shutter Shutter Sound Location Flip Selfie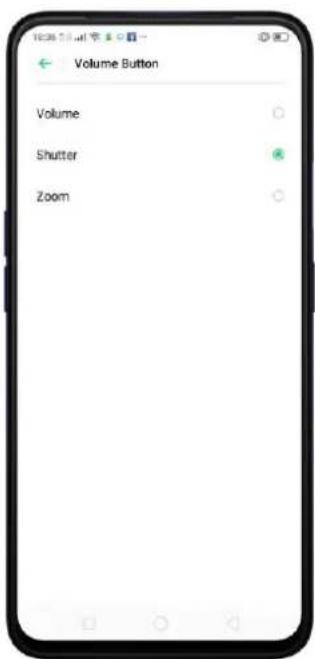
text_image
Volume Button Volume Shutter ZoomZoom in or out when shooting video. (rear camera) Toggle 1x or 2x. You can also pinch the screen to zoom in and out or press and hold the zoom number until a
line comes out and adjust it by dragging to left or right. Same process as taking photo.
Turn the flash on or off. Click 🧑️ turn on the Fill Light which gives more light to the subject. Click ⚙️ to turn off the flash.
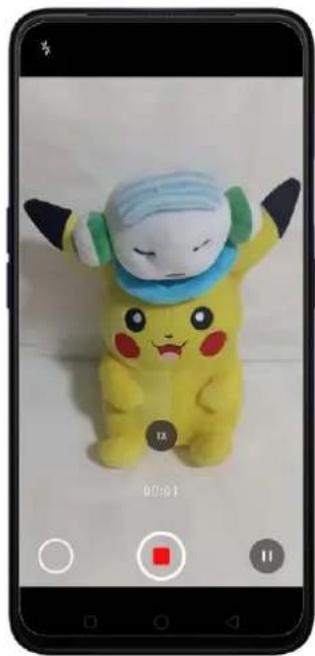
natural_image
Poksumus mascot displayed on a smartphone screen, no visible text or symbols in the image itself.
natural_image
Yellow Pikachu figurine with green hat and blue scarf, displayed on smartphone (no text or symbols on the figure itself)To choose TIME-LAPSE or SLO-MO video click ☐. TIME-LAPSE records a scene or object that has a slow state-of-change and turns it into a video that plays back in high speed while SLO-MO records a scene or object that has a normal action or move and turns it into a video that plays back in very low speed.
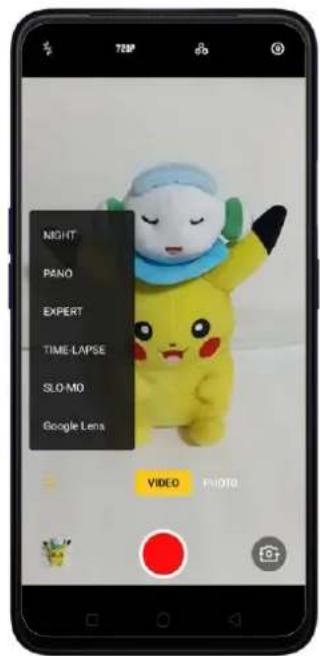
text_image
72BP NIGHT PANO EXPERT TIME-LAPSE SLO-MO Google Lens VIDEO PHOTOTake photos when shooting a video. Click the Shutter button in the lower-left corner of the screen.

text_image
Smartphone screenshot displaying a Pikachu mascot with a camera app interface showing 'VIDEO' and 'PHOTO' buttons.Add a filter. You can apply a filter before you take a photo. Click 📁, then you'll see a series of filter options, with each one showing a preview of what it will look like when used. Click the filter you want to use. Switch to ORIGINAL to remove the filter.
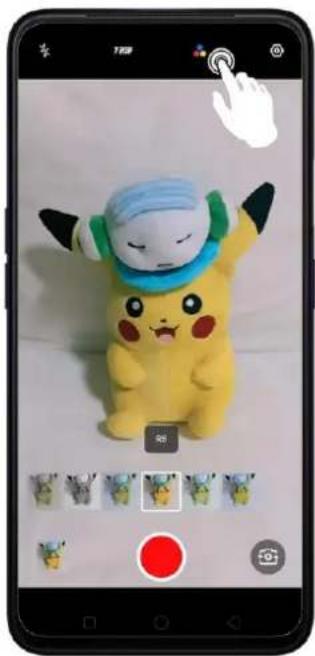
natural_image
Black-and-white photo of a Pikachu character with a blue hat and green scarf, displayed on a smartphone screen (no text or symbols visible on the character itself)7.9.4. Camera Settings
Camera settings are special options that help you to take pictures or record videos or manage the camera sound when taking a photo. From your Camera just click on the top-right corner to Camera settings or go to [Settings] > [System Apps] > [Camera].
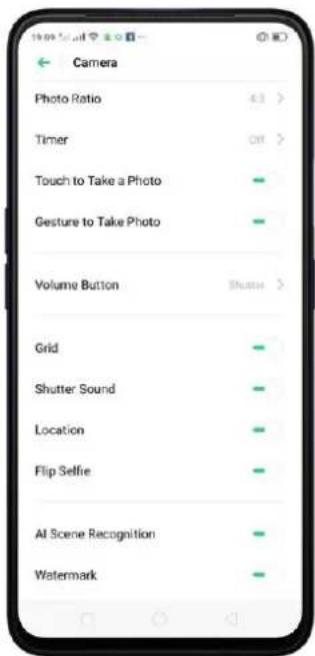
text_image
Camera Photo Ratio 4.3 > Timer Off > Touch to Take a Photo Gesture to Take Photo Volume Button Shutter > Grid Shutter Sound Location Flip Selfie AI Scene Recognition WatermarkPhoto Ratio: Set the screen size to Default 4:3, Square 1:1, full screen, 4:3 Ultra HD.
Timer: You can set timer to 3s, 10s, or none.
Touch to take a photo: Makes you take picture by touching the screen.
Gesture to take a photo: This is available for taking selfie only. Just show your palm to take a picture.
Volume button: Set the Volume buttons to function as a volume or zoom controls, or the shutter release. (Note: For Video, volumes up and down can be used to start and stop a recording).
Grid: Display grid lines to ensure the camera is leveled.
Shutter sound: Make or mute camera shutter sound when capturing photos.
Location: Tag your photos with geo-locations.
Flip selfie: Mirror flips your front facing camera photos.
AI Scene Recognition: Automatically recognizes scenes or subjects.
Watermark: Automatically add an realme watermark after taking a photo.
Photographer: You can manually add the name of the photographer and will automatically say that it is shot from an realme phone.
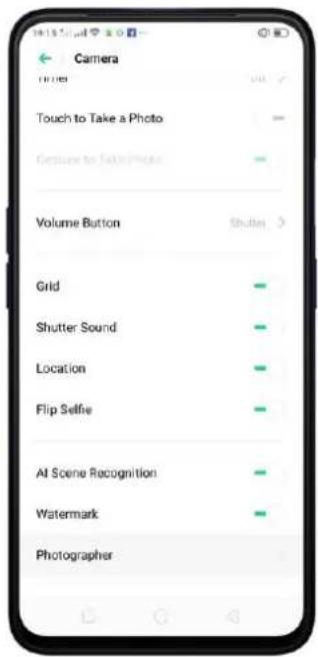
text_image
Camera Touch to Take a Photo Gestion to Take Photo Volume Button Grid Shutter Sound Location Flip Selfie At Scene Recognition Watermark Photographer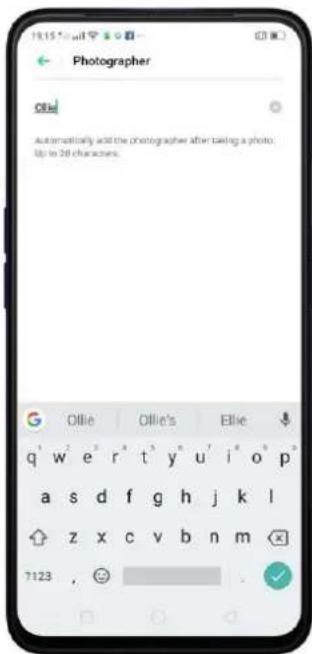
text_image
Photographer Ollie Automatically add the photographer after taking a photo. Up to 20 characters.
natural_image
Plush Pikachu figurine with a blue surgical cap and green band, sitting on a white surface (no text or symbols visible)7.10. Photos
7.10.1. Photos Overview
The Photos app is where you store your photos and videos, including those you've taken with the built-in camera, saved from an app or a webpage, copied from optional storage devices, and more. You can view, share, and edit your photos and videos directly on your phone.
View Photos. You can view the roll of photos in either Camera or Photos. All photos are sorted by the dates and times-they were taken. In Photos, select Year or Month view in timeline to quickly lock the look-up scope. Click an album to view the photos or videos on that album. You can also pinch the screen to zoom in and out

text_image
Photos Albums Memories 2018 2019
text_image
19:24:5:44 Time: Phone: Peoria Photos Albums Memories January 2019 February 2019 March 2019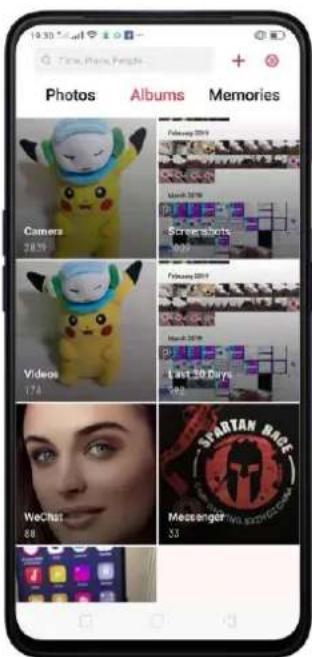
text_image
19:30 Time, Photo People Photos Albums Memories Camers 28.7% Videos 174 WeChat 80 February 2019 February 2019 March 2019 Screehorts 100% February 2019 March 2019 Last 30 Days 50% SMARTAN MUSIC Messenger 53Note: Memories and Stories are terms that can be interchangeably used and doesn't affect the full functionality of the feature.
7.10.2. Albums
Each time you take a new photo, by default, it gets stored in the Photos album. Within the Photos app, there are a number of default albums into which your photos get automatically organized. In addition to these, you can also create your own albums into which you can organize photos further.
You can see your photo albums by clicking Albums at the bottom right of the Photos app.

text_image
Albums 1月2日 2 DCIM Movies 3 Pictures 13 OR LAN VOLIST Bluetooth 325 Download 18 Rarely used AlbumsWhat's new in ColorOS 6? If you scroll down at the bottom of the Album page, you will see Media type which categorizes the type of mode when you took the shot. GIF and Recently Deleted have been added too.
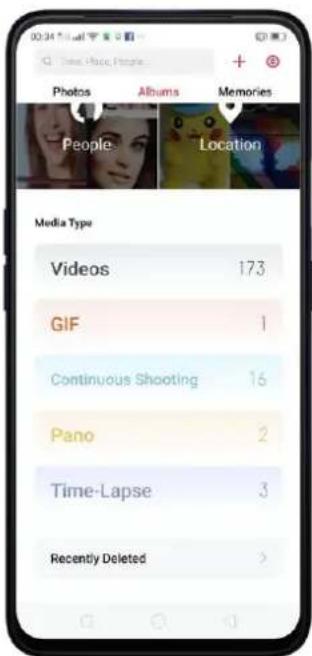
text_image
00:34 Mail Time: Music People Photos Albums Memories People Location Media Type Videos 173 GIF 1 Continuous Shooting 16 Pano 2 Time-Lapse 3 Recently Deleted >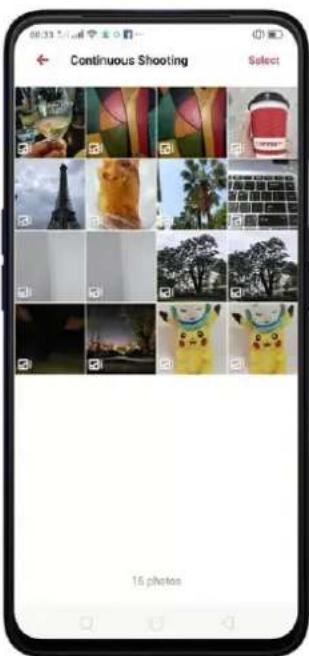
text_image
Continuous Shooting Select 16 photosCreate a new album. Click +, enter a name, then click Save. Once saved, you'll be given categories of photos that you can transfer to your album. Just choose the image or click Select all then click Save.
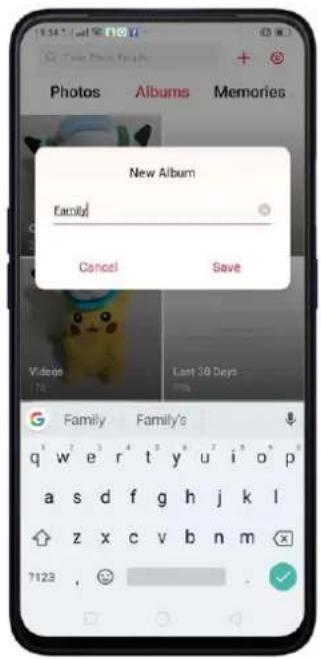
text_image
New Album Family! Cancel Save Videos Last 30 Days 174 7123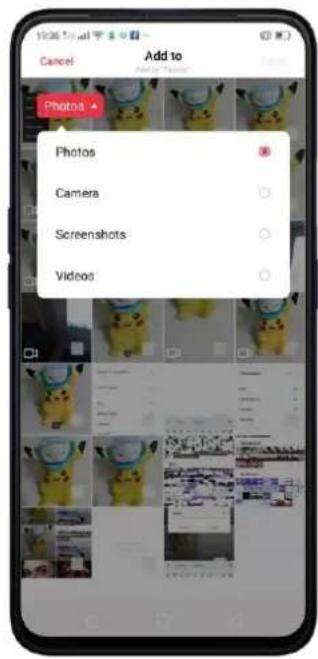
text_image
Add to Photos Camera Screenshots Videos
text_image
19:30 AM Cancel Add to WeChat Messenger Messenger InstagramAdd items to an existing album. While viewing photos, click Select, select items, click Add to, then select an album.
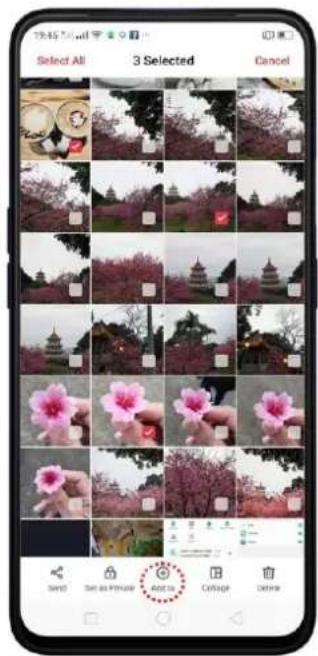
text_image
29:45:00 Selected All 3 Selected Cancel SAND Set as Picture Add to Culoupe Delete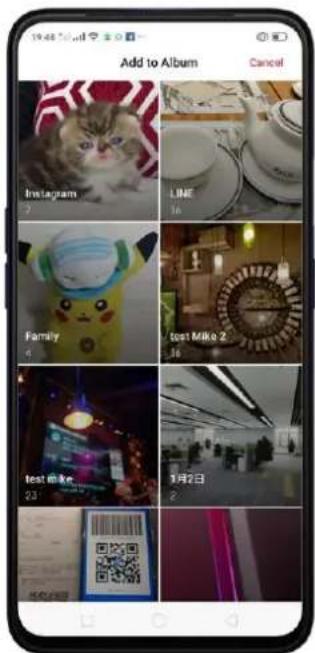
text_image
Add to Album Cancel Instagram LINE Family cost Mike 2 test Mike 9月2日 23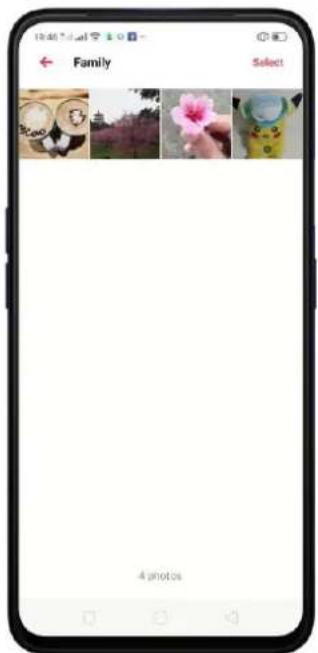
text_image
Family Select 4 photosRemove items from an album. From the album screen, click Select, select items,
click Delete, then click Delete_Photos.
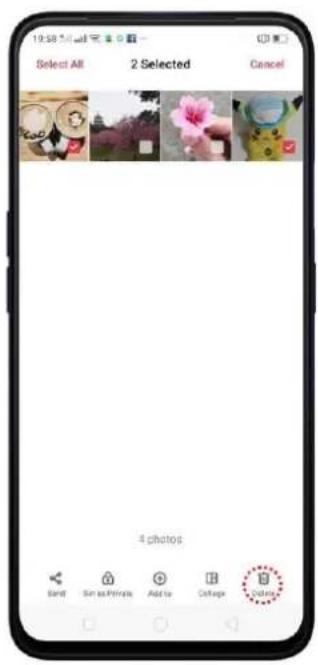
text_image
19:58 5:44 Select All 2 Selected Cancel 4 photos Send Sim as Private Add to College Color
text_image
Select All 2 Selected Cancel Delete 2 Photos CancelDelete an album. From the Albums screen, click Edit then click albums you want to delete, click Delete > Delete _ Albums. Default photo albums cannot be deleted.
Delete a photo or video from Photos. Click a photo or video or click Select or
Select All then select the photos or videos to be deleted, then click Delete > Delete Items. . Deleted photos and videos are kept in the Recently Deleted album for 30 days before they're permanently removed.
Restore a deleted photo or video. In the Recently Deleted album, click the photo or video or click Edit to manage the photos then click Restore >Restore_Items.
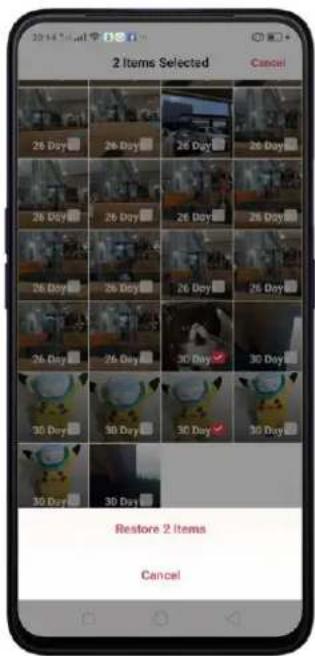
text_image
2 Items Selected Cancel 26 Day 26 Day 26 Day 26 Day 26 Day 26 Day 26 Day 26 Day 30 Day 30 Day 30 Day 30 Day 30 Day Restore 2 Items CancelSmart album search and cleanup. You can search your photo library depending on the date, location, people, and content of the photos on your device. In Phone Manager, you can also clean up photos in batches such as similar and blurry photos. See Clean Up Storage
Optimized album management.
- In addition to the frequently used social apps, images downloaded from third-party apps will be saved in Rarely-used Album. You can put other images into Rarely-used Album by clicking an image then click Add to > Set as rarely-used.

text_image
Albums Edit + 1月2日 DCBM Movies Pictures Bluecloth Download Rarely-used Albums- Your photos will be put into sequential order by modification time. In other words, once an old photo or video has been modified, it will be saved as the latest photo or video.
- Photos downloaded from spam applications will be controlled by phone's blacklist and will not be displayed in albums.
Note: Memories and Stories are terms that can be interchangeably used and doesn't affect the full functionality of the phone.
7.10.3. Stories / Memories
Using the on-device facial recognition and AI detection of what's on your images, your phone can combine photos into themed mini-movies complete with transitions and a soundtrack. For instance, it will put together an album about your last vacation in Europe, or an album of your kids growing up. You can also edit them and share them with others.
Play a Memory movie. Choose Memories, click a Memory, then click ☑. The movie will play in landscape mode by default. To pause, click the movie, then click II.
Note: Your phone categorizes your photos weekly while your phone is plugged and locked.

text_image
Photos Albums Memories Little Fluffy Buddies 2018 To 2019 The Year in Review 2018 Three Months of Mem... December 2018 To February 2019
text_image
The Year in Review 2019
text_image
The Year in Review 2016Customize a Memory movie. Click a memory, while it's playing, then click Edit to do the following:

text_image
The Year in Review 00:00 01:00 Theme Music Cover Title Photo Lan Cancel Done- Change the theme: Click Theme, then click a theme or swipe the themes left or right to pick a new one, such as Joyful, Cozy, and more. For each theme, there is a music of the Memory movie.
- Choose different music: Click Music, then swipe the music left or right to pick a new one. You can also use your local and saved music.
- Choose a cover: Click Cover, then click the photo you want to use.
• Edit the title: Click Title, edit the title, then click Save.
- Choose or delete photos: Click Photos, click +, then select the photos you want in the movie. Click 📄 to remove the photos from the movie.
- Change the movie length: Click Length, then scroll the wheels to change the length.
Share a Memory movie. Click a Memory while it's playing then click 📋 then click Send.

text_image
1 Video Selected Cancel OPPO Share. Tap here to open Wi-Fi and Bluetooth to send via "OPPO Share". Facebook Your Story RealDai Gmail Messages Bluetooth AUG's Mega YouTubeNote: Memories and Stories are terms that can be interchangeably used and don't affect the full functionality of the feature.
7.10.4. People
In the Photos app, there's an album called "People." It uses facial technology to identify the people in the pictures or those with combine identifications, then group pictures of the same people together. You can name or rename a People album, hide People albums, merge People albums into one, and more.
*Your phone generates People album while your phone is plugged and locked.
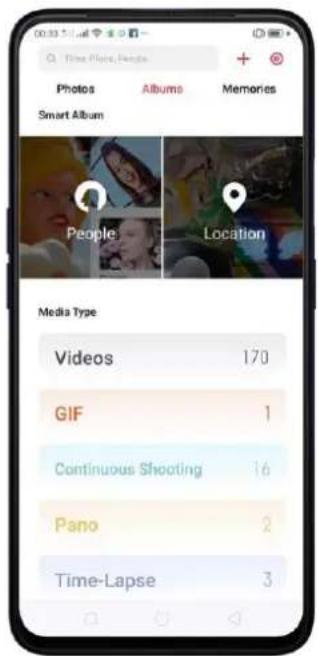
text_image
00:33:54 Time Place, People + - Photos Albums Memories Smart Album People Location Media Type Videos 170 GIF 1 Continuous Shooting 16 Pano 2 Time-Lapse 3
text_image
People Select More PeopleName or rename a People album
If a profile is unnamed, click the People album, click "Add Name", then type in the name you want to use and click Save.
If a profile has a wrong name, click the People album, click the name, then type in the name you want to use and click Save.
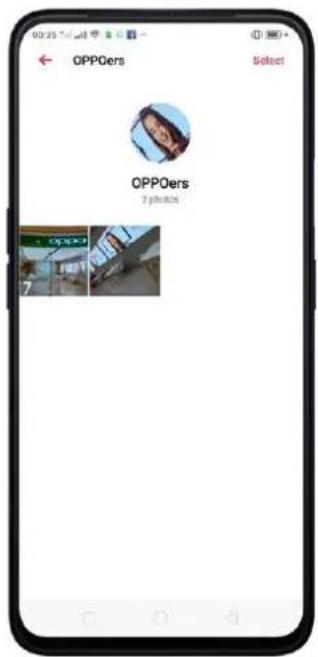
text_image
OPPOers Select OPPOers 7 photos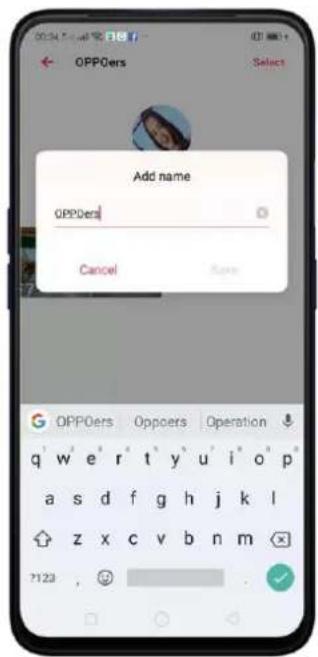
text_image
OPPOers Add name OPPOers Cancel OK OPPOers Oppoers Operation q w e r t y u i o p a s d f g h j k l z x c v b n m 7123 ,Add photos to a People album
Click a People album, click More People, and select the photos you want to be added on the album, then click Display.
Hide, display, and merge People albums
Hide People albums. Open the People albums, then Select > Hide. The hidden albums are collected in More People.
Display People albums. To display the hidden albums, click More People, click Select and choose the people you want to display, then click Display.
Merge People albums into one. Click Select, select at least two People albums, and then click Merge.
Remove misidentified photos from an album
Click an album you want to remove photos from, click Select, select the misidentified photos, and then click Wrong Person. The photos will be moved to More People.
Set a cover of the People album
Click an Album, click the portrait, then choose the photo you want as the cover.

text_image
00:47 Select All 1 photo selected Cancel OPPOers 2 photosNote: Memories and Stories are terms that can be interchangeably used and doesn't affect the full functionality of the phone.
7.10.5. View and use photos and videos
View your photos and videos. Click Photos, and then click a photo or video. Click
to play a video. Or click Camera, and then click the thumbnail on the lower-left corner of the screen.
View a photo at full screen. Click a photo, and then click the screen to hide the controls.
View the next or previous photo. Flick left or right.
View a photo in landscape orientation. On Control center, turn [Portrait Orientation] off, then rotate your phone sideways. The photo automatically reorients and, if it's in landscape format, expands to fit the screen.
Zoom in or out. Double-click or pinch a photo to open or closed. Drag to see other parts of the photo.
See photo and video details. Click a photo or video, click More and choose Details.
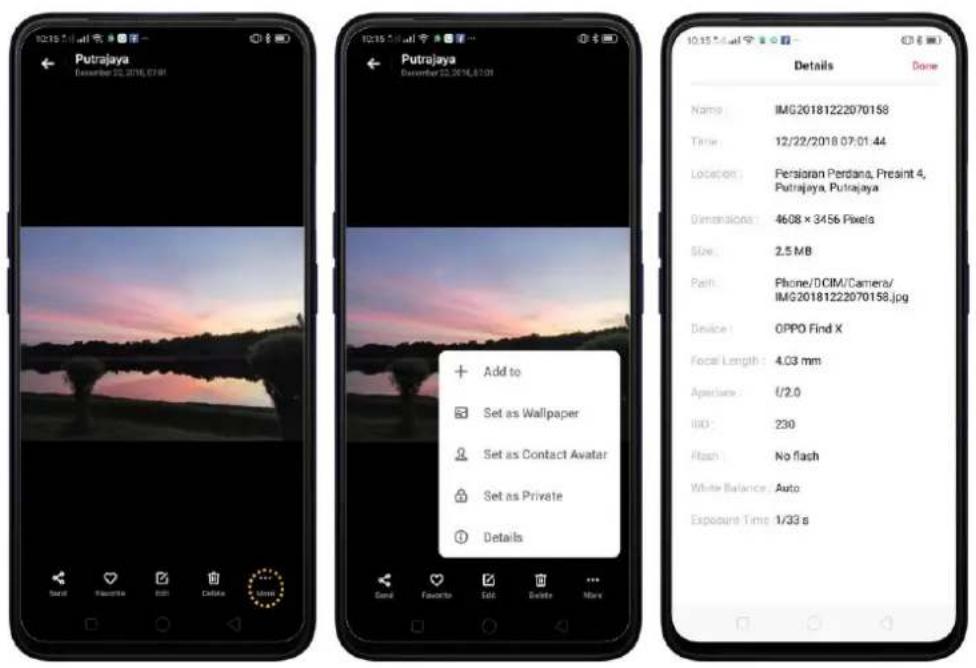
Send a photo or video. Click 📋, and then choose where to send your photo or video.

natural_image
Smartphone screenshot displaying a sunset over water with trees and hills, no visible text or symbols on the image itself.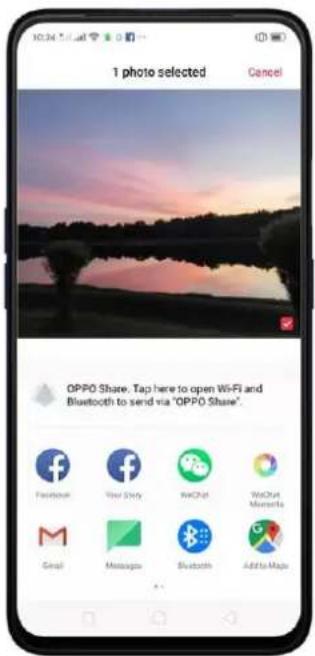
text_image
1 photo selected Cancel OPPO Share. Tap here to open Wi-Fi and Bluetooth to send via "OPPO Share". Facebook Your Story WeChat WeChat Magenta Gmail Messages Bluetooth Addie MapsUse a photo as wallpaper. Click a photo, click More and choose Set as Wallpaper. Drag the photo to pan, or pinch the photo to zoom in or out, until it looks the way you want. You can also click scroll with Home Screen so your wallpaper will move the way you navigate your screen. Click Set as to set the wallpaper as your Home Screen or Lock Screen or Both.
text_image
Putrajaya December 20, 2014, 67:08 + Add to Set as Wallpaper Set as Contact Avatar Set as Private Details
text_image
10 29 Mon, Mar 10 Scroll with Home Screen Set as
text_image
10 29 Mon, Mar 18 Set as Lock Screen Wallpaper Set as Home Screen Wallpaper Set Both CancelAssign a photo to a contact. Click a photo, click More and choose Set as Contact Avatar, select a contact, crop the photo, and then click Done.

text_image
Putrajaya December 22, 2018, 07:01 + Add to Set as Wallpaper Set as Contact Avatar Set as Private Details
text_image
10:55 Mail Select Contacts Cancel Searchin (Connects) G Globe James J James O Ollie
natural_image
Smartphone displaying a sunset over water with pink sky and silhouetted trees (no text or symbols visible)Add a photo or video to an existing album. Click a photo, click More and choose Add to.
Edit the photo. Choose an image then click Edit . You can edit your photos using a set of professional editing tools, including cropping, adding text, stickers and filters, and more. See Edit photos and videos.
text_image
10:15 L 1:45 PM Petrogpo Auction: 2.0000000000 Cancel CancelDelete a photo or video. Click Delete
Add a favorite photo. Click Favorite so the photo will be added to the Favorites Album.
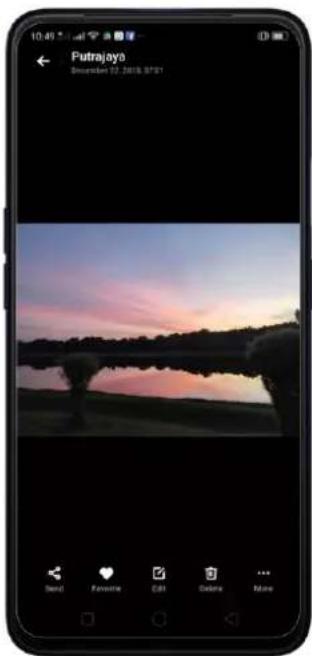
natural_image
Smartphone screenshot displaying a sunset over water with silhouetted trees (no text or symbols visible on the image itself)
text_image
10:51:54:57 Albums Edit + Camera 2635 Favorites ! Screenshots 3129 Videos 171 Last 30 Days 1111 WeChat 98 SPARTAN ROCECombine the photos. From the Photos screen, click Select, select photos, then click Collage. Choose a type of collage: Template, Poster, or Stitch.

natural_image
Mobile phone screenshot showing cherry blossoms and a pink flower, with no visible text or symbols on the main image area.
text_image
Collage Dome THE BEST THING TO HOLD ONTO IN LIFE IS EACH OTHER Template Poster Stitch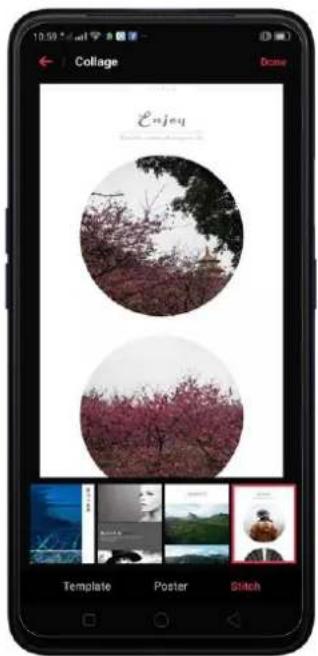
text_image
10:59 Collage Dose Enjoy Template Poster Stitch7.10.6. Edit photos and videos
You can edit your photos and videos on the Photos app directly using a set of professional editing tools, including cropping, adding text and filters, and more.
Edit a photo. Open the Photos app and view the photo full screen, click Edit, then click a tool. Click Compare to view changes. When you're finished, click Done.
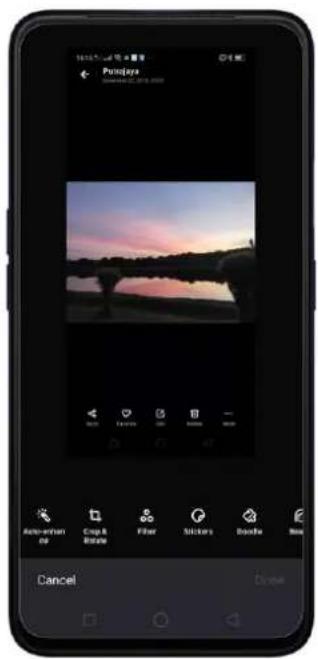
text_image
Posinjys September 25, 2013 Auto-attention Crop & Stroke Filter Stickers Double New Cancel
text_image
Periogra Compare Filter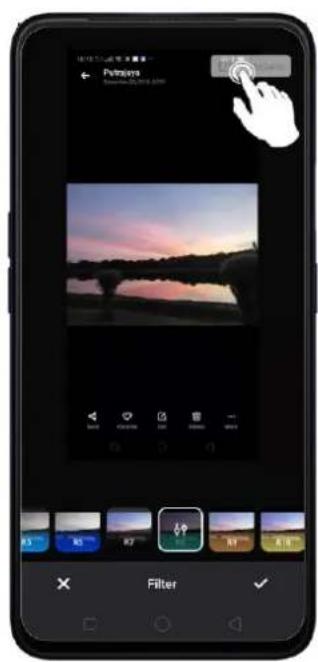
text_image
Purions Balance: 2018.04.09 Filter- Auto Enhance: Enhances the photo's light levels, contrast, saturation, color temperature, and other qualities to make the photo more visually balanced.
- Crop and rotate: To crop the photo, click and drag a corner or side of the photo, or click Ratio and apply a preset aspect ratio to the photo, such as 1:1 or 9:16. To rotate the photo, move the wheel to your desired angle, or click Rotate to rotate the photo 90 degrees. Click Undo to reset these changes.
• Filter: Add a color filter to the photo, such as R1, R2, R3, and so on.
• Stickers: Add funny and cute stickers on the photo. - Doodle: Write or draw on the photo. You can adjust colors and thickness of your handwriting.
- Beauty: Click One-tap to Beautify to automatically improve both the appearance and the shape of your face. You can choose from 6 beauty levels. To beautify part of the face, choose a tool and make adjustments to the face, such as whiten skin, remove unwanted blemishes, enlarge eyes, and more.
- Text: Click the photo to add the text. You can adjust colors and thickness of your text. Click and drag the text to move its position; click and drag

to adjust the font size; click and drag

to rotate the text; click

to delete the text.

text_image
Panjaro Sunset Color Size Text- Adjust: Manually adjust the photo's brightness, contrast, saturation, and color temperature.
- Mosaic: Pixelate part of the photo. You can change the pattern and thickness of the mosaic.
- Blur: Set the blur effect over the photo with circle or straight lines. The area within the circle or lines represents the non-blur part. Click the screen and drag the circle or the lines to select where to blur. Drag the slider to left or right to adjust the blur Intensity.
- Eraser pen: Erase people, watermarks, and any unwanted objects that's on your photo.
Edit a video. Open the Photos app, click the video, click Edit, click a tool. When you're finished, click Done.
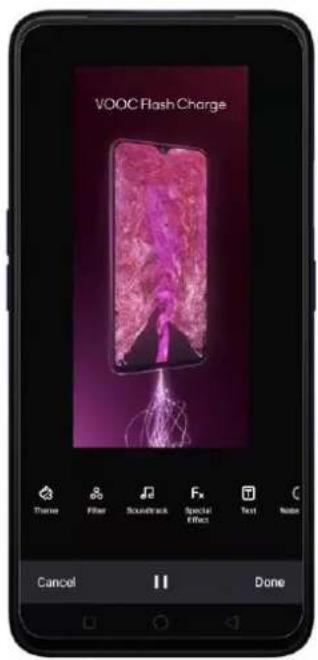
text_image
VOOC Flash Charge Timer Filter Soundtrack Special Effect Text Noise Cancel || Done- Speed of the video. Choose what speed you would like the video to play. The slowest is 0.25X and fastest is at 2X. The normal one is 1X.
- Theme of the video: You can choose from None, Old Days, Lens, Memory, Tasty Food/Delicacy, Joy, Travel, and Simplicity.
• Filter Video: Add a color filter to the video, such as C1, C2, C3 and so on. - Soundtrack: Add a soundtrack to the video. You can also use your local and saved music. Click 📷 to turn off the original sound of the video.
• Fx Special Effect. You can choose from None, Close-up, and Pulsation.
- Text: Click 📄 to add overlay text on the video. Click and drag the text to move its position. Drag the frame viewer to control when the text showed up.
- Watermark: Add a watermark with the location and date of the video. If the video doesn't contain the details of location and date, you cannot add the watermark.
7.11. Music
7.11.1. Music
Use the Music app to enjoy songs stored on your phone. You can also create playlists, set songs as ringtones for incoming calls, and more.
To see what you can do with your music, click : on the right side of the song title.

text_image
Tracks Artists Albums Playlists Add to List Send Song Set as Ringtone View Details Delete Song CancelAdd to playlist. Add a song to an existing playlist. You can also create a new playlist.
Send song. You can share a song with your friends using multiple ways.
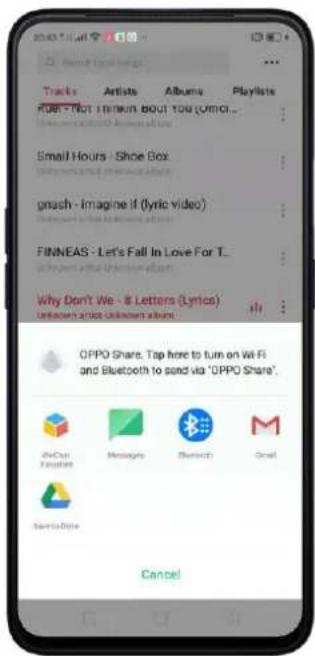
text_image
20:43:15 AM Tracks Artists Albums Playlists ROAD - Not I remember about You (WMCI... Small Hours - Shoe Box gnash - Imagine if (lyric video) FINNEAS - Let's Fall In Love For T... Why Don't We - 8 Letters (Lyrics) OPPO Share. Tap here to turn on Wi-Fi and Bluetooth to send via "OPPO Share". MyChat Favorites Messages Bluetooth Gmail Save to Drive CancelSet as ringtone. You can set a song as a ringtone for all incoming calls and messages, or for a contact. You can also set a song as an alarm tone.
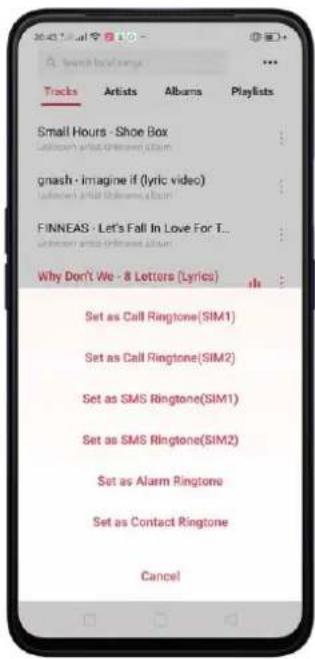
text_image
Small Hours - Shoe Box gnash - imagine if (lyric video) FINNEAS - Let's Fall In Love For T... Why Don't We - 8 Letters (Lyrics) Set as Call Ringtone(SIM1) Set as Call Ringtone(SIM2) Set as SMS Ringtone(SIM1) Set as SMS Ringtone(SIM2) Set as Alarm Ringtone Set as Contact Ringtone CancelView details. Click to view the name, artist, album, format, size, and storage location of a song.
Delete song. Remove the song from the playlists and your phone storage.
7.11.2. Change sort mode
By sorting your playlist, you can easily order the songs on your phone.
Change the order of your songs. From the Music screen, click a song, click ... in the upper-right corner of the screen, and then click Select Sorting Method. Your songs can be sorted alphabetically, by time when the song is added, or by folders the songs are in.

text_image
Tracks Artists Albums Playlists Small Hours - Shoe Box Universe all the (Lyric video) gnash - Imagine it (Lyric video) Universe all the (Lyric video) FINNEAS - Let's Fall In Love For T... Universe all the (Lyric video) Why Don't We - 8 Letters (Lyric) Universe all the (Lyric video) Troye Sivan - Somebody To Love ... Universe all the (Lyric video) No Rome It. The 1975 - Narcisslet... Select Sorting Method Scan Local Songs Manage Songs Cancel Select Sorting Method Cancel Display Alphabetically Display by Time Added (Default) Display by Folder7.11.3. Scan local songs
The Music app contains all music-related materials on your phone storage. To manually scan for local songs, or choose which songs can be displayed on your list, do the following:
Scan all local songs. Click … on the upper-right corner of the Music screen, then click Scan Local Songs. Your phone will automatically start scanning.
Scan specific folders. Click Scan specific folders, and then choose the folders you want the phone to scan for. Go back to the Scan Local Songs screen, and then click Scan again.
Filter audio files. To filter tracks that are too short (under 60 seconds) and too small (under 100KB), toggle the sliders to orange.
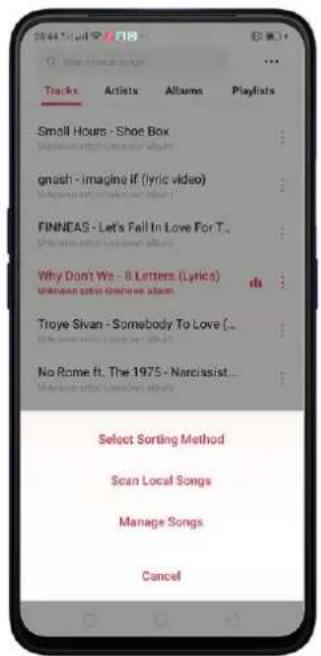
text_image
Tracks Artists Albums Playlists Small Hours - Shoe Box gnush - Imagine if (lyric video) FINNEAS - Let's Fall In Love For T. Why Don't We - 0 Letters (Lyrics) Unknown artist (Narcissist album) Troye Sivan - Somebody To Love (_ No Rome ft. The 1975 - Narcissist... Select Sorting Method Scan Local Songs Manage Songs Cancel
text_image
Scan Local Songs Done Found 50 song(s) 100% Skip Songs Under 50 Secs Recording (Yes) and (No) double digitizer Yes Skip Songs Smaller than 100 KB Song (Yes) will be below 100kb Scan Specified Folders Local training (Yes) in specific folders Scan Again
text_image
Scan Specified Folders 360 //storage/ Simulated/GI360 Android //storage/ Simulated/GI360 Backup //storage/ Simulated/GIBackup Bluetooth //storage/ Simulated/GIBluetooth ColorOS //storage/ Simulated/GIColorOS Download //storage/ Simulated/GIDownload DCIM //storage/ Simulated/GIDCIM Intsig.Log //storage/ Simulated/GIIntsig.Log Movies //storage/ Simulated/GIMemes New Folder //storage/ Simulated/GINew Folder7.12. Videos
Use Videos to watch videos you've downloaded or taken with the built-in camera.
Play a video. Click Videos on the Home Screen, then click the video.
Control video playback. Click the screen to show or hide the controls.

text_image
21:04 OPPO_F9 Pro VOOC Hash Charge 00:22 00:32
text_image
Screen rotation and keys are disasoodTO
DO THIS
| Play or pause a video | Click ▶ or ∥. |
| Raise or lower the volume | Click the volume buttons on the side of the phone, or swipe your finger up or down on the right side of the screen. |
| Increase or dim the brightness | Swipe your finger up or down on the left side of the screen. |
| Skip to the next or previous video | Click ↗ or ↙. |
| Rewind or fast-forward | Swipe your finger left or right on the screen. |
| Start a video over | Click ↕ twice quickly. |
| Skip to any point in the video | Drag the play head left or right. |
| Lock the screen rotation and disable bottom keys | Click [IMAGE]. |
| Play audio only and no image. | Click [IMAGE]. |
| Play on full screen. | Click [IMAGE]. |
Sort videos. From the video screen, click ≡ and choose to sort by name, added date, or duration.
Send videos. From the Videos screen, click Select, choose videos, click Send, then choose an option for sending the video.

text_image
2155.000 / 10 Select all 2 Videos Selected Cancel VID20180828135555 received_6...35315246 Record_20...4-09-10-37 Record_20...3-17-29-49 OPPO Share. Tap here to turn on Wi-Fi and Bluetooth to send via "OPPO Share". Facebook Auto Maps Bluetooth Street Show to Share Uploads/Mybox YouTube CancelRename a video. Click Select, choose a video, and then click Rename. Enter the name, then click Save.
See details about a video. Click Select, choose a video, and then click Details.
Edit a video. Click Select, choose a video, and then click Edit.
Delete videos. Click Select, choose videos, click Delete, and then click Delete Video.
7.13. Clock
7.13.1. Set Alarm Clocks
Time to set up that alarm and never be late again. You can also set multiple alarms, set each alarm to repeat on days you specify or to sound only once.
Set an alarm. Click Alarm and click +, scroll wheels to change the time then click Save. Note: You'll be given the exact time before the alarm will turn on.

text_image
7 hours 26 minutes from the next alarm 05 80 06 00 07 81 Label Alarm Repeat None > Ringtone Minones > SnoozeManage alarm settings.
- To give the alarm a description, click Label. Your phone displays the label when the alarm sounds.
• To set the alarm to repeat on certain days, click Repeat and choose the days.
• To choose the ringtone that sounds when the alarm goes off, click Ringtone. - To set whether the alarm gives you the option to hit snooze, turn Snooze on or off. If Snooze is on and you click Snooze when the alarm sounds, the alarm stops and then sounds again in five minutes.

text_image
22:43 Clock Alarm Snooze Stop 22:43 ClearZEC Press Fri Mar 15Turn an alarm on or off. Toggle the slider to orange or white. If at least one alarm is set and turned on, 🔒 appears on the status bar at the top of the screen.
Tip: The alarm still works even if your phone is turned off.

text_image
Edit Alarm Clock Stopwatch Timer 07:30 Alarm 08:00 Alarm 08:20 AlarmDelete an alarm. Long press on the alarm time that you want to delete then click

Delete.

text_image
Edit Alarm Clock Stopwatch Timer 07:30 Alarm 08:00 Alarm 08:20 Alarm Select All Selected 1 Alarm(s) Done 07:30 Alarm 08:00 Alarm 08:20 AlarmChange settings for an alarm. Click the alarm.
7.13.2. Add and view clocks for locations around the world
You can add multiple clocks to show the time in major cities around the world.

text_image
Edit Alarm Clock Stopwatch Timer Tokyo Yamashan, +1 HRS 00:00 Paris Today, 7 HRS 16:00 Cairo Today, 6 HRS 17:00 Beijing Today 23:00View clocks. Click Clock. If the clock face is white, it's daytime in that city. If it's black, it's nighttime.
Add a clock. Click + and type the name of a city. Cities matching what you've typed appear below. Click a city to add a clock for that city.

text_image
B Adelaide, Australia GMT+09:30 Aden, Yemen GMT+08:00 Albuquerque, U.S.A. MST Algiers, Algeria GMT+01:00 Alice Springs, Australia GMT+09:30 Almaty, Kazakhstan GMT+06:00 Alofi, Niue GMT+11:00 Ammon, Jordan GMT+02:00 Amsterdam, Netherlands GMT+01:00 Amundsen-Scott Station, Antarctica GMT+12:00 Anadyi, RussiaDelete a clock. Long press the clock that you want to delete and then click Delete. Click Select All when you want to delete all clocks or Undo if you change your mind,

Delete.
then click Done.

text_image
Edit Alarm Clock Stopwatch Timer Tokyo 00:07 TOMOROW +1 HRS Paris 16:07 Today -2 HRS Cairo 17:07 Today -6 HRS Beijing 23:07
text_image
Select All Selected 1 Clock(s) Done Tokyo Tokyo+1 HRS Paris Today -7 HRS Cairo Today -6 HRS Beijing TodayRearrange clocks. Long press the clock that you want to change position then drag ≡ next to a clock to replace its position then click Done. Note: No need to tick the box. It can be dragged still.
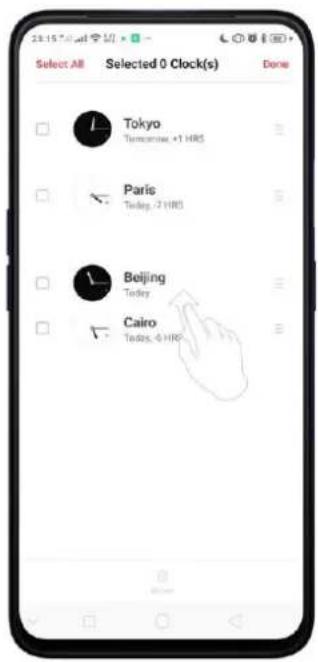
text_image
Select All Selected 0 Clock(s) Done Tokyo Tomorrow +1 HRS Paris Tuesday -2 HRS Beijing Tuesday Cairo Tuesday -6 HRS
text_image
Select All Selected 0 Clock(s) Done Tokyo Tomorrow +1.HRS Paris Today -7.HRS Beijing Today Cairo 100day 4.HRSChange the look of your clock. With ColorOS 6, you now have an option to change the look of your Clock. Choose between linear and circular. Click ≡ to change it
to circular look then click 88 to go back to linear.
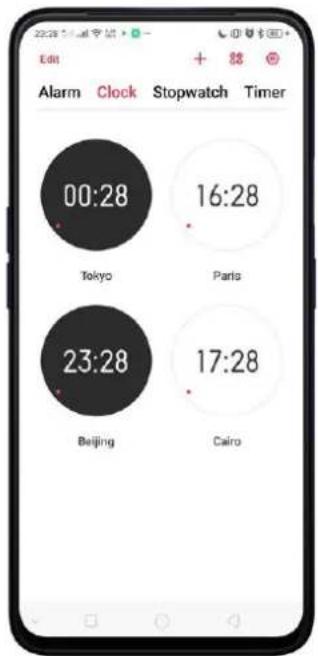
text_image
Edit Alarm Clock Stopwatch Timer 00:28 16:28 Tokyo Paris 23:28 17:28 Beijing Cairo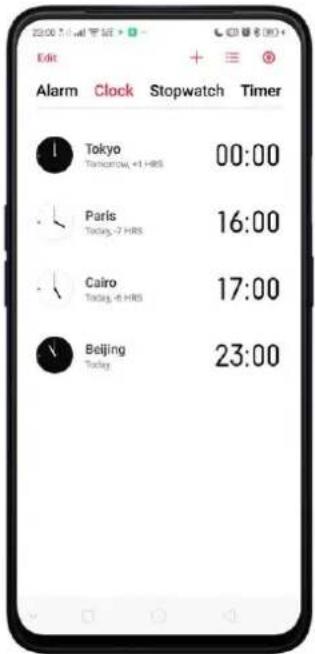
text_image
22:00 PM Edit + - Alarm Clock Stopwatch Timer Tokyo Tokyo, +1 HRS 00:00 Paris Tokyo, -7 HRS 16:00 Cairo Tokyo, -6 HRS 17:00 Beijing Tokyo 23:007.13.3. Use the Stopwatch
You can measure the duration of an event with the stopwatch.
Use the stopwatch to measure time. Click Stopwatch. Click Start.
To record lap times, click Lap after each lap. Click Stop to pause the stopwatch. Then click Start to resume, or click Reset to go back to zero.
If you start the stopwatch and go to another application, the stopwatch continues running in the background.

text_image
Alarm Clock Stopwatch Timer 00:00.00 Start
text_image
Alarm Clock Stopwatch Timer 00:19.70 02 00:17.74 +00:08.61 01 00:09.13 +00:09.13 Stop Lap7.13.4. Set the timer
In the Clock app, you can count down from a specific time with the timer.
Set and start the timer. Click Timer, scroll the wheels to set the duration of time, then click Start.
If you start the timer and go to another application, the timer continues running in the background. You can cancel or pause the timer at any time before it ends. When the timer ends, your phone sounds and vibrates to prompt you that it is already time. Just click Stop.

text_image
Edit Alarm Clock Stopwatch Timer 23 59 03 00 hours 00 mins 04 secs 01 01 05 Brush Teeth Face Made Dream Eggs 06:02:00 08:15:00 09:10:00 + Start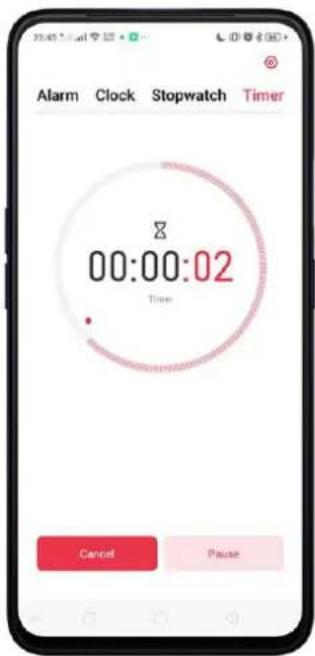
text_image
Alarm Clock Stopwatch Timer 00:00:02 Time Cancel Pause
text_image
23:50 Stop 22:02 1:49 AM Time: Clock Enter Enter ends Execands Stop ClearMSC Live Hi: Mar 16 Weather Calendar Phlogs Settings Google Music Play Store ClockCustomizing Timer
Set timer or countdown for activities that you usually do. Simply save it on the timer and click Start when you are ready.
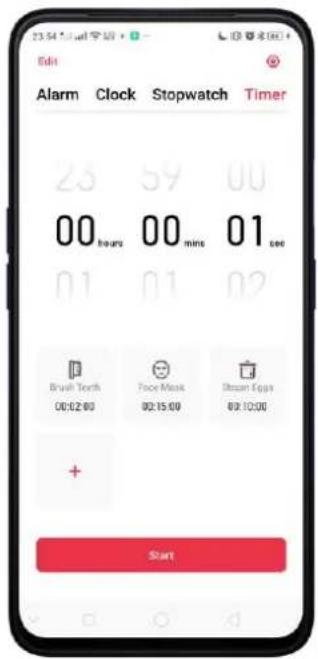
text_image
Edit Alarm Clock Stopwatch Timer 23 59 00 00 hours 00 mins 01 sec 01 01 02 Brush Tooth 00:02:00 Face Mask 00:15:00 Stream Eggs 00:30:00 + StartChange the 3 default activities. There are 3 available activities by default. To change an activity click Edit at the top-right portion. Choose the one you want to change then click - at the corner of each activity, then click Done.
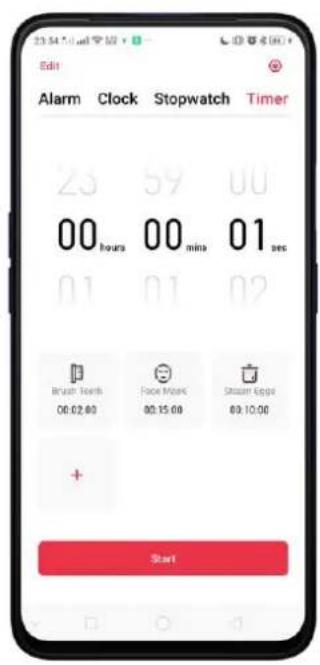
text_image
Edit Alarm Clock Stopwatch Timer 25 59 00 00 hours 00 min 01 sec 01 01 02 Brush Teeth 00:02:00 Face Noise 00:15:00 Stream Eggs 69:10:00 + Start
text_image
23 00 hours 01 02 03 04 05 06 07 08 09 10 11 12 13 14 15 16 17 18 19 20 21 22 23 Brush Tech Edit FaceMask Edit Stream Eggs Edit Short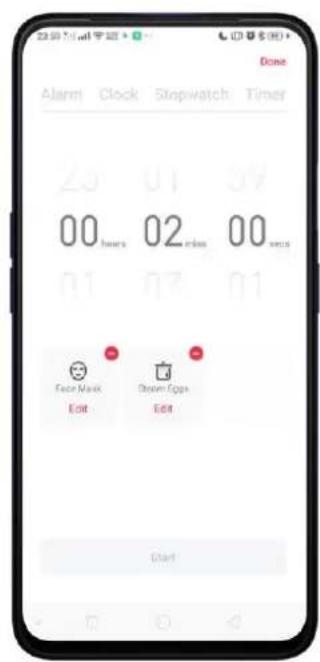
text_image
Done Alarm Clock Stopwatch Timer 20 01 09 00 hours 02 min 00 secs 01 03 01 Face Mask Edit Dawn Eggs Edit StartNote: Edit will delete the activity and you would need to manually do the renaming and setting of time.
Add a new activity. Click + then add a new name of the activity you like and then set the timer. Click Save once done.

text_image
Edit Alarm Clock Stopwatch Timer 25 01 59 00 hours 02 mins 00 secs 01 03 01 Face Mask 00:15:00 Dream Eggs 02:10:00 + Start
text_image
Cancel Add Timer Save Label Brush teeth 23 01 54 00 02 00 01 03 01 I teething teeth teethe q w e r t y u i o p a s d f g h j k l z x c v b n m 12# a Done
text_image
Edit Alarm Clock Stopwatch Timer 23 01 59 00 hours 02 mins 00 secs 01 03 01 Foot Mask 6:00:15:00 Steam Eggs 00:10:00 Brush teeth 6:00:02:00 + StartYou can add up to 12 activities on the timer and you can use emoji's for the activity name.
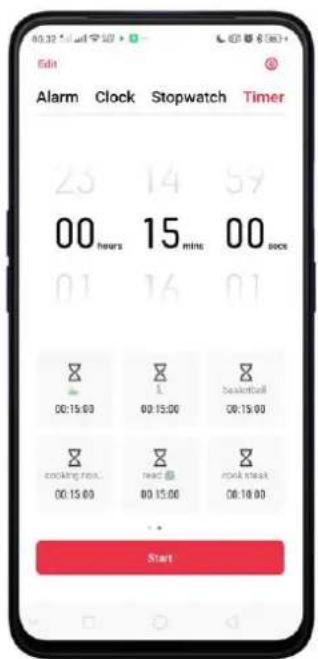
text_image
Edit Alarm Clock Stopwatch Timer 23 14 59 00 hours 15 mins 00 sock 01 16 01 00:15:00 00:15:00 00:15:00 cooking next read rock steak 00:15:00 00:15:00 00:18:00 StartStart the timer. Click Start so timer starts and choose to either Pause or Cancel the timer.

text_image
Edit Alarm Clock Stopwatch Timer 23 01 59 00 hours 02 mins 00 secs 01 03 01 Fapp Mask 00:15:00 Steam Eggs Brush teeth 02:18:00 08:02:00 + Start
text_image
Alarm Clock Stopwatch Timer 00:01:51 Brush teeth Cancel PauseShortcut to Date & Time Setting. Click 🔒 to directly go to Date & Time Setting.
7.14. Files
7.14.1. File Manager
The File Manager provides you a more convenient way to work with the file system and perform various operations on files and folders such as search, create, edit, rename, copy, delete, compress, batch process etc. Go to your Home Screen and click File Manager app to start managing your files.

text_image
Phone Manager Theme Store PUBG MOBILE File Manager Game Desk Music Party Teaching Video Sound Animal ChangchusFile classification
- The Files app automatically categorizes your files based on their extensions so you can browse them more clearly and conveniently. Options vary by apps you've downloaded. For example, if you will download Messenger, Messenger becomes another option for classification.
text_image
File Manager Audio 1460 items > Video 186 items > Photos 5871 items > Documents 210 items > APK 26 items > Phone Storage 11.9 GB Unused > Clean Storage 154 MR Cleasable >
text_image
File Manager Audio 1450 Items > Video 156 Items > Photos 5927 Items > Documents 210 Items > APK 56 Items > Messenger 54 Items > Phone Storage 11.7 GB Unused > Clean Storage 154 MB CleanSide >- Under Phone storage, your frequently used files will be listed separately so that you can quickly look up to them.
text_image
Phone Storage Load Offer All Files Bluetooth 2017 Items (Mar 7, 2019) DCIM 4 Items (Mar 7, 2019) documents 1 item (Mar 7, 2019) Movies 5 items (Mar 3, 2019) Music 2014 Items (Mar 7, 2019) Pictures (7 items (Mar 3, 2019) Recordings 1 item (Mar 15, 2019) New Folder Sort- In [Phone storage] > [All Files] > [Android] > [data], select an app folder, you can see that files you downloaded from the app are saved in different folders, so you can quickly search for them. Click 🔒 and type the file you want to search.

text_image
Phone Storage com.android.providers.media 1 version: Mar 7, 2019 com.android.pr._ders.telephony 1 version: Mar 8, 2019 com.android.vending 1 version: Mar 7, 2019 com.brokenrea._merger.android 1 version: Mar 13, 2019 com.color.ulengine 1 version: Mar 8, 2019 com.coloros.avastofferwall 1 version: Mar 8, 2019 com.coloros.blacklist 1 version: Mar 8, 2019 com.coloros.blacklistapp 1 version: Mar 8, 2019 com.coloros.compass? new folder Sort
text_image
p Cancel My Info Changes Display Ago File With This Keyword (24 items) _m.access_company.android... F:\168\101_15.2019 _rckenreality.planemerger.an... Jx7.psd_15_2019 _coloros.accegamesdk.apk 13.4.2019_May_15_2019 _oros.onekeylockscreen.apk 13.4.2019_May_15_2019 mail Honduras touchmail.apk 1- put p pay q w e r t y u i o p a s d f g h j k l z x c v b n m 12# q . SearchAll Files. Select All files if you want to manage files on a certain folder. Example, lets choose Backup. You can manage and choose files by clicking Select or Select All to either share, cut, copy, and delete. There are also options to compress file, set it as private, read the details about it by clicking More.
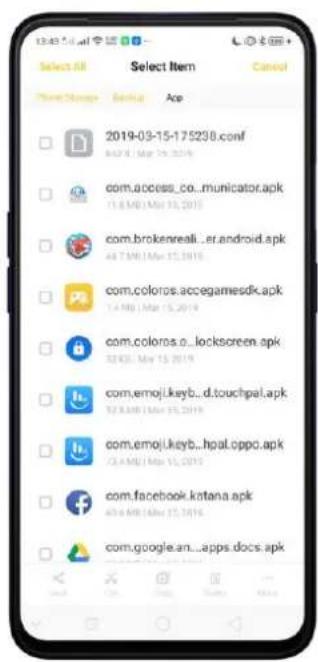
text_image
Select All Search Status Beclin Ace 2019-03-15-175238.conf com.access_co..municator.apk 11.6 MB / Mar 15, 2019 com.brokenreali...er.android.apk 44.7 MB / Mar 17, 2019 com.coloros.accegamesdk.apk 1.4 Mb / Mar 15, 2019 com.coloros.o..lockscreen.apk 32 KB / May 15, 2019 com emoji.keyb...d.touchpal.apk 52 KB / Mar 15, 2019 com emoji.keyb...hpal.cppo.apk 73.4 MB / Mar 15, 2019 com.facebook.kntana.apk 43.6 MB / Mar 15, 2019 com.google.an...apps.docs.apk
text_image
27 Selected File Search Google App 2019-03-15-175238.conf com.àobess_co_municator.apk com.brokenreal_er.android.apk com.coloros.accegamesdk.apk com.coloros.c_lockscreen.apk com emoji.keyb_d.touchpal.apk com emoji.keyb_hpal Cento.apk com.facebook.katana.apk com.google.an._apps.docs.apk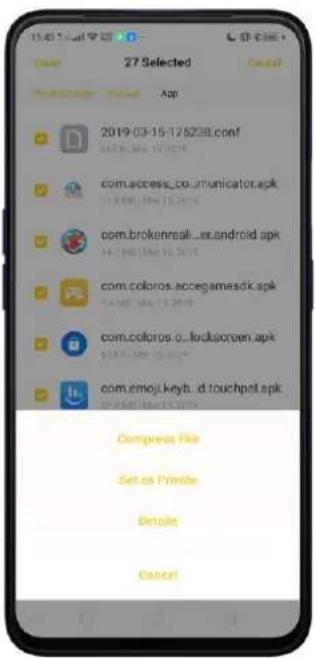
text_image
27 Selected Cancel App Store Tools App 2019-03-15-17 S238.conf SAPR@Lai 14.2019 com.access_co_unicator.apk 14.2019 (Mar 15, 2019) com.brokenreali_ex.android.apk 14.2019 (May 15, 2019) com.coloros.eccegamesdk.apk 14.2019 (May 15, 2019) com.coloros.c_lockscreen.apk 14.2019 (May 15, 2019) com.emoj.keyt._d.touchpet.apk Compress File Set as Private Details Cancel三
+
You can also sort them by clicking Sort or make a new folder by clicking New Folder, then click Save once done.
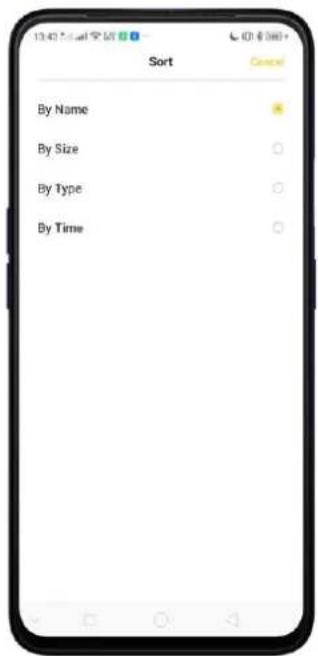
text_image
Sort By Name By Size By Type By Time Cancel
text_image
Phone Storage Home Storage Business App 2014.03.15 17:30:00 New Folder New Folder Cancel Save com.colorot.acoregamesck.apk com.coloros.o._lockscreen.apk 12# 9 . Done7.14.2. Clean Up Storage
Clean Up Storage will let you use the cleanup feature in Phone Manager directly. See Phone Manager
Delete junk files. Click Phone Manager app, then click Safe to Clean. Click Clean up to delete all kinds of junk files. You can also choose files to be deleted.
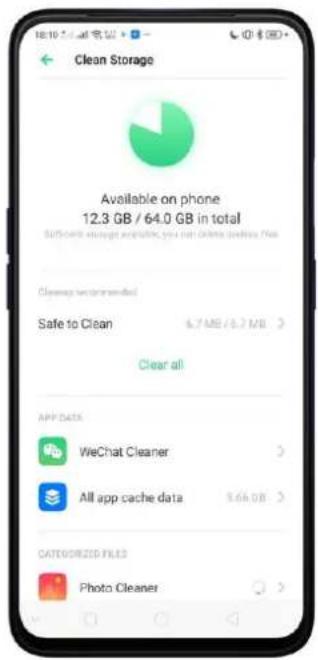
text_image
Clean Storage Available on phone 12.3 GB / 64.0 GB in total Sufficient enough available, you can change business free Clearup recommended Safe to Clean 6.7 MB / 6.7 MB > Clear all APP DATA WeChat Cleaner All app cache data 5.6k GB > CATEGORIES FILED Photo Cleaner
text_image
Safe to Clean 157 MB / 157 MB Cache Junk 157 MB Supported by Cheeran Clean Master Clean up 157 MBDelete app data. Click All app cache data, select the apps that has caches, then click Delete. The action cannot be undone.
text_image
Clean Storage Safe to Clean 157 MB / 757 MB Clear all APP DATA WeChat Cleaner Messenger Cleaner All app cache data 4.25 GB CATEGORIES FILES Photo Cleaner 3.970 pcs Video Cleaner 8.14 GB Audio 7.48 GB Documents 4.12 MB All app cache data 1.47 GB selected / 4.25 GB in store System Cache 1.39 GB Photos 1.31 GB Bluetooth 81.5 MB WeChat 62.7 MB YouTube 48.7 MB Google Play Store 31.1 MB TouchPol 21.5 MB Messenger 17.5 MB Residual Files 15.0 MB Delete 1.47 GBFree up more storage space. You can delete your unnecessary files on the phone, including photos, audio, videos, and documents.
7.14.3. Remotely Manage Phone Files
Remote Management can turn your phone into an FTP server so you can view and download files stored on your phone remotely from your computer.
Remotely view and download files. Click File Manager, then click ☐ to connect to a Wi-Fi network, then click Start Service. Search the URL displayed on your phone screen with your computer, then you can view your phone's file system and download files directly to your computer.
Note: Make sure that your phone and computer are connected to the same Wi-Fi network.
text_image
File Manager Audio 1460 bytes > Video 168 bytes > Photos 5977 bytes > Documents 219 bytes > APK 25 bytes > Messenger 34 bytes > Phone Storage 11.7 GB (Unated) > Clean Storage 154 MB Cloudable >
text_image
Remotely Manage Files Current Wi-Fi Connection:"HITRON-505" Start picking to manage files on your phone necessary from your F12 Start Service
text_image
Remote Manage Files Current Wi-Fi Connection:"HITRON-505" Enter in this address End or "My Computer" Do #192.168.8.123321 Stop Service7.14.4. Private Safe
Start Using Private Safe.
- Please set the Privacy passcode first before using this application. Go to [Settings] > [Fingerprint, Face, & Passcode] > [Lock Screen passcode] and enter your desired encryption method. You can also click SET PASSCODE and enter your desired encryption method. You will also be asked for a security question as an added layer of security for your privacy.

text_image
Set Security Question Cancel Done What is the name of one of your teachers? I have an active with 20 words YOU CAN ALSO Bind Security Email Address Not Sound Associate OPPO ID Not Associated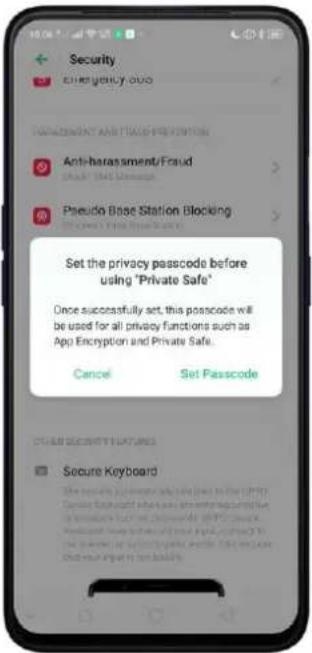
text_image
Security Emergency 000 MANAGEMENT AND TRADE PREVENTION Anti-harassment/Fraud Attack/That Message Pseudo Base Station Blocking Access to First Base Search Set the privacy passcode before using "Private Safe" Once successfully set, this passcode will be used for all privacy functions such as App Encryption and Private Safe. Cancel Set Passcode CHAND SECURITY FEATURES Secure Keyboard- Manage files on Private Safe: Go to [Settings] > [Security] > [Private Safe] enter the passcode that you have set, and then manage files that you want to be kept private.
Files that can be added in Private safe are Photos, Videos, Audios, Documents, and other Files that are supported by the app.
You can also create a shortcut on your Home Screen for easy access.

text_image
iPhone Store Game Store Music Party Facebook Tools iPenset Google iPhone Store7.15. Calculator
The new Calculator app for ColorOS 6 has a new cleaner and brighter look. It's not just a calculator but also has exchange rate features and other conversions.
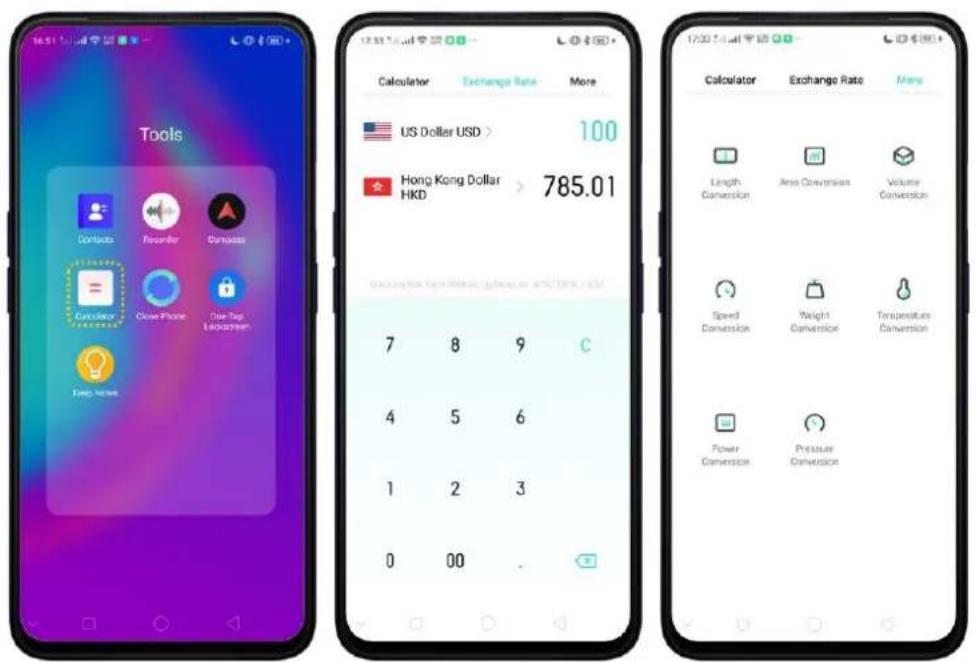
text_image
Tools Contacts Recorder Canvas Calculator Open Phone One-Top Lockdown Keep Now US Dollar USD > 100 Hong Kong Dollar HKD > 785.01 7 8 9 C 4 5 6 1 2 3 0 00 . 17:00 AM 星期 17:00 AM 星期 17:00 AM 星期 17:00 AM 星期 17:00 AM 星期 17:00 AM 星期 17:00 AM 星期 17:00 AM 星期 17:00 AM 星期 17:00 AM 星期 17:00 AM 星期 Calculator Exchange Rate More Length Conversion Area Conversion Volume Conversion Speed Conversion Weight Conversion Temperature Conversion Power Conversion Pressure ConversionUse Calculator. When in doubt, calculate.
Delete the last digit. Click ✗.
Clear the calculation results. Click C.
Hide or show the keypad. Click ____ in the middle of the screen to hide the keypad. Click Calculate or the calculation formula to resume.
Return to the calculator page. Click Continue to go back to where the numbers are.
Delete calculations. Click Clear if you want to clear everything and start a new one.

text_image
17:44 17:44 888+888 1,776 C % ÷ 7 8 × 4 5 6 — 1 2 3 + 0 00 . =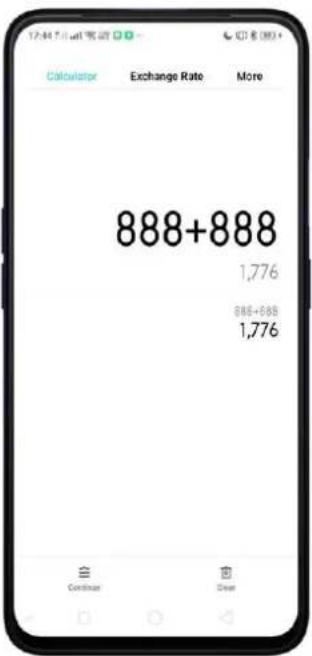
text_image
Calculator Exchange Rate More 888+888 1,776 886+888 1,776 Continuer ClearUse the scientific calculator. Rotate your phone to landscape orientation.

text_image
RAD sin cos tan C % 3 + - ln log I 7 8 9 × π e ^ 4 5 6 - { } ✓ 1 2 3 + inv rad deg 0 00 . =Use Exchange Rate. When you want travel on a certain country or if you just want to know the rate or currency of a certain country.
Check currencies you would like to convert. The default is US dollar and the currency of your current location.
Click on the currency you want changed then you will be shown alphabetical order of currencies with their national flags beside them. You can also click 🔒 to search for the country or currency that you would like to convert. Click ✗ to delete the last digit and click C to clear results.

text_image
Calculator Exchange Rate More US Dollar USD > 100 Philippine Peso PHP 5,261 Rate conversion from World updates Select Currency Algerian Dinar DZD Argentine Peso AR$ Australian Dollar AUD Bahrain Dinar BHD Belarus Ruble BYN Brazilian Real BRL Brunel Ringgit BND Bulgarian Lev BGN Camboddian Riel KHR Canadian Dollar CADNote: Given that the exchange rates are volatile and change every second, you need to have an internet connection for this to function and to get the real-time conversions.
Use Conversions. Easily convert Length, Area, Volume, Speed, Weight, Temperature, Power, and Pressure.
Convert Unit. Click More and then click on the unit. Input the number you want to be converted. Click ✗ to delete last digit and click C to clear result.

text_image
17:00 5.1 mm 定价 12:30 5.1 mm 定价 Calculator Exchange Rate More Length Conversion Area Conversion Volume Conversion Speed Conversion Weight Conversion Temperature Conversion Power Conversion Pressure Conversion Length Conversion meter m > 1 mile mi > 0.0006214 7 8 9 C 4 5 6 1 2 3 0 00 Length Conversion meter m > 100 mile mi > 0.06214 Length Conversion 7 8 9 C 4 5 6 1 2 3 0 00 .7.16. Sound Recording
7.16.1. Recorder
With the Recorder app, you can use your phone's built-in microphone to record you singing or when interviewing someone.
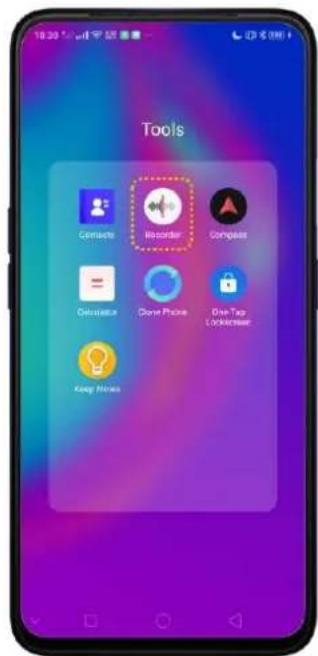
text_image
Tools Contacts Recorder Compass Calendar Clock Phone One Tap Lockpressor Keep More 10:25 5:00 PMMake a sound recording. Open Recorder, click ● to start recording. Click 🔊 to
pause or continue. Click √ to stop and save the recording.
text_image
Standard Calls No Recordings
text_image
Standard 00:02.90 Recording...
text_image
Standard Save Recording REC20190316183033 Delete Save I q w e r t y u i o p a s d f g h j k l z x c v b n m T2# . DoneIf you start the sound recorder and go to another application, the sound recorder continues running in the background. To return to Sound Recorder, click the red bar at the top of the screen.
text_image
18:44 G Calendar Photos Settings Google Music Play Store Cloud7.16.2. Manage recordings
Play the sound back. If you already recorded any audio, your recordings will show under Standard and Call. Click the recording and it will start to play. Click 11 to pause. Note: Not all regions support Call feature.

text_image
18:54 1:44 AM Select Standard Calls REC20190316185418.mp3 3:16:19 REC201903161844D9.mp3 3:16:19
text_image
Select Standard Calls REC20190316185418.mp3 REC20190316184409.mp3Send, rename, set as ringtone or delete a recording. Long press on a recording or click Select / Select All, then choose an option.
text_image
19:00 Select Standard Calls REC20190316185418.mn3 0000 0/15/71 REC20190316184409.10 0000 0/15/71
text_image
Select All 1 File Selected Cancel Standard Calls REC20190316185418.mp3 REC20190316184409.mp3 Send Restore Sell at home Decor7.17. Compass
You can use the compass app to quickly find the direction you're facing.
Calibrate the compass when prompted. Move away from the interference and spin your phone in the pattern of an infinity symbol.
Find your direction. Turn on Location Service first, then click Tools folder on the Home Screen, click Compass, and you can quickly find your direction, see your latitude and longitude.

text_image
Tools Contacts Recording Compass Calculator Cloud Phone One-Tag Lockdowns Keep Notes
text_image
1900.54.11 Compass Calibration Move away from any sources of interference and then perform the operations illustrated in the above picture to re-calibrate the compass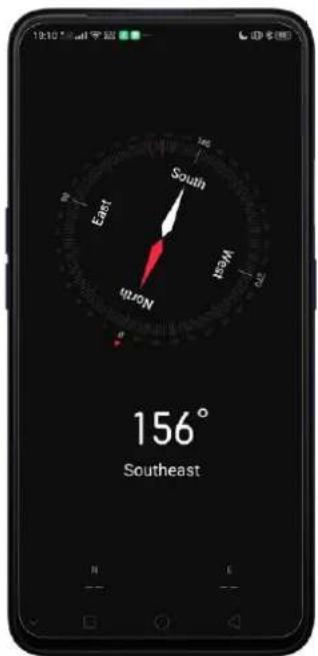
text_image
19:10 AM South East North West 156° Southeast7.18. Chrome
7.18.1. Search the web
The Browser lets you see webpages just as they were designed to be seen in computer-based browsers. Pinch the screen to zoom in and out; rotate the phone sideways for a wider view. You can also add page icons and bookmarks for quick accesses.
Search the web. Click the icon on the left side of the search bar to change the search engine or website. Click 🔔 and say whatever you want to search for, or click the search bar, type the content or web address, then click a matching result under the search bar
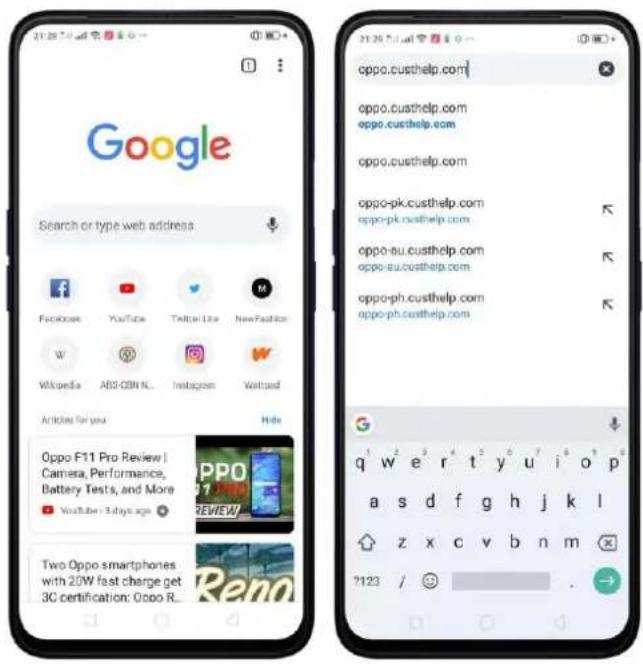
text_image
Google Search or type web address Facebook YouTube Twitter Use NewFashion Wikipedia A63-0BN NL Instagram Waitpad Articles for your Hide Oppo F11 Pro Review | Camera, Performance, Battery Tests, and More YouTube: 5 days ago Two Oppo smartphones with 20W fast charge get 3C certification: Oppo R. Reno 21.20 7:44 21.20 7:44 oppo.custhelp.com oppo.custhelp.com oppo.custhelp.com oppo-pk.custhelp.com oppo-pk.custhelp.com oppo-au.custhelp.com oppo-au.custhelp.com oppo-ph.custhelp.com oppo-ph.custhelp.com q w e r t y u i o p a s d f g h j k l z x c v b n m ?123 / 😊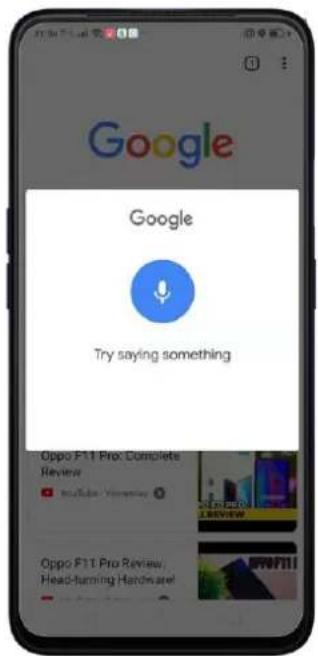
text_image
Google Google Try saying something Oppo F11 Pro Complete Review http://www.100.com/ Oppo F11 Pro Review, Head-turning Hardware!
text_image
Friendly, Convenient & Professional Welcome to OPPO Support Search for help Self Service, Quick and ConvenientYou can also click the Google search bar on the Home Screen, then type or say whatever you want to search for.
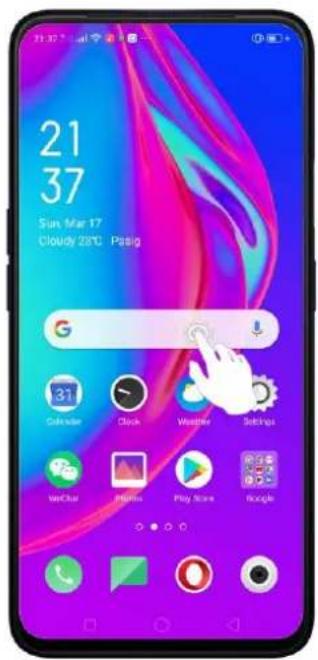
text_image
21 37 Sun Mar 17 Cloudy 28°C Pasing
text_image
Search example of spain number google translate skin vs case TRENDING SEARCHERS pcso lotto swertres result kim joon ho gambling mosque christchurch new zealand pba live streaming 2019 and enango is milay garris thanks I we q w e r t y u i o p a s d f g h j k l z x c v b n m 7123Erase all the text on the address field. Click the address field, then click ✗.
Open a suggested article. The browser will suggest several hot topic articles that you might be interested on its home page. Click an article to view it or you can click Hide. To delete articles that you dislike, long press the article and you will be given
options and of that is to delete it.

text_image
Google Search or type web address Open In new tab Open In Incognito tab Download link Remove Learn more OPPO OFFID... Facebook M W New Fashion Web Pack Articles for you Oppo F11 Pro: Cor Review YouTube - Yesterday Oppo F11 Pro Review: Head-turning Hardware! YouTube - 2 days ago Oppo Reno to have7.18.2. Browse the web
View a webpage in widescreen orientation. Swipe up from the bottom of the screen to open Control Center, then turn off [Portrait Orientation Lock]. Rotate the phone sideways. The Browser automatically reorients and expands the page.

text_image
21.29 Daily 客户 https://oppo.custhelp.com oppo Friendly, Convenient & Professional Welcome to OPPG Support Search for Help Self Service, Quick and Convenient
text_image
Friendly, Convenient & Professional Welcome to OPPO Support Search for helpOther Chrome features you should know. Click ⋮ on the top right corner of the page to open other features.
| TO | DO THIS |
| Add to bookmarks. | Click ☆ |
| Download from the website. | Click ↓ |
| Know more details about the website. | Click i |
| Refresh website. | Click C |
| Open a new tab. | Click New tab |
| When you want to browse privately and browsing history won't be saved. | Click New incognito tab |
| Check websites you bookmarked. | Click Bookmarks |
| Check the latest websites you have checked. | Click Recent tabs |
| Check the websites you have visited. | Click History |
| Check the downloads you have made. | Click Downloads |
| When you want to share it to your social media, or print it, or through wireless sharing and others. | Click Share |
| When you want to search a specific word or item. | Click Find in page |
| When you want to add the website on your Home Screen. | Click Add to Home Screen |
| When you want to view it on a desktop mode. | Click Desktop site |
| To change languages, erase cookies, manage notifications and privacy and others. | Click Settings |
| When having issues with Chrome browser. | Click Help & feedback |
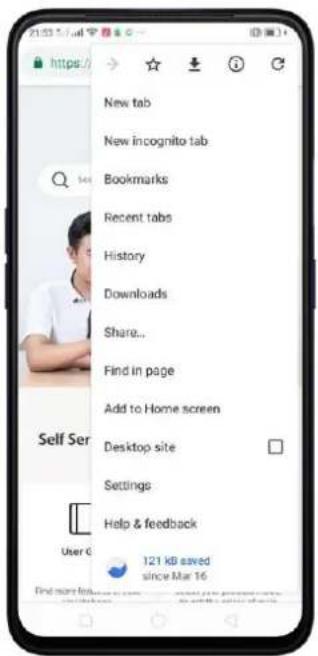
text_image
New tab New incognito tab Bookmarks Recent tabs History Downloads Share... Find in page Add to Home screen Desktop site Settings Help & feedback 121 kb saved since Mar 16 User © Find more fees...8. Safety & Privacy
8.1. Device security
8.1.1. Lock Screen password
Security on your device begins on Lock Screen. You can set a passcode that will be needed to unlock your phone.
Set, change, or turn off the passcode. Go to [Settings] > [Fingerprint, Face & Passcode]. You can draw a pattern, use a 4-Digit, 6-Digit, or 4-16 Digit Numeric Code or 4-16 Character Alphanumeric Code.
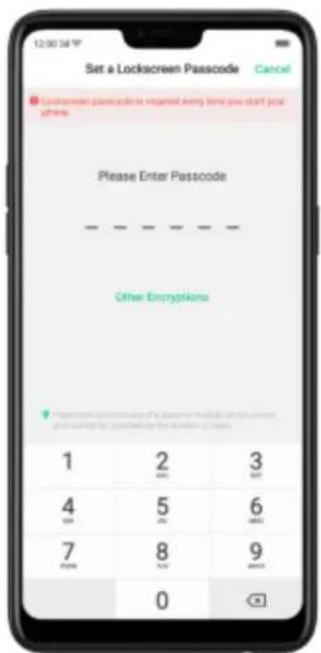
text_image
12:00:54 P Set a Lockscreen Passcode Cancel Please Enter Passcode - Other Encryptions 1 2 3 4 5 6 7 8 9 0
text_image
Set a Lockscreen Passcode Cancel Please Enter Passcode Other Disapplication Pattern Code 4 Digit Numeric Code 4-16 digit numeric passcode 4-15 character alphanumeric passcode CancelAdd a fingerprint. Before you can add a fingerprint, you need to create a passcode. You can use the fingerprint to unlock the phone. You can add up to 5 different fingerprints on your phone.

text_image
10:28 Cancel Add a Fingerprint Use a fingerprint instead of a passcode. Place your finger on the fingerprint button on the back of your phone.
text_image
Done Fingerprint recognition is ready. You can unlock your phone using your fingerprint. Continue Fragmentin are placed in the security, including: https://www.org/10.0000.com or www.org/10.0000.comEnroll face. Before you can enroll a face, you need to create a passcode. You can use the face to unlock the phone instead of the fingerprints or passcode. You can enroll only one face on your phone.
View more about setting a passcode, face ID and fingerprint on your realme phone, see Fingerprint, Face and Passcode.
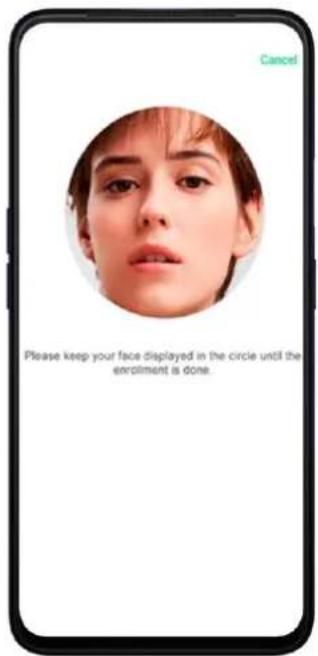
text_image
Cancel Please keep your face displayed in the circle until the enrolment is done.
text_image
Cancel Face Recognition is ready, you can unlock the phone with your face8.1.2. Smart Lock
Smart lock is an easy and handy way to gain access to your phone. It keeps your phone unlocked when it is safe with you.
Turn on Smart Lock options. Go to [Settings] > [Additional Settings] > [Device & Privacy] > [Smart Lock], then enter your phone passcode.

text_image
Smart Lock On-body detection Keep your device unlocked while it's on you Trusted places Add location where device should be unlocked Trusted devices Add device to keep this one unlocked when it's nearby Voice Match Set up Voice Match- On-body detection. Once enabled, your device will be kept unlocked while it's with you, like when you are holding it or carrying it. Your device will lock when it detects that it's been set down, like putting it on the table or is away from your body.
- Trusted places. If you have added trusted places, your device will be kept unlocked when it's nearby those areas. For example, if you have added your home as a trusted place and you're 80m away from your house the device will be kept in unlocked mode.
- Trusted devices. If you have added trusted devices, for example, your Bluetooth watch, your car's Bluetooth system, when they are connected, your device will be kept in unlock mode. (Note: Bluetooth connections have a range of up to 100 meters.)
- Trusted voice. Say "OK Google" and save it on your Google account. When you say "OK Google" the next time, your device will be unlocked once it recognizes your voice.
Note: When Smart Lock is on, your phone will remain unlocked if you're carrying the phone, which will quickly drain your phone's battery. This will also lead to accidental commands if you put the phone in your pocket. Therefore, if you want to use Smart Lock, use it wisely and properly.
8.1.3. Payment protection
While you shop online, your realme phone will provide protection for the mobile transactions, such as detecting the system, captcha and, app security. You can see the detected information of the current payment environment on the upper-right corner of the screen.
Set up payment protection for apps. You may go to Phone Manager on your Home
Screen on go to [Settings] > [Security] > [Payment Protection]. Your phone alerts you if risks exist, or it will say "Safe to Pay". Click View and do as what the phone prompts to remove the risks.
text_image
Security SYSTEM SECURITY Permissions > Floating Windows > Personal Information Protection > Find My Device > Importously to this device Payment Protection SOS Emergency SOS > HARRASSMENT AND FRAID PREVENTION Anti-harassment/Fraud Biotech Skill Message > Pseudo Base Station Blocking Biotech 1 Token Base Status > PRIVACY PROTECTION Payment Protection Safe To Pay NO PRESENT THREATS View 3 APPS: ARE GUARDED BY PAYMENT PROTECTION are Grab WeChat Alipay Payment Environment Detection Payment Environment is secure with no Threats Found System Security Detection The Phone has not been rated System is updated with the least security patch Data transfer via USB not allowed Captcha Security Detection Default system SMS app used App Security Detection No malicious apps found8.1.4. Set up a SIM card lock
For better security, you can set up a SIM card lock. The SIM lock will make sure that only those who know the password can use the phone.
Set up a SIM card lock. Go to [Settings] > [Additional Settings] > [Device & Privacy] > [Set up SIM card lock]. Click the slider next to Lock SIM Card, type in the PIN code and then click OK.
Note: If the wrong PIN is entered more than three times, both your SIM card and phone will be locked. You can enter the PUK code to unlock them. See About SIM card PIN & PUK code.
Change the SIM card PIN code. Click Change SIM PIN, type in the current PIN code, click OK. Then you can type in the new PIN code, click OK, retype your new PIN code when prompted, then click OK.

text_image
Device & Privacy Service Security Content Lock Get a security key to help you SECURITY STATUS Google Play Protect Home Libya server Find My Device Go Security update February 5, 2019 ORPTION AND LOCKING Set Up SIM Card Lock Show Passcode Modify closing password on account when they are being installed in the passcode box APP INSTALLATION Unknown Source Installation Select SIM1 SIM2 Cancel Lock SIM cord Enter the SIM PIN 1 2 3 4 5 6 7 8 9 08.1.5. Virus Scan
For better security, you should regularly scan and remove potential and actual threats to your phone.
Scan for virus. Click Phone Manager, then click Virus Scan. Wait for the scan to complete. If threats were found, remove them; if not, you will see a message that says your phone is in a good state.
text_image
3% Scanning / storage/emulated/ill/backup/App/com, access, company android e/communicato.uk Supplified by Quick-360 Malicious Apps 0 items scanned Malicious Files 41 items scanned Stop Scanning8.1.6. Pseudo Base Station Blocking
Your phone might receive many spam messages (including investment advice, promotional messages, and more), or be infected by mobile viruses sent from the pseudo base stations. When these stations are identified, your phone will automatically block the information sent by them, thus safeguarding and securing your information.
Block pseudo base stations. Go to [Settings] > [Security] > [Pseudo Base
Station Blocking] and you will see a list of pseudo base stations if they are identified and blocked by the phone.
text_image
Security SOS Emergency SOS HATAGEMENT AND FRUIT PREVENTION Anti-harassment/Fraud Block1: PART Message Pseudo Base Station Blocking Blocked by Fake Base Station PRIVACY PROTECTION App Encryption Kid Space Private Safe OTHER SECURITY FEATURES Secure Keyboard The system automatically avolutions to the OPPO Secure Encryption when you are ensuring sensitive Information about your personal needs. OPPO Secure Keyboard does not record your input, correct to the Internet or teletemplate needs. This ensures and you have been blocked. Pseudo Base Station Block1... Select Pseudo Base Station blocks are dispensed as basic structure of format content. They are used by distributors to send disqualified messages and other information to obtain via document/friends, posting good links. Fake Base Station Blocking Records Fake Base Station0002 Localise information not contained 3/5/19 19:12 Fake Base Station0001 Localise information not contained 11/5/18 09:23 2 hours8.1.7. Protect Personal Information
Apps automatically read your personal information to access restricted functions, while most of these information are sensitive, such as call history, contacts, messages, and calendar events; some apps will probably engage in malicious activities like uploading or exposing your private data and monitoring your activities. By using this feature, when an app tries to read information that it needs, your phone will provide empty information instead of what you really have, which helps you protect your privacy.
Protect your call history, contacts, messages, and events. Go to [Settings] > [Security] > [Personal Information Protection], then choose an option.
You will see a list of apps that require the certain information. If you don't want to give an app your real information, switch the app slider to green, then click [Turn on feature]. Your phone will then provide empty information.
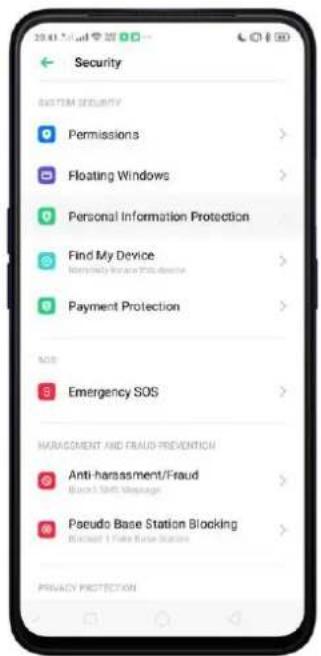
text_image
Security SYSTEM SECURITY Permissions Floating Windows Personal Information Protection Find My Device Payment Protection Emergency SOS HARAGMENT AND FRUIT PREVENTION Anti-harassment/Fraud Block 1 Safe Message Pseudo Base Station Blocking Block 2 Safe Base Station PRINACY PROTECTION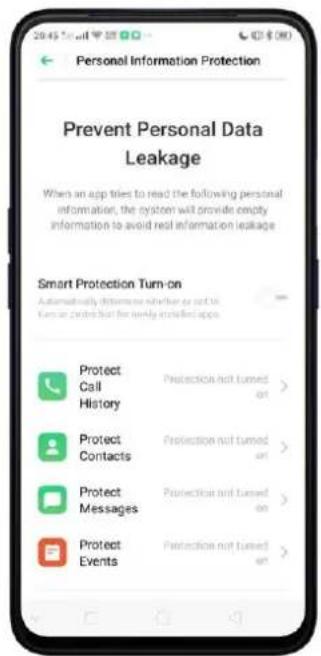
text_image
2045 Mail 38 Personal Information Protection Prevent Personal Data Leakage When an app tries to read the following personal information, the system will provide empty information to avoid rest information leakage Smart Protection Turn-on Automatically determine whether or not to Turkish phone but for newly installed apps Protect Call History Protect Contacts Protect Messages Protect Events Protection not turned on > Protection not turned on > Protection not turned on > Protection not turned on >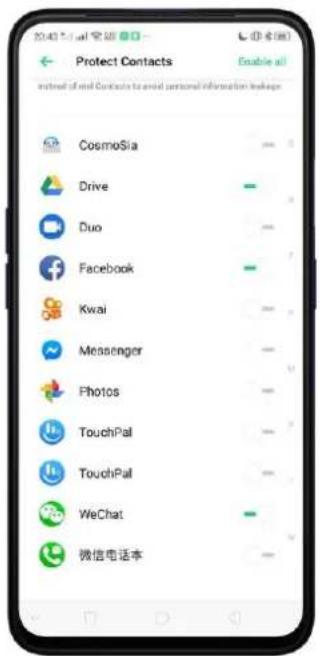
text_image
Protect Contacts Instead of email contacts to avoid personal information leakage CosmoSia Drive Duo Facebook Kwai Messenger Photos TouchPal TouchPal WeChat 微信电话本You can also enable Smart Protection Turn-on which automatically determines whether to turn on protection for newly installed apps. Toggle to green and click Turn On.

text_image
Personal Information Protection Prevent Personal Data Leakage When an app tries to read the following personal information, the system will provide empty information to avoid real information leakage Smart Protection Turn-on Automatically determine whether it is not in turn or protection for early enrolled apps Protect Call History Protect Contacts Protect Messages Protect Events Protection not turned on Protection not turned on Protection not turned on Protection not turned on Protection not turned on
text_image
Personal Information Protection Prevent Personal Data Leakage When an app tries to meet the following personal information, the system will provide empty Turn On Smart Protection Function? When turned on, the system will automatically determine whether or not to protect an app. Items that are protected will have blank information to replace the actual information. Note: Some apps may not work property. Cancel Turn On Protect Protection not turned Contacts + Protect Protection not turned Messages + Protect Protection not turned Events +1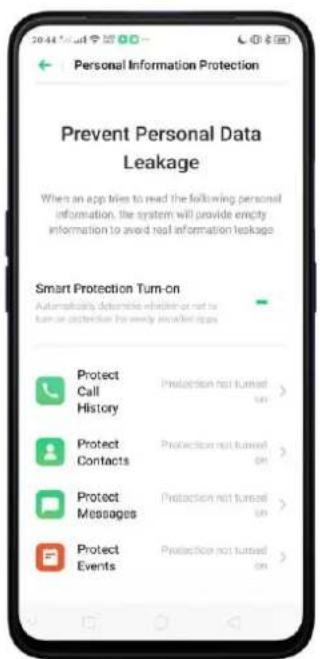
text_image
Personal Information Protection Prevent Personal Data Leakage When an app tries to read the following personal information, the system will provide empty information to avoid real information leakage Smart Protection Turn-on Automatically detectable whether or not to turn on protection for every installed apps Protect Call History Protect Contacts Protect Messages Protect Events Protection not turned On Protection not turned On Protection not turned On Protection not turned On8.2. Device administration
8.2.1. Allow and install apps from unknown sources
Install apps from unknown sources. Go to [Settings] > [Additional Settings] > [Device & Privacy] and click [Apps Installed from Unknown Sources].
Switch the sliders to green if you want to install apps from these sources then click Allow. For example, if you want to install apps downloaded from Chrome, then enable Chrome.
Note: Installing apps from unknown sources means that you are now responsible for your phone's safety. Don't ever install any apps unless you are absolutely sure that it is not a malware.
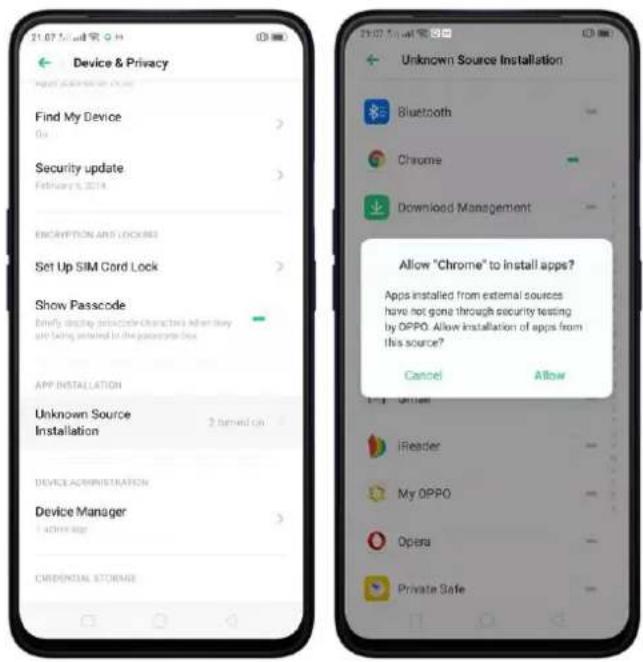
text_image
Device & Privacy Find My Device Security update February 6, 2014 ENCRYPTION AND LOCKING Set Up SIM Cord Lock Show Passcode Brief display code characters when they are falling included in the passcode box APP INSTALLATION Unknown Source Installation 2 items on DEVICE ADMINISTRATION Device Manager 100% age CREDENTIAL STORAGE Unknown Source Installation Bluetooth Chrome Download Management Allow "Chrome" to install apps? Apps installed from external sources have not gone through security testing by OPPO. Allow installation of apps from this source? Cancel Allow iReader My OPPO Opera Private Safe8.2.2. App permissions
Every application installed on your device may require certain data or access to your phone's other features (mic, camera, etc.). To check and manage what an app is trying to access, do the following:
Check all permission details. Go to [Settings] > [Security] > [Permissions]. You will find all the permission categories on your phone. Click "Apps" to view apps installed on your phone and the permission groups an app has.

text_image
Security SYSTEM SECURITY Permissions Floating Windows > Personal Information Protection > Find My Device Importly to the source Payment Protection > SMS Emergency SOS > HARASSMENT AND FRUIT PREVENTION Anti-harassment/Fraud > Pseudo Base Station Blocking > PRINACY PROTECTION App Permissions Permissions Apps Make a Call 1 Apps > read phone state 9 Apps > Call History Read Call History 1 Apps > Write or Delete Call History 1 Apps > Contacts Read Contacts 6 Apps > Write or Delete Contacts Information 3 Apps > SMS Read SMS 7 Apps > Read SMS 5 Apps > 2019.5.11 安全 2019.5.11 安全 2019.5.11 安全 2019.5.11 安全 2019.5.11 安全 2019.5.11 安全 2019.5.11 安全 2019.5.11 安全 2019.5.10 安全 2019.5.10 安全 2019.5.10 安全 2019.5.10 安全 2019.5.10 安全 2019.5.10 安全 2019.5.10 安全 2019.5.10 安全 2019. 2019. 2019. 2019. 2019. 2019. 2019. 2019. 2019. 2019. 2019. 2019. 2019. 2019. 2019. 2019. 2019. 2019. 2019. 2019. 2019.Change the permission. You can go through each permission or app on your phone and, with full control, allow, forbid or limit each permission according to your requirements.
- Allow: Always allow the app to use the required permissions.
- Forbid: Disable the required permissions completely for the app.
- Ask: Every time you start the app, it asks you to grant the permissions that are required.
8.2.3. Hide Home Screen icon
Without deleting the app from your phone, you can simply hide the app icons from the Home Screen.
Before you can hide Home Screen icons, you must first setup Privacy Lock.
Hide Home Screen icon. After encrypting the apps, do the following:
- Go to [Settings] > [Security] > [App Encryption], then enter the verification passcode to enter the App Encryption screen.
- Click an app, turn on [Start Passcode Verification], then turn on [Hide Home Screen icon].
- A pop-up message will display on the screen to ask you to set an access number. You can open the hidden applications by dialing the number. This message will only pop up when you use the hidden feature for the first time. Click Set Access Number.
- Set a number that starts and ends with “#” and contains one to sixteen characters, then click Done.
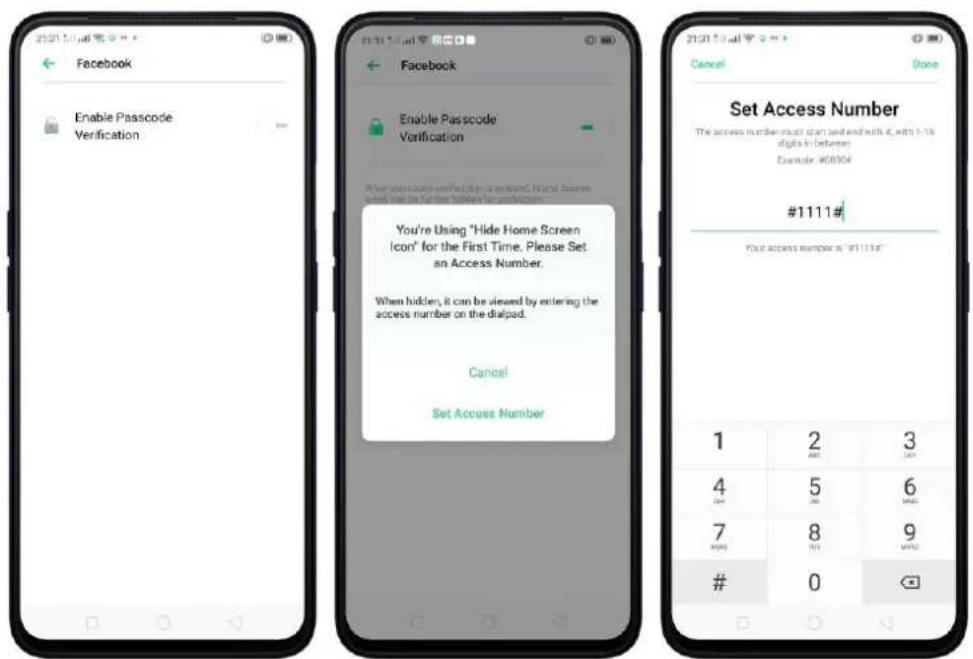
text_image
21/01/17 Facebook Enable Passcode Verification 21/01/17 Facebook Enable Passcode Verification When we see location verification is replaced, there is a further notification for verification. You're Using "Hide Home Screen Icon" for the First Time. Please Set an Access Number. When hidden, it can be viewed by entering the access number on the dialpad. Cancel Set Access Number 21/01/17 Cancel Done Set Access Number The access number must start and end with 4, with 5-15 digits in between Example: #00056 #1111# Your access number is "F1111E" 1 2 3 SAT MINI 4 5 6 7 8 9 MARS MARS0
- You can also set the hidden app not to display in Recent Tasks, or disable its notifications.
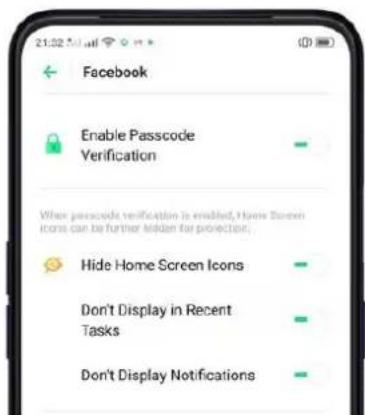
text_image
Facebook Enable Passcode Verification When passcode verification is enabled, Home Screen icons can be further hidden for protection. Hide Home Screen Icons Don't Display in Recent Tasks Don't Display NotificationsOpen hidden apps. Click Phone, click the keypad to enter your access number, then the Hidden Apps folder will pop-up.
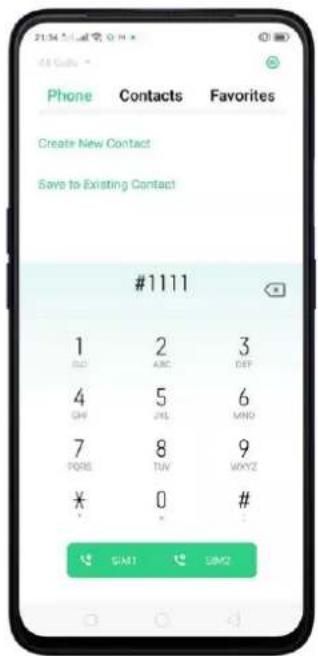
text_image
Phone Contacts Favorites Create New Contact Save to Existing Contact #1111 1 2 3 GND ABC DEF 4 5 6 GND JNL MND 7 8 9 PORT TUV WAYZ ¥ 0 # SIM1 SIM2
text_image
31:32:54 Hidden Apps f * FacebookNote:
- You can override encryption passcode and open hidden apps directly by dialing the access number.
- Apps that aren't displayed in Recent Tasks can be closed using the one-tap cleanup function.
- Access number can be set only once when you use the hidden feature for the first time. If you forgot the number, reset the phone to its factory settings to reset the number.
8.2.4. Kids Space
With Kids Space, parents can set limits especially for the children's use of the phone, such as setting up phone usage time and apps that are allowed to be accessed. It does a good job in charge prevention, system modification, and addiction prevention when your kids use the phone.
Set up Kids Space. Go to [Settings] > [Security] > [Kids Space]. Select the apps your kids can access, set how long they can use the phone, and choose whether to use cellular data, then click Enter Kids Space. Note: You need to turn Lock Screen passcode before you can enter Kids Space.
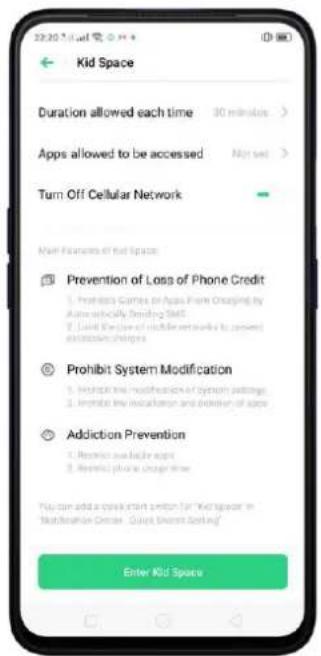
text_image
22:30:51.m Kid Space Duration allowed each time 30 minutes > Apps allowed to be accessed Not set > Turn Off Cellular Network Main Features of Kid Space Prevention of Loss of Phone Credit 1. Prevent Games on Apps From Ordering by Autoversically Smashing Kit 2. Build the Open of mobile networks to prevent excessive changes Prohibit System Modification 1. Highlight the modification of system settings 2. Avoid the association and decision of apps Addiction Prevention 1. Revisit available apps 2. Revisit phone usage time You can add a quick start limit for "Kid Space" in "Madmission Event - Quick Start Setting" Enter Kid Space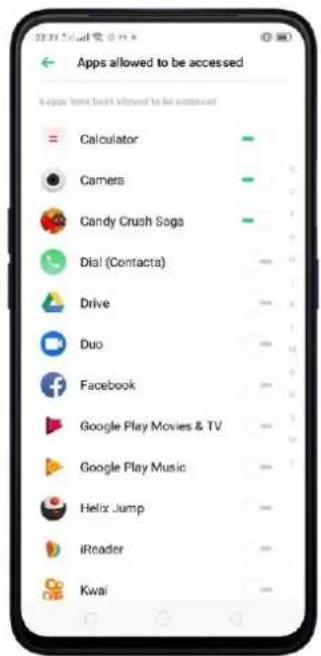
text_image
Apps allowed to be accessed Apps have been allowed to be accessed Calculator Camers Candy Crush Saga Dial (Contacts) Drive Duo Facebook Google Play Movies & TV Google Play Music Helix Jump iReader Kwai
text_image
Duration allowed each time 15 minutes 30 minutes 1 hour 2 hours 3 hours UnrestrictedQuit Kids Space. When the duration of time you set ends, your phone will alert you and lock the screen after 30 seconds, or you can quit Kids Space at any time by clicking Quit Kids Space at the bottom of the screen. Input your fingerprint or Lock Screen passcode to return to the normal mode.

text_image
22:31 CanElace Canvas Canvas-Crafts Phen's vs. BurBlue Puzzle SuperRare Go Auridopes Qui Kit Space
text_image
You Will Need to Verify Your Identity to Quit "Kid Space" Please Enter the Lockscreen Passcode 1 2 3 4 5 6 7 8 9 0 Back8.2.5. Block unwanted calls and messages
Block feature helps you to prevent unwanted phone calls and messages from reaching you. You can also add numbers to blacklist or to block specific phone numbers, or add numbers to whitelist to allow their calls to come through all the time.
Block calls and messages. Go to [Settings] > [Security] > [Anti-harassment/Fraud], or go to [Settings] > [Call] > [Block], or go to [Settings] > [Messages] > [Block].
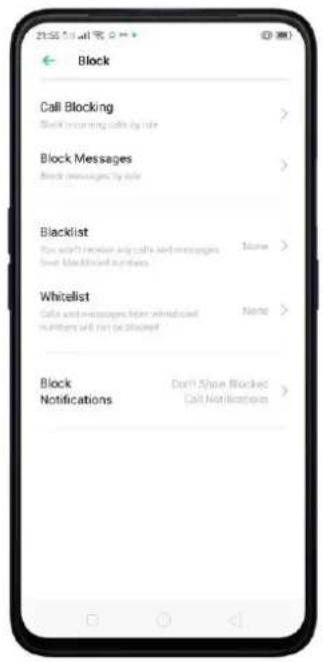
text_image
Block Call Blocking Block warning calls by role > Block Messages Block messages by role > Blacklist How isn't never any calls and messages. Note > Show Blacklisted passwords Whitelist Calls and messages, then whiteboard numbers will not be blocked. Note > Block Notifications Don't Share Blocked Call Notifications >- Block Calls: Choose the options available for blocking incoming calls. See Block calls.
- Block Messages: You can block all unknown messages, or block specific spam messages by entering the keywords.

text_image
Call Blocking SIM 1 SIM 2 You can view all blocked calls by filtering "Blocked Calls" in call history. Top to view. Rules for SIM1 Use Block All Incoming Calls Block Unknown Incoming Calls Off > Block Unknown Numbers by Location of Origin None > Block One-ring Incoming Calls For unknown numbers only Block Calls from Hidden Numbers
text_image
Block Messages SIM 1 SIM 2 View all blocked messages by selecting "Blocked messages" in messages for Top to View Block Messages from Unknown Numbers (See Currents all messages except those from your contacts will be blocked)Add a contact or a phone number to the blacklist. Click Blacklist, click Add, then enter the number or choose your contacts. Or open a caller's contact card in Contacts, then click Add to Blacklist.

text_image
Blacklist No BlackList Numbers Enter Number Select Number Cancel
text_image
10:59 AM Ollie Share Contact Add to VIP Contacts Add to Blacklist Delete ContactAdd a contact or a phone number to the whitelist. Click Whitelist, click Add, then enter the number or choose your contacts. Calls and messages from these numbers will not be blocked.
8.2.6. Find my device
If for some reason you left, lost and forgotten your phone or was stolen, Google Find My Device will help you locate your device remotely. In order for it to work, you need to sign in your Google account and turn on Location Service on your phone.
Activate and use Find my Device.
There are three ways you can do this on your phone.
- Go to [Settings] > [Security] > and click Find My Device. Switch the slider to blue.
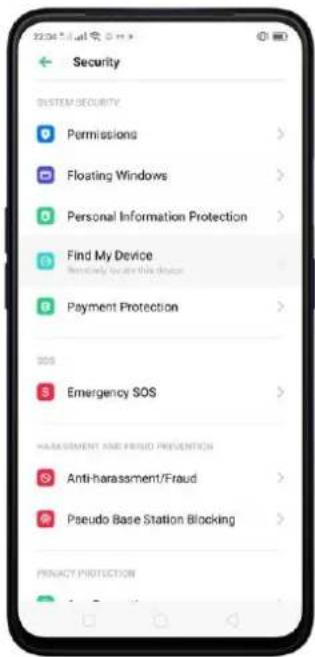
text_image
Security SYSTEM SECURITY Permissions > Floating Windows > Personal Information Protection > Find My Device Payment Protection > SOS Emergency SOS > HARASSMENT AND FRUIT PROTECTION Anti-harassment/Fraud > Pseudo Base Station Blocking > PRODUCT PROTECTION >- Go to [Settings] > [Additional Settings] > [Device and Privacy] and click Find My Device. Switch the slider to blue.
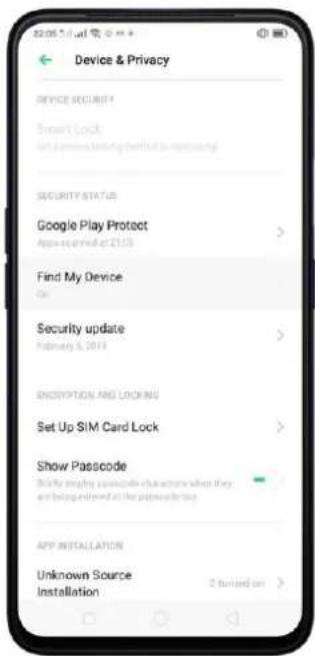
text_image
Device & Privacy DEVICE SECURITY? Smart Lock Get a new or existing software to improve SECURITY STATUS Google Play Protect App is ordered at 2135 Find My Device Go Security update February 6, 2019 ENDERTION AND LOCKING Set Up SIM Card Lock Show Passcode Describe playing passcode characters when they are being entered at the password list APP INSTALLATION Unknown Source Installation- Go to [Settings] > [Google] > [Security] and click Find My Device. Switch the slider to blue.
text_image
Security Find My Device Find My Device Remotely locate this device Security Status Google Play Protect Apps scanned at 21:05Note: You can choose from any the options above to activate Find My Device.
On the Find My Device page, it will show you ways on how to locate the phone using any android devices.
8.3. Privacy
8.3.1. Location Service
Apps like Maps, Weather, and Compass must know your exact position before it can provide accurate services and results.
Turn on Location Service. Swipe down from the top of the screen to open Control Center, then click 🔒. You can also go to [Settings] > [Google] > [Location] and toggle the slider to green.
text_image
13:44 Home Store 54 Home Store 54 13:44 Home Store 54 13:44 Home Store 54 13:44 Home Store 54 13:44 Home Store 54 13:44 Home Store 54 13:44 Home Store 54 13:44 Home Store 54 13:44 Home Store 54 13:44 HomeStore 54 13:44 HomeStore 54 13:44 HomeStore 54 13:44 HomeStore 54 13:44 HomeStore 54 13:44 HomeStore 54 13:44 HomeStore 54 13:44 HomeStore 54 13:44 HomeStore 54You can choose from three types of positioning modes, which differ in accuracy and battery drain:
- High accuracy (GPS, Wi-Fi, Bluetooth, and mobile network).
- Battery saving (Wi-Fi, Bluetooth and mobile network).
- Device only (GPS).
A history of recent location requests. You'll see a list of apps that have requested location. Click an app to enter the App info page that allows you to manage the app directly.
Apps that use GPS in the background. Turn the slider to green if you allow the app to use GPS in the background. Keeping background GPS of the apps active may drain the battery significantly.

text_image
Apps Using GPS in Background Taining it on is recommended. Taining accuracy may be altered when it is turned off. WeChat Taining it off is recommended. System power consumption will increase when it is turned off Google Play Music WeSing Lazada Opera Photos Facebook Kwai Merge Plane TouchPal 微信电话本Google Location service
- Use Google Location History to retrace your steps. Google Location History will customize search results for location and search history.
- Use Google Location Sharing to share your locations with friends and contacts in real time.
8.3.2. Join User Experience Project
"User Experience Project" is a continuous plan to improve realme products, features, and services. You are free to decide whether to join the project or not. If you agree to join, we will collect the related data of your usage to realme products, features, and services, then conduct research and analysis of these information to provide you a better user experience. We will not collect any of your private information in this process.
Join User Experience Project. The first time you switch your realme phone on, it will prompt you to join User Experience Project, or you can go to [Settings] > [Additional Settings] > [Device & Privacy] and switch [Join "User Experience Project"] slider to green.
text_image
Device & Privacy Storage Type Hardware Support Trusted Certificates > Install Certificates from Storage > Remove All User Certificates PRIVACY Location Information On > Join "User Experience Project" Pre-cell collect instructions about gain average of efficient functions for products and saving improvement purpose. The entire product is successfully with the Privacy policy. ADVANCED Trusted Agents > View or download as trusted agents > Screen Pinning ON >8.3.3. Privacy Protecting and Security Warning
The phone provides several measures in place to protect your privacy and security.
Privacy protecting
When you're typing with Secure Keyboard, viewing Private Safe, or using other privacy-related features, you will not be able to capture or record the screen. If you try to capture the screen, the phone will alert you "Cannot capture screenshot. The page contains personal information." If you try to record the screen, you will only record a black screen.
Security warning
Some Android malware can spy on your activities in the background and can take pictures or make recordings without notifying you, resulting in leaking of the information. With Security Warning function, your phone will remind you every time the malware performs these activities.
Prevent apps from taking pictures in the background. A warning window will pop up on your phone screen.
Prevent apps from making recordings in the background. If any app starts the sound recorder, the status bar turns red.
8.4. Advanced
8.4.1. Screen pinning
Screen Pinning temporally restricts the user from leaving the app or tasks or being interrupted by notifications. Once your app activates Screen Spinning, your phone is restricted to only display interface of this app, you cannot see notifications, access other apps, or return to the Home Screen, until your app exits this mode.
Activate screen pinning
Go to [Settings] > [Additional Settings] > [Device & Privacy], scroll to the bottom of the screen and turn on [Screen Pinning].
text_image
Screen Pinning Screen Pinning Lock Screen After UnpinningOpen the app you want to pin and click the Multitasking button to access the multitasking tray. Click 🔒 icon to pin the app to your phone screen.
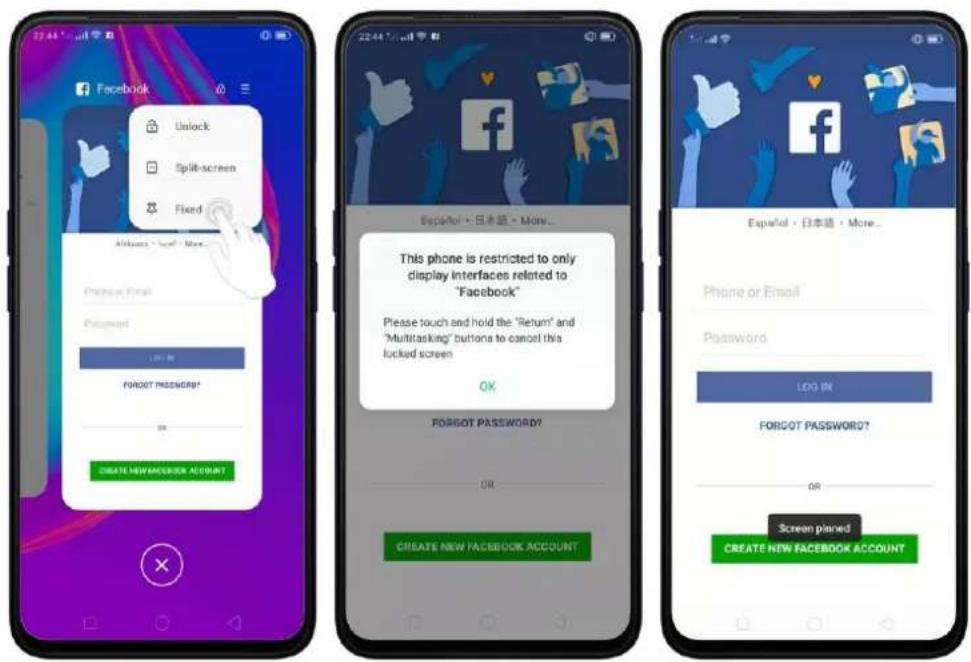
text_image
Facebook Unlock Split-screen Fixed Alkkaos - "alt" More... Password Email Password LRT 80 FORGOT PASSWORD? OK CREATE NEW FACEBOOK ACCOUNT 22:44 July 1997 Español · 日本語 · More... This phone is restricted to only display interfaces related to "Facebook" Please touch and hold the "Return" and "Multitasking" buttons to cancel this locked screen OK FORGOT PASSWORD? OR CREATE NEW FACEBOOK ACCOUNT Español · 日本語 · More... Phone or Email Password LOG IN FORGOT PASSWORD? OR Screen planed CREATE NEW FACEBOOK ACCOUNTUnpin the screen. Touch and hold the Return and Multitasking button until you see "Screen Unpinned".

text_image
Español · 日本語 · More... Phone or Email Password LOG IN FORGOT PASSWORD? Please touch and hold the "Return" and "Multitasking" buttons to cancel this locked screen CREATE NEW FACEBOOK ACCOUNT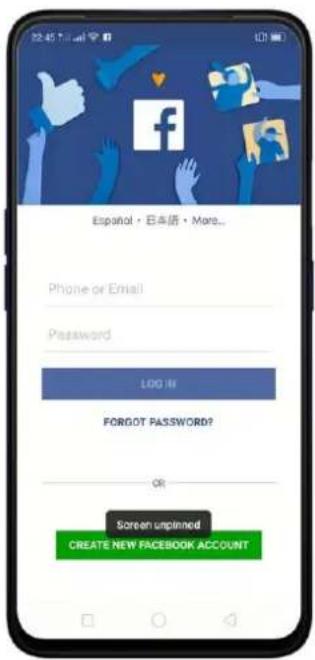
text_image
Español · 日本語 · More... Phone or Email Password LOG III FORNOT PASSWORD? OR Screen unplanned CREATE NEW FACEBOOK ACCOUNTIf you want to lock the phone screen directly when unpinning the screen, switch the [Lock device when unpinning] slider to green.

text_image
Screen Pinning Screen Pinning Lock Screen After Unpinning8.5. App Encryption
If you want to fully secure your personal apps it is always best to encrypt them. This is to prevent theft of private data.
How to encrypt apps
Go to [Settings] > [Security] > [App Encryption] then select the apps that you would like to be encrypted, then click Enable Encryption.

text_image
Security SOS Emergency SOS > HARRASSMENT AND PRAUD PROTECTION Anti-harassment/Fraud > Pseudo Base Station Blocking > PRIVACY PROTECTION App Encryption Kid Space > Private Safe > OTHER SECURITY FEATURES Secure Keyboard The system allows effectively exclusive to the OPPO Secure Keyboard when you are ordering sensitive information, such as pseudoscripts. OPPO Secure Keyboard does not record your input, connect to first internet, or auto-equipped words. This excludes most your result in Not listed.You will be asked to set the Privacy Passcode first. Apart from the 4 numerical method, you can also choose from Pattern Passcode and Custom Alphanumeric Passcode. Just click Other Methods to be given this option.
After successfully setting a passcode, you will be asked to set a security question. This can you help you reset the passcode when you forget it. You can also customize a question, then click Done.
If you want to use fingerprint to encrypt apps, go to [Settings] > [Fingerprint, Face &Passcode] > [Use fingerprints for] then choose App Lock.

text_image
Use Fingerprints for Unlock App Lock Private Safe When the fingerprint scanner is enabled, you may use a sound fingerprint instead of your authentication payments or other you choose.You will see a padlock on apps that you have encrypted.

text_image
App Lock Facebook File Manager Find Device Game Space Gmail Google Helix Jump iReader Keep Notes Kwai LazadaHide Apps from the Home Screen
You can also hide the app on the homescreen and can only be viewed when entering the access number on the dial pad. It can be opened without encryption passcode verification. See Hide apps from Home Screen
Managing encrypted apps
Go to [Settings] > [Security] > [App Lock] then click 📍 on the right top corner of the screen. You will be given options to manage the following:
• Change verification passcode
- Modify the security question
• Change access number
You can also enable the following:
• Use fingerprint for app encryption
- Skip authentication for short exits

text_image
App Lock Settings Change Access Number When app locks are logged by the home outlet, you can have them by entering the accepted number on the shield. Skip Authentication for Short Exits After clicking an important app, please provide verification to not required for accessing the app if the device is not allowed.9. Share Internet connection and files
9.1.1. Tether your phone's Internet connection
Using tethering can make you share your phone's Internet connection with several devices, such as your computer, tablet or other gadgets. Tethering works when your phone is connected to the Internet via mobile data or Wi-Fi network.
Turn your phone into a personal hotspot.
- Go to [Settings] > [Other Wireless Connections] > [Personal Hotspot], then switch the slider to green.
- Set the hotspot name and password.
- On another device, choose your hotspot from the list of available Wi-Fi networks.
Note: When a device is connected, a blue band appears at the top of the phone screen.
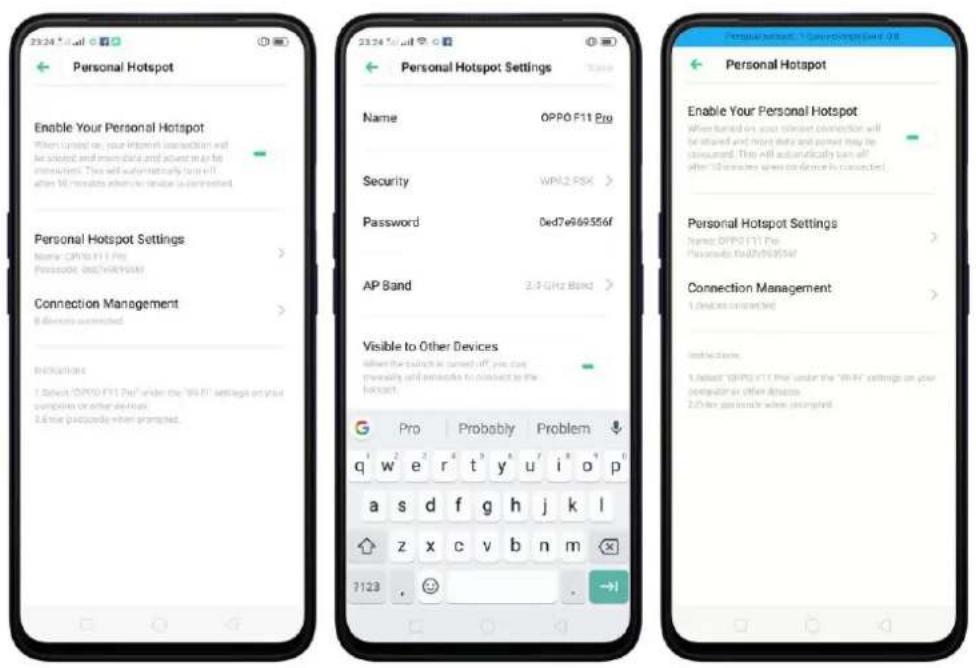
text_image
Personal Hotspot Enable Your Personal Hotspot Please turn to your Internet connection will be stored and install any data and access to all the operators. This will automatically turn off after 10 minutes when connected is connected. Personal Hotspot Settings Name: OPPO F11 Pro Security: WPK2.PSK > Password: 0ed7e869356f AP Band: 2.5 GHz Band > Visible to Other Devices do not use a button or switch to access to the hotspot. G Pro Probably Problem q w e r t y u i o p a s d f g h j k l z x c v b n m 7123 . → Personal Hotspot Enable Your Personal Hotspot When turned on a soft socket connection will be stored and more data and power may be consumed. This will automatically turn off after 10 minutes when connected is connected. Personal Hotspot Settings Name: OPPO F11 Pro Password: 0d7e869356f Connection Management: 1 device connected Indicators 1.dset: OPPO F11 Pro under the "WPK" settings on your computer as other devices 2.Other ports handle when ungrind.This makes your phone as a Wi-Fi router which basically has the same functionality to that of a traditional router which enables the sharing of internet to other Wi-Fi devices. See Tether your phone's internet connection.
Use Wi-Fi Tethering
- Go to [Settings] > [Other Wireless Connections] > and enable [Wi-Fi Tethering].
- In [Wi-Fi Tethering Settings] you can change the name, manage security, and input passcode. Also, when Visible to other Devices is turned off, you can manually add networks to connect to the hotspot.
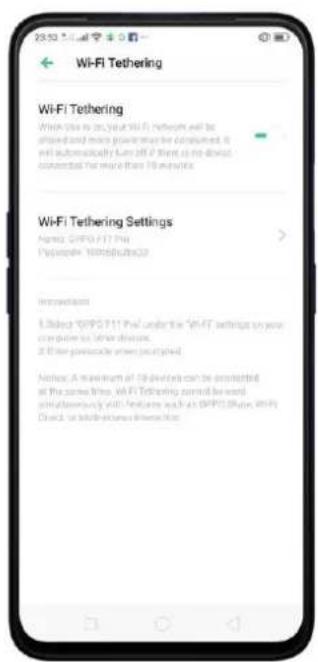
text_image
23:52 Wi-Fi Tethering Wi-Fi Tethering Which type is in your Wi-Fi network will be applied and more power than be consumed. It will automatically turn off if there is no about connected the more than 10 myTrip. Wi-Fi Tethering Settings Named: GPPD P11 Pte Proprietive: Non-Service Introduction 1. Subject "GPPD P11 Pte" under the Wi-Fi settings on your computer for other directions. 2. If the software screen is upgraded. Notice: A minimum of 10 devices can be considered at the same time, Wi-Fi tethering cannot be used simultaneously with features such as GPPD Shape Wi-Fi Direct or Internet Services Introduction.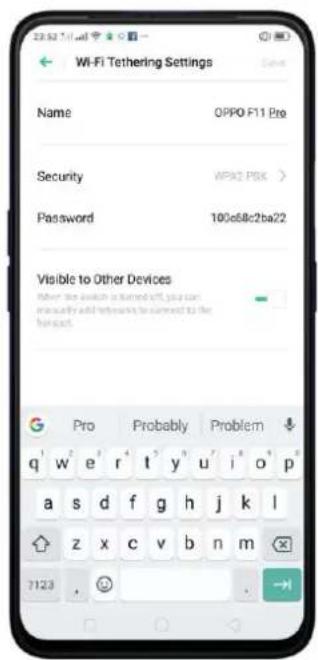
text_image
Wi-Fi Tethering Settings Name OPPO F11 Pro Security WPX2 PSK > Password 100c68c2ba22 Visible to Other Devices When the switch is turned off, you can manually add following to correct to the format. G Pro Probably Problem q w e r t y u i o p a s d f g h j k l z x c v b n m 7123 ,Note: Wi-Fi Tethering will automatically turn off if no device is connected for more than 10 minutes. This is to save energy. A maximum of 10 devices can be connected but cannot be used simultaneously with features such as realme Share, Wi-Fi Direct, or Multi-screen Interaction.
Use USB Tethering.
- Connect your phone to your computer using the cable that came with it.
- Go to [Settings] > [Other Wireless Connections] > [USB Tethering], then switch the slider to green.
- In your computer's Network preferences, choose your realme phone, then configure the network settings.
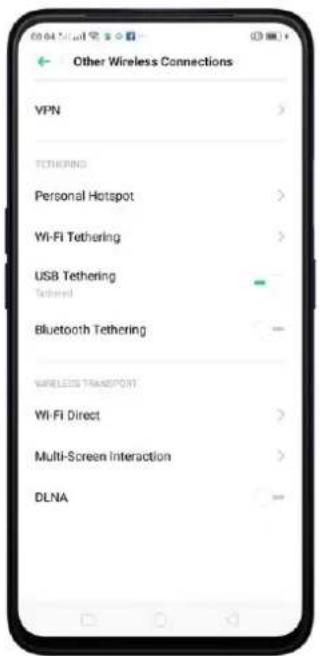
text_image
Other Wireless Connections VPN Tethering Personal Hotspot Wi-Fi Tethering USB Tethering Tethered Bluetooth Tethering WIRELESS TRANSPORT Wi-Fi Direct Multi-Screen Interaction DLNATether via Bluetooth.
- Go to [Settings] > [Other Wireless Connections] and enable [Bluetooth Tethering].
- In [Settings] > [Bluetooth], pair and connect your phone with your Bluetooth device.
- Click ⓘ next to the device's name, then enable either Internet Access or Contact Sharing.

text_image
Other Wireless Connections VPN TETHERING Personal Hotspot Wi-Fi Tethering USB Tethering Bluetooth Tethering WIRELESS TRANSPORT Wi-Fi Direct Multi-Screen Interaction DLNA
text_image
Bluetooth Bluetooth Device Name OPPC FT1 Pro Visible to Other Devices RIPED DEVICES shang2
text_image
Paired Device Device Name: shang2 > Unpse Unit Type Internet Access Disconnected Contact Sharing For sharing of contactsMonitor your mobile data network usage. Go to [Settings] > [Dual SIM & Cellular Data].
9.2. Share Files
9.2.1. Wireless file sharing
You can share files wirelessly between wireless devices.
Use realme share. Share files between realme smartphones in a flash. Very fast way.
- Open Control Center, then turn on realme Share on both realme phones.
- Select the files to be shared and the device to share with, click Send, then click the detected realme phone.
- Click Receive on the other device and start sharing.
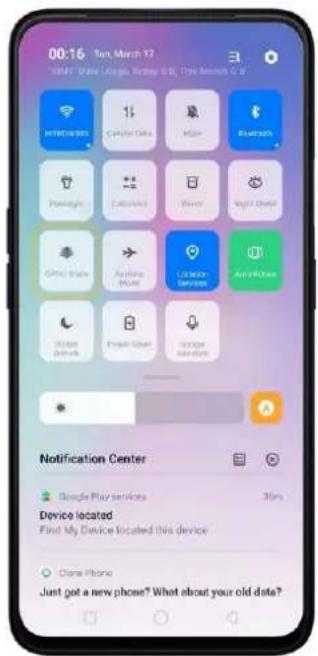
text_image
00:16 Tex March 17 Microsoft Office, Turkey 0.8, This March 0.8 HITROGEN Catalina Data Miao Risikendi Pemirsky Catalina Frost Might Disney Giant Share Android Music Catalina Service Airborne 24-bit Dashbox Power Touch Orange Switcher Notification Center Google Play services 30% Device located Find My Device located this device Clone Phone Just got a new phone? What about your old data?
text_image
1 photo selected Cancel! Top the avatar to send via "OPPO Shaw" First Find X Facebook Your Diary WeChat WeChat Varrants Email Messages Bluetooth Add In MapsShare via Bluetooth.
- Go to [Settings] > [Bluetooth] and enable Bluetooth. Then pair and connect your phone with your Bluetooth device.
- Select the files to be shared, click Send, then click Bluetooth.
- Click Accept on your Bluetooth device and start sharing.

text_image
1 photo selected Cancel Tap the avatar to send via "OPPO Share" Find First X Facebook Your Story WeChat WeChat Moments Email Messages Shewicht Add to MassUse Remote Management to view and download files.
- Connect your phone and laptop to the same Wi-Fi network.
- Click Files, click Remotely Manage Phone Files, then click Start Service. Search the URL displayed on your phone screen with your computer, then you can view your phone's file system and download files directly to your computer. See Remotely Manage Phone Files.
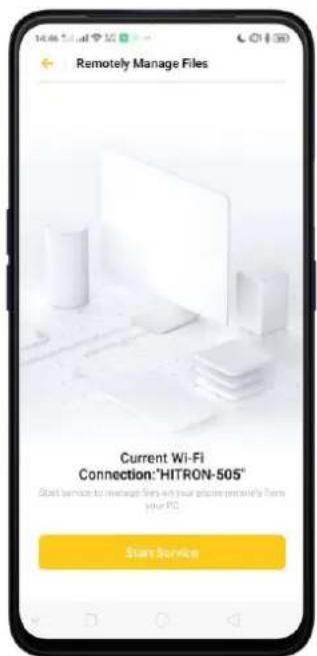
text_image
Remotely Manage Files Current Wi-Fi Connection:"HITRON-50S" Start service for microwave Sony with your profile remaining from your PC Start Service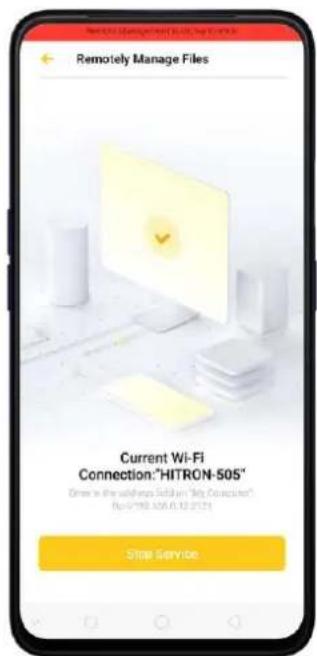
text_image
Remotely Manage Files Current Wi-Fi Connection:"HITRON-505" Order in the software Solution "My Connection" By: 07192.505.01.12.01.24 Stop ServiceWi-Fi Direct. Wi-Fi Direct allows devices to connect to each other directly through Wi-Fi, without the need of a Wi-Fi network or hotspot, and without having to set up the connection. You can also use Wi-Fi Direct to share files with the help of third-party apps, such as ZAPYA.
- Go to [Settings] > [Wi-Fi] and enable Wi-Fi.
- Go to [Settings] > [Other Wireless Connections] > [Wi-Fi Direct].
- Click Search to start scanning for nearby Wi-Fi Direct devices. After the scan, select a device, then follow the prompts to pair the devices.
Multi-screen Interaction. You can stream your phone screen to TV sets, TV Boxes, or computers which is certified with Wi-Fi Miracast technology.
Stream to computer
Notice:
-
Connect your realme smartphone and computer to the same Wi-Fi network.
-
The function is only supported by Win 10. For Win 8 system, you can install additional software and apps like AirServer to support.
Computer Setting
- Go to [Settings] > [System] > [Project onto the computer].
- Allow projection on all locations and every time when a request comes.
- Enable the PIN code and remember your computer name.
realme smartphone Setting
- Go to [Settings] > [Other Wireless Connections] > [Multi-screen Interaction], switch [Multi-screen Interaction] to green to start searching devices.
- Select your computer name from the list and match it to your smartphone. You will see the shared screen on computer once it's connected successfully.

text_image
Multi-Screen Interaction Multi-Screen Interaction Phone screen can be projected to TV setup, TV doses and other equipment through Wireless Display technology. AVAILABLE DEVICESStream to TV
- Connect your realme smartphone and TV to the same Wi-Fi network.
- Select your TV name from the list and match it to your smartphone. You will see the shared screen on TV once it's connected successfully.
- If you want to stream the video playing on your smartphone to your TV, you can install additional apps like IQIYI to support.
DLNA.
9.2.2. Wired file sharing
Transfer files between your phone and a computer.
- Connect your phone to your computer using the cable that came with it.
- Click phone's notification, then click File Transfer.
- On the computer, click your phone name, click Internal shared storage, then you can copy phone files to the computer.

text_image
00 39 Chang No service | GLOBE USB Debugging Transferring Photos via US$ Tap to see more options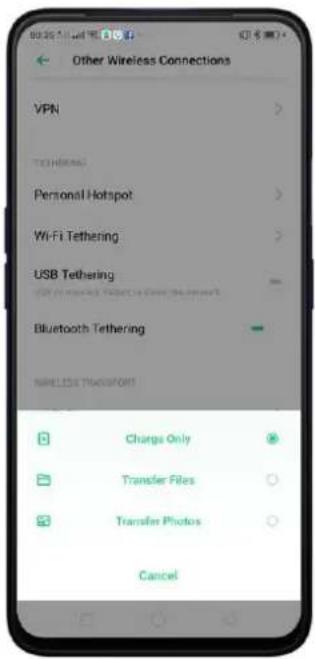
text_image
Other Wireless Connections VPN TOMBERING Personal Hotspot Wi-Fi Tethering USB Tethering Bluetooth Tethering NIRELESS TRANSPORT Charge Only Transfer Files Transfer Photos CancelTransfer files with USB OTG. You can connect and add additional storage devices or USB flash drives directly to your phone using USB OTG cable.
- Go to [Settings] > [Additional Settings] and enable [OTG Connection].
- Connect a storage device to your phone using USB OTG cable. You can directly access data on the external storage device and play movies or music without having to store them on your device.

text_image
Additional Settings Search Download Management User Guide Automatic On/Off Device & Privacy SIM Toolkit Accessibility Display RAM/Memory Information for Recent Tasks OTG Connection Back Up and Reset9.2.3. Share from apps
In addition to sharing your information from the Files app, you can also share from many other apps on your realme smartphone.
Share from apps. In many apps, you can click Send or 📋 to choose how to share your information. The choices vary depending on the app you're using. Additional options may appear if you've downloaded apps with sharing options.
Take the Photos app as an example, click 📋 and you'll see all the sharing options.
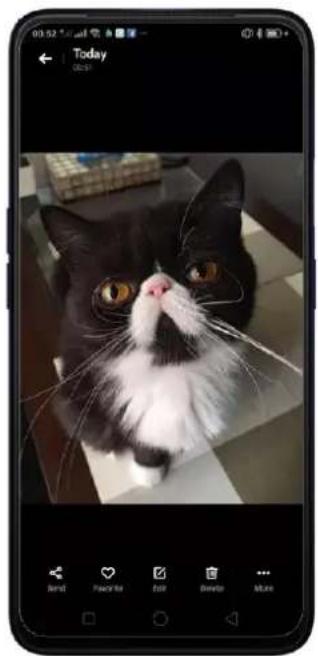
natural_image
Close-up photo of a black and white cat with large eyes, looking upward (no text or symbols visible)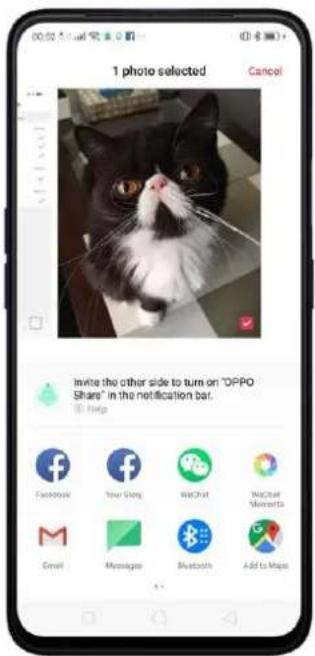
text_image
1 photo selected Cancel Invite the other side to turn on "OPPO Share" in the notification bar. Help Facebook New Glory WeChat WeChat Minutes Email Messages Bluetooth Add to Maps10. Restart, update, back up, and restore
10.1. Restart the phone
If something isn't working right, try restarting the phone.
Restart realme phone. Press and hold the Sleep/Wake button until the Slide down to power off message appears. Drag the power icon down to turn off the phone. To turn the phone back on, press and hold the Sleep/Wake button until you see the realme logo.
text_image
Sleep/ Wake Button Cancel Please and Next The Power Button and Volume Uptake for more than 10% to restart the phoneForce restart realme phone. If the phone is not responding, press and hold the Sleep/Wake and Volume Up buttons for at least 8 seconds until you see the realme logo.
10.2. Update ColorOS software
There are three ways to update your device.
Notice before doing the update.
- Plug your realme phone into power, or keep the battery level over 40%.
- The update process takes some time. Do not operate or power off your device during the process.
- DO NOT root the phone yourself, for that might cause damage to your system, and the warranty service will be terminated immediately.
Update your realme phone wirelessly
- Connect to a working Wi-Fi or Mobile network. The system will automatically show new update if any. You can see a notification on the "System updates" icon, otherwise, it will show "It is already the latest version".
text_image
Settings Software Updates About Phone Accounts and Sync Google App Management Clone Apps OPPO Cloud Download Manager Instructions Call Contacts Settings Software Updates It is already the latest version. OPW130790.11.A.01.170523 Features- Download the firmware. Download under a Wi-Fi network to avoid mobile consumption.
- Click [System Updates]. Your device will reboot and start updating, which will take a few minutes.
text_image
Updating, please wait Don't uninstall the battery or do-other operations! Estimated time remaining is 3 minutes ... ...10.3. Back up and restore the phone
10.3.1. Back up your phone
If you use your device on a regular basis, having a reliable backup is essential in case something goes wrong.
Use the built-in backup tool. Go to [Settings] > [Additional Settings] > [Back up and reset] and click [Backup & Restore]. All your personal data, system data, and applications will be backed up to phone storage.
text_image
Back Up and Reset DATA BACKUP Back Up & Restore GOOGLE BACKUP Back Up My Data Back Up accounts in WiFi (data, and other settings to the Google server) Back Up Account Automatic Restore After any copy or installed again, the options will restore backup up settings and data. PERSONAL DATA Reset to Factory Settings Create all data on phone Back Up & Restore Select BACKUP RECOO: March 15, 17:52: Phone Storage Set off types of data • Setup of application data is currently not happened to ensure data website. • Payments or trading phone accounts and waiting will locate the backup data in your green storage (Air Phone Storage - Backup). Therefore, copy the backup data to install a message at your PC before performing these conditions to avoid data loss. Create new backup Select the Data to Be Backed up Contacts Messages Call History System Data Clock and others App (Excluding Data) Start backupBack up to Google. Go to [Settings] > [Additional Settings] > [Back up and reset] and turn on [Back up my data]. You can back up your app data, Wi-Fi data, and other settings to the Google server.
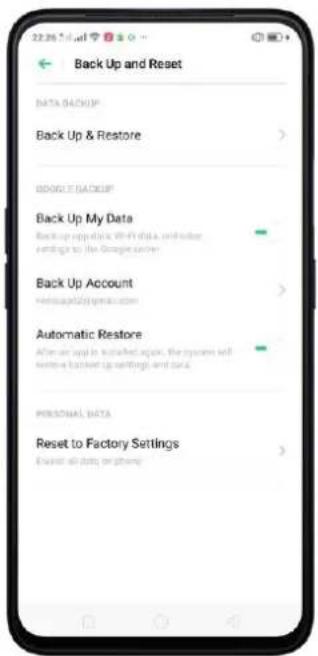
text_image
Back Up and Reset DATA BACKUP Back Up & Restore GOOGLE BACKUP Back Up My Data Backup applicable with data and other settings to the Google Server Back Up Account ########@gprm.com Automatic Restore After an app is installed again, the system will write a business settings and data. POSTUAL DATA Reset to Factory Settings Allow all data or groupsConnect your phone to a computer to create a backup on it. This is a common way to back up all your data. Don't disconnect your phone during the copy backup process.
10.3.2. Restore data on your phone
There are various methods to restore data on realme smartphone. Select the corresponding restoration method according to the way you have made the backup.
Restore your realme smartphone from Local backup
Before you start, make sure that you have copied and saved the data on realme smartphone via Local backup.
- Go to [Settings] > [Additional Settings] > [Back up and Reset] and click [Backup & Restore]. You can find the data you want to restore according to its backup time.
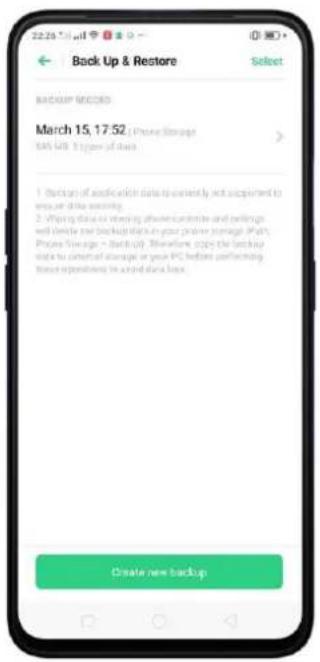
text_image
Back Up & Restore BackUp MORE March 15, 17:52: (Phone Storage) MS-WB 8 types of data 1. Backup of application data to currently not acquired to area or drive security. 2. Working data or referring above conditions and settings will decide the backup back in your prime storage (Path: Phone Storage - Backup). Therefore, copy the backup data to convert at average or your PC before performing these extensions to avoid data loss. Create new backup- Select data to be restored, including Contacts, Messages, Call history, system data and Apps and their data. Then start the restoration.

text_image
Select the Data to Be Restored Contacts 87% (c) Messages 30% (c) Call History 22% (c) System Data 52% (b) Check installers App (Excluding Data) 25% (b) Start Restoring- You device will display the progress and details till the restoration is done. You can click Stop Restoring at any time during the process.
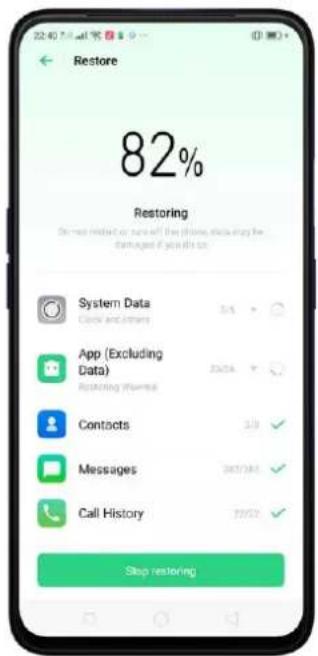
text_image
82% Restoring Do not need or run off the phone, excluding the Damaged if you're doing. System Data Clock and history App (Excluding Data) Accounting Information Contacts Messages Call History Stop restoring
text_image
22:40 Mail and Email Restore Restored Successfully File http://images/data/ Contacts Messages Call History System Data App (Excluding Data) Description exempted Date* DO NOT turn off or restart your phone during the restoration process, otherwise, data may be damaged or lost.
* After restoration has succeeded, you can delete data that are no longer needed.
Restore your realme smartphone via computer
If your backup files are stored on external storage such as SD card, removable hard drive, etc., copy these files to your realme smartphone to complete data restoration.
Transfer your data with Clone Phone
If you have switched to a new realme phone, you can transfer your data from old phone to your new realme phone through Clone Phone.
Restore your realme smartphone data from third-party Apps
realme does not recommend you back up, transfer or restore data via third-party APPs, for they may be in conflict with realme system, leak personal information, or cause other safety problems.
10.3.3. Reset the phone
Resetting your realme phone will reset the phone back to its original factory settings, and will permanently erase all your personal data. You can do Factory data reset if your phone starts to lag or there's a delay in navigating, has too much junk files and caches, or has issues with system or applications.
Before you do factory reset, back up all the needed data.
Reset your phone to factory settings
Go to [Settings] > [Additional settings] > [Back up and Reset] > [Reset to Factory Settings], choose an option available for factory data reset.
* Any reset option cannot be revoked once it is operated.
Reset System Settings Only
This option will reset all system settings without deleting any data or media files.
Clear Downloaded Apps and App Data
This option will delete all third-party apps and app data. But the data saved by the user will be kept such as photos, music, and videos.
Clear All Data
Through this option, all data of on you device will be cleared including contents, settings, photos, and music. It will reset to its inactivated initial state, which is the factory state.
Clear the Contacts and Call History on This Phone
By choosing this option, all the contacts and call history on the phone will be erased. Only the contacts on the SIM card will be preserved. Other data on your device will not be affected.
Clear the SMS and MMS Messages on This Phone
By choosing this option, all the SMS and MMS messages on the phone will be erased. Only the SMS messages on the SIM card will be preserved. Other you're your device will not be affected.

text_image
Reset to Factory Settings Reset System Settings Only Clear Downloaded Apps and App Data Any data (e.g. phone, image) Clear All Data Clear all data (including phone and email) Clear the Contacts and Call History on This Phone Contacts on the SMS call will be installed Clear the SMS and MMS Messages on This Phone SMS messages on the SMS call will be installed11. Barrier-free
11.1. TalkBack
TalkBack helps blind and vision-impaired users to interact with the phones more easily. It uses spoken word, vibration, and other audible feedback to let you know what's on your screen, what you're touching, and what you can do with it.
Turn TalkBack on. Go to [Settings] > [Additional Settings] > [Accessibility] and enable TalkBack.
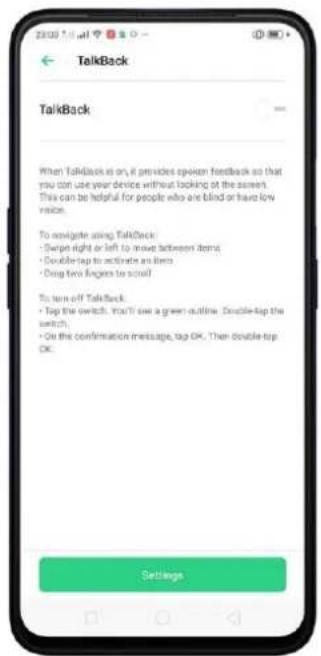
text_image
TalkBack TalkBack When TalkBack is on, if provides spoken feedback so that you can use your device without looking at the screen. This can be helpful for people who are blind or have low version. To navigate using TalkBack: • Swipe right or left to move between items • Double-top to activate an item • Drop two fingers to scroll! To turn off TalkBack: • Top the switch. You'll see a green outline. Double-top the switch; • On the confirmation message, tag OK. Then double-top OK. Settings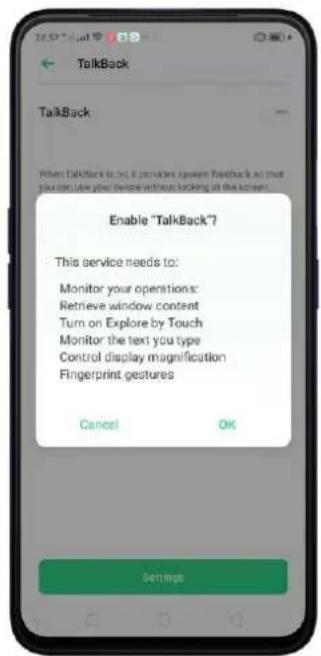
text_image
Enable "TalkBack?" This service needs to: Monitor your operations: Retrieve window content Turn on Explore by Touch Monitor the text you type Control display magnification Fingerprint gestures Cancel OK Settings
text_image
TalkBack tutorial TalkBack is a screen reader primarily for people with birdness and low vision. It allows interaction with the device using spoken feedback. TURN TALKBACK OFF Lesson 1: Basic navigation Switching exploring activating LEARN PRACTICE Lesson 2: Scrolling Scrolling forward and backward LEARN PRACTICE Lesson 3: TalkBack menus Global TalkBack menu, local TalkBack menu LEARN PRACTICEWhen TalkBack is on:
Your device provides spoken feedback to help blind and low-vision users. For example, it describes what you touch, select, and activate.
- To select an option: Click the option to show the green border, then double-click to activate it.
• To scroll the screen: Swipe upward or downward with two fingers.

text_image
22:58 6. ClearPKD New Bus Mar 17Turn Talkback off. Go to [Settings] > [Additional Settings] > [Accessibility] >
[TalkBack], switch the slider to white, then click Off.

text_image
TalkBack TalkBack When TalkBack is on, it provides speakers feedback on that you can use your device without looking at the screen. This can be helpful for people who are liked or have low volumes. To navigate using TalkBack: • Skip right or left to move between items • Double-tag to activate an item • Drop two fingers to scroll To run off Talkback: • Tap the switch. You'll see a green outline. Double-tag the switch. • On the confirmation message, tap OK. Then double-tag OK. Settings
text_image
TalkBack TalkBack When TalkBack is on, it's an extra spoken feedback so that you can use your device without looking at the screen. This can be helpful for people who are tired or have low voice. To navigate using TalkBack • Skip or left to choose between home • Don't bring to activate any home Disable "TalkBack"? Cancel Off settings11.2. Magnification Gestures
Magnification gestures work similarly to the full-screen magnifiers, which allows users to zoom in and pan the whole screen to get a closer look at screen content.
Enable magnification gestures. Go to [Settings] > [Additional Settings] > [Accessibility] and enable [Magnification Gestures].
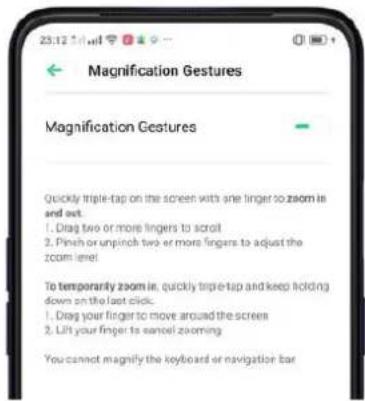
text_image
Magnification Gestures Magnification Gestures Quickly triple-tap on the screen with one finger to zoom is and out. 1. Drag two or more fingers to scroll 2. Pinch or unpinch two or more fingers to adjust the zoom level To temporarily zoom in, quickly triple-tap and keep holding down on the last click. 1. Drag your finger to move around the screen 2. Lift your finger to cancel zooming You cannot magnify the keyboard or navigation bar- Quickly triple-tap the screen to zoom in and out. The triple-tapping does not work well on the keyboard or on the navigation bar - if you have the magnifier running while the keyboard is shown, only the area above the keyboard will be
magnified.
- Drag two or more fingers across the screen to pan across the screen.
- Pinch your fingers together or apart to adjust the zoom level.

text_image
23:15 ClearUTC 早晴 Sun Mar 17
text_image
31 Calendar Photos Music Play Store
text_image
Recipient:o Ollie Mobile +639177010428Turn the magnifier on temporarily. Triple-tap the screen and hold the third click.
• Drag one finger around the screen to move the view.
• Lift the finger to cancel zooming.
• Quickly triple-tap to exit.
11.3. Press Power Button to End Call
- In addition to end calls by clicking 🔍, you can make the Power button do this function.
- End Calls with the Power button. Go to [Settings] > [Additional Settings] > [Accessibility] and turn on [Press Power Button to End Call]. Then you can end calls by clicking Decline or pressing the Power button.

text_image
Accessibility Large Mouse Pointer ATTRACTIVE CONTROLS Switch Access Click When the Pointer Stops Moving Press Power Button to End Call Touch & Hold Delay Audio AND ON SCREEN TEXT Mono Audio Moges channels were playing audio Subtitles Downloaded Services ir TouchPal12. Safety, handling, and support
12.1. Health & Safety
12.1.1. Using Environment
Keep in mind the following rules. Switch off your phone when it is prohibited, or might cause disturbance or danger.
- The ideal phone working temperature is 0^ C to 35^ C and 35% to 85% humidity. A too high or too low temperature might affect the performance or cause damages. The ideal phone storage temperature is -20^ C to 45^ C.
- Your phone might interfere with electronic and medical equipment. Obey the related rules and switch off your phone in these places.
- Try not to use your phone in weak signal areas or near high-precision electronic devices. Radio interference might lead to malfunction or other issues in electronic devices, especially pay attention when near the following devices: hearing aids, pacemakers and other medical devices, fire detectors, automatic doors and other automatic control devices.
-
In rare cases, the phone might interfere with the electronic systems in certain cars, such as the ABS anti-lock brakes and the air bag. Consult your network operator or car manufacturer before connecting the phone.
-
Before connecting to other devices, carefully read the user manual for more detailed, accurate, and safety instructions. Do not connect to incompatible products.
-
Do not use your phone in rain, or near washbasins or other wet locations.
12.1.2. Battery Safety
Battery Precautions
- Do not disassemble the built-in lithium polymer battery yourself, otherwise, it might cause battery leakage, overheat, explosion, and fire. Go to an realme designated after-sales service center if battery replacement is needed.
- Do not puncture or pierce the battery with hard objects (e.g., needles and tacks) to avoid battery leakage.
- Liquid in the battery is harmful to your skin. If liquid can be seen leaking from the battery, do not attempt to touch it. If the liquid contacts with the skin and eyes rinse immediately with water and go to a doctor if needed.
- Do not expose the battery to extreme ambient temperatures, fire, wet locations, and direct sunlight.
- If the battery sends out strange smell, turn off your phone immediately, and send it to an authorized service provider for battery replacement. Do not attempt to disassemble or replace the battery yourself.
- Do not continuously charge the battery over 12 hours.
Battery Life Tips
- Use realme original accessories. Use realme original charger (power adapter and USB cable) that matches your phone model. Charging with third-party or counterfeit charger accessories might impact battery lifespan or even cause security incidents.
- Charge at a suitable temperature. The ideal charging temperature is 5^ C to 40^ C. Battery life might temporarily shorten in low-temperature conditions, or irreversibly damage when temperature is too high. The battery should be charged within the ideal temperature range to avoid decreased battery performance and standby time.
- Turn off phone features when not in use. Using features such as Bluetooth, Wi-Fi, and GPS or keeping them active in the background may drain the battery significantly. Turn them off when not in use to save the battery.
Dimming your screen and reducing the screen timeout setting can also preserve the battery life.
-
Do not use when charging. Your phone might quickly get warm or even cause damage if you use it a lot during charging.
-
Do not fully drain your phone's battery. Charge your phone when your battery level goes down to 10%. If phone's battery is fully drain, the battery could fall into a deep empty/drain state, which will cause it to be slightly damaged.
-
Store the phone long term. If you plan to store the phone for a long time, charge it to 60% or above every month.
-
External environment. Avoid exposing your phone battery to high or low temperature, humid environment or sun exposure.
12.1.3. Charger Usage Notes
- Only use the charger specified by realme.
- Charging voltage should be consistent with that specified on the charger. Using mismatched voltage might cause leakage, fire, and damages.
- Do not use a power socket that is incompatible with the charger. Make sure the charger is plugged in firmly to avoid any fire hazard.
- Do not charge your phone with a partially damaged charger, for that could result in electric shock, fire or other damages.
- Do not charge your phone near washbasins or other water containers, or in wet locations such as bathrooms. Take caution to not spill any food or liquid on your phone or charger. Do not touch chargers, cables or power sockets with wet hands. In case the charger gets wet, unplug all cables, allow it to dry thoroughly before charging again.
- Do not disassemble or modify the charger or cables yourself.
- Do not place heavy objects on the charger, for that might cause electric shock and fire.
- Before cleaning the charger, unplug all cables (hold and pull the plug instead of pulling the cable, otherwise the cable will be ripped off).
-
Do not charge your phone when there is lightening or thunderstorm. Do not make phone calls while charging.
-
Avoid exposing your charger to following conditions: exposing to direct sunlight, temperatures lower than 5^ C or higher than 40^ C, damp and dusty places or that with excessive vibrations (might cause breakdowns), places near electrical appliances such as TV and radio sets (might cause interference to images and sound).
12.1.4. Traffic Safety
Use both hands when driving, and give full attention to driving and on the road. If you decide to use your phone while driving or riding a bicycle, keep in mind the following conditions:
▶ Safety should always come first while driving or riding a bicycle. Make sure to follow the related regulations in the area or country.
- Keep your eyes on the road. If you get an incoming call at an inconvenient time, let your voicemail answer it for you, or answer with a Bluetooth headset.
▶ An air bag in your vehicle inflates with great force. Do not store your phone or any of its accessories in the area over the air bag or in the air bag deployment area.
- Do not rely solely on the map on your phone when searching for locations, buildings, directions, and distances. Map routes and compass change as information provided by the service provider changes, so the map might be incorrect, incomplete or unsupported.
- Do not ship the phone; with its components or accessories in the same compartment with flammable liquids, gases or explosives
12.2. Maintenance and Repair
12.2.1. Phone Cases
Keeping your phone protected from damage should be pretty important to you. The phone case that come along with your phone can effectively mitigate your concerns.
realme original phone case is made of TPU material, which is lightweight and soft and helps keep the original 'feel' of the phone since the case is a tight-fitting overlay. It does a good job of protecting against drops and shock damage on the corners and rear of your phone, also can reduce the damage caused by extreme temperature, liquid and dust invasion, etc.
12.2.2. Screen Protector
realme provides you with an original HD clear screen protector made of PET material, which is a thin piece of electro-conductive film that self-adheres to your screen. It protects your screen from cracking, also does offer resistance to scratches, finger prints, and abrasions. Besides, realme screen protector ensures high-definition and sensitiveness of the screen, which will not affect the screen display quality.
12.2.3. Maximize battery life and lifespan
Note: Rechargeable batteries have a limited number of charge cycles and may eventually need to be replaced. It is normal for the battery to lose its capacity over time, but you can do the following to maximize its life and lifespan.
Use realme original accessories. Charge the phone with realme original power adapter and USB cable. Charging with third-party charger accessories might impact battery lifespan or even cause security incidents.
Use at a suitable temperature. realme smartphone battery is designed to have a good performance in a wide range of ambient temperatures, with 16^ C to 25^ C as the ideal comfort zone. When temperature is higher than 45^ C, battery capacity will damage irreversibly, and phone might even short-circuit and burn.
Do not use when charging. Programs such as long-time calls, games or online videos will make phone get warm quickly.
Do not fully discharge your phone's battery. Charge your phone when your battery level goes down to 10%. If phone's battery is fully discharged, the battery could fall into a deep discharge state, which will cause it to be slightly damaged.
Store the phone long term. If you plan to store the phone for a long-term, charge it to 60% or above every month.
External environment. Avoid exposing your phone battery to humid environment or sun exposure.
Keep a good using habit. Using features such as Bluetooth, Wi-Fi, and GPS or keeping them active in the background may drain the battery significantly. Turn them off when not in use to save the battery. Dimming your screen and reducing the screen timeout setting can also preserve the battery life.
Do not charge with a portable power bank frequently. If a power bank supplies current which is above your phone battery's capacity, then it will cause damage to your battery gradually. Make sure the power bank you buy is of good quality and
has power ratings which are suitable for your phone, basically match the current to the wall charger you use.
12.2.4. Keep Clean
Your mobile phone could be a hotspot for bacteria, so clean your phone is of great importance. Follow these steps:
- To clean your phone, unplug all cables and turn it off first.
- Dip the included cleaning cloth or a soft, slightly damp, lint-free cloth in distilled water or low concentration alcohol, and shake or squeeze to remove any excess liquid.
- Slightly wipe across your phone. Avoid getting moisture in openings.
- Gently wipe the screen with the dry part of the microfiber cloth, but don't try to pick up all the excess water if it means pressing hard.
Do not attempt to dry your phone with an external heat source, such as a hair dryer. If impurities cannot be cleaned up, contact realme Service Center for professional assistances.
12.2.5. Keep dry and solve water damage
Do not use your phone in rain, or near washbasins or other wet locations. Take care not to spill any food or liquid on your phone. In case your phone gets wet, follow these emergency measures:
- Take your phone out of the liquid immediately, unplug all cables and turn off your phone.
- If your phone has a removable battery, remove it.
- Use a tissue or soft cloth to thoroughly adsorb water stains or liquids on the surface of your phone, and gently shake the phone in the realmesite direction of liquid inflow.
- Let your phone dry thoroughly before turning it on again. Avoid drying your phone with an external heat source, such as a hot air hair dryer.
If your phone has a serious water damage, take your phone, warranty card and proof of purchase to a nearby realme Customer Center for repairs at once.
12.2.6. Use connectors, ports, and buttons.
Never force a connector into a port for that might cause damage, which is not covered by warranty service. Check for obstructions on the port. If the connector and port don't join with reasonable ease, they probably don't match. Make sure that the connector matches the port and that you have positioned the connector correctly in relation to the port.
12.2.7. Other information
Mobile phones are perishable items, use with care. The following instructions might help to protect your phone:
- Do not drop your phone or let it receive a substantial impact.
- Do not place your phone in a microwave oven or other high voltage equipment, otherwise, it might cause damages, fire or explosion.
- Do not leave the phone in hot, humid, or dusty environments. This may cause the phone to malfunction.
- Your phone contains small parts, which may present a choking hazard to small children. Keep your phone and its accessories away from small children.
- Do not paint your phone. Paint will block the sensors and lead to phone disoperation.
- Dirty sockets might cause poor contact or electrical leakage. Regularly clean the power socket.
- Do not take out the SIM or SD card when transmitting or saving information, otherwise, some important information might be lost.
- Use only the supplied or approved antenna for replacement. Modified accessories might damage the phone or violate administer regulations of radio devices.
Note:
Read all safety information carefully before using the phone to ensure personal safety and proper use. Consumable parts (such as the battery and earphone) possess different warranty periods from your phone. Check with your warranty receipt for details.
12.3. FCC Compliance Statement
FCC Statement
This device complies with part 15 of the FCC rules. Operation is subject to the following two conditions: (1) This device may not cause harmful interference, and (2) this device must accept any interference received, including interference that may cause undesired operation.
Note
The manufacturer is not responsible for any radio interference caused by unauthorized modifications to this product. Such modifications could negate the user's authority to operate the product.
This product has been tested and found to comply with the limits for a Class B digital device, pursuant to part 15 of the FCC Rules. These limits are designed to provide reasonable protection against harmful interference in a residential installation. Using this product can radiate radio frequency energy and, if not installed and used in accordance with the instructions, it may cause harmful interference to radio communications. However, there is no guarantee that interference will not occur in some conditions. If this product does cause harmful interference to radio or television reception itself, follow one or more of these measures to correct that:
- Reorient or relocate the receiving antenna.
- Keep a longer distance between the product and receiver.
- Plug the product and receiver into outlets of different circuits.
- Consult the dealer or an experienced radio/TV technician for help.
FCC Caution
- Any changes or modifications not expressly approved by the party responsible for compliance could void the user's authority to use the product.
The antenna(s) used for this transmitter must not be co-located or operated in conjunction with any other antenna or transmitter.
The country code selection is for non-US model only and is not available to all US models. Per FCC regulation, all Wi-Fi products marketed in US must fixed to US operation channels only.
▶ Operations in the 5.15-5.25 GHz band are restricted to indoor usage only.