Pocket RGB - Kit de flash Savage - Free user manual and instructions
Find the device manual for free Pocket RGB Savage in PDF.


| Product Type | Portable RGB LED Video Light |
| Brand | Savage |
| Model | Pocket RGB |
| Color Temperature Range | 3200K to 5600K (CCT mode) |
| RGB Color Selection | 360 colors (Hue) with adjustable Saturation |
| Brightness Control | Adjustable via up/down arrows and app |
| Special Effects | Fade, Strobe, Pulse, Scene (Fire, Party, Police, TV, Lightning, Candle) |
| Music Sync | Pulses to music via app (random color effect) |
| App Control | Savage Light Manager (iOS and Android) via Bluetooth |
| Charging Method | USB-C (adapter included), up to 2.5 hours for full charge |
| Mounting Options | Shoe mount (camera) or 1/4"-20 thread (light stand) |
| Display | Back panel LCD with mode, brightness, battery info |
| Dimensions | Approx. 120 x 70 x 40 mm (4.7 x 2.8 x 1.6 in) |
| Weight | Approx. 200 g (7 oz) |
| Color Temperature Presets | 3200K, 3300K, 3700K, 4300K, 5600K, plus custom |
| Customizable Presets | Up to 6 saved colors via app |
| Standard Colors | Cyan, Red, Green, Blue (fixed) |
| Rainbow Effect | Cycles through all colors in Fade, Strobe, Pulse modes |
| Package Contents | Light, ball head, shoe adapter, USB-C cable, AC adapter, manual |
| Maintenance | Wipe with a dry, soft cloth |
| Safety | Do not expose to water or excessive heat |
Frequently Asked Questions - Pocket RGB Savage
User questions about Pocket RGB Savage
0 question about this device. Answer the ones you know or ask your own.
Ask a new question about this device
Download the instructions for your Kit de flash in PDF format for free! Find your manual Pocket RGB - Savage and take your electronic device back in hand. On this page are published all the documents necessary for the use of your device. Pocket RGB by Savage.
USER MANUAL Pocket RGB Savage
MOUNT TO A CAMERA
To attach to a camera with a shoe mount, screw the included ball head into the bottom of the Pocket RGB Video Light. Slide the shoe mount adapter on the bottom of the ball head into the camera shoe mount. Tighten using the knurled knob to secure.
MOUNT TO A LIGHT STAND
To mount to a light stand, unscrew the shoe adapter from the bottom of the ball head and thread the ball head into any light stand with a 14 "-20 male thread.
CHARGING
Plug the USB end of the supplied power cord into the AC wall adapter. Plug the USB-C end of the cord into the port on the side of the light. Charging will begin automatically. Charging from a fully drained light to full power can take up to 2 12 hours.
BACK PANEL CONTROL
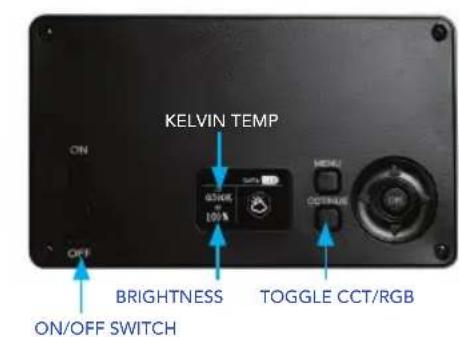
Slide the On/Off bar to the On position. The back panel will display in the mode it was last used.
To change from CCT (color correcting) mode to RGB (color) mode, press the CCT/Hue button in and hold for 2 seconds. The light will shift to the RGB bulbs. To go back to CCT mode, repeat.
CCT MODE
In CCT mode, the back panel will display:
TOP LEFT: current Kelvin temperature
BOTTOM LEFT: brightness level
TOP RIGHT: expected run time at the current brightness level
To increase brightness, press the upward arrow button until the desired level is reached. Press the downward arrow to decrease. To increase Kelvin temperature, press the right arrow. Press the left arrow to decrease the Kelvin temperature. 5600K is considered daylight and 3200K is a tungsten source similar in appearance to an incandescent household bulb. Adjusting the Kelvin temperature can be used to achieve color accuracy (5600K) or gradually warm the subject by decreasing. Besides warming the subject for creative purposes, the feature can also be used to match the available light already present in any environment. Almost all locations will be somewhere between 3200K and 5600K.
RGB MODE
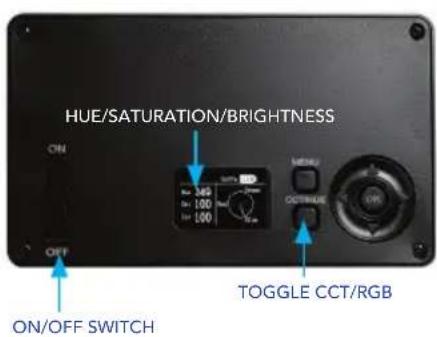
After switching to RGB mode, the panel will display:
TOP LEFT: "Hue" (color)
MIDDLE LEFT: "Sat." (saturation)
BOTTOM LEFT: "Int." (brightness)
"Hue" allows selection of 360 available colors while "Sat." allows adjustment of the intensity of each selected color. To select a desired color, press the right or left arrows to scroll through the 360 available colors.
$$ 0 = \text { RED }, 1 2 0 = \text { GREEN }, 2 4 0 = \text { BLUE } $$
To change the saturation of a selected color, press the CCT/Hue button one time. You can now use the right/left arrow to increase or decrease the saturation of the color. At any selected color or saturation, press the up arrow to increase light output and the down arrow to decrease.

To access the special effects, start from either the RGB or CCT menu. Press the "Menu" button one time.
The panel will display
TOP LEFT: Fade
BOTTOM LEFT: "Scene"
TOP RIGHT: "Strobe"
BOTTOM RIGHT: 'Pulse'
You can select the category of choice by pressing the left, right, up and down arrows. Once the desired category has been selected, press the "Ok" button one time.
FADE:
The fade function gradually increases or decreases the selected color. To select an available color, use the up or down arrows. Once the color of choice has been selected, user can increase or decrease the speed of the fade using the right/bell arrow. The Rainbow function scroll through all 380 colors.
STROBE
The strobe function creates a fast, flashing light pattern of the selected color. To select an available color, use the up or down arrows. Once the color of choice has been selected, user can increase or decrease the speed of the strobe using the right/left arrow. The Rainbow function scrolls through all 360 colors.
PULSE:
The pulse function is similar to the Stroke function but allows the user to switch back and forth between 2 available colors. Only color combinations in the menu are possible. The Rainbow function scrolls through all 360 available colors.
SCENE:
allows the user to select scenes for videos. The available scenes are Fire Light, Party Light, Police Car, TV Light, Lightning and Candle Light. Scroll using the up/down arrows to select a scene.
RGB COLOR MODE
STANDARD COLORS ACTIVITY CONTROLS
SMART PHONE APP
The Savage Pocket RGB Video Light can be controlled remotely using the free Savage Light Manager app available for download in the Google Play Store & Apple Store.
With the Bluetooth setting on your phone enabled, turn the light on and open the Savage Light Manager app. The app should pair automatically with the light and the Bluetooth icon should come on at the top right corner of the back panel screen. If the Bluetooth icon does not illuminate, the light is not paired. If this happens, refer to the trouble shooting guide.
SPECIAL EFFECTS
There are 4 activity controls at the bottom of the app. Tap the activity button at the bottom that you wish to activate.
ADJUST FUNCTION
The adjust function allows the user to change color, brightness, Kelvin temperature, save colors, and adjust hue and saturation.
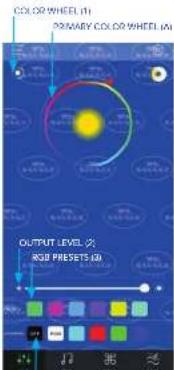
PRIMARY COLOR WHEEL (A)
Primary Color Wheel (A) allows user to scroll around the color wheel to select 350 different colors. Once the desired color has been selected, slide right on the white "Light Output Bar" (2) to increase or left to decrease light output.
HUE AND SATURATION WHEEL (B)
Tap the color wheel (1) in the top left hand corner of the app and the "Hue and Saturation Wheel" will be visible. This function allows the user to both select the desired hue and also adjust the saturation of the selected color. Tap the area of the color wheel anywhere inside the wheel to make your selection. You may also drag your finger inside the wheel until you observe the desired color on the light. Below the Light Output Star (2), there are 6 programmes "Preset Buttons" (3) that allow you to save the color of your choice for future use. To save a color, lap any of the 8 preset buttons. A check mark will appear in the box. Scroll to the color of your choice on the color wheel. Tap the checked preset button again to unlock the box. The check mark will disappear and the box will change to the color you selector. That color is saved for future use. You can repeat the above steps to save up to 6 colors. The presets will not save the light level. Only the desired color.
Below the 6 presets, there are 4 common 'Standard Colors'. They are cyan, red, green, blue and cannot be programmed. Simply lap to select and the light will change to the standard color. Press 'RGB' button to go from the selected color to white.
DAYLIGHT MODE
STANDARD PRESETS
MUSIC MODE
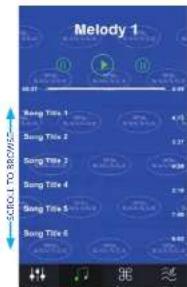
MUSIC FUNCTION

SAVAGE LIGHT MANAGER APP

Google Play
Select the "Off" button to decrease light output to 0%. Tap any color on the color wheel or any of the color buttons and the light will restart at the selected color.
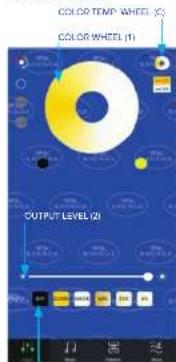
COLOR TEMPERATURE WHEEL (C)
The Sewage Pocket RGB Video Light can be set to 5500K/daylight output. It can also be set to 3200K/tungsten light that is similar to a cool white incandescent lock. In many rooms, there are multiple light sources in the room that are blending together. In those instances, the light in the room is neither daylight nor tungsten. The Kelvin wheel allows the user to blend the 2 light sources to match the available light in the room. It can also be used to "warm" or "cool" the subject for creative purposes.
To encode the color temperature blending function on the Pocket RGB Video Light, top the "Color Temperature Wheel" (C). You will then be able to slide your finger around the color wheel (1) to achieve the color temperature of your choice. Once the desired color has been selected, scroll right on the white Light Output Bar (2) to increase or left to decrease light output. Below the Light Output Bar (2), there are 6 "Preset Buttons". They are not programmable.
The first button in the Standard presets will decrease the light output to 0% (the light will still be in the On position). The second button labeled "3200K" will adjust your light to tungsten. The third button labeled "5600K" will set the light to daylight color temperature. The 50% button will change the Kelvin temperature to 4300K, the 25% changes the output to 3700K and the 5% button will change the output to 3300K. The Light Output Bar (2) can adjust the light intensity of the selected color temperature.
MUSIC FUNCTION
Your Savage Pocket RGB Video Light can be used to pulse with your music and audio files stored in your media library. The pulsing light will cycle through the various colors (random effect) available and match the beat of the music or voices for audio recordings. It is not possible to specify a specific color in this function. Upon launch the app will ask for ease to your devils's media library. Allow permission if you would like to use music or audio files stored on your device to pair with the app's features. If not, disallow. If you would like to use the function but disallow at a later date, follow the procedure below.
FOR IPHONE
Go to your phone's Settings, scroll to Apps. Select Light Manager. Select the Media & Apple Music button to remove permission
FOR ANDROID
Go to your phone's Settings Select Application Manager Select Light Manager Select Permissions. Select the Storage button to remove permission
To use, tap the Music button at the bottom of the app. If permission is enabled, you will see a music list in the center of the screen. Select the song/audio recording of your choice. The selected content will begin to play. The volume bars at the top left of the screen should be green. If they are white, tap them to activate the light. If you wish to leave the music playing but prevent the want from pulsing, tap again and the light end the pulsing will stop.
PATTERNS MODE
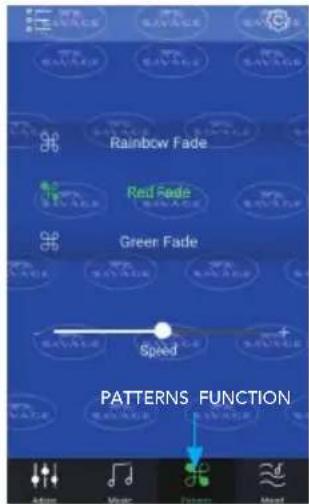
PATTERNS FUNCTION
This function allows the user to engage numerous special effects. The various "Pulsating" functions cause the light to gradually fade up or down. The various "Strobe" functions cause quick flashes. The various "Fade" functions are similar to the "Pulsating" functions but there are more choices. The user can also select the special effects "Candle Light", Fire Light, Party Light, Police Car, TV Light and Lightning.
The Pulse, Strobe, Fade and Special Effects functions can be slowed down or sped up by sliding the speed wheel left to slow the effect or right to speed up. The various rainbow effects cause the light to cycle through all available colors. To select an effect, use your finger to scroll up or down to your selection. When your chosen effect is highlighted in green, the effect will be enabled. There is no need to tap to select.
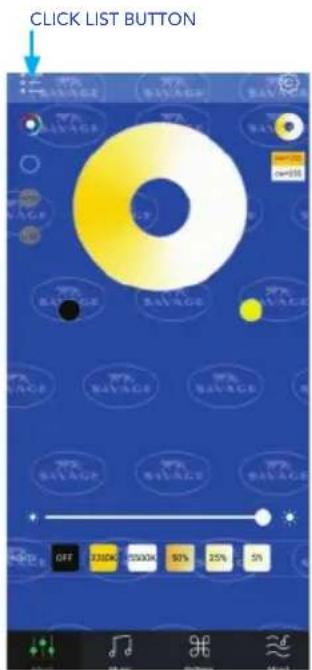
MANAGE BULBS
FOR ANDROID:
Name your Pocket RGB Video Light: Tap the "List" icon at the top left of the app. A side bar will open up that lists "Manage Bulbs". Click the "Settings" icon next to "Manage Bulbs". You should see the Light listed. It will begin with "Magic..."
Tap the wrench icon next to the listed light. A box will open to rename. Type in the name of your choice and select OK. If you have multiple lights, it is possible to control them separately using the Savage Light Manager.
IPHONE:
Tap the "List" icon at the top left of the app. A sidebar will open up that lists "Group Manage" and "My Device". Click "Group Manage", then "Add". Type in the name of your choice and select OK.
Repeat above steps to rename the second light.
Important: If you are using the app on more than one phone, you can only pair the device/devices to one phone at a time. If the device is paired to more than one phone at the same time, the functions will not work.
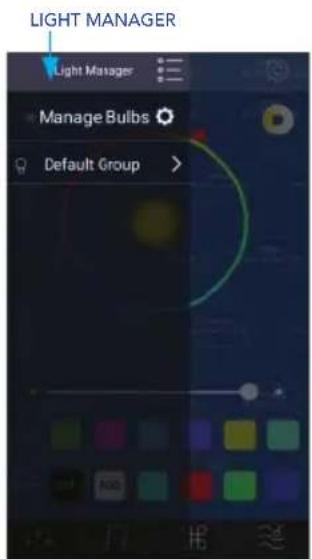
TO CONTROL MORE THAN ONE POCKET RGB VIDEO LIGHT USING DEFAULT GROUPS Tap the "List" icon at the top left of the app
A side bar will open up that lists "Default Groups" Tap on right pointing arrow next to "Default Group" and you should see each paired light Pocket RGB Video Light.
Note: Only lights that are currently turned on will be visible. If the light is controllable with the app, it will be highlighted with a blue background for Android or gray for iPhone.
If multiple Pocket RGB Video Lights are highlighted, then the app will control all at the same time.
If the Pocket RGB Video Light does not have a blue/gray background, tap on it in the app. Blue/ gray background will come on and the light will be controllable. Note: the bulb to the left of the named Pocket RGB Video Light should appear to be lighted. If it does not, tap the bulb and it will appear to light.
Note: The chain to the right side of the Pocket RGB Video Light should appear unbroken, if the 2 links appear to be separated, tap on the chain until they appear connected. Breaking the chain can be used when temporarily disabling the light from the app is desired. Only highlighted lights will be controlled by the app. To control Pocket RGB Video Lights separately, tap any panel icon and the blue highlight will disappear. That panel will no longer be controlled by the app allowing the user to control each Pocket RGB Video Light independently.

Brand : Savage
Model : Pocket RGB
Category : Kit de flash