
PowerSync Mini - Portable DVD Player Impact - Free user manual and instructions
Find the device manual for free PowerSync Mini Impact in PDF.


| Product Type | Radio Flash Slave System |
| Brand | Impact |
| Model | PowerSync Mini |
| Number of Channels | 16 user-selectable |
| Wireless Range | 328 ft. (100 m) |
| Radio Frequency | 2.4 GHz |
| Maximum Sync Speed | 1/200 sec |
| Transmitter Battery | 1x CR2450 3V |
| Receiver Battery | 2x AA 1.5V |
| Transmitter Dimensions | 1.2 x 1.2 x 1.4 in (3.0 x 3.0 x 3.6 cm) |
| Receiver Dimensions | 2.1 x 1.2 x 3.1 in (5.4 x 3.1 x 8.0 cm) |
| Transmitter Weight | 1.0 oz (28 g) |
| Receiver Weight | 2.6 oz (74 g) |
| Connectivity | 3.5 mm sync output, Mini-USB port |
| Receiver Mounting | Hot shoe, 1/4-20 socket, lanyard, cradle with adhesive strips |
| Transmitter Mounting | Hot shoe with locking wheel |
| Backward Compatibility | Impact PowerSync 16 and PowerSync 16-80 systems |
| Included Accessories | 1/4 in. adapter, 3.5 mm sync connector, cradle with adhesive strips, flash sync cable, lanyard with pin tool |
| Safety Precautions | Keep away from water and flammable gases; do not disassemble; use only recommended batteries; turn off before changing batteries |
| Maintenance | Remove batteries before long-term storage; clean with dry cloth |
| Warranty | One-year limited warranty |
| FCC Compliance | Part 15 of FCC rules; Class B digital device |
Frequently Asked Questions - PowerSync Mini Impact
User questions about PowerSync Mini Impact
0 question about this device. Answer the ones you know or ask your own.
Ask a new question about this device
Download the instructions for your Portable DVD Player in PDF format for free! Find your manual PowerSync Mini - Impact and take your electronic device back in hand. On this page are published all the documents necessary for the use of your device. PowerSync Mini by Impact.
USER MANUAL PowerSync Mini Impact
PS16-Mini-R / T
PowerSync Mini
Digital Radio Slave
INSTRUCTIONS
Introduction
Thank you for choosing Impact.
Impact's PowerSync Mini is a sixteen-channel radio slave system that's a reliable, professional-grade solution to remotely trigger portable on-camera flashes and studio monolights.
Add additional receivers, and the PowerSync Mini system will control multi-light setups and allow you to trigger as many flash units as your setup requires.
The PowerSync Mini system features 16 user-selectable channels that allow you to work in the most demanding conditions, without fear of interference from other photographers or radio slave systems in the area. The 2.4 GHz radio signal lets you control your flashes without line-of-sight, and it offers an exceptional operating range of 328 ft. (100 m) as well as a maximum sync speed of 1/200 sec.
The receiver is equipped with a multi-use hot shoe that's compatible with most on-camera flash units. Connecting the receiver to a camera with a compatible release cable (not included) makes it possible to trigger a single- or multi-camera setup by using the transmitter as a handheld remote.
Precautions
- Please read and follow these instructions, and keep this manual in a safe place.
- Keep this unit away from water and any flammable gases or liquids.
- Do not attempt to disassemble or repair the equipment—doing so will void the warranty, and Impact will not be responsible for any damage.
- The Impact PowerSync is an accessory device for flash photography. Do not use this product in a manner not specified within this documentation.
- Use only the batteries recommended by this manual.
- Install fresh batteries into the PowerSync System. Make sure to align batteries with proper polarity. Weak batteries will shorten the distance of transmission and reception.
- Turn your equipment off before changing batteries.
- Remove all power sources from the unit before long-term storage to prevent the product from igniting or leaking corrosive liquids.
- All images are for illustrative purposes only.
Overview
PS16-Mini-R Receiver
1 3.5 mm flash sync output
2 Channel selector
3 Hot shoe
4 Power switch
5 LED indicator
6 USB port
7 Lanyard hole
8 Battery compartment
9 Battery compartment lock
10 1/4-20 socket

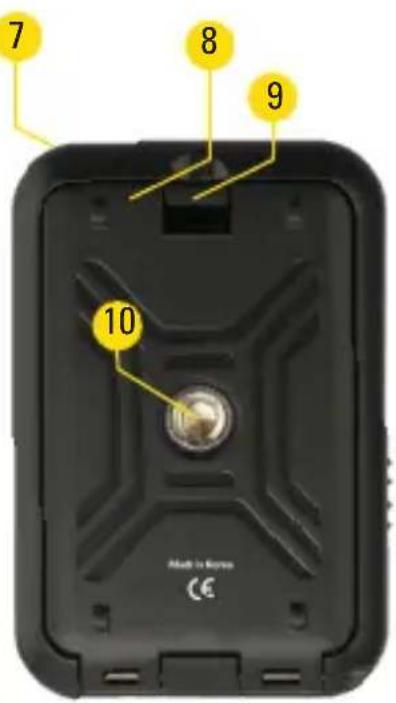
PS16-Mini-T Transmitter
11 Locking wheel
12 Channel selector
13 LED indicator
14 Test button
15 Mounting foot
16 Battery door release
17 Power switch
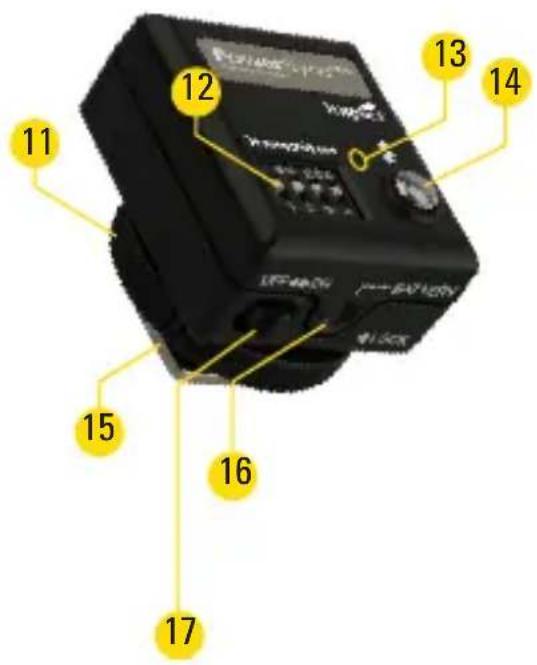
Overview
PS16-Mini Accessories
18 1/4 in. adapter
19 3.5 mm flash sync connector
20 Cradle with adhesive strips
21 Flash sync cable
22 Lanyard with pin tool

Installing the Batteries
natural_image
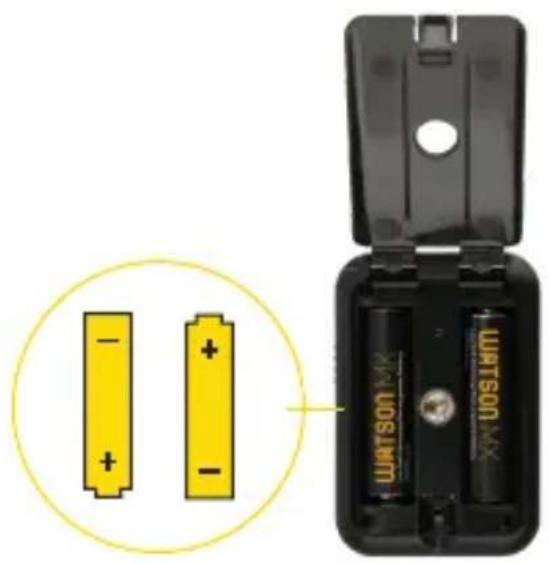
Two yellow batteries with positive and negative charge, one open and one inside a black battery case (no text or symbols visible)Receiver
- Remove the receiver from its cradle.
- Press the battery compartment lock and open the battery compartment door.
- Place two AA batteries into the battery compartment, with the orientation shown in the diagrams inside the compartment.
- Close the battery compartment door until it locks shut.
natural_image
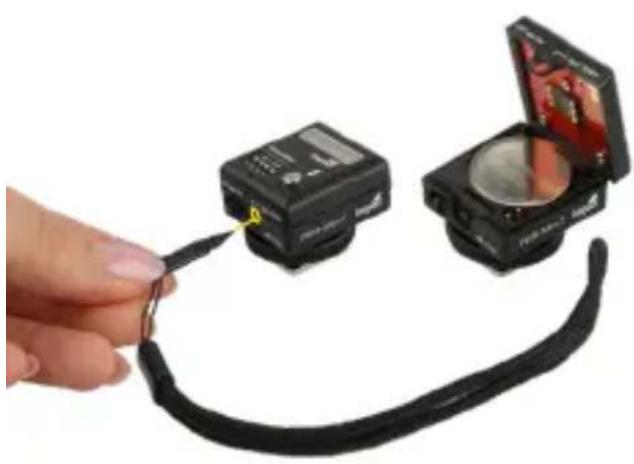
Hand holding a flexible cable connected to two black electronic devices, one open showing internal components (no visible text or symbols)Transmitter
- Use the tip of a pen or the included lanyard pin tool to press the battery door release, and open the battery compartment door.
- Place a CR2450 battery into the battery compartment with the orientation shown in the diagram inside the compartment.
- Close the battery compartment door until it locks.
Synchronizing Channels
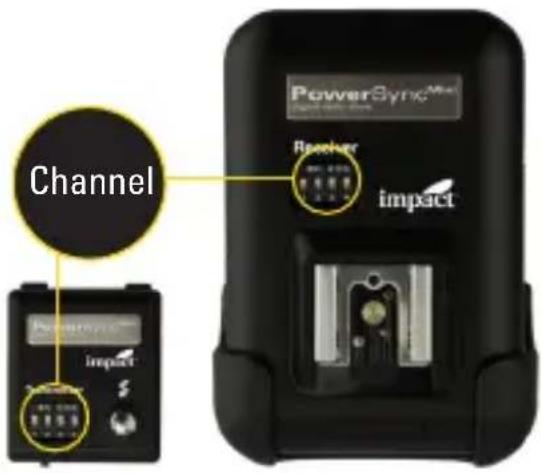
For the PowerSync system to work properly, the transmitter and receiver must be set to the same channel.
The lanyard features a pin tool for changing the DIP switches. To set the channel, follow these steps:
- Make sure both units are turned off.
- Use the diagram below to set the DIP switches on the transmitter and receiver to the same configuration.
- Turn on the transmitter and receiver.
- To test the setup, press the test button on the transmitter. The receiver's LED indicator will flash to indicate correct synchronization.

Channel 1 Channel 2 Channel 3 Channel 4 Channel 5 Channel 6 Channel 7 Channel 8

Channel 9 Channel 10 Channel 11 Channel 12 Channel 13 Channel 14 Channel 15 Channel 16
The PowerSync Mini is backward compatible with the PowerSync 16 and PowerSync 16-80 systems (see Backward Compatibility below.)
Setting Up the Transmitter
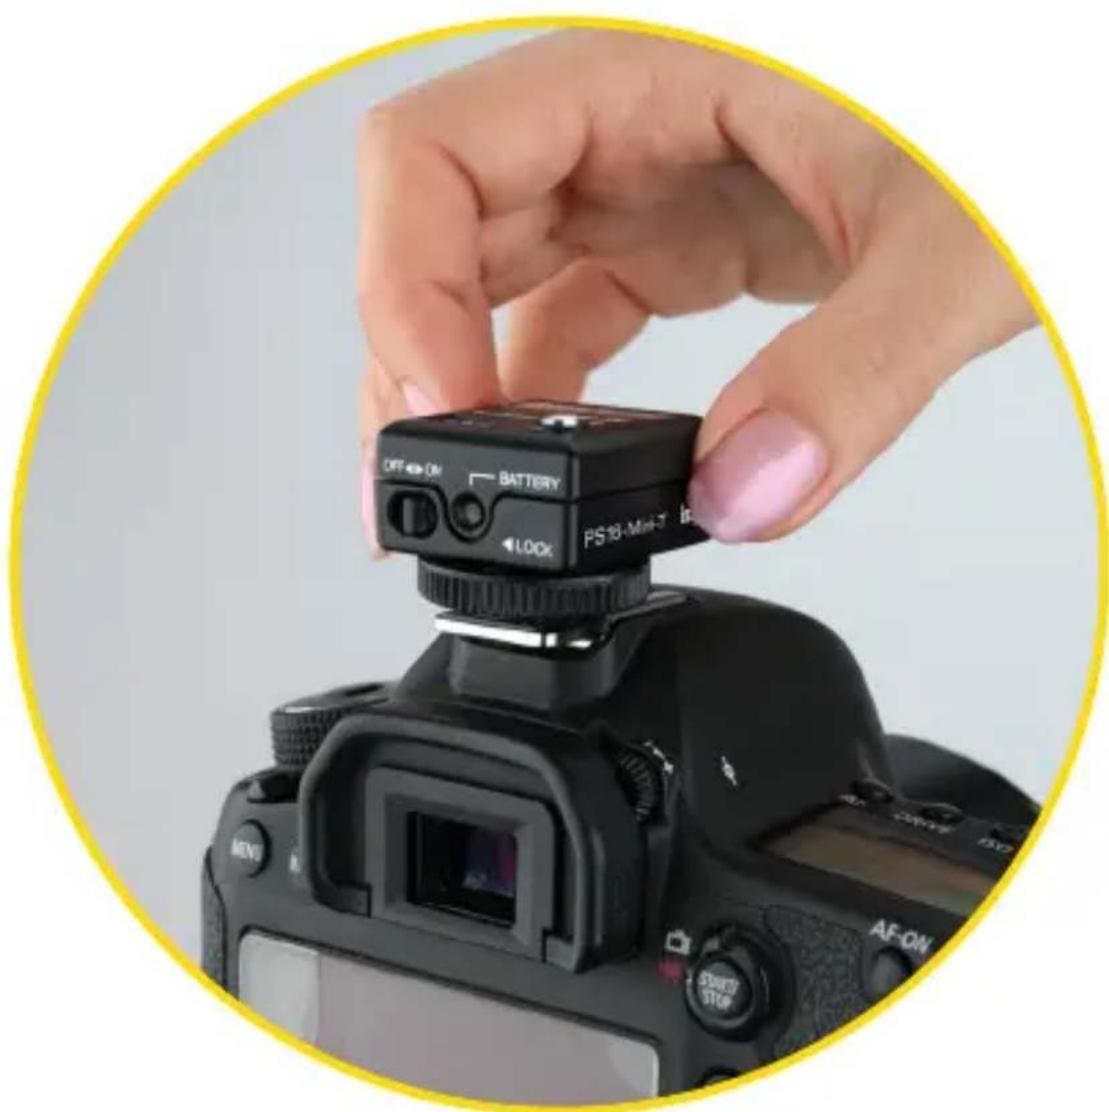
- Slide the transmitter into your camera's hot shoe.
- The test button should be at the back, on the same side as the viewfinder.
- Then tighten the locking wheel until secure.
Setting Up the Receiver
With a Portable Flash Unit
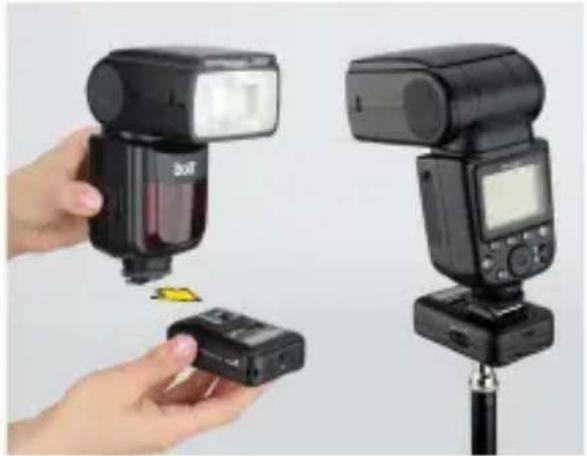
Slide the flash directly onto the receiver's hot shoe.
Remove the cradle to expose the 1/4-20 socket. You can now mount your flash directly onto a tripod, light stand, or mounting arm with a 1/4-20 screw.
natural_image
Two black-and-white photo cameras with flash units and a small electronic device, no visible text or symbols.With a Monolight
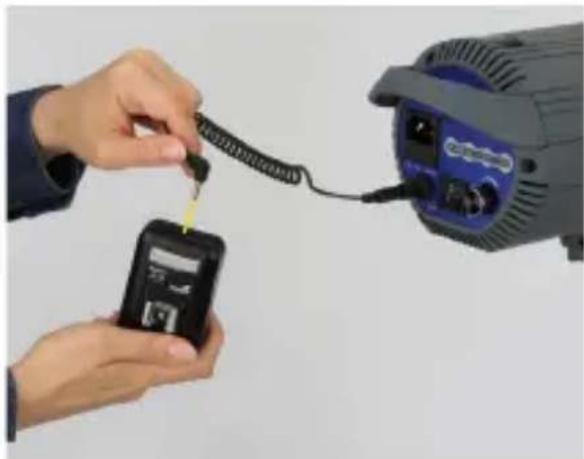
Use the flash sync cord to connect the receiver directly to the monolight's sync socket.
If the monolight has a 1/4 in. sync socket, use the included 1/4 in. adapter on one end of the sync cable.
natural_image
Close-up of hands connecting a cable to a handheld device (no visible text or symbols)Mounting the Receiver to a Monolight
There are several ways to mount the receiver to a studio flash. Here are two common methods:
- Attach the lanyard to the receiver via the lanyard hole, and hang the receiver on the light stand where your studio flash is mounted.
- With the receiver in the cradle, remove the backing to expose the adhesive strips. Press the cradle onto your light's chassis.
The PowerSync's effective range depends on the orientation and position of the transmitter and receiver. Reception can be affected by large metal or concrete objects and by bodies of water. Moving one or both devices a few feet is often enough to solve many reception problems.

natural_image
Hand holding a small digital camera on a tripod-mounted optical lamp (no visible text or symbols)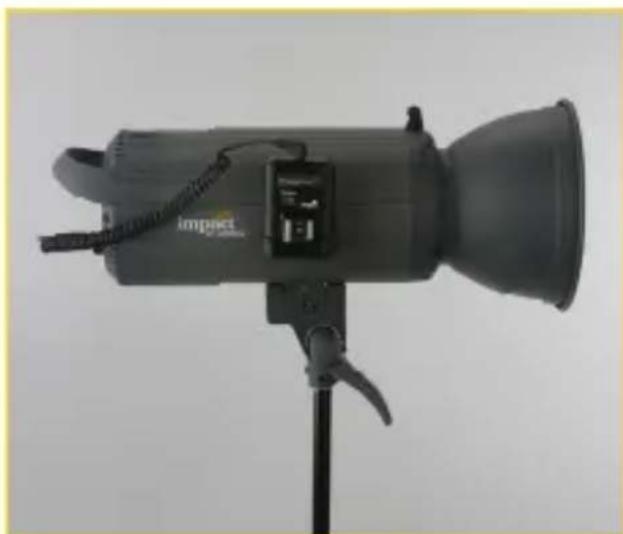
natural_image
Photograph of a Impact flashlight with adjustable lens and stand (no visible text or symbols)Triggering a Remote Camera
You can user your PowerSync Mini to trigger a remote camera. The camera must have an electronic shutter release connection, and you must have a compatible camera release cable (sold separately).
- Connect the receiver to the electronic shutter release connection on your camera, using a compatible shutter release cable.
- Make certain that the receiver and transmitter are set to the same channel and are powered up.
- Half-press the test button to wake the camera or activate autofocus. Fully press the test button to trigger the camera.

natural_image
Close-up of a hand holding a small black electronic device next to a black Boil flash unit mounted on a stand, with no visible text or symbols.Bulb Mode
- Set your camera to bulb mode.
- Half-press the test button to wake the camera or activate autofocus.
- Fully press the test button to focus and open the camera's shutter.
- Release the test button to close the shutter and end the exposure.
Bulb Lock
Bulb lock lets you trigger the camera and leave the shutter open indefinitely without holding the test button.
- Set your camera to bulb mode.
- Press and hold the test button for three seconds to lock the shutter open. Releasing the test button will not close the shutter.
- Press the test button again to close the shutter and end the exposure.
Backward Compatibility
The PowerSync Mini is backward compatible with Impact's PowerSync 16 and PowerSync 16-80 systems. See the Backward Compatibility table for channel configurations.
PowerSync Mini Transmitter to PowerSync 16-80 Receiver
The PowerSync Mini transmitter can be used to trigger the PowerSync 16-80. Set the PowerSync 16-80 to Receiver (Rx) or Transmitter/Receiver (Tx/Rx) mode, and use the M button to accept a signal from the PowerSync Mini transmitter. Make sure both devices are set to the same channel.
PowerSync Mini Transmitter to PowerSync 16 Receiver
The PowerSync Mini will automatically trigger the PowerSync 16 AC or DC receiver as long as both devices are set to the same channel.
PowerSync 16-80 Transmitter to PowerSync Mini Receiver
The PowerSync 16-80 can be used to trigger the PowerSync Mini receiver. Set the PowerSync 16-80 to transmitter (Tx) or Transmitter/Receiver (Tx/Rx) mode, using the M button to send a signal. Make sure both devices are set to the same channel.
For channel selection, the PowerSync Mini and PowerSync 16 systems rely on manual channel selection DIP switches. Use
the PowerSync 16-80's digital interface to set the corresponding channels.
Backward Compatibility
| PowerSync^16.80 | CH65 | CH66 | CH67 | CH68 | CH69 | CH70 | CH71 | CH72 |
| PowerSync^Mini PowerSync^16 | 1 | 2 | 3 | 4 | 5 | 6 | 7 | 8 |
| SwitchConfiguration | ||||||||
| PowerSync^16-80 | CH73 | CH74 | CH75 | CH76 | CH77 | CH78 | CH79 | CH80 |
| PowerSync^Mini PowerSync^16 | 9 | 10 | 11 | 12 | 13 | 14 | 15 | 16 |
| SwitchConfiguration |
Important! The PowerSync 16-80 will work with the PowerSync 16 system only if No Group is selected on the PowerSync 16-80.
Accessories
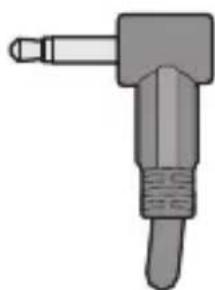
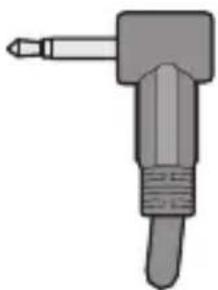
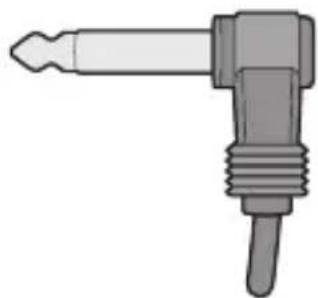
Your PowerSync Mini system is compatible with a wide variety of flash units right out of the box, but you may need an accessory sync cable for some flash units. Below are the plug ends commonly in use and the equipment they typically connect. Verify the plug compatible with your equipment.
natural_image
Illustration of a mechanical tool or connector with a handle and shaft (no text or symbols)1/8 in. (3.5 mm) Miniphoned
Fits a wide variety of flashes.
natural_image
Illustration of a mechanical tool with a handle and screw base (no text or symbols)2.5 mm Sub-Miniphone
This plug is typically used only on slave systems
natural_image
Illustration of a mechanical tool with a pointed tip and threaded end (no text or symbols)1/4 in. Phono Plug
Fits most Bowens, Dynalite (new), Monolite, Profoto, Speedotron, etc.
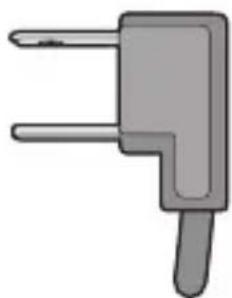
natural_image
Simple 3D illustration of a gray L-shaped tool or connector (no text or symbols)Household 2-Blade Plug
Most professional flashes with dual-blade receptacles, such as Lumedyne, Norman, Speedotron, and Dynalite (old)

natural_image
Illustration of a mechanical device with a handle and base (no text or symbols)Hot Shoe
Fits most cameras featuring a hot shoe with a large center contact
Visit www.impactstudiolighting.com for a complete list of plugs and cable lengths available.
Troubleshooting
If the Transmitter and Receiver are not communicating with each other, try these common solutions.
- If it's a DC receiver, turn the receiver off, and verify that the batteries' polarity is correct. Then turn the receiver back on.
- Make sure the batteries in the Transmitter are fresh. Weak batteries will reduce the maximum transmission distance.
- Ensure that both the transmitter and receiver are connected properly.
- Make sure that both units are set to the same channel.
- Verify that the flash lighting equipment in use is operating properly when not connected to the PowerSync16-Mini System. If triggering a flash that uses a household-style sync terminal, make certain that the plug is oriented correctly.
- Verify that the flash lighting equipment has a sync voltage that is compatible with the PowerSync16-Mini System.
- Ensure that all cables attached to both the flash and PowerSync16-Mini System are fully intact and are not frayed or torn.
- Check for a stuck test button on all units, including the flash units.
- Sync speed and working distance are affected by radio reflections and obstructions. Avoid placing the transmitter and receiver between a large hill or concrete, metal, or water obstructions. Reposition the units so they are not blocked by these objects. Often, moving the transmitter and receiver a couple of feet will solve the problem.
Specifications
Wireless
Channels: 16
Wireless Range: 328 ft. (100 m)
Radio Frequency: 2.4 GHz
General
Sync Speed: 1/200 sec.
Connectivity
Ports: 3.5 mm sync
Mini-USB
Electrical
Battery Type: PS16-Mini-T: CR2450 3 V
PS16-Mini-R: AA 1.5 V (×2)
Physical
Dimensions: PS16-Mini-T: 1.2 × 1.2 × 1.4 in. ( 3.0 × 3.0 × 3.6 cm)
PS16-Mini-R: 2.1 × 1.2 × 3.1 in. (5.4 × 3.1 × 8.0 cm)
Weight: PS16-Mini-T: 1.0 oz. (28 g)
PS16-Mini-R: 2.6 oz. (74 g)
FCC Compliance
This device complies with part 15 of the FCC rules. Operation is subject to the following two conditions:
- This device may not cause harmful interference.
- This device must accept any interference received, including interference that may cause undesired operation.
Note: This equipment has been tested and found to comply with the limits for a Class B digital device, pursuant to part 15 of the FCC Rules. These limits are designed to provide reasonable protection against harmful interference in a residential installation. This equipment generates, uses, and can radiate radio frequency energy and, if not installed and used in accordance with the instructions, may cause harmful interference to radio communications. However, there is no guarantee that interference will not occur in a particular installation. If this equipment does cause harmful interference to radio or television reception, which can be determined by turning the equipment off and on, the user is encouraged to try to correct the interference by one or more of the following measures:
- Reorient or relocate the receiving antenna.
- Increase the separation between the equipment and receiver.
- Connect the equipment to an outlet on a circuit different from that to which the receiver is connected.
- Consult the dealer or an experienced radio/TV technician for help.
Important: Changes or modifications to this product not authorized by Gradus Group could void the electromagnetic compatibility (EMC) and wireless compliance and negate your authority to operate the product. This product has demonstrated EMC compliance under conditions that included the use of compliant peripheral devices and shielded cables between system components. It is important that you use compliant peripheral devices and shielded cables between system components to reduce the possibility of causing interference to radios, televisions, and other electronic devices.
One-Year Limited Warranty
This Impact product is warranted to the original purchaser to be free from defects in materials and workmanship under normal consumer use for a period of one (1) year from the original purchase date or thirty (30) days after replacement, whichever occurs later. The warranty provider's responsibility with respect to this limited warranty shall be limited solely to repair or replacement, at the provider's discretion, of any product that fails during normal use of this product in its intended manner and in its intended environment. Inoperability of the product or part(s) shall be determined by the warranty provider. If the product has been discontinued, the warranty provider reserves the right to replace it with a model of equivalent quality and function.
This warranty does not cover damage or defect caused by misuse, neglect, accident, alteration, abuse, improper installation or maintenance. EXCEPT AS PROVIDED HEREIN, THE WARRANTY PROVIDER MAKES NEITHER ANY EXPRESS WARRANTIES NOR ANY IMPLIED WARRANTIES, INCLUDING BUT NOT LIMITED TO ANY IMPLIED WARRANTY OF MERCHANTABILITY OR FITNESS FOR A PARTICULAR PURPOSE. This warranty provides you with specific legal rights, and you may also have additional rights that vary from state to state.
To obtain warranty coverage, contact the Impact Customer Service Department to obtain a return merchandise authorization ("RMA") number, and return the defective product to Impact along with the RMA number and proof of purchase. Shipment of the defective product is at the purchaser's own risk and expense.
For more information or to arrange service, visit www.impactstudiolighting.com or call Customer Service at 212-594-2353.
Product warranty provided by the Gradus Group. www.gradusgroup.com
Impact is a registered trademark of the
Gradus Group. ©2019 Gradus Group LLC. All Rights Reserved.

IMPACT
A Gradus Group Brand
GG1
- Introduction
- Precautions
- Overview
- PS16-Mini-R Receiver
- PS16-Mini-T Transmitter
- PS16-Mini Accessories
- Installing the Batteries
- Receiver
- Transmitter
- Synchronizing Channels
- Setting Up the Transmitter
- Setting Up the Receiver
- With a Portable Flash Unit
- With a Monolight
- Mounting the Receiver to a Monolight
- Triggering a Remote Camera
- Bulb Mode
- Bulb Lock
- Backward Compatibility
- PowerSync Mini Transmitter to PowerSync 16-80 Receiver
- PowerSync Mini Transmitter to PowerSync 16 Receiver
- PowerSync 16-80 Transmitter to PowerSync Mini Receiver
- Accessories
- 1/8 in. (3.5 mm) Miniphoned
- mm Sub-Miniphone
- 1/4 in. Phono Plug
- Household 2-Blade Plug
- Hot Shoe
- Troubleshooting
- Specifications
- Wireless
- General
- Connectivity
- Electrical
- Physical
- FCC Compliance
- One-Year Limited Warranty
Brand : Impact
Model : PowerSync Mini
Category : Portable DVD Player