
220PI - Tracking PHILIPS - Free user manual and instructions
Find the device manual for free 220PI PHILIPS in PDF.


| Product Type | LCD Monitor |
| Screen Size | 22" (16:10) |
| Native Resolution | 1680 x 1050 at 60 Hz |
| Brightness | 250 cd/m² |
| Contrast Ratio (typical) | 1000:1 |
| SmartContrast | 25000:1 |
| Response Time (typical) | 5 ms |
| Display Colors | 16.7 million |
| Viewing Angle | 176° (H) / 170° (V) at C/R > 5 |
| Signal Input | VGA (analog), DVI-D (digital, HDCP) |
| USB Ports | USB 2.0 x 1 (upstream), downstream available |
| Built-in Audio | 1.5 W x 2 (stereo) |
| Power Consumption (typical) | On: < 28.5 W, Sleep: < 0.8 W, Off: < 0.5 W |
| Stand Adjustments | Tilt: -5/+20°, Height: 130 mm, Swivel: -65/+65° |
| VESA Mount | 100 x 100 mm |
| Dimensions (with stand) | 502 x 589 x 220 mm (220P1) |
| Weight (with stand) | 6.4 kg (220P1) |
| SmartImage Presets | Office Work, Image Viewing, Entertainment, Economy, Off |
| Cleaning | Use a soft dry cloth; avoid alcohol or ammonia-based liquids |
| Safety | Keep away from heat sources; use approved power cord; do not block ventilation |
| Warranty | 3 years (varies by region; see Philips F1rst Choice) |
Frequently Asked Questions - 220PI PHILIPS
User questions about 220PI PHILIPS
0 question about this device. Answer the ones you know or ask your own.
Ask a new question about this device
Download the instructions for your Tracking in PDF format for free! Find your manual 220PI - PHILIPS and take your electronic device back in hand. On this page are published all the documents necessary for the use of your device. 220PI by PHILIPS.
USER MANUAL 220PI PHILIPS
Philips LCD Monitor Electronic User's Manual
| Home | safety and troubleshooting | about this manual | product information | installing your monitor | on-screen display | customer care and warranty | download & print |

Safety and Troubleshooting Information
Safety Precautions and Maintenance
FAQs
Troubleshooting
Regulatory Information
Safety and Troubleshooting Information
Safety precautions and maintenance

WARNING: Use of controls, adjustments or procedures other than those specified in this documentation may result in exposure to shock, electrical hazards and/or mechanical hazards.
Read and follow these instructions when connecting and using your computer monitor:
Operation:
- Keep the monitor out of direct sunlight and away from stoves or any other heat source.
- Remove any object that could fall into ventilation holes or prevent proper cooling of the monitors electronics.
- Do not block the ventilation holes on the cabinet.
- When positioning the monitor, make sure the power plug and outlet are easily accessible.
- If turning off the monitor by detaching the power cable or DC power cord, wait for 6 seconds before attaching the power cable or DC power cord for normal operation.
- Please use approved power cord provided by Philips all the time. If your power cord is missing, please contact with your local service center. (Please refer to Customer Care Consumer Information Center)
- Do not subject the LCD monitor to severe vibration or high impact conditions during operation.
- Do not knock or drop the monitor during operation or transportation.
Maintenance:
- To protect your display from possible damage, do not put excessive pressure on the LCD panel. When moving your monitor, grasp the frame to lift; do not lift the monitor by placing your hand or fingers on the LCD panel.
- Unplug the monitor if you are not going to use it for an extensive period of time.
- Unplug the monitor if you need to clean it with a slightly damp cloth. The screen may be wiped with a dry cloth when the power is off. However, never use organic solvent, such as, alcohol, or ammonia-based liquids to clean your monitor.
- To avoid the risk of shock or permanent damage to the set, do not expose the monitor to dust, rain, water, or excessive moisture environment.
- If your monitor gets wet, wipe it with dry cloth as soon as possible.
- If foreign substance or water gets in your monitor, please turn the power off immediately and disconnect the power cord. Then, remove the foreign substance or water, and send it to the maintenance center.
Safety and Troubleshooting Information
- Do not store or use the LCD monitor in locations exposed to heat, direct sunlight or extreme cold. - In order to maintain the best performance of your monitor and use it for a longer lifetime, please use the monitor in a location that falls within the following temperature and humidity ranges.
Temperature: 0-40°C 32-95°F
Humidity: 20-80% RH
- IMPORTANT: Always activate a moving screen saver program when you leave your monitor unattended. Always activate a periodic screen refresh application if your LCD monitor will display unchanging static content. Uninterrupted display of still or static images over an extended period may cause "burn in", also known as "after-imaging" or "ghost imaging", on your screen. "Burn-in", "after-imaging", or "ghost imaging" is a well-known phenomenon in LCD panel technology. In most cases, the "burned in" or "after-imaging" or "ghost imaging" will disappear gradually over a period of time after the power has been switched off.
WARNING: Severe" burn-in" or "after-image" or "ghost image" symptoms will not disappear and cannot be repaired. The damage mentioned above is not covered under your warranty.
Service:
- The casing cover should be opened only by qualified service personnel.
- If there is any need for any document for repair or integration, please contact with your local service center. (please refer to the chapter of "Consumer Information Center")
- For transportation information, please refer to "Physical Specifications".
- Do not leave your monitor in a car/trunk under direct sun light.

Consult a service technician if the monitor does not operate normally, or you are not sure what procedure to take when the operating instructions given in this manual have been followed.
RETURN TO TOP OF THE PAGE
FAQs (Frequently Asked Questions)
|| Safety and Troubleshooting
General FAQs
□ Compatibility with Other Peripherals
LCD Panel Technology
☐ Ergonomics, Ecology and Safety Standards
Troubleshooting
Regulatory Information
FAQs (Frequently Asked Questions)
General FAQs
Q1: When I install my monitor what should I do if the screen shows 'Cannot display this video mode'?
A: Recommended resolution for Philips 22": 1680x1050 @60Hz.
- Unplug all cables, then connect your PC to the monitor that you used previously.
- In the Windows Start Menu, select Settings/Control Panel. In the Control Panel Window, select the Display icon. Inside the Display Control Panel, select the 'Settings' tab. Under the setting tab, in box labeled 'desktop area', move the slider to 1680x1050 pixels (22").
- Open 'Advanced Properties' and set the Refresh Rate to 60Hz, then click OK.
- Restart your computer and repeat step 2 and 3 to verify that your PC is set at 1680x1050@60Hz (22").
- Shut down your computer, disconnect your old monitor and reconnect your Philips LCD monitor.
- Turn on your monitor and then turn on your PC.
Q2: What does the recommended refresh rate for LCD monitor?
A: Recommended refresh rate in LCD monitors is 60Hz, In case of any disturbance on screen, you can set it up to 75Hz to see if that removes the disturbance.
Q3: What are the .inf and .icm files on the CD-ROM? How do I install the drivers (.inf and .icm)?
A: These are the driver files for your monitor. Follow the instructions in your user manual to install the drivers. Your computer may ask you for monitor drivers (.inf and . icm files) or a driver disk when you first install your monitor. Follow the instructions to insert the ( companion CD-ROM) included in this package. Monitor drivers (.inf and . icm files) will be installed automatically.
FAQs (Frequently Asked Questions)
Q4: How do I adjust the resolution?
A: Your video card/graphic driver and monitor together determine the available resolutions. You can select the desired resolution under Windows® Control Panel with the "Display properties".
Q5: What if I get lost when I am making monitor adjustments?
A: Simply press the OK button, then select 'Reset' to recall all of the original factory settings.
Q6: Will the LCD screen be resistant to scratches?
A: In general it is recommended that the panel surface is not subjected to excessive shocks and is protected from sharp or blunt objects. When handling the monitor, make sure that there is no pressure or force applied to the panel surface side. This may affect your warranty conditions.
Q7: How should I clean the LCD surface?
A: For normal cleaning, use a clean, soft cloth. For extensive cleaning, please use isopropyl alcohol. Do not use other solvents such as ethyl alcohol, ethanol, acetone, hexane, etc.
Q8: Can I change the color setting of my monitor?
A: Yes, you can change your color setting through OSD control as the following procedures,
- Press "OK" to show the OSD (On Screen Display) menu
- Press "Down Arrow" to select the option "Color" then press "OK" to enter color setting, there are three settings as below.
a. Color Temperature; The six settings are 5000K, 6500K, 7500K, 8200K, 9300K and 11500K. With settings in the 5000K range the panel appears 'warm,' with a red-white color tone, while a 11500K temperature yields 'cool,
file:///E:/CD/S20Monitor/S20M/Philips/M1-project/220B1-220F1/220B1-E...F8.0V301.007/CI-Contents/ed/rarus/-/KCL.SH/220B1/safety/saf-faq.htm 第2页 / 共5 [88-06-18 17:01]
FAQs (Frequently Asked Questions)
blue-white toning."
b. sRGB; this is a standard setting for ensuring correct exchange of colors between different device (e.g. digital cameras, monitors, printers, scanners, etc)
c. User Define; the user can choose his/her preference color setting by adjusting red, green blue color.
^* A measurement of the color of light radiated by an object while it is being heated. This measurement is expressed in terms of absolute scale, (degrees Kelvin). Lower Kevin temperatures such as 2004K are red; higher temperatures such as 9300K are blue. Neutral temperature is white, at 6504K.
Q9: Can the Philips LCD Monitor be mounted on the wall?
A: Yes. Philips LCD monitors have this optional feature. For standard VESA mount holes on the rear cover allows the user to mount the Philips monitor on most of the VESA standard arms or accessories. We recommend to contact your Philips sales representative for more information.
RETURN TO TOP OF THE PAGE
Compatibility with other Peripherals
Q10: Can I connect my LCD monitor to any PC, workstation or Mac?
A: Yes. All Philips LCD monitors are fully compatible with standard PCs, Macs and workstations. You may need a cable adapter to connect the monitor to your Mac system. Please contact your Philips sales representative for more information.
Q11: Are Philips LCD monitors Plug-and-Play?
A: Yes, the monitors are Plug-and-Play compatible with Windows® 95, 98, 2000, XP, Vista and Linux.
RETURN TO TOP OF THE PAGE
file:///F:/CD/S20Monitor%2XO/M/Philips/M1-project/220B1-220P1/220B1-F.../5R.OV301.007/CI-Contents/ed/marus/6KCI.SH/220B1/safety/saf_faq.htm 第3页/共5 [S8-05-18 17:01]
FAQs (Frequently Asked Questions)
LCD Panel Technology
Q12: What kind of wide-angle technology is available?
A: Currently, the IPS type panels offer the best Contrast Ratio, compared to MVA, or PVA technologies. TN panels have improved over the years, but still cannot match the Contrast Ratio offered by IPS panel.
RETURN TO TOP OF THE PAGE
Ergonomics, Ecology and Safety Standards
Q13: What is Image Sticking, or Image Burn-in, or After Image, or Ghost Image in LCD panels?
A: Uninterrupted display of still or static images over an extended period may cause "burn in", also known as "after-imaging" or "ghost imaging", on your screen. "Burn-in", "after-imaging", or "ghost imaging" is a well-known phenomenon in LCD panel technology. In most cases, the "burned in" or "atter-imaging" or "ghost imaging" will disappear gradually over a period of time after the power has been switched off.
Always activate a moving screen saver program when you leave your monitor unattended.
Always activate a periodic screen refresh application if your LCD monitor will display unchanging static content.
WARNING: Severe"burn-in" or "after-image" or "ghost image" symptoms will not disappear and cannot be repaired. The damage mentioned above is not covered under your warranty.
Q14: Why is my Display not showing sharp text, and is displaying jagged characters?
A: Your LCD monitor works best at its native resolution of 1680x1050@60Hz. For best display please use this resolution.
RETURN TO TOP OF THE PAGE
FAQs (Frequently Asked Questions)
file:///E:/CD/S20Monitor%200M/Philips/M1-project/220B1-220F1/220B1-E...5B.0V301.007/CI-Contents/ed/rarus/-KGL.SH/220B1/safety/saf_faq.htm 第5頁/共5 [98-06-18 17:01]
Troubleshooting
Safety and
Troubleshooting
FAQs
Common Problems
Imaging Problems
Regulatory Information
Troubleshooting
This page deals with problems that can be corrected by a user. If the problem still persists after you have tried these solutions, contact Philips customer service representative.
| Common Problems | |
| Having this problem Check these items | |
| No Picture(Power LED not lit) | Make sure the power cord is plugged into the power outlet and into the back of the monitor.First, ensure that the power button on the front of the monitor is in the OFF position, then press it to the ON position. |
| No Picture(Power LED is white blinking) | Make sure the computer is turned on.Make sure the signal cable is properly connected to your computer.make sure the monitor cable has no bent pins on the connect side. If yes, repair or replace the cable.The Energy Saving feature may be activated |
| Screen saysATTENTIONCHECK CABLE CONNECTION | Make sure the monitor cable is properly connected to your computer. (Also refer to the Quick Set-Up Guide).Check to see if the monitor cable has bent pins.Make sure the computer is turned on. |
| AUTO button doesn't function in VGA mode | The auto function is applicable only in VGA-Analog mode. If the result is not satisfactory, you can do manual adjustments via the OSD menu. Note that the Auto Function is not applicable in DVI-Digital mode as it is not necessary. |
| Imaging Problems | |
| Image is not centered | Press the Auto button.Adjust the image position using the Phase/Clock of Setup in OSD Main Controls. |
Troubleshooting
| Image vibrates on the screen | Check that the signal cable is properly securely connected to the graphics board or PC. | |
Vertical flicker appears | Press the Auto button.Eliminate the vertical bars using the Phase/Clock of Setup in OSD Main Controls. | |
Horizontal flicker appears |  | Press the Auto button.Eliminate the vertical bars using the Phase/Clock of Setup in OSD Main Controls. |
| image appears blurred, indistinct or too dark | Adjust the contrast and brightness on On-Screen Display. | |
| An "after-image", "burn-in" or "ghost image" remains after the power has been turned off. | Uninterrupted display of still or static images over an extended period may cause " burn in", also known as "after-imaging" or "ghost imaging", on your screen. "Burn-in", "after-imaging", or "ghost imaging" is a well-known phenomenon in LCD panel technology. In most cases, the "burned in" or "after-imaging" or "ghost imaging" will disappear gradually over a period of time after the power has been switched off.Always activate a moving screen saver program when you leave your monitor unattended.Always activate a periodic screen refresh application if your LCD monitor will display unchanging static content. | |
| Image appears distorted. Text is fuzzy or blurred. | Set the PC's display resolution to the same mode as monitor's recommended screen native resolution. | |
| Green, red, blue, dark, and white dots appears on the screen | The remaining dots are normal characteristic of the liquid crystal used in today's technology,Pls refer the pixel policy for more detail. | |
file:///B:/LCD%20Monitor%20OEM/Pallips/M1-project/22051-220P1/22051-E...B.0V301.001/CD-Contents/od/manual/ENCLLS1/22051/satency/saf_roub.htm 第2页/共3 [58-06-18 17:51]
Troubleshooting
The "power on" light is too strong to disturb me.
- You can adjust "power on" light using the power LED of Setup in OSD main Controls.
For further assistance, refer to the Consumer Information Centers list and contact Philips customer service representative.
RETURN TO TOP OF THE PAGE
Regulatory Information
1 TCO Displays 5.0 Information
Recycling Information for Customers
Waste Electrical and Electronic Equipment-WEEE
1 CE Declaration of Conformity
^1 Energy Star Declaration
Federal Communications Commission (FCC) Notice (U.S. Only)
FCC Declaration of Conformity
Commission Federale de la Communication (FCC Declaration)
EN 55022 Compliance (Czech Republic Only)
1 Polish Center for Testing and Certification Notice
North Europe (Nordic Countries) Information
↑ BSMI Notice (Taiwan Only)
1 Philips End-of-Life Disposal
China RoHS
] Lead-free Product
Troubleshooting
1 Other Related Information
Frequently Asked Questions (FAQs)
Regulatory Information
Available for selective models
TCO Displays 5.0 Information

Congratulations, Your display is designed for both you and the planet!
This display carries the TCO Certified label. This ensures that the display is designed for minimal impact on the climate and natural environment, while offering all the performance expected from top of the line electronic products. TCO Certified is a third party verified program, where every product model is tested by an accredited independent test laboratory. TCO Certified represents one of the toughest certifications for displays worldwide.
Some of the Usability features of the TCO Displays 5.0 requirements:
Visual Ergonomics
Good visual ergonomics in order to improve the working environment for the user and to reduce sight and strain problems. Important parameters are:
• Light levels without color tint, Uniform color and luminance, Wide color gamut
• Calibrated color temperature and gamma curve
- Wide luminance level, Dark black levels, Low motion blur
Electrical Safety
. Product fulfills rigorous safety standards
Emissions
- Low alternating electric and magnetic fields emissions
- Low acoustic noise emissions
Some of the Environmental features of the TCO Displays 5.0 requirements:
- The brand owner demonstrates corporate social responsibility and has a certified environmental management system (EMAS or ISO 14001)
- Very low energy consumption both in on- and standby mode
- Restrictions on chlorinated and brominated flame retardants, plasticizer and polymers
- Restrictions on heavy metals such as cadmium, mercury and lead (RoHS compliance)
- Both product and product packaging is prepared for recycling
• The brand owner offers take-back options
The requirements included in this label have been developed by TCO Development in co-operation with scientists, experts, users as well as manufacturers all over the world. Since the end of the 1980s TCO has been involved in influencing the development of IT equipment in a more user-friendly direction. Our labeling system started with displays in 1992 and is now requested by users and IT-manufacturers all over the world.
For more information, please visit www.tcodevelopment.com
Regulatory Information

Technology for you and the planet
RETURN TO TOP OF THE PAGE
Recycling Information for Customers
There is currently a system of recycling up and running in the European countries, such as The Netherlands, Belgium, Norway, Sweden and Denmark.
In Asia Pacific, Taiwan, the products can be taken back by Environment Protection Administration (EPA) to follow the IT product recycling management process, detail can be found in web site www.epa.gov.tw
The monitor contains parts that could cause damage to the nature environment. Therefore, it is vital that the monitor is recycled at the end of its life cycle.
For help and service, please contact Consumers Information Center or F1rst Choice Contact Information Center in each country.
RETURN TO TOP OF THE PAGE
Waste Electrical and Electronic Equipment-WEEE
Attention users in European Union private households

This marking on the product or on its packaging illustrates that, under European Directive 2002/96/EC governing used electrical and electronic appliances, this product may not be disposed of with normal household waste. You are responsible for disposal of this equipment through a designated waste electrical and electronic equipment collection. To determine the locations for dropping off such waste electrical and electronic, contact your local government office, the waste disposal organization that serves your household or the store at which you purchased the product.
Attention users in United States:
Like all LCD products, this set contains a lamp with Mercury. Please dispose of according to all Local, State and Federal laws. For the disposal or recycling information, contact www.mygreenelectronics.com or www.eiae.org.
RETURN TO TOP OF THE PAGE
Regulatory Information

EPEAT
The EPEAT (Electronic Product Environmental Assessment Tool) program evaluates computer desktops, laptops, and monitors based on 51 environmental criteria developed through an extensive stakeholder consensus process supported by US EPA.
EPEAT system helps purchasers in the public and private sectors evaluate, compare and select desktop computers, notebooks and monitors based on their environmental attributes. EPEAT also provides a clear and consistent set of performance criteria for the design of products, and provides an opportunity for manufacturers to secure market recognition for efforts to reduce the environmental impact of its products."
Benefits of EPEAT
Reduce use of primary materials
Reduce use of toxic materials
Avoid the disposal of hazardous waste EPEAT'S requirement that all registered products meet ENERGY STAR's
energy efficiency specifications, means that these products will consume less energy throughout their life.
RETURN TO TOP OF THE PAGE
ROHS is a European Directive aiming to control the use of certain hazardous substances in the production of new electrical and electronic equipment. Philips has completely eliminated four of six RoHS-banned substances form its products by 1998-eight full years before compliance was required and has lowered usage of the remaining substances significantly below the mandated levels.
RETURN TO TOP OF THE PAGE
CE Declaration of Conformity
This product is in conformity with the following standards
- EN60950-1:2001 (Safety requirement of Information Technology Equipment)
- EN55022:2006 (Radio Disturbance requirement of Information Technology Equipment)
- EN55024:1998 (Immunity requirement of Information Technology Equipment)
- EN61000-3-2:2006 (Limits for Harmonic Current Emission)
- EN61000-3-3:1995 (Limitation of Voltage Fluctuation and Flicker)
following provisions of directives applicable
- 2006/95/EC (Low Voltage Directive)
- 2004/108/EC (EMC Directive)
and is produced by a manufacturing organization on ISO9000 level.
The product also comply with the following standards
- ISO13406-2 (Ergonomic requirement for Flat Panel Display)
- GS EK1-2000 (GS specification)
- prEN50279:1998 (Low Frequency Electric and Magnetic fields for Visual Display)
- MPR-II (MPR:1990:8/1990:10 Low Frequency Electric and Magnetic fields)
- TCO'03, TCO Displays 5.0 (Requirement for Environment Labelling of Ergonomics, Energy, Ecology and Emission,
TCO: Swedish Confederation of Professional Employees) for TCO versions
Elev3/ELCD620lncor82COEMPhdIns/21-en-sic1/22051-2201472...CDLCD-Ccr.cnt.sch2measFINGJIS-F22CEU-SA/ETY-RDGSI/EGULA ITM第3页/共39 P848-22 16/5
Regulatory Information
RETURN TO TOP OF THE PAGE
Energy Star Declaration
This monitor is equipped with a function for saving energy which supports the VESA Display Power Management Signaling (DPMS) standard. This means that the monitor must be connected to a computer which supports VESA DPMS. Time settings are adjusted from the system unit by software.
VESA State LED Indicator Power Consumption
Normal operation ON (Active) White < 24 W (typ.)
Power Saving Alternative 2 One step
Sleep White Blinking < 0.8 W (typ.)
Switch Off Off < 0.5 W (typ.)

As an ENERGY STAR® Partner, we have determined that this product meets the ENERGY STAR® guidelines for energy efficiency.

We recommend you switch off the monitor when it is not in use for a long time.
RETURN TO TOP OF THE PAGE
Federal Communications Commission (FCC) Notice (U.S. Only)

This equipment has been tested and found to comply with the limits for a Class B digital device, pursuant to Part 15 of the FCC Rules. These limits are designed to provide reasonable protection against harmful interference in a residential installation. This equipment generates, uses and can radiate radio frequency energy and, if not installed and used in accordance with the instructions, may cause harmful interference to radio communications. However, there is no guarantee that interference will not occur in a particular installation. If this equipment does cause harmful interference to radio or television reception, which can be determined by turning the equipment off and on, the user is encouraged to try to correct the interference by one or more of the following measures:
- Reorient or relocate the receiving antenna.
- Increase the separation between the equipment and receiver.
- Connect the equipment into an outlet on a circuit different from that to which the receiver is connected.
- Consult the dealer or an experienced radio/TV technician for help.
Regulatory Information

Changes or modifications not expressly approved by the party responsible for compliance could void the user's authority to operate the equipment.
Use only RF shielded cable that was supplied with the monitor when connecting this monitor to a computer device.
To prevent damage which may result in fire or shock hazard, do not expose this appliance to rain or excessive moisture.
THIS CLASS B DIGITAL APPARATUS MEETS ALL REQUIREMENTS OF THE CANADIAN INTERFERENCE-CAUSING EQUIPMENT REGULATIONS.
RETURN TO TOP OF THE PAGE
FCC Declaration of Conformity
Declaration of Conformity for Products Marked with FCC Logo, United States Only

This device complies with Part 15 of the FCC Rules. Operation is subject to the following two conditions: (1) this device may not cause harmful interference, and (2) this device must accept any interference received, including interference that may cause undesired operation.
RETURN TO TOP OF THE PAGE
Commission Federale de la Communication (FCC Declaration)

Regulatory Information
EN 55022 Compliance (Czech Republic Only)
This device belongs to category B devices as described in EN 55022, unless it is specifically stated that it is a Class A device on the specification label. The following applies to devices in Class A of EN 55022 (radius of protection up to 30 meters). The user of the device is obliged to take all steps necessary to remove sources of interference to telecommunication or other devices.
Polish Center for Testing and Certification Notice
The equipment should draw power from a socket with an attached protection circuit (a three-prong socket). All equipment that works together (computer, monitor, printer, and so on) should have the same power supply source.
The phasing conductor of the room's electrical installation should have a reserve short-circuit protection device in the form of a fuse with a nominal value no larger than 16 amperes (A).
To completely switch off the equipment, the power supply cable must be removed from the power supply socket, which should be located near the equipment and easily accessible.
A protection mark "B" confirms that the equipment is in compliance with the protection usage requirements of standards PN-93/T-42107 and PN-89/E-06251.
Regulatory Information
North Europe (Nordic Countries) Information
Placering/Ventilation
WARNING:
FÖRSÄKRA DIG OM ATT HUVUDBRYTARE OCH UTTAG ÄR LÄTÄTKOMLIGA, NÄR DU STÄLLER DIN UTRUSTNING PÄPLATS.
Placering/Ventilation
ADVARSEL:
S∅RG VED PLACERINGEN FOR, AT NETLEDNINGENS STIK OG STIKKONTAKT ER NEMT TILGÆNGELIGE.
Paikka/llmankierto
VAROITUS:
SIJOITA LAITE SITEN, ETTÄ VERKKOJOHTO VOIDAAAN TARVITTAESSA HELPOSTI IRROTTAA PISTORASIASTA.
Regulatory Information
BSMI Notice (Taiwan Only)
符合乙類資訊產品之標準
RETURN TO TOP OF THE PAGE
End-of-Life Disposal
Your new monitor contains materials that can be recycled and reused. Specialized companies can recycle your product to increase the amount of reusable materials and to minimize the amount to be disposed of.
Elev321LCDC20Mnclor82COEMPhdIns/21-en-sic1/22051-2201472. CDCD-Ccr.cnt.sch2meaRNGJF-F22CEU-SA/ETY-RDG5(REGULA)ITEM第3页/共39 P648-22 16/5
Regulatory Information
Please find out about the local regulations on how to dispose of your old monitor from your sales representative.
(For customers in Canada and U.S.A.)
This product may contain lead and/or mercury. Dispose of in accordance to local-state and federal regulations.
For additional information on recycling contact www.eia.org (Consumer Education Initiative)
RETURN TO TOP OF THE PAGE
China RoHS
The People's Republic of China released a regulation called "Management Methods for Controlling Pollution by Electronic Information Products" or commonly referred to as China RoHS. All products including CRT and LCD monitor which are produced and sold for China market have to meet China RoHS request.
中国大陆RoHS
Regulatory Information
中国能源效率标识
Philips eliminated toxic substances like lead from its displays. Lead-free display helps protect your health and promotes environmentally sound recovery and disposal of waste from electrical and electronic equipment. PHILIPS Brand designs and produces display products in compliance with strict Restriction of Hazardous Substances (RoHS) european legislation that restrict lead and other toxic.
RETURN TO TOP OF THE PAGE
About This Manual
1 About This Guide
Notational Descriptions
About This Manual
About This Guide
This electronic user's guide is intended for anyone who uses the Philips LCD Monitor. It describes the LCD monitor's features, setup, operation and other important information. Its contents are identical to the information in our printed version.
It includes the following sections:
- Safety and Troubleshooting Information provides tips and solutions for common problems as well as other related information you may need.
- About This Electronic User's Manual gives an overview of information included, along with notation icon descriptions and other documentation for your reference.
- Product Information gives an overview of the monitor's features as well as the technical specifications for this monitor.
- Installing Your Monitor describes the initial setup process and gives an overview of how to use the monitor.
- On-Screen Display provides information on adjusting the settings on your monitor.
- Customer Care and Warranty contains a list of worldwide Philips Consumer Information Centers along with help desk phone numbers and information on the warranty applicable to your product.
• Glossary defines technical terms. - Download and Print Option transfers this entire manual to your hard drive for easy reference.
RETURN TO TOP OF THE PAGE
Notational Descriptions
The following subsections describe notational conventions used in this document.
Notes, Cautions and Warnings
file:///R:/CD/S20Monitor/S200-M/Philips/M1-project/220B1-220F1/220B1-EOFU/5B.0V301.001/CD-Contents/fcd/manual/ENGLIS-4220B1/about/about.htm 第1页/共2 [98-06-18 17:02]
About This Manual
Throughout this guide, blocks of text may be accompanied by an icon and printed in bold or italic type. These blocks contain notes, cautions or warnings. They are used as follows:

NOTE: This icon indicates important information and tips that help you make better use of your computer system.

CAUTION: This icon indicates information that tells you how to avoid either potential damage to hardware or loss of data.

WARNING: This icon indicates the potential for bodily harm and tells you how to avoid the problem.
Some warnings may appear in alternate formats and may not be accompanied by an icon. In such cases, the specific presentation of the warning is mandated by the relevant regulatory authority.
RETURN TO TOP OF THE PAGE
Product Information
Your LCD Monitor
Smartimage
SmartContrast
SmartSaturate
SmartSharpness
II Technical Specifications
Resolution & Preset Modes
Philips Pixel Defect Policy
|| Automatic Power Saving
Product Views
1 Physical Function
SmartControl II
Product Information
Your LCD monitor
Congratulations on your purchase and welcome to Philips. To fully benefit from the support that Philips offers, register your product at. www.philips.com/welcome
SmartImage
What is it?
SmartImage provides presets that optimize display for different types of content, dynamically adjusting brightness, contrast, color and sharpness in real time. Whether you're working with text applications, displaying images or watching a video, Philips SmartImage delivers great optimized LCD display performance.
Why do I need it?
You want a LCD display that delivers optimized display all your favorite types of content, SmartImage software dynamically adjust brightness, contrast, color and sharpness in real time to enhance your LCD viewing experience.
How does it work?
SmartImage is an exclusive, leading edge Philips technology that analyzes the content displayed on your screen. Based on a scenario you select, SmartImage dynamically enhances the contrast, color saturation and sharpness of images and videos for ultimate display performance - all in real time with the press on a single button.
How to enable SmartImage?
Product Information
natural_image
Illustration of a monitor with a blue circular icon showing a stylized 'D' symbol, no text or symbols present.- Press to 📋 launch the SmartImage on screen display;
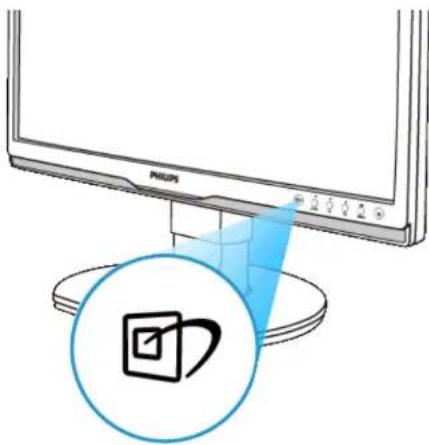
- Keep press to toggle between Office Work, Image Viewing, Entertainment, Economy, and Off;
- The SmartImage on screen display will remain on screen for 5 seconds or you can also press "OK" to make confirmation.
- When SmartImage is enabled, the sRGB scheme is disabled automatically. To use sRGB you need to disable SmartImage with the button at the front bezel of your monitor.
Except using 📋 key to scroll down, you can also press ▼▲ buttons to choose and press "OK" to confirm selection and close the SmartImage OSD.There are five modes to be selected: Office Work, Image Viewing, Entertainment, Economy, and Off.
There are five modes to be selected: Office Work, Image Viewing, Entertainment, Economy, and Off.
File:01/CD/20Monitor8.200N-PhilipsV1-project/2003-200P/D2...301 357 CD-Controls/biothermal/ING...ISI/23HPRODUKT/PRODUKT/IFM 第2页/共10 [98-06-19 13:00]
Product Information
Smart Image
Office Work
Image Viewing
Entertainment
Economy
Off
- Office Work: Enhances text and dampens brightness to increase readability and reduce eye strain. This mode significantly enhances readability and productivity when you're working with spreadsheets, PDF files, scanned articles or other general office applications.
- Image Viewing: This profile combines color saturation, dynamic contrast and sharpness enhancement to display photos and other images with outstanding clarity in vibrant colors - all without artifacts and faded colors.
- Entertainment: Ramped up luminance, deepened color saturation, dynamic contrast and razor sharpness displays every details in darker areas of your videos without color washout in brighter areas maintaining a dynamic natural values for the ultimate video display.
- Economy: Under this profile, brightness, contrast are adjusted and backlighting fine-tuned for just right display of everyday office applications and lower power consumption.
- Off: No optimization by SmartImage.
RETURN TO TOP OF THE PAGE
SmartContrast
What is it?
Unique technology that dynamically analyzes displayed content and automatically optimizes a LCD monitor's contrast ratio for maximum visual clarity and viewing enjoyment, stepping up backlighting for clearer, crisper and brighter images or dimming backlighting for clear display of images on dark backgrounds.
Why do I need it?
You want the very best visual clarity and viewing comfort for every type of content. SmartContrast dynamically controls contrast and adjusts backlighting for clear, crisp, bright gaming and video images or displays clear, readable text for office work. By reducing your monitor's power consumption, you save on energy costs and extend the lifetime of your monitor.
How does it work?
When you active SmartContrast which will analysis the content you are displaying in real time to adjust colors and
Product Information
control backlight intensity. This function can obviously enhance contrast in dynamic for more entertainment fun when viewing videos or playing games.
RETURN TO TOP OF THE PAGE
SmartSaturate
What is it?
Smart technology that controls color saturation - the degree to which one on screen color is diluted by neighboring colors - to deliver rich and vibrant images for more entertainment fun when you are viewing videos.
Why do I need it?
You want rich, vibrant images for more entertainment fun when viewing photos or videos.
How does it work?
SmartSaturate dynamically controls color saturation - the degree to which on-screen color is diluted by neighboring colors - to deliver rich, vibrant display for more entertainment fun when you are viewing images or videos in your display's Entertainment mode and is turned off for top quality display of office application and in the Economy mode to reduce power consumption.
RETURN TO TOP OF THE PAGE
SmartSharpness
What is it?
Smart technology that enhances sharpness when you need it for ultimate display performance and more entertainment fun when you are viewing videos or photos.
Why do I need it?
You want the ultimate in sharpness for more entertainment fun when viewing photos or videos.
How does it work?
Smart technology enhances sharpness when you need it for ultimate display performance and more entertainment fun when you are viewing videos or photos in the Entertainment mode and is turned off for top quality display of office applications and in the Economy mode to reduce power consumptions.
RETURN TO TOP OF THE PAGE
Technical Specifications\*
File:01/01.01%20/Monitor8.20/EN/PhilipsM1-project/2003-200P1/22_351-007/CD-Contents/ed/bournal/ENG.JSH/22SHI/PRODUXT/PRODUXT.COM第4页/共10[98-06-19 13:00]
Product Information
| Picture/Display | |
| II LCD panel type | TFT-LCD |
| Panel size | 22" W |
| Aspect ratio | 16:10 |
| Pixel Pitch | 0.282 x 0.282 mm |
| Brightness | 250 cd/m2 |
| SmartContrast | 25000:1 |
| Contrast ratio (typ.) | 1000:1 |
| Response time (typical) | 5 ms |
| Optimum Resolution | 1680 x 1050 @ 60Hz |
| Viewing angle | 176° (H) / 170° (V) @ C/R > 5 |
| Picture Enhancement | Smartimage |
| Display colors | 16.7 M |
| Vertical refresh rate | 56Hz -76Hz |
| Horizontal Frequency | 30kHz - 80kHz |
| sRGB | YES |
| Connectivity | |
| Signal input | DVI-D (digital, HDCP), VGA (Analog) |
| USB | USB 2.0 x 1 |
| Input Signal | Separate Sync, Sync on Green |
| Audio In/Out | Stereo Audio |
| Convenience | |
| Built-in Audio | 1.5 W x 2 |
| User Convenience | Smartimage, Auto (Back), Input (Down), Brightness (UP) Menu (OK), Power On/Off |
| OSD Languages | English, French, German, Italian, Russian, Spanish, Simplified Chinese, Portuguese |
| Other convenience | VESA mount ( 100 x 100mm), Kensington lock |
| Plug & Play Compatibility | DDC/CI, sRGB, Windows 98/2000/XP/Vista, Mac OS X |
| Stand | |
| Tilt | -5/+20 |
| Height adjustment | 130mm (220P1), 70mm (220B1) |
| Swivel | -65/+65 (220P1), -45/+45 (220B1) |
File:01/CD/20Monitor8.200N-PhilipsV1-project/2003-200P/D2...301 357 CD-Controls/bednaural/ING...ISI/23HPRODUKT/PRODUKT/IFM 第5页/共10 [98-06-19 13:00]
Product Information
| Power | |||
| II On mode | < 28.5 W (typ.), < 31 W (max) | ||
| II On mode (ECO mode) (typical) | < 21 W | ||
| Energy Consumption(EnergyStar 5.0 test method) | AC Input Voltage at 100VAC +/-5VAC, 50Hz +/- 3Hz | AC Input Voltage at 115VAC +/-5VAC, 60Hz +/- 3Hz | AC Input Voltage at 230VAC +/-5VAC, 50Hz +/-3Hz |
| Normal Operation (typcial) 24 W | 24 W 24 W | ||
| Sleep 0.8 W 0.8 W 0.8 W | |||
| Off 0.5 W 0.5 W 0.5 W | |||
| Heat Dissipation* | AC Input Voltage at 100VAC +/-5VAC, 50Hz +/-3Hz | AC Input Voltage at 115VAC +/-5VAC, 60Hz +/-3Hz | AC Input Voltage at 230VAC +/-5VAC, 50Hz +/-3Hz |
| Normal Operation 81.91BTU/hr 81.91BTU/hr 81.91BTU/hr | |||
| Sleep 2.73BTU/hr 2.73BTU/hr 2.73BTU/hr | |||
| Off 1.7BTU/hr 1.7BTU/hr 1.7BTU/hr | |||
| II Power LED indicator | On mode: White, Standby/Sleep mode: White (blinking) | ||
| II Power Supply | Build-in, 100-240VAC, 50/60Hz | ||
| Dimension | |||
| II Product with stand (WxHxD) | 502 x 589 x 220mm (220P1), 502 x 446 x 228mm (220B1) | ||
| II Product without stand (WxHxD) | 502 x 346 x 58mm | ||
| II Box dimension (WxHxD) | 658 x 410 x 272mm (220P1), 562 x 480 x 168mm (220B1) | ||
| Weight | |||
| II Product with stand | 6.4kg (220P1), 5.2kg (220B1) | ||
| II Product without stand | 4.1kg | ||
| II Product with packaging | 7.6kg (220P1), 6.9kg (220B1) | ||
| Operating Condition | |||
| II Temperature range (operation) | 0°C to 40°C | ||
| II Temperature range (operation) | -20°C to 60°C | ||
| II Relative humidity | 20% to 80% | ||
| II Altitude | Non-operation: + 12,000 ft (3,658 m) | ||
| operation: + 40,000 ft (12,192 m). | |||
| II MTBF | 50000 hrs | ||
| Environmental | |||
| II ROHS | YES | ||
| II EPEAT | sliver | ||
File:01/CD/20Monitor8.200N-PhilipsV1-project/2003-200P/D2...301 357 CD-Controls/biothermal/ING...ISI/22SHPRODUKTPRODUKTFTFM 第6页/共10 [98-06-19 13:00]
Product Information
| ☐ EnergyStar | 5.0 |
| ☐ Packaging | 100% recyclable |
| Compliance and standards | |
| ☐ Regulatory Approvals | CE Mark, Energy Star 5.0, FCC Class B, SEMKO, TCO5.0, TÜV/GS, TÜV Ergo, UL/cUL |
| Cabinet | |
| ☐ Color | Black/Sliver, Black/Black |
| ☐ Finish | Texture |
* This data is subject to change without notice.
RETURN TO TOP OF THE PAGE
Resolution & Preset Modes
A. Maximum Resolution
- For 220P1/220B1
1680 x 1050 at 60 Hz (analog input)
1680 x 1050 at 60 Hz (digital input)
B. Recommended Resolution
- For 220P1/220B1
1680 x 1050 at 60 Hz (digital input)
18 factory preset modes:
H. freq (kHz) Resolution V. freq (Hz)
31.469 640*350 70.086
31.469 720*400 70.087
31.469 640*480 59.940
35.000 640*480 67.000
37.500 640*480 75.000
35.156 800*600 56.250
37.879 800*600 60.317
46.875 800*600 75.000
48.363 1024*768 60.004
60.023 1024*768 75.029
63.981 1280*1024 60.020
File:01/CD/20Monitor8.200N-PhilipsV1-project/2003-200P/D2...301 357 CD-Controls/obarmal/ING...ISI/23HPRODUKT/PRODUKT/IFM 第7页/共10 [98-06-19 13:00]
Product Information
79.976 1280*1024 75.025
55.469 1440*900 59.901
55.935 1440*900 59.887
70.635 1440*900 74.984
66.587 1920*1080 60.000 (reduce blinking)
65.290 1680*1050 60.000
64.674 1680*1050 60.000
RETURN TO TOP OF THE PAGE
Automatic Power Saving
If you have VESA DPM compliance display card or software installed in your PC, the monitor can automatically reduce its power consumption when not in use. If an input from a keyboard, mouse or other input device is detected, the monitor will 'wake up' automatically. The following table shows the power consumption and signaling of this automatic power saving feature:
| Power Management Definition | |||||
| VESA Mode | Video | H-sync | V-sync | Power Used | LED color |
| Active | ON | Yes | Yes | < 28.5 W (typ.)< 31 (max.) | White |
| Sleep | OFF | No | No | < 0.8 W (typ.) | White (Blinking) |
| Switch Off OFF | -- | < 0.5 W (typ.) | Off | ||
| This monitor is ENERGY STAR® compliant. As an ENERGY STAR®Partner, we have determined that this product meets the ENERGY STAR®guidelines for energy efficiency. | |||||
* This data is subject to change without notice.
The native resolution of the monitor is 1680 x 1050, By default, your monitor has 100% (max.) 50% contrast, and 6500K color temperature, with full white pattern, without audio/USB.
RETURN TO TOP OF THE PAGE
Product Views
Follow the links to see various views of the monitor and its components.
File:FIJ/LCIT/S20Monitor8,2010EN/Philips/M1-project/2003-200P1/22...301.007/CD-Contents/ed/manual/ENG.JSH/2003I/PRODUCT/PRODUCT.IITM 第8页/共10 [98-06-19 13:00]
Product Information
Front View Product Description
RETURN TO TOP OF THE PAGE
Physical Function
Tilt
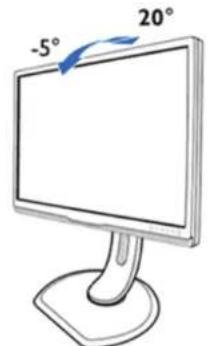
220PI
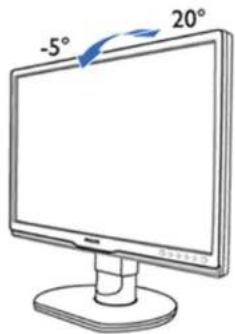
220BI
Swivel

220PI
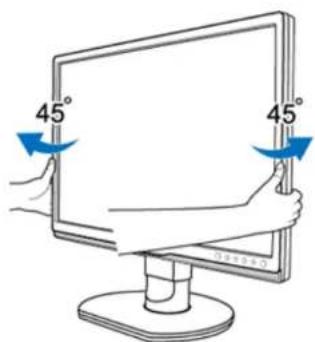
220BI
File:01/CD/20Monitor8.200N-PhilipsV1-project/2003-200P/D2...301 357 CD-Controls/obarmal/ING...ISI/23HPRODUKT/PRODUKT/IFM 第9页/共10 [98-06-19 12:00]
Product Information
Height adjustment
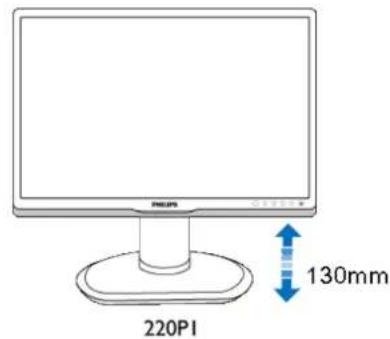

Pivot (220P1)

RETURN TO TOP OF THE PAGE
File:01J.CDS20Monitor8.200EN/PhilipsVII-project/200E-200P192_301.DS/CD-Contents/ed-manualING.ISU/ZEBI.PRODUCTPRODUCECTITFM第10页/共10 [98.06.19 10:03]
Philips Pixel Defect Policy
Product Features
Technical Specifications
|| Resolution & Preset Modes
¶ Automatic Power Saving
Physical Specification
II Pin Assignment
II Product Views
Philips Pixel Defect Policy
Philips' Flat Panel Monitors Pixel Defect Policy
Philips strives to deliver the highest quality products. We use some of the industry's most advanced manufacturing processes and practice stringent quality control. However, pixel or sub pixel defects on the TFT LCD panels used in flat panel monitors are sometimes unavoidable. No manufacturer can guarantee that all panels will be free from pixel defects, but Philips guarantees that any monitor with an unacceptable number of defects will be repaired or replaced under warranty. This notice explains the different types of pixel defects and defines acceptable defect levels for each type. In order to qualify for repair or replacement under warranty, the number of pixel defects on a TFT LCD panel must exceed these acceptable levels. For example, no more than 0.0004% of the sub pixels on a 19" XGA monitor may be defective. Furthermore, Philips sets even higher quality standards for certain types or combinations of pixel defects that are more noticeable than others. This policy is valid worldwide.

Pixels and Sub pixels
A pixel, or picture element, is composed of three sub pixels in the primary colors of red, green and blue. Many pixels together form an image. When all sub pixels of a pixel are lit, the three colored sub pixels together appear as a single white pixel. When all are dark, the three colored sub pixels together appear as a single black pixel. Other combinations of lit and dark sub pixels appear as single pixels of other colors.
Types of Pixel Defects
Pixel and sub pixel defects appear on the screen in different ways. There are two categories of pixel defects and several types of sub pixel defects within each category.
file:///FJLCID%20Monitor%20CEV/17pi"psM1-project/220B1-220F1/220B1-E_L/5R.0V301.001/CID-Contents/ed/manual/ENG1.SH/20B1-product/pixe.htm 第1页/共4 [58-06-18 17:08]
Philips Pixel Defect Policy
Bright Dot Defects Bright dot defects appear as pixels or sub pixels that are always lit or 'on'. That is, a bright dot is a sub-pixel that stands out on the screen when the monitor displays a dark pattern. There are the types of bright dot defects:

One lit red, green or blue sub pixel
Two adjacent lit sub pixels:
- Red + Blue = Purple
- Red + Green = Yellow
- Green + Blue = Cyan (Light Blue)
Three adjacent lit sub pixels (one white pixel)

A red or blue bright dot must be more than 50 percent brighter than neighboring dots while a green bright dot is 30 percent brighter than neighboring dots.
Black Dot Defects Black dot defects appear as pixels or sub pixels that are always dark or 'off'. That is, a dark dot is a sub-pixel that stands out on the screen when the monitor displays a light pattern. These are the types of black dot defects:

One dark sub pixel Two or three adjacent dark sub pixels
Proximity of Pixel Defects
Because pixel and sub pixels defects of the same type that are near to one another may be more noticeable, Philips also specifies tolerances for the proximity of pixel defects.
file:///FJLCD%20Monitor%20CEV/Phips/M1-project/220H1-220F1/220H1-F...L05R.0V301.001/CD-Certens/led/manual/FNG1,SH/220B1/product/pixel.html 第2页/共4 [SE-06-18 17:03]
Philips Pixel Defect Policy
Pixel Defect Tolerances
In order to qualify for repair or replacement due to pixel defects during the warranty period, a TFT LCD panel in a Philips flat panel monitor must have pixel or sub pixel defects exceeding the tolerances listed in the following tables.
| BRIGHT DOT DEFECTS ACCEPTABLE LEVEL | |
| MODEL | 220P1/220B1 |
| 1 lit subpixel 3 | |
| 2 adjacent lit subpixels 1 | |
| 3 adjacent lit subpixels (one white pixel) 0 | |
| Distance between two bright dot defects* >15mm | |
| Total bright dot defects of all types 3 |
| BLACK DOT DEFECTS ACCEPTABLE LEVEL | |
| MODEL | 220P1/220B1 |
| 1 dark subpixel 5 or fewer | |
| 2 adjacent dark subpixels 2 or fewer | |
| 3 adjacent dark subpixels 0 | |
| Distance between two black dot defects* >15mm | |
| Total black dot defects of all types 5 or fewer |
| TOTAL DOT DEFECTS ACCEPTABLE LEVEL | |
| MODEL | 220P1/220B1 |
| Total bright or black dot defects of all types 5 or fewer |
Note:
file:///FJ/LCD%20Monitor%20CEV/F?psM1-project/220B1-220F1/220B1-F...L/58.0V301.001/CID-Contents/led/manual/ENG1, SH/220B1/product/pixel.htm 第3页/共4 [56-05-18 17:08]
Philips Pixel Defect Policy
* 1 or 2 adjacent sub pixel defects = 1 dot defect
RETURN TO TOP OF THE PAGE
file:///FJLCD%20Monitor%20CEV/Phips/M1-project/220H1-220F1/220H1-F...L05R.0V301.001/CD-Certens/led/manual/FNG1,SH/220B1/product/pixel.html 第4页/共4 [SE-06-18 17:03]
SmartControl
II Product Information
Philips Pixel Defect Policy
Philips SmartControl II
System support and requirement
Installation
1 Start to use
Q&A
SmartControl II (Selective Models)
Philips SmartControl II
SmartControl II is monitor-based software with an easy-to-use on-screen graphic interface that guides you through fine-tuning resolution, color calibration and other display settings including brightness, contrast, clock & phase, position, RGB, white point and - on models with onboard speakers - volume adjustments.
System support and requirement:
- Sytem support: 2000, XP, NT 4.0, XP 64 Edition, Vista 32/64. IE Support 6.0/7.0.
- Language support: English, Simplified Chinese, German, Spanish, French, Italian, Russian, Portuguese.
- Philips Monitor support DDC/CI Interface.
Installation:

SmartControl II
Installer.exe

File#/E/LCD%50Monitor%200LM/Palys/M1-project/2061 220P/220S...B.V.S1.00/CD-Contents/lob/narc/ENG...ISF22031/product/SMAKT.HTM 第1页/共17 [98 06 18 17:00]
SmartControl
- Follow the instruction and complete the installation.
- You can launch after installation complete.
- If you want to launch later, you can either click the shortcut on desktop or toolbar.
Start to use:
1. First launch -Wizard
- The first time after installation of SmartControl II, it will automatically go to Wizard for first time launch.
- The wizard will guide you through adjustment your monitor performance step by step.
- You can go to Plug-in menu to launch wizard later on as well.
- You can adjust more options without wizard by Standard pane.
| Wizard Analog Sequence Wizard Digital Sequence | |
| Resolution Resolution | |
| Focus | Contrast |
| Brightness Brightness | |
| Contrast White Point (Color Temp) | |
| Position File | |
| White Point (Color Temp) | |
| File | |

2. Start with Standard pane:
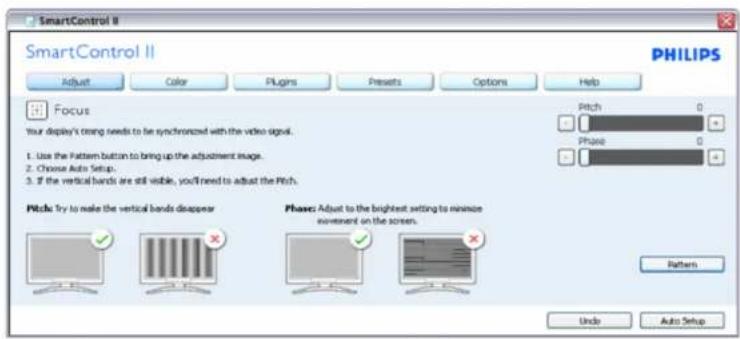
Adjust menu:
SmartControl
- Adjust Menu allow you to adjust Brightness, Contrast, Focus, Position and Resolution.
- You can follow the instruction and do the adjustment.
- Cancel prompts user if you want to cancel installation.
| Tab Heading Sub Menu Display in Analog Display in Digital | |||
| Adjust Brightness Yes Yes | |||
| Adjust | Contrast Yes | Yes | |
| Adjust Focus (Clock & Clock Phase) Yes No | |||
| Adjust Position Yes No | |||
| Adjust Resolution Yes Yes | |||


File/E/LCD&5Monitor%200LM/Palys/M1-project/2061 220P/220S...B.V.S1.00/CD-Contents/lob/narc/ENG...ISF22031/product/SMAKT.HTM 第3页/共17 [98 06 18 17:00]
SmartControl


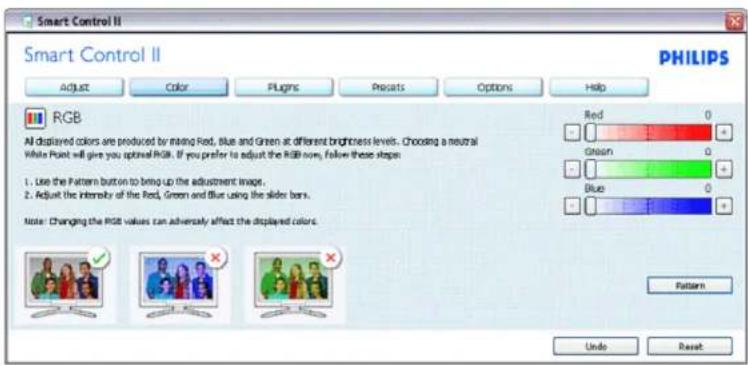
Color menu:
File/E/LCD&20Monitor&20OEM/Platyc/MI-project/2061-220/P/2203...B.VJ51.001/CD-Contents/Iod/annac/ENG-LSH/220-SI-product/SMAKT.HTM第4页/共17 [98 06 18 17:00]
SmartControl
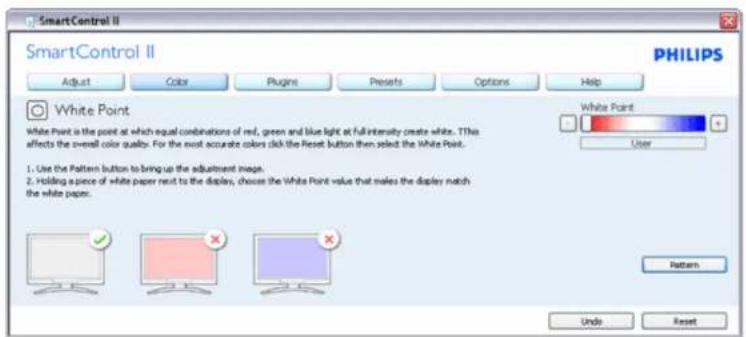
- Color Menu allow you to adjust RGB, Black Level, White Point, Color Calibration, and SmartImage (Please refer to SmartImage section).
- You can follow the instruction and do the adjustment.
- Refer to below table for sub-menu item base on your input.
• Example for Color Calibration
| Tab Heading Sub Menu Display in Analog Display in Digital | ||
| Color RGB Yes Yes | ||
| Color Black Level Yes | Yes | |
| Color White Point Yes Yes | ||
| Color Color Calibration Yes Yes | ||
| Color Viewing Mode Yes Yes | ||
File/E/LCD/50Monitor%200LM/Halys/M1-project/2061 220P/220S...B.V.S1.00/CD-Contents/lob/narc/ENG...ISF/22031/product/SMAKT.HTM 第5页/共17 [98 06 18 17:00]
SmartControl


- "Show Me" starts color calibration tutorial.
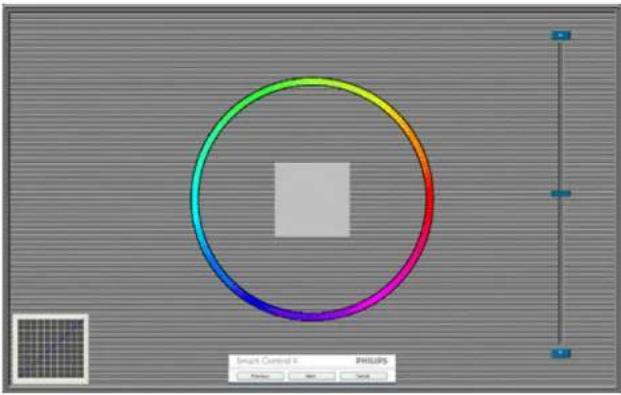
- Start - starts the 6-step color calibration sequence.
- Quick View loads the before/after images.
- To return to Color home pane, click the Cancel button.
- Enable color calibration - by default is on. If unchecked, does not allow for color calibration to happen, dimes out start and quick view buttons.
- Must have patent info in calibration screen.
First color Calibration Screen:
SmartControl
natural_image
Colorful circular ring diagram with a central square, displayed on a grid background (no text or symbols)- Previous button is disabled until the second color screen.
- Next goes to the succeeding target (6-targets).
- Final next goes File>Presets pane.
- Cancel closes the UI and returns to the plug in page.
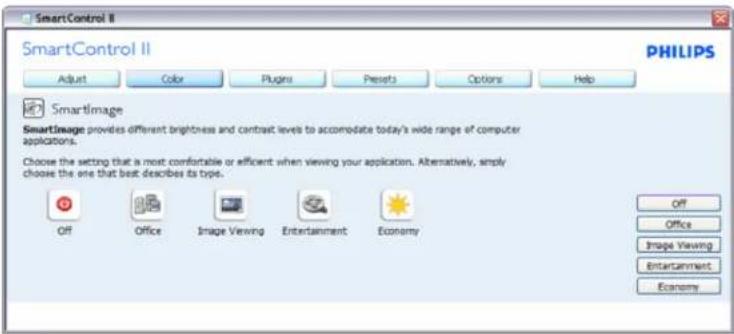
SmartImage - Allows user to change setting for better display setting based on content.
When Entertainment is set, SmartContrast and SmartResponse are enabled.
Plug-Ins - Asset Management Pane will only be active when selecting Asset Management from the drop-down Plug Ins menu.
File#/E/LCD%50Monitor%200LM/Palys/M1-project/2061_220P/220S_BLOV31.001/CD-Contents/lob/narc/ENG_LSHF22031/product/SMAKT.HTM 京/页/共17 [98 06 18 17:00]
SmartControl
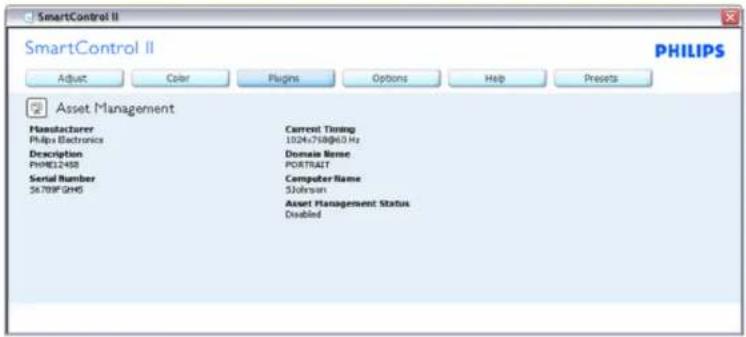
Displays Assent Management information on Management, Description, Serial Number, Current Timing, Domain Name, and Asset Management Status.
To return to Plug-in home pane select the plug-in tab.
Plug-Ins - Theft Deterrence Pane will only be active when selecting Theft Deterrence Mode from the drop-down Plug Ins menu.
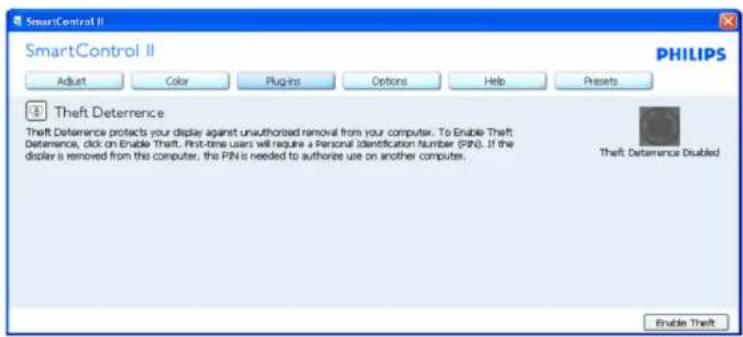
To enable Theft Deterrence, clicking Enable Theft Mode button brings up the following screen:
SmartControl
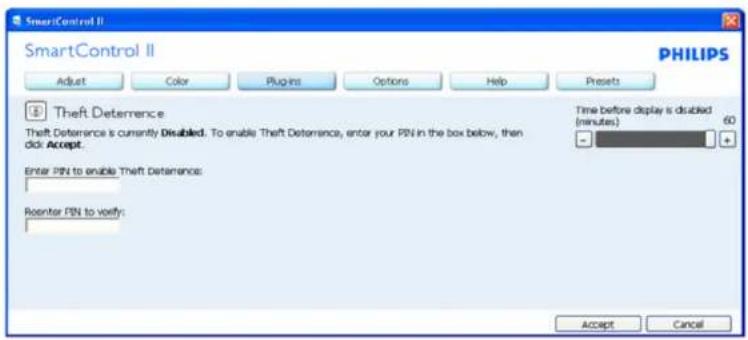
- User can enter PIN between 4 and 9 digits numbers only.
- After entering PIN, Accept button takes user to the pop-up dialog box on the following page.
- Minimum minutes set to 5. Slider set to 5 by default.
- Does not require the display be attached to a different host to go into theft mode.
Once a PIN is entered and accepted, the following dialog box appears:

- Click on No button takes user to the following screen.

File/E/LCD&5Monitor%200LM/Palys/M1-project/2061 220P/220S...B.V.S1.00/CD-Contents/lob/narc/ENG...ISF22031/product/SMAKT.HTM 京9頁/共17 [98 06 18 17:00]
SmartControl
- Click on Yes button takes user to secure web site landing page.
After creating PIN, the Theft Deterrence pane will indicate Theft Deterrence Enabled and provide PIN Options button:
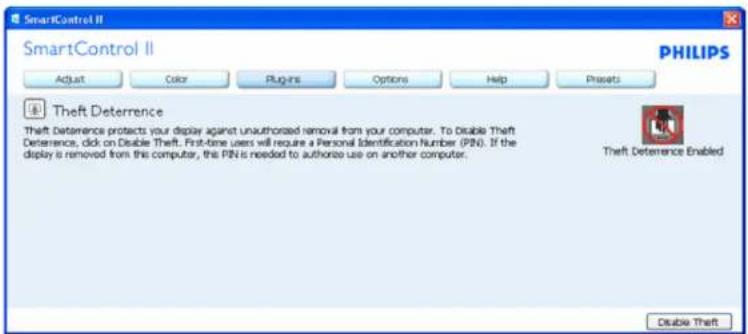
- Theft Deterrence Enabled is displayed.
- Disable Theft Mode opens pane screen on next page.
- PIN Options button only available after user creates PIN, button opens secure PIN web site.
Disable Theft button opens the following pane:

- After entering PIN, Accept button disables PIN.
- Cancel button opens up main Theft Deterrence pane, displaying Theft Deterrence Disabled. Enable Theft Mode and PIN Options buttons.
- Entering incorrect PIN results in the following dialog box:
SmartControl

Options>Preferences - Will only be active when selecting Preferences from the drop-down Options menu. On a non-supported display capable of DDC/CI, only the Help and Options tabs are available.
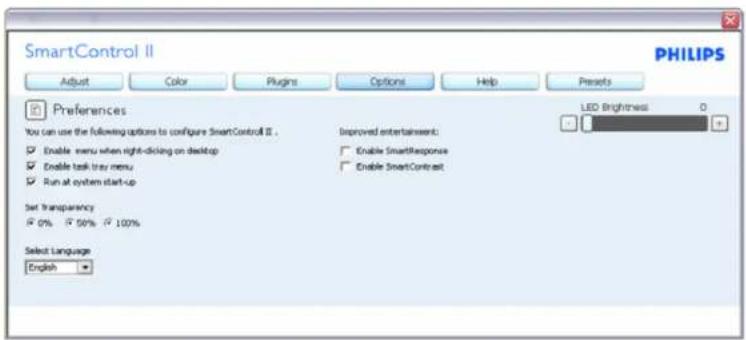
- Displays current preference settings.
- A checked box enables the feature. The check box is a toggle.
- Enable Context Menu on desktop is checked (On) by default. Enable Context menu displays SmartControl II selections for Select Preset and Tune Display in the desktop right-click context menu. Disabled removes SmartControl II from the right click context menu.
- Enable Task Tray icon is checked (On) by default. Enable context menu shows the task tray menu for SmartControl II. A right click on the task tray icon displays the menu options for Help, Technical Support. Check for Upgrade, About, and Exit. When Enable task tray menu is disabled, the task tray icon will only display EXIT.
- Run at Startup is checked (On) by default. When disabled, SmartControl II will not launch at start or be in the task tray. The only way to launch SmartControl II is either from the desktop short cut or from the program file. Any preset set to run at startup will not load when this box is unchecked (Disabled).
- Enable transparency mode (Vista, XP, and 2k only). Default is 0% Opaque.
Options>Input - Will only be active when selecting Input from the drop-down Options menu. On a non-
supported display capable of DDC/CI, only the Help and Options tabs are available. All other SmartControl II tabs are not available.
SmartControl

- Display the Source instruction pane and current input source setting.
- On single input displays, this pane will not be visible.
Options>Audio - Will only be active when selecting Volume from the drop-down Options menu. On a non-supported display capable of DDC/CI, only the Help and Options tabs are available.

Option>Auto Pivot
Ele/F/E/LCD%DSMonitor%200LM/Platipe/M1-project/20051-230P/2208...B.VJCI.001/CD-Contents/Iod/hannac/ENG...ISI/220.31/prosec/SMAKT.HTM第12页/共17 [98.06 18 17:03]
SmartControl

Help>User Manual - Will only be active when selecting User Manual from the drop-down Help menu. On a non-supported display capable of DDC/CI, only the Help and Options tabs are available.

Help>Version - Will only be active when selecting Version from the drop-down Help menu. On a non-supported display capable of DDC/CI, only the Help and Options tabs are available.
SmartControl

Context Sensitive menu
The Context Sensitive menu is Enabled by default. If Enable Context Menu has been checked in the Options>Preferences pane, then the menu will be visible.

The Context Menu has four entries:
- SmartControll II - When selected the About Screen is displayed.
- Select Preset - Provides a hierarchical menu of saved presets for immediate use. A check mark shows the currently selected preset. Facoty Preset can also be called from the drop down menu.
- Tune Display - Opens the SmartControl II control panel.
- Fly off for SmartImage - Check current settings, Off, Office Work, ImageViewing, Entertainment, Economy.
Task Tray Menu Enabled
File:///E:/LCD&50Monitor%200LM/Platycs/M1-project/22051.220*1/2203...B.VJ51.001/CD.Conteners/ledbanmac/ENG-LSH/28031/prosec/SMAKT.HTM第14页/共17[98.06 18 17:03]
SmartControl
The task tray menu can be displayed by right-clicking on the SmartControl II icon from the task tray. Left Click will launch the application.

The task tray has five entries:
- Help - Access to User Manual file: opnes User Manual file using the default browser window.
- Technical Support - displays the tech support page.
- Check for Update - takes the user to PDI Landing and checks the user's version against the most current available.
- About - Displays detailed reference information: product version, release information, and product name.
- Exit - Close SmartControl II. To run SmartControl II again either select SmartControl II from Program menu, double-click the desktop PC icon or restart the system.

Task Tray Menu Disabled
When the Task Tray is disabled in the preference folder, only the EXIT selection is available. To completely remove SmartControll II from the task tray, disable Run at Startup in Options>Preferences.
Q&A
File:///E:/LCD&50Monitor%200LM/Platycs/M1-project/22051 220P/220S...BUV31.00/CO-Contents/ledanac/mENG-LSH/22031/prosec/SMAKT.HTM 第19页/共17 [98.06 18 17:03]
SmartControl
Q1. I change the monitor on a PC to a different one and the SmartControl becomes un-usable, what do I do?
A. Restart your PC and see if SmartControl can work. Otherwise, you will need to remove and re-install SmartControl to ensure proper driver is installed.
Q2. The SmartControl functions well at the beginning, but it is not workable, what can I do?
A. If the following actions were executed, the monitor driver may need to be re-installed.
- Change video graphic adapter to another one
- Update video driver
● Activities on OS, such as service pack or patch - Run Windows Update and updated monitor and/or video driver
- Windows was booted with the monitor power off or disconnected.
To find out, please right click My Computer and click on Properties->Hardware->Device Manager.
If you see "Plug and Play Monitor" shows under Monitor, then you need to re-install. Simply remove SmartControl and re-install it.
Q3. After installing SmartControl, when clicking on SmartControl tab, nothing shows up after a while or a failure message shows, what happened?
A. It might be your graphic adaptor is not compatible with the SmartControl. If your graphic adaptor is one of the above mentioned brands, try to download the most updated graphic adaptor driver from corresponding companies! web site. Install the driver. Remove SmartControl, and re-install it once more.
If it is still not working, we are sorry that the graphic adaptor is not supported. Please pay attention to Philips® web site for any updated SmartControl driver available.
Q4. When I click on Product Information, only partial information is shown, what happened?
A. It might be your graphic card adaptor driver is not the most updated version which fully supporting DDC/CI interface. Please try to download the most updated graphic adaptor driver from corresponding companies! web site. Install the driver. Remove SmartControl, and re-install it once more.
| ATTENTION |
| Theft Deference enabled |
Q5. I forgot my PIN for Theft Deterrence Function. How can I do?
A. Please contact IT manager or Philips Service Center.
Q6. In a monitor with the SmartImage feature, the sRGB scheme of color temperature function in SmartControl is not responding, why?
A. When SmartImage is enabled, the sRGB scheme is disabled automatically. To use sRGB, you need to disable SmartImage with the button at the front bezel of your monitor.
Elec/IE/LCD/S20Monitor/S20OLM/Philips/M1-project/22051-220F1/2208...B.0V351.001/CD.Contenics/led/ansma/ENG_15H/22051/product/SMART.HTM 第 16 页 / 共 17 [98-06-18 17:03]
SmartControl
RETURN TO TOP OF THE PAGE
Ele3/E/LCD&20Monitor%200LM/Plaidje/MI-project/22051 220/P/2205...B.0V3C1.001/CD-Contents/led/man.ac/ENG_LSH/220-31produc/SMAKT-HTM 第17页/共17 [98.06 18 17:03]
Installing Your LCD Monitor
• Front View Product Description
- Connecting to Your PC
- The Base
- Getting Started
- Optimizing Performance
Installing Your LCD Monitor
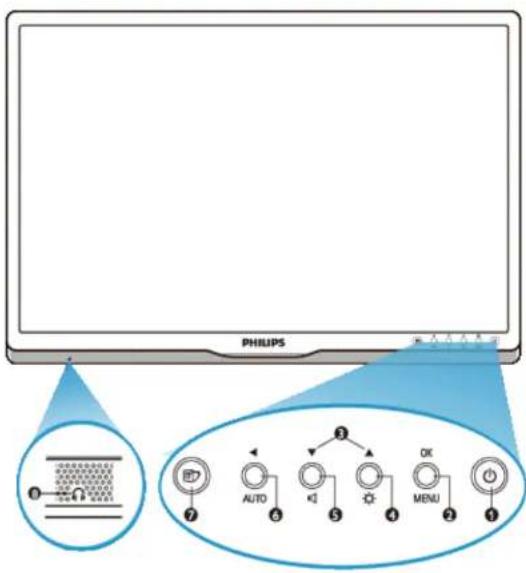
Front View Product Description
flowchart
graph TD
    A["PHILIPS"] --> B["Device ①"]
    B --> C["Auto ②"]
    C --> D["OK ③"]
    D --> E["MENU ④"]
    E --> F["⑤"]
    F --> G["⑥"]
    G --> H["⑦"]
1 To switch monitor's power On and Off
2 MENU/OK To access the OSD menu
3 ▲▼ To adjust the OSD menu
4 To adjust brightness of the display
5 To adjust volume of the display
6 AUTO / ▶ Automatically adjust the horizontal position, vertical position, phase and clock settings / Return to previous OSD level
7 SmartImage. There are five modes to be selected: Office Work, Image Viewing, Entertainment, Economy, and Off
Installing Your LCD Monitor

RETURN TO TOP OF THE PAGE
Rear View

1 USB upstream port and downstream port
2 VGA input
3 DVI-D input (available for selective models)
4 AC power input
5 PC Audio input
6 Kensington anti-thief lock
RETURN TO TOP OF THE PAGE
file:///FJ1.CD%20Monitor%20FMPhilips/M1-project:220B1-220P1/220B1-ED...J5B.0V301.001/CD-Contents/led/manual/ENGLISH/220B1/install/install.htm 第 2 页 / 共 3 [95-06-13-17:03]
Installing Your LCD Monitor
Optimizing Performance
- For best performance, ensure that your display settings are set at 1680x1050, 60Hz.

Note: You can check the current display settings by pressing the 'OK' button once. The current display mode is shown in OSD main controls called RESOLUTION.
RETURN TO TOP OF THE PAGE
Connecting to Your PC
Front View Product Description
Accessory Pack
Connecting to Your PC
Getting Started
Optimizing Performance
The Base
Connecting to Your PC
Accessory Pack
Unpack all the parts.

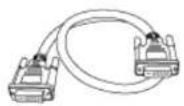
DVI cable (Optional)
Power cord


EDFU pack
VGA cable (Optional)
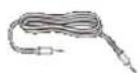
Audio cable
RETURN TO TOP OF THE PAGE
Connecting to Your PC
file:///E:/CD/S20Monitor%2XO/M/Philips/M1-project/220B1-220P1/220B1-E...5B.0V301.0C7/CI-Contents/led/manual/FNG...SH/220B1/install/connect.htm 第1页/共3 [98-06-18 17:02]
Connecting to Your PC
1) Connect the power cord to the back of the monitor firmly. (Philips has pre-connected VGA cable for the first installation.
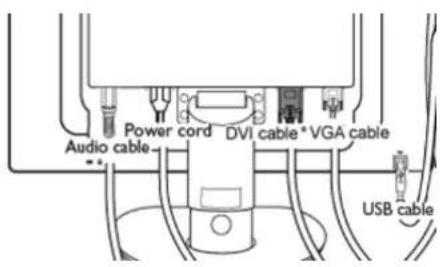
*available for selective models
file:///F:/CD/S20Monitor%2XO/M/Philips/M1-project/220B1-220P1/220B1-F...5B.0V301.0C7/CI-Contents/led/manual/FNG...SH/220B1/install/connect.htm 第2页/共3 [98-06-18 17:09]
Connecting to Your PC
*available for selective models
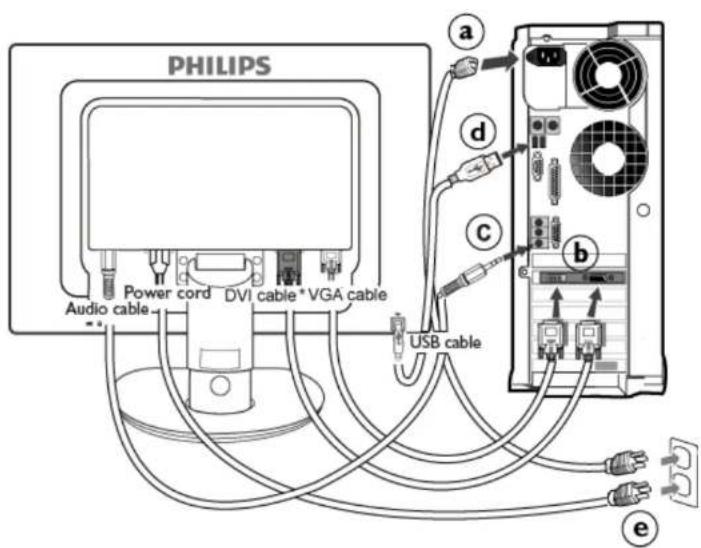
2) Connect to PC
(a) Turn off your computer and unplug its power cable.
(b) Connect the monitor signal cable to the video connector on the back of your computer.
(c) Connect the PC audio cable to the audio connector on the back of your computer.
(d) Connect the USB upstream port on the monitor and the USB port on PC with a USB cable. The USB downstream port is now ready for any USB device to plug in.
(e) Plug the power cord of your computer and your monitor into a nearby outlet.
(f) Turn on your computer and monitor. If the monitor displays an image, installation is complete.
RETURN TO TOP OF THE PAGE
The Base
- Install base stand
- Remove base stand
- Front View Product Description
- Accessory Pack
- Connecting to your PC
- Getting Started
- Optimizing Performance
- Remove the Base
The Base
Install base stand
220B1
(a) Place the monitor base stand on a stable surface.

(b) Firmly grasp the monitor with both hands.

natural_image
Illustration of hands holding a blank document with a blue arrow pointing to a small container on a base (no text or symbols)file:///E:/LCD%20Monitor%20E/M/Philips/M1-project/220F1-220F1/220B1-F0FU/5H.0V30.001/CD-Contents/loc/manual/ENGL.ISH/220B1/install/base.htm 第1页 / 共8 [98-06-18 7:03]
The Base
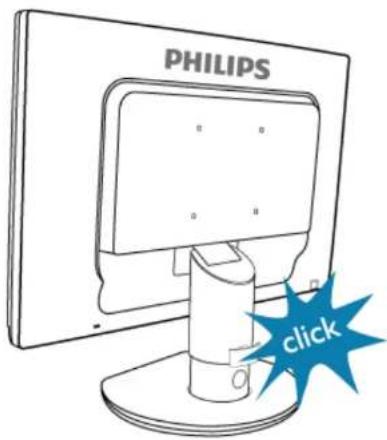
(c) Attach the monitor stand to the monitor column until the tabs "click" into place before releasing the height adjustable column.
Remove base stand
220B1
Before you start disassembling the monitor base, please follow the instructions below to avoid damage or injury.
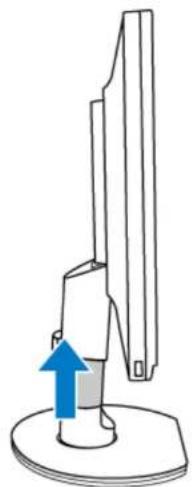
a) Extend the monitor stand to its maximum height.
file:///E:/LCD%20Monitor%20E/M/Philips/M1-project/220F1-220F1/220B1-F0FU/5H.0V30.001/CD-Contents/loc/manual/ENGL.ISH/220B1/install/base.htm 第2页 / 共8 [98-06-18 17:03]
The Base
natural_image
Diagram of a mechanical component with a blue upward arrow indicating force or direction (no text or symbols present)(b) Place the monitor face down on a smooth surface, taking care to avoid scratching or damaging the screen. Then lift the monitor stand.

natural_image
Line drawing of a mechanical device with a rotating shaft and base plate, showing an upward arrow (no text or symbols)(c) Press the release button on the rear of the stand to remove the base from the stand.
file:///E:/LCD%20Monitor%20E/M/Philips/M1-project/220F1-220F1/220B1-F0FU/5H.0V30.001/CD-Contents/loc/manual/ENGL.ISH/220B1/install/base.htm 第3页 / 共8 [98-06-18 17:03]
The Base

Remove the Base
Condition:
• for VESA standard mounting applications
(a) Remove the 4 screw covers.
220P1

natural_image
Technical diagram of a mechanical assembly with a rotating component and an upward arrow indicating motion (no text or symbols)220B1
file:///E:/LCD%20Monitor%20E/M/Philips/M1-project/220E1-220E1/220E1-FIDU/5B.0V30.001/CD-Contents/loa/manual/ENGL.ISH/22CB1/install/base.htm 第4页/共8 [38-06-18 17:03]
The Base
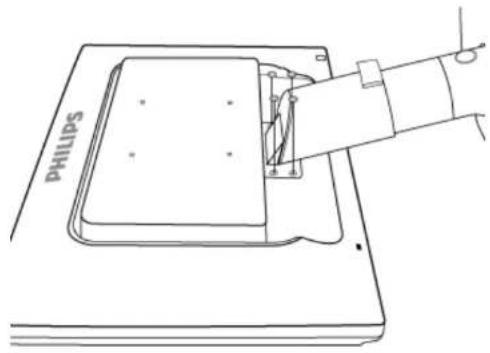
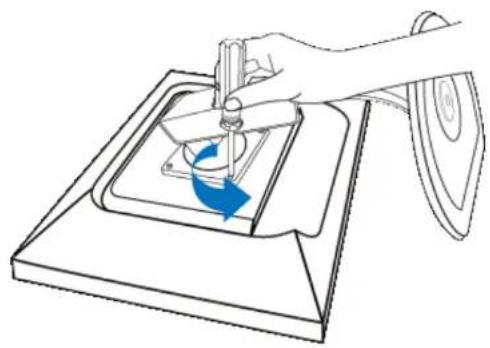
(b) Remove the 4 screws and then remove the base from the LCD monitor.
220P1
natural_image
Line drawing of a hand using a tool to press or write on a mechanical component, with no visible text or symbols.file:///E:/LCD%20Monitor%20E/M/Philips/M1-project/220F1-220F1/220B1-F0FU/5H.0V30.001/CD-Contents/loc/manual/ENGL.ISH/220B1/install/base.htm 第5页 / 共8 [98-06-18 17:03]
The Base

220B1
file:///E:/LCD%20Monitor%20E/M/Philips/M1-project/220E1-220E1/220E1-FIDU/5B.0V30.001/CD-Contents/loa/manual/ENGL.ISH/22CB1/install/base.htm 第8页 / 共8 [38-06-18 17:03]
The Base


natural_image
Diagram of a Philips device with a mechanical component and an arrow indicating direction (no text or symbols present)file:///E:/LCD%20Monitor%20E/M/Philips/M1-project/220F1-220F1/220B1-F0FU/5H.0V30.001/CD-Contents/loc/manual/ENGL.ISH/220B1/install/base.htm 第7页 / 共8 [98-06-18 17:03]
The Base
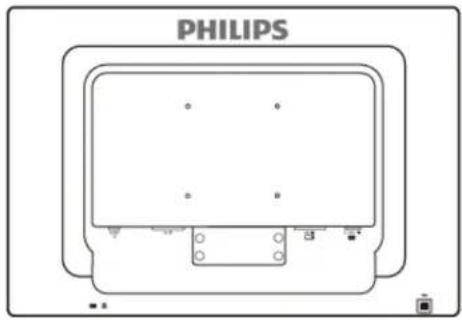
Note: This monitor accepts a 100mmx100mm VESA-Compliant mounting interface.
RETURN TO TOP OF THE PAGE
file:///E:/LCD%20Monitor%20E/M/Philips/M1-project/220F1-220F1/220B1-F0FU/5H.0V30.001/CD-Contents/loc/manual/ENGL.ISH/220B1/install/base.htm 第8页 / 共8 [98-06-18 17:03]
Getting Started
Your LCD Monitor :
Front View Product Description
Setting Up and Connecting Your Monitor
□ Getting Started
Optimizing Performance
Getting Started
Getting Started
Use the information file (.inf) for Windows® 2000/XP/Vista or later
The built-in VESA DDC2B feature in Philips Monitors supports Plug & Play requirements for Windows® 2000/XP/Vista. This information file (.inf) should be installed in order that your Philips monitor can be enabled from the 'Monitor' dialog box in Windows® 2000/XP/Vista and the Plug & Play application can be activated. The installation procedure based on Windows® 2000, XP and Vista is specified as follows.
For Windows® 2000
- Start Windows® 2000
- Click on the 'Start' button, point to 'Settings', and then click on 'Control Panel'.
- Double click on the 'Display' Icon.
- Select the 'Settings' tab then click on 'Advanced...'.
- Select 'Monitor'
- If the 'Properties' button is inactive, it means your monitor is properly configured. Please stop installation.
- If the 'Properties' button is active. Click on 'Properties' button. Please follow the steps given below.
- Click on 'Driver' and then click on 'Update Driver...' then click on the 'Next' button.
- Select 'Display a list of the known drivers for this device so that I can choose a specific driver', then click on 'Next' and then click on 'Have disk...'.
- Click on the 'Browse...' button then select the appropriate drive F: (CD-ROM Drive).
- Click on the 'Open' button, then click on the 'OK' button.
- Select your monitor model and click on the 'Next' button.
- Click on the 'Finish' button then the 'Close' button. If you can see the 'Digital Signature Not Found' window, click on the 'Yes' button.
For Windows® XP
- Start Windows® XP
- Click on the 'Start' button and then click on 'Control Panel'.
- Select and click on the category 'Printers and Other Hardware'
- Click on the 'Display' Item.
- Select the 'Settings' tab then click on the 'Advanced' button.
- Select 'Monitor' tab
- If the 'Properties' button is inactive, it means your monitor is properly configured. Please stop installation.
file:///E:/CD%20Monitor%20XOM/Philips/M1-project/220B1-220P1/220B1-E...B.0V301.001/CD-Contents/ed/manual/ENG:1SH/220B1/install/gt_start.htm 第1页/共2 [98-06-18 17:03]
Getting Started
- If the 'Properties' button is active, click on 'Properties' button. Please follow the steps below.
- Click on the 'Driver' tab and then click on 'Update Driver...' button.
- Select the 'Install from a list or specific location [advanced]' radio button and then click on the 'Next' button.
-
Select the 'Don't Search. I will choose the driver to install' radio button. Then click on the 'Next' button.
-
Click on the 'Have disk...' button, then click on the 'Browse...' button and then select the appropriate drive F: (CD-ROM Drive).
-
Click on the 'Open' button, then click the 'OK' button.
-
Select your monitor model and click on the 'Next' button.
-
If you can see the 'has not passed Windows® Logo testing to verify its compatibility with Windows® XP' message, please click on the 'Continue Anyway' button.
-
Click on the 'Finish' button then the 'Close' button.
-
Click on the 'OK' button and then the 'OK' button again to close the Display_Properties dialog box.
For Windows® Vista
- Start Windows® Vista
- Click the Start button; select and click on 'Control Panel'.
- Select and click on 'Hardware and Sound'
- Choose 'Device Manager' and Click on 'Update device drivers'.
- Select 'Monitor' and then right click on 'Generic PnP Monitor'.
- Click on 'Update Driver Software'.
- Select 'Browse my computer for driver software'.
- Click the 'Browse' button and choose the drive in which you've placed the disk. Example: (CD-ROM Drive:\Lcd\PC\drivers).
- Click the 'Next' button.
- Wait few minutes for installing the driver, and then click 'Close' button.
If your Windows® 2000/XP/Vista version is different or you need more detailed installation information, please refer to your Windows® 2000/XP/Vista user's manual.
RETURN TO TOP OF THE PAGE
On-Screen Display
☐ Description of the On-Screen Display
The OSD Tree
On-Screen Display
Description of the On Screen Display
What is the On-Screen Display?
On-Screen Display (OSD) is a feature in all Philips LCD monitors. It allows an end user to adjust screen performance or select functions of the monitors directly through an on-screen instruction window. A user friendly on screen display interface is shown as below:

Basic and simple instruction on the control keys.
In the OSD shown above users can press ▼▲ buttons at the front bezel of the monitor to move the cursor, OK to confirm the choice or change.
On-Screen Display
RETURN TO TOP OF THE PAGE
The OSD Tree
Below is an overall view of the structure of the On-Screen Display. You can use this as a reference when you want to work your way around the different adjustments later on.

file:///E:/CD/S20Monitor/S20M/Philips/M-project/220B1-220F1/220B1-E0FD/5B.0V301.001/CD-Contents/ed/manual/ENGLIS-H220B1/osd/osddesc.htm 第2页 / 共3 98-06-18 17:64
On-Screen Display
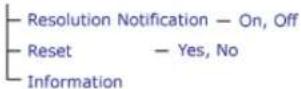
Resolution notification
This monitor is designed for optimal performance at its native resolution, 1680x1050@60Hz. When the monitor is powered on at a different resolution, an alert is displayed on screen: Use 1680x1050@60Hz for best results.
Display of the native resolution alert can be switched off from Setup in the OSD (On Screen Display) menu.
RETURN TO TOP OF THE PAGE
Customer Care & Warranty
Customer Care & Warranty
PLEASE SELECT YOUR COUNTRY/AREA TO REVIEW DETAILS OF YOUR WARRANTY COVERAGE
WESTERN EUROPE: • Austria • Belgium • Denmark • France • Germany
• Greece • Finland • Ireland • Italy • Luxembourg • the Netherlands • Norway
• Portugal • Sweden • Switzerland • Spain • United Kingdom • Poland
EASTERN EUROPE: • Czech Republic • Hungary • Russia • Slovakia • Slovenia
• Turkey
LATIN AMERICA: • Argentina • Brasil
NORTH AMERICA: • Canada • USA
PACIFIC: • Australia • New Zealand
ASIA: • China • Hong Kong • India • Indonesia • Korea • Malaysia • Pakistan
• Philippines • Singapore • Taiwan • Thailand • Vietnam
AFRICA: • South Africa
MIDDLE EAST: • United Arab Emirates
Your Philips First Choice Warranty
Your Philips F1rst Choice Warranty
Thank you for purchasing this Philips monitor.

All Philips monitors are designed and manufactured to high standards and deliver high-quality performance, ease of use and ease of installation. Should you encounter any difficulties while installing or using this product, please contact the Philips helpdesk directly to benefit from your Philips F1rst Choice Warranty. This three-year service warranty entitles you to a swap model on-site if your monitor turns out to be faulty or defective. Philips aims at a swap within 48 hours of your call being received.
What is covered?
The Philips F1rst Choice Warranty applies within Andorra, Austria, Belgium, Cyprus, Denmark, France, Germany, Greece, Finland, Ireland, Italy, Liechtenstein, Luxembourg, Monaco, the Netherlands, Norway, Poland, Portugal, Sweden, Switzerland, Spain and the United Kingdom and only for monitors originally designed, manufactured, approved and/or authorized for usage within these countries.
Warranty coverage begins as from the day you buy your monitor. For three years thereafter, your monitor will be swapped by at least an equivalent monitor in case of defects provided for under the warranty coverage.
The swap monitor remains yours and Philips keeps the defective/original monitor. For the swap monitor the warranty period remains equal to that of your original monitor, being 36 months as from the purchase date of your original monitor.
What is excluded?
The Philips F1rst Choice Warranty applies provided the product is handled properly for its intended use, in accordance with its operating instructions and upon presentation of the original invoice or cash receipt, indicating the date of purchase, dealer's name and model and production number of the product.
The Philips F1rst Choice Warranty may not apply if:
- The documents have been altered in any way or made illegible;
- The model or production number on the product has been altered, deleted, removed or made illegible;
- Repairs or product modifications and alterations have been executed by unauthorized service organizations or persons;
- Damage is caused by accidents including but not limited to lightning, water or fire, misuse or neglect;
Your Philips First Choice Warranty
- Reception problems caused by signal conditions or cable or antenna systems outside the unit;
- Defects caused by abuse or misuse of the monitor;
- Product requires modification or adaptation to enable it to comply with local or national technical standards, which apply in countries for which the product was not originally designed, manufactured, approved and/or authorized. Therefore always check whether a product can be used in a specific country.
- Note that products that are not originally designed, manufactured, approved and/or authorized for usage within the Philips F1rst Choice countries, do not apply to the Philips F1rst Choice Warranty. In these cases the Philips global warranty terms are valid.
Just a click away
In case of any problems, we advise you to read the operating instructions carefully or go to the www.philips.com/support website for additional support.
Just a phone call away
In order to avoid unnecessary inconvenience, we advise you to read the operating instructions carefully or go to the www.philips.com/support website for additional support before contacting the Philips helpdesk.
To solve your problem quickly, please prepare the following details before contacting the Philips helpdesk:
• Philips type number
• Philips serial number
• Purchase date (copy of purchase may be required)
• PC environment Processor:
CUP and Graphic card name and driver version
Operating system
Application being used
- Other cards installed
Having the following information available will also help speed up the process:
- Your proof of purchase indicating: date of purchase, dealer name, model and product serial number.
- The full address to which the faulty monitor has to be collected and the swap model should be delivered.
Philips' customer help desks are located worldwide. Click here to access the F1rst Choice Contact Information.
Or you can reach us via:
Website: http://www.philips.com/support
file:///E|/LCD%20Monitor-%20OEM/Philips/M1-project/22CB1-22071/220B1-EDFU/SB.0V301.001/CD-Contents/loc/manual/ENGLISH/warranty/war_1st.htm 第2日/共3 [98-06-18 17:04]
Your Philips First Choice Warranty
f.e://E/LCD%20Monitor%20OEM/PhilipsM1-project/22051-220P1/220BL-EDFU/5B.0V301.001/CD-Contexts/lcd/national/ENGLISH/warranty/war_lst.htm 第3日/共3 [98-06-18 17:04]
First Choice Contact Information
F1rst Choice Contact Information
Country Code Telephone number Tariff
Austria +43 0810 000206 € 0.07
Belgium +32 078 250851 € 0.06
Denmark +45 3525 8761
Local call tariff
Finland
+358
09 2290 1908 Local call tariff
France +33 082161 1658 € 0.09
Germany
+49 01803 386 853
€ 0.09
Greece
+30 00800 3122 1223
Free of charge
Ireland
+353
01 601 1161 Local call tariff
Italy
+39 840 320 041 € 0.08
Luxembourg
+352
26 84 30 00 Local call tariff
The Netherlands
+31 0900 0400 063
€ 0.10
Norway +47
2270 8250
Local call tariff
Poland +48 0223491505 Local call tariff
Portugal
+351
2 1359 1440 Local call tariff
Spain
+34 902 888 785 € 0.10
Sweden +46 08 632 0016 Local call tariff
Switzerland
+41 02 2310 2116 Local call tariff
United Kingdom
+44 0207 949 0069
Local call tariff
Your Guarantee in Central and Eastern Europe
Your Guarantee in Central and Eastern Europe
Dear Customer,
Thank you for purchasing this Philips product, which has been designed and manufactured to the highest quality standards. If, unfortunately, something should go wrong with this product Philips guarantees free of charge labor and replacement parts during a period of 36 months from date of purchase.
What is covered?
This Philips Guarantee in Central and Eastern Europe applies within Czech Republic, Hungary, Slovakia, Slovenia, Russia and Turkey and only for monitors originally designed, manufactured, approved and/or authorized for usage within these countries.
Warranty coverage begins as from the day you buy your monitor. For 3 years thereafter, your monitor will be serviced in case of defects provided for under the warranty coverage.
What is excluded?
The Philips guarantee applies provided the product is handled properly for its intended use, in accordance with its operating instructions and upon presentation of the original invoice or cash receipt, indicating the date of purchase, dealer's name and model and production number of the product.
The Philips guarantee may not apply if:
- the documents have been altered in any way or made illegible;
- the model or production number on the product has been altered, deleted, removed or made illegible;
- repairs or product modifications and alterations have been executed by unauthorized service organizations or persons;
- damage is caused by accidents including but not limited to lightning, water or fire, misuse or neglect.
- Reception problems caused by signal conditions or cable or antenna systems outside the unit;
- Defects caused by abuse or misuse of the monitor;
- Product requires modification or adaptation to enable it to comply with local or national technical standards, which apply in countries for which the product was not originally designed, manufactured, approved and/or authorized. Therefore always check whether a product can be used in a specific country.
Please note that the product is not defective under this guarantee in the case where modifications
Your Guarantee in Central and Eastern Europe
become necessary in order for the product to comply with local or national technical standards which apply in countries for which the product was not originally designed and/or manufactured. Therefore always check whether a product can be used in a specific country.
Just a click away
In case of any problems, we advise you to read the operating instructions carefully or go to the www.philips.com/support website for additional support.
Just a phone call away
In order to avoid unnecessary inconvenience, we advise you to read the operating instructions carefully before contacting our dealers or Information Centers
In case your Philips product is not working correctly or is defective, please contact your Philips dealer or directly the Philips Service and Consumer Information Centers
Philips and the Philips Shield Emblem are registered trademarks of Koninklijke Philips Electronics N.V. and are used under license from Koninklijke Philips Electronics N.V.
Website: http://www.philips.com/support
Consumer Information Centers
Consumer Information Centers
• Argentina • Australia • Brasil • Canada • New Zealand • Belarus • Bulgaria
• Croatia • Czech Republic • Estonia • United Arab Emirates • Hong Kong
• Hungary • India • Indonesia • Israel • Latvia • Lithuania • Malaysia
• Middle East + North Africa • New Zealand Pakistan • Romania • Russia
• Serbia & Montenegro • Singapore • Slovakia • Slovenia • South Africa
• South Korea • Taiwan • Philippines II Thailand • Turkey • Ukraine • Vietnam
Eastern Europe
BELARUS
Technic al Center of JV IBA
M. Bogdanovich str. 155
BY - 220040 Minsk
Tel: +375 17 217 33 86
BELARUS
Service.BY
Petrus Brovky st. 19 - 101-B
220072, Minsk
Belarus
BULGARIA
LAN Service
140, Mimi Balkanska Str.
Office center Translog
1540 Sofia, Bulgaria
Tel: +359 2 960 2360
www.lan-service.bg
CZECH REPUBLIC
General Consumer Information Center
800 142100
Xpectrum
Lu.ná 591/4
CZ - 160 00 Praha 6 Tel: 800 100 697 or 220 121 435
Profi Service Center Ltd.
123 Kulso-Vaci Street,
H-1044 Budapest (Europe Center)
Hungary
Tel: +36 1 814 8080
m.andras@psc.hu
LATVIA
ServiceNet LV
Jelgavas iela 36
LV - 1055 Riga,
Tel: +371 7460399
Email: serviss@servicenet.lv
LITHUANIA
ServiceNet LT
Gaiziunu G. 3
LT - 3009 KAUNAS
Tel: +370 7400088
Email: servisas@servicenet.lt
www.servicenet.it
files/FjLCD/S20V/niiter/S20CFM/Philips/M1-project/220B1-220P1/240B1-FDFU5R/CV301.001/CD-Center/electrəmed/FNGI.ISH/warrant:/warcic.html 2良/共9 [36-36-18-17:04]
Consumer Information Centers
ROMANIA
Blue Ridge Int'l Computers SRL
115, Mihai Eminescu St., Sector 2
RO - 020074 Bucharest
Tel: +40 21 2101969
SERBIA & MONTENEGRO
Kim Tec d.o.o.
Viline vode bb, Slobodna zona
Beograd L12/3
11000 Belgrade
Serbia
Tel. +381 11 20 70 684
SLOVAKIA
General Consumer Information Center
0800004551
Datalan Servisne Stredisko
Puchovska 8
SK - 831 06 Bratislava
Tel: +421 2 49207155
Email: servis@datalan.sk
SLOVENIA
PC HAND
Brezovce 10
SI - 1236 Trzin
Tel: +386 1 530 08 24
Email: servis@pchand.si
RUSSIA
CPS
18, Shelepihinskaya nab.
123290 Moscow
Russia
Tel. +7(495)797 3434
Profservice:
14A -3, 2Karacharovskaya str.
109202, Moscow,
Russia
Tel. +7(095)170-5401
Consumer Information Centers
TURKEY
Türk Philips Ticaret A.S.
Yukari Dudullu Org.San.Bolgesi
2.Cadde No:22
34776-Umraniye/Istanbul
Tel: (0800)-261 33 02
UKRAINE
Comel
Shevchenko street 32
UA - 49030 Dnepropetrovsk
Tel: +380 562320045
www.csp-comel.com
LLC Topaz Company
Topaz-Service Company,
Mishina str. 3,
Kiev
Ukraine-03151
Tel: +38 044 245 73 31
Latin America
ARGENTINA
Azopardo 1480.
(C1107ADZ) Cdad. de Buenos Aires
Tel: 0800 3330 856
Email: CIC.monitores@Philips.com
BRASIL
Alameda Raja Gabaglia, 188 - 10°Andar - V.
Olímpia - S. Paulo/SP - CEP 04551-090 -
Brasil
Tel: 0800-7254101
Email: CIC.monitores@Philips.com
Pacific
Consumer Information Centers
AUSTRALIA
Company: AGOS NETWORK PTY LTD
Address: 4/5 Dursley Road, Yenorra, NSW 2161, Australia
Tel: 1300 360 386
Fax: +61-2-80808147
Email: philips@agos.com.au
Service hours: Mon.\~Fri. 8:00am-7:30pm
NEW ZEALAND
Company: Visual Group Ltd.
Address: 28 Walls Rd Penrose Auckland
Phone: 0800 657447
Fax: 09 5809607
E-mail: vai.ravindran@visualgroup.co.nz
Service Hours: Mon.\~Fri. 8:30am\~5:30pm
Asia
HONG KONG/Macau
Company Name: PHK Service Limited
Address: Flat A, 10/F., Pak Sun Building, 103 - 107 Wo Yi Hop Road, Kwai Chung, New Territories, Hong
Kong
Tel.: (852) 2610-6908 / (852) 2610-6929 for Hong Kong and (853) 2856-2277 for Macau
Fax: (852) 2485 3574 for Hong Kong and (853) 2856 1498 for Macau
E-mail: enquiry@phkservice.com.hk
Service Hours: Mon.\~Sat. 09:00am\~06:00pm
India
Company: REDINGTON INDIA LTD
Address: SPL Guindy House, 95 Mount Road, Chennai 600032, India
Tel: +9144-42243352/353
E-mail: aftersales@in.aocmonitor.com
Service hours: Mon.\~Fri. 9:00AM\~5:30PM; Sat. 9:00AM\~1:00PM
Consumer Information Centers
Indonesia
Company Name: PT. Gadingsari elektronika Prima
Address: Kompleks Pinang 8, JI. Ciputat raya No. 8F, Pondok Pinang. Jakarta
Tel: 021-750909053, 021-750909056
Fax: 021-7510982
E-mail: gepta@cbn.net.id
Service hours: Mon.\~Fri. 8:30am\~4:30pm; Sat. 8:30am\~2:00pm
Additional service points:
- Philips Building JI. Buncit Raya Kav 99. Jakarta Selatan.
Phone: 021-7940040, ext 1722/1724, 98249295, 70980942
- JI. Tanah Abang 1 no 12S. Jakarta Pusat.
Phone: 021-3455150, 34835453
- Rukan City Home no H31, Gading Square. JI. Bulevar Barat. Kelapa Gading. Jakarta Utara. Phone: 021-45870601, 98131424
South Korea
Company: PCS One Korea Ltd.
Address: 112-2, Banpo-dong, Seocho-ku, Seoul, 137-040, Korea
Call Center Tel: 080-600-6600
Tel: 82 2 591 1528
Fax: 82 2 595 9688
E-mail: cic_korea@philips.com
Service hours: Mon.\~Fri. 9:00AM\~ 6:00PM; Sat. 9:00AM\~1:00PM
Malaysia
Company: After Market Solutions (CE) Sdn Bhd
Address: Lot 6. Jalan 225/51A, 46100 Petaling Jaya, Selangor DE, Malaysia.
Phone: 603 7953 3370
Philips Info Line: 1-800-880-180
Fax: 603 7953 3338
E-mail: pceinfo.my@philips.com
Service Hours: Mon.\~Fri. 8:15am\~5:15pm; Sat. 9:00am\~1:00pm
Pakistan
Philips Consumer Service
Address: Mubarak manzil, 39, Garden Road, Saddar, Karachi-74400
Tel: (9221) 2737411-16
Fax: (9221) 2721167
E-mail: care@philips.com
Website: www.philips.com.p
files/FjLCD/S20V/niiter/S20CFM/Philips/M1-project/220B1-220P1/240B1-FDFU5R/CV301.001/CD-Center/electrəmed/TNGL.ISH/warrant:/watch.html示S良/共9[36-36-18 17:04]
Consumer Information Centers
Singapore
Company: Philips Electronics Singapore Pte Ltd (Philips Consumer Care Center)
Address: 620A Lorong 1 Toa Payoh, TP4 Building Level 1, Singapore 319762
Tel: (65) 6882 3999
Fax: (65) 62508037
E-mail: consumer.care.sg@philips.com
Service hours: Mon.\~Fri. 9:00am\~6:00pm; Sat. 9:00am\~1:00pm
Taiwan
Company: FETEC.CO
Address: 3F, No.6, Lane 205, Sec. 1, Chang Hsing Rd, Lu Chu Hs, Taoyuan, Taiwan R.O.C 33800
Consumer Care: 0800-231-099
Tel: (03)2120336
Fax: (03)3129184
E-mail: knlin08@xuite.net
Service hours: Mon.-Fri. 8:30am-7:00pm
Thailand
Company: Axis Computer System Co., Ltd.
Address: 1421 Soi Lardprao 94, Srivara Town In Town Soi 3 Road, Wangthonglang, Bangkok 10310
Thailand
Tel: (662) 934-5498
Fax: (662) 934-5499
E-mail: axis5@axiscomputer.co.th
Service Hours: Mon.-Fri. 08:30am-05:30pm
Vietnam
Company: Digiworld Corp
Address: 211-213 Vo Van Tan St, Ward 5, Dist.3, Ho Chi Minh city, Vietnam
Tel: 848-38266065
Fax: 848-38267307
E-mail: Digicare@dgw.com.vn
Service hours: 8:00 to 12:00 AM and 13:30 to 17:30 PM (from Monday to Friday)
Philippines
Glee Electronics Inc
Contact nos. (632) 636-3636 / 7064028 to 29
Fax no. (632) 7064026
Receiving Centers
NEO CARE - Megamall
4th Level Cyberzone, Building B,
SM Megamall, Mandaluyong City
NEO CARE - SM North EDSA
files/FjLCD/S20V/niiter/S20CFM/Philips/M1-project/220B1-220P1/240B1-FDFU5R/CV301.001/CD-Center/electrəmed/FNGI.ISH/warrant/y/warch:html示7良/共9[36-36-18 17:04]
Consumer Information Centers
4th Level Cyberzone, Annex Bldg.
SM City North EDSA, Quezon City
441-1610
MDR Microwave Sales Inc.
Cebu Branch
N. Escario corner Clavano St., Cebu City Phils.
# 255-4415/ 255-3242/253-9361/4124864 to 67
Sun # 0922-8210045 to 46
Davao Office:
C. Arellano St., Davao City 8000
082-225-3021/225-3022
Sun# 0922-8210015
CDO Office:
1445 Corrales Ext., CDO City
088-856-8540/856-8541
Sun # 0922-8210080
Iloilo Office:
C. Lim Comp., Gomez St., Iloilo City
# 033 338-4159/ 033 508-3741
Sun # 0922-8808850
Africa
SOUTH AFRICA
Company name: Sylvara Technologies Pty Ltd
Address: Ho Address Palm Springs Centre Christoffel Road Van Riebeeck Park Kempton Park, South Africa
Tel: +27878084456
Fax: +2711 391 1060
E-mail: customercare@philipssupport.co.za
Service hours: Mon.\~ Fri. 08:00am\~05:00pm
Middle East
Consumer Information Centers
Middle East + North Africa
Company: AL SHAHD COMPUTER L.L.C
Address: P.O.BOX: 29024, DUBAI, UNITED ARAB EMIRATES
TEL: 00971 4 2276525
FAX: 00971 4 2276242
E-mail: shahd52@eim.ae
Service hours: Sat.\~Thur. 9:00am\~1:00pm & 4:00pm- 8:00pm
Israel
Company: Eastronics LTD
Address: 13 Rozanis St. P.O.B. 39300, Tel Aviv 61392 Israel
Tel: 1-800-567000 call free in Israel; (972-50-8353722 after service hours until 20:00)
Fax: 972-3-6458759
E-mail: eastronics@eastronics.co.il
Service hours: Sun.-Thurs. 08:00 - 18:00
International Guarantee
Your International Guarantee
Dear Customer,
Thank you for purchasing this Philips product which has been designed and manufactured to the highest quality standards.
If, unfortunately, something should go wrong with this product Philips guarantees free of charge labor and replacement parts irrespective of the country where it is repaired during a period of 12 months from date of purchase. This international Philips guarantee complements the existing national guarantee obligations to you of dealers and Philips in the country of purchase and does not affect your statutory rights as a customer.
The Philips guarantee applies provided the product is handled properly for its intended use, in accordance with its operating instructions and upon presentation of the original invoice or cash receipt, indicating the date of purchase, dealer's name and model and production number of the product.
The Philips guarantee may not apply if:
- the documents have been altered in any way or made illegible;
- the model or production number on the product has been altered, deleted, removed or made illegible;
- repairs or product modifications and alterations have been executed by unauthorized service organizations or persons;
- damage is caused by accidents including but not limited to lightning, water or fire, misuse or neglect.
Please note that the product is not defective under this guarantee in the case where modifications become necessary in order for the product to comply with local or national technical standards which apply in countries for which the product was not originally designed and/or manufactured. Therefore always check whether a product can be used in a specific country.
In case your Philips product is not working correctly or is defective, please contact your Philips dealer. In the event you require service whilst in another country a dealer address can be given to you by the Philips Consumer Help Desk in that country, the telephone and fax number of which can be found in the relevant part of this booklet.
In order to avoid unnecessary inconvenience, we advise you to read the operating instructions carefully before contacting your dealer. If you have questions which your dealer cannot answer or any related question please contact the Philips Consumer Information Centers or via:
Website: http://www.philips.com
International Guarantee
file:///E:/CD%20Monitor%20F/M/Philips/M1-project/220B1-220P1/220B1-EDFU/53.0V301.001/CD-Contents/led/manual/ENGLIS-Warranty/war_intl.htm 第2頁/共2 [88-05-18 17:04]
United States Guarantee
Your Philips F1rst Choice Warranty(USA)
Thank you for purchasing this Philips monitor.

All Philips monitors are designed and manufactured to high standards and deliver high-quality performance, ease of use and ease of installation. Should you encounter any difficulties while installing or using this product, please contact Philips directly to benefit from your Philips F1rst Choice Warranty. This three-year service warranty entitles you to a swap model on-site within 48 hours of your call being received within the first year of purchase. If you have any problems with your monitor within the second or third year of purchase, we will repair it after it has been sent to the service provider at your expense and returned to you within five working days, free of charge.
LIMITED WARRANTY (Computer Monitor)
Click here to access the Warranty Registration Card.
Three Years Free Labor / Three Years Free Service on Parts / One Year Exchange\*
*Product will be exchanged with a new or renewed to original specifications unit within two business days for the first year. This product must be shipped in at your expense for service during years two and three.
WHO IS COVERED?
You must have proof of purchase to receive warranty service. A sales receipt or other document showing that you purchased the product is considered proof of purchase. Attach it to this owner's manual and keep both nearby.
WHAT IS COVERED?
Warranty coverage begins the day you buy your product. For three years thereafter, all parts will be repaired or replaced, and labor is free. After three years from the day of purchase, you pay for the replacement or repair of all parts, and for all labor charges.
All parts, including repaired and replaced parts, are covered only for the original warranty period. When the warranty on the original product expires, the warranty on all replaced and repaired products and parts also expires.
WHAT IS EXCLUDED?
file:///E:/CD%20Monitor%20F/M/Philips/M1-project/220B1-220P1/220B1-E0FDJ5B.0V301.001/CD-Contents/fcd/manual/ENGLIS-Warranty/war_usa.htm 第1页 / 共4 (98-06-18 17:08)
United States Guarantee
Your warranty does not cover:
- labor charges for installation or setup of the product, adjustment of customer controls on the product, and installation or repair of antenna systems outside of the product.
- product repair and/or part replacement because of misuse, accident, unauthorized repair or other cause not within the control of Philips Consumer Electronics.
- reception problems caused by signal conditions or cable or antenna systems outside the unit.
- a product that requires modification or adaptation to enable it to operate in any country other than the country for which it was designed, manufactured, approved and/or authorized, or repair of products damaged by these modifications.
- incidental or consequential damages resulting from the product. (Some states do not allow the exclusion of incidental or consequential damages, so the above exclusion may not apply to you. This includes, but is not limited to, prerecorded material, whether copyrighted or not copyrighted.)
- the model or production number on the product has been altered, deleted, removed or made illegible.
Where IS SERVICE AVAILABLE?
Warranty service is available in all countries where the product is officially distributed by Philips Consumer Electronics. In countries where Philips Consumer Electronics does not distribute the product, the local Philips service organization will attempt to provide service (although there may be a delay if the appropriate spare parts and technical manual(s) are not readily available).
Where CAN I GET MORE INFORMATION?
For more information, contact the Philips Customer Care Center by calling (877) 835-1838 (U.S.A. customers only) or (919) 573-7855.
Before Requesting Service...
Please check your owner's manual before requesting service. Adjustments of the controls discussed there may save you a service call.
TO GET WARRANTY SERVICE IN U.S.A., PUERTO RICO OR U.S. VIRGIN ISLANDS...
Contact the Philips Customer Care Center phone number listed below for product assistance and procedures for servicing:
Philips Customer Care Center
file:///R:/CD/S20Monitor/S200-M/Philips/M1-project/220B1-220F1/220B1-FDFU5B.0V301.001/CD-Contents/led/manual/ENGLIS-Warranty/war_usa.htm (6) 2页 / 共4 (98-06-18 17:05)
United States Guarantee
(877) 835-1838 or (919) 573-7855
(In U.S.A., Puerto Rico and U.S. Virgin Islands, all implied warranties, including implied warranties of merchantability and fitness for a particular purpose, are limited in duration to the duration of this express warranty. But, because some states do not allow limitations on how long an implied warranty may last, this limitation may not apply to you.)
TO GET WARRANTY SERVICE IN CANADA...
Please contact Philips at:
(800) 479-6696
Three years free parts and three years free labor will be provided at Philips Canada depot or any one of its authorized service centers.
(In Canada, this warranty is given in lieu of all other warranties. No other warranties are expressed or implied, including any implied warranties of merchantability or fitness for a particular purpose. Philips is not liable under any circumstances for any direct, indirect, special, incidental or consequential damages, howsoever incurred, even if notified of the possibility of such damages.)
REMEMBER... Please record the model and serial numbers found on the product below.
MODEL #
SERIAL #
This warranty gives you specific legal rights. You may have other rights which vary from state/province to state/province.
Before contacting Philips, please prepare the following details so we can solve your problem quickly.
• Philips type number
• Philips serial number
● Purchase date (copy of purchase may be required)
• PC environment Processor:
CUP and Graphic card name and driver version
Operating system
Application being used
file:///R:/CD/S20Monitor/S200-M/Philips/M1-project/220H1-220P1/220B1-E0F/U5/B0V301.001/CD-Concerts/led/manual/ENGLJS-I/warranty/war_usa.htm 第3页 / 共4 98-06-18 17:08
United States Guarantee
• Other cards installed
Having the following information available will also help speed up the process:
- Your proof of purchase indicating: date of purchase, dealer name, model and product serial number.
- The full address to which the swap model should be delivered.
Just a phone call away
Philips customer help desks are located worldwide. Within the U.S. you can contact Philips customer care Monday-Friday from 8:00 AM-9:00 PM Eastern Time (ET) and on Saturdays from 10:00 AM-5:00 PM ET hrs by using one of the contact phone numbers.
For more information on this and more great Philips products visit our website at:
Website: http://www.philips.com
Download and Print
□ Installing your LCD monitor driver
☐ Download and Printing Instructions
Download and Print
Installing Your LCD monitor driver
System requirements:
- PC running Windows® 2000, Windows® XP, Windows® Vista or later
- Find your driver ".inf/.icm/.cat" at : /PC/drivers/
Read the "Readme.txt" file before installing.
Add" refer to http://www.p4c.philips.com/ to download the latest version of monitor drivers."
This page provides an option to read the manual in .pdf format. PDF files can be downloaded into your hard disk, then viewed and printed with Acrobat Reader or through your browser.
If you do not have Adobe® Acrobat Reader installed, click on the link to install the application. Adobe® Acrobat Reader for PC / Adobe® Acrobat Reader for Apple Macintosh.
Download instructions:
To download the file:
- Click-and-hold your mouse over the icon below. (Windows® 95/98/2000/Me/XP/Vista users right-click)
Download

220P1/220B1.pdf
-
From the menu that appears, choose 'Save Link As...', 'Save Target As...' or 'Download Link to Disk'.
-
Choose where you would like to save the file; click 'Save' (if prompted to save as either 'text' or 'source', choose 'source').
Download and Print
Printing instructions:
To print the manual:
With the manual file open, follow your printer's instructions and print the pages you need.
RETURN TO TOP OF THE PAGE


- Safety and Troubleshooting Information
- Safety precautions and maintenance
- Operation:
- Maintenance:
- Service:
- FAQs (Frequently Asked Questions)
- General FAQs
- Compatibility with other Peripherals
- LCD Panel Technology
- Ergonomics, Ecology and Safety Standards
- Troubleshooting
- Regulatory Information
- TCO Displays 5.0 Information
- Congratulations, Your display is designed for both you and the planet!
- Some of the Usability features of the TCO Displays 5.0 requirements:
- Visual Ergonomics
- Electrical Safety
- Emissions
- Some of the Environmental features of the TCO Displays 5.0 requirements:
- RETURN TO TOP OF THE PAGE
- Recycling Information for Customers
- Waste Electrical and Electronic Equipment-WEEE
- EPEAT
- Benefits of EPEAT
- CE Declaration of Conformity
- Energy Star Declaration
- Federal Communications Commission (FCC) Notice (U.S. Only)
- FCC Declaration of Conformity
- Commission Federale de la Communication (FCC Declaration)
- EN 55022 Compliance (Czech Republic Only)
- Polish Center for Testing and Certification Notice
- End-of-Life Disposal
- (For customers in Canada and U.S.A.)
- China RoHS
- 中国大陆RoHS
- 中国能源效率标识
- About This Manual
- About This Guide
- Notational Descriptions
- Product Information
- Your LCD monitor
- SmartImage
- What is it?
- Why do I need it?
- How does it work?
- How to enable SmartImage?
- Smart Image
- SmartContrast
- SmartSaturate
- SmartSharpness
- Technical Specifications\*
- Resolution & Preset Modes
- Automatic Power Saving
- Product Views
- Philips Pixel Defect Policy
- Philips' Flat Panel Monitors Pixel Defect Policy
- Types of Pixel Defects
- Pixel Defect Tolerances
- SmartControl II (Selective Models)
- Philips SmartControl II
- System support and requirement:
- Installation:
- Start to use:
- First launch -Wizard
- Start with Standard pane:
- Context Sensitive menu
- Task Tray Menu Enabled
- Task Tray Menu Disabled
- Q&A
- Installing Your LCD Monitor
- Front View Product Description
- Optimizing Performance
- Connecting to Your PC
- Accessory Pack
- 2) Connect to PC
- The Base
- Install base stand
- 220B1
- Remove base stand
- Your LCD Monitor :
- Getting Started
- Use the information file (.inf) for Windows® 2000/XP/Vista or later
- For Windows® 2000
- For Windows® XP
- For Windows® Vista
- On-Screen Display
- Description of the On Screen Display
- The OSD Tree
- Resolution notification
- Customer Care & Warranty
- Your Philips F1rst Choice Warranty
- What is covered?
- What is excluded?
- Just a click away
- Just a phone call away
- F1rst Choice Contact Information
- Your Guarantee in Central and Eastern Europe
- Consumer Information Centers
- Eastern Europe
- BELARUS
- BULGARIA
- CZECH REPUBLIC
- LATVIA
- LITHUANIA
- ROMANIA
- SERBIA & MONTENEGRO
- SLOVAKIA
- SLOVENIA
- RUSSIA
- TURKEY
- UKRAINE
- Latin America
- ARGENTINA
- BRASIL
- Pacific
- AUSTRALIA
- NEW ZEALAND
- Asia
- HONG KONG/Macau
- India
- Indonesia
- South Korea
- Malaysia
- Pakistan
- Singapore
- Taiwan
- Thailand
- Vietnam
- Philippines
- Receiving Centers
- NEO CARE - SM North EDSA
- Africa
- SOUTH AFRICA
- Middle East
- Middle East + North Africa
- Israel
- Your International Guarantee
- Your Philips F1rst Choice Warranty(USA)
- LIMITED WARRANTY (Computer Monitor)
- Three Years Free Labor / Three Years Free Service on Parts / One Year Exchange\*
- WHO IS COVERED?
- Where IS SERVICE AVAILABLE?
- Where CAN I GET MORE INFORMATION?
- Before Requesting Service...
- TO GET WARRANTY SERVICE IN U.S.A., PUERTO RICO OR U.S. VIRGIN ISLANDS...
- Philips Customer Care Center
- TO GET WARRANTY SERVICE IN CANADA...
- Download and Print
- Installing Your LCD monitor driver
- Download instructions:
Brand : PHILIPS
Model : 220PI
Category : Tracking