
VDOT730AR - Oven VIKING - Free user manual and instructions
Find the device manual for free VDOT730AR VIKING in PDF.

| Product Type | Professional TurboChef Speedcook Double Wall Oven |
| Brand | Viking |
| Model | VDOT730AR |
| Category | Oven |
| Cooking Technology | Patented Airspeed Technology (high-speed convection) with microwave energy in upper oven; conventional convection in lower oven |
| Number of Ovens | 2 |
| Upper Oven Type | Speedcook oven (microwave + convection) |
| Lower Oven Type | Conventional/convection oven with warming and proofing modes |
| Total Cooking Modes | 14 (8 in Speedcook, 6 in Lower Oven) |
| Speedcook Modes | Bake, Roast, Broil, Convection Bake, Air Crisp, Dehydrate, Toast, Defrost |
| Lower Oven Modes | Bake, Roast, Convection Bake, Convection Roast, Hi Broil, Lo Broil, Warm, Proof |
| Pre-programmed Settings | Over 700 food items (upper oven) |
| Temperature Range (Upper) | 250°F – 500°F |
| Temperature Range (Lower) | 100°F – 500°F |
| Self-Cleaning | Yes, both ovens independently (approx. 4 hours) |
| Control Type | Touch screen display with LED light ring |
| Oven Light | Touch-activated bulb icon for each oven |
| Door Lock | Touch-activated for each oven (auto-locks during self-clean) |
| Timer | Independent egg timer and oven timer |
| Warranty | 2 years full (residential), 5 years limited on heating elements |
| Power Supply | 240 V / 60 Hz, grounded, permanent wiring |
| Maximum Air Speed | Up to 60 mph (Air crisp mode) |
| Software Updates | Via USB flash drive (2.0 or higher) |
| Favorites Storage | Up to 9,999 custom recipes |
| Temperature Probe | Included, plug-in (lower oven) |
Frequently Asked Questions - VDOT730AR VIKING
User questions about VDOT730AR VIKING
0 question about this device. Answer the ones you know or ask your own.
Ask a new question about this device
Download the instructions for your Oven in PDF format for free! Find your manual VDOT730AR - VIKING and take your electronic device back in hand. On this page are published all the documents necessary for the use of your device. VDOT730AR by VIKING.
USER MANUAL VDOT730AR VIKING
natural_image
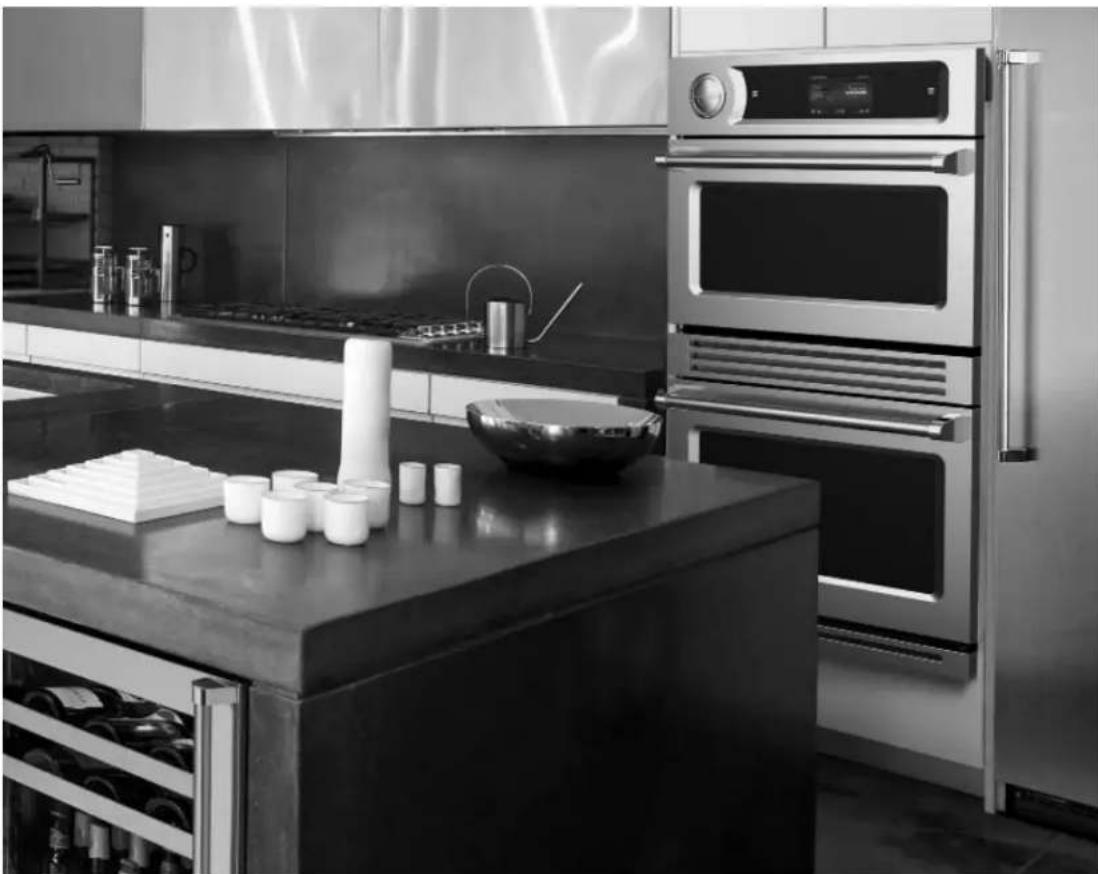
Exterior view of a modern stainless steel double oven with control panel and door (no visible text or symbols)7 SERIES
Professional TurboChef Speedcook Double Oven
VDOT730
Congratulations
Congratulations and welcome to the elite world of speedcook ownership.
We hope you will enjoy and appreciate the care and attention we have put into every detail of your new, state-of-the-art Professional TurboChef Speedcook Oven.
Your Speedcook oven is designed to offer years of reliable service. This Use and Care Manual will provide you with the information you need to become familiar with your oven's care and operation.
Your complete satisfaction is our ultimate goal. If you have any questions or comments about this product, please contact the dealer from whom you purchased it, or contact our Customer Support Center at 1-888-(845-4641).
We appreciate your choice of a speedcook oven and hope that you will again select our products for your other major appliance needs.
For more information about the complete and growing selection of products, contact your dealer or visit us online at vikingrange.com in the US or brigade.ca in Canada.
natural_image
Modern kitchen interior with stainless steel ovens, built-in oven, and open counter (no visible text or symbols)Table of Contents
Getting Started
Warnings and Important Information 4
Your Professional TurboChef Oven 8
Before Using the Ovens 10
Product Controls
Navigating the Control Panel 12
Operation
The Speedcook Oven 15
Pre-programmed Cook Settings 36
The Lower Oven 38
Using the Timer ____ 43
Using Utilities 44
Product Care
About Utilities 46
Self-Cleaning 49
Frequently Asked Questions 50
Troubleshooting 51
Service Information 52
Warranty 53
IMPORTANT – Please Read and Follow!
Warning and Important Safety Instructions appearing in this manual are not meant to cover all possible conditions and situations that may occur. Common sense, caution, and care must be exercised when installing, maintaining, or operating this appliance.
ALWAYS contact the manufacturer about problems or conditions you do not understand.
Recognize Safety Symbols, Words, Labels
! DANGER
Hazards or unsafe practices which WILL result in severe personal injury or death
WARNING
Hazards or unsafe practices which COULD result in death or severe personal injury
CAUTION
Hazards or unsafe practices which COULD result in minor personal injury or property damage.
All safety messages will identify the hazard, tell you how to reduce the chance of injury, and tell you what can happen if the instructions are not followed.
WARNING
The misuse of the oven door(s) (e.g. stepping, sitting, or leaning on them) can result in hazards or injuries and damage to the product.
To ensure proper and safe operation:
Appliance must be properly installed and grounded by a qualified technician. DO NOT attempt to adjust, repair, service, or replace any part of your appliance unless it is specifically recommended in this manual. All other servicing should be referred to a qualified service technician. For proper and safe operation, this unit is not intended to be operated by an external timer or separate remote control system.
WARNING

To avoid risk of property damage, personal injury, or death; follow information in this manual exactly to prevent a fire or explosion.
WARNING

DO NOT store or use gasoline or other fl ammable vapors and liquids in the vicinity of this or any appliance.
WARNING
For your safety, the information in this manual must be followed to minimize the risk of fire or explosion, electric shock, or to prevent property damage, personal injury, loss of life, or excessive exposure to microwave energy.
WARNING
When using electrical appliances, the following basic safety precautions should be followed to reduce the risk of burns, electric shock, fire, injury to persons or exposure to microwave energy.
IMPORTANT – Please Read and Follow!
Read and follow all instructions before using this appliance to prevent the potential risk of fi re, electric shock, personal injury or damage to the appliance as a result of improper usage of the appliance. Use this appliance only for its intended purpose as described in this manual.
Safety Precautions
- Install or locate this appliance only in accordance with the provided installation instructions. Be sure your appliance is properly installed and grounded by a qualified technician.
- ALWAYS adjust the racks in the oven cavity while the oven is cool. If rack must be moved while the oven is hot, DO NOT let a potholder contact the heating elements in the oven. Oversized foods or metal utensils should not be inserted in a microwave/toaster oven, as they may create a fi re or risk of electric shock.
- Some products, such as whole eggs and sealed or unopened food containers — for example, sealed glass jars—may explode due to a buildup of vapor and should NOT be heated in this oven.
- Use care when opening oven door—let hot air or steam escape before removing or replacing food.
- This appliance should be serviced only by qualified service personnel. Contact Viking Range, LLC at 1-888-(845-4641) for examination, repair, or adjustment.
- Use this appliance only for its intended purpose as described in this manual. DO NOT use corrosive chemicals or vapors in this appliance. This oven is specifically designed to heat or cook food and is not intended for laboratory or industrial use. DO NOT use the oven to warm or heat a room.
-
DO NOT store fl ammable materials in this oven or near surface units. DO NOT store any materials, other than manufacturer's recommended accessories, in this oven when not in use.
-
DO NOT attempt to repair or replace any part of this oven unless it is specifically recommended in this manual. All other servicing should be referred to a qualified technician.
- DO NOT use aluminum foil to cover contents, racks, or any part of the Speedcook Oven. Prolonged use can cause overheating and damage the microwave components.
• DO NOT cover the oven bottom or racks. This could result in damage to your oven. - DO NOT cook directly on the oven bottom. This could cause damage to your appliance. Always use the oven racks when cooking.
- DO NOT use moist or damp potholders. Moist or damp potholders on hot surfaces may result in burns from steam. DO NOT let a potholder touch the heating elements. DO NOT use a towel or other bulky cloth.
- DO NOT allow children to operate without adult supervision. Children should not be left alone or unattended in the area where this appliance is in use. They should never be allowed to sit or stand on any part of the oven.
- DO NOT operate this appliance wearing loose-fi tting or hanging garments.
- DO NOT operate this appliance if it has a damaged cord or plug, is not working properly, or has been damaged or dropped.
- DO NOT cover or block any openings on this appliance. Keep oven vent ducts unobstructed.
• DO NOT store this appliance outdoors. - DO NOT use this appliance near water—for example, in a wet basement or near a swimming pool.
- DO NOT use water on grease fi res. Smother fi re or fl ame or use dry chemicals or a foam-type extinguisher.
IMPORTANT – Please Read and Follow!
WARNING
The use of cabinets for storage above the oven may result in potential fire or burn hazard.
WARNING
This appliance must be connected to a grounded, metallic, permanent wiring system, or an equipment grounding conductor should be run with the circuit conductors and connected to the equipment grounding terminal or lead on the appliance.
• To Reduce the Risk of Fire in the Oven Cavity:
o Use only oven-suitable containers in the oven.
o Remove wire twist-ties from paper or plastic bags being placed in the oven. For oven cooking bags—DO NOT use wire twist-ties to close the bag.
o If materials inside the oven should ignite, keep the oven door closed, turn the oven off and shut off power at the fuse or circuit breaker panel. If the door is opened, the fire may spread.
o DO NOT cook items wrapped in cling wrap or plastic film.
o DO NOT overcook food. Carefully attend to the oven if paper, plastic, or other combustible materials are placed inside the oven to facilitate cooking.
• DO NOT Touch Heating Elements Or Interior Surfaces of Oven
Heating elements may be hot even though they are dark in color. Interior surfaces of an oven become hot enough to cause burns. During and after use, DO NOT touch, or let clothing or other fl ammable materials contact the heating elements or interior surfaces of oven until they have had suffi cient time to cool.
CAUTION
The Speedcook oven uses a high-speed convection fan and a cooling fan for optimum cooking performance. Air movement from the fans can be heard while cooking and during a cool down period after cooking. This is normal. The cooling fan should be operating while the unit is in operation and will cycle off and on during cool down. If you notice the cooling fan is not operating or you observe unusual noise, contact an authorized service center before continuing operation. Failure to do so can result in damage to the oven or surrounding cabinets.
Precautions to Avoid Possible Exposure to Excessive Microwave Energy
- DO NOT attempt to operate the top oven with the door open since open-door operation can result in harmful exposure to microwave energy. It is important NOT to defeat or tamper with the safety interlocks.
- DO NOT place any object between the oven front face and the door or allow soil or cleaner residue to accumulate on sealing surfaces.
- The oven should not be adjusted or repaired by anyone except properly qualified personnel.
- DO NOT operate the oven if it is damaged. It is particularly important that the oven door close properly and that there is no damage to the: (1) door (bent), (2) hinges and latches (broken or loosened), or (3) door seals and sealing surfaces.
IMPORTANT – Please Read and Follow!
Grounding Instructions
Service
- Should this appliance require service, please call Viking Range, LLC at 1-888-(845-4641). A qualified service representative will assist you and if required, coordinate a service visit by an authorized service agent in your area.
Power Connections
- To avoid potential hazards, only the manufacturer, its service agent, or a similarly-qualified person should replace a damaged power cable. Flexible conduit, conductors and connectors are supplied by the manufacturer. The oven must be connected using the fl exible conduit and conductors provided.
Self-Cleaning Oven Guidelines
- Clean the oven only in accordance with the guidelines provided on page 49.
- Before self-cleaning the oven, remove broiler pan, grid, racks, and other cookware. Clean only parts listed in manual.
- Listen for fan—a fan noise should be heard during the self-cleaning cycle. If not, call Viking Range, LLC at 1-888-(845-4641) before self-cleaning again.
- DO NOT clean the door gasket. The door gasket is essential for a good seal. DO NOT to rub, damage, or move the gasket.
- DO NOT use oven cleaners. No commercial cleaner or oven liner protective coating of any kind should be used in or around any part of the oven. Residue from oven cleaners will damage the inside of the oven when the self-clean mode is used.
- In the event the oven is malfunctioning in the self-clean mode, turn the oven off or disconnect it from the power supply and call Viking Range, LLC at 1-888-(845-4641).
- Complete instructions on the operation of the self-clean mode can be found on page 49.
RF Interference Considerations
- The appliance has been tested and was determined to be in compliance with applicable portions of FCC part 18 requirements and with the protection requirements of Council Directive 89/336/EEC on the approximation of the laws of the European Union Member States relating to electromagnetic compatibility at the time of manufacture. However, some equipment with sensitivity to signals below these limits may experience interference.
- If any equipment experiences interference, the following steps should be considered:
o Increase the physical distance between the sensitive equipment and this oven.
- If the sensitive device can be grounded, do so following accepted grounding practices.
o If battery-powered microphones are being affected, ensure that the batteries are fully charged.
- Keep sensitive equipment on separate electrical circuits if possible.
- DO NOT route intercom wires, microphone wires, or speaker cables near the oven.
SAVE THESE INSTRUCTIONS
Your Professional TurboChef Oven
Your new TurboChef Speedcook Double Wall Oven offers you the versatility to cook all your favorite foods in a fraction of the time they usually require. The Lower (Convection) Oven offers you numerous features including warming and proofing modes. The Speedcook (Upper) Oven combines innovative microwave and convection technologies to ensure you crisp, evenly browned pastries, meats and casseroles browned on the outside with moisture and flavor locked on the inside, and so much more—all in far less time than cooking these same foods in a conventional oven. Using the ovens together, you will bring elaborate meals to the table in an hour or less with each dish cooked perfectly and ready to serve at the right temperature.
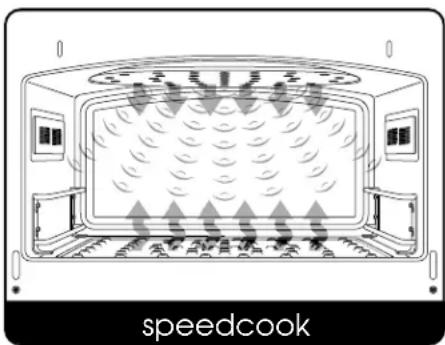
natural_image
Diagram of a speed Cook oven interior with fan arrangement and control panel (no text or symbols on the diagram itself)Convenience of Pre-programmed Settings
Every cook knows that getting the time and temperature right for a particular dish can be a challenge. In the Speedcook Oven, pre-set times and temperatures are already programmed for more than 700 food items, eliminating the guess work. You choose a dish from the Food Item menu and select the weight, the number of pieces, the size of the dish, or a few other variables. Speedcook does the rest.
Each food item has settings for time, temperature, microwave power level, and air intensity from the upper and lower convection fans. These fans have been carefully tested by professional chefs. Equipped with Patented Airspeed Technology™, these fans can attain air speeds up to 60 mph, cooking your food much faster than even the best convection oven.
Visible Arcing in the Speedcook Oven
While using the Speedcook oven, a visible "spark," called arcing, can occur within the oven cavity. The amount of arcing that can occur depends on the amount of food being cooked. For example, cooking a single muffi n is more likely to produce arcing than cooking an entire batch of muffi ns.
This type of arcing will not harm the oven or affect the food being cooked as long as the oven is used correctly:
- Never start a cook cycle without food inside the oven cavity.
- If using a metal cooking pan or baking sheet, ensure the edges do not touch the oven cavity's sides, the inside of the oven door, or the glass.
Your Professional TurboChef Oven
Flexibility of Adapting and Saving Your Own Favorite Recipes
The Speedcook Oven will store up to 9,999 of your favorite recipe settings. You can also adapt your favorite recipes to get the cook cycle that yields perfect results for each dish.
At first, you will want to use the pre-programmed settings, but as you become more familiar with your Speedcook Oven, you will want to use Advanced Setting (explained in more detail on "Making Adjustments at the End of a Cook Cycle" on page 30), to change cook time, oven temperature, and even the cooking cycle—including the microwave power and the intensity of the upper and lower convection fans.
A Full Range of Features
To summarize, with your Professional TurboChef Oven you will enjoy:
- The Speedcook Oven's Patented Airspeed Technology™, which cooks food 15 times faster than conventional cooking methods, retaining moisture and locking in flavor for superior quality. Proven technology in over 130,000 commercial kitchens worldwide.
• A total of 14 cooking modes: 8 in the Speedcook Oven and 6 in the Lower Oven. - These include broiling modes in both ovens and 4 convection modes, where greater air circulation is used to shorten cooking times and cook foods more evenly.
- A temperature probe in the Lower Oven to ensure perfect baking and roasting of meats.
- The ability to use Save to Favorites to store cook settings for thousands of favorite recipes.
- A concealed bake element for easier cleaning.
• Self-cleaning functions in both ovens.
Auto Reboot
If the oven is not being used and has been powered on for more than 24 hours, the oven will automatically reboot at 1 AM. The screen will go blank and the sound will be disabled during the reboot so as not to be an annoyance in the middle of the night. It will reset within one minute of the reboot. This process will only take a couple of minutes to complete. The benefit of having this feature is to allow the software to run more productively and efficiently.
If the oven is being used, the auto reboot will be skipped.
Before Using the Ovens
Initial Cleaning
Before the first use of each oven, wipe the interior with soapy water and dry thoroughly.
Setting the Clock and Personal Preferences on the Utilities Screen
You can access the Utilities screen from any screen. Tap the three dots above the clock (shown below) to access the Utilities menu. For more information about using the features under utilities, go to pages 46-47.
For access to the utilities, including the clock, and the timer, tap the three dots above the clock time on the tab in the middle of the bottom of the screen. The tab will pull up, showing two sections, one for utilities and one for the timer, as shown below:
Use the utilities to set the clock or alter personal preferences such as the display and the sounds.
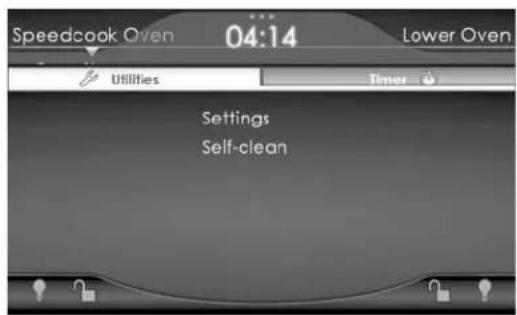
The egg timer, which is independent of other timers on the unit, can also be accessed from this screen. For information on using the timer, see page 43.
Before Using the Ovens
Setting the Clock
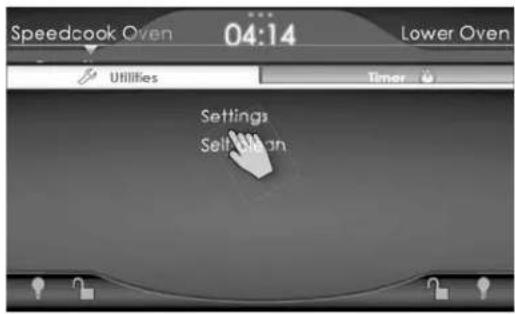
- At the Utilities screen, tap Settings. The following screen displays:
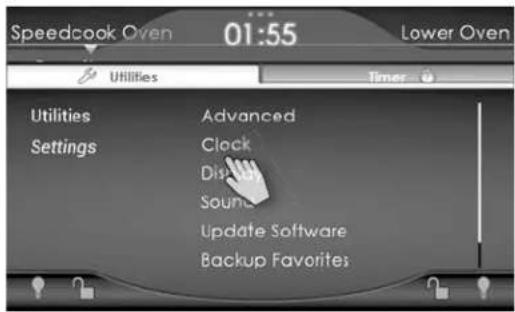
- At the Settings screen, tap Clock.
- At the Clock screen, select Standard or Military time.

- If standard time is chosen, AM/PM, will appear. Select the correct time. The "del" key will clear the last number entered.
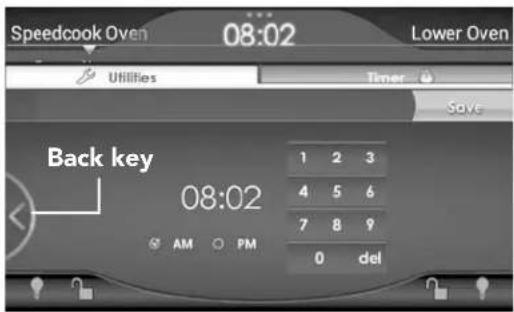
Tap the Back key (in the half circle on the left side of the screen) to cancel and return to the Clock screen.
- Tap Save. The Clock screen displays.
- Exit the Clock function by tapping any menu level above clock, by tapping Speedcook Oven, or by tapping the Utilities tab.
Adjusting Personal Preferences
From the Utilities screen you can also adjust such features as the touch screen brightness (select Display) and the volume and notification settings (select Sound). The full range of features available under utilities is described on pages 46-47.
Navigating the Control Panel
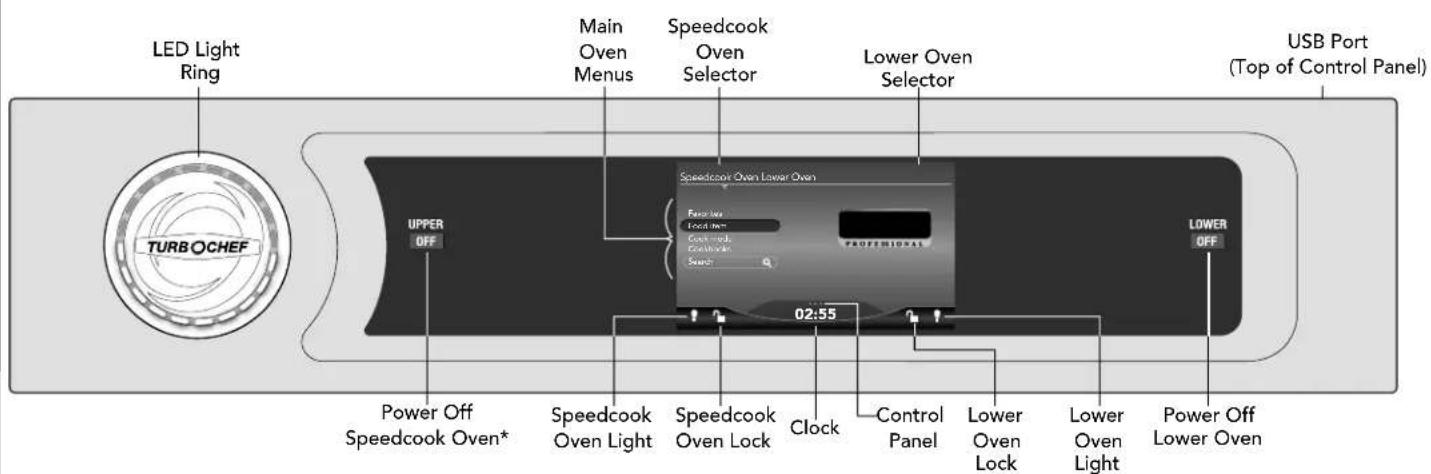
*Note: Holding "Upper/Off" for more than
5 seconds will reset the oven software.
Navigating the Control Panel
To start either oven, tap the oven name. An arrow appears under the name of the oven selected. The first menu of options for that oven also displays.
Note: Only the Speedcook oven will start to preheat when selected. The Lower oven doesn't start preheating until Preheat button is selected.
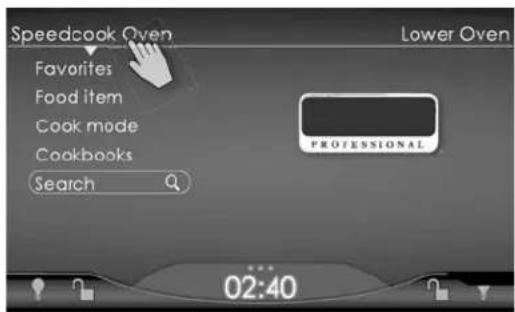
Tap Speedcook Oven. The following screen displays with the menu choices for the Speedcook Oven:
Tap Lower Oven. The screen with menu choices for the Lower Oven displays:
Oven Light and Lock
At the bottom of the screen, on the left for the Speedcook Oven and on the right for the Lower Oven, are two icons:
Oven Light Tap the light bulb icon under the name of the oven you are using to illuminate that oven's cavity. The icon will change from gray to white to indicate that the light is on. Tap the light bulb icon again to turn the oven light off. The light bulb will change back to gray.
Oven Lock: When the door of either oven is locked, the lock icon under the name of that oven changes from the gray unlocked image to the white, locked image Tap the icon for three seconds to engage/disengage the door lock.
Note: During self-cleaning the lock cannot be disengaged. When the oven reaches a safe temperature (below 520°F), the locks will automatically disengage.
Moving between Speedcook and Lower Oven Screens
It is important to know how to shift, or toggle, between the two ovens when you are using both of them. Given how rapidly the Speedcook Oven completes cooking foods, you may be taking dishes out and putting others in it, while the Lower Oven is baking or roasting other foods over longer times. Or you may be starting one oven while fi nishing with the other or switching it to a different cooking mode. For example, you could be changing the Lower Oven to Warming mode to hold food cooked in the Speedcook Oven.
Navigating the Control Panel
In all cases, the last screen viewed in the other oven will open when you toggle over to it.
- To toggle from the Lower Oven to a Speedcook screen, you have two options:
a. Tap the Back key. b. Tap Speedcook Oven.
- To go from the Speedcook Oven to a Lower Oven screen, tap Lower Oven.
Canceling a Function
In the Lower Oven,
- Tap the current cooking mode tab to see all options. For example, if you want to stop the oven from baking, tap Bake. The list of cook modes appears.
- If cooking is in progress, tap Cancel on the cooking bar to end the cook cycle.
- Tap the Off light to completely turn the oven off. The light goes off, signifying that the oven is off.
In the Speedcook Oven,
- Tap Speedcook Oven to exit back to the main menu.
- If cooking is in progress, tap Cancel on the cooking bar to end the cook cycle.
- Tap the Off light to completely turn the oven off. The light goes off, signifying that the oven is off.
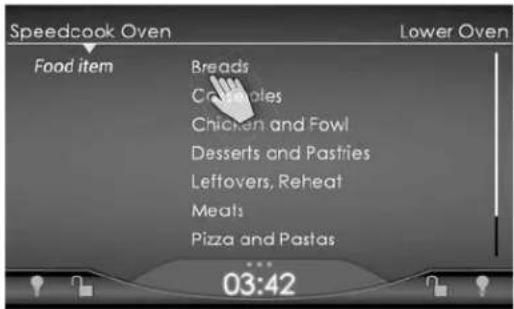
Moving through Menu Levels
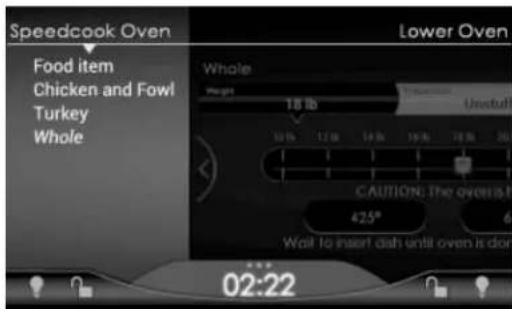
In the Speedcook Oven, you navigate from the Main Menu to reach the settings for the food item you want to cook. For example, if you plan to roast a whole turkey you might start at the main menu with "Food item," and progress to "Chicken and Fowl," to "Turkey," and then to "Whole." When you tap Whole, the preheat and cook screen for roasting a whole turkey displays, with choices about the poundage, etc.
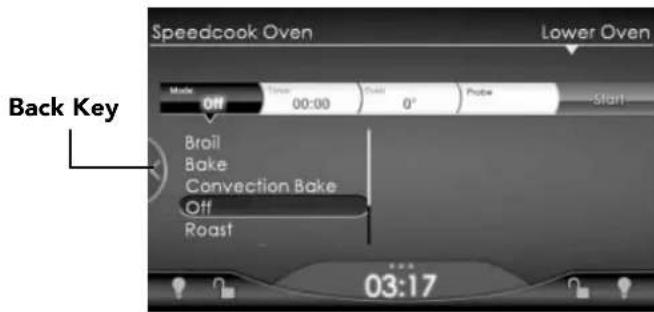
To see where you are in the menu levels or to back out of your selection, you can tap the Back key. The preheat and cook screen for whole turkey will be dimmed on the right of the screen, and the menu levels will show on the left:
To return to preheat and cook for whole turkey, tap Whole. To back out of the selection, tap the category you want to return to. For example, to return to all "Chicken and Fowl" choices, tap Chicken and Fowl. To return to all Food Items, tap Food item.
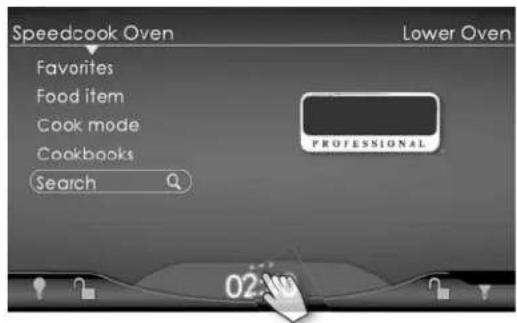
The Speedcook Oven
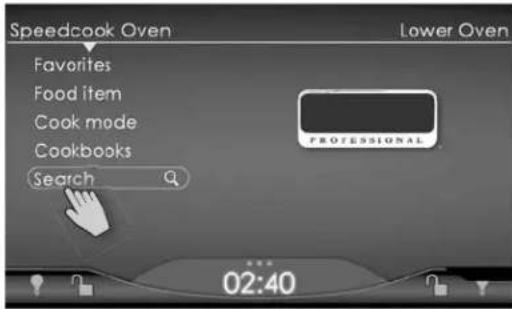
To use the Speedcook Oven, simply select from one of the menu items listed on the touch screen.
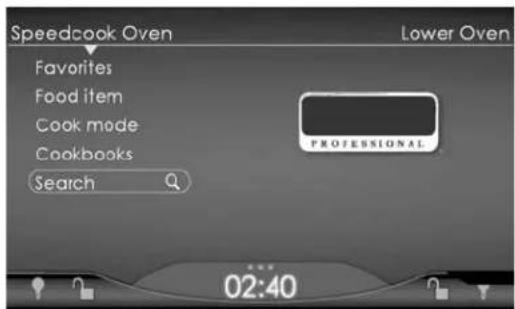
From this main menu you can navigate to each Speedcook function by tapping the function name on the screen. Then you continue on through menus of food types to the settings for specific food items. Whether you start from Favorites, Food Item, Cook Mode, Cookbooks, or Search, you can reach the preheat and cook screens for the food you wish to cook already programmed for the correct time and temperature.
The following example will familiarize you with the Speedcook process. Later sections describe each of the Speedcook functions available from the main menu.
Cooking Example: Choosing the Settings
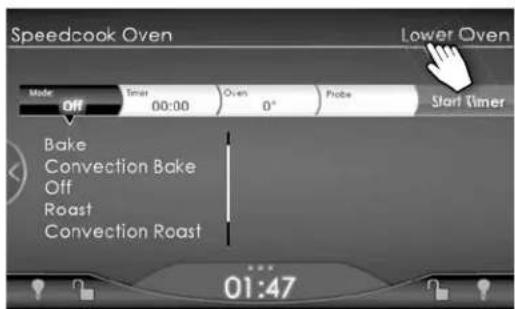
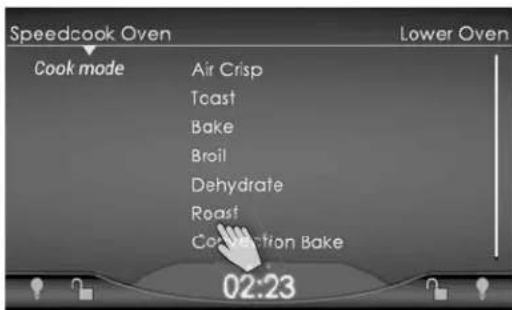
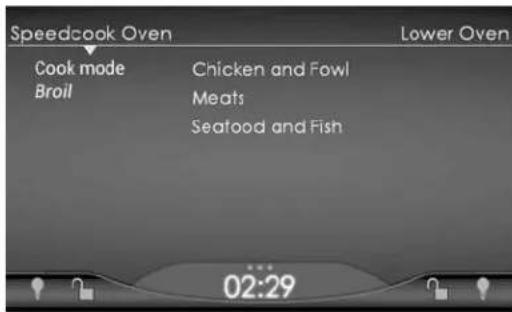
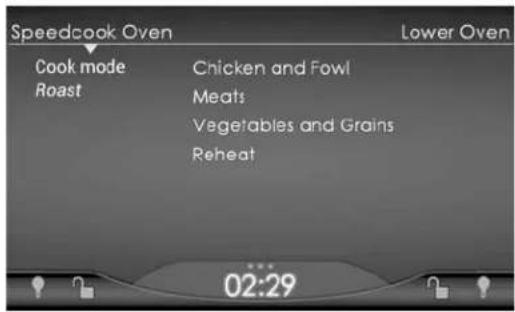
If you tap Cook mode on the main menu, a screen opens showing the eight cooking modes available in Speedcook (scroll down to see Defrost):
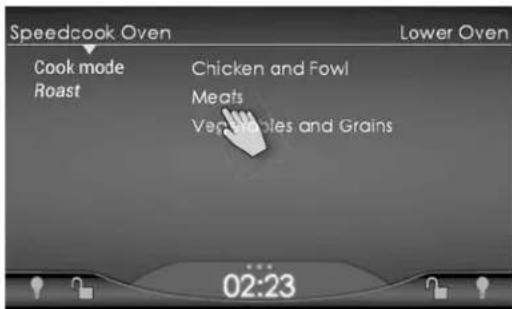
- From this menu, choose Roast to see a list of categories of foods that do well when roasted:
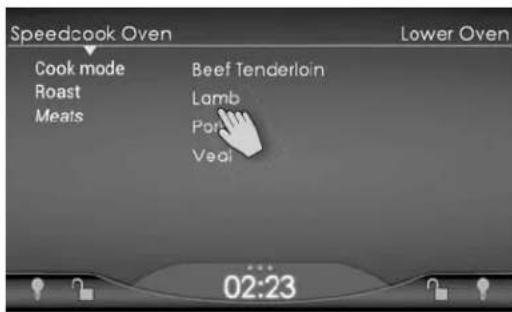
- Tapping Meat will take you to a menu of choices among types of meat:
The Speedcook Oven
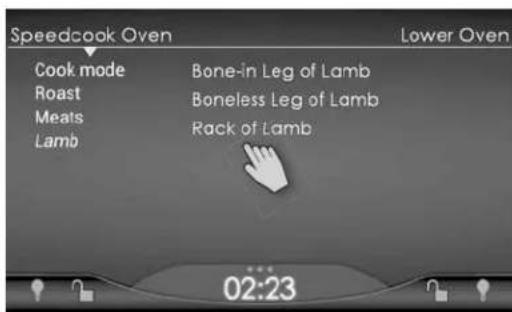
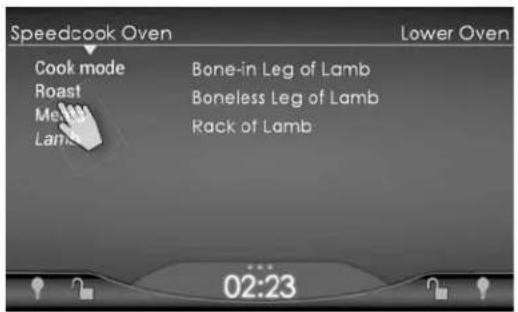
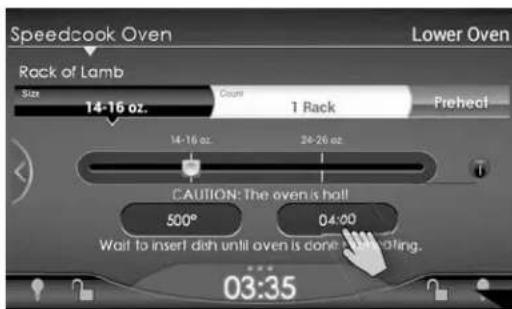
- Tapping Lamb opens a screen listing various cuts of lamb that can be roasted.
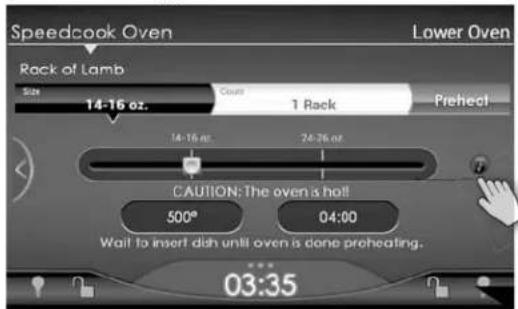
- Tapping Rack of Lamb from this menu will take you directly to the screen for cooking a rack of lamb.
Cooking Example: Preheating and Cooking
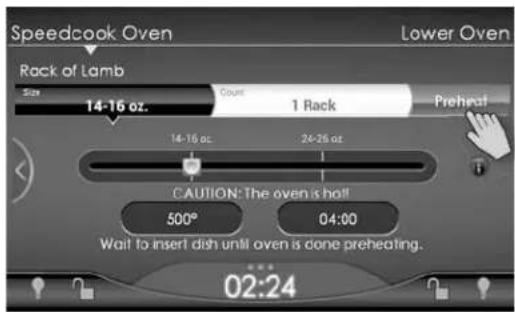
In our example we have gone from Cook Mode to Roast to Meat to Lamb to Rack of Lamb. Tapping Rack of Lamb opens the screen for preheating and cooking.

In this screen you can choose up to four specifications for the food you wish to cook, such as the weight, the number of pieces, the degree of doneness, or the size of the cook dish. In this example, to cook a rack of lamb, you specify the weight (14-16 ounces here) and the number of pieces (one).
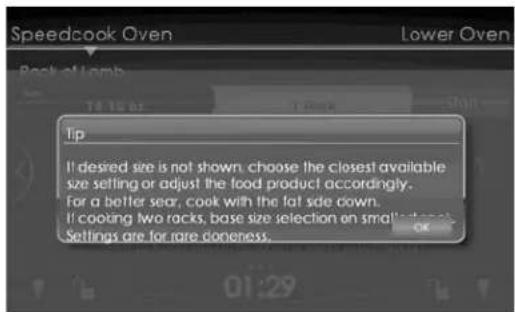
Using Tips: At this point, for many foods you will also see the information key logo iTap this logo to see helpful tips about cooking your food. For example, the tip may tell you that the cook settings are based on the food going into the oven at a refrigerated or frozen temperature, or that the settings are for an unstuffed meat or poultry item.
Note: For ALL foods use the smallest pan possible to get the greatest air flow and the best cooking results.
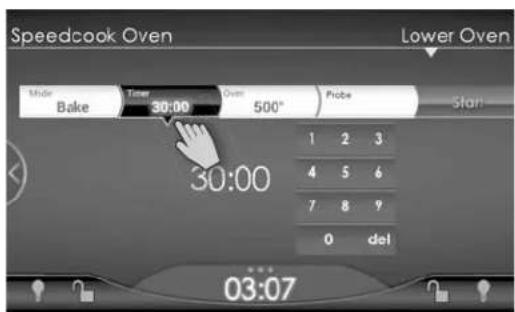
Adjusting Time and Temperature: This screen will also give you options for adjusting the oven temperature and the cooking time by tapping the Temperature or Time sections of the bar. For more information on adjusting temperature, go to page 31, and for more information on adjusting time, go to page 29.
The Speedcook Oven
Note: The pre-programmed Speedcook settings, which have been developed through extensive testing by our staff of professional chefs, may differ in time and temperature from what your original recipe indicates.
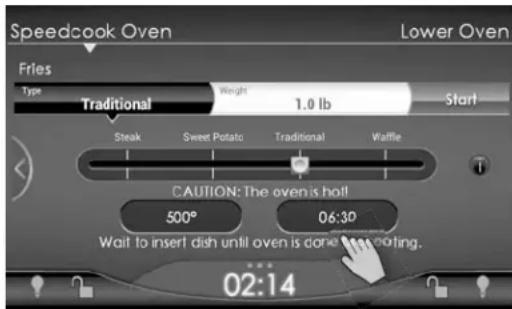
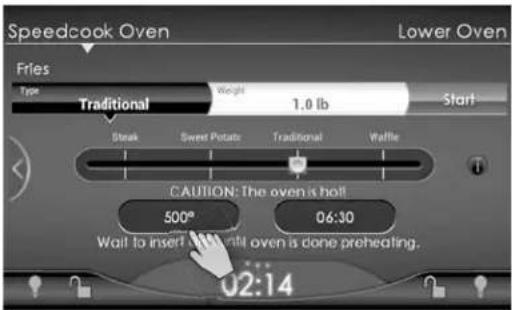
Once your specifications are set, the oven will display the temperature and time needed to cook your food item. Follow these steps to preheat the oven and cook your food:
- Tap Preheat to begin the preheat cycle.
- Preheat progress is displayed on the status bar and LED light ring. Preheating will take 8-14 minutes. The oven will chime when preheating is complete. The preheating progress will be displayed on a bar near the bottom of the screen.
The LED light ring, beside the touch screen, is also synced with the progress meter to show preheat status.
- Once preheating is complete, place the food in the oven.
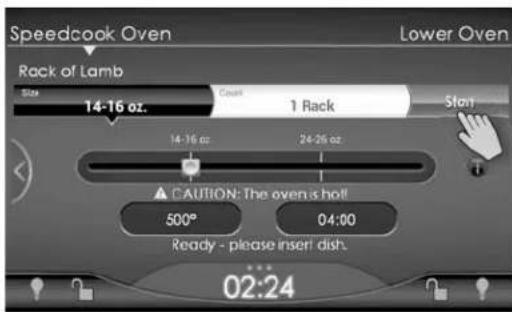
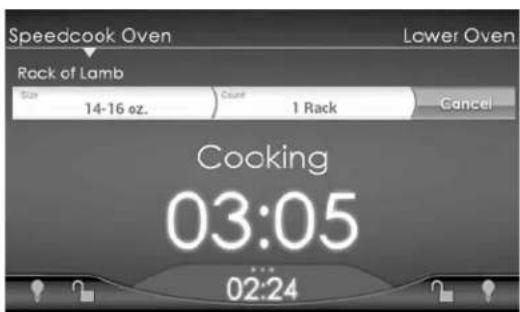
- Tap Start to begin the cook cycle. The oven automatically begins counting down the cook time once Start is tapped. No buttons are visible and no further modifications are possible until the 80% complete point.
CAUTION
Before beginning a cook cycle, make sure your food item has been placed in the oven. Except for the preheat cycle, the oven should not be run with an empty cook cavity.
Note: The oven door must be completely closed before oven will initiate a cook cycle.
Note: At any time during preparation, preheating, and cooking, tapping Cancel or Speedcook Oven will stop all activity and return you to the main Speedcook menu.
The Speedcook Oven
- At 80% complete, a chime sounds and the cook cycle pauses. At this point you can check the food and adjust the settings. There is a 1 minute window for response. If you do not make adjustments, cooking resumes and continues according to the original settings.
a. To resume cooking with the original settings, close the oven door, and tap Continue Cooking, then Start.
b. To change the settings, select one of the adjustment options: "Continue Cooking," "Cook less," "Brown less," "Cook & brown less," and "Finished." For more information, see page 28, "Making Adjustments during a Cook Cycle."
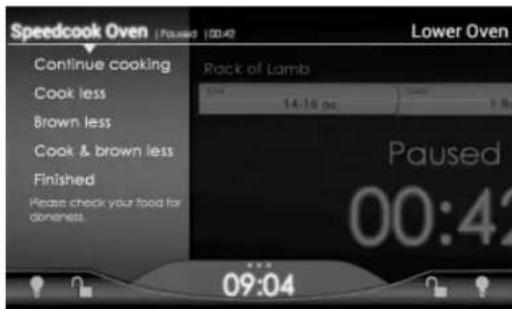
c. If your food item is done at the 80% complete chime, remove it from the oven and tap "Finished" to end the cook cycle.
Note: This step does NOT apply if the cooking cycle is less than 3 minutes.
Note: You may open the oven door and check your food at any point during the cook cycle. Pausing the cook cycle by opening the door also allows you to adjust the cook settings.
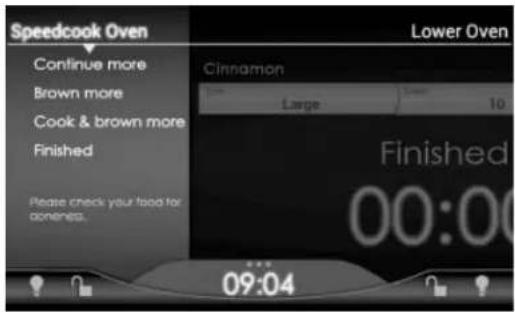
- At the end of the cook cycle, a chime sounds, notifying you that your item is done. At this point, open the door to check the food and, if needed, make an adjustment. This option is available for 1 minute. The oven will continue to chime every 3 seconds until either:
a. The door is opened
- When you open the door, or after 3 seconds, four adjustment options appear on the touch screen: "Cook more," "Brown more," "Cook & brown more," or "Finished." You can select one of these options. If you select the cook and/or brown more options, cooking resumes. If you select "Finished," cooking stops.
b. A cooking adjustment is made or
c. After 1 minute has elapsed with no activity.
- If no selection is made within 1 minute, the Repeat Cook menu will display. If nothing is selected in the Repeat Cook menu after 1 minute, the oven will turn off and go back to the Main Screen. This is a fail safe option in the event that no one is available to turn the oven off after the cook time has completed.
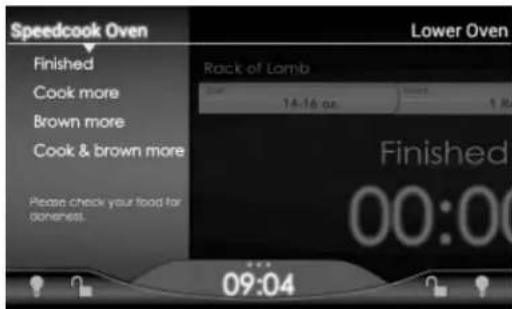
- Once cooking stops, remove the dish from the oven.
The Speedcook Oven
- The touch screen will then display these options: "Save to favorites," "Repeat Cook," or "Main menu." You can choose one of these options. For more information see page 30, "Making Adjustments at the End of a Cook Cycle."
a. To "Save to Favorites," see page 26.
b. To cook more of the same food, tap Repeat Cook.
c. To return to the main menu, tap Main Menu. (This turns the oven off).
Note: If you cannot find your specific food item in the touch screen menus, select a pre-programmed setting for an item that closely resembles the one you wish to cook. At the 80% and 100% complete points, you will be able to check your item and make any necessary adjustments.
Using the Five Main Speedcook Functions
Now that you know more about operating your Speedcook Oven, let's look at the full array of functions available from the Speedcook main menu. From each main menu option, the process of selecting from a few submenus to get to the food item you want to cook is essentially the same. You will also discover that starting from different functions and following different menu paths will take you to the same food item and programmed settings.
Starting from Cook Mode
Your Speedcook Oven offers eight cook modes that enable you to choose the best cooking method for many kinds of foods. As shown in the example, tapping Cook mode on the main Speedcook Oven menu opens this screen.

Scroll down the list if you want to access Defrost.
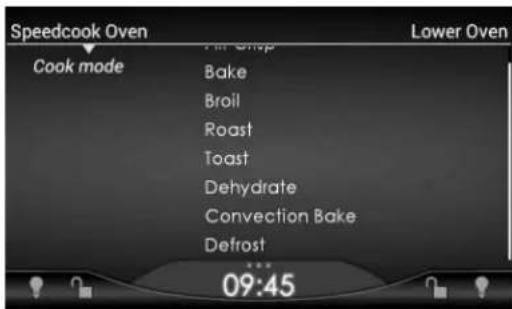
Five of these modes, Bake, Roast, Broil, Defrost, and Convection Bake are traditional settings while the other three, Air Crisp, Dehydrate, and Toast, are new cook modes designed to expand and enhance your cooking experience.
The Speedcook Oven
Tap any cook mode to open a screen listing the various types of foods you can cook using this mode. As we saw in the example, tapping Roast opens a menu of food types that do well when roasted.
As you navigate through the menus under each option, notice that the touch screen helps you keep track of where you are by showing each menu level in the left-hand column. You can return to the previous level by tapping the category shown above it. For example, if you have gone to the lists of cuts of pork and want to see lamb instead, tap Meats to return to that screen.
Air Crisp
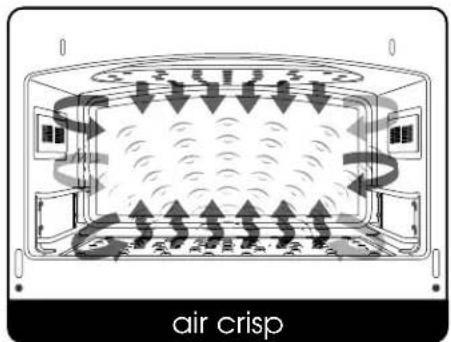
Think of Air Crisp cooking as air frying. In Air Crisp mode, high temperature air moves through the cook cavity at varying speeds to brown and crisp the food product. Food comes out nicely caramelized, but much lower in fat content than if it had been deep fried.
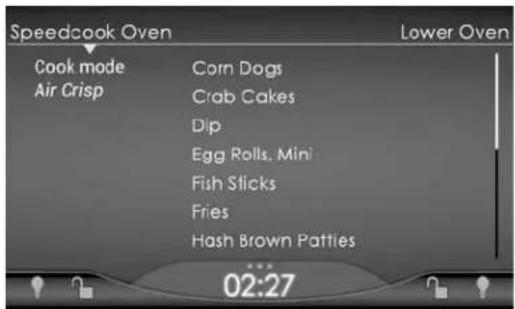
This mode is great for foods that traditionally taste best when fried, like French fries, as well as items, like stuffed mushrooms, with any sort of breading or stuffing that should toast and brown in the cooking process.
Metal sheet pans work well for air crisping.
The Speedcook Oven
Toast
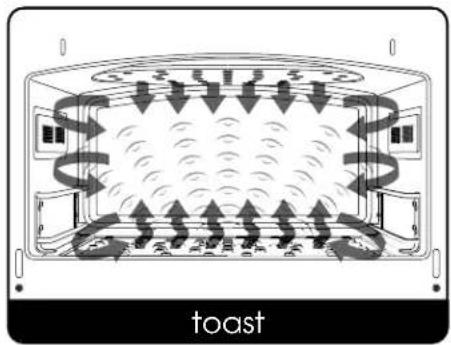
Toasting browns and crisps foods. Using high heat and high-speed air, the Toast mode can enhance flavor and melt cheese.
Use Toast mode for foods like bread, bagels, tortillas, and pastries. For best results, place food directly on the oven rack. For products like fi lled pastries that may run over, use a metal sheet pan.
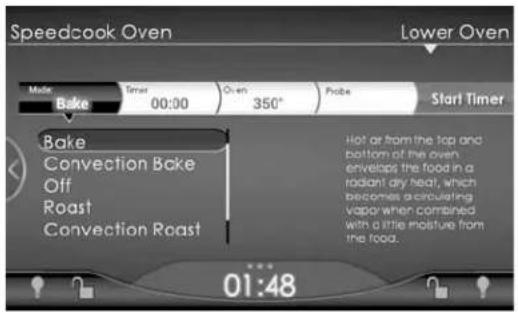
Bake
natural_image
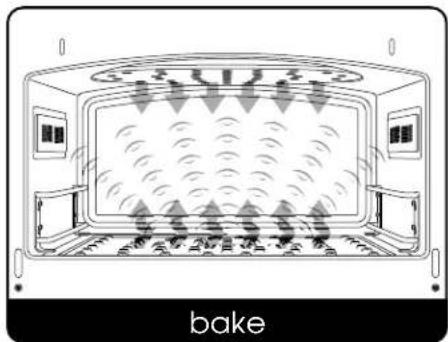
Diagram of a bake oven with fan arrangement and ventilation system (no text or symbols)Traditionally, to bake is to cook with dry heat. Hot air from the top and bottom of the oven envelops the food in a radiant dry heat, which combines with a little moisture from the food to become a circulating vapor in the oven.
The Speedcook Oven uses the traditional baking process. However, the hot air is moved through the cook cavity at higher speeds than in a traditional oven. This rapid movement of air decreases cook times while ensuring foods bake evenly and retain more moisture.
Baking is the usual mode for cooking breads, cakes, cookies and other pastries, and most casseroles.
In Bake mode, metal cookware will provide more bottom browning while items in glass cookware will tend to cook a little faster. Pizzas can be baked on a pizza pan or placed directly on the oven rack. Some casseroles may need to be covered with parchment paper to prevent over-browning.
The Speedcook Oven
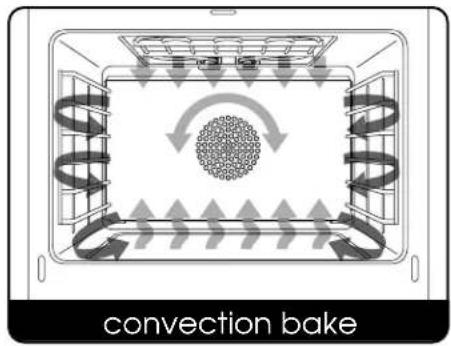
Broil
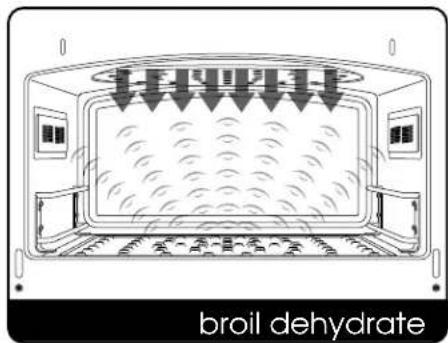
The Broil mode on your Speedcook Oven will yield the same or superior results as broiling in a traditional oven. The only difference is that your food cooks faster due to the hot air moving through the cook cavity at increased speeds.
Foods that are typically broiled are quick cooking, inherently tender, relatively lean, and not too thick, (for example, beef steaks, whole fish, and chicken satay).
Cast iron grill pans, metal sheet pans, and metal broiling pans all work well in Broil mode.
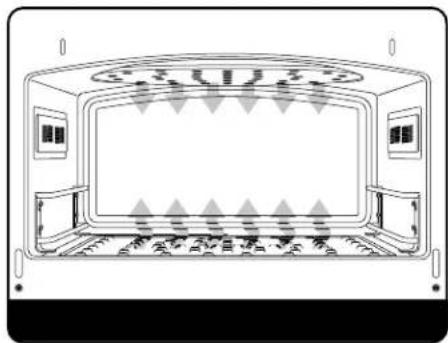
Dehydrate
natural_image
Line drawing of a vehicle front view with control panels and ventilation grilles (no text or symbols)Considered the original form of preservation, dehydrating removes a food's natural moisture by slowly drying it with a low heat. Food can be dehydrated manually by placing thin slices on racks and allowing them to dry, assisted only by sun or air. To shorten the dehydrating process, the Speedcook Oven uses low temperature air moving at higher speeds.
This mode is ideal for products like banana chips and other dried fruits, as well as dried meats, like beef jerky.
Sheet pans, non-stick screens, and pizza pans (with or without holes) are all recommended for use with Dehydrate mode.
The Speedcook Oven
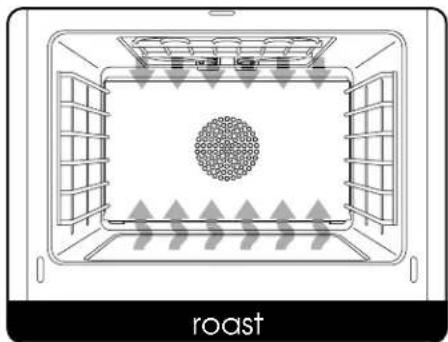
Roast
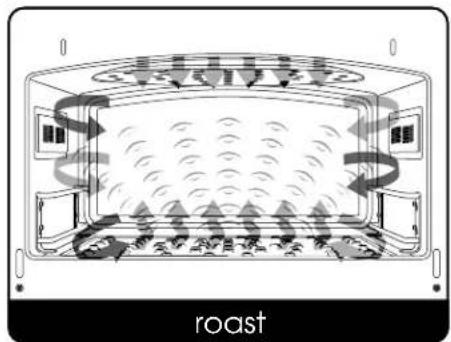
natural_image
Diagram of a modern restaurant interior with curved ceiling and seating arrangement, labeled 'roast' at bottom (no other text or symbols)In Roast mode (see the screen in the introduction to Cook mode), the Speedcook Oven uses a combination of low and high speed air to brown the outside of food while retaining moisture inside.
Roasting and baking are similar in concept, but roasting is used mostly for meats and vegetables.
Roasting pans (without lids), glass casserole dishes (with or without lids), and sheet pans all work well with this mode. Shallow pans will allow food to brown more. An uncovered pan without liquids will help keep the heat dry and allow foods to brown and crisp. Setting meats and poultry directly on a rack in a pan keeps them from steaming in their own juices.
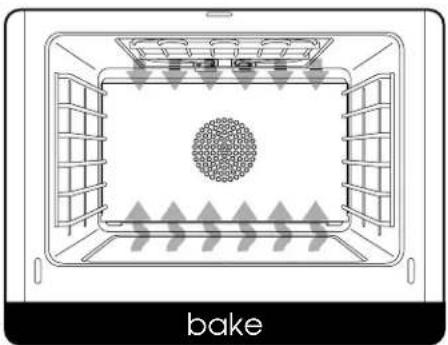
Convection Bake
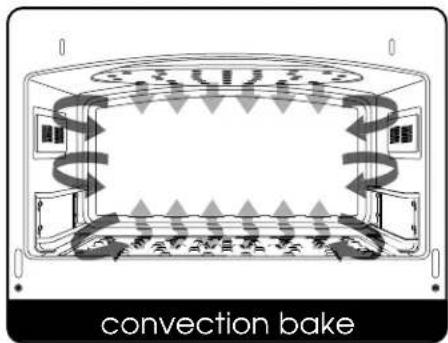
When set to Convection Bake, the Speedcook Oven operates as a standard convection oven with the fans running at a low speed. This function creates the same cooking environment as the Lower Oven in Convection Bake mode.
Tap Convection Bake to open this screen.
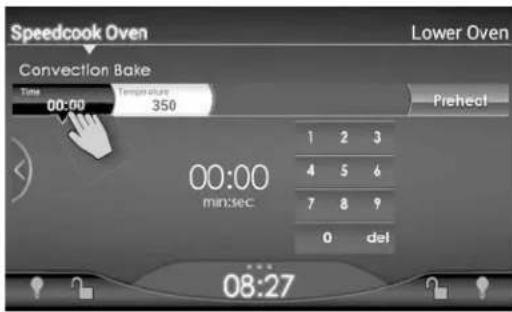
Using the touch screen:
- Tap Time to open a keypad for setting the cooking time.
The Speedcook Oven
- Tap Temperature to open a scaled bar for setting the oven temperature. The temperature can be changed in 5° F increments.
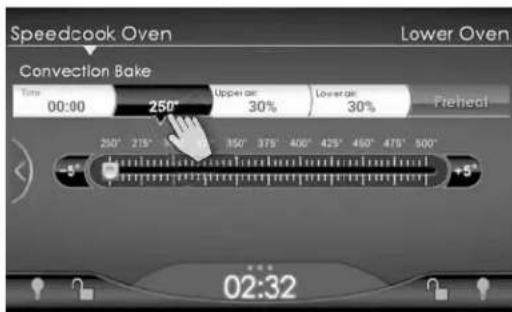
- Tap Preheat.
- When the preheat cycle is complete, the oven will chime.
- Place food in the oven and tap Start. Food placed in the oven will begin cooking regardless of whether Start is tapped or not. However, tapping Start begins the time countdown.
- When the timer reaches zero, the oven will chime letting you know the cook cycle is complete.
- To alter the time and/or temperature, follow the instructions in Steps 1 and 2.
- When the cook cycle is complete, remove the dish from the oven.
- When you have finished cooking, tap Cancel or Speedcook Oven to turn the oven off.
Note: Convection Bake cook cycles cannot be saved to Favorites.
Defrost
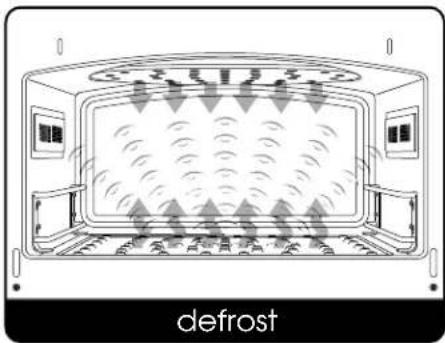
natural_image
Diagram of a refrigerator with air flow patterns and labeled 'defrost' at the bottom (no other text or symbols)The Defrost function can be used to aid in thawing foods, especially frozen meats and casseroles.
To access this function:
- From Cook mode tap Defrost. The following screen displays:
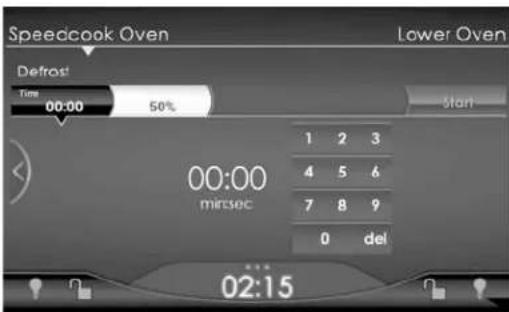
- Place the frozen food in the oven cavity.
- Using the keypad, set the defrost time.
- Tap Start.
- At the end of the defrost cycle the oven will chime, letting you know the defrost cycle is complete.
a. If the food is suffi ciently thawed, remove it from the oven.
b. If the food needs more defrosting, add cook time with the keypad, and Tap Start. Oven is still ON (OFF is illuminated) once defrost cycle is complete.
The Speedcook Oven
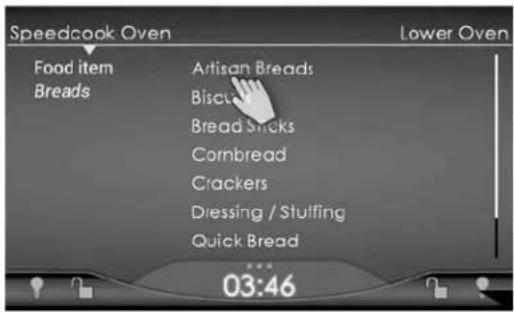
Starting from Food Item
Cooks traditionally set an oven to a specific mode according to the kind of food they are cooking. Because the Speedcook Oven has programmed times and temperatures for more than 700 food items, you can also go to the correct preheat and cook screen by choosing a food item.
At the main menu, tap Food Item to navigate through the database of pre-programmed food settings available through the Food Items menus.
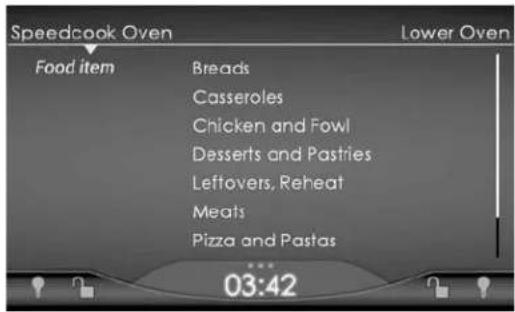
Scroll through the categories to select the right one for the food you want to cook.

Scroll down to see the rest of the Food items on the list.
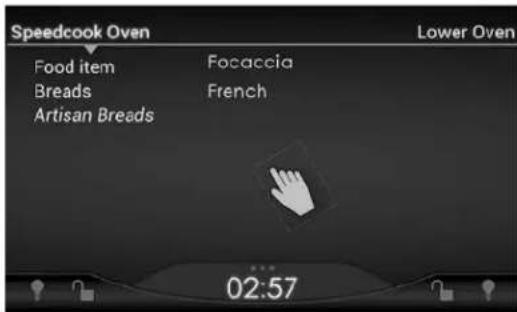
For example, to bake focaccia, tap Breads to open this menu:
Tap Artisan Breads to open this menu. Tapping Focaccia will take you to the time and temperature settings for baking focaccia.
Tapping a category name opens a screen listing all the specific recipes in that category. For example, the Desserts & Sweets menu starts with this screen.
The Speedcook Oven
Reheating Leftovers
The Food Item menu includes "Leftovers, Reheat." This is a generic setting for any item you are reheating and does not have any options for changing time and temperature.
- Tap Leftovers, Reheat.
- Tap Preheat.
- Once the oven has preheated, place the food in the oven and tap Start.
Starting from Cookbooks
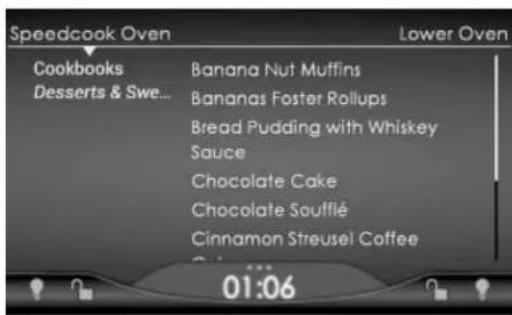
To cook any of the recipes you prepared from the instructions in the cookbook, tap Cookbooks at the main menu. The screen that opens show the various categories of foods for which recipes are included in the cookbook available online.
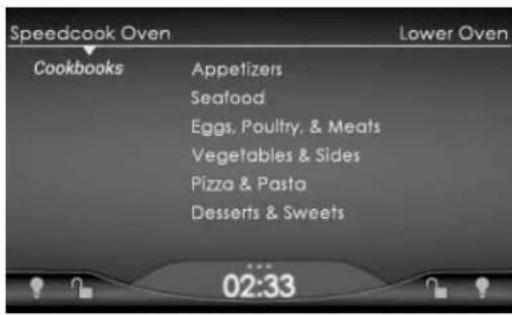
Tapping a category name opens a screen listing all the specific recipes in that category. For example, the Desserts & Sweets menu starts with this screen.
Starting from Favorites
As you use your Speedcook Oven, you will begin adapting your own favorite recipes to the oven, adjusting the time and temperature, or using advanced settings to ensure that your personal recipes—from family heirlooms to recipes you found or developed last week—are cooked perfectly. You can store the setting for thousands of food items in Favorites. You also have the option of deleting items.
Saving a Food Item or Customized Cooking Settings to Favorites
The "Save to Favorites" option enables you to store and easily recall up to 9,999 custom cook settings for your own recipes, or to save the settings you may have customized for a food item already programmed in Speedcook. Choose Save to Favorites at any of the following times:
• At the end of a cook cycle.
- If Finished is selected at the pause or 80% complete screen, the next screen displayed will give the option to Save to Favorites.
To save a dish to favorites:
- Tap Save to Favorites. The keyboard screen displays.
- Type in the name of the dish.
- Tap Save. The oven will return to the Repeat Cook menu.
- Tap Finished. When the oven returns to the Main Screen, select Favorites to see your newly added item which will be listed alphabetically by the name you gave it.
The Speedcook Oven
Naming a Favorite
- Favorites are named at the end of a cook cycle where adjustments have been made.
- Type in the name of the favorite. Use the Sym 123 key to add numbers to the name of your favorite.
- To edit, use the Delete key.
- When the name of the food item is complete, tap Save.
Deleting a Dish from Favorites
To delete a dish from Favorites:
- Select Favorites at the main Speedcook menu.
- Select X next to the favorite name of the dish/cook setting to be deleted. You will be prompted to confirm deletion.
- The item is automatically deleted and the oven will return to the main Favorites screen.
Cooking a Dish Already Saved in Favorites
To cook a dish already saved in Favorites, follow the directions below.
- Select Favorites at the main Speedcook menu.
- Scroll to the name of the food item to cook and tap it.
- Select Preheat.
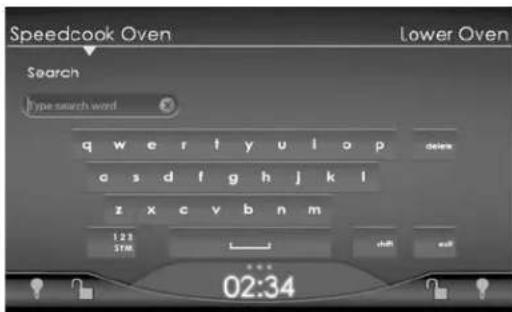
Starting with Search
Tapping Search opens a keyboard that allows you to search for food items in all the databases (pre-programmed and Favorites).
Typing the first letter opens a menu of prompted food items. Type additional letters if needed to narrow the search. Select the dish you want to cook. The Speedcook Oven will go to the preheat and cook screen for that dish.
The Speedcook Oven
Making Adjustments Making Adjustments during a Cook Cycle
When a cook cycle is 80% complete, the oven chimes and cooking is paused for 1 minute. This gives you the chance, if desired, to make mid-course adjustments to account for differences in food products and individual tastes. To make adjustments during a cook cycle:
Note: For food items with a cook time of less than 2-1/2 minutes, the cook cycle does not pause at the 80% complete mark.
- Choose and cook an item as described in previous sections.
- When the cook cycle is 80% complete, a chime sounds, the cook cycle pauses and you have the option to check your food and, if desired, adjust the cook settings.
a. Check your food item for adjustments at 80% complete.
b. If you do not wish to check the food item, tap Continue Cooking to resume the cook cycle or do nothing. After 1 minute, the oven will automatically resume cooking. If an adjustment is not made, the oven completes the cook cycle according to the original settings.
Note: Anytime the oven door is opened, a message will display on the screen saying the oven door is open, close to continue.
- On the touch screen, select the desired adjustment.

- Continue Cooking: Select if food is cooking to expectations
• Cook less: Select if food appears to be overcooking or the internal temperature is too high. - Brown less: Select if the outside of the food is browning faster than desired.
• Cook & brown less: Select if food is cooking and browning more than expected, but still requires additional cooking time. - Finished: Select if no adjustments are needed and your food is sufficiently cooked.
Note: If your food item is done at the 80% complete chime, remove it from the oven and tap Finished to end the cook cycle.
- Oven will automatically restart when these adjustments are selected. Adjustments cannot be changed after they are made.
Note: When an adjustment is made, only the power level changes, NOT the remaining cook time.
Note: If Repeat Cook is selected at the end of the cook cycle, the oven will use the exact same settings used for the previous cook cycle, including any adjustments made at the 80% complete point.
The Speedcook Oven
If the cook cycle is started from a pre-programmed cook setting or from a cook setting in Favorites, changes made at the 80% complete point will not alter the original pre-programmed or saved setting. To permanently save your adjustment(s), the item must be permanently saved to Favorites (see page 26).
Making Adjustments at the End of a Cook Cycle
At the end of a cook cycle, the oven chimes and cooking stops. If desired, you can make final adjustments by selecting Cook more,
Brown more, or Cook & brown more. To make adjustments at the end of a cook cycle:
-
Cook an item.
-
A chime sounds indicating the cook cycle is complete. Check the food item by opening the oven door. When the door is opened or after 3 seconds, four options appear: "Cook more," "Brown more," "Cook & brown more," or "Finished."
-
On the touch screen select the desired option:
• Cook more: Select if the outside meets expectations, but inside needs to cook longer.
• Brown more: Select if the inside meets expectations, but outside needs to cook longer.
• Cook & brown more: Select if both the inside and outside need to cook longer.
• Finished: Select if no adjustments are needed.
The Speedcook Oven
- Selecting "Cook more," "Brown more," or "Cook & brown more" adds 15 seconds to the time.
a. If "Finished" is selected, the oven advances to the "Save to Favorites"/"Repeat Cook"/"Main Menu" screen.
- Oven will automatically restart when these adjustments are selected. Adjustments cannot be changed after they are made.
Note: If after 20 seconds a selection has not been made, the oven assumes the item is done and advances to the "Save to Favorites"/"Repeat Cook"/"Main Menu" screen. After an additional 20 seconds, if no selection is made, the oven goes off and returns to the Main Screen.
Note: "Cook more," "Brown more," and "Cook & brown more" can be used as many times as necessary to achieve the desired results.
Note: If Repeat Cook is selected at the end of the cook cycle, the oven will use the exact same settings used for the previous cook cycle, including adjustments made at the end of the cook cycle.
The original pre-programmed or saved setting will not be altered. To permanently save your adjustment(s), the item must be permanently saved to Favorites (see page 26).
Adjusting the Cook Time
The pre-programmed cook time for each item has been calculated through extensive testing by a staff of professional chefs to yield optimal results. Be aware that pre-programmed cook times in the Speedcook can vary significantly from traditional settings. The first time you cook an item, it is recommended that you start with the item's pre-programmed cook setting. However, once you develop a feel for the food or dishes outcome using the pre-programmed setting, you may wish to adjust the pre-programmed cook time.
- Select the pre-programmed cook setting for the item to be cooked. The screen will look like this.
- Tap the displayed time (06:30 on this screen). A keypad will display, allowing you to enter a new time.
- Enter the new time.
- Tap Save to confirm the new cook time. Tap OK. The cook screen displays showing the new time.
- If no further adjustments are needed, tap Preheat.
Note: If Repeat Cook is selected at the end of the cook cycle, the oven will use the exact same settings used for the previous cook cycle, including any changes to the cook time.
The original pre-programmed or saved setting will not be altered. To permanently save your adjustment(s), the item must be permanently saved to Favorites (see page 26).
The Speedcook Oven
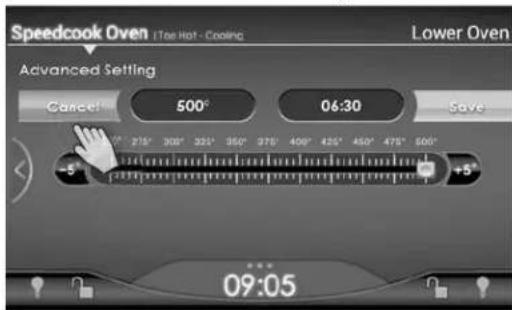
Adjusting the Oven Temperature
Like the cook times, pre-programmed temperatures have been calculated by a staff of professional chefs to yield optimal results. Be aware that pre-programmed temperatures in the Speedcook Oven can vary significantly from traditional settings. The first time you cook an item, it is recommended that you start with the pre-programmed settings. However, once you develop a feel for the product's outcome using the pre-programmed setting, you may wish to alter a pre-programmed temperature to suit your personal preferences with specific products and recipes.
To adjust the temperature using the touch screen:
- Select the pre-programmed cook setting for the item to be cooked. The screen will look like the one shown in "Adjusting the Cook Time," page 29.
- Tap the displayed temperature (500° in the screen shown above). The temperature bar will display.
-
Drag the button (which moves in 5^ F increments to the new temperature.
-
Tap Save to confirm the new temperature. Tap OK. The cook screen displays showing the new temperature.
- If no further adjustments are needed, tap Preheat.
Note: If Repeat Cook is selected at the end of the cook cycle, the oven will use the exact same settings used for the previous cook cycle, including any adjustments to the oven temperature.
The original pre-programmed or saved setting will not be altered. To permanently save your adjustment(s), the item must be permanently saved to Favorites (see page 26).
The Speedcook Oven
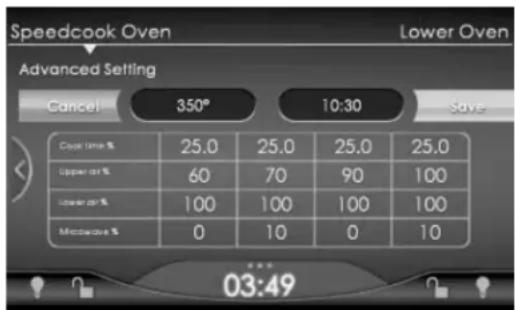
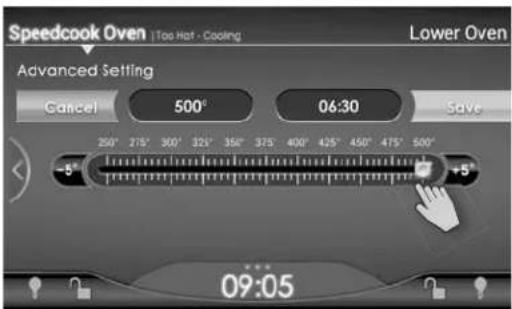
Using the Advanced Setting
In Advanced Setting you can adjust not only the cook time and oven temperature but also the air flow and microwave power levels of a pre-programmed setting. In addition to customizing an existing setting, you can make adjustments in the Advanced Setting to develop new settings from pre-existing ones. A high level of familiarity with the oven is suggested before attempting to make changes in this mode.
To use the Advanced Setting, follow the process to select the pre-programmed cook setting for the item to be cooked. From this screen:
-
Tap the preset time or temperature to make any adjustments you wish to time and/or temperature as described in the preceding sections.
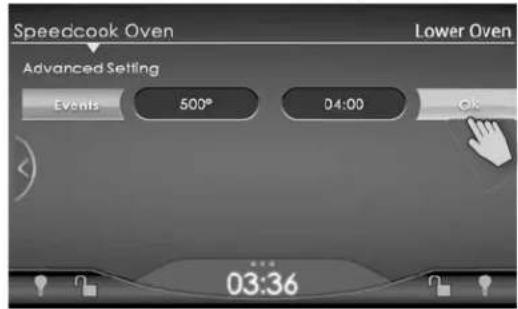
-
Tap Cancel on the left side of the bar. The word "Cancel" changes to "Events."
- Tap Events.
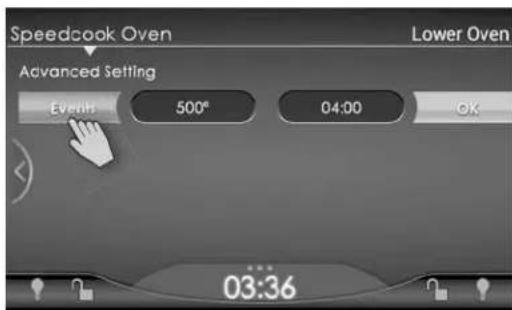
- The word "Events" changes back to "Cancel," and the table of cooking cycle intervals displays below the temperature and time settings.
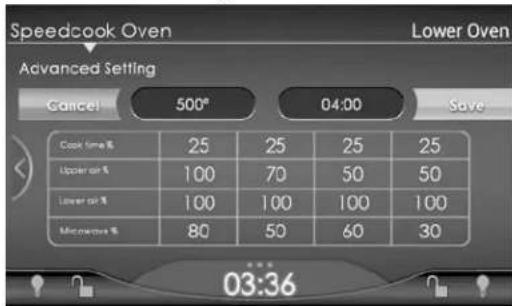
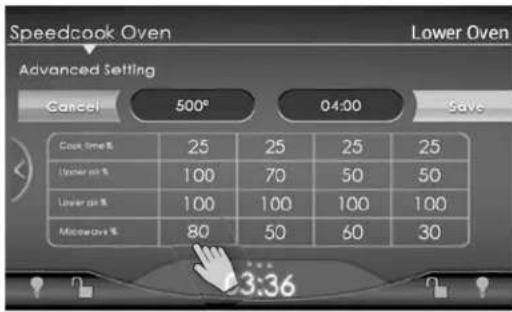
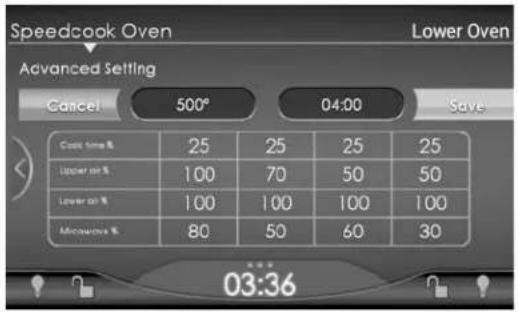
- Make any adjustments you wish to make to upper air intensity, lower air intensity, or microwave power.
The Speedcook Oven
Each programmed setting is divided into four time intervals, and each interval has four associated settings; Time, Upper Air, Lower Air, and Microwave:
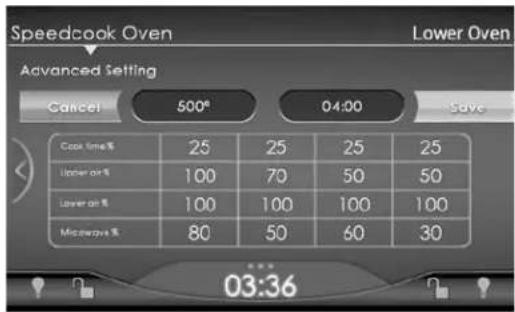
Time: The interval's length is a percentage of the total cook time. In the screen shown above, the total cook time is 4 minutes so each interval is 1 minute (25% of total) in length. When time intervals are adjusted, they must total 100%.
Upper Air: The intensity of the air coming from the convection fan in the top of the oven. You can adjust the air intensity in 10% increments from 0–100%. An upper air intensity of 0% would mean that no air is blowing from the top of the oven. An upper air intensity of 100% would mean that the upper air fan is at its maximum.
Lower Air: The intensity of the air coming from the convection fan in the bottom of the oven. You can adjust the air intensity in 10% increments from 0 to 100%. A lower air intensity of 0% would mean that no air is blowing from the bottom of the oven. A lower air intensity of 100% would mean that the lower air fan is at its maximum.
Microwave: Controls the amount of microwave power being used. You can adjust the microwave power in 10% increments from 0 to 100%.
- To change the settings, at the Advanced Setting screen tap the number in the table that you want to change. For example, to decrease the microwave power in the first interval to 40%, tap the 80 in the fourth row of the first column.
The microwave power bar will display:
- Tap and slide the white button left from 80% to 40% (as shown above) to reduce the microwave power.
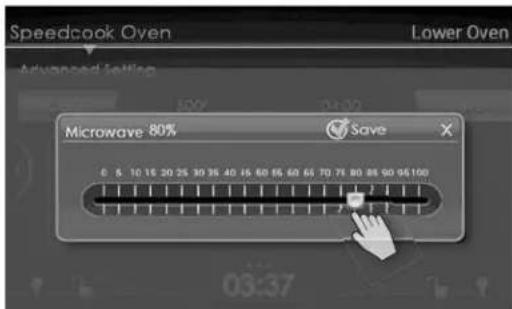
- Tap Save to return to the Advance Setting screen. The microwave power will now show as 40% for the first interval. Use the same process to continue making any other changes.
Tap X to cancel and return to the Advance Setting screen without saving.
The Speedcook Oven
- At the Advanced Setting screen tap Save to confirm the changes you have made, or Cancel to return to the original settings.
- Tap OK to return to the preheat and cook screen and start the preheat.
Note: If an interval is not used, it will default to zero ("0").
a. If Save is selected, the bar will with "Events" showing again at the left and "OK" at the right and "Events successfully changed" will display above clock.
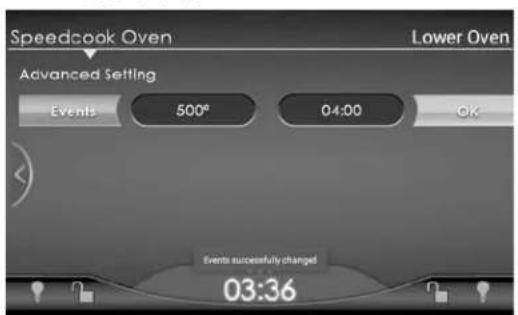
yNote: If Repeat Cook is selected at the end of the cook cycle, the oven will use the exact same settings used for the previous cook cycle, including any adjustments made in the Advanced Setting screen.
The original pre-programmed or saved setting will not be altered. To permanently save your adjustment(s), the item must be permanently saved to Favorites (see page 26).
b. If Cancel is selected, the bar will display with "Events" showing again at the left, and "OK" at the right.

The Speedcook Oven
Speedcook Oven Tips
The Speedcook Oven comes equipped with a variety of helpful hints that cover a range of topics.
After choosing your pre-programmed cook setting, you may also see the information key logo i Tap this logo to see helpful tips about cooking your food.
For example, the tip may tell you that the cook settings are based on the food going into the oven at a refrigerated or frozen temperature, or that the settings are for an unstuffed meat or poultry item.
Pre-programmed Cook Settings
AirCrisp
Corn Dogs
Crab Cakes
Dip
Egg Rolls
Fishsticks
Fries
Hash Brown Patties
Mini Tacos
Mozzarella Sticks
Nachos
Nuggets
Potato Skins
Quiche, Mini
Spanakopita
Stuffed Jalapenos
Stuffed Mushrooms
Tenders
Tots
Wings
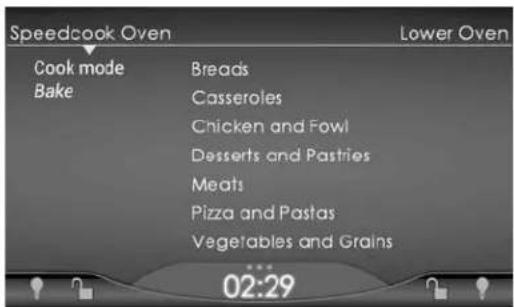
Bake
Breads
- Artisan Breads
o Focaccia
o French
Biscuits
Breadsticks
Corn Bread
Crackers
Dressing, Stuffi ng
Jalapeno/Cheese
Light Rye
Multigrain
Olive
Potato
Quick Bread
Rolls
- Cinnamon
- Crescent
- Dinner
Wheat Bread
White Bread
Casseroles
- Generic
- Enchilada
- Green Bean
- Meat, Uncooked
- Pot Pie
- Strata
Bake (cont.)
Chicken & Fowl
- Chicken
o Bone-In Portions
o Boneless
o Whole
- Cornish Game Hen
- Turkey
o Bacon
o Boneless Breasts
o Whole
Desserts & Pastries
- Bars
o Hello Dolly
o Pecan
o Turtle
- Blondies
- Brownies
Cakes
- Box Mix
o Angel Food
o Bundt
o Carrot
o Chocolate
o Coffee
o Spice
o Sponge
- Homemade
o Angel Food
o Cheesecake
o Chocolate
o Italian Cream
o Other Scratch
o Pound
o Spice
o White
o Yellow
Cookies
- Biscotti
- Chocolate Chip
- Oatmeal Raisin
- Peanut Butter
- Sugar
- Other
Cupcakes
- Carrot
- Chocolate
- Italian Cream
- Spice
- White
- Yellow
Bake (cont.)
Custards
- Bread Pudding
- Crème Brûlée
- Flan
- Vanilla
Fruit Cobbler
Muffi ns
- Boxed Mix
o Banana Nut
o Berry
o Carot Raisin
o Chocolate Chip
o Honey Bran
o Orange Cranberry
- Homemade
o Carot Raisin
o Blueberry
o Banana Nut
o Bran
o Cornbread
Pastries
- Cream Puff Shells
- Scones
- Tart, Dessert
- Tart, Savory
- Turnovers
Pies and Quiche
- Crust
- Custard, Cream
- Fruit, Double Crust
- Meringue Browning
- Pecan
- Pumpkin
- Quiche
- Sweet Potato
Meats
- Bacon
- Beef Wellington
- Ham
- Meatballs
- Meatloaf
- Pork Chops, Bone-in
Pizza & Pastas
- Pizza
o Raw Dough
o Frozen
o Homemade
- Lasagna
- Mac and Cheese
Pre-programmed Cook Settings
Bake (cont.)
- Pasta with Red Sauce
- Pasta with White Sauce
- Stuffed Shell
Vegetables & Grains
- Dressing, Stuffing
- Potatoes
o Au Gratin
o Baked
o Scalloped
o Sweet
- Rice
- Steamed Vegetables
o Asparagus
o Broccoli
o Carrots
o Caulifl ower Florets
o Corn on the Cob
- Diced Squash
o Acorn
o Butternut
o Pumpkin
o Spaghetti
o Yellow
o Zucchini
- Mixed Vegetables
- Stuffed Jalapenos
- Stuffed Mushrooms
- Stuffed Peppers
Broil
Chicken & Fowl
- Chicken
o Kabobs
o Skewers/Satay
- Turkey
o Burgers
o Hot Dogs
Meats
- Beef
o Brats
o Burgers
o Hot Dogs
o Italian Sausages
o Kabobs
o Meatballs
o Skewers/satay
o Steaks
- Lamb
o Chops
o Kabobs
Broil (cont.)
- Pork
o Bone-In Chops
o Brats
o Breakfast Links
o Breakfast Patties
o Hot Dogs
o Italian Sausages
o Kabobs
o Ribs
- Veal Chops
- Seafood & Fish
- Fish Fillets
o Catfi sh
o Cod
o Halibut
o In Parchment
o Salmon
o Snapper
o Tilapia
o Trout
o Other
- Fish Steaks
o Monkfi sh
o Salmon
o Swordfi sh
o Tuna
o Other
- Shellfi sh
o Kabobs
o Lobster Tails
o Lobster Whole
o Oysters Rockefeller
o Sea Scallops
o Shrimp
- Whole Fish
o Red Snapper
o Trout
o Other
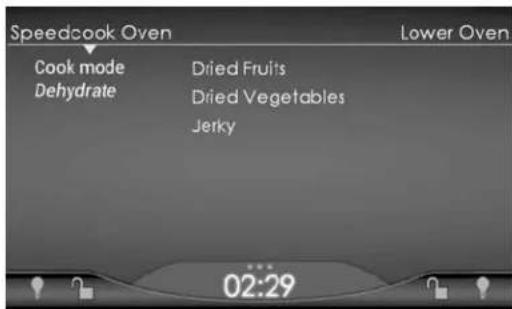
Dehydrate
Dried Fruits
Dried Vegetables
Jerky
Roast
Chicken & Fowl
- Chicken
o Bone-In Portions
o Boneless
Roast (cont.)
- Cornish Game Hen
- Duck, Whole
- Turkey
o Boneless Breasts
o Whole
- Meats
o Beef Tenderloin
o Lamb
- Bone-In Leg of Lamb
- Boneless Leg of Lamb
- Rack of Lamb
o Pork
- Crown Roast
- Loin
- Tenderloin
o Veal
- Boneless
- Rib Roast
Vegetables & Grains
- Asparagus
- Carrots
• Caulifl ower Florets
- Corn on the Cob
- Eggplant
- Garlic
-
Kabobs
-
Mixed Vegetables
- Roasted Potatoes
- Sliced Onions
- Sliced Peppers
- Squashes
o Acorn
o Butternut
o Pumpkin
o Spaghetti
o Yellow, Diced
o Zucchini, Diced
Reheat
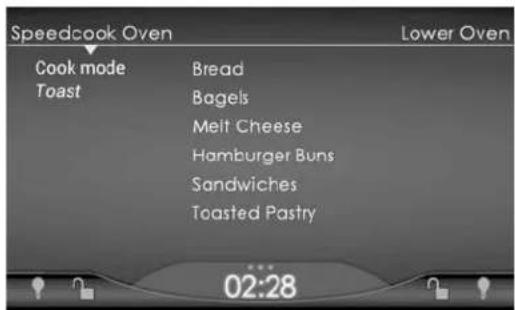
Toast
Bread
Bagels
Melt Cheese
Hamburger Buns
Sandwiches
- Cheese Sandwich
- Panini
- Tuna Melt
- Other
Toasted Pastry
The Lower Oven
The Lower Oven in the Double Oven model is both a conventional and convection oven that provides uniform cooking throughout in fi ve cook modes. The Lower Oven also uses the touch screen control.
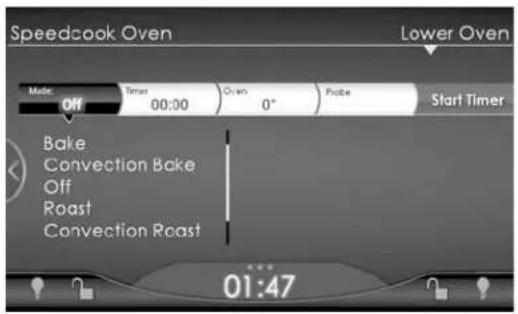
The Lower Oven can also be used as a proofing oven or warming drawer.
Lower Oven Functions and Settings
The Lower Oven features six cook modes:
- Convection Bake
- Convection Roast
• Hi Broil - Low Broil
- Roast
- Bake
In addition to these six modes, Warm and Proof Modes further expand the overall capabilities of the bottom oven.
The Lower Oven has two top heating elements, a fan and heating element in the back of the cook cavity, and a bottom heating element. Unlike most traditional ovens, the bottom heating element is concealed beneath the cook cavity. This feature allows for a bigger cook cavity, easier cleaning, and more uniform heating.
Cook Modes
Bake
natural_image
Top-down diagram of a baking oven with a central bowl and decorative windows, labeled 'bake' at the bottom (no other text or symbols)Traditionally, baking is to cook with dry heat. Hot air from the top and bottom of the oven envelops the food in a radiant dry heat, which combines with a little moisture from the food to become a circulating vapor in the oven.
The Lower Oven
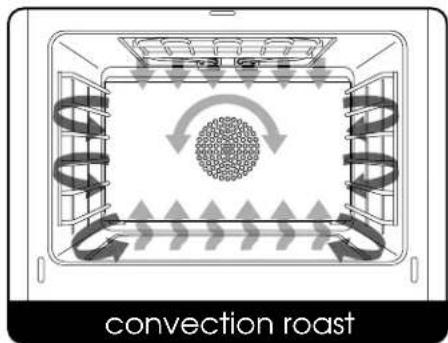
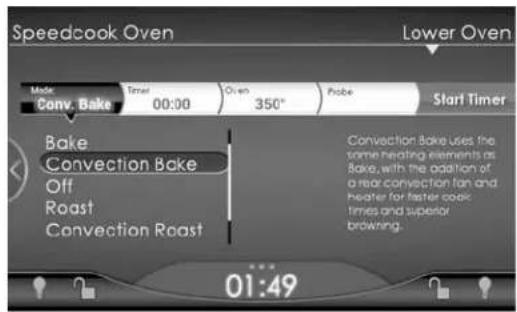
Convection Bake
Convection Bake uses the same heating elements as Bake, with the addition of a convection fan and heater in the back of the cook cavity. This fan and heater help heat and circulate the air evenly throughout the chamber to produce superior browning and crisping.
Any food cooked in the Bake mode can also be prepared using Convection Bake and vice versa. In general, items cooked in Convection Bake will cook about 33% faster than when cooked in Bake. The temperature should be reduced by 25°F.
Broil Hi and Broil Lo
natural_image
Top-down diagram of a broiler oven with a central granular material inside (no text or symbols)Broiling directly exposes food to radiant heat (as over a fire or on top of a grill). The heat is direct and intense, and it differs from baking or roasting in that only the top side of the food is exposed to the heat source.
Foods that are typically broiled are quick cooking, inherently tender, relatively lean, and not too thick, (for example, beef steaks, whole fish, and chicken satay).
Roast
natural_image
Top-down diagram of a microwave oven with grating and air ducts, showing airflow direction (no text or symbols)Roasting and baking are similar in concept, but roasting is used mostly for meats and vegetables as opposed to baked goods. Hot air from the top and bottom of the oven is used to brown the outside of food while retaining moisture inside.
In the Lower Oven, the two top heating elements provide optimized control for broiling and roasting.
The Lower Oven
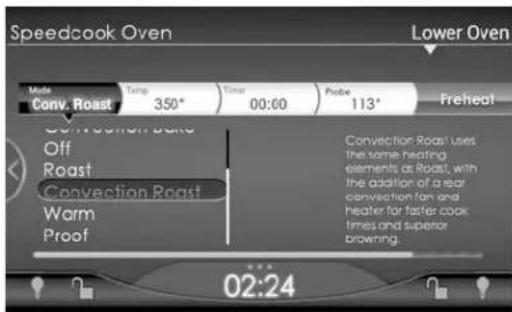
Convection Roast
Convection Roast uses the same heating elements as Roast. However, unlike Roast, Convection Roast utilizes the convection fan and heater in the back of the oven to help heat and circulate the air throughout the cook cavity.
Any item cooked under Roast can be prepared using Convection Roast and vice versa. As a general rule, items cook about 33% faster under Convection Roast than Roast. The temperature should be reduced by 25°F.
Additional Settings
Two additional settings increase the versatility of your oven.
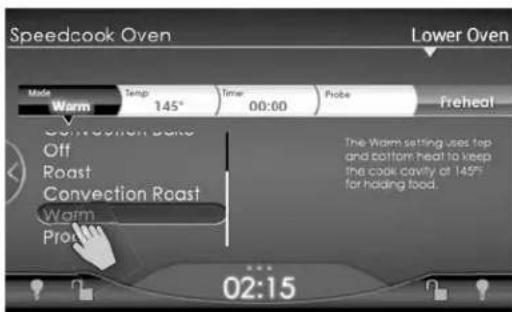
Warm
In the Warm setting, the Lower Oven becomes a warming drawer, using top and bottom heat to keep the cook cavity at 145°F, the perfect environment for holding foods at just the right temperature until serving time. Because foods cook individually and rapidly in the Speedcook Oven, you will want to use the Warm setting to hold dishes cooked first until the entire meal is ready to serve.
Proof
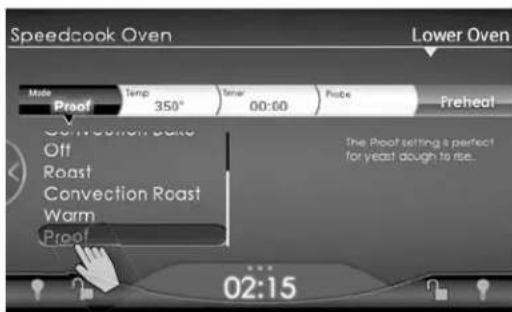
The Proof setting uses heat from the top and bottom of the oven to keep the cook cavity at the perfect temperature for yeast dough to rise: 90° to 105° F. Some doughs may require moisture to proof correctly. If moisture is needed, place a sheet pan of water under the lower rack.
Using the Lower Oven
CAUTION
Due to the concealed heating element in the bottom oven, DO NOT cover or line the bottom of the oven with foil.
From the Lower Oven main menu:
- Use the touch screen to select the desired oven mode: Convection Bake, Convection Roast, Broil, Roast, Bake, Warm, or Proof. Once a cooking mode is selected, the mode screen displays a bar with the mode you have chosen, a timer section, an oven temperature section, and a probe section (see page 42 for using the oven probe).
Scroll down to see more functions.

The Lower Oven
- To select the oven temperature, tap the preset temperature (450° on the screen show below) on the "Oven" section of the bar. The temperature bar will display:
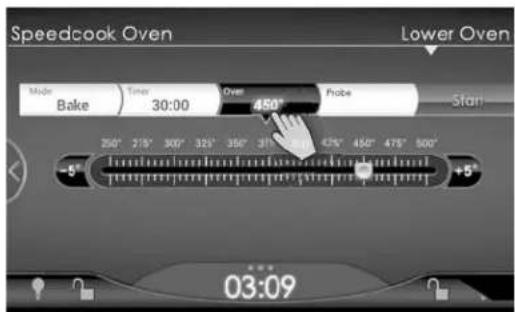
-
Slide the white button, which moves in 5° F increments to set the oven temperature.
-
To set the timer, select Timer.
The keypad displays:
-
Enter the desired cook time using the keypad.
-
Tap Preheat. The oven will begin preheating. "Preheating" will display at the screen top right and the oven temperature will be shown.
-
The oven chimes when preheating is complete. Open the door and place the dish(es) into the oven.
-
When food has finished cooking, carefully remove it from the oven.
-
Turn the oven off by tapping Off in the menu or on the right side of the glass.
Note: When the timer is set, the remaining cook time is displayed as the primary information. If the meat probe is in use, the probe temperature (see screen under Temperature Probe Function on next page) is displayed while the dish is cooking.
Warm
This function allows you to use the oven as a warming drawer:
-
At the Lower Oven main menu scroll down and select Warm. The Warm screen displays:
-
Set the timer as already described.
Note: The warming drawer temperature is set at 145^ F and cannot be changed.
- Tap Preheat to begin preheating the warming drawer.
The Lower Oven
Proof
This function allows you to raise ("proof") bread or other yeast doughs. When the lower oven is used for proofing, the temperature can be adjusted within the range 90^ - 105^ .
Note: When proofing, some doughs may need moisture to proof correctly. If the recipe requires moisture, place a sheet pan of water under the lower rack.
- At the Lower Oven main menu scroll down and select Proof.
The Proof screen displays:
-
Set the timer as already described.
-
Tap the temperature shown in the Oven section of the bar, and slide the white button to choose a temperature between 90° and 100° F in 5° F increments:
-
Tap Preheat to begin preheating the proofing oven.
Temperature Probe Function
The temperature probe takes the guesswork out of roasting by cooking foods to the ideal internal temperature.
To Use the Probe Function:
- Plug the probe into the outlet located on right interior wall of the oven and close oven door, leaving the meat probe end outside the oven.
- Select desired Cook Mode and set temperature. Select Preheat.
- Once the oven is preheated, open the oven door. Using a pot holder, carefully slide out the oven rack. Place the roasting pan on the rack and insert probe into meat.
- Carefully slide rack back into oven and close door. Select Start.
- The internal temperature of food will be displayed on the touch screen while it is cooking.
Note: When the internal temperature is reached, the oven will not beep and will not shut off.
Using the Timer
The egg timer is a traditional timer that operates independently of any of the oven timers. It is displayed on the right side of the utility drawer handle (visible when you tap to pull up the tab centered in the bottom of the screen).
- Use the keypad to set the desired time.

- Tap Start. The Time bar on the left of the timer handle will begin counting time.
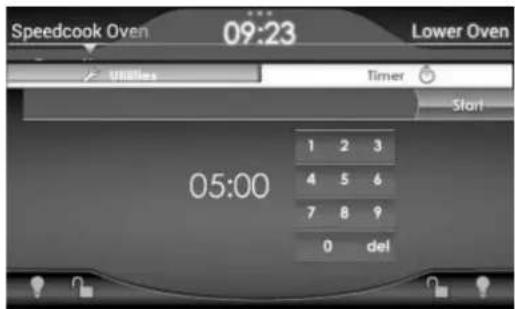
Once Start is selected, the Timer Screen closes and returns to the Main Screen. The clock at the bottom is replaced by the Timer.
- The timer chimes when the time reaches 00:00.
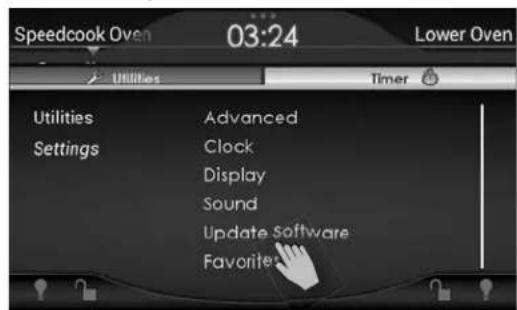
Using Utilities
The Utilities screen, which is visible when you tap the tab centered in the bottom of the screen permits you to use a variety of features in your oven; set preferences (e.g., for sounds or screen brightness); and access software updates, installer, and other technical information.
When you pull up the Utilities screen, the main menu shows:
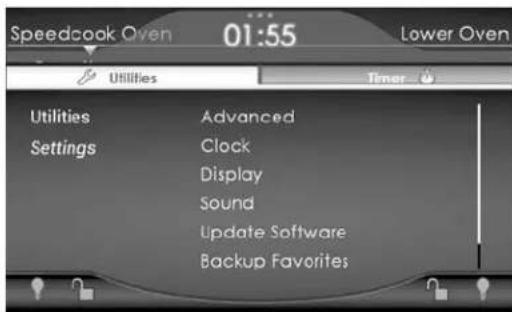
Note: Once the cook mode has started, you cannot access Utilities. However, you can access the options under Settings during Preheat.
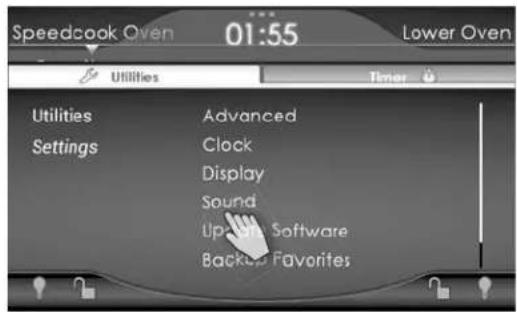
Adjusting Speedcook Sounds Oven Sounds: On or Off
There are several events within a cook cycle that have an associated sound. These sounds can be turned on and off independently to suit your personal preference. When your oven first arrives, all of the sounds will be turned on.
To turn a sound off (or on):
- From the Settings screen, select Sound.
- To turn on or off individual sounds select Notifi cations.
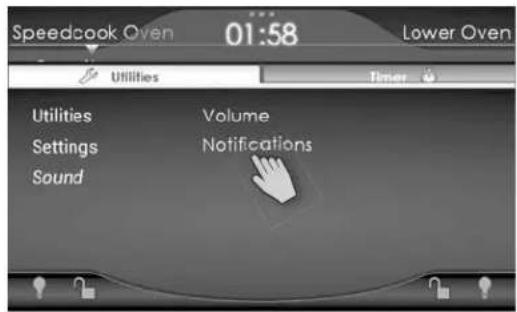
Using Utilities
- Select the individual sound you wish to turn on or off:
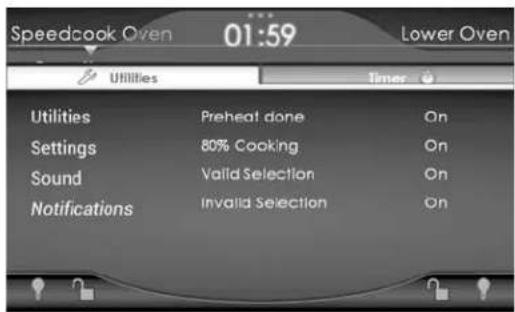
- Preheat Done: When the preheat cycle has completed, the oven will chime every five minutes until you either start the cook cycle or cancel.
- 80% Cooking Reminder: When the cook cycle is 80% complete, the oven will chime at 15 seconds and 30 seconds as a reminder to check the dish. After 1 minute, the oven resumes cooking.
- Valid Selection: This sound indicates a valid selection has been made.
-
Invalid Selection: This sound indicates an invalid selection has been made.
-
Tap On or Off for the selected sound.
-
Tap Settings to return to previous screen.
Oven Sounds: Volume
The volume of the oven chimes can be adjusted to suit your personal preference. Volume changes apply to all oven sounds.
To change the volume:
- From the Settings screen select Sound.
- To adjust volume select Volume. The screen displays the volume bar, which allows you to change the sound volume from low (on the left) to high (on the right).
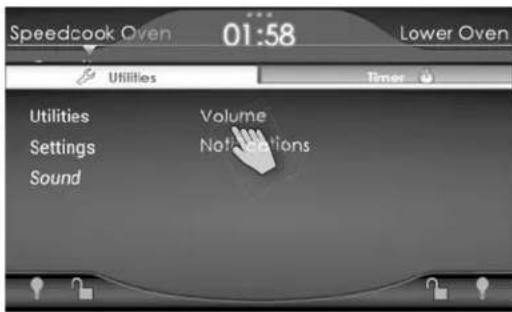
- Slide the white button to the left or right to adjust the volume as desired.
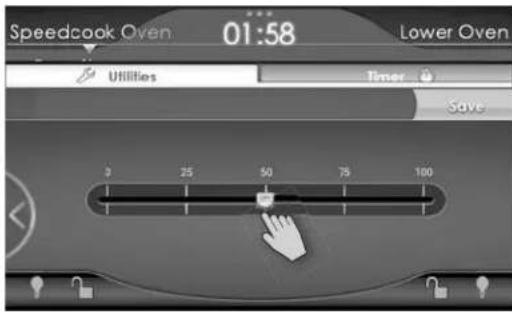
- Tap Save.
- Tap the Back key to return to previous screens.
Using Utilities
Adjusting the Display Brightness
To adjust the display brightness:
- From the Settings menu, tap Display.
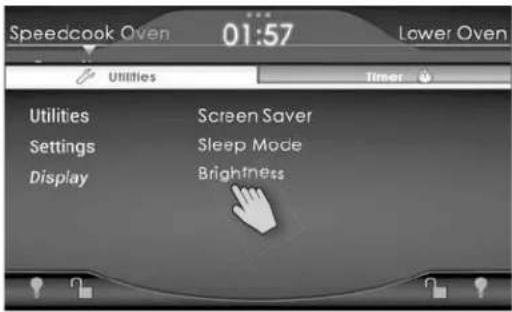
- To adjust brightness select Brightness. The screen displays the brightness bar, which allows you to change the display brightness from low (on the left) to high
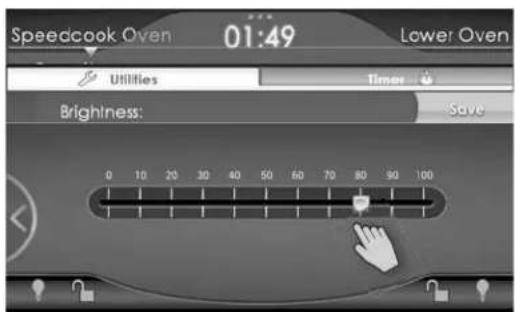
(on the right).
- Slide the white button to the left or right to adjust the brightness as desired.
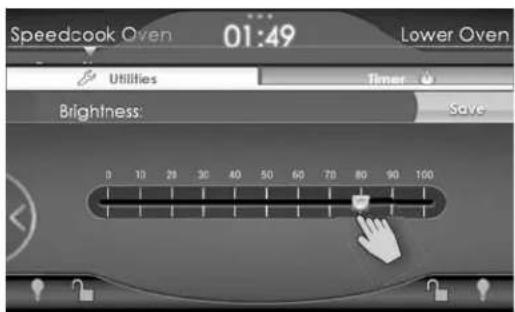
-
Tap Save.
-
Tap the Back key to return to previous screens.
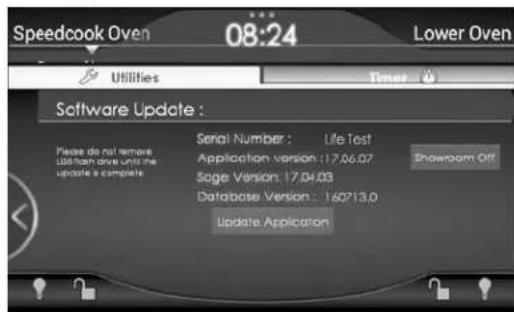
Updating the Software
Software updates contain product enhancements and additional pre-programmed food items. When a software update is released, you will be notified by email and/or mail. Updates are applied to the oven via USB flash drive (not included with the oven) and can be downloaded directly from:
www.vikingrange.com/turbochef in the US or www.brigade.ca/turbochef in Canada
-
Follow instructions on the website to save the update file to a USB flash drive.
-
Place the USB Flash Drive into the USB port located on the top right corner of the control panel. Ensure the USB flash drive is properly connected to the oven's USB port.
Note: Flash drive must be 2.0 or higher.
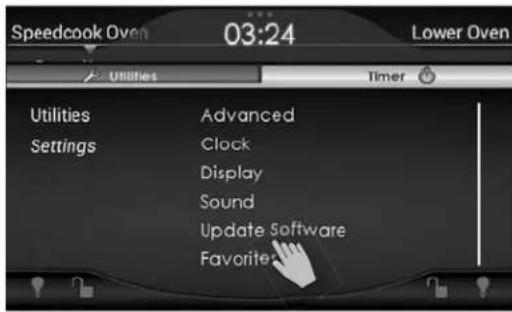
- From the Settings screen under Utilities, select Update Software.
- To update the software, tap Update Application.
Using Utilities
Note: To cancel, tap the back button or simply remove the flash drive.
If the USB fl ash drive is not connected properly, the oven cannot proceed with the software update. Double check the USB fl ash drive to make sure it is properly connected.
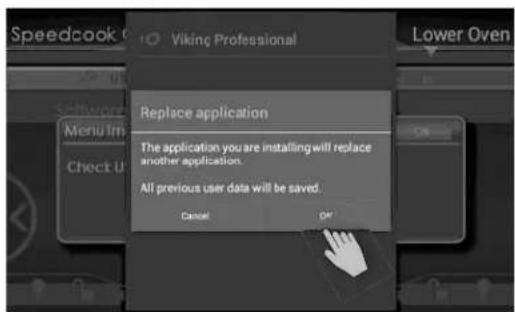
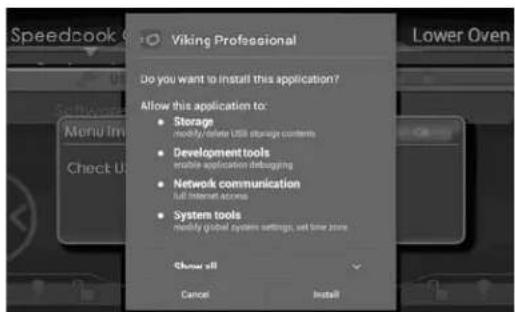
- You will be prompted to replace current application. Tap Ok to continue.
- You will be prompted to install the new application. Tap Install to continue.
Note: DO NOT remove USB flash drive or turn off power while application is installing. - Once the application is successfully loaded, it will reboot and the logo screen will appear on the display.
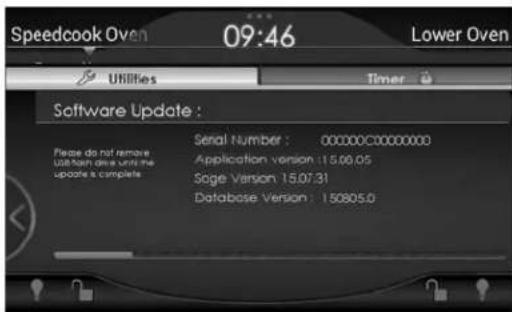
- After the Application updates, the oven will automatically begin the 2nd step of the updated process; udating the firmware.
- The Update Application button on the display will be disabled while the firmware is loading. Progress is displayed on the status bar at the bottom of the screen.
Note: DO NOT remove USB flash drive or turn off power while firmware is installing.
- Once the fi rmware is successfully loaded, the status bar will disappear. Software will shut down and restart the oven to complete loading of the fi rmware.
Backup Favorites
Favorites will not be lost when the application or firmware is updated.
- To create a backup file of your Favorite recipes, Insert a flash drive into the USB port.
- In Utilities, select Settings then Favorites then Backup Favorites. After a few seconds, a message will pop up that says "Favorites Backup Successful."
Restore Favorites
- To restore Favorites that you have backed up to USB, insert the flash drive into the USB port.
- In Utilities, select Settings then Favorites then Restore Favorites. After a few seconds, a message will pop up that says "Favorites Backup Successful".
Using Utilities
Accessing Version Information and Installer Setup
Should you need to call technical support, you may be asked to provide information concerning the oven's software version. Knowing this information can help Customer and/or Technical Service Departments serve you more efficiently.
You can display software and firmware versions by going to "Utilities", "Settings" and tapping Update Software.
Maintenance Mode, found under "Utilities," "Settings," "Advanced," "Maintenance," is a feature to help qualified service technicians quickly and accurately diagnose and repair a service issue. By entering a four-digit code, technicians can gain access and have the ability to test the oven's different internal components. This feature is to be used by qualified service technicians ONLY.
Serial Number
Should you need to call technical support, you may be asked to provide information concerning the oven's serial number. Knowing this information can help Customer and/or Technical Service Departments serve you more efficiently.
You can display serial number by going to "Utilities", "Settings" and tapping Update Software.
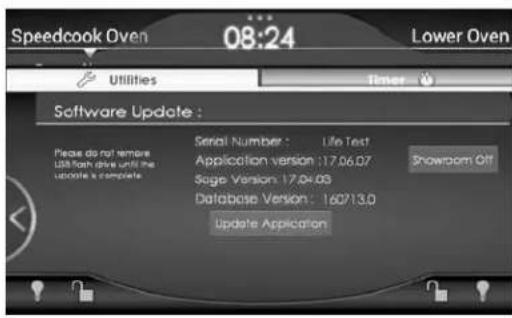
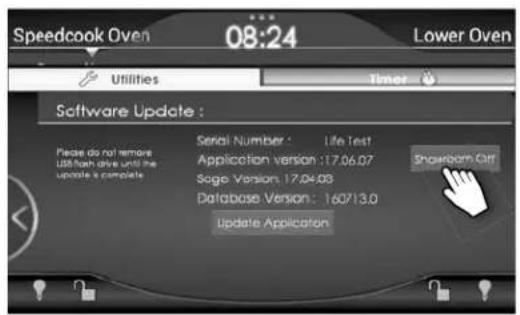
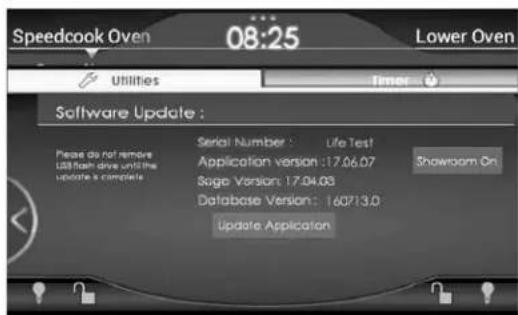
Showroom Mode
Access the showroom mode by going to "Utilities", "Settings" and tapping Update Software. The default setting for showroom mode is "OFF". Press the button to change to "ON". When the unit is in showroom mode, only the lights, locks, and fans are functional. The heating elements and magnetrons do not come on.
Self-Cleaning
CAUTION
Do not touch the exterior portions of the oven after self-cleaning cycle has begun, since some parts become extremely hot to the touch! During the first few times the self-cleaning feature is used, there may be some odor and smoking from the curing of the binder in the high-density insulation used in the oven. When the insulation is thoroughly cured, this odor will disappear. During subsequent self-cleaning cycles, you may sense an odor characteristic of high temperatures. Keep the kitchen well-vented during the self-cleaning cycle.
Note: The upper and lower ovens CANNOT be self-cleaned at the same time.
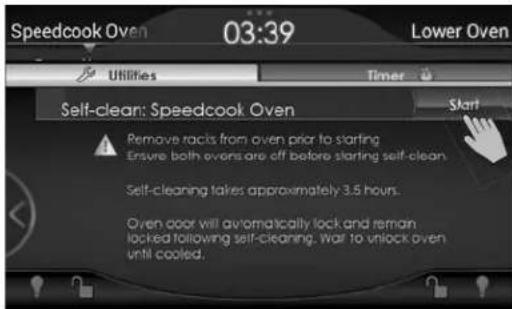
During the self-clean cycle, the oven heats to an extremely high temperature in order to allow food soil to burn off. To initiate a self-clean cycle:
- Make sure the cook cavity is empty and remove the oven rack.
Note: Failure to remove the oven rack will cause the rack to discolor.
- Remove large particles and wipe standing liquids/grease.
Note: Failure to remove large food particles and wipe the oven down may result in smoke while the oven is self-cleaning.
Removing the lower jetplate and cleaning beneath it prior to performing a self-clean cycle (Speedcook Oven ONLY) is recommended.
- From the Advanced screen under Settings, select Self-Clean. Then choose Self-clean Speedcook Oven or Self-clean Lower Oven.
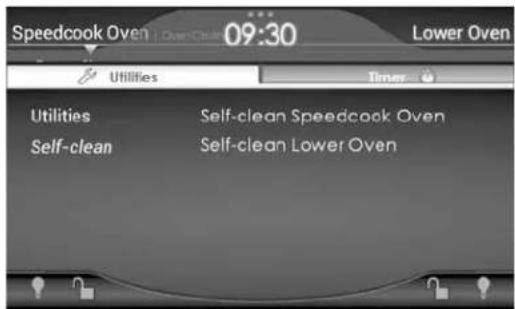
- Tap Start.
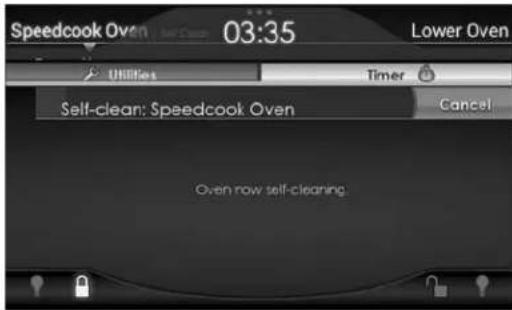
CAUTION
During the self-clean cycle, the oven door is locked and the oven surfaces can become very hot.
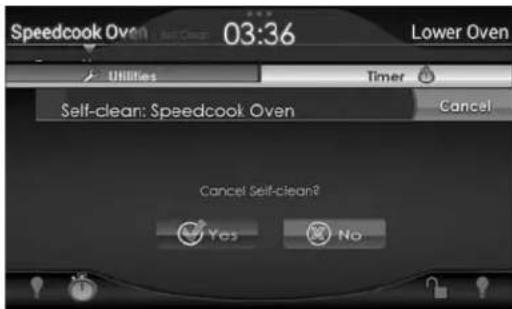
- To immediately terminate a self-clean cycle, tap Cancel.
- When the cleaning cycle is complete and the oven has returned to a safe temperature, the screen displays a message and the oven sounds a tone and powers down.
Frequently Asked Questions
What can I cook in the Speedcook Oven?
What about my recipes?
Anything that is cooked in a regular oven can be cooked in the TurboChef Speedcook oven. Cook settings for favorite recipes can be saved in the oven for quick and easy access whenever cooking one of the family favorites. There are certain foods that require low heat and slow cooking for best results.
Is the lower oven a Speedcook oven also?
No. The lower oven is a conventional/convection oven. Additionally, the lower oven can be used as a warming drawer or proofing oven.
What is the temperature range of the oven?
The upper oven cooks at 250^ F to 500^ F. The lower oven cooks at 100^ F to 500^ F.
Is the oven self-cleaning?
Yes. Both the upper and lower ovens are self-cleaning. Self-cleaning takes approximately 4 hours. You can not self-clean the top and bottom ovens at the same time.
How long does the oven take to preheat?
Preheat takes 8-14 minutes depending on the temperature selected. By default, the oven preheats to 350^ F.
What if moisture collects on control panel?
Cooking foods with high moisture content may cause steam/moisture to collect on the control panel. This is normal and can be simply removed with a dry soft cloth.
How much faster is the Speedcook Oven?
Up to 15 TIMES FASTER than "conventional" cooking. Up to 5-8 TIMES FASTER than "convection" cooking.
Some examples of cook times:
• 12 lb. turkey in 42 minutes
• A single baked potato in 6 minutes
• 20 stalks of asparagus in 45 seconds
- 6 chocolate souffl és in 3 minutes
How does the Speedcook oven work?
The Speedcook oven uses a patented Airspeed Technology to cook food up to 15 times faster than conventional cooking methods while retaining more moisture and locking in juices and flavor.
What is Airspeed Technology?
Airspeed Technology refers to how the air is circulated through the cook cavity. Unlike a convection oven, where air is circulated by a fan in the back of the oven, the TurboChef Speedcook oven, forces the air through "jet plates" located in the top and bottom of the oven, at varying speeds, to accelerate the cooking process while maintaining superior quality.
How do I know what time and temperature to use for the Speedcook oven?
The oven does all the work. The oven contains over 700 preprogrammed time and temperature settings that were developed by an experienced team of chefs, food scientists, and engineers who performed over 6,000 tests. Through the user interface, the oven guides the user through a series of selections: cooking mode (roast), food type (turkey), weight (12 lbs.). From the users selections, the oven can determine the proper cook time and temperature.
Can I make adjustments to the preprogrammed settings?
Yes. When the cook cycle is 80% complete, the user will have the opportunity to tell the oven how they would like it to proceed: Cook Less, Brown Less, Cook & Brown Less, Finished, or continue on without any changes. When the cook cycle is complete, the user again has the opportunity to tell the oven how to proceed: Cook More, Brown More, Cook & Brown More, or Finished.
Once a cook setting has been perfected, it can be saved under the "Favorites" mode. This allows the user to quickly recall the exact cook settings the next time the item is cooked.
Troubleshooting
Before calling for service, please consider the following troubleshooting guidelines.
| Problem Solution | |
| Displays and indicator lights are not working. Verify the oven is receiving power. | |
| The touch screen display is too dark or light. Adjust the display brightness. See page 46. | |
| Sounds are not working. Verify the sound is turned on. See page 44.Verify the volume is turned up. See page 45. | |
| Oven sounds are too loud or soft. Adjust the volume. See page 45. | |
| I forgot to save my changes to a recently-cooked recipe. | See Saving to Favorites, page 26. |
| The clock is set to the wrong time. See Clock under the Settings menu, page 10. | |
| The oven light bulb is burned out. Call Customer Service at 1-888-(845-4641) to order a replacement bulb.Instructions and all necessary components are included with each bulb. | |
| I experience interference with my wireless phone. 90 MHz cordless phones are recommended to limit interference.Also, try operating your wireless network on channel 1 if possible. | |
Note: In the event that the oven displays an alert message that tells you to contact the Viking Range, LLC at 1-888-(845-4641). Before calling, take note of the failure alert displayed on the screen. This will help the service technician diagnose the potential problem in an efficient manner.
Service Information
If service is required, call your authorized service agency.
Have the following information readily available.
- Model number
- Serial number
- Date purchased
• Name of dealer from whom purchased
Clearly describe the problem that you are having. If you are unable to obtain the name of an authorized service agency, or if you continue to have service problems, contact Viking Range, LLC at 1-888-(845-4641), or write to:
VIKING RANGE, LLC
PREFERRED SERVICE
111 Front Street
Greenwood, Mississippi 38930 USA
Record the following information indicated below. You will need it if service is ever required.
The serial number and model number for your appliance are located on the identification plate mounted under the bottom right side of the control panel.
Record the information indicated below. You will need it if service is ever required.
Model number ____
Serial number ____
Date of purchase ____
Date installed
Dealer's name ____
Dealer's Address ____
If service requires installation of parts, use only authorized parts to ensure protection under the warranty.
KEEP THIS MANUAL FOR FUTURE REFERENCE.
Warranty
PROFESSIONAL TURBOCHEF SPEEDCOOK DOUBLE OVEN WARRANTY
TWO YEAR FULL WARRANTY
Electric wall ovens and all of their component parts, except as detailed below*†, are warranted to be free from defective materials or workmanship in normal residential use for a period of two (2) years from the date of original retail purchase or closing date for new construction, whichever period is longer. Viking Range, LLC, warrantor, agrees to repair or replace, at its option, any part which fails or is found to be defective during the warranty period.
*FULL NINETY (90) DAY COSMETIC WARRANTY: Product is warranted to be free from cosmetic defects in materials or workmanship (such as scratches on stainless steel, paint/porcelain blemishes, etc.) for a period of ninety (90) days from the date of original retail purchase or closing date for new construction, whichever period is longer. Any defects must be reported to the selling dealer within ninety (90) days from date of original retail purchase. Viking Range, LLC uses high quality processes and materials available to produce all color finishes. However, slight color variation may be noticed because of the inherent differences in painted parts and porcelain parts as well as differences in kitchen lighting, product locations, and other factors. Therefore, this warranty does not apply to color variation attributable to such factors.
†FULL NINETY (90) DAY WARRANTY IN "RESIDENTIAL PLUS" APPLICATIONS: This full warranty applies to applications where use of the product extends beyond normal residential use, but the warranty period for products used in such applications is ninety (90) days. Examples of applications covered by this warranty are bed and breakfasts, fire stations, private clubs, churches, yachts, etc. Under this "Residential Plus" warranty, the product, its components and accessories are warranted to be free from defective material or workmanship for a period of ninety (90) days from the date of original retail purchase. This warranty excludes use of the product in all commercial locations such as restaurants, food service locations and institutional food service locations.
FIVE YEAR LIMITED WARRANTY ON BURNERS AND ELEMENTS
Any bake element, broil element, or convection element which fails due to defective materials or workmanship (excluding cosmetic failures) in normal household use during the third through fifth year from the date of original retail purchase will be repaired or replaced, free of charge for the part itself, with the owner paying all other costs, including labor. This does not include ignition systems, burner bases, etc.
TERMS AND CONDITIONS
This warranty extends to the original purchaser of the product warranted hereunder and to each transferee owner of the product during the term of the warranty and applies to products purchased and located in the United States and Canada. Products must be purchased in the country where service is requested. If the product or one of its component parts contains a defect or malfunction during the full warranty period after a reasonable number of attempts by the warrantor to remedy the defect or malfunction, the owner is entitled to either a refund or replacement of the product or its component part or parts. Replacement of a component part includes its free installation, except as specified under the limited warranty. Under the terms of this warranty, service must be performed by a factory authorized Viking Range, LLC service agent or representative. Service will be provided during normal business hours, and labor performed at overtime or premium rates shall not be covered by this warranty. Owner shall be responsible for proper installation, providing reasonable and necessary maintenance, providing proof of purchase upon request, and making the appliance reasonably accessible for service. The return of the Owner Registration Card is not a condition of warranty coverage. You should, however, return the Owner Registration Card so that Viking Range, LLC can contact you should any question of safety arise which could affect you.
This warranty gives you specific legal rights, and you may also have other rights which may vary from jurisdiction to jurisdiction.
WHAT IS NOT COVERED BY THIS WARRANTY: This warranty shall not apply to damage resulting from abuse, failure to provide reasonable and necessary maintenance, accident, delivery, negligence, natural disaster, loss of electrical power to the product for any reason, alteration, outdoor use, improper installation, improper operation, or repair or service of the product by anyone other than an authorized Viking Range, LLC service agency or representative. This warranty does not apply to commercial usage.
LIMITATION OF REMEDIES AND DURATION OF IMPLIED WARRANTY
OWNER'S SOLE AND EXCLUSIVE REMEDY FOR A CLAIM OF ANY KIND WITH RESPECT TO THIS PRODUCT SHALL BE THE REMEDIES SET FORTH ABOVE. VIKING RANGE, LLC IS NOT RESPONSIBLE FOR CONSEQUENTIAL OR INCIDENTAL DAMAGE, INCLUDING BUT NOT LIMITED TO FOOD OR MEDICINE LOSS, DUE TO PRODUCT FAILURE, WHETHER ARISING OUT OF BREACH OF WARRANTY, BREACH OF CONTRACT OR OTHERWISE. Some jurisdictions do not allow the exclusion or limitation of incidental or consequential damages, so the above limitation or exclusions may not apply to you. ANY IMPLIED WARRANTIES OF MERCHANTABILITY OR FITNESS FOR A PARTICULAR PURPOSE APPLICABLE TO THIS PRODUCT ARE LIMITED IN DURATION TO THE PERIOD OF COVERAGE OF THE APPLICABLE EXPRESS WRITTEN LIMITED WARRANTIES SET FORTH ABOVE. Some states do not allow limitations on how long an implied warranty lasts, so the above limitation may not apply to you.
WARRANTY SERVICE
To obtain warranty service, contact an authorized Viking Range, LLC service agent, or Viking Range, LLC, 111 Front Street, Greenwood, Mississippi 38930, (888) 845-4641. Provide model and serial number and date of original purchase or closing date for a new construction. For the name of your nearest authorized Viking Range, LLC service agency, call Viking Range, LLC. IMPORTANT: Retain proof of original purchase to establish warranty period.
Specifications subject to change without notice.
Notes
Notes
Viking Range, LLC
111 Front Street
Greenwood, Mississippi 38930 USA
(662) 455-1200
For product information,
call 1-888-(845-4641)
or visit our web site at vikingrange.com in the US
or brigade.ca in Canada
- SERIES
- Congratulations
- Table of Contents
- Getting Started
- Product Controls
- Operation
- Product Care
- IMPORTANT – Please Read and Follow!
- ! DANGER
- WARNING
- CAUTION
- To ensure proper and safe operation:
- Safety Precautions
- Precautions to Avoid Possible Exposure to Excessive Microwave Energy
- Grounding Instructions
- Service
- Power Connections
- Self-Cleaning Oven Guidelines
- RF Interference Considerations
- SAVE THESE INSTRUCTIONS
- Your Professional TurboChef Oven
- Convenience of Pre-programmed Settings
- Visible Arcing in the Speedcook Oven
- Flexibility of Adapting and Saving Your Own Favorite Recipes
- A Full Range of Features
- Auto Reboot
- Before Using the Ovens
- Initial Cleaning
- Setting the Clock and Personal Preferences on the Utilities Screen
- Setting the Clock
- Adjusting Personal Preferences
- Navigating the Control Panel
- Oven Light and Lock
- Moving between Speedcook and Lower Oven Screens
- Canceling a Function
- Moving through Menu Levels
- The Speedcook Oven
- Cooking Example: Choosing the Settings
- Cooking Example: Preheating and Cooking
- Using the Five Main Speedcook Functions
- Starting from Cook Mode
- Starting from Food Item
- Reheating Leftovers
- Starting from Cookbooks
- Starting from Favorites
- Saving a Food Item or Customized Cooking Settings to Favorites
- Naming a Favorite
- Deleting a Dish from Favorites
- Cooking a Dish Already Saved in Favorites
- Starting with Search
- Making Adjustments Making Adjustments during a Cook Cycle
- Making Adjustments at the End of a Cook Cycle
- Adjusting the Cook Time
- Adjusting the Oven Temperature
- Using the Advanced Setting
- Speedcook Oven Tips
- Pre-programmed Cook Settings
- AirCrisp
- Bake
- Bake (cont.)
- Broil
- Broil (cont.)
- Dehydrate
- Roast
- Roast (cont.)
- Toast
- The Lower Oven
- Cook Modes
- Additional Settings
- Warm
- Proof
- Using the Lower Oven
- Temperature Probe Function
- Using the Timer
- Using Utilities
- Adjusting Speedcook Sounds Oven Sounds: On or Off
- Oven Sounds: Volume
- Adjusting the Display Brightness
- Updating the Software
- Backup Favorites
- Restore Favorites
- Accessing Version Information and Installer Setup
- Serial Number
- Showroom Mode
- Self-Cleaning
- Frequently Asked Questions
- Troubleshooting
- Service Information
- Warranty
- PROFESSIONAL TURBOCHEF SPEEDCOOK DOUBLE OVEN WARRANTY
- TWO YEAR FULL WARRANTY
- FIVE YEAR LIMITED WARRANTY ON BURNERS AND ELEMENTS
- TERMS AND CONDITIONS
- LIMITATION OF REMEDIES AND DURATION OF IMPLIED WARRANTY
- WARRANTY SERVICE
- Notes
Brand : VIKING
Model : VDOT730AR
Category : Oven