
FEP350YW2 - Cooker Roper - Free user manual and instructions
Find the device manual for free FEP350YW2 Roper in PDF.

| Product Type | Electric Range |
| Brand | Roper |
| Model | FEP350YW2 |
| Width | 29.88 inches |
| Height | 46.5 inches |
| Depth | 27.75 inches |
| Weight | 150 lbs |
| Power Supply | 240V, 60Hz, 40A |
| Surface Elements | 4 coil elements (2 x 6 inch, 1 x 8 inch, 1 x 6/9 inch dual) |
| Oven Capacity | 5.0 cubic feet |
| Oven Features | Bake, Broil, Keep Warm |
| Self-Cleaning | No |
| Digital Display | No, manual controls |
| Storage Drawer | Yes |
| Broiler | Yes, integrated in oven |
| Control Type | Knobs |
| Drip Pans | Removable, replaceable |
| Oven Door | Removable for cleaning |
| Color | White |
| Warranty | 1 year limited |
Frequently Asked Questions - FEP350YW2 Roper
User questions about FEP350YW2 Roper
0 question about this device. Answer the ones you know or ask your own.
Ask a new question about this device
Download the instructions for your Cooker in PDF format for free! Find your manual FEP350YW2 - Roper and take your electronic device back in hand. On this page are published all the documents necessary for the use of your device. FEP350YW2 by Roper.
USER MANUAL FEP350YW2 Roper
STANDARD-CLEANING ELECTRIC RANGE
2-93
MODEL FEP350Y
A Note To You
Thank you for buying a Roper appliance.
You have purchased a quality, world-class home appliance. Years of engineering experience have gone into its manufacturing. To ensure that you will enjoy many years of trouble-free operation, we have developed this Use and Care Guide. It is full of valuable information on how to operate and maintain your appliance properly and safely. Please read it carefully. Also, please complete and mail the Ownership Registration Card provided with your appliance. This will help us notify you about any new information on your appliance.
Your safety is important to us.
This guide contains safety symbols and statements. Please pay special attention to these symbols and follow any instructions given. Here is a brief explanation of the use of each symbol.
WARNING
This symbol will help alert you to such dangers as personal injury, burns, fire and electrical shock.
CAUTION
This symbol will help you avoid actions which could cause product damage (scratches, dents, etc.) and damage to your personal property.
Our toll-free number, 1-800-44-ROPER (1-800-447-6737), is available 24 hours a day.
If you ever have a question concerning your appliance's operation, or if you need service, first see "If You Need Assistance Or Service" on page 26. If you need further help, feel free to call us. When calling, you will need to know your appliance's complete model number and serial number. You can find this information on the model and serial number plate (see diagram on page 6). For your convenience, we have included a handy place below for you to record these numbers, the purchase date from the sales slip and your dealer's name and telephone number. Keep this book and the sales slip together in a safe place for future reference.
Model Number ____
Dealer Name ____
Serial Number
Dealer Phone ____ ____ ____
Purchase Date ____
Important Safety Instructions
WARNING
To reduce the risk of fire, electrical shock, injury to persons, or damage when using the range, follow basic precautions, including the following:
General
- Read all instructions before using the range.
• Install or locate the range only in accordance with the provided Installation Instructions. The range must be installed by a qualified installer. The range must be properly connected to electrical supply and grounded.
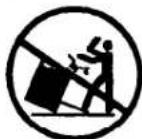
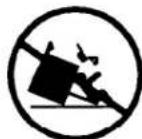
- WARNING: To reduce the risk of tipping of the appliance, the appliance must be secured by a properly installed anti-tip bracket. To check if the bracket is installed properly, see "The anti-tip bracket" on page 18.
- CAUTION: Do not store things children might want above the range. Children could be burned or injured while climbing on it.
- Do not leave children alone or unattended in area where the range is in use. They should never be allowed to sit or stand on any part of the range. They could be burned or injured.
- Do not operate the range if it is damaged or not working properly.
- Do not use the range for warming or heating the room. Persons could be burned or injured, or a fire could start.
- Use the range only for its intended use as described in this manual.
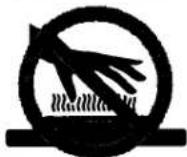
- DO NOT TOUCH SURFACE UNITS, AREAS NEAR UNITS, HEATING ELEMENTS OR INTERIOR SURFACES OF OVEN. Surface units and heating elements may be hot even though they are dark in color. Areas near surface units and interior surfaces of an oven become hot enough to cause burns. During and after use, do not touch, or let clothing or other flammable materials contact surface units, areas near units, heating elements or interior surfaces of oven until they have had sufficient time to cool. Other surfaces of the range may become hot enough to cause burns; such as, the oven vent opening, the surface near the vent opening, the cooktop, the oven door and window.

- Do not wear loose or hanging garments when using the range. They could ignite if they touch a hot surface unit and you could be burned.
- Use only dry potholders. Moist or damp potholders on hot surfaces may result in burns from steam. Do not let potholder touch hot heating elements. Do not use a towel or bulky cloth for a potholder. It could catch on fire.
- Keep range vents unobstructed.
- Do not heat unopened containers. They could explode. The hot contents could cause burns and container particles could cause injury.
- Do not store flammable materials on or near the range. The fumes can create an explosion and/or fire hazard.
When using the cooktop
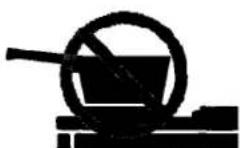
• Make sure the reflector bowls are in place during cooking. Cooking without reflector bowls may subject the wiring and components underneath them to damage.
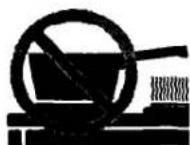
- Do not line reflector bowls with aluminum foil or other liners. Improper installation of these liners may result in a risk of electric shock or fire.
- Select a pan with a flat bottom that is about the same size as the surface unit. If pan is smaller than the surface unit, some of the heating element will be exposed and may result in the igniting of clothing or potholders. Correct pan size also improves cooking efficiency.
- Check to be sure glass cooking utensils are safe for use on the range. Only certain types of glass, glass-ceramic, ceramic, earthenware or other glazed utensils are suitable for cooktops without breaking due to the sudden change in temperature.
- Never leave surface units unattended at high heat settings. A boilover could result and cause smoking and greasy spillovers that may ignite.
- Turn pan handles inward, but not over other surface units. This will help reduce the chance of burns, igniting of flammable materials, and spills due to bumping of the pan.
When using the oven
• Always position oven rack(s) in desired location while oven is cool. If a rack must be removed while oven is hot, do not let potholder contact hot heating element in oven.
- Use care when opening oven door. Let hot air or steam escape before removing or replacing food.
Grease
- Grease is flammable. Do not allow grease to collect around cooktop or in vents. Wipe spillovers immediately.
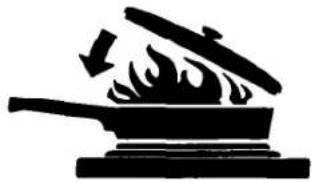
natural_image
Silhouette of a frying pan with flames and smoke, no text or symbols present- Do not use water on grease fires. Never pick up a flaming pan. Smother flaming pan on range by covering with a well-fitted lid, cookie sheet or flat tray. Flaming grease outside of pan can be extinguished with baking soda or, if available, a multipurpose dry chemical or foam-type extinguisher.
Care and cleaning
- Do not soak removable heating elements in water. The element will be damaged and shock or fire could result.
- Do not clean door heat seal. It is essential for a good seal. Care should be taken not to rub, damage or move the seal. Clean only parts recommended in this Use and Care Guide.
- Do not repair or replace any part of the range unless specifically recommended in this manual. All other servicing should be referred to a qualified technician.
- Disconnect the electrical supply before servicing the range.
- SAVE THESE INSTRUCTIONS -
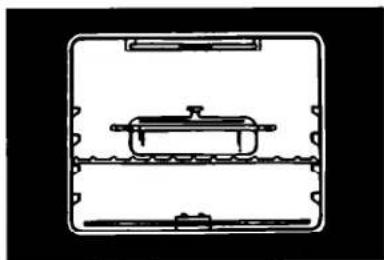
Parts And Features
This section contains captioned illustrations of your range. Use them to become familiar with the location and appearance of all parts and features.
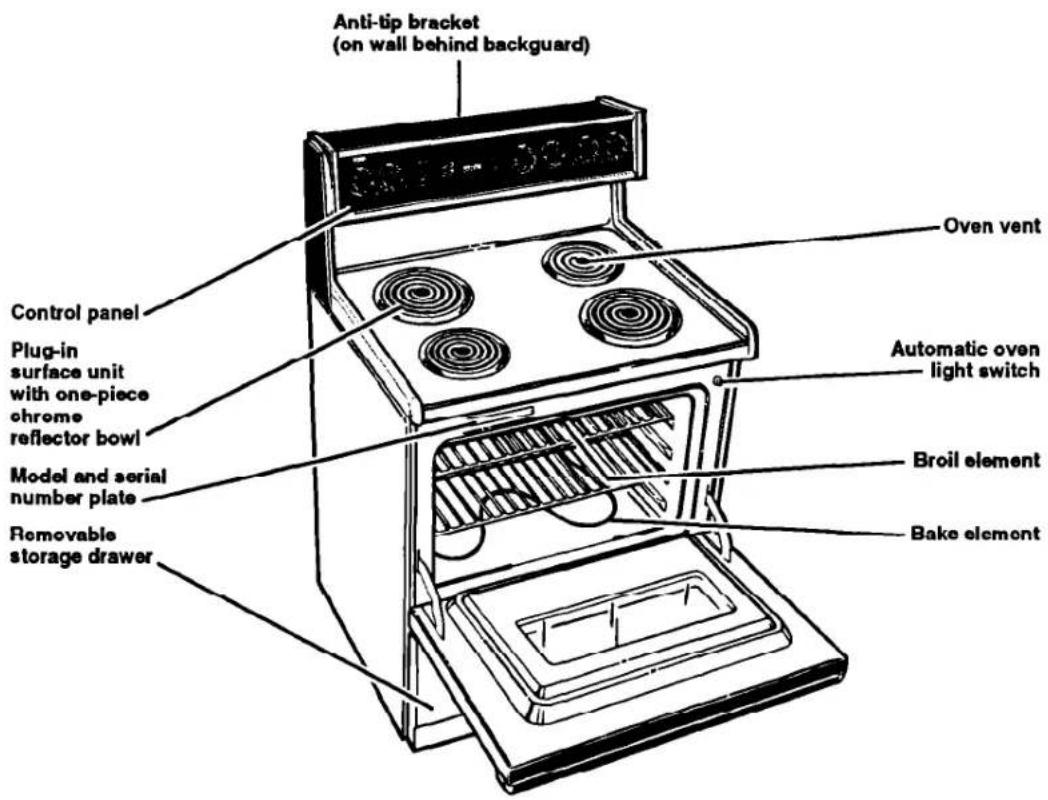
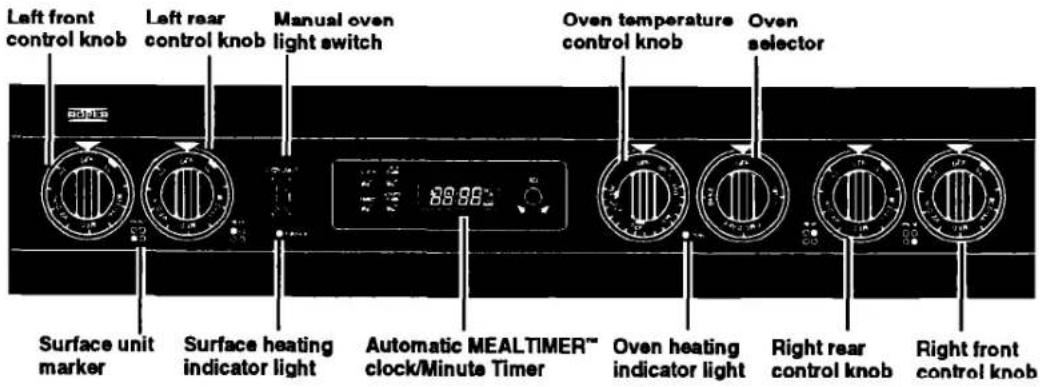
Control panel
Using Your Range
In This Section
Page
Using the surface units 7
Positioning racks and pans 9
For best air circulation....10
Using aluminum foil for baking 10
Setting the electronic clock....11
Using the electronic Timer 11
Baking/roasting 12
Adjusting the oven temperature control .....12
Page
Broiling 13
Broiling tips 14
Energy saving tips....14
Using the automatic MEALTIMER™ clock ..... 15
The oven vent 17
The storage drawer 17
The anti-tip bracket 18
To obtain the best cooking results possible, you must operate your range properly. This section gives you important information for efficient and safe use of your range.
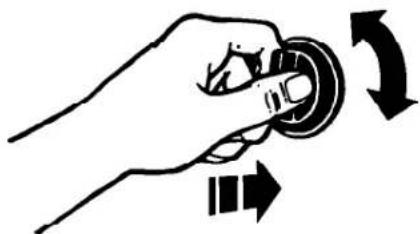
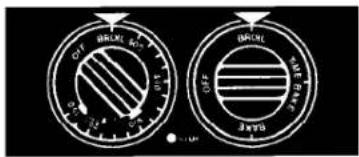
Using the surface units
Push in control knobs before turning them to a setting. You can set them anywhere between HI and OFF.
Surface unit markers
The solid dot in the surface unit marker shows which surface unit is turned on by that knob.
Surface heating indicator light
The SURFACE HEATING Indicator Light on the control panel will glow when a surface unit is turned on.
natural_image
Hand holding a circular button with directional arrows indicating rotation (no text or symbols)WARNING
Burn and Fire Hazard
Be sure all control knobs are turned to OFF and all indicator lights are OFF when you are not cooking.
Someone could be burned or a fire could start if a surface unit is accidentally left ON.
Until you get used to the settings, use the following as a guide. For best results, start cooking at the high setting; then turn the control knob down to continue cooking.
| SETTING | RECOMMENDED USE |
| HI | To start foods cooking.To bring liquids to a boil. |
| MED-HI | To hold a rapid boil.To fry chicken or pancakes. |
| MED | For gravy, pudding and icing.To cook large amounts of vegetables. |
| MED-LO | To keep food cooking after starting it on a higher setting. |
| LO | To keep food warm until ready to serve. |
Cookware tips
- Select a pan that is about the same size as the surface unit.
- NOTE: For best results and greater energy efficiency, use only flat-bottomed utensils that make good contact with the surface units. Utensils with rounded, warped, ridged (porcelain enamel-ware) or dented bottoms could cause severe overheating, which damages the utensil and/or surface unit.
Woks, canners and teakettles with flat bottoms suitable for use on your cooktop are now available in most stores that sell housewares.
- The pan should have straight sides and a tight-fitting lid.
- Choose medium to heavy gauge (thickness) pans that are fairly light-weight.
- The pan material (metal or glass) affects how fast heat transfers from the surface unit through the pan material and how evenly heat spreads over the pan bottom. Choose pans that provide the best cooking results.
- Handles should be made of sturdy, heat-resistant material and be securely attached to the pan.
CAUTION
Product Damage Hazard
- If a surface unit stays red for a long time, the bottom of the pan is not flat enough or is too small for the surface unit. Prolonged usage of incorrect utensils for long periods of time can result in damage to the surface unit, cooktop, wiring and surrounding areas. To prevent damage, use correct utensils, start cooking on HI and turn control down to continue cooking.
- Do not leave an empty utensil, or one which has boiled dry, on a hot surface unit. The utensil can overheat and may damage the utensil or surface unit.
Home canning information
To protect your range:
- Use flat-bottomed canners/pans for best results.
- Use the largest surface unit for best results. Also, use a canner/pan which can be centered over the surface unit and which does not extend more than one inch outside surface unit area. Large diameter canners/pans, if not properly centered, trap heat and can cause damage to the cooktop.
- Do not place canner on two surface units at the same time. Too much heat will build up and will damage the cooktop.
- Start with hot water. This reduces the time the control is set on high. Reduce heat setting to lowest position needed to keep water boiling.
- Keep reflector bowls clean for best heat reflection.
- To prolong the life of the elements:
- Prepare small batches at a time.
- Do not use elements for canning all day.
Optional canning kit
The large diameter of most water-bath or pressure canners combined with high heat settings for long periods of time can shorten the life of regular surface units and cause damage to the cooktop.
If you plan to use the cooktop for canning, we recommend the installation of a Canning Kit. Order the kit (Part No. 242905) from your Roper dealer or authorized Roper service company.
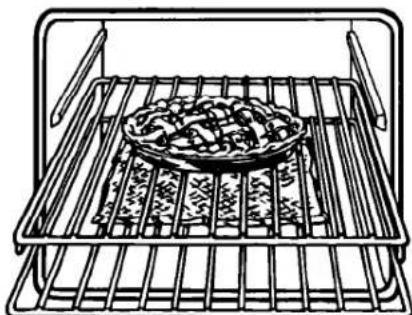
Positioning racks and pans
For baking/roasting with one rack, place the rack so the top of the food will be centered in the oven.
Rack placement for specific foods:
| FOOD | RACK POSITION |
| Frozen pies, large roasts, turkeys | Lowest level or 2nd level from bottom |
| Angel and bundt cakes, most quick breads, yeast breads, casseroles, meats | 2nd level from bottom |
| Cookies, biscuits, muffins, cakes, nonfrozen pies | 2nd or 3rd level from bottom |
When baking on two racks, arrange racks on bottom and third level from bottom.
NOTE: For recommended rack placement when broiling, see "Broiling rack position chart" on page 14.
WARNING
Personal Injury Hazard
- Always position oven rack(s) in desired location before turning oven on. Be sure the rack(s) is level.
- If rack(s) must be moved while oven is hot, use potholders or oven mitts to protect hands.
Failure to follow the above precautions may result in personal injury.
For best air circulation
The hot air must circulate around the pans in the oven for even heat to reach all parts of the oven. This results in better baking.
- Place the pans so that one is not directly over the other.
- For best results, allow 1 12 to 2 inches (4-5 cm) of space around each pan and between pans and oven walls. There must be a minimum space of 1 inch (2.5 cm).
- Use only one cookie sheet in the oven at one time.
Use the following as a guide to determine where to place the pans.
One pan
Place in the center of the oven rack.
Two pans
Place in opposite corners of the oven rack.
Three or four pans
Place in opposite corners on each oven rack.
Stagger pans so no pan is directly over another.

natural_image
Line drawing of two circular containers on a metal rack inside an oven (no text or symbols)Using aluminum foil for baking
Use aluminum foil to catch spillovers from pies or casseroles.
- Place the foil on the oven rack below the rack with the food. Turn up foil edges and make sure foil is about 1 inch (2.5 cm) larger all around than the dish holding the food.
- Do not cover the entire rack with aluminum foil. It will reduce air circulation and cause poor cooking results.
- Do not line oven bottom with foil or other liners. Poor baking will result.
WARNING
Electrical Shock and Fire Hazard
Do not allow foil to touch the heating elements because it will damage them and could result in shock or fire hazard.
natural_image
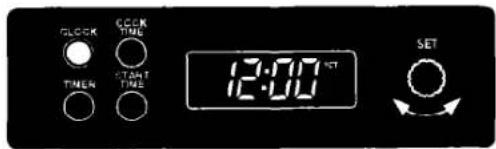
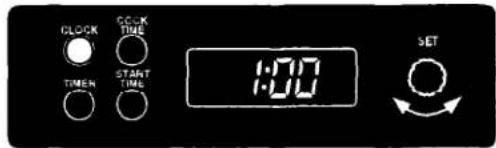
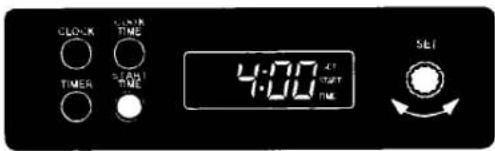
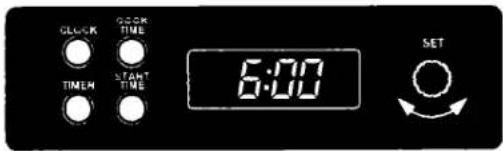
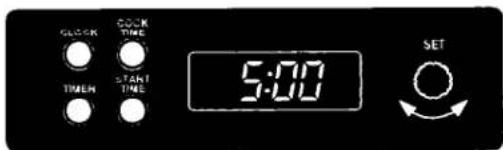
Line drawing of a grater setup with a plate of food and utensils (no text or symbols)Setting the electronic clock
When you first plug in the range, or if your electricity was off for a while, all indicators will come on and the display will show "88:88". The display will then change to "--:-". SET and the Clock Indicator will show in the display.
- Push the Clock button. "12:00" will show in the display.
-
Turn the Set Knob until the correct time shows in the display.
-
Push the Clock button to start clock operation.

Using the electronic Timer
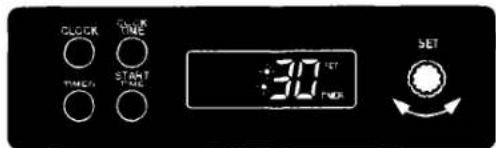
The Timer does not start or stop the oven. It works like a kitchen timer. Set it in minutes up to 24 hours.
- Push the Timer button. SET, TIMER, HR and MN will come on and the display will show ":00".
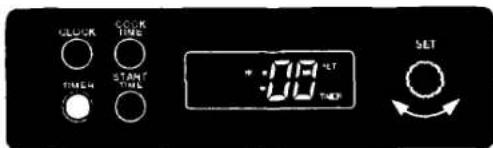
- Turn the Set Knob until the desired time shows in the display. The timer will begin counting down two seconds after the time is set. You will hear two tones when one minute is remaining on the timer. When the time is up, you will hear three tones. After the three tones, the display will return to the time of day and TIMER will flash. You will hear two tones every 10 seconds until you cancel the Timer.
- To cancel Timer after countdown is over, push the Clock button and the display will return to the time of day. TIMER will stop showing.
To cancel Timer before countdown is over:
Push the Timer button. The display will show SET, TIMER, HR, MN and ":00" for a few seconds. The time of day will then be displayed.
Baking/roasting
-
Position the rack(s) properly before turning on the oven. To change rack position, lift rack at front and pull out. For further information, see "Positioning racks and pans" on page 9.
-
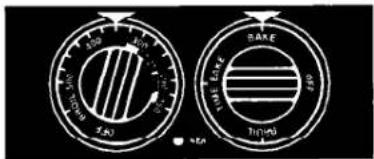
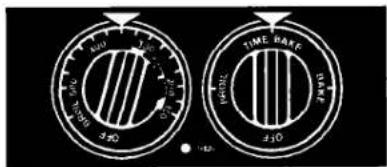
Set the Oven Selector to BAKE.
-
Set the Oven Temperature Control Knob to the baking/roasting temperature you want. The OVEN HEATING Indicator Light will come on. The oven is preheated when the OVEN HEATING Indicator Light first goes off. NOTE: Do not preheat oven when roasting or cooking items such as casseroles.
-
Put food in the oven. During baking/roasting, the elements will turn on and off to maintain the temperature setting. The OVEN HEATING Indicator Light will turn on and off with the elements. NOTE: The top element helps heat during baking/roasting, but does not turn red.
-
When baking/roasting is done, turn both the Oven Selector and the Oven Temperature Control Knob to OFF. The OVEN HEATING Indicator Light will go off.
natural_image
Pure technical diagram of a mechanical component with no text or symbols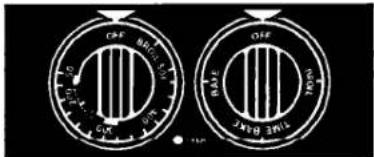
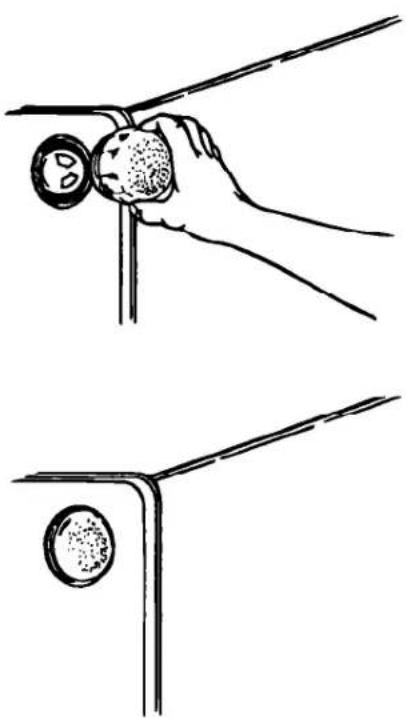
Adjusting the oven temperature control
Oven temperature controls will gradually shift after years of use. So, even though your new oven is properly adjusted to provide accurate temperatures, it may cook faster or slower than your old oven.
If, after using the oven for a period of time, you are not satisfied with the temperature settings, you can change them by following these steps:
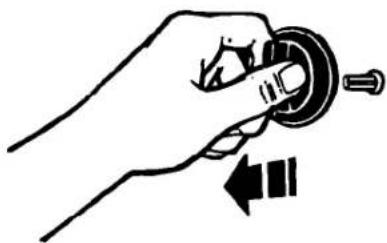
- Turn the Oven Temperature Control Knob to the off position. Pull knob straight off and flip it over.
natural_image
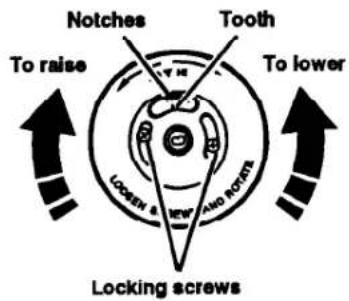
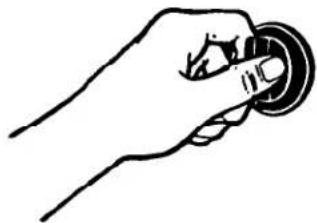
Hand holding a circular mechanical component with a knob, showing a left-hand rule (no text or symbols present)- Loosen the locking screws inside the control knob. Note the position of the notches.
- To lower the temperature, hold knob handle firmly and move the tooth a notch counterclockwise. Each notch equals about 10°F (5°C).
- To raise the temperature, hold knob handle firmly and move the tooth a notch clockwise. Each notch equals about 10^ F ( 5^ C).
Tighten the locking screws and replace the control knob.
Broiling
- Position the rack properly before turning on the oven. Position rack so that the surface of the food is at least 3 inches (7.4 cm) away from the broil element. See "Broiling rack position chart" on page 14.
- Put the broiler pan and food on the rack.
- Close the door to the Broil Stop position (open about 4 inches [10.2 cm]). The door will stay open by itself.
- Set the Oven Selector and Oven Temperature Control Knob to BROIL. The OVEN HEATING Indicator Light will come on.
NOTE: Do not preheat oven when broiling.
- When broiling is done, turn both the Oven Selector and Oven Temperature Control Knob to OFF. The OVEN HEATING Indicator Light will go off.
Custom broil
- If food is cooking too fast, turn the Oven Temperature Control Knob counterclockwise until the OVEN HEATING Indicator Light goes off.
- If you want the food to broil slower from the start, set the Oven Temperature Control Knob between 170°F and 325°F (77°C and 163°C). These temperature settings allow the broil heating element to cycle and to slow cooking. The lower the temperature, the slower the cooking.
- Fish and chicken are some foods that may cook better if you use lower broiling temperatures.
The Oven Selector must be on BROIL for all broiling temperatures.
NOTE: Leave the oven door partly open whenever using the oven to broil. This allows the oven to maintain proper temperatures.
Broiling rack position chart
| RACK POSITION FROM BOTTOM | TYPE OF FOOD/ DONENESS |
| 4 | Hamburger patties and thin steaks, 1⁄2" thick or less |
| 3 | Quickly searing food, rare and medium steaks, medium patties, ham slices, fish steaks, frankfurters |
| 2 | Well-done steaks and patties, lamb chops, split chicken, pork steaks and chops, whole fish |
Broiling tips
- Use the broiler pan and grid for broiling. They are designed to drain excess liquid and fat away from the cooking surface to help prevent spatter, smoke or fire.
• Refer to a broiling chart in a reliable cookbook for correct broiling times.
• After broiling, remove the broiler pan from the oven when you remove the food. Drippings will bake on the pan if you leave it in the heated oven.
WARNING
Fire Hazard
- Place meat the correct distance from the element. Meat placed too close to the element may spatter, smoke, burn or catch fire during broiling.
- To ensure adequate grease drainage, do not use cookie sheets or similar pans for broiling. Also, covering the broiler grid with foil is not recommended. Poor drainage of grease may result in fire. If foil is used, cut slits in foil to line up with all openings in broiler grid. Grease can then drain away and cool in pan.
Energy saving tips
Although the energy used for cooking is usually a very small percentage of the total energy used in the home, cooking energy can be used efficiently. Here are some tips to help you save energy when using your cooking product.
- Use pans with flat bottoms, straight sides and tight-fitting lids.
- Match the pan to the surface unit size.
• Cook with a minimum of liquid or fat to help shorten cooking time. - Preheat pans only when recommended and for the shortest time possible.
- Start food on higher heat settings, then set surface unit control on low or off to finish cooking. Use retained heat for cooking when possible.
-
Use the more efficient surface units instead of the oven when possible.
-
Turn on the surface unit only after placing filled pan on the unit.
- "Oven peeking" may cause heat loss, longer cooking times and unsatisfactory baking results. Rely on your timer to keep track of the cooking time.
- Bake cakes, pies or cookies when oven is warm. Best time is after a meal has been cooked in it.
- Preheat the oven no longer than necessary.
- Plan your meals for the most efficient use of the range. When using the oven to cook one food, try to cook the rest of the meal in it also.
- Do not preheat when broiling, roasting or cooking items such as casseroles.
- Keep reflector bowls clean for best heat reflection.
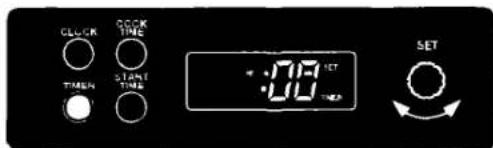
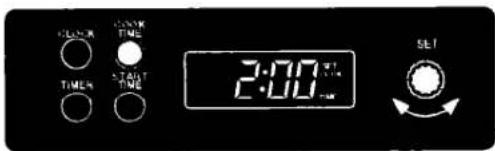
Using the automatic MEALTIMER™ clock
The automatic MEALTIMER clock is designed to turn the oven on and off at times you set ... even when you are not around.
Delayed time baking/roasting is ideal for foods which do not require a preheated oven, such as meats and casseroles. Do not use the delayed time cycle for cakes, cookies, etc. ... undercooking will result.
Before using the MEALTIMER clock, make sure the clock is set to the correct time of day. (See "Setting the electronic clock" on page 11.)
To delay start and stop automatically:
- Position the oven rack(s) properly and place the food in the oven.
- Push the Cook Time button. Then turn the Set Knob to set the cooking time you want (up to 11 hours, 50 minutes).
After five seconds, only COOK and the cooking time will show in the display.
- Push the Start Time button. Then turn the Set Knob to set the start time you want (up to 11 hours, 59 minutes from the current time of day). In example shown, a two-hour cooking time and a 4 o'clock start time would cause the oven to turn off at 6 o'clock.
After five seconds, only DELAY and the time of day will show in the display.
- Set the Oven Selector to TIME BAKE.
- Set the Oven Temperature Control Knob to the baking/roasting temperature you want. The oven will now start and stop automatically. The OVEN HEATING and ON Indicator Lights will come on when the start time is reached. Only COOK and the cooking time will show in the display.
- After baking/roasting is done, you will hear three tones, the display will return to the time of day, and COOK will flash. You will hear two tones every 10 seconds until you cancel the MEALTIMER clock. To cancel, push any button and COOK will stop showing. Turn both the Oven Selector and Oven Temperature Control Knob to OFF. NOTE: If the Timer is on, the display will return to the countdown. COOK will flash and TIMER will come on. Push any button to make COOK stop showing.
To cancel the setting after oven has started: Push the Cook Time button twice.
To cancel the setting before oven has started: Push the Cook Time button twice. Then push the Start Time button twice.

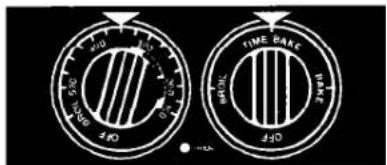
To start baking/roasting now and stop automatically:
- Position the oven rack(s) properly and place the food in the oven.
-
Push the Cook Time button. Then turn the Set Knob to set the cooking time you want (up to 11 hours, 50 minutes).
After five seconds, only COOK and the cooking time will show in the display. -
Set the Oven Selector to TIME BAKE.
-
Set the Oven Temperature Control Knob to the baking/roasting temperature you want.
-
After baking/roasting is done, you will hear three tones, the display will return to the time of day, and COOK will flash. You will hear two tones every 10 seconds until you cancel the MEALTIMER™ clock. To cancel, push any button and COOK will stop showing. Turn both the Oven Selector and Oven Temperature Control Knob to OFF.
NOTE: If the Timer is on, the display will return to the countdown. COOK will flash and TIMER will come on. Push any button to make COOK stop showing.
To cancel the setting after oven has started: Push the Cook Time button twice.
WARNING
To avoid sickness and food waste when using the MEALTIMER™ clock:
- Do not let most UNFROZEN food stand for more than two hours before cooking starts.
- Do not allow food to remain in oven for more than two hours after the end of cooking cycle.
NOTE: Do not use foods that will spoil while waiting for cooking to start. Such foods are: dishes with milk or eggs, cream soups, and cooked meats or fish. Also, foods containing baking powder or yeast will not rise properly when cooked using delay start.
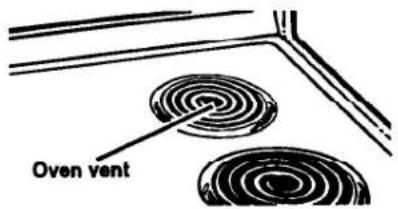
The oven vent
Hot air and moisture escape from the oven through a vent under the right rear surface unit. You can cook on the unit or keep food warm on it while the oven is on. The vent is needed for air circulation. Do not block the vent. Poor baking/ roasting can result.
NOTE: Plastic utensils left over the vent can melt.
WARNING
Burn and Fire Hazard
If you leave a utensil on the right rear surface unit, use potholders when moving it. Pan handles can become hot enough to burn.
Keep flammable materials away from oven vent.
Failure to do so can result in burns or a fire.
The storage drawer
You can remove the storage drawer to make it easier to clean under the range. Use care when handling the drawer.
Removing the storage drawer:
- Empty drawer of any pots and pans before removing drawer. Pull drawer straight out to the first stop. Lift front and pull out to the second stop.
- Lift back slightly and slide drawer all the way out.
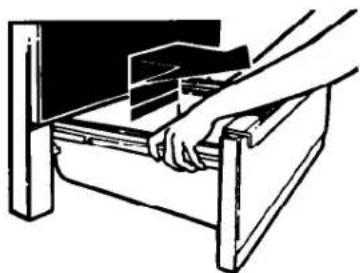
natural_image
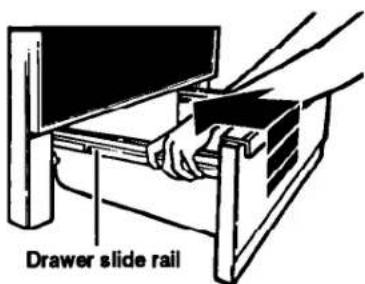
Line drawing of a hand inserting or removing a device into a drawer (no text or symbols)Replacing the storage drawer:
- Fit ends of drawer slide rails into the drawer guides on both sides of opening.
- Lift drawer front and push in until metal stops on drawer slide rails clear white stops on drawer guides. Lift drawer front again to clear second stop and slide drawer closed.
The anti-tip bracket
The range will not tip during normal use. However, tipping can occur if you apply too much force or weight to the open door without the anti-tip bracket properly secured.
To verify the anti-tip bracket is engaged:
- Look to see if the anti-tip bracket is attached with screws to the wall behind the backguard.
- Make sure the cable tether on the back of the range is secured by the two hooks on the bracket.
• See Installation Instructions for further details.
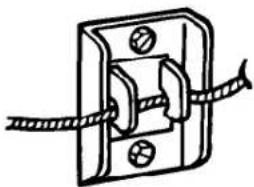
natural_image
Simple line drawing of a mechanical clamp or bracket with two bolts and a coiled cable (no text or symbols)Caring For Your Range
In This Section
Page
Surface units and reflector bowls ....19
Lift-up cooktop 22
Removing the oven door 22
Page
Cleaning chart 23
The oven light 25
Your range is designed for ease of care. You can do most cleaning with items found around your home. Cleaning your range whenever spills or soiling occurs will help to keep it looking and operating like new.
WARNING
Burn and Electrical Shock Hazard Make sure all controls are OFF and the range is cool before cleaning.
Failure to do so can result in burns or electrical shock.
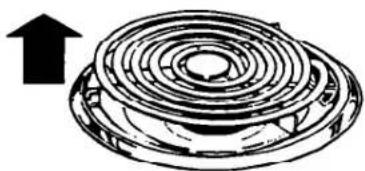
Surface units and reflector bowls
Removing
- Make sure all surface units are off and cool before removing surface units and reflector bowls.
natural_image
Line drawing of a hand holding a circular object (no text or symbols)- Lift the edge of the unit, opposite the receptacle, just enough to clear the element holddown clip and the reflector bowl.
natural_image
Technical line drawing of a mechanical component with concentric rings and a central hole, no text or symbols present.CARING FOR YOUR RANGE
-
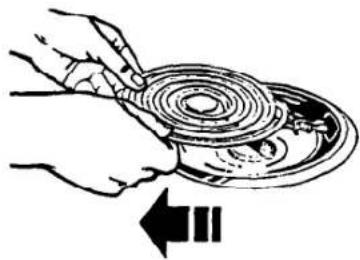
Pull the surface unit straight away from the receptacle.
-
Lift out the reflector bowl. See "Cleaning chart" on page 23 for cleaning instructions.
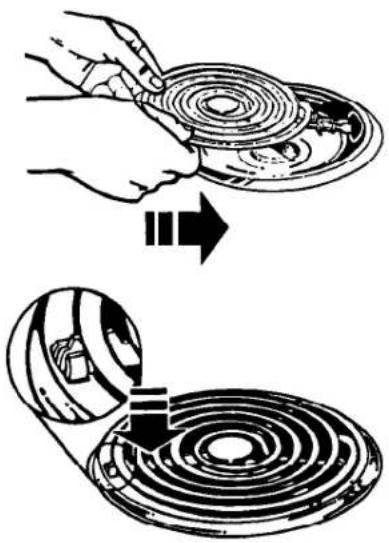
Replacing
-
Make sure all surface units are off and cool before replacing surface units and reflector bowls.
-
Line up openings in the reflector bowl with the surface unit receptacle and the element hold-down clip.
natural_image
Illustration of hands holding a circular object with concentric rings, no text or symbols present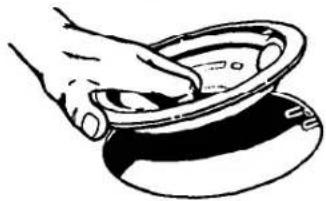
natural_image
Illustration of a hand gripping a circular object with a handle (no text or symbols)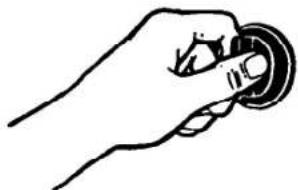
natural_image
Hand holding a circular button or knob, no text or symbols visible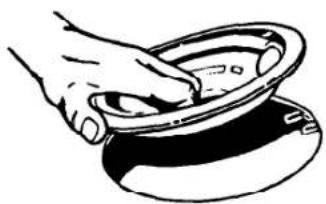
natural_image
Illustration of a hand pressing down on a metallic top hat (no text or symbols)CARING FOR YOUR RANGE
- Hold the surface unit as level as possible with the terminal just started into the receptacle. Push the surface unit terminal into the receptacle.
- When terminal is pushed into the receptacle as far as it will go, push down the edge of the surface unit opposite the receptacle. The element hold-down clip will keep the surface unit from moving around.
NOTE: Reflector bowls reflect heat back to the utensils on the surface units. They also help catch spills. When they are kept clean, they reflect heat better and look new longer.
If a reflector bowl gets discolored, some of your utensils may not be flat enough, or some may be too large for the surface unit. In either case, some of the heat that's meant to go into or around a utensil goes down and heats the reflector bowl. This extra heat can discolor it.
natural_image
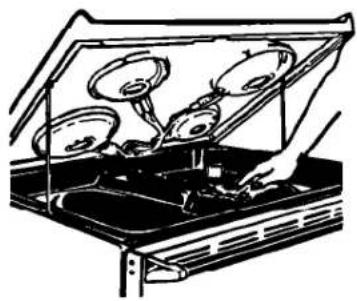
Two-step diagram showing a hand holding a circular component being inserted into a ring, with no text or symbols present.Lift-up cooktop
- Lift front of cooktop at both front corners until the support rods lock into place.
WARNING
Personal Injury and Product Damage Hazard
- Be sure both support rods are fully extended and in the locked position. Failure to do so could result in personal injury from the cooktop accidentally falling.
-
Do not drop the cooktop. Damage can result to the porcelain and the cooktop frame.
-
Wipe with warm, soapy water. Use a soapy steel-wool pad on heavily soiled areas.
- To lower the cooktop, lift cooktop from both sides while pressing the support rods back to unlock them. Lower the cooktop into place.
Removing the oven door
Removing the oven door will help make it easier to clean the oven.
WARNING
Burn and Electrical Shock Hazard Make sure all controls are OFF and the oven is cool before removing oven door. Failure to do so can result in burns or electrical shock.
- Open the door to the first stop position.
- Hold the door at both sides and lift it at the same angle it is in.
- To replace, fit the bottom corners of the door over the ends of the hinges.
Push the door down evenly. The door will close only when it is on the hinges correctly.
natural_image
Line drawing of a car hood with four panes and a hand using a tool (no text or symbols)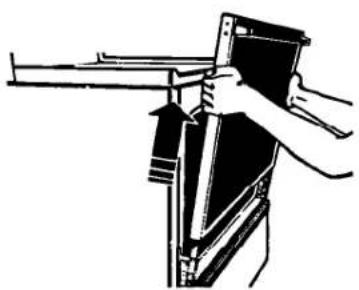
natural_image
Illustration of hands assembling or adjusting a mechanical component (no text or symbols visible)Cleaning chart
Use the following table to help you clean all parts of your range.
| PART | WHAT TO USE | HOW TO CLEAN |
| Control knobs | Sponge and warm, soapy water | Turn knobs to OFF and pull straight away from control panel.Wash, rinse and dry thoroughly. Do not soak.Replace knobs. Make sure all knobs point to OFF.DO NOT USE steel wool or abrasive cleaners. They may damage the finish of the knobs. |
| Control panel | Sponge and warm, soapy waterORPaper towel and spray glass cleaner | Wash, rinse and dry thoroughly.DO NOT USE steel wool or abrasive cleaners. They may damage the finish.DO NOT spray cleaner directly on panel.Apply cleaner to paper towel. |
| Exterior surfaces (other than control panel) | Sponge and warm, soapy water | Wash, rinse and dry thoroughly.USE nonabrasive, plastic scrubbing pad on heavily soiled areas.Do not use abrasive or harsh cleansers. They may damage the finish.NOTE: Do not allow foods containing acids (such as vinegar, tomato or lemon juice) to remain on surface. Acids may remove the gloesy finish. Also wipe up milk or egg spills when cooktop is cool. |
| Surface units | No cleaning required | Spatters or spills will burn off.Do not immerse in water. |
| Chrome reflector bowls | Warm, soapy water and a nonabrasive, plastic scrubbing pad | Wash, rinse and dry thoroughly.Clean frequently.Do not use abrasive or harsh cleansers. |
| Broller pan and grid (clean after each use) | Steel-wool pad and warm, soapy water | Wash, rinse and dry thoroughly. |
| Oven racks | Steel-wool pad and warm, soapy water | Wash, rinse and dry thoroughly. |
| Oven door window | Paper towel and spray glass cleanerORWarm, soapy water and a nonabrasive, plastic scrubbing pad | Make sure oven is cool.Follow directions provided with the cleaner.Wash, rinse and dry thoroughly. |
continued on next page
CARING FOR YOUR RANGE
| PART | WHAT TO USE | HOW TO CLEAN |
| Oven cavity | Sponge and warm, soapy waterSoapy steel-wool pad for heavily soiled areasORCommercial oven cleaner for heavily soiled areasHeavy-duty aluminum foil or shallow pan used while cooking | Make sure oven is coolRemove door for easier access. (See page 22.)Wash, rinse and dry well.Remove door for easier access.Place newspaper on floor to protect floor surface.Follow directions provided with the oven cleaner.Rinse well with clear water.Use in well-ventilated room.Do not allow commercial oven cleaners to contact the heating elements, heat seal, thermostat or exterior surfaces of the range. Damage will occur.Place piece of foil or shallow pan, slightly larger than the cooking container, on lower rack to catch spillovers.NOTE: Do not use foil or foil liner to cover the oven floor. Poor baking/roasting results could occur. |
The oven light
The oven light will come on when you open the oven door. To turn the light on when the oven door is closed, use the Oven Light Switch on the control panel.
WARNING
Electrical Shock and Personal Injury Hazard
- Make sure oven and light bulb are cool and power to the range has been turned OFF before replacing the light bulb. Failure to do so could result in electrical shock or burns.
- The bulb cover must be in place when using the oven. The cover protects the bulb from breaking, and from high oven temperatures. Because bulb cover is made of glass, be careful not to drop it. Broken glass could cause injury.
To replace the oven light:
- Unplug appliance or disconnect at main power supply.
- Remove the glass bulb cover in the back of the oven by screwing it out counterclockwise.
-
Remove the light bulb from its socket. Replace the bulb with a 40-watt appliance bulb.
-
Replace the bulb cover by screwing it in clockwise. Plug in appliance or reconnect at the main power supply.
natural_image
Illustration of a hand holding a ball near a pole, with another close-up showing the same ball (no text or symbols present)If You Need Assistance Or Service
This section is designed to help you save the cost of a service call. Part 1 of this section outlines possible problems, their causes, and actions you can take to solve each problem. Parts 2 and 3 tell you what to do if you still need assistance or service. When calling our toll-free telephone number for help or calling for service, please provide a detailed description of the problem, your appliance's complete model and serial numbers and the purchase date. (See page 2.) This information will help us respond properly to your request.
1. Before calling for assistance ...
Performance problems often result from little things you can find and fix without tools of any kind. Please check the chart below for problems you can fix. It could save you the cost of a service call.
| PROBLEM | POSSIBLE CAUSE | SOLUTION |
| Nothing will operate | The power cord is not plugged into a live circuit with proper voltage.A household fuse has blown or a circuit breaker has tripped. | Plug the power cord into a live circuit with proper voltage. (See Installation Instructions.)Replace household fuse or reset circuit breaker. |
| The oven will not operate | You have not turned the Oven Selector to BAKE or BROIL.You have set a delayed start time.You have not turned the Oven Temperature Control Knob to a temperature setting.You have not set the automatic MEALTIMER clock correctly. | Turn the Oven Selector to the desired setting.Wait for the start time to be reached.Turn the Oven Temperature Control Knob to a temperature setting.Set the MEALTIMER clock correctly.(See “Using the automatic MEALTIMERTM clock” on page 15.) |
| The surface units will not operate | A household fuse has blown or a circuit breaker has tripped.You have not plugged in surface units all the way.You are not setting the control knobs correctly. | Replace household fuse or reset circuit breaker.Plug surface units in all the way. (See “Replacing” on page 20.)Push control knobs in before turning to a setting. |
| Control knob(s) will not turn | You are not pushing in before turning. | Push control knob(s) in before turning to a setting. |
IF YOU NEED ASSISTANCE OR SERVICE
| PROBLEM | POSSIBLE CAUSE | SOLUTION |
| Cooking results are not what you expected | The range is not level.The oven temperature seems too low or too high.You have not preheated the oven as the recipe calls for.The recipe has never been tested or is not from a reliable source.The pans are not the type or size recommended in the recipe.There is not proper air circulation around pan when baking.The cooking utensils are not the proper shape or do not fit the surface units being used. | Level range. (See Installation Instructions.)Adjust the oven temperature control. (See "Adjusting the oven temperature control" on page 12.)Preheat oven if called for in recipe.Use only tested recipes from a reliable source.Refer to a reliable cookbook for recommended pan type and size.Allow 112 to 2 inches (4-5 cm) on all sides of the pans for air circulation. There must be a minimum space of 1 inch (2.5 cm).Use cooking utensils with smooth, flat bottoms that fit the surface units being used. |
2. If you need assistance ...
Call our toll-free telephone number. Dial free from anywhere in the U.S.:
1-800-44-ROPER
(1-800-447-6737)
and talk with one of our trained consultants. The consultant can instruct you in how to obtain satisfactory operation from your appliance or, if service is necessary, recommend a qualified service company in your area.
For further information, write to:
Mr. William Clark
Consumer Assistance Representative
Roper Brand Appliances
2000 M-63
Benton Harbor, MI 49022
Please include a daytime phone number in your correspondence.
3. If you need service ...
Contact the dealer from whom you purchased the appliance or the authorized servicer in your area. For help finding an authorized servicer in your area, call our toll-free telephone number in Step 2.
4. If you are not satisfied with how the problem was solved ...
- Contact the Major Appliance Consumer Action Panel (MACAP). MACAP is a group of independent consumer experts that voices consumer views at the highest levels of the major appliance industry.
- Contact MACAP only when the dealer, authorized servicer and Roper Brand Appliance warrantor have failed to resolve your problem. Major Appliance Consumer Action Panel 20 North Wacker Drive Chicago, IL 60606
• MACAP will in turn inform us of your action.
ROPER® Electric Cooking Product Warranty
| LENGTH OF WARRANTY | WE WILL PAY FOR |
| FULL ONE-YEAR WARRANTY(from date of purchase) | Replacement parts and repair labor to correct defects in materials or workmanship. Service must be provided by an authorized Roper service company. |
| WE WILL NOT PAY FOR | |
| A. Service calls to:1. Correct the installation of your appliance.2. Instruct you how to use your appliance.3. Replace house fuses or correct house wiring.4. Replace owner accessible light bulbs.B. Repairs when appliance is used in other than normal, single-family household use.C. Pickup and delivery. Your appliance is designed to be repaired in the home.D. Damage to appliance caused by accident, misuse, fire, flood, acts of God, or use of products not approved by us.E. Repairs to parts or systems caused by unauthorized modifications made to the appliance.8-92 | |
This Roper appliance is warranted by Whirlpool Corporation. Under no circumstances shall it be liable under this warranty for incidental or consequential damages and all implied warranties are limited to the same time period stated in the express warranties for Roper Brand Appliances. Some states do not allow the exclusion or limitation of incidental or consequential damages, so this limitation or exclusion may not apply to you.
This warranty gives you specific legal rights, and you may also have other rights which vary from state to state.
Outside the United States, a different warranty may apply. For details, please contact your authorized Roper distributor or military exchange.
If you need service, first see the "Assistance or Service" section of this book. After checking "Assistance or Service," additional help can be found by calling our toll-free telephone number, 1-800-44-ROPER (1-800-447-6737), from anywhere in the U.S.
- A Note To You
- Thank you for buying a Roper appliance.
- Your safety is important to us.
- WARNING
- CAUTION
- Our toll-free number, 1-800-44-ROPER (1-800-447-6737), is available 24 hours a day.
- Important Safety Instructions
- General
- When using the cooktop
- When using the oven
- Grease
- Care and cleaning
- Parts And Features
- Using Your Range
- In This Section
- Using the surface units
- Surface unit markers
- Surface heating indicator light
- Burn and Fire Hazard
- Cookware tips
- Product Damage Hazard
- Home canning information
- Positioning racks and pans
- Personal Injury Hazard
- For best air circulation
- Using aluminum foil for baking
- Setting the electronic clock
- Using the electronic Timer
- To cancel Timer before countdown is over:
- Baking/roasting
- Adjusting the oven temperature control
- Broiling
- Custom broil
- Broiling tips
- Fire Hazard
- Energy saving tips
- Using the automatic MEALTIMER™ clock
- To delay start and stop automatically:
- To start baking/roasting now and stop automatically:
- The oven vent
- The storage drawer
- Removing the storage drawer:
- Replacing the storage drawer:
- The anti-tip bracket
- Caring For Your Range
- Surface units and reflector bowls
- Removing
- Replacing
- Lift-up cooktop
- Personal Injury and Product Damage Hazard
- Removing the oven door
- Cleaning chart
- The oven light
- Electrical Shock and Personal Injury Hazard
- To replace the oven light:
- If You Need Assistance Or Service
- Before calling for assistance ...
- If you need assistance ...
- If you need service ...
- If you are not satisfied with how the problem was solved ...
- ROPER® Electric Cooking Product Warranty
Brand : Roper
Model : FEP350YW2
Category : Cooker