
M18FFW09 - Refrigerator MATSUI - Free user manual and instructions
Find the device manual for free M18FFW09 MATSUI in PDF.

| Product Type | Deep Fryer |
| Brand | Matsui |
| Model | M18FFW09 |
| Power Supply | 230 V ~50Hz |
| Power Consumption | 1800 W |
| Oil Capacity | 1.8 L (max) |
| Temperature Control | Adjustable (see frying guide) |
| Timer | 15-minute mechanical timer with bell |
| Basket | Removable, hinged handle, 1.8 L capacity |
| Filters | Dual action: plain filter + charcoal filter |
| Lid | Removable, spring-loaded, cool-touch |
| Viewing Window | Yes, with anti-fog coating |
| Safety Features | Auto shut-off, cool-wall body, non-slip feet |
| Cleaning | Removable parts dishwasher safe (hand wash recommended) |
| Accessories Included | Frying basket, plain filter, charcoal filter, manual |
| Replacement Parts | Basket (31BZ0-01-W-1), plain filter (96BZ0-01-W), charcoal filter (96BZ0-01-B) |
| Dimensions (approx.) | 35 x 30 x 25 cm (estimated) |
| Weight (approx.) | 3.5 kg (estimated) |
| Earthing | Must be earthed (Class I) |
Frequently Asked Questions - M18FFW09 MATSUI
User questions about M18FFW09 MATSUI
0 question about this device. Answer the ones you know or ask your own.
Ask a new question about this device
Download the instructions for your Refrigerator in PDF format for free! Find your manual M18FFW09 - MATSUI and take your electronic device back in hand. On this page are published all the documents necessary for the use of your device. M18FFW09 by MATSUI.
USER MANUAL M18FFW09 MATSUI
natural_image
White kitchen grater with temperature and timer control panel (no visible text or symbols on body)Safety
When using electrical appliances, basic safety precautions should always be followed, including the following:
- Read all the instructions and retain them.
- During and after use, parts of the appliance are HOT. Do not touch oil tank of the appliance until it is cool.
-
Unplug the appliance from the mains socket after use and allow it to cool before handling or cleaning any parts.
-
The oil or fat in the appliance will stay hot for some time after use. Do not move the appliance until it is completely cool. To lift the appliance, use the recessed handle grips at the sides.
-
Do not touch hot surfaces, use oven gloves.
-
Do not pour oil out of the appliance when the oil and the appliance are hot. Allow them to cool first. This can take at least 3 hours depending on ambient temperatures and the oil temperature.
-
Never connect the appliance to the mains socket without placing the oil in the tank.
-
Never operate the appliance when the oil in the tank is above the maximum or below the minimum mark. The maximum amount of oil is 1.8 litres.
-
Do not immerse the body of the appliance or the mains cable or, mains plug in water or liquids.
-
Never place the appliance on or near a source of heat such as a hot gas, electric burner or heated oven. Do not allow it to touch curtains, wall coverings, clothing, dishtowels or other flammable materials during use.
-
Ensure ample clearance around and above the appliance so you can work safely.
-
Use the appliance on stable heat-resistant surface.
-
Do not exposed the appliance to direct sunlight.
-
Operate the appliance with the controls facing you. Do not reach across the appliance while it is operating or when it is hot.
-
Steam will build up during cooking, and it will escape when you open the lid. Stand back when opening the lid. Always open the lid away from you.
-
Never leave the appliance unattended when it is connected to the mains.
-
Make sure that the mains cable does not touch any hot surface or overhang on a table edge.
-
Do not use the appliance outdoors.
-
Do not place the appliance under any overhead cupboards when in use.
-
Do not use attachments or accessories not recommended by the manufacturer.
-
Close supervision is necessary when an appliance is used near children. Parents must warn children not to touch the hot appliance parts. Children should not operate this appliance.
-
This appliance is not intended for use by persons (including children) with reduced sensory or mental capabilities, or lack of experience and knowledge unless they have been given supervision or instruction concerning the use of the appliance by a person responsible for their safety.
- Children should be supervised to ensure that they do not play with the appliance.
- Do not use the appliance with a damaged mains cable or mains plug or frying basket. Seek expert advice.
- If the mains cable is damaged it must be replaced by the manufacturer, its service agent, or similarly qualified persons in order to avoid a hazard.
- Do not use extension cables with kitchen equipment as they increase the risk of accidents.
- If you are using a solid fat, melt this gently in a separate pan and pour it into the oil tank before switching on. Do not melt solid fat in the appliance by placing it in the basket or you may damage the appliance.
- Renew the cooking oil regularly. Used oil may contain contaminants, lower smoking temperatures and cause excessive foaming and spattering.
- Always dry food before frying as moist foods cause excessive foaming and spattering. Even small amounts of water may cause the oil to spatter.
- Never overload the frying basket. If too much food is fried at the same time, the food will not get crisp and may cause excessive foaming and spattering.
- After completion of frying, allow the food to drain before removing it from the basket.
- Ensure the Timer Knob is set to OFF before connecting or disconnecting the appliance.
- This appliance is for household use. Do not use for any purpose not expressly specified in this manual.
- The appliance must not be left unattended while it is connected to the mains socket.
Introduction
Your family fryer features a cool-wall body, a removable lid and a dual action filter in the lid for easy cleaning. The dual action filter in the lid absorbs cooking vapours and smells.
Please read all the instructions before using the appliance. Read all the safety notes carefully.
If you pass the fryer on to a third party, please include these instruction manual.
Unpacking the Family Fryer
Remove all packaging from the family fryer. Retain the packaging. If you dispose of it please do so according to any recycling regulations.

natural_image
Line drawing of a mesh-coated filter or sieve device with handle and circular base (no text or symbols)Frying Basket with hinged handle X 1 part number 31BZ0-01-W-1
Plain Filter X 1
part number 96BZ0-01-W

Charcoal Filter X 1
part number 96BZ0-01-B
Instruction Maunal X 1 part number 62BZ0-1982
If items are missing or damaged, please contact Partmaster (UK only). Tel: 0870 6001 338 for assistance.
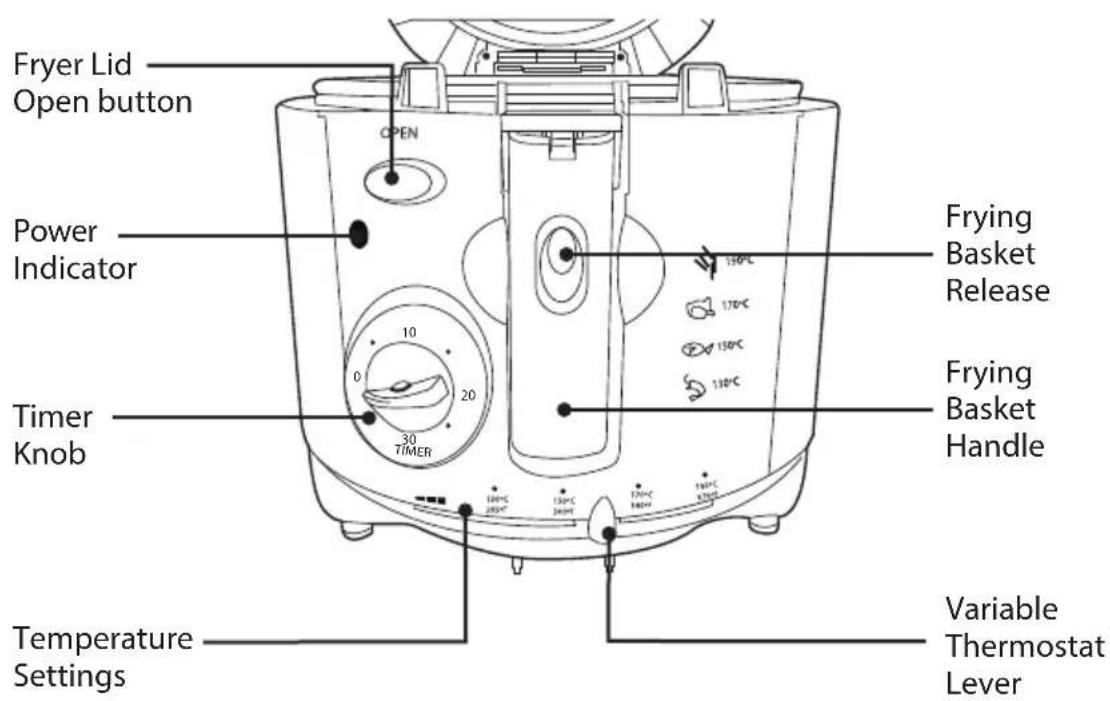
Your Family Fryer Components
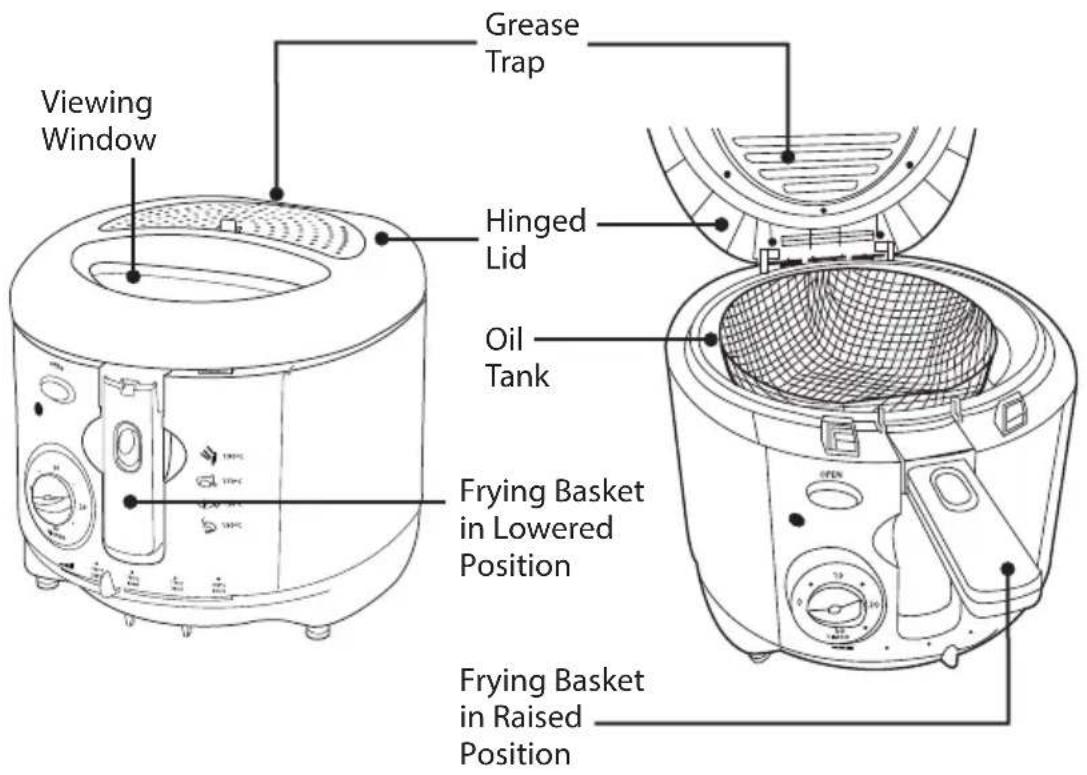
Controls & Indicators
Positioning the Fryer
- Site your family fryer on a firm, flat, heat-resistant work surface. Steam given off by the cooking process may mark or damage anything above or around the fryer, ensure these areas are kept clear.
- In order to avoid possible fire hazards, keep the area above and around the fryer clear. Leave a clear space all around the fryer, and keep it as far back from the front edge of the work surface as possible.
- Do not put the fryer or the mains cable close to any other cooking or heating appliance.
- Place the fryer close to a switched mains socket. Do NOT use mains sockets without switches or extensions.
Preparation
Before using your fryer for the first time, you should carefully wash the appliance.
Open the lid by pushing the button marked OPEN. The lid is spring loaded and will open automatically. Remove the frying basket and the lid.
1. Remove the frying basket
You may raise and lower the basket with the lid open or shut. Carefully lift up the handle of the frying basket until it latches into position.
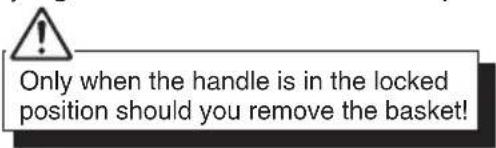
Holding the basket
NEVER place your thumb on the button when moving the basket as the basket may release unexpectedly and spill any contents.
natural_image
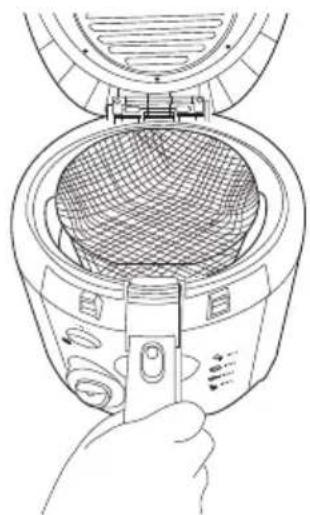
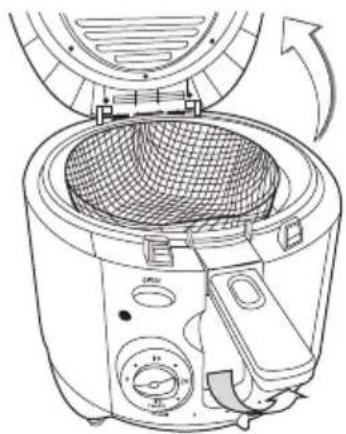
Line drawing of a hand holding a kitchen air fryer with a mesh chamber (no text or symbols)2. Remove the lid
With the lid fully open, hold the lid at both sides and ease the lid off the spring catch.
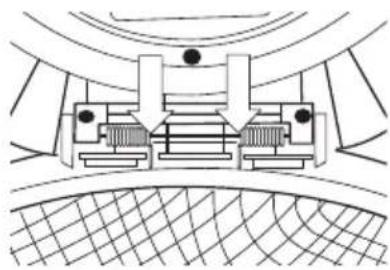
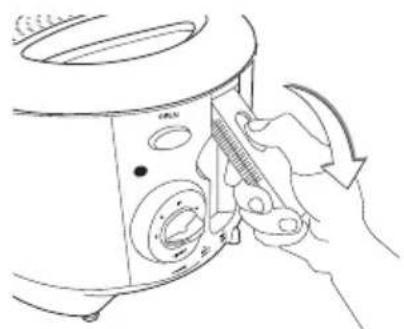
Remove the grease trap cover and filters
Grip the catch on the filter trap cover between thumb and forefinger. Press the catch down and lift out the lid.

natural_image
Line drawing of a hand pressing down on a circular object with upward arrows indicating motion (no text or symbols)
Now lift out the two filters.
3. Wash the fryer components
- Wash the fryer lid, the grease trap cover and the basket by hand in warm soapy water. Rinse and allow to dry.
- Pour warm soapy water into the oil tank and wash it with a damp cloth. Rinse with fresh hot water and dry well.
- Wipe the exterior of the fryer with a damp cloth. Do NOT immerse the body of the fryer in water.
4. Replace the grease trap cover
- Dry the fryer lid and replace the grease filters. Place the plain filter in the trap first, followed by the charcoal filter.
- Replace the grease trap cover back into position.
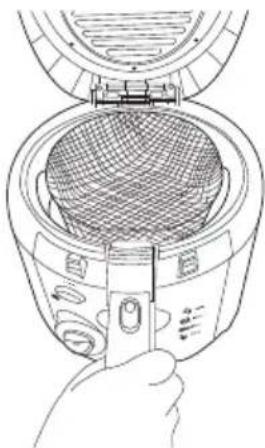
5. Replace the fryer lid
Stand in front of the fryer. Hold the lid on each side and place the lid spring in front of the metal catch at the rear of the fryer. The two metal shafts in the lid should be situated right at the plastic housing.
natural_image
Pure technical diagram of a mechanical assembly without any text, numbers, or symbolsCooking with the Fryer
Cooking with the fryer is a two part process.
First the tank must be filled with the correct amount of oil and be preheated to the correct temperature. Only when this process is complete should you proceed to the COOKING stage.
PART 1
1. Fill the Tank with Oil
- On the inside of the oil tank at the back, there are two marks MIN and MAX. Pour in sufficient oil to reach the MAX marks. Do not overfill.
- The maximum capacity of the tank is 1.8 litres. There should always be sufficient oil in the tank to cover the MIN mark.
- Corn oil, sunflower oil, ground nut oil and vegetable oil are all suitable for use with the fryer. If you wish you may use solid vegetable fat but this is much more difficult to handle. Solid fat should be melted in a separate pan before transferring it to the tank.
Do not use margarine, butter or olive oil. Do not mix different oils and fats.
- Lightly smear the viewing window with a little oil. This will prevent it from getting fogged by condensation and allow you to view the food while it cooks.
2. Replace the frying basket
Hold the basket as described earlier. Align the groove in the basket handle over the raised lip at the front of the fryer and press down to make sure the basket is firmly seated.
3. Close the lid
Close the lid of the fryer by pressing down at both sides. This will prevent steam from escaping.
4. Lower the basket into the oil
Pull back the button on the handle to release the catch and fold the handle down.
5. Plug the fryer into the mains
Plug the fryer into the mains socket and switch on the power at the mains.
natural_image
Line drawing of a hand holding a kitchen appliance with a mesh chamber (no text or symbols)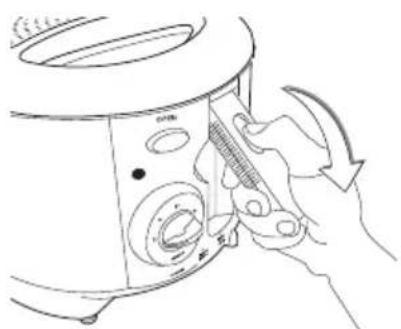
natural_image
Line drawing of a hand using a tool to adjust or install a kitchen appliance (no text or symbols visible)6. Preheat the Oil
Preheating will take 15 minutes.
Do not omit the Preheating process!
- Set the correct oil temperature for the food - the frying guide on page 11 will assist you.
- Set the timer to the 15 minute mark. The POWER indicator will light on. After 15 minutes a bell will ring and the POWER indicator will go off.
When using for the first time, the fryer may emit a slight odour. This is harmless and quite normal. The odour will cease after a very short time.
PART 2 - Cooking
- Raise the basket and lock it in the raised position
- Open the fryer lid
- Place the food into the raised basket
Place the food to be cooked (which should be as dry as possible) in the basket. Always have the basket in the raised position when filling it with food. Do not overfill the basket.
natural_image
Line drawing of a rice cooker interior showing mesh chamber and fan (no text or symbols)- Set the Cooking Timer
Set the time for cooking the food according to the frying guide on page 12. The POWER indicator will light on.
-
Close the fryer lid
-
Lower the filled basket into the oil
Lower the filled basket into the oil by slowly returning the handle to the recessed position, as described earlier.
natural_image
Line drawing of a hand using a tool to adjust or install a kitchen appliance (no text or symbols present)Cooking Home-Battered Foods
This alternative method requires extreme care.
- If you place wet batter in the basket prior to cooking, the food may stick. Coat the food in batter and leave it to drain slightly to remove any excess.
- Ensure the correct cooking temperature has been reached. Set the frying time but leave the basket in the lowered position.
- Open the lid of the fryer.
Hints on Using your Fryer
- Use a recommended oil - do not mix oils or fats.
• Take into account the type of food when you set the frying temperature. Generally, precooked foods need a higher cooking temperature than raw foods. - If you need to add oil, do so between batches. Allow a short time for the oil to heat up to the right temperature.
- Use the timer to help you cook food for the correct time.
- Ensure there is enough room to open the appliance lid and operate the frying basket.
- Cook food thoroughly. Remember that food may turn golden brown before it has cooked through.
- Use the fryer in well ventilated conditions. All food contains moisture which turns to steam during frying. Most of this steam escapes through the filter in the lid.
- Do not lean over the fryer when cooking food or when opening the lid.
- Check the progress of the food during cooking by raising the basket using the handle and view the food through the viewing window.
When the Food is Cooked
• After the preset cooking time has elapsed, a bell will ring and the POWER indicator will go off.
- Raise the basket and wait a few seconds to let the steam subside. Now open the lid fully. Be careful as there may be steam in the fryer.
- Shake the basket slightly to remove excess oil and transfer the food carefully to a heatproof utensil. Hold the handle as described on page 6.
- Return the basket to the fryer and close the lid.
If the food is not fully cooked: Close the lid, lower the basket into the oil, add some extra time on the timer and continue the cooking process.
When Cooking has been Completed
Return the basket to the fryer, set the Timer knob to OFF, switch off the mains socket and unplug the fryer. Now leave the appliance to cool fully before cleaning.

If you are using solid fat, remove the basket from the fryer before the fat in the tank solidifies. Wash the basket in hot soapy water. Use great care as the fat may splatter when it comes into contact with the water. Alternatively, leave the basket on a heatproof surface to cool after removing it from the fryer.
Frying guide time and temperature chart
The times given here are approximate and should be adjusted to suit quantities, portion sizes and individual taste.
| Item | Weight | Temp. | Frying Time | ||
| Fresh Chips | 700g | 190 | °C | 10-15 minutes | |
| Frozen Chips | 700g | 190 | °C | 13-18 minutes | |
| Fish | 500g | 150 | °C | 8-12 minutes | |
| Whitebait | (just sufficient to cover the basket area) | 190°C | 2-3 minutes | ||
| Fresh cod or haddock in batter | 500g | 190 | °C | 10-15 minutes | |
| Frozen cod or haddock in batter | 500g | 170 | °C | 12-18 minutes | |
| Frozen plaice | 600g | 190 | °C | 12-18 minutes | |
| Frozen Hamburgers | 4(qty) | 150 | °C | 8-10 minutes | |
| Chicken portions in Crumbs | 600g | 170 | °C | 12-18 minutes | |
| Fresh crumbed chicken drumsticks | 600g | 170 | °C | 12-15 minutes | |
| Frozen veal escalopes | 500g | 170 | °C | 8-10 minutes | |
Cleaning the fryer
Cleaning should be carried out when the fryer is unplugged from the mains socket and the timer is switched to OFF. The fryer and the oil should be completely cool. When cleaning, avoid the use of abrasive cleaning materials as these may damage the fryer surfaces.
Remove the basket from the fryer. Remove the lid, and remove the filter from the grease trap. For guidance on removing and repositioning these items see page 6-7.
1. Two-piece Filter
Remove the filter before cleaning the lid. Lift and remove the grease trap cover. Refer to page 7. Remove the two filters and check their condition. The filters can be used about fifty times before replacement. This depends on the nature of the food and the period of cooking.

natural_image
Simple black semicircle with a white arc above it (no text or symbols)2. Cleaning the basket
The basket and handle should be washed in warm soapy water, rinsed and dried.
3. Cleaning the fryer lid
The lid and the grease trap cover should also be washed in warm soapy water, rinsed and dried.
4. Cleaning the Oil Tank
Ensure the fryer is fully cool, the lid has been removed and the fryer is unplugged. Carefully lift and tilt the fryer to the left and pour the oil off into a suitable receptacle from the left rear corner. (If you are left-handed use the right corner.) Pour warm soapy water into the tank and wash it well. Rinse in fresh water and allow to dry.

Note: If you intend to re-use the oil, then make sure you filter it well.
If you are using solid fat
Remove the basket before the fat has cooled. Remove as much of the cooled fat as possible with a plastic spatula before washing the tank. Ensure the washing water is hot enough to remove all traces of fat from the tank. When washing the oil tank ensure you do not damage the interior surface.
Wipe the body of the fryer with a damp cloth and dry well. Never immerse the body in any liquid.
5. When all the components are cleaned and dried
Re-assemble the fryer. Replace the filters in the correct order with the white one underneath and the charcoal filter on top.
Store the fryer safely in a cool dry place out of the reach of children and pets.
6. Storing the oil
You may store filtered, cooled oil in the fryer. Solid fat must not be stored in the fryer.
Technical Specification
| Model M18FFW09 | |
| Power 230 V ~50Hz, 1800W | |
| Tank Capacity 1.8 litres MAX. |
THIS PRODUCT MUST BE EARTHED
| NOTE: If you require a replacement for any of the items listed below, please quote their corresponding part numbers: | |
| Replacement Part Part Number | |
| frying basket 31BZ0-01-W-1 | |
| plain filter 96BZ0-01-W | |
| charcoal filter 96BZ0-01-B | |
| instruction manual 62BZ0-1982 | |

Visit Partmaster.co.uk today for the easiest way to buy electrical spares and accessories. With over 1 million spares and accessories available we can deliver direct to
your door the very next day.
Visit www.partmaster.co.uk
or call
0870 6001 338
(UK customers only)
Calls charged at National Rate.

This symbol on the product or in the instructions means that your electrical and electronic equipment should be disposed at the end of its life separately from your household waste. There are separate collection systems for recycling in the EU.
For more information, please contact the local authority or your retailer where you purchased the product.
DSG Retail Ltd. Maylands Avenue Hemel Hempstead Hertfordshire HP2 7TG England
- Safety
- Introduction
- Unpacking the Family Fryer
- Your Family Fryer Components
- Controls & Indicators
- Positioning the Fryer
- Preparation
- Remove the frying basket
- Holding the basket
- Remove the lid
- Remove the grease trap cover and filters
- Wash the fryer components
- Replace the grease trap cover
- Replace the fryer lid
- Cooking with the Fryer
- PART 1
- Fill the Tank with Oil
- Replace the frying basket
- Close the lid
- Lower the basket into the oil
- Plug the fryer into the mains
- Preheat the Oil
- PART 2 - Cooking
- Cooking Home-Battered Foods
- This alternative method requires extreme care.
- Hints on Using your Fryer
- When the Food is Cooked
- When Cooking has been Completed
- Frying guide time and temperature chart
- Cleaning the fryer
- Two-piece Filter
- Cleaning the basket
- Cleaning the fryer lid
- Cleaning the Oil Tank
- If you are using solid fat
- When all the components are cleaned and dried
- Storing the oil
- Technical Specification
Brand : MATSUI
Model : M18FFW09
Category : Refrigerator