SIDTTX11 - Dishwasher Sandstrøm - Free user manual and instructions
Find the device manual for free SIDTTX11 Sandstrøm in PDF.

| Product Type | Built-in Dishwasher |
| Brand | Sandstrøm |
| Model | SIDTTX11 |
| Dimensions (H x W x D) | 815 x 448 x 550 mm |
| Weight | 35 kg |
| Power Supply | 220-240 V, 50 Hz, 10 A |
| Energy Efficiency Class | A+ |
| Place Settings | 12 |
| Noise Level | 47 dB |
| Number of Programs | 6 |
| Programs | Eco 50°C, Intensive 70°C, Normal 65°C, Quick 45°C, Glass 40°C, Rinse Hold |
| Drying System | Condensation drying |
| Water Consumption | 9.5 L per cycle (Eco) |
| Energy Consumption | 0.92 kWh per cycle (Eco) |
| Cycle Time (Eco) | 210 min |
| Maintenance | Clean filter regularly; check spray arms for blockage; use dishwasher salt and rinse aid |
| Safety Features | Child lock, anti-flood system, overfill protection |
| Spare Parts | Filter, spray arms, door seal, detergent dispenser |
| Repairability Index | 7.5 / 10 |
| User Manual | Free download in PDF from notice-facile.com |
Frequently Asked Questions - SIDTTX11 Sandstrøm
User questions about SIDTTX11 Sandstrøm
0 question about this device. Answer the ones you know or ask your own.
Ask a new question about this device
Download the instructions for your Dishwasher in PDF format for free! Find your manual SIDTTX11 - Sandstrøm and take your electronic device back in hand. On this page are published all the documents necessary for the use of your device. SIDTTX11 by Sandstrøm.
USER MANUAL SIDTTX11 Sandstrøm
Integrated Compact Dishwasher
SIDTTX11

natural_image
Interior kitchen scene with white tiled wall, potted plant, and plates (no visible text or symbols)
natural_image
Interior view of a stainless steel kitchen appliance with a horizontal metal rod (no text or symbols visible)
bar
| Category | Value | |---|---| | Category 1 | 100 | | Category 2 | 100 | | Category 3 | 100 | | Category 4 | 100 | | Category 5 | 100 | | Category 6 | 100 | | Category 7 | 100 | | Category 8 | 100 | | Category 9 | 100 | | Category 10 | 100 | | Category 11 | 100 | | Category 12 | 100 | | Category 13 | 100 | | Category 14 | 100 | | Category 15 | 100 | | Category 16 | 100 | | Category 17 | 100 | | Category 18 | 100 | | Category 19 | 100 | | Category 20 | 100 | | Category 21 | 100 | | Category 22 | 100 | | Category 23 | 100 | | Category 24 | 100 | | Category 25 | 100 | | Category 26 | 100 | | Category 27 | 100 | | Category 28 | 100 | | Category 29 | 100 | | Category 30 | 100 | | Category 31 | 100 | | Category 32 | 100 | | Category 33 | 100 | | Category 34 | 100 | | Category 35 | 100 | | Category 36 | 100 | | Category 37 | 100 | | Category 38 | 100 | | Category 39 | 100 | | Category 40 | 100 | | Category 41 | 100 | | Category 42 | 100 | | Category 43 | 100 | | Category 44 | 100 | | Category 45 | 100 | | Category 46 | 100 | | Category 47 | 100 | | Category 48 | 100 | | Category 49 | 100 | | Category 50 | 100 | | Category 51 | 100 | | Category 52 | 100 | | Category 53 | 100 | | Category 54 | 100 | | Category 55 | 100 | | Category 56 | 100 | | Category 57 | 100 | | Category 58 | 100 | | Category 59 | 100 | | Category 60 | 100 | | Category 61 | 100 | | Category 62 | 100 | | Category 63 | 100 | | Category 64 | 100 | | Category 65 | 100 | | Category 66 | 100 | | Category 67 | 100 | | Category 68 | 100 | | Category 69 | 100 | | Category 70 | 100 | | Category 71 | 100 | | Category 72 | 100 | | Category 73 | 100 | | Category 74 | 100 | | Category 75 | 100 | | Category 76 | 100 | | Category 77 | 100 | | Category 78 | 100 | | Category 79 | 100 | | Category 80 | 100 | | Category 81 | 100 | | Category 82 | 100 | | Category 83 | 100 | | Category 84 | 100 | | Category 85 | 100 | | Category 86 | 100 | | Category 87 | 100 | | Category 88 | 100 | | Category 89 | 100 | | Category 90 | 100 | | Category 91 | 100 | | Category 92 | 100 | | Category 93 | 100 | | Category 94 | 100 | | Category 95 | 100 | | Category 96 | 100 | | Category 97 | 100 | | Category 98 | 100 | | Category 99 | 100 | | Total (Total) |Contents
Unpacking....5
Location....6
Preparing the Location for the Dishwasher....6
Installing the Dishwasher 7
Product Overview....11
Front View 11
Rear View....11
Dishwasher Basket and Cutlery Basket......12
Internal View....12
Control Panel....13
Wash Cycle Table....14
Before Operating....15
To Open the Door....15
To Close the Door 15
Items Not Suitable for Use in the Dishwasher....15
Adding Detergent or Detergent Tablet.... 16
Adding Rinse Aid 17
Adjusting the Rinse Aid Reservoir 17
Adding Salt 18
Adjusting Salt Consumption 19
Loading the Dishwasher 20
Before Loading the Dishwasher 20
Dishwasher Basket 21
Hinged Cup Rack 21
Hinged Spikes....21
Cutlery Basket 22
Loading the Cutlery Basket....22
Loading the Dishwasher Basket for 6 Place Settings....22
Starting a Wash Cycle 23
Changing a Programme 23
At the End of a Programme....23
Switching Off the Unit 24
Unloading the Dishwasher 24
Cleaning After Use....24
External Care 24
The Door and the Door Seal 24
The Control Panel 24
Internal Care 24
Filtering System....24
Spray Arms....25
Frost Precaution 26
Moving the Dishwasher 26
Maintenance After a Prolonged Period of Non-Operation 26
Hints and Tips 27
Fault Code 27
Technical Problems....27
Disposal of the Dishwasher 29
Disposal of Packing Material 29
Specifications....30
Safety Warnings....31
Thank you for purchasing your new Sandstrøm Integrated Compact Dishwasher.
We recommend that you spend some time to read this installation/instruction manual in order to fully understand how to install and operate it.
Read all the safety instructions carefully before use and keep this installation/instruction manual for future reference.
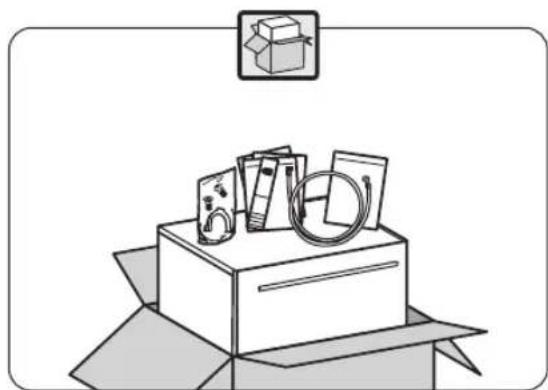
Unpacking
Remove all packaging from the unit. Retain the packaging. If you dispose of it please do so according to local regulations.
The following items are included:
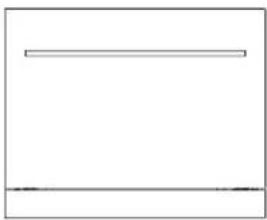
natural_image
Simple geometric diagram with two horizontal lines inside a rectangle (no text or symbols)The Main Unit
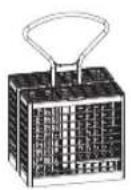
Cutlery Basket
P.N.: 673006200014
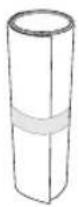
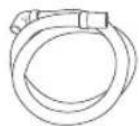
Condensation Strip
P.N.: 675001300716

This product has been wet tested to ensure correct operation. As a result some water may remain inside the unit. This is normal and safe. Remove any water droplets from the exterior if necessary.
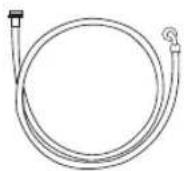
Water Supply Hose X 1
P.N.: 673000900060
Drain Hose X 1
P.N.: 673005400041

Drain Hose Mounting
Clamp X 1
P.N.: 672005400002
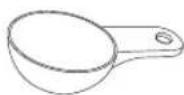
Detergent Measuring Spoon X 1
1 full spoon = 20g (approx.)
P.N.: 673002200079
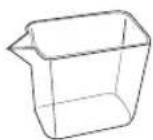
Measuring Cup X 1
60ml (approx.)
P.N.: 673006200004
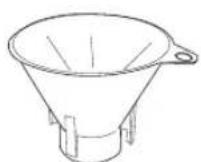
Salt Funnel X 1
P.N.: 673002200001
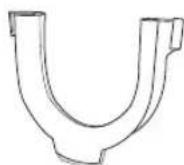
U-Shape Hose Holder X 1
P.N.: 673006200003
text_image
Sondstrom Instruction Manual Sondstrom Instruction ManualInstruction Manual X 1 P.N.: SIDTTX11-000

If items are missing, or damaged please contact Partmaster (UK only). Tel: 0844 800 3456 for assistance.
Location
When selecting a position for your dishwasher ensure the following conditions are met:
- The height is suitable for you to easily operate the dishwasher.
- The location is near to the water supply, drain and a mains socket.
- Avoid locating the dishwasher near a heat source, e.g. cooker, boiler or radiator. Extreme cold ambient temperature may also cause the dishwasher not to perform properly.
- This dishwasher is designed to be fitted in a kitchen cabinet. Do not use in a garage or outdoor installation.

Please ensure the dishwasher is installed by a qualified technician.
natural_image
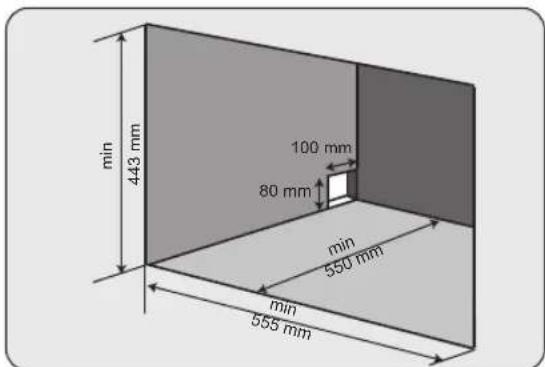
Illustration of an open box with scattered items including a box, rings, and a box (no text or symbols)Preparing.the.Location.for.the.Dishwasher
- Prepare a cavity in your cabinet, following the dimensions below.
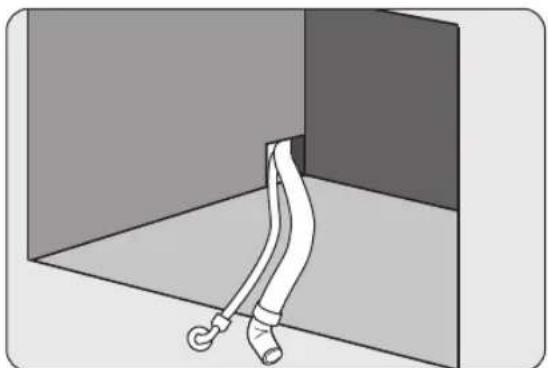
Prepare a hole in the cavity to allow access for the water supply hose, drain hose and the mains cable. It can be positioned on either the left or right whichever is more convenient.
text_image
min 443 mm 100 mm 80 mm min 550 mm min 555 mm- Feed the water supply hose and drain hose through the hole in the cavity.
natural_image
Simple line drawing of a cable being inserted into a wall, no text or symbols presentInstalling.the.Dishwasher

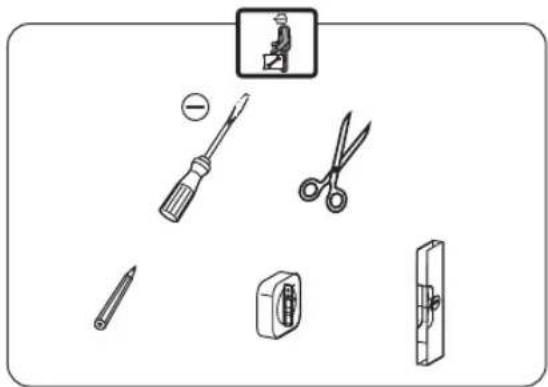
All parts removed must be saved to do the reinstallation in the future. Ensure the dishwasher is unplugged and empty. We recommend that 2 people handle the dishwasher during installation. Refer to the tools required.
natural_image
Illustration of various electrical components including screwdriver, scissors, pencil, socket, and switch (no text or symbols)- Temporarily place the dishwasher on a flat stable surface and adjust the levelling feet if needed to ensure the dishwasher is horizontal.
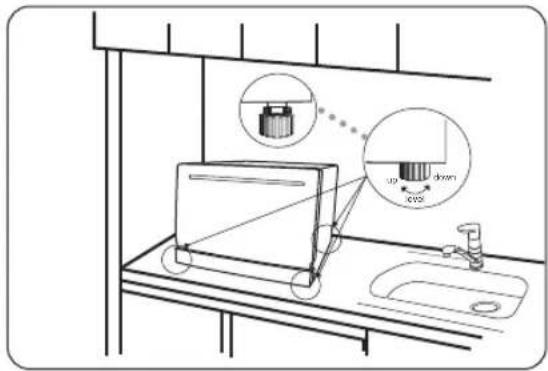
text_image
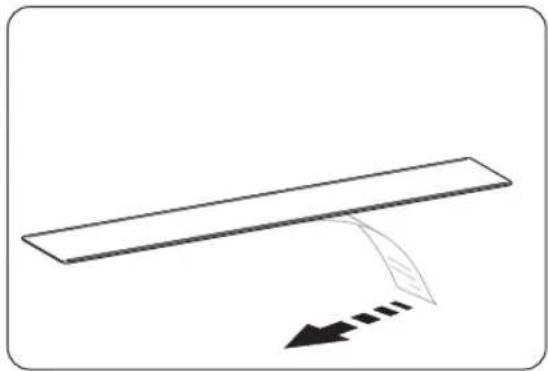
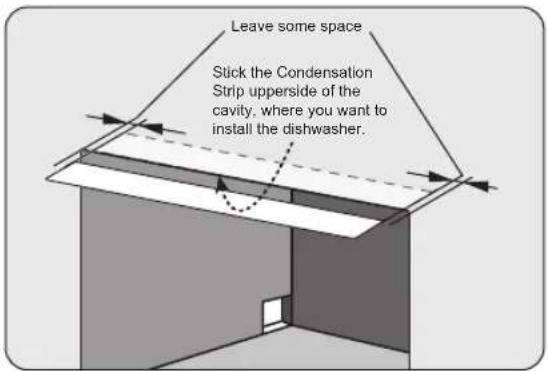
Diagram of a kitchen sink with labeled components including a battery, water drop, and drain, showing a close-up view of the water drop component.- The condensation strip must be fitted to the upperside of the cavity above where your dishwasher will be installed. Its purpose is to protect the cavity from steam rising from the dishwasher.
Remove the backing paper from the condensation strip.
natural_image
Simple line drawing of a rectangular object with an arrow indicating direction, no text or symbols present.- Stick the condensation strip to the upperside of the cavity.
text_image
Leave some space Stick the Condensation Strip upperside of the cavity, where you want to install the dishwasher.
Ensure the surface is clean prior to sticking the condensation strip to the upperside of the cavity.

Failure to attach the condensation strip could result in damage to the upperside of the cavity!
INSTALLATION
- Move the unit as close as possible to the cavity. You may need to position a table or chair close to the cavity to stand the dishwasher on while attaching the water supply hose and drain hose.
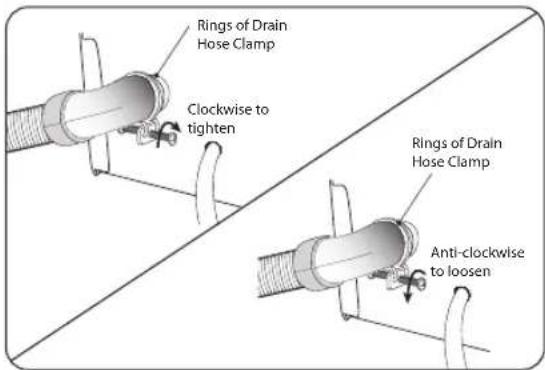
- Loosen the rings of the drain hose clamp by turning the screw in anti-clockwise direction. Then, insert the drain hose through the rings of the Drain Hose Clamp to the drain outlet firmly. Tighten the drain hose clamp by turning the screw in clockwise direction to secure the connection between the drain hose and the drain outlet.
Connect the water supply hose to the dishwasher.
text_image
Rings of Drain Hose Clamp Clockwise to tighten Rings of Drain Hose Clamp Anti-clockwise to loosen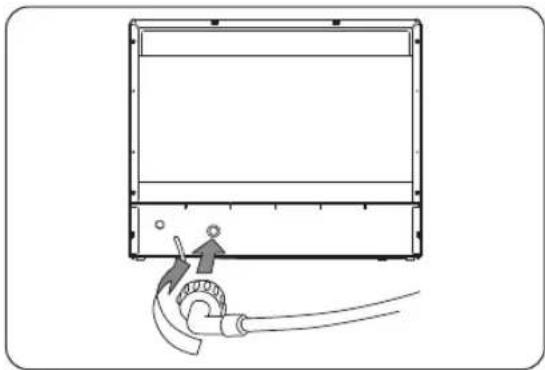
natural_image
Diagram of a device with a handle and cable, no text or symbols present- Feed the mains plug and cable through the cavity hole.
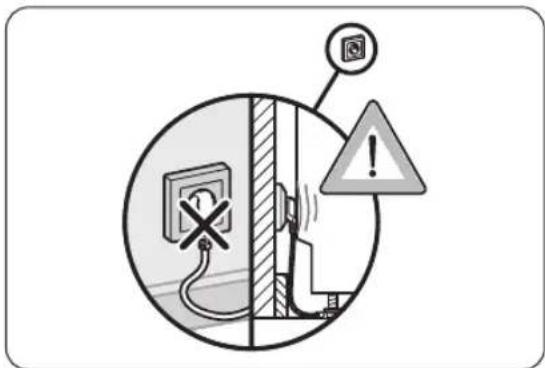
Do not connect the unit to the mains socket before installation. Ensure you are not installing the unit right in front of the mains socket. This is to avoid potential damage to the back of the unit.
After installing the appliance, ensure that the mains plug is easily accessible.
The electrical connection conditions must correspond with the specifications on the rating plate of the dishwasher. Do not use extension cables.
text_image
Safety warning illustration showing electrical hazard with a cross symbol, warning sign, and warning triangle- Slowly slide the unit into the cavity.
Ensure the water inlet and drain hoses are not kinked or squashed and that the unit is not standing on the mains cable.

natural_image
Crossed construction diagram showing gear and turbine components (no text or labels)- Adjust the screw to ensure that the door is horizontally aligned to the cabinet.
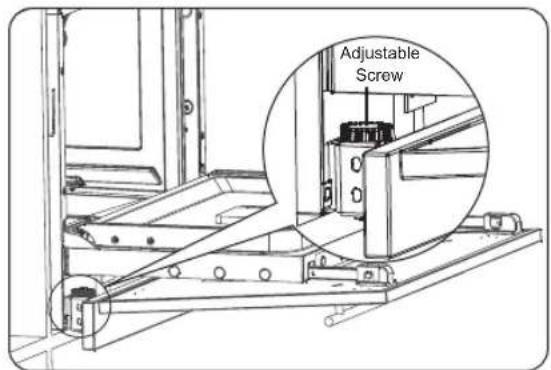
text_image
Adjustable Screw-
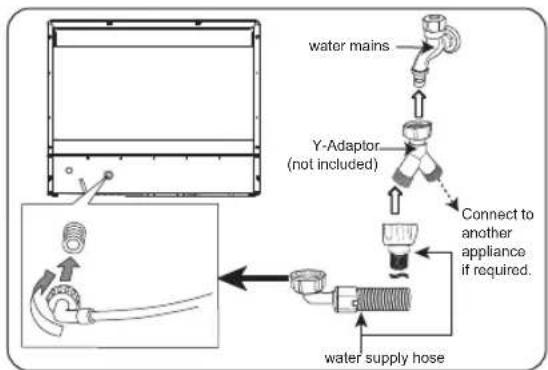
Make sure your plumbing is suitable for use with the dishwasher. If in doubt contact a qualified plumber. This unit MUST BE connected to COLD WATER MAINS using the new water inlet hose. OLD HOSE SETS MUST NOT BE RE-USED. The water pressure from the water mains needs to be at a minimum of 0.04 MPa and a maximum of 1.00 MPa.
-
Connect the other end of the hose to your water mains. Please ensure the black rubber seal is in place.
• After connecting the hose, turn on your water mains and check for leaks. - Connect the dishwasher to the mains socket.
flowchart
graph TD
    A["Water main"] --> B["Y-Adaptor (not included)"]
    B --> C["Connect to another appliance if required."]
    C --> D["Water supply hose"]
    D --> E["Water main"]
    style A fill:#f9f,stroke:#333
    style B fill:#ccf,stroke:#333
    style C fill:#cfc,stroke:#333
    style D fill:#fcc,stroke:#333

You may use a Y-adaptor (not included) for an additional water feed for another appliance, for example a washing machine. This is only applicable for cold water mains. A Y-adaptor is available from most DIY stores.
- Do not bend your drain hose.
- Do not lift the drain hose higher than 10 cm from the table top, otherwise the unit may not be able to expel the waste water properly.
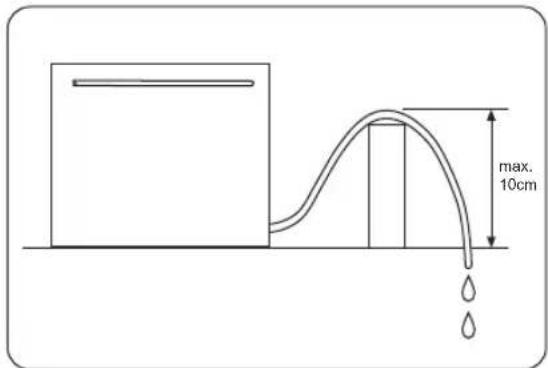
text_image
max. 10cmINSTALLATION
- Secure the water drain hose to the waste pipe to avoid it coming off during the washing process.

- The waste pipe must only be connected to the foul drains and not the surface water drainage system.
- The water drain hose should be placed lower than 10cm from the table top and must not be extended, otherwise the unit may not be able to expel the waste water properly.
- You may use the u-shaped drain hose holder to secure your drain hose and to avoid bending it.
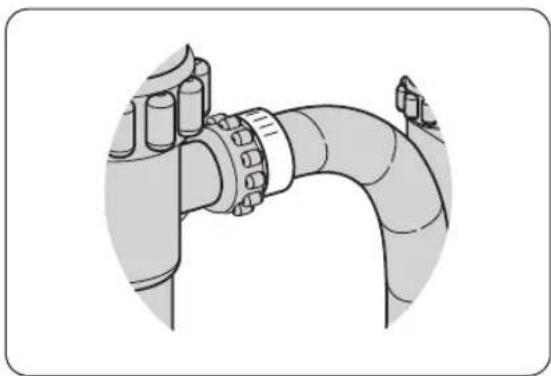
natural_image
Illustration of a pipe joint with bolts and fittings (no text or symbols)Product.Overview
Front.View
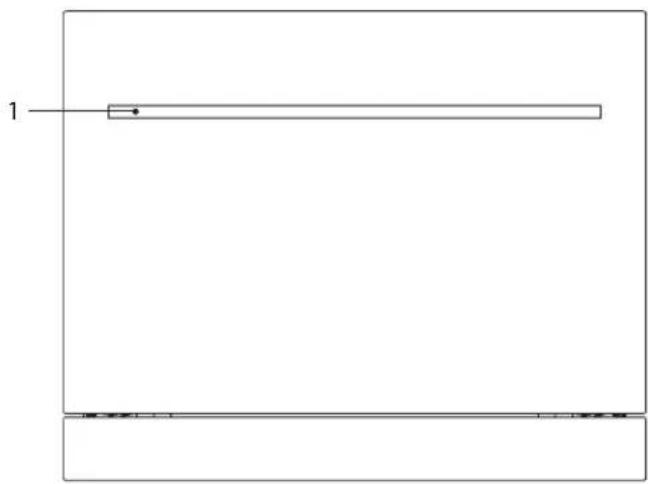
natural_image
Simple line drawing of a rectangular object with a small dot and label '1' pointing to it, no text or symbols present.- Door Handle
Rear.View
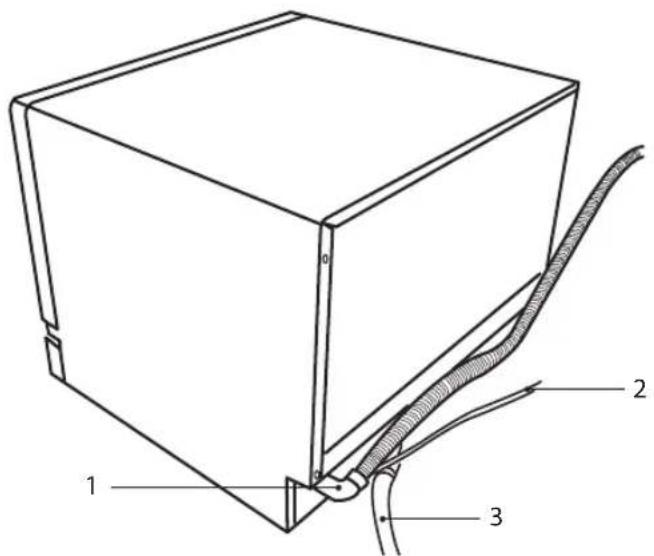
text_image
Technical diagram of a 3D cube with labeled components: one face, two edges, and a curved cable.- Drain Hose
- Mains Cable (Connect to Mains Socket)
- Water Supply Hose
Dishwasher.Basket.and.Cutlery.Basket
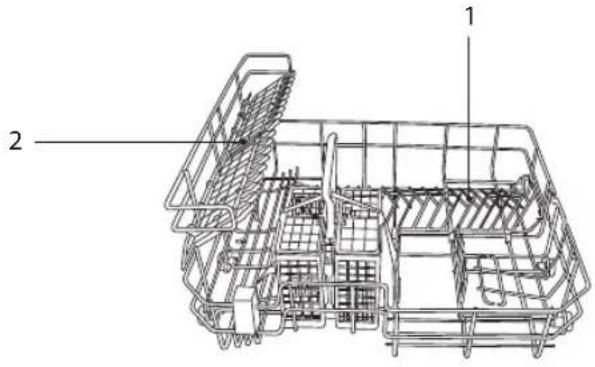
text_image
Technical diagram of a mechanical assembly with labeled parts 1 and 2- Spikes
- Cup Racks
Internal.View
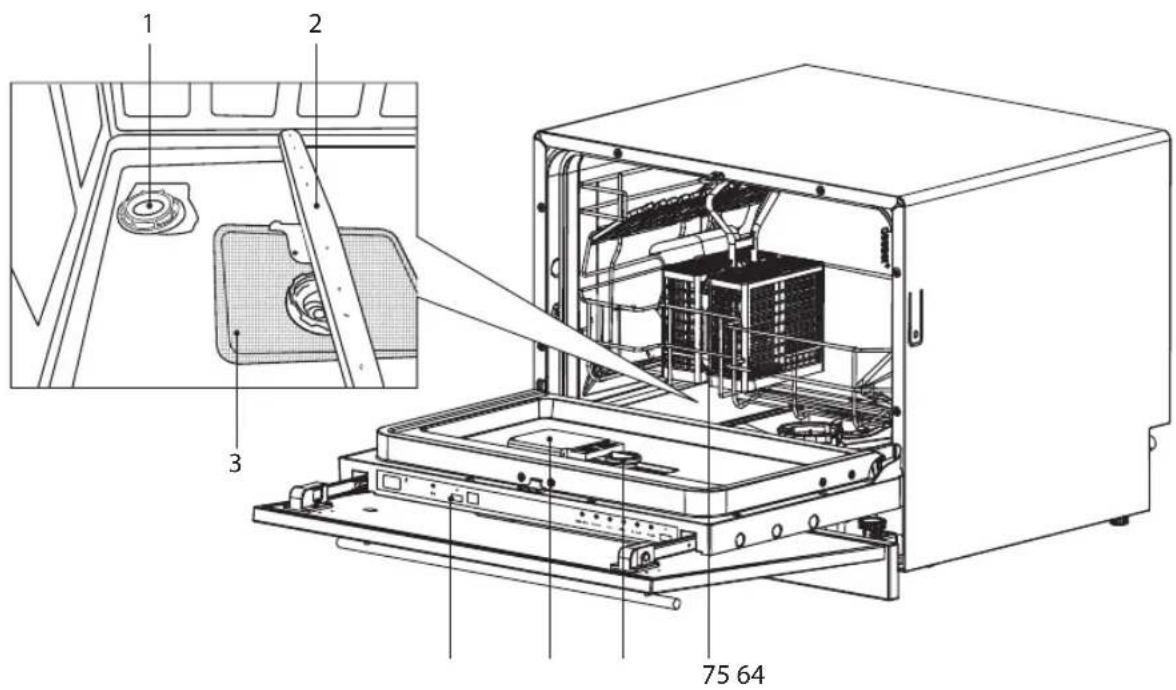
text_image
1 2 3 75 64- Salt Reservoir
- Spray Arms
- Filtering System
- Control Panel
- Detergent Dispenser (Dual Compartment)
- Rinse Aid Dispenser
- Cutlery Basket
Control Panel
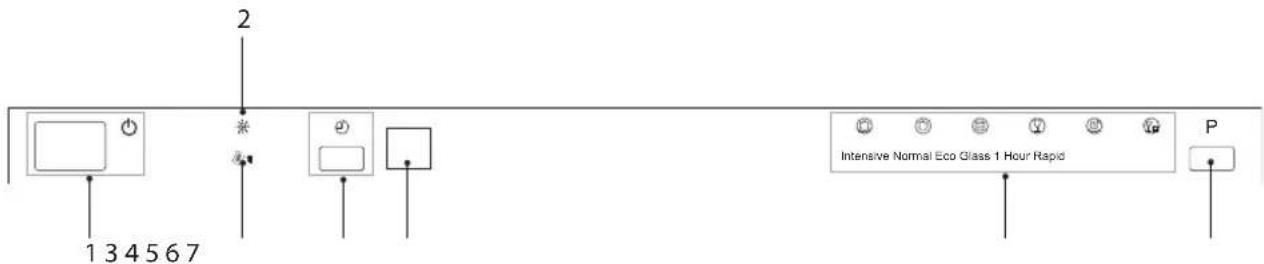
text_image
2 1 3 4 5 6 7 Intensive Normal Eco Glass 1 Hour Rapid P1. On / Off Button and Power Indicator
• To turn the dishwasher on and off.
- The LED light will illuminate when the dishwasher is on.
2. ✿ Rinse Aid Refill Warning Light
- Illuminates when the rinse aid dispenser needs refilling.
3. Salt Refill Warning Light
- Illuminates when the salt reservoir needs refilling.
4. Delay Start Button and Indicator Lights
- Press to preset the wash timer and delay the wash start time by up to 24 hours.
• Each press of this button increases the delay start time by 1 hour intervals.
5. Display Window
• Shows the delay time and error codes.
6. Programme Indicators
- Illuminate when the washing programme has been selected.
• Flashes when the selected washing programme is running.
7. Programme Button
• To select your required washing programme.
• Each press of this button switches from one washing programme to another.
Wash.Cycle.Table
| Programme Cycle | CycleSelectionInformation | Process | DetergentAmount(Pre-wash/Main wash) | RunningTime(min.) | EnergyConsumption(Kwh) | WaterConsumption(I) | RinseAid | |
| Intensive • Pots, | utensils and cutlery.Highly soiled. | • Pre-wash (50°C)• Wash (70°C)• Rinse (70°C)• Drying | • Pre-wash (3g)• Main Wash (15g) | 145 0.94 | 10.7 | √ | ||
| Normal • Pots, | utensils and cutlery.Normally soiled. | • Pre-wash• Wash (60°C)• Rinse (70°C)• Drying | • Pre-wash (3g)• Main Wash (15g) | 125 0.7 | 8.7 | √ | ||
| Economy* (EN50242) | • A shorter wash for lightly soiled items. | • Pre-wash• Wash (55°C)• Rinse (70°C)• Drying | • Pre-wash (3g)• Main Wash (15g) | 170 0.63 | 8.4 | √ | ||
| Glass • Glasses, | crystal and fine china.Lightly soiled. | • Wash (45°C)• Rinse (60°C)• Drying | • Main Wash (15g) | 75 0.48 | 6.8 | √ | ||
| 1 hour | 21h | • 1 hour wash for lightly to normal soiled loads. | • Wash (40°C)• Rinse (45°C) | • Main Wash (15g) | 60 0.3 | 6.8 | × | |
| Rapid • A shorter | wash for lightly soiled loads that do not need drying. | • Wash (40°C)• Rinse (45°C) | • Main Wash (15g) | 30 0.3 | 5.8 | × |
* To comply with Standards of Performance, i.e. EN50242, please ensure to use economy washing cycle for the test.

Condensing dry technology
• Energy is saved by drying the dishes using the remaining heat after the last rinse cycle.
- Wash cycle times are extended due to this drying method.
- Some wash programmes do not have a drying function, please refer to the Wash Cycle Table for more details.
Before.Operating
To.Open.the.Door
- Pull the door handle.
- If the door is opened during operation all functions are automatically interrupted.
To.Close.the.Door
• After loading the dishes, push the basket fully into the dishwasher.
- Lift the door upwards and push until it clicks into position.
- Do not slam the dishwasher door.
Items.Not.Suitable.for.Use.in.the.Dishwasher
When purchasing new crockery and cutlery, please make sure they are dishwasher-proof. Some items are not suitable for dishwashers.
The Following Items Are Not Suitable
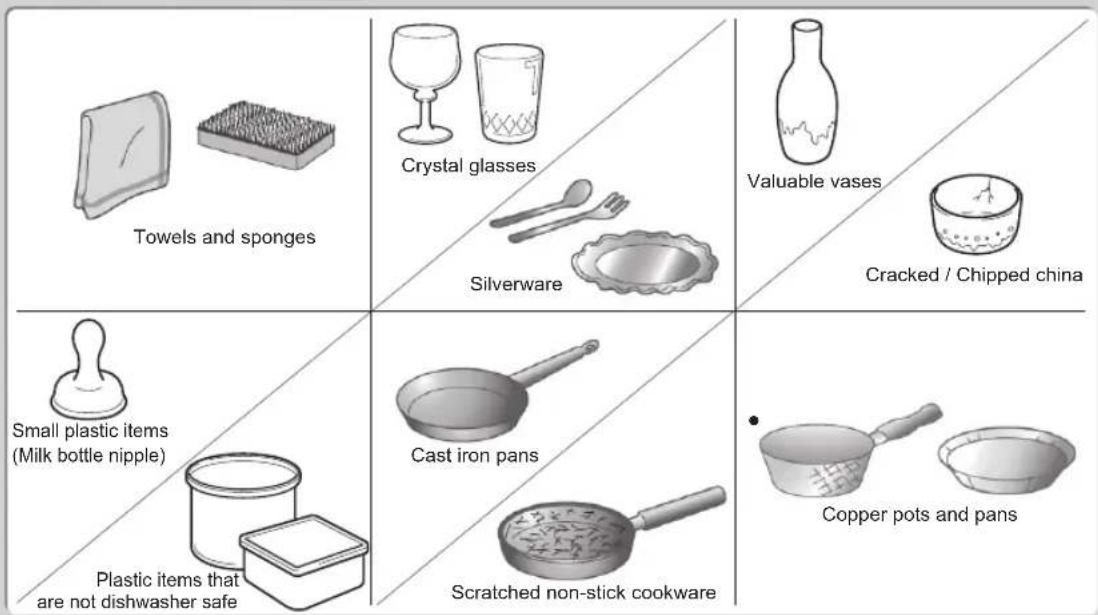
text_image
Towels and sponges Crystal glasses Silverware Valuable vases Cracked / Chipped china Small plastic items (Milk bottle nipple) Plastic items that are not dishwasher safe Cast iron pans Scratched non-stick cookware Copper pots and pans- Wooden cutlery and crockery or items with wooden parts may discolour and fade. The glue used in these items is not dishwasher-proof and wooden handles may come loose after being washed in a dishwasher.
- Craft items, antiques, valuable vases and decorative glassware are also not suitable for dishwashers.
- Plastic items (e.g. tupperware) which are not heat resistant may melt or loose shape due to the high temperature in the dishwasher.
• Copper, brass, tin and aluminium items may discolour or become matt.
- Clouding may occur on glasses and delicate glassware after frequent washing. Do not wash delicate glassware, or glassware containing lead crystal in a dishwasher. Wash delicate glassware by hand instead.
• Silver and aluminium parts have a tendency to discolour during washing. Residues like egg white, egg yolk and mustard often cause discolouring and staining on silver. Therefore, please clean the residues from silver immediately after use.
Adding.Detergent.or.Detergent.Tablet
Only use detergents specifically designed for use in dishwashers. To be more environmentally friendly, please use no more than the correct amount of detergent.
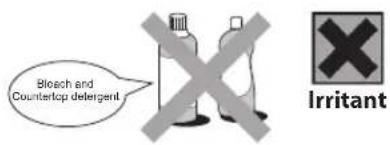
text_image
Bleach and Countertop detergent Irritant
- Keep out of the reach of children
- Irritating to eyes.
- Avoid contact with eyes. In case of contact with eyes, rinse immediately with plenty of water and seek medical advice.
• If swallowed, seek medical advice immediately.
Please follow the steps below to fill the detergent dispenser.
- Push the button on the lid of the detergent dispenser in the direction of the arrow until the flap springs open.

text_image
push up from the right side- Fill the detergent dispenser with detergent powder or insert the detergent tablet. The marking indicates the filling level.

You can choose to add a detergent tablet alone or to add detergent powder to both the main wash detergent chamber and the pre-wash detergent chamber for your selected wash cycle.
-
All programmes with pre-wash need an additional detergent dosage that must be placed in the pre-wash detergent chamber (please refer to the wash cycle table). This detergent will take effect during the pre-wash phase.
-
Close the lid firmly so that it clicks into place.
main wash detergent chamber
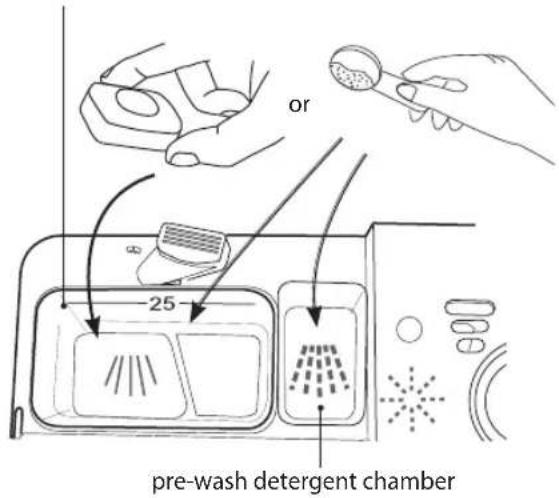
text_image
or 25 pre-wash detergent chamberAdding.Rinse.Aid
Rinse aid helps to ensure water does not cling and leave marks on crockery during the drying phase and helps crockery dry faster after it has been washed. Only pour rinse aid that is for domestic dishwashers into the reservoir. This model is designed to use liquid rinse aids only.
Please follow the steps below to pour the rinse aid into the storage reservoir, and the amount will dispense automatically.
- Turn the cap and open as indicated.
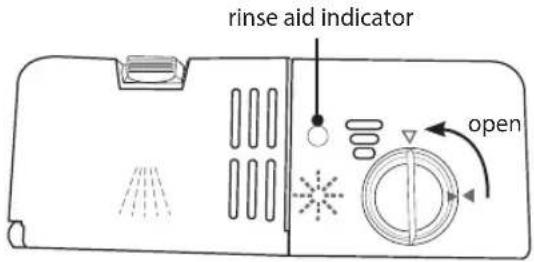
text_image
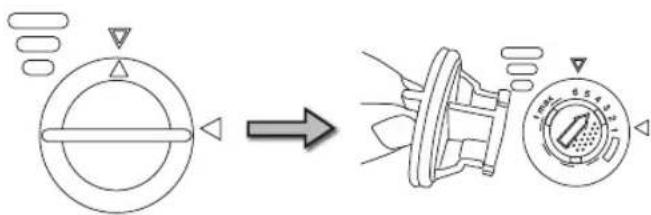
rinse aid indicator open- When the cap open marking is aligned, you may lift the cap up.
text_image
Diagram illustrating the process of a valve mechanism with labeled components and directional arrow-
Pour the rinse aid in until the level indicator turns completely black in colour and close the cap.
-
Be careful not to overfill the reservoir. Wipe up any spills. The approximate volume of the rinse aid reservoir is 110ml.
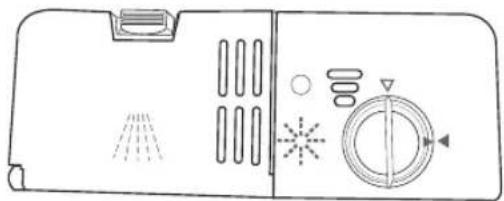
natural_image
Line drawing of a door panel with various symbols and components (no text or labels)
If the water hardness in your area is soft, you may not need rinse aid as it may cause white film to develop on your dishes.
The rinse aid warning light will illuminate when the reservoir is running out of rinse aid and requires refilling.

[NO TEXT]
rinse aid
warning light

Alternatively, you can judge the amount of rinse aid by checking the rinse aid indicator right next to the reservoir's cap. When the indicator is black, it means it is full. When it is clear, it means it is almost empty.
Adjusting.the.Rinse.Aid.Reservoir
The rinse aid reservoir has six settings. Both the recommended setting and the factory setting is "4". If the dishes are not drying properly or are spotted, adjust the dial to the next higher number until your dishes are spot-free.
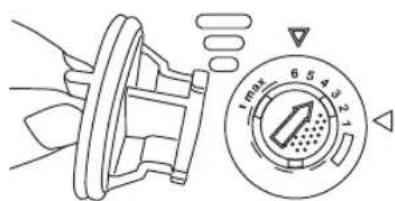
text_image
1 max 6 5 4 3 2 1Adding.Salt
If the water in your area is hard, deposits will form on your dishes and utensils. This appliance contains a salt reservoir for you to reduce the hardness of the water.
Please follow the steps below to pour the salt into the salt reservoir and it must be set to correspond to the water hardness level in your area.
- Remove the dishwasher basket and unscrew the reservoir cap.
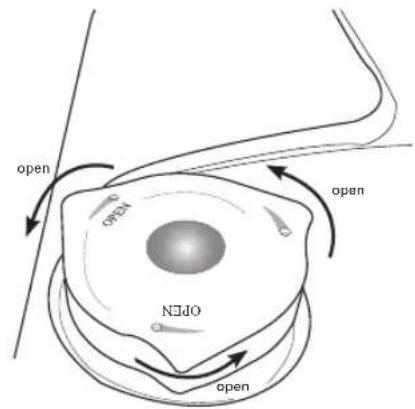
text_image
open OPEN OPEN open OPEN-
Fill the reservoir with approximately 1 liter of water (first use only).
-
Place the funnel provided over the salt reservoir.
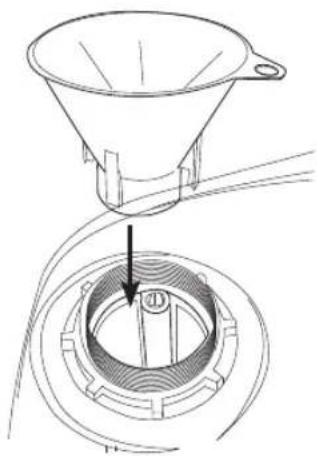
natural_image
Technical line drawing of a funnel pouring into a circular mechanical component (no text or symbols)-
Pour in approximately 1kg of dishwasher salt depending on the brand used.
-
Clean any excess salt from around the reservoir opening and then screw the cap on again firmly.
-
Run the "Rapid" wash programme immediately (without any crockery in the dishwasher) to remove any traces of salt from the compartment.
The salt warning light will illuminate when the reservoir is running out of salt and requires re-filling.
The salt warning light will cease to illuminate within a few days depending on how quickly the salt dissolves.
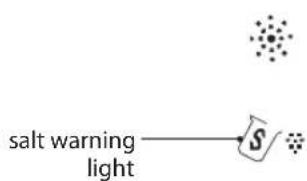
text_image
salt warning lightAdjusting.Salt.Consumption
Salt consumption must be adjusted to correspond to the water hardness level in your area. If you don't know how hard the water in your home is, please ask the company that supplies water in your area.
It is recommended that adjustments should be made in accordance with the following chart.
| Water.Hardness | Setting.on.the.Water.Softener | Digital.Display.State | |||
| °dh °fh °Clark mmol/l | |||||
| 0-5 0-9 0-6 0-0.9 1 H1 | |||||
| 6-11 10-20 7-14 1.0-2.0 2 H2 | |||||
| 12-17 21-30 15-21 2.1-3.0 3 H3 | |||||
| 18-22 31-40 22-28 3.1-4.0 4 H4 | |||||
| 23-34 41-60 29-42 4.1-6.0 5 H5 | |||||
| 35-45 61-80 43-56 6.1-8.0 6 H6 | |||||

1 °dh (German degree) = 1.25mmol/l
1 °fh (French degree) = 0.178mmol/l
1 °Clark (British degree) = 1.78mmol/l

- Do not use everyday table salt or cooking salt as they contain insoluble substances which could damage the dishwasher.
- Do not pour detergent into the salt container. This will damage the dishwasher.
To optimise and customise the level of salt consumption, please follow the steps below.
- Open the door and press the On/Off button.
- Within 60 seconds after pressing the On/Off button, press the Delay and Program buttons at the same time for 5 seconds, the display window will show the current level of salt consumption.
- Press the Program button to select the level of salt consumption.
- Press the Delay button or if there is no operation in 60 seconds, the selection will be saved and the unit will enter standby mode.
Loading.the.Dishwasher
Before.Loading.the.Dishwasher
Please observe the following notes before loading your cutlery and crockery into the basket.
- Remove lipstick stains and any food residues from crockery and dishes. Rinse if necessary.
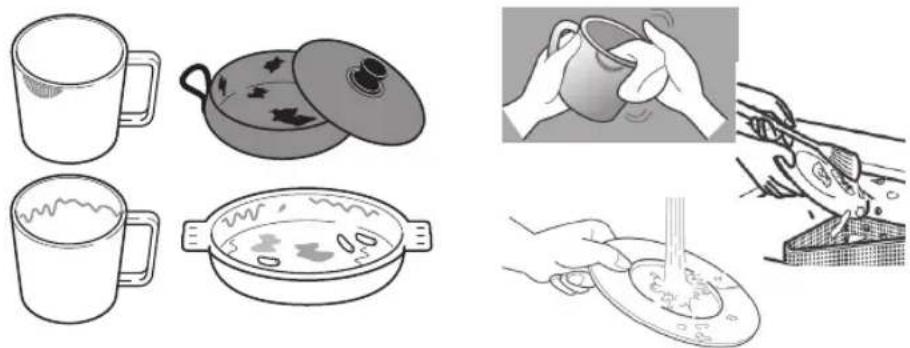
natural_image
Illustration showing various cooking and cleaning steps: cup, pot, bowl, lid, hand pouring liquid, and dish (no text or symbols)- Dishes and cutlery must not lay inside one another, or cover each other.
- Load your cutlery and crockery so that water can access all surfaces.
natural_image
Diagram of a mechanical assembly with pulleys and rods, no visible text or symbols- Ensure all items are securely positioned.
- Hollow items such as cups, glasses, pans, etc. must be placed upside down in the basket.
- Wide based items should be placed at an angle so that water can run off them freely.
- The spray arms must not be blocked by items which are too tall or hang through the basket. If in doubt, test for free movement by manually rotating the spray arms.
- Ensure that small items cannot fall through the holders in the basket.

Do not wash items soiled with ash, sand, wax, lubricating grease or paint in the dishwasher. Ash does not dissolve and can distribute in the dishwasher. Wax, sand, lubricating grease and paint can cause damage to the dishwasher.
Dishwasher.Basket
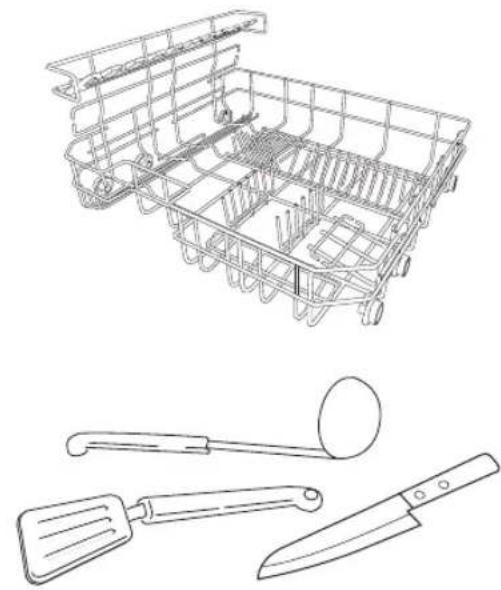
Please use the dishwasher basket for small and lightweight items such as cups, saucers, glasses, dessert bowls, etc. Shallow pans or casserole dishes can also be placed in the dishwasher basket.
Long items such as soup ladles, mixing spoons and long knives should be placed lying down across the front of the dishwasher basket.
natural_image
Line drawings of a shopping cart, kitchen utensils, and a knife (no text or symbols)Hinged Cup Rack
To make room for taller items in the dishwasher basket, raise the cup rack upwards. You can then lean the tall glasses against it. You can also remove it when it is not required for use.
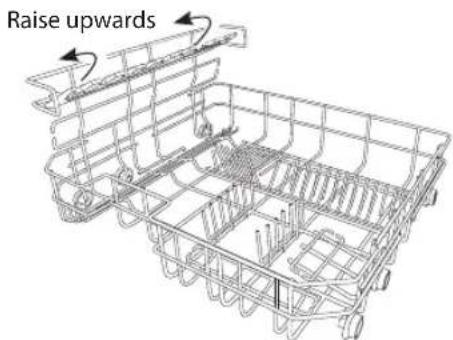
text_image
Raise upwardsHinged Spikes
The spikes are used for holding plates and a platter. They can be lowered to make more room for large items. Please refer below for the steps to open up the spikes.
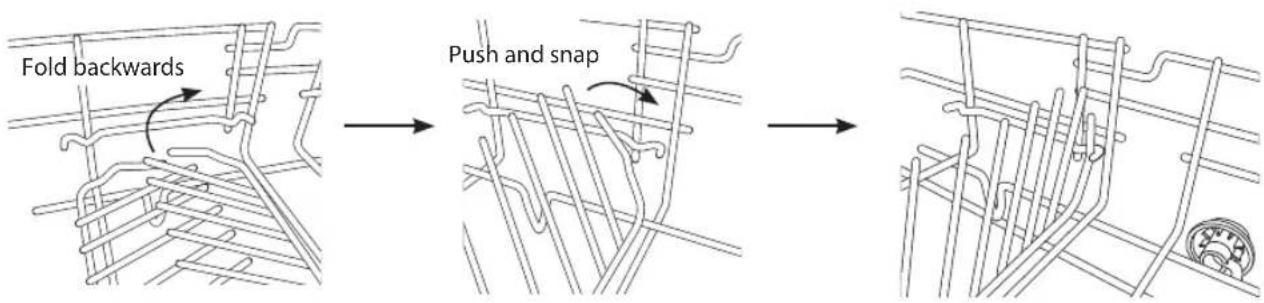
text_image
Fold backwards Push and snapLoading the Dishwasher Basket for 6 Place Settings
For loading the dishwasher basket, please refer to the table below.
| NumberItem | |
| 1 Cups | |
| 2 Medium serving bowl | |
| 3 Glasses | |
| 4 Saucers | |
| 5 Dish | |
| 6 Oval platter | |
| 7 Dinner plates | |
| 8 Soup plates | |
| 9 Dessert dishes | |
| 10 Cutlery basket |
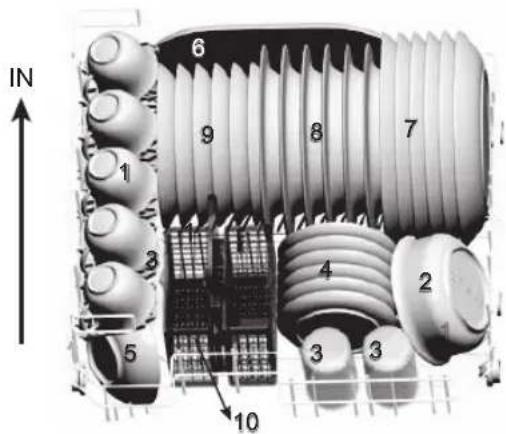
text_image
IN 1 2 3 4 5 6 7 8 9 10Cutlery.Basket
Loading the Cutlery Basket
To make unloading much easier, cutlery should be grouped in zones and placed in the cutlery basket. Please refer to the table below for placement method.
| NumberItem | |
| 1 Forks | |
| 2 Soup spoons | |
| 3 Dessert spoons | |
| 4 Teaspoons | |
| 5 Knives | |
| 6 Serving spoons | |
| 7 Gravy ladle | |
| 8 Serving fork | |
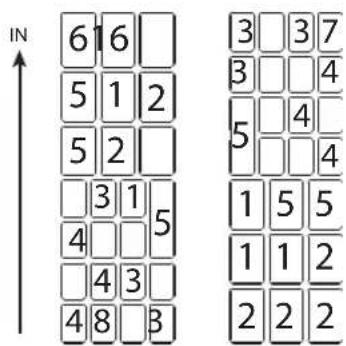
text_image
IN 616 5 1 2 5 2 3 1 5 4 3 4 8 3 3 3 7 3 4 5 4 4 4 1 5 5 1 1 2 2 2 2
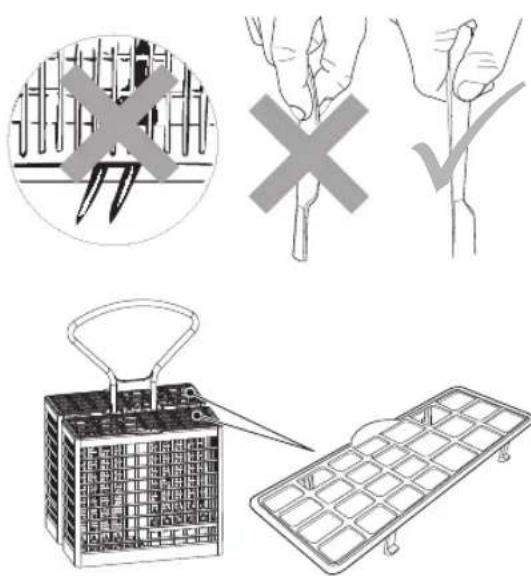
- Do not let any items extend through the bottom of basket.
• To avoid the risk of injury, please load your knives and forks with handles upwards. Do not hold them by their sharp edges. - The cutlery basket comes with covers, and they are designed for you to load the cutlery into the appropriate slots. If you use the basket without the cover, it may reduce the washing results of your cutlery.
- Please ensure the cover is securely locked to the basket before operation.
- To comply with Standards of Performance, i.e. EN50242, all cutlery must be loaded according to the instructions in this manual.
text_image
Diagram illustrating plant tissue damage, showing incorrect screening and defect removal methods with magnified views of the specimen.Starting.a.Wash.Cycle
Please follow the steps below to start a wash cycle.
- Ensure the unit is connected to the mains power and the water supply is on (water pressure between 0.04MPa and 1.00MPa).
- Open the door. Pull out the dishwasher basket, load the dishes and push the basket back.
- Pour in the detergent or place the detergent tablet in the detergent compartment and close firmly afterwards.
- Press the On/Off button, the power indicator light will illuminate.
- Press the Program button to select the wash cycle programme based on the loading and soil requirements. Please refer to the "Wash Cycle Table" (page 12).
- The selected programme indicator light will illuminate.
- Close the dishwasher door. A click sound should be heard when the door is closed correctly. Do not slam the door. The washing cycle will begin shortly.

If you open the dishwasher door during the washing cycle and then close it, the dishwasher will continue the current wash programme after 10 seconds. However, if the door is not closed correctly after 1 minute, the dishwasher will make an audible sound at 1 minute intervals.
Changing.a.Programme
To change the programme if the washing cycle has already started, follow the steps below.
- Open the door slightly to check if the unit has dispensed the detergent or detergent tablet. This will depend on how long the wash cycle was running for.
- If the detergent dispenser lid is opened, we suggest you to allow the wash cycle to complete.
- Open the dishwasher door slightly to stop the washing. Press the Program button more than 3 seconds to cancel the running programme. Then press the Program button repeatedly to select other programmes.
- Close the dishwasher door. The unit will start the new washing cycle shortly.
At.the.End.of.a.Programme
At the end of a programme, the dishwasher will make an audible sound.
Switching.Off.the.Unit
To save energy, remember to switch the dishwasher off using the ON/OFF button. The dishwasher will continue to use electricity until it is switched off with the ON/OFF button.
If the dishwasher is not going to be used for a long period of time, e.g. whilst on holiday, disconnect the unit from the mains supply.
Unloading.the.Dishwasher
Allowing dishes to cool down before unloading is important as dishes tend to break and chip more easily when they are hot. Open the dishwasher door fully after switching off to allow the dishes to cool down much faster.
Cleaning.After.Use
External.Care
The Door and the Door Seal
- Clean the door seals regularly with a soft damp cloth to remove food deposits.
- When the dishwasher is being loaded, food and drink residues may drip onto the sides of the dishwasher door. These surfaces are outside the wash cabinet and are not accessed by water from the spray arms. Any deposits should be wiped off before the door is closed.

- To avoid penetration of water into the door lock and electrical components, do not use a spray cleaner of any kind.
- Never use abrasive cleaners or scouring pads on the outer surfaces because they may scratch the finish. Some paper towels may also scratch or leave marks on the surface.
The Control Panel
If cleaning is required, the control panel should be wiped with a soft damp cloth ONLY.
Internal.Care
Filtering System
The filtering system in the base of the wash cabinet captures large particles of suds solution. Build up of these particles may cause the filters to block. Check the condition of the filters regularly and clean them if necessary under running water.
Follow the steps below to clean the filters in the wash cabinet.
- Ensure the dishwasher is switched off.
- Unscrew the coarse and fine filter.
- Gently lift the coarse and fine filter out.
- Gently lift the main filter with care.
- Rinse all the filters under running water, including the filter cylinder, and then refit all filters in the following order.
- Gently refit the main filter back with care.
- Gently rescrew the course and fine filter in a clockwise direction.
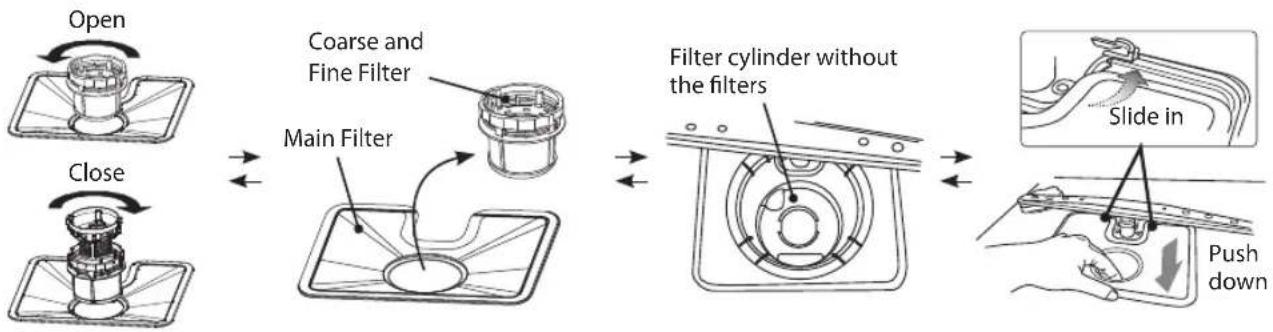
flowchart
graph LR
    A["Open"] --> B["Close"]
    B --> C["Main Filter"]
    C --> D["Filter cylinder without the filters"]
    D --> E["Slide in"]
    E --> F["Push down"]

- Do not over tighten the filters. Put the filters back in the filter cylinder in sequence securely, otherwise the residue could get into the system and cause a blockage.
- NEVER use the dishwasher without the filters in place. Improper replacement of the filters may reduce the performance level of the appliance and damage dishes and utensils.
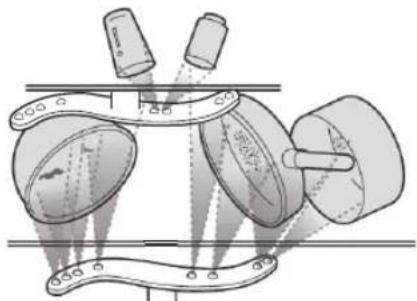
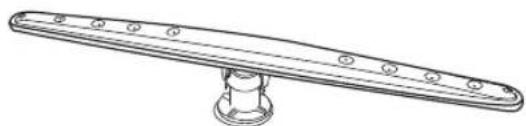
Spray.Arms
Particles of food can get stuck in the spray arm jets and bearings. The spray arms should therefore be checked and cleaned regularly.
- Use a pointed object, e.g. a cocktail stick, to loosen food particles in the spray arms' jets.
natural_image
Technical line drawing of a mechanical support or plate with mounting holes (no text or symbols)
Do not attempt to remove the spray arms.
Frost.Precaution
Avoid placing the dishwasher in a location where the temperature is below 0^ C. If your appliance is left in an unheated place over the winter, you are advised to:
- Disconnect the unit from the water inlet.
- Turn on the unit. Select any washing cycle and let it run for 1 minute only. This will allow all the excessive water that remains in the unit to drain out.
- Disconnect from the mains.
- Empty the dishwasher.
- Close the dishwasher's door.
- Disconnect the unit from the water drain. Use a suitable receptacle to catch the water.
Should you encounter any difficulties with the above steps, please ask a service technician for assistance.
Moving.the.Dishwasher
If you have to move the unit, for instance due to moving house, you are advised to:
- Disconnect the dishwasher from the mains.
- Disconnect the unit from the water inlet and drain. Use a suitable receptacle to catch the water.
- Remove the unit from the current location with the hoses discharged.
- Pull the unit out together with the hoses.

- Avoid over tilting the unit during transportation.
• We recommend that 2 people handle the dishwasher when moving it.
Maintenance. After.a.Prolonged.Period.of.Non-Operation
If you are not going to use the unit for a prolonged period of time, you are advised to:
- Disconnect the dishwasher from the mains.
- Disconnect the unit from the water inlet and drain. Use a suitable receptacle to catch the water.
- Open the door slightly to prevent unpleasant smells building up in the compartment.
- Ensure the washing compartment of the dishwasher is clean.
Hints.and.Tips

Repairs should only be carried out by a qualified technician in strict accordance with current local and national safety regulations. Unauthorised or incorrect repairs could cause personal injury or damage to the unit.
Fault.Code
| CodesPossible.CausesRemedy | ||
| E1 | Water tap is not turned on. Turn on the water tap. | |
| Low water pressure (<0.04MPa) Turn on the water tap and ensure it is in full position. | ||
| E4 | Too much inlet water. | |
| Some element of dishwasher leaks. | ||
Technical.Problems
| Technical.Problems | ||
| ProblemPossible.CausesRemedy | ||
| The dishwasher does not start. | The door is not properly closed. | Close the door firmly. |
| The unit is not connected to the mains. | Connect the mains plug to the mains socket. | |
| The unit is not switched on. Press | the On/Off button and select a programme. | |
| The drain pump is not working properly. | Kink in drain hose. Check the drain hose. | |
| Filter clogged. Check coarse the filter. See the section “Internal Care – Filtering System”. | ||
| The anti-flooding system has operated. | · Disconnect from the mains.· Disconnect the water inlet.· Call a qualified technician. | |
| General.Problems | ||
| ProblemPossible.CausesRemedy | ||
| Detergent residue is left in the dispenser at the end of the programme. | The detergent dispenser was still damp when detergent was added. | Make sure the dispenser is dry before adding detergent. |
| The detergent dispenser lid cannot be closed properly. | Clogged detergent residue is blocking the catch. | Clean the catch. |
| Knocking noise in the wash cabinet. | A spray arm is knocking against an item in a basket. | Interrupt the programme, and rearrange the items which are obstructing the spray arm. See the section “Loading the Dishwasher”. |
| Smearing appears on glassware and cutlery. | The rinse aid dosage is set too high. | Adjust the dial of the rinse aid dispenser to a lower setting. |
| Dishes, cutlery and glasses are not dry. | The amount of rinse aid may be insufficient, or the rinse aid reservoir is almost empty. | Replenish the reservoir, adjust the rinse aid dispenser dial to a higher setting or change the brand of rinse aid. |
| Crockery was taken out of the dishwasher too soon. | Leave the crockery in the dishwasher until you hear an audible sound. | |
| White residue is visible on cutlery and crockery, clouding occurs on glassware; film can be wiped off. | Not enough rinse aid was used. | Replenish the reservoir, adjust the rinse aid dispenser dial to a higher setting or change the brand of rinse aid. |
| There is not enough salt in the salt reservoir. | Fill the salt reservoir. | |
| The salt reservoir cap has not been screwed on correctly. | Ensure that it is screwed back on correctly. | |
| Unsuitable detergent has been used. | Change your detergent. Use a dishwasher standard powder detergent. | |
| The salt consumption setting is too low. | Select a higher salt consumption setting. | |
| Glassware is dull and discoloured; film cannot be wiped off. | The glassware is not dishwasher proof. The surfaces are affected. | Wash the non-dishwasher proof glassware by hand. |
| Tea or lipstick stains have not been completely removed. | The wash temperature of the selected programme was too low. | Select a programme with a higher wash temperature. |
| The bleaching effect of the detergent used is too low. | Change your detergent. | |
| Forgot to pre-rinse or remove the stains with a napkin prior to washing. | Pre-rinse or remove the stains with a napkin prior to washing. | |
Disposal.of.the.Dishwasher
- When disposing your old dishwasher, first make it unusable. Disconnect the hoses and unplug the mains cable. Cut off the mains cable from the dishwasher. Make the door lock inoperative, so that children cannot accidentally shut themselves in. Make appropriate arrangements for the disposal of the dishwasher.
- At the end of its working life, the product must not be disposed of as urban waste. It must be taken to a special local authority differentiated waste collection centre or to a dealer providing this service. Disposing of a household appliance separately avoids possible negative consequences for the environment and health deriving from inappropriate disposal and enables the constituent materials to be recovered to obtain significant savings in energy and resources. As a reminder of the need to dispose of household appliances separately the product is marked with a crossed out wheeled dustbin.
- Please ensure that it presents no danger to children while being stored for disposal.
Disposal.of.Packing.Material
Please dispose of the plastic wrappings and bags safely and keep out of the reach of babies and young children.
Specifications
| ModelSIDTTX11 | |
| Dimensions550 mm (W) x 500 mm (D) x 438 mm (H) | |
| Capacity6 Place Settings | |
| Water.Pressure.Required0.04 - 1.00MPa | |
| Power.Consumption1280W | |
| Rated.Voltage230V~ | |
Features and specifications are subject to change without prior notice.
Safety.Warnings
For your continued safety and to reduce the risk of injury or electric shock, please follow all the safety precautions listed below.
- Read all instructions carefully before using the dishwasher and keep them for future reference.
- Retain the manual. If you pass the dishwasher onto a third party, make sure to include this manual.
- Keep ventilation openings in the dishwasher enclosure clear of obstructions.
- Choose a location for your dishwasher away from heat sources such as radiators or fires.
- Young children should be supervised to ensure that they do not play with the dishwasher.
- Keep mains cable out of reach from children.
- This dishwasher is not intended for use by persons (including children) with reduced sensory or mental capabilities, or lack of experience and knowledge unless they have been given supervision or instructions concerning the use of the dishwasher by a person responsible for their safety.
- Keep children away from detergents and rinse aids. These may cause chemical burns in the mouth, throat and eyes or asphyxiation.
- Keep children away from the dishwasher when the door is open.
- Switch off and unplug before fitting or removing tools/attachments, after use and before cleaning.
- Keep your fingers away from moving parts and fitted attachments.
- Never use a damaged machine.
- If the mains cable is damaged, it must be replaced by the manufacturer, its service agent or a qualified technician in order to avoid a hazard.
- Keep the power unit, mains cable or plug away from water.
- Never exceed the maximum capacities.
• 2 people are required to lift this dishwasher.
- Only use the dishwasher for its intended domestic use.
WARNING

IT IS HAZARDOUS FOR ANYONE OTHER THAN AUTHORISED SERVICE PERSONNEL TO CARRY OUT SERVICING OF REPAIRS WHICH INVOLVE THE REMOVAL OF COVERS.

TO AVOID THE RISK OF AN ELECTRICAL SHOCK DO NOT ATTEMPT REPAIRS YOURSELF.
- Do not sit or stand on the door or dish rack.
- Do not move your dishwasher by holding the door or its edges. Hold the dishwasher around its sides or base when moving it.
- Do not touch the heating element during or immediately after use.
- Do not operate your dishwasher unless all enclosure panels are properly in place. Open the door very carefully when there is a programme running as there is a risk of hot water spraying out of the appliance.
- Do not place any heavy objects on the open door. The appliance could tip.
- When loading items to be washed:
- Locate sharp items so that they will not damage the door seal;
- Warning: Knives and other utensils with sharp points must be loaded in the basket with the points downwards or placed horizontally.
- Do not allow plastic items to come into contact with heating element.
- Check that the detergent receptacle is empty after completion of the wash cycle.
- Do not wash plastic items unless they are marked dishwasher safe or equivalent.
- Use only detergent and rinse aids designed for an automatic dishwasher.
- Other means for disconnection from the supply must be incorporated in the fixed wiring with at least 3mm contact separation in all poles.
- The door should not be left in the open position since this could present a tripping hazard.
- For energy saving, always remember to switch the dishwasher off when you have finished using it. The dishwasher should not be left unattended when in use.
- Remove the door to the washing compartment when removing an old dishwasher from service or discarding it.
- During installation, the power supply cord must not be excessively or dangerously bent or flattened.
- Do not tamper with controls.
- The appliance is to be connected to the water mains using new hose sets.
- The maximum number of place settings to be washed is 6.
- The maximum permissible inlet water pressure is 1Mpa, and the minimum permissible inlet water pressure is 0.04Mpa.
Earthing Instructions
WARNING: THIS APPLIANCE MUST BE EARTHED.

- This appliance is equipped with a mains cable having an equipment-earthing conductor and an earthing plug.
- The plug must be plugged into an appropriate outlet that is installed and earthed in accordance with local standards and requirements.

- Improper connection of the equipment-earthing conductor could result in a risk of electric shock.
- The wires in the cord are coloured as follows:
- Green and Yellow = Earth,
- Blue = Neutral,
- Brown = Live.
- Check with a qualified electrician or service representative if you are in doubt whether the appliance is properly earthed or the plug does not fit correctly.
- Never modify the plug provided with the appliance.
| NOTE: If you require a replacement for any of the items listed below, please quote their corresponding part numbers: | |
| Replacement.PartPart.Number | |
| Cutlery Basket 673006200014 | |
| Water Supply Hose 673000900060 | |
| Drain Hose 673005400041 | |
| Drain Hose Mounting Clamp 672005400002 | |
| Detergent Measuring Spoon (Approx. 20g) 673002200079 | |
| Measuring Cup (Approx. 60ml) 673006200004 | |
| U-Shape Hose Holder 673006200003 | |
| Salt Funnel 673002200001 | |
| Condensation Strip 675001300716 | |

Visit Partmaster.co.uk today for the easiest way to buy electrical spares and accessories. With over 1 million spares and accessories available we can
deliver direct to your door the very next day. Visit www.partmaster.co.uk or call 0844 800 3456 (UK customers only) Calls charged at National Rate.

This symbol on the product or in the instructions means that your electrical and electronic equipment should be disposed at the end of its life separately from your household waste. There are separate collection systems for recycling in the EU.
For more information, please contact the local authority or your retailer where you purchased the product.

bar
| Category | Value | |---|---| | Category 1 | 100 | | Category 2 | 100 | | Category 3 | 100 | | Category 4 | 100 | | Category 5 | 100 | | Category 6 | 100 | | Category 7 | 100 | | Category 8 | 100 | | Category 9 | 100 | | Category 10 | 100 | | Category 11 | 100 | | Category 12 | 100 | | Category 13 | 100 | | Category 14 | 100 | | Category 15 | 100 | | Category 16 | 100 | | Category 17 | 100 | | Category 18 | 100 | | Category 19 | 100 | | Category 20 | 100 | | Category 21 | 100 | | Category 22 | 100 | | Category 23 | 100 | | Category 24 | 100 | | Category 25 | 100 | | Category 26 | 100 | | Category 27 | 100 | | Category 28 | 100 | | Category 29 | 100 | | Category 30 | 100 | | Category 31 | 100 | | Category 32 | 100 | | Category 33 | 100 | | Category 34 | 100 | | Category 35 | 100 | | Category 36 | 100 | | Category 37 | 100 | | Category 38 | 100 | | Category 39 | 100 | | Category 40 | 100 | | Category 41 | 100 | | Category 42 | 100 | | Category 43 | 100 | | Category 44 | 100 | | Category 45 | 100 | | Category 46 | 100 | | Category 47 | 100 | | Category 48 | 100 | | Category 49 | 100 | | Category 50 | 100 | | Category 51 | 100 | | Category 52 | 100 | | Category 53 | 100 | | Category 54 | 100 | | Category 55 | 100 | | Category 56 | 100 | | Category 57 | 100 | | Category 58 | 100 | | Category 59 | 100 | | Category 60 | 100 | | Category 61 | 100 | | Category 62 | 100 | | Category 63 | 100 | | Category 64 | 100 | | Category 65 | 100 | | Category 66 | 100 | | Category 67 | 100 | | Category 68 | 100 | | Category 69 | 100 | | Category 70 | 100 | | Category 71 | 100 | | Category 72 | 100 | | Category 73 | 100 | | Category 74 | 100 | | Category 75 | 100 | | Category 76 | 100 | | Category 77 | 100 | | Category 78 | 100 | | Category 79 | 100 | | Category 80 | 100 | | Category 81 | 100 | | Category 82 | 100 | | Category 83 | 100 | | Category 84 | 100 | | Category 85 | 100 | | Category 86 | 100 | | Category 87 | 100 | | Category 88 | 100 | | Category 89 | 100 | | Category 90 | 100 | | Category 91 | 100 | | Category 92 | 100 | | Category 93 | 100 | | Category 94 | 100 | | Category 95 | 100 | | Category 96 | 100 | | Category 97 | 100 | | Category 98 | 100 | | Category 99 | 100 | | Total (Total) |