SlidePad NG-704 3G - Tablet MEMUP - Free user manual and instructions
Find the device manual for free SlidePad NG-704 3G MEMUP in PDF.

User questions about SlidePad NG-704 3G MEMUP
0 question about this device. Answer the ones you know or ask your own.
Ask a new question about this device
Download the instructions for your Tablet in PDF format for free! Find your manual SlidePad NG-704 3G - MEMUP and take your electronic device back in hand. On this page are published all the documents necessary for the use of your device. SlidePad NG-704 3G by MEMUP.
USER MANUAL SlidePad NG-704 3G MEMUP
SlidePadNG
704-3G
808DC
SlidePadNG
SlidePadNG
9708DC
SlidePad Elite
116

memup™
CONTENT
SAFETY AND OTHER INSTRUCTIONS 1
PRODUCT VIEW 2
OTHER CONNECTIONS 10
WIFI CONNECTION 11
PHOTO GALLERY 12
USING CAMCORDER 13
MOVIE CLIPS 13
PLAY MUSIC 14
PLAY VIDEO 15
SET EMAIL ACCOUNT 16
MANAGING APPLICATIONS 17
WEB BROWSING 18
SETTINGS 19
OPERA MARKET 21
OPTION PHONE / 3G 22
SPECIFICATIONS 25
SAFETY NOTICES 26
LEGAL AND TRADEMARK NOTICES 27
TROUBLESHOOTING 28
Welcome and thank you for choosing SlidePad NG. Our tab is a multimedia computer running Android™, with a built-in flash memory, you will then enjoy multimedia content, some applications and access to the Internet connected to the Wifi.
SAFETY AND OTHER INSTRUCTIONS
Please use SlidePad NG carefully and read following instructions.
>>> Copyright
Software, audio, video or any intellectual properties are protected by copyright and international laws.
It is user's responsibility when reproducing or distributing content(s).
>>> Codec Check
This product may not support some media formats. Please check available codec types.
>>> Data Backup
Please backup datas stored in this product in a safe place. We are not responsible for any data loss or damage.
>>> Drop / Shock
Do not give shock or drop the SlidePad NG. This may damage it.
>>> Foreign Substance
Do not insert any metal or inflammable foreign substances into player. This may damage it.
>>> Disassembly / Modification
Do not attempt to disassemble or modify any part of SlidePad NG. This may damage it. Any product modification may void the warranty.
>>> Load
Do not place any heavy object on the top of the SlidePad NG. This may damage it.
>>> Chemicals
Do not clean product using chemicals cleaners. This may damage the SlidePad NG.
>>> Water / Moisture
Do not contact the SlidePad NG with water or liquid.
This may cause fire or electric shock. If any conductive liquid enters, turn off the SlidePad NG and disconnect power adapter immediately.
>>> Magnet or Magnetic Properties
Do not place the SlidePad NG near a magnetic field. This may cause a malfunction or damage stored data.
>>> Heat
Do not place the SlidePad NG under direct sunlight or near a heat source. Do not keep it for long time in high temperature. This may damage it.
>>> Vision / Hearing
Do not watch movies or hear loud sound for long time. This may cause vision or hearing problem.
>>> Fire
During SlidePad NG use, if you detect smoke or unusual smell, turn off product, disconnect adapter immediately, and call the aftersales department if required.
>>> Power
Do not use many electronic products with single outlet.
Firmly insert power plug. When working, do not unplug.
>>> Glass breakage
The SlidePad NG touch screen panel can be damaged. Any glass breakage isn't included in the warranty.
PRODUCT VIEW
The buttons locations depend on the SlidePad NG you have.
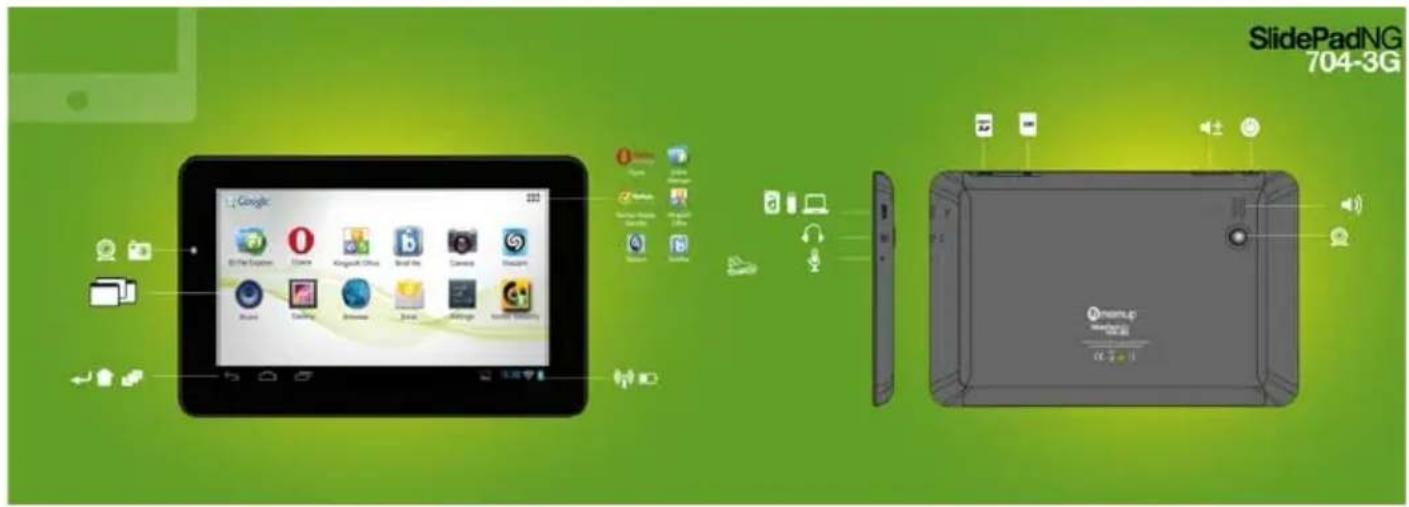
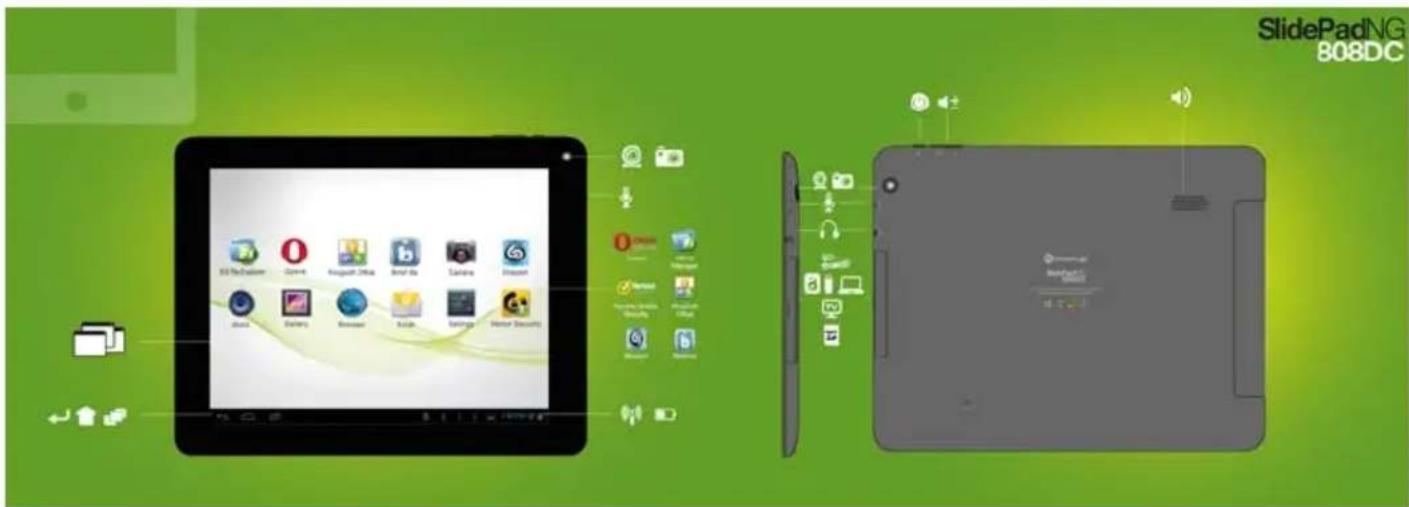
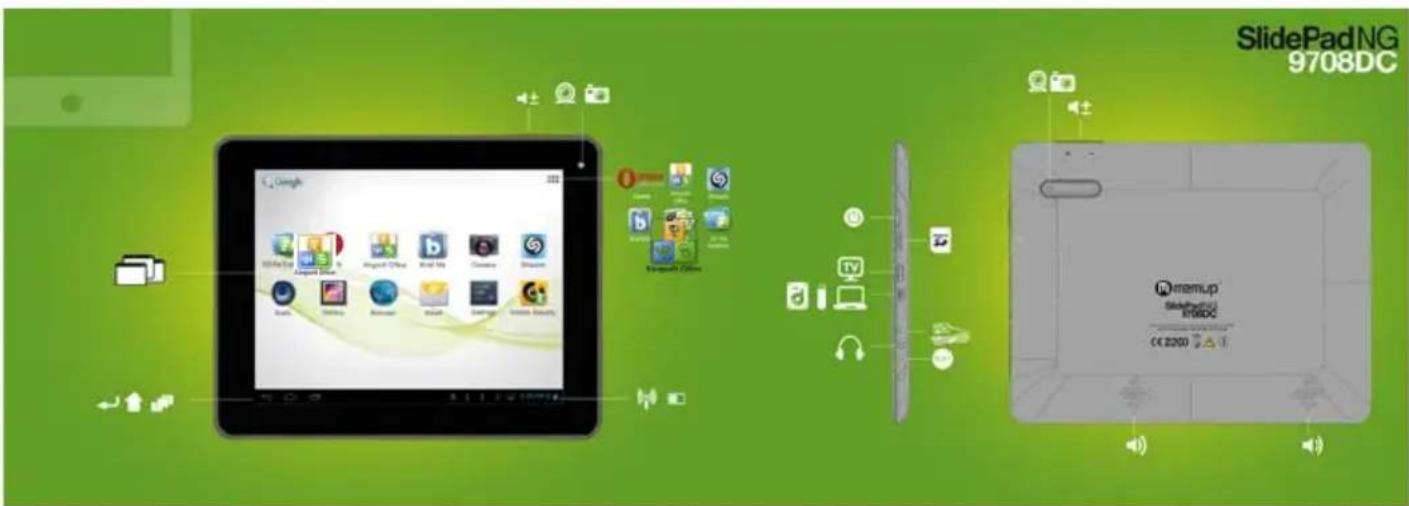
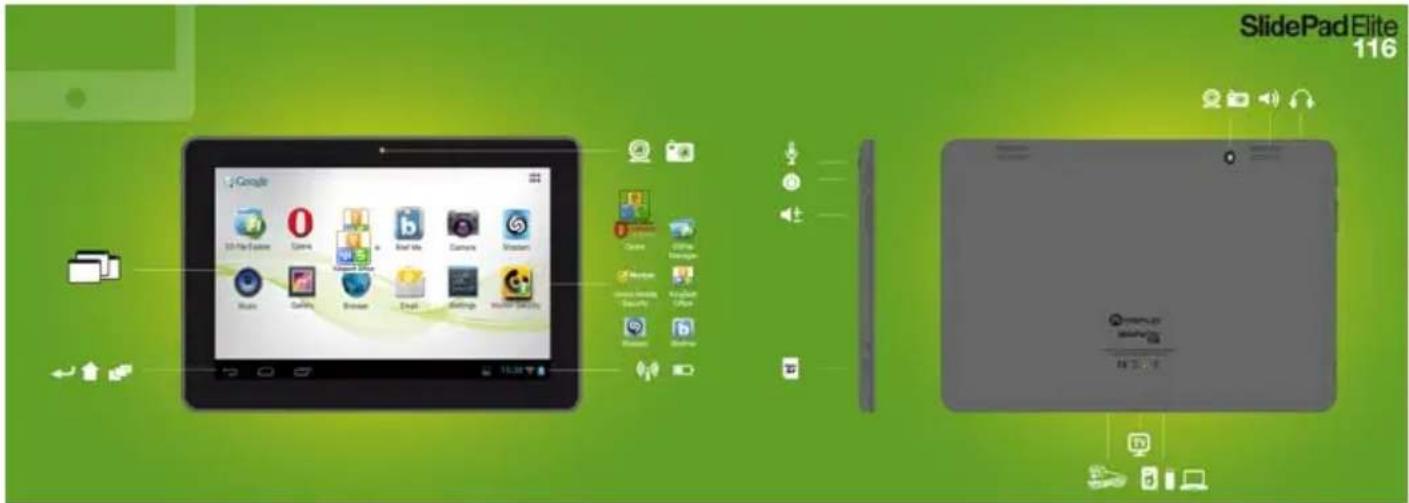
| Name Definition | |
| Screen LCD | |
| Camera Camera | |
| Audio in Connect to headphones | |
| Speakers Stereo speakers. | |
| Vol + | Press to increase the volume level. |
| Vol - Press to decrease the volume level. | |
| Power on/off | Press to turn the unit on, or to turn the screen on and off. |
| USB in | Connect to a PC. Connect the adapter to plug external HDD or USB key |
| HDMI out | Connect to a HD TV (Except SlidePad 704CE) |
| AC in | Charge and power the SlidePad NG with the included power adapter. |
| Micro SD slot | Load external microSD memory card here. |
| Reset hole | Press to reset the SlidePad NG if it freezes or behaves abnormally (use a paperclip or other small object to press this key.) |
Make sure you are connected to the Network when downloading applications (check Wifi connection).
Download and install applications
Download platforms: You have access to a few download platforms that already exist to easily get Android applications. For example: SlideMe, AndrAppStore, Opera, ...
These platforms are built-in applications to access directly to a market where you can download free or paid applications. The new SlidePad NG are delivered with Opera to easily download applications.
Applications access: Beyond the Internet access, make sure you agree with the different demands to be authorized when you download and install a software from a download platform.
The software will ask to access for example personal datas, your profile, ...
Applications format: You can also download directly from a few websites some applications, with apk extension and then paste file to install it. Make sure you have authorized installation from unknown source before installation.
Remove applications
1/ Tap the Settings shortcut in the Home Screen to display setting menus.
2/ Select "Applications".
3/ Tab on the application that you want to uninstall.
4/ Tab on "Uninstall" to uninstall the application.
Uninstall to save space or because applications are not satisfying. The file will be deleted permanently and you'll have to download and install it again if you want to use it one more time.
FIRST STEPS
Package contents
Please make sure that the items shown below are included in the package.
- Memup Internet SlidePad NG
- USB cable
- USB host adapter
- Stereo Earphones
- Power adapter
Features
- Browse the Web.
- Check your e-mail. Keep in touch with friends and family
- Watch videos
- Discover thousands of apps for Android™ download apps
- Connect to the Internet wirelessly High-speed Wifi 802.11 b/g/n networking
- HDMI™ output to your TV ** Enjoy videos, photos and more in the comfort of your living room (Except SlidePad 704CE)
- Enjoy your media library anywhere. SlidePad NG plays popular music, video, and photo formats
- MicroSD memory card reader Increase your storage capacity (up to 64 GB)
- Built-in front-facing camera
** Requires optional HDMI cable (Type A-to-Type C). 1080p HD video playback requires a video file encoded at 1080p. Streaming video quality will be affected by the source, and the quality and condition of your network connection.
Touchscreen
Use your finger tip to touch the area of the screen where a control icon is displayed. If you touch and hold the screen, it will register as a continuous button press.
To avoid damaging the screen, do not touch it with excessive force or with any object other than your finger. For best response, make sure your hands are clean before using the touchscreen controls.
Protective film
A thin film has been applied to the touchscreen to protect it during shipping. It could be removed.
Battery charge
Only use the SlidePad NG included AC adapter, don't use other plug to charge the SlidePad NG, it could damage it. the Status Indicator will light green when the battery is fully charged □.
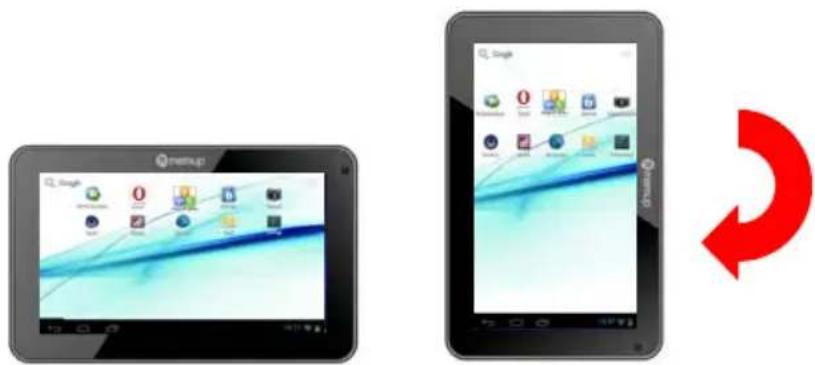
The orientation sensor
The SlidePad NG contains a sensor that will automatically change the orientation of most screens as you rotate the SlidePad NG. The orientation sensor can be turned on and off in the Display settings menu.
Touchscreen Actions
To control the SlidePad NG with the touchscreen, use your finger to manipulate icons, buttons, menu items, the onscreen keyboard, and other items displayed on the screen. You can perform the following actions on the touchscreen using your fingertip.
Touch: To activate an on-screen item (application icons, buttons, menu items, and the letter/symbols of the on-screen keyboard), simply touch them on-screen.
Touch and hold: Some on-screen items have an alternate action if you touch and hold it (opening an alternate menu, or dragging icons). Touch the item and do not lift your fingertip until the action occurs.
Drag: Drag an on-screen item to change its position. Touch and hold it for a moment, then without lifting your finger, move until the item reaches its target destination.
Swipe: Swipe up/down on the screen to scroll through a list. On some screens, you may be able to swipe left/right. Touch screen and then quickly move your fingertip across the screen without lifting your finger.
Double tap: Quickly tap the screen twice on a webpage or other application screen to zoom (when supported).
Inserting a memory card
The SlidePad NG accepts microSD memory cards to:
- Increase the memory capacity of your SlidePad NG
- Play media fles stored on the memory card (music video, or photo fles).
To insert a memory card:
-
Align the memory card with the card slot. The metal contacts of the memory card should face down away from the LCD screen.
-
Slide the card into the spring-loaded slot. Push the card in until it clicks into place.
Note:
Do not attempt to insert objects other than a microSD memory card into the card slot. A compatible memory card should easily fit into the slot, if you encounter resistance, check the alignment of the card. Do not force the card in and avoid touching the gold connector of the microSD.
To avoid damage and data corruption, do not remove a memory card while data is being written or read from the card.
ANDROID™ INTERFACE
Getting started
To turn the SlidePad NG on:
Press and hold the Power key until the LCD screen turns on. Wait until the Home screen appears; the SlidePad NG is now ready for use.
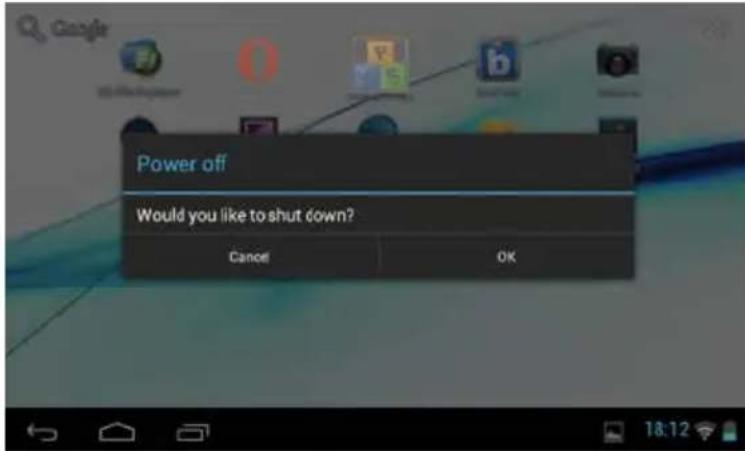
To turn the SlidePad NG off:
-
Press and hold the Power key until a confirmation message appears.
-
Touch OK to turn off the SlidePad NG.
Stand by
When the SlidePad NG is on, you can turn off the screen to save battery power.
Simply press the Power key once to turn the screen off. Press it again to turn the screen back on.
Note:
To save battery power, the screen can be set to turn off automatically when the SlidePad NG is not used (between 15 s and 30 mn). This option is available in the Display settings menu.
Unlock the screen
When the screen turns off, you will have to unlock the screen when you turn it on. To unlock the screen, drag the lock icon across the screen towards the lock icon.
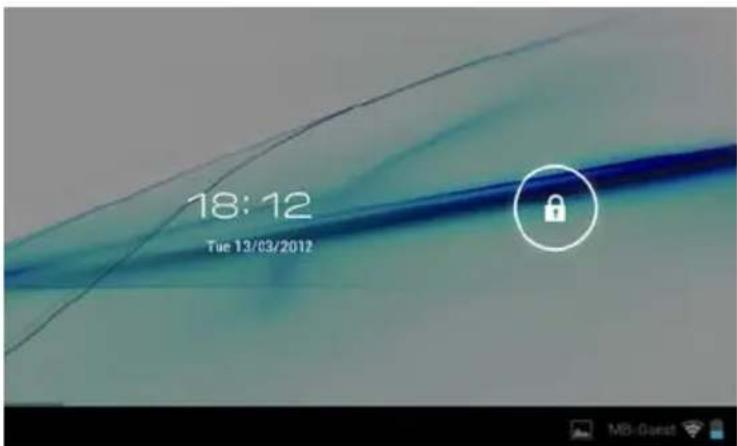
If a password has been set, enter it to finish unlock.
The Screen Unlock password can be set in the Location and security settings menu.
The welcome page
The interface is made of 5 virtual pages, each page could be customized with your own selected applications, move your finger on screen from right to left to use different applications/page.
In these pages, you can add shortcuts, widgets, bookmarks, to ease your SlidePad NG navigation and use.
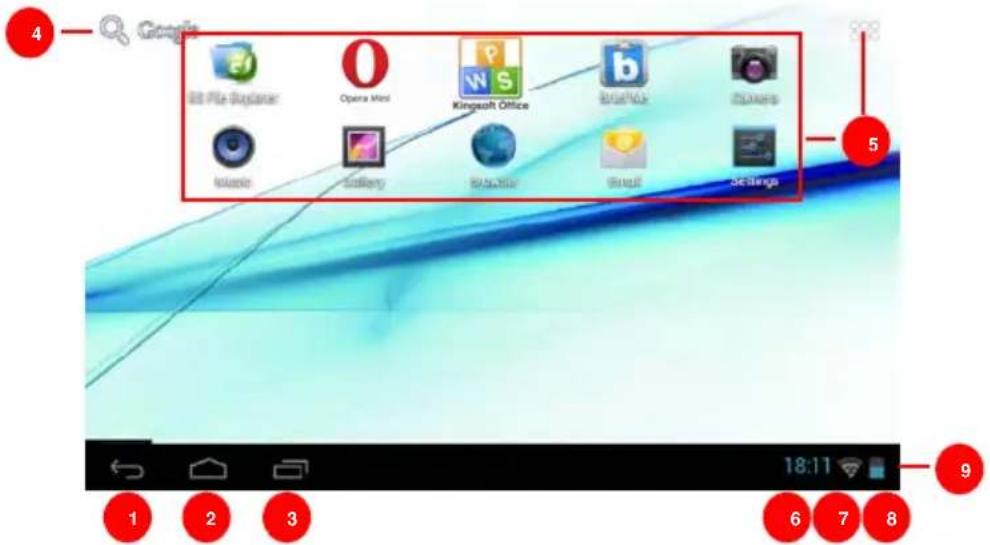
| Name Definition | ||
| 1 | Return Get back to previous screen or cancel action | |
| 2 | Home Shortcut to the welcome screen | |
| 3 | Multi tasks | It will display all opened applications to navigate from one to the other |
| 4 | Google search Shortcut to reach Google search by connecting the Internet | |
| 5 | Application folder | On the right side, you access the different applications installed in your SlidePad NG, long press on icon to move it to one of the 5 different pages. Note: You can swipe left and right to view additional screens. |
| 6 | Time | It displays current time |
| 7 | Wifi connection It displays the wifi signal | |
| 8 | Battery status | Shows the battery level before recharging the SlidePad NG |
| 9 | Notification bar | It's the right part of the bar, move this bar from bottom to top to open it and check the different actities on the SlidePad NG such as installed softwares, download failure, wifi status, notifications, battery status, ... |
You can add or remove from the 5 pages the different widgets or applications you want to customize in your SlidePad NGs, these are only shortcuts, it won't affect their installation. Uninstalling a program is different.
You can also add widget to display application with a larger display, programs are used and automatically refreshed by Internet access when selected and available.
It can be moved or deleted easily. Long press in empty space to add a new widget. You can also check into the applications shortcut to add a widget.
Note:
Some applications request Internet access to be used.
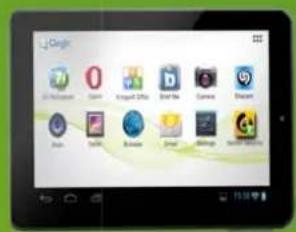
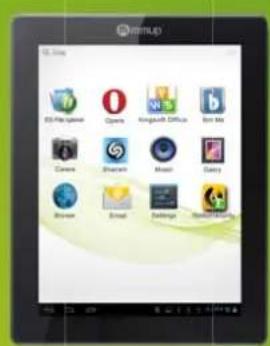
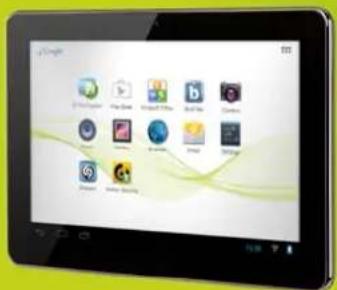
Preinstalled applications:
Some applications have been installed in your SlidePad NG for your convenience. These applications include:
| Opera Mini | Alternative market to download thousand of applications. |  | Office Suite Viewer to open and create your office files, compatible with .doc, .xls, .ppt,... |
 | EsFile Explorer is files browser. |  | Check news updated all day long. |
 | Search and find your favorite titles |  | Protect your tablet |
You can also download and install additional applications from other sources. The SlidePad NG must be set to allow installation of applications from non-Market sources. The Unknown sources option can be set in the Application settings menu.
Support for third-party applications is provided by their respective applications developers.
Memup is not responsible for the behavior of these applications please review the description and terms of use provided by third-party developers carefully before installing applications on your SlidePad NG.
COMPUTER CONNECTION
Add some files: Video, Photos, Audio, Documents or applications into the SlidePad NG by connecting it to your computer through the delivered USB cable.
Connection
Connect the SlidePad NG to a computer to transfer files.
-
Connect your SlidePad NG to the computer. With the included USB cable.
-
Plug the small end of the cable into the USB 2.0 Hi- speed connector of the SlidePad NG.
-
Plug the large end of the cable into an available USB 2.0 Hi-speed port on the computer.
-
When your SlidePad NG is connected, a USB icon will appear in the Notification bar.
Your SlidePad NG will be recognized by the computer as a Removable Storage drive. Drag and drop files between your SlidePad NG and the computer.
Transfer files
To transfer files, open the explorer and drag and drop files from a device to another.
Once finished, remove the USB device safely by clicking the USB icon to stop it and then pull out the USB cable.
Note:
Please don't power off when SlidePad NG is reading and writing.
CONNECT TO TV
Connect to a TV to enjoy your SlidePad NG from the comfort of your living room. An HDMI cable (Type A-to-Type C) is required to connect the SlidePad NG to a TV.

natural_image
Line drawing of a computer monitor connected to a cable via a cable (no text or symbols)To adjust the display settings:
1/ Open the Settings menu, select HDMI to turn on HDMI output and choose an HDMI resolution option;
2/ Turn on the digital television, and switch its Source mode to HDMI.
3/ Connect the device to the digital television through HDMI cable.
4/ Once the connection is built, the display of the device will turn black, and simultaneously the digital TV shows what should be displayed on the device screen;
5/ To switch the display back to the tablet, just disconnect the HDMI connection.
OTHER CONNECTIONS
Connecting earphones
Connect a pair of earphones (included) to the SlidePad NG to enjoy media in private. The headphones must have a 3.5 mm (1/8 inch) plug. □When headphones are connected; speaker output will be disabled automatically.
Note:
Hearing experts advise against the constant use of personal stereos played at high volume. Constant exposure to high volumes can lead to hearing loss. If you should experience ringing in the ears or hearing loss, discontinue use and seek medical advice.
Connecting a Keyboard
When you want to type for an extended period of time, you may want to connect a full-size keyboard to the SlidePad NG.
Use the included USB full-size adapter (included) to connect a keyboard to the SlidePad NG.
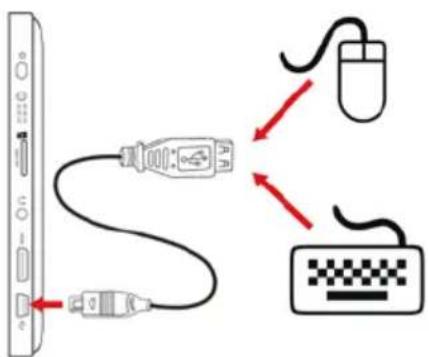
Note:
You may also use this connection to add a mouse to the SlidePad NG.
The adapter supports one connection at a time. To use a keyboard and mouse simultaneously, you will need an external USB hub.
Connecting a Storage Device
Use the included USB full-size (Type A) adapter (included) to connect a flash memory to the SlidePad NG.
Note:
This connection supports a maximum storage size of 4 GB. For additional storage capacity, a microSD card can be added to the SlidePad NG.
WIFI CONNECTION
Before using an application that requires Internet connection, make sure your Wifi connection is opened.
You have to be under a Wifi zone that will allow your connection.
SlidePad NG can use Wifi data networks to connect to the Internet over 300 feet; however, this distance can be affected by your surrounding environment and Wifi router.
When connected to the Wifi, the battery power will be empty faster due to resources use.
Requirements
In order to connect to the Internet, you will need the following:
-
A wireless router or access point with a broad-band Internet connection that supports Wifi 802.11b/g/n connections.
-
The wireless router network settings
You need to know the name of your network (SSID and the password or other credentials if your network is secured. These settings can be found on the administration webpage of your wireless router. Please refer to your wireless router's documentation for help or ask your network administrator for details.
Connect to a Wifi network
The Notification bar displays icons that indicate your SlidePad NG's Wifi status.

| Notification that an open Wifi network is in range. | |
| Connected to a Wifi network (waves indicate connection strength). | |
| No icon | There are no Wifi networks in range, or the Wifi is off. |
To turn on Wifi:
a. Go to the Settings
b. Open the Wireless & networks menu: Wi-Fi.
c. Choose on right side the Wi-Fi network you want to connect on.
d. Input password corresponding to chosen network.
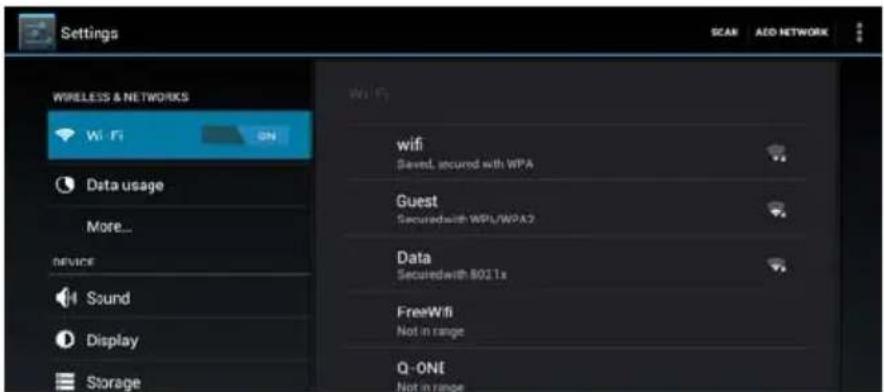
Note:
If you connect to a network you connected previously, the SlidePad NG will reconnect to it automatically. If you don't see your network in the list, you can force the SlidePad NG to re-scan.
PHOTO GALLERY
1/ Photos should be listed in thumbnail. You can slide your finger on the screen left or right to browse photos.

natural_image
Black-and-white photo of a person with purple smoke and yellow hair, no visible text or symbols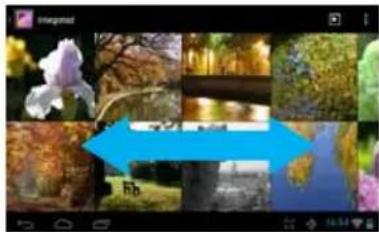
natural_image
Collage of nature photos including an orchid, water, and greenery with a blue arrow pointing to a location (no text or symbols)2/ Tap a photo thumbnail to view the photo in full screen.

natural_image
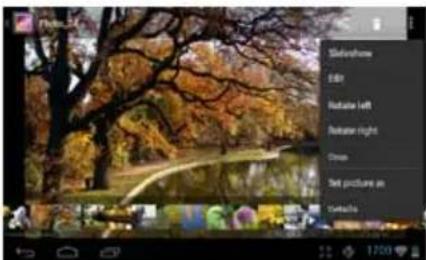
Autumn park scene with a calm lake reflecting autumn trees and golden-brown leaves (no text or symbols visible)3/ To display the previous/next picture, slide your finger on the screen horizontally.

natural_image
Scenic autumn park view with a lake, trees, and a blue arrow overlay (no text or symbols)4/ To zoom in or out the picture, pinch your finger on the picture.

natural_image
Hand holding a glass pyramid with yellow arrows pointing to the Louvre, against a blue sky (no text or symbols)Display Menu
When you are viewing the picture, you can tap on the screen or the Menu icon to show a menu.
USING CAMCORDER
Tap the Camera in the apps page.
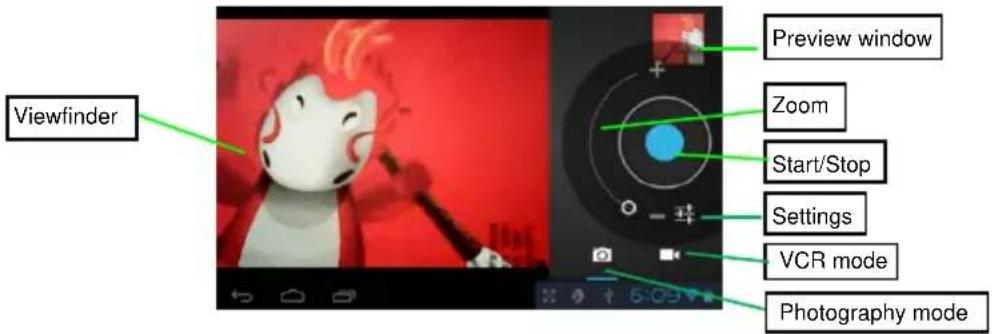
1/ To start making video clips, tap on the Start/Stop button to start video recording.
2/ Tap on the Start/Stop button again to stop video recording or photographing.
3/ The video clip / photo can be previewed in the Preview Window.
4/ To play the video, enter Video Player, and then tap the video.
5/ To view the photo, enter Photo Viewer mode, and then tap the photo.
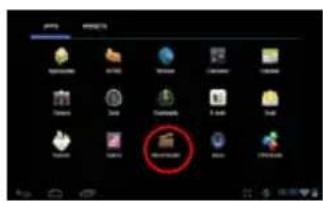
MOVIE CLIPS
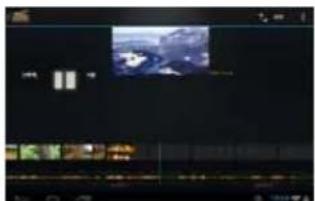
You can make some interesting movie clips with Movie Studio application. Tap the Movie Studio icon on the apps screen to run this application.
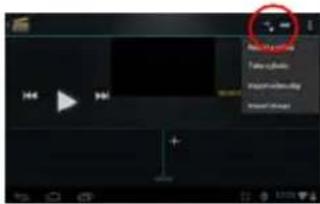
1/ Create new project. Use the virtual keyboard to name a new project.
2/ Tap on "+Add" button to open a new project.
3/ Once you have added photos or video, you can also add background music for it.
4/ Once you finished the movie, you can export it to the folder Movie in the device.
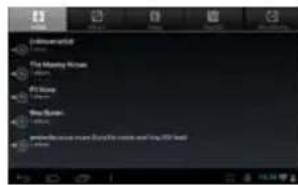
PLAY MUSIC
Music Library
You should enter the music library once you start the music player. The Music Library shows your music files sorted by categories (Artist, Album, etc.) if your music files contain these song information tags.
- You can drag your finger up and down on the file list to scroll through it.
- Tap a song to play.
| Artist | List music files by artist. | |
 | Album | List music files by album. |
 | Songs | List all music files. |
 | Playlists | List your favorite songs. |
 | Now Playing | Go to the Now Playing screen. |
Playback menu
During playback of a music file, tap on the MENU icon to bring up a context menu:
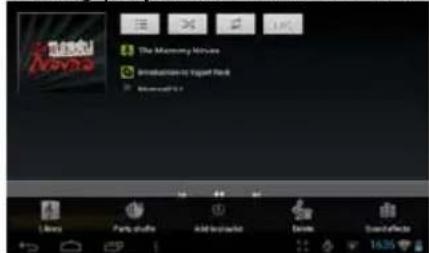
Library— return to music library menu.
Party Shuffle – select Party Shuffle mode.
Add to playlist – add a song to the playlist.
Delete – delete a song.
Sound Effects – Set the sound effects for the music playback.
Playlist
The playlist is a list of songs that you have added manually.
To add the current track to a playlist, tap ■ during playback, select "Add to playlist" and then choose a playlist or tap "new" to create a new playlist.
To start a playlist,
In the Music menu, tap the Playlist icon 📄 to display all the playlist. All songs are listed.
Tap a song to start playing.
PLAY VIDEO
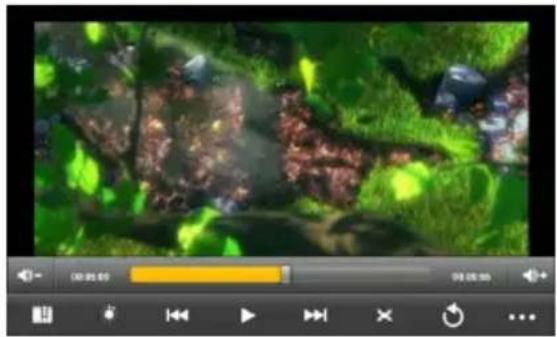
Navigate through Video Files
You should see the video list when you enter the video player.
• You can drag your finger up and down on the video list to scroll the video list up and down.
- Tap a video to start playing.
Playback Screen
natural_image
Game interface showing a video player with playback controls and a green stream scene (no readable text or symbols)Note: Some video files may not be played correctly with the device. Refer to the Technical Specifications at the end of the manual, and make sure the video resolution, encoding format or file type is supported.
Video Playback Settings
Tap on the 📄️ button to display the video settings.
| Delete Bookmark and Play from beginning | Delete bookmark and play from beginning. |
| Delete Bookmark | Delete the video bookmark. |
| Play Mode | Single – Plays current video and then stops after playing.Repeat One – Repeat the current video.Repeat All – Repeat all videos. |
| Help | Get instructions on playing video. |
| Return | Exit from the menu. |
SET UP EMAIL ACCOUNT
This device has an E-mail application pre-installed. You can send or receive e-mails from the Internet at any time. Make sure you have an Internet connection before using the email service.
In the Home Screen, tap the Applications shortcut to display all applications and then tap the Email icon to launch the e-mail application.
First you need to setup an E-mail account for receiving or sending emails.
1/ Start up the email application by tapping the Email application icon and you are prompted to setup an account.
2/ Input your email address and login password. You can set the account as default by selecting the option "Send email from this account by default".
3/ Tap "Manual Setup" to set the email server information.
4/ Choose the server type from POP3, IMAP or Exchange for incoming emails. To know what type of your email server is, you can consult the service provider, network administrator or search for information in the Internet.
5/ Input required information (server, port etc.). You can obtain the information from the service provider, network administrator or the Internet.
6/ Choose the server type for outgoing emails, and input required server information.
7/ Click "Next" to continue. The SlidePad NG will check the server settings. When it prompts you that "Your account is set up, and email is on its way", your account is set up successfully.
8/ Input your name and then tap on "Done" to finish.
Note: If you have more than one account, every time when you start up the email application, you enter the default email account.
Manage Accounts
You can setup more than one account and manage these accounts by checking information about the account, adding another account or deleting an account.
Add another Account
Following these steps to add another account if you want.
1/ Launch the email application and then tap on the Menu icon 📄 to display the menu item. Choose "Accounts" to display accounts.
2/ Tap on the Menu icon to display the menu item, and then choose "Add account".
3/ Follow the steps of setting up a Email Account to add an account.
Delete an Email Account
1/ When you are in the email box, tap on the Menu icon 📄 to display the menu items.
2/ Tap on "Accounts" to display all email accounts.
3/ Hold your tap on the account that you want to delete until a menu pop up.
4/ Tap on "Remove Account", and then tap on "OK" to confirm.
Check the Account Setting
1/ When you are in the email box, tap on the Menu icon to display the menu items.
2/ Tap on "Accounts" to display all email accounts.
3/ Hold your tap on the account that you want to check until a menu pop up.
4/ Tap "Account settings", and then you should see all setting information about the account. You can edit these settings as you want.
View Emails
You should enter your mailbox when you start up the email application.
- In the mailbox, you can slide your finger up and down to scroll through the email list.
- Tap on an email to open it.
- Hold on the email can display a menu. With the menu, you can open, reply, forward or delete the email.
Email Menu Items
Tap on the Menu icon 📄 to display the menu.
| Refresh | Refresh the emails. |
| Compose | Compose a new email. |
| Folders | Go back to email box. |
| Accounts | View all email accounts. |
| Account Settings | Check your account settings. |
MANAGING APPLICATIONS
There are number of useful apps pre-installed in the device as it is produced at the factory, and you can copy some from other resources, download or purchase them over the internet.
Download or Purchase Applications
With your device, you can visit an apps store or E-market website (e.g. Opera) that provides you plenty of free apps to download. For those apps that are not free, you will have to pay if you want to have them.
Install Applications
You can install applications following these steps:
1/ Open the Explorer application, then find the app you want to install.
2/ Tap the app you want to install to start installation. However, for the sake of security, the device may prompt you that there is possibility of attack risk if you install and run some apps whose sources are not guaranteed. In this case, you shall turn to the Settings menu and select Security to check the “Unknown sources” before you go on with the installation.
3/ Once the installation is completed, you can find the icon of the app in the apps screen. It is ready for use.
Uninstall Applications
1/ Tap the Settings shortcut in the Home Screen to display setting menus.
2/ Select "Apps".
3/ Tab on the application that you want to uninstall.
4/ Tab on "Uninstall" to uninstall the application.
5/ You can simply tap and hold on an app icon to jump to the Home Screen, then drag it to the dustbin icon to uninstall it.
Note:
- You cannot uninstall the pre-installed applications, but you can deactivate or stop them.
• Make sure all apps you have copied or downloaded to your SlidePad NG are in.apk format. - Some applications developed for Android mobile might not run properly in the device. Please consult the respective software developer for further information.
WEB BROWSING
The Browser application lets you visit webpages. Keep up with news, your friends or enjoy video.
To use Browser, the SlidePad NG must be connected to the Internet. Read the section "Wifi connection" to learn how to connect to the Internet.
To open Browser, touch the Browser icon

on the Home screen or in the Launcher.
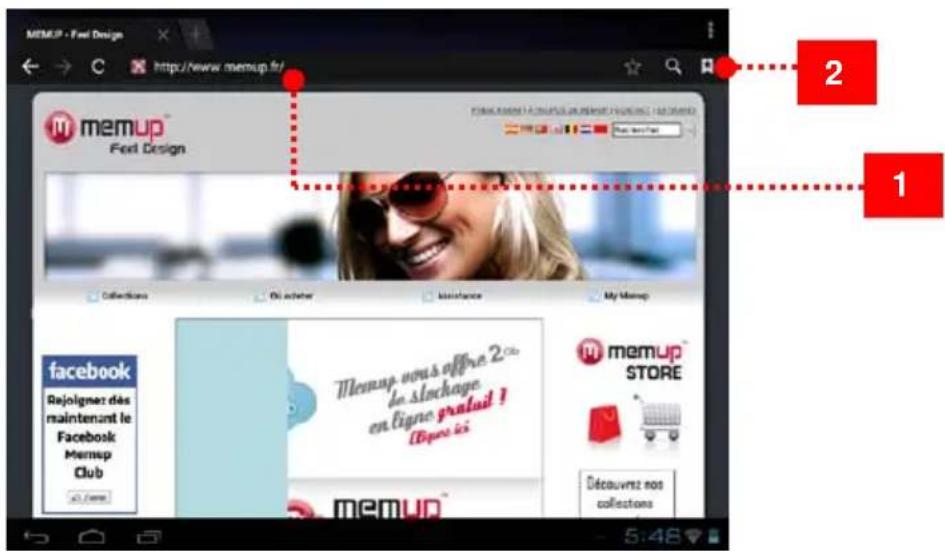
| Name | Description | |
| 1 | Address bar | Touch the bar to enter a new address or to search into the web. |
| 2 | Bookmark icon | Touch the Bookmark icon to add or view bookmarks, to view your most visited sites, or to view your browser history. |
To go to a webpage
- Touch the Address bar at the top of the Browser screen. The keyboard will open automatically.
- Use the keyboard to enter the address (URL) of the webpage.
- Touch "Go" to open the webpage.
To bookmark a webpage
Bookmark your favorite webpages in order to visit them faster.
- Go to the web-page that you want to bookmark
- Touch the Bookmark icon located on the right of the Address bar.
- Touch the Add title.
You can modify the name of the bookmark or its location (URL address).
To go to a bookmarked webpage
- Touch the Book-mark icon to the right of the Address bar.
- Touch a bookmark tile to open it.
To open a new browser window
- Press the Menu key to show the Browser options
- Touch New Window to open a new browser window.

To switch between browser windows
- Press the Menu key to show the Browser options.
- Touch Windows to show a list of open browser windows.
- Touch the name of a window to switch to it, or touch the "x" to close the window.
SETTINGS
Open the system settings menu to adjust functions. To open the Settings menu: From the Home screen, press the Settings icon.
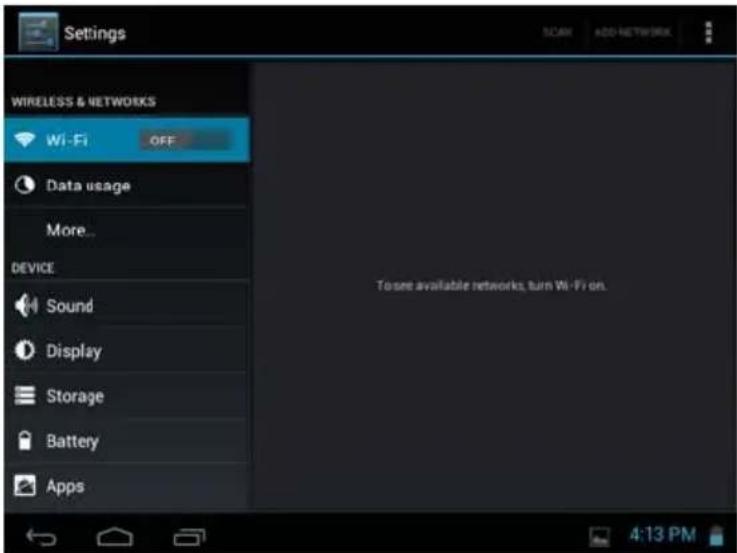
The settings are grouped by category. Touch a category to open and adjust its settings.
Wireless and network
Different connections are available but to save power, we suggest you to deactivate the Wifi connection.
Wifi: Tap on to enable or disable the Wifi connection
Wifi settings: Set up and manage your Wifi networks
When connected to the Wifi, the logo will be displayed on top right of the screen.
Airplane mode: it disables all wireless connections to avoid airplane's sensitive instruments.
Data usage
Set the data from mobile and limit (in GB) available for use
More...: Sets your tablet as a Portable hotspot and add a VPN network.
Sound
Volumes: Sets your sound's preferences for media, notifications and alarm
Ringtone & Notification: Sets the sound type for notifications.
System: Enables/disables the touch-screen or screen lock click sound.
Display
Brightness: Allows you to adjust the brightness and to reduce battery consumption.
Wallpaper: Choose between your Gallery, live wallpaper or default wallpaper.
Auto-rotate screen: Use G-Sensor as default or deactivate it.
Sleep: Automatically pass to sleep mode when set length is reached.
Font size: Allows you to adjust the font size from small, normal, large to huge.
HDMI
Turn on HDMI: Choose whether you want to activate this function as default or not.
If on:
HDMI resolution: Choose HDMI output resolution.
Screen zoom: Choose whether you want to zoom the HDMI output.
Storage
It displays left space on tablets defined by flash, application storage, internal memory storage, medias.
Unmount SD card: Safely remove SD card inserted in.
Erase SD card: Erases all data on the SD card, such as music and photos.
Battery
It displays battery status: charging status and remaining lifetime.
Apps
4 different tabs are displayed.
Downloaded: Applications downloaded by user.
USB storage: Applications installed on storage.
Running: Application currently in use, with use length.
All: All installed applications.
Accounts & sync
Email account synchronized with the tablet.
Location services
Use Google location services.
Google's location service: Let applications use data from source such as Wi-Fi and mobile networks to determine your approximate location
Locations & Google search: Let Google use your location to improve search results and other services
Back up and reset
Backup and restore
Backup my data: Backup application data, Wi-Fi passwords and other settings to Google servers.
Backup account: Process to backup.
Automatic restore: When reinstalling an app, restore backup setting and data.
Personal data
Factory data reset: Erases all data on tablet.
Date & time
Automatic date & time: When connected to the internet, use network-provided time.
Set date: When automatic mode is not activated, manual set date.
Set time: When automatic mode is not activated, manual set time.
Select time zone: Choose your time zone according to your location.
Use 24-hour format: 12-hour or 24-hour mode could be selected.
Select date format: According to your preferences and understanding.
Accessibility
Change your system preferences: Speak passwords, touch and delay sensitivity and web scripts installation.
Developer options
USB debugging: Debug mode when ISB is connected.
Stay awake: Screen will never sleep while charging.
Allow mock locations
HDCP checking: Use HDCP checking for DRM content only.
Desktop backup password: 12-hour or 24-hour mode could be selected.
User interface
Strict mode enabled: Flash screen when apps do long operations on main thread.
Pointer location: Screen overlay showing current touch data.
Show touches: Show visual feedback for touches.
Show CPU usage: Screen overlay showing current CPU usage.
Force GPU rendering: Use 2D hardware acceleration in applications.
Window animation scale: Choose 0.5x to 10x.
Transition animation scale: Choose 0.5x to 10x.
Apps
Don't keep activities: Destroy every activity as soon as the user leaves it.
Background process limit: Standard limit.
Show all ANRs: Show App Not Responding dialogue for background apps.
About tablet
OTA Service: When connected to the internet and when service is available, "On The Air" update the tablet automatically through the Internet.
Status: Status of the battery, network and other information.
Legal information: Open source licences.
OPERA MARKET
Download and install applications with different ways.
Thanks to Opera download platform :
1- Go into the Menu programs
2- Choose the icon Opera
When you want to install an application, you have to authorize installation on SlidePad NG to a lot of different services. We suggest you to carefully check all these demands.
Pay attention to the remaining disk space when installing a new application.
To get more info about Opera, visit www.opera.com/mobile website
A few applications could be directly downloaded from programmers and editors websites, Memup is not responsible for use and occurred problems following a manual installation from a downloaded software from the web.
PHONE OPTION / 3G
Only available by default on the SlidePad 704-3G and via dongle with the other models. NB: Your Wi-Fi connection must be switched off to avoid any conflict with your 3G network.
Insert your SIM card when your tablet is off, then turn it on. When your tablet is on, the system will ask for your PIN.
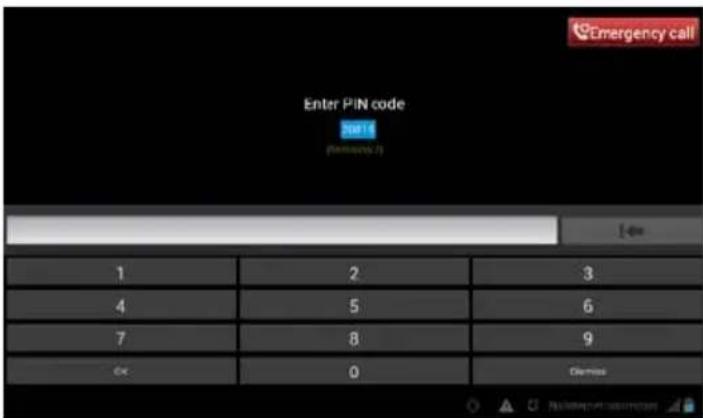
Your SIM card will be recognized by the tablet.
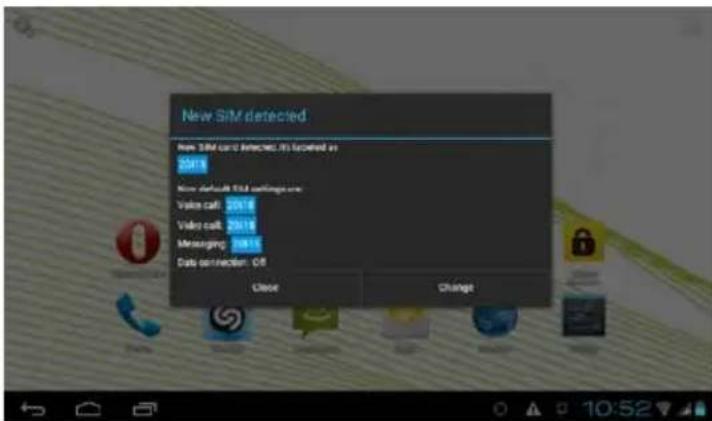
A detection message will appeared. Click "close" to keep the default settings or "Edit" to configure your 3G access.
Configure your 3G access
By default the phone is active. To activate your 3G network, please go to the section "Data Connection".
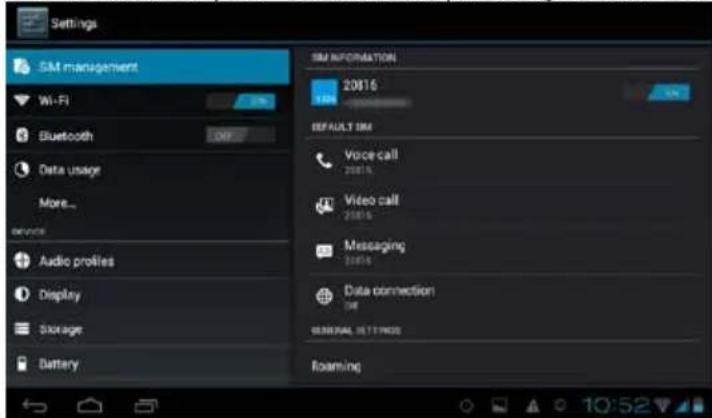
Switch to "data connection" mode and select your desired phone number.
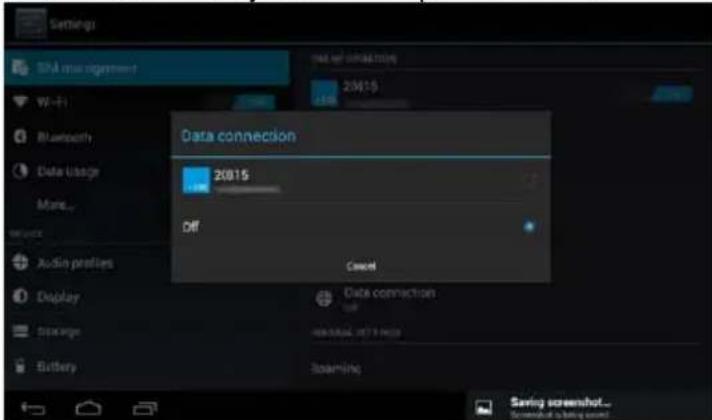
If your network is not configured automatically, please go in the "More" to do it manually. Then, select "Mobile Network" and then "Access Point Names"
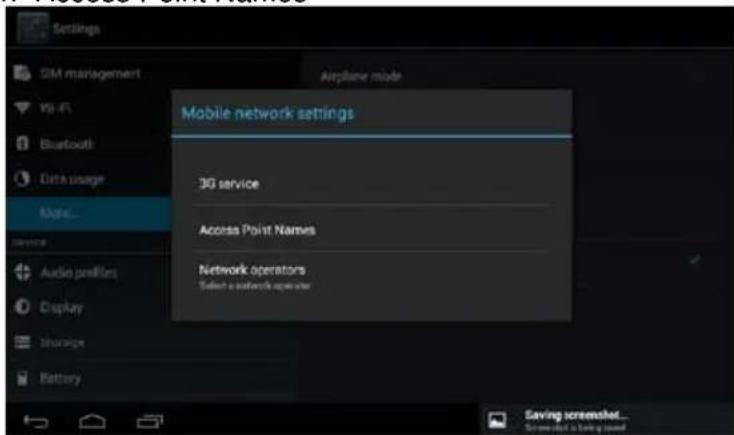
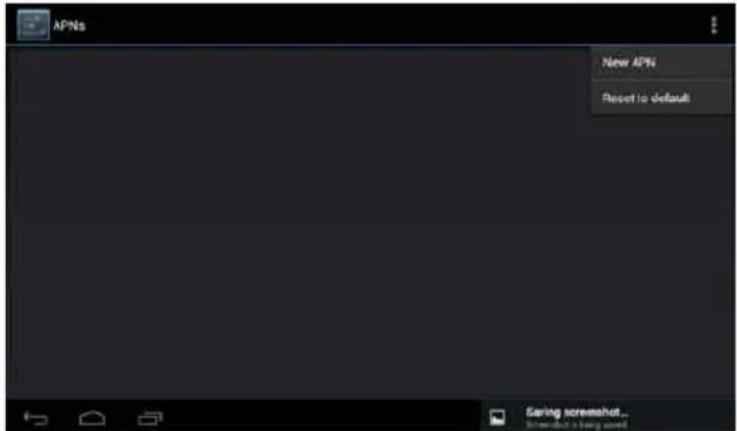
Then in the "Menu" function at the top right of the screen, select "New APN" (Access Point Name: Access Point Name)
Recover from your network components to configure your APN. Fill in the fields not configured as recommended by your operator.
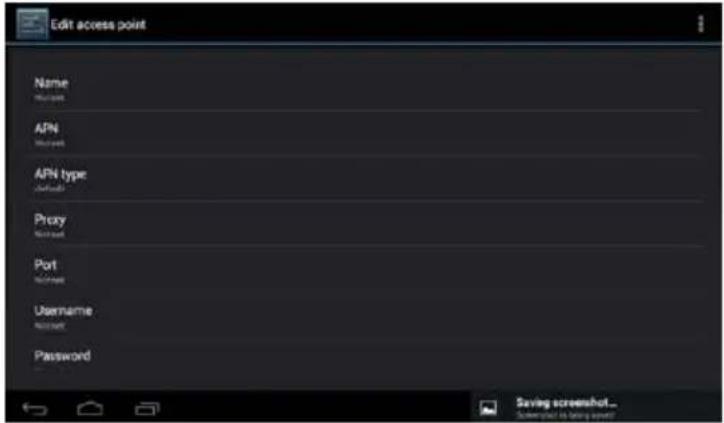
Once these fields set, please save your data through the menu at the top right of the screen. Restart your tablet to confirm the configuration of your card.
SPECIFICATIONS
Please visit www.memup.com for the latest product information. Design, specifications, and manual are subject to change without notice.
| SlidePad NG704-3G | SlidePad NG808 DC | SlidePad NG 9708DC | SlidePadElite116 | |
| Screen size | 7.0" | 8" | 9.7" | 10.1" |
| Touchscreen type | Capacitive | Capacitive | Capacitive | Capacitive - IPS |
| Resolution | 1024x600 | 1024 x 768 | 1024 x 768 | 1280 x 800 |
| Format | 16/9 | 4/3 | 4/3 | 16/9 |
| Chipset | Dual Core – Qualcomm MSM8225 – Cortex A5 | Dual Core – Rockchip RK3066 – Cortex A9 | Dual Core – AmLogic AML8726 MXS – A9 | Intel Atom Z2460– 1.6 GHz |
| RAM | 512MB DDR3 | 1GB DDR3 | 1GB DDR3 | 1GB DDR3 |
| Internal Memory* | 4GB | 8GB | 8GB | 16GB |
| MicroSD Slot | Up to 32GB | Up to 64GB | Up to 64GB | Up to 64GB |
| Operating System | Android^TM 4.0 | Android^TM 4.1 | Android^TM 4.1 | Android^TM 4.1 |
| 3G | Yes | Via dongle | Via dongle | Via dongle |
| GPS | Yes | No | No | No |
| Bluetooth | Yes | Yes | Yes | Yes |
| Market | Opera | Opera | Opera | Play Store |
| Wifi networking | IEEE 802.11 b/g/n | IEEE 802.11 b/g/n | IEEE 802.11 b/g/n | IEEE 802.11 b/g/nIntel WIDI |
| Video playback | AVI WMV 3GP MP4 MPG VOB MKV RMVB FLV TS TP | AVI WMV 3GP MP4 MPG VOB MKV RMVB FLV TS TP | AVI WMV 3GP MP4 MPG VOB MKV RMVB FLV TS TP | AVI WMV 3GP MP4 MPG VOB MKV RMVB FLV TS TP |
| Audio playback | MP3 MP2 WMA OGG WAV FLAC APE | MP3 MP2 WMA OGG WAV FLAC APE | MP3 MP2 WMA OGG WAV FLAC APE | MP3 MP2 WMA OGG WAV FLAC APE |
| Photos format | JPEG BMP GIF PNG | JPEG BMP GIF PNG | JPEG BMP GIF PNG | JPEG BMP GIF PNG |
| Video output | No | Mini HDMI, type C (1080p and 720p supported) | Mini HDMI, type C (1080p and 720p supported) | Mini HDMI, type C (1080p and 720p supported) |
| Audio output | 3.5 mm headphone Built-in stereo speakers | 3.5 mm headphone Built-in stereo speakers | 3.5 mm headphone Built-in stereo speakers | 3.5 mm headphone Built-in stereo speakers |
| PC interface | USB 2.0 Hi-speed | USB 2.0 Hi-speed | USB 2.0 Hi-speed | USB 2.0 Haut débit |
| Webcam Front-facing | camera (0.3 MP) Rear camera (2 MP) | Front camera (0.3 MP) Rear camera (2 MP) | Front camera (0.3 MP) Rear camera (2 MP) | Front camera (1.3 MP) Rear camera (2 MP) |
| Microphone | Built-in | Built-in | Built-in | Intégré |
| Power 3.7V, 2800mAh rechargeable Li-poly battery Power Adapter DC 5V | rechargeable Li-poly battery Power Adapter DC 5V | 3.7V, 4000mAh rechargeable Li-poly battery Power Adapter DC 5V | 3.7V, 6000mAh rechargeable Li-poly battery Power Adapter DC 5V | 3.7V, 5150mAh rechargeable Li-poly battery Power Adapter DC 5V |
| Playback time (hours)** | Up to 12 hours music 4 hours video 4 hours web browsing | Up to 12 hours music 4 hours video 4 hours web browsing | Up to 12 hours music 4 hours video 4 hours web browsing | Up to 12 hours music 4 hours video 8 hours web browsing |
* Available memory may vary slightly due to formatting and according to the operating system used (up to 10% for 1TB).
1TB (Terabyte) = 1000GB. 1GB = 1,000,000,000 bytes.
** Music was tested with a 128 kbps MP3 file; video was tested with a 1920 x 1080 MPEG-4/AVC file; browsing was tested with the screen brightness set to default. Actual playback results may vary.
SAFETY NOTICES
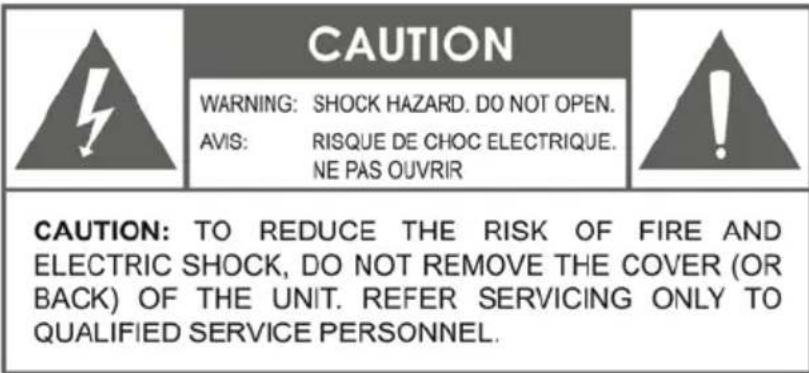
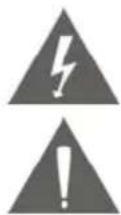
The lightning flash with arrowhead symbol within an equilateral triangle is intended to alert the user to the presence of uninsulated “dangerous voltage” within the product’s enclosure that may be of sufficient magnitude to constitute a risk of electric shock.
The exclamation point within an equilateral triangle is intended to alert the user to the presence of important operation and servicing instructions in the literature accompanying the appliance.
WARNING: To prevent fire or shock hazard, do not expose this device to rain or moisture. Dangerous high voltage is present inside the enclosure. Do not open the cabinet. Protect your hearing: Hearing experts advise against the constant use of personal stereos played at high volume. Constant exposure to high volumes can lead to hearing loss. If you should experience ringing in the ears or hearing loss, discontinue use and seek medical advice.
Note:
If the product suddenly has no response or powers off, an electrostatic discharge may be the cause. In this circumstance, please follow the procedures below for recovery:
- Turn off the unit by pushing and holding the slide button at the right (Power off position) for 15 seconds.
- Turn on the unit again
LEGAL AND TRADEMARK NOTICES
Android ^TM is a trademark of Google Inc.
Use of this trademark is subject to Google Permissions. Portions of the artwork used for this package are modifications based on work created and shared by Google and used according to terms described in the Creative Commons 3.0 Attribution License.
HDMI, the HDMI Logo and High-Definition Multimedia Interface are trademarks or registered trademarks of HDMI Licensing LLC.
MicroSD™ is a registered trademark of the SD Card Association. USB is a registered trademark of USB Implementers Forum, Inc.
YouTube™ is a trademark of Google, Inc. All other trademarks and logos are property of their respective owners unless indicated otherwise.
FCC statement:
This device complies with Part 15 of the FCC Rules. Operation is subject to the following two conditions:
(1) This device may not cause harmful interference, and
(2) This device must accept any interference received, including interference that may cause undesired operation.
Note:
This equipment has been tested and found to comply with the limits for Class B digital devices, pursuant to Part 15 of the FCC rules. These limits are designed to provide reasonable protection against harmful interference in a residential installation. This equipment generates, uses and can radiate radio frequency energy and, if not installed and used in accordance with the instructions, may cause harmful interference to radio communications. However, there is no guarantee that interference will not occur in a particular installation. If this equipment does cause harmful interference to radio or television reception, which can be determined by turning the equipment off and on, the user is encouraged to try to correct the interference by one or more of the following measures:
- Reorient or relocate the receiving antenna.
- Increase the separation between the equipment and receiver
- Connect the equipment into an outlet on a circuit different from that to which the receiver is connected.
- Consult the dealer or an experienced radio/TV technician for help
Use of shielded cable is required to comply with Class B limits in Subpart B of Part 15 of the FCC rules. Do not make any changes or modifications to the equipment unless otherwise specified in the manual. If such changes or modifications should be made, you could be required to stop operation of the equipment.
TROUBLESHOOTING
For detailed troubleshooting information, please visit www.memup.com and consult FAQ
1. Where is Android Market?
- Android Market is dedicated to run with phone service and GPS. Applications must fit screen size and require applications to be fully compatible with display. We offer you Opera to download a thousand applications for your SlidePad NG.
2. Some video files can't be read, why?
- The video playback depends on codec used and supported by the SlidePad NG. Some video files can't be supported. The chipset can't read some files due to new codecs, even some firmware couldn't correct, reading files are mentioned on giftbox and in "specifications" part.
3. I can't connect my SlidePad NG to the TV?
- Check if the HDMI output option under settings menu are correctly set
- Check if your video file resolution could be supported by the SlidePad NG
4. I can't install an Android application?
- If you try to install an application, a message will automatically appear asking you to check the "unknown sources" box in order to continue the installation procedure. You can access it by clicking on "settings" and then "Security" and then "unknown sources". After checking the box, you will not need to repeat the operation.
5. I can't connect to wireless network?
- Please check that the WiFi is enabled!
- Select "Settings" and then "Wireless & networks" and select the "Wifi" function.
● Find your network from the list, then enter your password. - Your device must be located within 10 meters of wireless Internet terminal in order to have an optimized signal.
6. How to install applications?
- You can install any application format apk.. Many applications are in this format on the Internet.
- If you download from the Internet, you can start the installation directly from the browser's download manager.
- If you drop it on the SD card, use a file manager to run the installation file.
- We suggest you use the Opera mini website, that allows downloading applications available on the net
7. What is the Android version of my device?
● To know the version of the Tablet PC is to know the potential of the product.
- Go to Settings, then down menu, go to "About device".
- Then check the information "Firmware Version".
8. The product does not connect to my PC?
- Check the condition of the USB cable.
- Please try another universal USB cable.
- Check the USB controller drivers for your computer.
- Connect the device with the USB cable.
- A menu appears and offers to "Connect using a USB cable", select this option.
● The tablet appears as a mobile disk (mass storage).
9. The product will not turn on?
- Please perform a reset of the device through the slot provided for it on the shelf.
- Please check your SLIDEPAD is charged.