
C64EWR - Unspecified Campomatic - Free user manual and instructions
Find the device manual for free C64EWR Campomatic in PDF.

| Product Type | Freestanding Washing Machine |
| Model | C64EWR |
| Brand | Campomatic |
| Dimensions (H x W x D) | 85 cm x 60 cm x 55 cm |
| Weight | 70 kg |
| Power Supply | 220-240 V~, 50 Hz, 10 A |
| Energy Class | A+++ |
| Capacity (kg) | 8 kg |
| Maximum Spin Speed | 1400 rpm |
| Number of Programs | 15 |
| Main Functions | Cotton, Synthetics, Delicates, Quick Wash, Eco, Rinse & Spin, Drum Clean, Delay Start, Child Lock |
| Display Type | LED Digital Display |
| Noise Level (Wash/Spin) | 52 dB / 75 dB |
| Water Consumption per Cycle | 45 L (Eco program) |
| Annual Energy Consumption | 170 kWh |
| Maintenance | Clean filter regularly; descale every 3 months; check inlet hose for leaks |
| Safety Features | Child lock, overflow protection, unbalanced load detection, anti-flammable material |
| Spare Parts Availability | Door seal, belt, pump, heating element, control board available through authorized service |
| Repairability Index | 7.2 / 10 |
| Warranty | 2 years parts and labor |
| Included Accessories | User manual, warranty card, inlet hose, outlet hose, caps |
Frequently Asked Questions - C64EWR Campomatic
User questions about C64EWR Campomatic
0 question about this device. Answer the ones you know or ask your own.
Ask a new question about this device
Download the instructions for your Unspecified in PDF format for free! Find your manual C64EWR - Campomatic and take your electronic device back in hand. On this page are published all the documents necessary for the use of your device. C64EWR by Campomatic.
USER MANUAL C64EWR Campomatic
Please read these instructions carefully before attempting to install or use this product. It is advisable to keep these instructions in a safe place for future reference.
Installation and Operating Instructions
CAMPOMATIC
60 CM SINGLE CAVITY
4 HOT PLATE
ELECTRICAL OVEN
C64EWR
CE
Please read these instructions carefully before attempting to install or use this product. It is advisable to keep these instructions in a safe place for future reference.
Installation and Operating Instructions
INTRODUCTION
Thank you for choosing this quality cooker. It has been designed to give years of trouble-free service provided it is installed and maintained correctly.
Please read these instructions carefully before installing or using your cooker. Included is some important safety information in addition to guidelines and recommendations which will enable you to take full advantage of all the functions available.
The manufacturer reserves the right to make changes and modifications to this product without notice.
This appliance must only be installed by a qualified electrician or technician from an authorised service dealer and in accordance with the local authority regulations in force.
The manufacturer will not accept responsibility for injury or damage caused by incorrect installation or improper use of the appliance.
This appliance does not contain any materials that are dangerous to the environment.
All materials used for packaging can be recycled.
Care must be taken to ensure that this appliance is not a hazard to others, particularly children, when it is disposed of. Cut through the mains cable and remove the door. Contact your local authority regarding recycling etc.
CAUTION!
- This appliance must only be repaired by authorised service personnel. If it is not repaired properly, you could be putting yourself and others at danger.
Do not use this appliance if it is known to be faulty. - Never lift the cooker by the oven door handle.
- Do not attempt to repair or replace the mains cable yourself. This must be done by qualified service personnel only.
2
INTRODUCTION
Thank you for choosing this quality cooker. It has been designed to give years of trouble-free service provided it is installed and maintained correctly.
Please read these instructions carefully before installing or using your cooker. Included is some important safety information in addition to guidelines and recommendations which will enable you to take full advantage of all the functions available.
The manufacturer reserves the right to make changes and modifications to this product without notice.
This appliance must only be installed by a qualified electrician or technician from an authorised service dealer and in accordance with the local authority regulations in force.
The manufacturer will not accept responsibility for injury or damage caused by incorrect installation or improper use of the appliance.
This appliance does not contain any materials that are dangerous to the environment.
All materials used for packaging can be recycled.
Care must be taken to ensure that this appliance is not a hazard to others, particularly children, when it is disposed of. Cut through the mains cable and remove the door. Contact your local authority regarding recycling etc.
CAUTION!
- This appliance must only be repaired by authorised service personnel. If it is not repaired properly, you could be putting yourself and others at danger.
Do not use this appliance if it is known to be faulty. - Never lift the cooker by the oven door handle.
- Do not attempt to repair or replace the mains cable yourself. This must be done by qualified service personnel only.
INDEX
GENERAL INFORMATION ....4
PURPOSE 4
TECHNICAL SPECIFICATION 4
PARTS IDENTIFICATION 4
PREPARATION FOR USE 5
IMPORTANT NOTES ....5
INSTALLATION ....6
POSITIONING 6
ELECTRICAL CONNECTIONS 6
USING THE HOB 7
SAFETY ADVICE IN THE CASE OF A COOKING PAN FIRE 7
COOKWARE SELECTION 8
USING THE GRILL 9
USING THE OVEN 10
MAINTENANCE AND CLEANING ....INSIDE BACK COVER
GENERAL REMARKS .....INSIDE BACK COVER
CLEANING THE HOT PLATE .....INSIDE BACK COVER
OVEN CLEANING....INSIDE BACK COVER
REPLACING THE LAMP .....INSIDE BACK COVER
3
INDEX
GENERAL INFORMATION 4
PURPOSE 4
TECHNICAL SPECIFICATION 4
PARTS IDENTIFICATION 4
PREPARATION FOR USE 5
IMPORTANT NOTES ....5
INSTALLATION 6
POSITIONING 6
ELECTRICAL CONNECTIONS 6
USING THE HOB 7
SAFETY ADVICE IN THE CASE OF A COOKING PAN FIRE 7
COOKWARE SELECTION 8
USING THE GRILL 9
USING THE OVEN 10
MAINTENANCE AND CLEANING .....INSIDE BACK COVER
GENERAL REMARKS . . . . . . . . . . . . . . . . . . . . . . . . . . . . . . . . . . . . . . . . . . . . . . . . . . . . . . . . . . . . . . . . INSIDE BACK COVER
CLEANING THE HOT PLATE .....INSIDE BACK COVER
OVEN CLEANING....INSIDE BACK COVER
REPLACING THE LAMP .....INSIDE BACK COVER
GENERAL INFORMATION
PURPOSE
The cooker should be used for preparing household meals only. It must not be used for any other purpose.
TECHNICAL SPECIFICATION
Supply voltage: 230/240V\~50Hz
Gross weight (kg): 54
External dimensions (cm): 59.8 width; 60 depth; 85 height
Oven capacity (litres): 58
Total wattage (kW): KP-L 220 8,05 kW / KP-L 200 8,0 kW
Energy rating: A
PARTS IDENTIFICATION
1 - control panel
2 - inner body
3 - oven door
4 - hot plate rear left
5 - hot plate rear right
6 - hot plate front left
7 - hot plate front right
8 - temperature control lamps
9 - shallow tray
10 - wire grid
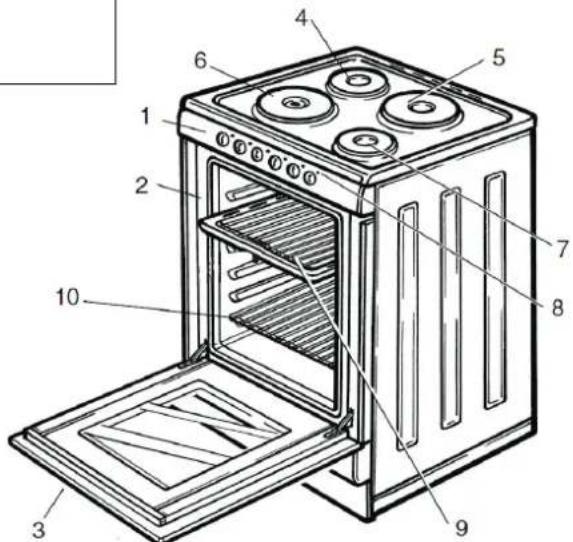
Figure 1
4
GENERAL INFORMATION
PURPOSE
The cooker should be used for preparing household meals only. It must not be used for any other purpose.
TECHNICAL SPECIFICATION
Supply voltage: 230/240V\~50Hz
Gross weight (kg): 54
External dimensions (cm): 59.8 width; 60 depth; 85 height
Oven capacity (litres): 58
Total wattage (kW): KP-L 220 8,05 kW / KP-L 200 8,0 kW
Energy rating: A
PARTS IDENTIFICATION
1 - control panel
2 - inner body
3 - oven door
4 - hot plate rear left
5 - hot plate rear right
6 - hot plate front left
7 - hot plate front right
8 - temperature control lamps
9 - shallow tray
10 - wire grid
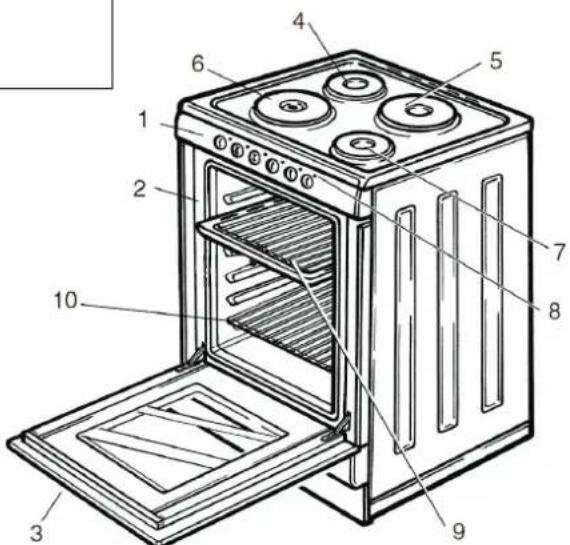
Figure 1
PREPARATION FOR USE
- Remove all packing materials including the protective film (if applicable) covering any chrome-plated and stainless steel parts. Dispose of the packing material according to your local authority's relevant regulations.
- Wipe the enamel and glass surfaces with a soft damp cloth.
- When using for the first time, turn on the hot plates, one at a time, and set the temperature control knob to position '3'. Leave them for about 5 minutes. This will burn off the protective film covering the plates. When the plates are cool, wipe them with a soft dry cloth.
- Clean the oven, grill shelf and baking tray etc. with warm water and washing-up liquid.
- Turn on the oven and and set it to the highest temperature for about 10 minutes to burn off any manufacturing residues. Ensure the kitchen is well ventilated.
IMPORTANT NOTES
- The hot plates and oven compartment become very hot when in use. Keep children well away!
- Overheated fats and oils may easily catch fire. Therefore, only cook dishes with these ingredients while supervising.
- Turn all controls off when not in use.
- Stand well back when opening an oven door to allow any build up of steam/heat to disperse.
- Use protective gloves when taking dishes off the electric hob or baking tins out of the oven.
- Obviously, during use the appliance becomes hot. Care should be taken to avoid touching heating elements, particularly inside the oven.
- Never leave children unsupervised where a cooking appliance is installed as all surfaces will be hot during and after use.
- Never store items that children may attempt to reach, above the appliance.
-
Never remove the oven shelves when the oven is hot.
-
Never use the oven compartment for storing inflammable or heat-sensitive items.
- Connecting leads of other household electrical equipment which may be in use while the cooker is being operated should be kept well away from the heating elements.
- Do not use the cooker for heating the room.
Hot plates
• Always keep the hot plates clean. A dirty plate does not transfer heat efficiently.
- Never turn the hot plates on without a dish or pan on them.
- Avoid placing wet pans on the hot plates.
- Never sprinkle cold water on an overheated plate.
- Turn the hot plate off a few minutes before the dish is cooked; the plate accumulates heat and is still hot for some time after turning off.
- Never use the hot plates for preparing foods wrapped in aluminium foil or in plastic pans. Never place any plastic trays etc. on the hot plates.
INSTALLATION
POSITIONING
- Remove all packing materials including the protective film covering the chrome-plated and stainless steel parts (if applicable).
- The kitchen should be dry and well ventilated. Position the cooker ensuring free access to all the controls.
- The distance between the hob and extractor hood should be at least 650mm.
- If necessary level the cooker by the adjustable feet.
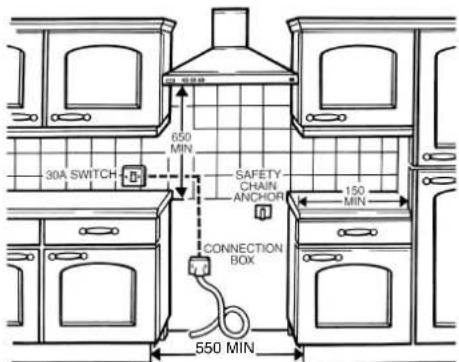
Figure 2
In order to eliminate the risk of the cooker falling forward a chain has been installed at the rear side of the cooker. This should be fastened securely to the wall behind the appliance with the bracket supplied (Figure 4).
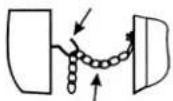
Figure 4
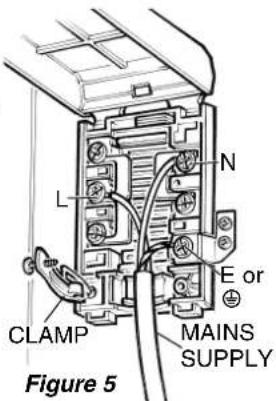
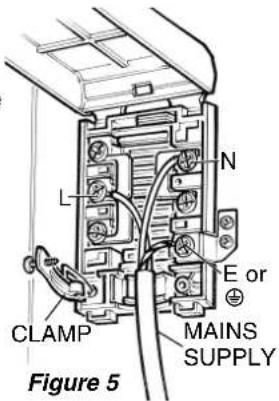
ELECTRICAL CONNECTIONS
The cooker must be properly connected to the mains supply by a qualified electrician according to current safety regulations. Do not modify or change the cooker in any way.
Before the cooker is connected to the mains supply make sure:
The mains voltage is the same as that specified on the data plate on the cooker.
The mains supply cable is rated for the maximum power consumed by the appliance as specified on the data plate on the cooker.
The appliance must be installed using a double pole switch of 45A minimum capacity, with 3mm minimum contact separation between poles.
Connect the cooker to the mains connection box following the colour code:
Yellow/green wire should be connected to earth terminal marked E or E.
Blue wire should be connected to the neutral terminal marked N.
Brown wire should be connected to live terminal
marked L.
Ensure that connections are tight and that no loose strands are left out of the terminals.
No lead must touch hot surfaces over 75°C.
INSTALLATION
POSITIONING
- Remove all packing materials including the protective film covering the chrome-plated and stainless steel parts (if applicable).
- The kitchen should be dry and well ventilated. Position the cooker ensuring free access to all the controls.
- The distance between the hob and extractor hood should be at least 650mm.
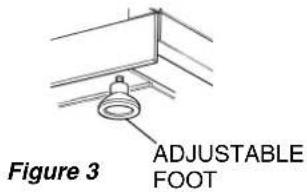
- If necessary level the cooker by the adjustable feet.
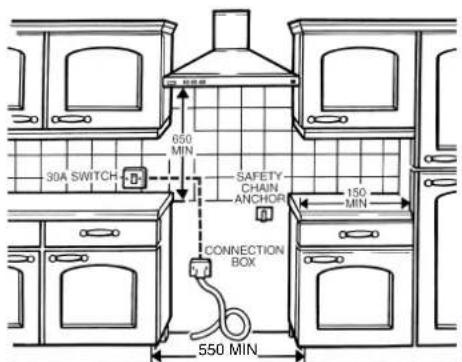
Figure 2
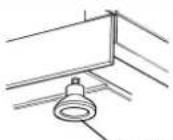
Figure 3
ADJUSTABLE FOOT
In order to eliminate the risk of the cooker falling forward a chain has been installed at the rear side of the cooker. This should be fastened securely to the wall behind the appliance with the bracket supplied (Figure 4).
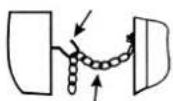
Figure 4
ELECTRICAL CONNECTIONS
The cooker must be properly connected to the mains supply by a qualified electrician according to current safety regulations. Do not modify or change the cooker in any way.
Before the cooker is connected to the mains supply make sure:
The mains voltage is the same as that specified on the data plate on the cooker.
The mains supply cable is rated for the maximum power consumed by the appliance as specified on the data plate on the cooker.
The appliance must be installed using a double pole switch of 45A minimum capacity, with 3mm minimum contact separation between poles.
Connect the cooker to the mains connection box following the colour code:
Yellow/green wire should be connected to earth terminal marked E or E.
Blue wire should be connected to the neutral terminal marked N.
Brown wire should be connected to live terminal marked L.
Ensure that connections are tight and that no loose strands are left out of the terminals.
No lead must touch hot surfaces over 75°C.
USING THE HOB
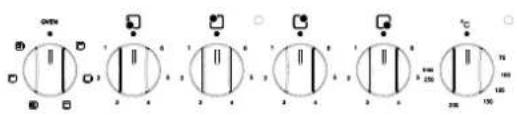
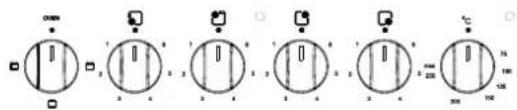
Figure 6
Warning!
If any of the hot plates become cracked, disconnect the appliance from the mains supply and do not use until repaired by a qualified electrician.
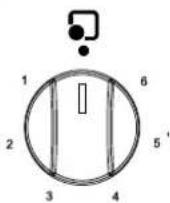
Figure 6a
Each hot plate is regulated using a selector knob (Figure 6). The control allows for the efficient transfer of heat to the cooking pan.
On the knob, which can be turned in both directions, there are numbers 0 to 3 (Figure 6a). These numbers correspond to the power setting of the hot plate where 3 is the highest setting and ● is off.
We recommend you turn off the hot plate 5 to 10 minutes before the dish is ready. This allows the heat accumulated in the hot plate to be used economically. The hot plate remains hot for a while after use.
SAFETY ADVICE IN THE CASE OF A COOKING PAN FIRE
In the event of a cooking pan fire:
- Turn off the cooker at the wall switch.
- Cover the pan with a fire blanket or damp cloth. This will smother the flames and extinguish the fire.
- Leave the pan to cool for at least an hour before attempting to move it. Injuries are often caused by picking up a hot pan and rushing outside with it.
NEVER USE A FIRE EXTINGUISHER TO PUT OUT A PAN FIRE as the force of the extinguisher could tip the pan over. Never use water to extinguish oil or fat pan fires.
7
USING THE HOB
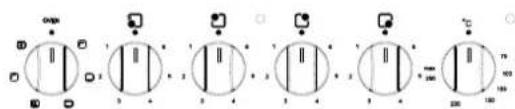
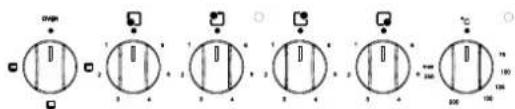
Figure 6
Warning!
If any of the hot plates become cracked, disconnect the appliance from the mains supply and do not use until repaired by a qualified electrician.
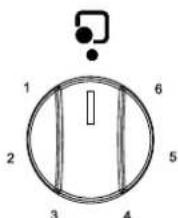
Figure 6a
Each hot plate is regulated using a selector knob (Figure 6). The control allows for the efficient transfer of heat to the cooking pan.
On the knob, which can be turned in both directions, there are numbers 0 to 3 (Figure 6a). These numbers correspond to the power setting of the hot plate where 3 is the highest setting and ● is off.
We recommend you turn off the hot plate 5 to 10 minutes before the dish is ready. This allows the heat accumulated in the hot plate to be used economically. The hot plate remains hot for a while after use.
SAFETY ADVICE IN THE CASE OF A COOKING PAN FIRE
In the event of a cooking pan fire:
- Turn off the cooker at the wall switch.
- Cover the pan with a fire blanket or damp cloth. This will smother the flames and extinguish the fire.
- Leave the pan to cool for at least an hour before attempting to move it. Injuries are often caused by picking up a hot pan and rushing outside with it.
NEVER USE A FIRE EXTINGUISHER TO PUT OUT A PAN FIRE as the force of the extinguisher could tip the pan over. Never use water to extinguish oil or fat pan fires.
COOKWARE SELECTION
- Any cookware should have a thick, flat and dry base of the same diameter or slightly bigger than the hot plate. If the cookware diameter is smaller than the hot plate, heat will be wasted.
- Cookware with uneven bases is very inefficient, making the cooking time longer and wasting electricity.
- Cookware made of flameproof glass, suitable for hot plate cooking, should match the hot plate size. Pans projecting beyond the hot plate may be broken due to temperature stresses. The heated pan must never be filled up with cold water or placed on cold metal or stone surfaces.
• Always use the pan with its lid on. This prevents the accumulation of vapour in the kitchen.
Correct!
- Low current consumption
• Good heat transfer
- even pans
- pan and plate diameters are equal
- pan covered with lid
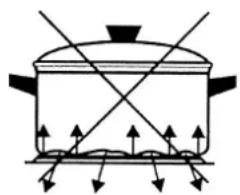
Wrong!
• High current consumption
- Poor heat transfer
- Longer cooking time
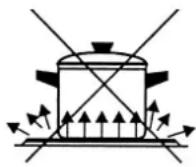
Pan too small!
Figure 7B
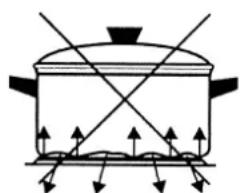
natural_image
Simple line drawing of a cooking pot with arrows indicating direction (no text or symbols)Uneven pan bottom!
Figure 7C
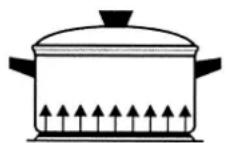
Figure 7A
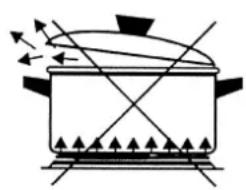
natural_image
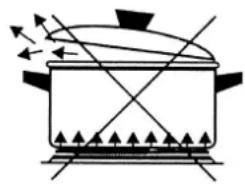
Simple line drawing of a cooking pot with steam rising and cooling (no text or symbols)Lid not properly placed!
Figure 7D
Important!
- Never turn the hot plate on before placing a pan on it, except when first used.
- If the hot plate is not to be used for a long time, apply a little grease to the painted surface.
- Do not allow spills to be burnt onto the hot plate since baked stains are very difficult to remove.
8
COOKWARE SELECTION
- Any cookware should have a thick, flat and dry base of the same diameter or slightly bigger than the hot plate. If the cookware diameter is smaller than the hot plate, heat will be wasted.
- Cookware with uneven bases is very inefficient, making the cooking time longer and wasting electricity.
- Cookware made of flameproof glass, suitable for hot plate cooking, should match the hot plate size. Pans projecting beyond the hot plate may be broken due to temperature stresses. The heated pan must never be filled up with cold water or placed on cold metal or stone surfaces.
- Always use the pan with its lid on. This prevents the accumulation of vapour in the kitchen.
Correct!
- Low current consumption
• Good heat transfer
- even pans
- pan and plate diameters are equal
- pan covered with lid
Wrong!
• High current consumption
- Poor heat transfer
- Longer cooking time
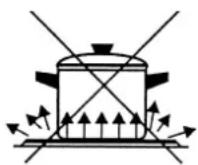
Pan too small!
natural_image
Simple line drawing of a cooking pot with arrows indicating direction (no text or symbols)Uneven pan bottom!
natural_image
Simple line drawing of a cooking pot with steam rising and cooling (no text or symbols)Lid not properly placed!
Figure 7B
Figure 7C
Figure 7D
Important!
- Never turn the hot plate on before placing a pan on it, except when first used.
- If the hot plate is not to be used for a long time, apply a little grease to the painted surface.
- Do not allow spills to be burnt onto the hot plate since baked stains are very difficult to remove.
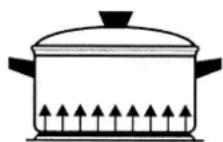
Figure 7A
USING THE GRILL – TOP CAVITY
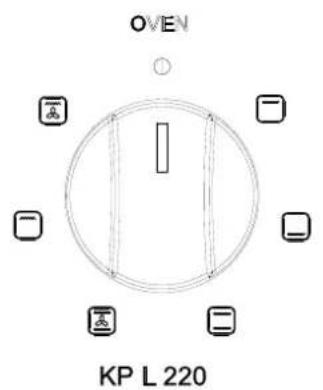
Figure 8
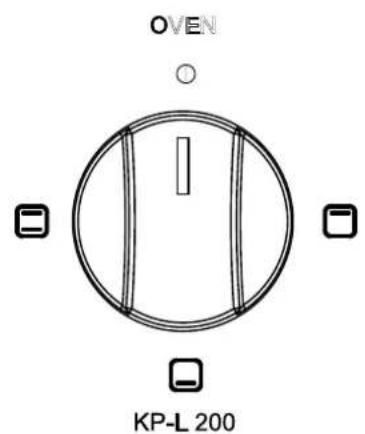
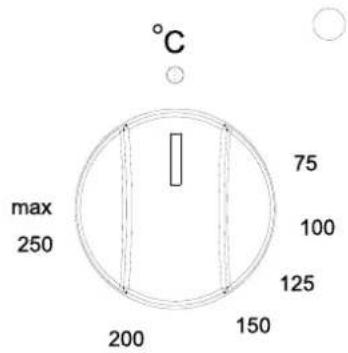
Figure 9
The top cavity control turns the grill on and off (Figure 8). Turn the control knob clockwise to select the grill temperature
When the food is cooked, turn the oven control and temperature control (°C) to off (•).
-9-
USING THE GRILL - TOP CAVITY
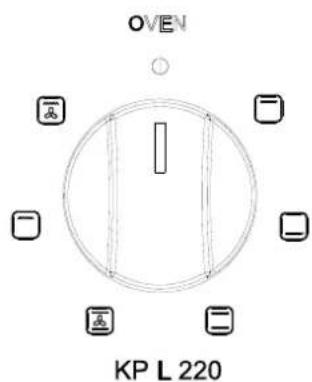
Figure 8
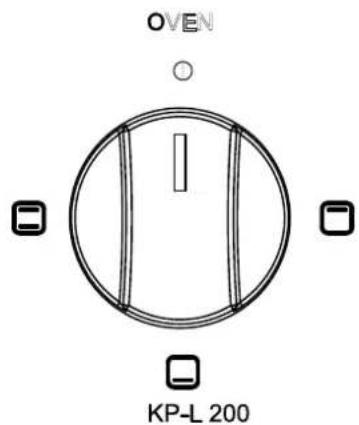
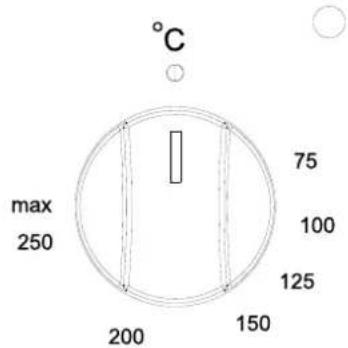
Figure 9
The top cavity control turns the grill on and off (Figure 8). Turn the control knob clockwise to select the grill temperature
When the food is cooked, turn the oven control and temperature control (°C) to off (•).
-9-
USING THE OVEN
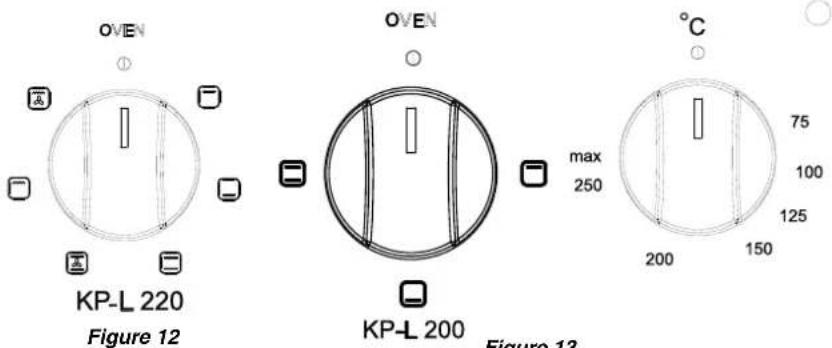
The oven is of a conventional type, using heating elements to reach cooking temperature.
You have the option to select what element(s) to use depending upon your cooking requirements. Turn the oven control to select the function to heat the oven.
Turn the temperature control (°C) clockwise and align the marker on the control knob with the desired temperature on the control panel (Figure 6). The indicator light on the control panel will go out when the selected temperature has been reached inside the oven. The maximum temperature is 250°C.
Always turn the control knob to off (●) when cooking has finished.
Figure 13
Please note: The appliance incorporates a safety thermostat which cuts the electric supply to the oven if the temperature becomes excessive.
| LEVEL | FUNCTION DESCRIPTION | |
| O Close | Oven is not working | |
| Oven LampGrill Heating Element | Oven Lamp and Grill heater works.Recommend to use for frying,Thermostat must be at maximum position. | |
| Oven LampTop&Bottom Heating Elements | Hot air comes from up and down heats the tray from both side, Top and bottom sides of meals cooked equally. | |
| Oven LampGrill Heating ElementTurbo Fan | Oven Lamp, Grill heater and Turbo Fan work together. Recommend to use for frying,Thermostat must be at maximum position. | |
| BottomHeating Element | Bottom heating element.Recommended to use cake and bread. | |
| TopHeating Element | Top Healing Element for keeping cooked food warm or gently reheating. | |
| Oven LampTop&Bottom Heating ElementsTurbo Fan | Hot air comes from up and down heats the tray from both side. Top and bottom sides of meals cooked equally with Turbo Fan. |
-10-
USING THE OVEN
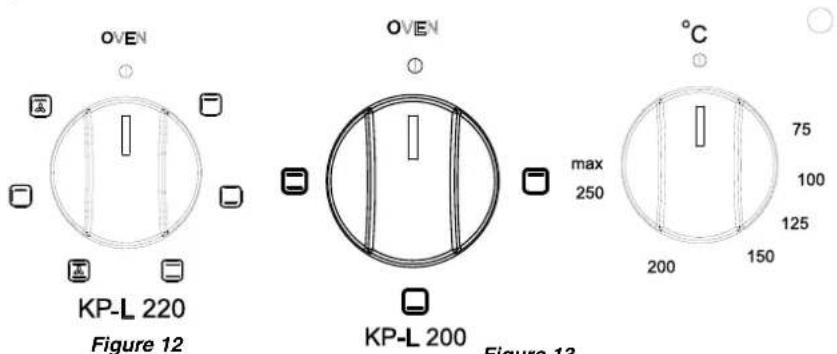
The oven is of a conventional type, using heating elements to reach cooking temperature.
You have the option to select what element(s) to use depending upon your cooking requirements. Turn the oven control to select the function to heat the oven.
Turn the temperature control (°C) clockwise and align the marker on the control knob with the desired temperature on the control panel (Figure 6). The indicator light on the control panel will go out when the selected temperature has been reached inside the oven. The maximum temperature is 250°C.
Always turn the control knob to off (●) when cooking has finished.
Figure 13
Please note: The appliance incorporates a safety thermostat which cuts the electric supply to the oven if the temperature becomes excessive.
| LEVEL | FUNCTION DESCRIPTION | |
| ○ Close | Oven is not working | |
| Oven LampGrill Heating Element | Oven Lamp and Grill heater works.Recommend to use for frying,Thermostat must be at maximum position. | |
| Oven LampTop&Bottom Heating Elements | Hot air comes from up and down heats the tray from both side. Top and bottom sides of meals cooked equally. | |
| Oven LampGrill Heating ElementTurbo Fan | Oven Lamp, Grill heater and Turbo Fan work together. Recommend to use for frying,Thermostat must be at maximum position. | |
| BottomHeating Element | Bottom heating element,Recommended to use cake and bread. | |
| TopHeating Element | Top Heating Element for keeping cooked food warm or gently reheating. | |
| Oven LampTop&Bottom Heating ElementsTurbo Fan | Hot air comes from up and down heats the tray from both side. Top and bottom sides of meals cooked equally with Turbo Fan. |
MAINTENANCE AND CLEANING
Warning!
Disconnect the cooker from the power supply before proceeding with washing and cleaning and wait until it cools down.
GENERAL REMARKS
- The cooker must be cleaned regularly. When cleaning, avoid using any coarse-grained abrasive powders, wire sponges, aggressive chemicals and sharp objects.
The knobs and the fascia panel should be cleaned with a soft cleaning liquid on a soft cloth. - Clean the enamelled parts with a soft cloth or sponge moistened in lukewarm water with the addition of a soft detergent avoiding too much water. Remove heavy stains with special kitchen cleaning agents.
- Baking tins and meat roasting pans should be soaked in lukewarm water with the addition of washing-up liquid and carefully dried.
- Check to make sure that the oven door seal is always kept clean.
CLEANING THE HOT PLATE
- Clean the hot plates with a damp sponge and then dry them by turning them on for a few seconds. To keep their appearance, apply a commercially available grease intended for the maintenance of hot plates.
- The hot plate trim rings can be cleaned with agents intended for the maintenance of stainless steel parts. The rings may become yellowed as a result of overheating. This is normal.
- If a hotplate is to be out of use for a long time, apply the special grease periodically.
OVEN CLEANING
CAUTION!
- Before cleaning it you should wait until the oven cools down.
- Do not steam pressure clean the oven.
- It is the best to clean the bottom of the oven after every use and not allow the remains of food and spots of oil to remain burned on.
REPLACING THE LAMP
Wait for the oven to cool.
Unscrew and remove the diffuser. Unscrew the lamp from the lampholder. Replace lamp and diffuser (Figure 14).
The replacement lamp must be of the same type, voltage and wattage (15W SES) for oven use.

Figure 14
19
MAINTENANCE AND CLEANING
Warning!
Disconnect the cooker from the power supply before proceeding with washing and cleaning and wait until it cools down.
GENERAL REMARKS
- The cooker must be cleaned regularly. When cleaning, avoid using any coarse-
grained abrasive powders, wire sponges, aggressive chemicals and sharp objects.
The knobs and the fascia panel should be cleaned with a soft cleaning liquid on a soft cloth. - Clean the enamelled parts with a soft cloth or sponge moistened in lukewarm water with the addition of a soft detergent avoiding too much water. Remove heavy stains with special kitchen cleaning agents.
- Baking tins and meat roasting pans should be soaked in lukewarm water with the addition of washing-up liquid and carefully dried.
- Check to make sure that the oven door seal is always kept clean.
CLEANING THE HOT PLATE
- Clean the hot plates with a damp sponge and then dry them by turning them on for a few seconds. To keep their appearance, apply a commercially available grease intended for the maintenance of hot plates.
- The hot plate trim rings can be cleaned with agents intended for the maintenance of stainless steel parts. The rings may become yellowed as a result of overheating. This is normal.
- If a hotplate is to be out of use for a long time, apply the special grease periodically.
OVEN CLEANING
CAUTION!
- Before cleaning it you should wait until the oven cools down.
- Do not steam pressure clean the oven.
- It is the best to clean the bottom of the oven after every use and not allow the remains of food and spots of oil to remain burned on.
REPLACING THE LAMP
Wait for the oven to cool.
Unscrew and remove the diffuser. Unscrew the lamp from the lampholder. Replace lamp and diffuser (Figure 14).
The replacement lamp must be of the same type, voltage and wattage (15W SES) for oven use.
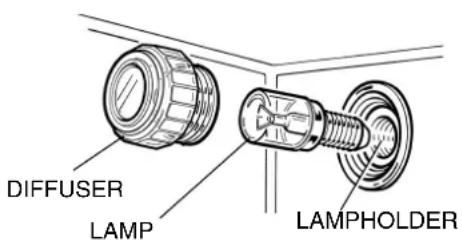
Figure 14

This appliance/fitting is marked according to the European directive 2002/96/EC on Waste Electrical and Electronic Equipment (WEEE). By ensuring this product is disposed of correctly, you will help prevent potential negative consequences for the environment and human health, which could otherwise be caused by inappropriate waste handling of this product.
The symbol on the product, or on the documents accompanying the product, the Crossed Out Wheelie Bin symbol, indicates that this appliance/fitting may not be treated as household waste. Instead it shall be handed over to the applicable collection point for the recycling of electrical and electronic equipment. Disposal must be carried out in accordance with local environmental regulations for waste disposal. For more detailed Information about treatment, recovery and recycling of this product, please contact your local authority, your household waste disposal service or the retailer where you purchased the product.
19

This appliance/fitting is marked according to the European directive 2002/96/EC on Waste Electrical and Electronic Equipment (WEEE). By ensuring this product is disposed of correctly, you will help prevent potential negative consequences for the environment and human health, which could otherwise be caused by inappropriate waste handling of this product.
The symbol on the product, or on the documents accompanying the product, the Crossed Out Wheelie Bin symbol, indicates that this appliance/fitting may not be treated as household waste. Instead it shall be handed over to the applicable collection point for the recycling of electrical and electronic equipment. Disposal must be carried out in accordance with local environmental regulations for waste disposal. For more detailed Information about treatment, recovery and recycling of this product, please contact your local authority, your household waste disposal service or the retailer where you purchased the product.
- CAMPOMATIC
- INTRODUCTION
- CAUTION!
- INDEX
- GENERAL INFORMATION ....4
- INSTALLATION ....6
- USING THE HOB 7
- USING THE GRILL 9
- USING THE OVEN 10
- MAINTENANCE AND CLEANING ....INSIDE BACK COVER
- GENERAL INFORMATION 4
- INSTALLATION 6
- MAINTENANCE AND CLEANING .....INSIDE BACK COVER
- GENERAL INFORMATION
- PURPOSE
- TECHNICAL SPECIFICATION
- PARTS IDENTIFICATION
- PREPARATION FOR USE
- IMPORTANT NOTES
- Hot plates
- INSTALLATION
- POSITIONING
- ELECTRICAL CONNECTIONS
- USING THE HOB
- Warning!
- SAFETY ADVICE IN THE CASE OF A COOKING PAN FIRE
- In the event of a cooking pan fire:
- COOKWARE SELECTION
- Correct!
- Wrong!
- Important!
- USING THE GRILL – TOP CAVITY
- USING THE GRILL - TOP CAVITY
- USING THE OVEN
- MAINTENANCE AND CLEANING
- GENERAL REMARKS
- CLEANING THE HOT PLATE
- OVEN CLEANING
- REPLACING THE LAMP
Brand : Campomatic
Model : C64EWR
Category : Unspecified