
SRM-872P - Radio Hanwha - Free user manual and instructions
Find the device manual for free SRM-872P Hanwha in PDF.

| Product Type | Mobile Network Video Recorder (NVR) with GPS and G-Sensor |
| Brand | Hanwha (formerly Samsung Techwin) |
| Model | SRM-872P |
| Video Inputs | Up to 8 IP cameras via PoE (IEEE 802.3af) |
| Recording Resolution | Up to 3MP per channel; recording up to 240fps at 1280x720 |
| Compression | H.264, MJPEG |
| Storage | 1 internal 2.5" HDD/SSD; 1 Micro SD slot (industrial, up to 32GB); USB backup |
| Audio | 8-channel audio via network camera; G.711/G.726; 1 phone jack (main unit), 1 RCA (control box) |
| Alarm I/O | 8 inputs (NO/NC), 8 outputs (open collector) |
| GPS | Built-in GPS receiver with SMA antenna connector; supports E-Map and Google Map |
| G-Sensor | 3-axis accelerometer in I/O box for event detection |
| Network | 1 Gigabit Ethernet + 8 Fast Ethernet with PoE; protocols: TCP/IP, DHCP, SMTP, NTP, HTTP, DDNS, RTP, RTSP |
| Remote Access | Web viewer, CMS (Smartviewer), mobile app (iPolisAuto for iOS/Android) |
| Power Input | 12-24V DC (vehicle battery); max 30W system consumption; PoE output 64W total (8W per channel) |
| Operating Temperature | -25°C to +50°C (system); HDD: 0°C to 60°C |
| Dimensions (System) | 225.5 x 59 x 312.2 mm (WxHxD) |
| Weight (without HDD) | System: 2.17 kg; I/O Box: 0.35 kg; Control Box: 0.18 kg |
| Certifications | CE, FCC, cUL, e-Mark, KCC, EN50155; MIL STD-810F shock/vibration |
| Maintenance | Clean with dry cloth; do not use near water; unplug during storms |
| Security | Initial admin password must be set; change password every 3 months; network encryption recommended |
Frequently Asked Questions - SRM-872P Hanwha
User questions about SRM-872P Hanwha
0 question about this device. Answer the ones you know or ask your own.
Ask a new question about this device
Download the instructions for your Radio in PDF format for free! Find your manual SRM-872P - Hanwha and take your electronic device back in hand. On this page are published all the documents necessary for the use of your device. SRM-872P by Hanwha.
USER MANUAL SRM-872P Hanwha
©2013 Samsung Techwin Co., Ltd. All rights reserved.
Trademark

SAMSUNG TECHWIN
is the registered logo of Samsung Techwin Co., Ltd.
The name of this product is the registered trademark of Samsung Techwin Co., Ltd.
Other trademarks mentioned in this manual are the registered trademark of their respective company.
Restriction
Samsung Techwin Co., Ltd shall reserve the copyright of this document. Under no circumstances, this document shall be reproduced, distributed or changed, partially or wholly, without formal authorization of Samsung Techwin.
Disclaimer
Samsung Techwin makes the best to verify the integrity and correctness of the contents in this document, but no formal guarantee shall be provided. Use of this document and the subsequent results shall be entirely on the user's own responsibility. Samsung Techwin reserves the right to change the contents of this document without prior notice.
Design and specifications are subject to change without prior notice.
The initial administrator ID is "admin" and the password should be set when logging in for the first time.
Set password for your wireless network if you use the product with a wireless router. Being not protected with password or using the default wireless router password may expose your video data to potential threat.
Please change your password every three months to safely protect personal information and to prevent the damage of the information theft.
Please, take note that it's a user's responsibility for the security and any other problems caused by mismanaging a password
Overview
IMPORTANT SAFETY INSTRUCTIONS
Read these operating instructions carefully before using the unit. Follow all the safety instructions listed below. Keep these operating instructions handy for future reference.
1) Read these instructions.
2) Keep these instructions.
3) Heed all warnings.
4) Follow all instructions.
5) Do not use this apparatus near water.
6) Clean only with dry cloth.
7) Do not block any ventilation openings, Install in accordance with the manufacturer's instructions.
8) Do not install near any heat sources such as radiators, heat registers, stoves, or other apparatus (including amplifiers) that produce heat.
9) Do not defeat the safety purpose of the polarized or grounding- type plug. A polarized plug has two blades with one wider than the other. A grounding type plug has two blades and a third grounding prong. The wide blade or the third prong are provided for your safety. if the provided plug does not fit into your outlet, consult an electrician for replacement of the obsolete outlet.
10) Protect the power cord from being walked on or pinched particularly at plugs, convenience receptacles,
and the point where they exit from the apparatus.
11) Only use attachments/accessories specified by the manufacturer.
12) Use only with the cart, stand, tripod, bracket, or table specified by the manufacturer, or sold with the apparatus. When a cart is used, use caution when moving the cart/ apparatus combination to avoid injury from tip-over.
13) Unplug this apparatus during lightning storms or when unused for long periods of time.
14) Refer all servicing to qualified service personnel. Servicing is required when the apparatus has been damaged in any way, such as power-supply cord or plug is damaged, liquid has been spilled or objects have fallen into the apparatus, the apparatus has been exposed to rain or moisture, does not operate normally, or has been dropped.

natural_image
Symbolic icon of a person pushing a large object, enclosed in a circle (no text or symbols)STANDARD APPROVALS
FC CE
This equipment has been tested and found to comply with FCC Rules. These limits are designed to provide reasonable protection against harmful interference when the equipment is operated in a commercial environment. This equipment generates, uses and can radiate radio frequency energy and, if not installed and used in accordance with the instruction manual, may cause harmful interference to radio communications. Operation of this equipment in a residential area is likely to cause harmful interference in which case the user will be required to correct the interference at his own expense..
BEFORE START
This manual provides operational information necessary for using the product and contains a description about each component part and its function as well as menu or network settings.
You have to keep in mind the following notices :
• SAMSUNG retains the copyright on this manual.
- This manual cannot be copied without SAMSUNG's prior written approval.
- We are not liable for any or all losses to the product incurred by your use of non-standard product or violation of instructions mentioned in this manual.
- Prior to opening the case, please consult a qualified technician first. Whenever this is needed power must be removed from the unit.
- Before adding a hard disk drive or external storage (USB memory, USB HDD, etc), check if it is compliant with this product. For the compatibility list, contact the retailer.
- Use industrial use 'Micro SD'(not included). It saves data on SD in lower temperature and changes to HDD when HDD reaches operational temperature.
- Place GPS Antenna evenly out of vehicle toward sky. If antenna installation is wrong, it receives unstable data. Normal GPS error distance is 16m in stop, 30m in moving.
WARNING
Caution
- Power off before installation to extend power cord, use AWG(American Wire Gauge) 18 or thicker.
- When Install GPS antenna, attach it on flat place outside of vehicle with accessories. GPS antenna must head to the air. Wrong installation causes unstable data receiving. GPS error range is 16m when stops, 30m when moving. When install GPS antenna in the vehicle, purchase and use 'Active Antenna(2.85V)'.
- Must use vehicle use batteries. Fuse may be broken when you connect to 'always on' power supply.
- Battery lifecycle can be shorten if battery status not good. Use good status batteries.
- Risk of Explosion if Battery is replaced by an Incorrect Type. Dispose of Used Batteries According to the Instructions.
System Shutdown
Turning off the power while the product is in operation, or undertaking improper actions may cause damage or malfunction to the hard drive or the product.
To safely cut off power, unplug the power cable.
You may want to install a UPS system for safe operation in order to prevent damage caused by an unexpected power stoppage. (Any questions concerning UPS, consult your UPS retailer.)
Operating Temperature
The guaranteed operating temperature range of this product is -25^ 50^ ( -13^ 122^ ).
This product may not work properly if you run right after a long period of storage at a temperature below the guaranteed one.
Prior to using a device that has been stored for a long period in low temperatures, allow the product to stand at room temperature for a period.
Especially for the built-in HDD in the product, its guaranteed temperature range is 0^ C \~ 60^ C ( 32^ F \~ 140^ F).
Likewise, the hard drive may not work at a temperature below the guaranteed one.
Ethernet Port
This equipment is indoor use and all the communication wirings are limited to inside of the building.
Security Precautions
The initial administrator ID is “admin” and the password should be set when logging in for the first time. Set password for your wireless network if you use the product with a wireless router. Being not protected with password or using the default wireless router password may expose your video data to potential threat. Please change your password every three months to safely protect personal information and to prevent the damage of the information theft.
Please, take note that it's a user's responsibility for the security and any other problems caused by Mis-managing a password.
Contents
p3 Overview
8 Product Features
9 Package Contents
10 Front & rear view and details
12 IO Box
13 Control Box
p14 Installation
14 Disassemble Brackets
14 Mount product
15 Install IO & Control box
16 Vehicle installation
p17 Surveillance
Start / END system
17 Log in
17 Shutdown system
18 Live monitoring screen
19 OSD icons
19 Contextual Menu on Live
20 Live screen division
20 Single Channel Live view
20 Backup
21 Live Monitoring
21 Recording Status
21 Emergency Recording
21 Move to Search mode
21 Enter Setup Menu
p22 System Setup
22 System Information
25 User Setup
27 Device
29 Profile SETUP
30 Audio
31 Alarm
32 Display
34 Record Setup
36 Network
40 Event
p42 Playback(Search)
p44 Backup
p45 Web Client Access
p47 Smartviewer Auto v1.0
52 Smartviewer AUTO v1.0 Setup
p55 Callback
p56 Mobile viewer iPolisAuto
p58 Appendix
58 System Specification
60 Default Configurations
62 IO BOX Installation
63 Connector Pin Map
66 FAQ
Product Features
- Provide Ultimate reliability with embedded linux System
• Dedicated Database structure for more stability.
• CMS(Central Monitoring System) support - Use same UI on NVR, CMS and web viewer.
- Web monitoring, Searching and setup available.
• Built in Media Player for backup playback - USB support for Mouse and external storage.
• HDD/SSD and Micro SD support - Mobile device support (IPhone and Android)
- Digital zoom
- Compact size for vehicle installation
- Backup storage support such as USB memory stick
• Built in GPS – E-Map support - Industrial standard in Enduring Temperature limit
• Built in power support (PoE). - Apply military product level test in vibration and shock test.
• I/O Box (Sensor, Alarm, G-Sensor, Status LED)
• Event detection through G-sensor in I/O Box - Control Box (IR input, Emergency Button, Status LED, Audio-Out)
The following components are included in product box
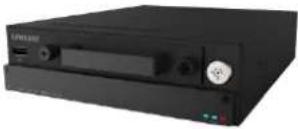 |  |  |
| NVR Main unit | IO BOX | Control Box |
 |  |  |
| Power cable(1ea) | RS232 connect cable(2ea) | RJ45 UTP cable (2ea) |
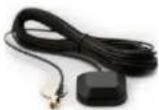 |  |  |
| GPS Antenna | Remote Control & Battery | CD (User manual) |
 |  |  |
| Quick Guide | HDD fix screw and Key | Rear cover |
- Part color and design may differ due to the manufacture
Front

| Name | Description | |
| 1 | WiFi / 3G USB | Connect USB module when use WiFi or 3G communication(optional) |
| 2 | USB port | Use for mouse connection or external storage. |
| 3 | Audio output | Sound output as line output |
| 4 | Video output | Connect VGA monitor to view display |
| 5 | HDMI output | Connect HDMI monitor |
| 6 | RESET switch | Use when restart system |
| 7 | Micro SD Slot | Insert Micro SD for recording |
| 8 | IR sensor | Receives signals from remote controller |
| 9 | LED | Display NVR status |
| 10 | Lock Key | Lock HDD device. This must be locked to start system. |
Rear
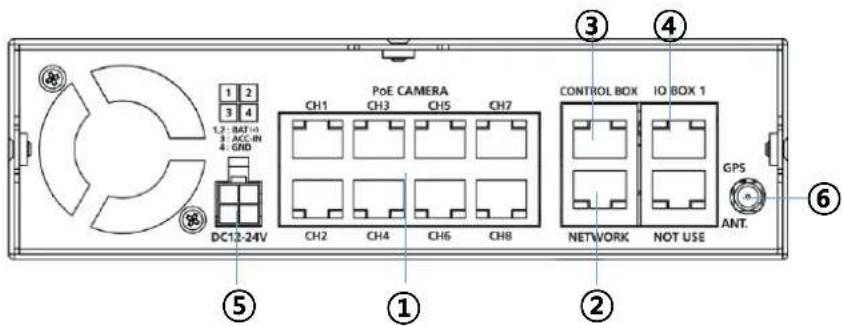
| Name | Description | |
| 1 | Poe Camera | Connect IP cameras. System supports power over Ethernet when use PoE IP camera |
| 2 | NETWORK | Connect network cable for CMS and Web view |
| 3 | CONTROL BOX | Connect to control box |
| 4 | IO BOX 1 | Connect to IO box |
| 5 | PWR | Connect power supply from vehicle |
| 6 | GPS | Connect GPS Antenna (SMA type) |
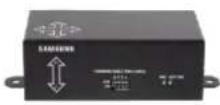
Front
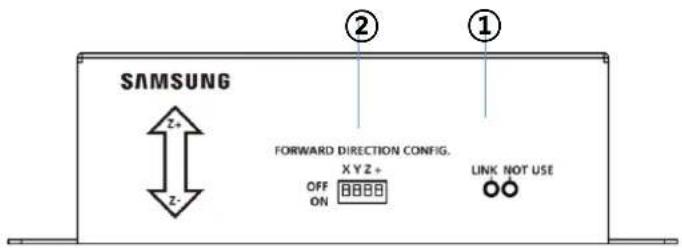
| name | Description | |
| 1 | LED Display | Display following status.-Link : Shows connection status of IO BOX |
| 2 | Dip Switch | Set moving direction of vehicle. |
*For more details, see page 62 'IO BOX Installation'.
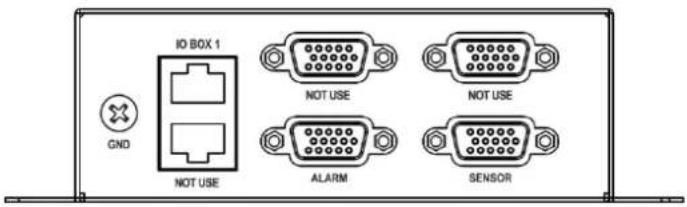
Rear
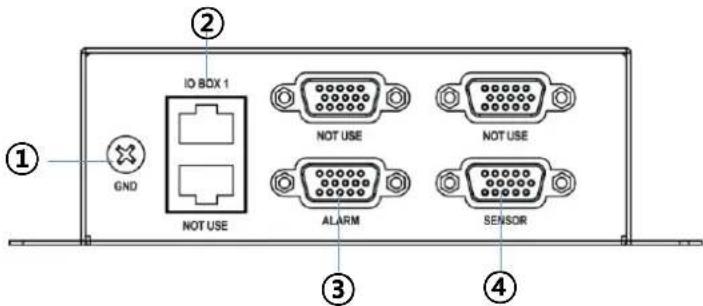
| name | Description | |
| 1 | GND | Ground connection. Connect to vehicle body |
| 2 | IO BOX 1 | Connect to main unit's port. |
| 3 | ALARM | Connect to speed pulse of the vehicle. This port can be used for RS232/485. |
| 4 | SENSOR | Connect Alarm output to External devices. Additional power required. (Open-collector type) |
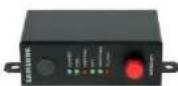
Front
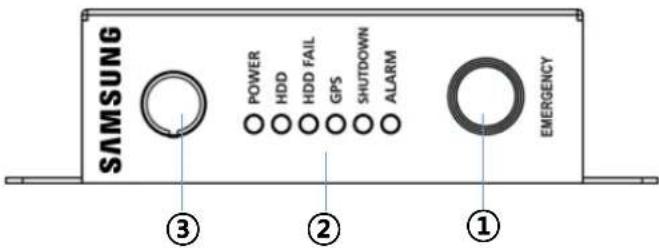
| name | Description | ||
| 1 | Emergency | Start Emergency Recording with this button. | |
| 2 | LED lights | POWER | Display power on status of control box |
| HDD | Light on when storage(HDD, SD) storage is available | ||
| HDD FAIL | Light on when storage (HDD, SD) is not available. | ||
| GPS | Light on GPS position fixed after receiving data | ||
| SHUTDOWN | Light on when ‘Shutdown delay’ is processing. | ||
| ALARM | Light on when alarm output is working | ||
| 3 | IR receiving ports | Receives IR signals from remote controller | |
Rear
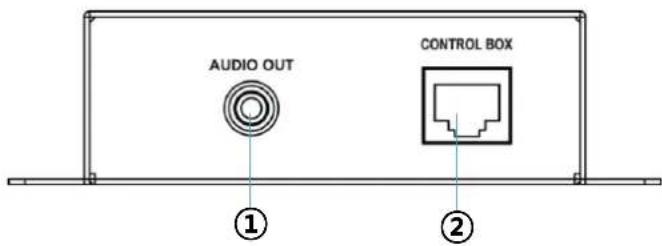
| name | Description | |
| 1 | Audio out | Audio Line out |
| 2 | Control box | Connect to main unit's control port |
Installation
Disassemble Brackets
- Open box and take out product. Then separate bottom bracket with screw(1) in picture.
- Place 'bottom bracket' on even place and assemble main unit and bracket with screw(2) in picture.
- Assemble rear cover and main unit with screw(3) in picture. The cables must be passed through rear cover hole as following picture.
- Tied up installed cables firmly.

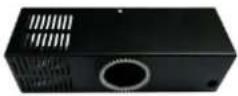
natural_image
Technical line drawing of a rectangular electronic device with ventilation grilles and a circular opening (no text or symbols)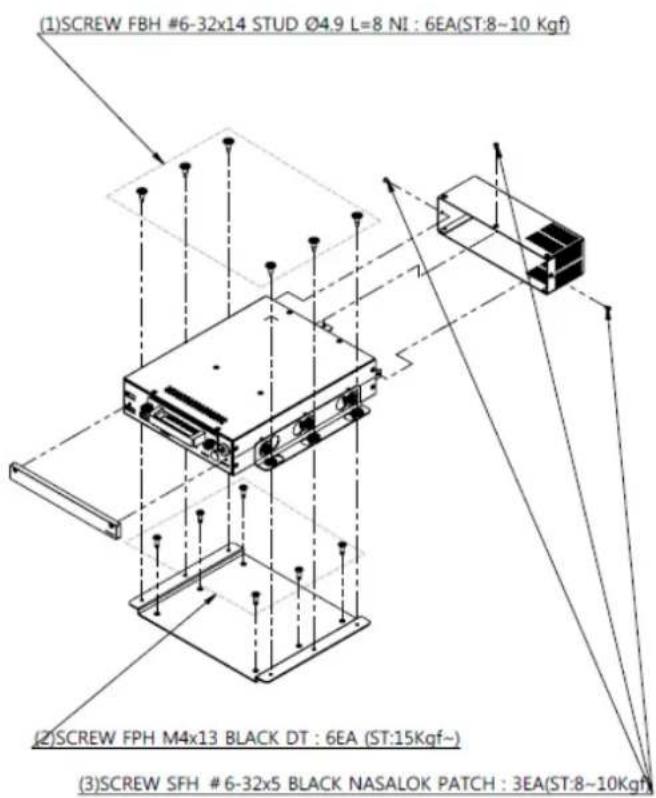
Screw Torque = ST (Kgf)
Mount product
Use 6 screws as following picture and mount brackets on installation place.
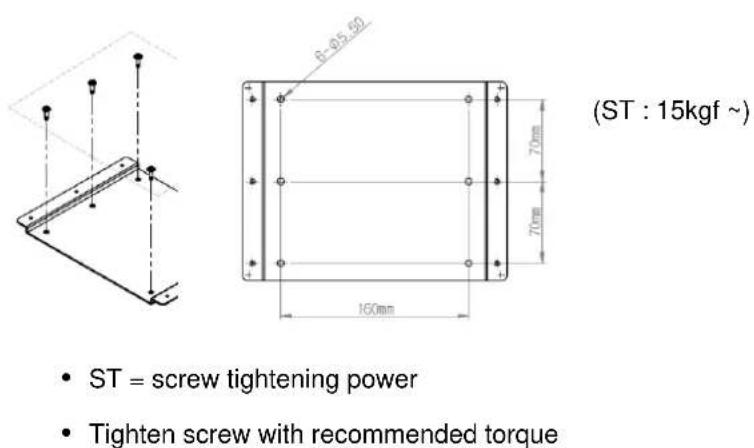
(ST : 15kgf \~)
• ST = screw tightening power
- Tighten screw with recommended torque
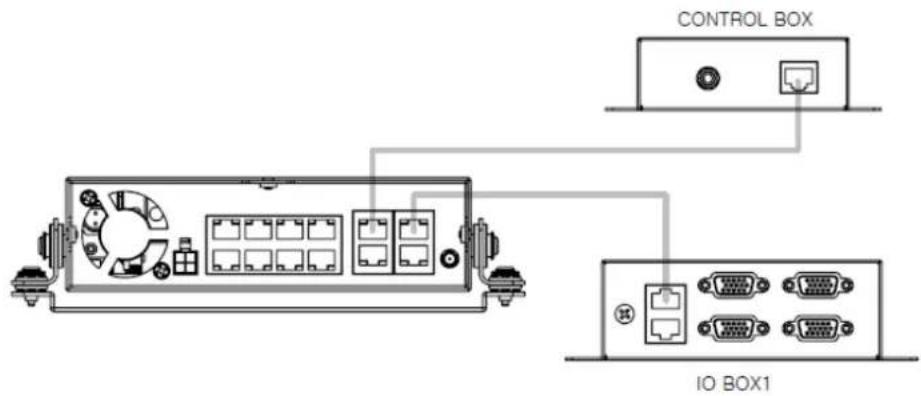
* Connect IO box and Control box with provided cable as above picture.

• ST = screw tightening power
- Tighten screw with recommended torque
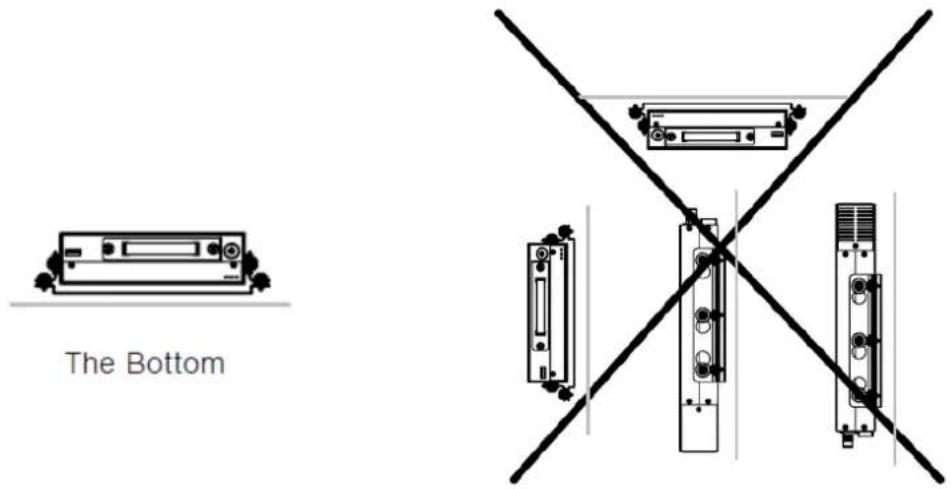
Vehicle Installations
When install on the bottom, fix the brackets on main unit to the bracket which installed on bottom with 6 screws.
Caution: When installed on bottom, it may cause HDD shock issues. For the torque of screws, see the pictures on previous page. * ST = torque of screws.
Each tool has differ torque, you should follow guided torque when installation.
Surveillance
Start/End system
Before install on vehicle, user should set system first. Connect VGA or HDMI monitor If monitor doesn't display because of resolution, press and hold 'zoom' key on remote controller for 5 seconds. It adjust system resolution automatically.
Log in
- Connect power on system.
- System displays initial screen and start initializing.
- It shows login screen.
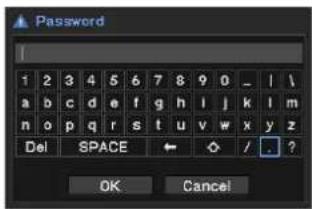
- To log in, select 'admin' and press 'OK'. No password is configured at initial time.
*if there's configured password, click password field and use virtual keyboard.(see picture) - System logs in as 'Administrator'.

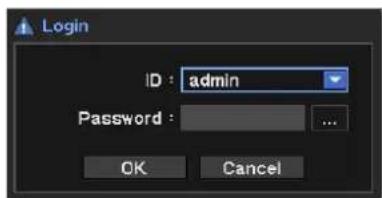
Note : password can be set up to 8 numbers with combination of number 0 to 9. Special character (& # < > ` \~) are not allowed. To enter new password, go to 'Menu->System->User' page.
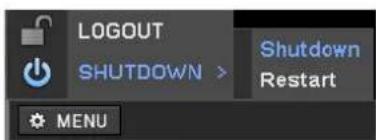
Shutdown system
- Press 'Menu' and select 'Shutdown' system Only allowed user can shut down system.
Monitoring system with VGA or HDMI output on control box after installation on Vehicle.
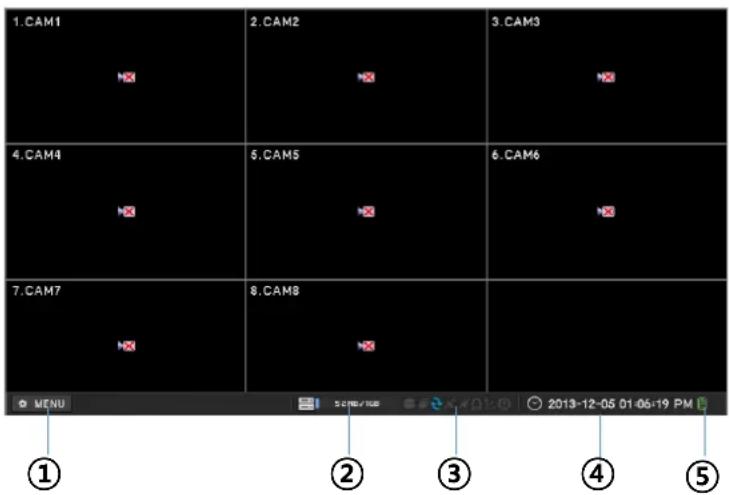
| Name | Description | ||
| 1 | Menu | Open NVR menu. | |
| 2 | HDD status | Display HDD used status with percentage. | |
| 3 | Status Icons |  | Turn on when archiving data |
 | Turn on when sequencing mode works | ||
 | Turned on when HDD is set as overwrite mode | ||
 | Turned on system receiving GPS data | ||
 | Turned on network connected | ||
 | Turned on when alarm is activating | ||
 | Turned on with G-Sensor detects events | ||
 | Turned on Emergency Recording is on. | ||
| 4 | Time & date info. | Display time & date information | |
| 5 | Remote controller | Turned on when IR remote controller is activating. Remote controller can control system regardless of system id If system ID is set ‘0’, | |
Following status icons displayed on each channels.
| name | Description |
| No Recording(greed) | |
| Recording (Red) | |
| Emergency Recording | |
| Event Recording (red) | |
| High ResolutionPlayback* |
| name | Description |
| Pre Event Rec.(blue) | |
| Motion Detection | |
| Sensor Detection | |
| IP Camera event Detection |
- Displays when it's over than following recorded size and it shows 1fps speed. (4 division 1280x720 60fps, 9 division : 1280x720 30fps)
Contextual Menu on Live
Press right mouse button to see Contextual menu. Frequently used features are in this menu box.


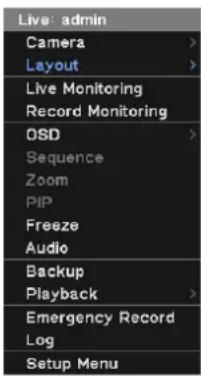
Right click mouse button on live screen
| name | Description | |
| 1 | Camera | Select camera and display |
| 2 | Layout | Select screen mode. |
| 3 | Live Monitoring | Display IP camera images |
| 4 | Record Monitoring | Display real time recording status |
| 5 | OSD | OSD display options. |
| 6 | Sequence | Sequence live channels |
| 7 | Zoom | Run Digital zoom. Only available on single channel mode. |
| 8 | PIP | Run PIP feature. Only available on single channel mode |
| 9 | Freeze | Freeze current screen. |
| 10 | Audio | Select audio channel |
| 11 | Backup | Playback recorded data |
| 12 | Playback | Move to search playback mode. |
| 13 | Emergency Rec. | Start emergency recording. |
| 14 | Log | Display current system log |
| 15 | Setup | Open setup menu |
* The Audio sound output in live mode is based on the channel configuration in 'Menu-Audio'. It has not same as current selected channel.
Live Screen division
Display live screen as 9 division (3x3), 4 division (2x2), and single screen mode.
| CH1 | CH2 | CH3 |
| CH4 | CH5 | CH6 |
| CH7 | CH8 | CH9 |
3x3 (9 Division)
| QH1 | QH2 |
| QH3 | QH4 |
2x2 (4 Division)

natural_image
Blank white image with a faint border and no visible text, symbols, or markings.Single screen mode
To change layout, click right mouse button on live mode and select camera or 'Lay out' menu.
| Layout | > | √ 2 x 2 |
| Live Monitoring | 3 x 3 | |
| Record Monitoring | Next |
Single Channel Live view
Enlarge selected channel as single full screen.
- Move mouse to desired channel and double click left mouse button and it display single channel view of selected channel
- Press desired channel number on remote controller and it displays single channel view of selected channel
- Click right mouse button on live view and select 'Camera' then select desired channel.
- Double click again back to previous mode.
Backup
- Click 'backup' button on remote controller
- Click right mouse button and open contextual menu.
- Select 'Backup' on menu and set storage and duration to archive
- Press 'start' to backup.
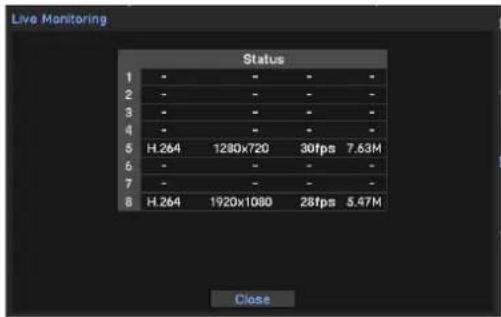
Live Monitoring
Select 'Live Monitoring' on live view. It displays Live status of connected camera and transmitting status.
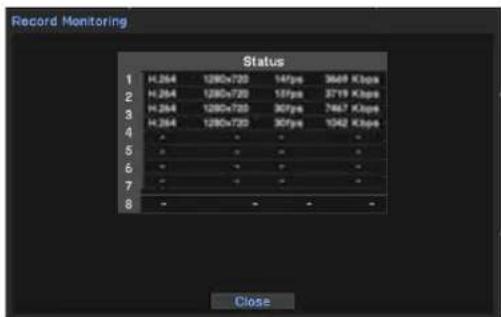
Recording status
Select 'Record Monitoring' on live view. It displays recording status of connected camera and transmitting status.
Emergency Recording
Record immediately on live mode
- Press 'Emergency Rec' button on control box. It turns red.
- Press 'E.REC' button on remote controller.
- Or use contextual menu (click right mouse button) and select 'Emergency Rec'.
Move to Search mode
- Click Right mouse button on live mode and open contextual menu.
- Select 'Playback' mode.
Enter Setup menu
- Click 'Menu' button on remote controller.
- Click 'Menu' button and enter setup mode
- Or use contextual menu and select 'Setup Menu'.
SYSTEM SETUP
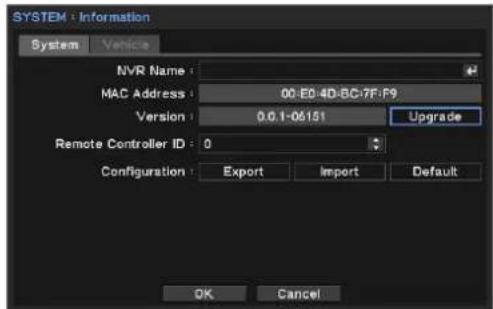
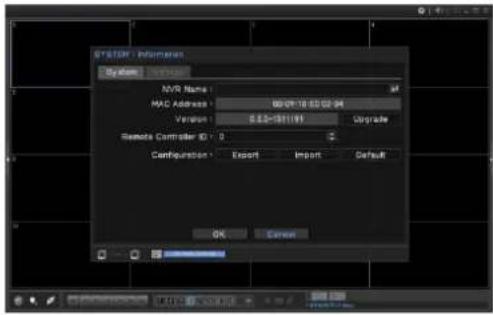
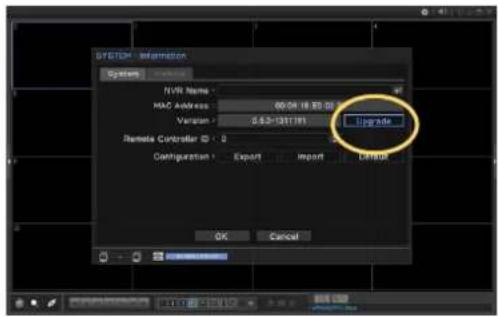
System information
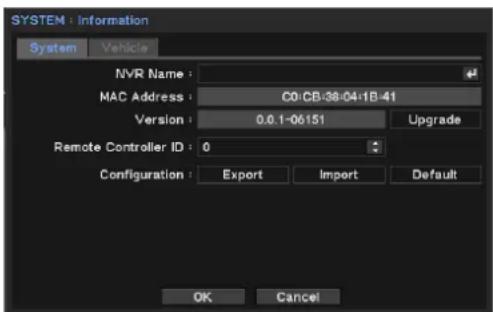
General information setup
- Press menu and move to SYSTEM->Information.
- Enter NVR name. (Easy to recognize in multiple device access)
- Set ID on 'Remote Controller'. User can control multi NVRs with single remote controller with changing IDs.
- User can export / Import and set default system setup. (To export/import, USB memory is required.)
- Back to default with 'Default' button
* Date&Time, User info., Display Resolution, Language, Network Setup(IP address, DDNS) will not be initialized.
- Press 'OK' to save changes.
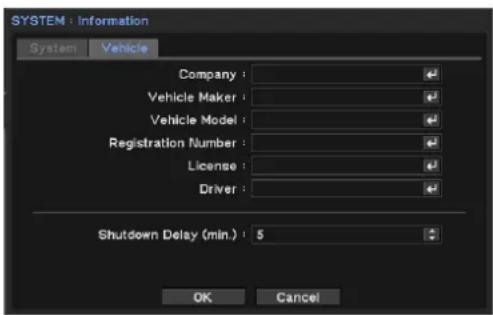
Enter Vehicle information
- Press Menu and move to 'SYSTEM->Information'.
- Enter necessary information.
- Shutdown delay: After ignition off, system waits for a configured time and safely shuts down system.
- Press 'OK' to save changes.
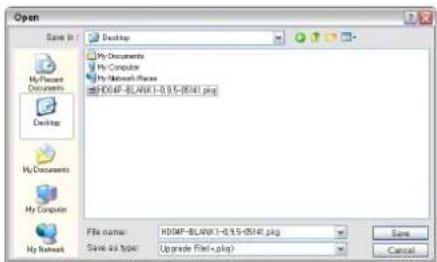
System Upgrade
Upgrade system firmware with new version.
- Press Menu and move to 'SYSTEM->Information' system page.
- Insert USB memory which contains update file.
- Press 'Update' button and select file.
- Start upgrade with selected file.
- System restarts automatically when update completed.
Note: Do not remove USB or power during updating.
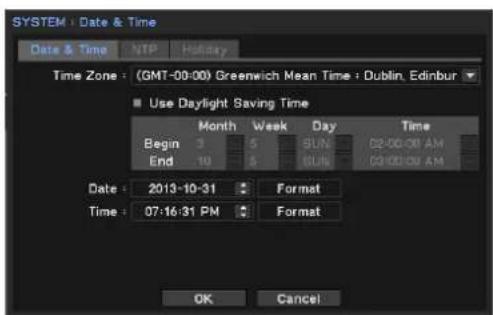
Set Date and time
- Press menu move to 'System-> Date&time'.
- Set time zone and choose option 'daylight saving time'.
* Configure Beginning and End day. - Set date and time with display format selection.
- Press 'OK' to save changes.
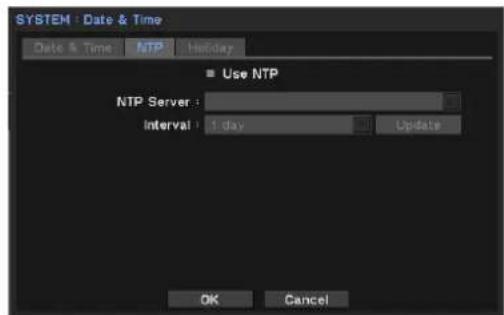
NTP setting
- Select 'NTP' tab menu on Date &Time setup menu.
- Tick 'Use NTP' option
- Press to enter time server.
- Enter time server name with virtual keyboard.
- Set update interval and press update button.
*Internet access required
Note: NTP is not essential for NVR operation. Time Sync. may not be completed due to heavy traffic or delays from time sync. server.
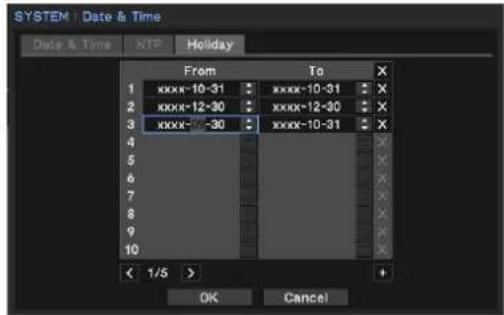
Set specific day or days as holiday and apply different recording schedule.
- Move to Holiday tab menu on Date & time setup.
- Press button and set date.
- Press 'OK' to apply setup.
Note: Holiday may not same date every year. User may have to update every year.
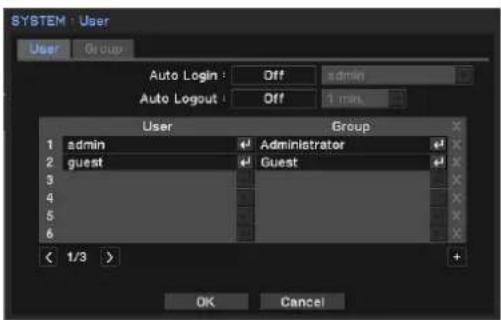
User setup
User can define new user and group permissions.
Add new User
- Press menu and move to 'SYSTEM-User'.
- Press button and add new user.
- Enter user name with virtual keyboard and select user group.
- Set password for new user.
*Auto Login: Log in automatically with selected user.
*Auto Logout: Log out when there is no action during configured time.
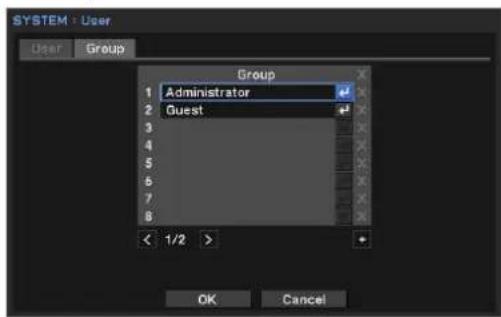
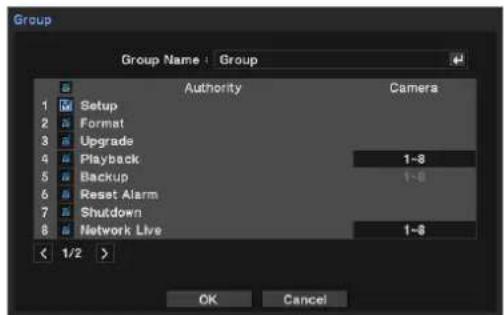
Add new group and set permission.
Administrator can define authority on each group. (not per user)
- Go to 'System-User' menu and select 'Group'.
- Press button.
- Enter new group name.
- Set permission on new group. Set camera channels on each authority (if necessary)
- Click 'OK' and save changes.
System Log
All system log can be searched in this page.
- Press Menu and move to SYSTEM->SYSTEM Log.
- To view latest log, press 'Reload' button and update logs. Use ☐ button to move next pages.
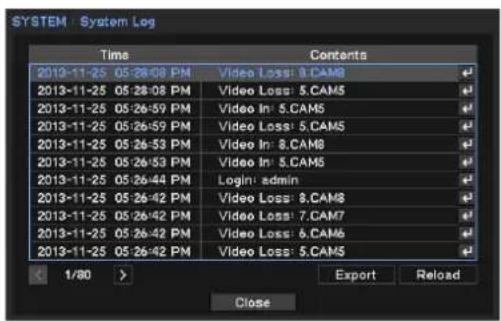
To Export Log file.
- Prepare USB memory.
- Insert & connect USB on system and move to 'System Log' page.
- Press 'Export' button.
- Set file name and press 'OK' button.

Note: log file exports as csv file format.
DEVICE
In this menu, Set configuration of camera, audio, alarm.
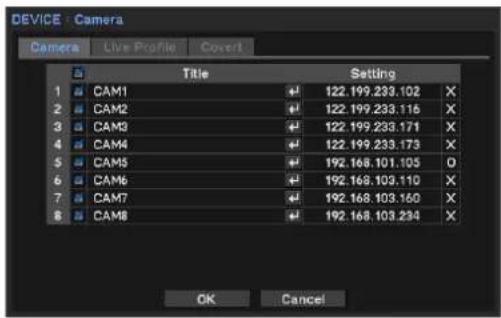
Change Camera Title
- Press Menu and move to 'DEVICE->Camera' page.
- Select camera and press to change title.
- Use virtual key and set new camera name.
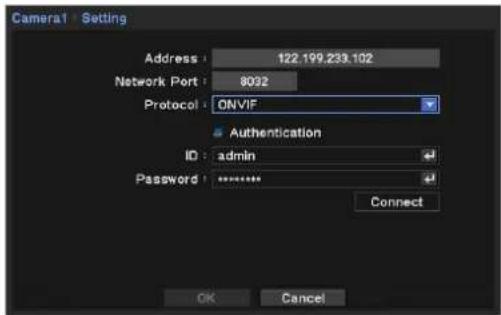
IP camera setup
Enter IP camera information and authorize it to check its working status.
- Press 'IP Address' on camera menu.
- Enter IP, ports and ID/Password of desired IP camera.
- Check 'Authentication' and press 'Connect' to check IP camera connection status.
- Once 'Log in' success message means it connects normally. If it fails, check information again.
- Press 'OK' to save information.
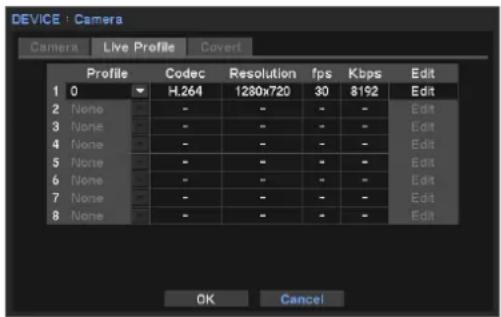
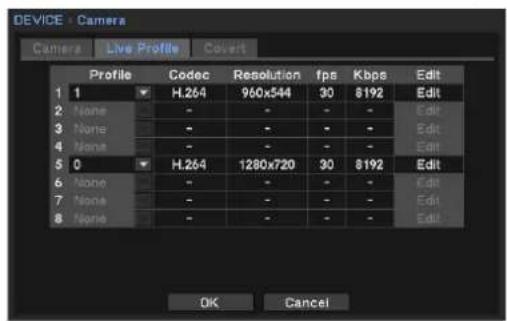
- Move to 'Device->Camera->Live profile' page.
- It shows profiles of connected camera. User can select profiles on each cameras and adjust codec & resolutions only available camera.
• Profile: Shows available profile on connected cameras.
- Codec: type of Image compressing algorithm.
- Resolution: image size for live monitoring.
- Fps: number of frames for live monitoring.
- Kbps: image data size for live monitoring.
- Press 'Edit' button to edit profiles.
- Press 'OK' to save changes.
Covert (Hidden) camera
Covert (Hide) camera on live view according to logged in user.
- Press Menu and move to 'DEVICE->Camera' page.
- Move to 'Covert' tab menu.
- Set schedule on 'From\~To' field.
- Select covert mode. -Low mode: No display but OSD. -High mode: No display at all.
- Press 'OK' to save changes.
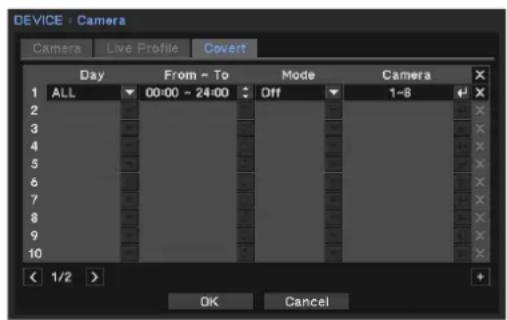
Note: Not effect on recording data. This applies on monitoring only.
PROFILE SETUP
Network camera generally provides single or multiple profiles and user can select details such as live, recording and network transmit profiles.
System shares added profiles. Once you edit profile on live, record or Network, it updates other profiles.
• Live Profile : 'Menu->Device->Camera->Live profile'
- Record Profile : 'Menu->Recording->Recording->Record profile'
• Network Profile : 'Menu->Network->Transmission->Network profile'
Add profiles
- Select one of profiles from Live, Recording and Network and move to that menu.
- Press 'Edit' button on right and it shows current profile details.
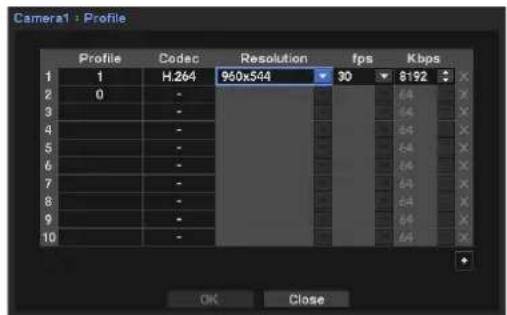
- To add new profile, press '+' button below and set profile name, codec, resolution, fps and Kbps information.
- May differ available profiles by camera
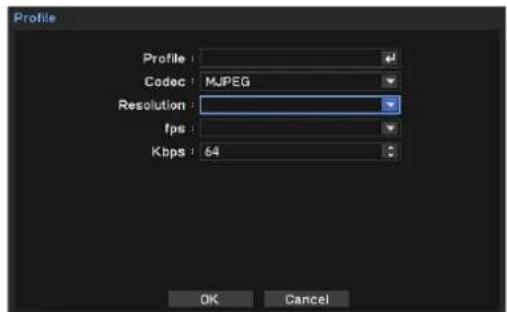
- Press 'OK' to save changes.
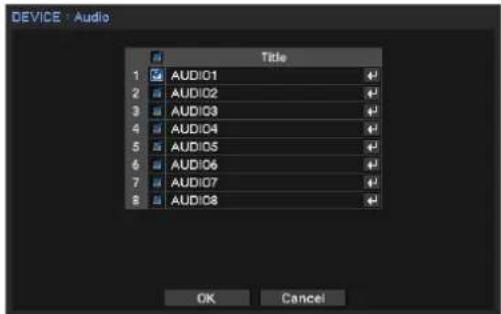
Audio
Audio Connect
NVR records sounds on each channels.
- Press Menu and move to 'DEVICE->Audio' page.
- Select audio channel and change title as desired name.
- Press 'OK' to save changes
Note: Audio input is only available with camera.
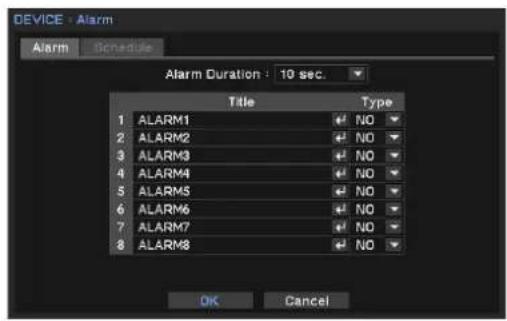
Alarm
Set alarm type and schedule.
Set Alarm type and duration
- Press Menu and move to 'Device-Alarm' page.
- Set duration of alarm activation.(5sec to 10min)
- Select alarm channel and change title as desired name.
- Choose type of alarm
-NO: Normal Open.
-NC : Normal Close
- Press 'OK' to save changes
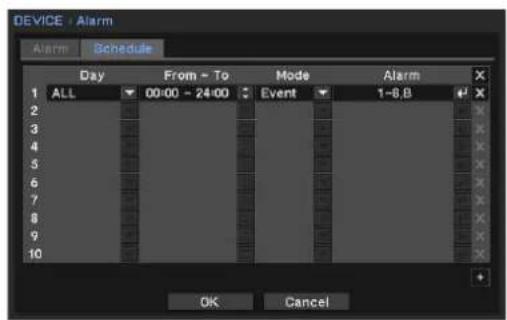
Set Alarm Schedule
- Move to Schedule tab.
- Select Day and time for alarm activation.
- Select mode. (Event, On, Off)
- Select alarm output number and buzzer options.
- Press 'OK' to save changes
* If schedule is overlapped, the latest one will have priority.
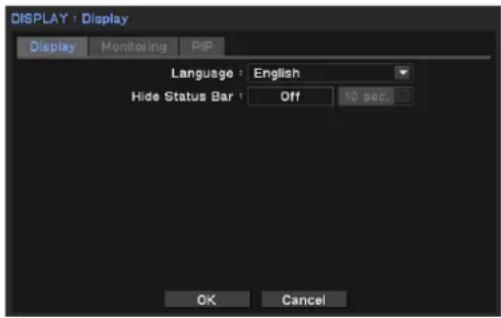
Display
Set monitor display and display language
- Press Menu and move to Display page.
- Set your language and other display options.
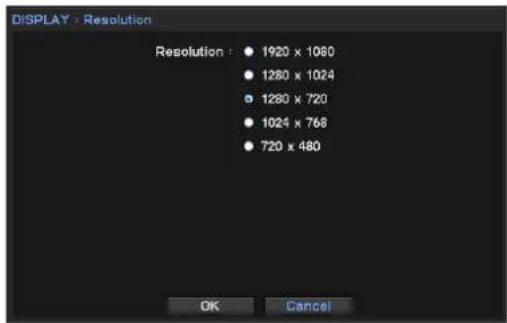
- To change display resolution, select 'Resolution' menu and select desired one.
- Press 'OK' to save changes
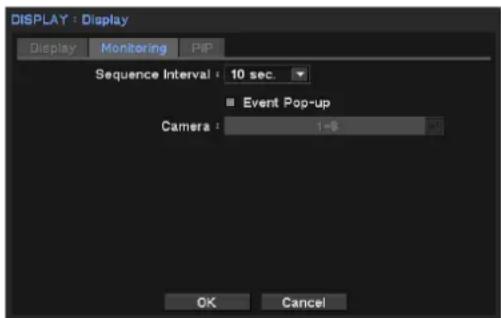
Channel popup by Event
Display (popup) event triggered channel for a configured time.
- Press Menu and move to 'Display-Monitoring' page.
- Set 'Sequence interval' time
- Check 'Event popup' option.
- Select camera number to be displayed when event occurred.
- Press 'OK' to save changes
PIP (Picture In Picture) Setup
- Press Menu and move to 'Display-PIP' page.
- Set 'Size' and 'Position'.
- Press 'OK' to save changes.
Note: PIP is only available on single live display.

Resolution setup
- Press Menu and move to 'Display-resolution' page.
- Set resolution
- Press 'Ok' to save changes.
Record Setup
Set storage and recording options.
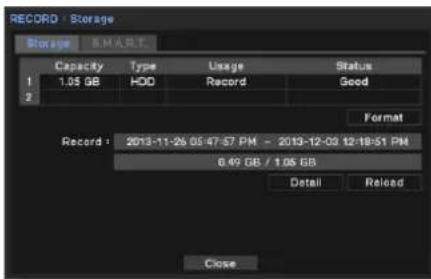
Set Storage
- Press Menu and move to 'Record->Storage'.
- System displays installed HDD(s) on list.
- To use HDD as storage, select one of HDD and press 'Format' button below.
- Press 'close' once format process is end.
Note: 'Record' shows data stored period and HDD usage.
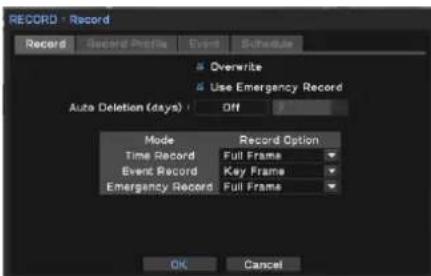
Recording Setup
- Press Menu and move to 'Record->Record'.
- Check 'Overwrite' option. *If not selected, system only records data until the current HDD is full.
• Time Record is continuous recording
• Event record is record only when event triggered.
• Emergency Record: Activated by Emergency Rec. signal from outside
- Press 'Ok' to save changes
Recording profile
Select profiles for recording. See details on 'Profile Setup' section before 'Audio'.
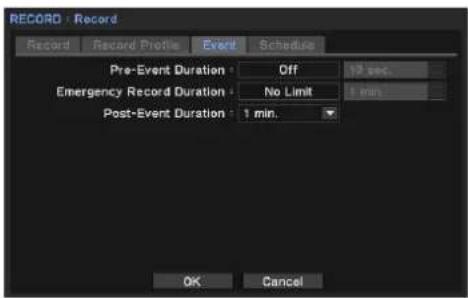
- Move to Event page
- Set 'Pre-Event' Duration 'On' and set time. System will record previous data from event triggered.
- Set time for Emergency Record. 'No Limit' setup record until off Emergency Rec.
- Event record duration is for general event recording duration.
- Press 'OK' to save changes.
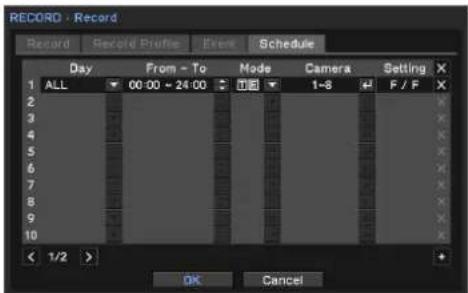
Set Recording schedule
- Press Menu and move to 'Record->Record' Schedule tab.
- Set day option on day field. *One selected day option on each line.
- Set time to record on 'From\~To' field.
- Select recording mode
- Select cameras to be applied.
- To delete schedule, press button on right.
Network
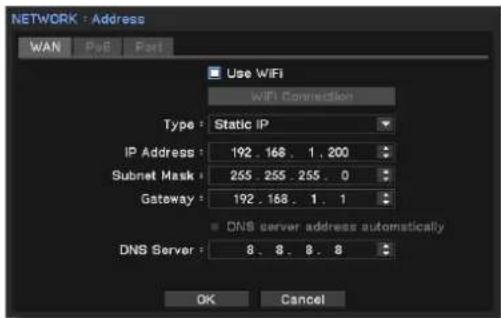
Set IP address
- Press Menu and move to 'Network->Address->WAN' page.
- Set one of IP address type.
*No IP address setup required in 'DHCP' option.
- In 'Static IP' option, you need to enter 'IP address, Subnet mask and Gateway'.
- Press 'OK' to save changes.
* To change communication port, move to 'PORT' page in this menu.
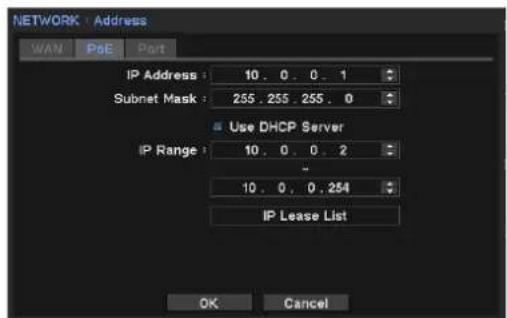
PoE Setup (Power Over Ethernet)
- Press Menu and move to 'Network->Address->PoE' page
- Set IP address and Subnet mask
- Check 'DHCP server' option. When use this system as DHCP server, must set IP ranges which will assigned to connected IP cameras.
* connected camera should be set on DHCP option.
- Press 'Ok' to save changes.
Set Port
- Press Menu and move to 'Network->Address->Port' page.
- Set port for 'Remote monitoring, Playback and setup. Default is '10101'. * Set Live port and other port sets automatically.
- Set port for Web viewer. Default is '80'.
- Set RTSP port. Default is '554'.
- Use UPnP: This feature enables auto port forwarding on router.

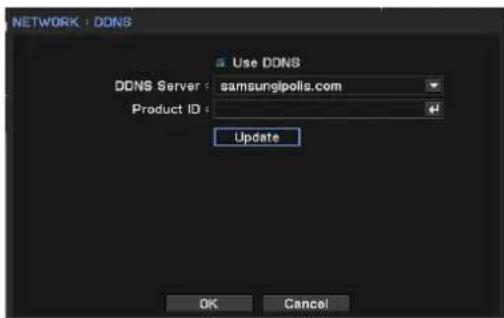
DDNS setup
For remote access, use DDNS service with DDNS server setup.
- Press Menu and move to 'Network-DDNS'.
- Check 'Use DDNS' option.
- Enter 'Product ID' and press 'Update' to check it access DDNS server normally.
- Press 'Ok' to save changes.
* To use DDNS, system should be connected to Internet.
* For more details about DDNS setup, see the manual of your router.
Use provided feature and send message to specified IP and E-mail.
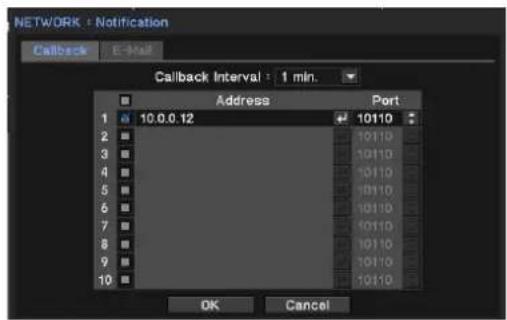
Callback Setup
- Press Menu and move to 'Network->Notification ->Callback' page.
- Set callback interval.
* The triggered event between intervals would not be delivered. It only delivers new event as callback message after interval.
- Enter IP address that would receive callback messages.
- Press 'Ok' to save changes.
- Callback utility is installed when you install Remote client software.
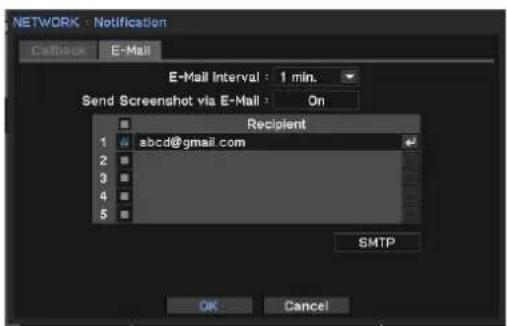
Email setup
- Press Menu and move to 'Network->Notification->Email' page.
- Set E-mail interval.
*not send event between interval time.
- Check image option to attach on email.
- Enter e-mail address of receiving side.
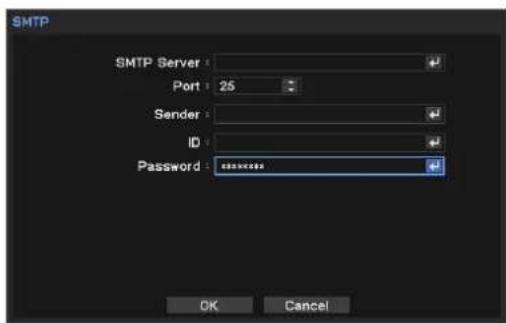
- Press SMTP button and enter information
- Press 'Ok' to save changes.
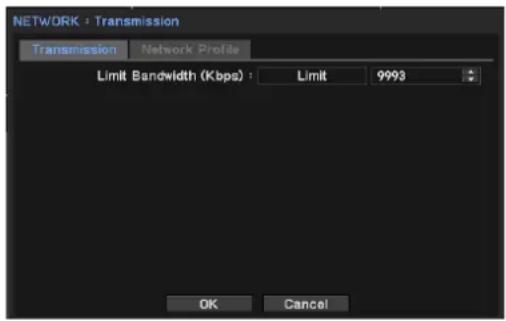
Network Transmission
Adjust network data streaming option and optimize it.
- Press Menu and move to 'Network->Transmission->Transmission page.
- Set network bandwidth according to you network speed.
- Press 'Ok' to save changes.
Network profile
Select profile for live monitoring. See details for profile section before Audio.
EVENT
Set event related options such as Sensor, Motion, Video Loss, System, G-sensor and IP camera.
About Event activation and activate Recording, Alarm and Notification
Each triggered event can be activated following actions.
- Record: start recording on selected multiple channels.
- Alarm: start alarming or buzzer on selected multiple channels.
- Notification: send message to remote pc with 'Callback' or 'E-mail.'
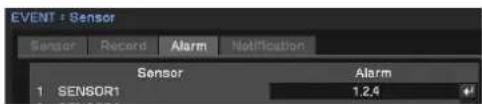
Once sensor 1 is triggered, record channel 1 & 2, alarming 1, 2, 4 and send Notification
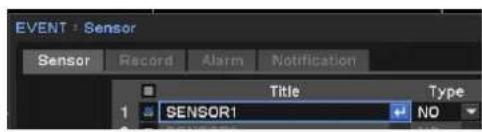
- Press Menu and move to 'Event->Sensor' page
- Tick 'Sensor1' and set type (NO or NC)
- Click 'Record' tab and click sensor1 'Record' field and select channel 1, 2.
- Click 'Alarm' tab and click sensor1 'Alarm' field and select channel 1, 2, 4.
- Click 'Notification' tab and click sensor1 'Notification' tab and select 'Callback' IPs and 'E-mail' on list.


* To register Callback IP and E-mail address go to 'Network->Notification' page.
Motion Event, Video Loss event setup is same as Sensor event setup.
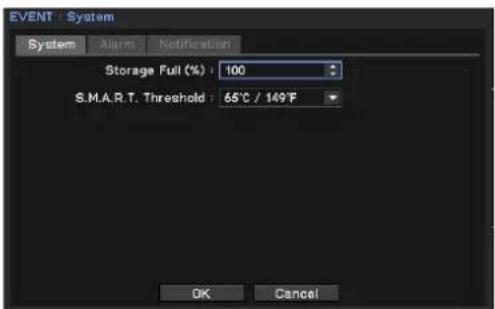
System Notification
Notify system status through alarm and Callback.
- Set level of Storage full. System start notification when storage reaches this level.
- Set temperature level you desired to get notification on S.M.A.R.T. Threshold.
- Set alarm and Notification.(see examples above)
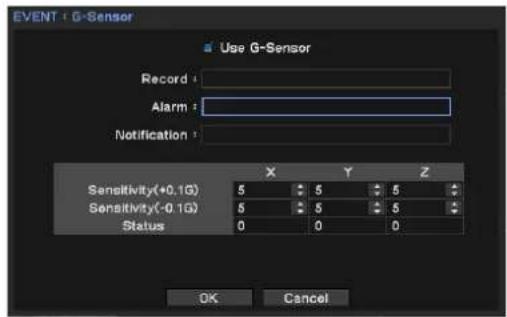
G-Sensor Notification
Detect movements such as sudden acceleration, stop and suspected as accident.
- Press Menu and move to 'Event->G-Sensor' page.
- Check 'Use G-sensor'.
- Press 'Record' field and select channels to be recorded when event triggered.
- Press 'Alarm' field and select channels for alarm activation.
- In 'Notification' field, select Client IP address and e-mail that will receive event notification.
- Set sensitivity of each x, y, and z axis.
* If G-sensor included IO box DIP switch configuration is wrong, it would generate unnecessary alarms. Please check DIP switch configuration when installation.
Playback (Search)
Time search (Go to Time)
- Click right mouse button on live mode and select 'Playback'
- Select storage that has recorded data.
- System enters 'Playback(Search)' mode
- Click right mouse button again and select 'Go to'.
- Select 'Go to time' of options.
- Set date and time and press 'OK' to playback.
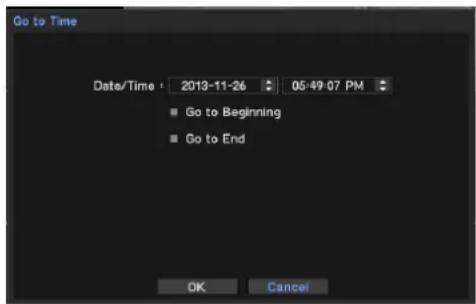
About Search options
- Go to time: set time and move to specific time.
- Go to Beginning: move to the first recorded data.
- Go to End: move to the end of data.
- Go to **sec: move to previous recorded data. (** data before)
* When playback recorded data, it displays single channel image which is close to search condition.
Calendar Search
1\~3. Same as 'Time Search'.
-
Click right mouse button again and select 'Calendar'
-
Select date and time and press 'Go To'.
-
Displays selected data on screen. Use playback control button below.
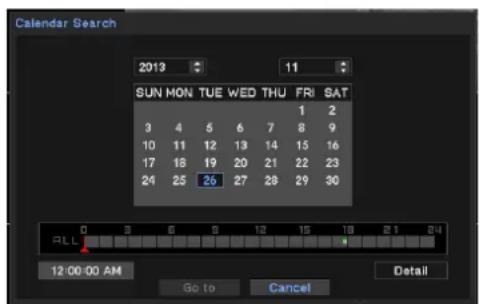
- To exit playback mode, click right mouse button and select 'Exit Playback'.
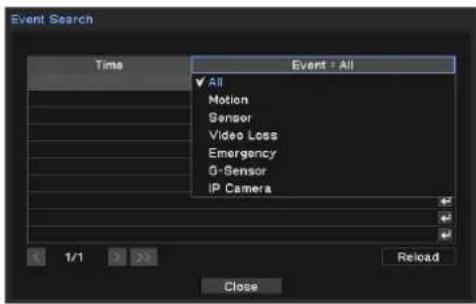
Event Search
Provides easy search by recorded event list
1\~3. Same as 'Time Search'.
- Click right mouse button again and select 'Event Search'
- Select the date and type of event to find specific data.
* Events are searched by 1,000ea and press >> button to see next 1,000 events.
*You can search event on 'Log' menu event page.
*System writes event log when it is set as Event recording
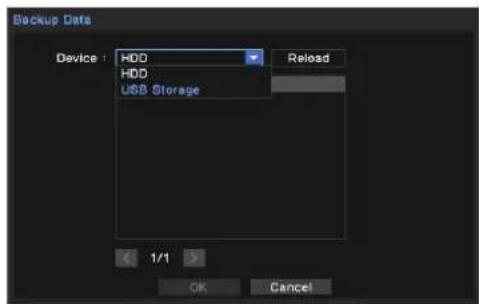
Backup data playback
- Click right mouse button on live mode.
- Select 'Backup data'
- Select Device and files
- System displays playback screen. Use playback control button below.
* Backup playback is only available if there's backup file.
Playback control
R.Play: Reverse Playback (1x->2x->..64x -> 1x)
Step Backward: Go to the previous image
Pause: Freeze or Stop current image
Step Forward: Go to the next image
Play: Play the data at normal speed (1x->2x->..64x -> 1x)

BACKUP
Backup Recorded Data
- Click right mouse button on live mode
- Select Backup and choose type.(backup or AVI maker)
- Insert USB memory on system USB slot.
- Select Device for backup data(generally USB memory is used)
-
Set backup data period and camera.
-
Select 'EXE' option and 'Password Option.
-
Press 'Start' button.
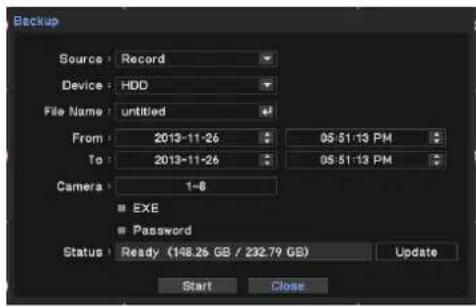
* 'Backup' data saved as 'strg, exe' format and requires exclusive player for multi channel playback.
* For Single channel backup, use AVI backup.
* Do not remove backup media while data backup is being processed
Web client access
Access System with using web browser.
-
Run web browser and enter IP address of NVR or DDNS address.
-
Enter ID and Password in log in page.
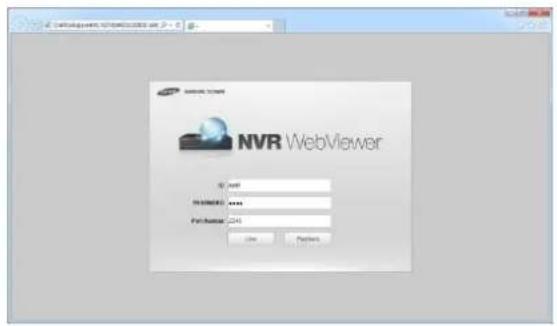
- Press buttons (Live, playback) and move to new windows.
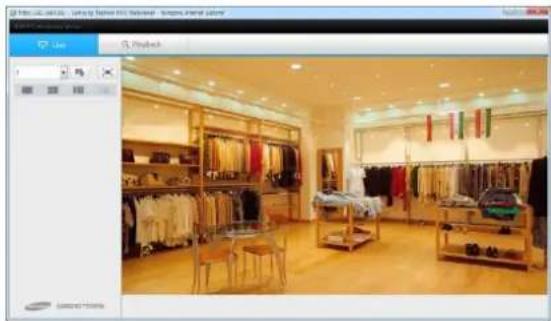
natural_image
Interior view of a fashion retail store with wooden shelves, dresses, and clothing racks (no visible text or signage)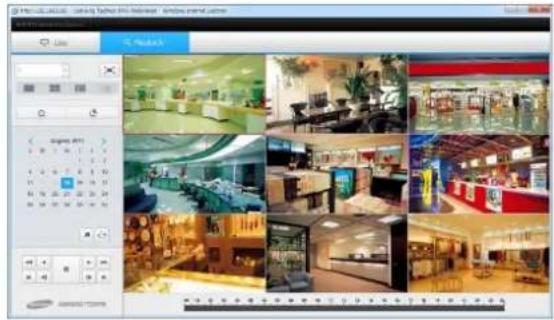
- Use following buttons to do data search
| Button | Description | Button | Description |
 | Select camera | Event search | |
 | Remote setup | FW/Rev Playback | |
 | Entire screen | 2~64x playback | |
 | Change layout | Move 1 frame | |
| [BYG2] | Select calendar | Move to first/last | |
 | Pause | ||
- Detail usage is same as remote client software. See 'Smart viewer' part on next page. If no 'Active X' installed, run explorer with 'Run as Administrator' option.
- To upload file on IE(internet Explorer), set options on 'Tools->Internet option->Security->Customer level'. *supported on IE7.0 or higher.

Smartviewer AUTO v1.0
Monitoring live view, search and other features on remote place through network.
Start Remote software(S.W should be installed on your PC)
- Double click remote s.w and run it.
- It displays main screen.
Minimum resolution: 1024x620.
Recommended resolution: 1280x1024
- To log in, select user and enter password.
* No initial password is set. Change password for your security.
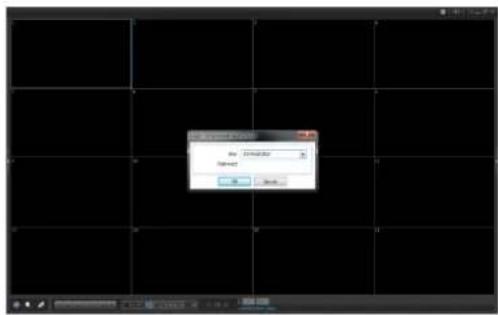
Connect NVR from remote software
1. Press Connect icon

isplay connection list.

-
Press 'Add' and NVR information that desired to connect.
-
Name : Enter NVR name
- Address : Enter NVR's IP address
- Port: Default is 10101. If changed, enter changed port.
• Description (Optional): enter comment. - User : select NVR user account
-
Password: enter password for NVR user.
-
Click 'OK' to save information and complete the registration.
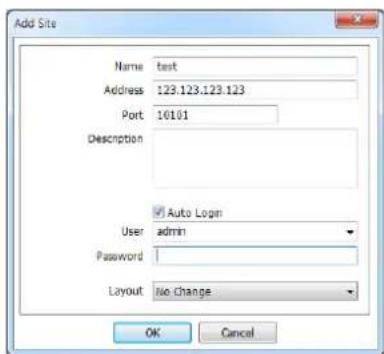
- Press double click NVR list on connection list and 'Connection' button.
Note: Auto Detection requires specific service. To use this service, install 'Apple® Bonjour®' service on remote PC
Note : Set NVR name when you use multiple systems.
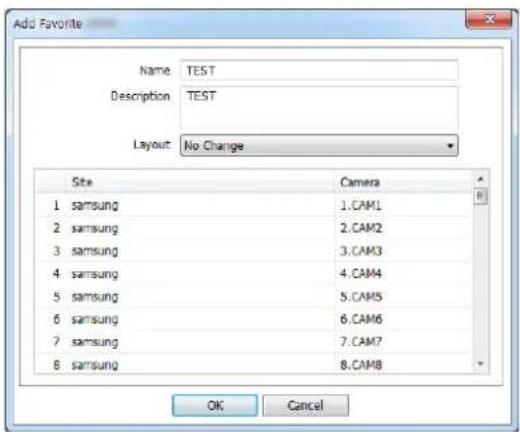
Manage multiple site. Up to 64 different cameras and sites can be monitored.
- Start Remote software
- Press button and select 'Favorite' tab.
- Press 'Add' button.
- Enter group name and description.
- Select 'Layout' and choose layout.
- Click 'site' field and select one of site and camera.
*Only Registered site can be displayed.
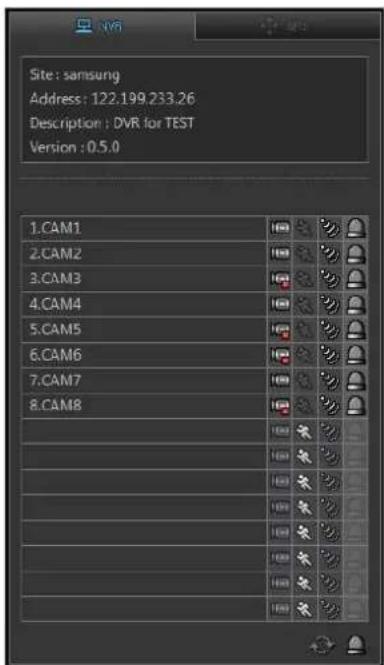
NVR status
Click buttons on right side to display to display NVR status. It shows NVR status as follows.


Reload: Refresh the latest NVR status info.

Reset Alarms: Turn off activated Alarms on the NVR.
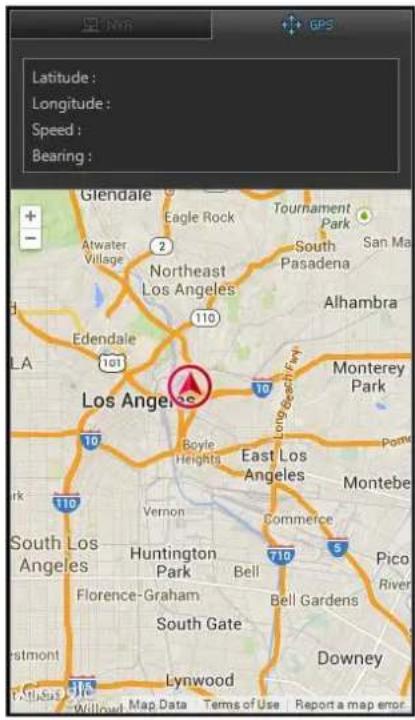
GPS
Displays NVR tracking under playback mode. GPS data is recorded with images using built in GPS on Mobile NVR. This data will be displayed on Google Map under playback mode.
You can check latitude, longitude, speed, direction angle etc.
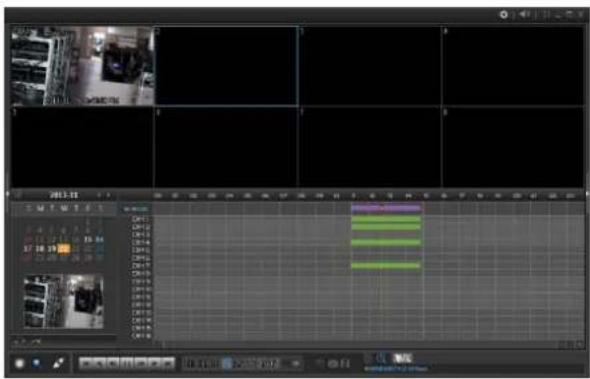
Remote Playback (Search)
- Press search button and connect NVR with connect button.
- Select date on calendar and time on screen.
- Playback image with control buttons.
| Button | Description |
| Move to the first | |
| Reverse playback (1~64x) | |
| 1 frame move to backward | |
| Pause | |
| 1 frame move to forward | |
| Forward playback (1~64x) | |
| Move to the end |

* In search mode, it displays a channel image of the closest time.
* Audio playback is only available on single channel playback.
Go to Time
- Click icon and enter time.
- Click icon to refresh and update calendar information.
- Playback image with control buttons.

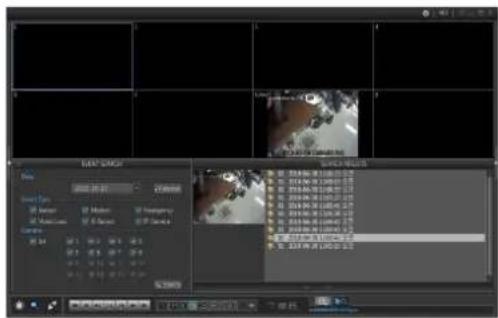
Event Search
- Press event search icon in playback mode.
- Select the date, event type and camera.
- Then select one of event desired to playback.
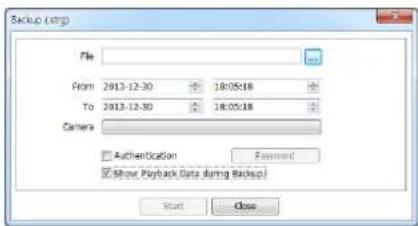
Saves recorded data
- Move to Playback mode.
- Click ☐ on and select 'Backup(.strg) or (.exe)'..
- Specify file name, duration and camera.
* '.strg' requires remote s.w to playback.
- Run remote software.
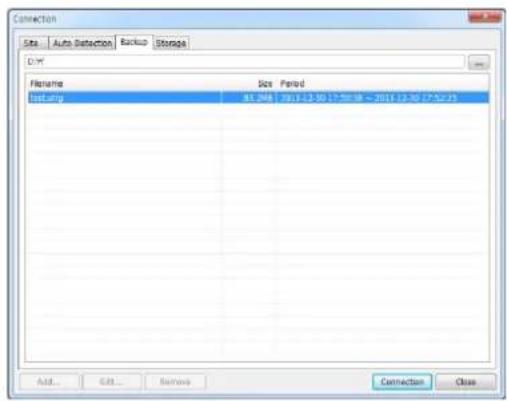
- Press 'connect' button.
- Click 'Backup' tab and select backup file.
- Click 'Connect' button to playback.
Playback HDD data on PC
- Connect HDD with USB cables.
- Remote s.w should be installed on PC.
- Run Remote s.w on PC (*run as administrator)
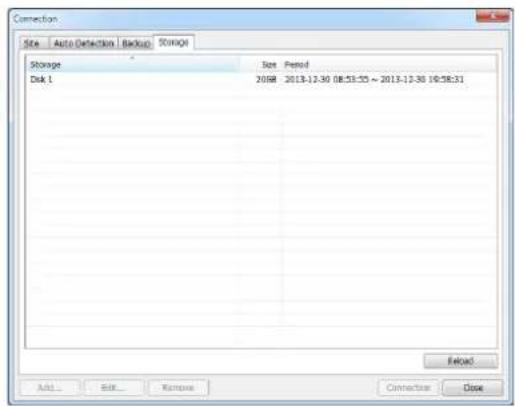
- Click Button and move to 'Storage' tab to display HDD data.
* Click 'Reload' button to refresh data.
- Double click one of list and click 'Connection' button
* Run Smartviewer AUTO v1.0 as 'Run as administrator' to display recorded data list on 'Storage tab'.(In Higher version than Widows Vista)
* To supply enough power, use cables as below picture. Double USB port required to supply enough power to HDD.

natural_image
Black rectangular electronic device with two USB connectors and a coiled cable (no visible text or symbols)Smartviewer AUTO v1.0 Setup
Remote Software setup
Click and 'Setup' to enter Remote software setup menu.
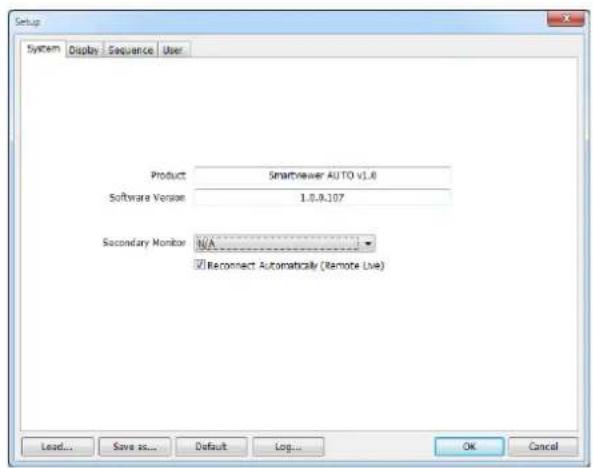
System
• Product: Displays general information of the S/W
- Software Version: Displays current S/W version
• Secondary Monitor: Select the secondary monitor when using multi monitors on PC
- Event Pop-up Duration: Set the time duration for a camera display when it is displayed in full screen mode in case of event.
- Reconnect Automatically: Set auto reconnection on Live if the connections is ended by any chances.
- Load: Load saved data for settings for remote software
- Save as: Save current settings of remote software
- Default: Set default settings of remote software
- Log..: Displays logs
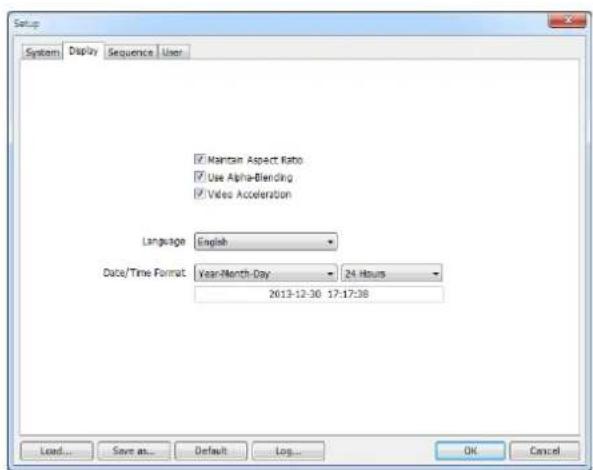
Display
- Maintain Aspect Ratio (4:3): Keep 4:3 ratio on display screen
- Use Alpha-Blending: Enables alpha-blending effect to S/W UI
• Video Acceleration: Enhances natural live image display.
*Do not select this option if live display is wrong. Some PC graphic card does not support nor compatible this option
• Language: Select language option for the remote software. This follows OS language. - Date/Time Format: Select Date/Time Format for the remote software
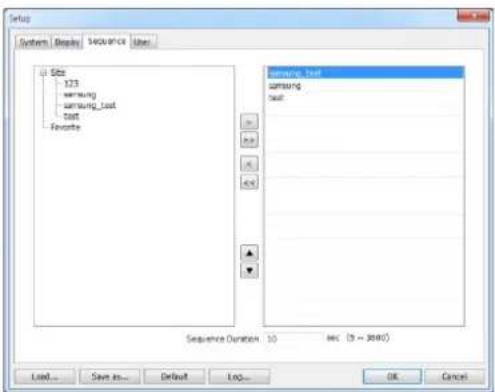
Sequence
Set sequence mode and sites from registered sites
- Move to 'Sequence' tab on Setup.
- Select the site on the list left side.
- Click > button and add to sequence list.
- To move all sites, click >> button.
- Set sequence duration.(interval time)
* Only selected sites can be sequenced on live monitoring
User setup
- Move to 'User' tab on setup.
- Press 'Add' button to add user.
- Enter user name and set password.
- Check necessary permissions on list.
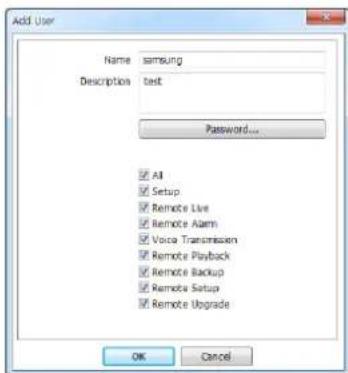
- Press 'OK'
- Select newly added user and his authority is correct..
![Setup System | Display | Sequence | User User Administrator [Authority] + Setup + Remote Line + Remote Alarm + Voice Transmission + Remote Playback + Remote Backup + Remote Setup + Remote Upgrade Add... Edit... Remove Load... Save in... Default... Log... OK Cancel](/content/2026/06/1190908/images/07406caf1e0b2cef362d15b69ac20cbdbbdc598a7e4d65378f349cb63a840001.jpg)
-
Connect NVR first. * if not connected, press connect button and connect device first.
-
Click 🎨 button on top of right and select 'Remote Setup'.
-
Display connected device's setup screen as same as local device. *Setup menu and usage is same as local device.
-
To exit setup, press 'menu->exit'.
Remote upgrade
- Prepare upgrade file from your provider.
- Go to 'Remote Setup' and move to 'System->Information' page.
- Press 'Upgrade' button and select upgrade file.
- Proceed upgrade.
* Do not close or power off system until the upgrade process is over.
Call Back
'Callback' installed together with remote software. Callback receives event list from NVRs through network.
- Go to 'Start->Program->Nemon2' and run 'Nemon Callback2'.
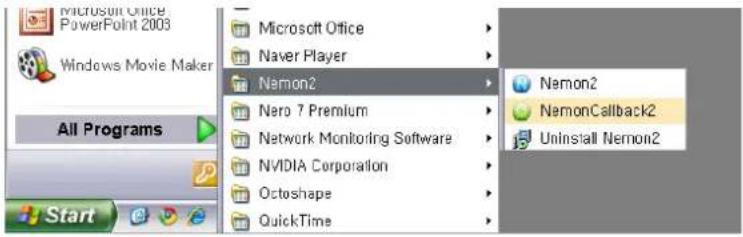
- Callback Icon displayed on windows task bar.

- Click Callback icon to display Callback window.
| Address | NVR Name | Date/Time | Event Type | Title |
| 192 168.0.2 | 2013-12-30 05:12:22 | Motion | CAM L | |
| 192 168.0.2 | 2013-12-30 05:12:15 | Sensor | SENSOR5 | |
| 192 168.0.2 | 2013-12-30 05:12:15 | Sensor | SENSOR3 | |
| 192 168.0.2 | 2013-12-30 05:12:15 | Sensor | SENSOR1 | |
| 192 168.0.2 | 2013-12-30 05:12:03 | G-Sensor |
- To connect NVR, select a log and click live or playback icon below.
• Clear : clear all logs on callback window
- Log: Open log search window. (up to 100,000 logs can be saved. 1,000 logs display per search. To see more, click 'More' button. To export, press export and save logs (txt or csv format)
- Setup: Set port for call back.

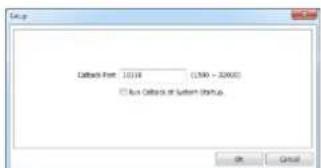
* UDP port needs to be set (open) to transmit Callback if Firewall is being used
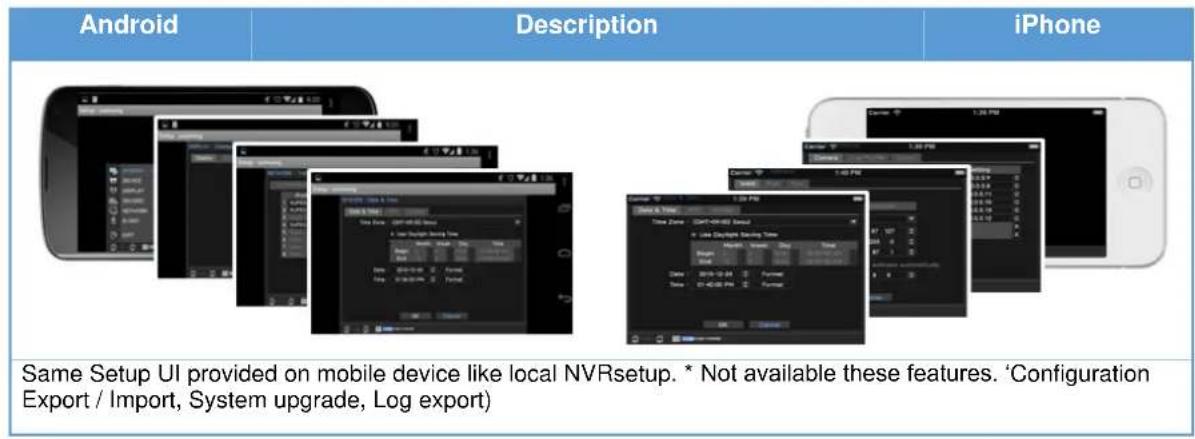
MobileViewer iPolisAuto
User can do live view, Search playback and setup configuration on mobile device. (Android / iOS)
How to use
- Search with the key word 'iPolisAuto' in 'App Store' or 'Play Store'.
| Android | Description | iPhone | ||
 | Press android's menu button to see the detail menu. User can add, Edit and delete NVR Site . | In iOS, use  ns to add , edit and delete site list. Displayed lists are the registered NVR site and 'Auto' button will display the NVRs which are searched on network. Select connection mode on below.'Live / Playback / Setup ns to add , edit and delete site list. Displayed lists are the registered NVR site and 'Auto' button will display the NVRs which are searched on network. Select connection mode on below.'Live / Playback / Setup |  | |
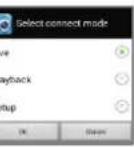 | Select site and connection mode. | |||
- Live mode
| Android | Description | iPhone | |
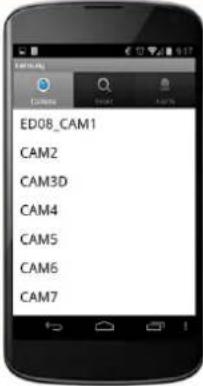 |  |  | 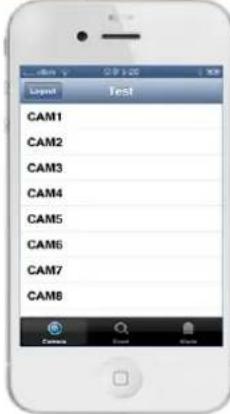 |
| Camera displays current camera list and select desired channel to see live view. | |||
| Event Display NVR's live events | |||
| Alarm Display alarm control list. | |||
 | 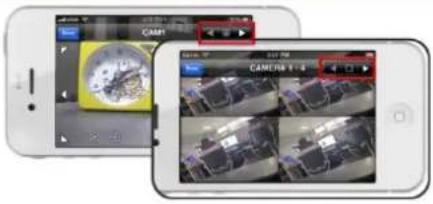 | ||
| Default live display is single division and 4divisions can be displayed in one live pane. | |||
- Search
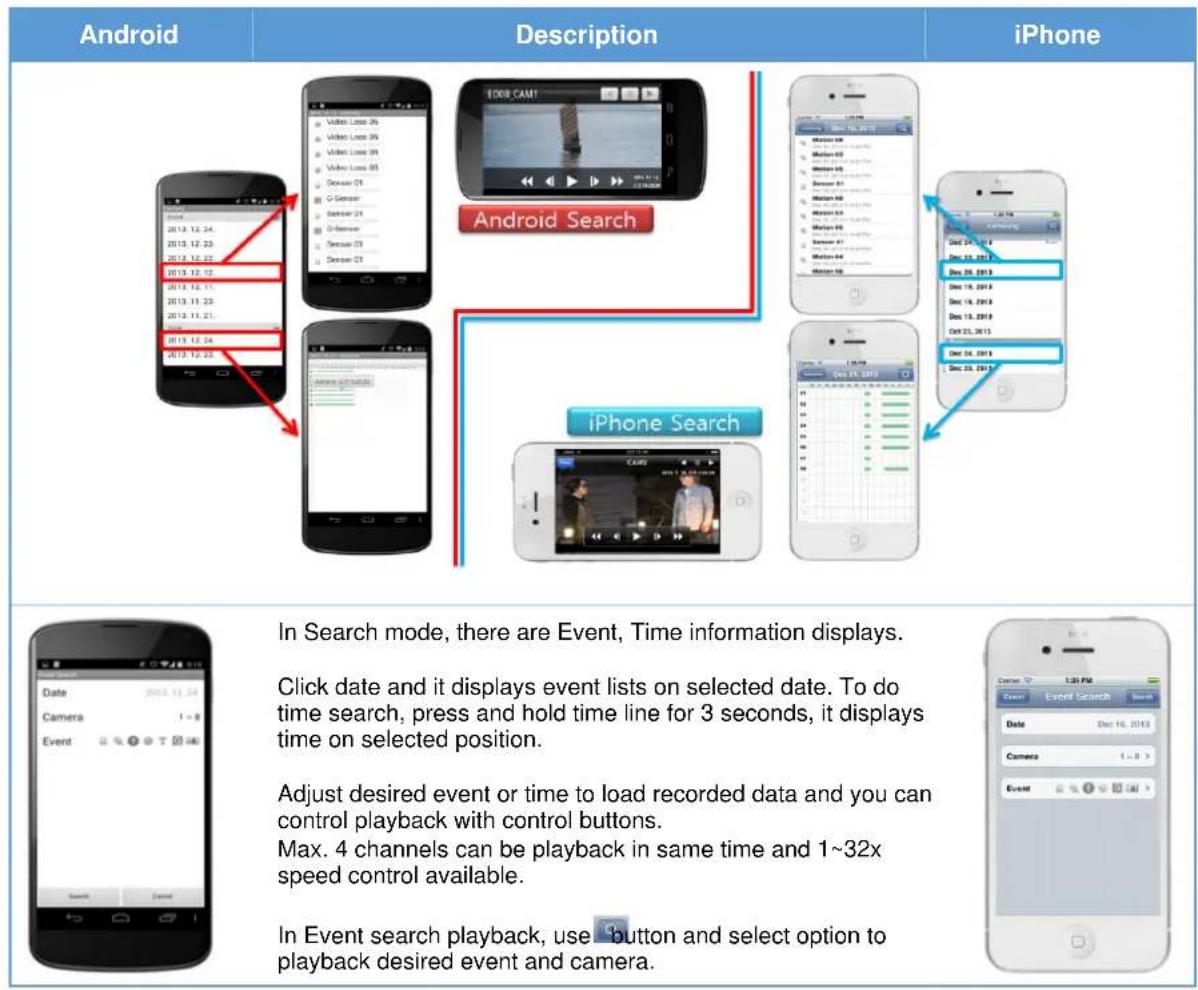
- Setup configuration
Appendix
System Specification
| Video | SRM-872 | |
| N/W Camera | Inputs | Up to 8CH |
| Resolution | CIF, VGA, 4CIF, 1.3M, 2M, 3M | |
| Protocols | ONVIF | |
| Installation | Camera Setup | Resolution, Frame rate, bit rate setup. |
| Viewer | Built-in Webviewer | |
| Multi Screen Monitor display | 1/4/9 | |
| Performance | ||
| OS | Embedded Linux | |
| Recording | Compression | H.264, MJPEG |
| Rec. bit rate | 64Mbps | |
| Record Rate | Up to 240fps @1280 x 720 (1.3M) | |
| Record Mode | Emergency, Schedule (Time/Event) | |
| Overwrite modes | Continuous, Auto Deletion w/ Retention duration | |
| Pre-alarm | Up to 30 sec. | |
| Post-Alarm | Up to 6 hour. | |
| Event | Source | Sensor, MD, V-Loss, G-Sensor, IP camera event |
| Network | Ethernet | Gigabit Ethernet x 1, FE x8 w/PSE |
| Transmission speed | Up to 1Gbps. | |
| Max. Remote users | Live (10)/ Search(3)/ Setup (1) | |
| Protocol support | TCP/IP, DHCP, SMTP, NTP, HTTP, DDNS, RTP, RTSP | |
| Monitoring | CMS, Webviewer, Smart-phone Viewer. | |
| Connection Mode | Static/DHCP | |
| Storage | Internal HDD | 1 HDD(2.5") or 1 SSD |
| Removable | Micro SD(Industrial, Max 32GB) | |
| Backup | USB | 2 USB Ports (use 2 ports below) |
| File Format | STRG(NVR Player), EXE(Include Player), AVI | |
| Search | Backup Viewer | Search Playback on Google Map |
| Function | 8ch Search/Playback, GPS information, G-Sensor | |
| Interface | ||
| Video | Inputs | 8 RJ-45 (PoE Support) |
| Output | 1 HDMI, 1 VGA, Up to 1080p | |
| Audio | Inputs | Network Camera audio input, up to 8CH |
| Compression | G.711, G.726 | |
| Ext. Audio Output | 1 Phone Jack (main unit), 1 RCA Connector(Control BOX) | |
| Alarm | Inputs | Terminal 8 inputs, NO/NC |
| Outputs | Terminal 8 outputs, NO/NC | |
| Others | Ethernet | 1 RJ45 (10/100/1000 Base-T Ethernet) |
| USB | 3 USB(2.0 High Speed) | |
| GPS | 1 SMA | |
| Functions | ||
| Power Management | Shutdown Delay | 1 Min. ~ 30 Min. (User selectable) |
| General | ||
| Electrical | Input Voltage | 12V ~ 24V DC |
| Power consumption | Max. 30 W | |
| Camera Power Output | Max. 8 W per channel, Total 64W(PoE, IEEE 802.3af ) | |
| Environmental | Operating Temp./Humidity | -25°C to +50°C (-13°F to +122°F) / 20% to 85% RH |
| Mechanical | Dimension (W x H x D) | • SYSTEM : 225.5(W)x 59(H) x 312.2(D) mm• I/O Box : 155(W) X 44(H) X 70(D) mm• Control Box : 121(W) X 32(H) X 75(D) mm |
| Weight (With Out HDD) | • SYSTEM : 2.17 Kg• I/O Box : 0.35Kg• Control Box : 0.18Kg | |
| Approvals | EMC/Safety | CE, FCC, cUL, e-Mark, KCC, EN50155 |
| Shock, Vibration | MIL STD-810F method 514.5, EN61373 | |
Default Configurations
| Classification | Details | Value | ||
| System | Information | System | NVR Name | None |
| Remote controller ID | 0 | |||
| Vehicle | Company | None | ||
| Manufacture | None | |||
| Model | None | |||
| Registration No. | None | |||
| License No. | None | |||
| Driver | None | |||
| System shut down Delay | 5 | |||
| Date & Time | Date & Time | Time zone | GMT | |
| Daylight saving | OFF | |||
| Date | YY-MM-DD | |||
| Time | 12hours | |||
| NTP | Use NTP | OFF | ||
| NTP Server | None | |||
| (NTP) Interval | 1day | |||
| Holiday | None | |||
| user | user | Auto Login | OFF | |
| Auto Logout | OFF | |||
| User | admin, guest | |||
| Group | Group | Administrator, Guest | ||
| Device | Camera | Camera | Title | CAM1~CAM8 |
| Protocol | ONVIF | |||
| ID | admin | |||
| Password | 4321 | |||
| Covert | Day | All | ||
| From ~ to | 00:00~24:00 | |||
| Mode | OFF | |||
| Camera | 1~8 | |||
| Audio | Select Audio | None | ||
| Name | AUDIO1~AUDIO8 | |||
| Alarm | Alarm | Alarm Duration | 10 sec. | |
| Title | ALARM1~ALARM8 | |||
| Type | NO | |||
| Schedule | Day | All | ||
| From ~ to | 00:00~24:00 | |||
| Mode | Event | |||
| Alarm | 1~8, Buzzer | |||
| Display | Displays | Display | Language | English |
| Hide Status Bar | Off | |||
| Monitoring | Sequence Interval | 10 sec. | ||
| Event popup | OFF | |||
| PIP | Size | Small | ||
| Position | Right bottom | |||
| Resolution | Resolution | 1280x720 | ||
| Record | Record | Record | Overwrite | ON |
| User Emergency Rec. | ON | |||
| Auto deletion | OFF | |||
| Time Record | Full frame | |||
| Event Record | Full frame | |||
| Emergency Record | Full frame | |||
| Event | Pre event duration | OFF | ||
| Emergency Record Duration | No Limite | |||
| Post Event Duration | 1 min. | |||
| Schedule | Day | All | ||
| From ~ to | 00:00~24:00 | |||
| mode | Time & event | |||
| Camera | 1~8 | |||
| Setting | Full frame | |||
| Network | Address | WAN | Type | Static IP |
| IP Address | 192.168.1.200 | |||
| Subnet mask | 255.255.255.0 | |||
| Gateway | 192.168.1.1 | |||
| DDNS server address automatically | OFF | |||
| DNS server | 8.8.8.8 | |||
| PoE | IP Address | 10.0.0.1 | ||
| Subnet Mask | 255.255.255.0 | |||
| Use DHCP Server | ON | |||
| IP Range Start | 10.0.0.2 | |||
| IP Range End | 10.0.0.254 | |||
| Port | Network port | 10101 | ||
| Web port | 80 | |||
| RTSP port | 554 | |||
| Use UPnP | OFF | |||
| DDNS | Use DDNS | OFF | ||
| DDNS server | smsungipolis.com | |||
| Product ID | None | |||
| Notification | Call back | Call Back Interval | 1 min | |
| Email interval | 1 min | |||
| Add capture image on email | OFF | |||
| Transmission | Transmission | Limit bandwidth(Kbps) | OFF | |
| Event | Sensor | Sensor | Select Sensor | None |
| Motion | Motion | Select Camera | None | |
| Video loss | Record | Select record | None | |
| System | System | Storage full | 100 % | |
| S.M.A.R.T. Threshold | 65°C / 149°F | |||
| Alarm | Storage bad | Buzzer, Alarm | ||
| Storage full | Buzzer, Alarm | |||
| S.M.A.R.T. | Buzzer, Alarm | |||
| No Record storage | Buzzer, Alarm | |||
| Emergency recording | None | |||
| G-Sensor | Use G-Sensor | OFF | ||
| IP Camera | Select IP Camera | None | ||
1. Cautions on Installation
Inside IO Box G-Sensor included. Mind following installation guide when install.
- No matter where you install, maintain level with your vehicle.
- Install parallelize with vehicle moving direction and X, Y, Z axis on product case.
- Check moving direction and axis and set DIP switch on front properly.
Ex) If installed following picture
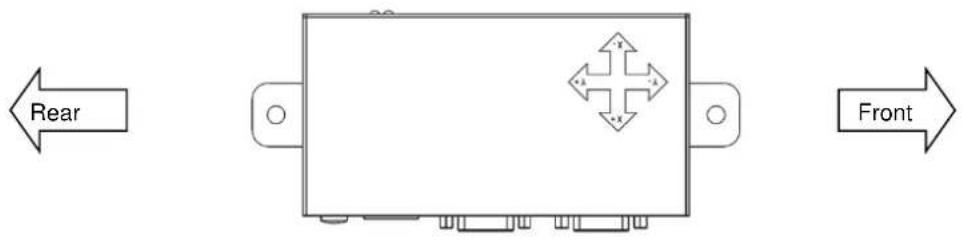
Set DIP switch as 'Y-' as following picture.

2. Cautions.
Maintaining Level and Dip switch setup should be done before power input to device because IO box calibrates G-sensor when system initialized. If not maintained level nor wrong dip switch setup, system may fail to G-Sensor calibration. If failed to calibrate, G-Sensor output value would not be adjusted again and it send sensor output data from IO box to main unit.
1. Power connector
- VCC/ACC input range is 12Vdc \~ 24Vdc.
- VCC power pin should be connected to battery on vehicle and connect ACC power pin to accessory power on vehicle.
- ACC. Power means the power on when turn key at 'ACC' mode..
DC12-24V
2. IP camera input connection pin map
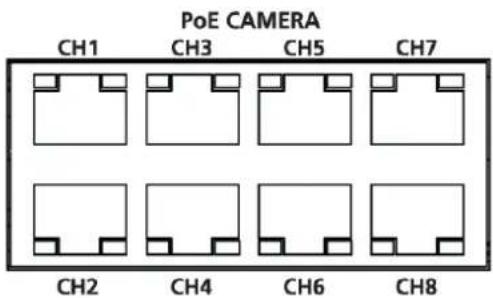
| No. | PoE Power out / Data in |
| 1 | TX+, DC+ |
| 2 | TX-, DC+ |
| 3 | RX+, DC- |
| 4 | Not use |
| 5 | Not use |
| 6 | RX- DC- |
| 7 | Not use |
| 8 | Not use |
- When connect IP camera, it's recommended to use 'FTP' or higher level of cable to minimize noises from outside.
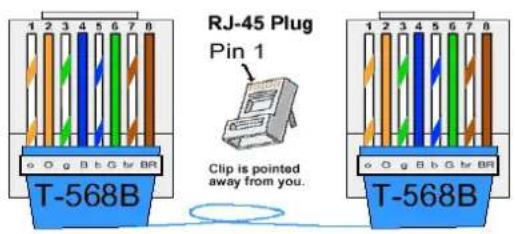
3. UTP Cable Pin Map (IO Box 1/2, Ctrl Box)
- RJ-45 Connector Pin map
| No. | IO Box1 | IO Box2 | Ctrl Box |
| 1 | Not use | Not use | Not use |
| 2 | Not use | Not use | GND |
| 3 | IO Box TXD | Not use | Analog Audio |
| 4 | VCC 12V | Not use | VCC 12V |
| 5 | VCC 12V | Not use | Ctrl Box TXD |
| 6 | IO Box RXD | Not use | GND |
| 7 | GND | Not use | Ctrl Box RXD |
| 8 | Detect Pin | Not use | Detect Pin |
- UTP Cable
Use Straight type UTP Cable.
4. Installation (IO Box, Control Box)

5. IO Box D-SUB15 Pin Map
| No. | Alarm / Sensor | No | Alarm/Sensor |
| 1 | Signal 1 | 9 | Signal 5 |
| 2 | GND | 10 | GND |
| 3 | Signal 2 | 11 | Signal 6 |
| 4 | GND | 12 | GND |
| 5 | Signal 3 | 13 | Signal 7 |
| 6 | GND | 14 | GND |
| 7 | Signal 4 | 15 | Signal 8 |
| 8 | GND | ||
- Sensor input connection
Connect one of sensor signal line to 'Signal' port and the other to 'GND port.
• Alarm output connection
It may cause malfunction of system when use alarm devices with excessive voltage or electric current with 'Open Collector' type. Contact installer before use this type.
FAQ
| Problem | Action |
| The system does not turn on and the LED indicator on the front panel does not work at all. | Check if the power supply system is properly connected.Check the system for the input voltage from the power source. |
| Video input is connected, but some channels do not display corresponding videos | Check the video output connecting the camera's webviewer.Check if the network port is properly connected and the network setting is set correctlyGo to 'Menu>Device>Camera>Setup' and enter ID/PW for camera again. |
| Only display logo continuously. | Mainboard or software may defected. Call your service provider. |
| No screen displays on monitor even it is connected. | Press 'zoom' button on remote controller for 5 seconds. It adjusts display resolution automatically. |
| Can't release triggered alarm | Change the 'hour' option on 'menu>device>alarm>Schedule' as 'off' or 'Event' mode. |
| Can't access from PC to system | Check network cable is connected.Check IP address configuration on PC.Do network Ping Test.Check if there's another device which uses same IP address on network. |
| System displays 'NO HDD' icon and error message popup. | Check HDD connection status. If there's no problem in connection status, call your service provider and ask them to check HDD.. |
| System doesn't' do recording. | Check live image first. If there's no image on live, it won't record.Check recording configuration is correct. If not configured correctly, it won't record. |
| Recorded image quality is not good. | Change 'resolution' and 'bit rate' option on 'Menu>record>Record profile'. |
| Recording frame rate is different to configured frame on Camera | If a camera connect and use multi profiles, it would services less frames than configured frame rate.. Set camera as same profile with single stream as much as you can. In other words, make them same as 'Record , live and network profile'. |
| Can't receive GPS signal. | Check GPS antenna connection status.Place GPS Antenna evenly out of vehicle toward sky. If antenna installation is wrong, it receives unstable data with magnetic bottom pad |
| G-Sensor event triggered on Stop status. | Remove the cable on IO Box and set dip switch properly according to the vehicle's moving direction and connect cable again. |
| Beep sound when power on system. | Beep sound would be generated by event configuration setup. See event setup.When don't use 'Micro SD', it would make beep sound until the HDD is 'ready to use' status. In case using Micro SD, data will be stored on it until system temperature reaches to HDD writable point and it switched to HDD when it reached to that temperature. |
| System still 'on' status after ignition off. | Check 'Shutdown Delay' option on 'Menu->System Information'. System hold power on status during configured time. |
OPEN SOURCE LICENSE REPORT ON THE PRODUCT
The software included in this product contains copyrighted software that is licensed under the GPL/LGPL. You may obtain the complete Corresponding Source code from us for a period of three years after our last shipment of this product by sending email to help.cctv@samsung.com
- GPL Software : linux kernel, u-boot, busybox, parted, ntfs-3g
• LGPL Software : glibc, ffmpeg - OpenSSL License : OpenSSL
- Apache License : mDNSResponder
GNU GENERAL PUBLIC LICENSE
Version 2, June 1991
Copyright (C) 1989, 1991 Free Software Foundation, Inc. 51 Franklin St, Fifth Floor, Boston, MA 02110-1301 USA Everyone is permitted to copy and distribute verbatim copies of this license document, but changing it is not allowed.
Preamble
The licenses for most software are designed to take away your freedom to share and change it. By contrast, the GNU General PublicLicense is intended to guarantee your freedom to share and change freesoftware--to make sure the software is free for all its users. ThisGeneral Public License applies to most of the Free SoftwareFoundation's software and to any other program whose authors commit to using it. (Some other Free Software Foundation software is covered bythe GNU Library General Public License instead.) You can apply it toyour programs, too. When we speak of free software, we are referring to freedom, notprice. Our General Public Licenses are designed to make sure that youhave the freedom to distribute copies of free software (and charge forthis service if you wish), that you receive source code or can get itif you want it, that you can change the software or use pieces of itin new free programs; and that you know you can do these things.
To protect your rights, we need to make restrictions that forbid anyone to deny you these rights or to ask you to surrender the rights. These restrictions translate to certain responsibilities for you if you distribute copies of the software, or if you modify it.
For example, if you distribute copies of such a program, whethergratis or for a fee, you must give the recipients all the rights that you have. You must make sure that they, too, receive or can get thesource code. And you must show them these terms so they know theirrights.
We protect your rights with two steps: (1) copyright the software, and(2) offer you this license which gives you legal permission to copy, distribute and/or modify the software.
Also, for each author's protection and ours, we want to make certain that everyone understands that there is no warranty for this freesoftware. If the software is modified by someone else and passed on, wewant its recipients to know that what they have is not the original, so that any problems introduced by others will not reflect on the original authors' reputations.
Finally, any free program is threatened constantly by software patents. We wish to avoid the danger that redistributors of freeprogram will individually obtain patent licenses, in effect making the program proprietary. To prevent this, we have made it clear that any patent must be licensed for everyone's free use or not licensed at all. The precise terms and conditions for copying, distribution and modification follow.
GNU GENERAL PUBLIC LICENSE TERMS AND CONDITIONS FOR COPYING, ISTRIBUTION AND MODIFICATION
- This License applies to any program or other work which contains a notice placed by the copyright holder saying it may be distributed under the terms of this General Public License. The "Program", below, refers to any such program or work, and a "work based on the Program" means either the Program or any derivative work under copyright law:
that is to say, a work containing the Program or a portion of it, either verbatim or with modifications and/or translated into another language. (Hereinafter, translation is included without limitation in the term "modification".) Each licensee is addressed as "you". Activities other than copying, distribution and modification are not covered by this License; they are outside its scope. The act of running the Program is not restricted, and the output from the Program is covered only if its contents constitute a work based on the Program (independent of having been made by running the Program).
Whether that is true depends on what the Program does.
-
You may copy and distribute verbatim copies of the Program's source code as you receive it, in any medium, provided that you conspicuously and appropriately publish on each copy an appropriate copyright notice and disclaimer of warranty; keep intact all the notices that refer to this License and to the absence of any warranty; and give any other recipients of the Program a copy of this License along with the Program. You may charge a fee for the physical act of transferring a copy, and you may at your option offer warranty protection in exchange for a fee.
-
You may modify your copy or copies of the Program or any portion of it, thus forming a work based on the Program, and copy and distribute such modifications or work under the terms of Section 1 above, provided that you also meet all of these conditions:
a) You must cause the modified files to carry prominent notices stating that you changed the files and the date of any change.
b) You must cause any work that you distribute or publish, that in whole or in part contains or is derived from the Program or any part thereof, to be licensed as a whole at no charge to all third parties under the terms of this License.
c) If the modified program normally reads commands interactively when run, you must cause it, when started running for such interactive use in the most ordinary way, to print or display an announcement including an appropriate copyright notice and a notice that there is no warranty (or else, saying that you provide a warranty) and that users may redistribute the program under
these conditions, and telling the user how to view a copy of this License. (Exception: if the Program itself is interactive but does not normally print such an announcement, your work based on the Program is not required to print an announcement.)
These requirements apply to the modified work as a whole. If identifiable sections of that work are not derived from the Program, and can be reasonably considered independent and separate works in themselves, then this License, and its terms, do not apply to those sections when you distribute them as separate works. But when you distribute the same sections as part of a whole which is a work based on the Program, the distribution of the whole must be on the terms of this License, whose permissions for other licensees extend to the entire whole, and thus to each and every part regardless of who wrote it. Thus, it is not the intent of this section to claim rights or contest your rights to work written entirely by you; rather, the intent is to exercise the right to control the distribution of derivative or collective works based on the Program. In addition, mere aggregation of another work not based on the Program with the Program (or with a work based on the Program) on a volume of a storage or distribution medium does not bring the other work under the scope of this License.
- You may copy and distribute the Program (or a work based on it, under Section 2) in object code or executable form under the terms of Sections 1 and 2 above provided that you also do one of the following:
a) Accompany it with the complete corresponding machine-readable source code, which must be distributed under the terms of Sections 1 and 2 above on a medium customarily used for software interchange; or,
b) Accompany it with a written offer, valid for at least three years, to give any third party, for a charge no more than your cost of physically performing source distribution, a complete machine-readable copy of the corresponding source code, to be distributed under the terms of Sections 1 and 2 above on a medium customarily used for software interchange; or,
c) Accompany it with the information you received as to the offer to distribute corresponding source code. (This alternative is allowed only for noncommercial distribution and only if you received the program in object code or executable form with such an offer, in accord with Subsection b above.)
The source code for a work means the preferred form of the work for making modifications to it. For an executable work, complete source code means all the source code for all modules it contains, plus any associated interface definition files, plus the scripts used to control compilation and installation of the executable. However, as a special exception, the source code distributed need not include
anything that is normally distributed (in either source or binary form) with the major components (compiler, kernel, and so on) of the operating system on which the executable runs, unless that component itself accompanies the executable.
If distribution of executable or object code is made by offering access to copy from a designated place, then offering equivalent access to copy the source code from the same place counts as distribution of the source code, even though third parties are not compelled to copy the source along with the object code.
- You may not copy, modify, sublicense, or distribute the Program except as expressly provided under this License. Any attempt otherwise to copy, modify, sublicense or distribute the Program is void, and will automatically terminate your rights under this License. However, parties who have received copies, or rights, from you under this License will not have their licenses terminated so long as such parties remain in full compliance.
- You are not required to accept this License, since you have not signed it. However, nothing else grants you permission to modify or distribute the Program or its derivative works. These actions are prohibited by law if you do not accept this License. Therefore, by modifying or distributing the Program (or any work based on the Program), you indicate your acceptance of this License to do so, and all its terms and conditions for copying, distributing or modifying the Program or works based on it.
- Each time you redistribute the Program (or any work based on the Program), the recipient automatically receives a license from the original licensor to copy, distribute or modify the Program subject to these terms and conditions. You may not impose any further restrictions on the recipients' exercise of the rights granted herein. You are not responsible for enforcing compliance by third parties to this License.
- If, as a consequence of a court judgment or allegation of patent infringement or for any other reason (not limited to patent issues), conditions are imposed on you (whether by court order, agreement or otherwise) that contradict the conditions of this License, they do not excuse you from the conditions of this License. If you cannot distribute so as to satisfy simultaneously your obligations under this License and any other pertinent obligations, then as a consequence you may not distribute the Program at all. For example, if a patent license would not permit royalty-free redistribution of the Program by all those who receive copies directly or indirectly through you, then the only way you could satisfy both it and this License would be to refrain entirely from distribution of the Program.
If any portion of this section is held invalid or unenforceable under any particular circumstance, the balance of the section is intended to apply and the section as a whole is intended to apply in other circumstances.
It is not the purpose of this section to induce you to infringe any patents or other property right claims or to contest validity of any such claims; this section has the sole purpose of protecting the integrity of the free software distribution system, which is implemented by public license practices. Many people have made generous contributions to the wide range of software distributed through that system in reliance on consistent application of that system; it is up to the author/donor to decide if he or she is willing to distribute software through any other system and a licensee cannot impose that choice.
This section is intended to make thoroughly clear what is believed to be a consequence of the rest of this License.
- If the distribution and/or use of the Program is restricted in certain countries either by patents or by copyrighted interfaces, the original copyright holder who places the Program under this License may add an explicit geographical distribution limitation excluding those countries, so that distribution is permitted only in or among countries not thus excluded. In such case, this License incorporates the limitation as if written in the body of this License.
- The Free Software Foundation may publish revised and/or new versions of the General Public License from time to time. Such new versions will be similar in spirit to the present version, but may differ in detail to address new problems or concerns.
Each version is given a distinguishing version number. If the Program specifies a version number of this License which applies to it and "any later version", you have the option of following the terms and conditions either of that version or of any later version published by the Free Software Foundation. If the Program does not specify a version number of this License, you may choose any version ever published by the Free Software Foundation.
- If you wish to incorporate parts of the Program into other free programs whose distribution conditions are different, write to the author to ask for permission. For software which is copyrighted by the Free Software Foundation, write to the Free Software Foundation; we sometimes make exceptions for this. Our decision will be guided by the two goals of preserving the free status of all derivatives of our free software and of promoting the sharing and reuse of software generally.
NO WARRANTY
-
BECAUSE THE PROGRAM IS LICENSED FREE OF CHARGE, THERE IS NO WARRANTY FOR THE PROGRAM, TO THE EXTENT PERMITTED BY APPLICABLE LAW. EXCEPT WHEN OTHERWISE STATED IN WRITING THE COPYRIGHT HOLDERS AND/OR OTHER PARTIES PROVIDE THE PROGRAM "AS IS" WITHOUT WARRANTY OF ANY KIND, EITHER EXPRESSED OR IMPLIED, INCLUDING, BUT NOT LIMITED TO, THE IMPLIED WARRANTIES OF MERCHANTABILITY AND FITNESS FOR A PARTICULAR PURPOSE. THE ENTIRE RISK AS TO THE QUALITY AND PERFORMANCE OF THE PROGRAM IS WITH YOU. SHOULD THE PROGRAM PROVE DEFECTIVE, YOU ASSUME THE COST OF ALL NECESSARY SERVICING, REPAIR OR CORRECTION.
-
IN NO EVENT UNLESS REQUIRED BY APPLICABLE LAW OR AGREED TO IN WRITING WILL ANY COPYRIGHT HOLDER, OR ANY OTHER PARTY WHO MAY MODIFY AND/OR REDISTRIBUTE THE PROGRAM AS PERMITTED ABOVE, BE LIABLE TO YOU FOR DAMAGES, INCLUDING ANY GENERAL, SPECIAL, INCIDENTAL OR CONSEQUENTIAL DAMAGES ARISING OUT OF THE USE OR INABILITY TO USE THE PROGRAM (INCLUDING BUT NOT LIMITED TO LOSS OF DATA OR DATA BEING RENDERED INACCURATE OR LOSSES SUSTAINED BY YOU OR THIRD PARTIES OR A FAILURE OF THE PROGRAM TO OPERATE WITH ANY OTHER PROGRAMS), EVEN IF SUCH HOLDER OR OTHER PARTY HAS BEEN ADVISED OF THE POSSIBILITY OF SUCH DAMAGES.
END OF TERMS AND CONDITIONS
How to Apply These Terms to Your New Programs
If you develop a new program, and you want it to be of the greatest possible use to the public, the best way to achieve this is to make it free software which everyone can redistribute and change under these terms.
To do so, attach the following notices to the program. It is safest to attach them to the start of each source file to most effectively convey the exclusion of warranty; and each file should have at least the "copyright" line and a pointer to where the full notice is found.
Copyright (C)
This program is free software; you can redistribute it and/or modify it under the terms of the GNU General Public License as published by the Free Software Foundation; either version 2 of the License, or (at your option) any later version.
This program is distributed in the hope that it will be useful, but WITHOUT ANY WARRANTY; without even the implied warranty of MERCHANTABILITY or FITNESS FOR A PARTICULAR PURPOSE. See the GNU General Public License for more details.
You should have received a copy of the GNU General Public License along with this program; if not, write to the Free Software Foundation, Inc., 51 Franklin St, Fifth Floor, Boston, MA 02110-1301 USA
Also add information on how to contact you by electronic and paper mail.
If the program is interactive, make it output a short notice like this when it starts in an interactive mode:
Gnomovision version 69, Copyright (C) year name of author Gnomovision comes with ABSOLUTELY NO WARRANTY; for details type 'show w'. This is free software, and you are welcome to redistribute it under certain conditions; type 'show c' for details.
The hypothetical commands `show w' and `show c' should show the appropriate parts of the General Public License. Of course, the commands you use may be called something other than `show w' and `show c'; they could even be mouse-clicks or menu items--whatever suits your program.
You should also get your employer (if you work as a programmer) or your school, if any, to sign a "copyright disclaimer" for the program, if necessary. Here is a sample; alter the names:
Yoyodyne, Inc., hereby disclaims all copyright interest in the program `Gnomovision' (which makes passes at compilers) written by James Hacker.
This General Public License does not permit incorporating your program into proprietary programs. If your program is a
subroutine library, you may consider it more useful to permit linking proprietary applications with the library. If this is what you want to do, use the GNU Library General Public License instead of this License.
/----/
GNU LESSER GENERAL PUBLIC LICENSE
Version 3, 29 June 2007
Copyright (C) 2007 Free Software Foundation, Inc. http://fsf.org/
Everyone is permitted to copy and distribute verbatim copies of this license document, but changing it is not allowed.
This version of the GNU Lesser General Public License incorporates the terms and conditions of version 3 of the GNU General Public License, supplemented by the additional permissions listed below.
0. Additional Definitions.
As used herein, "this License" refers to version 3 of the GNU Lesser General Public License, and the "GNU GPL" refers to version 3 of the GNU General Public License.
"The Library" refers to a covered work governed by this License, other than an Application or a Combined Work as defined below.
An "Application" is any work that makes use of an interface provided by the Library, but which is not otherwise based on the Library.
Defining a subclass of a class defined by the Library is deemed a mode of using an interface provided by the Library.
A "Combined Work" is a work produced by combining or linking an Application with the Library. The particular version of the Library with which the Combined Work was made is also called the "Linked Version".
The "Minimal Corresponding Source" for a Combined Work means the Corresponding Source for the Combined Work, excluding any source code for portions of the Combined Work that, considered in isolation, are based on the Application, and not on the Linked Version.
The "Corresponding Application Code" for a Combined Work means the object code and/or source code for the Application, including any data and utility programs needed for reproducing the Combined Work from the Application, but excluding the System Libraries of the Combined Work.
- Exception to Section 3 of the GNU GPL.
You may convey a covered work under sections 3 and 4 of this License without being bound by section 3 of the GNU GPL.
- Conveying Modified Versions.
If you modify a copy of the Library, and, in your modifications, a facility refers to a function or data to be supplied by an Application that uses the facility (other than as an argument passed when the facility is invoked), then you may convey a copy of the modified version:
a) under this License, provided that you make a good faith effort to ensure that, in the event an Application does not supply the function or data, the facility still operates, and performs whatever part of its purpose remains meaningful, or
b) under the GNU GPL, with none of the additional permissions of this License applicable to that copy.
- Object Code Incorporating Material from Library Header Files.
The object code form of an Application may incorporate material from a header file that is part of the Library. You may convey such object code under terms of your choice, provided that, if the incorporated material is not limited to numerical parameters, data structure layouts and accessors, or small macros, inline functions and templates (ten or fewer lines in length), you do both of the following:
a) Give prominent notice with each copy of the object code that the Library is used in it and that the Library and its use are covered by this License.
b) Accompany the object code with a copy of the GNU GPL and this license document.
4. Combined Works.
You may convey a Combined Work under terms of your choice that, taken together, effectively do not restrict modification of the portions of the Library contained in the Combined Work and reverse engineering for debugging such modifications, if you also do each of the following:
a) Give prominent notice with each copy of the Combined Work that the Library is used in it and that the Library and its use
are covered by this License.
b) Accompany the Combined Work with a copy of the GNU GPL and this license document.
c) For a Combined Work that displays copyright notices during execution, include the copyright notice for the Library among these notices, as well as a reference directing the user to the copies of the GNU GPL and this license document.
d) Do one of the following:
0) Convey the Minimal Corresponding Source under the terms of this License, and the Corresponding Application Code in a form suitable for, and under terms that permit, the user to recombine or relink the Application with a modified version of the Linked Version to produce a modified Combined Work, in the manner specified by section 6 of the GNU GPL for conveying Corresponding Source.
1) Use a suitable shared library mechanism for linking with the Library. A suitable mechanism is one that (a) uses at run time a copy of the Library already present on the user's computer system, and (b) will operate properly with a modified version of the Library that is interface-compatible with the Linked Version.
e) Provide Installation Information, but only if you would otherwise be required to provide such information under section 6 of the GNU GPL, and only to the extent that such information is necessary to install and execute a modified version of the Combined Work produced by recombining or relinking the Application with a modified version of the Linked Version. (If you use option 4d0, the Installation Information must accompany the Minimal Corresponding Source and Corresponding Application Code. If you use option 4d1, you must provide the Installation Information in the manner specified by section 6 of the GNU GPL for conveying Corresponding Source.)
5. Combined Libraries.
You may place library facilities that are a work based on the Library side by side in a single library together with other library facilities that are not Applications and are not covered by this License, and convey such a combined library under terms of your choice, if you do both of the following:
a) Accompany the combined library with a copy of the same work based on the Library, uncombined with any other library facilities, conveyed under the terms of this License.
b) Give prominent notice with the combined library that part of it is a work based on the Library, and explaining where to find the accompanying uncombined form of the same work.
6. Revised Versions of the GNU Lesser General Public License.
The Free Software Foundation may publish revised and/or new versions of the GNU Lesser General Public License from time to time. Such new versions will be similar in spirit to the present version, but may differ in detail to address new problems or concerns.
Each version is given a distinguishing version number. If the Library as you received it specifies that a certain numbered version of the GNU Lesser General Public License "or any later version" applies to it, you have the option of following the terms and conditions either of that published version or of any later version published by the Free Software Foundation. If the Library as you received it does not specify a version number of the GNU Lesser General Public License, you may choose any version of the GNU Lesser General Public License ever published by the Free Software Foundation.
If the Library as you received it specifies that a proxy can decide whether future versions of the GNU Lesser General Public License shall apply, that proxy's public statement of acceptance of any version is permanent authorization for you to choose that version for the Library.
/
OpenSSL License
/*
Copyright (c) 1998-2011 The OpenSSL Project. All rights reserved.
Redistribution and use in source and binary forms, with or without modification, are permitted provided that the following conditions are met:
- Redistributions of source code must retain the above copyright notice, this list of conditions and the following disclaimer.
- Redistributions in binary form must reproduce the above copyright notice, this list of conditions and the following disclaimer in the documentation and/or other materials provided with the distribution.
-
All advertising materials mentioning features or use of this software must display the following acknowledgment: "This product includes software developed by the OpenSSL Project for use in the OpenSSL Toolkit. (http://www.openssl.org/)"
-
The names "OpenSSL Toolkit" and "OpenSSL Project" must not be used to endorse or promote products derived from this software without prior written permission. For written permission, please contact openssl-core@openssl.org.
- Products derived from this software may not be called "OpenSSL" nor may "OpenSSL" appear in their names without prior written permission of the OpenSSL Project.
- Redistributions of any form whatsoever must retain the following acknowledgment:
"This product includes software developed by the OpenSSL Project for use in the OpenSSL Toolkit (http://www.openssl.org/)"
THIS SOFTWARE IS PROVIDED BY THE OpenSSL PROJECT "AS IS" AND ANY EXPRESSED OR IMPLIED WARRANTIES, INCLUDING, BUT NOT LIMITED TO, THE IMPLIED WARRANTIES OF MERCHANTABILITY AND FITNESS FOR A PARTICULAR PURPOSE ARE DISCLAIMED. IN NO EVENT SHALL THE OpenSSL PROJECT OR ITS CONTRIBUTORS BE LIABLE FOR ANY DIRECT, INDIRECT, INCIDENTAL, SPECIAL, EXEMPLARY, OR CONSEQUENTIAL DAMAGES (INCLUDING, BUT NOT LIMITED TO, PROCUREMENT OF SUBSTITUTE GOODS OR SERVICES;
LOSS OF USE, DATA, OR PROFITS; OR BUSINESS INTERRUPTION) HOWEVER CAUSED AND ON ANY THEORY OF LIABILITY, WHETHER IN CONTRACT, STRICT LIABILITY, OR TORT (INCLUDING NEGLIGENCE OR OTHERWISE) ARISING IN ANY WAY OUT OF THE USE OF THIS SOFTWARE, EVEN IF ADVISED OF THE POSSIBILITY OF SUCH DAMAGE.
This product includes cryptographic software written by Eric Young (eay@cryptsoft.com). This product includes software written by Tim Hudson (tjh@cryptsoft.com).
Original SSLeay License
Copyright (C) 1995-1998 Eric Young (eay@cryptsoft.com)
All rights reserved.
This package is an SSL implementation written by Eric Young (eay@cryptsoft.com).
The implementation was written so as to conform with Netscapes SSL.
This library is free for commercial and non-commercial use as long as the following conditions are aheared to. The following conditions apply to all code found in this distribution, be it the RC4, RSA, lhash, DES, etc., code; not just the SSL code. The SSL documentation included with this distribution is covered by the same copyright terms except that the holder is Tim Hudson (tjh@cryptsoft.com).
Copyright remains Eric Young's, and as such any Copyright notices in the code are not to be removed.
If this package is used in a product, Eric Young should be given attribution as the author of the parts of the library used.
This can be in the form of a textual message at program startup or in documentation (online or textual) provided with the package.
Redistribution and use in source and binary forms, with or without modification, are permitted provided that the following conditions are met:
- Redistributions of source code must retain the copyright notice, this list of conditions and the following disclaimer.
- Redistributions in binary form must reproduce the above copyright notice, this list of conditions and the following disclaimer in the documentation and/or other materials provided with the distribution.
-
All advertising materials mentioning features or use of this software must display the following acknowledgement:
"This product includes cryptographic software written by Eric Young (eay@cryptsoft.com)" The word 'cryptographic' can be left out if the rouines from the library being used are not cryptographic related :-). -
If you include any Windows specific code (or a derivative thereof) from the apps directory (application code) you must include an acknowledgement:
"This product includes software written by Tim Hudson (tjh@cryptsoft.com)"
THIS SOFTWARE IS PROVIDED BY ERIC YOUNG "AS IS" AND ANY EXPRESS OR IMPLIED WARRANTIES, INCLUDING BUT NOT LIMITED TO, THE IMPLIED WARRANTIES OF MERCHANTABILITY AND FITNESS FOR A PARTICULAR PURPOSE ARE DISCLAIMED. IN NO EVENT SHALL THE AUTHOR OR CONTRIBUTORS BE LIABLE FOR ANY DIRECT, INDIRECT, INCIDENTAL, SPECIAL, EXEMPLARY, OR CONSEQUENTIAL DAMAGES (INCLUDING, BUT NOT LIMITED TO PROCUREMENT OF SUBSTITUTE GOODS OR SERVICES; LOSS OF USE, DATA, OR PROFITS; OR BUSINESS INTERRUPTION)
HOWEVER CAUSED AND ON ANY THEORY OF LIABILITY, WHETHER IN CONTRACT, STRICT LIABILITY, OR TORT (INCLUDING NEGLIGENCE OR OTHERWISE) ARISING IN ANY WAY OUT OF THE USE OF THIS SOFTWARE, EVEN IF ADVISED OF THE POSSIBILITY OF SUCH DAMAGE.
The licence and distribution terms for any publicly available version or derivative of this code cannot be changed. i.e. this code cannot simply be copied and put under another distribution licence [including the GNU Public Licence.]
Apache License
Version 2.0, January 2004
http://www.apache.org/licenses/
TERMS AND CONDITIONS FOR USE, REPRODUCTION, AND DISTRIBUTION
1. Definitions.
"License" shall mean the terms and conditions for use, reproduction, and distribution as defined by Sections 1 through 9 of this document.
"Licensor" shall mean the copyright owner or entity authorized by the copyright owner that is granting the License.
"Legal Entity" shall mean the union of the acting entity and all other entities that control, are controlled by, or are under common control with that entity. For the purposes of this definition,
"control" means (i) the power, direct or indirect, to cause the direction or management of such entity, whether by contract or otherwise, or (ii) ownership of fifty percent (50%) or more of the outstanding shares, or (iii) beneficial ownership of such entity.
"You" (or "Your") shall mean an individual or Legal Entity exercising permissions granted by this License.
"Source" form shall mean the preferred form for making modifications, including but not limited to software source code, documentation source, and configuration files.
"Object" form shall mean any form resulting from mechanical transformation or translation of a Source form, including but not limited to compiled object code, generated documentation, and conversions to other media types.
"Work" shall mean the work of authorship, whether in Source or Object form, made available under the License, as indicated by a copyright notice that is included in or attached to the work (an example is provided in the Appendix below).
"Derivative Works" shall mean any work, whether in Source or Object form, that is based on (or derived from) the Work and for which the editorial revisions, annotations, elaborations, or other modifications represent, as a whole, an original work of authorship. For the purposes of this License, Derivative Works shall not include works that remain separable from, or merely link (or bind by name) to the interfaces of, the Work and Derivative Works thereof.
"Contribution" shall mean any work of authorship, including the original version of the Work and any modifications or additions to that Work or Derivative Works thereof, that is intentionally submitted to Licensor for inclusion in the Work by the copyright owner or by an individual or Legal Entity authorized to submit on behalf of the copyright owner. For the purposes of this definition, "submitted" means any form of electronic, verbal, or written communication sent to the Licensor or its representatives, including but not limited to communication on electronic mailing lists, source code control systems, and issue tracking systems that are managed by, or on behalf of, the Licensor for the purpose of discussing and improving the Work, but excluding communication that is conspicuously marked or otherwise designated in writing by the copyright owner as "Not a Contribution."
"Contributor" shall mean Licensor and any individual or Legal Entity on behalf of whom a Contribution has been received by Licensor and subsequently incorporated within the Work.
-
Grant of Copyright License. Subject to the terms and conditions of this License, each Contributor hereby grants to You a perpetual, worldwide, non-exclusive, no-charge, royalty-free, irrevocable copyright license to reproduce, prepare Derivative Works of, publicly display, publicly perform, sublicense, and distribute the Work and such Derivative Works in Source or Object form.
-
Grant of Patent License. Subject to the terms and conditions of this License, each Contributor hereby grants to You a perpetual, worldwide, non-exclusive, no-charge, royalty-free, irrevocable (except as stated in this section) patent license to make, have made, use, offer to sell, sell, import, and otherwise transfer the Work, where such license applies only to those patent claims licensable by such Contributor that are necessarily infringed by their Contribution(s) alone or by combination of their Contribution(s) with the Work to which such Contribution(s) was submitted. If You institute patent litigation against any entity (including a cross-claim or counterclaim in a lawsuit) alleging that the Work or a Contribution incorporated within the Work constitutes direct or contributory patent infringement, then any patent licenses granted to You under this License for that Work shall terminate as of the date such litigation is filed.
-
Redistribution. You may reproduce and distribute copies of the Work or Derivative Works thereof in any medium, with or without modifications, and in Source or Object form, provided that You meet the following conditions:
(a) You must give any other recipients of the Work or Derivative Works a copy of this License; and
(b) You must cause any modified files to carry prominent notices stating that You changed the files; and
(c) You must retain, in the Source form of any Derivative Works that You distribute, all copyright, patent, trademark, and attribution notices from the Source form of the Work, excluding those notices that do not pertain to any part of the Derivative Works; and
(d) If the Work includes a "NOTICE" text file as part of its distribution, then any Derivative Works that You distribute must
include a readable copy of the attribution notices contained within such NOTICE file, excluding those notices that do not pertain to any part of the Derivative Works, in at least one of the following places: within a NOTICE text file distributed as part of the Derivative Works; within the Source form or documentation, if provided along with the Derivative Works; or, within a display generated by the Derivative Works, if and wherever such third-party notices normally appear. The contents of the NOTICE file are for informational purposes only and do not modify the License. You may add Your own attribution notices within Derivative Works that You distribute, alongside or as an addendum to the NOTICE text from the Work, provided that such additional attribution notices cannot be construed as modifying the License.
You may add Your own copyright statement to Your modifications and may provide additional or different license terms and conditions for use, reproduction, or distribution of Your modifications, or for any such Derivative Works as a whole, provided Your use, reproduction, and distribution of the Work otherwise complies with the conditions stated in this License.
-
Submission of Contributions. Unless You explicitly state otherwise, any Contribution intentionally submitted for inclusion in the Work by You to the Licensor shall be under the terms and conditions of this License, without any additional terms or conditions. Notwithstanding the above, nothing herein shall supersede or modify the terms of any separate license agreement you may have executed with Licensor regarding such Contributions.
-
Trademarks. This License does not grant permission to use the trade names, trademarks, service marks, or product names of the Licensor, except as required for reasonable and customary use in describing the origin of the Work and reproducing the content of the NOTICE file.
-
Disclaimer of Warranty. Unless required by applicable law or agreed to in writing, Licensor provides the Work (and each Contributor provides its Contributions) on an "AS IS" BASIS, WITHOUT WARRANTIES OR CONDITIONS OF ANY KIND, either express or implied, including, without limitation, any warranties or conditions of TITLE, NON-INFRINGEMENT, MERCHANTABILITY, or FITNESS FOR A PARTICULAR PURPOSE. You are solely responsible for determining the appropriateness of using or redistributing the Work and assume any risks associated with Your exercise of permissions under this License.
-
Limitation of Liability. In no event and under no legal theory, whether in tort (including negligence), contract, or otherwise, unless required by applicable law (such as deliberate and grossly negligent acts) or agreed to in writing, shall any Contributor be liable to You for damages, including any direct, indirect, special, incidental, or consequential damages of any character arising as a result of this License or out of the use or inability to use the Work (including but not limited to damages for loss of goodwill, work stoppage, computer failure or malfunction, or any and all other commercial damages or losses), even if such Contributor has been advised of the possibility of such damages.
-
Accepting Warranty or Additional Liability. While redistributing the Work or Derivative Works thereof, You may choose to offer, and charge a fee for, acceptance of support, warranty, indemnity, or other liability obligations and/or rights consistent with this License. However, in accepting such obligations, You may act only on Your own behalf and on Your sole responsibility, not on behalf of any other Contributor, and only if You agree to indemnify, defend, and hold each Contributor harmless for any liability incurred by, or claims asserted against, such Contributor by reason of your accepting any such warranty or additional liability.
END OF TERMS AND CONDITIONS
APPENDIX: How to apply the Apache License to your work.
To apply the Apache License to your work, attach the following boilerplate notice, with the fields enclosed by brackets "[]" replaced with your own identifying information. (Don't include the brackets!) The text should be enclosed in the appropriate comment syntax for the file format. We also recommend that a file or class name and description of purpose be included on the same "printed page" as the copyright notice for easier identification within third-party archives. Copyright [yyyy] [name of copyright owner]
Licensed under the Apache License, Version 2.0 (the "License"); you may not use this file except in compliance with the License. You may obtain a copy of the License at
http://www.apache.org/licenses/LICENSE-2.0
Unless required by applicable law or agreed to in writing, software distributed under the License is distributed on an "AS IS" BASIS, WITHOUT WARRANTIES OR CONDITIONS OF ANY KIND, either express or implied.
See the License for the specific language governing permissions and limitations under the License.
Samsung Techwin cares for the environment at all product manufacturing stages, and is taking measures to provide customers with more environmentally friendly products.
The Eco mark represents Samsung Techwin's devotion to creating environmentally friendly products, and indicates that the product satisfies the EU RoHS Directive.
Correct Disposal of This Product (Waste Electrical & Electronic Equipment)
(Applicable in the European Union and other European countries with separate collection systems) This marking on the product, accessories or literature indicates that the product and its electronic accessories (e.g. charger, headset, USB cable) should not be disposed of with other household waste at the end of their working life. To prevent possible harm to the environment or human health from uncontrolled waste disposal, please separate these items from other types of waste and recycle them responsibly to promote the sustainable reuse of material resources. Household users should contact either the retailer where they purchased this product, or their local government office, for details of where and how they can take these items for environmentally safe recycling. Business users should contact their supplier and check the terms and conditions of the purchase contract. This product and its electronic accessories should not be mixed with other commercial wastes for disposal.
Correct disposal of batteries in this product
(Applicable in the European Union and other European countries with separate battery return systems.) This marking on the battery, manual or packaging indicates that the batteries in this product should not be disposed of with other household waste at the end of their working life. Where marked, the chemical symbols Hg, Cd or Pb indicate that the battery contains mercury, cadmium or lead above the reference levels in EC Directive 2006/6. If batteries are not properly disposed of, these substances can cause harm to human health or the environment. To protect natural resources and to promote material reuse, please separate batteries from other types of waste and recycle them through your local, free battery return system.
SAMSUNG
SALES NETWORK
SAMSUNG TECHWIN CO., LTD.
Samsung techwin R&D Center, 701,Sampyeong-dong, Bundang-gu,Seongnam-si,Gyeonggi-do, Korea, 463-400
TEL: +82-70-7147-8740\~60 FAX: +82-31-8018-3745
100 Challenger Rd. Suite 700 Ridgefield Park, NJ 07660
Toll Free: +1-877-213-1222 Direct: +1-201-325-6920
Fax: +1-201-373-0124
www.samsungcctvusa.com
SAMSUNG TECHWIN EUROPE LTD.
Samsung House, 1000 Hillswood Drive, Hillswood Business Park
Chertsey, Surrey, UNITED KINGDOM KT16 OPS
TEL: +44-1932-45-5300 FAX: +44-1932-45-5325
www.samsungtechwin.com
www.samsungsecurity.com
www.samsungipolis.com
- Restriction
- Disclaimer
- Overview
- IMPORTANT SAFETY INSTRUCTIONS
- STANDARD APPROVALS
- FC CE
- BEFORE START
- WARNING
- Caution
- System Shutdown
- Operating Temperature
- Ethernet Port
- Security Precautions
- Contents
- p3 Overview
- p14 Installation
- p17 Surveillance
- Start / END system
- p22 System Setup
- Product Features
- Installation
- Disassemble Brackets
- Mount product
- Vehicle Installations
- Surveillance
- Start/End system
- Log in
- Shutdown system
- Contextual Menu on Live
- Live Screen division
- Single Channel Live view
- Backup
- Live Monitoring
- Recording status
- Emergency Recording
- Move to Search mode
- Enter Setup menu
- SYSTEM SETUP
- System information
- General information setup
- Enter Vehicle information
- System Upgrade
- Set Date and time
- NTP setting
- User setup
- Add new User
- Add new group and set permission.
- System Log
- To Export Log file.
- DEVICE
- Change Camera Title
- IP camera setup
- Covert (Hidden) camera
- PROFILE SETUP
- Add profiles
- Audio
- Audio Connect
- Alarm
- Set Alarm type and duration
- Set Alarm Schedule
- Display
- Set monitor display and display language
- Channel popup by Event
- PIP (Picture In Picture) Setup
- Resolution setup
- Record Setup
- Set Storage
- Recording Setup
- Recording profile
- Set Recording schedule
- Network
- Set IP address
- PoE Setup (Power Over Ethernet)
- Set Port
- DDNS setup
- Callback Setup
- Email setup
- Network Transmission
- Network profile
- EVENT
- About Event activation and activate Recording, Alarm and Notification
- System Notification
- G-Sensor Notification
- Playback (Search)
- Time search (Go to Time)
- About Search options
- Calendar Search
- Event Search
- Backup data playback
- Playback control
- Backup Recorded Data
- Web client access
- Smartviewer AUTO v1.0
- Start Remote software(S.W should be installed on your PC)
- Connect NVR from remote software
- Press Connect icon
- NVR status
- GPS
- Remote Playback (Search)
- Go to Time
- Saves recorded data
- Playback HDD data on PC
- Smartviewer AUTO v1.0 Setup
- System
- Sequence
- Remote upgrade
- Call Back
- MobileViewer iPolisAuto
- How to use
- Appendix
- Cautions on Installation
- Cautions.
- Power connector
- IP camera input connection pin map
- UTP Cable Pin Map (IO Box 1/2, Ctrl Box)
- Installation (IO Box, Control Box)
- IO Box D-SUB15 Pin Map
- - Sensor input connection
- • Alarm output connection
- OPEN SOURCE LICENSE REPORT ON THE PRODUCT
- GNU GENERAL PUBLIC LICENSE
- Preamble
- GNU GENERAL PUBLIC LICENSE TERMS AND CONDITIONS FOR COPYING, ISTRIBUTION AND MODIFICATION
- NO WARRANTY
- END OF TERMS AND CONDITIONS
- GNU LESSER GENERAL PUBLIC LICENSE
- Additional Definitions.
- Combined Works.
- Combined Libraries.
- Revised Versions of the GNU Lesser General Public License.
- Definitions.
- Correct Disposal of This Product (Waste Electrical & Electronic Equipment)
- Correct disposal of batteries in this product
- SAMSUNG
- SALES NETWORK
Brand : Hanwha
Model : SRM-872P
Category : Radio