710 - Garden hose Liberty - Free user manual and instructions
Find the device manual for free 710 Liberty in PDF.

User questions about 710 Liberty
0 question about this device. Answer the ones you know or ask your own.
Ask a new question about this device
Download the instructions for your Garden hose in PDF format for free! Find your manual 710 - Liberty and take your electronic device back in hand. On this page are published all the documents necessary for the use of your device. 710 by Liberty.
USER MANUAL 710 Liberty
text_image
QR code image containing encoded data, no visible human-readable textWATCH THE VIDEO

text_image
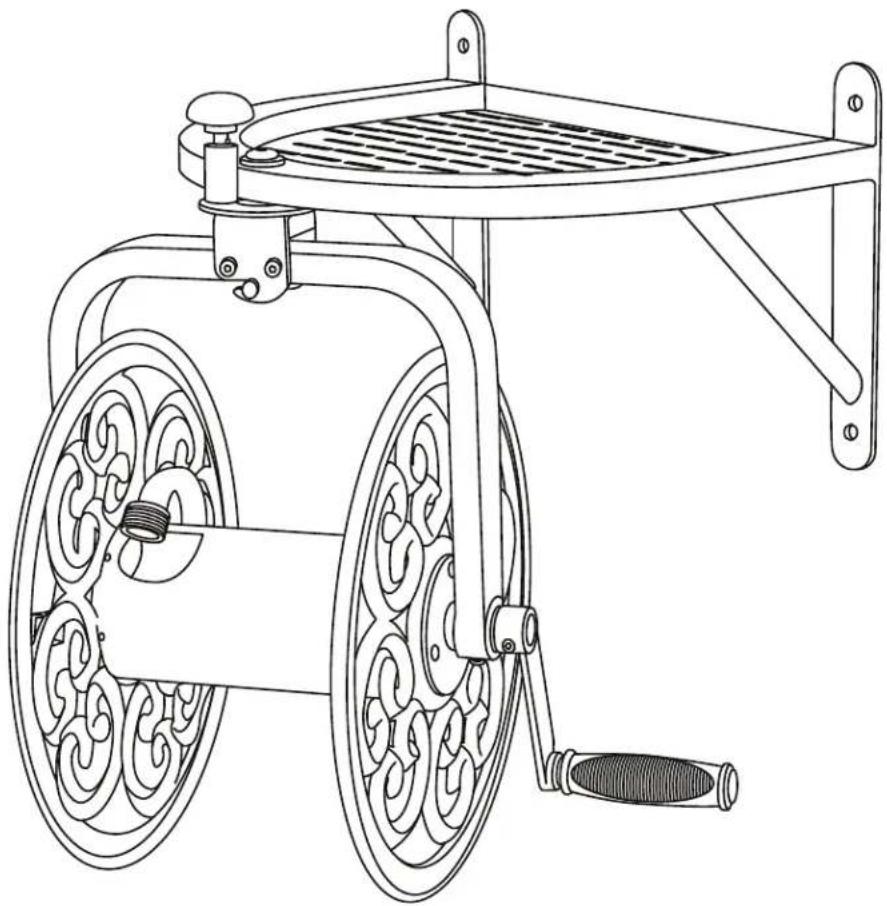
Liberty GARDENModel #710
NAVIGATOR™
ROTATING HOSE REEL Owner's Manual
natural_image
Line drawing of a two-wheeled cart with ornate wheels and a handle (no text or symbols)VISIT OUR WEBSITE: WWW.LIBERTYGARDENPRODUCTS.COM OR CALL US TOLL FREE AT 1-866-820-5805
LIBERTY GARDEN PRODUCTS, INC. 1161 SOUTH PARK DRIVE, KERNERSVILLE NC 27284
IMPORTANT: READ THE OWNER'S MANUAL BEFORE ASSEMBLING
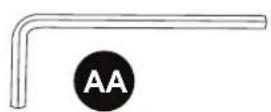
TOOLS REQUIRED:


natural_image
Line drawing of a handheld electric drill (no text or symbols)PliersAA. Allen wrench (Supplied) Adjustable wrench Drill
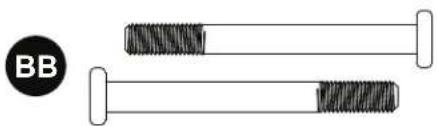
HARDWARE INCLUDED
natural_image
Two cylindrical objects with textured surfaces, one labeled 'BB' (no other text or symbols)BB. Allen bolts (2)

CC. Lock nuts (2)
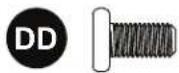
DD. Allen screw (1)
Note: Hardware not shown to actual size.
The wall mounting hardware is NOT included with this unit. Check with the retailer or visit a hardware store to purchase.
PARTS LIST
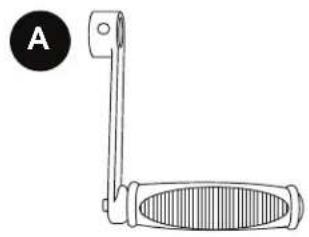
A. Crank handle (1)
B. Leader hose (1)
C. Base shelf (1)
D. Hose reel (1)
natural_image
Line drawing of a mechanical lever with a circular label A (no text or symbols on the lever itself)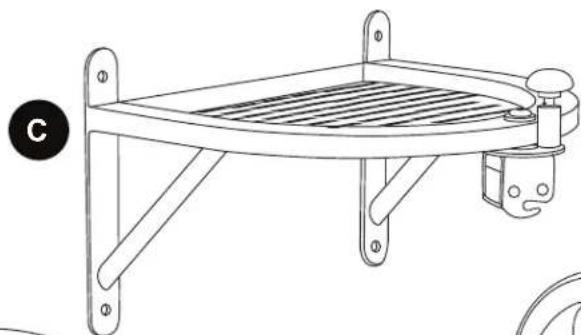
natural_image
Line drawing of a metal rack-mounted device with a slatted top and mounting bracket (no text or symbols)
natural_image
Line drawing of ornate circular objects with intricate carvings and a handle, no text or symbols present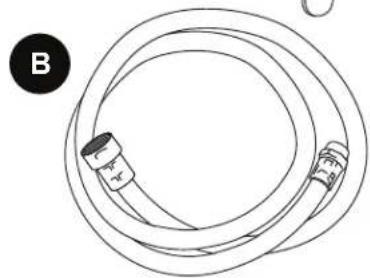
natural_image
Diagram of a coiled cable or hose with two connectors, labeled B (no text or symbols on the main diagram)IMPORTANT: LAY OUT ALL PARTS AND FASTENERS. MAKE SURE ALL PARTS ARE ACCOUNTED FOR. IF ANY PART IS MISSING PLEASE CONTACT LIBERTY GARDEN PRODUCTS AT 1-866-820-5805. DO NOT CONTACT THE RETAILER. YOU CAN ALSO VISIT OUR WEBSITE, WWW.LIBERTYGARDENPRODUCTS.COM, FOR MORE INSTRUCTIONS, PICTURES AND HELPFUL HINTS.
INSTALLATION
This hose reel must be mounted to a solid masonry wall or to wall studs
TIP: Remember to use the correct size and quantity of hardware to properly support the total weight of the unit. A standard 100' length of garden hose weighs approximately 15 lbs. Filled with water the additional weight can exceed 20 lbs. The mounting hardware must be able to support the combined weight of the unit, garden hose, plus water.
1. BRICK OR MASONRY ANCHOR SLEEVES:
NOTE: The following hardware (not included) is recommended for installation.
(4) 7 or 8 mm x 60 mm masonry wall anchors (5/16" x 2 1/2")
(4) Anchor sleeves
(4) Washers
(4) Lock washers
(4) Nuts
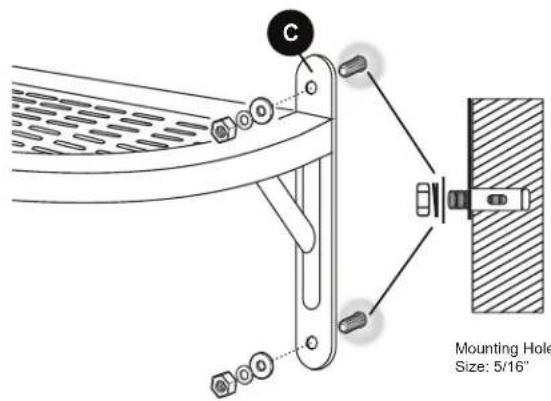
- Position and hold your Navigator base shelf (C) against the brick masonry wall at a convenient height. Mark the position of each suspension hole on the wall. Remove the base shelf (C).
- Using a hammer drill, drill holes 5/16" in diameter and 2 1/2" deep at the marked positions on the wall.
- Insert the masonry wall anchors into the anchor sleeve. Next, insert the anchor and sleeve into the drilled holes until the steel sleeve is completely in the wall.
- Place the base shelf (C) on the masonry wall anchors.
• Install a washer, lock washer, and nut over each wall anchor and tighten securely.
text_image
C Mounting Hole Size: 5/16"2. BRICK OR MASONARY SCREWS:
NOTE: The following hardware (not included) is recommended for installation.
(4) 7 or 8 mm x 60 mm masonry screws (5/16" x 2 1/2")
(4) Washers
- Position and hold your Navigator base shelf (C) against the brick masonry wall at a convenient height. Mark the position of each suspension hole on the wall. Remove the base shelf (C).
- Using a hammer drill, drill holes 1/4" in diameter and 2 1/2" deep at the marked positions on the wall.
- Align the hose reel suspension holes with the pilot holes.
- Attach the base shelf (C) to the wall using the concrete screws with washers and tighten securely.

text_image
C any based on concrete screw andMounting Hole Size: 1/4"
NOTE: Drill hole diameters may vary based on anchor sleeve, concrete screw and wood screw manufacturer.
Check product recommendations before drilling holes.
WOOD SCREWS:
NOTE: The following hardware (not included) is recommended for installation.
(4) 7 or 8 mm x 60 mm wood screws (5/16" x 2 1/2")
(4) Washers
• Using a stud finder locate the wood studs on your wall.
- Position and hold your Navigator base shelf (C) against the wood wall at a convenient height.
- Mark the position of each suspension hole on the wall.
- Remove the base shelf (C).
- Using a power drill, drill holes 1/4" in diameter and 2 1/2" deep at the marked positions on the wall.
- Align the hose reel suspension holes with the pilot holes.
- Attach the base shelf (C) to the wall using the wood screws with washers and tighten securely.
To learn more watch a video on our warranty and care section @ www.libertygardenproducts.com

text_image
C ent height. ons on the wall. n securely.Mounting Hole Size: 1/4"
ASSEMBLY
1 Attach the hose reel (D) to the base shelf (C) by hanging the reel on the small slot located at the front of the base.

text_image
C FIGURE 1 D2 Line up the holes in the hose reel (D) with the base shelf (C) and insert long Allen bolts (BB)
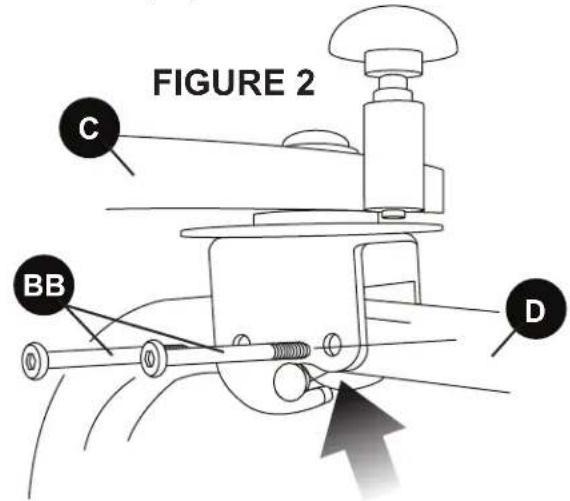
text_image
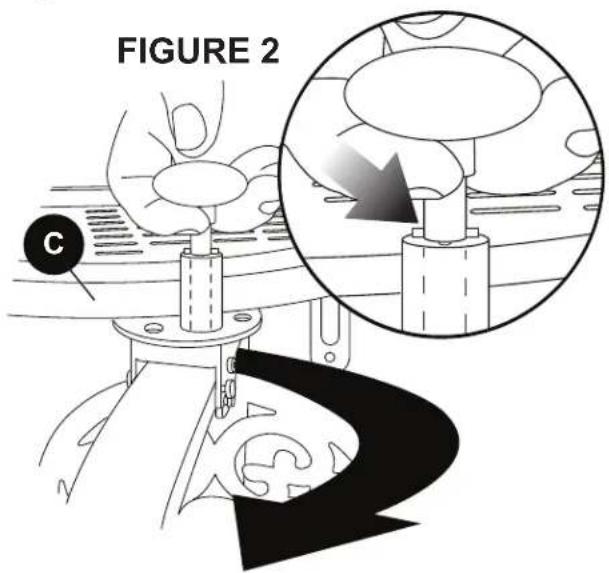
FIGURE 2 C BB D3 Tighten Allen bolts (BB) with the supplied Allen wrench (AA) at the same time using fingers screw on lock nuts (CC) to secure base shelf (C) to hose reel (D)
Pliers (not included) may be needed to hold and tighten lock nuts.

text_image
FIGURE 3 C CC AA BB D : DO NOT OVER LOCK NUTS ANDCAUTION: DO NOT OVER TIGHTEN LOCK NUTS AND ALLEN BOLTS.
ASSEMBLY
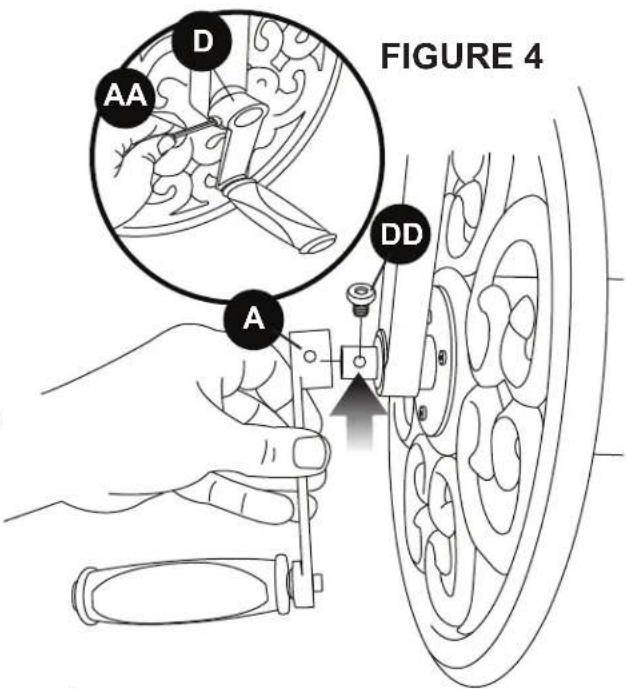
4 Align the holes in the crank handle (A) with the crank handle shaft on the hose reel (D). Insert the short Allen screw (DD) into the crank handle and tighten with supplied Allen wrench (AA)
5 Attach leader hose (B) to swivel connector on the hose reel (D). Attach end of leader hose to water source.
6 Attach your garden hose to the hose connector on the hose reel (D). The hose is now ready to wind around the spool. The Navigator holds up to 125 ft. of 5/8" garden hose.
text_image
FIGURE 4 A AA D DD A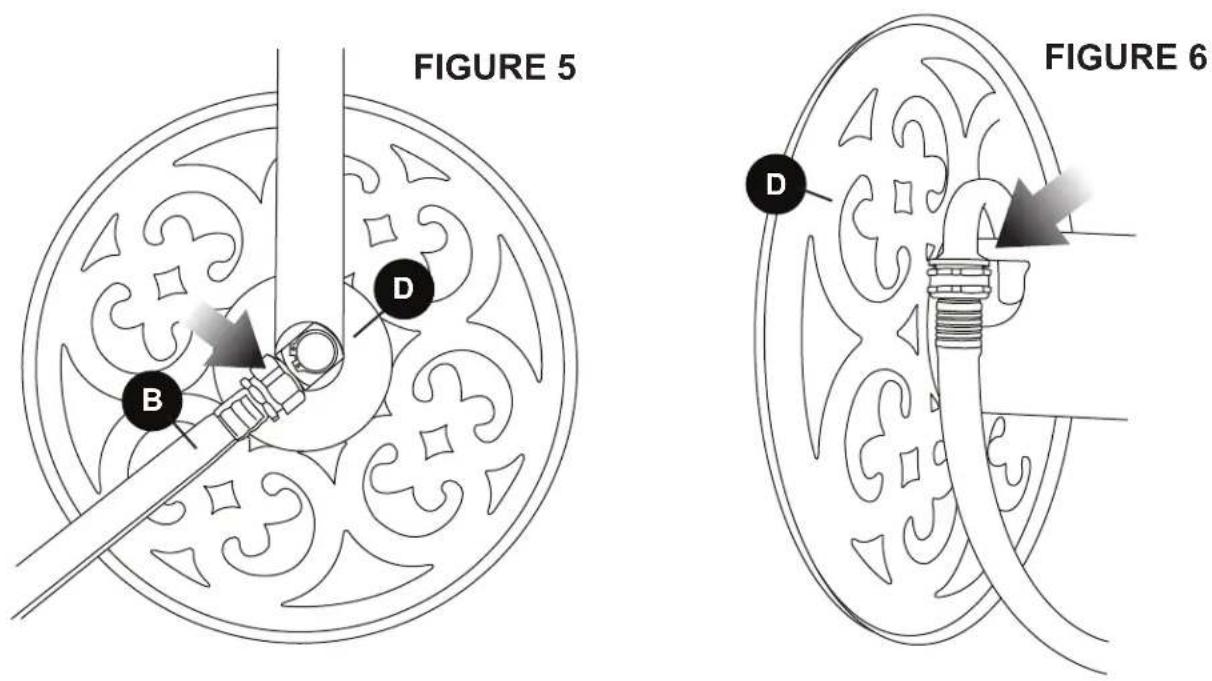
text_image
FIGURE 5 B D FIGURE 6 DOPERATING INSTRUCTIONS
1 Pull up on handle knob located on the base shelf (C) then rotate hose reel (D) to one of the four locking positions.
2 Pull up on the handle knob located on the base shelf (C) and turn the locking pin to the up position. The Navigator rotating hose reel will now turn a full 360 degrees.
text_image
FIGURE 2 C
text_image
then s. FIGURE 1 C D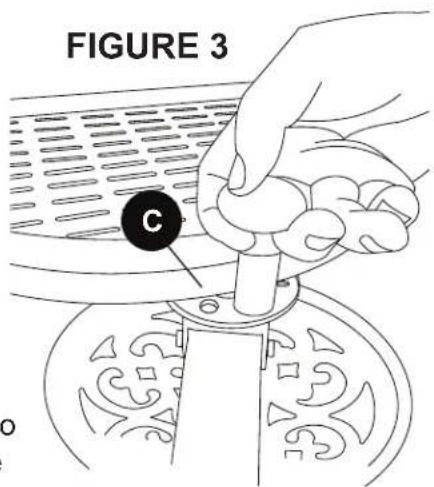
text_image
FIGURE 3 C3 Release the handle on the base shelf (C) and lock unit into one of the desired positions. Your Navigator rotating hose reel is now ready for use.
4 Located at the bottom of the base spool (D) near the crank handle is a pre-assembled Allen screw. Using the supplied Allen wrench (AA) tightened or loosen tension on the spool. To increase the tension, tighten the screw, to reduce tension, loosen the screw.
TIP: Keep reel in the locked position when winding garden hose.

text_image
D AA D F U G R U E 4CARE INSTRUCTIONS
Leaks
Your hose reel is manufactured with the finest quality components available. All components are manufactured to rigorous quality standards not common in other consumer grade hose reels available today. When you install your hose reel, be sure the hose washers are in place and all fittings are secure. DO NOT OVER TIGHTEN as you might damage the components. If you live in more temperate climates, be sure to drain the unit of any residual water before storing. DO NOT EXPOSE THE UNIT TO FREEZING TEMPERATURES while water remains in the plumbing system.
Troubleshooting Guide
Problem: Swivel head is not rotating causing the leader hose to kink up.
Solution: Remove leader hose and turn the square head of the swivel several times; apply lubricant.
Problem: Leaking fixtures (elbow; brass coupling; swivel)
Solution: Apply Teflon plumber's tape or/and make sure fixtures are tightened.
Rust
Your hose reel will give you many seasons of reliable and functional hose storage. As with any steel product, there is always the chance for rust developing over time. Your hose reel finish is designed for industrial applications, but even the toughest of coatings can be compromised by scratches. Such minor surface damage can occur in shipping despite our best efforts. We have found that most scratches occur during assembly and/or installation (in the case of wall mounted hose reels). If the base metal is exposed to the elements long enough, rust will develop. In the case of wall-mounted reels, be sure to use stainless steel mounting hardware. We recommend that you periodically inspect your reel for any surface damage. Scratches can easily be repaired by using standard automotive touch-up body paint. Some of our most loyal customers recommend that at the end of each season, the unit be cleaned and painted with a clear acrylic paint.
NOTE
It is recommended that the hose reel (D) be taken off and stored indoors or sealed in a plastic container for winter protection.
- To help delay rust, check for any scratches on your hose reel. Apply clear acrylic/weatherproof paint to avoid rusting.
- Drain water before storing.
- DO NOT leave water running though the reel while not in-use or unsupervised.
- Turn off water after each use.

natural_image
Line drawing of a decorative box with intricate patterns and a labeled point D (no text or symbols)Problem:
Your new Navigator rotating hose reel is leaking at the swivel.
Solution:
It is normal for the swivel to leak slightly until the O-rings are wet and have seated. If the leaking continues, you don't need to take the reel back to the store. This is a simple problem and is easily fixed by a few simple procedures.
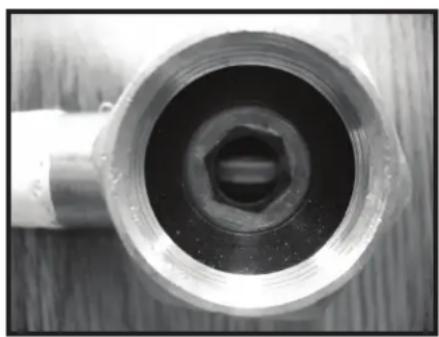
- If the leader hose is attached to the swivel, unscrew the hose and look inside the swivel.
- Using either a hex key or a large screw driver, insert the tool into the hex opening and gently tighten the threaded insert. DO NOT OVER TIGHTEN!
- This should stop the leaking.
- If the unit still leaks, please check that the hose washer is inside the nut. You may contact Liberty for a new hose washer or obtain one at any hardware store.
- If your swivel is old, the O-Rings may be worn, please contact us for a new set of O-Rings.
- If these steps do not solve your leaking problem, then contact Liberty Garden Products.
natural_image
Close-up of a metallic pipe fitting with a central hexagonal bolt, resting on a wooden surface (no text or symbols visible)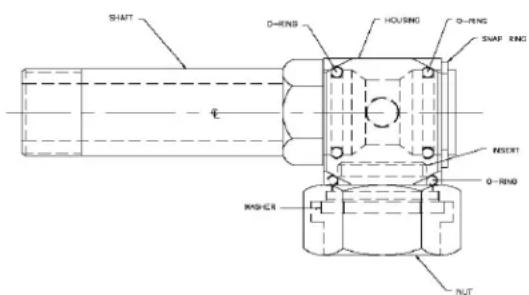
text_image
SHIFT O-RING HOUSING O-RING SWAP RING INSERT O-RING RISHER NUTCALL US AT 1-866-820-5805 IF YOU HAVE ANY QUESTIONS REGARDING TROUBLESHOOTING AND WARRANTY
WARRANTY
Our guarantee is as functional and straight-forward as our products. Since we design and build our products to provide you with many years of satisfaction, all Liberty™ products are guaranteed against defects in materials and workmanship. In the unlikely event that a problem arises as a result of a defect in our materials or work-ship, we will promptly repair or replace the item at our expense. All we require is that you contact us first and we'll take it from there. It is important to note that our guarantee is not an unconditional guarantee for the life of the product. Liberty™ hose reels are made from the finest materials available under our exact manufacturing standards. But, like any other product, it is not indestructible. Therefore, our guarantee does not cover:
- Product damage that is a result of abuse, misuse, or mishandling. (Exposing the unit to freezing temperatures with water remaining in the reel plumbing system voids the unit warranty.)
- Rust. Despite the industrial quality coating and our best efforts, steel will rust over time.
- Incidental damage, consequential damages, injury to persons or to other property not purchased from us due to the use of our product.
- DO NOT consume water from garden hose; not fit for human consumption.
If there is damage to the product that occurred as a result of shipping, you should file a damage claim with the carrier.
- DO NOT leave water running though the reel while not in-use or unsupervised.
As with any product, it should be expected that component parts - particularly moving parts, seals, o-rings, swivel, hose and connectors will wear with use and over time may need to be replaced or refurbished. This type of normal wear and tear is naturally not covered by our guarantee, but we will always be happy to provide you with prompt, high quality service and replacement parts at a nominal cost.
This warranty gives you specific legal rights, and you may also have other rights which vary from state to state. (Some states do not allow the exclusion or limitation of incidental or consequential damages, so the above limitation may not apply to you).
You will find that we apply the same standard of excellence to our customer service as we do to our products.
Warning! The hose and hose fittings contain chemical(s), including lead, known to the state of California to cause cancer, birth defects and other reproductive harm. Wash hands after use.

"Liberty" is a registered trademark of Liberty Garden Products, Inc. Kernersville, NC. All Rights Reserved 2014
Updated 8/13/2014