
KX-PS8000 - Printer PANASONIC - Free user manual and instructions
Find the device manual for free KX-PS8000 PANASONIC in PDF.

| Product Type | Monochrome Laser Printer |
| Print Technology | Laser |
| Print Speed | Up to 20 ppm (A4) |
| Print Resolution | 600 x 600 dpi |
| Paper Size | A4, Letter, Legal, Executive, B5 |
| Input Capacity | 250-sheet standard tray |
| Connectivity | USB 1.1, Parallel (IEEE 1284) |
| Dimensions (W x D x H) | 400 x 300 x 200 mm |
| Weight | Approx. 8 kg |
| Power Supply | 220-240 V, 50/60 Hz |
| Power Consumption | Max 800 W (printing), < 10 W (standby) |
| Main Functions | Print, Copy, Scan, Fax |
| Maintenance | Replace toner cartridge (approx. 3,000 pages) and drum unit (approx. 20,000 pages) |
| Cleaning | Wipe exterior with a soft, dry cloth; use recommended cleaning sheet for interior |
| Safety Features | Auto shut-off after idle period, overheat protection, fuse |
| Spare Parts & Repairability | Replaceable toner, drum, fuser, pickup rollers; service manual available |
| General Information | Panasonic KX-PS8000, first released circa 2005, duty cycle up to 20,000 pages per month |
Frequently Asked Questions - KX-PS8000 PANASONIC
User questions about KX-PS8000 PANASONIC
0 question about this device. Answer the ones you know or ask your own.
Ask a new question about this device
Download the instructions for your Printer in PDF format for free! Find your manual KX-PS8000 - PANASONIC and take your electronic device back in hand. On this page are published all the documents necessary for the use of your device. KX-PS8000 by PANASONIC.
USER MANUAL KX-PS8000 PANASONIC
Utilities and Drivers Reference Guide
Digital Color Imaging System Enhanced
Model No. KX-PS8000
natural_image
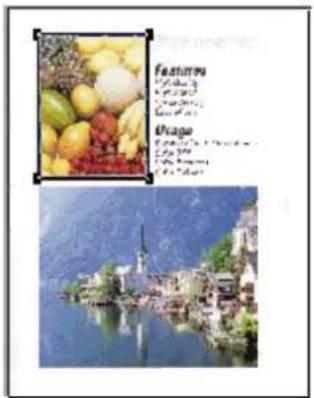
Line drawing of a printer with front panel and side cover (no text or symbols)Please carefully read the Operating Instructions and the Utilities and Drivers Reference Guide before using the Digital Color Imaging System. Keep this CD-ROM in the protective case. Do not expose the CD-ROM to direct sunlight or extreme heat and do not scratch or smudge the surface of the CD-ROM.
This manual explains how to use the Digital Duplicator Utility, Scanner and Printer features. It consists of three parts:
■ Part 1 Digital Duplicator Utility ( P. 3)
This part explains how to use the Digital Duplicator Utility, which lets you adjust the appearance of your document before duplicating. For example, you can enlarge or reduce the size of the image, change the color, or select an area. This utility also provides a variety of duplicating functions.
■ Part 2 Scanner Function ( P. 74)
This part explains how to use the scanner driver, which lets you adjust the appearance of your document before scanning. For example, you can enlarge or reduce the size of the image, change the contrast or brightness, or perform other enhancement selections to improve the final image, making it better than the original.
■ Part 3 Printer Function ( P. 108)
This part explains how to use the print features through the printer drivers (Windows® 95*1 / Windows 3.1*2 / Windows NT® 4.0*3).
■ Appendix ( P. 150)
This section consists of Troubleshooting (P. 151), Print Quality and Required Memory (P. 166) and Index (P. 168).
Microsoft, Windows and Windows NT are registered trademarks of Microsoft Corporation in the United States and/or other countries.
Corel is a trademark of Corel Corporation.
Adaptec and EZ-SCSI are trademarks of Adaptec, Inc.
All other acknowledgements are trademarks or registered trademarks of their respective holders.
* 1 Microsoft® Windows® 95 operating system (hereafter Windows 95)
* 2 Microsoft® Windows® operating system Version 3.1 (hereafter Windows 3.1)
* 3 Microsoft® Windows NT® Workstation operating system, and Microsoft® Windows NT® Server network operating system Version 4.0 (hereafter Windows NT 4.0)
It is granted from Microsoft Corporation to use Microsoft® Windows® Screen Shot(s).
Any details given in this manual are subject to change without notice.
Names and Functions 6
Option Buttons 10
Basic Tasks
Using the Print Preview Window 12
Reducing or Enlarging the Output (Zoom) 16
Displaying the Zoom Window 16
Changing the Zoom Value 18
Printing an Enlarged Image on Multiple Pages ..... 20
Shifting an Image 24
Displaying the Shift Window 24
Background Reduction 26
Selecting Print Quality 28
Creating a Mirror/Negative Image 29
Creating a Mirror Image 29
Creating a Negative Image 29
Double Side Printing 30
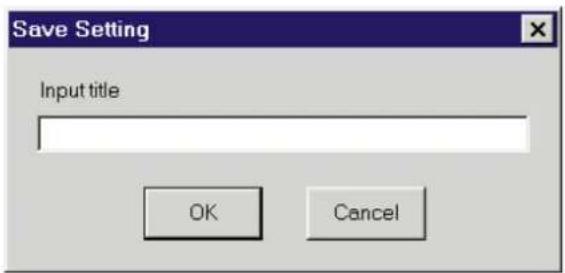
Saving, Loading or Deleting a Setting 32
Saving the Current Settings 33
Loading a Saved Setting 35
Deleting a Setting 36
Changing the Unit of Measurement (mm or inch) ..... 37
Changing the Preview Resolution 38
Enabling Jam Recovery ON 39
Table of Contents
Adjusting Colors
Adjusting the Overall Color of an Image 40
Displaying the Color Adjust Entire Image Window ..... 40
Adjusting a Specific Color of an Image 43
Modifying Color Data 46
Deleting the Stored Color Data 47
Area Duplicate
Area Duplicate Function 48
Displaying the Area Duplicate Window 49
Pasting an Area of an Image in the Layout Box 52
Moving a Selection Area in the Original Box 55
Resizing a Selection Area 56
Canceling a Selection Area 56
Moving an Image in the Layout Box 57
Resizing an Image in the Layout Box 57
Creating a Mirror or Negative Image in the Layout Box .... 60
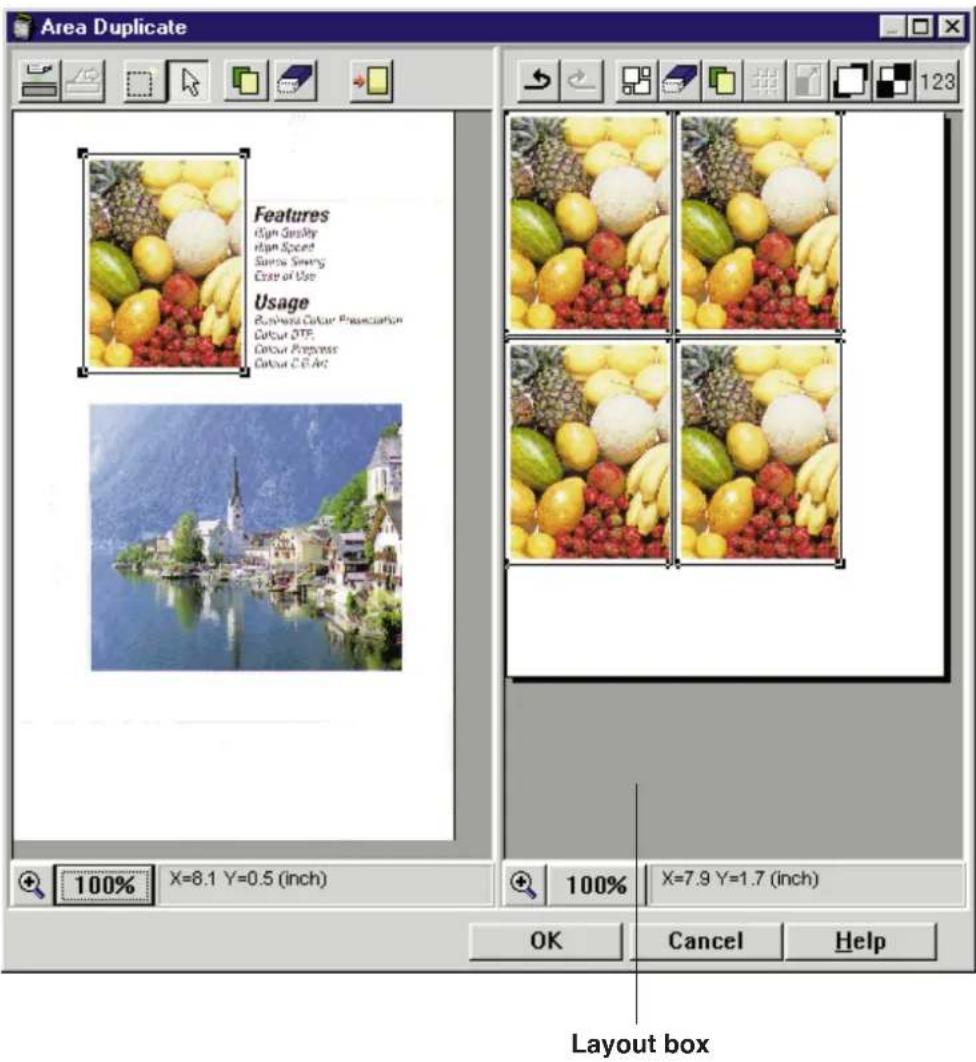
Creating Multiple Images in the Layout Box 61
Duplicating an Image in the Layout Box 63
Enlarging an Image to Fit on Paper 64
Zooming an Image in the Layout or Original Box 65
Moving the Selected Area to the Front in the Layout Box . . 66
Moving the Selected Area to the Back in the Layout Box . . . 66
Deleting an Image in the Layout Box 66
Using Template Function 67
Digital Duplicator Utility Window Overview
Displaying the Digital Duplicator Utility Window
To display the Digital Duplicator Utility main window, perform either of the following steps.
■ For Windows 95 / Windows NT 4.0
1 Click Start.
2 Select Programs, select KX-PS8000 Utilities then click Digital Duplicator Utility.
The Digital Duplicator Utility main window appears.
■ For Windows 3.1
1 From the Program Manager, double-click the KX-PS8000 Utilities icon.
2 Double-click the Digital Duplicator Utility icon. The Digital Duplicator Utility main window appears.
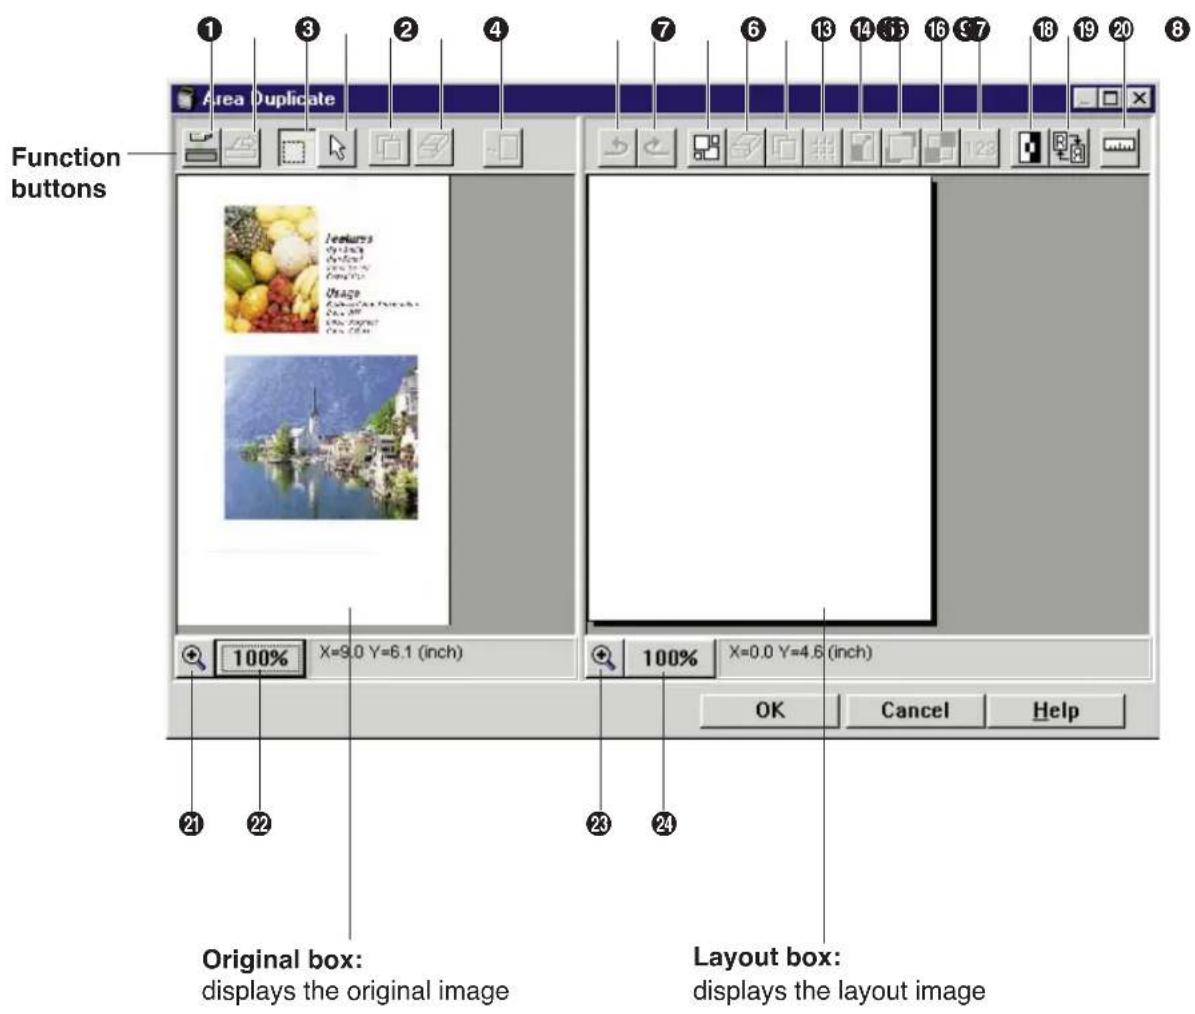
Names and Functions
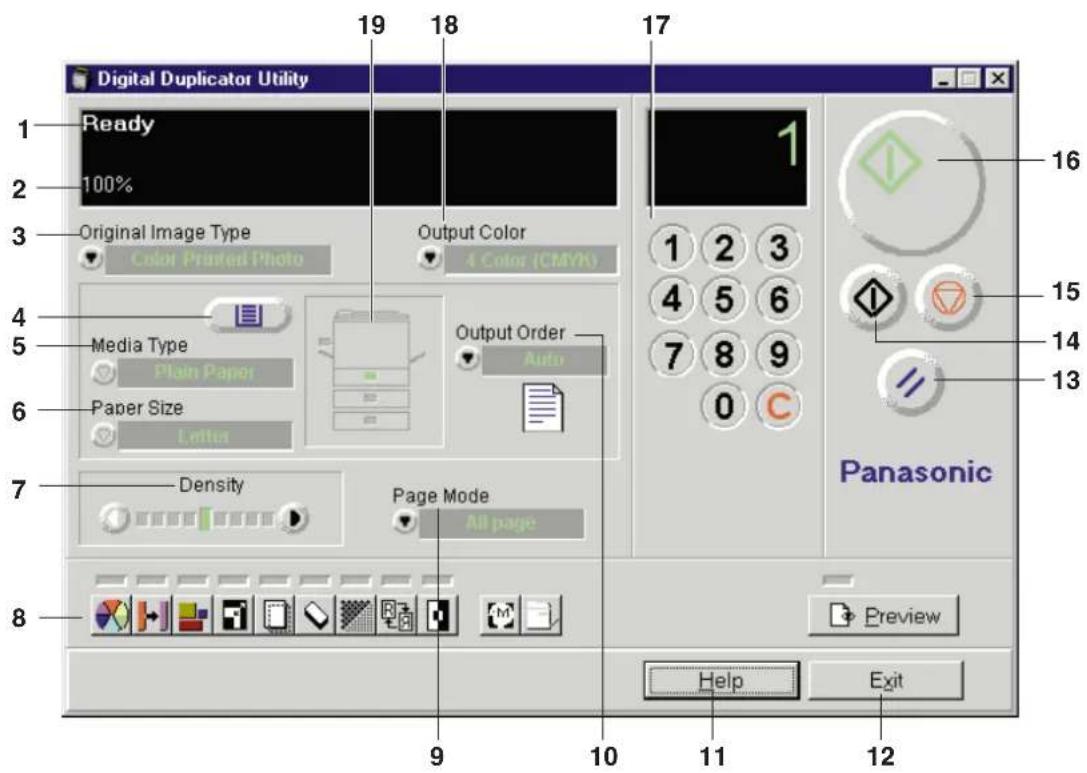
| No. | Name Function | |
| 1 | Status display | Displays the status of the printer and the scanner.Readywill be displayed when you open the main window. If not, refer toTroubleshooting( P. 151). |
| 2 | Zoom Value display | Displays the zoom value currently set. When the zoom values of the height and the width are the same, one value is displayed. If they are different, two values such as 100 × 50% are displayed.Clicking on the displayed zoom value opens theZoomwindow( P. 16). |
| 3 | Original Image Type | Used to select an image type by clicking ▼.● Color Printed Photo:Select for color printed materials such as a catalog. The color mode is selected in the Output Color ( No. 18).● Color Glossy Photo:Select for color photos such as a glossy photo. The color mode is selected in the Output Color ( No. 18).● B/W Text:Select for text.The monochrome color is selected in the Output Color ( No. 18).● B/W Halftone, Photo:Select for monochrome Photo or halftone original. The monochrome color is selected in the Output Color ( No. 18).The image can be viewed in the Print Preview window ( P. 12). |
| 4 | Tray Selection button( [IMAGE] ) | Allows you to select an installed tray by clicking this button or by pressing F12 on the keyboard. The indicator of the selected tray will be illuminated in the tray display ( No. 19). |
| 5 | Media Type | Allows you to select a media type loaded in the multi-purpose tray by clicking ▼. This is effective only when the multi-purpose tray is selected. Plain Paper, Transparency, Label, Coated paper or Paper 2nd Side can be selected. |
| 6 | Paper Size | Allows you to select a paper size loaded in the multi-purpose tray by clicking ▼, or displays the paper size of the selected media tray. This is effective only when the multi-purpose tray is selected. Letter, Legal or A4 can be selected. |
| 7 | Density | Printing density can be adjusted by clicking ▶ or ◀or by pressing + or - keys on the keyboard. |
| 8 | Option Buttons | Various options for editing an image can be selected ( P. 10). |
| Page Mode9 | Allows you to select a page mode by clicking ▼.● All page- All documents will be duplicated.● Even page * - Only even pages will be duplicated.● Odd page * - Only odd pages will be duplicated.This function is used for double side printing ( P. 30)*When Even page or Odd page is selected, the Output Order selection ( No. 10) is not effective and the documents are automatically printed face up. |
Digital Duplicator Utility Window Overview
| No. | Name Function | |
| 10 | Output Order | Specifies whether your document prints face up or face down in the printer's output tray by clicking ▼.Note: This selection is not effective when the MPT (Multi-Purpose Tray) is selected. When the MPT is selected, Face up is automatically selected. |
| 11 | ( Help ) | Views the help information by clicking Help Help button |
| 12 | Exit button( Exit ) | Exits the Digital Duplicator Utility window by clicking Exit. |
| 13 | Reset button( 🎨 ) | Resets all settings to default settings by clicking 🎨or by pressing the Home key on the keyboard. If you press 🎨while printing, the printer stops printing. |
| 14 | B/W Text Start button( 🔒 ) | Clicking 🔒 or pressing the Ctrl + S keys on the keyboard forces a document to print in black and white regardless of the color settings.Note: When the B/W Text is selected in the Original Image Type ( No. 3) and Black is selected in the Output Color ( No. 18), pressing the Start button ( 🔒 ) prints a document in black and white. |
| 15 | Stop button( 🔒 ) | Stops printing by clicking 🔒 . |
| 16 | Start button( 🔒 ) | Starts printing by clicking 🎨or by pressing the S key on the keyboard. It is also used to resume printing after loading media, or after clearing a media jam when the Jam Recovery ON is selected ( P. 39).When the Energy Star is set to ON if the printer is idle for 30 minutes, the printer will enter the Sleep Mode. The status display in the Digital Duplicator Utility window shows the message Ready (Sleep). While the printer is in the Sleep Mode, a document cannot be duplicated. To release the Sleep Mode, click the Start button ( 🔒 ). The message Ready will appear in the status display. |
| Numeric keypad17 | Used to enter the number of duplicates (1-999).Clicking 🎨or pressing C key on the keyboard resets the duplicate count to 1. |
Digital Duplicator Utility Window Overview
| No. | Name Function | |
| 18 | Output Color | Sets an output color. The items of Output Color vary depending on the item selected in theOriginal Image Type( No. 3).(1) When the Color Glossy Photo or Color Printed Photo is selected, 4 Color (CMYK) or 3 Color (CMY) can be selected. The 3 Color (CMY) selection provides faster duplicating speed, and is used only when printing on plain paper.When Transparency, Label or Coated paper media type is selected, 3 Color (CMY) cannot be selected.(2) When the B/W Text or B/W Halftone, Photo is selected, a monochrome color (Black, Yellow, Magenta or Cyan) can be selected. |
| 19 | Tray display | Displays the status of the selected tray. If the selected tray has paper installed, the green indicator will be illuminated. Otherwise, the red indicator will be illuminated. |
Digital Duplicator Utility Window Overview
Option Buttons
Various options for editing an image can be selected.
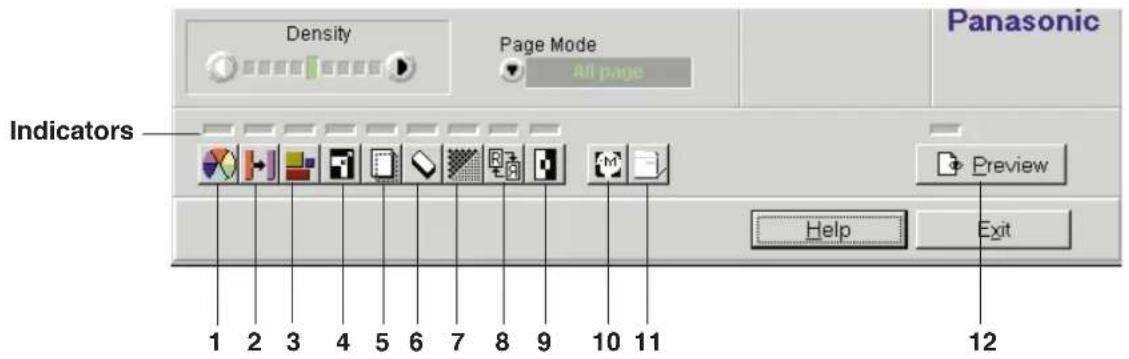
| No. | Button Name | Function | |
| 1 |  | Color Adjust Entire Image button | Adjusts the overall color of an image ( P. 40). |
| 2 |  | Color Adjust Specific Point button | Adjusts a specific color of an image ( P. 43). |
| 3 |  | Area Duplicate button | Allows you to select and edit an area of an image ( P. 48). |
| 4 |  | Zoom button | Enlarges or reduces an image ( P. 16). |
| 5 |  | Shifts an image ( P. 24).Shift button | |
| 6 |  | Background Reduction button | Reduces the visibility of a reverse side print and can reduce background stains ( P. 26). |
| 7 |  | Quality button | Changes the resolution setting ( P. 28). |
| 8 |  | Mirror button | Creates a mirror image of the original ( P. 29).● To return to the original, click this button. |
| 9 |  | Negative/Positive button | Creates a negative image of the original ( P. 29).● To return to the original, click this button. |
| 10 |  | Memorize Settings button | Saves, loads, or deletes the settings made in this utility ( P. 32). |
| 11 |  | Other Settings button | Used to select a unit of measurement (inch or mm) ( P. 37), a resolution (30 dpi or 60 dpi) ( P. 38), and enable or disable the Jam Recovery function ( P. 39). |
| 12 | Print Preview button | Allows you to preview the print image by clicking this button, or by pressing the Page Down key on the keyboard. The Print Preview window also shows immediately how your changes affect the image ( P. 12). |
■ Indicators
When an option button indicator is illuminated, it indicates that the default setting has been changed.
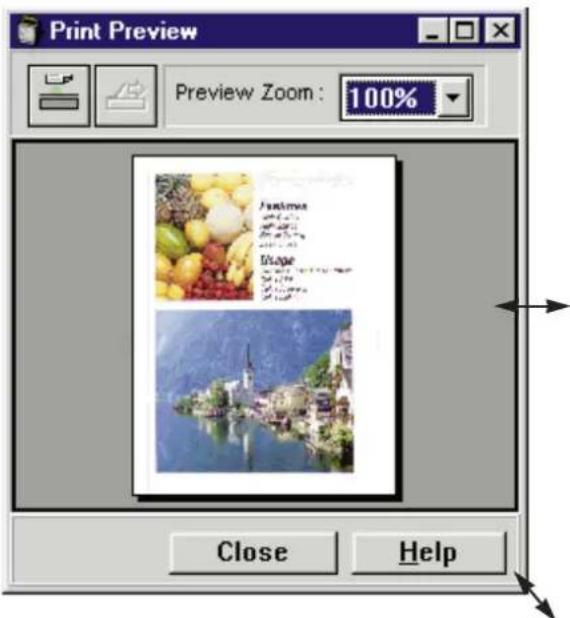
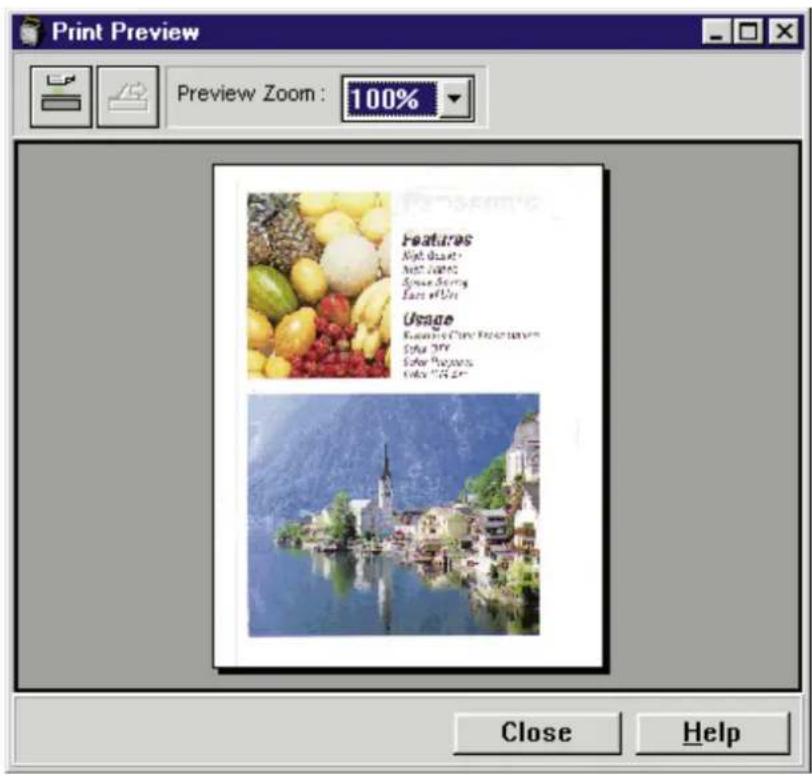
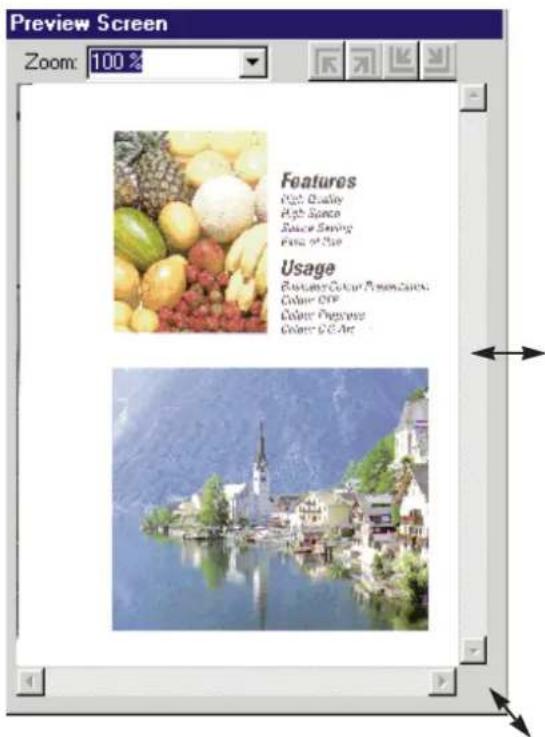
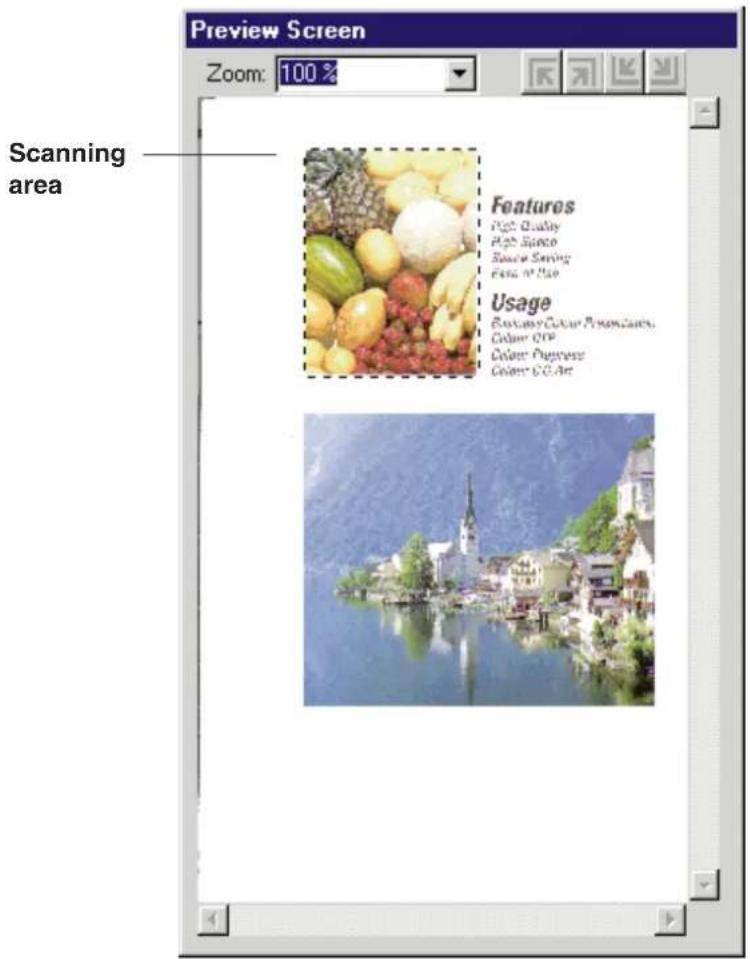
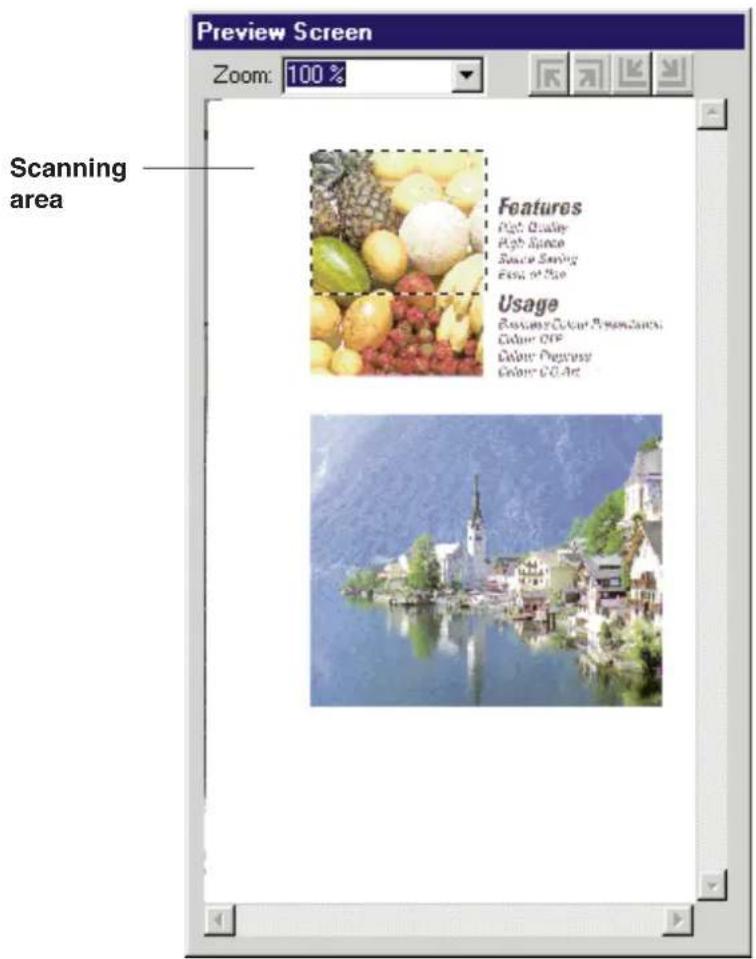
Using the Print Preview Window
The Print Preview window allows you to preview the print image of the document. Before sending it to the printer, all adjustments are shown immediately. It is helpful to open this window when you adjust an image using Zoom, Shift, Mirror or Negative/Positive functions.
Make sure that your document has been inserted in the ADF tray or placed on the scanner glass.
1 Click the Print Preview button (Preview).
The scanner starts prescanning the document. During prescanning the document the Scanning Progress window appears, then the prescanned image appears in the Print Preview window.
Note:
- The Print Preview will not automatically prescan documents if a document has already been prescanned. To represcan your document, click the Prescan button (☐) in the Print Preview window.
When the Prescan button is pressed, the Area Duplicate and Color adjustment settings will be reset to the default settings.
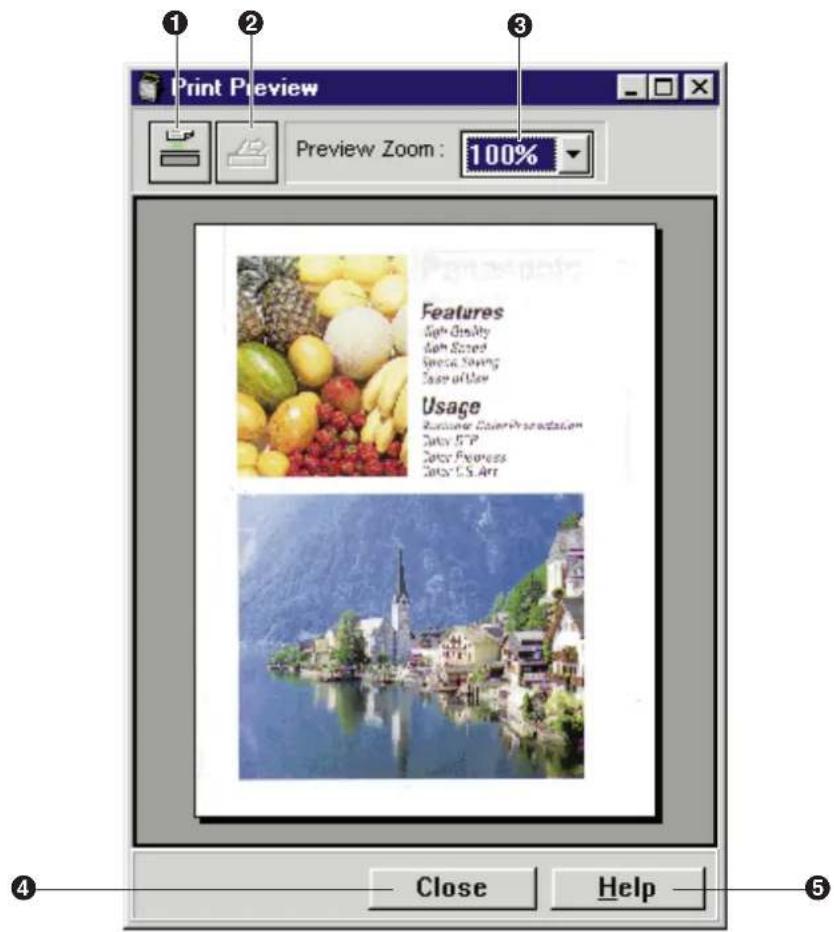
① Prescan button
Prescans a document and resets the Area Duplicate and the Color Adjustment settings to the default settings.
If a document is duplicated from the ADF tray, the document is ejected completely. However, if a document is prescanned from the ADF tray but not duplicated, it will remain in the ADF tray. To eject the document, press the Feed Out button ( [ ] ②).
② Feed Out button
Ejects the document that remains in the ADF tray.
③ Preview Zoom
Sets the zoom value (100, 125, 150, 175 or 200%) of the displayed image in the Print Preview window.
④ Close button
Closes the Print Preview window.
⑤ Help button
Displays help information on the Print Preview window.
■ Changing the size of the Print Preview window
Position the cursor on the side/corner of the window. The mouse pointer changes into a double-ended arrow. Press and hold the mouse button, and drag the side/corner to obtain the desired size. Then release the mouse button.
Reduced window
Enlarged window
■ Simultaneously viewing the enlarged and divided image
When Segment is selected for the enlarged image ( P. 20), the divided multiple images will be displayed in the Print Preview window.
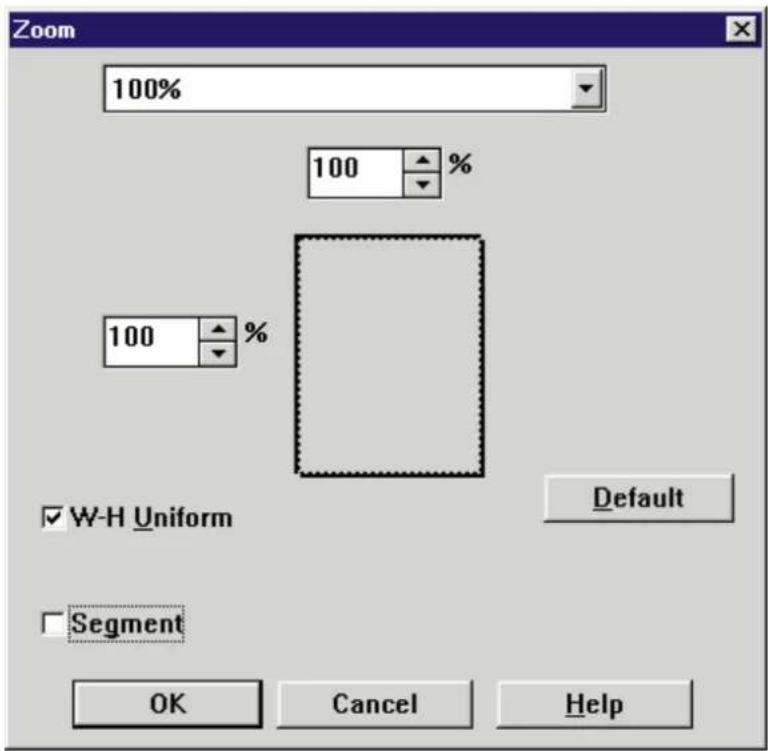
Reducing or Enlarging the Output (Zoom)
The zoom function reduces or enlarges the output on the printed page. For your convenience, open the Print Preview window to view changes to your image.
Note:
- When using the ADF tray, you cannot print an image enlarged more than 100%.
Displaying the Zoom Window
1 Click the Zoom button ( [f] ).
The Zoom window appears.
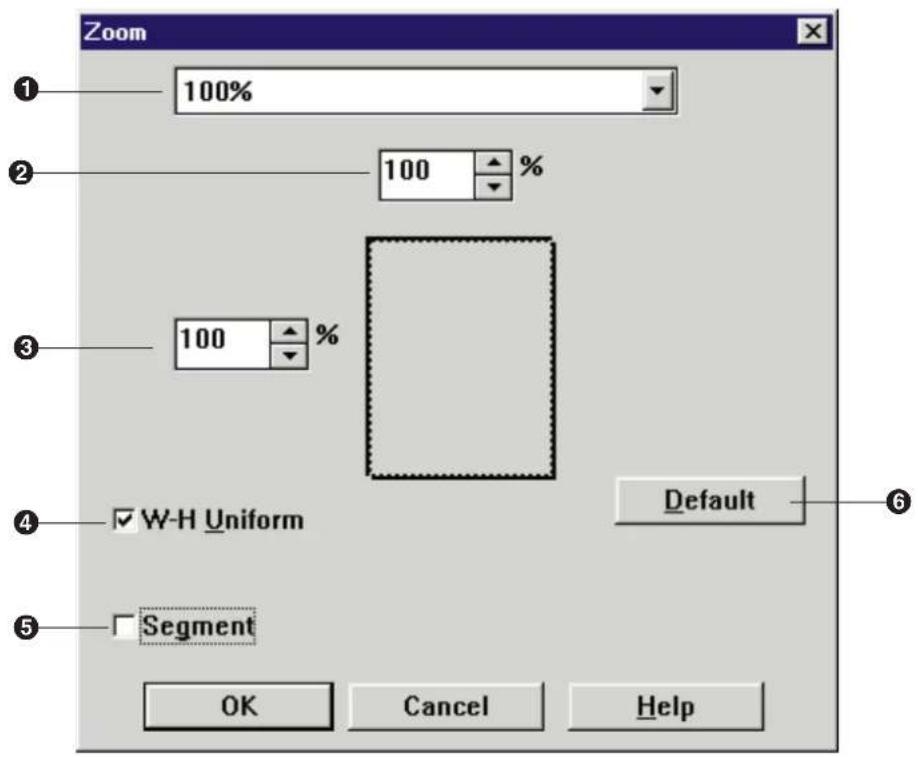
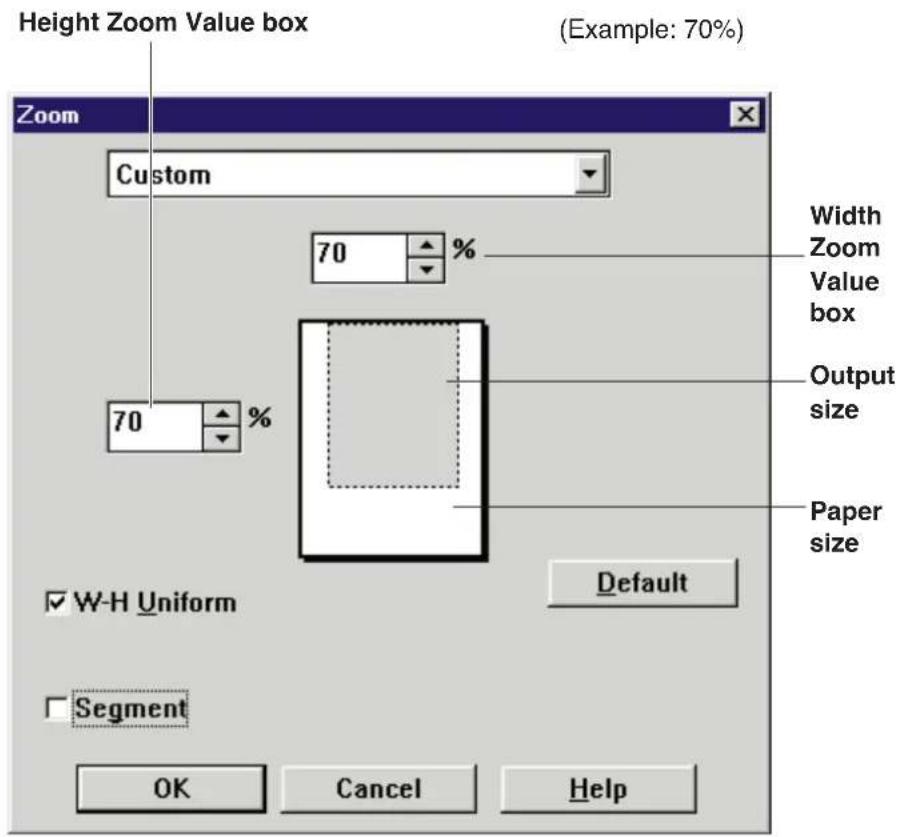
① Zoom Value box
Displays the current zoom value. It also allows you to select a zoom value by clicking ▼ ( P. 18). Choosing a selection maintains the proportional relationship of the height and width of an image.
② Width Zoom Value box
Set the zoom value of the width by clicking ▲ or ▼.
③ Height Zoom Value box
Set the zoom value of the height by clicking ▲ or ▼.
④ W-H Uniform
Clicking on this check box allows you to set height and width simultaneously by entering zoom value in either of their box. To set them independently, click off this check box.
⑤ Segment
Divides the enlarged image ( P. 20).
⑥ Default button
Resets the settings to the default settings.
Changing the Zoom Value
Change the zoom value by selecting an option from the Zoom Value box or by entering it in the Width or Height Zoom Value box.
■ Using the Zoom Value box
1 Click ▼ of the Zoom Value box.
The zoom value selections appear ( □ table below).
2 Click the desired selection.
The selected zoom value will be displayed in the Zoom Value, Width Zoom Value and Height Zoom Value boxes. You can see the result of the selection in the Print Preview window.
3 Click OK to make the selection effective.
The Zoom window will close.
| Selections FunctionZoom value | ||
| 100% | 100% | Duplicates the same size as the original.If the document size is the same as paper size,the edges of the document will not be printed. |
| 400% | 400% | Duplicates 4 times the original. |
| 300% | 300% | Duplicates 3 times the original. |
| 200% | 200% | Duplicates twice the original. |
| 50% | 50% | Duplicates at 50% of the original. |
| Custom | — | This option is automatically selected when the zoom value of width and height are set using the Width or Height Zoom Value box. |
| A5->A4 (fit) | 135% | Enlarges to fit the A5 size document on A4 size paper. |
| A4->A4 (fit) | 95% | Duplicates an entire A4 size document on A4 size paper. |
| A4->Letter (fit) | 90% | Duplicates an entire A4 size document on Letter size paper. |
| Letter->Letter (fit) | 96% | Duplicates an entire letter size document on Letter size paper. |
| Letter->A4 (fit) | 92% | Duplicates an entire letter size document on A4 size paper. |
| Letter ->Legal (fit) | 96% | Duplicates an entire letter size document on Legal size paper. |
| Legal->Legal (fit) | 96% | Duplicates an entire Legal size document on Legal size paper. |
■ Using the Width / Height Zoom Value boxes
1 Enter the zoom value in either the Width or Height Zoom Value box by clicking ▲ or ▼.
You can see the result of the selection in the Print Preview window.
▲ : increases the number of the zoom value (maximum 400%).
▼ : reduces the number of the zoom value (minimum 20%).
Holding down the mouse sequentially changes the zoom value.
- To set each value independently, click off the W-H Uniform check box.
2 Click OK to make the selection effective.
The Zoom window will close.
Note:
- The zoom value range available in the Digital Duplicator Utility is from 20 to 400% . If you have used 200% for Area Duplicate function (P.58), you can set the percentage up to 200% .
Printing an Enlarged Image on Multiple Pages
You can enlarge the image and print it on multiple pages. Each divided image overlaps 0.5 inch.
Note:
- The ADF tray cannot be used when performing a multi-page print.
■ Example: Enlarging a Letter size document to 140% and printing it on multiple pages
1 Click the Zoom button (F). The Zoom window appears.
2 Click on the Segment check box.
The Document Size box appears at the bottom of the Zoom window.

Note:
- The Document Size determines the size of the scanning area. The closest size to the document must be selected from the Document Size box.
3 Click the Document Size box, then click Letter.
Note:
- If an image has been pasted in the Layout box of the Area Duplicate window, the Document Size box becomes inactive. In this case, the paper size selected in the Digital Duplicator Utility window will be automatically assigned.
4 Set the width and length zoom value to 140% by clicking ▲ or ▼ of the Width or Height Zoom Value box.
The printing area (shade) is displayed on the divided pages.
5 Click OK to make the selection effective.
- To cancel the selection, click Cancel.
The Zoom window will close and its indicator is lit.
- If the Print Preview window is opened, the result of the selection is displayed.
6 Click the Start button ( ).
The printer starts printing multiple pages.
Shifting an Image
The Shift function shifts (scrolls) the image.
Note:
- The Shift function is not effective when the Segment is selected in the Zoom window ( P. 21).
Displaying the Shift Window
1 Click the Shift button (☐).
The Shift window appears.
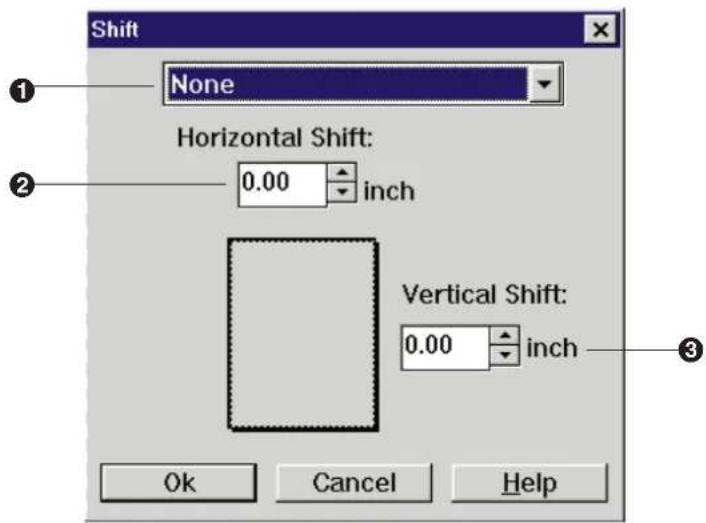
① Shift Direction box
Selects shift direction.
- None: Returns the image to original position.
- Left/Top Space: Allows you to make space on left and/or top.
● Right/Top Space: Allows you to make space on right and/or top. - Left/Bottom Space: Allows you to make space on left and/or bottom.
- Right/Bottom Space: Allows you to make space on right and/or bottom.
② Horizontal Shift box
Shifts the image horizontally.
③ Vertical Shift box
Shifts the image vertically.
- If you wish to use mm instead of inch, select mm in the Other Settings window (P. 37).
■ Example: Shifting the image 0.5" on the left and 0.3" on the top.
1 Click ▼ of the Shift Direction box, then select Left/Top Space.
2 Enter the desired space (0.5) in the Horizontal Shift box and (0.3) in the Vertical Shift box by clicking ▲ or ▼.
The image display reflects the changes.
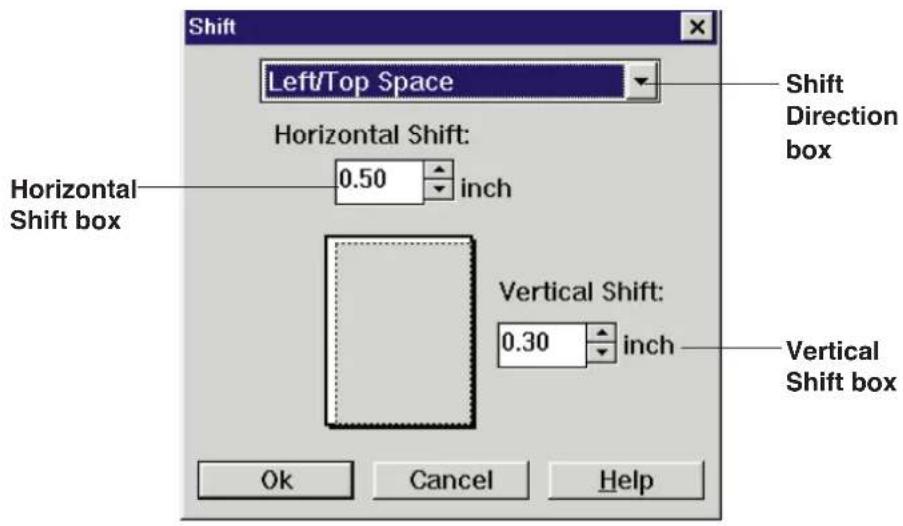
3 Click OK to make the selection effective.
- To cancel the selection, click Cancel.
The Shift window will close and its indicator is lit.
4 Click the Start button ( ).
The printer starts printing.
Background Reduction
When a double side printed document is printed, the reverse side print may be visible on the paper. To reduce this effect (visibility of a reverse side print), use the Background Reduction function.
1 Click the Background Reduction button (☑). The Background Reduction window appears.
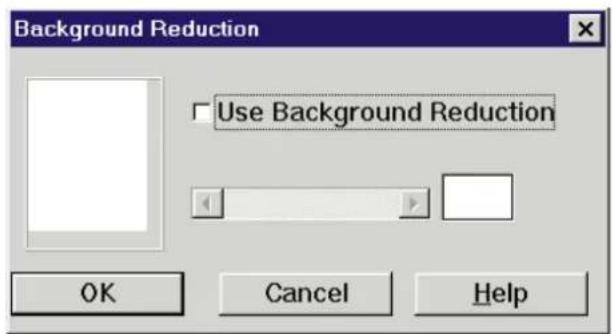
2 Click on the Use Background Reduction check box. The Background Level box becomes active.
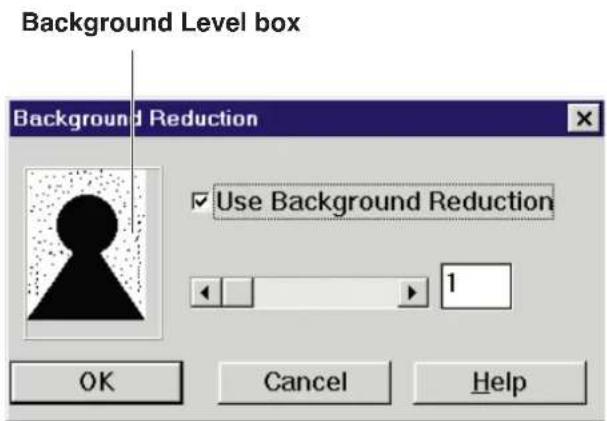
3 Drag the slider to right or click ▶ to reduce the background. The setting range is 1-8. The effect level is displayed in the Level box, and the result of the selection is displayed in the Background Level box.

4 Click OK. • To cancel, click Cancel. The Background Reduction window will close.
Selecting Print Quality
Three print quality modes (Standard, Fine and Enhanced) are available.
Fine or Enhanced mode provides better quality than Standard mode but takes longer to process.
The standard mode for the ADF tray and for the Flatbed (Scanner glass) can be selected individually.
| Selection Scanning resolution Printing resolution | ||
| Standard*1 | 300 × 300 dpi*1 | 600 × 600 dpi |
| 600 × 300 dpi*1 | ||
| Fine*2 | 600 × 600 dpi | |
| Enhanced*2 | 600 × 600 dpi 600 × 1200 dpi | |
*1 Standard (300 × 300 dpi for ADF tray, 600 × 300 dpi for Flatbed) is the default setting.
*2 Additional memory (SIMM, option) is required to select these modes ( P. 166 Print Quality and Required Memory).
To select a mode, perform the following steps.
1 Click the Quality button (☐).
The Quality window appears.
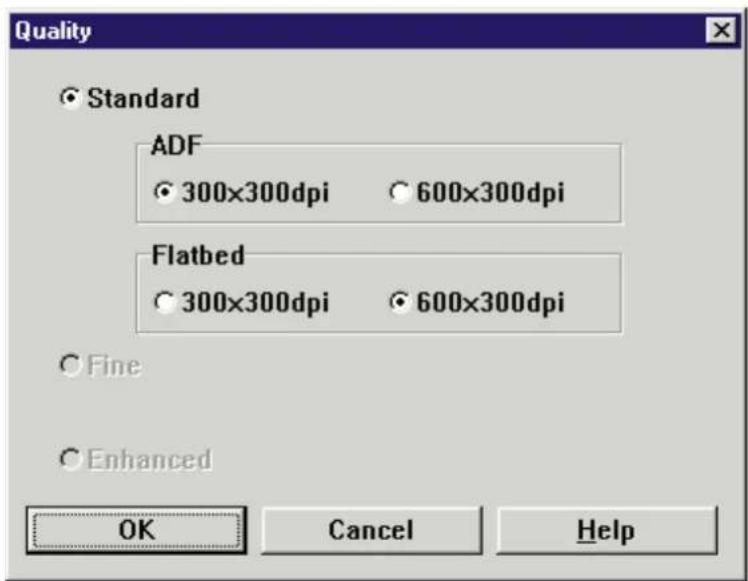
2 Click the desired mode.
3 Click OK.
- To cancel the selection, click Cancel
The Quality window will close.
Creating a Mirror / Negative Image
You can create a mirror or negative image of the original.
Mirror Image Negative ImageOriginal
Creating a Mirror Image
1 Click the Mirror button ( ).
The indicator is illuminated, and a mirror image of the document is displayed in the Print Preview window.
- To return to the original image, click the Mirror button again. The indicator is turned off.
Creating a Negative Image
1 Click the Negative/Positive button (☐).
The indicator is illuminated, and a negative image of the document is displayed in the Print Preview window.
- To return to the original image (positive image), click the Negative/Positive button again. The indicator is turned off.
Double Side Printing
Single sided documents can be printed on both sides of the paper by using the Page Mode function.
1 Insert the documents into the ADF with the printed sides facing up and top of the documents first.
2 Click ▼ of the Page Mode and select Odd page.
3 Click the Start button ( 🔍 ). Odd pages of the documents will be printed face up.
4 Place the printed pages in the multi-purpose tray of the printer with the page face down and top first. Select multi-purpose tray by clicking the Tray Selection button ( ☐ ).
5 Place all the documents into the ADF tray again ( Step 1 above).
6 Click ▼ of the Page Mode and select Even page.
7 Click ▼ of the Media Type and select Paper 2nd Side.
8 Click the Start button ( ).
Even pages will be printed on the back side of the paper.
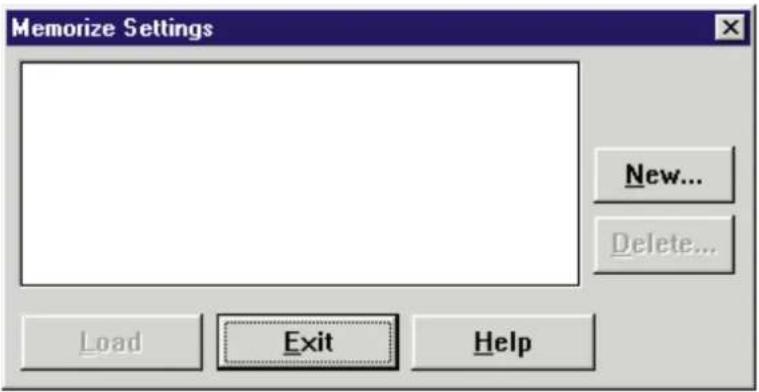
Saving, Loading or Deleting a Setting
The settings made in the Digital Duplicator Utility window can be saved, loaded or deleted by using the Memorize Settings button ( [M]).
Effective Settings for this function are as follows. The maximum number of saveable settings is 30.
Density ( P. 7)
Original Image Type ( P. 7)
Output Color ( P. 9)
Zoom ( P. 16)
Shift ( P. 24)
Background Reduction ( P. 26)
Mirror ( P. 29)
Negative/Positive (P. 29)
Unit ( P. 37)
Preview Resolution ( P. 38)
Overall Color adjustment ( P. 40)
Specific Color adjustment ( P. 43)
Saving the Current Settings
1 Click the Memorize Settings button (M).
The Memorize Settings window appears.
2 Click New...
The Save window appears.
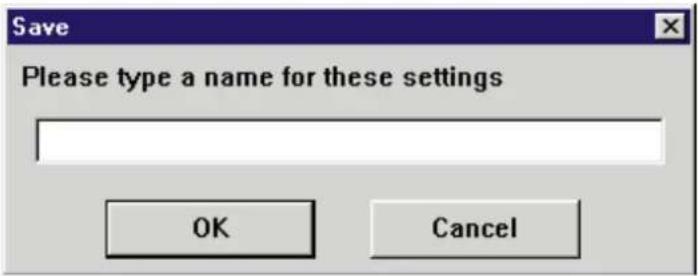
3 Enter a name for the setting.
A maximum of 32 characters can be entered.
(Example: color—zoom 120%)
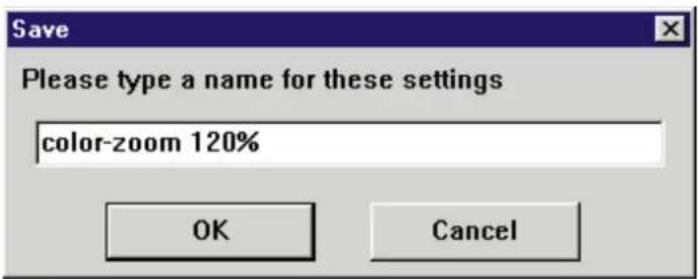
4 Click OK.
- To cancel, click Cancel.
The setting will be saved and listed in the Memorize Settings window.
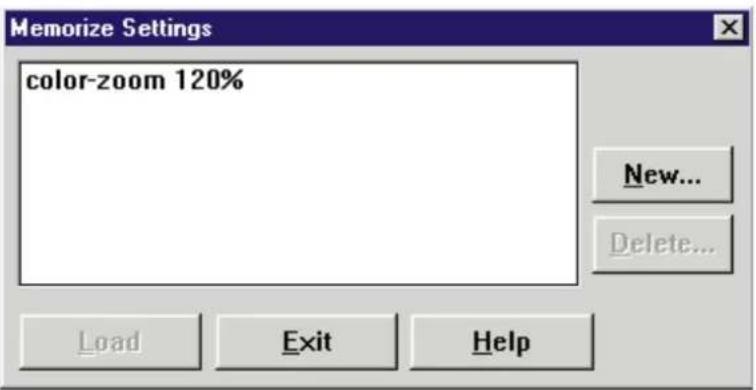
Note:
- Saved names will be listed in alphabetical order.
5 Click Exit.
The Memorize Settings window will close.
Loading a Saved Setting
1 Click the Memorize Settings button ( [M]).
The Memorize Settings window appears.

2 Click the setting you wish to load from the list.
3 Click Load.
The confirmation message appears.
4 Click Yes to load the setting.
- To cancel, click No .
The Memorize Settings window will close, and the new setting will be effective.
Deleting a Setting
1 Click the Memorize Settings button (☐).
The Memorize Settings window appears.
2 Click the setting that is to be deleted from the list.
3 Click Delete...
The confirmation message appears.
4 Click Yes.
- To cancel, click No .
The setting will be deleted from the Memorize Settings window.
5 Click Exit.
The Memorize Settings window will close.
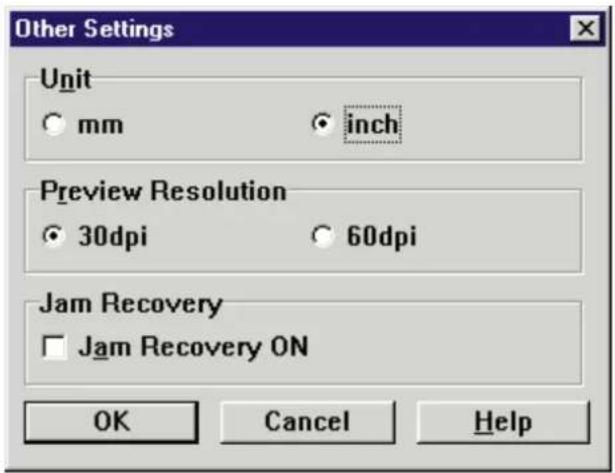
Changing the Unit of Measurement (mm or inch)
You can change the unit of measurement to mm or inch by using the Other Settings window.
1 Click the Other Settings button (☐).
The Other Settings window appears.
2 Click the desired unit of measurement.
3 Click OK.
- To cancel the selection, click Cancel. The Other Settings window will close.
Changing the Preview Resolution
To change the Preview Resolution setting, perform the following steps.
1 Click the Other Settings button (☐).
The Other Settings window appears.
2 Click the desired setting in the Preview Resolution box.
30 dpi : Provides fast operation.
60 dpi : Provides better image quality. However, the data transfer speed will be slower.
3 Click OK.
- To cancel the selection, click Cancel.
The Other Setting window will close.
Note:
- New resolution setting will become effective from the next prescan.
Enabling Jam Recovery ON
Enabling Jam Recovery ON resumes the print job when the printer recovers from a jam condition. When the printer recovers from a jam condition, the message Press Start Button appears in the Status display of the Digital Duplicator Utility window. Press the Start button ( ) to resume printing.
If the Jam Recovery ON is disabled, the print job will be canceled when the printer recovers from a jam condition.
Note:
- This function is effective only when a jam occurs in the printer during printing from the ADF tray and not effective when a jam occurs in the scanner.
To enable Jam Recovery ON, perform the following steps.
1 Click the Other Settings button (☐).
The Other Settings window appears.
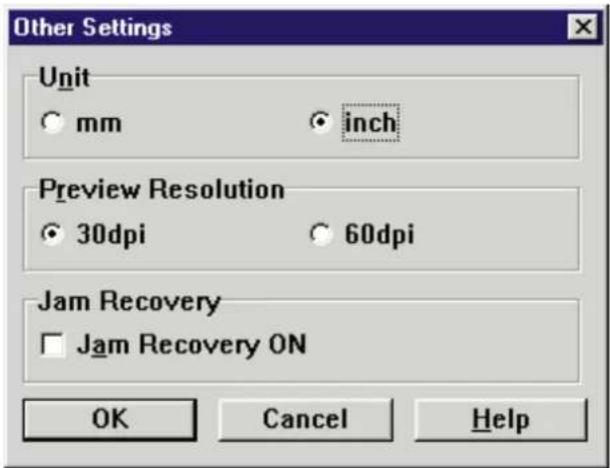
2 Click on the Jam Recovery ON check box.
- To disable, click off the check box.
3 Click OK. The Other Settings window will close.
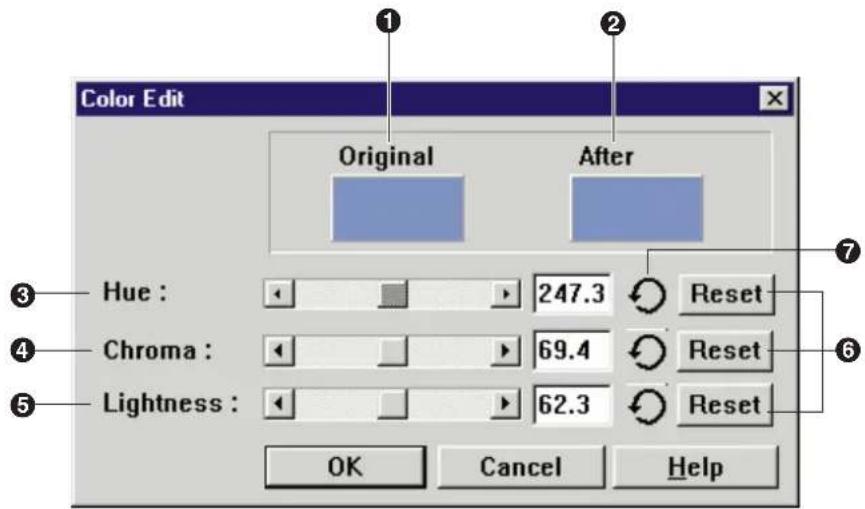
You can adjust the overall color of the image using HCL or CMYK options in the Color Adjust Entire Image window (below), or adjust a specific color of the image by using the Color Adjust Specific Point window (P. 43). The Color Adjustment Entire Image and Color Adjust Specific Point functions cannot be used simultaneously.
Adjusting the Overall Color of an Image
Displaying the Color Adjust Entire Image Window
1 Click the Color Adjust Entire Image button (☐) ( ☐ P. 10). The scanner starts prescanning the document, then the prescanned image appears in the Color Adjust Entire Image window.
Note:
- If a document has already been prescanned, the scanner will not automatically prescan the current document. The previous image appears in the Color Adjust Entire Image window.

■ Adjusting the overall color using HCL
To adjust the Hue, Chroma or Lightness, select HCL in the Color adjustment box.
① Original box
Displays the original image.
② After Color Adjust. box
Displays the result of an adjustment.
③ Hue
Changes the hue. The setting range is -30 to 30.
④ Chroma button
Changes the vividness of the image. The setting range is 0.5 to 1.5.
⑤ Lightness
Changes the lightness of the image. The setting range is -20 to 20.
6 Reset
Returns to the default setting.
1 Adjust the color by dragging each slider or clicking ◀ or ▶. You can see the result of the adjustment in the After Color Adjust. box.
2 Click OK.
- To cancel the selection, click Cancel. The Color Adjust Entire Image window will close.
■ Adjusting the overall color using CMYK
To adjust the level of Cyan, Magenta, Yellow or Black, select CMYK in the Color adjustment box.
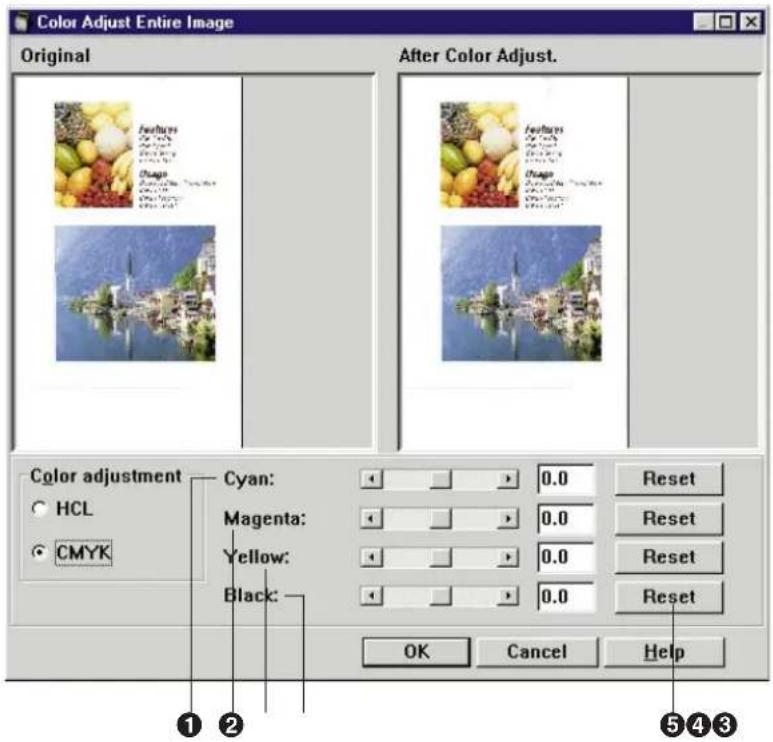
① Cyan
Changes the cyan color. The setting range is -20 to 20.
② Magenta
Changes the magenta color. The setting range is -20 to 20.
③ Yellow
Changes the yellow color. The setting range is -20 to 20.
④ Black
Changes the black color. The setting range is -20 to 20.
Note:
- When 3 Color (CMY) is selected in Output Color, Black cannot be adjusted.
⑤ Reset
Returns to the default setting.
1 Adjust the color by dragging each slider or clicking ◀ or ▶. You can see the result of the adjustment in the After Color Adjust. box.
2 Click OK.
- To cancel the selection, click Cancel. The Color Adjust Entire Image window will close.
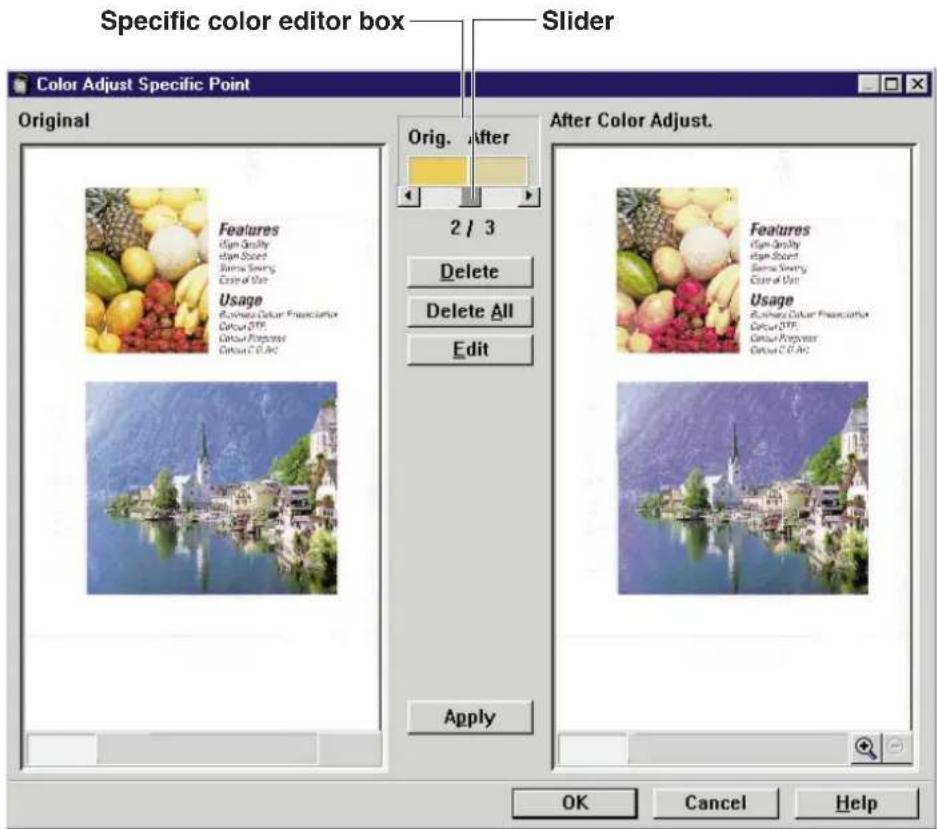
Adjusting a Specific Color of an Image
You can change a specific color without affecting other colors in the image.
1 Click the Color Adjust Specific Point button (☐).
The Color Adjust Specific Point window appears.
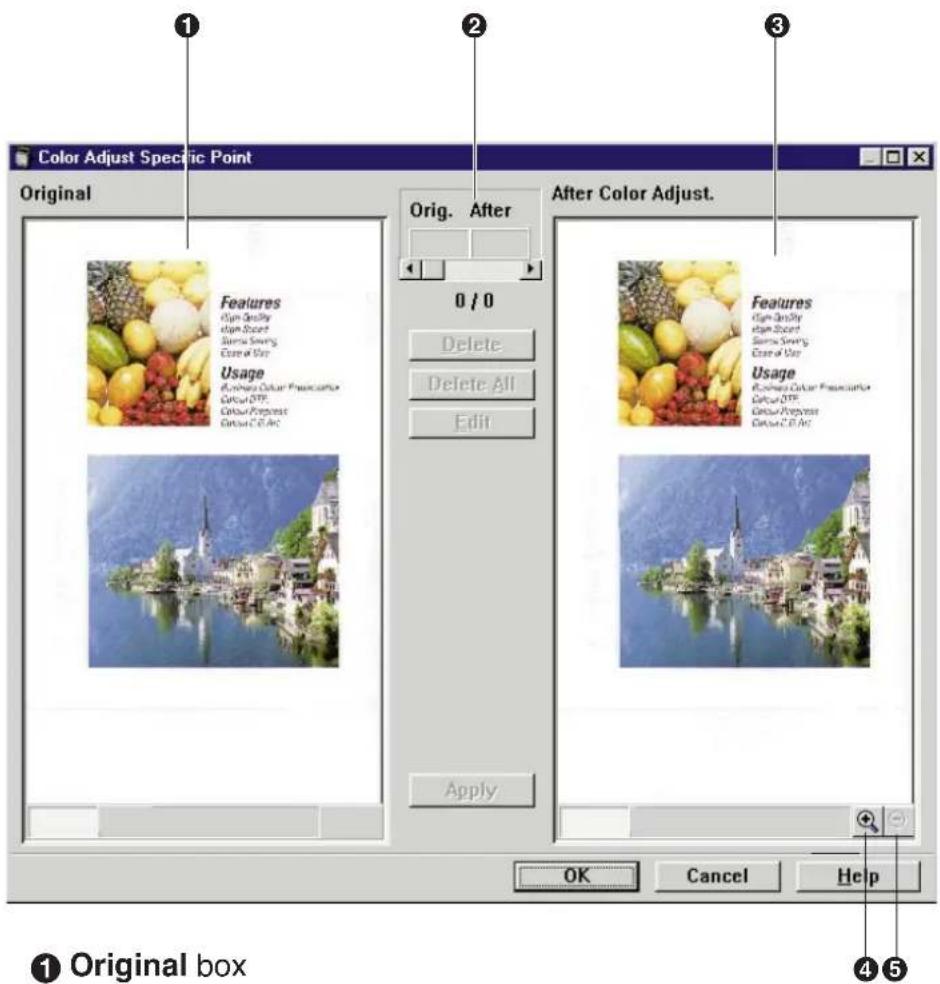
① Original box
Displays the original image.
② Specific color editor box
Displays the current color adjustment. It also allows you to store or modify the color adjustment settings.
③ After Color Adjust. box
Displays the result of adjustment.
④ Zoom Up button ( √ )
Enlarges the displayed image to 100% → 200% → 400%.
⑤ Zoom Down button ( - )
Reduces the displayed image to 400% → 200% → 100%.
2 Click the color of the image you wish to change in the Original box.
The Color Edit window appears.
① Original
Displays the original color.
② After
Displays the changed color.
③ Hue
Adjusts the hue.
④ Chroma
Adjusts the chroma.
⑤ Lightness
Adjusts the lightness.
⑥ Reset button
Returns to the original color.
⑦ Return button (○)
Returns to the settings that were active when this window was opened.
3 Adjust the color by dragging a slider or clicking ◀ or ▶ in Hue, Chroma or Lightness.
4 Click OK.
- If you do not wish to change the color, click Cancel.
The Color Edit window will close. The modified color data is stored in the Specific color editor box as follows:

5 Click Apply to view the change in the After Color Adjust. box.
6 Repeat steps 3 to 6 to adjust other specific colors.
A maximum of 40 color adjustments can be stored in the Specific color editor box.
7 Click OK to make all the settings effective.
- To cancel all settings, click Cancel. The Color Adjust Specific Point window will close.
Modifying Color Data
To modify the color that is already stored in the Specific color editor box, perform the following steps.
1 Drag the slider or click ◀, ▶ of the Specific color editor box to select the color data to be modified.
2 Click Edit.
The Color Edit window appears.
3 Adjust the color by dragging a slider or clicking ◀ or ▶ in Hue, Chroma or Lightness.
4 Click OK.
The color data is modified. Program preserves results of the modified color data immediately after you click OK in the Color Edit window.
5 Click Apply to see the result of the adjustment in the After Color Adjust. box.
6 Click OK.
The Color Adjust Specific Point window will close and the setting becomes effective.
Deleting the Stored Color Data
■ Deleting a single color data
1 Select the color data to be deleted by dragging the slider or clicking ◀ or ▶ of the Specific color editor box.
2 Click Delete.
The confirmation message appears.
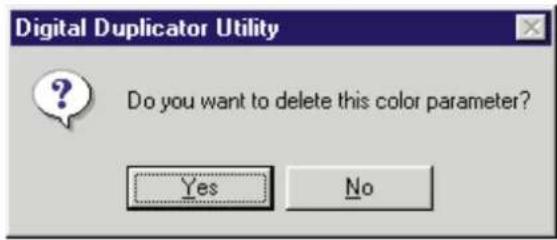
3 Click Yes.
The color data is deleted.
4 Click Apply to view the change in the After Color Adjust. box.
5 Click OK in the Color Adjust Specific Point window.
The Color Adjust Specific Point window will close.
■ Deleting all color data
1 Click Delete All
The confirmation message appears.
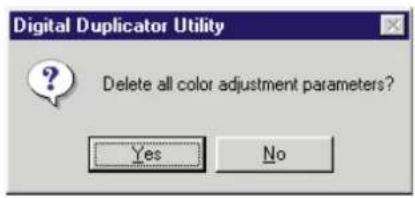
2 Click OK.
All color data is deleted.
3 Click Apply to view the change in the After Color Adjust. box.
4 Click OK in the Color Adjust Specific Point window.
The Color Adjust Specific Point window will close.
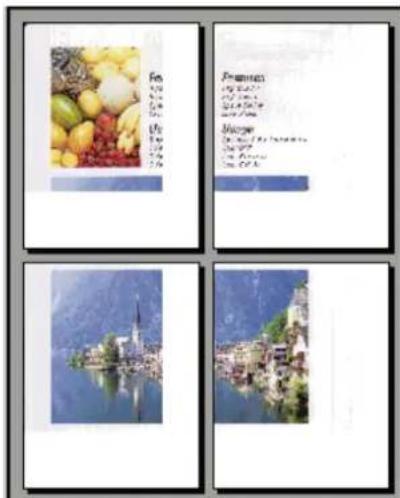
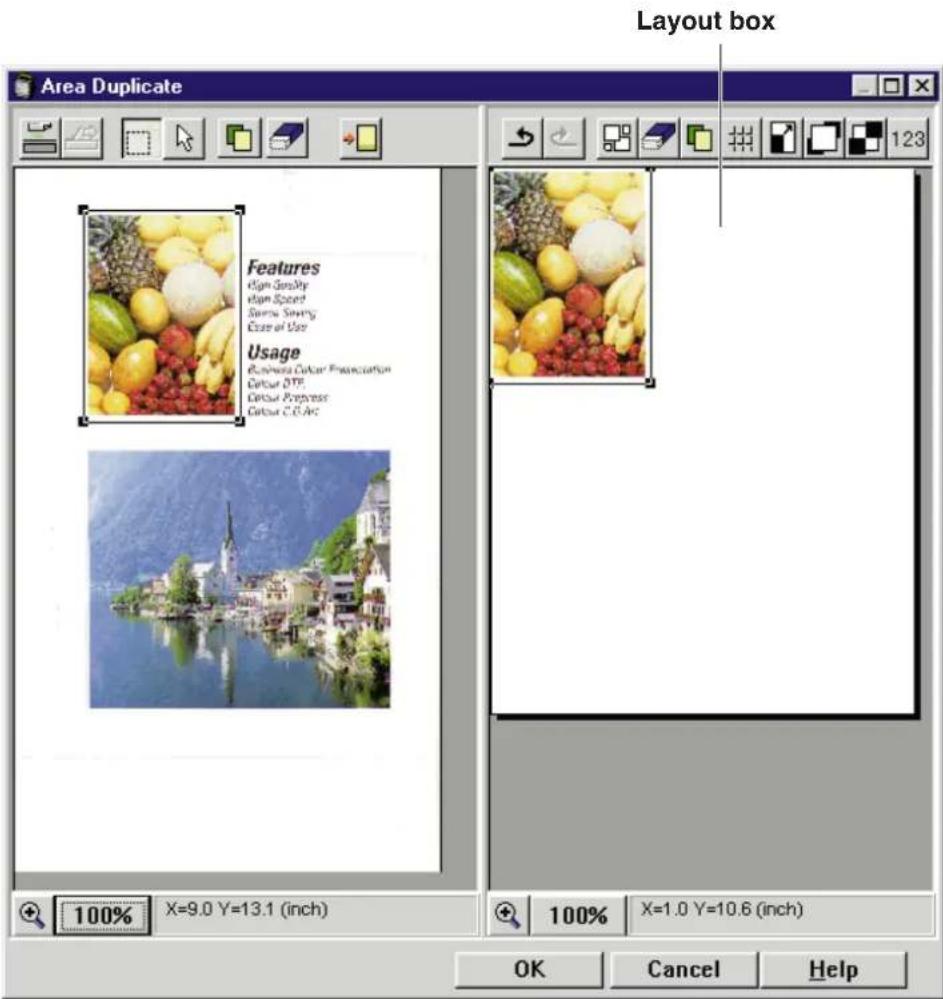
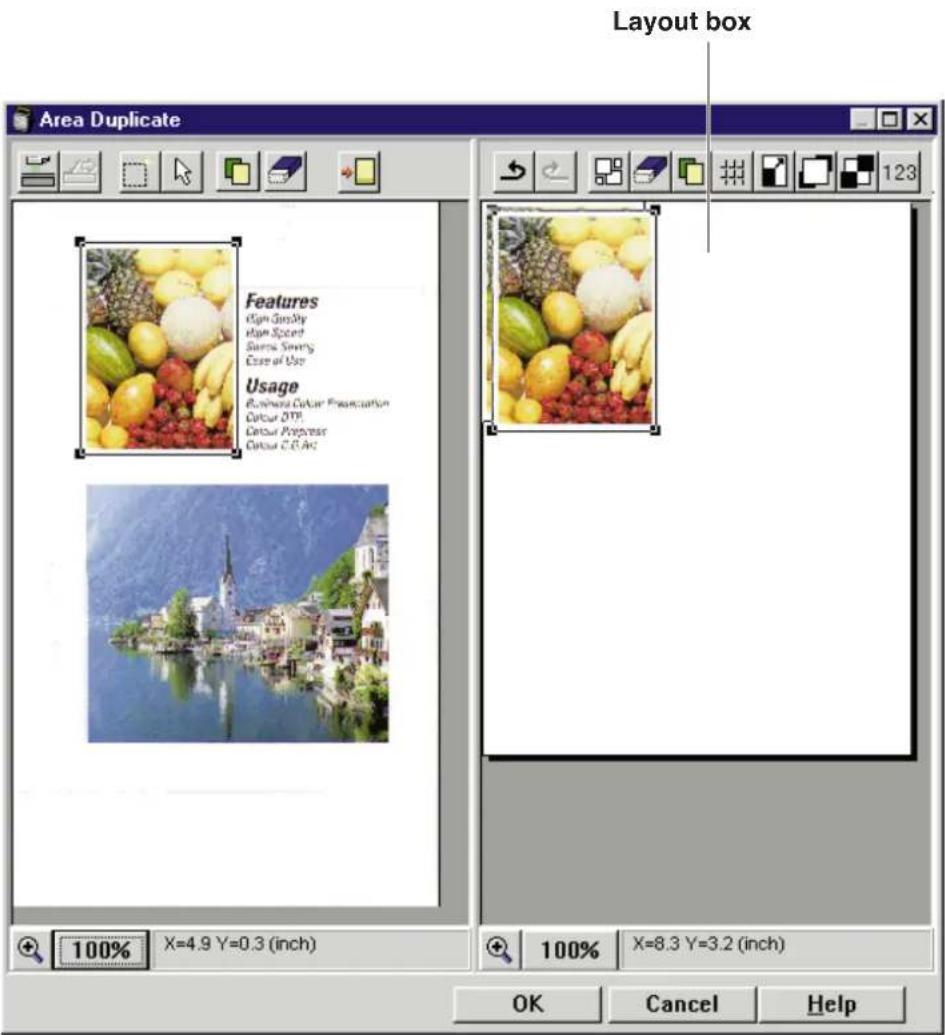
Area Duplicate Function
The Area duplicate function allows you to select an area of an image, then enlarge, reduce, or create multiple images before printing.
■ The desired area of the image can be duplicated
(Original)
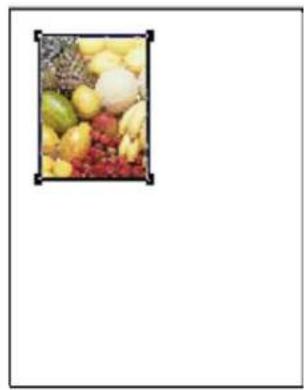
natural_image
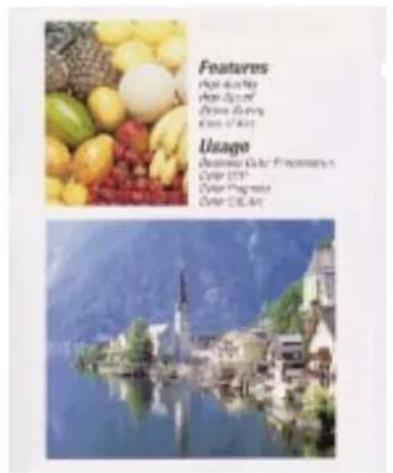
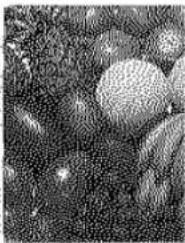
Close-up of assorted fresh fruits including peaches, pears, and strawberries in a rectangular frame (no text or symbols visible)(Image layout)
■ Create the desired page
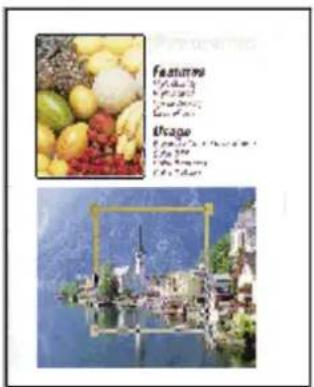
(Original)
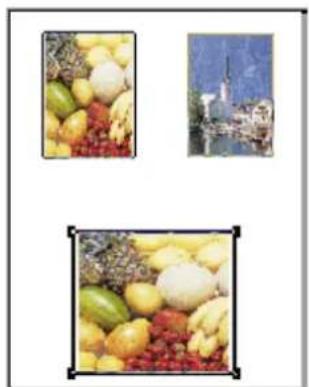
natural_image
Three-panel image showing fruit and landscape scenes: a close-up of yellow fruits, a distant cityscape with buildings, and a close-up of green and red fruits (no text or symbols)(Image layout)
Displaying the Area Duplicate Window
1 Click the Area Duplicate button ( ).
The Area Duplicate window appears.
A pop-up menu that displays the available functions can also be used instead of function buttons.
To display the pop-up menu, click the right mouse button in the
Original box or Layout box.
① Prescan button ( )
Prescans a document. The settings of the Area Duplicate and the Color Adjustment will be reset to the default settings. If a document is duplicated from the ADF tray, the document is fed out completely. However, if a document is prescanned from the ADF tray but not duplicated, it will remain in the ADF tray. To eject the document, press the Feed Out button ( ②).
② Feed Out button ( ☐ )
Ejects the document that remains in the ADF tray.
③ Create button (☐) Creates a selection area in the Original box.
④ Resize button (☐) Selects, resizes and moves a selection area.
⑤ Copy button (☐) Copies a selection area in the Original box.
⑥ Delete button (☐) Deletes a selection area in the Original box.
⑦ Paste button ( → ) Pastes a selection area in the Layout box.
⑧ Undo button ( ↗ ) Cancels a selection or operation such as copying, pasting etc.
⑨ Redo button ( 📊 ) Makes effective the same selection or operation that you canceled using the Undo button.
⑩ Select All button (☐) Selects all images in the Layout box.
⑪ Delete button ( [icon] ) Deletes an image in the Layout box.
⑫ Copy button (☐) Copies an image in the Layout box.
⑬ Repeat button ( ☐ ) Creates multiple images in the Layout box.
⑭ Fit To Paper button (☐) Enlarges an image in the Layout box to fit the printing area of paper.
⑮ Bring To Front button (☐) Moves a selected image in the Layout box to the front of all other images.
16 Send To Back button (☐) Moves a selected image in the Layout box behind all other images.
⑰ Digit button (123) Resizes an image in the Layout box by entering numerical value.
18 Negative/Positive button (☐) Creates a negative image in the Layout box.
19 Mirror button ( )
Creates a mirror image in the Layout box.
20 Template button ( )
Creates multiple templates in the Layout box.
② Original Zoom tool button ( + )
When this button is enabled, if you click an image in the Original Box using the left mouse button, the whole image will be enlarged. To reduce the image size, click the image using the right mouse button. To disable, click this button again. Also refer to page 65.
②2 Original Zoom button (100%)
Changes the zoom value used for the image in the Original Box.
②3 Layout Zoom tool button ( + )
When this button is enabled, if you click an image in the Layout Box using the left mouse button, the whole image will be enlarged. To reduce the image size, click the image using the right mouse button. To disable, click this button again. Also refer to page 65.
24 Layout Zoom button (100%)
Changes the zoom value used for the image in the Layout Box.
Pasting an Area of an Image in the Layout Box
1 Select an area of the image.
① Click the Create button (☐) The mouse pointer (+) appears.
Notes:
- When the Area Duplicate window is opened, the Create button (☐) is automatically selected.
- When the Create button (☐) is selected, the Resize button is not effective.
② Position the mouse pointer (+) in the Original box, hold down the mouse button, drag in any direction to form a rectangle, then release the mouse button.
The area of the image is selected.
Note:
- A maximum of 30 areas can be selected in the Original box.

- To cancel the selection area, click the Delete ( ) button. The rectangle is deleted.
- To enlarge/reduce the selection area, refer to Resizing a Selection Area (P. 56).
- To move the selection area, refer to Moving a Selection Area in the Original Box ( P. 55).
2 Paste the selection area in the Layout box by using either procedure A or B.
A Using the Paste button (→)
① Click the Paste button (→) in the Original box.
B Using the Resize button (☐)
① Click the Resize button (☐) in the Original box.
② Position the mouse pointer (◀) inside the selection area.
③ Hold down the mouse button and drag the entire selection area to the Layout box, then release the mouse button.
The selection area is pasted in the Layout box.
Note:
- A maximum of 30 areas can be pasted in the Layout box.
- To delete the pasted image, click the Delete button ( ) in the Layout box.
- To move the pasted image, refer to Moving an Image in the Layout Box (P. 57).
3 Click OK.
The Area Duplicate window will close and the setting becomes effective.
- To print the area of the image, click the Start button ( [icon] ) in the Digital Duplicator Utility window ( [icon] P. 5).
Note:
- If the image is prescanned from the ADF tray, only one image selection can be printed. When more than one area of the image has been created in the Layout box and the Start button ( 🔍 ) is pressed, the following error message appears.
Unable to print more than one area.
Moving a Selection Area in the Original Box
The image pasted in the Layout box changes by moving the selection area in the Original box.
1 Click the Resize button (☐).
2 Click inside a selection area in the Original box.
- To simultaneously select more than one area, click the areas while holding down the Shift key on the keyboard.
3 Hold down the mouse button, drag the selection area to the desired point, then release the mouse button.
The corresponding image area in the Layout box is changed to the same selection area in the Original box.
- To make the setting effective, click OK. The Area Duplicate window will close.
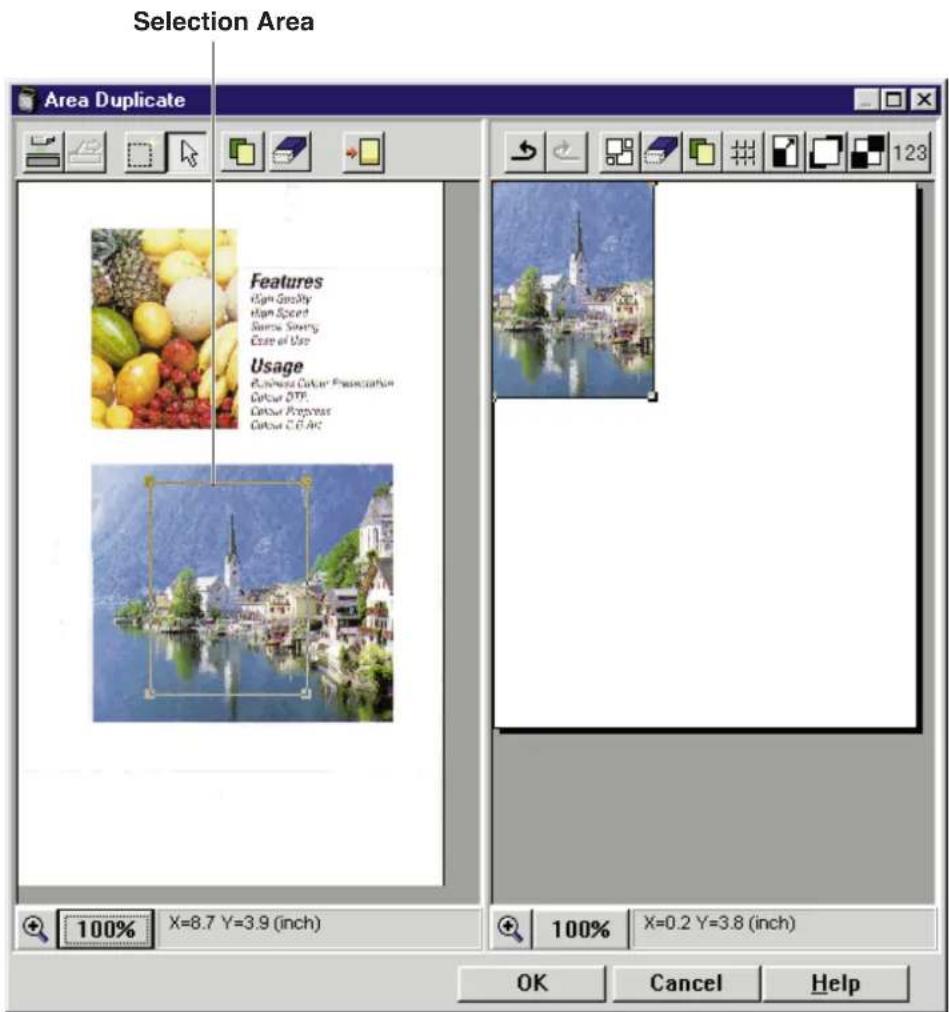
Resizing a Selection Area
The image pasted in the Layout box is resized by resizing the selection area in the Original box.
1 Click the Resize button (☐).
2 Click inside a selection area.
3 Position the mouse pointer ( ) to the side/corner of the selection area.
The shape of mouse pointer ( ) changes into a double-ended arrow( ).
4 Hold down the mouse button and drag the side/corner to obtain the desired size, then release the mouse button.
The corresponding image area in the Layout box is changed to the same selection area in the Original box.
Note:
- When an image is resized by dragging its corner, the width and the length will be resized with the same proportion.
- To make the setting effective, click OK. The Area Duplicate window will close.
Canceling a Selection Area
1 Click the Resize button (☐), then click the selection area that is to be canceled in the Original box.
2 Click the Delete button ( [icon] ) in the Original box.
The rectangle is deleted and the selection area is canceled.
The corresponding image in the Layout box is also deleted.
- To make the setting effective, click OK. The Area Duplicate window will close.
Moving an Image in the Layout Box
1 Click inside an image that is to be moved in the Layout box.
2 Hold down the mouse button, drag the image to the desired point, then release the mouse button.
The image is moved to the desired point in the Layout box.
- To make the setting effective, click OK. The Area Duplicate window will close.
Resizing an Image in the Layout Box
You can resize an image using a mouse or by entering digits.
■ Resizing using a mouse
1 Click an image that is to be resized in the Layout box.
2 Position the mouse pointer ( ) to the side/corner of the image.
The shape of mouse pointer ( ) changes into a double-ended arrow( ).
3 Hold down the mouse button and drag the side/corner to obtain the desired size, then release the mouse button.
Note:
- When an image is resized by dragging its corner, the width and the length will be resized with the same proportion.
- To make the setting effective, click OK. The Area Duplicate window will close.
■ Resizing by entering digits
1 Click an image that is to be resized in the Layout box.
2 Click the Digit button (123).
The Digit window appears.
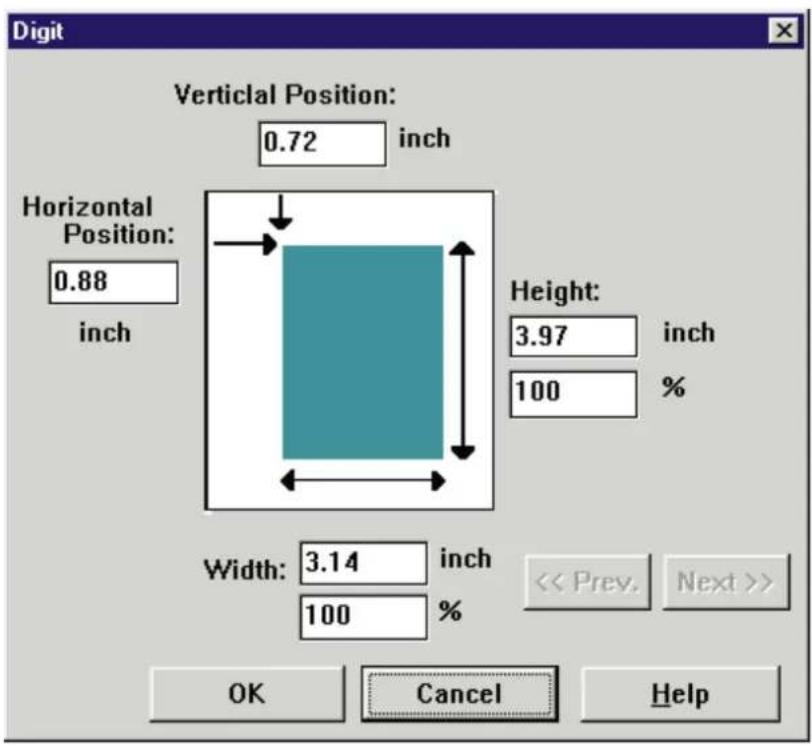
To use mm instead of inch, select mm in the Other Settings window (P. 37).
3 Enter the Height/Width and/or the Vertical/Horizontal Position of the image.
You can enter the height/width of the image either in the unit (inch) or percentage (%) box.
Note:
- The zoom value range available in this Digital Duplicator Utility is from 20 to 400% . If you have used 200% for Zoom function (P. 18), you can set the percentage up to 200 here.
If you have selected more than one image in the Layout box, the Prev. and Next buttons become effective.
You can select your desired image by clicking Prev. or Next button.
The images are displayed in the order in which you pasted them in the Layout box.
4 Click OK.
The Digit window will close and the setting becomes effective.
Creating a Mirror or Negative Image in the Layout Box
1 Click an image in the Layout box.
2 Click the Mirror button (☐) or the Negative/Positive button (☐).
The mirror or negative image of the original is displayed in the Layout box.
- To cancel the selection, click the button (Mirror or Negative/Positive button) again.
- To make the setting effective, click OK. The Area Duplicate window will close.
natural_image
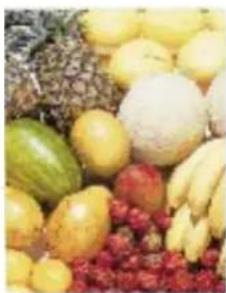
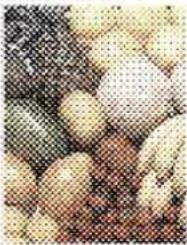
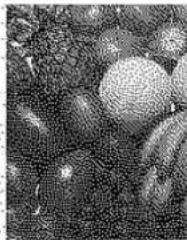
Assorted fruits including green, yellow, and red grains arranged in a cluster (no text or symbols visible)Original
natural_image
Assorted fresh fruits including peaches, mangoes, and strawberries arranged in a pile (no text or symbols visible)Mirror
natural_image
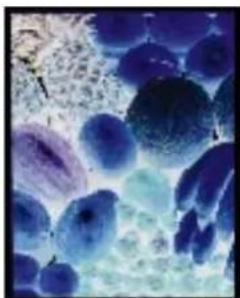
Microscopic view of stained biological cells with blue and purple staining (no text or symbols)Negative
Creating Multiple Images in the Layout Box
Note:
● This function is effective only for one selection area.
1 Select an area of the image in the Original box.
2 Click the Paste button (→).
The selection area is pasted in the Layout box.
3 Click the Repeat button (##).
The Repeat window appears.
Note:
- The available number of duplicates varies depending on the size of a selection area. The maximum number of duplicates is 30.
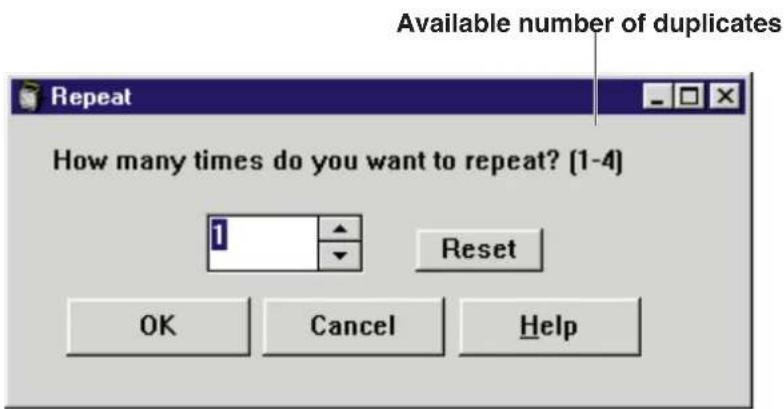
4 Enter the number of duplicates by clicking ▲ or ▼, or by typing the number.
- To reset the number to 1, click Reset .
5 Click OK.
Multiple images are created in the Layout box.
(Example: 4)
- To make the setting effective, click OK. The Area Duplicate window will close.
Duplicating an Image in the Layout Box
1 Click the image you wish to duplicate in the Layout box.
2 Click the Copy button ( ).
The image is duplicated.
- To make the setting effective, click OK. The Area Duplicate window will close.
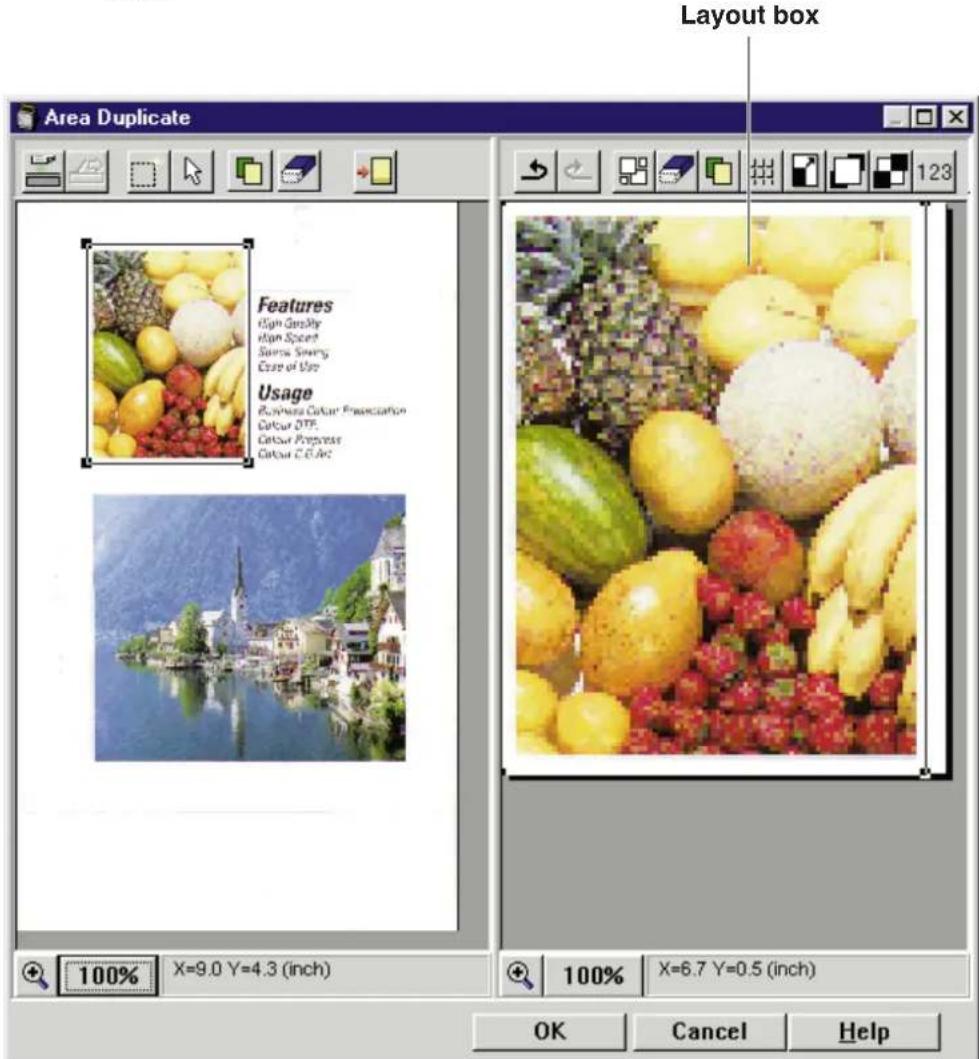
Enlarging an Image to Fit on Paper
An image in the Layout box can be enlarged to fit the printing area.
1 Click the image that is to be enlarged in the Layout box.
2 Click the Fit To Paper button ( ).
The image is enlarged.
- To make the setting effective, click OK. The Area Duplicate window will close.
Note:
● The Fit To Paper function is effective only for one image.
Zooming an Image in the Layout or Original Box
To zoom up/down an image in the Layout or Original box, use either of the following procedures (A or B).
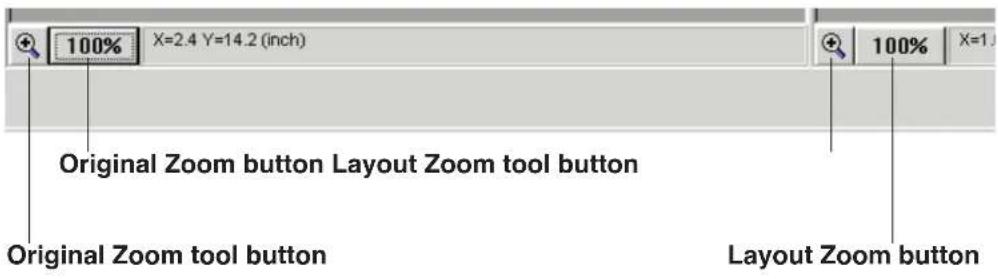
A Using the Layout Zoom or Original Zoom button ( 100%)
① Click the Layout Zoom or Original Zoom button located at the bottom of the Layout or Original box.
The pop-up menu is displayed.
② Click a zoom value that you wish to select.
The selected zoom value is displayed in the Layout Zoom or Original Zoom button.
The effect on the image can be seen in the Layout or Original box.
Using the Layout Zoom tool or Original Zoom tool button ( + )
① Click the Layout Zoom tool or Original Zoom tool button.
② Click the image that you wish to enlarge/reduce.
The zoom value is displayed in the Layout Zoom or Original Zoom button.
- Each time you click the left mouse button, the zoom value changes as follows:
$$ 100\% \rightarrow 125\% \rightarrow 150\% \rightarrow 175\% \rightarrow 200\% $$
Clicking the right mouse button changes the zoom value as follows:
$$ 200 \% \rightarrow 175 \% \rightarrow 150 \% \rightarrow 125 \% \rightarrow 100 \% $$
Moving the Selected Area to the Front in the Layout Box
1 Select the area that you wish to move to the front of other images.
- To select multiple areas, click areas while holding down the Shift key on the keyboard.
2 Click the Bring to Front button (☐).
The selected area(s) is (are) moved.
Moving the Selected Area to the Back in the Layout Box
1 Select the area that you wish to move behind other images.
- To select multiple areas, click areas while holding down the Shift key on the keyboard.
2 Click the Send to Back button (☐).
The selected area(s) is (are) moved.
Deleting an Image in the Layout Box
1 Click the image you wish to delete in the Layout box.
2 Click the Delete button ( ).
The image is deleted.
- To make the setting effective, click OK. The Area Duplicate window will close.
Using Template Function
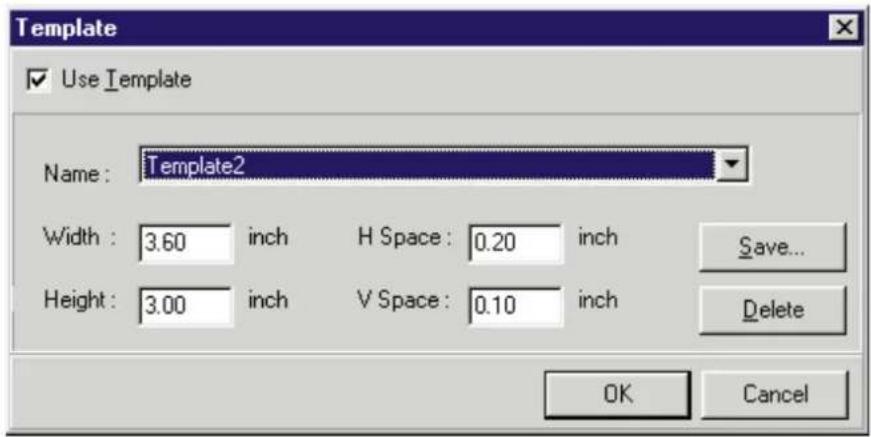
Use this function when you wish to create multiple templates of the same size. Using these templates you can create multiple images, and print them on a sheet of paper.
Note:
- This function is effective only for one selection area.
1 Click the Template button ( ). The Template window appears.
2 Click on the Use Template box.
3 Type in the Width, Height for the templates that you wish to create, and the Vspace (vertical space), Hspace (horizontal space) that you wish to keep between templates.
4 Click OK.
- To cancel, click Cancel .
The Template window will close, and multiple templates are created in the Layout box.
- To save these templates as a template file, refer to Saving a Template File (P. 70).
5 Paste an area of the image in the gray-shaded template in the Layout box ( P. 52 Pasting an Area of an Image in the Layout Box ).
6 Adjust the size of the image within the gray-shaded template ( P. 56 Resizing a Selection Area / P. 57 Resizing an Image in the Layout Box ).
7 Click the Repeat button (##).
The Repeat window appears.
Note:
- The available number of duplicates varies depending on the size of a selection area. The maximum number of duplicates is 30.
8 Enter the number of duplicates, then click OK.
The Repeat window will close, and multiple images are created in the templates in the Layout box.
(Example : 8)
9 Click OK.
The Area Duplicate window will close.
10 Click Start in the Digital Duplicator Utility window to print the images.
■ Saving a Template File
Make sure you have created a template file that you wish to save (steps 1-4 on page 67)
1 Click the Template button ( ).
The Template window appears.
2 Click Save .
The Save Template window appears.
3 Enter a name for the template file.
(Example : Template 1)
4 Click OK.
- To cancel, click Cancel.
The Save Template window will close. The file will be saved and listed in the Name box in the Template window.
■ Loading a Template File
1 Click the Template button ( ).
The Template window appears.
2 Click ▼ of the Name box, then select the file you wish to load from the list.
3 Click OK.
- To cancel, click Cancel.
The Template window will close, and the new setting will be effective.
■ Deleting a Template File
1 Click the Template button ( ). The Template window appears.
2 Click ▼ of the Name box, then select the file that you wish to delete from the list.
3 Click Delete .
The following confirmation message appears.
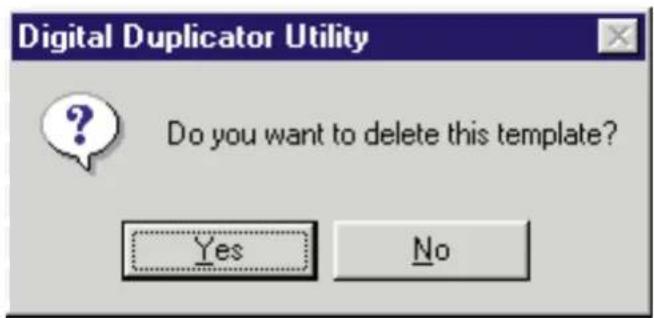
4 Click Yes.
- To cancel, click No.
The file will be deleted from the Name box.
5 Click OK.
The Template window will close.
■ Deactivating Template Function
1 Click the Template button ( ). The Template window appears.
2 Click off the Use Template box.
3 Click OK. The Template window will close.
Part 2
Scanner Function
Table of Contents
Panasonic
Scanner Driver
Window
Overview
Displaying the Panasonic Scanner Driver Window ..... 75
Names and Functions 77
Scale Tab 80
Image Tab 82
Adjust Tab 83
Filter Tab 85
Saving, Loading or Deleting a Setting 86
Saving a Setting 87
Loading a Setting 88
Deleting a Setting 88
Scanning an
Area of an Image
Selecting a Scanning Area 89
Moving the Scanning Area 90
Resizing the Scanning Area 91
Zooming the Entire Image 92
Hints for
Scanning
Image Types 93
Color Depth (Full Color) 96
Dither (Color/Black & White Halftone) 97
Drop Out Color (Monochrome) 99
Adjusting
Colors Intensity
Using the Hyper-Tetra Adjustment 100
Displaying the Hyper-Tetra Adjustment Window ..... 100
Color Adjustment 101
Using the Gamma Correction 104
Displaying the Gamma Correction Window 104
Color Adjustment 106
Panasonic Scanner Driver Window Overview
Displaying the Panasonic Scanner Driver Window
To use the scanner driver, Corel PHOTO-PAINT or TWAIN-compliant application must be installed.
Corel PHOTO-PAINT can be installed from the provided Driver & Utility CD-ROM.
For the installation, refer to the KX-PS8000 Operating Instructions manual.
To display the Panasonic Scanner Driver window, perform either of the following steps.
■ For Windows 95 / Windows NT 4.0
1 Click Start.
2 Select Programs, select Corel PHOTO-PAINT 6, then click Corel PHOTO-PAINT 6.
The Corel PHOTO-PAINT window appears.
3 Click the File menu and select Acquire Image, then click Select Source.
The Select Source window appears.
4 Select Panasonic KX-PS8000 32bit Driver, then click Select.
The Select Source window will close.
5 Click the File menu and select Acquire Image, then click Acquire.
The Panasonic Scanner Driver and the Preview Screen windows appear.
■ For Windows 3.1
1 From the Program Manager, click the Window menu.
2 Click Corel PHOTO-PAINT 5.
The Corel PHOTO-PAINT 5 window appears.
3 Double-click the Corel PHOTO-PAINT icon. The Corel PHOTO-PAINT Plus window appears.
4 Click Acquire Image from the File menu, then click Select Source.
The Select Source window appears.
5 Select Panasonic KX-PS8000 16bit Driver, then click Select. The Select Source window will close.
6 Click Acquire Image from the File menu, then click Acquire. The Panasonic Scanner Driver and the Preview Screen windows appear.
Names and Functions
![Panasonic Scanner Driver Prescan Scan Feed Out Image Type: Full Color [Width] (Height) inch Scan Size: 8.5 x 11.0 Paper Size: Letter Scale Image Adjust Filter Scale Mode Resolution Zoom Resolution Image Size 1.508 MB W-H Uniform (W) 75 dpi 30 9600 (H) 75 dpi Restore Default Setting... Close About... Help Preview Screen Zoom: 100 %](/content/2026/06/1190493/images/a661238ec31852ac1d3e5e6e83d92b13af6c1e7046480fd8bfde9f228b49e63c.jpg)
① Prescan button
Prescans the document and displays the document image in the Preview Screen. If a document is scanned from the ADF tray, the document is ejected completely. However, if a document is prescanned from the ADF tray but not scanned, it will remain in the ADF tray and the Prescan button becomes ineffective until the document is either scanned by clicking the Scan button or ejected by clicking the Feed Out button.
② Scan button
Scans the document or the scanning area of image displayed in the Preview Screen.
③ Feed Out button
Ejects the document that remains in the ADF tray.
④ Image Type ( P. 93)
Select a scanner image type by clicking ▼. If you want to scan the image according to its original form, select the image type closest to the original. You can also select an image type that is different from the original.
- Black & White 2 colors : Scans the original as black and white.
- Black & White Halftone : Scans the original as grayscale halftone.
- Black & White Photo : Scans the original as black and white photo.
- Color 8colors : Scans the original with 8 colors.
- Color Halftone : Scans the original as a color scale halftone.
● Color Photo (256) : Scans the original with 256 colors. - Full Color : Scans the original with full color (16.7 million colors).
⑤ Scan Size
Displays the size of a scanning area in inch, mm or pixel.
Change the unit of measurement by clicking ▼.
⑥ Paper Size
Select an image size (Letter, A4, Legal or Customize) by clicking ▼. When you select a scanning area in the Preview Screen ( P. 89), Customize is automatically selected.
⑦ Tabs
Scale Tab P. 80
Image Tab P. 82
Adjust Tab P. 83
Filter Tab P. 85
⑧ Setting... button
Saves, loads or deletes a setting. It also resets the current settings to the default settings. For details, refer to Saving, Loading or Deleting a Setting ( P. 86).
⑨ Close button
Exits the Panasonic Scanner Driver window.
⑩ About button
Opens the window that contains the version and copyright information.
⑪ Help button
Displays the Help window.
12 Preview Screen
Allows you to see the effect of any adjustments. You can also select a scanning area and/or adjust it in this screen.
- To view an enlarged area, you can enlarge the size of the Preview Screen window ( P. 79 Changing the size of the Preview Screen).
13 Zoom box
Displays the current zoom value of the displayed image. It also allows you to select a zoom value by clicking ▼ ( P. 92).
⑭ Scroll bars
Scroll the displayed image by clicking ◀, ▶, ▲ or ▼, or dragging the sliders on the scroll bars.
Note:
- If the zoom value is 100%, the scroll bars are ineffective.
15 Corner move buttons
Moves the top left corner of the scanning area close to the top left corner of the Preview Screen.
Moves the top right corner of the scanning area close to the top right corner of the Preview Screen.
Moves the bottom left corner of the scanning area close to the bottom left corner of the Preview Screen.
Moves the bottom right corner of the scanning area close to the bottom right corner of the Preview Screen.
Note:
- If the whole scanning area is displayed in the Preview Screen, these buttons are ineffective.
■ Changing the size of the Preview Screen
Position the cursor on the side/corner of the window. The mouse pointer changes into a double-ended arrow. Press and hold the mouse button, and drag the side/corner to obtain the desired size. Then release the mouse button.
Scale Tab
Click the Scale tab to set resolution or zoom. The result of these selections cannot be viewed in the Preview Screen.
■ When Resolution is selected
The following features are available when Resolution is selected.
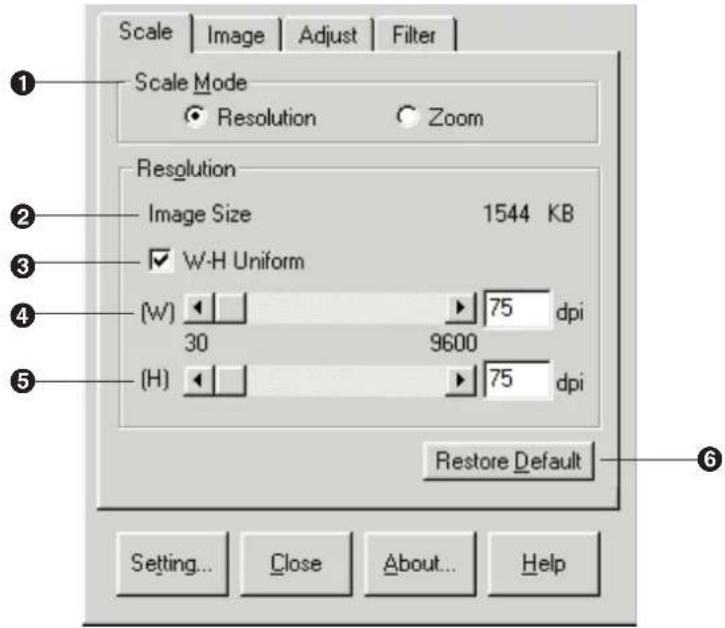
① Scale Mode
Allows you to select a scale type, either Resolution or Zoom.
② Image Size
Indicates the size of the current image data.
③ W-H Uniform
Clicking on this check box allows you to set the resolution of height and width simultaneously by dragging the slider or clicking ◀ or ▶. To set the resolution of height and width independently, click off this check box.
4 (W)
Sets the resolution of width by dragging the slider, clicking ◀ or ▶, or by entering a numerical value then pressing the return key on the key board.
⑤ (H)
Sets the resolution of height by dragging the slider, clicking ◀ or ▶, or by entering a numerical value then pressing the return key on the key board.
⑥ Restore Default
Resets the current Scale tab's settings to the default settings.
■ When Zoom is selected
The following features are available when Zoom is selected.

① Output Size
Indicates the currently set scanner image size. The displayed unit of measurement changes depending on the selection made in the Scan Size (P. 78).
② Image Size
Indicates the size of the current image data.
③ Output
Select an output resolution from 75, 100, 200, 300, 400, 600 or 1200 lpi (lines per inch) by clicking ▼. Higher resolution provides better output quality. However, the data size will be larger.
④ Zoom
Select a zoom value from 25, 50, 75, 100, 200, 400, 600, 800, 1200, 2400, 3200 % or Customize by clicking ▼. The selections vary depending on the output resolution.
Customize allows you to enter the desired zoom value.
When Customize is selected, the Zoom Customize window appears. Enter a zoom value (from 40 to 3200%), then click OK. The entered zoom value will be displayed in the box.
⑤ Restore Default
Resets the current Scale tab's settings to the default settings.
Image Tab
Click the Image tab to display the following features. You can view the result of the following selections in the Preview Screen.
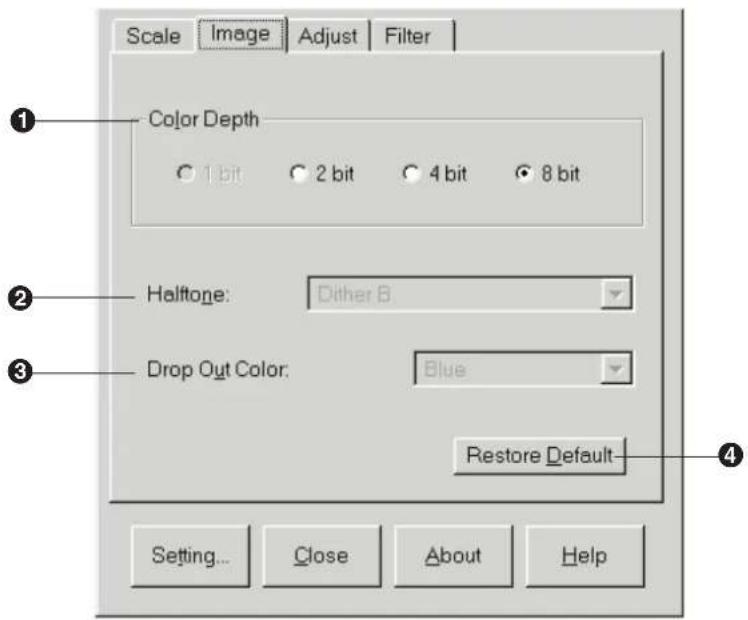
① Color Depth ( P. 96)
Sets bits per pixel. This selection is effective only when the Black & White Photo or Full Color image type is selected ( P. 78).
A greater amount of bits generates a better scanned image. However, data size will be larger.
② Halftone ( P. 97)
Halftone is an image type that simulates shades of color by selecting different dot patterns. This selection is effective only when the Black & White Halftone or Color Halftone image type is selected ( P. 78).
Selections are;
- Dither A, B, C
- Error Diffusion 1, 2, 3, 4
③ Drop Out Color ( P. 99).
Selects a drop out color (Green, Red, Blue or Factor Y) for scanning. This selection is effective only when the Black & White 2colors, Black & White Halftone or Black & White Photo image type is selected (P. 78).
Setting a drop out color converts the colors except the selected color to black and white.
④ Restore Default
Resets the current Image tab's settings to the default settings.
Adjust Tab
Click the Adjust tab to display the following features. You can view the result of the following selections in the Preview Screen.
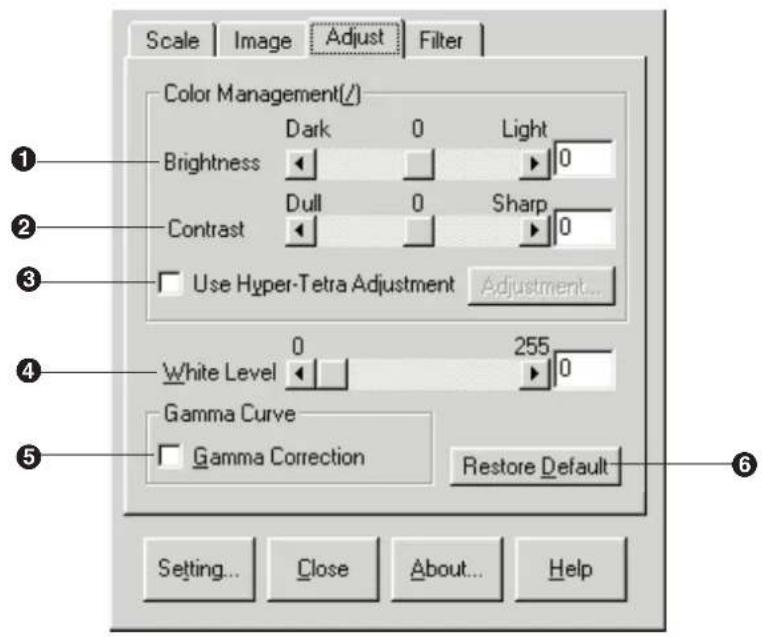
① Brightness/Threshold
Adjusts the brightness or threshold by typing the number, by dragging the slider, or by clicking ◀ or ▶.
Note:
- When the Black & White 2colors or Color 8colors image type is selected, Brightness will be replaced with Threshold.
Brightness — Makes the image lighter or darker. The setting range is -127 to 127.
Threshold — Sets a boundary value that is used to convert image colors to 8 colors or black and white. The setting range is 1 to 255.
② Contrast
Adjusts the contrast by typing the number then pressing the return key, by dragging the slider, or by clicking ◀ or ▶.
Adjusting contrast makes the image sharper or softer. This selection is not effective when the Black & White 2colors or Color 8colors image type is selected. The setting range is -127 to 127.
③ Use Hyper-Tetra Adjustment
Assigns the best color possible to represent the original image color accurately through the scanner, the monitor and the printer. This selection is effective only when the Full Color (Color Depth 8bit) or the Color Photo (256) image type is selected.
Clicking on this check box allows you to activate the Adjustment... button. The Hyper-Tetra Adjustment window appears by clicking the button. For the adjustment, refer to Using the Hyper-Tetra Adjustment ( P. 100)
④ White Level
Strengthens or weakens the white color level of the image. This selection is not effective when the Black & White 2colors or Color 8colors image type is selected. The setting range is 0 to 255.
⑤ Gamma Correction ( P. 104)
Clicking on this check box allows you to adjust the intensity of all colors or a specific color for scanning. When you click this check box, the gamma button ( ) appears. For details, refer to page 104.
⑥ Restore Default
Resets the current Adjust tab's settings to the default settings.
Filter Tab
Click the Filter tab to display the following features. You can view the result of the following selections in the Preview Screen.
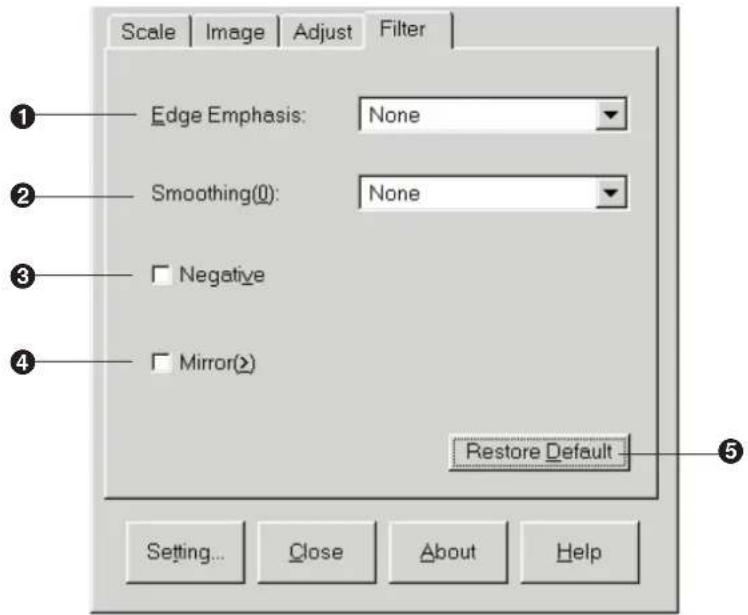
① Edge Emphasis
Select a edge emphasis level (Extra Sharp, Medium Sharp, Light Sharp, Light Soft, Medium Soft or Extra Soft) by clicking ▼. The default is None. This selection makes an image sharper or softer.
② Smoothing
Select a smoothing level (Light, Middle or Heavy) by clicking ▼. The default is None. This selection reduces an interference pattern.
③ Negative
Clicking on the check box creates a negative image of the original.
- To cancel the selection, click off the check box.
4 Mirror
Clicking on the check box creates a mirror image of the original.
- To cancel the selection, click off the check box.
⑤ Restore Default
Resets the current Filter tab's settings to the default settings.
Saving, Loading or Deleting a Setting
The settings made in the Scanner Driver window can be saved, loaded and deleted using the Setting window.
To open the Setting window, click Setting... located at the bottom of the Panasonic Scanner Driver window ( P. 77).
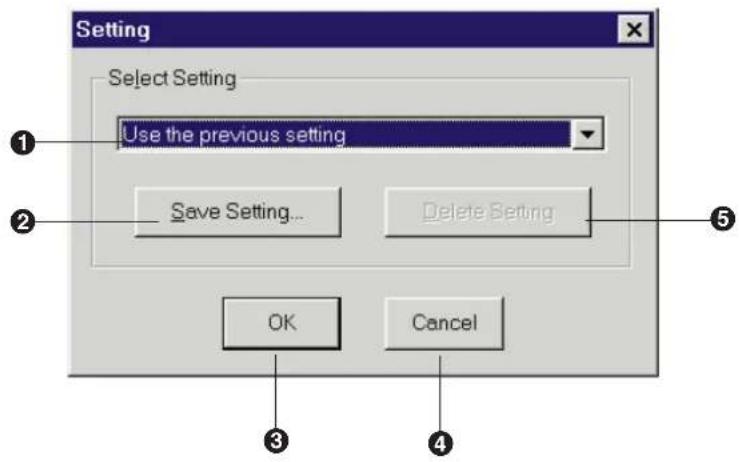
① Select Setting scroll box
Displays the saved setting names along with the following options by clicking ▼.
Use the previous setting: Selects the settings previously used.
Factory Default: Selects the default settings.
Corel PHOTO-PAINT: Selects the optimal settings for the use of Corel PHOTO-PAINT.
② Save Setting... button
Displays the Save Setting window that lets you enter a file name.
③ OK button
Loads a setting selected in the Select Setting scroll box and exits the Setting window.
④ Cancel button
Exits the Setting window without loading a setting.
⑤ Delete Setting button
Deletes a setting.
Saving a Setting
You can save the settings currently used in the Panasonic Scanner Driver window. A maximum of 100 settings can be saved.
1 Click Save Setting...
The Save Setting window appears.
2 Enter the saving name.
A maximum of 31 characters can be entered.
3 Click OK
- To cancel, click Cancel.
The Save Setting window will close and the entered saving name is displayed in the Select Setting scroll box.
4 Click OK.
The Setting window will close.
Loading a Setting
You can load your favorite settings. You can also load the previously used settings, factory default settings, or the settings for Corel PHOTO-PAINT.
1 Click ▼ of the Select Setting scroll box, then click the setting you wish to load.
The setting is displayed in the Select Setting scroll box.
2 Click OK.
- To cancel, click Cancel.
The Setting window will close and the new setting becomes effective.
Deleting a Setting
1 Click ▼ of the Select Setting scroll box, then click the setting you wish to delete.
The setting is displayed in the Select Setting scroll box.
Note:
- The options Use the previous setting, Factory Default and Corel PHOTO-PAINT cannot be deleted.
2 Click Delete Setting.
The Confirm Setting Delete window appears.
3 Click OK.
- To cancel, click Cancel.
The setting is deleted.
4 Click OK.
The Setting window will close.
Selecting a Scanning Area
You can scan an area of the image using the Preview Screen as follows.
1 Click Prescan to display the image in the Preview Screen.
2 Position the mouse pointer (+) in the Preview Screen.
- If the scanning area is already selected, it can be canceled by clicking anywhere outside the scanning area.
3 Hold down the mouse button and drag in any direction to form a rectangle.
Note:
- If the image is too large to fit within the Preview Screen and you wish to include a part of the image that is not displayed, you can do so by dragging the mouse until your desired part is included in the rectangle.
4 Release the mouse button.
A scanning area is selected.
- To scan the scanning area, click Scan in the Panasonic Scanner Driver window.
- To move the scanning area, refer to Moving the Scanning Area ( FF below).
- To resize the scanning area, refer to Resizing the Scanning Area. (P. 91).
Moving the Scanning Area
1 Position the mouse pointer inside the scanning area. The shape of mouse pointer changes to (◀).
2 Hold down the mouse button and drag the scanning area to anywhere in the Preview Screen.
3 Release the mouse button.
The scanning area is moved.
Resizing the Scanning Area
1 Position the mouse pointer (+) to the side or corner of the scanning area.
The shape of mouse pointer (+) changes into a double-ended arrow (↑).
2 Hold down the mouse button and drag the side or corner to obtain the desired size.
3 Release the mouse button.
The scanning area is resized.
Note:
- A scanning area may not be enlarged depending on the resolution currently selected. In this case, select a smaller resolution (P. 80), or reduce the scanning area.
Zooming the Entire Image
You can zoom up or down the entire image using the Preview Screen as follows.
1 Click ▼ of the Zoom box in the Preview Screen ( P. 77). The Zoom Value selections appear.
2 Click the desired selection.
Select a zoom value (100, 150, 200, 250, 300, 400, or Zoom to fit *) for the displayed image. You can also enter a zoom value from 100% to 3200%. The default value is 100%.
* Enlarges the selected area of the image to fit within the Preview Screen.
Note:
- Zoom value returns to 100%
— when the Paper Size "Letter", "A4" or "Legal" is selected in the main window ( P. 77 Paper Size).
— after scanning a document from the scanner glass or the ADF tray
— after ejecting a document from the ADF tray
Hints for Scanning
This section shows how selecting different features affect your original when it is printed.
This section is helpful when you select one feature from many.
Image Types

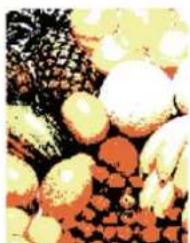
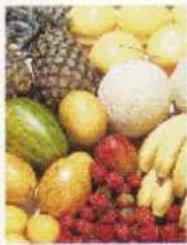
natural_image
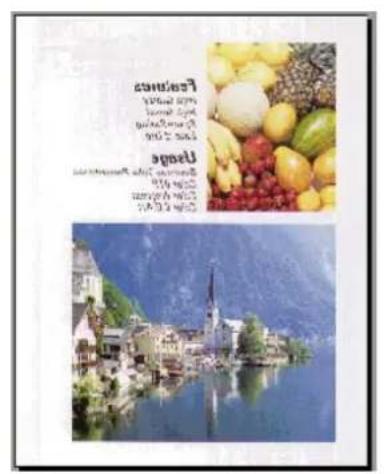
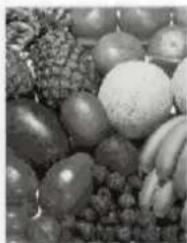
Assorted fresh fruits including pineapple, mango, and red berries arranged in a pile (no text or symbols visible)Features
high, everyday
High Speed
E## 2'022
Usage
Business Code: Pennsylvania
Color D:
Color Prepress
Color: 6.47

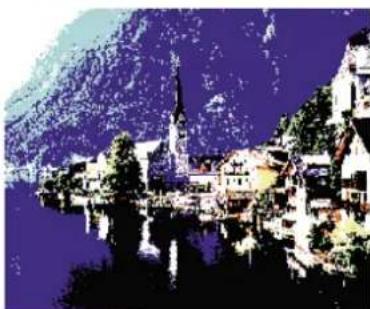
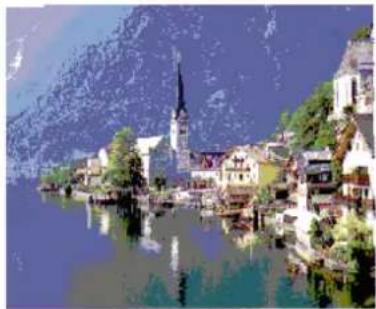
natural_image
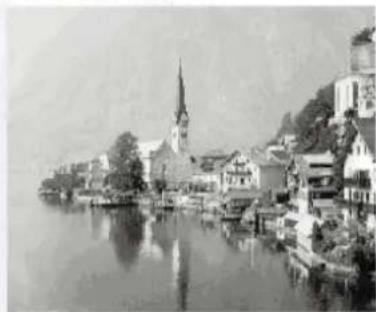
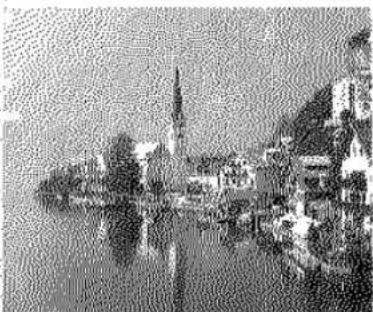
Scenic lakeside village with church and village houses, reflected in calm water, surrounded by mountainous terrain (no visible text or symbols)Original (Full Color)
natural_image
Abstract black-and-white pattern with scattered white shapes on dark background (no text or symbols)Features
H. 11, H. 10
报告内容
Sture Sarn
_1 = _2 + ·s + _n
Usage
1987年12月31日
47.07 21:4
a1 = 3,b1 = 4·s 4
a'ch'f'

natural_image
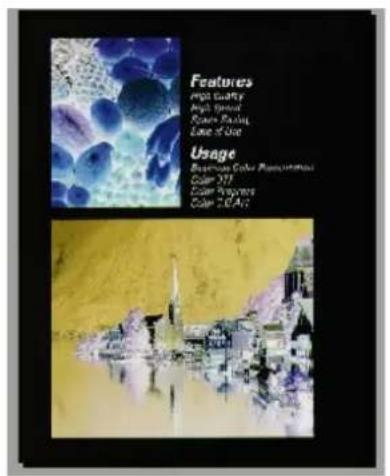
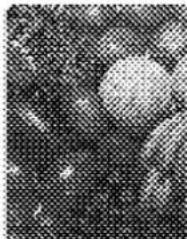
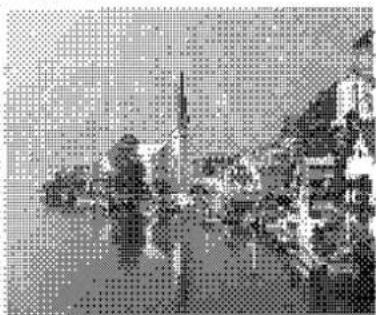
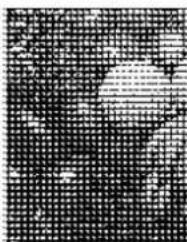
Black-and-white illustration of a cityscape with buildings, trees, and a spire (no visible text or symbols)Black & White 2colors
natural_image
Microscopic view of cellular or particulate structures with no visible text or symbolsFutimes
[Unreadable]
1.20 567
S###
Figure of the
Dinne
A. 100%
[Unreadable]
2017.12.23-245
ふ地はぼう
natural_image
Black-and-white photo of a person standing in front of a building with visible signage (no legible text)Black & White Halftone
natural_image
Black and white photo of assorted fruits including grapes, apples, and bananas (no text or symbols visible)Features
High Quality
High Speed
Science Sciences
E_217x^4b_117
Usage
Business Code: Presentations
Color 27F
Color Proportions
Color: 2.6 A/s
natural_image
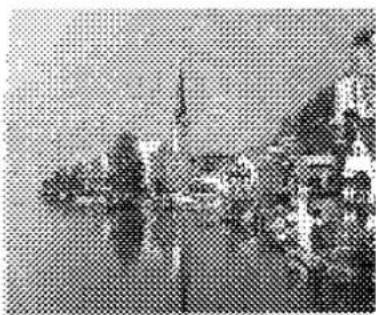
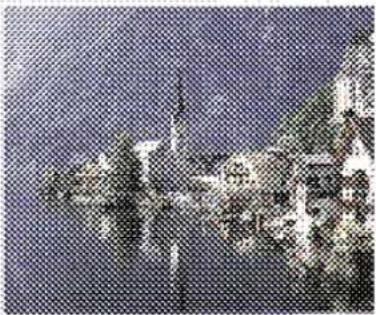
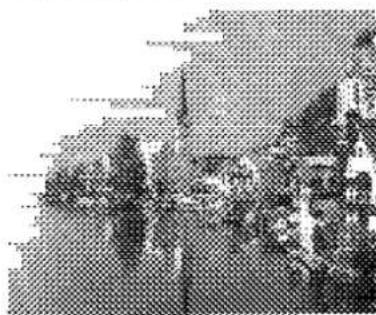
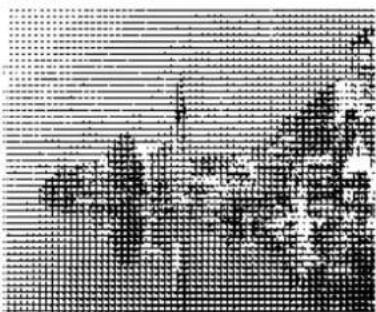
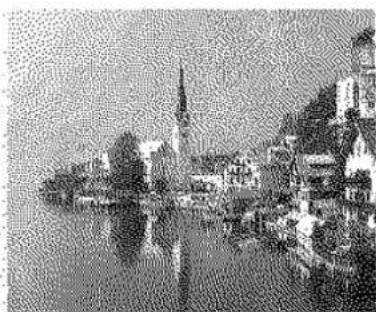
Black-and-white photo of a lakeside town with a church spire, buildings, and a hilltop (no visible text or signage)Black & White Photo
natural_image
Close-up of assorted fruits and vegetables with no visible text or symbolsFeatures
Hed the
[Unreadable]
St. 102, 5007
[Unreadable]
Usage
Business Ltd. (2014)
E
Cov. P.
Cer 2014
natural_image
Scenic lakeside village with a church and surrounding houses, reflected in water under a mountainous backdrop (no visible text or symbols)Color 8colors
natural_image
Close-up of small, round, beige objects with a dark background (no visible text or symbols)Features
(2) 05862
108.259
Eure of Sui
Usage
The following table is in English:
[Unreadable]
7657192008
5.6.7.6.4
natural_image
Pixelated image of a person in motion against a dark background, no visible text or symbolsColor Halftone
natural_image
Assorted fruits including yellow, green, red, and white fruits arranged in a cluster (no text or symbols visible)Features
High Gease
Suzco Swing
Case of the
Usage
Business Sales Presentation
Color DTP
Color replica
Color C: 20

natural_image
Scenic lakeside village with a church and surrounding buildings, reflected in calm water under a blue sky (no text or symbols visible)Color Photo (256)
Color Depth (Full Color)

natural_image
Assorted fruits and vegetables including pineapple, green onion, and garlic (no text or labels visible)Features
High Quality
High Speed
Stee S.491
E-mail: 0126
Usage
Business CEO: Financials
Color 21
E^10 ^2 _4
Lc#or C.G.AF
natural_image
Scenic lakeside village with church and village houses, reflected in calm water, surrounded by snow-capped mountains (no text or symbols visible)
natural_image
Assorted fruits including pineapple, grapes, and pears arranged in a basket (no text or symbols visible)Features
High Quality
High Spire
Stone S120%
Lina 2016
Usage
Business Colo: Pressroom
Color 217
Color Prepress
Color: 0.6 Art

natural_image
Scenic lakeside village with church and village houses, reflected in calm water, surrounded by mountainous terrain (no visible text or symbols)4 bit2 bit

natural_image
Assorted fresh fruits including pineapple, green fruit, and red berries arranged in a pile (no text or symbols visible)Features
High Quality
High Speed
Steeck Skimby
2011年02月
Usage
Business Code: 1080000
Color 9:17
Color Prepress
Color: C.G.Ar

natural_image
Scenic lakeside village with church and village houses, reflected in calm water, surrounded by green hills (no visible text or symbols)8 bit
Dither (Color / Black & White Halftone)

natural_image
Pixelated grayscale image of a landscape with scattered objects and no visible text or symbolsF
N
Supl. S###
5420
[Unreadable]
Usage
The following table is a simple diagram and cannot be extracted.
2447(2)
(A) = P_10000000000000000000000000000000000000000000000000000000000
[Unreadable]
natural_image
Pixelated grayscale image of a landscape with trees and water, no visible text or symbolsDither A
natural_image
Close-up of a textured surface with circular light spots and speckled patterns (no text or symbols)fummes
[Illegible]
[Unreadable]
S###
Figure 6.90
Dassn
The following table is a simple diagram and cannot be extracted.
Peter P.
Sint B.
[Unreadable]
natural_image
Black-and-white photo of a group of people in a group setting, no visible text or symbolsDither B
natural_image
Abstract black-and-white grid pattern with no discernible text, symbols, or structured dataFrances
[Unreadable]
The image is too blurry to recognize any text content.
[Unreadable]
N_甲 _0 _1 _2
1
2016年1月1日
无法识别
dolar A: 2008
[Unreadable]
Dither C
natural_image
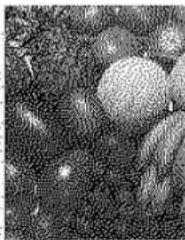
Close-up of a textured surface with spherical and irregular shapes, possibly organic or cellular structures (no text or symbols visible)Features
W_eq
HCT 2008.
Since Mr.10
Case of New
Usage
Business 2019/7630471a
Cain 477
[Unreadable]
a1 = a2 + 3
natural_image
Black-and-white photo of a lakeside town with buildings and reflections (no visible text or symbols)Error Diffusion 1
natural_image
Microscopic view of spherical particles or bubbles on a dark background (no text or symbols visible)Features
Fig. 6.1.2.
P67 30861
Spire of Young Eva of Uva
Usage
Business Corporate
(23.01)
10.47 PREDERS
(2)3, 1, 2
natural_image
Black-and-white photo of a lakeside town with a church and surrounding buildings, reflected in water (no visible text or symbols)Error Diffusion 2
natural_image
Microscopic view of cellular or particulate structures with granular surfaces (no visible text or labels)Features
^1 ^2 ^3
The image is too blurry to recognize any text content.
Space Swing
Lase of 1957
Usage
Business Company
Caiw 137
[Unreadable]
[Unreadable]

natural_image
Black-and-white photo of a historic village with a spire reflected in water, no visible text or symbolsError Diffusion 3
natural_image
Close-up of a textured surface with spherical and irregular shapes, possibly biological or geological (no text or symbols visible)Feature
Wg?12.57
1957 50-6:
Splice S###
Esco cf Nua
Usage
Business Corp.
Gain 67
Соны телега
C.3w C.5 a
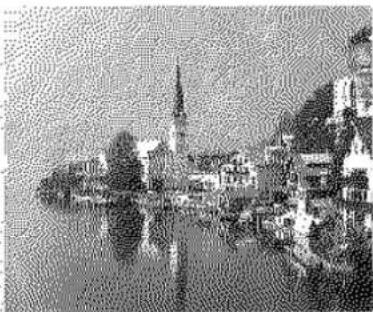
natural_image
Black-and-white photo of a historic village with a church spire reflected in water, surrounded by trees and hills (no visible text or symbols)Error Diffusion 4
Drop Out Color (Monochrome)
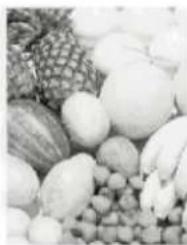
natural_image
Black and white photo of assorted fruits including pumpkins, corn, and beans (no text or symbols visible)Features
High Greyley
High Speed
Stone Survey
E64137652
Usage
Business Code: Financial
Color 27P
Color Prep. 2019
Color: C. G. Art
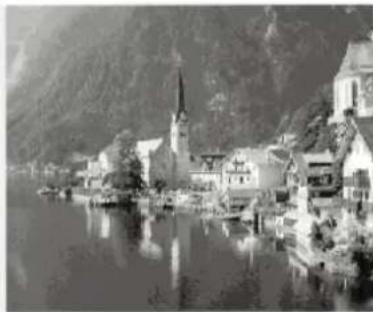
natural_image
Black-and-white photo of a lakeside village with church, church tower, and mountainous background (no visible text or symbols)Red
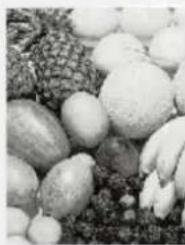
natural_image
Black and white photo of assorted fruits including round fruits, peaches, and pineapples (no text or symbols visible)Features
High Quality
High Speed
S###
Ecoe 3.05
Usage
Business Col. Presentation
Color D:
Color Progress
Color: C.G. Art
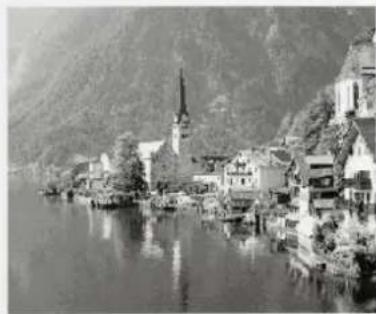
natural_image
Black-and-white photo of a lakeside village with a church and surrounding hills (no visible text or symbols)Green
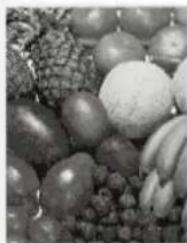
natural_image
Black and white photo of assorted fruits including grapes, apples, bananas, and a melon (no text or symbols visible)Features
High Country
Hot, 24-50
Science Survey
E315 x² b13
Usage
Business Colo: Presentation
Color 27
Cerp 102-1979
Color: 2.6 A
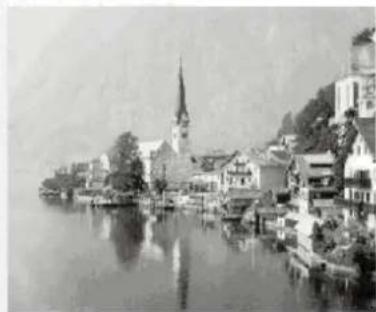
natural_image
Black-and-white photo of a lakeside town with a church spire, buildings, and reflections in the water (no visible text or symbols)Blue
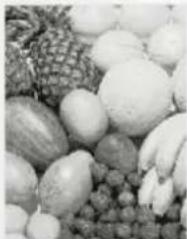
natural_image
Black and white photo of assorted fruits including bananas, apples, grapes, and a corn cob (no text or symbols visible)Features
Hoch Quansky
High Stated
Stee Shun
Eas 3.0
Usage
Business Colo: Breakfast
Color 21
Color Programs
Color: S.E.Art
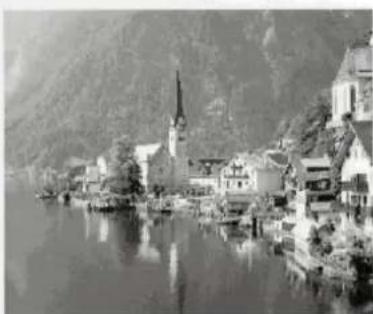
natural_image
Black-and-white photo of a lakeside village with a church and mountainous background (no visible text or symbols)Factor Y
Using the Hyper-Tetra Adjustment
You can adjust the color of the image using the Hyper-Tetra Adjustment window. This selection is effective only when Full Color (Color Depth 8 bit) or the Color Photo (256) image type is selected.
Displaying the Hyper-Tetra Adjustment Window
1 Click on the Use Hyper-Tetra Adjustment check box in the Adjust tab ( P. 83).
The Adjustment... button becomes effective.
2 Click Adjustment...
The Hyper-Tetra Adjustment window appears.
Color Adjustment
You can select Color Adjustment or Color Balance to adjust the image color. To adjust the hue, chroma or lightness of color, select Color Adjustment. To adjust the level of red, green, or blue, select Color Balance in the Hyper-Tetra Adjustment window.
■ When Color Adjustment is selected
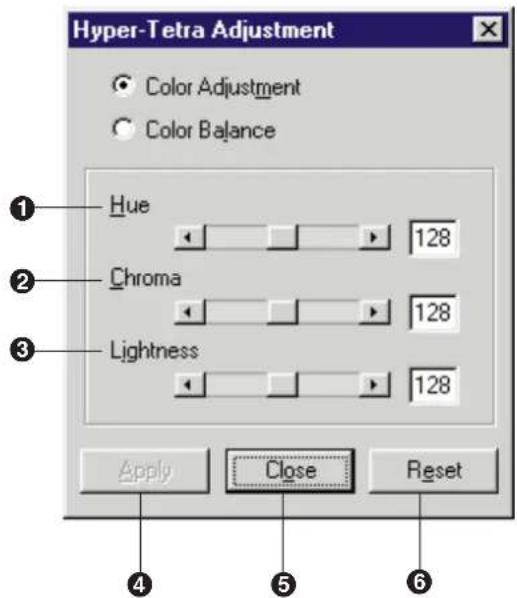
① Hue
Changes the aspect of color.
② Chroma
Changes the vividness of the image.
③ Lightness
Changes the brightness of the image.
The setting range of each option (① to ③) is from 0 to 255.
④ Apply button
Makes a setting effective and allows you to view the result of the setting in the Preview Screen.
⑤ Close button
Closes the window.
⑥ Reset button
Resets the current setting(s) made in this window to the default setting(s).
Adjust the color by performing the following steps.
1 Drag each slider left or right, click ◀ or ▶, or type the numerical value then press the return key.
2 Click Apply to see the result of the adjustment in the Preview Screen.
- To reset the setting, click Reset and Apply.
3 Click Close to close the window.
■ When Color Balance is selected
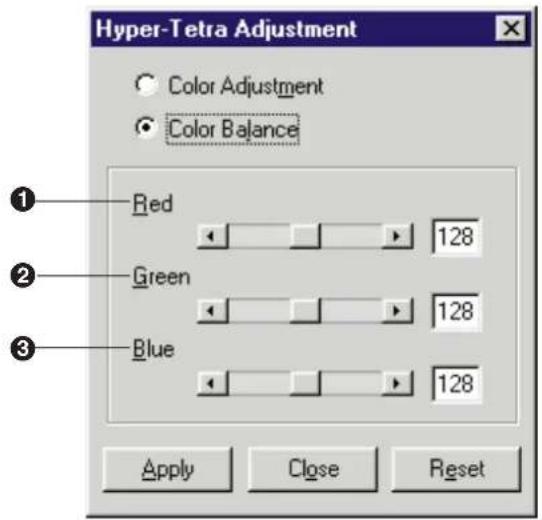
① Red
Lightens or darkens red. A darker level setting provides a stronger cyan.
② Green
Lightens or darkens green. A darker level setting provides a stronger magenta.
③ Blue
Lightens or darkens blue. A darker level setting provides a stronger yellow.
The setting range of each option is from 0 to 255.
Adjust the color by performing the following steps.
1 Drag each slider left or right, click ◀ or ▶, or type the numerical value then press the return key.
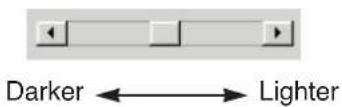
2 Click Apply to see the result of the adjustment in the Preview Screen.
- To reset the settings, click Reset and Apply.
3 Click Close to close the window.
Using the Gamma Correction
Displaying the Gamma Correction Window
You can adjust the intensity of color(s) using the Gamma Correction window. To display the Gamma Correction window, perform the following steps.
1 Click on the Gamma Correction check box in the Adjust tab. The Gamma button appears.
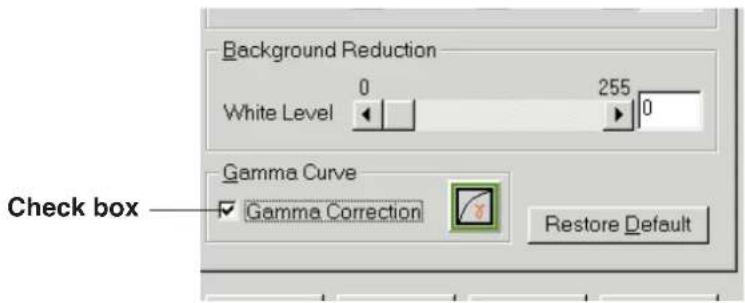
2 Click the Gamma button ( ). The Gamma Correction window appears.
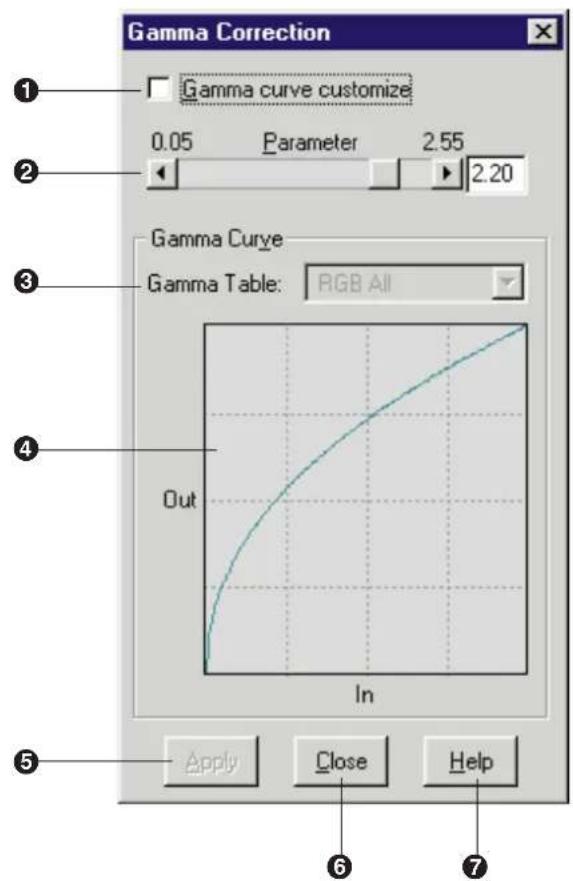
① Gamma curve customize check box
Clicking off this check box allows you to adjust the colors by using the parameter scroll bar.
Clicking on this check box allows you to adjust the gamma curve of the selected color manually.
② Parameter
Adjusts all the colors using the parameter slider. The current parameter value appears in the box. The parameter can be entered by typing the value in the box.
Setting a higher value provides stronger highlight.
③ Gamma Table
Selects a color or all colors for adjustment.
This selection is effective only when the Gamma curve customize check box is clicked on.
④ Gamma diagram
■ When the Gamma curve customize check box is clicked off
Displays the gamma curve according to the current parameter value.
■ When the Gamma curve customize check box is clicked on
Adjusts a gamma curve of the selected color by dragging three control points (P. 107).
⑤ Apply button
Makes a setting effective and shows the result of the adjustment in the Preview Screen.
⑥ Close button
Closes the Gamma Correction window.
Note:
- If the Apply button is not clicked before clicking the Close button, the changes made in the Gamma Correction window will not become effective.
⑦ Help button
Displays the help information on this window.
Color Adjustment
You can adjust the intensity of color(s) by using the Parameter scroll bar or the Gamma Curve control points.
■ Using the Parameter Scroll Bar
1 Click off the Gamma curve customize check box.
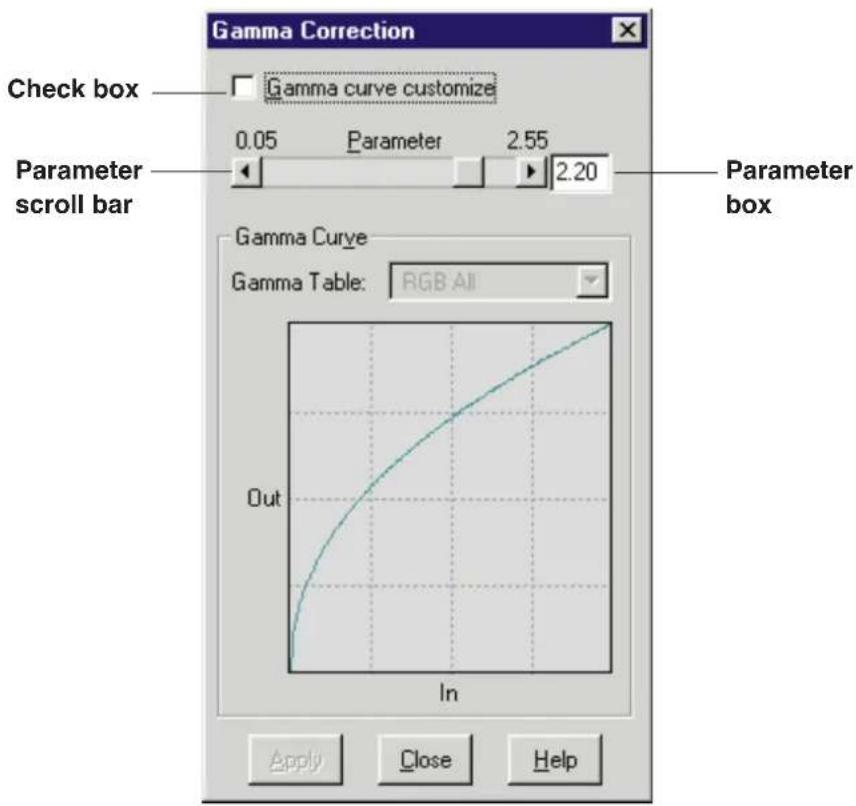
2 Set the parameter value by dragging the slider left or right in the Parameter scroll bar, or by typing the numerical value in the parameter box then pressing the return key.
The current parameter value appears in the box next to the parameter scroll bar, and the gamma curve is modified according to the value.
3 Click Apply to see the result of the setting in the Preview Screen.
- To cancel the setting, click Restore Default in the Adjust tab.
- To scan the adjusted image, click Scan in the Panasonic Scanner Driver window.
■ Using Gamma Curve Control Points
1 Click on the Gamma curve customize check box.
A gamma curve with three control points appears in the gamma diagram.
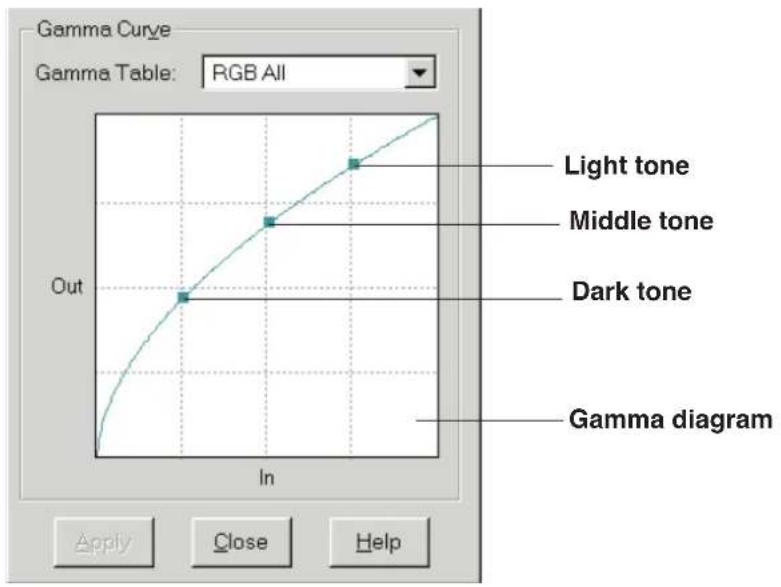
2 Click ▼ of the Gamma Table, and select the color to be adjusted.
RGB ALL: Red, Green and Blue colors can be adjusted at once.
Red, Green, Blue: Each color can be adjusted individually.
The color of the gamma curve changes according to the color selection.
If Red is selected, the gamma curve appears in red.
3 Place the mouse pointer on one of the control points, hold down the mouse button, and drag the gamma curve.
● Light tone : Adjusts the lighter shade.
● Middle tone : Adjusts the middle shade.
- Dark tone: Adjusts the darker shade.
4 Click Apply to see the result of the adjustment in the Preview Screen.
- To cancel the adjustment, click off the Gamma curve customize check box, or click Restore Default in the Adjust tab.
- To scan the adjusted image, click Scan in the Panasonic Scanner Driver window.
Part 3
Printer Function
Table of Contents
KX-PS8000
Window
Overview for
Windows 95/3.1
Displaying the Panasonic KX-PS8000 Window ..... 109
Details Tab 112
Paper Tab 113
Quality Tab 115
Option Tab 118
Memory Tab 120
KX-PS8000
Window
Overview for
Windows NT 4.0
Displaying the Panasonic KX-PS8000 Default Document Properties Window 122
Page Setup Tab 124
Advanced Tab 126
Displaying the Panasonic KX-PS8000 Properties Window . 131
Ports Tab 132
Sharing Tab 136
Device Settings Tab 139
Adjusting the Color
Using the Hyper-Tetra Adjustment 141
Displaying the Hyper-Tetra Adjustment Window .....141
Color Adjustment 142
Color Balance 144
Color CMYK Adjustment 145
Using the Density Adjustment 146
Displaying the Density Adjustment Window .....146
Double Side Printing
Double Side Printing Using Microsoft® Word word processor ....148
Displaying the Panasonic KX-PS8000 Window
The KX-PS8000 window can be displayed from Printers under Windows (see A below) or from an application (see B on page 111).
Note:
● Available option tags and operation buttons displayed through Windows 95 are different from those displayed through Windows 3.1.
A From Printers Under Windows
■ For Windows 95
1 Click Start, select Settings, then click Printers. The Printers window appears.
2 Click the Panasonic KX-PS8000 icon.
3 Click the File menu, then click Properties.
The Panasonic KX-PS8000 Properties window appears.
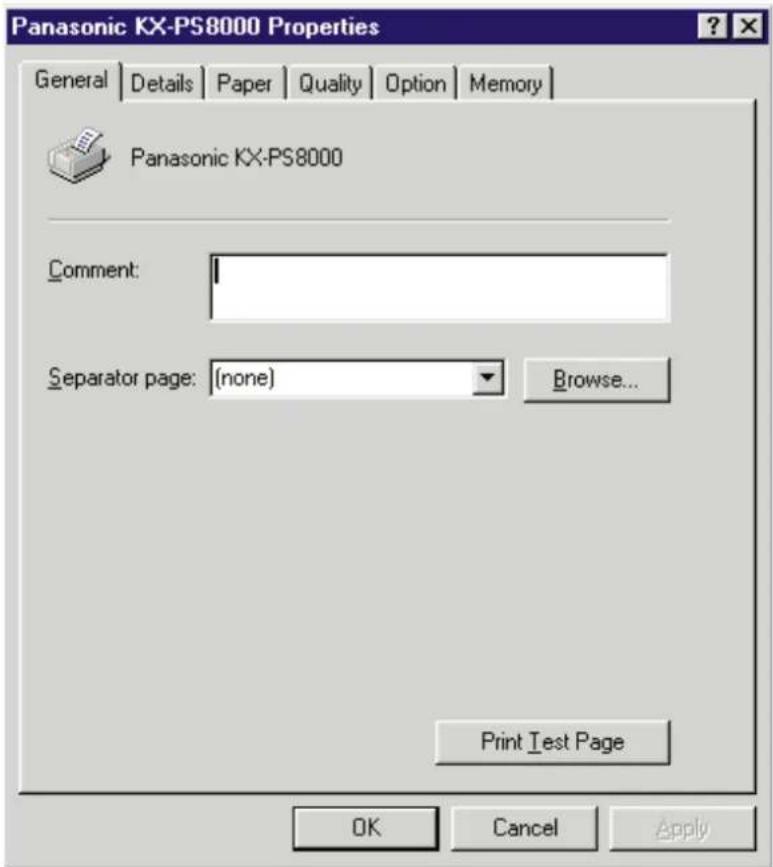
4 Click a tab to view the features.
Details Tab P. 112
Paper Tab P. 113
Quality Tab P. 115
Option Tab P. 118
Memory Tab P. 120
■ For Windows 3.1
1 Double-click the Main icon and Control Panel icon, then double-click Printers icon.
The Printers window appears.
2 Select Panasonic KX-PS8000 on SCSI*: then click Setup.
The Panasonic KX-PS8000 window appears.
* The Port (SCSI) varies depending on the port where the printer is connected.
3 Click a tab to view the features.
Paper Tab P. 113
Quality Tab P. 115
Option Tab P. 118
Memory Tab P. 120
B From an application
For example, to print a document created in Microsoft WordPad in Windows 95, perform the following steps.
1 Click Start, select Programs, select Accessories, then click WordPad.
The WordPad window appears.
2 Click the File menu, then click Print...
The Print window appears.
3 Click Properties
The Panasonic KX-PS8000 window appears.
4 Click a tab to view the features.
Paper Tab P. 113
Quality Tab P. 115
Option Tab P. 118
Memory Tab P. 120
Note:
- The print options in the File menu depend on the Windows application. Refer to the application manual.
The instructions described hereafter are based on Windows 95. However, most instructions for Windows 3.1 are the same as Windows 95.
Details Tab
Note:
● This option is available only in Windows 95.
① Print to the following port
Selecting KXPS8000GDI: (KX-PS8000 on SCSI) allows you to send the print data to the printer via SCSI.
When you are using parallel interface cable, select the port where the cable is connected.
For the functions of other buttons, refer to the Help menu in the Windows.
Paper Tab
① Paper size
Selects a different paper size.
Letter, A4, Legal or Envelope can be selected.
② Orientation
Selects Portrait (vertical) or Landscape (horizontal).
Portrait

Landscape

③ Output order
Specifies whether the document exits face up or face down into the output tray. This selection is not effective when the multi-purpose tray (MPT Plain Paper, MPT Transparency, etc.) is selected in the Paper source (P. 114).
When the multi-purpose tray is selected, Face up is selected automatically.
④ Paper source
Selects media by choosing the location (trays) or the type of media.
- Auto [Plain Paper]:
Prints on paper loaded in a paper tray. The printer picks paper from the paper tray that is loaded with the media size you selected in the application software. When the tray is empty, the printer automatically picks from another paper tray of the same media size in the order of Upper, Middle and Lower.
• Auto [Transparency]:
Prints on transparency loaded in a transparency tray. The printer picks transparency from the transparency tray that is loaded with the media size you selected in the application software. When the tray is empty, the printer automatically picks from another transparency tray of the same media size in the order of Upper, Middle and Lower.
- Upper :
Prints on media loaded in the standard tray.
- Middle\*1 :
Prints on media loaded in the upper tray (optional feeder).
- Lower\*1 :
Prints on media loaded in the lower tray (optional feeder).
- MPT Plain Paper, MPT Transparency, MPT Label, MPT Coated Paper, MPT Envelope, MPT Paper 2nd Side :
Prints on paper, transparency or label, etc. loaded in the Multi-purpose tray. The printer will print on the selected media with optimal quality.
*1 If the optional feeder has not been installed, the printer selects the standard tray automatically.
⑤ Copies
Determines how many copies of the document will be printed.
Note:
- The number of copies can be also determined using the application software. However, it is recommended to set the number of copies using one method, either from this driver or from the application software to avoid printing problems.
⑥ About... button
Displays the window which contains the program version and copyright information.
⑦ Restore Defaults button
Resets the Paper tab's settings to the default settings.
Quality Tab
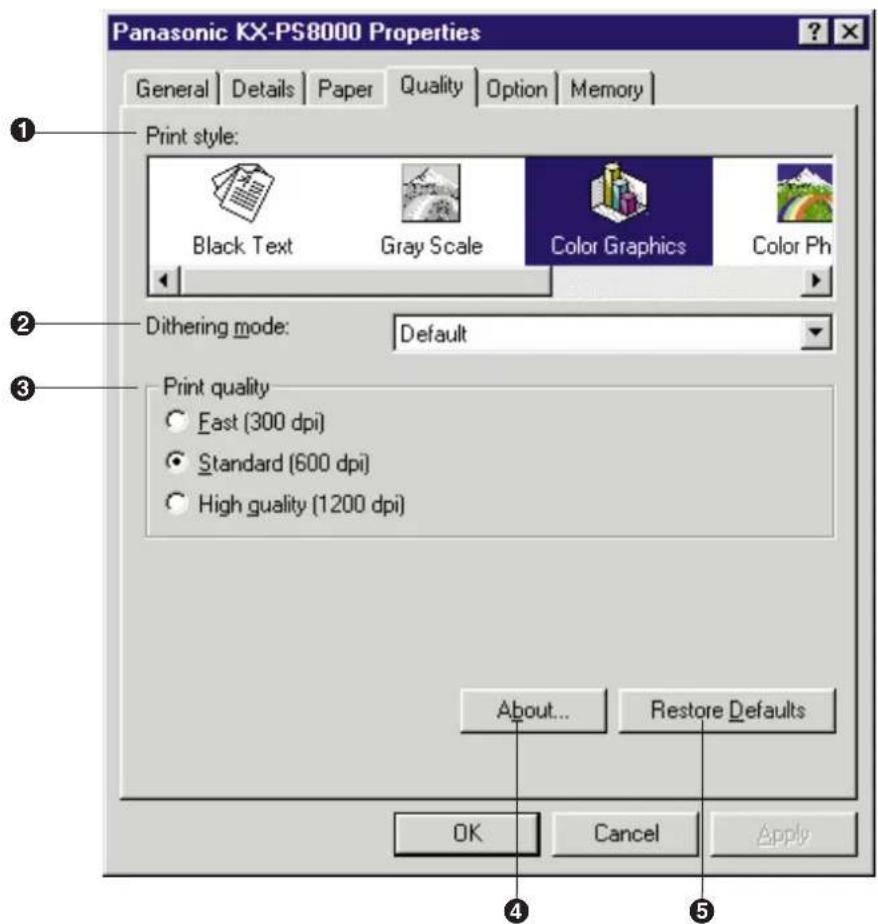
① Print Style
Select a type which is the closest to your document to ensure optimal print quality.
- Black Text:
Prints the document in black and white. Select this for black and white text. This is the fastest printing option.
- Gray Scale:
Prints the document in black and white. Select this for monochrome halftone images.
• Color Graphics: (default)
Prints the document in color. Select this for computer graphics, color text, spreadsheets with color graphics.
(Small text can be printed more clearly than when printed in Presentation.)
- Color Photo:
Prints the document in color. Select this for photo images such as a photo from a CD.
- Presentation:
Prints the document in color. Select this for presentation copies. (Presentation provides a clearer tone than Color Graphics.)
② Dithering mode
Color Graphics and Color Photo are print styles that simulate shades of color by changing the dot patterns. You can select a dot pattern using Default*, Dither A or Dither B.
This selection is effective only when Color Graphics or Color Photo is selected.
* Dither A or Dither B will be automatically selected according to the print quality you have selected.
Notes:
- When Color Graphics is selected in the Print Style, Dithering mode is available for all print quality selections.
- When Color Photo is selected in the Print Style, Dithering mode is available only for 600 dpi and 1200 dpi print quality selections.
- If the error message "Memory Overflow" appears when Default or Dither B is selected, change the selection to Dither A. With Dither A selected, memory overflow may not occur.

natural_image
Scenic view of a historic church with a tall spire beside a lakeside, surrounded by buildings and trees (no visible text or symbols)Dither A

natural_image
Scenic view of a historic European town with a prominent church and stone bridge, surrounded by water and trees (no visible text or signage)Dither B
③ Print quality
Selects a print quality. Fast (300 dpi), Standard (600 dpi) or High quality (1200 dpi) can be selected. A higher resolution provides better print quality. However, the throughput speed is diminished.
When Presentation is selected in the Print style, print quality cannot be selected and 300 dpi is automatically assigned.
④ About button
Displays the window that contains the program version and copyright information.
⑤ Restore Defaults button
Resets the Quality tab's settings to the default settings.
Option Tab
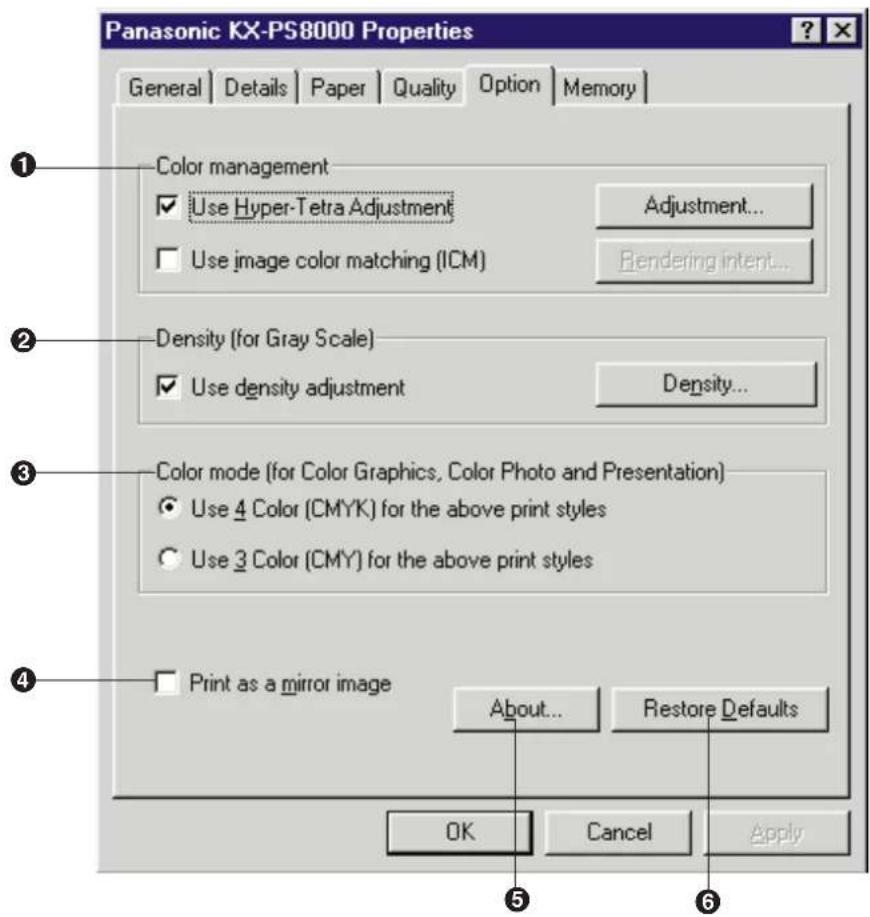
① Color management
This feature provides two-color adjustment functions as described below. These functions are effective only when printing a document with Color Graphics, Color Photo or Presentation print style.
- Use Hyper-Tetra Adjustment
Adjusts the brightness, contrast, hue, saturation, or red, green, blue of the image, or cyan, magenta, yellow, black of the image. For the adjustment, refer to Using the Hyper-Tetra Adjustment (P. 141).
- Use image color matching (ICM) \*1
The printer assigns the best color possible to represent the original color accurately by selecting different rendering intents (Saturation, Contrast or Colormetric). Click on this check box, then click the Rendering intent button. The Rendering intent window appears. Select the desired rendering intent, which determines how the printer assigns the color.
② Density (for Gray Scale)
Adjusts the density of the gray scale image. This function is effective only when the Gray Scale print style ( P. 115 Quality Tab) is selected. For the adjustment, refer to Using the Density Adjustment ( P. 146).
③ Color mode (for Color Graphics, Color Photo and Presentation)
Provides two selections as described below.
These selections are effective only when printing a document with Color Graphics, Color Photo or Presentation print style in the Quality tab.
- Use 4 Color [CMYK] for the above print styles
The document is printed using 4 toners (Cyan, Magenta, Yellow and Black).
- Use 3 Color [CMY] for the above print styles
The document is printed using 3 toners (Cyan, Magenta and Yellow). This selection provides faster print speed, and is used only when printing on plain paper.
Note:
- When Auto [Transparency], MPT Transparency, MPT Label, MPT Coated Paper or MPT Envelope paper source is selected in the Paper Tab (P. 113), the document is always printed using 4 Color (CMYK).
④ Print as a mirror image
Clicking on this check box allows you to print a mirror image of the document.
⑤ About button
Displays the window that contains the program version and copyright information.
⑥ Restore Defaults button
Resets the Option tab's settings to the default settings.
Memory Tab
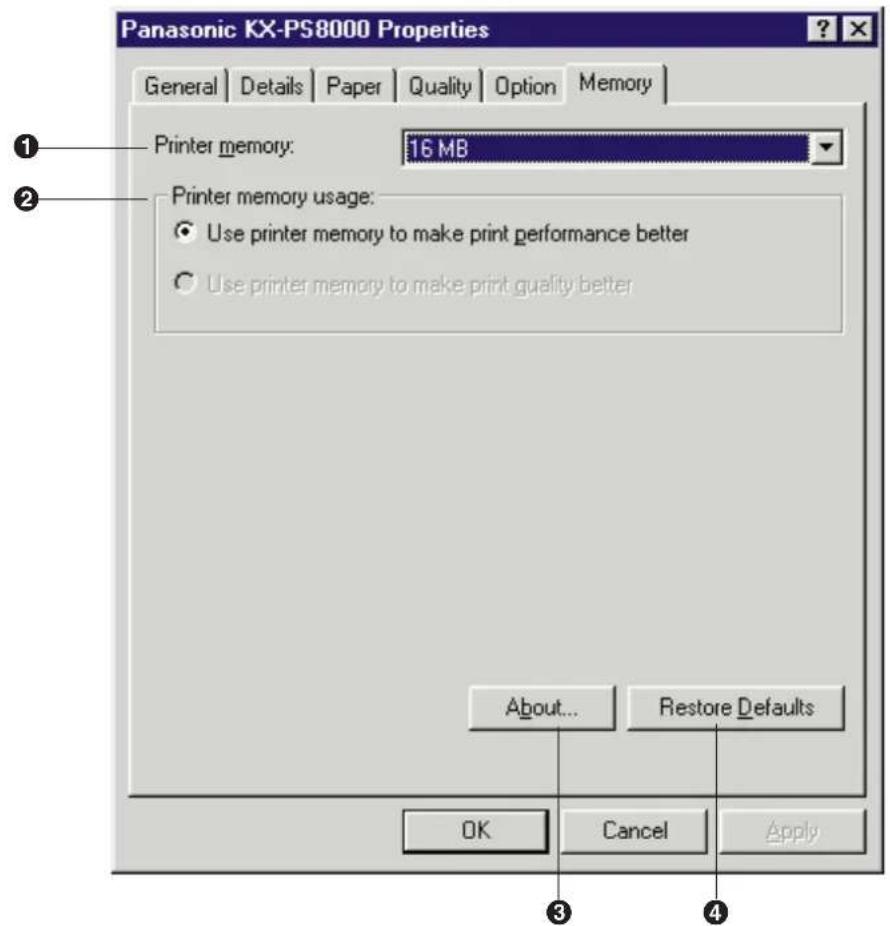
① Printer memory
Selects the amount of memory installed in the printer. If the amount of memory in the printer does not match this setting, a MEMORY
OVERFLOW message might be displayed. To determine how much memory is installed in the printer, print out the Test page (Operating Instructions manual).
As the printer memory increases, printing throughput improves. If the total amount of memory installed in the printer is more than 32 MB, Use printer memory to make print quality better can be selected in the Printer memory usage box.
② Printer memory usage
Determines how the printer memory is used, either for better print performance or for better print quality. This selection is effective only when the Gray Scale or the Color Photo print style is selected and the Standard (600 dpi) is selected.
- Use printer memory to make print performance better
Sends the data to the printer with the standard level of compression to improve throughput.
- Use printer memory to make print quality better
Sends the data to the printer with a lower level of compression or without compression to improve the print quality. However, the throughput will be diminished. More than 32 MB is required on the printer to select this option.
③ About button
Displays the window that contains the program version and copyright information.
④ Restore Defaults button
Resets the Memory tab's setting to the default setting.
Displaying the Panasonic KX-PS8000 Default Document Properties Window
The KX-PS8000 Default Document Properties window can be displayed from Printers under Windows (see A below) or from an application (see B on page 123).
A From Printers Under Windows NT 4.0
1 Click Start, select Settings, then click Printers. The Printers window appears.
2 Click the Panasonic KX-PS8000 icon.
3 Click the File menu, then click Document Defaults....
The Panasonic KX-PS8000 Default Document Properties window appears.
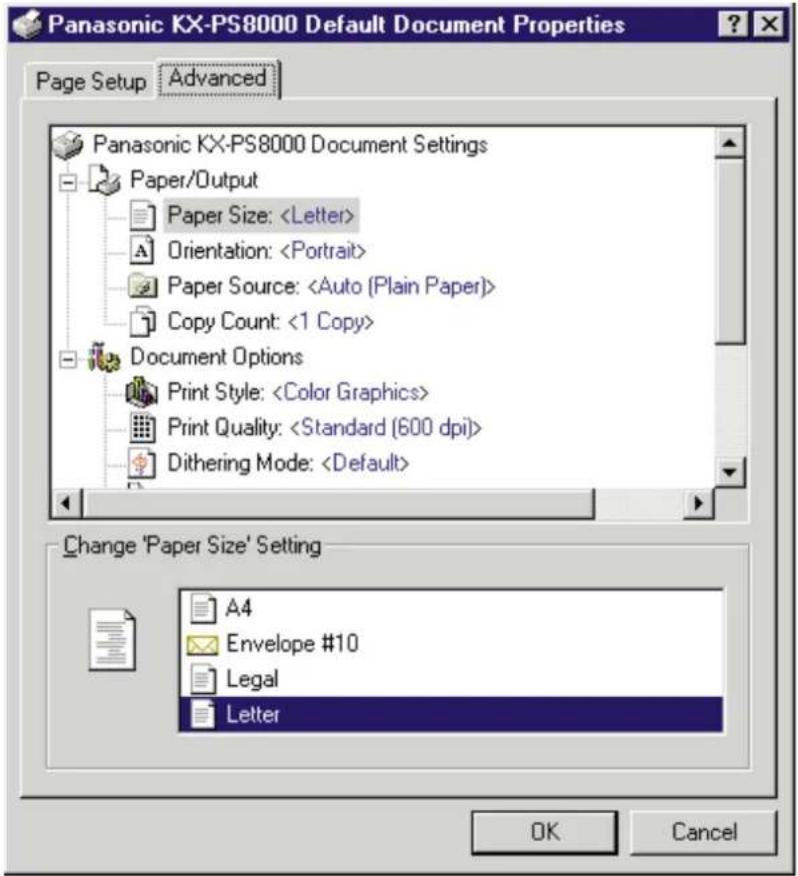
4 Click a tab to view the features.
Page Setup Tab P. 124
Advanced Tab P. 126
B From an application
For example, to print a document created in Microsoft WordPad on Windows NT 4.0, perform the following steps.
1 Click Start, select Programs, select Accessories, then click WordPad.
The WordPad window appears.
2 Click the File menu, then click Print...
The Print window appears.
3 Click Properties.
The Panasonic KX-PS8000 Document Properties window appears.
4 Click a tab to view the features.
Page Setup Tab P. 124
Advanced Tab P. 126
Note:
- The print options in the File menu depend upon the Windows application. Refer to the application manual.
Page Setup Tab
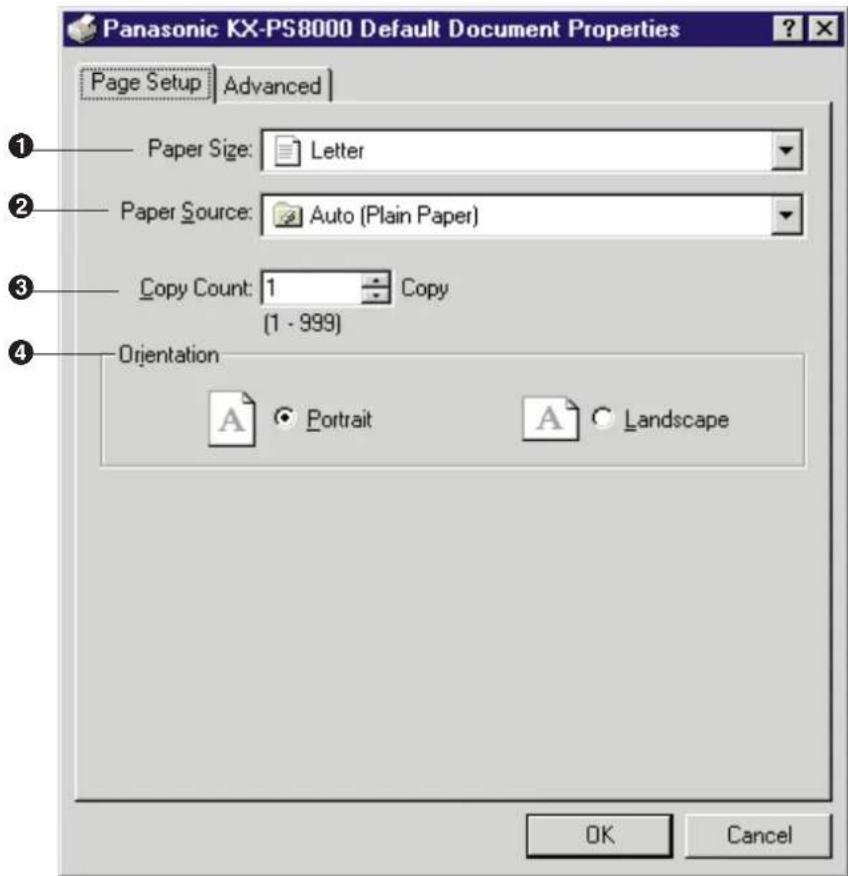
① Paper Size
Selects a different paper size.
Letter, A4, Legal or Envelope #10 can be selected.
② Paper Source
Selects media by choosing the location (trays) or the type of media.
- Auto [Plain Paper]:
Prints on paper loaded in a paper tray. The printer picks paper from the paper tray that is loaded with the media size you selected in the application software. When the tray is empty, the printer automatically picks from another paper tray of the same media size in the order of Upper, Middle and Lower.
• Auto [Transparency]:
Prints on transparency loaded in a transparency tray. The printer picks transparency from the transparency tray that is loaded with the media size you selected in the application software. When the tray is empty, the printer automatically picks from another transparency tray of the same media size in the order of Upper, Middle and Lower.
- Upper :
Prints on media loaded in the standard tray.
- Middle\*1 :
Prints on media loaded in the upper tray (optional feeder).
- Lower\*1 :
Prints on media loaded in the lower tray (optional feeder).
- MPT Plain Paper, MPT Transparency, MPT Label, MPT Coated Paper, MPT Envelope, MPT Paper 2nd Side :
Prints on paper, transparency or label, etc. loaded in the Multi-purpose tray. The printer will print on the selected media with optimal quality.
*1 If the optional feeder has not been installed, the printer selects the standard tray automatically.
③ Copy Count
Determines how many copies of the document will be printed.
Note:
- The number of copies can be also determined using the application software. However, it is recommended to set the number of copies using one method, either from this driver or from the application software to avoid printing problems.
4 Orientation
Selects Portrait (vertical) or Landscape (horizontal).
Portrait
Landscape


Advanced Tab
Two categories (Paper/Output and Document Options) for document settings are available. To display the items of a category, click on that category.
■ Paper/Output
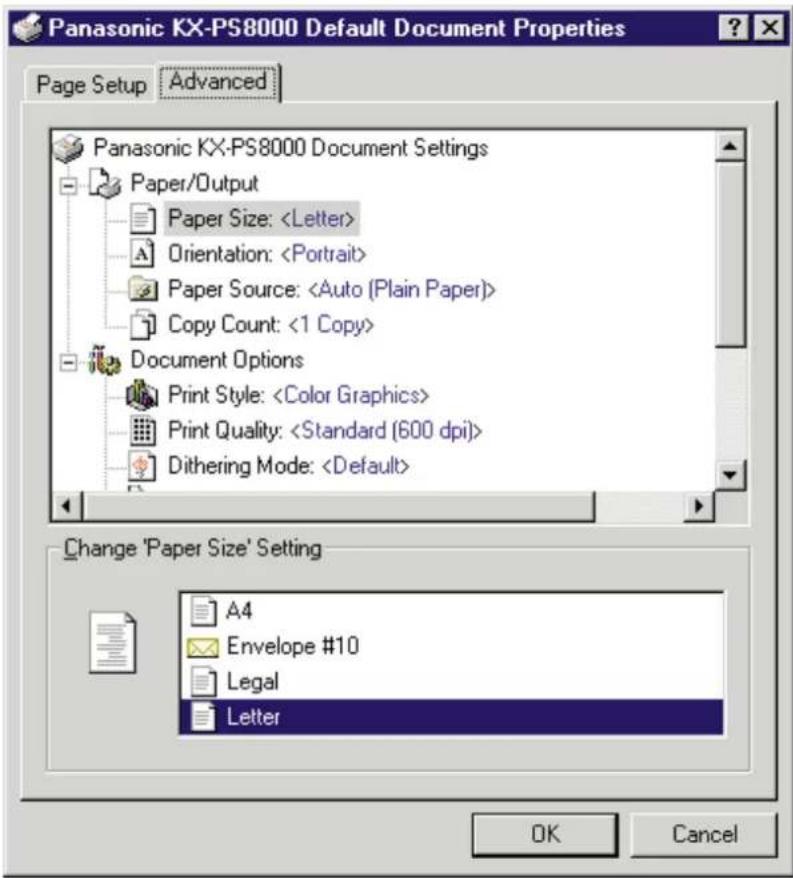
As for the features of each items (Paper Size, Orientation, Paper Source, Copy Count), refer to Page Setup Tab (P. 124).
Clicking on an item displays its selections in the lower box. Click your desired selection, then click OK.
■ Document Options

① Print Style
Click on Print Style to display its selections in the lower box, and select a type which is the closest to your document to ensure optimal print quality.
- Black Text:
Prints the document in black and white. Select this for black and white text. This is the fastest printing option.
- Gray Scale:
Prints the document in black and white. Select this for monochrome halftone images.
• Color Graphics: (default)
Prints the document in color. Select this for computer graphics, color text or spreadsheets with color graphics.
(Small text can be printed more clearly than when printed in Presentation.)
- Color Photo:
Prints the document in color. Select this for photo images such as a photo from a CD.
- Presentation:
Prints the document in color. Select this for presentation copies. (Presentation provides a clearer tone than Color Graphics.)
② Print Quality
Click on Print Quality to display its selections in the lower box, and select a print quality. Fast (300 dpi), Standard (600 dpi) or High quality (1200 dpi) can be selected. A higher resolution provides better print quality. However, the throughput speed is diminished.
When Presentation is selected in the Print style, print quality cannot be selected and 300 dpi is automatically assigned.
③ Dithering Mode
Color Graphics and Color Photo are print styles that simulate shades of color by changing the dot patterns. You can select a dot pattern using Default *, Dither A or Dither B.
This selection is effective only when Color Graphics or Color Photo is selected.
* Dither A or Dither B will be automatically selected according to the print quality you have selected.
Notes:
- When Color Graphics is selected in the Print Style, Dithering mode is available for all print quality selections.
- When Color Photo is selected in the Print Style, Dithering mode is available only for 600 dpi and 1200 dpi print quality selections.
- If the error message "Memory Overflow" appears when Default or Dither B is selected, change the selection to Dither A. With Dither A selected, memory overflow may not occur.

natural_image
Scenic view of a historic village with a church spire beside a calm lake, surrounded by mountains and trees (no visible text or symbols)Dither A

natural_image
Scenic view of a lakeside town with historic buildings and a church tower, surrounded by greenery (no visible text or symbols)Dither B
④ Output Order
Specifies whether the document exits face up or face down into the output tray. This selection is not effective when the multi-purpose tray (MPT Plain Paper, MPT Transparency, etc.) is selected in the Paper Source (P. 124). When the multi-purpose tray is selected, Face up is selected automatically.
⑤ Hyper-Tetra Adjustment...
Adjusts the brightness, contrast, hue, saturation, or red, green, blue, or cyan, magenta, yellow, black of the image. For the adjustment, refer to Using the Hyper-Tetra Adjustment ( P. 141). This function is effective only when the Color Graphics, Color Photo or Presentation print style is selected.
⑥ Gray Scale Density Adjustment...
Adjusts the density of the gray scale image. This function is effective only when the Gray Scale print style ( P. 126 Advanced Tab) is selected. For the adjustment, refer to Using the Density Adjustment ( P. 146).
⑦ Print as a Mirror image
Clicking on Print as a Mirror image allows you to print a mirror image of the document.
⑧ Color Mode
Provides two selections as described below.
These selections are effective only when printing a document with Color Graphics, Color Photo or Presentation print style ( P. 127).
- Use 4 Color [CMYK] for the above print styles
The document is printed using 4 toners (Cyan, Magenta, Yellow and Black).
- Use 3 Color [CMY] for the above print styles
The document is printed using 3 toners (Cyan, Magenta and Yellow). This selection provides faster print speed, and is used only when printing on plain paper.
Note:
- When Auto [Transparency], MPT Transparency, MPT Label, MPT Coated Paper or MPT Envelope paper source is selected in the Advanced Tab (P. 126) or Page Setup Tab (P. 124), the document is always printed using 4 Color (CMYK).
⑨ Metafile Spooling
Specifies the format in which the printing information is stored on your disk for printing. Generally, metafile spooling set to Enabled frees up your program faster than Disabled.
■ When Panasonic KX-PS8000 Document Settings is selected
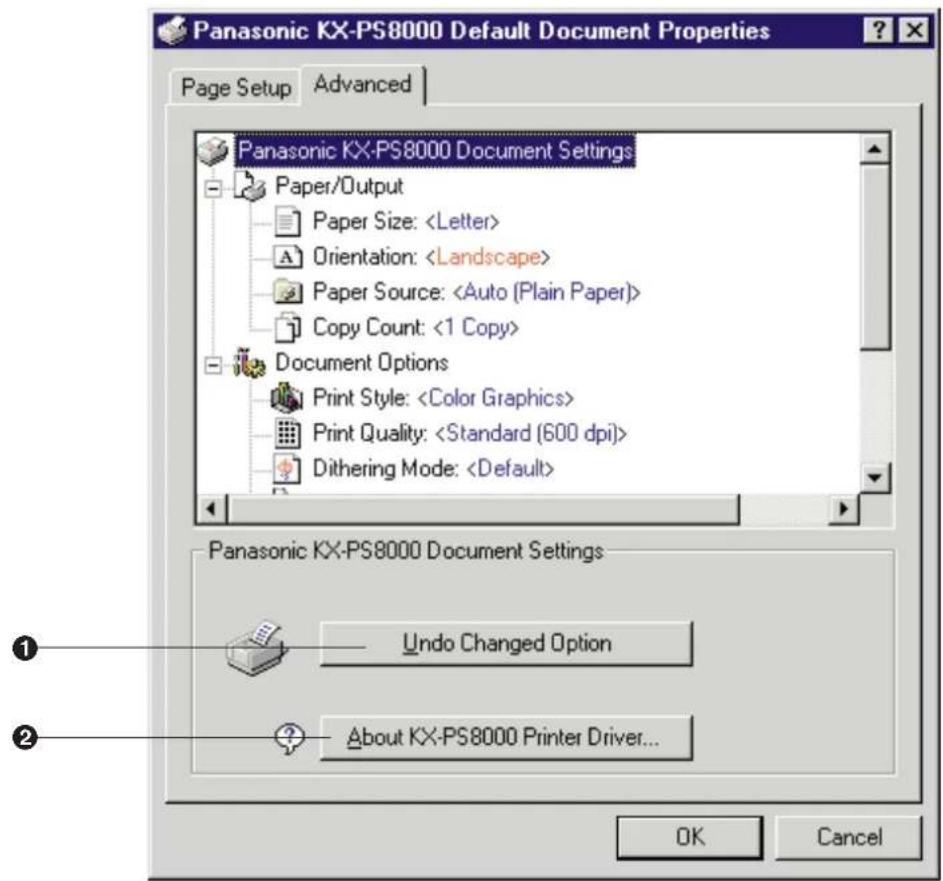
① Undo Changed Option
Returns the Page Setup and Advanced tab's settings to the previous settings.
② About KX-PS8000 Printer Driver...
Displays the window that contains the program version and copyright information.
Displaying the Panasonic KX-PS8000 Properties Window
1 Click Start, select Settings, then click Printers. The Printers window appears.
2 Click the Panasonic KX-PS8000 icon.
3 Click the File menu, then click Properties.
The Panasonic KX-PS8000 Properties window appears.
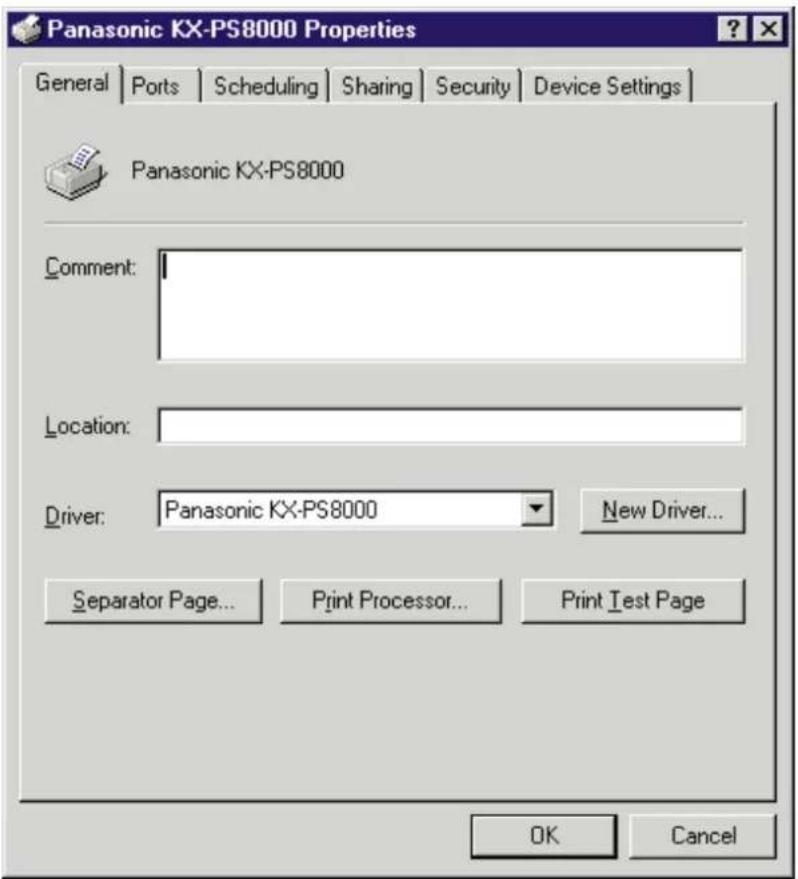
4 Click a tab to view the features.
| Ports Tab | P. 132 |
| Sharing Tab | P. 136 |
| Device Settings Tab | P. 139 |
For the features of the other tabs, refer to the Help menu in the Windows NT 4.0.
Ports Tab
Note:
- This option is available only for Windows NT 4.0.
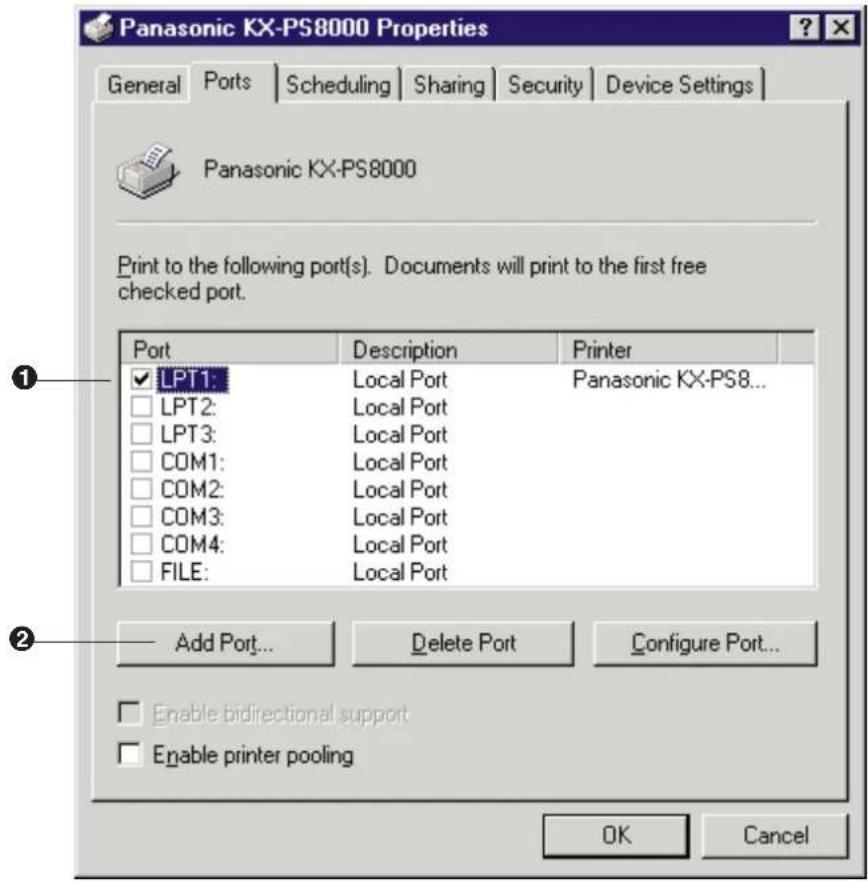
① Checked port
Documents will print to the checked port.
② Add Port... button
Adds a new port ( P. 133 Installing the SCSI port).
■ Installing the SCSI port
Notes:
- It is recommended that you do not connect the printer directly to the file server. Otherwise the printer and server performance may be diminished.
- When printing through the SCSI port, the access speed between other connected SCSI devices is diminished.
- To connect the KX-PS8000 to your SCSI port, a SCSI driver and ASPI Manager must be installed. Refer to your SCSI board manual.
1 Click Add Port...
The Printer Ports window appears.
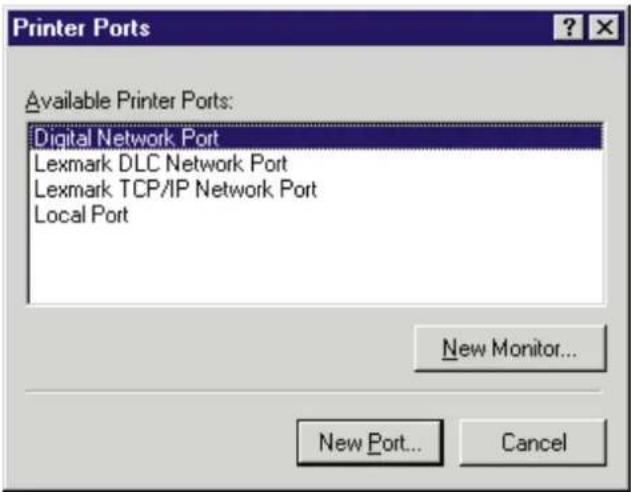
2 Click New Monitor...
The Installing Print Monitor window appears.
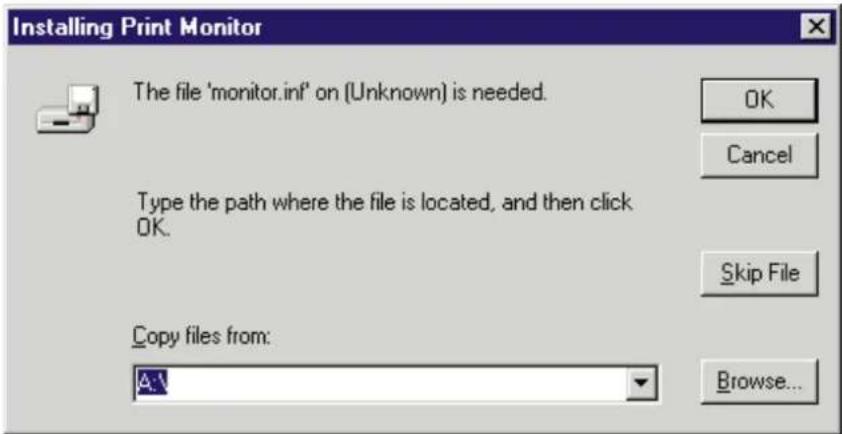
3 Insert the KX-PS8000 CD-ROM into the CD-ROM drive.
4 Click Browse...
5 Click Cancel . The Locate File window will be displayed.
Note:
- The SCSI port cannot be installed through the Monitor.inf file when copied to a directory with long file name.
6 Select CD-ROM drive.
7 Open Drivers, WinNT40, Printer then open Monitor.inf file.
8 Click OK. The Printer Ports window appears.
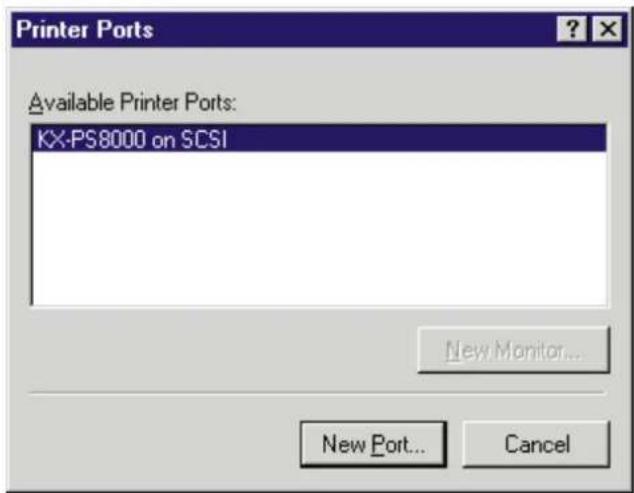
9 Click New Port... .
The Port Name window appears.
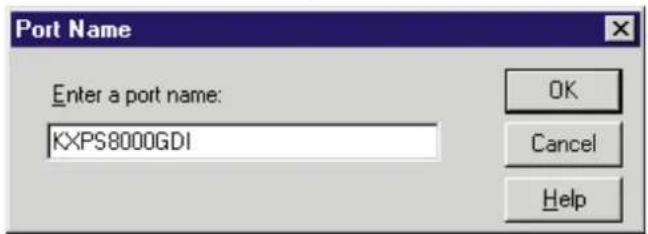
10 Type the port name (for example; KXPS8000GDI), then click OK.
The Printer Ports window appears.
11 Click Close.

Sharing Tab
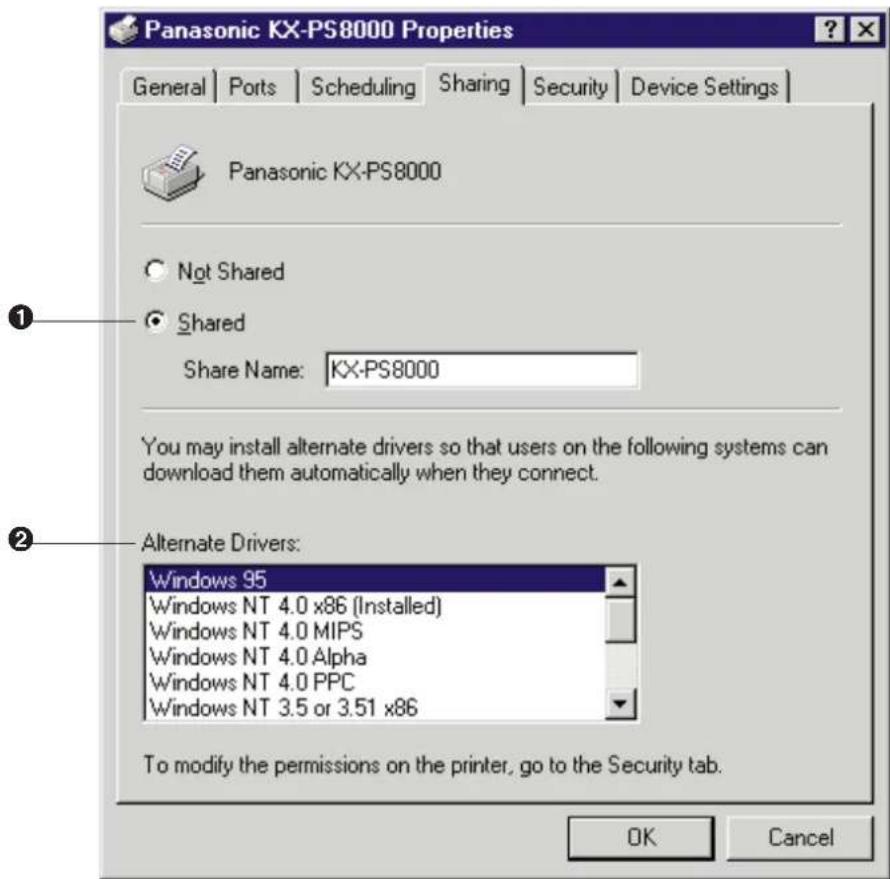
① Shared
To share the printer over the network.
For the setup operation, refer to Sharing the printer with a client computer (P. 137).
② Alternate Drivers
To install an alternate driver.
For the installation, refer to Installing an alternate driver (P. 137).
■ Sharing the printer with a client computer
1 Click Shared.
2 Type the printer name (for example: KX-PS8000).
Note:
- If the shared printer is used through Windows 95, the printer name must not exceed 12 characters.
3 Click OK.
■ Installing an alternate driver (for example: Windows 95)
1 Select Windows 95, then click OK.
The Insert Disk window appears.
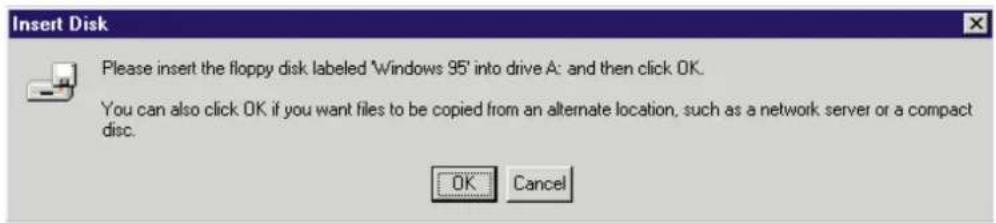
2 Click OK.
The Printer Drivers for Windows 95 window appears.
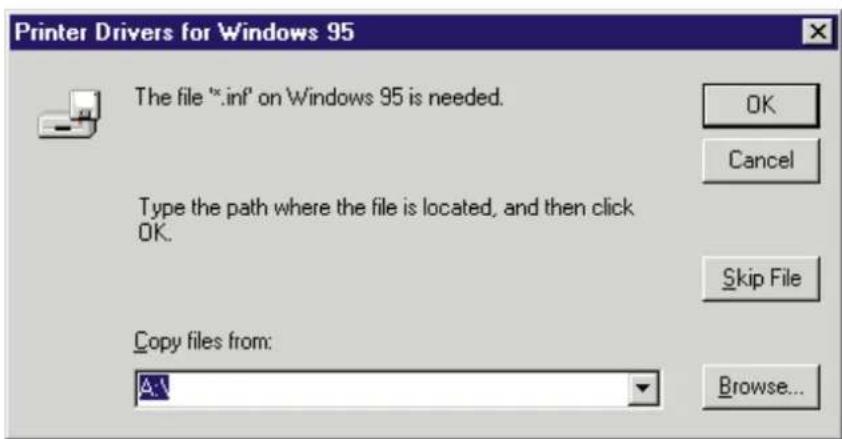
3 Click Browse...
4 Click Cancel. The Locate File window appears.
5 Insert the supplied KX-PS8000 CD-ROM into the CD-ROM drive.
6 Select CD-ROM drive.
7 Open Drivers, Win95, Printer, then open Pgdi95.inf file. The Printer Drivers for Window 95 window appears.
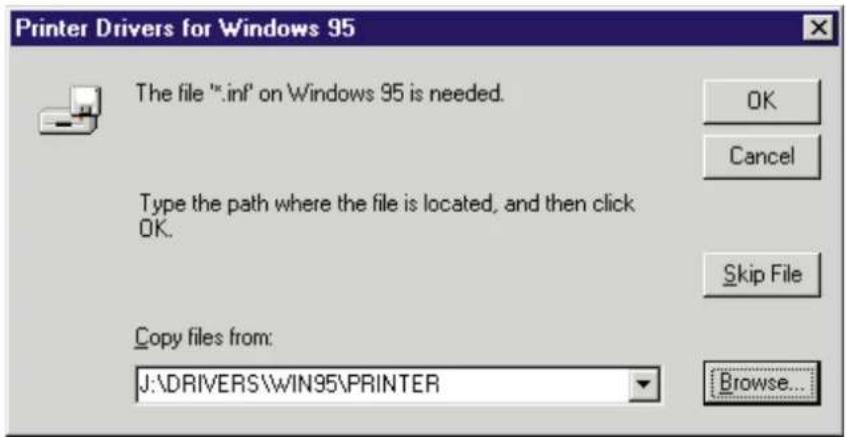
8 Click OK.
Device Settings Tab
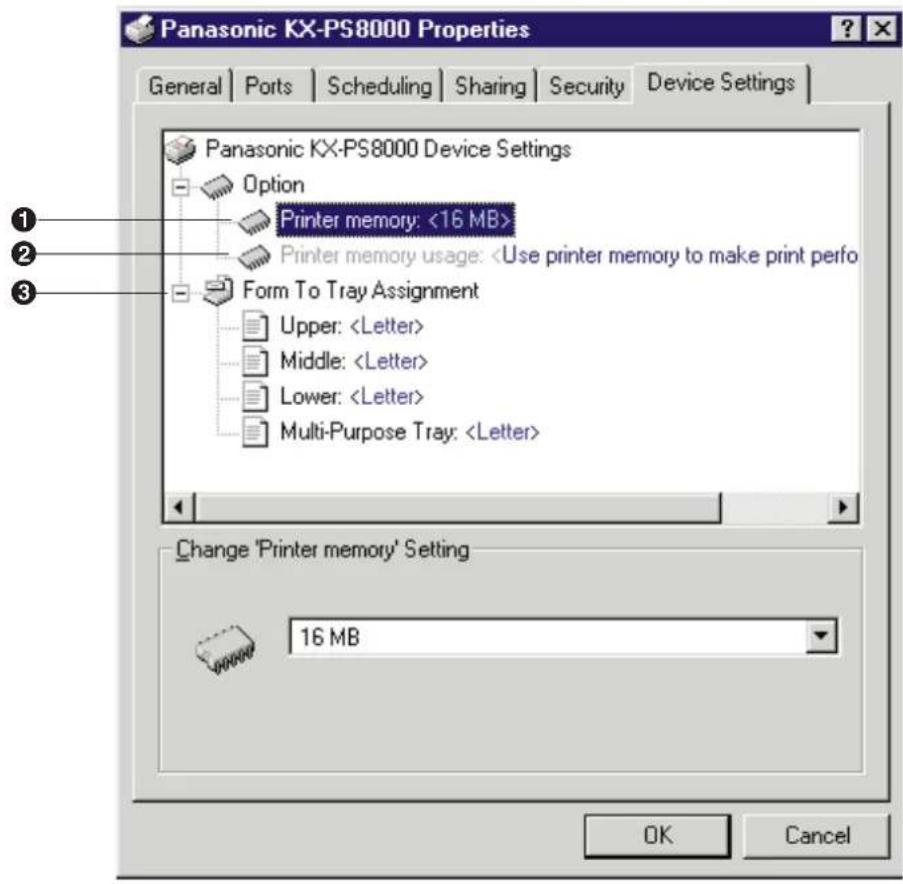
① Printer memory
Selects the amount of memory installed in the printer. If the amount of memory in the printer does not match this setting, a MEMORY
OVERFLOW message might be displayed. To determine how much memory is installed in the printer, print out the Test page (Operating Instructions manual).
As the printer memory increases, printing throughput improves. If the total amount of memory installed in the printer is more than 32 MB, Printer memory usage option (②) becomes effective.
② Printer memory usage
Determines how the printer memory is used, either for better print performance or for better print quality. This selection is effective only when the Gray Scale or the Color Photo print style is selected and the Standard (600 dpi) is selected.
More than 32 MB is required on the printer to select this option.
- Use printer memory to make print performance better
Sends the data to the printer with the standard level of compression to improve throughput.
- Use printer memory to make print quality better
Sends the data to the printer with a lower level of compression or without compression to improve the print quality. However, the throughput will be diminished.
③ Form To Tray Assignment
Server can assign and display the media loaded in the printer. Client can view the media assignment. This assignment does not affect any print job.
■ When Panasonic KX-PS8000 Device Settings is selected
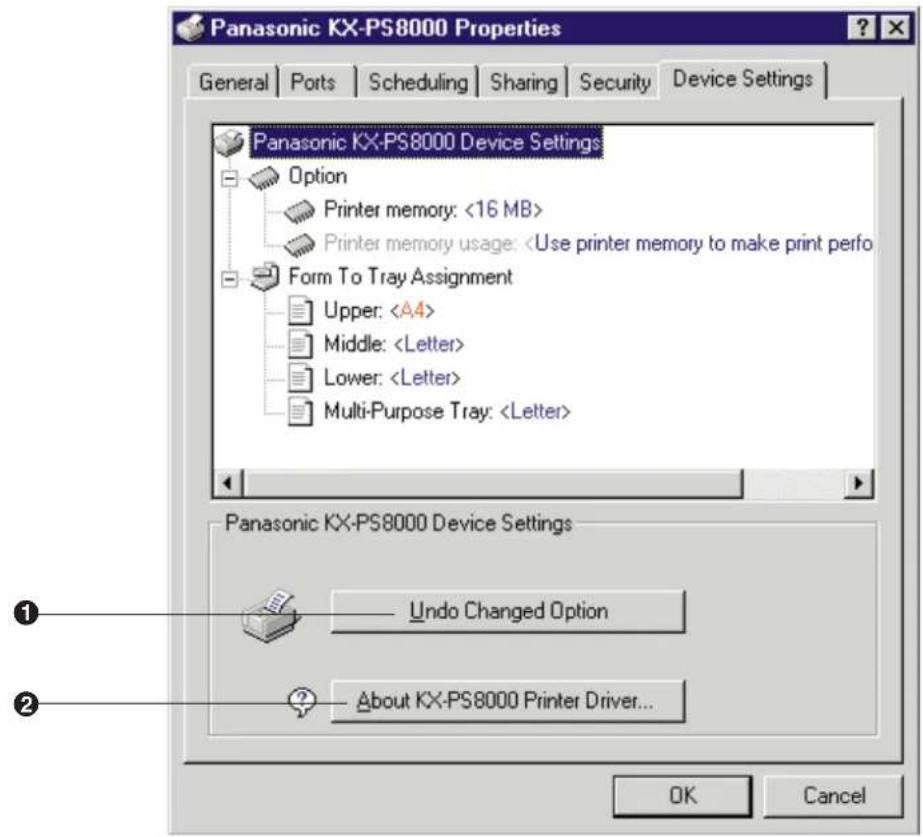
① Undo Changed Option
Returns the Device Settings tab's setting to the previous setting.
② About KX-PS8000 Printer Driver...
Displays the window that contains the program version and copyright information.
Using the Hyper-Tetra Adjustment
You can adjust the color of your output using the Hyper-Tetra Adjustment window.
Displaying the Hyper-Tetra Adjustment Window
■ For Windows 95/3.1
1 Click on the Use Hyper-Tetra Adjustment check box in the Option tab ( P. 118). The Adjustment... button becomes effective.
2 Click Adjustment... The Hyper-Tetra Adjustment window appears.
■ For Windows NT 4.0
1 Click on Hyper-Tetra Adjustment... in the Advanced tab ( P. 126). The Hyper-Tetra Adjustment... button appears in the lower box.
2 Click Hyper-Tetra Adjustment... The Hyper-Tetra Adjustment window appears.
Color Adjustment
To adjust the brightness, contrast, hue or saturation of color, select Color Adjustment in the Hyper-Tetra Adjustment window.
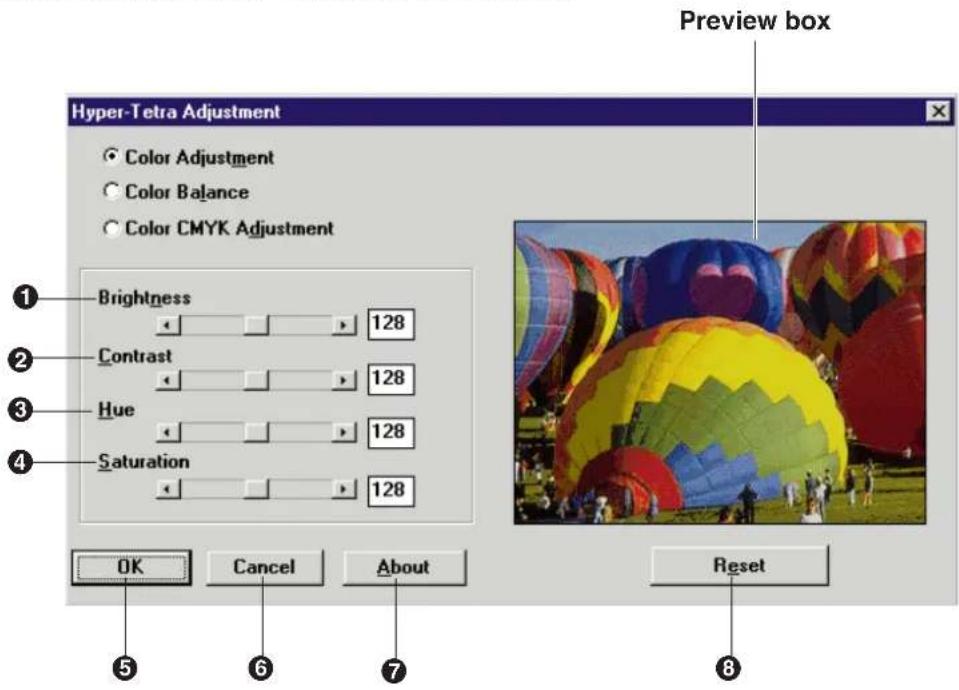
① Brightness
Changes the brightness of an image. A higher brightness setting provides a lighter image and a lower brightness setting provides a darker image.
② Contrast
Adjusts the range between the darkest and the lightest shades in the image.
③ Hue
Changes the aspect of color.
④ Saturation
Changes the brightness and vividness of color. Lower saturation settings provide dull and dark images, and higher saturation settings provide bright and vivid images.
The range of each option (① to ④) is from 0 to 255.
⑤ OK button
Makes a selection effective and closes the window.
⑥ Cancel button
Cancels a selection and closes the window.
⑦ About button
Displays the window that contains the program version and copyright information.
⑧ Reset button
Resets the current setting(s) made in this window to the default setting(s).
Adjust the color by performing the following steps.
1 Drag each slider left or right or click ◀ or ▶, or type the numerical value.
- You can see the result of the adjustment in the Preview box.
- To reset the setting, click Reset.
2 Click OK to make the setting(s) effective.
Color Balance
To adjust the level of red, green or blue, select Color Balance in the Hyper-Tetra Adjustment window. The following options appear.
① Red
Lightens or darkens red. A darker level setting provides a stronger cyan.
② Green
Lightens or darkens green. A darker level setting provides a stronger magenta.
③ Blue
Lightens or darkens blue. A darker level setting provides a stronger yellow.
The setting range of each option is from 0 to 255.
Adjust the color by performing the following steps.
1 Drag each slider left or right or click ◀ or ▶, or type the numerical value.
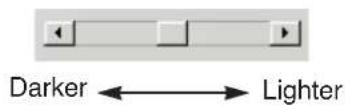
- You can see the result of the adjustment in the Preview box.
- To reset the settings, click Reset
2 Click OK to make the setting(s) effective.
Color CMYK Adjustment
To adjust the cyan, magenta, yellow or black color, select Color CMYK Adjustment in the Hyper-Tetra Adjustment window.
① Cyan
Adjusts the Cyan density of the image.
② Magenta
Adjusts the Magenta density of the image.
③ Yellow
Adjusts the Yellow density of the image.
④ Black
Adjusts the Black density of the image.
The setting range of each option is from 0 to 255
Adjust the color by performing the following steps.
1 Drag each slider left or right or click ◀ or ▶, or type the numerical value.
- You can see the result of the adjustment in the Preview box.
- To reset the settings, click Reset.
2 Click OK to make the setting(s) effective.
Using the Density Adjustment
You can adjust the grayscale density of your output using the Density adjustment window.
Displaying the Density Adjustment Window
■ For Windows 95/3.1
1 Click on the Use density adjustment check box in the Option tab ( P. 118). The Density... button is enabled.
2 Click Density... The Density Adjustment window appears.
■ For Windows NT 4.0
1 Click on Gray Scale Density Adjustment... in the Advanced tab (「P. 126). The Gray Scale Density Adjustment... button appears in the lower box.
2 Click Gray Scale Density Adjustment... The Density Adjustment window appears.
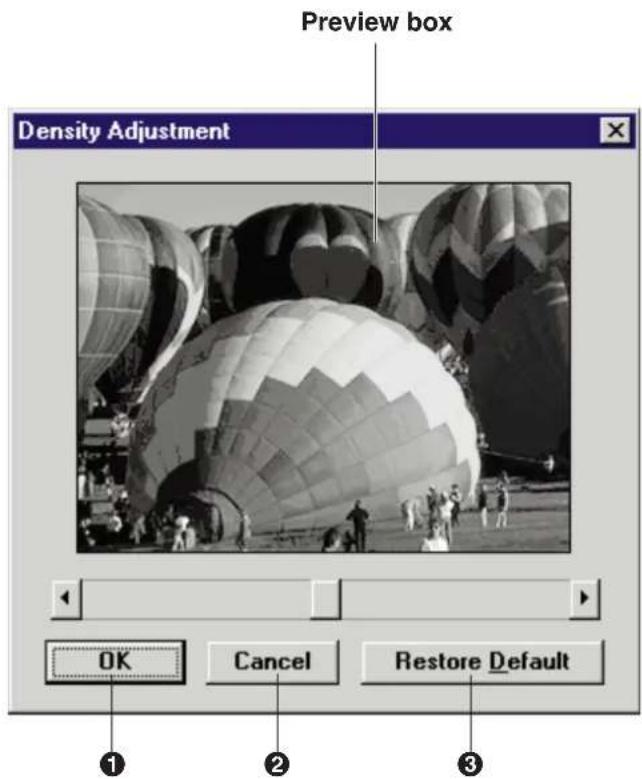
① OK button
Makes the adjustment effective and closes the window.
② Cancel button
Cancels the adjustment and closes the window.
③ Restore Default button
Restores the default image.
Adjust the grayscale by performing the following steps.
1 Drag the slider left/right, or click ◀/▶.
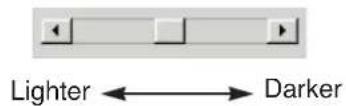
- You can see the result of the adjustment in the Preview box.
2 Click OK to make the adjustment effective.
Double Side Printing Using Microsoft® Word word processor
Single sided documents can be printed on both sides of the paper using an application software, such as Microsoft Word for Windows 95. The instructions described here are only for Microsoft Word for Windows 95.
1 Open document in Word for Windows 95.
2 From the File menu, click Print...
The Print window appears.
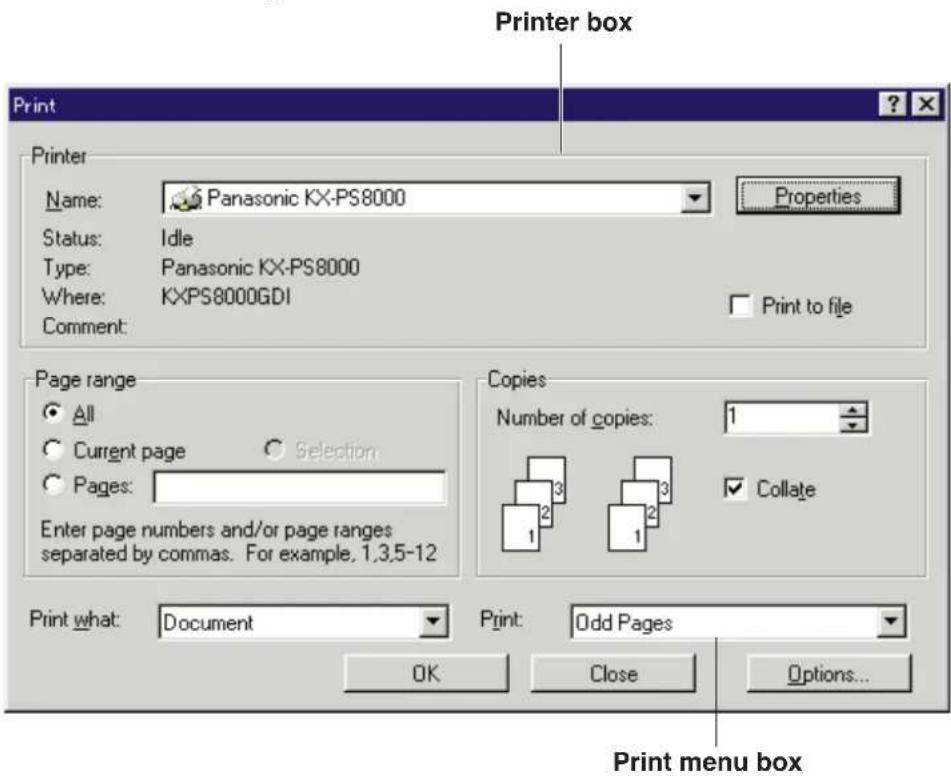
3 Make sure that Panasonic KX-PS8000 is selected in the Printer box, then click Properties.
The Panasonic KX-PS8000 window appears.
4 Select Face up in the Output order box, then click OK.
The Panasonic KX-PS8000 window will close.
5 Select Odd pages from the Print menu box, then click OK.
The Print window will close and odd pages will be printed face up.
6 Place the printed pages in the multi-purpose tray with the pages face down and top first.
7 From the File menu, click Print...
The Print window appears.
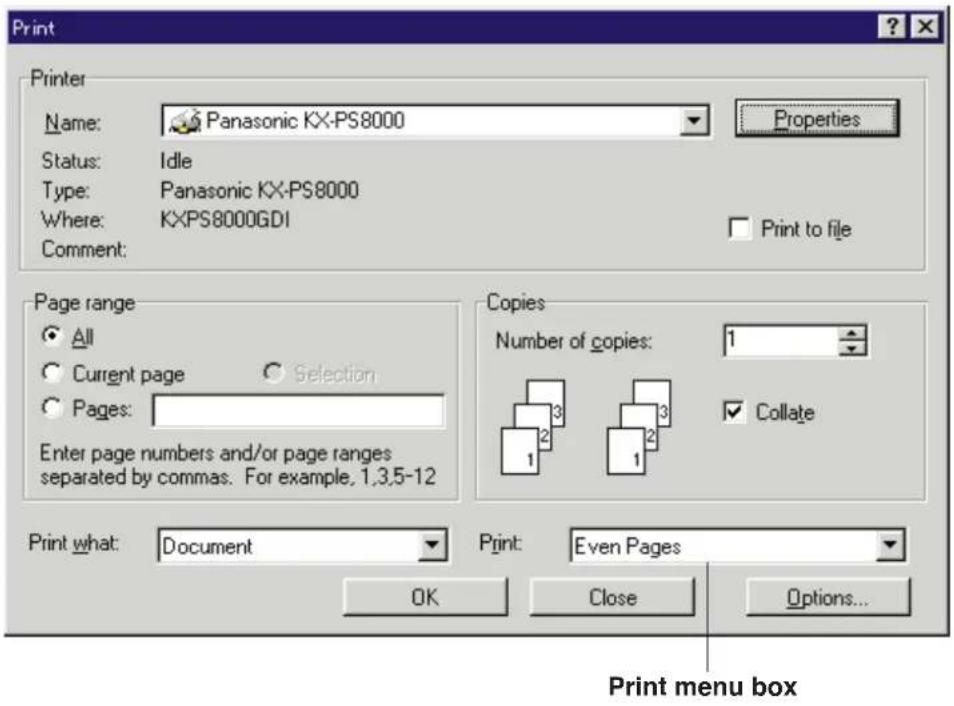
8 Click Properties .
The Panasonic KX-PS8000 window appears.
9 Select MPT Paper 2nd Side from the Paper source pop-up menu, then click OK.
The Panasonic KX-PS8000 window will close.
10 Select Even Pages from the Print menu box, then click OK.
The Print window will close and even pages will be printed on the back side of the paper.
Appendix
Table of Contents
Troubleshooting 151
Digital Duplicator Utility 151
Scanner 152
Printer Driver for Windows 3.1 .....154
Printer Driver for Windows 95 .....156
Printer Driver for Windows NT 4.0 ....159
Status Display....161
SCSI 163
Print Quality and Required Memory 166
When Using the Digital Duplicator Utility .....166
When Using the Printer Driver 167
Index 168
Digital Duplicator Utility
| Error message Possible cause Recovery | ||
| Cannot find printer. | Printer is not turned on or improper cable connection. | Check the cable connection. Close the Digital Duplicator Utility window and turn off the system (scanner / printer / computer), then turn it on again. |
| Cannot find scanner | Scanner is not turned on or improper cable connection. | |
| Cannot find scanner and printer | Scanner and printer are not turned on or improper cable connection. | |
| Cannot use more than 100% zoom when using ADF | An image enlarged more than 100% is being printed using the ADF tray. | Zoom function is not available when using the ADF tray. Place the document on the scanner glass and rescan. |
| DCIS did not start printing. Abort printing. | DCIS did not start duplicating. | Turn off the system (scanner / printer / computer), then turn it on again. |
| Digital Duplicator Utility requires 256 colors or higher | The number of displayed colors on the monitor is less than 256 Colors. | Set the number of colors to 256 colors or more. |
| Exceeded 30 areas. Delete other areas and try again. | More than 30 images are pasted on the Layout box. | Delete the unnecessary images from the Layout box ( P. 66). |
| No response from scanner. Check the power or cable. No response from printer. Check the power or cable. | Scanner or printer is not turned on or cable connection is improper. | Check the connection and turn on the scanner and/or printer. Click Retry on the message window. |
| Resource DLL file is not found. | found. | Reinstall the KX-PS8000 software. The nece |
| Unable to print more than one area | More than one area is selected for printing using the ADF tray. | Remove the document from the ADF tray, place it on the scanner glass, then print. |
ssary file
Scanner
| Error message Possible cause Recovery | ||
| ADF is busy! To scan or pre- | ADF is taking REUSE. on the | message window.To cancel, click CANCEL on the message window. |
| File Not Found | File or Path is not found. Reinstall the | KX-PS8000 software. |
| File open error!! | Failed to transfer the file for scanning. | Increase the hard disk space, then re-scan. |
| File write error!! | ||
| Gamma data read error!! | Failed to load the data of the gamma correction. | Close the application which controls the scanner, turn off the system (scanner/printer/computer), then turn it on again. |
| Help file is not found Help file is not found. | Reinstall the KX-PS8000 software. | |
| Horizontal scan area is too big. Would you like to change the horizontal scan size? | The width of the scan area is too large. | Click Yes or No on the message window.Yes: Makes the width of the scan area smaller, so that it can be scanned.No: The width of the scan area remains the same. Decrease the scanning resolution, then re-scan. |
| Memory Allocation Error! | Memory is insufficient. | Close the application which controls the scanner, turn off the system (scanner/printer/computer), then turn on again. |
| No ASPI managers are loaded. This typically occurs when a DOS ASPI manager is not resident in memory. | SCSI board is not correctly set. Correctly set the SCSI board in the computer. (Refer to the instructions/manual of the SCSI board.) For any other trouble related to SCSI, refer to the SCSI section of Troubleshooting ( P. 163). | |
| Path Not Found | File or Path is not found. | Reinstall the KX-PS8000 software. |
| PCOM95. DLL Function Error!! | Pcom95.dll internal error has occurred. | |
| PCom95.DLL was not found!! | The file Pcom95.dll is not found. | |
| PCOM31. DLL Function Error!! | Pcom31.dll internal error has occurred. | |
| PCom31.DLL was not found!! | The file Pcom31.dll is not found. | |
| Power Off or Cable Error! Check that the scanner is powered on, and the SCSI cable is connected correctly. | The scanner is not recognized. | Close the application which controls the scanner driver, turn off the system (scanner/printer/computer), then turn on again. |
| PTAB3D.DLL was not found!! | The file Ptab3d.dll is not found. Reinstall the KX-PS8000 software. | |
| Scanner is reserved by other application! | Scanner is being used by another application. | Rescan later when the scanner is free from other jobs.Rescan after closing the application which controls the scanner.Close the application, turn off the system (scanner/printer/computer), then turn it on again. |
| Resource DLL file is not found. | found. | Reinstall the KX-PS8000 software.The necessary file |
| Scanner is reserved by other device! | Scanner is being used by another device. | Rescan later when the scanner is free from other jobs.Close the application which controls the scanner, turn off the system (scanner/printer/computer), then turn it on again. |
| winaspi.dll is not found. | SCSI board is not set correctly. | Correctly set the SCSI board in the computer. (Refer to the instructions manual of the SCSI board.)For any other trouble related to SCSI, refer to the SCSI section of Troubleshooting (P. 163). |
Printer Driver for Windows 3.1
| Error message Possible cause Recovery | ||
| ASPI does not support this mode!! | SCSI board and its driver are not installed correctly. | Correctly install the SCSI board and its driver. (Refer to the instructions manual of the SCSI board.)For any other trouble related to SCSI, refer to the SCSI section of Troubleshooting ( P. 163). |
| ASPI is not initialized!! | ||
| Block 16 table open error: Table file not open! | 1/16 compression table is not found. | Reinstall the KX-PS8000 software. |
| KX-PS8000 already is used by other devices. | The printer is being used by another device. | ● Reprint later when the printer is free from other jobs.● Turn off the system (scanner / printer / computer), then turn it on again. |
| KX-PS8000 is not detected. Selected port is LPT. Please check LPT cable, Power ON or Printer condition. | The printer connected with the parallel cable is not recognized. | Check the cable connection of the printer or turn on the printer. |
| KX-PS8000 is not detected. Selected port is SCSI. Please check SCSI cable, Power ON or Printer condition | KX-PS8000 is not recognized as a SCSI device. | Check the cable connection of the system or turn on the printer. |
| Driver is in error. Abort printing. | An illegal error has occurred.KX-PS8000 | ● Print the SCSI board is correctly installed in the computer and cable is correctly connected.● Turn off the computer, then turn it on again. |
| LPT Port or KX-PS8000 is busy. | The printer is printing. | ● Reprint later when the printer is free from other jobs. |
| Memory is allocated Above 16MB. If your SCSI controller is installed in an ISA slot, File may not print correctly!! | The transfer data area for printing has allocated more than 16MB. | Close all applications and turn off the computer, then turn it on again. |
| No ASPI managers were found!! | SCSI board and its driver are not installed correctly. | Correctly install the SCSI board and its driver. (Refer to the instructions manual of the SCSI board.)For any other trouble related to SCSI, refer to the SCSI section of Troubleshooting ( P. 163). |
| One or more ASPI for DOS managers are loaded which do not support ASPI for WIN16!! | ||
| Printing aborted for occurred SCSI error. | An illegal error has occurred. | Confirm the SCSI board is correctly installed in the computer or cable is correctly connected.Turn off the computer, then turn it on again. |
| SCSI Command parameter error!!Abort printing. | properly when a SCSI command was being transferred. | Re-boot PC and Printer.The board or cable |
| occurred. | The printer is not responding.SCSI Err | Tulr ToffelCusystem (scanner / printer / computer) and turn on again. Then print the document again. |
| The printer does not print correctly (not an error message). | The computer is not properly communicating with the printer. | Follow the procedure below and disable the bi-directional interface.Double-click Status display setup icon in KX-PS8000 Utilities program group.Click Device tab.Click off Monitor Printer check box.Click OK.The Status Display function becomes ineffective. |
| Unable to Allocate Memory | The computer's internal memory for printing is insufficient. | Close the windows of the applications except for the one which controls the printer, then print again.Turn off the computer, then turn it on again. |
| Unable to Free Memory!! Re-boot Windows.Something happened to the memory environment of Windows. | ||
| Check sum error!! | The necessary file for printing is not found. | Reinstall the KX-PS8000 software. |
| File ID not match!! | ||
| Resource DLL file is not found. | ||
| Table file open error!! | ||
| Table file read error!! | ||
| *.DLL function Error | ||
| *.DLL not found | ||
■ Some applications settings may take priority over the printer driver settings.
Printer Driver for Windows 95
| Error message Possible cause Recovery | ||
| ASPI Manager is not found. Install ASPI for Windows. (e.g. install wnaspi32.dll to your windows(system directory.) | SCSI board and its driver are not installed correctly. | Correctly install SCSI board and its driver. (Refer to the instructions manual of the SCSI board.)wnaspi32.dll will be installed or replaced with a new version. |
| Can not find Panasonic KX-PS8000. Make sure that Panasonic KX-PS8000 is connected to your PC by SCSI, and then retry again. | Cable connection is improper or printer is not ready.The terminator setting is improper. | Perform the following procedure.1. Confirm that the terminator is correctly set.2. Confirm that the printer is ready.3. Confirm that the printer is correctly connected with a SCSI cable.4. Turn off the computer, then turn it on again. |
| Can not initialize ASPI for Windows. Install newer version of ASPI for Windows | SCSI board and its driver are not installed correctly. | Correctly install the SCSI board and its driver. (Refer to the instructions manual of the SCSI board.)wnaspi32.dll will be installed or replaced with a new version.For any other trouble related to SCSI, refer to the SCSI section of Troubleshooting ( P. 163). |
| The ASPI for Windows installed on this PC does not have expected function. Install newer version of ASPI for Windows. | ||
| The ASPI for Windows installed on this PC does not support expected mode. Install newer version of ASPI for Windows. | ||
| The ASPI manager installed on this PC does not support Windows. Install ASPI for Windows. [e.g. install wnaspi32.dll to your windows (system directory)]. | ||
| The printer does not print correctly (not an error message). | The computer is not properly communicating with the printer. | Follow the procedure below and disable the bi-directional interface.1. Click Start, select Settings, then click Printers.2. Click the Panasonic KX-PS8000 icon.3. Click the File menu, then click Properties.4. Click Details tab and Spool settings....5. Click Disable bi-directional support for this printer, then click OK.The Status Display function becomes ineffective. |
| The Status Display does not appear when printing a document. | The Status Display function is not effective. | Follow the procedure below to make the setting effective.1. Click Start, select Settings, then click Printers.2. Click the Panasonic KX-PS8000 icon.3. Click the File menu, then click Properties.4. Click Details tab and Spool settings....5. Click Enable bi-directional support for this printer, then click OK. |
| There was an error writing to LPT1: for the printer (Panasonic KX-PS8000): There was a problem sending your document to the printer. Make sure the printer cable is connected and the printer is on-line. To continue printing, click retry. Windows will automatically retry after 5 seconds | Cable connection is improper or the printer is not ready. | Connect the printer (parallel cable) correctly or make the printer ready. |
Troubleshooting
| Error message Possible cause Recovery | ||
| There was an error writing to KXPS8000GDI: for the printer (Panasonic KX-PS8000): The printer is not ready. Make sure it is turned on and on-line. To continue printing, click retry. Windows will automatically retry after 5 seconds | ● Cable connection is improper or the printer is not ready. ● The terminator setting is improper. | Perform the following procedure.1. Confirm that the terminator is correctly set.2. Confirm that the printer is ready.3. Confirm that the printer is correctly connected with a SCSI cable.4. Turn off the computer, then turn it on again. |
| Unable to Allocate Memory!! | The memory for printing is insufficient. | ● Close all applications except for the one which controls the printer, then print it again. ● Turn off the computer, then turn it on again. Then print the document again. |
| Can not load pclradj.dll | found. | Reinstall the KX-PS8000 software. The necessary file |
| Check sum error!! | ||
| File ID not match!! | ||
| Resource DLL file is not found. | ||
| Table file open error!! | ||
| Table file read error!! | ||
| Windows could not write to the printer spool file.Make sure your disk has enough free space and try again. | Hard disk space is insufficient. | Increase the hard disk space.If it is difficult to increase the hard disk space or printing error occurs even after increasing the hard disk space, change the spool data format from EMF to RAW by performing the following steps.However, RTA (Return To Application: the length of time between the start of printing and the return of control to an application) of RAW is longer than that of EMF.1. Click Start, select Settings, then click Printers.2. Click the Panasonic KX-PS8000 icon.3. Click the File menu, then click Properties.4. Click the Details tab and Spool settings....5. Change the Spool data format to RAW, then click OK. |
■ Some applications settings may take priority over the printer driver settings.
Printer Driver for Windows NT 4.0
| Error message Possible cause Recovery | ||
| ASPI Manager is not found. Install ASPI for Windows. (e.g. install wnaspi32.dll to your system32 directory). | SCSI Board and its driver are not installed correctly. | Correctly install SCSI board and its driver. (Refer to the instructions manual of the SCSI board.) Wnaspi32.dll will be installed or replaced with a new version. |
| Can not initialize ASPI for Windows. Install newer version of ASPI for Windows. | SCSI Board and its driver are not installed correctly. | Correctly install SCSI board and its driver. (Refer to the instructions manual of the SCSI board.) Wnaspi32.dll will be installed or replaced with a new version. For any other trouble related to SCSI, refer to the SCSI section of Troubleshooting ( P. 163). |
| The ASPI for Windows installed on this PC does not have expected function. Install newer version of ASPI for Windows. | ||
| The ASPI for Windows installed on this PC does not support expected mode. Install newer version of ASPI for Windows. | ||
| The ASPI for Windows installed on this PC does not support Windows. Install ASPI for Windows. [e.g. install wnaspi32.dll to your system32 directory] | ||
| Error writing to KXPS8000GDI for: The printer command is invalid. Do you wish to retry or cancel the job? | KX-PS8000 software is not installed correctly. | Reinstall the KX-PS8000 software. |
Troubleshooting
| Error message Possible cause Recovery | ||
| Error writing to KXPS8000GDI for: The device is not ready. Do you wish to retry or cancel the job? | ● Cable connection is improper or printer is not ready. | Perform the following procedure.1. Confirm that the terminator is correctly set.2. Confirm that the printer is ready.3. Confirm that the printer is correctly connected with a SCSI cable.4. Turn off the computer, then turn it on again. |
| Separator page has been set. Cancel | the Separator page setting. | |
| Error writing to LPT1: for “Application name”: The device is not ready. Do you wish to retry or cancel the job? | Cable connection is improper or printer is not ready. | Connect the printer (parallel cable) correctly or make the printer ready. |
| Error writing to “Port name” for “Application name”: The request could not be performed because of an I/O device error. Do you wish to retry or cancel the job? | ● Cable connection is improper or printer is not ready.● The terminator setting is improper. | Perform the following procedure.1. Confirm that the terminator is correctly set.2. Confirm that the printer is ready.3. Confirm that the printer is correctly connected with a SCSI cable.4. Turn off the computer, then turn it on again. |
| System Process-Out of Virtual MemoryYour system is running low on virtual memory. Please close some applications. You can then start the System option in the Control Panel and choose the Virtual Memory button to create an additional paging file or to increase the size of your current paging file. | Your system is running low on virtual memory. | Increase the virtual memory by following the procedure below.1. Click Start, Settings, then click Control Panel.2. Double click the System icon.3. Click the Performance tab.4. Click Change....5. Increase the value of Initial Size [MB] and Maximum Size [MB].6. Click Set.7. Click OK.8. Click Close.9. Click Yes in the System Settings Change dialog, then restart your computer.If the same error message appears after increasing the virtual memory, repeat the steps above. |
Status Display
| Error message Possible cause Recovery | ||
| ASPI for Win16 or 32 could not properly initialize itself. This may be caused by a lack of system resources. | Lack of system resources, or other trouble related to SCSI. | Close some application and retry.For any other trouble related to SCSI , refer to the SCSI section of Troubleshooting ( P. 163). |
| Invalid LPT Port. | Unavailable LPT port is selected when using Windows 3.1. | Select the other available LPT port by following the procedure below.1. Double click the Main icon.2. Double click the Control Panel icon.3. Double click the Printers icon.4. Click Connect... 5. Click the other port, then click OK.6. Click Close . |
| Load Library Error!, File Open Error! or Install Error! appears and Status Display does not appear. | The necessary file is not installed in the computer. | Reinstall the KX-PS8000 software. |
| No ASPI managers are loaded. This typically occurs when a DOS ASPI manager is not resident in memory. | SCSI board is not correctly set. | Correctly set the SCSI board in the computer. (Refer to the instructions manual of the SCSI board.)For any other trouble related to SCSI , refer to the SCSI section of Troubleshooting ( P. 163). |
| Not Detect. Turn off the system (see an open print the printer were turned on after turning on the computer.The terminator setting is improper.SCSI setting or cable connection is improper. | computer), then turn it on again. If the trouble still remains, confirm the following points.The terminator is correctly set.The SCSI board is correctly installed in the computer.The system is correctly connected with SCSI cables.Each SCSI device has a different ID Number.For any other trouble related to SCSI , refer to the SCSI section of Troubleshooting ( P. 163). | |
| One or more ASPI for DOS managers are loaded which do not support ASPI for Win16 or 32. | SCSI board is not correctly set. | Correctly set the SCSI board in the computer. (Refer to the instructions manual of the SCSI board.)For any other trouble related to SCSI , refer to the SCSI section of Troubleshooting ( P. 163). |
Troubleshooting
| Error message Possible cause Recovery | ||
| There isn't available LPT Port. | Unavailable LPT port is selected when using Windows 3.1. | Select the other available LPT port by following the procedure below.1. Double click the Main icon.2. Double click the Control Panel icon.3. Double click the Printers icon.4. Click Connect... .5. Click the other port, then click OK.6. Click Close. |
| This ASPI manager does not support this mode of Windows. You typically see this error code when running Windows in Real Mode | SCSI board is not correctly set. Restart Windows in Enhanced mode. | |
| SCSI device can not be used. Because ASPI dll file is not exist or doesn't match. | SCSI board is not installed correctly in the computer and/or it is not set correctly. | Confirm that the SCSI board is correctly installed in the computer and it is correctly set. (Refer to the instructions manual of the SCSI board.)For any other trouble related to SCSI, refer to the SCSI section of Troubleshooting ( P. 163). |
| SCSI device is not responded. | Printer and/or scanner are not responding. | Click Yes or No on the message window.Yes: Printer and scanner cannot be used. Turn off the system (printer / scanner / computer), then turn it on again.No: Waits until the printer and/or scanner responds. |
| Status Display does not exist. | KX-PS8000 software is not installed correctly. | Reinstall the KX-PS8000 software. |
| winaspi.dll is not found. | SCSI board is not correctly set. Correctly set the SCSI board in the computer. (Refer to the instructions manual of the SCSI board.)For any other trouble related to SCSI, refer to the SCSI section of Troubleshooting ( P. 163). | |
SCSI
If trouble occurs when printing, scanning or duplicating using SCSI, confirm that the ASPI Manager is installed. If the ASPI Manager is not installed, you must install it. It is assumed that the Adaptec SCSI host adapter is installed.
■ Windows 3.1 users
1 Confirm that the SCSI host adapter is installed in your PC correctly.
2 In CONFIG.SYS file, check the following setting.
If this setting does not exist in CONFIG.SYS, reinstall SCSI driver using EZ-SCSI (refer to the SCSI host adapter users manual).
3 Confirm that the EZ-SCSI is installed in Windows 3.1. If Adaptec EZ-SCSI program group does not exist, install SCSI driver using EZ-SCSI (refer to SCSI host adapter users manual).
4 After finishing necessary procedure, restart PC and make sure that the following message appears on your PC.
"ASPInDOS.SYS Installation successful"
5 Start Windows and confirm that the printer and/or scanner is recognized by PC using SCSI utility in EZ-SCSI program group or Show Configuration in KX-PS8000 Utilities program group.
If the printer and/or the scanner are not recognized, please refer to KX-PS8000 Operating Instructions manual and recheck SCSI ID or terminator settings.
$$ \text { DEVICE } = \text { ASPInDOS.SYS (n = 2, 4, 8 etc.) } $$
■ Windows 95 users
1 Confirm that the SCSI host adapter is installed in your PC correctly.
2 Click Start and select Settings, then click Control Panel.
3 Double-click the System icon from the Control Panel.
4 Click Device Manager tab.
If the SCSI host adapter does not exist or displayed with the exclamation mark!, SCSI driver is not installed correctly. Reinstall the SCSI driver (refer to SCSI host adapter users manual).
5 If the SCSI driver is installed correctly, confirm that the printer and/or the scanner is recognized by PC using SCSI utility in EZ-SCSI program or Show Configuration in KX-PS8000 Utilities program.
If the printer and/or the scanner are not recognized, refer to the KX-PS8000 Operating Instructions manual and recheck the SCSI ID or terminator settings.
■ Windows NT 4.0 users
1 Confirm that the SCSI host adapter is installed in your PC correctly.
2 Click Start and select Settings, then click Control Panel.
3 Double-click the SCSI Adapters icon from the Control Panel. If the SCSI host adapter does not exist, SCSI driver is not installed correctly. Reinstall the SCSI driver (refer to SCSI host adapter users manual).
4 If the SCSI driver is installed correctly, confirm that the printer is recognized by PC using SCSI utility in EZ-SCSI program.
If the printer is not recognized, refer to the KX-PS8000 Operating Instructions manual and recheck the SCSI ID or terminator settings.
Print Quality and Required Memory
The following tables show how much memory is required for better printing performance. Increasing memory gives better printing quality.
The total amount of memory installed in the printer is reported on the Test Page.
When Using the Digital Duplicator Utility
| Total Printer Memory | Selectable Print Quality Mode (Scanning Resolution) | Full-Size Print Area | |
| 16 MB(Standard) | Standard | 300 x 300 dpi | Letter, A4, Legal |
| 600 x 300 dpi | Letter, A4, Legal*1 | ||
| 20 or 24 MB(Add 4MB or 8MB) | Standard | 300 x 300 dpi | Letter, A4, Legal |
| 600 x 300 dpi | |||
| 32 MB(Add 16MB) | Standard | 300 x 300 dpi | |
| 600 x 300 dpi | |||
| Fine 600 x 600 dpi | Letter, A4, Legal*1 | ||
| More than 48 MB(Add more than 32 MB) | Standard | 300 x 300 dpi | Letter, A4, Legal |
| 600 x 300 dpi | |||
| 600 x 600 dpiFine | |||
| Enhanced | 600 x 600 dpi | ||
*1 Legal size is ineffective when a color image type (Color Printed Photo or Color Glossy Photo) is selected.
■ Printing Resolution
The printing resolution of each mode is as follows.
Standard 600 x 600 dpi
Fine 600 x 600 dpi
Enhanced 600 x 1200 dpi
When Using the Printer Driver
| Total Memory | Selectable Print Quality Mode | Printable without Memory Overflow |
| 16 MB(Standard) | Letter, A4, LegalFast | |
| Standard (600 dpi) | Letter, A4*1 | |
| 20 MB (Add 4MB) | Standard (600 dpi) | Letter, A4, Legal |
| 64 MB (Add 48MB) | High Quality (1200 dpi) | Letter, A4*1 |
| 80 MB (Add 64 MB) | Letter, A4, Legal |
(300 dpi)
*1 Documents can be printed on Legal size paper when the print style is set to Color Graphics ( P. 115, 127) provided the data size of the document is small.
Note:
- More than 32 MB is required on the printer to use “Printer memory usage” in the printer driver ( P. 120, 140).
A
ADF tray .....13, 16, 20, 28, 30, 39, 49, 54, 77
Adjust tab, scanner function .....83
Adjusting colors intensity, Scanner function .100-107
Using Gamma Correction .....104
Using Hyper-Tetra Adjustment .....100, 141
Adjusting overall color of an image .....40
Adjusting specific color of an image .....43
Adjusting the Color, Printer function .....141
Using Density Adjustment .....146
Using Hyper-Tetra Adjustment .....141
Advanced tab, printer function .....126
Alternate drivers....136
Installing 137
Appendix 150
Apply 46,101,105
Area Duplicate 10,48-73
Canceling an area 56
Creating mirror image 60
Creating multiple images 61
Creating negative image 60
Deleting an image 66
Duplicating an image 63
Enlarging to fit on paper 64
Moving an area 55, 57
Moving an area to the front .....66
Moving an area to the back .....66
Pasting an area .52
Resizing an area 56, 57
Selecting an area 52
Using template function 67
Zooming an image 65
Auto, tray selection .....114, 125
B
B/W Halftone, Photo, original image type .....7
B/W Text Start button....8
B/W Text, original image type .....7
Background Reduction....10, 26
Black, monochrome color .....9
Black & White 2colors, image type ..78, 82-84, 94
Black & White Halftone, image type . . . .78, 82, 94
Black & White Photo, image type .....78, 82, 94
Black Text, print style .....115, 127
Blue
Color Balance 144
Drop Out Color .....82, 99
Gamma Correction .....107
Brightness 83,142
C
Chroma 41, 44, 46, 101
Coated paper, media type 7
Color
Adjusting .....40-47, 100-107, 141-147
Deleting 47
Modifying 46
Overall 40
Specific 43-47
Color Adjust Entire Image .....10, 40, 41
Color Adjust Specific Point .....10, 43, 45
Color Adjustment .....101, 106, 142
Color Balance 103, 144
Color 8colors, image type .....78, 83, 84, 94
Color data 46, 47
Adjusting and saving 42
Deleting 47
Modifying 46
Color Depth 82,96
Color Graphics, print style ....115, 116, 127, 128
Color Halftone, image type .....78, 82, 95
Color management .....118
Color Photo, image type .....78, 84, 95
Color Photo, print style .....115, 116, 119, 127
Contrast 83,142
Copies 114
Copy Count 125
Corel PHOTO-PAINT .....75, 76
Custom, zoom 18, 19
Customize
Gamma curve .....104, 107
Paper Size 78
Zoom 81
Cyan, monochrome color .....9
D
Deleting
Color data 47
Digital Duplicator Utility setting .....36
Scanner settings 88
Details tab, printer function .....112
Density 7
Device Settings tab, printer function .....139
Digit window 58
Digital Duplicator Utility 5-73
B/W Text Start 9
Density 7
Media Type 7
Numeric keypad 8
Option buttons 7,10
Original Image Type .....7, 9
Output Color 8,9
Output Order 8
Page Mode 7,30
Paper Size 7
Reset 8
Start 8
Status display 6
Stop 8
Tray display 9
Tray Selection 7
Zoom 6,10,16-23
Dither 82,97
Document Options 127
Double Side Printing 7,30,148
Driver selection, scanner .....75, 76
16-bit 76
32-bit 75
Drop Out Color 82,99
E
Edge Emphasis 85
Energy Star 8
Enhanced, print quality .....28, 166
Enlarging an image .....16-23
Error Diffusion 82, 97, 98
Error messages .....151-162
Even Page 7,30
F
Factor Y, Drop Out Color .....82, 99
Fast, print quality .....117, 128, 167
Feed Out 13,50,77
Fine, print quality .....28, 166
Filter tab, scanner function .....85
Form to Tray Assignment .....140
Full color, image type .....78, 82, 84, 93
G
Gamma Correction 84, 104-107
Gray Scale, print style .....115, 119, 127
Green
Color Balance 103, 144
Drop Out Color 82,99
Gamma Correction 107
H
Halftone 82, 94, 95, 97
Height Zoom Value .....16, 18, 19
High quality, print quality .....117, 128, 167
Hints for scanning 93-99
Horizontal Shift .....24, 25
Hue 41, 44, 46, 101, 142
Hyper-Tetra Adjustment . . .84, 100, 118, 129, 141
Color Adjustment 101, 142
Color Balance 103, 144
|
Image Color Matching (ICM) .....118
Image Size 80, 81
Image tab, scanner function .....82
Image Type 78, 82-84, 93
Indicators 10
J
Jam Recovery ON 39
L
Label, media type .....7
Lightness 41, 44, 46, 101
Loading
Digital Duplicator Utility settings . . . . . . . . . . . . 35
Scanner setting 88
Lower, tray selection .....114, 125
M
Magenta, monochrome color .....9
Media type 7,31,114,125
Memorize Settings .....10, 32-36
Deleting 36
Loading 35
Saving 33
Memory, printer 120, 139, 166
Metafile Spooling 129
Microsoft Word 148
Index
Middle, tray selection .....114, 125
Mirror, Filter tab 85
Mirror image .....10, 29, 60, 85, 119, 129
MPT (multi-purpose tray), tray selection .114, 125
Multi-page print 20
N
Negative, Filter tab ....85
Negative image 29, 60, 85
Negative/Positive 10, 29, 50, 60
Numeric keypad 8
0
Odd page 7,30
Option buttons 10
Option tab, printer function .....118
Orientation 113, 125
Original Image Type 7
Other Settings 11, 37, 38, 39
Output, Scale tab .....81
Output Color 9
Output Order 8,113,129
Output Size, Scale tab .....81
P
Page Mode 7,30
Page Setup tab, printer function .....124
Paper size ....7, 78, 113, 124 source ....114, 125 trays ....114, 125
Paper/Output 126
Paper 2nd side, media type .....7, 31, 114, 125
Paper tab, printer function .....113
Parameter 105, 106
Plain paper, media type .....7, 114, 125
Ports tab, printer function .....132
Presentation, print style .....115, 127
Prescan 13, 49, 77
Preview 142
Preview Zoom 13
Print as a mirror image .....119, 129
Print Preview 12-15
Resizing 14
Print quality .....28, 117, 128, 166, 167
Enhanced 28,166
Fast 117, 128, 167
Fine 28,166
High quality .....117, 128, 167
Standard .....28, 117, 128, 166, 167
Print Quality and Required Memory .....166, 167
Print Style, Advanced tab .....127
Print style, Quality tab ....115
Print to port 112
Printer Driver 109-149
Advanced tab 126
Details tab 112
Device Settings tab 139
Double Side Printing 148
Quality tab 115
Option tab 118
Page Setup tab ....124
Paper tab 113
Ports tab 132
Memory tab 120
Sharing tab 136
Printer Function 109-149
Printer memory, Device Settings tab .....139
Printer memory, Memory tab ....120
Printer memory usage, Device Settings tab . . .140
Printer memory usage, Memory tab .....121
Q
Quality 10, 28, 117, 128, 166, 167
Quality tab 115
R
Red
Color Balance 103, 144
Drop Out Color....82,99
Gamma Correction .....107
Reducing an image .....16-19
Repeat window 61
Reset/Restore ....8, 41, 44, 80-82, 84, 85, 114, 117, 119, 143
Resizing an image .....56-58, 91
Resolution .....28, 80, 81, 91, 117, 128
RGB, Gamma Correction .....107
S
Saving 33, 45, 87
Color data 45
Digital Duplicator Utility settings .....33
Scanner settings 87
Saturation 142
Scale mode 80, 81
Resolution 80
Zoom 81
Scale tab, scanner function .....80
Scan button 77
Scan Size 78,81
Scanner Drivers 75-107
Adjust tab 83
Filter tab 85
Image tab 82
Image Type 78,93
Paper Size 78
Scale tab 80
Scan Size 78
Scanner Function 75-107
Scanner glass 12, 28
Scanner setting
Deleting 88
Loading 88
Saving 87
Scanning an area of an image 89
Scanning area....89-91
Moving 90
Resizing 91
Selecting 89
SCSI port 133
installing 133
Segment 15, 17, 21
Selection area ....52, 53, 55, 56
Canceling 56
Creating 52
Moving .....55
Printing 54
Resizing 56
Setting window 86
Sharing the printer 137
Sharing tab, printer function .....136
Shift Direction 24, 25
Shifting an image 10, 24, 25
Sleep mode 8
Smoothing 85
Specific color editor .....43, 45-47
Standard, print quality . . . .28, 117, 128, 166, 167
Start button 8
Status display 6, 161, 162
Stop button 8
T
Template function 67
Saving a template file 70
Loading a template file .....71
Deleting a template file .....72
Deactivating template function .....73
Transparency, media type .....7, 114, 125
Tray display 9
Tray selection 7,114,125
Threshold 83
Troubleshooting 151-165
Digital Duplicator Utility .....151
Printer Driver 154-160
Scanner 152, 153
SCSI 163-165
Status Display 161, 162
U
Unit of measurement 37
Upper, tray selection .....114, 125
Use Hyper-Tetra Adjustment . . .84, 100, 118, 141
V
Vertical Shift .....24, 25
W
W-H Uniform 17, 19, 80
White level 84
Width Zoom value 16, 18, 19
Windows 3.1 .....5, 76, 111, 141, 146, 154, 163
Windows 95 . .5, 75, 109, 118, 141, 146, 156, 164
Windows NT 4.0 5, 75, 122-140, 141, 146, 159, 165
Y
Yellow, monochrome color .....9
Z
Zoom 10, 16-23, 81
Multiple pages print .....20-23
Zoom Down 43
Zoom Up 43
Zoom Value 6, 16, 18, 59, 81, 92
Zooming an entire image 92
- Utilities and Drivers Reference Guide
- ■ Part 1 Digital Duplicator Utility ( P. 3)
- ■ Part 2 Scanner Function ( P. 74)
- ■ Part 3 Printer Function ( P. 108)
- ■ Appendix ( P. 150)
- Table of Contents
- Adjusting Colors
- Area Duplicate
- Digital Duplicator Utility Window Overview
- Displaying the Digital Duplicator Utility Window
- ■ For Windows 95 / Windows NT 4.0
- ■ For Windows 3.1
- Names and Functions
- Option Buttons
- ■ Indicators
- Using the Print Preview Window
- Click the Print Preview button (Preview).
- Note:
- ① Prescan button
- ② Feed Out button
- ③ Preview Zoom
- ④ Close button
- ⑤ Help button
- ■ Changing the size of the Print Preview window
- ■ Simultaneously viewing the enlarged and divided image
- Reducing or Enlarging the Output (Zoom)
- Displaying the Zoom Window
- Click the Zoom button ( [f] ).
- ① Zoom Value box
- ② Width Zoom Value box
- ③ Height Zoom Value box
- ④ W-H Uniform
- ⑤ Segment
- ⑥ Default button
- Changing the Zoom Value
- ■ Using the Zoom Value box
- Click ▼ of the Zoom Value box.
- Click the desired selection.
- Click OK to make the selection effective.
- ■ Using the Width / Height Zoom Value boxes
- Enter the zoom value in either the Width or Height Zoom Value box by clicking ▲ or ▼.
- Click OK to make the selection effective.
- Printing an Enlarged Image on Multiple Pages
- Click on the Segment check box.
- Click the Document Size box, then click Letter.
- Set the width and length zoom value to 140% by clicking ▲ or ▼ of the Width or Height Zoom Value box.
- Click OK to make the selection effective.
- Click the Start button ( ).
- Shifting an Image
- Displaying the Shift Window
- Click the Shift button (☐).
- ① Shift Direction box
- ② Horizontal Shift box
- ③ Vertical Shift box
- Background Reduction
- Selecting Print Quality
- Click the Quality button (☐).
- Creating a Mirror / Negative Image
- Creating a Mirror Image
- Click the Mirror button ( ).
- Creating a Negative Image
- Click the Negative/Positive button (☐).
- Double Side Printing
- Click ▼ of the Media Type and select Paper 2nd Side.
- Click the Start button ( ).
- Saving, Loading or Deleting a Setting
- Saving the Current Settings
- Click the Memorize Settings button (M).
- Click New...
- Enter a name for the setting.
- Click OK.
- Click Exit.
- Loading a Saved Setting
- Click the Memorize Settings button ( [M]).
- Click the setting you wish to load from the list.
- Click Load.
- Click Yes to load the setting.
- Deleting a Setting
- Click the Memorize Settings button (☐).
- Changing the Unit of Measurement (mm or inch)
- Click the Other Settings button (☐).
- Click the desired unit of measurement.
- Click OK.
- Changing the Preview Resolution
- Click the desired setting in the Preview Resolution box.
- Enabling Jam Recovery ON
- Click on the Jam Recovery ON check box.
- Click OK. The Other Settings window will close.
- Adjusting the Overall Color of an Image
- Displaying the Color Adjust Entire Image Window
- ■ Adjusting the overall color using HCL
- ■ Adjusting the overall color using CMYK
- ① Cyan
- ② Magenta
- ③ Yellow
- ④ Black
- ⑤ Reset
- Click OK.
- Adjusting a Specific Color of an Image
- Click the Color Adjust Specific Point button (☐).
- ① Original box
- ② Specific color editor box
- ③ After Color Adjust. box
- ④ Zoom Up button ( √ )
- ⑤ Zoom Down button ( - )
- Click the color of the image you wish to change in the Original box.
- ① Original
- ② After
- ③ Hue
- ④ Chroma
- ⑤ Lightness
- ⑥ Reset button
- ⑦ Return button (○)
- Modifying Color Data
- Deleting the Stored Color Data
- ■ Deleting a single color data
- ■ Deleting all color data
- Area Duplicate Function
- ■ The desired area of the image can be duplicated
- ■ Create the desired page
- Displaying the Area Duplicate Window
- Click the Area Duplicate button ( ).
- ① Prescan button ( )
- Pasting an Area of an Image in the Layout Box
- Select an area of the image.
- Notes:
- Paste the selection area in the Layout box by using either procedure A or B.
- A Using the Paste button (→)
- B Using the Resize button (☐)
- Moving a Selection Area in the Original Box
- Click the Resize button (☐).
- Click inside a selection area in the Original box.
- Hold down the mouse button, drag the selection area to the desired point, then release the mouse button.
- Resizing a Selection Area
- Canceling a Selection Area
- Moving an Image in the Layout Box
- Resizing an Image in the Layout Box
- ■ Resizing by entering digits
- Enter the Height/Width and/or the Vertical/Horizontal Position of the image.
- Creating a Mirror or Negative Image in the Layout Box
- Creating Multiple Images in the Layout Box
- Duplicating an Image in the Layout Box
- Enlarging an Image to Fit on Paper
- Zooming an Image in the Layout or Original Box
- A Using the Layout Zoom or Original Zoom button ( 100%)
- Using the Layout Zoom tool or Original Zoom tool button ( + )
- Moving the Selected Area to the Front in the Layout Box
- Moving the Selected Area to the Back in the Layout Box
- Deleting an Image in the Layout Box
- Using Template Function
- Click the Repeat button (##).
- Enter the number of duplicates, then click OK.
- ■ Loading a Template File
- Click the Template button ( ).
- Click ▼ of the Name box, then select the file you wish to load from the list.
- ■ Deleting a Template File
- ■ Deactivating Template Function
- Part 2
- Scanner Function
- Panasonic Scanner Driver Window Overview
- Displaying the Panasonic Scanner Driver Window
- ② Scan button
- ③ Feed Out button
- ④ Image Type ( P. 93)
- ⑤ Scan Size
- ⑥ Paper Size
- ⑦ Tabs
- ⑧ Setting... button
- ⑨ Close button
- ⑩ About button
- ⑪ Help button
- Preview Screen
- Zoom box
- ⑭ Scroll bars
- Corner move buttons
- ■ Changing the size of the Preview Screen
- Scale Tab
- ■ When Resolution is selected
- ① Scale Mode
- ② Image Size
- ③ W-H Uniform
- (W)
- ⑤ (H)
- ⑥ Restore Default
- ■ When Zoom is selected
- ① Output Size
- ③ Output
- ④ Zoom
- ⑤ Restore Default
- Image Tab
- ① Color Depth ( P. 96)
- ② Halftone ( P. 97)
- ③ Drop Out Color ( P. 99).
- ④ Restore Default
- Adjust Tab
- ① Brightness/Threshold
- ② Contrast
- ③ Use Hyper-Tetra Adjustment
- ④ White Level
- ⑤ Gamma Correction ( P. 104)
- Filter Tab
- ① Edge Emphasis
- ② Smoothing
- ③ Negative
- Mirror
- ① Select Setting scroll box
- ② Save Setting... button
- ③ OK button
- ④ Cancel button
- ⑤ Delete Setting button
- Saving a Setting
- Click Save Setting...
- Enter the saving name.
- Click OK
- Loading a Setting
- Selecting a Scanning Area
- Moving the Scanning Area
- Resizing the Scanning Area
- Zooming the Entire Image
- Hints for Scanning
- Image Types
- Color Depth (Full Color)
- Dither (Color / Black & White Halftone)
- Drop Out Color (Monochrome)
- Using the Hyper-Tetra Adjustment
- Displaying the Hyper-Tetra Adjustment Window
- Color Adjustment
- ■ When Color Adjustment is selected
- ① Hue
- ② Chroma
- ③ Lightness
- ④ Apply button
- ⑤ Close button
- ■ When Color Balance is selected
- ① Red
- ② Green
- ③ Blue
- Adjust the color by performing the following steps.
- Using the Gamma Correction
- Displaying the Gamma Correction Window
- ① Gamma curve customize check box
- ② Parameter
- ③ Gamma Table
- ④ Gamma diagram
- ⑤ Apply button
- ⑥ Close button
- ⑦ Help button
- ■ Using the Parameter Scroll Bar
- Click off the Gamma curve customize check box.
- ■ Using Gamma Curve Control Points
- Click on the Gamma curve customize check box.
- Click ▼ of the Gamma Table, and select the color to be adjusted.
- Place the mouse pointer on one of the control points, hold down the mouse button, and drag the gamma curve.
- Click Apply to see the result of the adjustment in the Preview Screen.
- Part 3
- Printer Function
- Displaying the Panasonic KX-PS8000 Window
- A From Printers Under Windows
- ■ For Windows 95
- Click a tab to view the features.
- B From an application
- Details Tab
- ① Print to the following port
- Paper Tab
- ① Paper size
- ② Orientation
- ③ Output order
- ④ Paper source
- - Auto [Plain Paper]:
- • Auto [Transparency]:
- - Upper :
- - Middle\*1 :
- - Lower\*1 :
- - MPT Plain Paper, MPT Transparency, MPT Label, MPT Coated Paper, MPT Envelope, MPT Paper 2nd Side :
- ⑤ Copies
- ⑥ About... button
- ⑦ Restore Defaults button
- Quality Tab
- ① Print Style
- ② Dithering mode
- ③ Print quality
- ④ About button
- ⑤ Restore Defaults button
- Option Tab
- ① Color management
- - Use Hyper-Tetra Adjustment
- - Use image color matching (ICM) \*1
- ② Density (for Gray Scale)
- ③ Color mode (for Color Graphics, Color Photo and Presentation)
- ④ Print as a mirror image
- ⑤ About button
- ⑥ Restore Defaults button
- Memory Tab
- ① Printer memory
- ② Printer memory usage
- ③ About button
- ④ Restore Defaults button
- Displaying the Panasonic KX-PS8000 Default Document Properties Window
- A From Printers Under Windows NT 4.0
- Click Start, select Programs, select Accessories, then click WordPad.
- Click the File menu, then click Print...
- Click Properties.
- ② Paper Source
- ③ Copy Count
- Orientation
- Advanced Tab
- ■ Paper/Output
- ■ Document Options
- ② Print Quality
- ③ Dithering Mode
- ④ Output Order
- ⑤ Hyper-Tetra Adjustment...
- ⑥ Gray Scale Density Adjustment...
- ⑦ Print as a Mirror image
- ⑧ Color Mode
- ⑨ Metafile Spooling
- ① Undo Changed Option
- ② About KX-PS8000 Printer Driver...
- Displaying the Panasonic KX-PS8000 Properties Window
- Ports Tab
- ① Checked port
- ② Add Port... button
- ■ Installing the SCSI port
- Click Add Port...
- Click New Monitor...
- Click New Port... .
- Type the port name (for example; KXPS8000GDI), then click OK.
- Click Close.
- Sharing Tab
- ① Shared
- ② Alternate Drivers
- Device Settings Tab
- ③ Form To Tray Assignment
- ■ When Panasonic KX-PS8000 Device Settings is selected
- ■ For Windows 95/3.1
- ■ For Windows NT 4.0
- ① Brightness
- ④ Saturation
- ⑤ OK button
- ⑥ Cancel button
- ⑦ About button
- ⑧ Reset button
- Drag each slider left or right or click ◀ or ▶, or type the numerical value.
- Click OK to make the setting(s) effective.
- Color Balance
- Color CMYK Adjustment
- Using the Density Adjustment
- Displaying the Density Adjustment Window
- Adjust the grayscale by performing the following steps.
- Double Side Printing Using Microsoft® Word word processor
- Appendix
- SCSI
- ■ Windows 3.1 users
- ■ Windows 95 users
- ■ Windows NT 4.0 users
- Print Quality and Required Memory
- ■ Printing Resolution
- A
- B
- C
- D
- E
- F
- G
- H
- |
- J
- L
- M
- Index
- N
- 0
- P
- Q
- R
- S
- T
- U
- V
- W
- Y
- Z
Brand : PANASONIC
Model : KX-PS8000
Category : Printer