
ERD-16 - Unspecified Chief - Free user manual and instructions
Find the device manual for free ERD-16 Chief in PDF.


| Product Type | Monitor Arm / Display Mount |
| Model | ERD-16 |
| Brand | Chief |
| Maximum Weight Capacity | 25 lbs (11.3 kg) |
| VESA Compatibility | 75x75mm, 100x100mm |
| Mounting Type | Clamp or Grommet |
| Tilt Range | -5° to +15° |
| Swivel Range | ±90° |
| Rotation Range | 360° |
| Arm Reach | Up to 16.5 inches (419 mm) |
| Height Adjustment | Yes, with gas spring |
| Color | Black |
| Materials | Steel and aluminum |
| Graphics | Minimalist design |
| Screen Size Supported | 17" to 32" |
| Weight | 6.5 lbs (2.95 kg) |
| Warranty | 10 years |
| Included Parts | Mounting hardware, cable management clips |
| Manual Languages | English (EN) |
| Maintenance | Wipe with damp cloth, no solvents |
| Safety | Do not exceed weight limit; ensure secure attachment |
Frequently Asked Questions - ERD-16 Chief
User questions about ERD-16 Chief
0 question about this device. Answer the ones you know or ask your own.
Ask a new question about this device
Download the instructions for your Unspecified in PDF format for free! Find your manual ERD-16 - Chief and take your electronic device back in hand. On this page are published all the documents necessary for the use of your device. ERD-16 by Chief.
USER MANUAL ERD-16 Chief
INSTALLATION INSTRUCTIONS
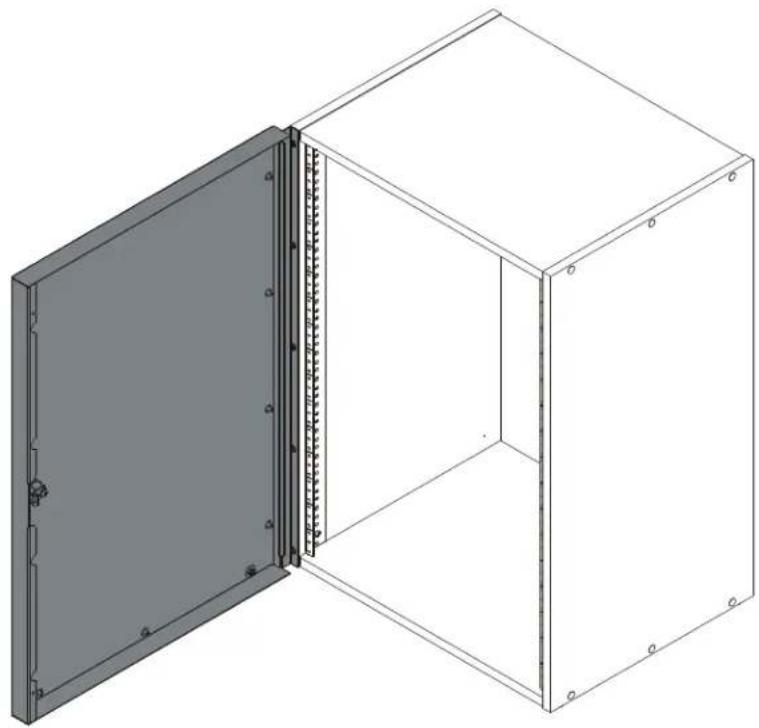
natural_image
Isometric line drawing of a two-cell cabinet with a door open, showing internal structure and mounting holes (no text or symbols)Economy Rack Door
DISCLAIMER
Milestone AV Technologies and its affiliated corporations and subsidiaries (collectively "Milestone"), intend to make this manual accurate and complete. However, Milestone makes no claim that the information contained herein covers all details, conditions or variations, nor does it provide for every possible contingency in connection with the installation or use of this product. The information contained in this document is subject to change without notice or obligation of any kind. Milestone makes no representation of warranty, expressed or implied, regarding the information contained herein. Milestone assumes no responsibility for accuracy, completeness or sufficiency of the information contained in this document.
Chief® is a registered trademark of Milestone AV Technologies. All rights reserved.

IMPORTANT SAFETY INSTRUCTIONS!

WARNING: A WARNING alerts you to the possibility of serious injury or death if you do not follow the instructions.

CAUTION: A CAUTION alerts you to the possibility of damage or destruction of equipment if you do not follow the corresponding instructions.

WARNING: Failure to read, thoroughly understand, and follow all instructions can result in serious personal injury, damage to equipment, or voiding of factory warranty! It is the installer's responsibility to make sure all components are properly assembled and installed using the instructions provided.

WARNING: Use this mounting system only for its intended use as described in these instructions. Do not use attachments not recommended by the manufacturer.

WARNING: Never operate this mounting system if it is damaged. Return the mounting system to a service center for examination and repair.

WARNING: Do not use this product outdoors.
IMPORTANT ! : Minimum spacings between the Accessories and components and the (ITC/AV) Rack Enclosure shall be maintained for safe operation of the equipment when installed in accordance with the National Electric Code, ANSI/NFPA 70-2008. Operating temperature inside rack shall not exceed 104°F.
--SAVE THESE INSTRUCTIONS--
LEGEND
 | Tighten Fastener |
| Apretar elemento de fijación | |
| Befestigungsteil festziehen | |
| Apertar fixador | |
| Serrare il fissaggio | |
| Bevestiging vastdraaien | |
| Serrez les fixations | |
 | Loosen Fastener |
| Aflojar elemento de fijación | |
| Befestigungsteil lösen | |
| Desapertar fixador | |
| Allentare il fissaggio | |
| Bevestiging losdraaien | |
| Desserrez les fixations | |
 | Phillips Screwdriver |
| Destornillador Phillips | |
| Kreuzschlitzschraubendreher | |
| Chave de fendas Phillips | |
| Cacciavite a stella | |
| Kruiskopschroevendraaier | |
| Tournevis à pointe cruciforme | |
 | Open-Ended Wrench |
| Llave de boca | |
| Gabelschlüssel | |
| Chave de bocas | |
| Chiave a punte aperte | |
| Steeksleutel | |
| Clé à fourche | |
 | By Hand |
| A mano | |
| Von Hand | |
| Com a mão | |
| A mano | |
| Met de hand | |
| À la main | |
 | Hex-Head Wrench |
| Llave de cabeza hexagonal | |
| Sechskantschlüssel | |
| Chave de cabeça sextavada | |
| Chiave esagonale | |
| Zeskantsleutel | |
| Clé à tête hexagonale |






TOOLS REQUIRED FOR INSTALLATION

PARTS
![A (1) [ERD door] B (4) [nail glide] C (1) [lock bracket] D (10) #10 x 5/8" E (spacer bag - attached to door) E1 (1) E2 (1) E3 (1) E4 (1)](/content/2026/06/1190261/images/77749c837d8d5864a626842956acab5d5e8ec7af52dd63c1d0fcac2f1d685add.jpg)
DIMENSIONS
![MODEL NUMBER DESCRIPTION DIMENSION "A" ERD-8 ECONOMY RACK PLEXI DOOR-8 SPACES 15.75 [400.0mm] ERD-12 ECONOMY RACK PLEXI DOOR-12 SPACES 22.75 [577.9mm] ERD-16 ECONOMY RACK PLEX DOOR-16 SPACES 29.75 [755.6mm] ERD-20 ECONOMY RACK PLEX DOOR-20 SPACES 36.75 [933.5mm] ERD-8P ECONOMY RACK PERF DOOR-8 SPACES 15.75 [400.0mm] ERD-12P ECONOMY RACK PERF DOOR-12 SPACES 22.75 [577.9mm] ERD-16P ECONOMY RACK PERF DOOR-16 SPACES 29.75 [755.6mm] ERD-20P ECONOMY RACK PERF DOOR-20 SPACES 36.75 [933.5mm] 1.38 [34.9] 20.50 [520.7] "A" "A"/2 ERD-16 SHOWN](/content/2026/06/1190261/images/9bb5d3be5192350a244301044fdb49986e9472d5fcd6301ac4519c74420f4680.jpg)
ASSEMBLY
IMPORTANT ! : The following installation instructions assume the ER rack has already been completely assembled. Complete ER rack assembly following ER rack installation instructions prior to installing the ERD door.
IMPORTANT ! : The ERD doors were designed specifically to be installed to the front of the ER racks. Do NOT attempt to install this door to any other rack or mounting device.
NOTE: The hinge member that attaches to the front edge of the rack is the same width and height as the rack and should be lined up as such.
- Measure and mark 1" from the top and bottom of the edge on what will be the hinge side of the door. (See Figure 1)
NOTE: Door can be connected on either side depending on user preference. - Drill a 1/16" hole, 1/2" in depth, at each of these marked locations. (See Figure 1)
- Use two #10 x 5/8" Phillips pan wood screws (D) to attach door (A) at drilled hole locations. (See Figure 1)

Figure 1
- Drill 1/16" holes, 1/2" in depth, at remaining hole locations. (See Figure 2)
- Install one #10 x 5/8" Phillips pan wood screw (D) in each drilled hole location to fully secure door (A) to rack. (See Figure 2)
- Install four nail glides (B) on underside of rack in order to allow door to swing freely above ground. (See Figure 2)
- Close door (A). (See Figure 2)

Figure 2
- With door closed, turn the lock so that the "cam" ("L" shaped part of lock) is horizontal.
- Position lock bracket (C) over cam making sure the cam can clear the bracket when turned completely from locked to unlocked position.
- Mark the location of the two holes on the lock bracket (C). (See Figure 3)
- Drill two 1/16" holes, 1/2" in depth, at these marked locations. (See Figure 3)
- Use two #10 x 5/8" Phillips pan wood screws (D) to attach lock bracket (C) to rack. (See Figure 3)

Figure 3
- Install one of four spacers (E1-E4) into hole on cam to provide the desired spacing between cam and lock bracket. (See Figure 4)

Figure 4
NOTE: Only clean the door with water, mild detergent and a soft cloth.
ERD Series
Installation Instructions


Brand : Chief
Model : ERD-16
Category : Unspecified