Management - Software TrustPort - Free user manual and instructions
Find the device manual for free Management TrustPort in PDF.

User questions about Management TrustPort
0 question about this device. Answer the ones you know or ask your own.
Ask a new question about this device
Download the instructions for your Software in PDF format for free! Find your manual Management - TrustPort and take your electronic device back in hand. On this page are published all the documents necessary for the use of your device. Management by TrustPort.
USER MANUAL Management TrustPort
Copyright © 2012, TrustPort, a.s., All rights reserved.
Content
CONTENT....2
1 INTRODUCTION....4
2 THE CLIENT ....4
2.1 INSTALLATION AND UNINSTALLATION....5
2.1.1 Command Line Parameters....8
2.2 STARTING THE CLIENT FOR THE FIRST TIME 9
2.3 REGISTRATION....9
2.4 LOGGING IN....9
2.5 SYNCHRONIZATION 9
2.6 SUPERAGENT....10
3 THE SERVER....11
3.1 INSTALLATION AND UNINSTALLATION.... 12
3.1.1 Command Line Parameters.... 16
4 TPMPROBE TOOL 18
5 USING THE TRUSTPORT MANAGEMENT CONSOLE 18
5.1 LOGGING IN TO TRUSTPORT MANAGEMENT.... 18
5.2 OVERVIEW.... 19
5.2.1 Info 19
5.2.2 About 21
5.3 MANAGE 21
5.3.1 Directory....21
5.3.2 Registration rules 24
5.3.3 Add new stations....25
5.4 POLICIES 27
5.5 TASKS 28
5.6 REPOSITORY 30
5.6.1 File management 30
5.6.2 Package management.... 31
5.7 REPORTING.... 31
5.7.1 Events 31
5.7.2 Statistics.... 32
5.7.3 Audit log 33
5.7.4 Network overview 34
5.7.5 Devices 34
5.8 SETTINGS 35
5.8.1 Users 35
5.8.2 Updating 36
5.8.3 Backuping 37
5.8.3.1 Backup management 37
5.8.3.2 Create / Upload backup.... 38
5.8.3.3 List of available backup files.... 38
5.8.3.4 Last activities.... 38
5.8.4 Credentials 38
5.8.5 Automatic upgrade package 39
5.8.6 List of available updates....40
5.8.7 License 41
1 Introduction
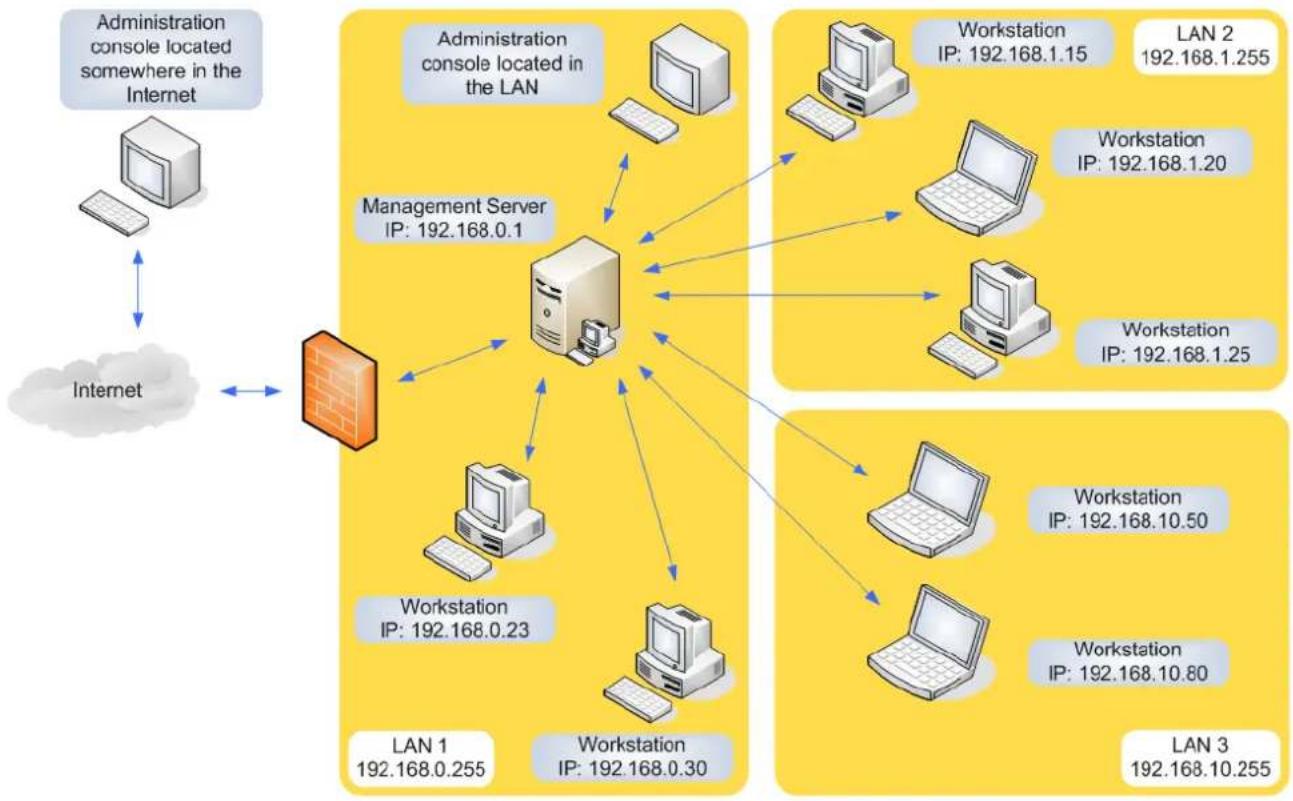
The TrustPort Management application is used to remotely manage TrustPort a.s. applications on workstations connected to a local network, and to remote management of the own workstations. Managing these stations and the settings of their applications from one central point significantly simplifies the process of their maintenance. The person or persons responsible for management need not install and repair applications and configurations physically at each station, but can perform all these tasks from one place and for many stations at once. This also removes the problems arising from different workstations having different program settings. By using TrustPort Management it's possible to ensure that all programs are installed with the same settings, or sort stations into groups and assign specific settings per group. Any given station can be inspected to see its current settings or a list of alerts generated by that station. These features make TrustPort Management ideal for use in company networks or wherever it's necessary to work on more than one station at a time.
TrustPort Management is made up of three components: the client, server and administration console.
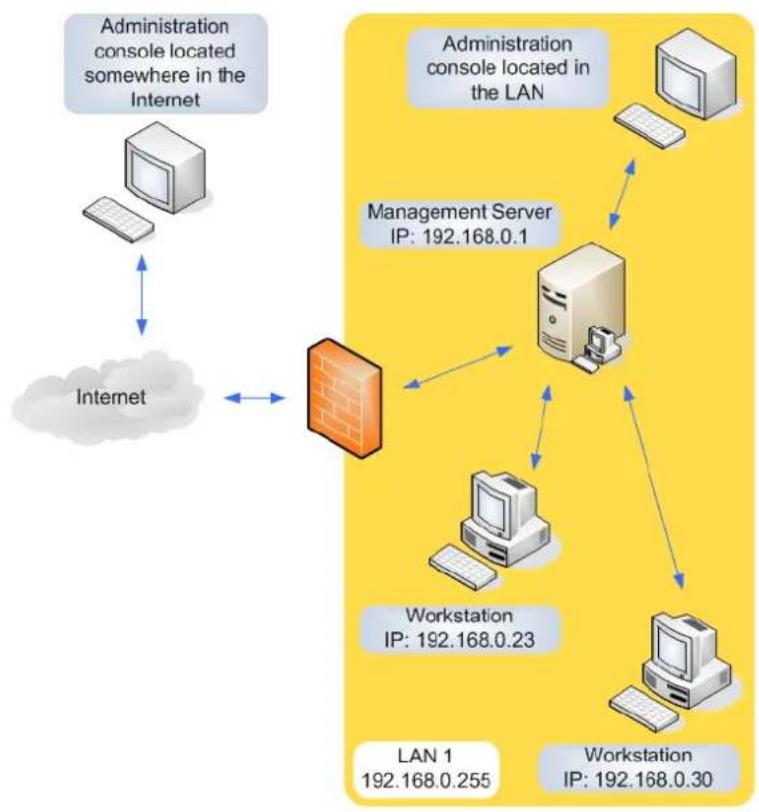
flowchart
graph TD
    A["Administration console located somewhere in the Internet"] <--> B["Internet"]
    C["Workstation IP: 192.168.0.23"] --> D["Management Server IP: 192.168.0.1"]
    D --> E["Administration console located in the LAN"]
    E --> F["Workstation IP: 192.168.0.30"]
    F --> D
    D --> G["LAN 1 192.168.0.255"]
    G --> H["Internet"]
2 The Client
The client is part of the TrustPort Management application that is installed on stations in a local computer network. The main part of the client is the 'agent', which communicates with the server and with other applications installed on the station. These applications are centrally managed. The agent can be described as an interlink between the server and the application.
2.1 Installation and uninstallation
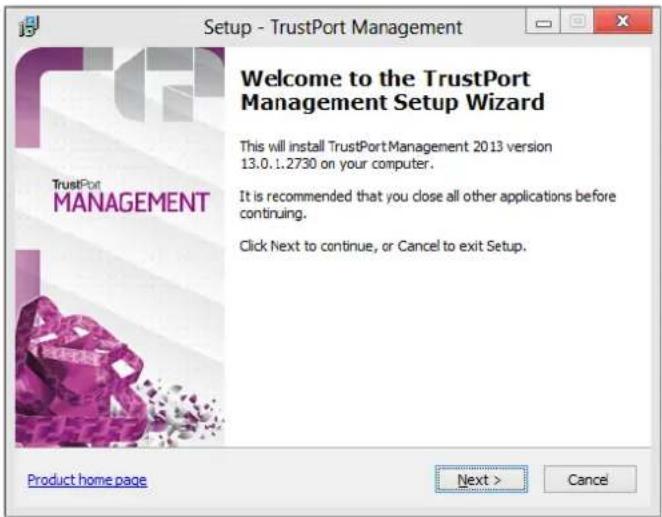
It is not possible to manage the computer and its applications by TrustPort Management if the client is not installed on the computer. It is possible to install the client remotely using the management console or manually at the station. Manual installation of the client is performed by running setup.exe (the program icon is displayed below). The installation program is designed as an easy to use wizard that is clear even for inexperienced users.

setup.exe
The behavior of the client installation program can be influenced by command line parameters.
Welcome to the TrustPort Management Setup Wizard
This first page of the installation wizard provides information about the installation of the TrustPort Management client. The product version number including release number is also displayed. To continue the installation process, press the Next button. Before proceeding, it is recommended to close all running applications.

License Agreement
This page displays the license agreement. The user is required to carefully read the license terms and conditions and confirm whether he agrees to them or not. This is done by clicking the appropriate radio button located below the text window.
If the user does not agree to the terms and conditions, it will not be possible to continue with the installation.
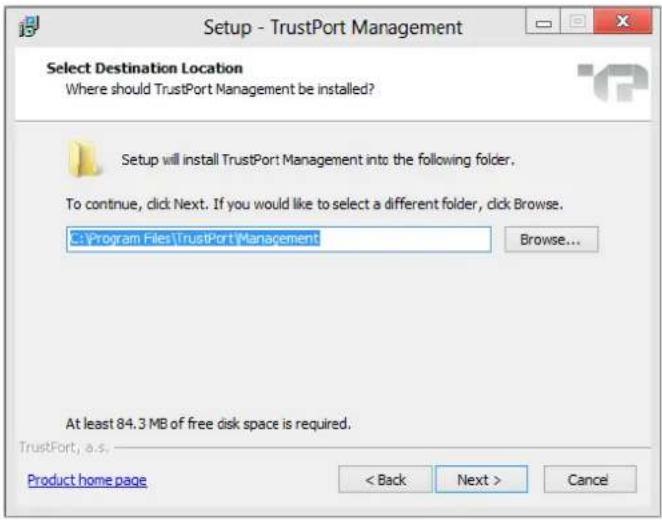
Select Destination Location
This step is used to enter the directory where TrustPort Management will be installed. The installer program uses a predefined directory path which can be accepted or changed. In the lower part of the window is displayed how much free disk space is required to perform the installation.

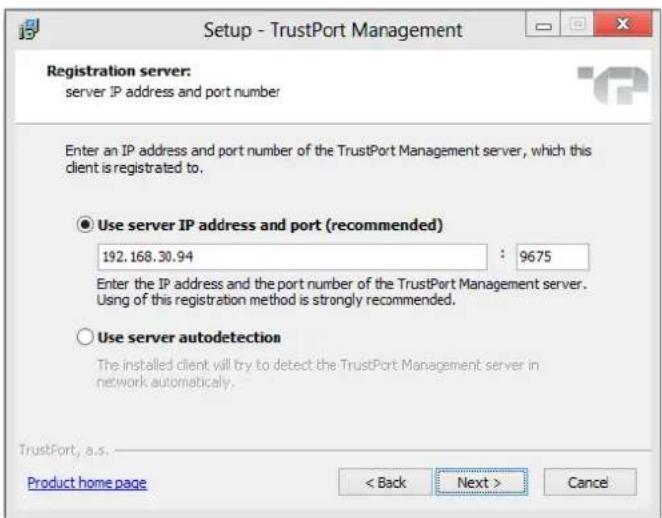
Registration server
In the "Registration server" window, choose the way the TrustPort Management server will be detected. Only one of two choices is possible:
- IP address and port
the entered IP address and port are used to register the station on the server. The port field is preset to 9675 and it is not recommended changing this. If the server address is assigned by the /REGSERVERIP parameter (see Command Line Parameters), then the IP address field will be already filled with this IP address.
- Autodetect
the station attempts to find TrustPort Management server by querying the network. If there is more than one TrustPort Management server (not recommended) then the first one detected will be the one used. This option can be automatically set using the /AUTODETECT parameter (see Command Line Parameters).
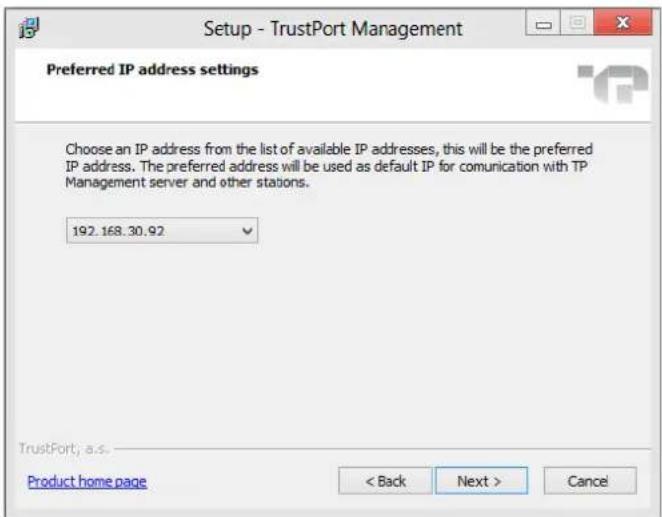
Preferred IP address settings
It is possible to choose an IP address from the dropdown menu, it will be used as default IP for communication with server and other stations.
Ready to Install
When displaying this window, the installer has enough information and is ready to copy files to the destination directory. A summary of the installation information is supplied in the window. This window is the user's last opportunity to go back and change any settings before the installation proceeds.
Click the Install button to begin copying files.

Completing the TrustPort Management Setup Wizard
The installation program has finished copying files and registering components and waits for the installation to be completed.
Click the Finish button to close the installation wizard. TrustPort Management Client is now installed and ready for use.
Uninstallation
Uninstalling the TrustPort Management client is possible from the administration console only. From the security reasons it is denied using of the standard uninstallation from the "Add/Remove Programs" panel in the Windows system control panel directory. In other case users would have been able to uninstall the TrustPort Management client accidentally or intentionally.
2.1.1 Command Line Parameters
You can modify how an installation is performed by command line parameters. The list of possible parameters can be obtained by starting the installation program with the parameter /?
| Parameters | |
| /?, /HELP | Displays a window with a list of possible installation parameters. |
| /SILENT, /VERYSILENT | Silent installations can be done in two modes: SILENT or VERYSILENT. In case of /SILENT, the Setup window isn't displayed, but the installation process window is. If the switch /VERYSILENT is used, not even the installation process window is displayed. The /REGSERVERIP parameter should always be used with this parameter. (If not, then the installer will always assign "autodetect" as choice of server detection.) |
| /DIR="x:\directory name" | This overwrites the initial directory name as displayed in the 'Select Destination Location' page of the Setup wizard. The full path to the directory must be entered. This is also available in both silent installation modes. |
| /NOCANCEL | The user is not allowed to interrupt the installation process, by disabling the 'Cancel' button and ignoring the close application button. This switch can be used together with /SILENT. |
| /NORESTART | This parameter makes it possible to stop the station from restarting if the installation process requires. In certain cases a restart can be undesirable, such as when installing the client on a mail server, etc. In such cases use /NORESTART to restart the computer manually when it is convenient. |
| /REGSERVERIP=ip | Use this parameter to specify during installation which server should be used for registration. This will pass on the server IP address to the installer. If this parameter is not used, then the IP address will be filled with the value 0.0.0.0. This parameter is normally used when performing remote installations of the client using the TrustPort Management console. |
| /REGSERVERPORT=port | Use this parameter together with the /REGSERVERIP parameter. It specifies port number on which the server accepts registration requests of new clients. If the parameter is not entered, then there is used the implicit port number, 9675. |
| /AUTODETECT | The /AUTODETECT parameter is used to automatically detect the TrustPort Management server in the network. If this parameter is not entered, then the installer will request the IP address of the server. |
| /NEWREG | Use the /NEWREG parameter to force an overwrite of existing configuration files on TrustPort Management client. If this parameter is not used, then the original configuration files will be kept. |
| /PREFIP=ip | Using this parameter, it is possible to choose default IP address, which will be used for communication between server and other stations. |
| /NOVERUPD | Using this parameter, checking of new versions will be disabled at the end of installation process. |
Example of use: setup.exe /VERYSILENT /DIR="C:\TrustPort\Management" /REGSERVERIP=192.168.0.10
When removing the client, the standard uninstallation process can also use the /SILENT or /VERYSILENT switch. These parameters have the same purposes as when installing. Uninstalling TrustPort Management can be performed from the Management Console of TrustPort Management.
2.2 Starting the Client for the first time
After the client has been installed on the station, the client will attempt to register on the TrustPort Management server. If the parameter identifying the IP address of the server was entered on set up, the client will attempt to register directly on that server. This parameter is normally used when performing a remote installation of the client by way of the management console. If no IP address was supplied, TrustPort Management will be detected in the local network. If no server responds to the client, the client will try to detect a server periodically. It is possible to specify which server of TrustPort Management should be used in the Command Line Parameters.
2.3 Registration
Once the connection to a server has been successful, the newly created profile of the new client is transferred to the server and the client waits for whether the TrustPort Management administrator approves or denies its registration. The client periodically queries the server whether the registration has been approved or not. In implicit behavior all clients are automatically registered into the server. This mode is naturally possible to change and approve all registrations from the clients manually. If the registration is denied, then the client stops querying the server and the agent adopts a state whereby it can no longer be managed by TrustPort Management. From this point on, in order to include such a denied workstation among permitted workstations, it is necessary to reinstall the client component of TrustPort Management on the station with the parameter /NEWREG. The list of all refused stations is displayed in the TrustPort Management Console. If the registration of the client is allowed, then the profile of the workstation is created on the server. From this moment on, the station can be managed by the TrustPort Management. Each newly registered workstation is automatically placed into the default group Unclassified group and from there the administrator can move it to any other group.
2.4 Logging in
Once the client has been successfully registered on the server, the client is able to log on to the server for the first time. Logging on is performed every time the TrustPort Management agent is launched on the workstation, either when starting the station or restarting the agent service. When the client is logged on to the server, the following information is sent: information about applications managed by TrustPort Management, the operating system version, IP address, computer name and name of the domain to which the station belongs (if it is included in one). No other information is transferred to the server. The server responds to a successful log in by transmitting user account login details in order to access network resources and execute applications. This data is transferred in encrypted form for security reasons. This log-in data is not stored on the client. If this logging in is not successful, then the TrustPort Management agent will not be able to access network resources needed to perform downloading of applications, etc.
2.5 Synchronization
Once the client has logged in to the system of TrustPort Management, it is possible to synchronize the workstation with the server. Synchronization of the station is initiated by the client, periodically, every so many minutes. By default the station is synchronized with the server every 120 minutes but this amount can be set according to the requirements of the administrator. In the policy area of TrustPort Management synchronization can be set to use so called Time-Shaking. This feature serves to spread out the synchronization of stations over a predefined interval, making each station's specific time different. Time-Shaking is active after installation. Synchronization can also be initiated by the server, if required by the administrator. Such a call from the server side is done manually from the management console and can target one or more clients at the same time. During this process the configuration of the given workstation/application is checked for consistency, and if any changes need to be applied, such as new updates performed, etc., then the relevant data files are downloaded and applied. During the synchronization client sends information about managed applications and all alerts that were created by managed applications.
2.6 Superagent
Clients of TrustPort Management can operate in superagent mode. When operating in this mode, the client will automatically download the latest virus definitions from the server and distribute them to other TrustPort Management clients in the same sub-network. It allows to delegate one or more superagents for each sub-network and spread out the load of the TrustPort Management server. When a station desires to update its virus definitions, the first place it will look is at the sub-network superagent. If one exists, then the client will access the superagent and download the virus definitions. If more than one superagent exists in the same sub-network, the client will select one that is available and perform the download. If no superagent exists in the same network, which is the initial state, or no superagent is available at the time, the client will download definitions directly from the server, which in cases of very large networks, can cause a significant load on its resources.
An example of deploying superagents in a network:
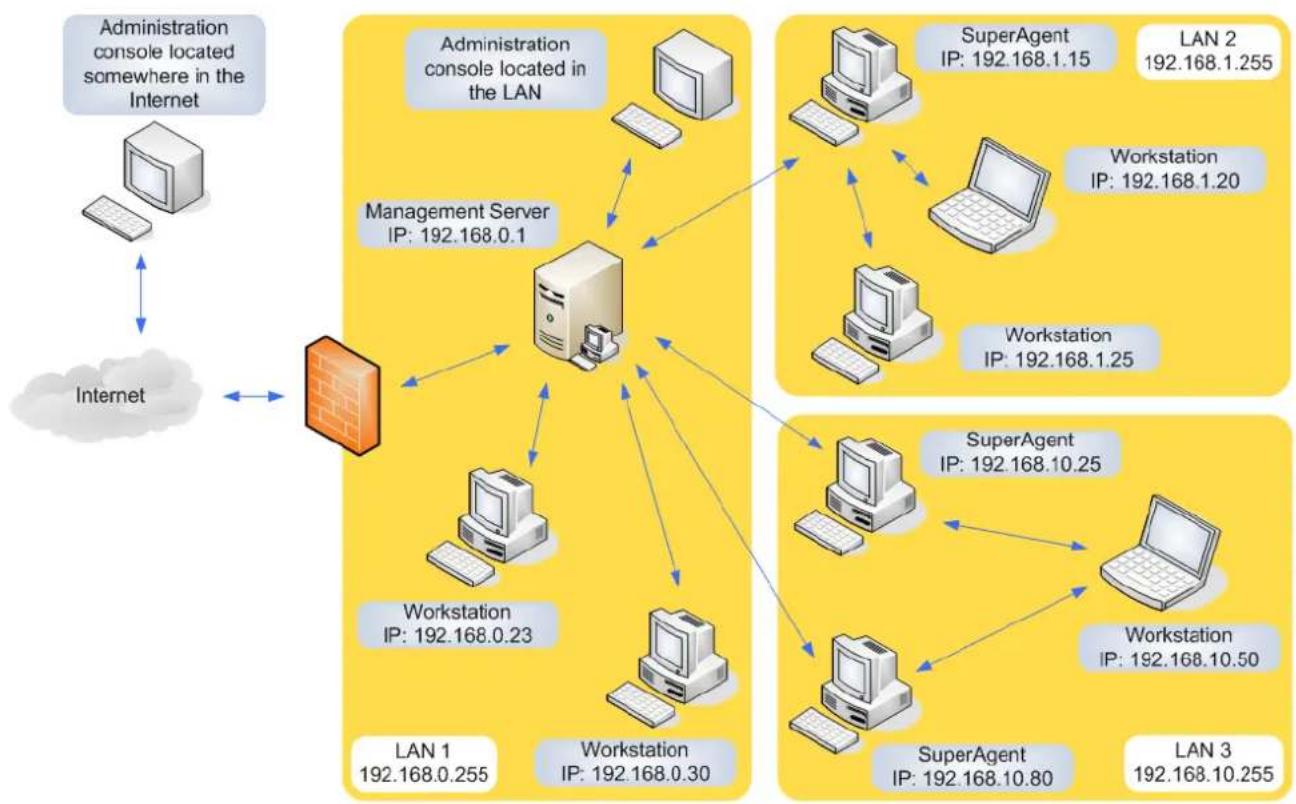
flowchart
graph TD
    A["Administration console located somewhere in the Internet"] <--> B["Internet"]
    B <--> C["Management Server"]
    C --> D["LAN 1: 192.168.0.255"]
    C --> E["LAN 2: 192.168.1.255"]
    C --> F["Workstation IP: 192.168.0.23"]
    C --> G["Workstation IP: 192.168.0.30"]
    C --> H["SuperAgent IP: 192.168.10.25"]
    C --> I["SuperAgent IP: 192.168.10.80"]
    C --> J["SuperAgent IP: 192.168.10.50"]
    C --> K["LAN 3: 192.168.10.255"]
    C --> L["LAN 2: 192.168.1.255"]
    C --> M["Workstation IP: 192.168.1.20"]
    C --> N["Workstation IP: 192.168.1.25"]
    C --> O["SuperAgent IP: 192.168.1.15"]
An example of a network without using of superagents:
flowchart
graph TD
    A["Administration console located somewhere in the Internet"] <--> B["Internet"]
    B <--> C["Management Server IP: 192.168.0.1"]
    C --> D["Workstation IP: 192.168.0.23"]
    C --> E["Workstation IP: 192.168.0.30"]
    C --> F["Workstation IP: 192.168.1.25"]
    C --> G["Workstation IP: 192.168.1.20"]
    C --> H["Workstation IP: 192.168.1.15"]
    C --> I["Workstation IP: 192.168.10.50"]
    C --> J["Workstation IP: 192.168.10.80"]
    C --> K["LAN 1 192.168.0.255"]
    C --> L["LAN 2 192.168.1.255"]
    C --> M["LAN 3 192.168.10.255"]
If the superagent still has not downloaded virus definitions, (the planned download has not yet occurred) and a client attempts to download them from the superagent, this operation will fail. The following attempt, however, will succeed, once the superagent has obtained a set of definitions. The TrustPort Management server will automatically at a predetermined time interval download the latest virus definitions from TrustPort, a.s. The initial download can be performed immediately after installation.
Individual clients can be set to superagent mode by selecting the Act as a superagent check box in the Properties tab of the Manage pane for a specified station. Stations will not begin to act in superagent mode until synchronizing with the server. Surrounding stations must be informed that a superagent is operating in their vicinity. This information is supplied when these stations synchronize with the server.
3 The Server
The server is the main part of the TrustPort Management. It is installed on one computer in the local network. There can be only one server in the local computer network. On this server stores all the current configurations of stations, alert messages, policies, lists of updates, information about clients and their membership to groups in TrustPort Management. Clients are registered, logged in, connected to and download their policies from the server. A web server that supports the TrustPort Management console is also run on the server. Administrators and auditors connect to TrustPort Management through the management console by way of the web server. When the TrustPort Management is implemented, the server is always installed first and only then it is possible to install individual clients. When installing the server component on a computer, the client component of TrustPort Management is also automatically installed.
3.1 Installation and uninstallation
Installation of the server is started by launching the program setup.exe (the program icon is displayed below). The installation program is designed as a straightforward wizard that is easy to understand even for inexperienced users.

setup.exe
The behavior of the server installation program can be influenced by command line parameters.
The TrustPort Management Server application allows clients not to know the server's address, as clients will find the server automatically. This is performed by the client emitting a request into the network which is detected and picked up by a server, processed and then answered. A similar technique also applies to servers. The purpose for this it that only one server in the local network should process the requests of clients. If another server detects the client request, it will not respond but leave it for the answering server. This system ensures that clients are only registered on one server in the local network and will always synchronize with that same one.
When performing remote installations through the TrustPort Management console, the client is already in contact with the server directly, without needing to locate it. If the installation is guided by the installation wizard then it's possible to choose there if the client will connect to the TrustPort Management server directly or will detect the TrustPort Management server automatically.
Welcome to the TrustPort Management Setup Wizard
This first page of the installation wizard provides information about the installation of the TrustPort Management server. The product version number including release number is also displayed. To continue the installation process press Next. Before proceeding, it is recommended to close all running applications.
License Agreement
This page displays the license agreement. The user is required to carefully read the license terms and conditions and confirm whether he agrees to them or not. This is done by clicking the appropriate radio button located below the text window.
If the user does not agree to the terms and conditions, it will not be possible to continue with the installation.
Select Destination Location
This step is used to enter the directory where TrustPort Management will be installed. The installer program uses a predefined directory path which can be accepted or changed. In the lower part of the window is displayed how much free disk space is required to perform the installation.
Select Start Menu Folder
The TrustPort Management application will create a shortcut in the Start menu, from which the user can start the TrustPort Management console. Use this window to select the program caption in the Start menu. The installer program will automatically enter a name for this item, which may be used or changed.

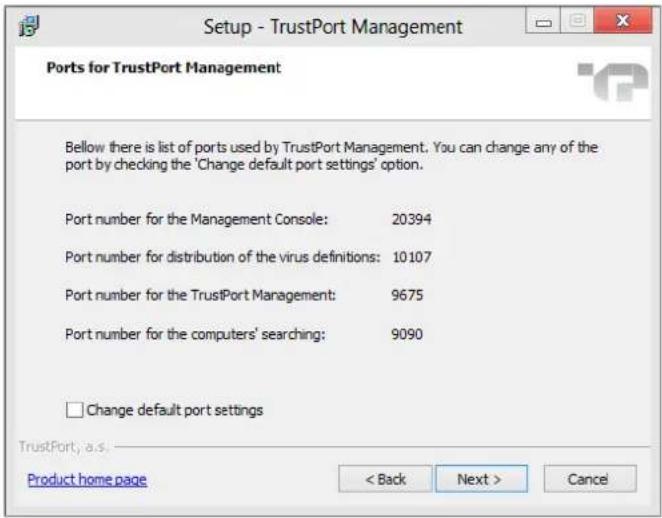
Ports used for TrustPort Management
On the "Ports used for TrustPort Management" page, a list of ports used by TrustPort Management is displayed.
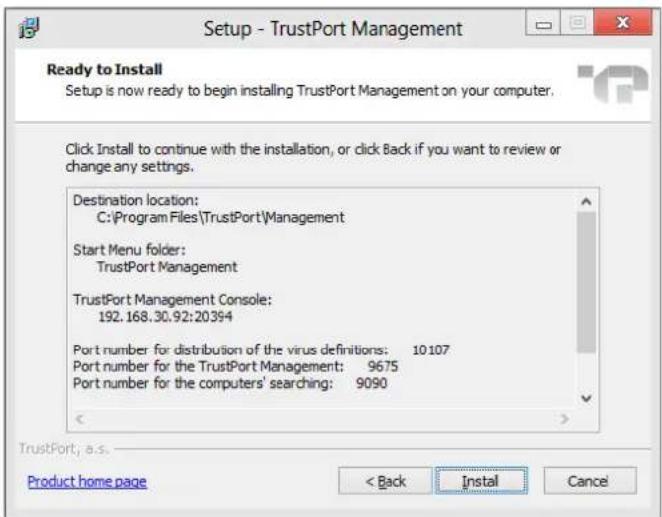
Default port values:
- Port for the Management Console: 20394
- Port for distribution of the virus definitions: 10107
- Port for the TrustPort Management: 9675
- Port for the computers' searching: 9090
These parameters can be changed through the check box Change default port settings.
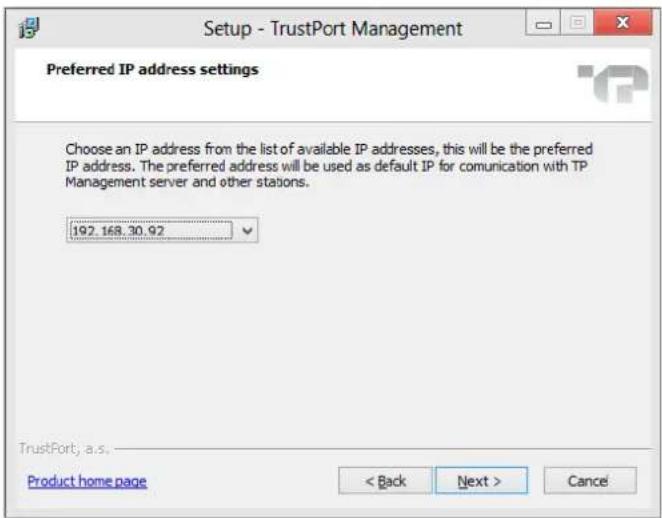
Preferred IP address settings
It is possible to choose an IP address from the dropdown menu, it will be used as default IP for communication with server and other stations.
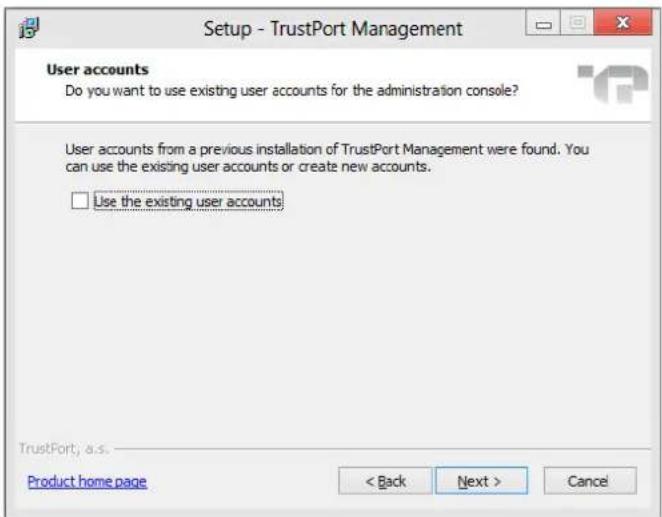
User accounts
In case that there are configuration files with user accounts left from previous installation of TrustPort Management server, it is possible to use these accounts to log in to administration interface. To keep the accounts, the checkbox Use the existing user accounts has to be checked. In the opposite case installation wizard will carry on to the next page, where required passwords need to be entered so that new accounts for administrator and auditor are created.
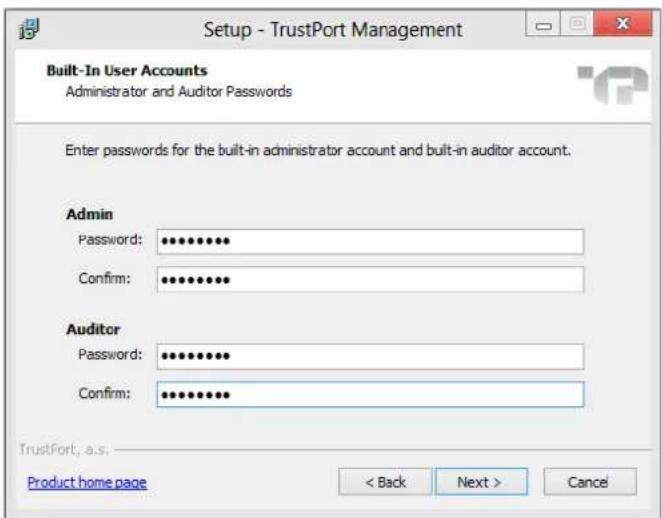
Administrator and Auditor Passwords
Use this page to enter passwords used when logging in to the TrustPort Management console. By default, two accounts are generated during installation, admin and auditor. For security reasons, the created passwords should contain upper and lower case characters, at least one number and should be longer than 7 characters.
If the security requirements for the requested passwords are not fulfilled or there is a difference between a password and its confirmation entry, or the password is left empty, the user will be informed after clicking the Next button.
Ready to Install
When displaying this window, the installer has enough information and is ready to copy files to the destination directory. A summary of the installation information is supplied in the window. This window is the user's last opportunity to go back and change any settings before the installation proceeds.
Click the Install button to begin copying files.
Completing the TrustPort Management Setup Wizard
The installation program has finished copying files and registering components and waits for the installation to be completed.
Click the Finish button to close the installation wizard. TrustPort Management server is now installed and ready for use. Checking the Download virus definition files from the Internet check box before clicking this button runs the updater tool which download up-to-date virus definitions.
Uninstallation
Uninstalling the TrustPort Management application is done in the same way as most applications. Start the "Add/Remove Programs" panel in the Windows system control panel and select TrustPort Management. Click the "Remove" button to start the uninstall process. This process will ask you to confirm that you really want to do this.
After confirming the uninstall, the uninstall process will proceed automatically.
After finishing, you may be asked to restart the system. It is recommended to do so if requested.
The last uninstallation step is a possibility of deletion the whole application folder. Uninstallation program will ask you to confirm that you really want to delete the whole application folder. If you confirm deletion then the whole application folder and its content will be deleted, ie. even if some files weren't part of TrustPort Management they will be deleted too. In other words, if you placed some files into the application folder and you will confirm the deletion, then you will lost this data.
3.1.1 Command Line Parameters
You can modify how an installation is performed by command line parameters. The list of possible parameters can be obtained by starting the installation program with the parameter /?
| Parameters | |
| /?, /HELP | Displays a window with a list of possible installation parameters. |
| /SILENT, /VERYSILENT | Silent installations can be done in two modes: SILENT or VERYSILENT. In case of /SILENT, the Setup window isn't displayed, but the installation process window is. If the switch /VERYSILENT is used, not even the installation process window is displayed. |
| /DIR="x:\directory name" | This overwrites the default directory name as displayed in the 'Select Destination Location' page of the Setup wizard. The full path to the directory must be entered. This is also available in both silent installation modes. |
| /NOCANCEL | The user is not allowed to interrupt the installation process, by disabling the 'Cancel' button and ignoring the close application button. This switch can be used together with /SILENT. |
| /NORESTART | This parameter makes it possible to stop the station from restarting if the installation process requires. During installation of the server it can occur that a restart of the computer is needed. In certain cases a restart can be undesirable, such as when installing TrustPort Management server on a mail server, etc. In such cases use /NORESTART to restart the computer manually when it is convenient. |
| /REGSERVERIP=ip | Use this parameter to specify during installation which server should be used for registration. This will pass on the server IP address to the installer. If this parameter is not used, then the client will automatically try to detect the server. |
| /REGSERVERPORT=port | Use this parameter together with the /REGSERVERIP parameter. It specifies port number on which the server accepts registration requests of new clients. If the parameter is not entered, then there is used the implicit port number, 9675. |
| /GUIIP=ip | This parameter makes it possible to define IP address where a web server with pages of the TrustPort Management administration console and local mirror with antivirus database will be placed. If the parameter is not entered, then there is automatically used IP address of TrustPort Management server. |
| /GUIPORT=port | Use this parameter together with the /GUIIP parameter. It specifies port number on which the web server with pages of the TrustPort Management administration console listens. If the parameter is not entered, then there is used the implicit port number, 20394. |
| /DISABLESRVLOOK | After the start up TrustPort Management Server emits request to check if there is other TrustPort Management Server in the same network. If there is another one detected then module for automatic registration of stations is switched off to prevent of TrustPort Management clients competing registration. /DISABLESRVLOOK parameter turns this control off. It's not recommended to use this parameter as well as isn't recommended to install more than one TrustPort Management server in local network. |
| /NEWREG | Use the /NEWREG parameter to force an overwrite of existing configuration files on TrustPort Management server. If this parameter is not used, then the original configuration files will be kept. |
| /PREFIP=ip | Using this parameter, it is possible to choose default IP address, which will be used for communication between server and other stations. |
| /NOVERUPD | Using this parameter, checking of new versions will be disabled at the end of installation process. |
Example of use: setup.exe /VERYSILENT /DIR="C:\TrustPort\Management" /REGSERVERIP=192.168.0.10
When removing TrustPort Management, the standard uninstallation process can also use the /SILENT switch. This requires executing the file unins000.exe, located in the program installation directory, with the /SILENT parameter. Uninstalling TrustPort Management can also be performed from the TrustPort Management Console.
4 Tpmprobe tool
Tpmprobe is a general-purpose tool used to detect problems with remote installation of client (cmdline application) on a station. If installation fails for some reason, it is possible not only to detect the problem, but as well to solve most of the standard problems, even on a remote station.
Usage: tpmprobe.exe [parameters] [ip-address-of-remote-computer]
| Parameters | |
| --domain=domain | If the tool is used on a remote station, then an account with local administrator rights is needed. If this account is in a domain, it is necessary to define it using this parameter. |
| --login=user name (loginname) | If the tool is used on a remote station, then an account with local administrator rights is needed. Enter name of this account. |
| --passwd=password | If an identification of user by parameter --login is used, then it is necessary to enter his password using this parameter. |
| --fix | If a problem occurs which can be fixed by this tool, and this parameter is used, then it will try to fix it after entering this parameter. |
| --help | Displays help. |
| --pressakey | By using this parameter, pressing of any key will be demanded before the program ends. |
| --details | By using this parameter, you will get detailed parameters about the network. |
| --quiet | Use this parameter if you don't want to display any output from this program. |
If tpmprobe is executed without parameters, then it checks settings of the computer, from which it was started. It is also possible to run it for remote computer by entering its IP address as a parameter.
5 Using the TrustPort Management Console
The TrustPort Management application is controlled by means of a thin client application, the console. This thin client can be used with almost any web browser, such as Internet Explorer or Firefox. This thin client is used by the system administrator to connect to the computer running TrustPort Management server with a web server, so as to perform TrustPort Management tasks. The advantage of a thin client in managing TrustPort Management is that the administrator doesn't need to install any further applications in order to work with TrustPort Management. A standard web browser is enough, and these are found pre-installed on workstations. This also allows the administrator to operate TrustPort Management even when operating in other operating system environments, such as Linux. Connecting to TrustPort Management with this thin client is possible almost anywhere, even outside the local network with a connection through the Internet.
The optimum screen resolution of the TrustPort Management console is 1024x768 pixels.
5.1 Logging in to TrustPort Management
To operate TrustPort Management it is necessary to log in to the TrustPort Management console. Start a web browser and in the address field enter the address of the server where the TrustPort Management web server is installed and the port number it listens on. The default port that the TrustPort Management web server listens on is 20394. Don't forget to enter the https protocol, the standard used due to the higher level of security it confers. The address may resemble the following example:
https://192.168.1.10:20394/
If using the management console directly on the server on which the TrustPort Management application is installed, you can start the console by clicking directly on the corresponding icon in the start menu or desktop that was placed there when the application was installed. These start icons are configured to start the management console with the IP address and port number already pre-entered for the TrustPort Management web server.
The log in window to the central management console of TrustPort Management is shown below.

In the Login field enter the username of the administrator or auditor of TrustPort Management. Enter the corresponding password in the Password field. On installing TrustPort Management, two users for the system are created. Their usernames and passwords are set during the installation of TrustPort Management Server.
Logging in is performed by clicking the corresponding Log in button. If an error is made when logging in, the administrator or auditor will be informed of the reason on the logging page.
5.2 Overview
5.2.1 Info
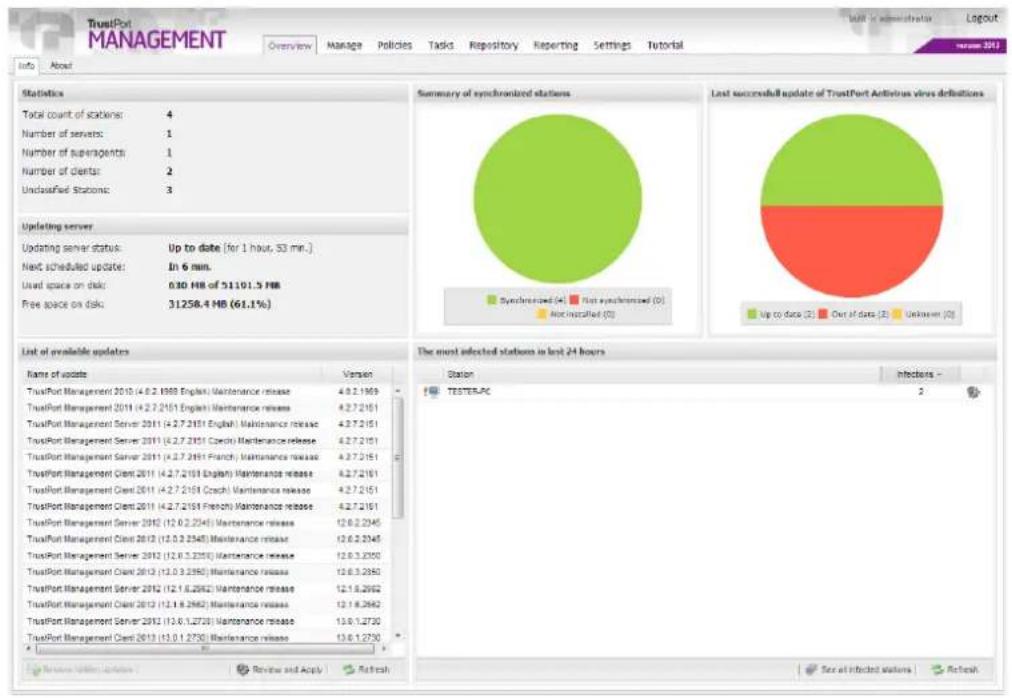
after successful logging in to the TrustPort Management, the Overview tab is displayed. This tab displays information divided into few sections.
Statistics
displays number of administered clients, unclassified stations and superagents. Detailed information about the number of stations and subnetworks division can be found on Reporting - Network overview tab.
Updating server
displays basic information about updating server status and information about used space. Detailed information about updating server can be found on Settings - Updating tab.
Summary of synchronized stations
displays a graph which represents count of synchronized, not synchronized and not installed stations.
Last successful update of TrustPort Antivirus virus definitions
displays a graph which represents count of stations which are up to date, out of date or their update status is unknown.
pie
Summary of synchronized stations | Category | Count | | :--- | :--- | | Synchronized (A) | 4 | | Not synchronized (O) | 0 | | Not installed (O) | 0 | Last successful update of TrustPort Activirus virus definitions | Category | Count | | :--- | :--- | | Up to date (2) | 2 | | Out of date (3) | 2 | | Unknown (O) | 0 | The most selected stations in last 24 hours | Station | Infection | | :--- | :--- | | TESTER.PC | 2 |List of available updates
this part of the site now allows administrator to manually select which updates of TrustPort software should be further distributed. Updates selected for further use will be automatically installed on the end stations, though user can be asked for restart if needed. If stations have TrustPort Management Client installed on them, they are dependent on server's updating settings. If there are no updates selected to be applied in the TrustPort Management console, then no updates will be applied on the clients.
After clicking on Review and Apply button, a dialog window displaying list of available updates is opened. Administrator can choose action for the required update here.
By default, the option I'll decide later is selected.
After selecting the option Apply update, confirming by Proceed button and synchronizing, the selected update will be distributed to the local repository on the server and will be further provided to all clients in the network. If there are any superagents available in the network, then the repository is automatically distributed to them during their synchronization with server and then they are responsible for the distribution in the particular subnetwork.
If the option Hide update is selected, the particular update will no longer be displayed on the start page in the List of available updates section. All hidden updates can be restored back to the List of available updates by using Restore hidden updates button. Restoring of hidden updates does not influence their usability, ie. in order for the update was further distributed, the option Apply update always has to be selected.
List of available updates can be restored by Refresh button.
The most infected stations in last 24 hours
this part of the page displays list of stations, that were most infected in last 24 hours. There is always a name of the station, number of found infections and in the right part of the list there is an icon which is used to display Station's properties.
This list can be restored using Refresh button in the bottom right corner.
Complete list of all infected stations is displayed after clicking on See all infected stations button.
5.2.2 About
displays information about TrustPort Management version installed and contact information on TrustPort a.s.
In the top right corner, actually logged in user is displayed as well as Logout button for logging this user out of the TrustPort Management.
5.3 Manage
5.3.1 Directory
Directory tab is divided into two sections. On the left side, there is a tree with groups of TrustPort Management displayed, after selecting particular group, stations classified in this group are displayed on the right.
Groups
By station's classification into a new group, administrator is able to control this station and other stations all at once and it enables him to classify stations to logical units, e.g. according to station's location, classification to department etc. List of groups contains two predefined groups, Root Group and Unclassified Stations. All stations after installation are automatically added to the Unclassified Stations group.
Station can be moved to a new group, which is created by New item from Actions menu in the Groups section. To complete creation of new group successfully, its label, eventually description, needs to be entered in Group Properties window and all must be confirmed by button Save. Groups cannot be added only to the default group Unclassified Stations. After completing, the created group is displayed in the Groups tree. List of all created groups can be updated by button Refresh.
After clicking on Properties in Tools menu, a window with Properties and Tasks tabs is displayed:
- Properties - in the Properties tab it is possible to change label and description of group, eventually to move group to another location in the Groups tree by button Select. There is also possibility to assign particular policy from policy catalogue to the group. In default settings, when policy has not been assigned yet, information appears, saying that policy is inherited, which means that the group inherited policy from parent group. If No policy option is chosen from the Select policy window, then this policy will be inherited from parent group again. All changes must be confirmed by Save button.
- Tasks - in this window it is possible to assign chosen task to the group, through button Add task. A window with list of all created tasks is displayed. Now it is possible to choose task and confirm the assigning by button Select. The assigning of task to group can be removed by clicking the icon Delete task. All changes must be confirmed by Save button.
Other items from the upper ribbon like Delete, Synchronize, Message or Properties are available both for groups and for stations.
Through the Message button, it is possible to send a message with text to chosen group or station, the message is displayed on the station either for a selected time period or until user confirms the message.
Synchronize item from the upper ribbon – during synchronization, agent receives list of all files from server, which should be downloaded during synchronization. In this list, there is always policy assigned to the station present, then list of all scheduled tasks which should be run on the station. During synchronization, list of currently managed applications, station's settings and list of alerts are passed on to the server. Synchronization can be done individually for particular stations or collectively for whole group of stations.
Station or group can be permanently removed by selecting item Delete in appropriate section.
Stations of selected group
List of stations is displayed on the right, each station has in its row detailed information, including date of last synchronization or for example icons signaling possible problem with connection or update. If you want to move station to another group, you have to select the required station from the list of stations and use Move item from the Actions drop-down menu on the upper ribbon. In the Select Group window, target group is selected and all is confirmed by Select button.
Each item in the list of stations has, in the beginning of each row, icon representing whether it is a client, a superagent or a server. By clicking the plus icon in each row, detailed information about chosen station is displayed, like operating system of the station, applications installed or actual information about problems with connection, security or updates.
If a client has been uninstalled from a station, then the station is marked in grey color. It is still possible to display its settings, but most of these settings can't be changed anymore.
![TrustPort MANAGEMENT Overview Manage Policies Tasks Repository Reporting Settings Tutorial Directory Registration rules Add new stations Groups Actions Tools Real Group (14) unclassified Stations (30) new group (20) Statutes of selected group [ Unclassified Stations ] Label * TESTER-PC PC Name TestER-PC Domain: Microsoft Windows 7 Enterprise Station Service Pack II (valid 7001), 12:48 Last synchronization: 11/19/2012 13:50 Last logis: 11/19/2012 13:00 Antivirus: Installed On-Access Scanner: running Internal Protection: running Date of last successful updates: 11/08/2012 15:52 Date of license expiration: 6/1/2012/2013 23:58 Forecast: MS5965 Fiscal Status: Vasr VJBS Date of license expiration: 01/12/2013 23:58 Connections Station is successfully applying to the server. Station is successfully synchronizing with the server. Security: TrustPort Personal Firewall is installed. TrustPort Antivirus is installed. TrustPort Personal Firewall controls the network communication. On-Access Scanner is turned on. On-Access Scanner starts automatically. Index: Value definitions have been updated for a long time. Value definitions for On-Access Scanner have been updated for a long time. WINHOLDENESS 102.168.30.51 11/19/2012 13:58 11/19/2012 09:37 Displaying 1 - 2 of 3 Page 1 of 1 Backout Tools Edit](/content/2026/06/1190236/images/e3bea8268130f7cfd311cb913d3eb4bcdea02172de414364bcb400c25a69ed34.jpg)
Other items from the upper ribbon like Delete, Synchronize, Message or Properties are available both for groups and for stations.
Through the Message button, it is possible to send a message with text to chosen group or station, the message is displayed on the station either for a selected time period or until user confirms the message.
After clicking on Properties in Tools menu, a window opens containing following tabs:
- General - detailed information about the station is displayed here, including list of possible problems with connection, security or update.
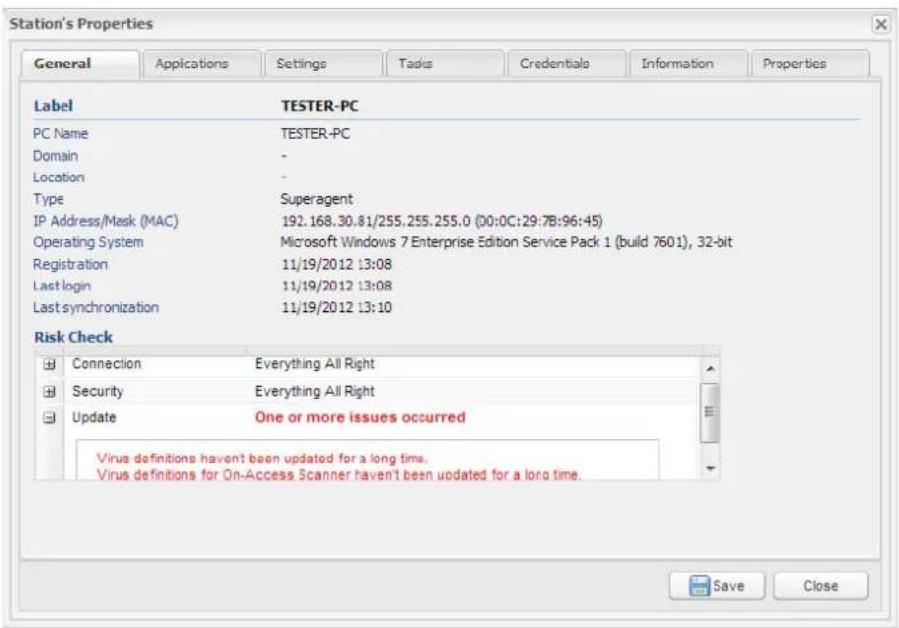
- Applications - informs about installed applications in detail, for example about status of On-Access Scanner and Internet Protection of Antivirus or about date of license expiration.
- Settings - displays summary of settings of particular properties of applications installed on this station.
- Tasks - a chosen task can be assigned to selected station here, this assigning is done similarly as in case of groups. In addition, here in list of assigned task, the status of particular task is displayed, after unrolling selected task it is possible to find out exact data when the task was started and stopped, when next run is planned and what is the result of scheduled task.
- Credentials - if particular user account should be used for selected station, it is possible to enter it here. First of all, check box Use specific user account defined below has to be checked, then Username and User password should be entered, in case of a domain account user should also enter User domain. For more about accounts see Settings - Credentials.
- Information – displays list of last events, list of station's devices and information about virus infections that were found on the station.
- Properties - setting is similar to groups, besides label change, moving to group or assigning of particular policy, it is possible to choose whether the station should act as a superagent. By choosing this option, it is defined that the station will distribute updates of virus definitions to other computers. In case of server, this option is chosen by default and it is not possible to change it.
In case of any changes in Properties window, it is necessary to confirm these changes by Save button, otherwise they will be ignored.
Synchronize item from the upper ribbon – during synchronization, agent receives list of all files from server, which should be downloaded during synchronization. In this list, there is always policy assigned to the station present, then list of all scheduled tasks which should be run on the station. During synchronization, list of currently managed applications, station's settings and list of alerts are passed on to the server. Synchronization can be done individually for particular stations or collectively for whole group of stations.
Station or group can be permanently removed by selecting item Delete in appropriate section.
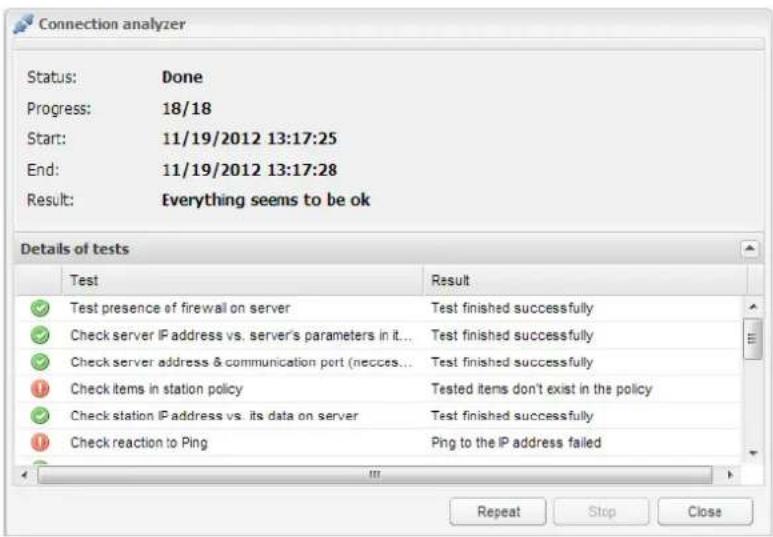
Connection analyzer item is used to find out possible problems in connection between server and selected station. After clicking on Connection analyzer button, a dialog is displayed asking for user account. This account will be used during some tests for problems detection on particular station. After filling in the dialog, a set of tests is started, which should diagnose whether the connection is correct. Details about these tests including their results are displayed below in Details of tests section. Results of these tests are distinguished by warning icons. Overview information about analysis made is displayed
above, including date and complete result of the performed analysis. Test can be repeated by using Repeat button, eventually interrupted by Stop button. By clicking on Close button, Connection analyzer will be terminated.
For better orientation in the list of stations, it is possible to use filtering. Filter is hidden in a ribbon on right side of the page by default. By clicking on double arrow on the ribbon, the filter is opened. In the basic scheme, stations can be filtered by entered text, by possible problems with connection, security or updates, or by last successful update of antivirus. More options of filtering are displayed after clicking on Advanced button. Filtering is started by clicking on Search button, to remove currently used filter Clear filter button is used. If filter should be applied only to currently selected group, it is necessary to check the check box Selection in actual group.
5.3.2 Registration rules
Registration rules are used to sort stations into required groups automatically during remote installation of client to the target stations. These groups can be defined on the Manage - Directory tab.
List of rules is displayed in the left part of the page, on the right side there are displayed properties of the selected rule. The list of rules contains two predefined rules, Root group rule, where the server is included and rule for Unclassified stations, where are all installed clients placed.
If you want some stations to be included in another group during client installation, you can define a new rule. It is created by using the Add new item from the Tools menu. Its properties appear on the right side. Here you can define Rule name and Destination group, where the stations will be included. Changes are confirmed by clicking on Update button.
Next you have to specify rule conditions, which can be done through Add new condition button. In the Add new condition dialog, you can specify the conditions that will define to which group the station will be placed. You can specify range of IP addresses, stations' names, stations' operating systems, or role in the management, i.e. whether the station is client or server. If stations match the defined rule, they will be placed into the defined group.
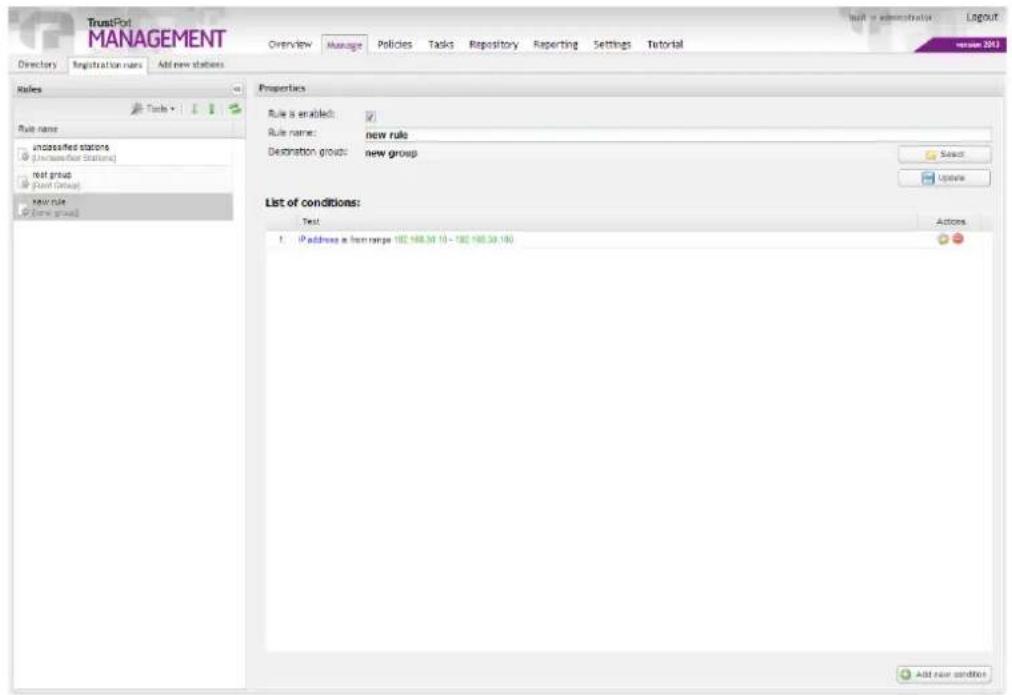
Rules can be removed by using the Delete button from the Tools menu. If you wish just to disable the rule temporary, you can do it in the rule properties section by unchecking the checkbox Rule is enabled.
The rules that are on the top position in the list will be used as first, you can change the order of the rules by Move up and Move down arrows. The first matching rule is used and after that the rest of rules is ignored.
5.3.3 Add new stations
Remote installation of clients on selected stations in network can be performed on Add new stations tab.
Before installing, it is necessary to find these stations in network. User can choose from five methods of searching – Active Directory, Automatic, Net Search, Manual, and Import from file, these methods are displayed on start page of Add new stations tab. Each of these methods is specified by its description. Below on the page, there are prearranged setup files of TrustPort Management client displayed, it is possible to download them to computer and use later for manual installation on particular station. Each package is specified by its description.
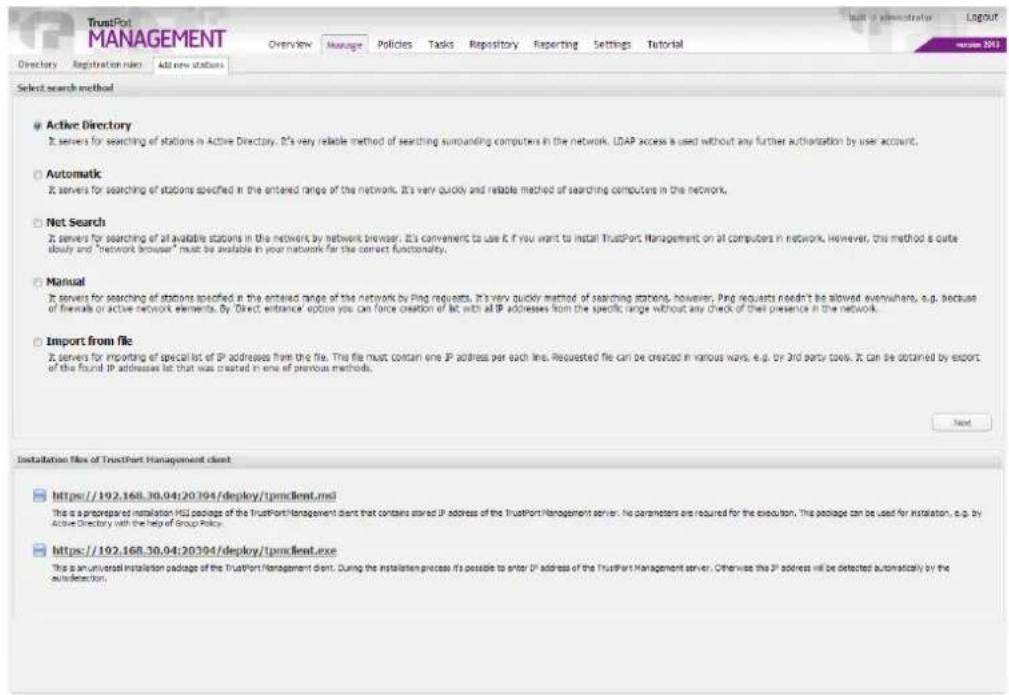
Searching of stations is performed by choosing required method and clicking on Next button. Then the searching can start either directly (methods Active Directory and Net Search) or after user enters a range of IP addresses (methods Automatic and Manual), or after he imports a file from computer with a list of IP addresses (Import from file). For correct functioning of Active Directory method, computer must be joined to a domain.
On the following page, there is a list of found stations and status of current searching, which includes count of found stations, method used or a total time of searching. It is possible to end currently running search by Stop button and by New search button it is possible to start search with a new method of searching.
List of found stations, on the right side of the page, displays result of searching by chosen method. Found stations are specified by IP address, Name, eventually MAC address. Selection of particular stations is performed by clicking on check box next to required station. Stations can be deselected from the list by clicking on Deselect all, they can be exported into .csv file by clicking on Export button. This .csv file can be used later for import of list of stations by Import from file method of searching.
After selecting required station from the list, the process continues by clicking on Install into selected stations button. To perform the installation successfully, it is necessary to enter account information, which can be used to log in to selected station, into Network credentials dialog. This account can be either domain or local, but it always should have administrator rights. If station is not joined to a domain, domain won't be entered and local account will be used instead. In case that installation fails for some reason, information about possible problem is displayed in the results of installation. If the problem disappears, user can repeat the installation by Install to unsuccessful stations button. If the installation completes successfully, information appears in the Results of installation.
Requirements for successfully performed remote installation:
The station must be a Microsoft network client, Share files and printers in Microsoft networks service must be installed and default administrator sharing (C\, D\, ADMIN\$, etc.) must be allowed.
If a firewall is running on the computer, the following ports must be opened to allow communication between the server and stations. The specific ports are the following:
- allow UDP connections in both directions on port 9090,
- allow TCP connections in both directions on port 9675,
-
allow incoming TCP connections on port 135 for RPC,
-
allow TCP connections in both directions on ports 137 and 138 for RPC,
- allow outgoing TCP connections on port 139 for RPC,
- allow incoming TCP connections on port 445 for resource sharing on Windows,
- allow outgoing TCP connections on port 480 for detection of available products update.
To perform remote „push“ installation of clients, it is necessary that on computers with Vista operating system and higher, which are not joined in a domain, UAC feature is not active (at least for incoming connections).
To perform remote „push“ installation of clients, it is necessary that on computers which are not joined in a domain, authentication of users for local accounts was set to local users authenticate as themselves, not as Guest.
It is necessary to have an user accounts prepared for installing the client on a station. The user account set for installing the client may need to be set according to the type of network:
- Installing in networks with a domain – in this case, in principle it is possible to use any domain account that has local administrator rights, ie. belonging to the local administrator group.
- Installing in networks without a domain – in this case, a domain account cannot be used. A local account must be used that belongs to the local administrator group.
5.4 Policies
Policies tab can be used to define policies for particular stations or groups of stations. Policy is a rule defining properties settings of included products. In the List of available policies, predefined default policies for Root group and for Unclassified stations are present by default. If a group has no policy assigned to it, then it automatically inherits policy from parent group. Only the predefined Root group must always have a policy assigned to it. Policy works the same way for stations. After installation, station is assigned into the group Unclassified stations by default and therefore it inherits its policy.
To create new policy with user defined settings, item Add new policy from Tools menu is used. During creation of new policy, it is necessary to enter its name, it can be specified in Description of new policy. User has an option to create either new empty policy or use some of the templates. Process of creating is finished by clicking on Create new policy button.
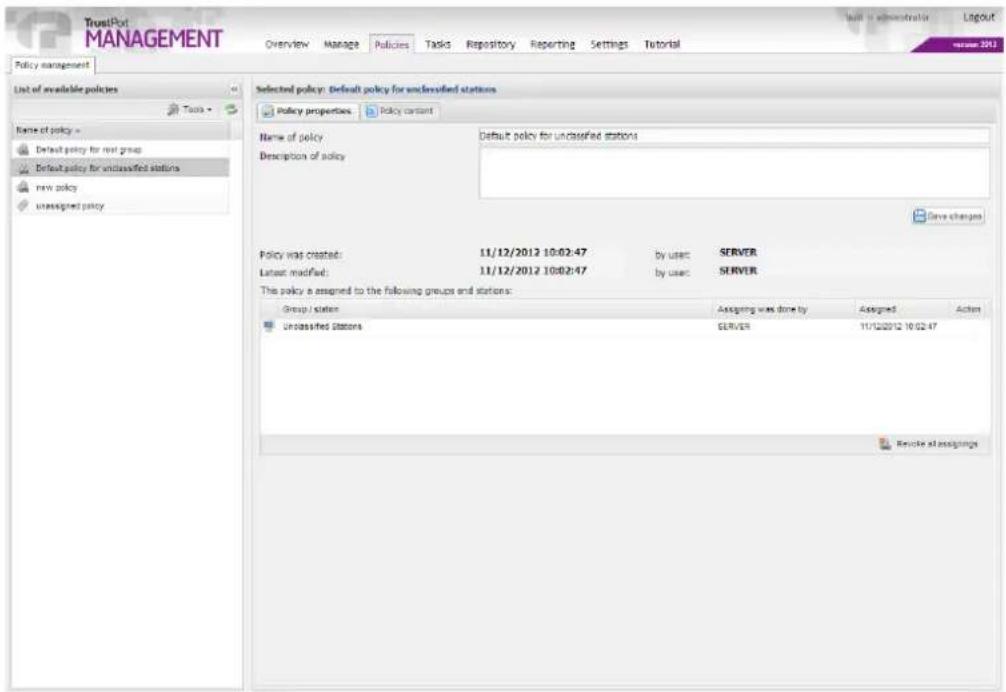
After the policy is created, Policy properties tab is displayed, it is possible to make additional changes in the name and the description of the policy here. After assigning of created policy to a station or a group, list of the assigned groups / stations is displayed here. Assigning can be removed any time by clicking on icon Revoke assigning in Action column or collectively by Revoke all assignings button.
Assigning of policy to station can be done on Manage tab, as described above.
To delete created policy, Remove selected policy from Tools menu is used. List of all available policies can be updated by Refresh button.
Selected policy can be exported to XML file, this action is performed through Export selected policy from Tools menu. On the contrary, Import new policy is used to import policy from file into the List of available policies.
On the Policy content tab, it is possible to choose which items should be used in a particular policy and change their settings. The page is divided into two sections. User selects required items from the left section Available unused items in policy and by clicking on the arrow icon moves them into the section on the right Currently used items in policy. All items which are present on the right will be used in the selected policy. To remove item from the list of used items, it has to be moved by using arrow icon back to the policy of unused items.
By moving mouse over the required item, a hint is displayed. Item's current setting is displayed next to it in square brackets. This setting can be changed only in Currently used items in policy, by selecting required item and clicking on particular icon, then the Modification of policy item properties window is opened. Modification of properties needs to be saved by clicking on OK, and finally, confirm all changes by clicking on Save changes, otherwise they will be ignored.
5.5 Tasks
On the Tasks tab, it is possible to schedule actions that should be performed on particular stations or on whole groups of stations, in detail. That means e.g. user plans that on particular group of stations TrustPort Antivirus product should be installed in exact scheduled time.
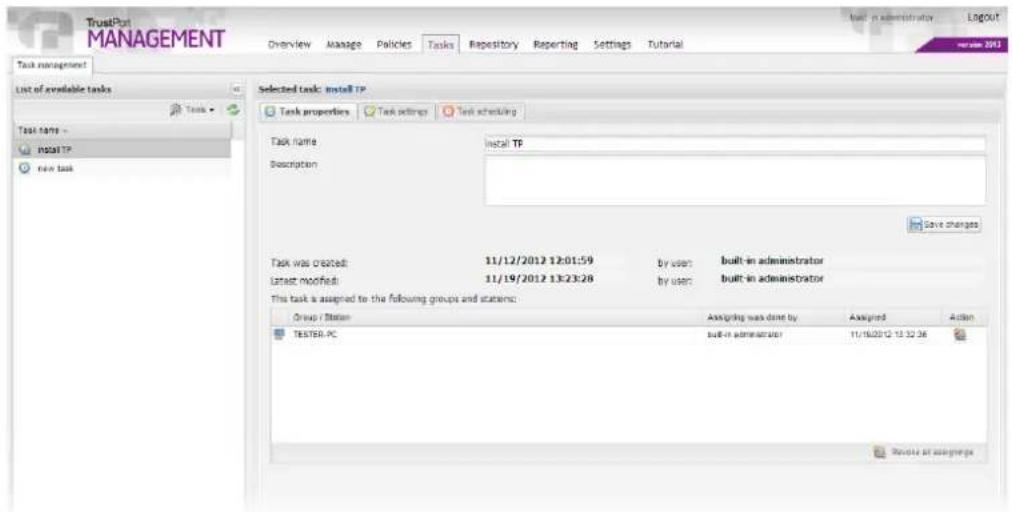
New task is created by Add new task item from Tools menu. Creating of task is done simply through New task wizard. To complete the process of task creating, it is necessary to fill in all items on particular pages of the wizard. All data entered and set in this wizard can be changed any time later, as described below. Created task can be deleted using Remove selected task from Tools menu. List of all created tasks can be updated by Refresh button.
By clicking on any of the created tasks, three tabs appear on the right side of the page:
Task properties tab allows user to modify general information about the task, like Task name and Description. These changes must be confirmed by clicking on Save changes button. Besides, information about the date of created task, its author and last modification is available on the page. Below, there is a list of all groups or stations which have the selected task assigned to it. This assigning is done on Manage tab, as described above. Assigning can be removed either on Manage tab in Station's or Group's Properties, or on Tasks tab, when on the right side of the page, Revoke assigning icon is used in the list of assigned stations in Actions column, eventually Revoke all assignings button is used.
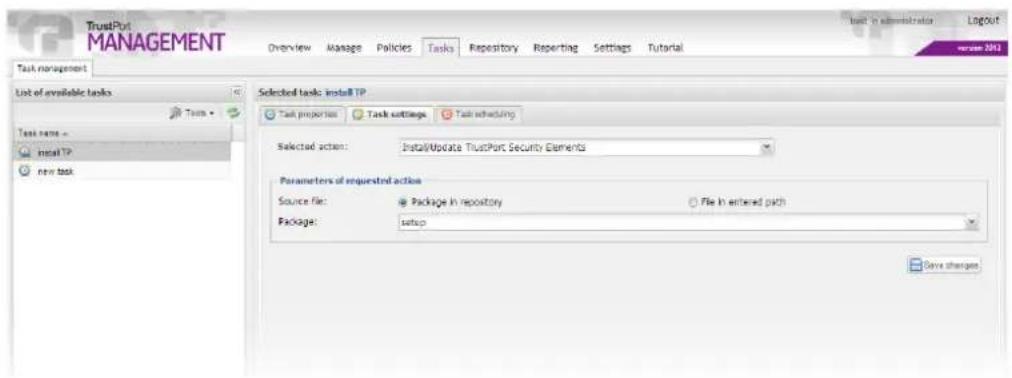
Task settings tab is used to set an action which should be performed on particular station. From the Selected action drop-down menu, an action that should be executed is chosen. Other parameters of the performed action are displayed below.
If user chooses as a type of action installation of a product, it is necessary to enter path to the setup file, or select this file from a package in repository. Creating of packages is described in Repository chapter. If a path to the file is in the network, it is necessary to have Network Access account defined, which can be done on Settings - Credentials tab.
Similarly is proceeded when executing some application, in addition, it is possible to enter parameters for execution in this case.
With Run On-Demand Scan option user can choose from several parameters, it is possible to choose type and priority of scanning, eventually to select particular files or directories, which should be checked. Paths to these files or folders must be separated by space.
When selecting actions like Restart or Turn computer off, it is possible to enter a message which will display to the user of particular station. This message will be displayed either for selected time period, after which computer performs required action, or it is possible to postpone this action until user confirms the message.
All modifications made need to be confirmed by Save changes button, otherwise they will be ignored.
Task scheduling tab enables to schedule time intervals in which the action will be executed. If time set on server and on client differs, it is possible to choose what type of time data should be used for the scheduled task, which means either GMT or local time of client.
Task can be executed once, either immediately, which means that scheduled task will be executed after next synchronization, or it is possible to set concrete date and time when the task should be started. If station was not able to run the task in the set time, it will be started after next synchronization.
Task can be started during system startup as well. This execution can be postponed for some time period of several minutes. It is also possible to set the task to run during startup, though only once a day.
To run task repeatedly, it is necessary to choose Run periodically. Here you can set in what time interval of days, hours or minutes the task should be repeated, eventually limit the execution for specific time period, e.g. task is started periodically every five minutes, but only for the period of one month.
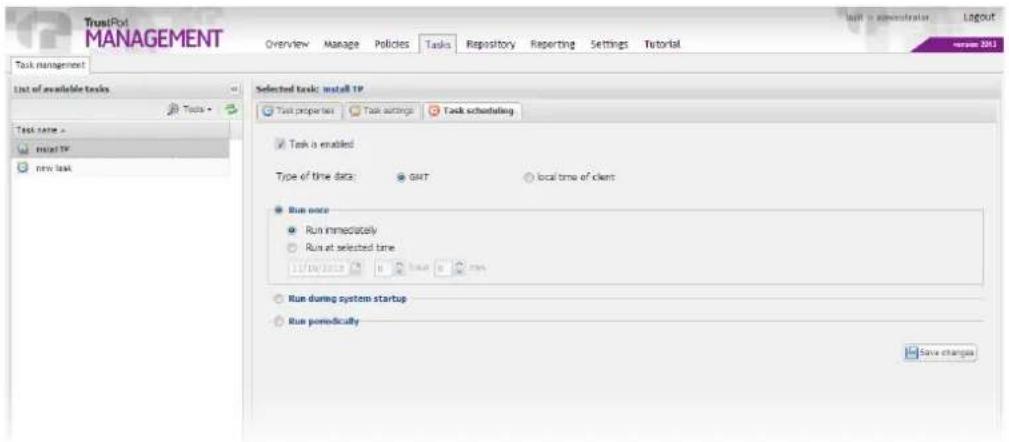
On Task scheduling tab, it is possible to activate or deactivate the task by checking the check box Task is enabled, whereas all settings stay saved.
All changes made need to be confirmed by clicking on Save changes button, otherwise they will be ignored.
5.6 Repository
Repository is used as a data storage, its content automatically replicates between superagents and a server as well as between superagents themselves.
Repository is divided into two parts:
- Private - contains files needed for correct function of TrustPort Management. It contains policy catalogue, list of scheduled tasks, definition of product template and list of available superagents. Content of this part is strictly set and administrator can influence only the content of policy catalogue or list of scheduled tasks.
- Public - part containing packages, which can be used in cooperation with scheduled tasks. Content of this part can be influenced directly on Repository tab. Package can be created only from files that user uploads to the public directory. All operations with this directory are performed on File management tab.
5.6.1 File management
The public subdirectory is created in installation directory as a default directory for managing files, its content is displayed here. Files can be added in it either directly by copying files on disc or using TrustPort Management console, either directly into this directory or it is possible to subdivide it into another subdirectories. New directory can be added using Create directory from Tools menu. In Create new directory dialog window, only name of new directory has to be entered and confirmed by clicking OK button. This new directory is created in Directories section and is classified as a
subdirectory of the default public directory. Created directory can be removed using Delete directory from Tools menu. List of all created directories can be updated by Refresh button.
New files can be added into directories by Add file button. File is chosen by clicking on Browse button and selecting the required file from computer. All process is completed when Upload file option is confirmed. All added files are displayed in the list of files in directory. Added file can be modified using icons in the list of files, in Action column. Download icon is used to download and save file to computer and Delete icon to remove file permanently.
5.6.2 Package management
After uploading required files into public directory, it is possible to create a package. Package is created by clicking Add new from Tools menu in Packages section. To continue, it is necessary to enter Package name, it can be specified in Package description.
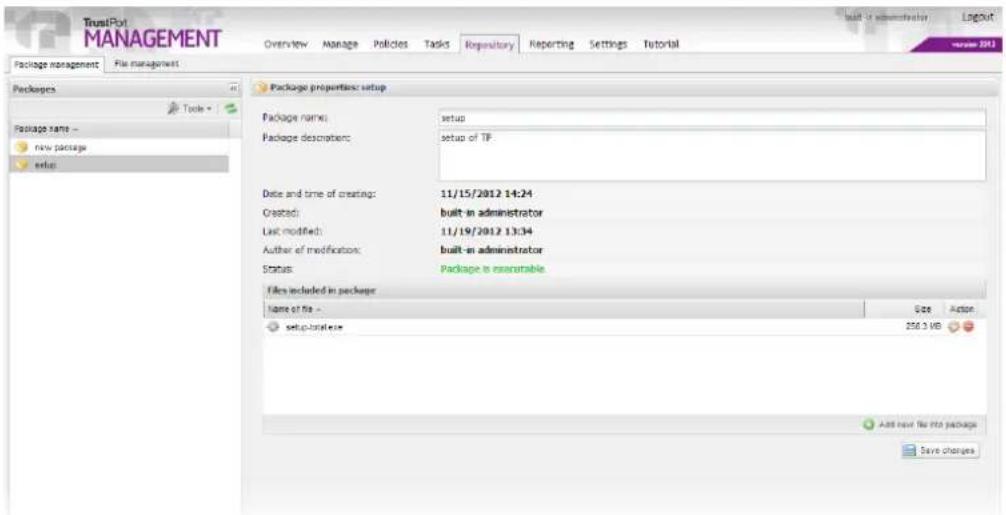
Particular files that will be included in the package are added by clicking Add new file into package button. In List of available files window, required files are selected from public directory, eventually its subdirectories. After user chooses required file, the choice has to be confirmed by clicking on Add selected file into the package. The uploaded file is displayed in Files included in package section, icon Delete from Action column can be used to delete it. In Action column, it is as well possible to use icons Set as a default one for executing and Modify parameters of execution. These entered parameters will always take priority over the parameters which are used during installation of a product using scheduled task. To finish successfully, it is necessary to confirm all changes by Create new package button, this new package will be then displayed in Packages section. Created package can be removed at any time by using Delete from Tools menu. List of all added packages can be updated by Refresh button. If a package should be modified in any way, it can be done just by selecting it, then on the right side of the page, there appears page with package properties, where it is possible to make any changes, eventually add new file into the package. All changes made need to be confirmed by clicking on Save changes button.
5.7 Reporting
5.7.1 Events
On Events tab, there is a list of events which indicate some status or occurrence of some event (e.g. a virus was found). These events are distinguished by icons which mark their priority – critical, high, normal or low. Similar events are grouped together and marked with a magnifier icon in the beginning of a row, by clicking on this icon List of grouped events window is opened, where all those events are listed. Only events which occurred during today are listed by default. Older events can be found using filtering.
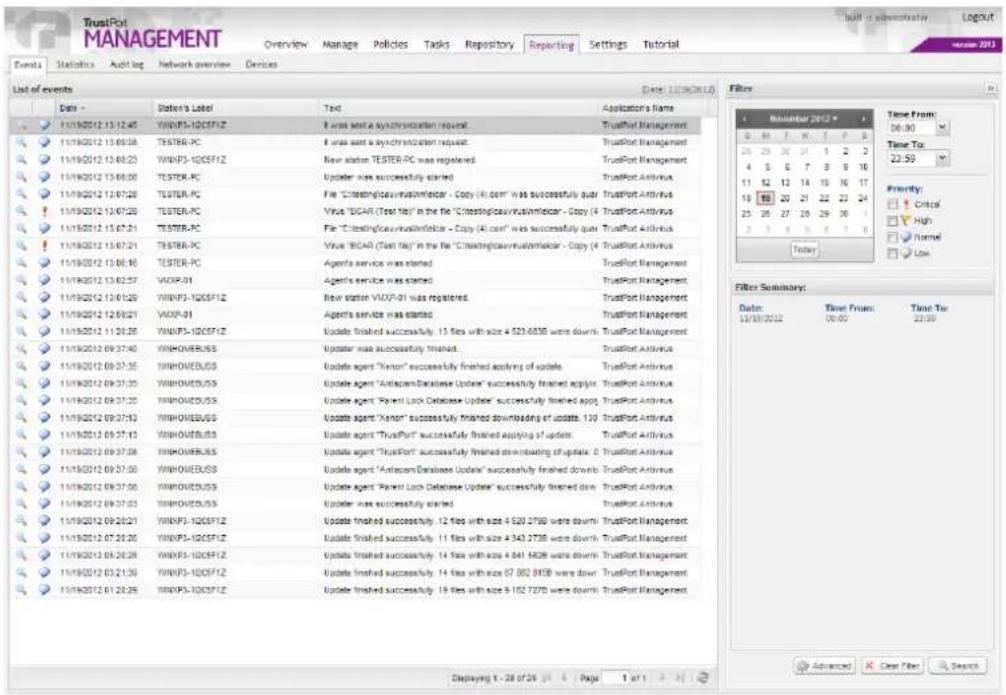
Events can be searched by using filter, which is hidden into a ribbon on the right side of the page by default. This filter is opened by clicking on double arrow in upper part of the ribbon. Filter enables to filter by several options – by date and priority, or it is possible to use the advanced filter. User can choose here from four tabs, on each tab, it is possible to check either required user, station, source or application and perform filtering by clicking on Search button. Used filter can be removed by clicking on Clear filter button.
5.7.2 Statistics
Statistics tab is used to display statistics and overviews, which simplify acquiring information about stations.
There are several statistics available, they can be displayed by choosing them in Selection of statistics section on the right. Before selecting statistics to display, it is possible to modify the Range of view, that means after unchecking the View global statistics check box, a group that should be used for generating statistics can be selected by Choose group button.
After selecting a statistic from Statistic's list, a chart is displayed in the middle of the page. Depending on the selected statistic, other specifying items to select appear.
Type of the chart display can be changed in the section Output data type, when stations can be changed to pie, bar or linear display. You can also download statistics saved in CSV file format, by checking the CSV file radiobutton and by clicking on Download CSV file button.
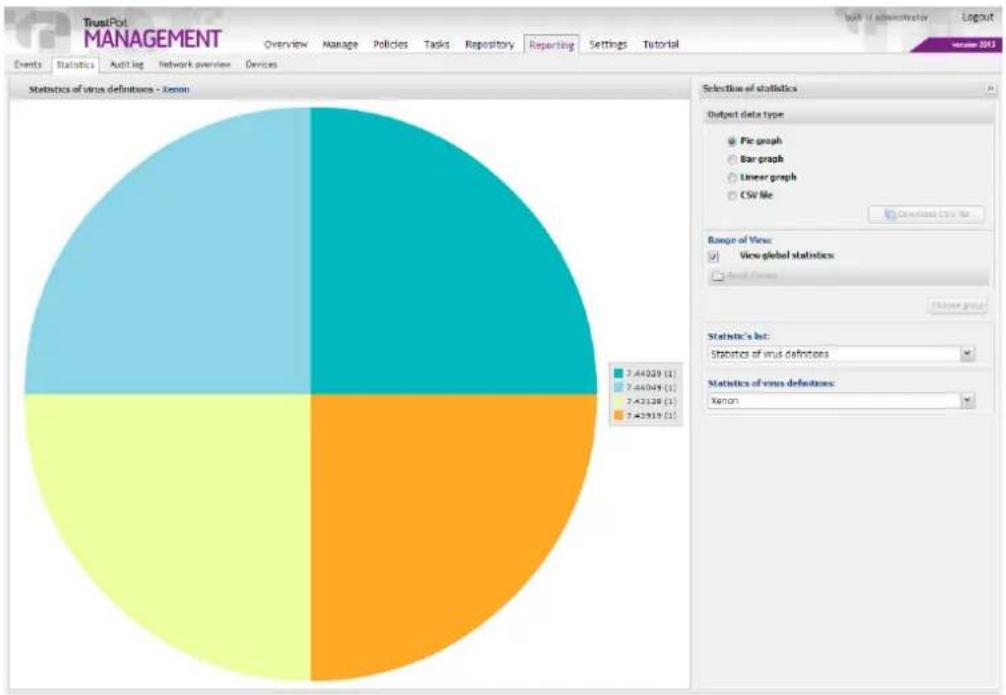
pie
| Category | Value | | -------------- | ------ | | Pie graph | 2.44039 | | Bar graph | 7.44049 | | Linear graph | 7.42128 | | CSV file | 7.42919 |Particular values in the displayed chart can be clicked, a window with list of stations with that value is opened. Detailed information about stations, including their IP address or group to which the station is assigned, is displayed in this window. After clicking on icon in the right part of the window, Station's Properties window is opened, it can be opened from Manage tab, Stations section as well.
5.7.3 Audit log
On Audit log tab, activities of all users are displayed, including the date, description of the event and which user performed that activity.
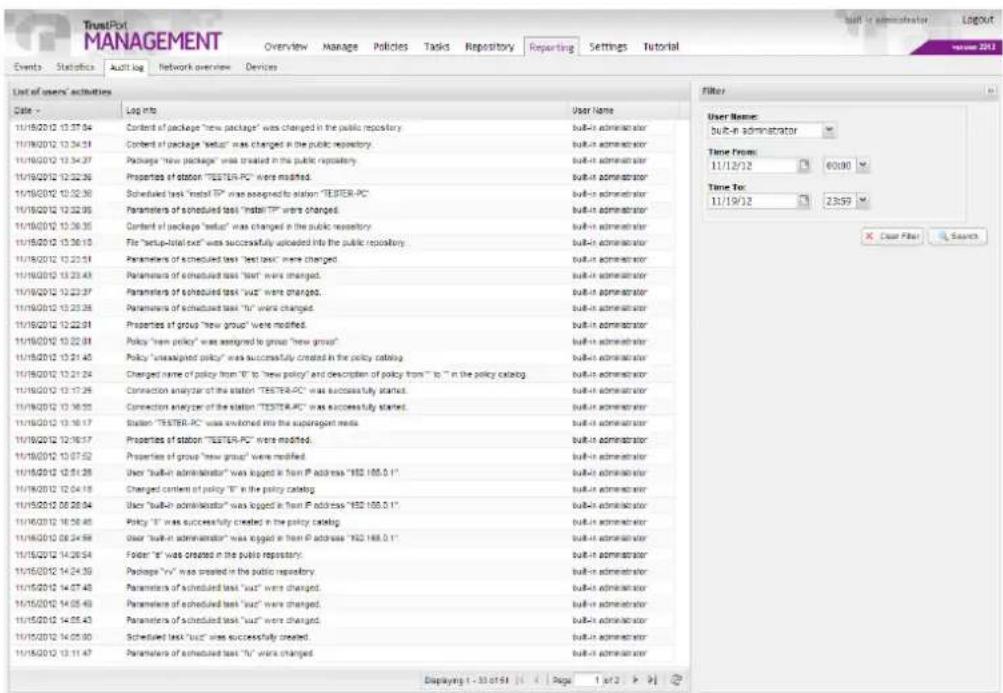
To filter these logs, a filter is used, by default it is hidden into a ribbon on the right, it can be opened by clicking on double arrow in the upper part of the ribbon. Logs are filtered compulsorily by user name,
optionally by date from - to. Filter is started by clicking on Search button, and removed by Clear Filter button.
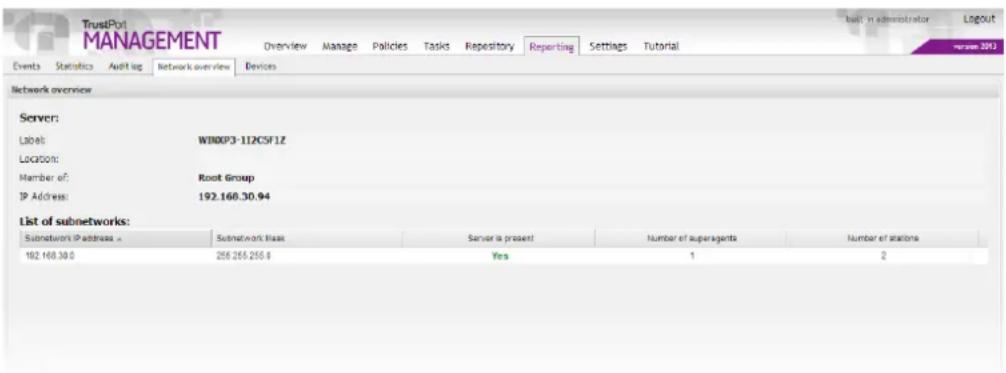
5.7.4 Network overview
Network overview tab displays list of subnetworks and information about the TrustPort Management server. Information about the server includes its name, location, group of which it is member and its IP address. List of subnetworks displays IP address and subnetwork mask and information whether there is a server present and how many superagents and agents are present.
5.7.5 Devices
Devices tab allows user to view devices from all stations. The list of devices is displayed on the left, it can be expanded by the Expand all button, which is located in the lower right part of this section. This list can help to define instances for the devices that should be automatically allowed or blocked in the Policies tab.
By clicking on Details button, located in the lower left part of this section, you can display further information about the currently selected device, like device class (identifies category of the device), general device identificator (this device path identifies devices and it's always equal for the same devices), specific device identificator (general device identificator extended by unique device dependent part; this identificator doesn't exist for every device, e.g. codecs), the station's label, device status – whether the device is active or not. By clicking on the icon on the right, you can open Station's properties.
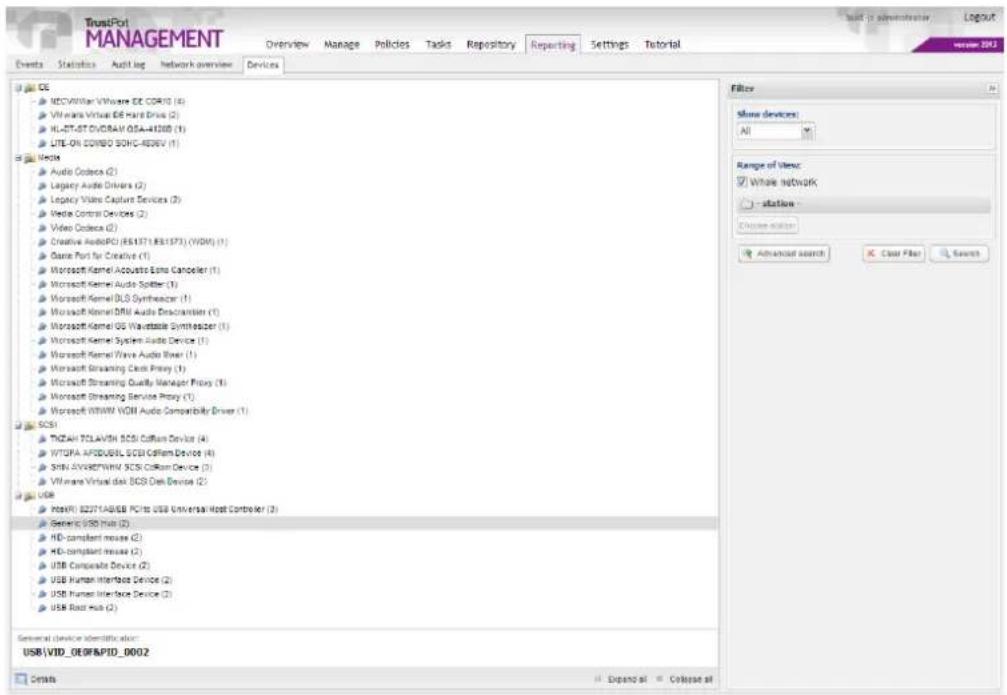
By default, active devices from whole network are displayed in the list. If you want to display also inactive devices, or only devices for some specific station, you can do it with help of Filter, which is located in the right part of the page. In Show devices, you can select if you want to view Active, Inactive or All devices. After unchecking Whole network checkbox, you can use Choose station button to select for which station the filter will be used. The search is started by clicking on Search button. To reset the filter, use Clear filter button.
Advanced search button helps you to set more specified searching parameters. You can find devices by their device class, by the category or by any entered text.
The list of devices can be found also in Station's Properties, on Manage – Directory tab.
5.8 Settings
5.8.1 Users
The Users pane displays a list of all users capable of logging in to the administration console of TrustPort Management. TrustPort Management allows three classes of users – administrator, auditor and power user. Administrator can perform any kind of operation including modifying all settings parameters. Auditor is a type of user with very limited rights, and used only to supervise or inspect the settings the administrator has set. Power user is a user with limited access and possibilities of modification in some section of TrustPort Management. These restrictions can be changed for all users in user account settings. On installing TrustPort Management, two users are generated in the system, whose passwords are set during the TrustPort Management server installation.
All users except the currently logged in user can be deleted from TrustPort Management by clicking on the Delete icon in the Action column. If the name of a user is deleted, then it won't be possible to log on with his username. After clicking on Edit icon, User settings window opens where it is possible to edit his settings such as name, surname, username, password, language or email. In this edit mode, it is possible to open Permission details window. Here you can simply modify user's permissions by checking / unchecking particular items. In User settings window, it is possible to modify activity / inactivity of user by using the Enabled check box. Inactive user won't be able to log in TrustPort Management.
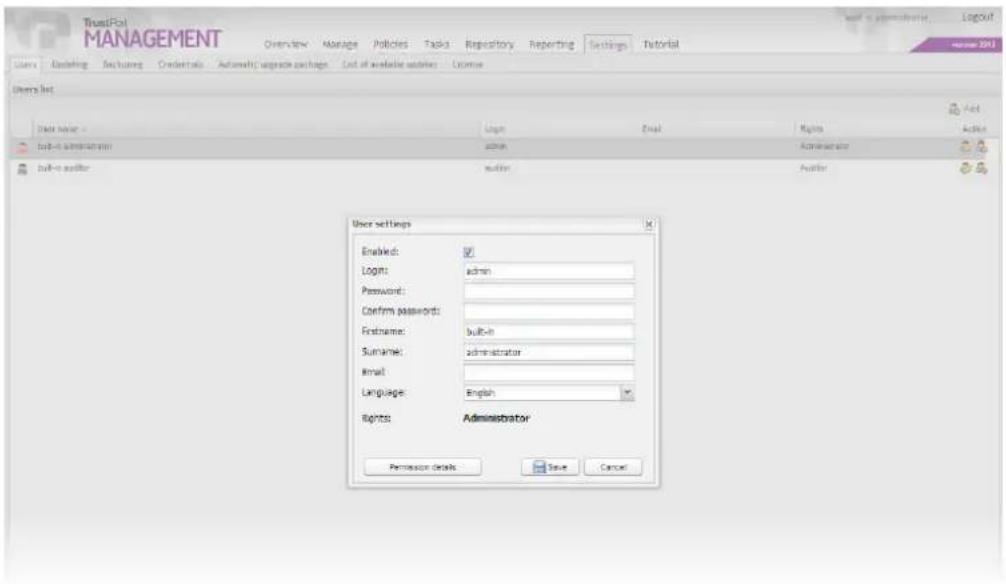
New users can be added by clicking the Add button. This displays a pane where after entering the user details, the new user is added to the system.
The Name and Surname text fields are used to enter the name and surname of the new user in TrustPort Management. Enter the username in the Username field. This name is used in the log-in pane of TrustPort Management. It is necessary to enter a password in the Password field that will be used together with the username to log on to the system in the log-in pane. All these fields are required and if left unfilled then the new user account will not be created or existing user account edited.
In the Email field the email of the new user can be entered if desired. In the Language pull-down menu it is possible to select in which language the TrustPort Management will be displayed to the newly created user. The Rights buttons sets the type of user. Possible choices are Administrator, Auditor and Power user.
Process is finished by clicking on Save button, then a list of all TrustPort Management users is displayed and a new user is created or performed changes are saved.
As a part of the TrustPort Management server installation, service application addadmin can be used to add new administrator account.
5.8.2 Updating
Updating tab gives the user an overview of all passed, as well as scheduled updates of server.
State of updating server informs whether the server is updated or not. By default, content of an update is downloaded on server from web repository using scheduled task. From here, it is distributed automatically to all superagents, on each superagent, there is also an updating task which performs automatic updates downloading. Station chooses accidentally any of superagents from list if it's available, otherwise it connects directly to the server, if it's not available updates are downloaded directly from preset URL address.
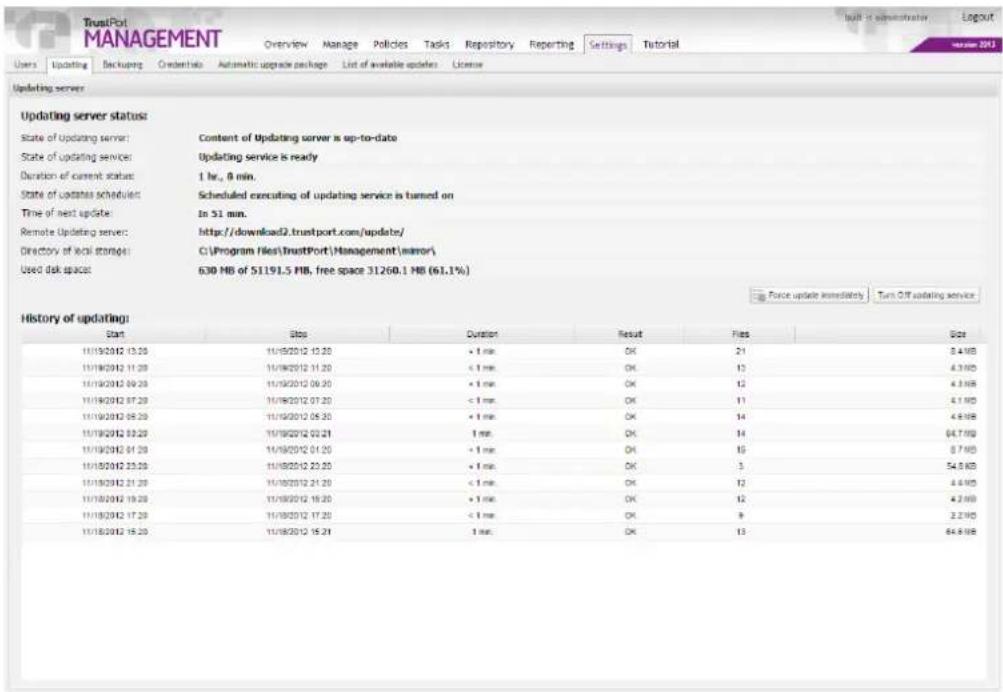
State of updates scheduler informs, whether update scheduling is turned on or not. This state can be changed by clicking on Turn off updating service, eventually Turn on updating service, depending on the current settings. Time of next update displays exact date and time when next update will be executed, if scheduled executing of update is turned off, this pane remains empty.
User can also update manually, by clicking on Force update immediately button, progress of this forced update is displayed in State of updating service, time elapsed in Duration of current status.
Its result, including number and size of downloaded files, is listed in History of updating, there is also a list of all already performed updates.
5.8.3 Backuping
Backup tab is used to create backups of TrustPort Management and to other operations with this backup files.
5.8.3.1 Backup management
displays current state of backuping service, including duration of this state, it informs whether scheduler service is enabled and when next scheduled backup should be executed. Scheduler can be turned off by clicking on Turn off backup service button, in that case no automatic backuping will be performed and it will be possible to create backups only manually from Create / Upload backup tab. To turn on scheduler again, button Turn on backup service is used.

5.8.3.2 Create / Upload backup
on this tab, new backups can be created or it is possible to upload backup file to server from here. During creating new backup, it is necessary to enter its name, optionally it can be specified in Notes. Process of creating is finished by clicking on Create data backup button. In Upload backup file, a file with backup is selected from computer using Browse button and by clicking on Upload file to server it is successfully uploaded to TrustPort Management server.
5.8.3.3 List of available backup files
list of last backup files is displayed here, detailed information about each backup can be displayed by clicking on plus icon. Each item from the list contains icon in Action column that can be used for different operations with the backup files. Using these icons, it is possible to restore data from selected backup, delete the backup permanently or download the backup into computer. The downloaded backup can be later uploaded to server from Create / Upload backup tab again.
5.8.3.4 Last activities
informs in detail about last performed backup and about last restoration of backup, including date, user who made the backup or restoration and result of these actions.
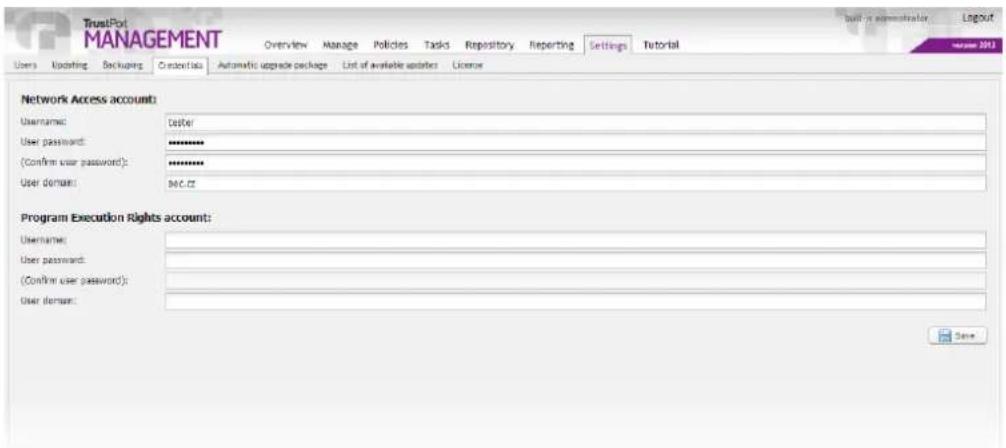
5.8.4 Credentials
Credentials tab allows log in details to be set for accounts used by TrustPort Management. The first is an account used for access to the network and the second is used to execute commands, perform installations, etc.
Network Access account
TrustPort Management uses this account to log into the network in order to download updates and to access network resources. Logging in can be performed using a domain account (including username and password), as long as it applies to a domain where the username and password are valid. If the account details do not apply for a specific domain, then the domain field may be left empty. For stations already registered, this account can be modified in the Credentials tab of the Manage pane.
Program Execution Rights account
This second type of account is used to run commands, install applications and similar tasks on a client station. If the account details are not valid (such as an incorrect password, a mistake in the username, a missing domain name), then some features of TrustPort Management will not function on the station. Executing commands can be performed using a domain account (including username and password), as long as it applies to a domain where the username and password are valid. In order for a command
to be executed under a given domain name, the station must be situated in that domain. If it isn't, then TrustPort Management will not be able to perform the required task using this account and must use a local account. Local accounts can also be used even when the station is part of the stated domain. If the domain field is left empty, a local account will be used. This account should have administrator rights, as these rights will be required when performing installations. As this concerns the setting of system rights of TrustPort Management, when using a local account it is recommended that this account exists on all stations under TrustPort Management. This account can also be changed for currently registered stations under the Credentials tab, although it is preferable to make as few as possible of such particular exceptions, and use one global account for all remaining stations.
After installing TrustPort Management, both user access account fields are empty. When running the administrator console for the first time, at least the Network Access account must be set up. Without this, TrustPort Management will not operate properly.
The Program Execution Rights account is not required for proper functioning. If not filled in, programs on stations will automatically run using SYSTEM user rights.
5.8.5 Automatic upgrade package
On this page, you can create automatic upgrade package with your own customized settings. This package can be used to install, upgrade or uninstall TrustPort Management client and/or Security Elements on the target station.
First you have to select which products you want to include in the package, by checking the checkboxes Include TrustPort Management client and Include TrustPort Security Elements. Then you have to select an action that should be performed to this product – install, upgrade or uninstall. In case of installation, you have to select the setup file from the Repository. If you install only Management client, you can use the default setup file which is stored in deploy directory.
By checking the Force restart checkbox, you can set if you want to restart the target station immediately after the required action is performed, without any user intervention, or if it should be postponed until user closes all documents etc. The restart can be delayed for some defined period, you can set it in the Delay restart edit field.
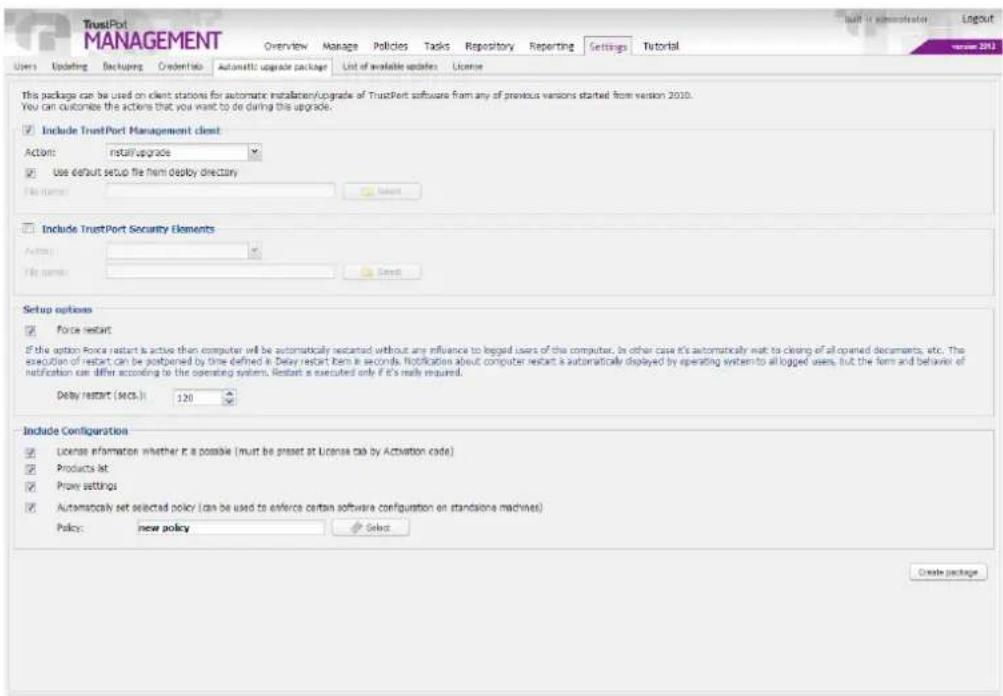
In the Include configuration part, you can specify which configuration should be included in the package. You can set a policy that should be used on the station. Also you can use either one of the default policies, or create your own on the Policies tab.
After you set all the parameters, click on the button Create package in the lower right corner of the page. In the following window, you can specify name of the new package, or leave the default. Package is created by clicking on Save button. The process of creating is confirmed in the Creation result window, which also allows user to Download the created package. All created packages are stored in the Public folder in the installation directory and they are also available in the Repository - File management tab.
The created package can be distributed on the target stations and launched manually, or you can create a setup package on the Repository – Package management tab and then create task Update Management client by automatic upgrade package on the Tasks tab. The second option is possible only if the stations are already controlled by TrustPort Management.
5.8.6 List of available updates
This tab allows administrator to manually select which updates of TrustPort software should be further distributed. Updates selected for further use will be automatically installed on the end stations, though user can be asked for restart if needed. If stations have TrustPort Management Client installed on them, they are dependent on server's updating settings. If there are no updates selected to be applied in the TrustPort Management console, then no updates will be applied on the clients.
After clicking on Review and Apply button, a dialog window displaying list of available updates is opened. Administrator can choose action for the required update here.
By default, the option I'll decide later is selected.
After selecting the option Apply update, confirming by Proceed button and synchronizing, the selected update will be distributed to the local repository on the server and will be further provided to all clients in the network. If there are any superagents available in the network, then the repository is automatically distributed to them during their synchronization with server and then they are responsible for the distribution in the particular subnetwork.
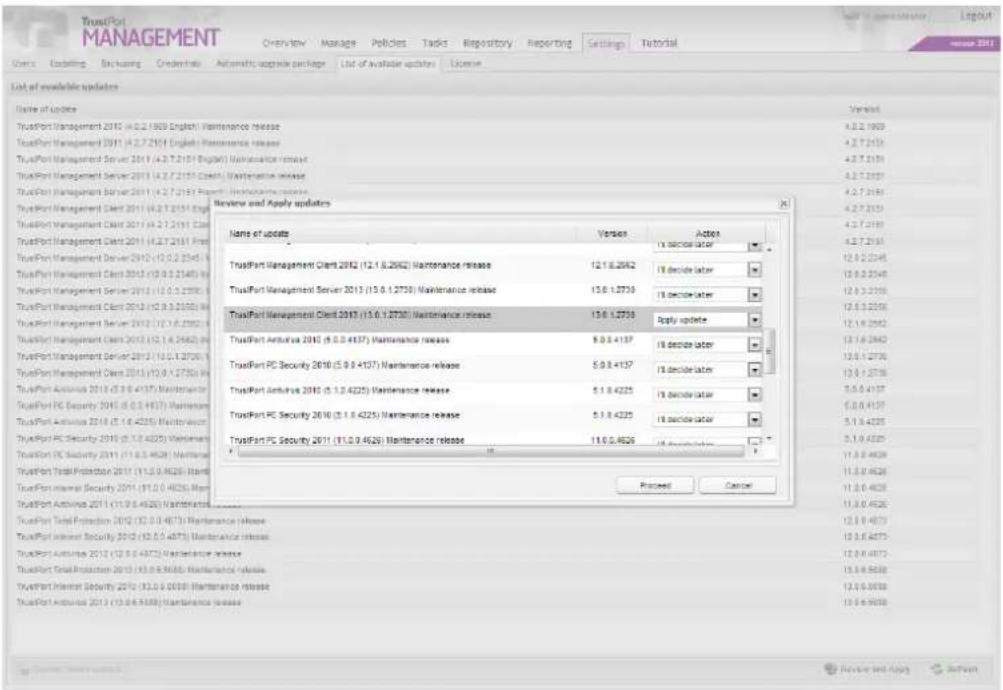
If the option Hide update is selected, the particular update will no longer be displayed on the start page in the List of available updates section. All hidden updates can be restored back to the List of available updates by using Restore hidden updates button. Restoring of hidden updates does not influence their usability, ie. in order for the update was further distributed, the option Apply update always has to be selected.
List of available updates can be restored by Refresh button.
5.8.7 License
License tab displays information about current license and at the same time it offers possibility to enter valid activation code and so to register TrustPort Management product.