BR903AX-F - Range hood Bellini - Free user manual and instructions
Find the device manual for free BR903AX-F Bellini in PDF.


| Product Type | Automatic Slide Out Range Hood |
| Model | BR903AX-F |
| Brand | Bellini |
| Width | 900 mm |
| Maximum Extension Height | 980 mm |
| Chimney Height (each section) | 500 mm |
| Power Supply | 220-240 V, 50 Hz |
| Motor Power | 190 W |
| Lighting | 2 x 20 W Halogen (12 V) |
| Air Outlet Diameter | 150 mm |
| Power Cord Length | 2 m |
| Control Type | Electronic with Timer |
| Speed Levels | 3 (Low, Medium, High) |
| Operation Modes | Extraction (ducted) and Recirculation (with charcoal filter) |
| Filter Type | Aluminum Grease Mesh (washable) + Optional Charcoal |
| Drawer Operation | Automatic slide out on power on, slide in on power off |
| Installation | Wall mounted, minimum 600 mm (electric) / 650 mm (gas) above cooktop |
| Warranty | 3 years in-home |
| Included Accessories | Mounting bracket, chimney brackets, outlet, duct, screws, installation template |
| Safety Features | Anti-tilt screws, automatic shut-off timer, overheat protection |
Frequently Asked Questions - BR903AX-F Bellini
User questions about BR903AX-F Bellini
0 question about this device. Answer the ones you know or ask your own.
Ask a new question about this device
Download the instructions for your Range hood in PDF format for free! Find your manual BR903AX-F - Bellini and take your electronic device back in hand. On this page are published all the documents necessary for the use of your device. BR903AX-F by Bellini.
USER MANUAL BR903AX-F Bellini
natural_image
Exterior view of a stainless steel kitchen range hood (no text or symbols visible)60cm/90cm Automatic Slide Out Range hood Model No.
BR603AX FINELINE: 5102305 AUS ONLY
BR603AX-F
BR903AX FINELINE: 5102306 AUS ONLY
BR903AX-F
V.12 APR18
Thank you
Thank you for choosing Bellini Appliances.
Bellini prides itself on ‘affordable living’ making sure there is no compromise in your favourite room ... The Kitchen
All Bellini appliances carry a 3 year In Home warranty,
be sure to retain your installation and user manual and
receipt.
For all warranty and technical queries please contact
1300 373 199
Content
Safety instructions---- 2
Product description---- 4
Operation Mode ----5
Installation----6
Start using your Range hood----11
Maintenance and cleaning ----12
Warranty---- 13
Safety instructions
This manual explains the proper installation and use of your oven, please read it carefully before using even if you are familiar with the product. The manual should be kept in a safe place for future reference. In case of failure, only the Authorised Technical Service may repair this range hood. Otherwise the guarantee will be null and void. All Bellini Appliances are for domestic use only.
Never to do:
- This appliance is not intended for use by persons (including children) with reduced physical, sensory and mental capabilities, or lack of experience and knowledge, unless they have been given supervision or instruction concerning use of the appliance by a person responsible for their safety.
● Never carry out flammable cooking under the appliance - The exhaust from the range hood must not be discharged into any heating flue, which may carry combustion products from other sources.

natural_image
Illustration of a laboratory setup with a lamp, beaker, and control panel (no text or symbols)- Do not leave li t gas burners exposed due to the risk of fire.

natural_image
Illustration of a steaming hot air generator with a cross-shaped smoke or flame symbol (no text or labels)- This range hood is not recommended for barbecues.
Always to do:
● Packaging materials (eg; polystyrene and plastic items) must be kept out of reach of babies or young children at all times due to risk of suffocation.
● Young children should be supervised to ensure that they do not play with the appliance.
- Ensure the range hood is switched off before carrying out maintenance, to avoid any possibility of electric shock.
- Grease filters must be removed every four weeks (maximum) for cleaning to reduce the risk of fire.
- There must be adequate ventilation of the room when the range hood is used at the same time as appliances burning gas or other fuels.
● Always cover lit gas burners with pots or pans when range hood is in use.
● Always switch off gas burners before you remove pots or pans.
- If the supply cord is damaged, the cord must be replaced by the manufacturer, its service agent or similarly qualified persons in order to avoid a hazard
- Plug must be accessible after installation.
Safety instructions
Never to do:
● This range hood cannot be installed for outdoor use.
- It is prohibited to fit the range hood over a solid fuel stove
- This appliance must not be connected to a chimney or vent flue which is in use.
- This appliance is not to be vented into the roof cavity, must exit into open air.
- Exhaust air must not be discharged into a wall cavity, unless the cavity is designed for the purpose.
- This appliance should not be connected to ducting which ventilates rooms with fire places.
Always to do:
- Attention should be given to ensure that any applicable regulations concerning discharge of exhaust air are fulfilled.
- This appliance should be installed and maintained by a suitably qualified and competent person in accordance with the relevant safety regulations.
- Before connecting the appliance to the mains supply, ensure that the voltage and frequency details on the rating plate are consistent with the source of supply.

This product must not be disposed together with domestic waste. This product has to be disposed at an authorised place for recycling of electrical and electronic appliances.
By collecting and recycling waste, you help save natural resources, and make sure the product is disposed in an environmental friendly and healthy way.

Product description
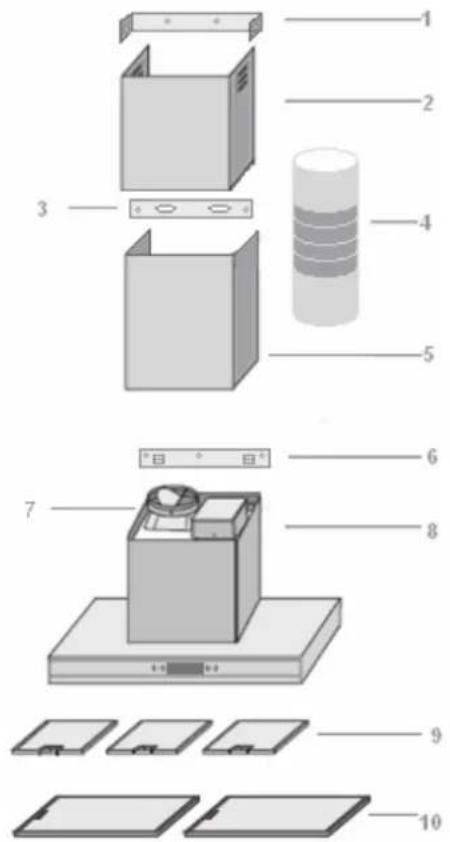
| Accessories bag | ||
| Description | Picture | |
| User Manual 1 | ||
| 1:1 installation guide template 1 | ||
| Upper chimney retaining bracket |  | 1 |
| Lower chimney retaining bracket |  | 1 |
| Hood mount bracket |  | 1 |
| Outlet ( diameter 150mm) | 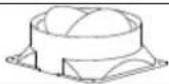 | 1 |
| Dry wall anchors plugs |  | 9 |
| Screw (ST4x8mm) |  | 8 |
| Screw (ST4x40mm) |  | 7 |
| Screw (ST4x30mm) |  | 2 |
QTY
Component list:
- Upper chimney retaining bracket
- Upper decorative chimney (Inner)
- Lower chimney retaining bracket
- Flexible exhaust duct
- Lower decorative chimney (outer)
- Hood mount bracket
- Outlet (diameter 150mm)
- Main body
- Grease mesh filter for BR603/903AX(-F)
Technical data:
Power supply: 220 - 240v, 50Hz
Motor: 190W
Lights: 2x20W Halogen lamp
Length of power cord: 2m
Air outlet diameter: 150mm
Operation Mode
Your range hood can be operated in two modes, choose the mode suitable for your kitchen before installation.
Air Extraction

For air extraction mode, a ducting kit is required, the air is drawn in and cleaned by the grease filters and via the ducting must be directed to the outside atmosphere.
Ducting must be vented to outside atmosphere
Air Recirculation
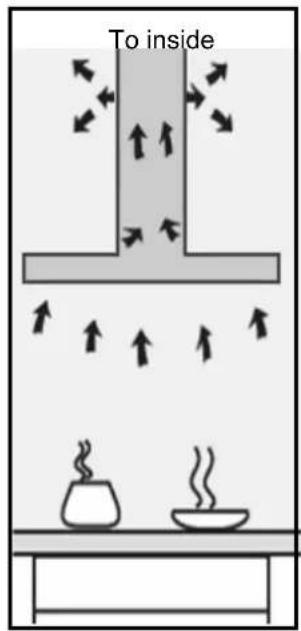
For air recirculation mode, charcoal filter (Optional Accessory) must be installed to eliminate cooking smells.
The air is drawn in and cleaned first by the grease filters and then charcoal filter. The cleaned air is then re-circulated back into kitchen through vents in the Upper Decorative Chimney.
Installation
Dimensions:
BR603AX(-F)/BR903AX(-F)
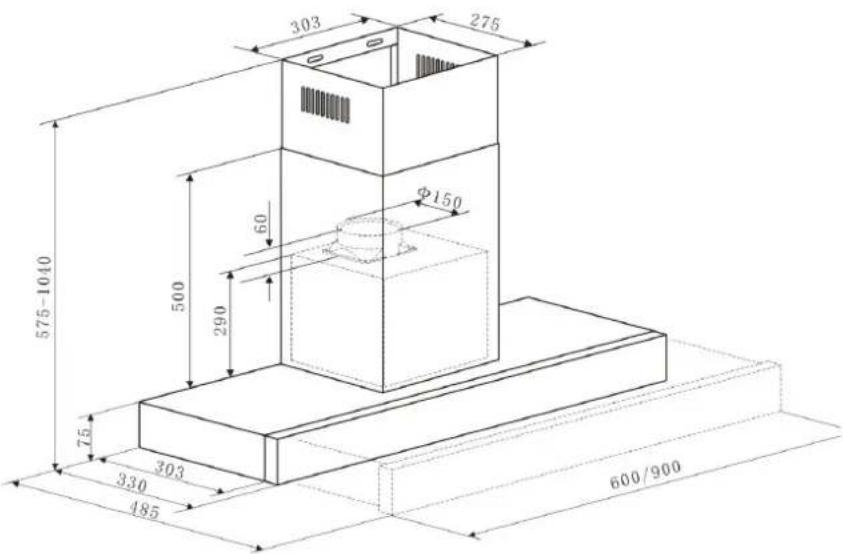
*Width of BR603AX(-F) is 600mm, width of BR903AX(-F) is 900mm
Installation:
Warning:
Check that the installation complies with the standards of local building, gas and electrical authorities. Before connecting to the mains supply ensure the mains voltage corresponds to the voltage on the appliance rating plate inside the range hood.
When installing the range hood, make sure you adhere to the minimum and maximum distances from the range hood base to the cooktop hob surface.
Hints for exhaust duct installation
The following rules must be strictly followed to obtain optimal air extraction
- Keep exhaust duct short and straight
- Do not reduce the size or restrict exhaust duct
- When using flexible duct always install the duct pulled taut to minimize pressure loss
- Failure to observe these basic instructions will reduce the performance and increase noise levels of the range hood
Ensure the exhaust ducting selected for installation complies with relevant standards and is fire retardant.
- Using a spirit level, mark a vertical line on the wall (Central to the cook top installed below) to indicate the centre location of the hood and a horizontal line where the hood base will be positioned.
NOTE: The distance from the horizontal line to an electrical cooktop underneath must be minimum of 600mm & 650mm Free space to the gas cook top and a maximum height of 800mm (refer to table below).
Vertical centre line

*If the instructions of the hob specify a greater distance than the minimum above, then that shall be the minimum height for installation
- Use the installation guide template to determine where screw mount holes should be located. Make sure vertical and horizontal lines on the installation guide template superimpose with the lines just drawn on the wall.
- According to the positions just marked as per installation guide template, drill holes in the wall and fit dry wall anchor plugs into holes.
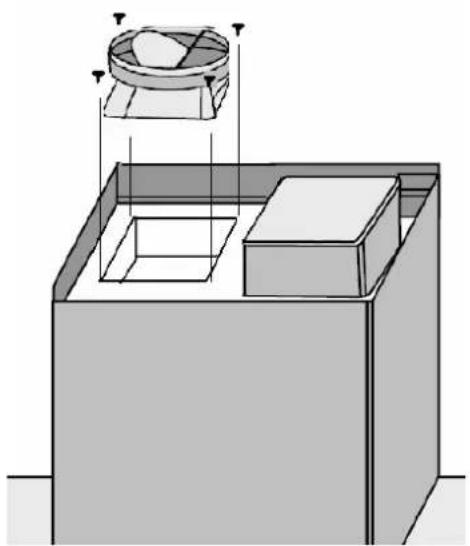
- Fit the outlet on the top of range hood body and retain with 4pcs ST4x8mm screws.
natural_image
3D diagram of a mechanical assembly with a cylindrical component and two rectangular components, no text or symbols present.- Fit the flexible exhaust duct onto outlet. (Air Extraction mode only)
Note : For the Air Circulation Mode option, skip step 5 and proceed with step 6.

natural_image
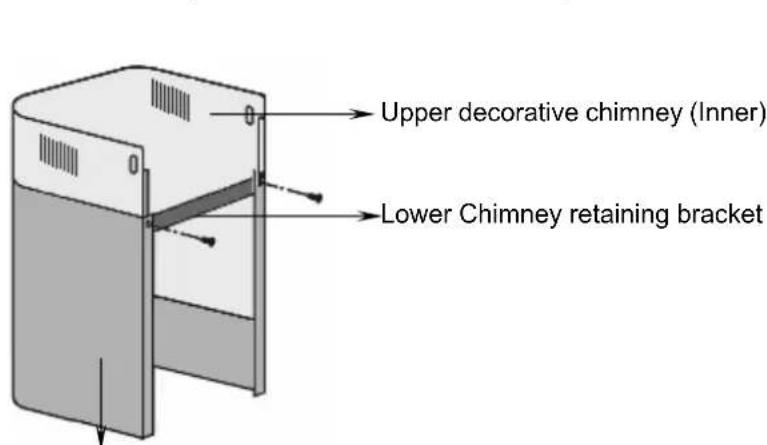
Illustration of a mechanical device with a tool inserted into a circular component, no text or symbols present- Place Upper Decorative Chimney inside the Lower Decorative Chimney.
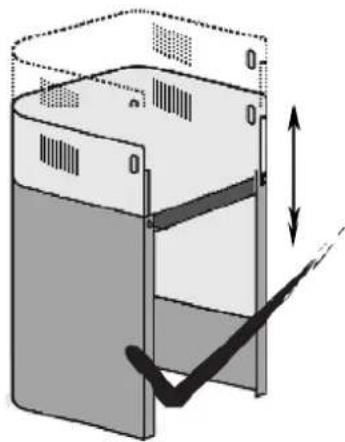
Connect the Lower Chimney retaining bracket to the Lower Decorative Chimney with 2 x ST4x8mm screws, do not fully tighten, allowing for sufficient clearance to telescopically adjust the Upper Decorative Chimney to the desired position when installation is completed.
natural_image
3D diagram of a container with internal compartments and a checkmark indicating inspection or clearance (no text or symbols)Lower decorative chimney (Outer)
- Install active Charcoal Filters (Air Recirculation Mode only)
Note: For Air Extraction Mode option, skip Step 7 and proceed with Step 8.
1) Remove the lower and upper chimney sections from the main body of the hood.
2) Use a screwdriver to undo the screws that hold the motor access panel in place.

natural_image
Technical line drawing of a mechanical device with a rotating arm and mounting base (no text or symbols)3) Once the motor access panel is removed, you will be able to see the motor.

natural_image
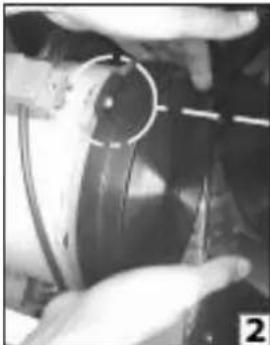
Technical line drawing of a mechanical device with a magnified inset showing internal components (no text or symbols)4) Hook the carbon filter over the pins that are located at the end of the motor.
natural_image
Close-up of hands adjusting a dark mechanical component with a dashed line and circular annotation (no visible text or symbols)
natural_image
Close-up of mechanical components with a highlighted circular area (no visible text or symbols)5) Turn the carbon filter anticlockwise, until you feel it click into place.

o Repeat this process for the second carbon filter. You need to place a carbon filter at either end of the motor.
o Refit the motor access panel and fully tighten the screws that you removed previously.
o Refit the lower and upper chimney sections to the main body of the hood.
The carbon filters should be replaced every 3 - 6 months, if they show signs of damage or if you start to smell cooking odours returning into the kitchen through the vent at the top of the chimney section.
Charcoal Filters are available at your local Bunnings
Part Number: CF160 Fineline:5103075
- Secure the hood mount bracket onto wall with 3 x ST4x40mm screws, making sure screws are securely tightened.
- Position the hood assembly onto the Hood Mount Bracket, ensuring that bracket hooks are securely interlocking into the mounting slots of the hood assembly.

natural_image
Diagram showing a brick wall with a pipe and directional arrows, next to a mounted tower with a cylindrical component (no text or symbols)- Secure the base of the hood with 2 x ST4x30mm anti -tilt screws to ensure unit is installed level, mounting holes for the screws are accessible via the fan motor chamber.
- Fasten the Lower Chimney retaining bracket to the wall with 2 x ST4x40mm screws.
- Plug into the main power supply.
- Position the Upper Chimney retaining bracket at the extended height of the decorative chimney and secure to the wall with 2 x ST4x40mm screws.
* Total maximum extension height of BR603AX and BR903AX is 980mm, each chimney height is 500mm.
- Extend the Upper decorative chimney to the desired height and secure it with 2 x ST4 x 8mm screws to the chimney retaining bracket.

natural_image
Diagram of a brick wall-mounted cabinet with hanging fixtures and an upward arrow indicating motion (no text or symbols)- Remove all blue protective film on chimney and cooker hood, the installation is now finished.
Start using your range hood

Timer

Lamp


Speed

Power
Timer – Clock time setting, auto off
Clock time setting
- Depress "Timer" for 2 to 5 second, hour digit segment will flash, depress "Speed" to increase and "Lamp" to decrease hour digit until current clock hour time appears.
- Depress "Timer" again, minute digit segment will flash, depress "Speed" to increase and "Lamp" to decrease minute digit until current clock minute time appears.
- Depress "Timer" again to confirm and finalize clock time setting
Auto off duration setting
At the end of cooking if the timer is switched on, the range hood will continue to run for an additional duration as you set up to remove any odors that remain at the completion of cooking. After the set up duration the range hood will turn itself OFF. This function is available only when range hood motor is running.
- Depress "Timer" to enter into this function, default setting is 5:00 min, you can depress "Speed" to increase and "Lamp" to decrease and adjust the duration from 1:00 to 60:00 min.
- Depress "Timer" again to confirm and finalize auto off duration setting
*Your range hood can remember the last setting, so if no new settings next time, the function will be on according to the last setting.
Lamp - Turn on/off light, decrease digit in timer setting
Speed –select speed to suit cooking conditions, increase digit in timer setting
Low - light frying/boiling
Medium - frying/wok cooking/heavy boiling
High - grilling, intensive frying and wok cooking
Power – Turn on/off the range hood.
* For BR603AX(-F)/903AX(-F), turn on the range hood, drawer will slide out automatically; turn off the range hood, drawer will slide in automatically.
Maintenance and cleaning
Caution:
- Before maintenance or cleaning is carried out, the range hood should be disconnected from the main power supply. Ensure that the range hood is switched off at the wall socket and the plug removed.
- External surfaces are susceptible to scratches and abrasions, so please follow the cleaning instructions to ensure the best possible result is achieved without damage.
GENERAL
Cleaning and maintenance should be carried out with the appliance cold especially when cleaning Avoid leaving alkaline or acid substances (lemon juice, vinegar etc.) on the surfaces
STAINLESS STEEL
The stainless steel must be clea ned regularly (e.g. weekly) to ensure long life expectancy.
Dry with a clean soft clot h. A speci alized stainless steel cleaning fluid may be used.
NOTE: Ensure that wipin g is done al ong with the grain of the stainless steel to prevent any unsightly crisscross scratching patterns from appearing.
CONTROL PANEL SURFACE
The inlay control panel can be cleaned using warm soapy water. Ensure the cloth is clean and well wrung before cleaning. Use a dry soft cloth to remove any excess moisture left after cleaning.
Important
Avoid using harsh cleaning chemicals, strong household detergents or products containing abrasives as this will affect the appliance appearance and potentially remove any printing of artwork on the control panel and will void manufactures warrantee
GREASE MESH FILTERS
The mesh filters can be cleaned either by hand or in the dishwasher. After cleaning ensure that the filters are completely dry before refitting.
- By hand: Soak in warm water and a neutral washing up liquid. For stubborn grease stains use a soft nylon brush or sponge to help remove these stains. (Leave to dry naturally out of direct sun light)
- In a dishwasher: Ensure that placement of the filters is made so as to not impede the function of the spray arm. Washing the filters in a dishwasher may cause discoloration of the aluminum inner mesh over time although it will not affect their performance.
Filters should be washed separately to crockery and kitchen utensils. it is advisable not to use rinse aid.
Replace Lamp
natural_image
Simple line drawing of a magnifying glass with a small object inside (no text or symbols)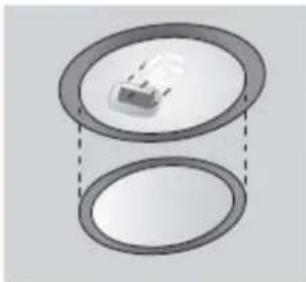
natural_image
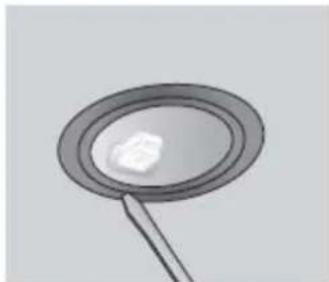
Diagram showing two concentric circular layers with a central object, no text or symbols presentUsing a small flat blade screwdriver remove the inner stainless steel ring to obt ain access to the halo gen globe.
When removing the inner ring, do so ca refully so not damage the range hood, as the gla ss lens could easily fall out of the inner ring. Remove halogen globe, whilst cool, and replace carefully with a new globe. The range hood take s 2 x 20W, 12 volt haloge globes.
Important
When handling globes hold with a cloth or gloves to ensure perspiration does not come in contact with the globe as this can reduce the life of the globe.
WARRANTY
1.1 In this warranty:
1.1.1 Australian Consumer Law means the law as set out in Schedule 2 of the Competition and Consumer Act 2010;
1.1.2 Company means GSM Sales Pty Ltd ABN 53 007 682 475 of 142-144 Fullarton Road, Rose Park SA 5067. Telephone 1300 373 199. Email admin@gsmsales.com.au;
1.1.3 Consumer means a “consumer” as that term is defined in Section 3 of the Australian Consumer Law as the original purchaser of a Belliniproduct;
1.1.4 Consumer Guarantees means the guarantees under the Australian Consumer Law;
1.1.5 You means the Consumer.
1.2 Nothing in this warranty affects any person's rights under the Australian Consumer Law. The benefits to any Consumer under this warranty are in addition to the rights and remedies available under any Consumer Guarantees.
1.3 Subject to the other clauses of this warranty, the Company warrants to the Consumer that the Bellini product will be free of manufacturing defects and will perform to the Company's specifications.
1.4 The benefit of this warranty extends only to the Consumer as original purchaser of a Bellini product which is installed in a domestic household area.
*The in Home warranty does not apply to Commercial and or industrial usage. * Please See 1.7.7 for additional information
1.5 This warranty commences on the date of purchase of the Bellini product by the Consumer and continues for the benefit only of the Consumer until the expiry of three (3) year (Warranty Period).
1.6 If within the Warranty Period a manufacturing defect is discovered in the Bellini product or it fails to perform to the Company's specifications as a result of some defect in materials, components or workmanship (Defect) then the Company will, at its option, repair the Bellini product or supply a replacement Bellini product free of charge. A replacement Bellini product may differ from the original product purchased by the Consumer.
1.7 This warranty will not apply to any Bellini product:
1.7.1 Installed by any person other than a qualified tradesperson; or
1.7.2 Subjected to misuse, neglect, negligence or accidental damage; or
1.7.3 Operated in any way contrary to any operating or maintenance instructions; or
1.7.4 Improperly handled, installed or maintained; or
1.7.5 Altered or modified prior to or after installation; or
1.7.6 Damaged directly or indirectly by power surges, electrical storm damage or connection to incorrect power supply
1.7.7 Industrial and or Commercial usage is inclusive of staff areas in office/shop environments, hotel/motel or other similar accommodation or rental type properties including Bed and Breakfast establishments.
The Australian Consumer Law requires the inclusion of the following
statement with this warranty:
Our goods come with guaranteed that cannot be excluded under the Australian Consumer Law. You are entitled to a replacement or refund for a major failure and for compensation for any other reasonably foreseeable loss or damage. You are also entitled to have the goods repaired or replaced if the goods fail to be of acceptable quality and the failure does not amount to a major failure.
IN ORDER TO MAKE A CLAIM UNDER THIS WARRANTY THE CONSUMER MUST CALL 1300 373 199 (AUSTRALIA) OR 0508 123 108
(NEW ZEALAND) TO CONNECT TO THE NEAREST AUTHORISED CENTRE
1.8 You must provide proof of your purchase of the Bellini product and the date of purchase in order to obtain the benefit of this warranty.
1.9 If you live outside the service area of the Company or one of its service agents, this warranty does not cover the cost of transport of the Bellini product for service nor the service agent's traveling costs to and from your home.
1.10 If you are required to transport the Bellini product to the Company or its service agent, you must ensure it is safely disconnected by a qualified tradesman and securely packed and insured. The Company does not accept any responsibility for loss or damage of the Bellini product prior to it being received by the Company or its service agent.
1.11 You will be responsible for all costs of returning a Bellini product to the Company and for redelivery of the Bellini product by the Company (whether it is the original or a repaired and/or a replacement Bellini product) and for any other expenses you incur in claiming under this warranty.
1.12 The Company or its service agent will examine any Bellini product and if the Company determines that it is defective through no fault of the Owner and is otherwise undamaged, the Company will repair or replace the Bellini product in accordance with this warranty.
DO NOT SEND IN THIS WARRANTY
Fill out the following details and file with your purchase invoice.
RETAIN & FILE WITH YOUR RECEIPT
Your Purchase Receipt/Invoice is proof of date of purchase. If you are unable to establish the date of purchase, or if the fault is not covered by this warranty, or if the product is found to be in working order, you will be required to bear all service call charges.
GSM Sales Pty Ltd reserves the right to discontinue items, modify designs and change specifications without incurring obligation.
Whilst every effort is made to ensure that descriptions, specifications and other information in this publication is correct, no warranty is given in respect thereof and the company shall not be liable for any errors therein.
Purchased from:
Co. Name:
Address:
Date of Purchase:
Serial number:
NOTE: Consistent with our continuing product development policy, improvements may have been made which render the contents of this packaging slightly different to that shown.
FOR WARRANTY SERVICE CALL 1300 373 199 (AUSTRALIA) OR 0508 123 108 (NEW ZEALAND) TO CONNECT YOU TO THE NEAREST AUTHORISED SERVICE CENTRE


- Thank you
- Content
- Safety instructions
- Never to do:
- Always to do:
- Product description
- Component list:
- Technical data:
- Operation Mode
- Installation
- Dimensions:
- Installation:
- Warning:
- Hints for exhaust duct installation
- Start using your range hood
- Timer – Clock time setting, auto off
- Clock time setting
- Auto off duration setting
- Maintenance and cleaning
- Caution:
- GENERAL
- STAINLESS STEEL
- CONTROL PANEL SURFACE
- Important
- GREASE MESH FILTERS
- WARRANTY
- In this warranty:
- DO NOT SEND IN THIS WARRANTY
- RETAIN & FILE WITH YOUR RECEIPT
- FOR WARRANTY SERVICE CALL 1300 373 199 (AUSTRALIA) OR 0508 123 108 (NEW ZEALAND) TO CONNECT YOU TO THE NEAREST AUTHORISED SERVICE CENTRE
Brand : Bellini
Model : BR903AX-F
Category : Range hood