
YP-T8Q/ELS - Mp3 player SAMSUNG - Free user manual and instructions
Find the device manual for free YP-T8Q/ELS SAMSUNG in PDF.

| Product Type | MP3 Player |
| Brand | Samsung |
| Model | YP-T8Q/ELS |
| Built-in Memory | 2 GB |
| Display | 1.8-inch Color TFT LCD |
| Audio Playback Formats | MP3, WMA, Ogg, Audio ASF |
| Video Playback | Yes (SVI format via Multimedia Studio) |
| USB Host Function | Yes (connect external devices like cameras) |
| Direct MP3 Recording | Yes (from CD, cassette, radio without PC) |
| Data Transfer Speed | USB 2.0 High Speed up to 120 Mbps |
| Audio Enhancement | DNSe Surround Sound with multiple presets |
| Built-in Games | Dart, Hurdles, Hextris, Pipe Plus |
| Battery Type | Built-in rechargeable Li-Ion, 850 mAh, 3.7 V |
| Battery Life (Music) | Up to 20 hours |
| Charging Time | Approximately 3 hours 30 minutes |
| Dimensions | 44.5 x 83 x 15.5 mm |
| Weight | 55 g |
| FM Radio | Yes, 87.5 – 108.0 MHz, preset storage up to 30 |
| Text & Image Viewer | Yes (.txt, .jpg, etc.) |
| PC Interface | USB 2.0, removable disk, Media Studio software |
| Operating System Support | Windows 98 SE/ME/2000/XP |
| Firmware Upgrade | Yes, via www.samsung.com |
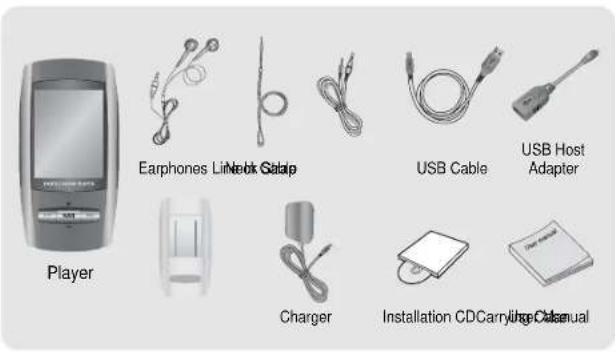
| Accessories Included | Installation CD, USB cable, earphones, line cable, charger |
Frequently Asked Questions - YP-T8Q/ELS SAMSUNG
User questions about YP-T8Q/ELS SAMSUNG
0 question about this device. Answer the ones you know or ask your own.
Ask a new question about this device
Download the instructions for your Mp3 player in PDF format for free! Find your manual YP-T8Q/ELS - SAMSUNG and take your electronic device back in hand. On this page are published all the documents necessary for the use of your device. YP-T8Q/ELS by SAMSUNG.
USER MANUAL YP-T8Q/ELS SAMSUNG
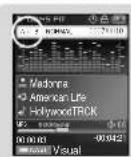
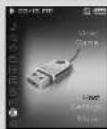
MP3, WMA, Audio ASF and Ogg Playback
- Your player supports playback of MP3, WMA, Audio ASF and Ogg.
USB Host Function Support
- Connect external devices such as digital cameras and MP3 player directly to the unit for easy transfer of music, images and other data files without the need for a PC.
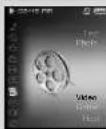
Video Playback
- You can view video files after downloading using the Multimedia Studio.
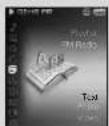
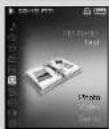
Text and Image Viewer
- The player can be used as a text and image viewer to view saved e-books or pictures.
Direct MP3 Recording
- You can convert music from CDs, cassettes, and radio into MP3 files without a PC.
USB 2.0 High Speed Data Transfer
• Maximum data speed transfer of 120 Mbps
DNSe Surround Sound
- The 3D surround feature adds spaciousness to the sound.
1.8-inch Color TFT LCD
- You can enjoy high-quality image & video files.
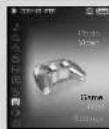
Various Games Support
- You can enjoy various games such as Dart and Hurdles by using the 3-axis sensor.
Built-in Rechargeable Li-Ion Battery
- The built-in rechargeable lithium battery provides up to 20 hours of music. (According to company measurement)
Upgradable
- You can upgrade the built-in programs when available. Please check the home page (www.samsung.com) for upgrades.
Contents Contents
Chapter 1 Preparations
Features 2
Safety Instructions 6
Battery Charger Safety 8
Charging the Battery 9
Components 10
Location of Controls 11
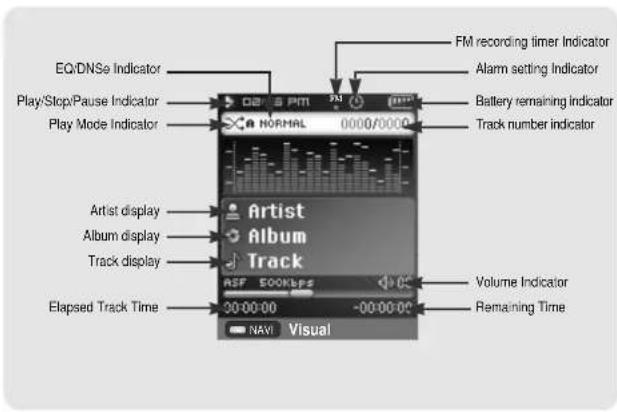
Display 12
Chapter 2 Connection to Computer
Connecting the player to your PC......13
• Installing Software ....13
- Connecting the player to your PC with the
USB cable 15
Manual Installation of the USB Driver....17
- If an error occurs during installation of the
USB driver 17
Using the Player as a Removable Disk..19
- Downloading Files ....19
- Disconnecting the USB Cable ....20
Installing Media Studio 21
Using Media Studio....23
• Downloading Music Files....23
- Sending Playlist....25
- Formatting the Player ....27
• Ripping Tracks from an Audio CD 28
- Creating a Folder 29
- Deleting Files 30
To View Help on Media Studio ....31
Installing Multimedia Studio ....32
Using Multimedia Studio ....34
• Editing Images 34
- Sending images....35
- Sending Videos ....37
• Capturing Video 39
o View Help on Multimedia Studio.....41
Chapter 3 Using Your Player
Playing Music 42
- Turning Power On and Off 42
- Playing Music....42
• Pausing Music....42
- Adjusting the Volume......42
- Hold Function....42
Searching for Music/Voice Files......43
• To search for specific parts during play.....43
• To change tracks during play 43
• To change tracks when stopped/paused ...43
.oop Repeating....44
- Starting Point 44
• Ending Point 44
Recording Voice......45
Recording MP3s 46
Setting Main Functions in Music Mode ..47
- Bookmark....47
- Playlist 47
- Play Mode 48
• DNSe....49
• NAVI Button Mode ....49
MENU Options....51
Using Navigation....52
Setting Playlist 53
- Setting Playlist 53
- Playing Playlist ....53
Listening to FM Radio....54
- Switching to FM Radio Mode ....54
• Search for a Frequency....54
Recording FM 54
Setting Main Functions in FM Mode .....55
- Add to Preset....55
• Auto Preset....55
- Searching Preset 55
- Delete Preset....56
• FM Region 56
• FM Search Level 57
• Timer FM Rec 57
/viewing a Text 58
Setting Main Functions in Text Mode.....59
- Setting a Bookmark 59
• Bookmark 59
• Text Viewer Color 59
/viewing an Image 60
Viewing a Video 61
Playing a Game 62
• Hurdle Game 62
• Hextris 63
• Pipe Plus 64
• Dart 65
Using USB Host....66
- Connecting an External Device 66
• Transferring Files from an External Device to
the Player 67
- Deleting Files in an External Device......68
• Transferring Files from the Player to an
External Device 69
- Deleting Files in the Player 70
■ YP-T8 USB HOST Compatible 71
Setting the Advanced Functions....72
Selecting the Play mode....73
• Play Mode 73
Setting Sound Effect 74
• DNSe 74
■ 3D-User Set 74
- 3D User Set 75
• Street Mode....75
• User EQ Set ....76
• Play Speed 76
• Search Speed....77
- Intro Time 77
Record Settings....78
- Bit Rate 78
• Auto Sync 78
Time/Alarm Settings 79
• Date:Time Set....79
• Alarm Set 79
• Sleep 79
Display Settings 80
- Scroll Speed 80
• Text Viewer Color 80
- Backlight Time 80
- Clock Screen Saver 81
- Block Screen Cover 81 Language Setting 82
• Language 82
System Settings 83
- Deleting a File 83
- Building a File....83 - Auto Power Off....83
- Auto Power Off....65 - Recum. 84
- Resume 84 + Boon 85
- Beep 65 - Default set 95
- Default set 85 - Foreset 95
• Formal 85 Viewing System Information 96
viewing System Information....86
- About 86
Chapter 4 Additional Features
MENU Table....87
Chapter 5 Customer Support
Troubleshooting....88
Specifications 90
Safety Instructions
Safety Instructions
Please read and understand all the instructions to avoid injury to yourself and damage to the device


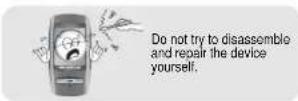
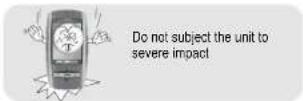

*Please be aware that we claim no responsibility for damage from data loss due to breakdown, repair or other causes.
| Earphones
Follow Traffic Safety Instructions
- Do not use the earphones while driving an automobile or riding a bicycle.
It's not only dangerous, but also against the law. - To avoid an accident, do not turn up the volume of the earphones too high while walking.
Protect your ears
- Do not turn up the volume too high. Doctors warn against prolonged exposure to high volume.
- Stop using the device or turn the volume down if you have ringing in your ears.
- Take care so that the earphone cable is not caught by your arm or other objects while walking or exercising.
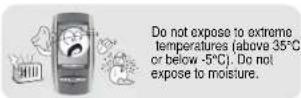
| Ambient operating conditions
• Ambient temperature : 5°C \~ 35°C (41°F \~ 95°F)
• Humidity : 10 \~ 75%
Environmental Information
- Follow local guidelines for waste disposal when discarding packages, batteries, and old electronic appliances.
- Your player is packaged with cardboard, polyethylene etc., and does not use any unnecessary materials.
Battery Charger Safety
Charging the Battery

CAUTION
Opening the case may result in electric shock.


The uninsulated parts inside the charger may cause electric shock. Please do not open the charger case for your safety.

Read the user manual to prevent problems while using the charger.

图 1-2
- Use the charger away from water sources to avoid fire or electric shock.

③用C:
- To avoid electric shock, use the charger only with a power outlet that matches the shape of the converter's plug.
- Make sure that the charger's plug is inserted all the way into the outlet.
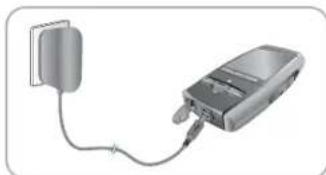
The charger is supplied with your player.
Plug the charger into a wall outlet.
* When recharging is complete,
"Fully Charged!" will be displayed on the screen.
* The player can also be charged at low speed using the power supplied from PC through the USB cable.
* Recharging takes approximately 3 hours and 30 minutes.

Caudoc.M
- To avoid the risk of fire, do not charge longer than 12 hours.
- Do not plug several devices into the same outlet.
- Do not use a charger that is defective.
- When using the rechargeable battery for the first time or after several months of non-use, fully charge it first.
- Overcharging will reduce the battery life.
- The rechargeable battery is a consumable item and its capacity will decrease gradually.
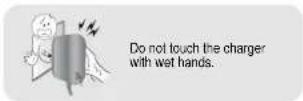
- Do not let metallic objects, such as necklaces or coins, come into contact with the terminals (metallic parts) of the charger and the built-in rechargeable battery.
A fire or electric shock may result. - Do not touch the charger with wet hands.
natural_image
Illustration of a device with a cable and connector, no text or symbols presentComponents Location of Controls
| Model | YP-T8V | YP-T8X | YP-T8Z | YP-T8Q |
| Built-in memory | 256MB | 512MB | 1GB | 2GB |
- The capacity of the useable built-in memory is less than indicated as the internal firmware uses a part of the memory as well.
- The accessories' design is subject to change for the purpose of improvement, without notice.
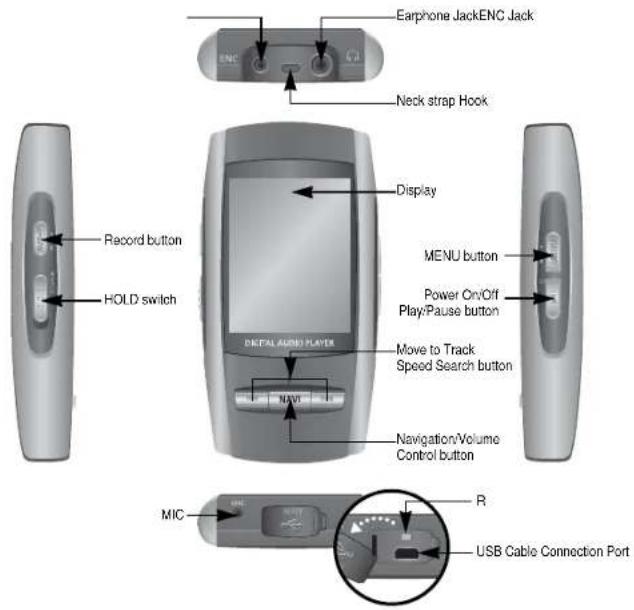
Location of Controls
Connecting the player to your PC
| Display
For Windows 98SE, install the USB driver prior to connecting the player to PC.
□ System Requirements.
The PC system must meet the following specifications:
- Pentium 200MHz or greater
- CD-ROM drive(double speed or greater)
- Windows 98 SE/ME/2000/XP • USB port (2.0) supported
- 50MB of available hard disk space • DirectX 9.0 or above.
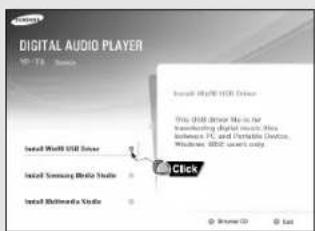
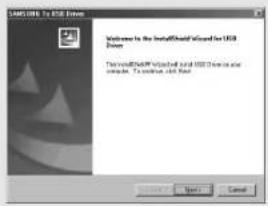
Installing Software
1 Insert the Installation CD into CD-ROM drive. Select [Install Win98 USB Driver].
Continued...
Connecting the player to your PC
Connecting the player to your PC
2 Follow the instructions in the window to complete the installation.
▶
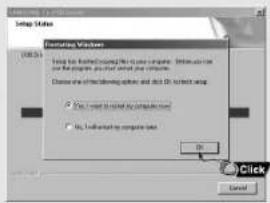
- When software installation is completed, connect the player to PC as shown in the next page.
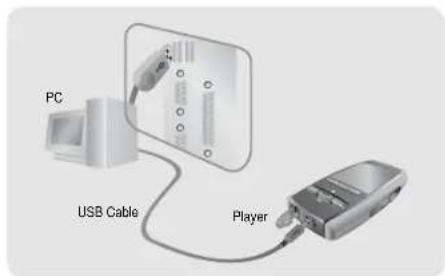
I Connecting the player to your PC with the USB cable
1 Connect the USB cable to the USB port on your PC.
2Connect the other end of the USB cable to the USB cable connection port on the bottom of the player.
- If you disconnect the USB cable from your PC while implementing a command or initializing during USB driver installation, your PC may not function correctly.
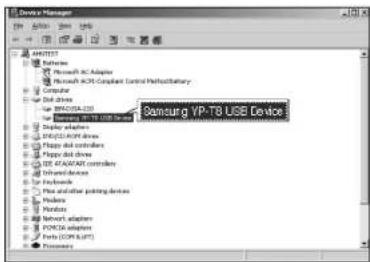
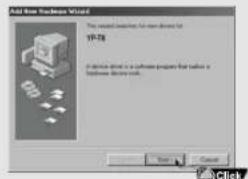
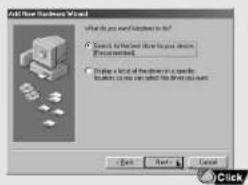
3The USB driver is installed with a message saying that it is searching for a new device. You may not see the display screen during installation.
Go to the device manager to check that installation has been successfully completed.
4 Upon installation of the USB driver "Samsung YP-T8 USB Device" will appear in the [Device Manager].
Connecting the player to your PC
Manual Installation of the USB Driver
How to check if USB driver is properly installed
Windows 98SE:ME:
Control Panel → System → Device Manager → Disk Drives → Samsung YP-T8
Windows 2000/XP:
Control Panel · System · Hardware · Device Manager · Disk Drives
Samsung YP-T8 USB Device
5 When USB driver is not installed automatically, refer to next page.
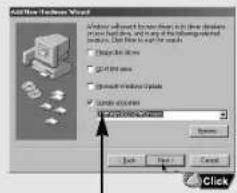
If the driver does not install automatically, follow the instructions below to install the USB driver manually.
If an error occurs during installation of the USB driver
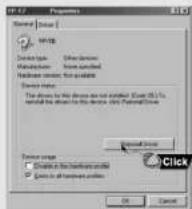
1 Check the device manager.
Windows 98SE
Control Panel → System → Device Manager
2 Check to see if there is a device marked with an exclamation or question mark (displayed as unknown device or USB device).
3 Double-click a device marked with an exclamation or question mark.
4 Select the Driver tab and click [Update Driver].
4
- The installation method may vary depending on the type of PC or operating system. Contact your PC dealer or service center for installation information.
- If errors occur continuously when you install the USB driver, reconnect the USB cable after rebooting your system.
![Settings Properties General: General Manager [Default Picture] [Settings] New device type: New device to configuration Computer COM/ML COM/ML COM/ML COM/ML COM/ML COM/ML COM/ML COM/ML COM/ML COM/ML COM/ML COM/ML COM/ML COM/ML COM/ML COM/ML COM/ML COM/ML COM/ML COM/ML COM/ML COM/ML COM/ML COM/ML COM/ML COM/MS COM/MS COM/MS COM/MS COM/MS COM/MS COM/MS COM/MS COM/MS COM/MS COM/MS COM/MS COM/MS COM/MS COM/MS COM/MS COM/MS COM/MS COM/MS COM/MS COM/MS COM/MS COM/MS COM/MS COM/MS COM/CSA-1.0173 COM/CSA-1.0173 COM/CSA-1.0173 COM/CSA-1.0173 COM/CSA-1.0173 COM/CSA-1.0173 COM/CSA-1.0173 COM/CSA-1.0173 COM/CSA-1.0173 COM/SCA-1.0173 COM/SCA-1.0173 COM/SCA-1.0173 COM/SCA-1.0173 COM/SCA-1.0173 COM/SCA-1.0173 COM/SCA-1.0173 COM/SCA-1.0173 COM/SCA-1. COM/SCA-1. COM/SCA-1. COM/SCA-1. COM/SCA-1. COM/SCA-1. COM/SCA-1. COM/SCA-1. COM/SCA-1. COM/SCA-1. COM/SCA-1. COM/SCA-1. COM/SCA-1. COM/SCA-1. COM/SCA-1. COM/SCA-1.0173 COM/SCA-1.0173 COM/SCA-1.0173 COM/SCA-1.0173 COM/SCA-1.0173 COM/SCA-1.0173 COM/SCA-1.0173 COM/SCA-1.0173 COM/SCA-1.0173 COM/SCA-1.0173 Com/SCA-1.0173 COM/SCA-1.0173 COM/SCA-1.0173 COM/SCA-1.0173 COM/SCA-1.0173 COM/SCA-1.0173 COM/SCA-1.0173 COM/SCA-1.0173 COM/SCA-1.0173 COM /SCA - 2.0654896666666666666666666666666666666666666666666666666666666666666666666666666666666666666666666666666666](/content/2026/06/1189716/images/69975083486c84a76913d09b2729c1a4d4782930ae320842688d3f60c359e2c4.jpg)
Continued...
Manual Installation of the USB Driver
Using the Player as a Removable Disk
Follow the instructions below to install the USB driver manually.
USB driver location
When the MP3 player is connected to your PC, the PC will see it as a removable disc. Music and other files can then be dragged and dropped into the removable disc for playback on the MP3 player.
| Downloading Files
1Connect the player to your PC with the supplied USB cable.
2 Right click on the Start button, then choose Explore to Open Windows Explorer on PC.
- [Removable Disk] is displayed in Windows Explorer.
3 Select the file to save and drag-and-drop it into the desired folder.
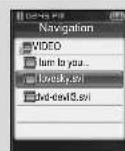
- Drag & drop music files into MUSIC folder, text files into TEXT folder, image files into PHOTO folder and svi files into VIDEO folder.
- The player only supports video files which have a .svi extension. To view video files on other formats, convert the files using Multimedia Studio and then transfer the converted files into the player.
Cafuebch
- Disconnecting the USB cable during file download may cause malfunction of the player.
- The music file order displayed in Windows Explorer may differ from the play order on your player.
Using the Player as a Removable Disk
Installing Media Studio
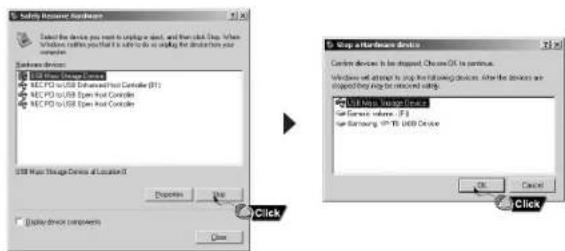
Disconnecting USB Cable
After completing file transfer, you must disconnect the cable using the following way:
1 Double click the green arrow in the taskbar located at the bottom right side of the screen.
2 Select the USB device and click the [Stop] button. When the [Stop a Hardware Device] screen appears, click the [OK] button and then disconnect the USB cable.
cau1bun
- If you disconnect the USB cable improperly, the files on the device may be damaged and will not play.
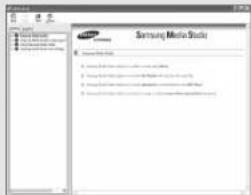
Media Studio is the program that enables you to download music files to the player, and play back music files on your PC.
1 Insert the Installation CD into CD-ROM drive. Select [Install Samsung Media Studio].


[Unreadable]
- Log Into your PC as an administrator (Main User) and install the supplied software (Media / Multimedia Studio) for Windows 2000 and XP. Otherwise, the software may not install properly.
2Select language.
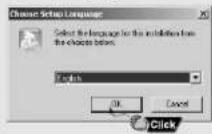
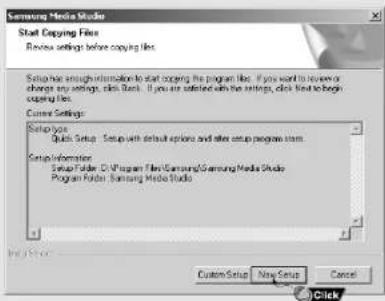
Installing Media Studio
Using Media Studio
3 Follow the instruction in the window to complete the installation. - Samsung Media Studio icon will be created on the desktop.
- Click Media Studio icon from the Desktop.
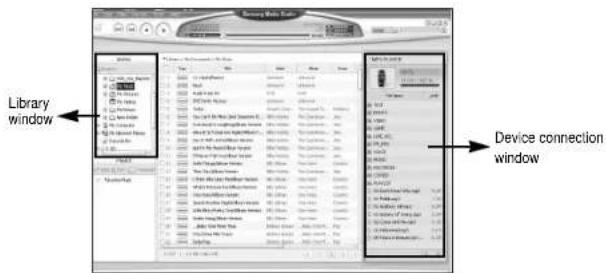
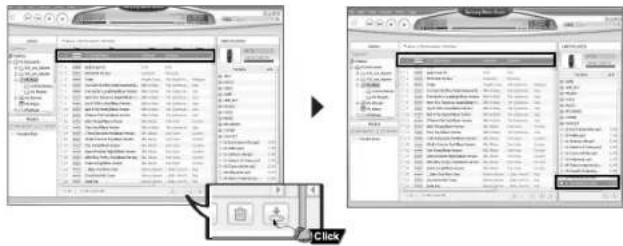
I Downloading Music Files
1Connect the player to PC.
- A device connection window will appear on the right side of the screen. Select [Device] – [Show device Window] at the top of the screen if device connection window does not automatically appear.
2 Select the folder with the file(s) you want to transfer from the [Library] window. The music files within the folder appear on the center of the screen.
Using Media Studio
Using Media Studio
3 When music files appear, select the file(s) you want to transfer, and then press the [Transfer] button.
- The selected file(s) are transferred to the player.
Note
- Refer to [Help] for more detailed information.
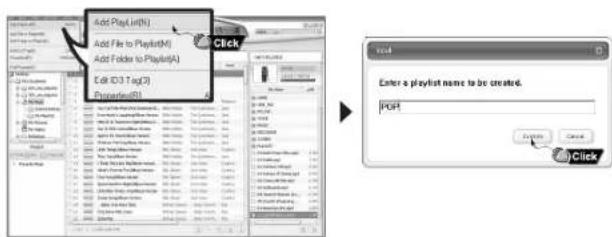
I Sending Playlist
1Connect the player to PC.
2 Press the [File] → [Add Playlist] at the top of the screen.
- Enter the name of Playlist folder when input screen appears.
3Select the folder with the file(s) you want to transfer from the [Library] window.
• The music files within the folder appear on the center of the screen.
Continued...
Using Media Studio
Using Media Studio
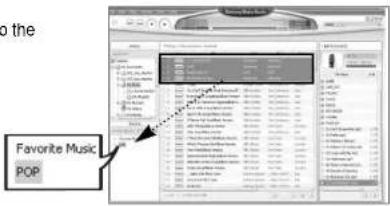
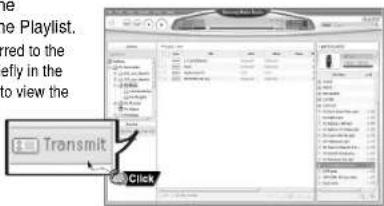
4Drag & drop the desired files into the created Playlist.
5Press the [Transmit] button in the Playlist window after selecting the Playlist.
- Files within the Playlist are transferred to the player. Press the MENU button briefly in the MUSIC mode and select [Playlist] to view the transmitted Playlist.
N
- A new Playlist is created when [Add] button on the Playlist window is pressed. A selected Playlist is deleted when [Delete] button is pressed.
- Refer to [Help] for more detailed information
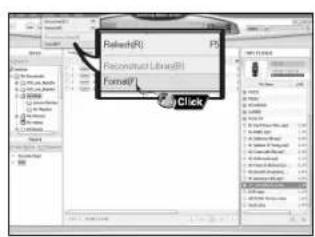
- Formatting deletes all files on the MP3 player so maximum memory is available for new file storage. It saves you the trouble of deleting unwanted files one at a time.
1 Formatting the Player
1Connect the player to PC.
2 Press the [Device] → [Format] at the top of the screen.
3Press the [Start] button when the Format screen appears.
- The memory of the player is formatted and all the saved files will be deleted.

4
- Refer to [Help] for more detailed information
Using Media Studio
Using Media Studio
I Ripping Tracks from an Audio CD
1 Insert your CD including tracks to rip into the CD-ROM drive of your PC.
2 Press the [Search Audio CD] button on the lower part of the screen.
• The tracks on the CD are displayed.

3 Select tracks to be ripped and press the [Rip a CD] button.
• The selected file is converted into an MP3 file.
- Select [Tools]→[Audio Source Format Conversion Settings] on the top of the screen to change rip settings.
- Refer to [Help] for more detailed information.
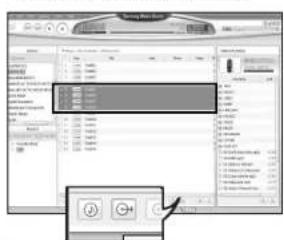
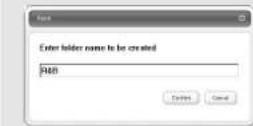
I Creating a Folder
1Connect the player to the computer.
2 Press the [Create Folder] button at the bottom of device connection window.
3 Enter the name of the new folder when an input screen appears.
- A new folder is created.
- If you open a new folder and transfer a file, the file is transferred to the newly created folder.
▶
- Refer to [Help] for more detailed information.
Using Media Studio
To View Help on Media Studio
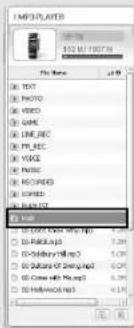
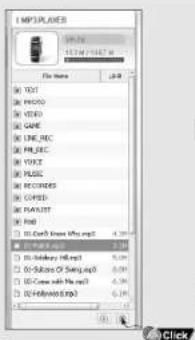
I Deleting Files
1 Connect the player to the computer.
2 Press the [Delete] button at the bottom of the connection windows after selecting required files or folders from the device connection windows.
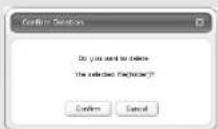
3Press the [Confirm] button when an Confirm Deletion screen appears.
- A selected folder or file is deleted.

[Unreadable]
- Refer to [Help] for more detailed information.
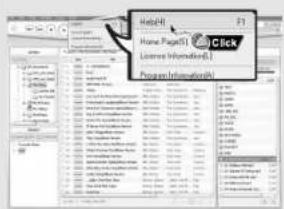
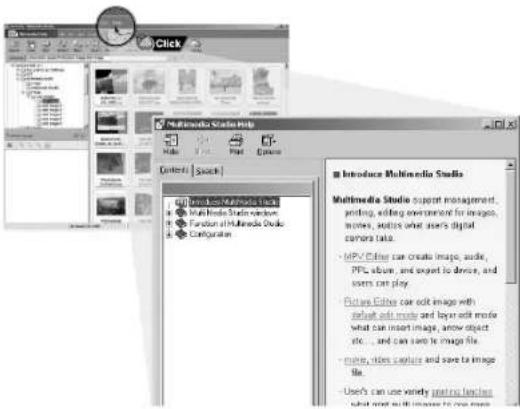
Press F1 after starting Media Studio.
- Help will appear.
Click on [Help] at the top of the screen. - Click on [Help] and the Help window will appear.

- Music recognition technology and related data are provided by Gracenote and Gracenote CDDB®Music Recognition Service™.
- CDDB is a registered trademark of Gracenote. The Gracenote logo and logotype, the Gracenote CDDB logo and logotype, and the "Powered by Gracenote CDDB" logo are trademarks of Gracenote. Music Recognition Service and MRS are service marks of Gracenote.
Installing Multimedia Studio
Installing Multimedia Studio
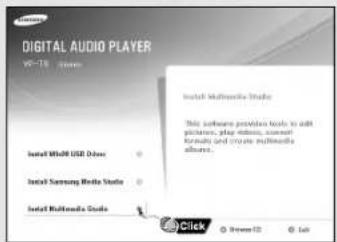
- Multimedia Studio is a program that supports image editing, video playback and format conversion, and multimedia album creation.
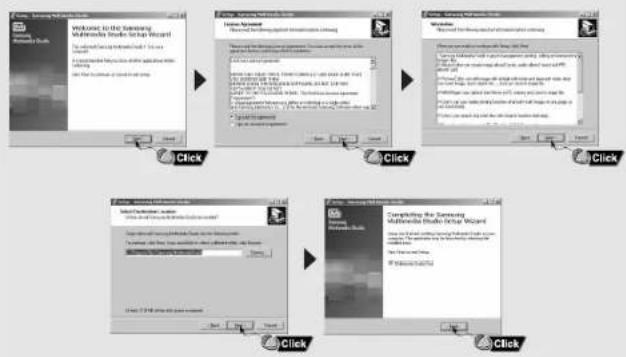
1 Insert the Installation CD into CD-ROM drive.
The picture shown below appears. Select [Install Multimedia Studio].
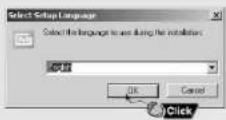
2Select language.
3 Follow the instructions in the window to complete the installation.
Using Multimedia Studio
Using Multimedia Studio
- Run Multimedia Studio from the Desktop.
I Editing Images
1 Select the folder containing images to edit from the directory window at the upper left-hand section of Multimedia Studio.
- The saved files will be displayed in the file list window on the right.
2 Select the image to edit.
- The selected image will be displayed in the [Preview image] window.
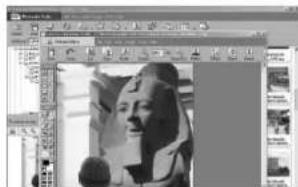
3 Press the [Edit Img] button.
- From the [Picture editor] window, you can perform functions like editing wallpaper images, editing layers, inserting clip art, making frames and other various editing functions.

- Refer to [Help] for more detailed information
I Sending images
1 Connect the player to PC.
2 Select the image(s) to send to the player.
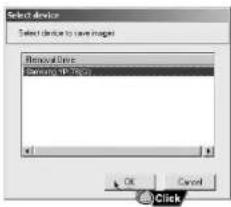
3 Select [File] · [Export images to device] at the top of the Multimedia Studio menu.
4 Select the device connected to PC from the [Select device] screen, and then press the [OK] button.

Continued...
Using Multimedia Studio
Using Multimedia Studio
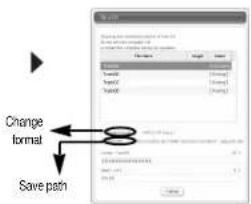
5 Set the size and path of the image at the [Resize images] window and then click the [OK] button.
• The image will be sent to the selected device.
- The transferred picture can be viewed at [Photo/Video] → [Photo].
- The optimal image size for viewing on the unit is 160 x 128. Please adjust the image size if the image does not display correctly on the player.
A
- Path refers to the location or folder where the converted image(s) will be saved to on your PC.
- Image files saved in the player can be deleted by selecting [File] - [Delete images from device].
- Refer to [Help] for more detailed information
I Sending Videos
1 Connect the player to PC.
2 Select the video(s) to send to the player.
3 Select [File] → [Export videos to device] at the top of Multimedia Studio.
4 Select the device connected to PC from the [Select device] screen, and then press the [OK] button.
▶

Continued...
Using Multimedia Studio
Using Multimedia Studio
5 Select the folder to save from the folder selection screen, and then press the [OK] button.
6 Press the [Convert] √ Convert button when conversion screen appears.
• The converted file is transferred in svi format.
- The transferred video file can be viewed from [Video].

▲ For converting and transferring a video file, you have to check the following:
- Check if Direct X 9.0 or higher has been installed in the PC.
- Check if Windows Media Player 9.0 or higher has been installed in the PC.
- Check if Unified Codec Pack has been installed in the PC.
Z
- Video files saved onto the device can be deleted by selecting [File] - [Delete videos from device].
- Refer to [Help] for more detailed information
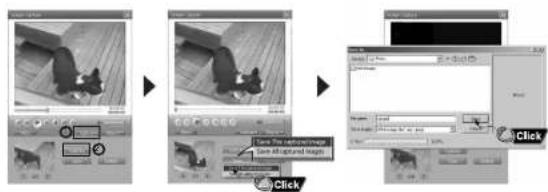
- The Multimedia Studio software allows you to capture a still frame from a video file and save it as a picture, then transfer it to the YP-T8.
Capturing Video
1 Press the [Capture] button at the top of the Multimedia Studio menu.
• The Media Player screen will be displayed.
2 Click [Menu] → [Open] on your PC and select the video to play.
- The selected video will be played.

Continued...
Using Multimedia Studio
To View Help on Multimedia Studio
3 Press the ① [Capture] button and then press the ② [Capture] button when the image you want to capture appears.
• The selected image will be captured.
4 Press the [Save] button.
- Save This captured image: saves the currently selected image.
- Save All captured images: saves all captured images.
5 Select the directory to save to from the [Save As] window and press the [Save] button.
- The selected image will be saved.
4
- Video playback and conversion codecs are not provided. It is recommended that you use
codecs of latest versions. - Refer to [Help] for more detailed information.
Run Multimedia Studio and press the Help button at the top of the screen.
- Help will be displayed.
Playing Music
Searching for Music/Voice Files
Make sure the player is fully charged and the earphones are connected.
I Turning Power On and Off
Power On : Press the ▶ button to turn on the power.
Power Off : Press and hold the ▶ button to turn off the power.
I Playing Music
Press the ▶|| button.
- Playback starts automatically.
I Pausing Music
Press the ▶ button to pause playback.
- If no buttons are pressed within 1 minute (or custom settings), the player automatically powers off.
- While in Pause mode, press the ▶Ibutton again to resume playback.
I Adjusting the Volume
Press the —, + button on the player during playback to adjust the volume.
• The volume can be adjusted from 00 to 40.
I Hold Function
In Hold mode, all other buttons are disabled.
Slide the switch in the direction of the arrow.

Note
- If the file name is not displayed correctly, move to [Settings] → [Language] and then change the language setting.
- WMA files can only be played as music files with a compression rate of 48Kbps-192Kbps.
- The power off time can be set in the menu. (refer to page 83)
To search for specific parts during play
- Press and hold the 🖼️ button during playback to search for the part you want to listen to.
- Release the button to resume play normally.
To change tracks during play
- Press the ▶button briefly during playback to play the next track.
- Press the button briefly within 5 seconds after playback starts to move to and play the previous track. Press the button briefly after 5 seconds to play the current track from the beginning.
To change tracks when stopped/paused
- Press the 🖼️ button in stop/pause mode to move to the previous/next track.

图 6
- VBR(Variable Bit Rate) file: A file that constantly changes the compression rate according to the type of sounds, such as their pitch, in the file.
- When playing a VBR file, you cannot move to and play the previous track even if you press the within 5 seconds after playback starts.
- Files that were downloaded in MP2 or MP1 and had their file extension changed to MP3 may not play.
Loop Repeating
Recording Voice
| Starting Point
While playing music files, press the A-B button briefly at the beginning of the loop you want to set.
- A appears in the display.
| Ending Point
Press the A-B button briefly again to set the end of the loop.
- A - B appears in the display.
- The loop is played repeatedly.
Press the A←B button briefly to cancel the loop.
Albue
- Loop Repeat is automatically released if you Speed Search with the 🎥, ➞ button.
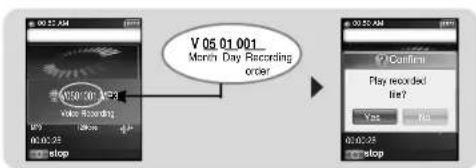
1 Press and hold the button to start voice recording.
2 Press the button again to stop the recording and save the voice file.
• The files are recorded in the order of V....,001,V....,002..., and saved as MP3 files in the [RECORDED] → [VOICE] after recording.
3 When the Confirm screen appears, select [Yes] or [No]. • When selecting [Yes], the recorded file will be played.
Z
- If the Memory is full, Voice Recording will be disabled automatically.
- Voice recording does not work in FM mode or when the line in cable is connected.
- Beeps are disabled while recording.
Recording MP3s
Setting Main Functions in Music Mode
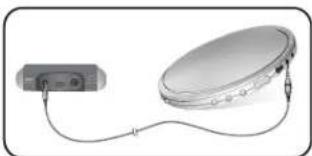
1 Connect the Audio OUT port (or Line OUT) on the external audio source to the ENC
port on the device with the Line cable.
Press the play button on the external device to play the music to record.
2 Press and hold the button to start MP3 recording.
- If the ▶II button is pressed, recording is paused and if the ▶II button is pressed again, the recording resumes.
natural_image
Diagram of a portable electronic device connected to a circular fan or disc (no text or symbols visible)3 If the button is pressed during recording, the recording stops and an MP3 file is created.
- The files are recorded in the order of L----001, L----002.... and saved as MP3 files in the [RECORDED] - [LINE] folder after recording.
4 When the Confirm screen appears, select [Yes] or [No].
- When selecting [Yes], the recorded file will be played.
.
- Bit Rates can be set within the range of 32Kbps\~192Kbps.
- Beeps are disabled while recording.
[Logo]
- Do not disconnect the Line in cable during recording.
- If the battery is not sufficiently charged, the player will not completely record the file.
- Adjust the volume of the external audio source to a suitable level and record it.
If the volume level is too high or low, the sound quality might be poor.
- You can move and select using the NAVI button.
- Press the button to move to the previous screen.
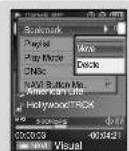
Bookmark
1 Press the MENU button briefly in music mode.
2 Move to [Bookmark] and press the NAVI button.
3 Move to [Move] or [Delete] and press the NAVI button.
- Move: Select the location of the bookmark you want and press the NAVI button. Then, you move to the bookmark.
- Delete: Select the location of the bookmark you want and press the NAVI button. Then, the bookmark is deleted.
Kuta
- To set a bookmark, refer to [NAVI Button mode] – [Bookmark]. (refer to page 50)
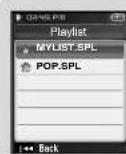
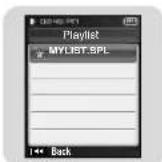
| Playlist
1 Press the MENU button briefly in music mode.
2 Move to [Playlist] and press the NAVI button.
• The playlist(s) you set will be displayed.
3 Move to the playlist you want and press the NAVI button.
• The selected playlist will be played.
▶
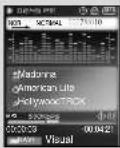
图3
- To set a playlist, refer to "Setting Playlist". ( refer to page53).
Setting Main Functions in Music Mode
Setting Main Functions in Music Mode
| Play Mode
1 Press the MENU button briefly in music mode.
2 Move to [Play Mode] and press the NAVI button.
3 Move to the play mode you want and press the NAVI button.
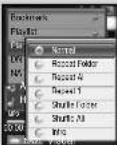

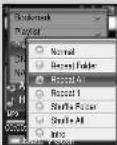
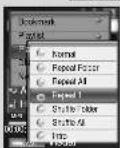
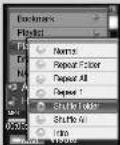
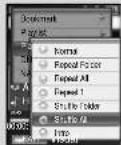
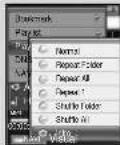
- Normal: To play all the tracks in order one time.
- Repeat Folder : To repeat the current folder.
- Repeat All: To repeat all files.
- Repeat 1: To repeat one file.
- Shuffle Folder : To play files in the folder at random.
- Shuffle All: To play files at random.
- Intro: To play the first few seconds of a music file.
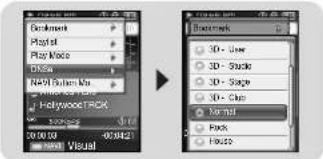
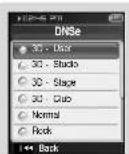
| DNSe
1 Press the MENU button briefly in music mode.
2 Move to [DNSe] and press the NAVI button.
3 Move to the equalizer mode you want and press the NAVI button.
- 3D-User → 3D-Studio → 3D-Stage → 3D-Club → Normal → Rock → House → Dance → Jazz → Ballad → Rhythm & Blues → Classical → User EQ
| NAVI Button Mode
1 Press the MENU button briefly in music mode.
2 Move to [NAVI Button Mode] and press the NAVI button.
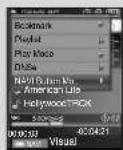
Setting Main Functions in Music Mode
MENU Options
3Move to the mode you want and press the NAVI button.
- Visual : Whenever pressing and holding the NAVI button in music mode Effect screen is changed.
• Effect screen 1,2,3 • EQ screen
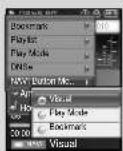
- Play Mode: Whenever pressing and holding the NAVI button in music mode a play mode is changed.
- Normal → Repeat Folder → Repeat All → Repeat 1 → Shuffle Folder → Shuffle All → Intro

- Bookmark: When pressing and holding the NAVI button in music mode, the current location is bookmarked. If the bookmark is set, "I" mark will be displayed.
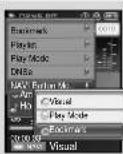
www
- By setting a Bookmark, you can easily find the specified position.
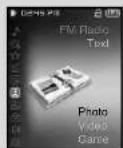
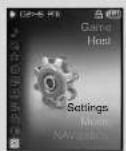
Press and hold the MENU button to switch to the menu mode.
Use the NAVI button to select the menu you want and press the NAVI button.
Press the MENU button to exit the menu mode.
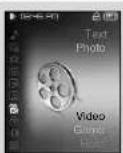
• Music : To check the file currently playing
- Navigation : To move to Navigation Mode and browse files.
- Playlist: To play back only the files you want.
• FM Radio : To listen to FM radio
- Text : To read a text file
• Photo : To view an image file
• Video : To view a video file
• Game : To play a game
- Host : To transfer files saved in the player to external devices or transfer files saved in external devices to the player.
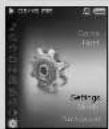
- Settings : To set the additional functions.
图建
- Menu mode will be cancelled if no buttons are pressed within a minute.
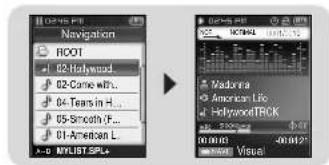
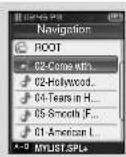
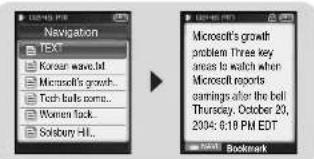
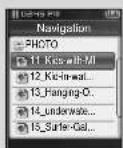
Using Navigation
Setting Playlist
- You can easily search for files or switch modes using the Navigation function.
1 Press the NAVI button to enter Navigation mode or press and hold the MENU button to move to Menu and then select Navigation in Menu.
2 Select the file or folder that you want to play.
• move to a higher-level folder.
• ▶To move to a lower-level folder.
• - +To move to a file or folder in the same directory.
- A -- B : When selected file, the selected file will be designated as part of the playlist.
3 Press the NAVI button.
• The selected file will be played.
A
- Press the MENU button in Navigation mode to exit the Navigation mode.
- Navigation mode will be cancelled if no buttons are pressed within a minute.
| Setting Playlist
1 Press the NAVI button to move to Navigation mode.
2 Move to the file you want and press the A→B button.
- The selected file will be marked and added to [playlist] → [MYLIST].
Press the MENU button in the MUSIC mode and select Playlist to view [MYLIST].
- To exit the playlist setting, move to the marked file in Navigation mode and press the A→B button again.
| Playing Playlist
1 Press and hold the MENU button to move to Menu and then select the playlist from the menu.
• The playlist(s) you set will be displayed.
2 Move to the playlist you want and press the NAVI button.
• The selected playlist will be played.
Listening to FM Radio
Setting Main Functions in FM Mode
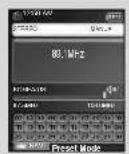
Switching to FM Radio Mode
Press and hold the MENU button. Select FM Radio from Menu and then press the NAVI button.
I Search for a Frequency
- Manual Search: Press the buttons to change the frequency up or down.
• Automatic Search: Press and hold the Buttons to automatically search for receiving frequencies.
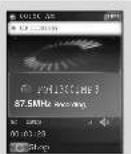
Recording FM
1 Press and hold the button while receiving FM.
- Recording of the current FM frequency begins.
2 Press the button again.
- A recording file is created and the recording stops.
- Files are recorded in the order F....001, F....002.... and saved as MP3 files in [RECORDED] -- [FM].
3 When the Confirm screen appears, select [Yes] or [No].
- When selecting [Yes], the recorded file will be played.
N
- Beeps are disabled while recording.
- You can record FM broadcast only at 64kbps.
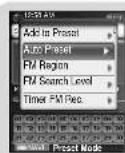
I Add to Preset
- You can manually preset desired FM frequencies.
- You can store up to 30 frequencies.
1 Press the MENU button in the FM mode.
2 Move to [Add to Preset] and press the NAVI button. • The current frequency is added to preset.
| Auto Preset
1 Press the MENU button in the FM mode.
2 Move to [Auto Preset] and press the NAVI button.
- Frequencies are automatically stored, starting from 1.
| Searching Preset
1 Press and hold the NAVI button in the FM mode.
- Move to the preset mode.
2 Use the button to move to the preset number you want.
Setting Main Functions in FM Mode
Setting Main Functions in FM Mode
I Delete Preset
1 Press and hold the NAVI button in the FM mode.
- Move to the preset mode.
2 Move to [Delete Preset] and press the NAVI button.
3 After moving to the preset number you want to delete, press the NAVI button.
- The saved preset number will be deleted.

I FM Region
1 Press the MENU button in the FM mode.
2 Move to [FM Region] and press the NAVI button.
3 Move your FM region and press the NAVI button.
- Korea/U.S: Search FM frequencies between 87.5MHz to 108.0MHz In increments of 100 kHz.
• Japan: Search FM frequencies between 76.0MHz to 108.0MHz in increments of 100 kHz. - Other Country : Search FM frequencies between 87.50MHz to 108.00MHz in increments of 50 kHz.

图1
- The default FM region setting may vary depending on the target region of the player.

| FM Search Level
1 Press the MENU button in the FM mode.
2 Move to [FM Search Level] and press the NAVI button.
3 Move to the the desired FM Search Level and press the NAVI button.
- The higher the FM search level, the more frequencies can be received.
- High→ Middle→ Low
Timer FM Rec.
1 Press the MENU button in the FM mode.
2 Move to [Timer FM Rec.] and press the NAVI button.
3 Use the — or button to select and press the NAVI button to move to the next stage.
- When set to Off in the first stage, you are not moved to the next stage.
4 After setting Timer Rec, move to [Yes] and press the NAVI button.

215
- The player must be Off for a Timer Recording to occur.
- The player will automatically turn on and record at the time you specified.
- After setting Timer Rec, the timer icon will be displayed.
Viewing a Text
Setting Main Functions in Text Mode
- Text Viewer allows you to read text files that were created on your PC. Text files must have a .txt extension to be viewed by Text Viewer.
- You can select an text file to view while listening to the music.
1 Press and hold the MENU button to move to menu and select Text.
• The Text screen appears.
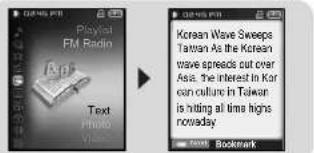
2 Press the NAVI button briefly to move to the text selection screen. Move to the text you want and press the NAVI button.
- The selected text file will be displayed.
- -, + : To adjust the volume.
-1←,→: To move to the previous/next page. - Press and hold the MENU button to move to the MENU screen
- You can move and select using the NAVI button. - Press the button to move to the previous screen.
I Setting a Bookmark
Press and hold the NAVI button in the Text screen.
• The current page is bookmarked.
- You can create only 1 bookmark.
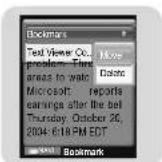
| Bookmark
1 Press the MENU button in the Text screen.
2 Move to [Bookmark] and press the NAVI button.
3 Move to [Move] or [Delete] and press the NAVI button.
- Move: Move to a bookmark within the text file.
- Delete: Delete the bookmark you set within the text file.
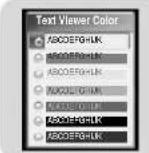
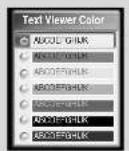
| Text Viewer Color
1 Press the MENU button in the Text screen.
2 Move to [Text Viewer Color] and press the NAVI button.
3 Select the color you want and press the NAVI button.
• Text appears with the selected color.
Viewing an Image
Viewing a Video
You can select an image file to view while listening to the music.
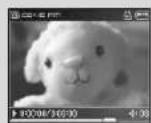
1 Press and hold the MENU button to move to menu and select Photo.
• The Photo screen appears.
2 Press the NAVI button briefly to move to the image selection screen.
Move to the image you want and press the NAVI button.
- The selected image file will be displayed.
- -, +: To adjust the volume.
- ◀◀, ▶▶: To move to the previous/next image.
- Press and hold the MENU button to move to the MENU screen
4
- The optimal image size for the player is 160X128. Images larger than 800X600 may take longer to display. If the image size is too large, use Multimedia Studio to adjust the size and resend it to the player. (Refer to page 35)
- If an image file is not displayed on the screen, resend it using Multimedia Studio to display it correctly.

1 Press and hold the MENU button to move to menu and select Video.
• The Video screen appears.
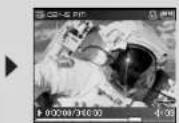
2 Press the NAVI button briefly to move to the video selection screen. Move to the video you want and press the NAVI button.
• The selected video will be played.
- =, +. To adjust the volume.
- (Preasing briefly): To move to the previous/next video.
- Pressing and holding):
To browse videos fast. - MENU: Check the progress time, total time, and volume.
- Press and hold the MENU button to move to the MENU screen
▶
Note
[Unreadable]
The player only supports video files which have an .svi extension. To view video files on other formats, convert the files using Multimedia Studio and then transfer the converted files into the player. To send video files to the player, refer to "Sending Videos" of "Using Multimedia Studio". ((Refer to page 37)
Playing a Game
Playing a Game
- Press and hold the MENU button to move to menu.
- Use — or + to move to the game you want to play and press the NAVI button.
Hurdle Game

[How to Play]
- Hurdle Is a game where people have to jump over a number of obstacles while running and go to the finish line.
1 When the player stops at the starting point, shake the main body from side to side.
• The runner starts running.
2 When a hurdle appears, a sound is produced. If the sound is produced, shake the device up and down.
• The runner jumps over the hurdle.
[Logo]
- For more information, refer to Help on the Main menu.
| Hextris
[How to Play]
- Hextris is a game that the player places out the blocks by completing a row, column or diagonal with over 3 common properties. - Monster HP decreases whenever blocks are deleted. When monster HP reaches 0, move to the next stage.
[How to Play]

图2-3
- For more information, refer to Help.
Playing a Game
Playing a Game
| Pipe Plus
[How to Play]
- Pipe Plus is a game where a pipe is rotated to connect waterways from left to right.
- If the waterways are connected and the water is completely full, you are moved to the next stage.
![SAMSUNG YP-T8Q/ELS - [How to Play] - 2](/content/2026/06/1189716/images/69d762db80d68caa4b5b6eec92e329620511d23d6a2d2e5b8bc6dc0834e8bb21.jpg)
[How to Play]
![SAMSUNG YP-T8Q/ELS - [How to Play] - 3](/content/2026/06/1189716/images/b70fca3f4beeaf12d92109d4d6c63e70283ff265ecce29529d71e34377797a0f.jpg)
- For more information, refer to Help.
I Dart
![SAMSUNG YP-T8Q/ELS - [How to Play] - 4](/content/2026/06/1189716/images/fbb3ef8153a114e41ad0df9e6cb7e7670d13796ed4cbdedd42f5bf8d00bbe482.jpg)
[How to Play]
- Dart is a game where you throw darts at a board.
- Move the device left and right to move to the target point. Tilt the device forward to throw a dart.
![SAMSUNG YP-T8Q/ELS - [How to Play] - 2](/content/2026/06/1189716/images/4f31af80a476823f6585622e06a1b5af69008aa5e0f9e6d227019be14d81e384.jpg)
- For more information, refer to Help.
Using USB Host
Using USB Host
I Connecting an External Device
1 Connect the player to the USB host adapter.
2 Use the external device's USB cable to connect the external device and the USB host adapter.
- Turn on the External Device's Power.

[2]
- Use only the USB cable supplied with the external device.
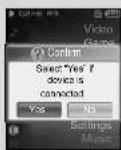
3 Press and hold the MENU button to move to menu. Select Host and press the NAVI button.
4 Use the button to move to [Yes] and press NAVI button.
• The External Device screen will be displayed.

▶
▶

八七日
- When the external device that is connected to the USB host consumes considerable amount of power, the USB host function may not operate properly.
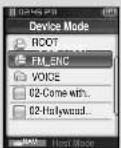
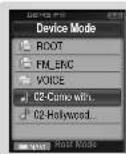
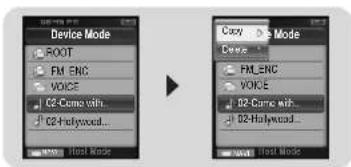
I Transferring Files from an External Device to the Player
1 Move to the file to transfer to the player and press the NAVI button.
• - +o move up and down.
- : move to a subfolder.
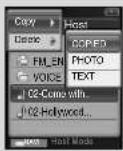
2 When a popup window appears, move to [Copy] and then press the NAVI button.
3 Select the folder where the file is copied and press the NAVI button.
- The selected file will be transferred to the player.
Do not disconnect the player from the external device during file transfer.
- The file transferred can be found in the selected folder of the player.
▶
Using USB Host
Using USB Host
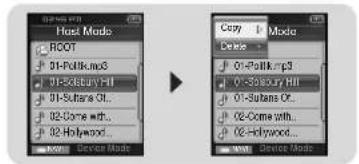
I Deleting Files in an External Device
1 Move to the file you want to delete from the screen of the external device and press the NAVI button.
• —:to move up and down.
- move to a subfolder.
2 When a popup window appears, move to [Delete] and then press the NAVI button.
3 When the Confirm screen appears, select [Yes] and then press the NAVI button.
• The selected file will be deleted.
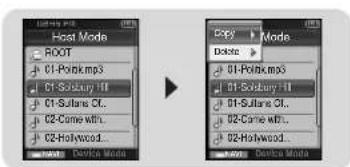
I Transferring Files from the Player to an External Device
1 When the screen of the external device appears, press and hold the NAVI button.
• The Navigation screen of the player appears.
2 Move to the file you want to transfer to the external device and press the NAVI button.
•,—:to move up and down.
- : Remove to a subfolder.
3 When a popup window appears, move to [Copy] and then press the NAVI button.
- The selected file will be transferred to the external device.
Do not disconnect the player from the external device during file transfer.
Using USB Host
Using USB Host
I Deleting Files in the Player
1 When the screen of the external device appears, press and hold the NAVI button.
• The Navigation screen of the player appears.
2 Move to the file you want to delete and press the NAVI button.
• —: move up and down.
- : Remove to a subfolder.
3 When a popup window appears, move to [Delete] and then press the NAVI button.
4 When the Confirm screen appears, select [Yes] and then press the NAVI button.
• The selected file will be deleted.
| YP-T8 USB HOST Compatible
- The following is a list of cameras and MP3 players(Samsung) that are compatible with YP-T8 USB Host function.
- This list may change with firmware upgrade.
| Device Model Number Device Model Number | |||
| MP3 Player (Samsung) | YP-55 | Digital Camera | Nicon ooolpix-4200 |
| YP-35 | Sony DSC-P93 | ||
| YP-53 | Sony DSC-T1 | ||
| YP-T5 | Sony DSC-P100 | ||
| YP-780 | Sony DSC-V1(W1) | ||
| YP-60 | Fujifilm Finepix-A340 | ||
| YP-T6 | Fujifilm Finepix-F450 | ||
| YP-MT6 | Fujifilm Finepix-F610 | ||
| YP-T7 | Kyocera Finecam-SL300R | ||
| YV-120 | Minolta Dimage-ZI | ||
| VY-H700 | Pentax Optio-S40 | ||
| VY-S100 | Pentax Optio-S | ||
| Pentax Optio-430RS | |||
| Panasonic DMC FZ20 | |||
| Caslo EX-Z40 | |||
Setting the Advanced Functions
Selecting the Play mode
1 Press and hold the MENU button to move to menu and select Settings.
2 In Settings, move to the function you want and press the NAVI button to select.
- Press the 🔊 on to move to the previous menu.
Press and hold the MENU button to move to menu and select [Settings] - [Music].
| Play Mode
1 Select Play Mode from Music.
2 Use - or + to move to the play mode you want and press the NAVI button.
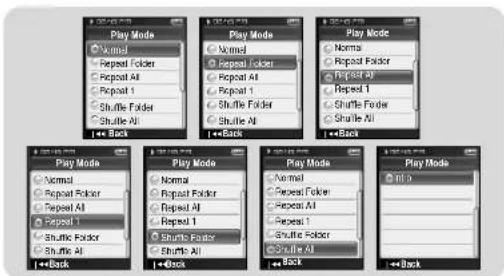
- Normal: To play all the tracks in order one time.
- Repeat Folder: To repeat the current folder.
- Repeat All: To repeat all files.
- Repeat 1: To repeat one file.
- Shuffle Folder : To play files in the folder at random.
- Shuffle All: To play files at random
- Intro: To play the first few seconds of a music file.
Setting Sound Effect
Setting Sound Effect
DNSe
- Use — or + to move to the sound mode you want and press the NAVI button.
- 3D-User → 3D-Studio → 3D-Stage → 3D-Club → Normal → Rock → House → Dance → Jazz → Ballad → Rhythm & Blues → Classical → User EQ
- Select User EQ to set the EQ as desired.
▶

▶
3D-User Set
3D-User Set is applied only when 3D sound mode is selected from DNSe.
[3D]
- Use — or + to move to the 3D level you want and press the NAVI button.
- 3D level can be set within the range of 0 to 5.
![SAMSUNG YP-T8Q/ELS - [3D] - 1](/content/2026/06/1189716/images/e294ff04cca169c41a2a27250e60cc2283045c63611eba500779b77ab3cf2c53.jpg)
I 3D-User Set
[Bass Enhance]
- Use —or +to move to the bass Enhance level you want and press the NAVI button.
- Bass Enhance level can be set within the range of 0 to 3.
![SAMSUNG YP-T8Q/ELS - [Bass Enhance] - 1](/content/2026/06/1189716/images/a1dc549e7da61a8707de4567eac9683ef947e89d104de2e4880ddeca28ec9768.jpg)
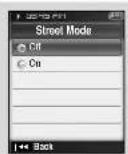
I Street Mode
- Use —or +to move to Street Mode On or Off and press the NAVI button.
- Off: Tracks are played in the setting sound mode.
- On: You can hear the sound with better quality when you listen to music in the street.
Setting Sound Effect
Setting Sound Effect
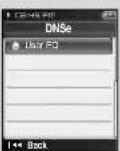
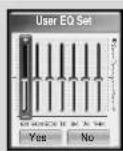
I User EQ Set
- You can adjust the EQ to your preference in the User EQ Set.
- Press the button to move left or right and press
- or + to adjust a level. After the setting is completed, move to [Yes] and press the NAVI button.
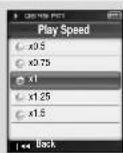
I Play Speed
- Use —or + to move to the play speed you want and press the NAVI button.
- Play speed can be set to x0.5, x0.75, x1, x1.25 or x1.5.
- The larger the number, the faster the speed of play, and the smaller the number, the slower the speed of play.
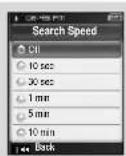
| Search Speed
- Use —or + to move to the search speed you want and press the NAVI button.
- You can select Off → 10sec → 30sec → 1min → 5min → 10min.
- Skip Interval determines the interval to be skipped when you press the location in Music mode.
- If you set the Search Speed to Off, if you press the button, the previous or next track will be selected.
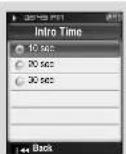
I Intro Time
- Use — or + to move to the intro time you want and press the NAVI button.
- You can select 10sec → 20sec → 30sec. If you set the Intro Time, the beginning of all files will be played back for the seconds you set.
Record Settings
Time/Alarm Settings
Press and hold the MENU button to move to menu and select [Settings] · [Record].
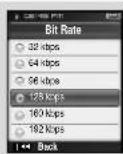
Bit Rate
- Use —or + to select the recording bit rate you want and press the NAVI button.
- When recording music into an MP3 file, you can select one of the following bit rates: 32kbps, 64kbps, 96kbps, 128kbps, 160kbps, and 192kbps.
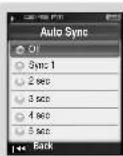
| Auto Sync
- Use —or + to set the Auto Sync Time and press the NAVI button.
- Auto Sync Time is a function for separating and saving MP3 files when there is no sound for a set time during MP3 recording.
- Auto Sync Time can be set to Off, Sync 1, 2 seconds, 3 seconds, 4 second, or 5 seconds.
- In SYNC 1 setting, recording stops and it moves to Music Mode when there is no sound for over 2 seconds during recording.
- If Auto Sync Time is set to Off, recording keeps going even if there is no sound, and then it is saved as one file.
Press and hold the MENU button to move to menu and select [Settings] → [Time/Alarm].
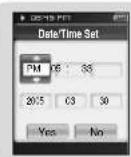
| Date/Time Set
You can set the current date and time.
1 Use -or + to set the time and press the button.
2 Use -or + to set the date and press the button.
3 After the setting is completed, move to [Yes] and press the NAVI button.
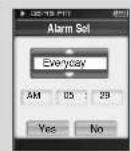
I Alarm Set
1 Use — or + to set the alarm repetition count and press the ➡ button.
2 Use - or + to set the time and press the button.
3 After the setting is completed, move to [Yes] and press the NAVI button
- When the power is off while the alarm is set, the player will automatically turn on at the time you set.
- After setting Alarm, the alarm icon will be displayed.

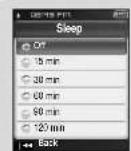
I Sleep
- Use —or + to set the sleep time and press the NAVI button.
- Sleep time can be set to Off, 15\~120 minutes. The player will automatically turn off after the time you set.
- When sleep time set to Off, the function is disabled.
Display Settings
Display Settings
Press and hold the MENU button to move to menu and select [Settings] → [Display].
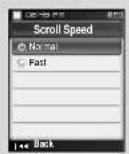
| Scroll Speed
- Use — or + to set the scroll speed and press the NAVI button.
• Normal: Track title moves at a normal speed. - Fast: Track title moves faster than normal speed.
| Text Viewer Color
- Use —or + to set the text viewer color and press the NAVI button.
- When reading text, the text appears with the selected color.
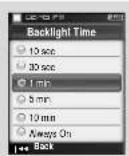
Backlight Time
- Use — or + to set the backlight time and press the NAVI button.
- Backlight time can be set to 10 seconds, 30 seconds, 1 minute, 5 minutes, 10 minutes, and Always On.
- When set to Always On, the backlight stays on continuously.
- When the backlight is turned off, the backlight is tuned on even if any button is pressed. Press the corresponding button again after the backlight is turned on.
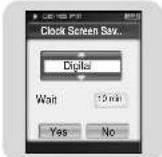
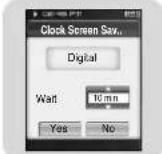
Clock Screen Saver
1 Use — or + to set the clock type and then press the button.
- Analog: The screen saver of an analog type clock appears.
- Digital: The screen saver of a digital type clock appears.
2 Use - or + to set the wait time and press the ➞ button.
- Wait time can be set to 10 seconds, 30 seconds, 1 minute, 5 minutes, or 10 minutes.
If no button is pressed during playback, the clock screen appears automatically after the time you set.
3 After the setting is completed, move to [Yes] and then press the NAVI button.
Language Setting
System Settings
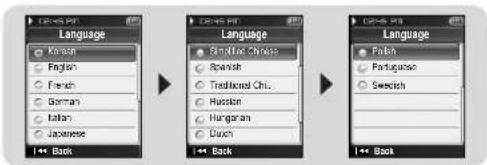
Press and hold the MENU button to move to menu and select [Settings] - [Language].
Language
Use —, + to select the desired language to display menu and text .
- Korean → English → French → German → Italian → Japanese → Simplified Chinese → Spanish → Traditional Chinese → Russian → Hungarian → Dutch → Polish → Portuguese → Swedish
flowchart
graph LR
    A["Language"] --> B["Simple Chinese"]
    B --> C["Spanish"]
    B --> D["Traditional Chinese"]
    B --> E["Russian"]
    B --> F["Hungarish"]
    B --> G["Durch"]
    A --> H["Back"]
A
- Supported languages can be changed or added.
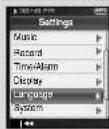
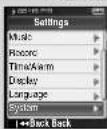
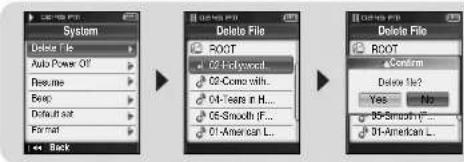
Press and hold the MENU button to move to menu and select [Settings] → [System].
I Deleting a File
1 Use -or + to move to the file you want to delete and press the NAVI button.
2 Move to [Yes] and press the NAVI button.
• The selected file is deleted.
flowchart
graph LR
    A["Delete File"] --> B["Default set"]
    B --> C["Default set"]
    C --> D["Default set"]
    D --> E["Default set"]
    E --> F["Default set"]
    F --> G["Default set"]
    G --> H["Default set"]
    H --> I["Default set"]
    I --> J["Default set"]
    J --> K["Default set"]
    K --> L["Default set"]
    L --> M["Default set"]
    M --> N["Default set"]
    N --> O["Default set"]
    O --> P["Default set"]
    P --> Q["Default set"]
    Q --> R["Default set"]
    R --> S["Default set"]
    S --> T["Default set"]
    T --> U["Default set"]
    U --> V["Default set"]
    V --> W["Default set"]
    W --> X["Default set"]
    X --> Y["Default set"]
    Y --> Z["Default set"]
    Z --> AA["Default set"]
    AA --> AB["Default set"]
    AB --> AC["Default set"]
    AC --> AD["Default set"]
    AD --> AE["Default set"]
    AE --> AF["Default set"]
    AF --> AG["Default set"]
    AG --> AH["Default set"]
    AH --> AI["Default set"]
    AI --> AJ["Default set"]
    AJ --> AK["Default set"]
    AK --> AL["Default set"]
    AL --> AM["Default set"]
    AM --> AN["Default set"]
    AN --> AO["Default set"]
    AO --> AP["Default set"]
    AP --> AQ["Default set"]
    AQ --> AR["Default set"]
    AR --> AS["Default set"]
    AS --> AT["Default set"]
    AT --> AU["Default set"]
    AU --> AV["Default set"]
    AV --> AW["Default set"]
    AW --> AX["Default set"]
    AX --> AY["Default set"]
    AY --> AZ["Default set"]
    AZ --> BA["Default set"]
    BA --> BB["Default set"]
    BB --> BC["Default set"]
    BC --> BD["Default set"]
    BD --> BE["Default set"]
    BE --> BF["Default set"]
    BF --> BG["Default set"]
    BG --> BH["Default set"]
    BH --> BI["Default set"]
    BI --> BJ["Default set"]
    BJ --> BK["Default set"]
    BK --> BL["Default set"]
    BL --> BM["Default set"]
    BM --> BN["Default set"]
    BN --> BO["Default set"]
    BO --> BP["Default set"]
    BP --> BQ["Default set"]
    BQ --> BR["Default set"]
    BR --> BS["Default set"]
    BS --> BT["Default set"]
    BT --> BU["Default set"]
    BU --> BV["Default set"]
    BV --> BW["Default set"]
    BW --> BX["Default set"]
    BX --> BY["Default set"]
    BY --> BZ["Default set"]
    BZ --> CA["Default set"]
    CA --> CB["Default set"]
    CB --> CC["Default set"]
    CC --> CD["Default set"]
    CD --> CE["Default set"]
    CE --> CF["Default set"]
    CF --> CG["Default set"]
    CG --> CH["Default set"]
    CH --> CI["Default set"]
    CI --> CJ["Default set"]
    CJ --> CK["Default set"]
    CK --> CR["Default set"]
    CR --> CS["Default set"]
    CS --> CT["Default set"]
    CT --> CU["Default set"]
    CU --> CV["Default set"]
    CV --> CW["Default set"]
    CW --> CX["Default set"]
    CX --> CY["Default set"]
    CY --> CZ["Default set"]
    CZ --> DA["Default set"]
    DA --> DB["Default set"]
    DB --> DC["Default set"]
    DC --> DD["Default set"]
    DD --> DE["Default set"]
    DE --> DF["Default set"]
    DF --> DG["Default set"]
    DG --> DH["Default set"]
    DH --> DI["Default set"]
    DI --> DJ["Default set"]
    DJ --> DK["Default set"]
    DK --> DL["Default set"]
    DL --> DM["Default set"]
    DM --> DN["Default set"]
    DN --> DO
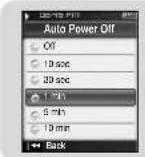
| Auto Power Off
- Use —or + to set the power-off time and press the NAVI button.
- Auto off time can be set to Off, 10 seconds, 30 seconds, 1 minute, 5 minutes, or 10 minutes. If no button is pressed after play stops, the player will automatically turn off after the time you set.
- When set to Off, the function is disabled.
System Settings
System Settings
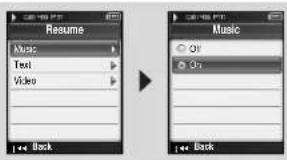
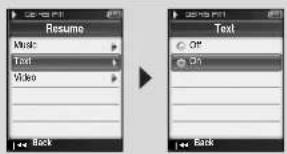
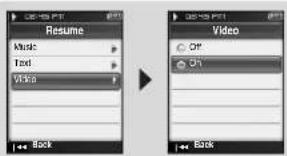
Resume
[Music]
- Use —or + to move to [On] or [Off] and press the NAVI button.
- Off : Playback will resume from the beginning of the file/track that was playing when stopped.
- On : Playback will resume from the point it was previously stopped.
[Text]
- Use — or + to move to [On] or [Off] and press the NAVI button.
- Off: Text will resume at the beginning of the file.
- On: Text will resume from the point of last view.
[Video]
- Use — or + to move to [On] or [Off] and press the NAVI button.
- Off : Playback will resume from the beginning of the video file that was playing when stopped.
- On : Playback will resume from the point it was previously stopped.
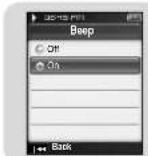
I Beep
- Use —or + to move to [On] or [Off] and press the NAVI button.
- Off: The player does not beep.
- On: The player beeps when the buttons are pressed.
Default set
- Use the or button to move to [Yes]
or [No] and press the NAVI button. - Yes: All selected settings will be restored to the default settings.
- No: The selected settings are maintained.
Format
- Use the or button move to
[Yes] or [No] and press the NAVI button. - Yes: Memory is formatted and all saved files are deleted.
- No: Memory is not formatted.

C
- Care must be taken as formatted files can not be recovered.
Viewing System Information
MENU Table
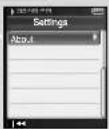
Press and hold the MENU button to move to menu and select [Settings] - [About].
I About
[Firmware Version]
- Select Version to check the firmware version of the player.
[Memory]
- Select Memory to check the used capacity, remaining capacity, and total capacity.
[Files]
- Select Files to check the saved files.
![SAMSUNG YP-T8Q/ELS - [Files] - 1](/content/2026/06/1189716/images/7815fbeb929273cdce192ddc6a67dc2b2a5163570b2665fe2a94b89a07bd2ff3.jpg)
![SAMSUNG YP-T8Q/ELS - [Files] - 2](/content/2026/06/1189716/images/65a09ea5515401b4c20514f834c556daa940c8f8d3eeec38ce2e99ff6682df86.jpg)
![SAMSUNG YP-T8Q/ELS - [Files] - 3](/content/2026/06/1189716/images/7df6dca9481cb4b28de9a4c847fdc3a7964a5e1216c966748ee3e20a2e03843e.jpg)
flowchart
graph TD
    A["MENU"] --> B["Music"]
    A --> C["Navigator"]
    A --> D["Playlist"]
    A --> E["FM Radio"]
    A --> F["Text Photo Video Game USS Host"]
    A --> G["Settings"]
    G --> H["Hoxris"]
    G --> I["Ear/Game"]
    G --> J["Hurdle"]
    G --> K["Pipoplus"]
    H --> L["Play Mode"]
    H --> M["Bit Rate"]
    H --> N["Auto Sync"]
    H --> O["Data/Time Set"]
    H --> P["Alarm Set"]
    H --> Q["Scroll Speed"]
    H --> R["Test View Color"]
    H --> S["Sceal Light Time"]
    H --> T["Cool Screen Star"]
    U["System About Language Display Time/Alarm Record Music"] --> V["Delete File"]
    U --> W["Hardware Version"]
    U --> X["Auto Power Off"]
    U --> Y["Memory"]
    U --> Z["Resume"]
    U --> AA["Sleep"]
    U --> AB["Default set"]
    U --> AC["Format"]
    V --> AD["Auto User Set"]
    V --> AE["3D User Set"]
    V --> AF["Street Mode"]
    V --> AG["User EQ Set"]
    V --> AH["Play Speed"]
    V --> AI["Search Speed"]
    V --> AJ["Intro Time"]
- Use the NAVI key to move and select.
Troubleshooting
Troubleshooting
The software doesn't work
- Refer to the System Requirements.
The player does not work and the LCD displays nothing.
- Reset the player by pressing the RESET Hole using a pointed object such as a safety clip.
- Check the battery charge status of the player.
- Make sure the Hold switch is in the off position.
In Play mode, music is not played after pressing the Play button.
- Check to see if MP3 or WMA files are saved in the memory.
- Make sure the Hold switch is in the off position.
Files cannot be downloaded.
- Check to see if the driver is installed correctly in the computer.
- Check the USB connectivity between the player and the computer.
- Operating system limits the number of files you can save.
Please save your music files by creating a subfolder.
- Check if the memory is full.
- Reset the player by pressing the RESET Hole using a pointed object such as a safety clip.
The backlight is off.
- Check the backlight settings.
- Check the battery charge status of the player.
Buttons on the player does not work.
- Make sure the Hold switch is in the off position.
Play Time is not displayed correctly during playback.
- Check if you are playing a VBR (Variable Bit Rate) file.
VBR files are only partially supported.
The file name and Tag information are not displayed correctly.
- Select [Settings] → [Language] from the menu and change the Language setting.
There is a file saved in the player, but "No File" appears in the screen.
- After checking whether the folder is played, use the Navigation function to change the folder.
I cannot properly connect the player to the PC.
- Win98 SE : Try to connect again after installing Driver.
- WinME/2000/XP : Press Start in the desktop to execute Windows Update.
After selecting important update and service pack, execute update all.
Try to connect it again after rebooting PC.
Specifications
Specifications
| Model | YP-T8 |
| Built-in Memory capacity | YP-T8 V(256MB) / YP-T8 X(512MB) / YP-T8 Z(1GB) / YP-T8Q(2GB) |
| Built-in Rechargeable Battery Capacity | 850mAh |
| Voltage | 3.7V (LJ-Ion) |
| Dimensions/Weight | 44.5 X 83 X 15.5mm /55g |
| Case | Plastic |
| Maximum File Transfer Data Rate | 120Mbps |
| Noise Ratio | 90dB with 20kHz LPF (based on 1kHz 0dB) |
| Earphones Jack Output Power | 20mW(France 5mW/CH)(16Ω) |
| Output Frequency Range | 20Hz~20kHz |
| Operating Temperature Range | -5~+35°C (23~95F) |
| FM Frequency | 87.5~108.0MHz |
| FM Signal to Noise Ratio | 45dB |
| FM T.H.D | 1% |
| FM Useable Sensitivity 10dB | |
| File Support | AUDIO : MP3(MPEG1/2/2.5 Layer3), WMA, Ogg(Q0~Q10)VIDEO : JPEG, MPEG4(GCIF 10~15 Frame) |
The product unit accompanying this user manual is licensed under certain intellectual property rights of certain third parties. This license is limited to private non-commercial use by end-user consumers for licensed contents.
No rights are granted for commercial use. The license does not cover any product unit other than this product unit and the license does not extend to any unlicensed product unit or process conforming to ISO/IEC 11172-3 or ISO/IEC 13818-3 used or sold in combination with this product unit. The license only covers the use of this product unit to encode and/or decode audio files conforming to the ISO/IEC 11172-3 or ISO/IEC
13818-3. No rights are granted under this license for product features or functions that do not conform to the ISO/IEC 11172-3 or ISO/IEC 13818-3.
Specifications
MEMO
— EUROPE ONLY —
This marking shown on the product or its literature, indicates that it should not be disposed with other household wastes at the end of its working life.
To prevent possible harm to the environment or human health from uncontrolled waste disposal, please separate this from other types of wastes and recycle it responsibly to promote the sustainable reuse of material resources.
Household users should contact either the retailer where they purchased this product, or their local government office, for details of where and how they can take this item for environmentally safe recycling.
Business users should contact their supplier and check the terms and conditions of the purchase contract.
This product should not be mixed with other commercial wastes for disposal.
natural_image
Symbol of a trash bin crossed with no text or numbers, enclosed in a rounded square (no text or symbols present)- MP3, WMA, Audio ASF and Ogg Playback
- USB Host Function Support
- Video Playback
- Text and Image Viewer
- Direct MP3 Recording
- USB 2.0 High Speed Data Transfer
- DNSe Surround Sound
- 1.8-inch Color TFT LCD
- Various Games Support
- Built-in Rechargeable Li-Ion Battery
- Upgradable
- Contents Contents
- Chapter 1 Preparations
- Chapter 2 Connection to Computer
- Chapter 3 Using Your Player
- Chapter 4 Additional Features
- Chapter 5 Customer Support
- Safety Instructions
- | Earphones
- Follow Traffic Safety Instructions
- Protect your ears
- | Ambient operating conditions
- Environmental Information
- Battery Charger Safety
- Charging the Battery
- CAUTION
- 图 1-2
- ③用C:
- Plug the charger into a wall outlet.
- Caudoc.M
- Components Location of Controls
- Location of Controls
- Connecting the player to your PC
- □ System Requirements.
- Installing Software
- I Connecting the player to your PC with the USB cable
- Manual Installation of the USB Driver
- How to check if USB driver is properly installed
- If an error occurs during installation of the USB driver
- Using the Player as a Removable Disk
- | Downloading Files
- Installing Media Studio
- Disconnecting USB Cable
- Using Media Studio
- I Downloading Music Files
- I Sending Playlist
- Formatting the Player
- I Ripping Tracks from an Audio CD
- I Creating a Folder
- To View Help on Media Studio
- I Deleting Files
- Installing Multimedia Studio
- Using Multimedia Studio
- I Editing Images
- I Sending images
- A
- I Sending Videos
- Capturing Video
- To View Help on Multimedia Studio
- Playing Music
- Searching for Music/Voice Files
- I Turning Power On and Off
- I Playing Music
- I Pausing Music
- I Adjusting the Volume
- I Hold Function
- To search for specific parts during play
- To change tracks during play
- To change tracks when stopped/paused
- Loop Repeating
- Recording Voice
- | Starting Point
- | Ending Point
- Albue
- Z
- Recording MP3s
- Setting Main Functions in Music Mode
- Bookmark
- | Playlist
- | Play Mode
- | DNSe
- | NAVI Button Mode
- MENU Options
- Using Navigation
- Setting Playlist
- | Setting Playlist
- | Playing Playlist
- Listening to FM Radio
- Setting Main Functions in FM Mode
- Switching to FM Radio Mode
- I Search for a Frequency
- Recording FM
- I Add to Preset
- | Auto Preset
- | Searching Preset
- I Delete Preset
- I FM Region
- | FM Search Level
- Timer FM Rec.
- Viewing a Text
- Setting Main Functions in Text Mode
- I Setting a Bookmark
- | Bookmark
- | Text Viewer Color
- Viewing an Image
- Viewing a Video
- Playing a Game
- [How to Play]
- Using USB Host
- I Connecting an External Device
- I Transferring Files from an External Device to the Player
- I Deleting Files in an External Device
- I Transferring Files from the Player to an External Device
- I Deleting Files in the Player
- | YP-T8 USB HOST Compatible
- Setting the Advanced Functions
- Selecting the Play mode
- Setting Sound Effect
- DNSe
- 3D-User Set
- [3D]
- I 3D-User Set
- [Bass Enhance]
- I Street Mode
- I User EQ Set
- I Play Speed
- | Search Speed
- I Intro Time
- Record Settings
- Time/Alarm Settings
- Bit Rate
- | Auto Sync
- | Date/Time Set
- I Alarm Set
- I Sleep
- Display Settings
- | Scroll Speed
- Backlight Time
- Clock Screen Saver
- Language Setting
- System Settings
- Language
- I Deleting a File
- | Auto Power Off
- Resume
- [Music]
- [Text]
- [Video]
- I Beep
- Default set
- Format
- Viewing System Information
- MENU Table
- I About
- [Firmware Version]
- [Memory]
- [Files]
- Troubleshooting
- The software doesn't work
- The player does not work and the LCD displays nothing.
- In Play mode, music is not played after pressing the Play button.
- Files cannot be downloaded.
- The backlight is off.
- Buttons on the player does not work.
- Play Time is not displayed correctly during playback.
- The file name and Tag information are not displayed correctly.
- There is a file saved in the player, but "No File" appears in the screen.
- I cannot properly connect the player to the PC.
- Specifications
- MEMO
- — EUROPE ONLY —
Brand : SAMSUNG
Model : YP-T8Q/ELS
Category : Mp3 player