
NT-SD-701 - Home Automation Controller AMX - Free user manual and instructions
Find the device manual for free NT-SD-701 AMX in PDF.

| Type of Product | Home Automation Controller (N-Touch) |
| Brand | AMX |
| Model | NT-SD-701 |
| Connectivity | Ethernet (RJ-45), serial ports |
| Power Supply | 12V DC, 2A (typical) |
| Dimensions (approx) | 8.5 in x 1.75 in x 6 in (21.6 cm x 4.4 cm x 15.2 cm) |
| Weight (approx) | 2 lbs (0.9 kg) |
| Primary Function | Control and automation of audio/video systems, support for N-Command and Panel Builder |
| Software | Panel Builder, JavaScript scripting, N-Command compatible |
| Control Capacity | Supports up to 256 endpoints (encoders/decoders) |
| Mounting | Rack-mountable (optional kit) |
| Operating Temperature | 0°C to 40°C (32°F to 104°F) |
| Humidity | 10% to 90% non-condensing |
| Included Accessories | Power supply, mounting hardware, user manual (PDF) |
| Warranty | 2 years (typical AMX warranty) |
Frequently Asked Questions - NT-SD-701 AMX
LeftTV.switch(MediaPlayer); in the button script.LG_TV_ON = "6b 61 20 30 20 30 31 0d";. Then use LeftTV.serialHex(LG_TV_ON); and LeftTV.dviOn(); to turn on, or the off equivalents.RightTV.getStatus(function() { if (RightTV.status.stream == MediaPlayer.status.stream) { RightTV.switch(Laptop); } else { RightTV.switch(MediaPlayer); } });LeftTV = N_Series("169.254.10.25");. You can also define global variables like serial commands.asciiToHex("ka 0 01") + " 0d"; in JavaScript.http:///panels/modules.php .print() to echo an object to console. Check the Logs page on the device to see recent commands.User questions about NT-SD-701 AMX
0 question about this device. Answer the ones you know or ask your own.
Ask a new question about this device
Download the instructions for your Home Automation Controller in PDF format for free! Find your manual NT-SD-701 - AMX and take your electronic device back in hand. On this page are published all the documents necessary for the use of your device. NT-SD-701 by AMX.
USER MANUAL NT-SD-701 AMX
The goal of this tutorial is to introduce the JavaScript interface of the N-Touch controller. Throughout the tutorial, programming terminology is used, but little to no knowledge of JavaScript is assumed. Instead, you are encouraged to copy/paste the examples and modify them to suit your needs.
NOTE: For links to more detailed information outside the scope of this tutorial, see the section Additional Resources on page 7.
For this tutorial, we are going to build a control panel which allows the following control at the touch of a button:
- Switching multiple sources (a Media Player and a Laptop) to multiple displays (two TVs).
- Turning a TV on and off using serial commands to enable and disable the video port.
- Toggle a display's source back and forth based on feedback.
NOTE: The system example used for this document is shown in FIG. 1 and is built using N2000 Encoders and Decoders. However, the procedure given would be applicable whether the device is controlling an N1000, N2000, or N3000 based system. When using N-Command, ports 80 and 3001 cannot be blocked for the N-Command device's IP addresses (in order for Panel Builder to work correctly).

flowchart
graph TD
    A["MEDIA PLAYER"] --> B["ANX"]
    B --> C["N2000 ENCODER"]
    C --> D["ANX"]
    D --> E["N2000 ENCODER"]
    E --> F["LAPTOP"]
    G["TV 1"] --> H["ANX"]
    H --> I["N2000 ENCODER"]
    I --> J["ANX"]
    J --> K["N2000 ENCODER"]
    K --> L["TV 2"]
    style A fill:#f9f,stroke:#333
    style G fill:#bbf,stroke:#333
    style B fill:#dfd,stroke:#333
    style D fill:#dfd,stroke:#333
    style H fill:#dfd,stroke:#333
    style J fill:#dfd,stroke:#333
    style K fill:#dfd,stroke:#333
    style L fill:#dfd,stroke:#333
FIG. 1 Example Setup
Step 1: Create a New Project
- Launch Panel Builder. The Welcome screen appears.
![2. Click the New button. Welcome to the panel builder. Would you like to create a new, open, or import an existing project? Recent: [Choose...] New Open Import](/content/2026/06/1189531/images/44d891cd2984be8e901f55249b1855ac9db4fce5b78805df9b1d5cf90304e6b8.jpg)
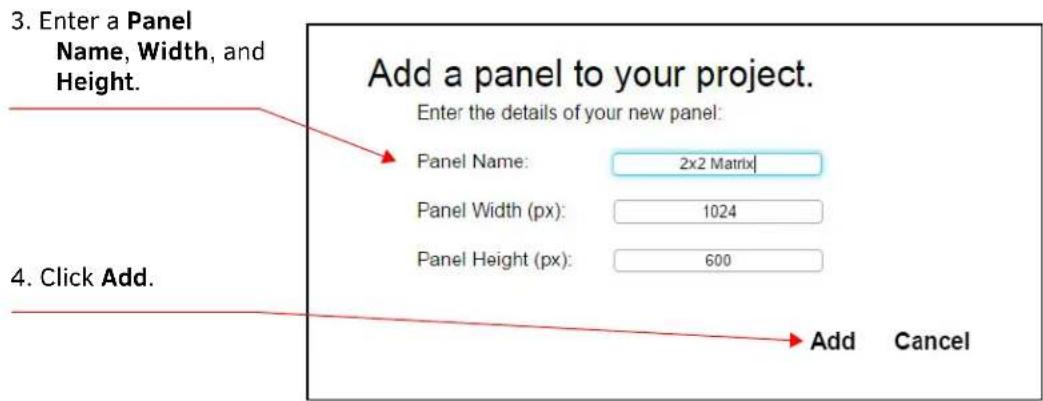
FIG. 2 Creating a Project and Adding a Panel
- The system launches the Project editor (as shown in FIG. 3).
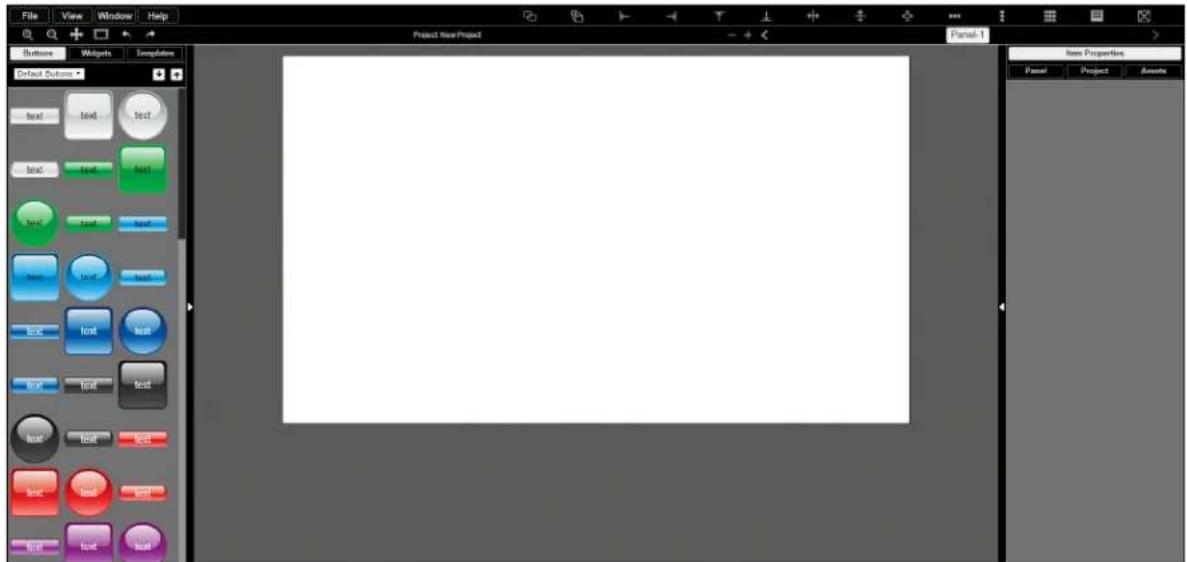
FIG. 3 Project Editor
- For this tutorial, we begin by adding eight buttons. Drag and drop buttons from the left into the project space as shown in FIG. 4. Click in the text field to rename your buttons.
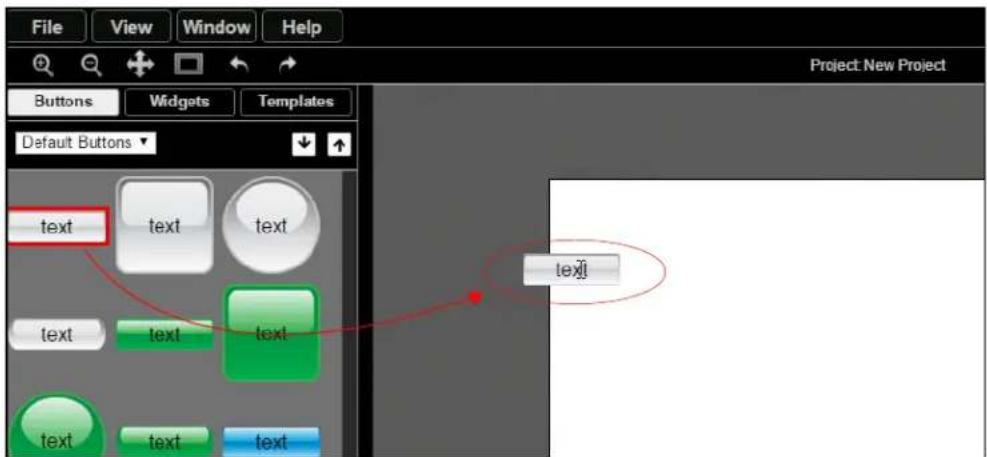
FIG. 4 Adding Buttons
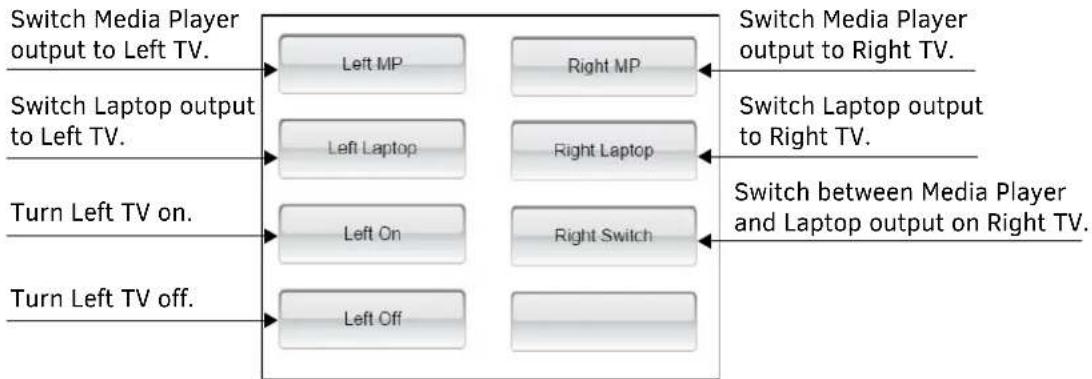
- Continue dragging and naming buttons until you have the setup displayed in FIG. 5. Once this tutorial is complete, the buttons will perform as described in FIG. 5's callouts.
flowchart
graph TD
    A["Switch Media Player output to Left TV."] --> B["Left MP"]
    A --> C["Right MP"]
    D["Switch Laptop output to Left TV."] --> E["Left Laptop"]
    D --> F["Right Laptop"]
    G["Turn Left TV on."] --> H["Left On"]
    G --> I["Right Switch"]
    J["Turn Left TV off."] --> K["Left Off"]
    B --> L["Switch Media Player output to Right TV."]
    E --> M["Switch Laptop output to Right TV."]
    H --> N["Switch between Media Player and Laptop output on Right TV."]
FIG. 5 Button Definitions
Step 2: Discover Encoder/Decoder IP Addresses
If you do not already know the IP addresses of your Encoders and Decoders, use N-Able to discover them.
NOTE: N-Able is SVSI's free device management software. Follow these links to download:
- PC version - http://www.amx.com/products/N-ABLE-PC.asp
- Mac version - http://www.amx.com/products/N-ABLE-MAC.asp
For this tutorial, we are using two N2000 Decoders and two N2000 Encoders to connect to our displays (i.e., Left and Right TVs) and our sources (i.e., Media Player and Laptop). The Decoder and Encoder IP addresses are as follows:
| Display/Source Device Type | Connected to... Decoder/Encoder IP Address | |
| Left TV N2-DECODER | 1 169.254.10.25 | |
| Right TV N2-DECODER | 2 169.254.10.26 | |
| Media Player N2-ENCODER | 1 169.254.10.27 | |
| Laptop N2-ENCODER | 2 169.254.10.28 | |
Step 3: Create Startup Script Using JavaScript Objects
Follow these steps to create a startup script using JavaScript objects.
1. Under Project>Setup Script, click the view button.

FIG. 6 Creating Startup Script
3. The Project Setup Script window is displayed. Enter the script below:
//Create N_Series objects of all our units
LeftTV = N_Series("169.254.10.25");
RightTV = N_Series("169.254.10.26");
MediaPlayer = N_Series("169.254.10.27");
Laptop = N_Series("169.254.10.28");
This script defines LeftTV, RightTV, MediaPlayer, and Laptop as N_Series objects that can be used throughout our scripts. Defining an N_Series also calls .getStatus() to do a one-time update of the current status of that unit.
NOTE: Copy/paste scripts from this document and edit to fit your system requirements.
4. Now enter the script below to define your serial on and serial off string.
//Turn LG TV on
LG_TV_ON = "6b 61 20 30 20 30 31 0d";
//Turn LG TV off
LG_TV_OFF = "6b 61 20 30 20 30 30 0d";
NOTE: For this example, we are using the HEX commands to turn an LG TV off and on. Your TV may be different. If you only know your TV's commands in ASCII, do one of the following:
- Change the script to read: LG_TV_ON = asciiToHex("ka 0 01") + " 0d"; LG_TV_OFF = asciiToHex("ka 0 00") + " 0d";
- Convert the ASCII command to HEX. A convenient way of doing this is to use N-Able (SVSI's device management software discussed earlier on page 3). From N-Able's main menu, select Tools > Serial Commands. Enter the ASCII command, and copy/paste the converted HEX command.
- Once the script is edited to match your needs, click the Save button. See FIG. 7.
![Default Project Setup Script tcpclient 192.168.1.12 50001 message/data ascii [SVSI...] add //Create N_Series objects of all our units LeftTV = N_Series("169.254.10.25"); RightTV = N_Series("169.254.10.26"); MediaPlayer = N_Series("169.254.10.27"); Laptop - N_Series("169.254.10.28"); //Turn LG TV on LG_TV_ON = "6b 61 20 30 20 30 31 0d"; //Turn LG TV off LG_TV_OFF = "6b 61 20 30 20 30 30 0d"; Help Save Can](/content/2026/06/1189531/images/03f8d0db0d597f56ef2d32a2fab988f5efc311cbed272fe27828cc40784b1b8d.jpg)
FIG. 7 Enter and Save Script
NOTE: This is far more convenient than using raw IP addresses with the tcpclient function. Also, the objects have feedback and methods to make our code easier which will be shown next.
Step 4: Edit Button Scripts for Switching Displays and Sources
Follow these steps to add functionality which will allow you to:
- Switch Media Player output to the Left and Right TVs (using the Left MP and Right MP buttons).
-
Switch Laptop output to the Left and Right TVs (using the Left Laptop and Right Laptop buttons).
-
In the Project editor main page, click the Left MP button.
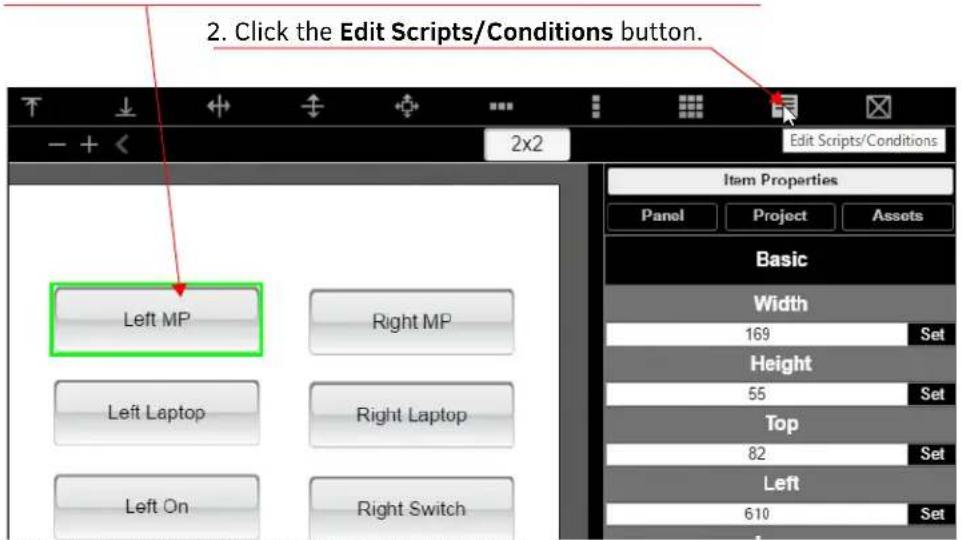
FIG. 8 Launch Left MP Button's Script Editor
- Enter (copy/paste) the following script into the script editor. This script causes the Left TV to display the Media Player source (see FIG. 9).
LeftTV.switch(MediaPlayer);

FIG. 9 Left TV - Media Player Script
- Once the script is edited to match your needs, click the Save button.
- Launch the Left Laptop button's script editor. See FIG. 10.
Click the Left Laptop button and click the Edit Scripts/Conditions button.

FIG. 10 Launch Left Laptop Button's Script Editor
-
Enter (copy/paste) the following script into the script editor. This script causes the Left TV to display the Laptop source:
LeftTV.switch(Laptop); -
Once the script is edited to match your needs, click the Save button.
NOTE: The switch script switches the stream of a Decoder. It can accept a raw stream number (such as 200) or it can accept another N_Series object.
- Save the project so that you can test the changes made so far.
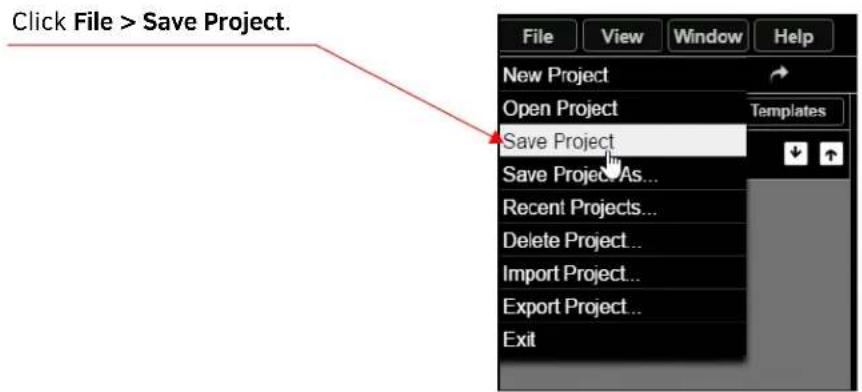
Click Here's a link to your project to display the panel in your browser:

FIG. 11 Saving Your Project to Test
- The Left MP and Left Laptop buttons should now be active. Click the buttons to switch the Left TV display between the two sources.
- Repeat this process for the Right TV, using the following scripts:
• Right MP button script:
RightTV.switch(MediaPlayer);
• Right Laptop button script:
RightTV.switch(Laptop);
- Again, save the project so that you can test the changes made so far. The N-Touch now has a functional 2x2 matrix.
Step 5: Edit Startup Scripts for Turning a TV On/Off
Follow these steps to add functionality which will allow you to turn the Left TV display off and on.
- In the Project editor main page, click the Left On button.
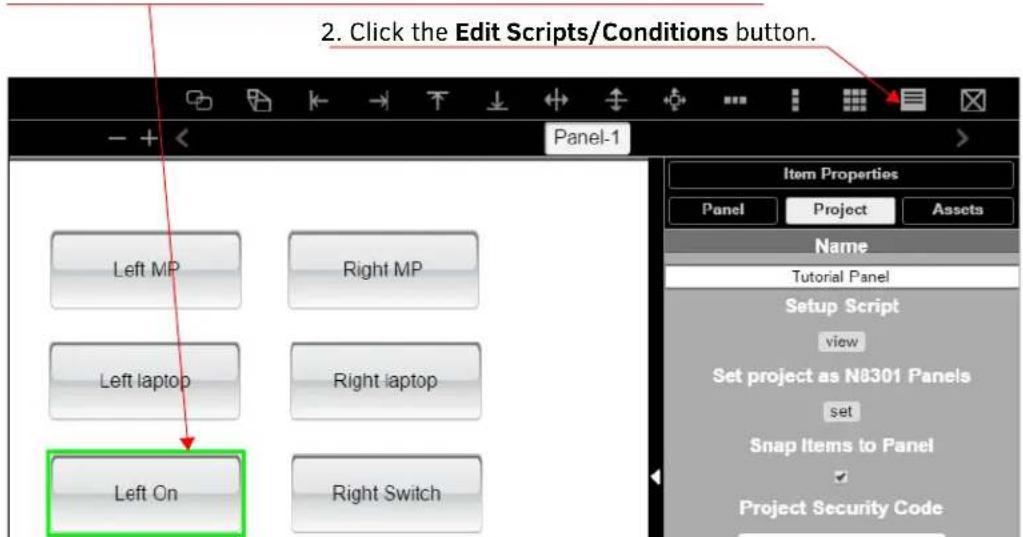
FIG. 12 Launch Left On Button's Script Editor
- Enter (copy/paste) the following script into the script editor. This script sends the serial HEX string and turns the DVI on.
LeftTV.serialHex(LG_TV_ON);
LeftTV.dviOn();
- Repeat the process for the Left Off button using the following script:
LeftTV.serialHex(LG_TV_OFF);
LeftTV.dviOff();
- Once the script is edited to match your needs, click the Save button.
The .serialHex() is a function built in to N_Series objects to send a space-delimited string of HEX characters from the serial port. Because LG_TV_ON was defined in the Startup Script, we can use a variable name instead of retyping a long string of characters. Assuming an LG TV is connected properly to the LeftTV's serial port, those buttons should now turn the TV off and on. The dviOff() and dviOn() are also built-in N_Series commands. Some TVs will automatically turn off and on when disconnected. If yours supports this, using these commands to turn on/off the Decoder's output may be preferred.
Step 6: Toggle Scripts
Follow these steps to add functionality which will allow you to use the Right Switch button to toggle the Decoder (connected to the Right TV) between the two Encoders (depending on the stream it is currently on). In other words, if the Right TV is currently displaying output from the Laptop, clicking the Right Switch button causes the Right TV to begin displaying Media Player output.
This example demonstrates configuring a button to function based on feedback and will be the most complicated script in this tutorial.
- Launch the Right Switch button's script editor.
- Copy/paste the following script into the editor:
RightTV.statusStatus(function() {
    if (RightTV.status.stream == MediaPlayer.status.stream) {
    RightTV.switch(Laptop);
    } else {
    RightTV.switch(MediaPlayer);
    }
});
The commands are defined individually below:
RightTVsquareStatus()
This updates the status of RightTV. The getStatus() function accepts another function as a parameter. This is called a "callback function." This function gets executed when the get status is finished.
if (RightTV.status.stream == MediaPlayer.status.stream) {
All the statuses are available in a .status object of your N_Series object. To look at the current stream number of RightTV, we look at the RightTV.status.stream. The if statement is asking, "Does this stream number equal the stream number of the MediaPlayer?"
RightTV.switch(Laptop);
If the stream equals the MediaPlayer stream, then switch to the Laptop.
} else {
Otherwise....
RightTV.switch(MediaPlayer);
...switch to the MediaPlayer.
The panel is now complete. It supports a 2x2 matrix, serial commands, turning the DVI off and on, and a toggle button that looks at the feedback of a Decoder.
Additional Resources
JavaScript
- Mozilla Developer Network (function reference): https://developer.mozilla.org/en-US/
• Codecademy Online Coding Classes: https://www.codecademy.com - Stack Overflow (programmer Q&A): https://stackoverflow.com/
• W3Schools (tutorial-based help): http://www.w3schools.com/js/ - jQuery (N-Touch has this useful library available for general use): https://api.jquery.com/
Module Help
- Source code and function list are available on the N-Touch: http://
/panels/modules.php - Press F12 (for Mac users, press Command + Shift + I) to launch the built-in Google Chrome debugger on your web browser. The debugger console may show clues to the problem.
If using the Chrome debugger, the method "print()" will echo the entire object to the console.
NOTE: SVSI devices list their most recent commands on the Logs page. Look at Logs to see if the command you expected appears. You may wish to periodically reset the Logs to clear out older commands.

FIG. 13 Logs Page
- Step 1: Create a New Project
- Step 2: Discover Encoder/Decoder IP Addresses
- Step 3: Create Startup Script Using JavaScript Objects
- Under Project>Setup Script, click the view button.
- The Project Setup Script window is displayed. Enter the script below:
- Now enter the script below to define your serial on and serial off string.
- Step 4: Edit Button Scripts for Switching Displays and Sources
- Step 5: Edit Startup Scripts for Turning a TV On/Off
- Step 6: Toggle Scripts
- Additional Resources
- JavaScript
- Module Help
Brand : AMX
Model : NT-SD-701
Category : Home Automation Controller