EU24BL - Telephony AVAYA - Free user manual and instructions
Find the device manual for free EU24BL AVAYA in PDF.

User questions about EU24BL AVAYA
0 question about this device. Answer the ones you know or ask your own.
Ask a new question about this device
Download the instructions for your Telephony in PDF format for free! Find your manual EU24BL - AVAYA and take your electronic device back in hand. On this page are published all the documents necessary for the use of your device. EU24BL by AVAYA.
USER MANUAL EU24BL AVAYA
All Rights Reserved.
Notice
While reasonable efforts were made to ensure that the information in this document was complete and accurate at the time of printing, Avaya Inc. can assume no liability for any errors. Changes and corrections to the information in this document may be incorporated in future releases.
For full legal page information, please see the complete document, Avaya Legal Page for Hardware Documentation, Document number 03-600759.
To locate this document on our website, simply go to http://www.avaya.com/support and search for the document number in the search box.
Documentation disclaimer
Avaya Inc. is not responsible for any modifications, additions, or deletions to the original published version of this documentation unless such modifications, additions, or deletions were performed by Avaya. Customer and/or End User agree to indemnify and hold harmless Avaya, Avaya's agents, servants and employees against all claims, lawsuits, demands and judgments arising out of, or in connection with, subsequent modifications, additions or deletions to this documentation to the extent made by the Customer or End User.
Link disclaimer
Avaya Inc. is not responsible for the contents or reliability of any linked Web sites referenced elsewhere within this documentation, and Avaya does not necessarily endorse the products, services, or information described or offered within them. We cannot guarantee that these links will work all of the time and we have no control over the availability of the linked pages.
Warranty
Avaya Inc. provides a limited warranty on this product. Refer to your sales agreement to establish the terms of the limited warranty. In addition, Avaya's standard warranty language, as well as information regarding support for this product, while under warranty, is available through the following Web site: http://www.avaya.com/support
Copyright
Except where expressly stated otherwise, the Product is protected by copyright and other laws respecting proprietary rights. Unauthorized reproduction, transfer, and or use can be a criminal, as well as a civil, offense under the applicable law.
Avaya support
Avaya provides a telephone number for you to use to report problems or to ask questions about your product. The support telephone number is 1-800-242-2121 in the United States. For additional support telephone numbers, see the Avaya Web site:
http://www.avaya.com/support
Contents
About the EU24/EU24BL Expansion Module 5
Overview 5
Issue Date 5
The EU24/EU24BL Expansion Module 6
Requirements 7
Using the EU24/EU24BL Expansion Module. 7
Adjusting the Viewing Angle 7
To Adjust the Expansion Module Upward 7
To Adjust the Expansion Module Downward 7
Viewing the Alternate Display. 8
Selecting a Call Appearance/Feature Button 8
Changing the EU24/EU24BL Contrast 8
Changing the Display Contrast Using a 2420 Digital Telephone . . . . . . 8
Changing the Display Contrast Using a 4620/4620SW, 4621SW, 4622SW, or 4625SW IP Telephone. 9
Understanding Call Appearance/Feature Button Status Icons . . . . . . . . . . 10
Contents
About the EU24/EU24BL Expansion Module
Overview
The EU24/EU24BL Expansion Module is an optional device that extends the number of call appearances and Feature buttons available on the telephone. The EU24 and EU24BL Expansion Modules are identical in terms of features and functionality. The EU24BL has a backlit display area and is used with different telephone models than the EU24, which does not have a backlit display.
Use the EU24 with these Avaya telephones:
●2420 Digital Telephone
●4620/4620SW IP Telephone
●4625SW IP Telephone
Use the EU24BL with these Avaya telephones:
●4621SW IP Telephone
●4622SW IP Telephone
The expansion module has 24 buttons arranged in two columns. Depending on how they have been programmed for your call processing system, these buttons can be call appearances, which are lines for incoming and outgoing calls, or features like Call Forwarding.
Issue Date
This document was issued for the first time in May, 2002. This document was revised for Issue 2 in April, 2005 to include the EU24BL Expansion Module. Procedures to adjust the expansion module's contrast and its viewing angle were also added for Issue 2.
This document was revised in November, 2006 for software Release 2.7 to add the 4625SW IP Telephone.
The EU24/EU24BL Expansion Module
Figure 1 shows a top view of the EU24/EU24BL, with the left column displayed for illustration purposes.
Figure 1: The EU24/EU24BL Expansion Module
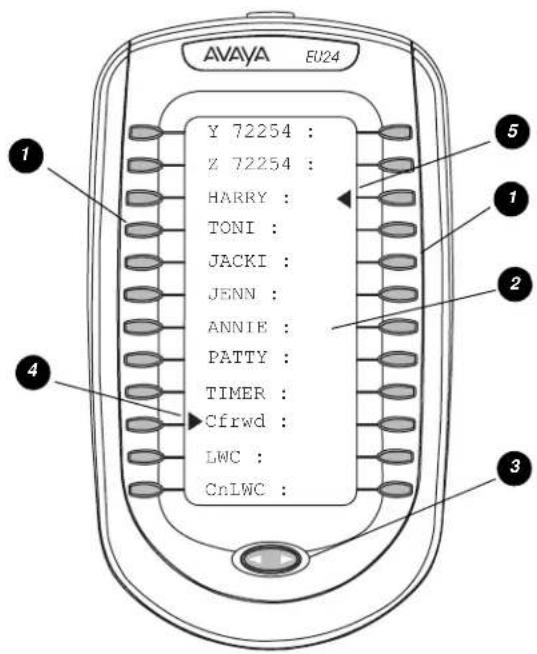
1 Call Appearance/Feature buttons
2 Display
3 Alternate Display button
4 Feature Active icon for feature in left column
5 Feature Active icon for feature in right column
Requirements
Before you can use the EU24/EU24BL Expansion Module, you must connect the module to the telephone. See the EU24/EU24BL Expansion Module Installation and Safety Instructions (555-233-136) for instructions.
Using the EU24/EU24BL Expansion Module
The following sections explain how to use the features of the EU24/EU24BL Expansion Module. For more information, consult your system administrator.
Adjusting the Viewing Angle
You can adjust the expansion module's viewing angle to match that of the phone to which it is attached.
To Adjust the Expansion Module Upward
- Hold the EU24/EU24BL base with one hand.
- Grasp the top of the module and pull up until the module's height equals that of the telephone.
- Ensure that the movable section on the underside of the module clicks into the appropriate height adjustment notch on the expansion module's base.
To Adjust the Expansion Module Downward
- Hold the EU24/EU24BL base with one hand.
- Depress the button on the top edge of the module and gently push the expansion module down until the module's height equals that of the telephone.
- Ensure that the movable section on the underside of the module clicks into the appropriate height adjustment notch on the expansion module's base.
Viewing the Alternate Display
Although the EU24/EU24BL Expansion Module supports an additional 24 Call Appearance/Feature buttons, it displays only the button labels for one column of 12 buttons at a time. A dotted line separates the left column from the right column. When you view the labels and icons for the left column, the icons for any active or selected right column features display to the right of the dotted line. To view the column not currently displayed, press the Alternate Display button. You can alternately press any Call Appearance/Feature button on the column not currently displayed. Doing so displays that column and selects the line/feature associated with the button you pressed.
Selecting a Call Appearance/Feature Button
To select an available call appearance or feature, press the button next to the appropriate label in the column currently displayed. If you select a button not programmed as a Call Appearance or a Feature button, an error tone sounds.
If the desired call appearance or feature is not currently displayed, use the Alternate Display button to access the additional Call Appearance/Feature button labels. See Viewing the Alternate Display for more information.
Changing the EU24/EU24BL Contrast
On first-time startup, the display area contrast is set to a mid-level. To adjust it to better suit your work environment and lighting, 15 contrast levels are available.
Note:
You might not be able to distinguish between all 15 contrast level settings. Some of the upper and/or some of the lower contrast level settings might appear identical to adjacent settings. This is normal.
Changing the Display Contrast Using a 2420 Digital Telephone
- With the EU24 attached to your phone, press the telephone's Option softkey.
- Select the Contrast Line/Feature button.
-
Press the Line/Feature button on either side of the line in which you see EU24. Doing so identifies that you want to adjust the display contrast and highlights that line.
-
To brighten the contrast, press the telephone's Right Page button until you reach the desired contrast level. To dim the contrast, press the telephone's Left Page button until you reach the desired contrast level.
Each press results in the contrast being increased or decreased, depending on which page button you press. Chevron symbols provide visual confirmation of the current level.
- Save the contrast level you set by pressing either the telephone's Done softkey or the Exit button. To re-adjust the contrast, repeat this procedure from Step 1.
Changing the Display Contrast Using a 4620/4620SW, 4621SW, 4622SW, or 4625SW IP Telephone
- With the EU24/EU24BL attached to your phone, press the telephone's Options button to access the Options Main screen.
- Select the Contrast Control option from the Options Main screen.
- Press the Line/Feature button on either side of the column in which you see the expansion module's model number, for example, EU24. Doing so identifies that you want to adjust the display contrast and highlights that line.
- To brighten the contrast, press the telephone's Right Arrow softkey until you reach the desired contrast level. To dim the contrast, press the telephone's Left Arrow softkey until you reach the desired contrast level.
Each softkey press results in the contrast being increased or decreased, depending on which arrow softkey you press. Chevron symbols provide visual confirmation of the current level. - Save the contrast level you set by pressing the telephone's Save softkey. To restore the previous setting without changing the contrast, press the Cancel softkey.
The first Options Main screen displays.
Understanding Call Appearance/Feature Button Status Icons
When a call arrives for a call appearance on the EU24/EU24BL Expansion Module, the bell icon blinks on the corresponding call appearance. To answer the call, press the button associated with the call appearance.
The icons displayed on the call appearance allow you to determine the status, for example, on Hold, of each call on the EU24/EU24BL Expansion Module. Table 1 contains an explanation of these icons.
Table 1: EU24/EU24BL Status Icons
| Icon | Condition | Definition |
| None | Idle | The call appearance line is available, or the feature is off. |
| Ringing An incoming call is waiting to be answered. | ||
| Active The call you are currently handling. | ||
| On hold A call currently on hold. | ||
| On soft hold A call put on hold during a transfer or conference. | ||
| Feature/Line active Button on left side of the display currently is enabled. | ||
| Feature/Line active Button on right side of the display currently is enabled. | ||
| Feature pending Your request is being processed but is not immediately available. | ||
| Feature status The Call Center Q Time feature uses this icon. | ||
| Feature status The Call Center Aux Work feature uses this icon. | ||
| Feature status | The Call Center Service Observing feature uses this icon. | |