Squall - Bag Kelty - Free user manual and instructions
Find the device manual for free Squall Kelty in PDF.

User questions about Squall Kelty
0 question about this device. Answer the ones you know or ask your own.
Ask a new question about this device
Download the instructions for your Bag in PDF format for free! Find your manual Squall - Kelty and take your electronic device back in hand. On this page are published all the documents necessary for the use of your device. Squall by Kelty.
USER MANUAL Squall Kelty
natural_image
Line drawing of a backpack with harnesses and straps (no text or symbols)INSTRUCTION INDEX
Safety Warnings p. 2-3
Care & Cleaning p. 3
Suspension Features p. 4
Custom Fitting your Pack p. 5-9
Frame Shaping p. 9-10
Packing Hints p. 11
Kelty Warranty p. 12

SAFETY INFORMATION -IMPORTANT-
- Read, and follow, all instructions before using this backpack!
- Failure to follow these warnings could result in a potentially hazardous situation which, if not avoided could cause rapid fatigue, death, serious injury or permanent disability to you or others.

WARNING indicates a potentially hazardous situation which, if not avoided, could result in death or serious injury.

CAUTION indicates a potentially hazardous situation which, if not avoided, could result in property damage.

WARNING
THIS BACKPACK MAY AFFECT YOUR COORDINATION AND BALANCE
- Before use, DO familiarize yourself with the added weight of the pack and contents.
- DO use a spotter to assist when hoisting pack onto shoulders.
- When strapping items such as skis to pack, be aware that they can catch on overhead obstructions causing you to lose your balance and fall.
- DO NOT overload pack, don't carry more weight than you can manage.

WARNING
PROTECT YOURSELF
• DO NOT place backpack near a campfire, stove or any open flame.
- Only carry liquid fuel in containers approved for such use and make sure they are tightly sealed before placing in a pack.
CAUTION
DO NOT USE A DAMAGED BACKPACK
- DO check the condition of the backpack before each use.
- DO check to assure all buckles snaps, straps, and adjustments are secure before each use.
- DO NOT use pack if the frame, fabric, straps or buckles are damaged.
- DO NOT use pack if pack is damaged in any way.
- DO NOT leave (store) a pack in direct sunlight. Ultra-violet light will cause materials to weaken and fade.
- For assistance in repairing your pack or answering any questions, call Kelty Customer support staff; toll free at 866-349-7225 (866-FIX-PACK).
CARE AND CLEANING
- Brush off loose dirt with a dry brush.
- As needed, wipe out the inside with a damp sponge and mild soap.
- Rinse only, if possible. Use cold water and a sponge or rinse in a tub without soap.
- Machine wash in front-loading unit (DO NOT use machine with agitator, agitator could cause damage not covered under warranty) with cold water and mild soap (Ivory Flakes, Woolite, Sport Wash, Etc.) Not detergents.
- DO NOT soak in soapy water, it may cause damage to the coated fabric.
- Rinse thoroughly to eliminate soap residue.
- DO NOT use a dryer, air dry only.
- Always store in a cool, dry area.
ZIPPER CARE
- Keep loose threads trimmed.
- Keep free from dirt.
- Spray periodically with a non-greasy, non-staining silicone spray designed for fabrics.
- To prevent salt water corrosion on zipper pulls, make sure you rinse with clear water after exposure.
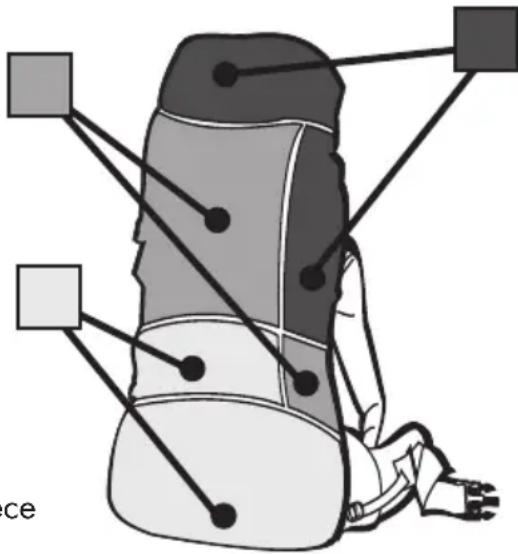
1. SUSPENSTION FEATURES
The Backcountry Storm & Squall suspension features:
HYDRATION system included.
LOAD-LIFTER STRAPS
lift the pack's weight off the shoulders.
adjust vertically on the stays for perfect torso fit.
LIGHTBEAM™ STAYS
provide load transfer, strength and support.
Adjustable height STERNUM STRAP
helps stabilize load.
Flexible, supportive
PLASTIC FRAMESHEET
gives vertical "body" to the backpanel.
Padded WAISTBELT with Scherer Cinch.
BELT STABILIZER STRAPS
on waistbelt help to transfer and control load.
2. FITTING YOUR PACK
Follow these steps IN SEQUENCE to achieve the best fit every time you use your pack. Refer to the figure on page 4 to identify pack parts.
Before starting, loosen all load-lifter & belt stabilizer straps.
A. FIRST weight the pack with at least 25 lb. (35 lb. is ideal).
B. NEXT put the pack on and tighten the waistbelt. Make sure you place the waistbelt in the proper location (Figures 2A & 2B).
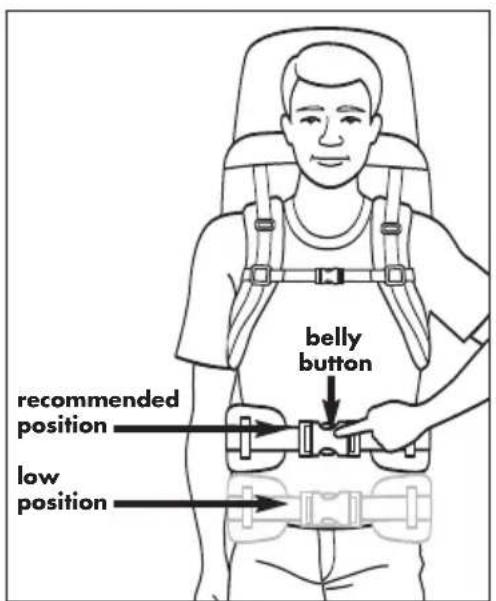
Figure 2A
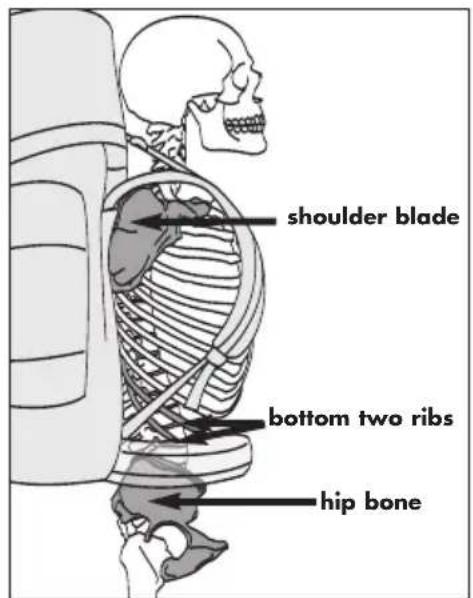
Figure 2B
It is recommended to wear the belt on hip bones, just under the rib cage. If you still prefer to wear the belt low, add one to two inches to your torso length measurement. Figure 2A shows both the preferred placement of the waistbelt and an example of a belt worn low. The low position is not recommended. Once positioned correctly, tighten the belt to prevent it from sliding. (A good rule of thumb is to have the belt buckle approximately over your belly button.)
Benefits of wearing the belt high on the waist:
- Proper loading of the skeletal frame, further supported by the two strongest muscle groups in the body: the quadriceps & gluteals.
- Blood flow & nerves route across the front of the hips; wearing the belt too low can restrict blood flow causing muscle fatigue, nerve pinching and possible numbness.
C. Once the waistbelt is in the correct position, tighten the shoulder straps. To tighten shoulder straps pull the webbing at the lower ends of the shoulder strap down & back. The pad of the shoulder strap should start one to two inches below the top of your shoulder (Figure 2C). (Put a little more load on your shoulders than you want to end up with.) During this operation the load-lifter straps should be kept loose.
With the waistbelt positioned correctly and the shoulder straps as shown below, you have achieved a perfect fit.
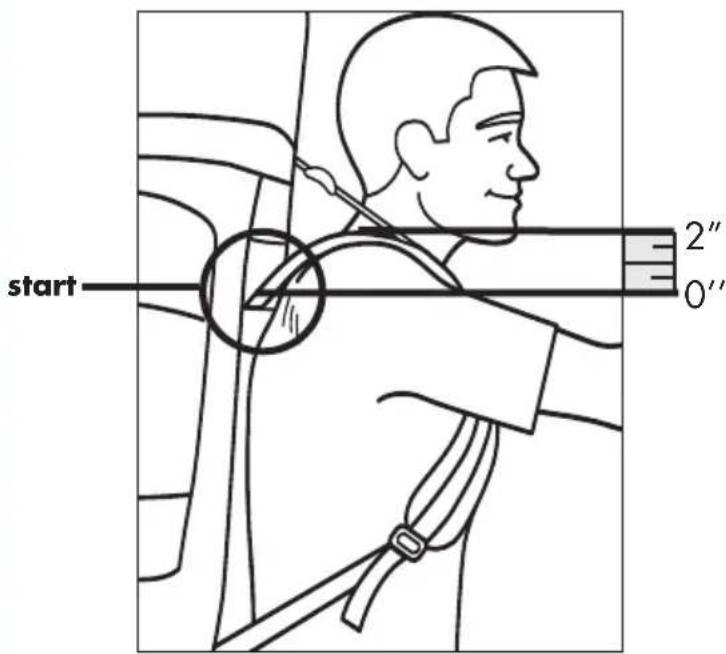
If you do not have the correct shoulder strap position, you will need to adjust the torso length as directed in the following section.
Figure 2C
natural_image
Diagram of a backpack with harnesses and a black arrow indicating a downward motion (no text or symbols)Figure 2D
natural_image
Diagram of a backpack with harnesses and a downward arrow indicating a loading or lifting mechanism (no text or symbols present)Figure 2E
natural_image
Diagram of a backpack with two hanging harnesses and directional arrows indicating movement or force (no text or symbols present)Figure 2F
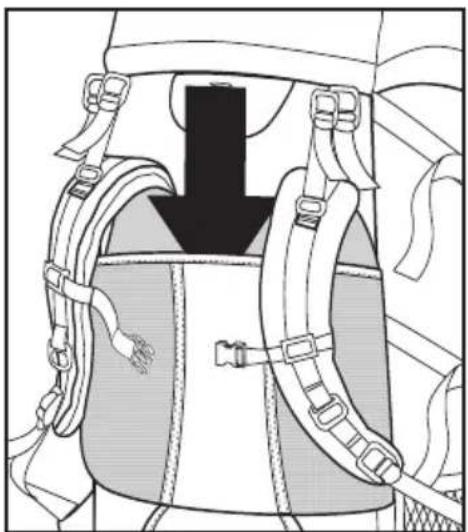
I. Insert an open hand between the hook & loop material in front of the packbag but behind the shoulder straps (Figure 2D).
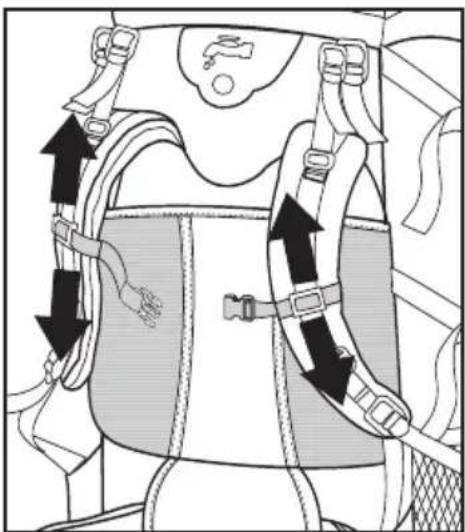
II. Insert your other open hand behind the padded backpanel but in front of the shoulder straps (Figure 2E).
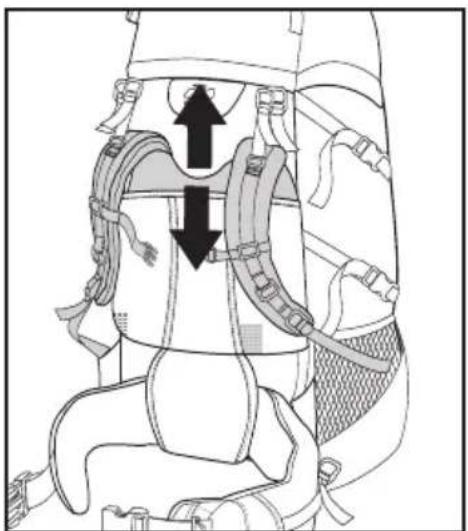
III. Slide the shoulder straps into the desired position by pulling up or pushing down on the shoulder straps (Figure 2F).
natural_image
Diagram of a vehicle back cover with belt and harnesses, showing directional arrows indicating movement (no text or symbols)Figure 2G
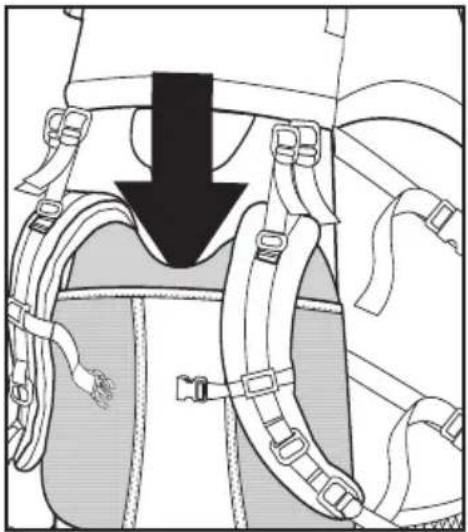
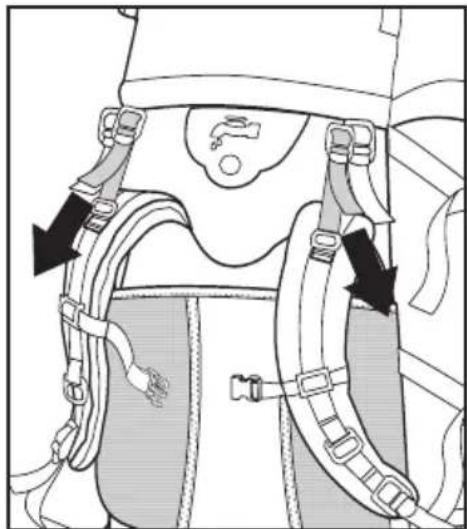
D. Snug the load-lifter straps (Figure 2G) This lifts the shoulder straps (and the pack's weight) off the top of your shoulders. Don't allow the load-lifters to pull the shoulder straps more than 1/2" off your shoulder, or it will cause pressure points. If the pack feels better the more you pull the load lifter, the stays might need to be adjusted.
natural_image
Diagram of a vehicle's seatbelt system with belt and harness (no text or labels)Figure 2H
E. OPTIONAL- Position the sternum strap (Figure 2H) on your chest, and pull it snug. The sternum strap should cross your chest high, just below your clavicle, so it doesn't interfere with your breathing. Some people find it more comfortable not to use the sternum strap when breathing hard—especially at altitude.
natural_image
Technical illustration of a seatbelt buckle with belt and mesh pattern (no text or symbols)Figure 21
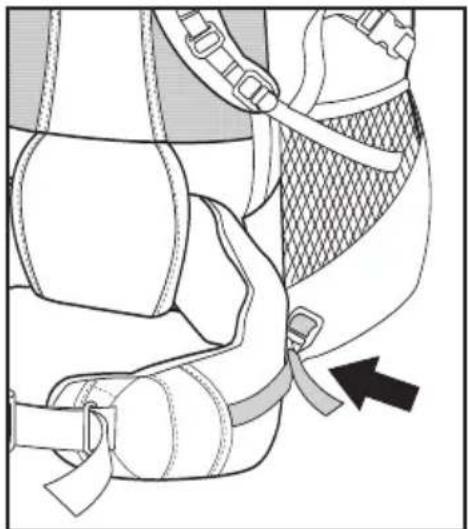
F. OPTIONAL- Pull the belt stabilizers just snug (Figure 2I). If overtightening them feels good, you might need to bend more curve into the frame in the lumbar region. Overtightening causes gaps between you and the belt. Belt stabilizers are best left loose for the first 15-30 minutes of hiking.)
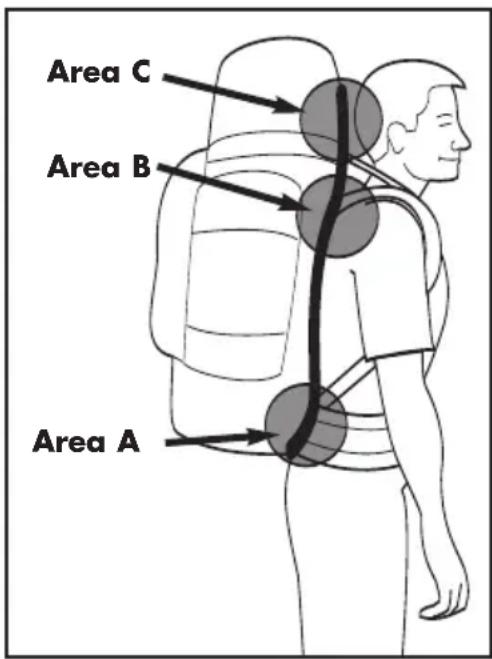
Figure 2J
G. When the waistbelt and shoulder straps are in the correct positions, walk around and notice how the pack feels against your back. The pack should conform to your back as in Figure 2J. Use the short evaluation below to ensure a great fit. Take notice of any pressure points and trouble shoot them in the next section.
| feels great | discomfort/pressure | |
| Area A- Lumbar Pad(bottom of the belt) | □ top | □ top |
| □ mid | □ mid | |
| □ bottom | □ bottom | |
| Area B - Shoulder Pad(top of back) | □ | □ |
| Area C - Headroom | □ | □ |
3. FRAME SHAPING
If you have answered "discomfort/pressure" see, the "Frame Shaping" section on page 10.
When you are walking with weight in the pack, the pack's shape should be exactly the same as your back. We put an average curve into the frame at the factory, but some additional fine-tuning may be required.
HINT: Most bending of the stays can be done over a knee without taking the stays out of the pack. (Bending and re-bending the stays won't hurt them.) Fit your pack with an average load, wear your hiking boots, and carefully load your pack with the weight close to your back just like you would for a trip. Walk around. Use the guide below to address problems.
HINT: Wearing a pack with wrinkled clothing or seam lumps under the waistbelt can cause pressure points. Belt loops and elasticized waistbands are classic sources of discomfort.

PROBLEM: Pressure at bottom of belt
Bend at lumbar pad top (X) to tuck the pad into the small of your back.
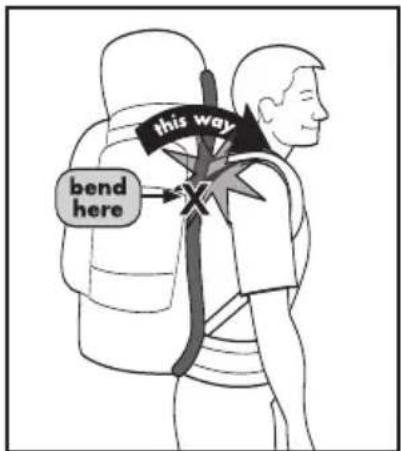
PROBLEM: Gap at top of shoulder
Add curve to the frame and then bend back the top (X).
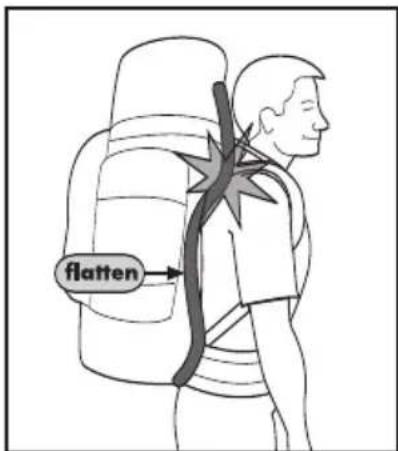
PROBLEM: Pressure at top of back
Flatten the curve of the frame where it bows away from the back.
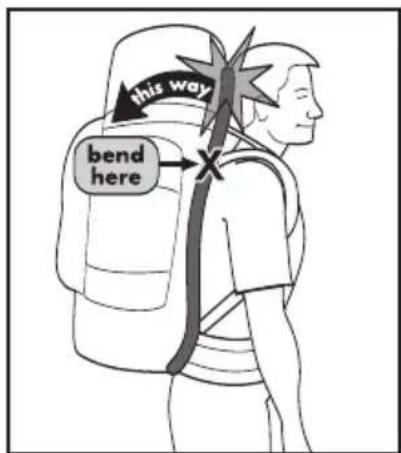
PROBLEM: Need more headroom
Bend the frame away from the head (at X).
4. PACKING HINTS
Loading the pack greatly affects your comfort-follow the guidelines below for optimum comfort.
MEDIUM ITEMS
- Cooking utensils
- Some clothing
- Some foods
- Tent body and fly
LIGHTEST ITEMS
- Sleeping bag
- Pad
- Rain, wind gear
- Bivy sack
- Bulky clothing/ fleece
HEAVY ITEMS
- Water
- Stove
- Fuel
- Food
- Tent poles
NOTE: If your pack feels like it's leaning away too much from your shoulders, you have a weight distribution problem.
Hints to keep you comfortable when out on the trail:
- When balance is crucial for off-trail travel, climbing or skiing, pack heavy items centered and close to the back.
- The sleeping bag should always go in or on the bottom of the pack.
- Pack clothing and other light gear around heavy items (ie. a stove or climbing gear) in order to keep them from shifting.
- Items you will need during the day should be packed in the top of the main compartment, the top pocket, or side pockets.
- Foam pads and odd-sized equipment (such as long tent poles) can be carried on the outside of the pack. Use the appropriate accessory patches, ice axe loop, or ski slots for these items.
- Do not put heavy items like water bottles or climbing equipment in pockets located far from your back.
natural_image
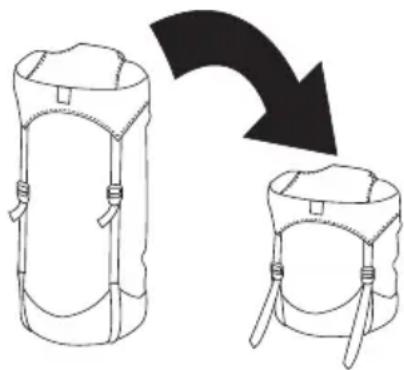
Diagram showing two backpacks with straps and a curved arrow indicating direction (no text or symbols)HINT: Compression stuff sacks help increase available room in the pack by compressing the size of your sleeping bag.
KELTY Lifetime Warranty
Kelty takes pride in its workmanship and undertakes to manufacture the best possible products. Kelty products are covered under warranty, to the original owner, for the lifetime of the product, against defects in materials or workmanship.
Since no Kelty product is indestructible, Kelty's warranty does not cover defects attributable to or resulting from normal wear and tear (ie: exhausted zippers), natural hazard damage (ie: weather, animals, ultraviolet [UV] damage on tents), abuse or alteration.
All products being returned require a Return Authorization
number. Service under our warranty is available to the original purchaser by returning the product to any authorized Kelty dealer or by contacting our customer service department at 1-866-349-7225 (1-866-FIX-PACK) for a Return Authorization number.
If, after inspection, we determine that the product is defective, we will repair or replace it at our discretion, free of charge. If your Kelty product needs service or repair that is not covered under warranty, we will provide the necessary service at a reasonable charge.
This warranty gives you, the original purchaser, specific legal rights. You may also have other rights, which vary from state to state.