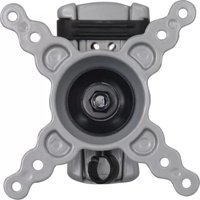
PWLB243 - Wall mount Pyle - Free user manual and instructions
Find the device manual for free PWLB243 Pyle in PDF.


| Product Type | Wall Mount |
| Brand | Pyle |
| Model | PWLB243 |
| TV Size Range | 10" - 24" |
| Maximum Weight Capacity | 15 kg (33 lbs) |
| VESA Compatibility | 75x75 mm, 100x100 mm |
| Tilt Angle Range | -5° to +15° |
| Material | Steel |
| Color | Black |
| Installation Surface | Wood stud or solid concrete wall |
| Cable Management | Yes, integrated |
| Hardware Included | M4/M5 bolts, spacers, washers, concrete anchors, long bolts, allen wrenches, hexagon screw, box wrench |
| Number of People Required for Installation | 2 |
| Indoor Use Only | Yes |
| Safety Warning | Choking hazard from small parts |
Frequently Asked Questions - PWLB243 Pyle
User questions about PWLB243 Pyle
0 question about this device. Answer the ones you know or ask your own.
Ask a new question about this device
Download the instructions for your Wall mount in PDF format for free! Find your manual PWLB243 - Pyle and take your electronic device back in hand. On this page are published all the documents necessary for the use of your device. PWLB243 by Pyle.
USER MANUAL PWLB243 Pyle
Thank you for choosing our product
Pyle Audio
1600 63rd st. Brooklyn, NY. 11204
(718)236-8000

Warning
This product contains small items that could be a choking hazard if swallowed. Keep these items away from young children
I. Make sure these instructions are read and completely understood before attempting installation. If you are unsure of any part of this installation, contact a professional installer for assistance.
2. The wall or mounting surface must be capable of supporting the combined weight of the mount and the display; otherwise the structure must be reinforced
3. Safety gear and proper tools must be used. A minimum of two people are required for this installation. Failure to use safety gear can result in property damage, serious injury or death.

PYLE®
Home
INSTALLATION GUIDE
Item No.:PWLB243Item No.:PWLB243

natural_image
Technical line drawing of a mechanical assembly with gears and housing (no text or symbols)• TV Size Range: 10"2-4"
• Maximum Weight Capacity: 15kg/33lbs
- Adjustable angle: -5 15
• Integrated Cable management
www pyleaudio com.
MADE IN CHINA

CAUTION
This product was designed to be installed on wood stud walls and solid concrete walls. Before installing, make sure the supporting surface will support the combined load of the equipment and hardware. Never exceed the Maximum Load Capacity. This product is intended for indoor use only. Use of this product outdoors could lead to product failure or personal injury.
Hardware Kit: Hardware Kit.

| ID | Qty | Description |
| A | 4 | M4x12mm bolt |
| B | 4 | M4x25mm bolt |
| C | 4 | M5x12mm bolt |
| D | 4 | M5x25mm bolt |
| E | 4 | Spacer |
| F | 2 | Long bolt washer |
| G | 2 | Concrete Anchor |
| H | 2 | Long bolt |
| I | 2 | Allen Wrench 2x2 5x5( & |
| J | 1 | Hexagon screw |
| K | 1 | Box wrench |

Part 4-Adjusting display and using cord management
Route cords along articulating arm using cord management Articulating arm can be adjusted to position display into desired location. Use allen wrench (I) 5x5 to tighten and loosen the tension screw. Do not overtighten and do not loosen to the point the screws come out.
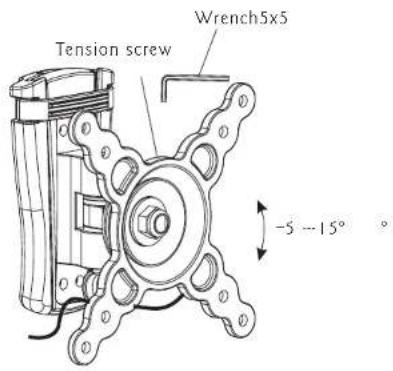
Cable management clip Cable routing access points
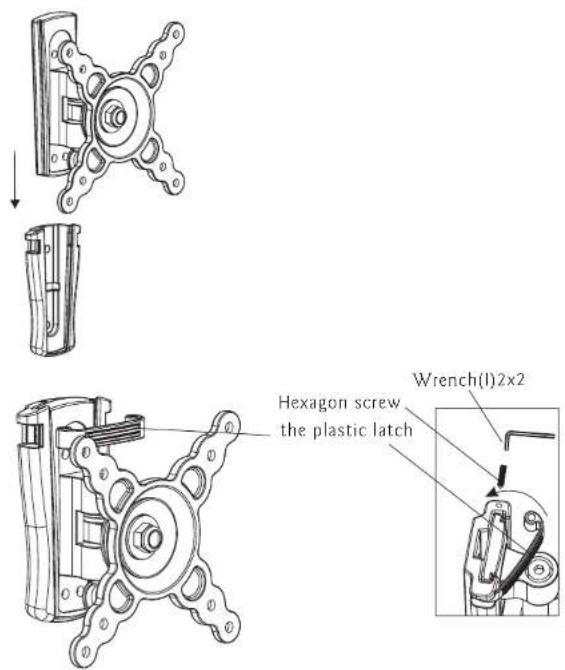
Part 3 Attaching Adapter Plate to Wall Plate
Attach adapter plate to wall plate by sliding flanges of adapter plate into flanges of wall plate. Secure with .Hexagon screw and Plastic latch
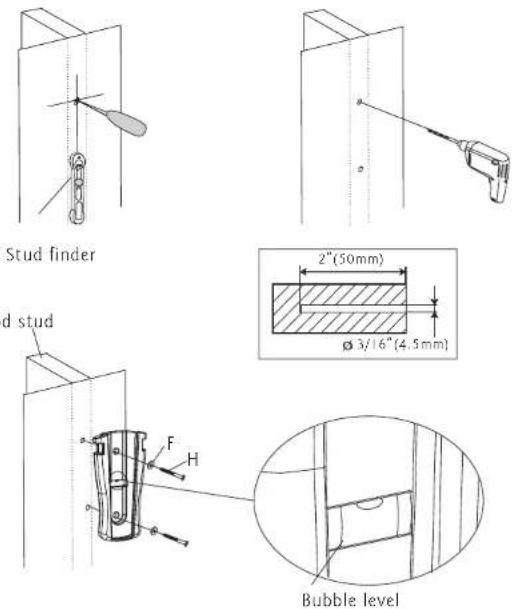
Part 1a-Wood StudiMounting
Use wall plate as template, makes sure it is two and mark mounti holes along the center line of the wood stud. Drill twice (5mm) dia. holes 2" (50mm) deep. Level wall plate and attach to wall with two long bolts (H) and two washers(F). Tighten screws firmly Do not overtighten
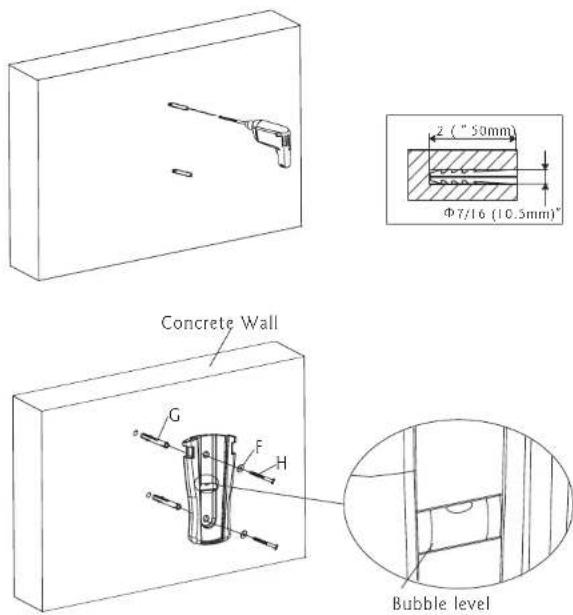
Part IIb-Concrete Wall-Mounting
Level wall plate and use wall as a template to mark two holes. Drill two 7 ^7 16 (10.5mm) dia. holes 2" (50mm) deep. Insert two anchors(G) into holes and secure wall plate with two long bolts(H) and two washers(F). Tighten screws firmly. Do not overtighten
Part 2-Attaching Adapter Bracket to Screen
Determine the proper VESA mounting configuration for your screen. If attaching to screen with Curved back select the small(B) or medium(D) screws. Attach adapter bracket to screen using four selected screws and four spacers(E) as shown in figure 1.
If attaching to screen with flat back select the small(A) or medium(C) screws. Attach adapter bracket to screen using four selected screws as shown in figure 2. Tighten screws firmly. Do not overtighten.

Figure 1
Figure 2
Brand : Pyle
Model : PWLB243
Category : Wall mount