Aquience 850 Bow - Aquarium Aqua One - Free user manual and instructions
Find the device manual for free Aquience 850 Bow Aqua One in PDF.

User questions about Aquience 850 Bow Aqua One
0 question about this device. Answer the ones you know or ask your own.
Ask a new question about this device
Download the instructions for your Aquarium in PDF format for free! Find your manual Aquience 850 Bow - Aqua One and take your electronic device back in hand. On this page are published all the documents necessary for the use of your device. Aquience 850 Bow by Aqua One.
USER MANUAL Aquience 850 Bow Aqua One
natural_image
Exterior view of a modern petri dish with fish and aquatic plants (no signage or text visible)This appliance is not intended for use by children or infirm persons without supervision. Young children should be supervised to ensure that they do not play with the appliance.
Warning: To guard against injury, basic safety precautions should be observed, including the following:
-
Read and follow all safety instructions before using this appliance.
-
Danger: To avoid possible electric shocks, special care should be taken since water is employed in the use of aquarium equipment. For each of the following situations do not attempt repairs yourself. Return the appliance to an authorised service facility for service or discard the appliance.
a) If the light falls into water, do not reach for it, unplug it and then retrieve it. If the electrical components of the appliance get wet, unplug the appliance immediately (non immersible equipment only).
b) If the aquarium shows any sign of abnormal water leakage, immediately unplug it from the power source.
c) Carefully examine the aquarium after installation. It should not be plugged in when there is water on parts which are not intended to be wet.
d) Do not operate any aquarium component if it has a damaged cord or plug, or if it is malfunctioning, or dropped or damaged in any manner.
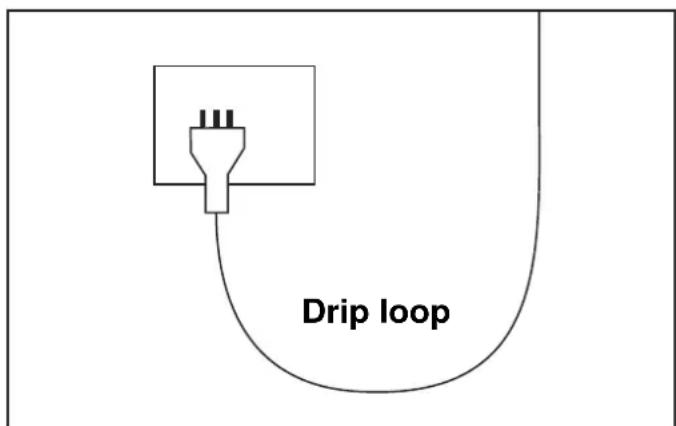
A “drip loop” (See the diagram) should be arranged by the user for each cord connecting an aquarium component to a receptacle. The drip loop is the part of the cord below the level of the receptacle or the connector if an extension cord is used. It is used to prevent water traveling along the cord and coming in contact with the receptacle.
If the plug or receptacle does get wet, do not unplug the appliance. Disconnect the fuse or circuit breaker that supplies the power to the appliance, then unplug and examine for presence of water in the receptacle.
-
Close supervision is necessary when the appliance is used by or near children.
-
Always unplug the aquarium from the electrical outlet, when not in use, before putting on or taking off parts, before any type of maintenance,
or cleaning. Never yank the cord to pull it from the outlet. Grasp the plug and unplug to disconnect.
- Do not use the aquarium for reasons other than the intended use. The use of attachments that are not recommended or sold by the aquarium manufacturer may cause the product to be unsafe. This is not recommended.
- Do not install or store the aquarium where it will be exposed to weather or temperatures below freezing.
- Make sure any component mounted on a tank is securely installed before operating it.
- Read and observe all the important notices on the aquarium and all components.
- Ensure input voltage is the same voltage as your local power supply.
- If an extension cord is necessary, a cord with a proper rating should be used. Care should be taken to arrange the cord so that it will not be tripped or pulled.
- A G.F.C.I (Ground fault circuit interrupter) & surge protector is recommended for all electrical appliances.
- Ensure your hand is dry when turning the power switch on/off and when inserting/removing the power cord from the receptacle.
- If you are in any doubt about the electrical installation or safety of this product you must consult a qualified electrician.
For Guarantee Conditions, please refer to the Guarantee form that is enclosed with this product.
Congratulations, you have purchased one of the finest quality aquariums available. This product will give you many years of excellent service when installed and maintained correctly.
Getting started:
WARNING: the aquarium alone even when empty may weigh up to 150KG. It must be lifted by at least two capable people. Please read all instructions for all appliances before commencing installation.
Step 1: Cabinet set up: please follow the set up instructions for the cabinet enclosed.
Step 2: Preparing the aquarium: remove all packaging from aquarium. Check carefully for any signs of damage to glass and structure. We suggest cleaning the tank inside before positioning on the cabinet. (see cleaning instructions below). NOTE: the aquarium has a protective mat underneath the tank. This must stay there to protect the glass aquarium. Non use of this mat invalidates the guarantee.
Step 3: Setting up the lighting system: once aquarium is in position. (see set up of lighting) Check lighting functions correctly. If you have chosen to change the colour spectrum of your light tubes see (changing your light tubes), do this while the lights are not positioned on the aquarium.
TOP TIP: we suggest removing the lighting when filling and landscaping the aquarium to avoid possibilities of accidental damage.
GENERAL SAFETY NOTICE
It is absolutely imperative that you ensure this cabinet and aquarium is installed upon level flooring. It is also a prerequisite that. you ensure the flooring upon which it is positioned is able to support the weight of this aquarium which could be up to 1000kg including water and decorations. Installation upon uneven flooring will result in poor distribution of weight. Damages to the aquarium, cabinet or equipment and damages caused by leaks due to improper or uneven installation are not covered by the guarantee with this product. We recommend against aquariums above 150KG being installed on 2nd story floorboards.
Connecting your appliance to the mains electricity supply - Country specific instructions.
United Kingdom Only
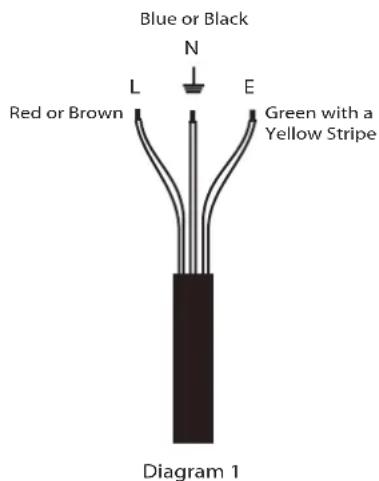
The plug supplied with this product is a sealed plug and we do not recommend removing or changing it. However, should the need arise, only a suitable plug should be connected using the following diagram 1
An approved earth leakage circuit breaker (RCCB) or otherwise known as an Residual circuit current device (RCCD) must be also fitted in the supply line.
IF YOU ARE IN ANY DOUBT ABOUT INSTALLING YOUR APPLIANCE YOU SHOULD CONSULT A QUALIFIED ELECTRICIAN.
Parts Required Contents:

Tools required:
natural_image
Illustration of a screwdriver with a pointed tip (no text or symbols)Glass Aquarium
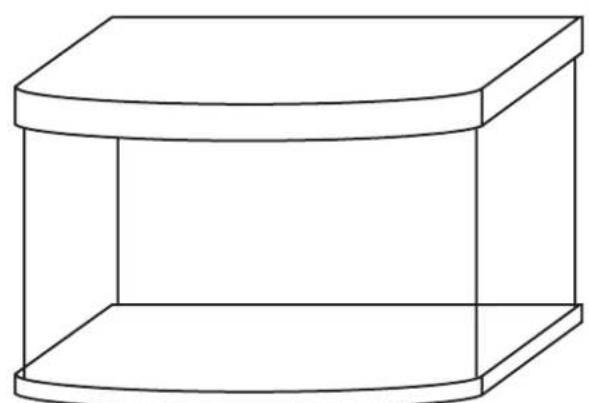
natural_image
Simple line drawing of a 3D rectangular box with a flat top and bottom (no text or symbols)Top panel

natural_image
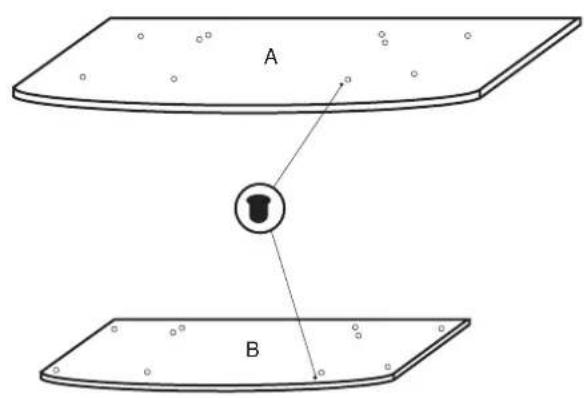
Simple line drawing of a curved surface with scattered dots labeled 'A' (no text or symbols beyond label)Base panel

natural_image
Simple line drawing of a curved rectangular plate with circular holes, labeled 'B' at the center (no text or symbols on the plate itself)Door Back Panel

natural_image
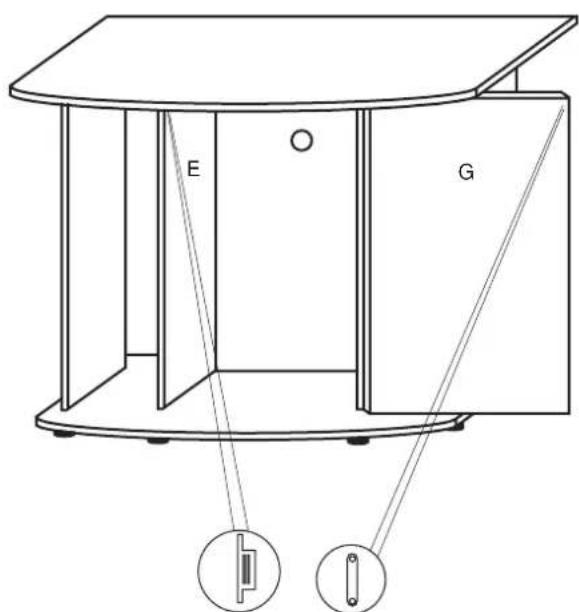
Two rectangular book covers labeled G and H, with no visible text or symbols on covers or background.Outer side panels x2
natural_image
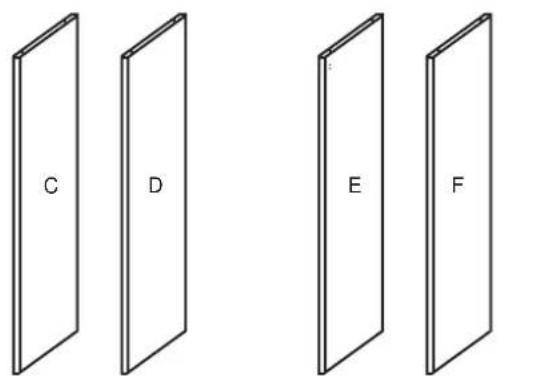
Four identical rectangular panels labeled C, D, E, F, showing different interior designs (no text or symbols beyond labels)Inner side panels x2
Back plastic hood strip
natural_image
Simple line drawing of a light bulb with no text or symbolsFront plastic hood strip
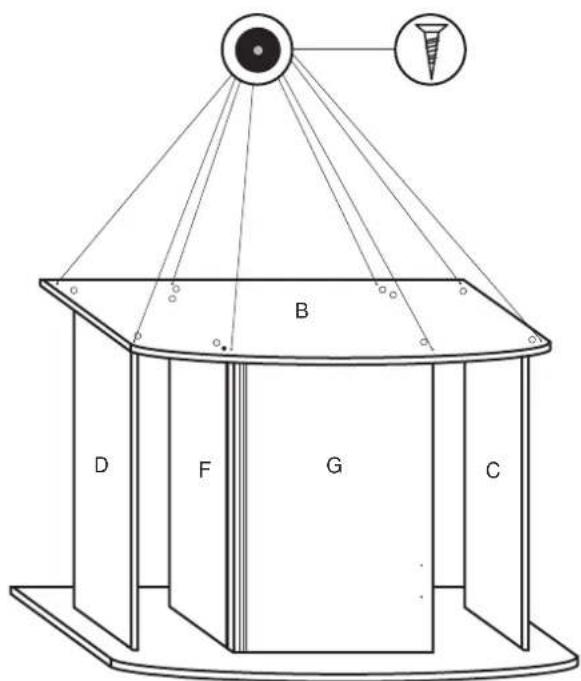
Step 1: Insert the 2 door support plugs, part into the top and bottom panel A & B.
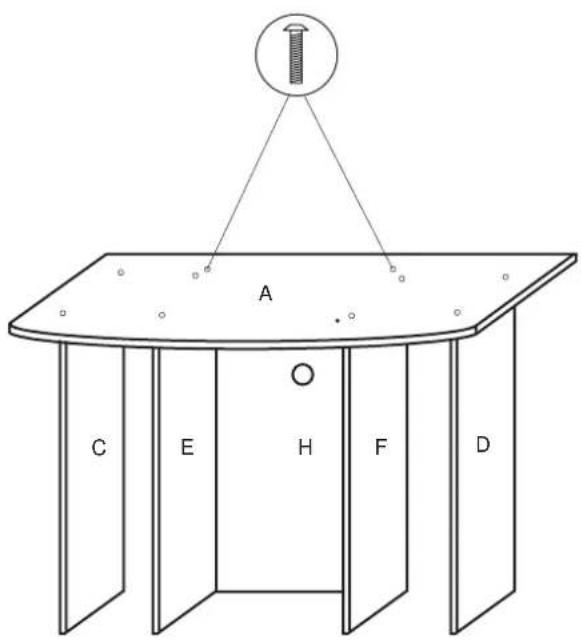
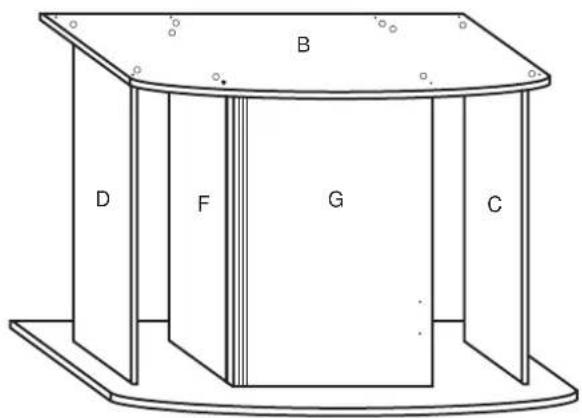
Step 2: Install top panel A to side & centre panels C,D, E & F using screws ④ Ensure that panel E with the 2 small holes for the door magnet is facing inwards.

Step 3: Install back panel H using screws ④
Step 4: Turn the cabinet over & install base panel B using screws ④ Insert the screws loosely but do not fasten them yet.
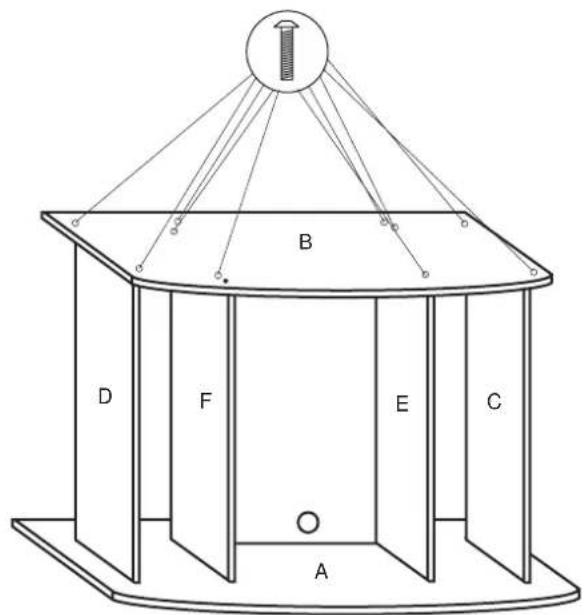
Step 5: Install the door G, push the little knobs attached to the top & bottom of the door into the door support plugs. Now fasten the screws ④ into the base. Remember to put the door in upside down since your cabinet is turned upside down at the moment.
Step 6: Install feet ① to the base panel B using screws ②
Step 7: Turn the cabinet back over on it's feet. Install the door handle⑤ with screws⑥
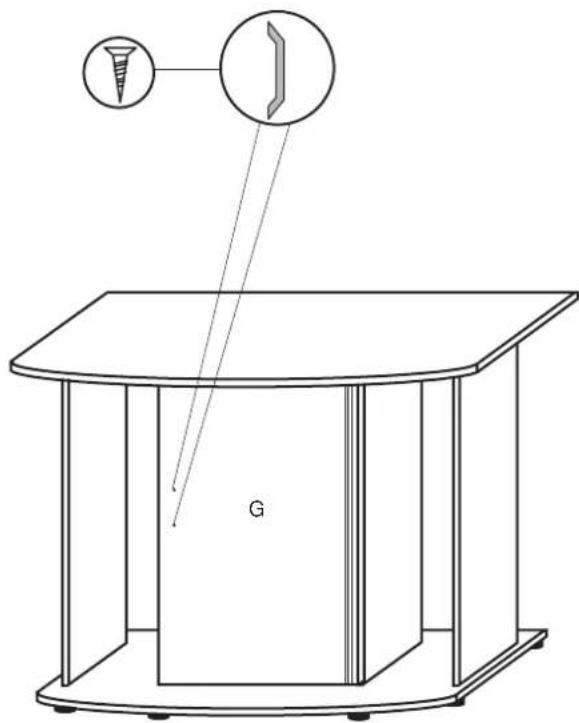
Step 8: Install the door magnet ⑦ using screws ⑨ to panel E. Install the other half of the door magnet ⑧ to the inside of the door G with screws ⑨
Installing the Aquarium:
Step 9: Place the Aquarium on top of the cabinet. Important: Do not remove polystyrene from underneath the tank. Removing the polystyrene will invalidate your warranty.
natural_image
Simple line drawing of a two-tiered rectangular box or shelf (no text or symbols)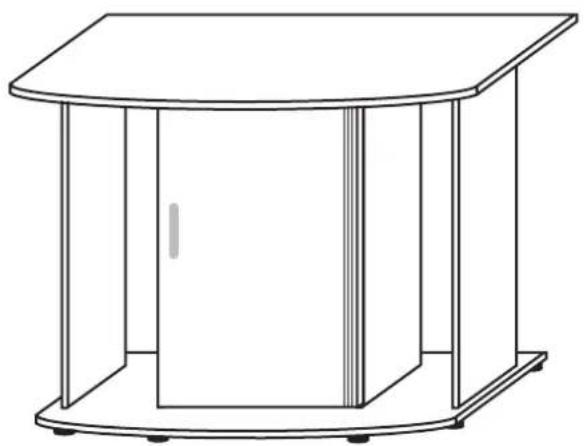
natural_image
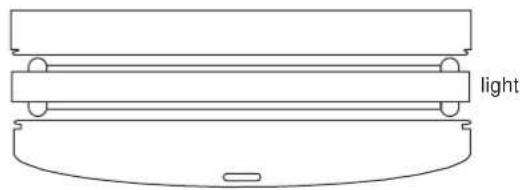
Line drawing of a simple modular furniture or storage unit with a top shelf and three vertical supports (no text or symbols)Step 10: Put the lights & plastic strips on the tank in the order indicated below. Lights first, then other covers hooking into the lights working towards the back.
natural_image
Simple geometric shape: a rounded rectangle outline with no text or symbols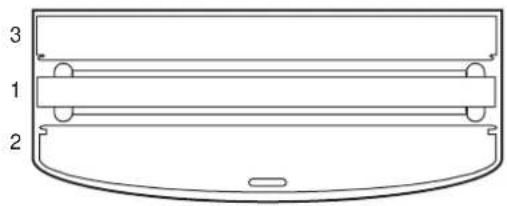
natural_image
Technical line drawing of a mechanical component with labeled parts (no text or symbols beyond numbers)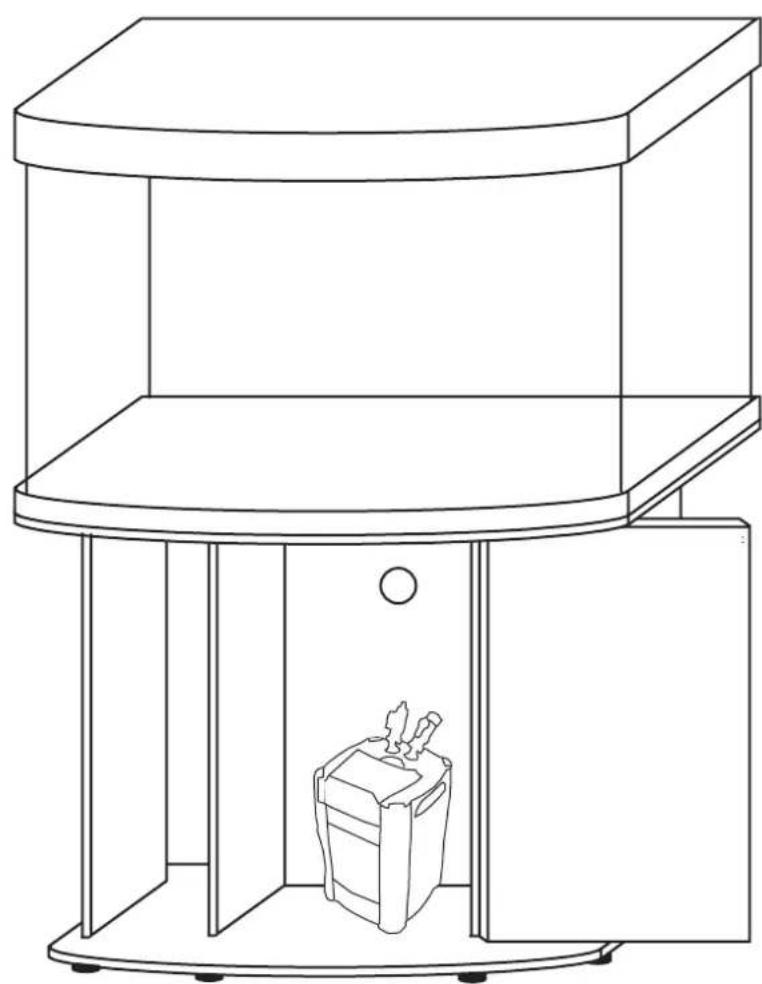
natural_image
Line drawing of a two-tiered storage unit with a central container and lid (no text or symbols)Step 11:
Install Filter (see filter instructions for details)
Install Heater (see heater instructions for details)
Care and Maintenance of your Aqua One Aquarium Glass:
It is recommended that you use a good quality glass cleaner and a non abrasive lint free cloth. Glass cleaner should only be used on the outside of the aquarium.
To clean the glass on the inside of the aquarium, it is recommended that you use an Aqua One Scraper or Magnetic Cleaner (available from your local Aqua One dealer).
Cabinet and Hood: The use of a damp cloth is recommended, do not use any detergents or harsh chemicals to clean the cabinet and hood as damage may occur.
Lighttubes(pleasereadthegeneralelectrical safetyinstructionsbeforeinstallingthelights, filterorheater)Yournewaquariumusesstandard 'T8'tubes(supplied). TheyareavailableasreplacementpartsfromyourlocalAquaOnedealer.Light tubesarenotcoveredbytheguarantee.Lifeexpectancyisgenerally10monthsormore,however tubesloosetheiroutputgraduallyovertime.To maintainthehealthofplantandaquaticlifeeffected bytheamountoflightavailablewesuggestchangingthemevery6months.
Locating the lights Positioning of lights on aquarium(lefttoright)(notesomemodelshave twinlightunits.Theblackendcapshavebrackets whichslideovertheaquariumtrim.Pleaseensure light unit is firmly in place before switching on. The black hood covers help secure the lights in place.
Removing Light Tubes Switch light off, remove frommainssupplyandtankbeforedisassemblyof lightsatanytime.Unscrewthewhiteendcapsofthe tube holdersbyturninganticlockwise.Bothcaps should be removed before the tube is slid out. Keep end caps as these are required for re-installing.
Installingnewtubeswiththelightunitunplugged andremovedfromthetank, slidetheendcaps over the tube both ends. (right) Gently slide the tube pinsintotheendcapreceptacles(firstright). Fully tightenthecapsbackontheirthreads.Becareful nottocrossthreadas thisisawatertightseal. Only usehandtight.Ensuretheyarefullytightened.Test before re-installing on to the tank.

natural_image
Close-up of a white plastic roller being handled by a black metal frame (no text or symbols visible)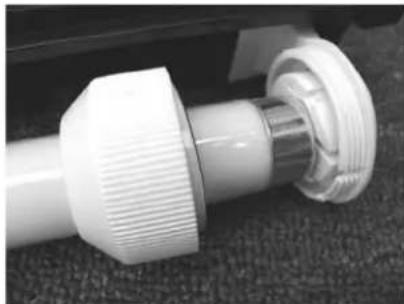
natural_image
Close-up of a white mechanical component with threaded ends and a metallic shaft, resting on a textured surface (no text or symbols visible)
natural_image
Close-up of a white plastic electrical plug with metal connectors, lying on a textured dark surface (no text or symbols visible)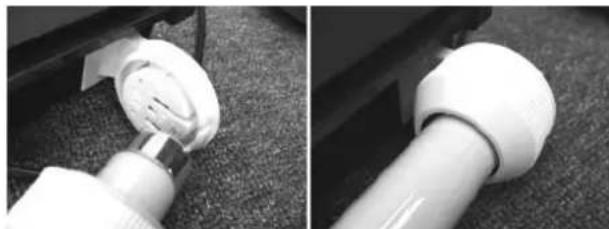
natural_image
Close-up of a white mechanical component being held, showing a curved handle and flange (no text or symbols visible)NOTE: YourlightunitistestedtoIPx7. Thismeansthatitcanwithstandtemporarysubmersion. However, ITISNOTASUBMERSIBLELIGHT
DAILY Feed your fish as per instructions on your fish food container.
WEEKLY Test and adjust pH levels if needed
Use Aqua One quality pH test kit, available from your local Aqua One Dealer. pH is a measure of how acidic or alkaline the water is. It is measured on a scale of 0-14 in which 7 is neutral, less than 7 is acidic and more than 7 is alkaline.
Some species require specific pH levels please seek advice from your aquarium specialist.
FORTNIGHTLY 25% Water Change
What you will need: A Bucket, Gravel Cleaner, Towel, Water Conditioner, Filter Supplement and clean hands. All items are available from your local Aqua One Dealer.
- Unplug the Light Unit and remove it from the aquarium. Place it somewhere safe away from water & where it will not be broken / damaged.
- Turn the Filter off.
- The fish and plants do not need to be removed when doing any maintenance.
- Place the towel on the floor in front of the aquarium to guard from water spillage.
- Use an Aqua One 4 in 1 algae scraper (Sold separately) and gently scrape away any algae growing on the glass or filter pipes.
- Using an Aqua One Gravel Cleaner* (Sold separately) empty approximately 25% of the aquarium water into the bucket. Take note of how much water is emptied.
- Fill the bucket up with the same amount of water that was removed from the aquarium.
- Treat the tap water with Aqua One Water Conditioner (Sold separately) as per the instructions on the bottle.
- Let the bucket sit for 10 minutes.
- Fill the aquarium up slowly to the level just underneath the glass brace.
- Turn the Filter back on and ensure that water is flowing out of the Spray Bar.
- Test and adjust pH levels.
- Add a filter supplement.
- Replace the Light Unit.
* Refer to the instructions on the back of your Gravel Cleaner to ensure correct use.
If you are in any doubt about the electrical installation or safety of this product you must consult a qualified electrician.
LIGHT UNIT DOES NOT WORK
- Ensure switch is in the on position on the lead of the light unit.
- Check light is plugged into power supply and the switch is on.
- Check the globe/s are in good condition. Replace if needed.
FILTER WORKING BUT NO / SLOW WATER FLOW (Refer to the instructions supplied with your Filter)
- Check Impeller is in good condition and replace if needed.
- Clean Impeller, Power Head and all Inlet and outlet pipes.
- Check that the Spray Bar is inserted correctly with the end cap at the opposite end to the elbow.
- Make sure water level is not to high it should be no higher than the glass brace.
- If an air stone is being used check it is not bubbling water over the rim of the aquarium if so turn the air pump down.
- Make sure the aquarium is sitting on a level surface.
- If it is a salt water aquarium remove any salt creep as it can drain water from the aquarium.
5a. Remove the Light Unit from the top of the aquarium. Mark the water level. Remove any excess water that may be sitting on the edge of the aquarium. Leave for an hour. If water level drops proceed to step 5b.
5b. Remove the fish, decorations and gravel. Empty the aquarium and clean the glass DO NOT WASH IN SOAP OR DETERGENT. Place a piece of newspaper on a flat level solid surface. Carefully fill the aquarium ensuring not to spill any water on to the newspaper. Leave the aquarium for several hours and then inspect the newspaper for wet patches.
Keep an eye out for these Aqua One products at your local retailer...
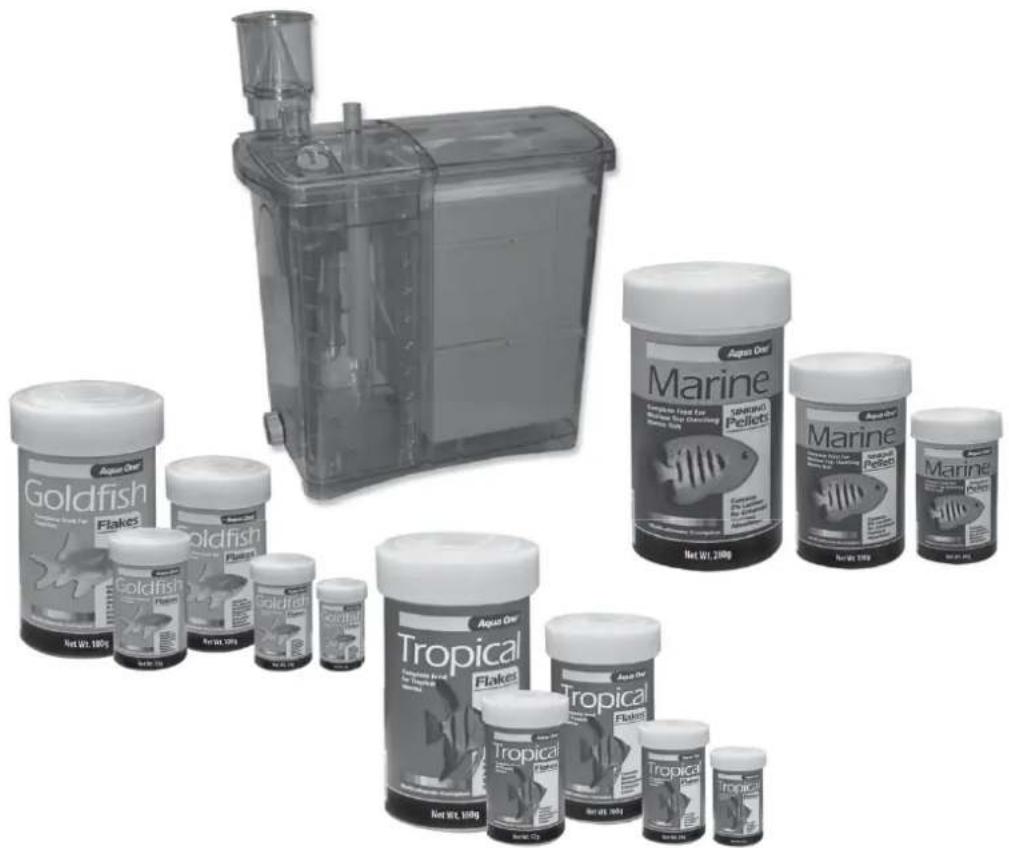
Fish keeping has never been easier...
Aqua One specialises in all of your aquarium needs.
Aqua One uses state of the art technology which results in the most efficient and superior aquarium products.
The Aqua One range includes a wide range of curved glass aquariums, air pumps, filters, power heads, heaters, reflectors, under water lighting, along with fish foods, cleaning and maintenance accessories and decorations.
www.aquaone.com.au
Precision Manufactured in the P.R.C. Designed in Australia by Aqua One Distributed in Australia by: Kong's (Aust.) Pty. Limited 48 Williamson Rd. Ingleburn. 2565 NSW Australia.
Distributed in New Zealand by: Kong's (NZ) Limited 52 Glenlyon Avenue. Greerton. Tauranga New Zealand.
Distributed in the UK by:
Kong's (UK) Ltd.
C/O Aqua Pacific UK Ltd.
PO Box 268
Romsey Hampshire
S051 0WW
United Kingdom