FTL-182DDAC - Fridge Hoshizaki - Free user manual and instructions
Find the device manual for free FTL-182DDAC Hoshizaki in PDF.

User questions about FTL-182DDAC Hoshizaki
0 question about this device. Answer the ones you know or ask your own.
Ask a new question about this device
Download the instructions for your Fridge in PDF format for free! Find your manual FTL-182DDAC - Hoshizaki and take your electronic device back in hand. On this page are published all the documents necessary for the use of your device. FTL-182DDAC by Hoshizaki.
USER MANUAL FTL-182DDAC Hoshizaki
natural_image
Exterior view of a modern stainless steel kitchen appliance with four drawers and side panels (no text or symbols visible)RTL/FTL-140DDAC
- This booklet is an integral and essential part of the product and should be kept and preserved by the user.
- Please read carefully the guidelines and warnings contained herein as they are intended to provide the installer/user with essential information for the proper installation and the continued safe use and maintenance of the product.
- Please preserve this booklet for any further consultation that may be necessary.
中文
重要安全须知 …… 1
1. 安装说明 …… 2
text_image
[3] [2] [1] SET KLENT -88.6 [8] SET [7] [6] ETC-3000 [5] 操作面板[4]
[1] 风扇指示灯 [5] 除霜按钮
[2] 设定指示灯 [6] 向下按钮
[3] 制冷指示灯 [7] 向上按钮
[4] 除霜指示灯 [8] 设定按钮
注意事项
IMPORTANT SAFETY INFORMATION
Throughout this manual, notices appear to bring your attention to situations which could result in death, serious injury, or damage to the unit.
| ▲WARNING | Indicates a hazardous situation which, if not avoided, could result in death or serious injury. |
| ▲CAUTION | Indicates a hazardous situation which, if not avoided, could result in minor or moderate injury. |
| NOTICE | Indicates a hazardous situation which, if not avoided, could result in damage to the unit. |
| ▲HYGIENE | Indicates important precautions for hygiene and food safety. |
| IMPORTANT | Indicates important information about the use and care of the unit. |
| IMPORTANT |
| This booklet is an integral and essential part of the product and should be kept and preserved by the user. |
| Please read carefully the guidelines and warnings contained herein as they are intended to provide the installer/user with essential information for the proper installation and the continued safe use and maintenance of the product. |
| Please preserve this booklet for any further consultation that may be necessary. |
| ⚠WARNING |
| This is a commercial refrigerator/freezer, and should be destined only to be used for the purpose for which it has been expressly designed.Any other use should be considered improper and therefore dangerous. The manufacturer will not be held liable or responsible for any damage caused by improper, incorrect and unreasonable use. |
| The installation, and relocation if necessary, must be carried out by qualified personnel, in accordance with current regulations, according to the manufacturer's instructions. |
| Do not wet this product or use it in potentially wet conditions. This may cause electric leakage, resulting in electric shock or fire. |
| Keep ventilation openings, in the appliance enclosure or in the built-in structure, clear of obstruction. |
| The use of any electrical appliance involves the observance of some fundamental rules. In particular:* Instances of high humidity and moisture increase the risk of electrical short circuits and potential electrical shocks. If in doubt, disconnect the refrigerator/freezer.* Do not damage the power cord or pull it in order to disconnect the refrigerator/freezer from the electrical supply network.* Do not touch the electrical parts or operate the switches with damp hands.* This appliance is not intended for use by persons (including children) with reduced physical, sensory or mental capabilities, or lack of experience and knowledge, unless they have been given supervision or instruction concerning use of the appliance by a person responsible for their safety.* Young children should be supervised to ensure that they do not play with the appliance.* Do not attempt to modify the refrigerator/freezer. Only qualified personnel may disassemble or repair the appliance. |
I. INSTALLATION INSTRUCTIONS
1. CONSTRUCTION
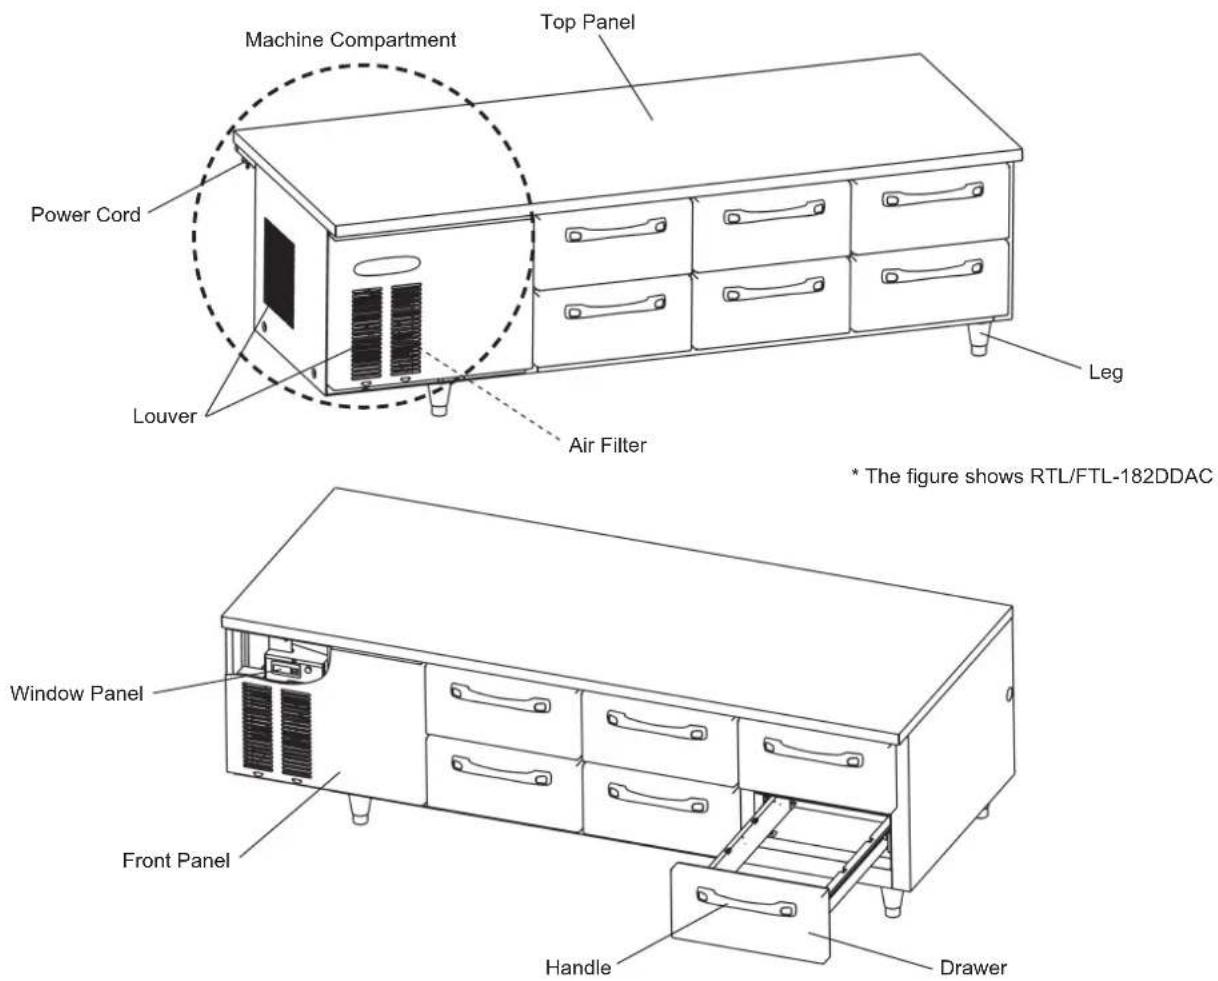
* The figure shows RTL/FTL-182DDAC
2. ACCESSORIES
| Model Number 98 140, 182 | |
| Instruction Manual 1 1 | |
| Leg 5 4 | |
| Flexible Hose 1 1 | |
| Elbow 1 1 | |
| Cable Strap 3 3 | |
| Hose Clamp 2 2 |
Instruction Manual

Leg
Flexible Hose

Elbow
Cable Strap

Hose Clamp
3. UNPACKING
WARNING
Children should not be allowed in reach of the packaging elements (plastic bags and expanded polystyrene) as they are potential sources of danger.
| △CAUTION |
| Do not lift or manoeuvre the carton by using the shipping bands. |
| When moving the unit by hand, hold the unit bottom. |
| Always wear protective gloves when carrying the unit. |
| When handling the carton or the unpacked unit, work in pair to prevent injury. |
1) Cut the shipping band and remove the carton.
2) Make sure that the refrigerator/freezer is in good condition. If in doubt, please do not use the refrigerator/freezer but apply to professionally qualified personnel.
3) Remove the shipping tape holding the drawers and front panel.
4) Remove the protective plastic film from the exterior. If the refrigerator/freezer is exposed to the sun or to heat, remove the film after the refrigerator/freezer cools.
5) Remove the package of accessories. Check the contents according to "2. ACCESSORIES".
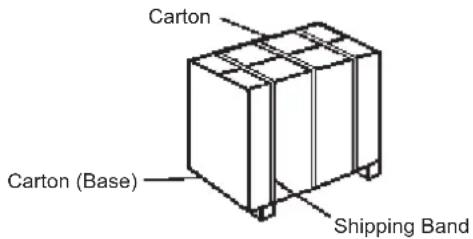
text_image
Carton Carton (Base) Shipping Band4. LOCATION
| ⚠WARNING |
| This refrigerator/freezer is not intended for outdoor use. |
| This appliance is not suitable for installation in an area where a water jet could be used. |
| ▲CAUTION |
| The location should provide a firm and level foundation for the refrigerator/freezer. |
| IMPORTANT |
| Normal operating ambient temperature should be within 5°C to 38°C. Operation of the refrigerator/freezer, for extended periods, outside of this normal temperature range may affect cooling performance. |
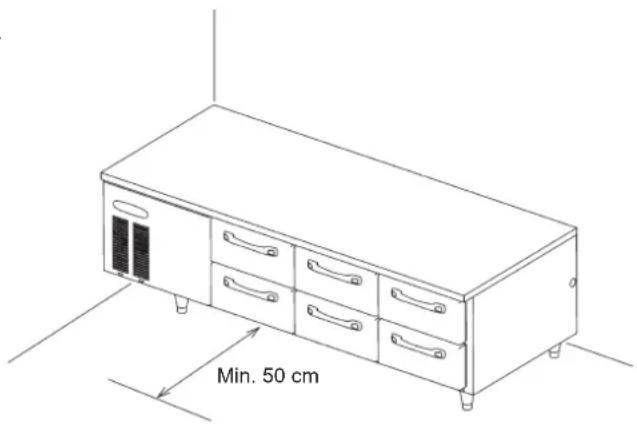
Allow at least 50 cm clearance between the front panel air inlet/outlet and the wall or other equipment for proper air circulation. The front of the unit should have enough space for smooth adjustment of the cabinet temperature. If the ambient temperature can exceed 38°C, allow at least 10 cm clearance from the wall at the side of the machine compartment to prevent overloading and damaging the refrigeration circuit.
natural_image
Line drawing of a simple cabinet with six drawers and a 50 cm minimum clearance indicator (no text or symbols on the cabinet itself)In some high humidity environments, condensation may form inside the machine and drip onto the floor. Do not install where the floor can be affected by water. Especially, a side-by-side or back-to-back installation (possibly with other manufacturer's unit) may cause condensation between the two units, resulting in dripping onto the floor.
Do not expose the unit to direct sunlight or higher temperatures.
5. INSTALLATION
| ▲CAUTION |
| Incorrect installation can cause harm to people, animals or other items, for which the manufacturer cannot be held responsible. |
| NOTICE |
| To prevent damage to the drain pipe at the bottom, do not place the unit directly on the floor before mounting the accessory legs. |
| Do not tilt the unit more than 45° when mounting the legs. |
| When any high heat producing equipment such as cooking range, microwave oven, and fryer is placed on the unit, lay a 5 - 10 mm thick plasterboard on the top panel. Otherwise heat from the equipment may eventually deteriorate the insulation material at the bottom of the top panel and reduce cooling performance. |
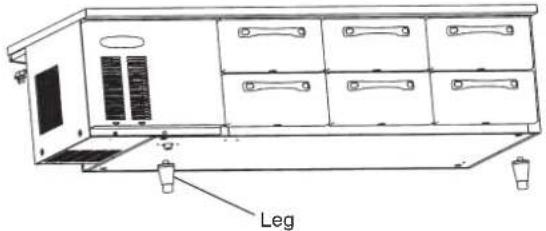
1) Tilt the unit backward to mount the front legs (work in pair).
2) Mount the rear legs in the same way.
Note: For RTL/FTL-98DDAC, attach the five legs provided to the mounting holes located at the bottom of the unit.
CAUTION
Do not tilt the unit too much forward. The drawers may slide out.
natural_image
Line drawing of a cabinet with drawers and a labeled leg (no text or symbols beyond label)3) Before operating the unit, remove all shipping carton, packing, tape(s) and protective plastic film on the exterior, interior and top panel. Be careful not to damage the exterior panels.
4) Position the unit in a selected site.
5) Clean the interior with a soft cloth soaked in cold or warm water Leg Height containing the proper amount of neutral cleaner and wrung dry.
6) Level the refrigerator/freezer in both the left-to-right and the front-to-rear directions. To adjust the height of the unit, turn the adjusters of the adjustable legs.
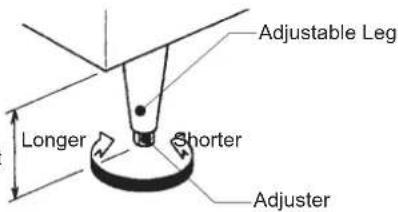
text_image
Adjustable Leg Longer Shorter AdjusterCAUTION
The height of the adjustable legs must be within 9 - 12 cm. If extended too much, the legs may become weak or the adjusters can come off, causing unexpected injuries.
NOTICE
Any heavy item such as cooking range, microwave oven, and fryer to be placed on the top panel must not exceed the maximum weight of 100 kg (RTL/FTL-98DDAC), 180 kg (RTL/FTL-140DDAC) or 250 kg (RTL/FTL-182DDAC).
6. ELECTRICAL CONNECTIONS
NOTICE
This refrigerator/freezer is provided with no power switch or earth leakage circuit breaker, but with overcurrent protection (fuse) only. Install an earth leakage circuit breaker with overload protection rated at least 10A on the main power supply.
* This refrigerator/freezer must be plugged into the separated power receptacle which is readily accessible and has enough capacity. The maximum allowable voltage variation should not exceed ± 6 percent of the nameplate rating. See the nameplate.
* Usually an electrical permit and services of a licensed electrician are required.
* If the supply cord and the plug should need to be replaced, it should only be done by a qualified service engineer.
7. DRAIN CONNECTION
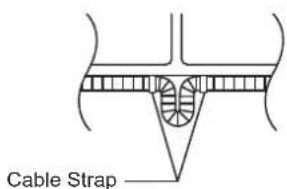
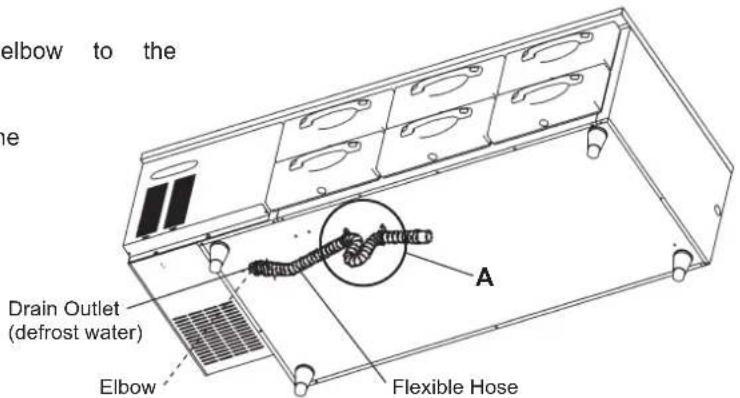
1) Connect the accessory flexible hose and elbow to the drain outlet located at the bottom of the unit.
2) Bend the flexible hose into a trap as shown. Use the accessory cable straps to fix the flexible hose tightly on the bottom of the unit (mounting holes provided).
text_image
Cable StrapDetail A (front view)
text_image
elbow to the the Drain Outlet (defrost water) Elbow A Flexible Hose| IMPORTANT | |
| To prevent disconnection, be sure to use the cable straps to secure the flexible hose in place. | |
| The drain line should be as short and straight as possible, sloped downward, and located below the drain outlet. | |
| To prevent backflow, do not connect the flexible hose directly to the sewer system. An air gap of at least 5 cm should be between the end of the flexible hose and the floor drain. | 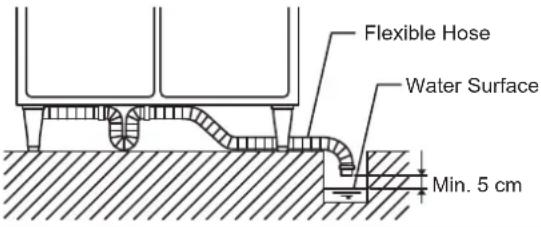 |
| If the flexible hose is too short to reach the floor drain, connect a commercial Pipe commercial pipe to the flexible hose. Be sure to allow an air gap of at least 5 cm between the end of the drain pipe and the floor drain. | 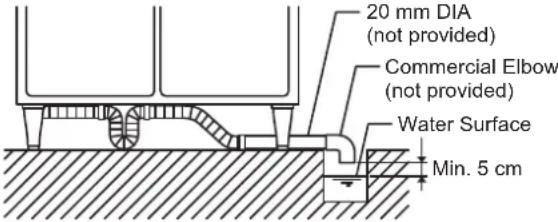 |
| The drain connections are required to prevent ambient air from causing excessive frost build up on the evaporator, resulting in reduction of the refrigeration capacity. | |
| Do not let water drain directly onto the floor before running into the drain. Foreign matter on the floor may mix into the water and clog the drain, or the water could run in a wrong direction. | |
II. OPERATING INSTRUCTIONS
| ⚠WARNING |
| Be careful not to wet the machine compartment. This might cause failure or electric shock hazard. |
| To prevent electric shock, do not touch the attachment plug with wet hands. |
| Do not store any volatile or flammable substances, such as benzine, ether, adhesives and LPG, in the unit. |
| △CAUTION |
| This refrigerator/freezer is designed only for temporary storage of foods. Use for any other purposes (e.g. storage of chemicals or medical supplies such as vaccine and serum) could cause deterioration of stored items. |
| Do not throw anything into the drawers or load more than 12 kg on each of them. They may fall off and cause injury. |
| Do not hang on or step on the drawers. They may fall off or the unit can tip over. |
| To prevent injury, install the drawers properly and securely. |
| Do not store bottles or cans near the air outlet. They may freeze up and break, causing a risk of injury. |
| Do not use combustible spray or place volatile and flammable substances near the unit. They could catch fire from a spark of a switch or the like. |
| Do not put anything into the machine compartment or the air inlet/outlet. The fan rotating rapidly inside may cause injury or heat. |
| IMPORTANT |
| Energise the refrigerator/freezer for 1 hour and check for proper temperature before putting foods in the cabinet. |
| Do not block the air inlet/outlet with foods. |
| Do not pack the cabinet with foods. Allow some space between them to ensure good air flow. |
| Use gastronorm pans or other special containers to store foods in the drawers. |
| To ensure proper air flow and smooth drawer movement, containers and foods inside the drawers must not exceed 100 mm in height. |
| Do not put in warm or hot foods. Let them cool first, or they will raise the cabinet temperature and could deteriorate other foods in the cabinet or overload the refrigerator/freezer. |
| Make sure all items are snug in each drawer. |
| Moist or fresh foods and those with a strong smell like seafood should be wrapped up in a plastic film or packed in a container. Otherwise the foods may dry up or give their smells to other foods. |
| Foods containing acetic acid or yeast should be wrapped up in a plastic film. Otherwise they may accelerate corrosion of the evaporator and copper tubes, resulting in failure. |
| Do not use the freezer to freeze foods. It is designed only to store frozen foods. High quality ice cream may melt during defrost cycle and should not be stored in the freezer. |
| The drawers may become difficult to open just after closed because of the negative pressure created inside the cabinet. Wait for about 30 seconds. |
1. START UP
1) Plug in the unit.
2) The compressor and condenser fan motor will start in 4 minutes.
2. CABINET TEMPERATURE SETTING
| IMPORTANT |
| Pressing the down key will not speed up refrigeration, but will only lower the temperature setting. |
| The temperature range given below is only the adjustable range. The actual cabinet temperature depends on the ambient temperature and other conditions. |
The cabinet temperature is factory-adjusted to 1^ C for the refrigerator and -20^ C for the freezer. If necessary, readjust the temperature as follows.
1) Loosen the thumbscrew at the bottom of the front panel, and remove the front panel.
2) Press the set key for 3 seconds:
When the screen displays "SEt", press the set key again to indicate the set temperature. Press the up or down key to set the desired temperature and press the set key. When the screen displays "SEt", press the set key again for 3 seconds or perform no operation for 10 seconds. The system will save the set temperature and indicate the cabinet temperature on the screen.
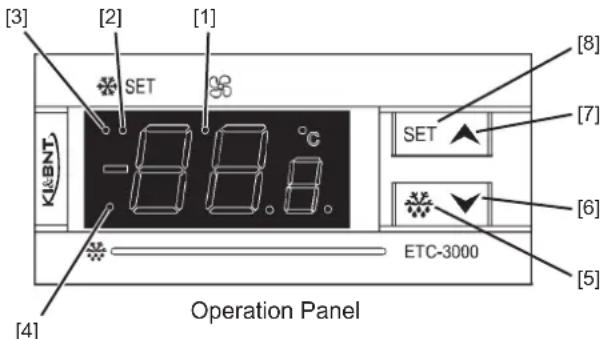
text_image
[3] [2] [1] SET KI&BNT 88.8 C SET ETC-3000 Operation Panel [4] [5] [6] [7] [8][1] Fan Indicator Light [5] Defrost Key
[2] Set Indicator Light [6] Down Key
[3] Refrigeration Indicator Light [7] Up Key
[4] Defrost Indicator Light [8] Set Key
| NOTICE |
| The temperature setting must be between -6 and 12°C for the refrigerator and -23 and -7°C for the freezer to prevent possible failure. |
| To avoid the risk of failure, do not make changes to other menus than “SEt”. |
| IMPORTANT |
| The displayed cabinet temperature is adjusted to be almost equal to the temperature at the center of the cabinet without foods. But it can be different from the actual temperature depending on arrangement of stored foods, frequency of door opening or measuring points. |
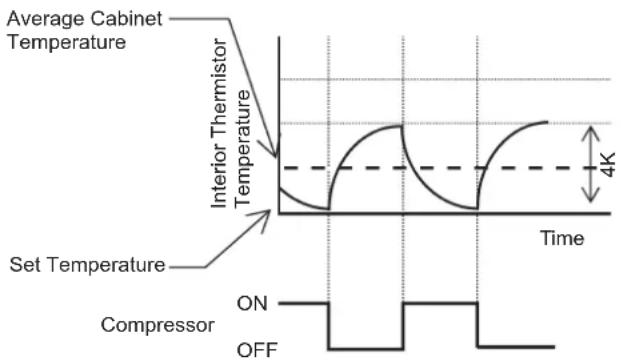
The compressor stops when the cabinet temperature reaches down to the set temperature, and starts when the cabinet temperature rises to the set temperature + 4°C. Accordingly, the average cabinet temperature will be around the set temperature + 2°C.
Set temperature (compressor off temperature)
Heater defrost (RTL series): -6 to +12°C
Heater defrost (FTL series): -23 to -7°C
line
| Time | Average Cabinet Temperature | Interior Thermistor Temperature | |------|------------------------------|----------------------------------| | 0 | 0 | 0 | | 1 | ~1.5 | ~1.5 | | 2 | ~3 | ~3 | | 3 | ~4 | ~4 | | 4 | ~4 | ~4 | | 5 | ~3 | ~3 | | 6 | ~1.5 | ~1.5 | | 7 | ~0 | ~0 | | 8 | 0 | 0 | | 9 | 1.5 | 1.5 | | 10 | 3 | 3 | | 11 | 4 | 4 | | 12 | 4 | 4 | | 13 | 3 | 3 | | 14 | 1.5 | 1.5 | | 15 | 0 | 0 | | 16 | 0 | 0 | | 17 | 0 | 0 | | 18 | 0 | 0 | | 19 | 0 | 0 | | 20 | 0 | 0 | | 21 | 0 | 0 | | 22 | 0 | 0 | | 23 | 0 | 0 | | 24 | 0 | 0 | | 25 | 0 | 0 | | 26 | 0 | 0 | | 27 | 0 | 0 | | 28 | 0 | 0 | | 29 | 0 | 0 | | 30 | 0 | 0 | | 31 | 0 | 0 | | 32 | 0 | 0 | | 33 | 0 | 0 | | 34 | 0 | 0 | | 35 | 0 | 0 | | 36 | 0 | 0 | | 37 | 0 | 0 | | 38 | 0 | 0 | | 39 | 0 | 0 | | 40 | 0 | 0 | | 41 | 0 | 0 | | 42 | 0 | 0 | | 43 | 0 | 0 | | 44 | 0 | 0 | | 45 | 0 | 0 | | 46 | 0 | 0 | | 47 | 0 | 0 | | 48 | 0 | 0 | | 49 | 0 | 0 | | 50 | 0 | 0 | | Note: The actual values for the interior thermometer and set temperature are not provided in the code. The data is presented in a table format as shown above and below the chart.3. DEFROST
Automatic defrost cycle
The refrigerator/freezer automatically defrosts the evaporator 6 hours after the refrigeration starts. The defrost indicator light on the operation panel comes on when the defrost cycle starts.
Manual defrost cycle
To start the manual defrost cycle, press the defrost key (freezer) for 3 seconds. The defrost indicator light on the operation panel comes on when the defrost cycle starts.
4. INDICATOR LIGHTS
| Indicator Light | Symbol Status Function | ||
| Refrigeration | [STD2] | On Compressor running | |
| Off Compressor stopped | |||
| Flash Compressor delayed | |||
| Quick flash | Manual refrigeration | ||
| Defrost |  | On Defrosting | |
| Off Defrost stopped | |||
| Flash Defrost drain | |||
| Quick flash | Manual defrost | ||
| Fan |  | On Fan running | |
| Off Fan stopped | |||
| Flash Fan delayed | |||
| Set SET On Setting mode | |||
| Off Normal mode | |||
| Celsius C On Celsius display | under normal mode | ||
| Off Fahrenheit display under normal mode | |||
5. SHUT DOWN
1) Before shutting down the unit, move the stored foods into another refrigerator/freezer.
2) Unplug the unit or disconnect the main power supply.
3) When preparing the unit for long storage, clean the cabinet interior and door gaskets, dry them thoroughly and store the unit in a dry place.
6. REMOVING DRAWERS
1) Open the drawer, and take out all items and containers inside.
2) Slide the drawer forward, lift it up, and pull it out.
| △CAUTION |
| When removing and installing the drawer, hold it securely with both hands. |
III. MAINTENANCE
1. CLEANING
| ▲WARNING |
| Before carrying out any cleaning or maintenance operations, unplug the unit. |
| Do not use a water jet to clean the machine compartment. |
| ▲CAUTION |
| When using a neutral cleaner, thoroughly read and understand the instructions provided to prevent potential health problems. |
| NOTICE |
| Do not touch or wet the machine compartment parts. This could result in failure or breakdown. |
| To prevent possible damage, do not clean the plastic parts with water above 40°C or in a dishwasher. |
| Chemical agents other than neutral cleaner might cause damage to the interior and exterior surfaces. |
| To prevent damage to the painted surface, do not use a commercial stainless cleaner on the drawer. |
[a] Interior, Exterior, Drawer and Drawer Handle
* Clean the interior and exterior at least once a week for sanitary use.
* Clean off the interior and exterior with a soft cloth soaked in cold or warm water containing the proper amount of neutral cleaner and wrung dry.
* The exterior surface of the drawer and drawer handle is easily contaminated. Clean these parts thoroughly every day.
* Any remaining detergent will damage metal or plastic surfaces. Use a soft cloth dampened with warm water to wipe it off.
* Do not use the following items. They could damage painted or plastic surfaces:
Polishing powder, alcohol, thinner, benzine, acidic or alkaline detergent, hot water, petroleum, soap powder, metal scourer or brush, etc.
Especially detergent to clean grease on ventilator or microwave.
Note: Some solutions other than the above may also damage painted or plastic surfaces. Immediately stop using such solutions if they cause any problems.
![Hoshizaki FTL-182DDAC - [a] Interior, Exterior, Drawer and Drawer Handle - 1](/content/2026/06/1188494/images/24311b8bbdb8baea1e67c5bab269a28b02dc222ce5ac2c4a79aea0cca1826189.jpg)
text_image
Polishing powder Alcohol Thinner Benzine Acidic/alkaline detergent Hot water* The door gasket and its contact surface get soiled easily. Clean every surface of these parts thoroughly. Remnants of food will accelerate aging.
* Remove and clean the drawer once per week.
* Use a cloth to wipe off any water staying inside the cabinet.
[b] Air Filter
Plastic mesh air filters remove dirt or dust from the air, and keep the condenser from getting clogged. If the filters get clogged, the refrigerator/freezer's performance will be reduced.
Check the filter at least twice a month. When clogged, use warm water and a neutral cleaner to wash the filter. Do not operate the unit with the air filter removed, or the condenser will get clogged, resulting in failure.
1) Loosen the thumbscrew at the bottom of the front panel, and remove the front panel.
2) Remove the air filter from the back of the front panel.
![Hoshizaki FTL-182DDAC - [b] Air Filter - 1](/content/2026/06/1188494/images/cde0f6928b08a4583d2492d5b8ab376a10fecb16c4da1ab548e6f4072428a3a7.jpg)
text_image
Front Panel Air Filter (back side)3) Wash the air filter carefully with cold or warm water containing the proper amount of neutral cleaner.
4) Rinse and dry the air filter thoroughly.
5) Attach the air filter to the back of the front panel.
6) Hook the top of the front panel on the cabinet, and tighten the thumbscrew at the bottom of the front panel.
| NOTICE |
| After cleaning, be sure to place the air filter back in position. |
- BEFORE CALLING FOR SERVICE
| NOTICE |
| Do not attempt to repair the unit yourself. |
| IMPORTANT |
| If the screen on the operation panel indicates an error code or something seems wrong with the unit, check for possible causes according to the following instructions. If the problem still exists, immediately contact an authorized Hoshizaki service company. |
| When contacting a service company, let them know the model name, serial number, date of installation (see warranty card) and state of the trouble. |
[a] Error Code Indication
If one of the following error codes is indicated on the display, before calling for service, check the following.
| Code | Possible Cause | Operation and Remedy |
| HHH A | Ambient temp too high | Compressor cycles on for 45 minutes and off for 15 minutes. Check ambient temperature. If problem cannot be resolved, immediately contact an authorized Hoshizaki service company. |
| LLL A | Ambient temp too low |
* The code "dF" is not an error code but indicates the unit is in defrost cycle.
[b] No Error Code Indication
If the refrigerator/freezer does not work properly or does not work at all and no error code is indicated on the display, before calling for service, check the following:
| Problem Possible Cause | |
| Unit fails to operate Unplugged. | |
| Power failure. | |
| Main power supply disconnected. | |
| Poor cooling performance Ambient temperature too high. | |
| Condensation around drawer(s) | Ambient humidity too high. |
| Drawer(s) not closed tightly. | |
| Noise Normal operating sounds from compressor, condenser fan motor or Interior fan motor. | |
| Frosting inside compartment Ambient humidity too high. | |
For further assistance or advice, contact your local Hoshizaki service agent.
3. DISPOSAL
When disposing of the refrigerator/freezer, contact an authorized Hoshizaki service company or a specialized waste disposal company.
| ⚠WARNING | |
 | The insulation foaming agent used for the unit body contains flammable gas cyclopentane. With this in mind, dispose of the refrigerator/freezer properly. |
4. WARRANTY
Hoshizaki warrants to the original owner/user that all Hoshizaki branded products shall be free of defects in material and/or workmanship for the duration of the “warranty period”. The warranty shall be effective for one year from the date of installation. Hoshizaki’s liability under the terms of the warranty are limited and shall exclude routine servicing, cleaning, essential maintenance and/or repairs occasioned by misuse and installations not in accordance with Hoshizaki guidelines.
Warranty repairs should be completed by an approved Hoshizaki dealer or service agency using genuine Hoshizaki components.
To obtain full details of your warranty and approved service agency, please contact your dealer/supplier, or the nearest Hoshizaki Service office.
SPECIFICATIONS
| Model RTL-98DDAC | RTL-140DDAC | |
| Type 2 drawers 4 drawers | ||
| Power Supply | 1 phase 220 - 240V 50Hz Capacity: 0.5kVA (2.27A) | 1 phase 220 - 240V 50Hz Capacity: 0.5kVA (2.27A) |
| Electric Consumption | Motor: 225W Heater: 163WRefrigeration: 239W Defrost: 163W | Motor: 225W Heater: 174WRefrigeration: 248W Defrost: 174W |
| Effective Capacity 85L | 176L | |
| Cabinet Temp Adjustable from -6 to 12°C | Adjustable from -6 to 12°C | |
| Dimensions | 980mm(W) x 750mm(D) x 570mm(H) | 1400mm(W) x 750mm(D) x 570mm(H) |
| Refrigerant | R134a | R134a |
| Weight | Net: 65kg (Gross: 74kg) | Net: 93kg (Gross: 102kg) |
| Ambient Temp | 5 - 38°C | 5 - 38°C |
| Voltage Range | Rated voltage ± 6% | Rated voltage ± 6% |
| Model RTL-182DDAC | FTL-98DDAC | |
| Type 6 drawers 2 drawers | ||
| Power Supply | 1 phase 220 - 240V 50Hz Capacity: 0.5kVA (2.27A) | 1 phase 220 - 240V 50Hz Capacity: 0.95kVA (4.3A) |
| Electric Consumption | Motor: 225W Heater: 183WRefrigeration: 257W Defrost: 183W | Motor: 360W Heater: 320WRefrigeration: 376W Defrost: 320W |
| Effective Capacity 267L 85L | ||
| Cabinet Temp Adjustable from -6 to 12°C Adjustable from -23 to -7°C | ||
| Dimensions 1820mm(W) x 750mm(D) x 570mm(H) 980mm(W) x 750mm(D) x 570mm(H) | ||
| Refrigerant R134a | R404A | |
| Weight | Net: 118kg (Gross: 130kg) | Net: 74kg (Gross: 80kg) |
| Ambient Temp | 5 - 38°C | 5 - 38°C |
| Voltage Range | Rated voltage ± 6% | Rated voltage ± 6% |
| Model FTL-140DDAC | FTL-182DDAC | |
| Type 4 drawers 6 drawers | ||
| Power Supply | 1 phase 220 - 240V 50Hz Capacity: 0.95kVA (4.3A) | 1 phase 220 - 240V 50Hz Capacity: 0.79kVA (3.6A) |
| Electric Consumption | Motor: 360W Heater: 347WRefrigeration: 390W Defrost: 347W | Motor: 360W Heater: 360WRefrigeration: 418W Defrost: 360W |
| Effective Capacity 176L 267L | ||
| Cabinet Temp Adjustable from -23 to -7°C | Adjustable from -23 to -7°C | |
| Dimensions 1400mm(W) x 750mm(D) x 570mm(H) 1820mm(W) x 750mm(D) x 570mm(H) | ||
| Refrigerant R404A | R404A | |
| Weight | Net: 99kg (Gross: 108kg) | Net: 124kg (Gross: 136kg) |
| Ambient Temp | 5 - 38°C | 5 - 38°C |
| Voltage Range | Rated voltage ± 6% | Rated voltage ± 6% |
Note: The above specifications are for the representative models.
联系人:星崎冷热机械(上海)有限公司
Hoshizaki Singapore Pte Ltd
18 Boon Lay Way #07-142 Tradehub 21, Singapore 609966
Tel: +65 6225-2612
Fax: +65 6225-3219
Hoshizaki Lancer Pty Ltd
5 Toogood Avenue, Beverley SA 5009 Australia
Tel: +61 8-8268-1388
Fax: +61 8-8268-1978
Contact: Hoshizaki Shanghai Co., Ltd.
Room 2802, Nanzheng Building, No. 580 West Nanjing Road, Jingan District,
Shanghai 200041 China
Tel: +86 21 5228-8181
Fax: +86 21 5228-0113
Hoshizaki Hong Kong Co., Limited
Unit 1201-1202, 12/F, Tamson Plaza, 161 Wai Yip Street, Kwun Tong, Kowloon, HK
Tel: +852 2866-2108
Fax: +852 2866-2109
Hoshizaki Singapore Pte Ltd
18 Boon Lay Way #07-142 Tradehub 21, Singapore 609966
Tel: +65 6225-2612
Fax: +65 6225-3219
Hoshizaki Lancer Pty Ltd
5 Toogood Avenue, Beverley SA 5009 Australia
Tel: +61 (0)8-8268-1388 Fax: +61 (0)8-8268-1978
生产商:星崎电机(苏州)有限公司
江苏省苏州工业园区青丘街15号
邮编:215126
电话:+86 512-62807850
传真:+86 512-62807860
Manufacturer: Hoshizaki (Suzhou) Co., Ltd.
No. 15 Qingqiu Street, Suzhou Industrial Park, Suzhou 215126 China
Tel: +86 512-62807850
Fax: +86 512-62807860