
Revelation Solo - Microphone MXL - Free user manual and instructions
Find the device manual for free Revelation Solo MXL in PDF.


| Type | Cardioid Pattern Tube Condenser Microphone |
| Diaphragm | 6 micron |
| Tube Type | EF86 pentode |
| Frequency Range | 20 Hz - 20 kHz |
| Polar Pattern | Cardioid |
| Sensitivity | -40 dB re 1 V/Pa |
| Impedance | 140 ohms |
| Pre-Attenuation Switch | 0 dB, -10 dB |
| Signal-to-Noise Ratio | 76 dB |
| Equivalent Noise Level | 18 dBA (A-weighted IEC 651) |
| Maximum SPL (0.5% THD) | 138 dB SPL |
| High Pass Filter | 12 dB/octave @ 125 Hz |
| Power Requirements | Dedicated power supply unit, 110/220 VAC, 50/60 Hz |
| Dimensions (Mic Only) | 7 1/2" x 2 1/2" |
| Weight (Mic Only) | 2 lbs |
| Finish | Dark Violet and Chrome |
| Included Accessories | 15 ft 7-pin Mogami cable, 15 ft XLR Mogami cable, Revelation Solo power supply, shockmount, aluminum flight case, cleaning cloth |
| Switches | Bass roll-off, Phase reversal, Ground lift, -10 dB pad |
| Warranty | 3 years (tube: 90 days) |
| Care | Store in case; use pop filter to protect capsule from moisture |
Frequently Asked Questions - Revelation Solo MXL
User questions about Revelation Solo MXL
0 question about this device. Answer the ones you know or ask your own.
Ask a new question about this device
Download the instructions for your Microphone in PDF format for free! Find your manual Revelation Solo - MXL and take your electronic device back in hand. On this page are published all the documents necessary for the use of your device. Revelation Solo by MXL.
USER MANUAL Revelation Solo MXL
Marshall Electronics
Professional Audio Division, El Segundo, CA
Phone: (310) 333-0606 ■ (800) 800-6608 ■ Fax: (310) 333-0688
www.mxlmics.com ■ www.mogamicable.com ■ sales@mxlmics.com
Cardioid Pattern Tube Microphone

An Introduction to the MXL Revelation Solo
Thank you for choosing the MXL Revelation Solo. Your new Revelation Solo microphone was designed and engineered in the USA by our world-class team of electrical and audio engineers and is built for the most critical sound applications. The newest member of the MXL flagship product family, the Revelation Solo is an extraordinary studio microphone that delivers the warmth and intimacy of a tube mic with clarity and punch for balanced recording.
The MXL Revelation Solo features individually selected components, chosen for their superior sonic capabilities. Examples include the EF86 pentode tube and balanced transformer output. The MXL Revelation Solo also includes a roll-off, phase reversal and -10dB pad.
The MXL Revelation Solo will provide many years of outstanding service and the finest quality recordings attainable. Before you get started, we encourage you to review this manual. Inside you'll find some recording tips, tricks and specific features of the MXL Revelation Solo that will help you obtain the best possible recording results.
Enjoy your MXL Revelation Solo!
The MXL Team
Warranty
Marshall microphones are guaranteed against defects in material and workmanship for three years (except tube which is 90 days) from date of purchase. Should you encounter any problem with this unit, promptly contact the company you purchased it from for assistance. The original dated sales receipt will be necessary for any warranty claim. Do not send any unit directly to us without prior authorization from our service department!
Warranty coverage is limited to repair or replacement (at our option) of the microphone, and does not cover incidental damages due to use of this unit, nor damage caused by accidental misuse of this product.
natural_image
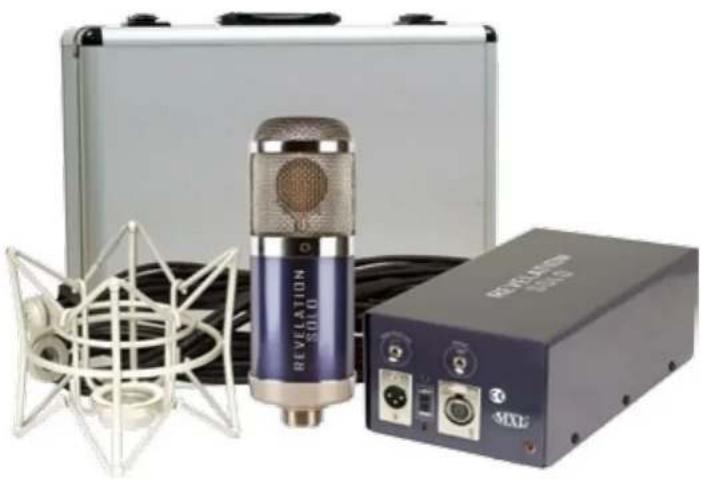
Exterior view of a studio microphone setup with a silver case, wire mesh, and SXX-branded audio unit (no visible text or symbols on main components)Marshall Electronics
Professional Audio Division, El Segundo, CA Phone: (310) 333-0606 ■ (800) 800-6608 ■ Fax: (310) 333-0688 www.mxlmics.com ■ www.mogamicable.com ■ sales@mxlmics.com
Specifications
| Cardioid Pattern Tube CondenserType: Microphone | |
| Diaphragm: 6 micron diaphragm | |
| Tube Type: EF86 | |
| Frequency Range: 20 Hz-20 kHz | |
| Polar Pattern: Cardioid | |
| Sensitivity: -40 dB re 1 V/Pa | |
| Impedance: 140 ohms | |
| Pre-Attenuation Switch: 0 dB, -10 dB | |
| S/N Ratio: 76 dB | |
| Equivalent Noise Level: 18dBA (A-weighted IEC 651) | |
| Max SPL for 0.5% THD: | 138 dB SPL |
| High Pass Filter: | 12 dB/octave @ 125Hz |
| Power Requirements: | Revelation Power Supply Unit110/220 VAC, 50/60Hz |
| Size: | 7 1/2" X 2 1/2" (mic only) |
| Weight: | 2lbs (mic only) |
| Metal Finish: | Dark Violet and Chrome |
Revelation Solo Features
Carefully unpack your MXL Revelation Solo Cardioid Pattern Tube microphone to verify that all of the components are included. Your MXL Revelation Solo includes the following:
■ Revelation Solo Microphone
■ 15ft 7-pin Mogami® cable
• 15ft XLR Mogami® microphone cable
• Revelation Solo power supply
- Shockmount
- Aluminum flight case
- Cleaning cloth
If any of the above items are missing or damaged, contact the company you purchased it from for assistance.
Power Requirements
The MXL Revelation Solo uses an EF86 tube that requires a dedicated power supply unit (included with your microphone). Even if your mixer has phantom power, it is recommended that you defeat the phantom power as a precautionary measure when it is not needed to power other mics that you might also be using.
This supply is switchable between 110 volts and 220 volts AC. In North America, the microphone ships in the 110 volts AC position and in the 220 Volts AC position for export. However, you always want to ensure that the power supply voltage is correctly set for your local voltage as permanent damage to the microphone and/or power supply may occur if the incorrect voltage setting is selected. Every Marshall Electronics MXL microphone has been thoroughly checked before shipping; so if you do not hear sound, check that the power supply is switched on.
Caution
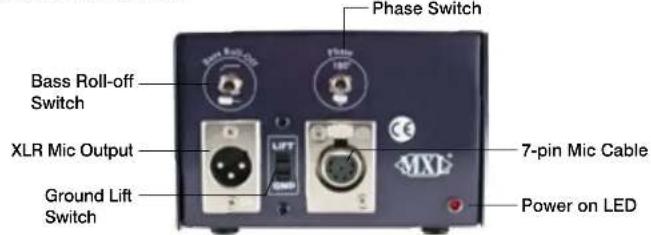
Do not "hot plug" the mic. Always ensure that the power supply is off when plugging and unplugging the included 7-pin cable from the microphone to avoid damaging the microphone and power supply.
Bass Roll-off Switch
REVELATION SOLO
User Manual
The Revelation Solo power supply features a bass roll-off switch to help reduce proximity effect. Proximity effect is distortion that often occurs when a sound source is too close to the mic. Some microphone patterns boost bass as you get closer to the microphone; cardioid mics, for instance, tend to boost bass. The bass roll-off switch reduces the low frequencies for a more full range sound.
Phase Switch
The Revelation Solo also includes a phase switch which allows you to reverse the polarity of the microphone signal by 180 degrees. This can help minimize phase issues when recording with multiple microphones.
Polar Pattern
One of the most popular polar patterns, a cardioid ☐ microphone picks up sound from the front of the microphone, less sound from the sides, and has good rejection of sound to the back of the microphone. The cardioid pattern is well suited for situations when you want to pick up specific sound sources like a guitar within an ensemble and is recommended for recording applications where the acoustics are good but not perfect. For instance, a cardioid pattern is less likely to pick up ambient noise from computers and recording equipment.
Ground Lift Switch
A ground loop is unwanted interference that can be created when multiple electronic devices improperly share a common ground. The Revelation Solo includes a Ground Lift switch to help prevent such occurrences. If a ground loop is audible (usually a 50-60Hz humming noise), the ground lift switch on the front of the power supply should be set to the 'lift' position.
-10dB Pad
The Revelation Solo can be used in very loud sonic environments without significant distortion. If you hear distortion from the microphone, engage the "-10dB pad" on the rear of the microphone to the -10dB position. You may also move the microphone farther away from the sound source.
Shockmount
The Revelation Solo comes with a custom shockmount specifically designed to handle its large size. Shockmounts decouple the microphone from the mic stand and the
environment and can minimize floor noise as well as noise induced by people handling the microphone stand. Shockmounts should be considered "standard equipment" for all recording applications. To mount the Revelation Solo in the shockmount, first attach the shockmount to the mic stand. With one hand, hold the Revelation Solo microphone inside the basket of the shockmount with the threaded base of the mic resting on the retaining nut at the bottom. With
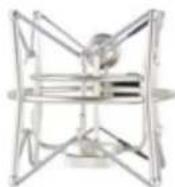
Fig. 4C
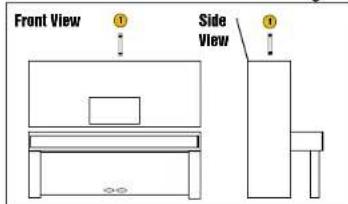
centered over the instrument (see Fig. 4C).
Single Microphone / Open Top: If you are using a single microphone, it is generally recommended that you record from above, as placement of the microphone in the lower center may interfere with the performer's ability to access the pedals and the microphone will likely pick up excessive pedal and other mechanical noise. Position the microphone just over the open top,
Recording a Drum Set
Like the piano, capturing the drums can be quite a challenge, if for no other reason than the fact that you must be very careful to avoid positioning the microphone(s) where they could be hit! Ideally you'll want a minimum of two microphones for this job, though a single microphone can be employed.
Fig. 5A
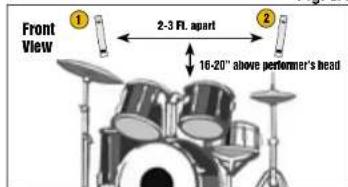
Fig. 5B
Stereo Overhead Pair: Position the two microphones approximately 16 - 20 inches above the performer's head, separated laterally by roughly 2 - 3 feet and placed 5 - 6 feet out in front of the drum kit. Adjust the two microphone's Pan position so that you achieve a good stereo spread, though generally not hard left and right (see Fig. 5A).
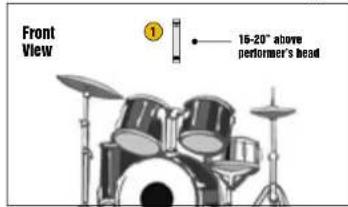
Single Overhead Microphone: Position the microphone approximately 16 - 20 inches above the performer's head - centered in front of the drum set, and placed 5 - 6 feet out in front. The microphone's Pan position should be centered for mono drums (see Fig. 5B).
become that much more difficult to capture if the room has hard, reflective surfaces, resulting in a muddy sound without any real definition. Further, you should always record the drums dry and add signal processing after the fact.
Placement of the amp is another important factor. If the amplifier sits on a carpeted floor, you are more likely to reduce the amount of brightness in the sound. Similarly, elevating the amplifier off the floor may result in a loss of low end. If you're looking for a big reverberant tone, placing the amp and microphone in the bathroom is another popular technique. The hard tiles and other reflective surfaces can do wonders for a dull sound. In this case, move the microphone back a few feet from the loudspeaker and crank it up!
Recording the Piano
Fig. 4A
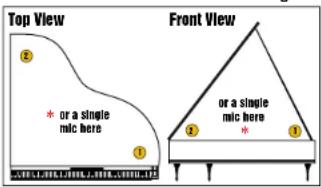
The piano is one of the most challenging instruments to record, and many problems stem from the quality and maintenance of the instrument itself. You'll obtain the best results by using an instrument that has just been tuned and is in good mechanical condition.
The piano is generally recorded using close miking technique. Ideally, you'll want a
minimum of two microphones. Usually, the microphone capturing the higher strings is assigned to the left channel and the microphone capturing the lower strings is assigned to the right channel in the final stereo mix, though the stereo spread generally is not hard left and right. While a single microphone can be used, the lower and upper extremities of the instrument will likely be compromised.
Grand Piano: For the upper strings, position the microphone approximately 8 inches from the piano hammers (to reduce mechanical noise) and 8 - 11 inches above the strings, with the Pan position set to left of center. For the lower strings, position the microphone toward the far end (away from the keyboard) roughly 6 - 12 inches from the end and 8 - 11 inches above the strings, with the Pan position set to right of center. Position the piano's lid at full stick (see Fig. 4A). If you are using a single microphone, position the microphone approximately 8 inches from the piano hammers (to reduce mechanical noise) and 8 - 11 inches above the strings - centered over the piano's mid point. Pan position should be centered and the piano's lid should be at full stick.
Upright Piano: With an upright piano, the two microphones are generally placed either just over the top of the piano with the top open, or you can remove the piano's front panel beneath the keyboard and place the microphones below.
Fig. 4B
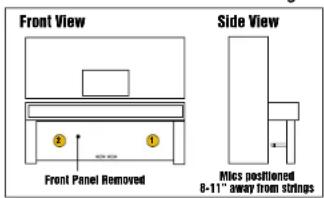
Front Panel Placement: For the upper strings, position the microphone approximately 8 - 11 inches away from the strings, with the Pan position set to left of center. For the lower strings, position the microphone 8 - 11 inches away from the strings, with the Pan position set to right of center (see Fig. 4B).
your other hand, rotate the retaining nut until the microphone is securely attached to the shockmount.
Microphone Cables
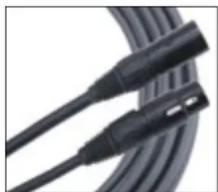
The microphone cable can have a profound effect on the sound of any microphone. Even the finest microphones will sound poor if the interconnect cable allows noise to enter or causes distortion and loss of information. We highly recommend exclusively using the Mogami® cables supplied with your Revelation Solo.
natural_image
Close-up of black cable connectors with metallic connectors (no text or symbols visible)Care
Dust and foreign material can degrade the performance of a microphone over time so always store the unit in its case.
Grill
The Revelation Solo microphone uses a single layer mesh grill. This design minimizes standing waves and harmonic distortion. Because this type of grill leaves little protection between the user of the microphone and the capsule, we highly recommend using a pop filter. Use of a pop filter will help protect your microphone's sensitive capsule, keeping it free from moisture caused by saliva and breath condensation.
Recording Tips and Tricks
Vocals and Dialog
Fig. 1
natural_image
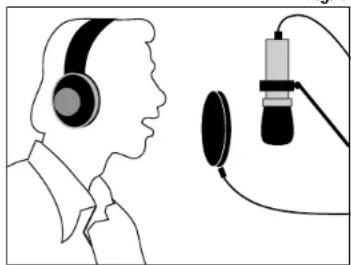
Silhouette of a person wearing headphones and listening to audio equipment (no text or symbols visible)Ideally, you want to record vocals in a relatively "dead" room. If you clap your hands and get an echo effect, you should consider adding some carpet, blankets, drapes, or other sound absorbing materials. On that note, make every effort to avoid getting too close to the room's walls. These hard, reflective surfaces can easily complicate the recording process. Move your mic setup toward the room's center.
Generally, you should position the vocalist roughly 6 - 8 inches away from the micro-
phone. Getting too close to the microphone tends to increase bass response and can create problems with plosive sounds (i.e., those popping Ps, Bs, Ds, and Ts). Getting too far away makes the microphone more subject to picking up room ambience and creates the effect of the vocalist being in a bowl. While vocalists may need to move about in order to hit those high notes, make every effort to maintain a constant distance from the microphone, as this will provide the greatest tonal balance (see Fig. 1). For the most part, the microphone's axis (or center line) should aim toward the nose and mouth to obtain the fullest sound. It's not a bad idea, however, to experiment angling the microphone slightly away from dead center so as to help minimize plosives. Further, you should always place a "pop" filter between the vocalist and the microphone, with the pop filter positioned 3 - 4 inches in front of the microphone. This will greatly increase your ability to achieve the most natural sounding recordings with minimal interference from plosive sounds. Fixing plosives with audio editing software often creates more of a problem than the plosive itself. Use of a pop filter will also protect your microphone's sensitive capsule, keeping it free from moisture caused by saliva and breath condensation. Remember—good microphone technique, proper positioning, and use of a pop filter can make all the difference between a so-so vocal recording and a great one.
Recording Acoustic Guitar
Fig. 2
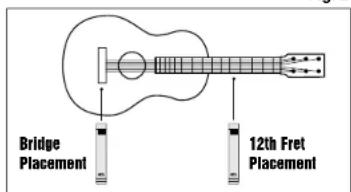
Your best results for capturing the acoustic guitar (or any similar stringed instrument) begin with a properly tuned instrument and strings that, while not old, aren't so new as to create tuning issues due to stretching. There are two optimum points for microphone positioning: either near the bridge or by the twelfth fret.
While it may seem natural to place the microphone in front of the instrument's
sound hole, doing so usually increases low frequency response to the point of making the instrument sound "boomy."
Twelfth Fret Placement: Placing the microphone roughly 2 - 4 inches from the twelfth fret and aimed directly at the strings will generally produce a warm, full bodied sound with good tonal balance. In addition, the sound hole's contribution to the sound will be moderated since the microphone is not pointed directly at it.
Bridge Placement: Similarly, you can position the microphone so it is 3 - 6 inches from the guitar's bridge. This will generally produce a somewhat brighter tonal quality. You should also be prepared to experiment with positioning the microphone slightly off-axis should you find yourself capturing too much low frequency response from the guitar's sound hole.
The acoustical characteristics of your room will also have a pronounced effect on your results. A "live" room will produce an overall "brighter" guitar sound, while a "damped" room will produce more of a mellow tone. If you have two microphones, you may wish to experiment using one in close proximity to the guitar as previously described, with the second microphone on a stand a few feet away to capture the room's ambience. Blending the two sources can produce excellent results.
Recording an Amplified (Electric) Guitar
While the electric guitar can certainly be recorded directly, there are times when there is simply no substitute for the sound of a real amplifier. Guitar amps have particular gain stages that facilitate the popular “crunch” guitar sound. While digital modeling and processing systems certainly have their place, they may not have the same level of realism as the sound from an amplifier. A small guitar amp can be just as effective for this application as a stack, because you don’t necessarily need to “crank” the volume.
Instead, you want to increase the amp's initial gain to achieve the desired amount of overdrive.
Fig. 3
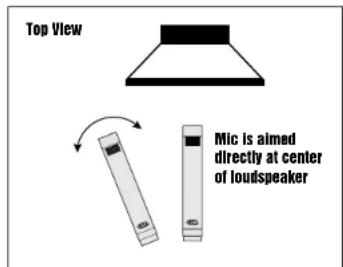
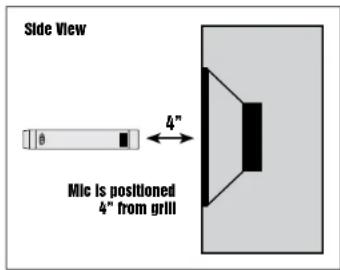
Typically, a guitar amp is close miked to achieve the highest direct sound. Placing the microphone roughly 4 inches from the grill, aimed directly at the center of the loudspeaker will produce the most "edge" to your sound. By angling the microphone slightly off axis and towards the wall, you can add more "room sound." Experimentation is a key factor in achieving the sound you are looking for (see Fig. 3).
- Marshall Electronics
- An Introduction to the MXL Revelation Solo
- Warranty
- Revelation Solo Features
- Power Requirements
- Caution
- REVELATION SOLO
- User Manual
- Phase Switch
- Polar Pattern
- Ground Lift Switch
- -10dB Pad
- Shockmount
- Recording a Drum Set
- Microphone Cables
- Care
- Grill
- Recording Tips and Tricks
- Recording an Amplified (Electric) Guitar
Brand : MXL
Model : Revelation Solo
Category : Microphone