
Lutea - Sphygmomanometer FAKIR - Free user manual and instructions
Find the device manual for free Lutea FAKIR in PDF.

| Product Type | Arm Blood Pressure Monitor |
| Brand | Fakir |
| Model | Lutea |
| Measurement Range (Blood Pressure) | 20 - 300 mmHg |
| Accuracy (Blood Pressure) | ±3 mmHg |
| Memory Capacity | 85 sets |
| Display Type | LCD |
| Automatic Shut-off | After 150 seconds |
| Operating Temperature | +10°C to +40°C |
| Operating Humidity | Less than 85% RH |
| Storage Temperature | -20°C to +50°C |
| Storage Humidity | Less than 85% RH |
| Unit Dimensions | 80 x 120 x 40 mm |
| Weight | Approx. 350 g |
| Power Supply | 4 x AA alkaline batteries (recommended) |
| Cuff Type | Arm cuff (preferred on left arm) |
| Safety Classification | Type BF |
| Standards Compliance | DIN EN 60601-1, DIN EN 1060-1, DIN EN 1060-3 |
| Cleaning Instructions | Wipe with cloth moistened with water or neutral detergent; avoid thinner, benzene |
| Care | Remove batteries if not used for long; avoid high temperature, direct sunlight, moisture, dust |
| Intended Use | Home use for non-invasive blood pressure measurement |
Frequently Asked Questions - Lutea FAKIR
User questions about Lutea FAKIR
0 question about this device. Answer the ones you know or ask your own.
Ask a new question about this device
Download the instructions for your Sphygmomanometer in PDF format for free! Find your manual Lutea - FAKIR and take your electronic device back in hand. On this page are published all the documents necessary for the use of your device. Lutea by FAKIR.
USER MANUAL Lutea FAKIR
DIN EN 1060-3: 9/97 "Non-invasive sphygmomanometers"
natural_image
Technical line drawing of a rectangular device with internal components and two separate battery-like components shown below (no text or symbols)natural_image
Line drawing of a human hand holding a device with a computer monitor nearby (no text or symbols)natural_image
Illustration of a person receiving a medical or health check with a heart symbol (no text or symbols present)
Systolic & Diastolic


Thank you for purchasing Fakir Lutea Arm Type Blood Pressure Monitor which has been designed and manufactured to give you many years of trouble-free service.
You may already be familiar with using a similar product, but do please take time to read these instructions - they have been written to ensure you get the very best from your purchase.
Keep this manual for future use.
LUTEA ARM TYPE BLOOD PRESSURE MONITOR
This fully automatic instrument is used for the non-invasive measuring and checking of arterial pressure values (systolic and diastolic) and heartbeat frequency. Blood pressure is the force exerted by blood on the arteries. This force varies constantly depending on heartbeat. When the heart contracts, blood pressure is at its highest (systolic blood pressure value) whilst at the end of the heart's "relaxation period", the value is at its lowest (diastolic blood pressure value). Blood pressure is influenced by many factors: smoke, stress, physical activity, eating, the time of day... Accurate and easy to use, this device enables even the elderly and less expert to measure blood pressure in the comfort of their own home; its quick and reliable results enabling pressure values to be checked daily. BEFORE STARTING TO USE THE DEVICE, PLEASE READ THIS INSTRUCTION MANUAL CAREFULLY FROM COVER TO COVER AND KEEP IT SAFE FOR FUTURE REFERENCE.
IMPORTANT SAFEGUARDS
- Use only as described in this manual.
- Self-measuring means checking, and is no substitute for diagnosis or treatment. Unusual values should always be discussed with your doctor. Under no circumstances should doses of any medicine prescribed by your doctor be altered.
- The heartbeat display is not suitable for checking the frequency of pacemakers!
- Should there be a deviation from the normal rhythm of the heart (arrhythmia) or other cardiac problems, for carriers of pacemaker, for those who use anticoagulants, for women in state of pregnancy, the measurements made with this device should be evaluated only after consulting your doctor. In such cases compare the results with the doctor in order to verify their correctness.
- In case of heavy arteriosclerosis and other circulation problems or spasms in the upper limbs the reading could result incorrect.
- This device cannot be used within the area interested by radiations of Computerized Axial Tomography (TAC), X rays and Magnetic Resonance (RMN).
- If there is reduced blood circulation in the arm due to acute or chronic vascular diseases (including the restriction of the diameter of the blood vessels), the precision of the measurement could be affected.
- In the case of cardio circulatory illnesses, the measurement could be falsified; the same could happen with very low blood pressure, problems with blood supply, arrhythmia or other pre-pathological conditions.
- Do not use near to strong magnetic fields. It must be kept well away from radio equipment or mobile phones.
- Do not drop the unit.
- Do not modify or disassemble the unit or the arm cuff.
- Do not twist the arm cuff.
- Use a cloth moistened with water or neutral detergent to clean to clean the body of the unit and then wipe it dry.
- Avoid thinner, benzene, and other harsh cleaners.
- Keep the unit in a suitable place. Avoid high temperature, direct sunlight, high moisture and dust.
- Remove the batteries if the unit will not be used for a long time.
- Do not pres the POWER button if the cuff has not been properly wrapped around the arm.
- Pressure varies from person to person, and increases or decreases every day, depending on the stress the heart is subjected to. Normally pressure is low during the night, during sleep or during relaxation, and it is higher during the day, when we smoke, during physical
exercise, under effort, when we are anxious or tense. Blood pressure tends to increase with age and depends greatly on the individual way of life. It is well known that stress, obesity, excessive intake of salt and alcohol all contribute to increase arterial pressure.
- This unit is only for home use. Keep the unit and the batteries out of the reach of children.
PRODUCT SPECIFICATIONS

TECHNICAL SPECIFICATIONS
Range of Measurement : 20 – 300 mmHg (blood pressure)
Accuracy : ±3 mmHg (blood pressure)
Sets of Memory : 85 sets
Display : LCD
Power Off : Automatic shut off if not used
for 150 seconds.
Operating Temperature: +10°C / +40°C
Less than 85% RH
Storage Temperature : -20^ / +50^
Less than 85% RH
Unit Dimension : 80 x 120 x 40
Type BF apparatus
This device conforms to the following standards: DIN EN 60601-1: 3/96 "Medical electrical equipment"
Part 1: General requirements for safety
DIN EN 1060-1: 12/95, AMD 1 09/02 "Non-invasive sphygmomanometers"
Part 1: General requirements
DIN EN 1060-3: 9/97 "Non-invasive sphygmomanometers"
Part 3: Supplementary requirements for electro-mechanical blood pressure measuring systems
USING THIS PRODUCT
Before Use
Installing / Replacing Batteries
1-Insert the batteries into the battery compartment matching correct polarities "+" and "-"
2- Replace all batteries if the low battery indicator appears.
3-Remove the batteries if the device will not be used for a long period of time.
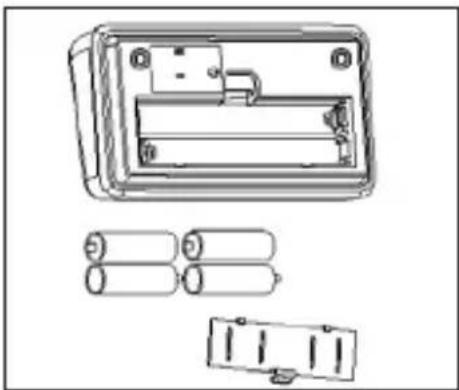
natural_image
Technical line drawing of a rectangular device with internal components and three separate battery-like components (no text or symbols)Note: It is recommended that the same type of alkaline batteries be used to avoid incompatibility.
Attaching the Pressure Cuff
1-Wrap the cuff around bareskinned left arm.
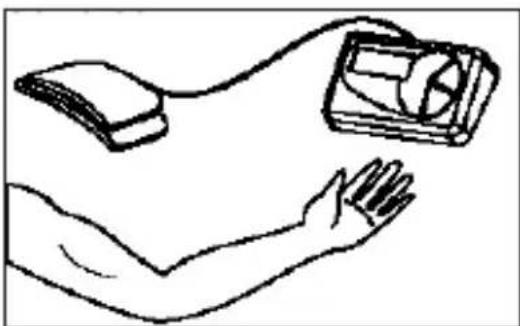
natural_image
Line drawing of a human arm holding a device with a computer monitor nearby (no text or symbols)2-Fasten the cuff. Make sure it is not too tight. The cuff's lower edge should be approximately one inch from the crook of the arm.
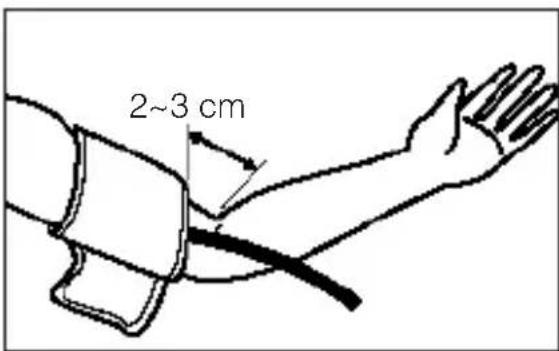
- If it is not possible to measure on the left arm. Attach the cuff on the right arm as shown in the figure.
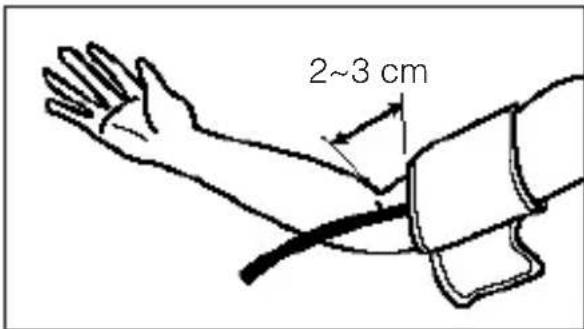
Measuring Posture
1- Sit upright and ensure that the measuring site is at heart level. Relax and measure in a natural position.

natural_image
Illustration of a person receiving medical aid from a patient's arm, with a heart symbol and dashed line indicating measurement (no text or symbols present)- Measure and record blood pressure at the same time every day to establish your blood pressure pattern.
How To Operate the Unit
1-Measuring Blood Pressure
Press and release the POWER button to start measuring.

- Initial display

- Pumping & measurement
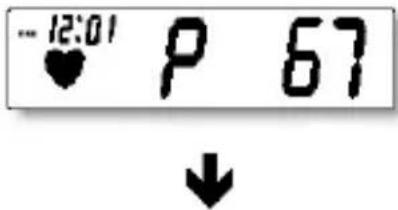
- Displaying the results

When the measurement is completed, the display will show the measured blood pressure value and pulse rate. Press the POWER button to turn off the unit or it will turn itself off automatically after 150 seconds.
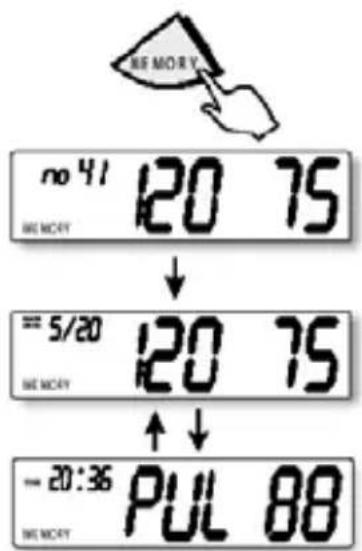
2-Recalling Memories
- 1 Press and release the MEMORY button to recall the last reading. The display will show the memorized pressure value and pulse rate switching back and forth.
2.2 Press the MEMORY button to go to previous memories.
3-Erasing Memories
You may erase one or all memories. To delete one record:
Step 1: Press and release MEMORY button to display records. Press and release MEMORY button again to choose the record that you wish to delete. Step 2: Press and hold the POWER button until the display shows "DEL".
Step 3: Press and hold the POWER button. After three beeps are heard, the selected record is deleted.
To delete all memories: Follow steps 1 and 2 above. Step 3: Press the MEMORY button again and the display shows "DEL ALL".
Step 4: Press and hold the POWER button. After three beeps are heard, all records are deleted.
4-Setting the Clock/Timer
Press and hold the MEMORY button for over three seconds. The display will show a blinking year. Press the POWER button to adjust the year when it is blinking. Then pres MEMORY button again, "month" will appear and blink to be adjusted, and then "date", "hour" and "minute" will follow as you press and release the MEMORY button repeatedly.
To adjust the clock Press the POWER button to adjust the values of "month", "date", "hour", and "minute" when they are blinking.
SPECIAL CASES
If the following circumstances occur:
1) After pressing the ON/OFF key the reading does not start.
- Check the batteries and replace them if needed.
- Clean the contacts of the batteries with a dry cloth
2) Nothing appears on the display when the MEMORY key is pressed.
- The stored data have been deleted.
3) The batteries do not last long.
- Use alkaline batteries to increase working autonomy. If normal zinccarbon batteries are used they will need changing more often.
4) You cannot complete a reading.
- Check the batteries and change them if needed.
5) The blood pressure levels are different with each reading - the readings are very low or very high.
• The measuring position is not correct
- The blood pressure readings vary constantly depending on the time of day and the state of nerves of the person. Read the paragraphs "Warnings" again.
6) The heart beat readings are too high or too low:
- The person moved while the reading was being taken.
- The reading was taken after physical exertion. Read the paragraphs "WARNINGS" again.
ERROR MESSAGES
| LL Err | The pressure measured was lower than 20mmHg. Please measure again. |
| The pressure measuredUU Err | was higher than 300mmHg. Please measure again. |
| Pumping error. Please checkPErr | cuff and try again. The pumping pressure is higher than 300mmHg.Please measure again. |
| The pressure can not berrErr | measured due to signal noise. Please measure again. |
| HI | The pumping pressure is higher than 300mmHg. Please measure again. |
| orNo display | Check or replace the 4 batteries and try again. |
| CLASSIFICATION OF BLOOD PRESSURE VALUES AND RANGE SYSTOLIC DIASTOLIC MEASURES | |||
| RANGE SYST | OLIC DIASTOLIC MEASURES | ||
| Hypotension below 105 below 60 consult | your doctor | ||
| Normal 105 - 140 60 - 90 self- | measuring | ||
| Limit range 140 – 160 90 – 95 consult | your doctor | ||
| Hypertension | over 160 | over 95 | consultyour doctor |
Fakir HAUSGERÄTE
- LUTEA ARM TYPE BLOOD PRESSURE MONITOR
- IMPORTANT SAFEGUARDS
- TECHNICAL SPECIFICATIONS
- Type BF apparatus
- USING THIS PRODUCT
- Before Use
- Installing / Replacing Batteries
- Attaching the Pressure Cuff
- Measuring Posture
- How To Operate the Unit
- 1-Measuring Blood Pressure
- 2-Recalling Memories
- 3-Erasing Memories
- 4-Setting the Clock/Timer
- SPECIAL CASES
- ERROR MESSAGES
- Fakir HAUSGERÄTE
Brand : FAKIR
Model : Lutea
Category : Sphygmomanometer