
RVC16 - Vacuum Cleaner PROLINE - Free user manual and instructions
Find the device manual for free RVC16 PROLINE in PDF.


| Product Type | Handheld Vacuum Cleaner |
| Brand | Proline |
| Model | RVC16 |
| Power Adapter Input | 230V~50Hz AC |
| Power Adapter Output | 3.6V DC |
| Vacuum Power | 25W |
| Battery Type | 3 x Ni-MH 1.2V rechargeable |
| Charging Time | At least 10 hours |
| Charging Indicator | Red (charging), Green (full) |
| Filter System | Washable inner and outer filters |
| Included Accessories | Brush tool, Crevice tool, Squeegee |
| Wet Pick-up Capability | Yes (with squeegee, at 30° angle) |
| Power Cord | No (cordless, battery-operated) |
| Charger Mounting | Wall-mountable (screw spacing 37mm) |
| Intended Use | Domestic household only |
Frequently Asked Questions - RVC16 PROLINE
User questions about RVC16 PROLINE
0 question about this device. Answer the ones you know or ask your own.
Ask a new question about this device
Download the instructions for your Vacuum Cleaner in PDF format for free! Find your manual RVC16 - PROLINE and take your electronic device back in hand. On this page are published all the documents necessary for the use of your device. RVC16 by PROLINE.
USER MANUAL RVC16 PROLINE
natural_image
Purple and white handheld vacuum cleaner (no visible text or symbols on body)
OPERATING INSTRUCTIONS

MANUEL D'UTILISATION

HANDLEIDING

ISTRUZIONI OPERATIVE

IMPORTANT SAFETY INSTRUCTIONS
The charger is for indoor use only and must not be used outdoors or exposed to wet conditions.
The charger is designed to operate from 230 Volts, 50 Hz AC mains supply.
If the power adapter becomes damaged, it should be
replaced with an adapter of the same type and rating to avoid a hazard.
Always disconnect the plug from the power supply if it is left unattended and before assembling, disassembling or cleaning.
Do not use the appliance with wet hands or feet.
Do not use without dust bag and/or filter in place.
Do not pick up anything that is burning or smoking, such as cigarettes, matches, or hot ashes.
Do not immerse the product in water or any other liquid for cleaning.
Do not use to pick up flammable or combustible liquids, such as gasoline, or use in areas where they may be present.
Use only original accessories approved by the manufacturer.
Do not hold the appliance with the dust compartment pointing upwards and do not tilt the appliance to one side when you suck up liquids.
Switch off the appliance when you recharge it.
Always use the vacuum cleaner with the filter unit assembled.
WARNING:
This appliance can be used by children aged from 8 years and above and persons with
reduced physical, sensory or mental capabilities or lack of experience and knowledge if they have been given supervision or instruction concerning use of the appliance in a safe way and understand the hazards involved.
Children shall not play with the appliance. Cleaning and user maintenance shall not be made by children without supervision.
Children should be supervised to ensure that they do not play with the appliance.
This appliance is intended for domestic household use only and should not be used for any other purpose or in
any other application, such as for none domestic use or in a commercial environment.
The plug must be removed from the socket outlet before cleaning or maintaining the appliance.
Battery handling and usage
The appliance is supplied with 3 rechargeable Ni-MH 1.2 V batteries which are accessible and can be replaced.
The battery must be removed from the appliance before it is scrapped.
The battery is to be disposed of safely.
Dispose of used batteries according to the instructions.
To remove the batteries

-
Unscrew and remove the battery cover.
-
Cut the connecting wires and remove the batteries.
DESCRIPTION
A. Dirt compartment
B. Dirt compartment release button
C. On/Off switch
D. Charging indicator light
E. Air outlet
F. Charger
G. Filter unit
- Outer filter
- Filter ring
- Inner Filter
- Filter holder
H. Brush tool
- Crevice tool
J. Squeegee

Preparing
Positioning the charger
The charger can be placed on a level surface or mounted on the wall.
Wall mounting
- Drill two holes on the wall. The space between the two drilling holes is 37 mm.
- Insert two screws (not supplied) into the holes.
- Attach the charger onto the two screws.

Charging the appliance
Make sure the appliance is switched off.
- Place the appliance on the charger.


- Plug the power adapter into the mains supply.
The charging indicator light will illuminate red to indicate that the appliance is charging.
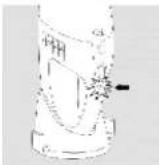
- When the appliance is fully charged, the charging indicator light will turn green.
ATTENTION: The appliance should be charged for at least 10 hours.
OPERATION
- Attach the desired accessory to the appliance.

Brush tool for cleaning delicate surfaces; Crevice tool for cleaning corners or gaps; Squeegee for sucking up liquid.
- Switch on the appliance.

When you suck up liquid, please hold the appliance with the nozzle pointing downwards at an angle of 30^ .
CAUTION: Never hold the appliance with the nozzle pointing upwards or tilt the appliance to one side or shake the appliance when there is liquid in the dust compartment to prevent the internal electronic components from being damaged.
- After use, switch off the appliance.
When you have used the appliance to suck up liquids, empty and dry the dust compartment before you place the appliance in the charger.
CLEANING AND MAINTENANCE
- Always switch off the appliance and remove the power adapter from the mains socket before cleaning.
- Clean the outside of the appliance and the charger with a damp cloth. DO NOT immerse them in water or any liquid.
- Hold the appliance over a dustbin, press the dust compartment release button and remove the dust compartment.

- Empty the dust compartment.

- Remove the filter unit anticlockwise from the appliance and separate the filter unit.

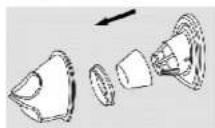
- Clean all the parts under running water then dry them thoroughly.
It is recommended to replace the inner filter if it cannot be cleaned properly.
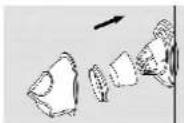
- Put the parts together then attach the filter unit to the appliance.
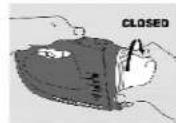
- Attach the dust compartment to the appliance, making sure the slot on the dust compartment is aligned with the projection on the appliance.


TROUBLESHOOTING
Please check the following details before you have your appliance repaired by an authorised servicing agent.
| Problem | Possible Cause | Possible Solution |
| The appliance does not work. | The batteries may be low. | Recharge the batteries. |
| The charging indicator light does not come on. | The power adaptor may not be inserted in the mains socket. | Insert the power adapter into the mains socket. |
| The appliance may not be properly placed on the charger. | Place the appliance on the charger in place. | |
| The appliance does not vacuum properly. | The dust compartment may not be attached properly to the appliance. | Attach the dust compartment to the appliance until a click is heard. |
| The dust compartment may be full. | Empty the dust compartment. | |
| The filter unit may be clogged. | Clean the inner filter and outer filter (See the chapter “Cleaning and maintenance”). | |
| Liquid leaks from the appliance. | The filter unit may be wet. | Dry the filter unit thoroughly before placing them in the appliance. |
| You may not put the filter unit in the appliance. | Never use the appliance without the filter unit. | |
| The filter unit may not be properly placed in the appliance. | Place the filter unit in place. | |
| The dust compartment is filled with liquid. | Empty the dust compartment immediately and dry it. |
SPECIFICATIONS
Power adapter ratings
Input: 230V\~50Hz
Output: 3.6V
Vacuum cleaner ratings: 3.6V 25W
We apologise for any inconvenience caused by minor inconsistencies in these instructions, which may occur as a result of product improvement and development.
Kesa Electricals © UK: EC1N 6TE 12/01/2012
MISES EN GARDE IMPORTANTES
natural_image
Technical line drawing of a mechanical component with mounting holes and a vertical alignment indicator (no text or symbols)
Kesa Electricals © UK: EC1N 6TE 12/01/2012
NL
BELANGRIJKE VEILIGHEIDSINSTRUCTIES
Voorbereiding
De oplader plaatsen
Kesa Electricals ©UK: EC1N 6TE 12/01/2012
IT
ISTRUZIONI DI SICUREZZA IMPORTANTI
28 29
Preparazione
Kesa Electricals © UK: EC1N 6TE 12/01/2012
36 37
Preparativos preliminares
Kesa Electricals © UK: EC1N6TE 12/01/2012
DÜLEŽITÉ BEZPEĚNOSTNÍ POKYNY
Pøiprava
Umístní nabíječky
Kesa Electricals © UK: EC1N 6TE 12/01/2012
DÔLEŽITÉ BEZPEČNOSTNÉ POKYNY
Príprava
Umiestnenie nabíjačky
Kesa Electricals © UK: EC1N 6TE 12/01/2012

- IMPORTANT SAFETY INSTRUCTIONS
- WARNING:
- Battery handling and usage
- DESCRIPTION
- Preparing
- Positioning the charger
- Charging the appliance
- OPERATION
- CLEANING AND MAINTENANCE
- TROUBLESHOOTING
- SPECIFICATIONS
- MISES EN GARDE IMPORTANTES
- NL
- BELANGRIJKE VEILIGHEIDSINSTRUCTIES
- Voorbereiding
- IT
- ISTRUZIONI DI SICUREZZA IMPORTANTI
- Preparazione
- Preparativos preliminares
- DÜLEŽITÉ BEZPEĚNOSTNÍ POKYNY
- Pøiprava
- DÔLEŽITÉ BEZPEČNOSTNÉ POKYNY
- Príprava
Brand : PROLINE
Model : RVC16
Category : Vacuum Cleaner