KA CH 7 - Heating KALORIK - Free user manual and instructions
Find the device manual for free KA CH 7 KALORIK in PDF.

User questions about KA CH 7 KALORIK
0 question about this device. Answer the ones you know or ask your own.
Ask a new question about this device
Download the instructions for your Heating in PDF format for free! Find your manual KA CH 7 - KALORIK and take your electronic device back in hand. On this page are published all the documents necessary for the use of your device. KA CH 7 by KALORIK.
USER MANUAL KA CH 7 KALORIK
natural_image
Two views of a portable electrical stove or heating unit with labeled components and directional arrow (no text or symbols on the device itself)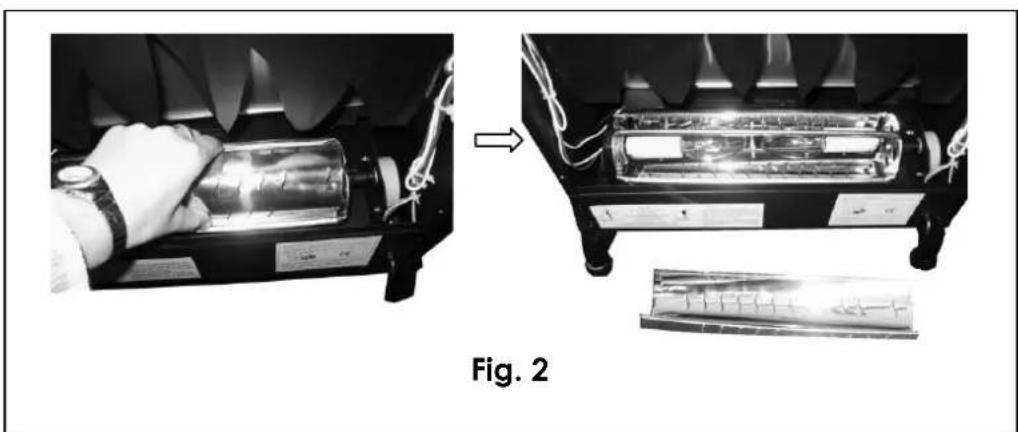
natural_image
Two-panel image showing a hand inserting a cylindrical device into an open appliance, with a close-up of its internal components (no visible text or symbols)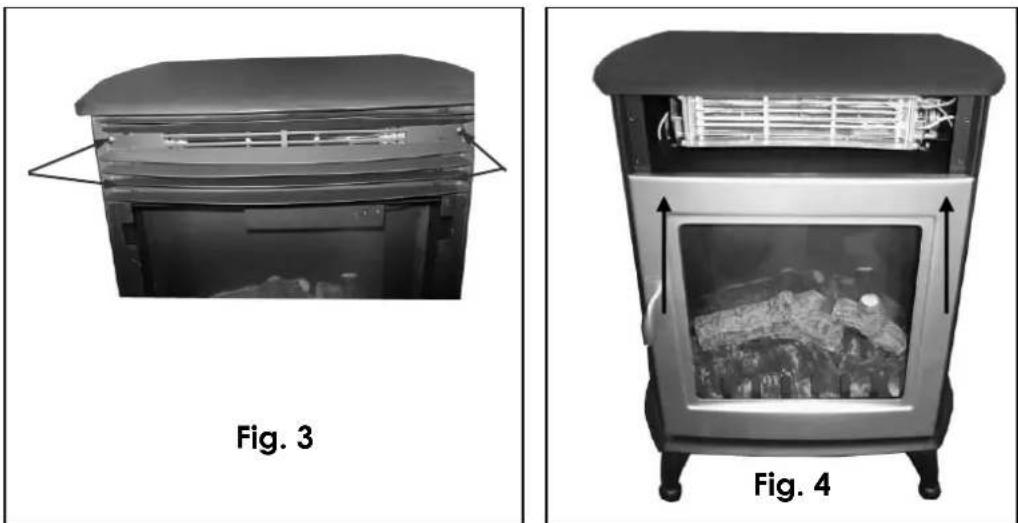
natural_image
Two views of a portable air conditioner unit, labeled Fig. 3 and Fig. 4, showing internal components and heating elements (no text or symbols on the devices themselves)2 KA CH7-060518
text_image
B D C Fig. 5GB OPERATING INSTRUCTIONS
IMPORTANT SAFEGUARDS
☐ Please read these instructions carefully before using the appliance.
☐ Check that your mains voltage corresponds to that stated on the rating plate of the appliance.
☐ Do not leave the heater unattended during operation and keep children away.
From time to time check the cord for damages. Never use the appliance if cord or appliance shows any signs of damage but have it checked and repaired by a competent qualified service(*). Should the cord be damaged, it must be replaced by a competent qualified service (*)
☐ Only use the appliance for domestic purposes and in the way indicated in these instructions.
☐ Never immerse the appliance in water or any other liquid for any reason whatsoever. When cleaning the appliance, refer to the instructions in the paragraph "Cleaning and maintenance" because the water penetration through the openings can be very dangerous for your appliance.
☐ Never use the appliance near hot surfaces.
Before cleaning, replacing a bulb or when you do not use the appliance, always unplug the appliance from the power supply. Do not attempt to remove the plug from the wall socket with wet hands.
☐ Never use the appliance outside and always place it in a dry environment.
☐ Never use accessories that are not recommended by the producer. They could constitute a danger to the user and risk to damage the appliance.
☐ Never move the appliance by pulling the cord. Make sure the cord cannot get caught in any way. Do not wind the cord around the appliance and do not bend it.
☐ No responsibility is accepted if damage results from improper use, or if these instructions are not complied with.
☐ Stand the appliance on a stable surface so that it cannot fall.
☐ Do not place the appliance under a power socket. The power socket must not be in the hot airflow of the appliance.
□ Always position the heater in such a way that inflammable materials (such as curtains) cannot be ignited. Ensure at all times that the unit is placed solidly on its base/feet. Make sure that the air inlet and outlet openings are not blocked.
To avoid any risk of fire, do not cover the heater (ex. With clothes)
☐ The heater should only be operated at a minimum distance of 1 meter from any wall, piece of furniture or other object and combustibles.
☐ Warning: Do not operate the heater near baths, showers, washbasins, swimming pools or any other water container. It must be impossible to reach the commands of your appliance when you are in contact with water.
☐ The temperature of the housing and the grids may be very high when the appliance is in use. Avoid contact with the skin.
☐ Do not allow the power cord to touch any hot part of the appliance.
□ Never use the appliance near inflammable or explosive materials.
☐ Do not insert any objects through the grille or into the interior of the appliance.
☐ Do not use double adapters or other appliances to connect with heater.
INSTALLATION
The heater should only be installed at a minimum distance of 1 meter from any wall, piece of furniture or other object and combustibles.
CONTROL PANEL
text_image
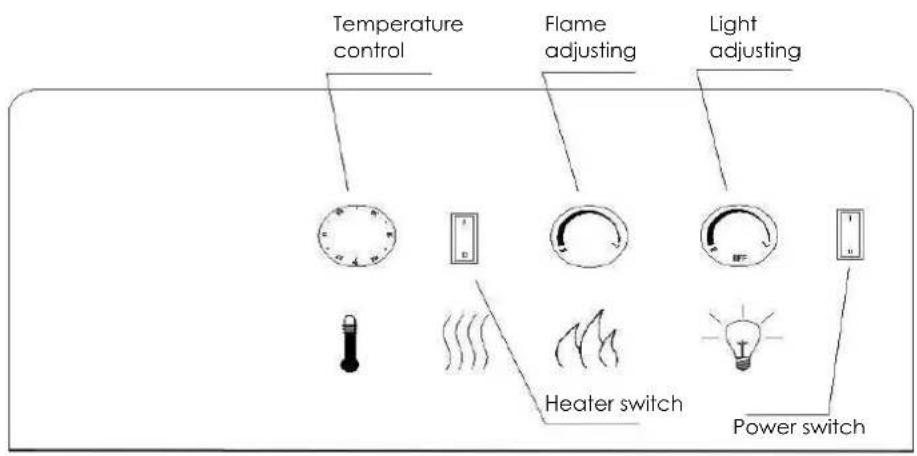
Temperature control Flame adjusting Light adjusting Heater switch Power switchOPERATION
The controls are located in the back of the fireplace.
Power switch: controls the power of the entire unit. Use it to switch the appliance on or off.
Heater switch: operates the heater when the power switch is turned on. When this switch is turned on, the heater will emit heat in the temperature range selected. The unit can operate with or without heat. Note: When first used, the heater may release a slight, harmless odour. This odour is a normal occurrence caused by the initial heating of the internal heating elements and will not occur again.
Temperature control dial: this dial adjusts the heater temperature and automatically shuts the heater off once the desired temperature is achieved.
Light adjusting dial: this dial adjusts the brightness of flame and fire log ember bed so that the best visual effect can be achieved.
Flame adjusting dial: this dial adjusts the intensity of flame.
CLEANING AND MAINTENANCE
Warning: The unit must be unplugged from the power supply prior to any maintenance or cleaning in order to reduce the risk electric shock or fire.
A. Light bulb replacement procedure
Most light bulbs are rated to last approximately 3000 hours. Like all light bulbs, bulbs require periodic replacement. When the bulbs in your unit have burned out you will notice one or more of the following:
• Contrasting light is dark
• The flame is dim or dark in certain areas
- The log set ember bed appears dim or dark in certain areas
Your unit must be opened in order to replace the light bulbs. To reduce the number of times you need to open the unit, replace all the lights bulbs at the same time if they are close to the end of their rated life.
Warnings:
- The light bulbs in your unit can become extremely hot. Allow at least 10 minutes between turning off the unit and removing the light bulbs to avoid the accidental burning of the skin.
• Always make sure to replace the bulbs by a bulb with exactly the same features.
Replacing the flame generation bulbs: first open the back plate by releasing the screws (fig. 1). Locate the flame generation cylindrical drum (A), remove one half of the drum cylinder by slightly squeezing the cover of the cylinder (fig. 2). You will see two light bulbs, pull out the old ones and replace them by new ones. After having replaced the bulbs, make sure to reassemble the cylinder correctly.
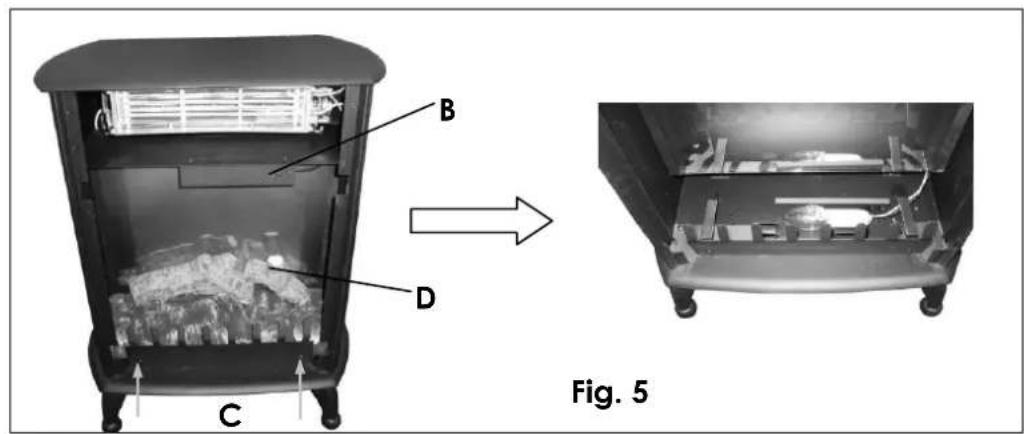
Replacing the top contrasting light bulbs and the log set ember bed light bulbs: first remove the grid on the top front side by releasing the screws situated between the louvers of the grid (fig. 3). Remove the glass panel forward from the top (fig. 4), then you can change the top light bulb (B). Slightly loosen the screws (C) that fix the log set ember bed (fig. 5) and pull forward and lift up the log set ember bed (D) to remove it. Replace the light bulb of the log set ember bed (fig. 5).
B. General cleaning instructions
- The housing may be wiped with a slightly damp, lint-fee cloth.; do not use any abrasive scouring pad or steel wool.
- Do not use detergents or cleaning products.
- If necessary, dust particles accumulated in the air outlet openings may be removed with a vacuum cleaner.
PROTECTION OF THE ENVIRONMENT- DIRECTIVE 2002/96/EC
In order to preserve our environment and protect human health, the waste electrical and electronic equipment should be disposed of in accordance with specific rules with the
implication of both suppliers and users. For this reason, as indicated by the symbol on the rating label or on the packaging, your appliance should not be disposed of as unsorted
municipal waste. The user has the right to bring it to a municipal collection point performing waste recovery by means of reuse, recycling or use for other applications in accordance with the directive.
