
Graphire Windows - Graphic tablet WACOM - Free user manual and instructions
Find the device manual for free Graphire Windows WACOM in PDF.


| Product Type | Graphics Tablet with Pen and Cordless Mouse |
| Model | Graphire Windows (Tablet: ET-0405-U, Pen: EP-100E, Mouse: EC-100) |
| Power Supply | USB powered (tools are batteryless) |
| Active Area | Approximately 4 x 5 inches (102 x 127 mm) |
| Pen Features | Pressure-sensitive, 1024 levels, DuoSwitch side switch, eraser, replaceable nib |
| Mouse Features | Cordless, 3 programmable buttons, integrated fingerwheel for scrolling |
| Connectivity | USB 1.1 (hot-pluggable) |
| Compatibility | Windows (Mac OS also supported via separate driver) |
| Cleaning and Maintenance | Clean with soft damp cloth and mild soap; avoid volatile liquids; do not disassemble |
| Safety Precautions | Do not twist pen or disassemble; store at room temperature; avoid extreme temperatures |
| Spare Parts and Repairability | Replaceable pen nibs; order from Wacom or dealer; no user-serviceable internal parts |
| Warranty | 1 year (US/Canada) or 2 years (Europe) on hardware; software as-is |
| In the Box | Graphire tablet, pen, cordless mouse, pen stand, USB cable, driver CD, user manual |
| General Information | Designed for creative professionals and everyday use; supports pressure-sensitive applications |
Frequently Asked Questions - Graphire Windows WACOM
User questions about Graphire Windows WACOM
0 question about this device. Answer the ones you know or ask your own.
Ask a new question about this device
Download the instructions for your Graphic tablet in PDF format for free! Find your manual Graphire Windows - WACOM and take your electronic device back in hand. On this page are published all the documents necessary for the use of your device. Graphire Windows by WACOM.
USER MANUAL Graphire Windows WACOM
VACOM graphire USER'S MANUAL

natural_image
White electronic device with a white mouse and a blue pen on a purple tray, no visible text or symbols on the device itself.USER'S MANUAL FOR MACINTOSH®
Navigation
Contents
Index
Wacom Graphire User's Manual for Macintosh, August 15, 2000
International English V2.1 for Macintosh
Copyright □ Wacom Company, Limited, 2000
All rights reserved. No part of this manual may be reproduced except for your express personal use. Wacom reserves the right to revise this publication without obligation to provide notification of such changes. Wacom does its best to provide current and accurate information in this manual. However, Wacom reserves the right to change any specifications and product configurations at its discretion, without prior notice and without obligation to include such changes in this manual.
TRADEMARKS
Wacom is a registered trademark. Graphire and DuoSwitch are trademarks of Wacom Company, Limited. Acrobat Reader Copyright 1987-2000 Adobe Systems Incorporated. All rights reserved. Adobe and Acrobat are trademarks of Adobe Systems Incorporated which may be registered in certain jurisdictions. Apple, the Apple logo, and Macintosh are registered trademarks of Apple Computer, Inc., registered in the U.S. and other countries. Any additional company and product names mentioned in this documentation may be trademarked and/or registered as trademarks. Mention of third-party products is for information purposes only and constitutes neither an endorsement nor a recommendation. Wacom assumes no responsibility with regard to the performance or use of these products.


Contents
Index
RADIO AND TELEVISION INTERFERENCE
The equipment described in this manual generates, uses, and can radiate radio-frequency energy. If it is not installed and used properly—that is, in strict accordance with Wacom instructions—it may cause interference with radio and television reception.
FCC NOTICE
This equipment has been tested and found to comply with the limits for a Class B digital device, pursuant to Part 15 of FCC Rules. These limits are designed to provide reasonable protection against harmful interference in a residential installation.
This equipment generates, uses and can radiate radio frequency energy and, if not installed and used in accordance with the instructions, may cause harmful interference to radio communications. However, there is no guarantee that interference will not occur in a particular installation.
You can determine whether the tablet is causing interference by powering it off. If the interference stops, it was probably caused by the tablet.
If your tablet does cause interference to radio or television reception, you may be able to correct the interference by using one or more of the following measures:
- Rotate the television or radio antenna until the interference stops.
- Move the tablet farther away from the television or radio.
- Plug the tablet and computer into an outlet that is on a different circuit from the television or radio.
If necessary, consult your Wacom dealer or an experienced radio/television technician for help.
Changes or modifications to this product not authorized by Wacom could void the FCC Certification and negate your authority to operate the product.


Contents
Index
CE DECLARATION
The Graphire® digitizing tablet, model ET-0405-U, has been tested by the Tokin Corporation in Japan and found to comply to the following harmonized European Norms:
• EN 50082-1 (electromagnetic immunity)
• EN 55022 Class B (electromagnetic emissions)
Based on the results of these tests, Wacom declares that the above mentioned devices conform to Article 10.1 of the European Council Directive 89/336/EEC and to the European Council Directive 73/23/EEC, and indicates this conformity by the CE-sign on each device.
The device must be installed and operated always in strict accordance to the instructions given in this handbook. Any changes or modifications to this product that were not specifically authorized by Wacom will invalidate this declaration.


Contents Index
TABLE OF CONTENTS
Trademarks 2
Radio and Television Interference 3
FCC Notice
CE Declaration
About the Manual 8
Navigating the Manual 10
INSTALLATION 11
Graphire Tablet Installation 12
iMac Requirements
Uninstalling the Software 14
Registration 14
Product Information 14
USING GRAPHIRE 15
Appearance and Features 16
Graphire Tablet
Graphire Tools
Setting Up Your Work Area 19
Working with the Tablet 20
Using the Graphire Pen 21
Holding the Pen
Pointing
Clicking
Using the Side Switch 24
Dragging
Proximity
Drawing with Pressure
11
12
13
14
14
14
15
16
16
17
19
21
21
22
23
25
26
27
Erasing 28
Eye-Hand Coordination Exercise 29
Using the Graphire Cordless Mouse 30
Using the Cordless Mouse Fingerwheel 31
Caring for Your Tools and Tablet 32
Replacing the Pen Tip 33
CUSTOMIZING 34
Opening the Control Panel 35
Control Panel Features 36
Tabs 37
Control Panel Lists 39
Control Panel Buttons 40
Customizing Your Pen and Cordless Mouse 41
Graphire Pen Tabs 41
Graphire Cordless Mouse Tabs
Adjusting Tip Feel
Adjusting Double-Click
Customizing Tool Buttons
Button Functions
Adjusting Eraser Feel
Tablet to Screen Mapping
Positioning Mode
Orientation
Aspect
Tablet Area
Display Area


Contents
Index
TABLE OF CONTENTS
Page 5
Customizing the Graphire Cordless Mouse 59
Customizing the Cordless Mouse Fingerwheel 60
Customizing the Pop-up Menu 61
Add Macros 62
Add Keystrokes 62
Removing Pop-up Menu Options 62
Working with Graphire Tools 63
Adding a Tool 64
Working with Application-Specific Settings 65
Creating an Application-Specific Setting 67
Adding a Tool to an Application's Tool List 69
Changing Settings for a Specific Application and Tool
Removing Application-Specific Settings
Pull-Down Menus
File
Edit
Add
Remove
Language
Help
ADVANCED FEATURES
Advanced Tip Pressure Settings
Click Force Adjustment
Pressure Curve Adjustment
Advanced Eraser Pressure Settings
Copying Settings
HAVING TROUBLE? 81
Troubleshooting 82
Testing USB Tablets 82
Verifying Your Macintosh is USB Ready 83
Resolving Software Conflicts 84
Using the Extensions Manager 84
Testing Your Graphire Tools 85
Testing the Graphire Pen 85
Testing the Graphire Cordless Mouse 86
Troubleshooting Tables 87
USB Tablet Problems 87
General Problems 88
Contacting Technical Support 91
Linking to the Web Page 91
Pre-Contact Checklist 91
Who to Call 92
USA, Canada, Central and South America 93
Europe, Middle East and Africa 94
Japan 95
Asia Pacific (English) 95
APPENDICES 96
Installing Multiple Tablets 97
Product Specifications 98
Graphire Tablet (Model ET-0405-U) 98
Graphire Pen (Model EP-100E) 99
Graphire Cordless Mouse (Model EC-100) 99
Graphire Inking Pen (Model EP-200, optional) 99





Contents
Index

TABLE OF CONTENTS
Page 6
Parts and Accessories 100
Ordering Parts and Accessories 100
License and Warranties 101
Software License 101
Limited Warranty 102
Warranty on Sales Outside of U.S. and Canada 104
License and Warranties (Europe) 105
Software License Agreement 105
Limited Warranty and Liability 106
Liability of WACOM 107
GLOSSARY 108
INDEX 112




Contents
Index

TABLE OF CONTENTS
ABOUT THE MANUAL
This interactive User's Manual provides quick access to information about Graphire. Just click on a navigation button or highlighted word to move through the document.
- The Table of Contents enables you to go directly to a topic by clicking on it.
- Installation describes how to install the hardware and software, and how to uninstall the software.
- Using Gr aphire introduces you to the many capabilities of your Graphire pen and mouse set, including a description of the features and functions of your Graphire tools. This section also includes exercises for new users.
- Customizing describes how you can change the control panel settings to optimize your Graphire pen and mouse set for your personal work style.
- Advanced Features allow further customization of your Graphire pen and mouse set. Explore them after you have become familiar with using Graphire and the basic control panel settings.
- Ha ving Trouble? Need troubleshooting guidelines? Do you have a question for Technical Support? You will find the answers to most common questions here.
- The Appendices include product specifications, license and warranty information, and a listing of replacement parts and accessories. If you are using more than one tablet on your computer, you will find instructions on adding and working with multiple tablets.
If you are new to electronic documentation, be sure to read Navigating the Manual.


Contents Index
SMALL CAPITAL LETTERS are used to identify the names of keyboard keys, dialog boxes, and control panel options.
As you read through the Customizing and Advanced Features chapters, you will notice that the screen shots of the control panel tabs do not show the tab buttons. These are intentionally left out in order to save space within the manual.
Remember that you can always use the Acrobat Reader zoom-in tool to increase the size of the manual on your display screen.
Certain kinds of information are not included in this manual:
• Information about your specific computer hardware.
• Information about your operating system.
• Information about other Wacom tablets.
- Information about application software. Many graphics applications have built-in support for Graphire features (such as pressure-sensitivity and eraser support). You can find a listing of applications that support these features at Wacom's web site (see Product Information). Refer also to your application manuals for information on how best to use Graphire features within specific applications.
Your best reference source for the above information is the set of manuals and disks that came with your hardware, operating system, applications, or other Wacom tablets.


Contents Index
NAVIGATING THE MANUAL
Use the navigation controls to move through the manual:

Go to front page.

Contents
Go to Table of Contents.

Index
Go to Index.

Go back to previous view.


Page back, or page forward.

HEADING TEXT
Go to beginning of section.
Topic
Go to topic.

Topic continued.
The Acrobat Reader provides you with additional tools for using and printing the manual. Refer to the Acrobat Reader Online Guide for more information.




Contents
Index
INSTALLATION
Graphire is compatible with any Power Macintosh equipped with a USB port, and with all applications that support a mouse. If you have an iMac, you will need Mac OS 8.5 or greater. Refer to the iMac Requirements for information on running the iMac Update software located on the Graphire Tablet CD.
The Wacom control panel requires a 640 x 480 or larger color monitor for proper display.
GRAPHIRE TABLET INSTALLATION UNINSTALLING THE SOFTWARE REGISTRATION


Contents Index
INSTALLATION
GRAPHIRE TABLET INSTALLATION
USB ports support hot-plugging so you can connect or disconnect Graphire without turning off your computer.
If you are using an iMac, refer to the iMac Requirements section before installing Graphire.
- Plug the Graphire USB connector into an active USB port on your computer or into an active USB hub.
-
If your computer is off, turn it on now. The tablet LED will light to indicate Graphire has registered as a USB device. If the LED does not light, your USB port may not be functioning properly; go to Having Trouble?
Graphire is working in mouse emulation mode. You should be able to use your Graphire Pen or Cordless Mouse on the tablet to move the screen cursor. Important: You must install the tablet software from the Graphire Tablet CD to get full tablet functionality. Disable any virus protection programs and close all open applications before installing the software. -
Insert the Graphire Tablet CD into your computer.
-
Double-click on the INSTALL icon. Choose your language option, click OK, and follow the prompts.
After restarting your computer, you will be able to use the Graphire Pen to move the screen cursor in Pen Mode. If you had any trouble with this installation, go to Having Trouble?


Contents Index

INSTALLATION
Each time you start your computer, the Wacom Tablet startup icon tells you if the tablet driver has successfully loaded.

The driver is loading.

The driver did not load.

The driver has loaded successfully.

The driver loaded, but a Wacom tablet cannot be found. The tablet may be unplugged.
iMAC REQUIREMENTS
Graphire requires Mac OS 8.5 or greater and Mac OS ROM 1.2.1 or greater.
- Verify the Mac OS and ROM versions: Click on the Apple icon and select ABOUT THIS COMPUTER.... The ABOUT THIS COMPUTER dialog box will appear with the OS version displayed in the top right corner. Mac OS 8.5 or greater is required. If the version shown is older than Mac OS 8.5, contact your local computer dealer to purchase an upgrade. If Mac OS ROM version 1.2.1 or greater displays under the Mac OS version, your iMac does not need the firmware or OS ROM update. If it does not appear or an older Mac OS ROM is installed, continue with the instructions below to install the iMAC FIRMWARE UPDATE and then install iMAC UPDATE 1.1.
- Install the iMac Firmware Update: In the APPLE IMAC UPDATES folder located on the Graphire CD, double-click on the iMAC FIRMWARE UPDATE icon. This will decompress the file. Within the open folder that appears on the desktop, double-click on the iMAC FIRMWARE UPDATE icon and follow the prompts. If in doubt, install this update.
- Install iMac Update 1.1: Install iMAC UPDATE 1.1 by double-clicking on the iMAC UPDATE 1.1 icon located in the APPLE iMAC UPDATES folder. This will decompress the file. Within the open folder that appears on the desktop, double-click on the iMAC UPDATE icon and follow the prompts. If in doubt, install this update.
- After updating your system, perform the Graphire Tablet Installation.


Contents
Index

INSTALLATION
UNINSTALLING THE SOFTWARE
To remove the Graphire software from your system:
- Insert the Graphire Tablet CD into your computer and double-click on the INSTALL icon.
- Select R EMOVE instead of INSTALL.
REGISTRATION
Please be sure to register your product. Depending on your region, the Wacom tablet may come with a Registration Card that you should complete and mail, or you may be prompted to register online during the installation process.
PRODUCT INFORMATION
To learn more about which software applications currently support the pressure-sensitivity and eraser functions of your Graphire tablet and tools, visit the Wacom web site for your region:
USA, Canada, Central and South America http://www.wacom.com/productinfo
Europe, Middle East and Africa http://www.wacom.de/productinfo
Japan http://tablet.wacom.co.jp
Asia Pacific (English) http://tablet.wacom.co.jp/asia-pacific


Contents
Index

INSTALLATION
USING GRAPHIRE
This section introduces you to the Graphire pen and mouse set. If you are new to using a graphics tablet and tablet input tools, read the following sections. They describe your Graphire tools and explain how to use them with the tablet.
APPEARANCE AND FEATURES
SETTING UP YOUR WORK AREA
WORKING WITH THE TABLET
USING THE GRAPHIRE PEN
USING THE GRAPHIRE CORDLESS MOUSE
CARING FOR YOUR TOOLS AND TABLET


Contents
Index
USING GRAPHIRE
APPEARANCE AND FEATURES
The Graphire pen and mouse set consists of two basic elements: a graphics tablet that serves as your work area, and the Graphire Tools you use with the tablet.
GRAPHIRE TABLET

Note: To learn more about your tablet, see Working with the Tablet.




Contents
Index

USING GRAPHIRE
GRAPHIRE TOOLS
Your Graphire tools are cordless, batteryless, and ergonomically designed.
The Graphire Pen is a pressure-sensitive freehand tool for image editing and creating natural-looking pen and brush strokes.


Contents
Index

USING GRAPHIRE
The Graphire Cordless Mouse is an ideal tool for navigation, with three customizable buttons that you can program for different functions. The integrated fingerwheel is both a programmable middle button and a rolling wheel. In most applications, rolling the wheel will cause the active window to scroll.

Graphire Cordless Mouse


Contents
Index

USING GRAPHIRE
SETTING UP YOUR WORK AREA
Organize your work area so you can work comfortably. Position your Graphire tablet, input tools, and keyboard so they are easily accessible without unnecessary reaching. Your monitor should be positioned so you can view it comfortably with a minimum of eyestrain.

natural_image
Man sitting at a desk using a vintage computer, no visible text or symbolsTo minimize fatigue:
• Take short breaks between tasks to stretch and relax your muscles.
- Use a gentle grip when working with your Graphire tools.
• Alternate tasks throughout the day.
- Minimize awkward postures and repetitive movements that cause discomfort.
You can attach the pen stand to better fit your work style. Refer to Working with the Tablet for additional information.


Contents
Index

USING GRAPHIRE
WORKING WITH THE TABLET
Your tablet comes with a detachable pen stand and a transparent overlay.

natural_image
Hand holding a white plastic object next to a blue rectangular object (no text or symbols visible)For free-standing use, place the pen stand within easy reach of your tablet.

natural_image
Hand holding a small white object with a blue border, next to a light blue surface (no text or symbols visible)To attach the pen stand, place the stand above the tablet cable. Push the stand toward the tablet's pen stand cutout until the stand fits snugly. To detach the pen stand, slide it back away from the tablet.
To trace or digitize an image, lift the tablet overlay and slide the image beneath it.

natural_image
Hand holding a small object over a light blue plastic tray (no text or symbols visible)


Contents
Index

USING GRAPHIRE
USING THE GRAPHIRE PEN
Your Graphire Pen is cordless, batteryless, and pressure sensitive. There are four basic techniques for using the Graphire Pen: pointing, clicking, double-clicking, and dragging. With a bit of practice, using the pen will become second nature to you. If you are unfamiliar with using a pen, try the exercises on the following pages.
HOLDING THE PEN
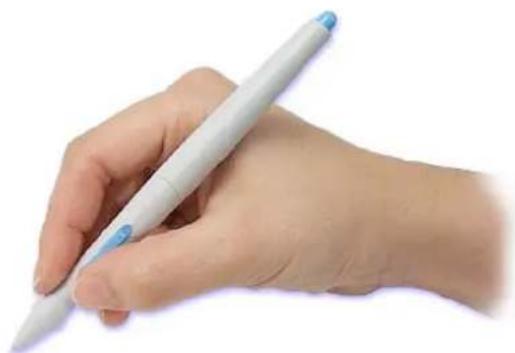
Hold the Graphire Pen like you would a normal pen. Make sure the DuoSwitch is in a convenient location where you can toggle it with your thumb or index finger, but not accidentally press the switch while drawing. You can tilt the pen in any way that feels most comfortable for drawing.
natural_image
Close-up of a hand holding a white pen with blue eraser (no text or symbols visible)Position for drawing

natural_image
Close-up of a hand holding a white and blue pen, no visible text or symbolsPosition for erasing
Important: When the Graphire Pen is not in use, place it in the pen stand or lay it flat on your desk. To maintain the sensitivity of your pen tip, do not store the pen in a container where it will rest on its tip.
Leaving a Graphire tool on the tablet may interfere with screen cursor positioning when using other pointing devices.


Contents Index

USING GRAPHIRE
POINTING
The Graphire Pen positions the pointer (or cursor) on your screen. You can position the screen cursor two different ways, like a pen (Pen Mode) or like a mouse (Mouse Mode).
- In Pen Mode, the tablet's active area is a mapped representation of your computer screen where every point on the tablet's active area corresponds to exactly one point on the display screen; wherever you place the pen on the tablet, the screen cursor will jump to the corresponding point on the screen. This is the default setting for the Graphire Pen, and makes tracing possible—something you cannot do with a mouse.
- In Mouse Mode (the default position for the Graphire Cordless Mouse), you move the cursor with a "pick up and roll" action similar to using a mouse.
Try moving the screen cursor by lifting the Graphire Pen and placing it in a new location on the tablet. The cursor instantly jumps to the new location.
As the pen enters Proximity, the tablet senses the pen above the tablet surface. You do not need to touch the tablet with the pen tip in order to move the screen cursor.
Learning Hint: If you are used to working with a mouse and find that using a pen is somewhat difficult, try the Eye-Hand Coordination Exercise.
Pointing Hint: Pointing is easier when you orient the tablet so the screen cursor follows the same direction as your hand movements on the tablet.

natural_image
Illustration of a desktop computer with a file icon and stylus, no text or symbols present


Contents Index

USING GRAPHIRE Page 22
CLICKING
Clicking. To click, tap the tablet once with the tip of the Graphire Pen, or press the pen tip on the tablet with enough force to register a click. (With the pen tip, there is no audible "click" sound.)
Try clicking on a folder icon by moving the screen cursor over the icon and pressing down on the pen tip. The icon should highlight when you press.
Double Clicking. To double-click, quickly tap the tablet twice in the same place with the pen tip. This is like clicking twice with a mouse button. You can also double-click by pressing the lower side switch—this is the preferred method of double-clicking with a pen.
Try both ways of double-clicking on a folder icon to open it. First use your pen tip to do this, then use the lower side switch.





Contents
Index

USING GRAPHIRE
USING THE SIDE SWITCH
The Graphire Pen is equipped with a DuoSwitch. This switch has two programmable functions that can be selected by rocking the switch in either direction. You can use the DuoSwitch whenever the pen tip is within Proximity of the tablet. You do not have to touch the pen tip to the tablet in order to use the switch.

Double-Click Hint: Press the lower side switch to double-click. This is easier than tapping twice with the pen tip.
To assign new switch functions, refer to Customizing Tool Buttons.




Contents Index

USING GRAPHIRE
DRAGGING
Dragging is used to select and move objects on the screen. To drag, first point to an object. Then press the Graphire Pen to the tablet and slide it across the tablet. The selected object will move across the screen. To select text, move the screen cursor to the beginning of a text line, then drag the Graphire Pen across the tablet until the text is highlighted.
First, try moving an icon on the screen. Then, within a document, select some text by pressing and dragging the pen tip across the text.

natural_image
Illustration of a computer monitor displaying a folder icon with arrows pointing to a stylus (no text or symbols present)


Contents
Index

USING GRAPHIRE
PROXIMITY
The pen is activated as soon as it enters proximity above the tablet's active area. This allows you to position the screen cursor or use the side switch without touching the pen tip to the tablet. You can also trace a drawing or photograph as long as the pen tip remains within proximity height.
Place a picture under the tablet overlay and try tracing it from within one of your graphics applications.
For the Graphire Pen, proximity is about 5 mm (0.2 inch), average.

natural_image
Illustration of a white pen writing on a blue surface (no text or symbols)


Contents Index

USING GRAPHIRE Page 26
DRAWING WITH PRESSURE
The Graphire Pen responds to the nuance and inflection of your hand movements, enabling you to create natural-looking pen and brush strokes. Many graphics applications have drawing tools that respond to the pressure you place on the pen. For example, in some drawing programs sliders are used to vary brush characteristics (width, color, and opacity). These characteristics can be controlled much better by the Graphire Pen's pressure-sensitivity. You can vary line width, blend colors, and change opacity with the pressure you exert upon the pen.
To draw with pressure-sensitivity, select a pressure-sensitive tool from your application's tool palette. Draw along the surface of the tablet while applying various amounts of pressure downward on the tip of the Graphire Pen. Press hard for thick lines or dense color. Press gently for thin lines or softer color. To adjust the tip feel, see Adjusting Tip Feel.

natural_image
Illustration of a vintage computer monitor displaying a yellow spiral graphic with a stylus, next to a stylus writing on a digital device (no text or symbols present)Visit our web site for a list of graphics applications that support pressure. See Product Information.




Contents Index

USING GRAPHIRE
ERASING
The eraser on the Graphire Pen works like the eraser on a pencil. In graphics applications that support the pen's eraser, you can erase intuitively and naturally. When you use the pen's eraser, the application will automatically switch to the eraser tool. You can also use the eraser in many standard office applications. The eraser will not be pressure sensitive, but you can use it to select and delete text or spreadsheet cells.

natural_image
Illustration of a computer monitor displaying a red apple with a green leaf, connected to a stylus and tablet device (no text or symbols)Try your eraser by opening Simple Text and typing a few words. Use the eraser to select the text. When you lift the eraser, the text will be erased. For further information on using your eraser, see Adjusting Eraser Feel.
Visit our web site for a list of graphics applications that support the eraser (see Product Information). If the eraser is not supported in an application, you can still use the eraser for navigating and drawing.


Contents
Index

USING GRAPHIRE
EYE-HAND COORDINATION EXERCISE
If you use a mouse, you may remember how long it took to get used to positioning the screen cursor. Your Graphire Pen, likewise, will take a bit of practice to master the technique of positioning the screen cursor in Pen Mode. This may seem difficult at first, but it is more natural and faster than in Mouse Mode.
This exercise is designed to retrain your eye-hand coordination for using the Graphire Pen:
-
Open any graphics application. Use the line tool to draw a rectangular grid with line spacings of about 20-25 mm (3/4 to 1 inch). (You can use your traditional mouse to do this.)
-
Choose a free-hand tool in your application and use the Graphire Pen to draw a dot at each grid intersection.
-
Draw an X at each grid intersection.
-
Now draw a circle around each intersection. Your screen should look like this:

- Clear your screen and make a simple drawing of your own. The more you use your Graphire Pen, the easier drawing and navigation will become.


Contents Index

USING GRAPHIRE
USING THE GRAPHIRE CORDLESS MOUSE
The Graphire Cordless Mouse is batteryless and works on your Graphire tablet. By moving the Cordless Mouse across the tablet's active area, you can position the screen cursor like you do with a regular mouse. The buttons are programmable, and the integrated fingerwheel is both a programmable middle button and a rolling wheel for scrolling.

Important: When using other pointing devices, place the Graphire Cordless Mouse on your desk. Leaving a Graphire tool on the tablet may interfere with screen cursor positioning when using other pointing devices.
To learn how to program buttons, see Customizing the Graphire Cordless Mouse.


Contents
Index

USING GRAPHIRE
To use the fingerwheel, place your hand on the Graphire Cordless Mouse with your index finger on the wheel.
- Button function. To use the button function, press down on the wheel to perform a button click.
- Scrolling. In most applications the fingerwheel will control scrolling; move the fingerwheel forward to scroll up, and back to scroll down. By default the fingerwheel is set to scroll 3 lines for each notch of wheel movement.

natural_image
Hand holding a white computer mouse with blue scroll wheel (no visible text or symbols)For a full description of fingerwheel features and functionality, see Customizing the Cordless Mouse Fingerwheel.


Contents
Index

USING GRAPHIRE
CARING FOR YOUR TOOLS AND TABLET
Keep your Graphire tools and tablet surface clean. Dust and dirt particles can stick to your Graphire tools and cause wear to the tablet surface. Regular cleaning with a soft, damp cloth will help prolong the life of your tablet surface and Graphire tools. You can also use a very mild soap diluted with water. Donot use volatile liquids, such as paint thinner or benzene, because they may damage the plastic case.
Keep your tablet and tools in a clean, dry place and avoid extremes in temperature. Room temperature is best. Also, your Graphire tools and tablet are not made to come apart. Twisting the pen case can break the pen. Taking apart the product will void your warranty.
Important: When the Graphire Pen is not in use, place it in the pen stand or lay it flat on your desk. To maintain the sensitivity of your pen tip, do not store the pen in a container where it will rest on the tip.


Contents Index

USING GRAPHIRE
REPLACING THE PEN TIP
The tip (nib) will wear with normal use. When the nib gets too short or develops a flat point, you can replace it with another nib. See Parts and Accessories.
- Clasp the old nib with a tweezer, needle-nosed plier, or similar instrument and pull it straight out of the pen.
- Slide the end of the new nib straight into the barrel of the pen. Firmly push the nib until it stops.

natural_image
Close-up of a hand holding a white pen tip, with another hand holding a thin tip (no text or symbols visible)To order replacement parts, refer to Parts and Accessories.


Contents
Index

USING GRAPHIRE
CUSTOMIZING
After you master the basics of using your Graphire pen and mouse set, you may want to customize the way Graphire works. This chapter describes how to use the Wacom control panel to adjust your Graphire tool and tablet settings.
Advanced users can learn how to further optimize Graphire by creating application-specific settings.
OPENING THE CONTROL PANEL
CONTROL PANEL FEATURES
CUSTOMIZING YOUR PEN AND CORDLESS MOUSE
CUSTOMIZING THE POP-UP MENU
WORKING WITH GRAPHIRE TOOLS
WORKING WITH APPLICATION-SPECIFIC SETTINGS
PULL-DOWN MENUS


Contents
Index
CUSTOMIZING
OPENING THE CONTROL PANEL
Open the control panel with the Graphire tool you wish to customize.
- Using your Graphire tool, open the Apple menu and choose CONTROL PANELS.
- Double-click on the tablet icon.

To open the Wacom control panel, double-click here with the tool you wish to customize.




Contents
Index

CUSTOMIZING
CONTROL PANEL FEATURES
Use the Wacom control panel to customize your Graphire pen and mouse set.

File Edit Add Remove Language Help
The Pull-Down Menus access many control panel features.
These buttons add an application or tool to the lists at the left.





Contents
Index

CUSTOMIZING
TABS
The tabs allow you to customize your Graphire tablet, Pen, and Cordless Mouse. When you open the control panel with a Graphire tool, the tool is automatically selected in the TOOL LIST and the appropriate tabs are displayed. To change settings for your other tool, select the appropriate tool icon to display the corresponding tabs.

flowchart
graph LR
    A["Mapping"] --> B["PopUp Menu"]
    B --> C["Eraser Feel"]
    C --> D["Tip Feel"]
    D --> E["Double Click"]
    E --> F["Tool Buttons"]
These tabs are displayed for the Graphire Pen.
Note: The APPLICATION LIST is for advanced users who want to create application-specific settings; it is not necessary to select or add applications to customize your Graphire tools. To customize Graphire, select the Graphire Pen or Cordless Mouse from the TOOL LIST; the appropriate tabs will display for the selected tool. Then select the tab for the tool setting(s) that you want to modify.





Contents Index

CUSTOMIZING
Tab buttons apply only to the selected tab:
- To set the currently open tab to its factory default values, click
Reset Tab to Default - If you have changed settings on a tab and want to return the tab to the last state when the control
panel was opened, click
Revert Tab
- To copy settings from one tool or application to another, click
This will display the
Copy Settings To... dialog box.
As you explore the control panel tabs, experiment with different settings to find what works best for you. You can always click RESET TAB TO DEFAULT to return to the factory settings. Or, click REVERT TAB to return a tab to the last state when the control panel was opened. Refer to Customizing Your Pen and Cordless Mouse for detailed information on working with tabs.




Contents Index

CUSTOMIZING Page 38
CONTROL PANEL LISTS
Located in the upper portion of the control panel, the APPLICATION LIST and TOOL LIST allow you to create different tool settings for individual applications. For example, you might set your pen tip for a soft feel in Painter and a firm feel in all other applications.
The APPLICATION LIST displays applications that have custom tool settings associated with them.
Click to add an installed application to the APPLICATION LIST. You can customize tool settings for the selected application.


The TOOL LIST displays which of your tools (Graphire Pen or Cordless Mouse) can be customized for the application selected above.
Your current selections are highlighted. Wedges emphasize the relationship between tab settings and the selected tool and application.
Click to add a Graphire tool to the TOOL LIST. You can customize the tool for the above selected application.


Contents
Index

CUSTOMIZING
- When you first install your Graphire pen and mouse set, the APPLICATION LIST displays the ALL APPLICATIONS icon. This contains tablet and tool settings for all of your applications.
- The TOOL LIST displays an icon for the Graphire Pen and Cordless Mouse. Each tool icon is automatically added to the TOOL LIST when a Graphire Pen or Cordless Mouse is first used on the tablet. See Adding a Tool for more information.
When you are ready to create custom settings for individual applications, see Working with Application-Specific Settings.
CONTROL PANEL BUTTONS
The control panel buttons are common to the entire control panel.
- To exit the control panel, either click on the close box (located on the window title bar), or select QUIT or CLOSE from the FILE menu.
- To display online Help for the control panel, click Or, you can choose HELP... from the HELP pull-down menu.
Balloon Help, which provides quick information and useful tips, is also available for most control panel items. To access balloons, turn them on by selecting SHOW BALLOONS from the HELP menu. Help for individual dialog boxes is available by clicking on the button in the specific dialog box.




Contents Index

CUSTOMIZING Page 40
CUSTOMIZING YOUR PEN AND CORDLESS MOUSE
To change tool settings, open the control panel using the tool you wish to customize. The tool will automatically be selected in the TOOL LIST, and the appropriate tabs will be displayed. To customize settings for a different tool, select it from the TOOL LIST by clicking on its icon.
GRAPHIRE PEN TABS
If you selected the Graphire Pen, the following control panel tabs are displayed:

flowchart
graph TD
    A["Mapping"] --> B["PopUp Menu"]
    B --> C["Eraser Feel"]
    A --> D["Tip Feel"]
    B --> E["Double Click"]
    C --> F["Tool Buttons"]
    style A fill:#f9f,stroke:#333
    style B fill:#ccf,stroke:#333
    style C fill:#cfc,stroke:#333
    style D fill:#ffc,stroke:#333
    style E fill:#fcc,stroke:#333
    note1["Settings on this tab apply to both the Graphire Pen and Cordless Mouse."]
GRAPHIRE CORDLESS MOUSE TABS
If you selected the Graphire Cordless Mouse, the following tabs are displayed:


Contents Index

CUSTOMIZING Page 41
ADJUSTING TIP FEEL
To adjust the sensitivity of your Graphire Pen tip, select the TIP FEEL tab. To create broad brush strokes or to click with a light touch, use a soft tip setting. For maximum control while drawing thin lines, use a firm tip setting.

Note: For all screen shots of tabs, the tab buttons are omitted in order to save space.


Contents
Index

CUSTOMIZING
ADJUSTING DOUBLE-CLICK
Double-clicking with the pen tip can be made easier by expanding the tap area that accepts a double-click (the double-click distance) and reducing the speed required to perform a double-click. This can be set in the DOUBLE CLICK tab. Because a large double-click distance may adversely affect your brushstrokes in some drawing applications, Wacom recommends setting a small double-click distance and using the lower side switch to double-click.
Use custom double-click settings when checked.
Note: DOUBLE-CLICK ASSIST can be enabled for some applications and disabled for others. See Working with Application-Specific Settings for more information.
Enter a number from 1 to 25 pixels or click the up and down arrows to increase or decrease double-click distance.

Tap twice on this icon with your pen tip to automatically set double-click distance and speed based on the way you normally double-click.


Contents
Index

CUSTOMIZING
CUSTOMIZING TOOL BUTTONS
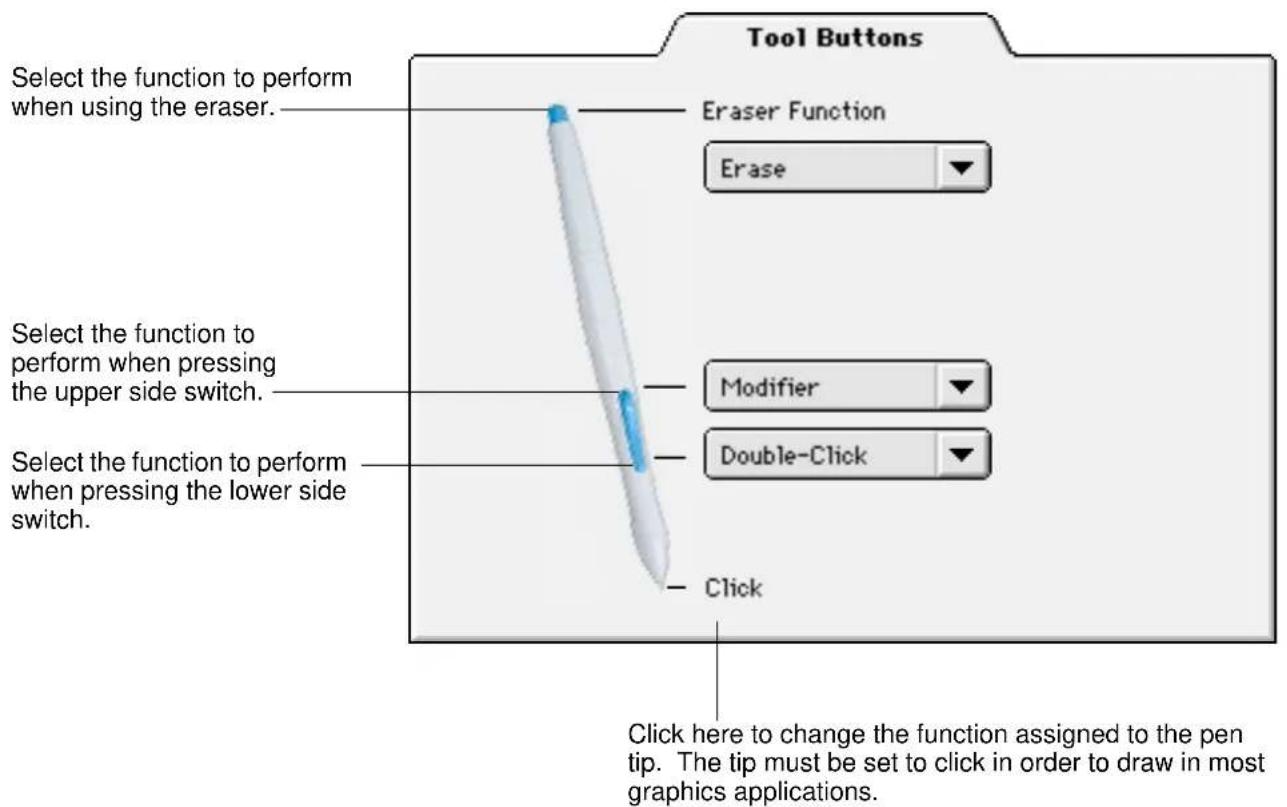
Select the TOOL BUTTONS tab to change the functions assigned to the eraser, side switch, and tip of your Graphire Pen. For each tool button, a pull-down menu enables you to choose the function that will be performed.


Contents
Index

CUSTOMIZING
Button Functions
Each button has a pull-down menu that allows you to choose the function that will be performed when the button is pressed. The following list describes all available functions. However, some options are not available for all buttons.
- C LICK. Default setting for the Graphire Pen tip. This option simulates a mouse button click. Be sure at least one button performs this function so you can always navigate and click.
- D OUBLE-CLICK. Default setting for the lower position of the side switch. When this option is selected, pressing the switch simulates a mouse button double-click. For easier double-clicking, use this function instead of tapping twice with your pen tip.
- C LICK-LOCK. Simulates holding down a mouse button. Press the tool button once to initiate click lock. Press the button again to release click lock. Click lock is useful for dragging objects or selecting blocks of text.


Contents Index

CUSTOMIZING Page 45
- KEYSTROKE.... Enables you to simulate a series of keystrokes. When you select this option, the DEFINE KEYSTROKE dialog box appears. There, you can enter a keystroke or keystroke sequence to play back. Keystroke combinations can include letters, numbers, function keys (such as F3) and modifier keys (such as SHIFT, OPTION, COMMAND, and CTRL). After defining a keystroke sequence, click OK.
Important: Because the RETURN key can be selected as a defined keystroke, it cannot be used to select OK. You must use a tool to click on the OK button.



Contents
Index

CUSTOMIZING
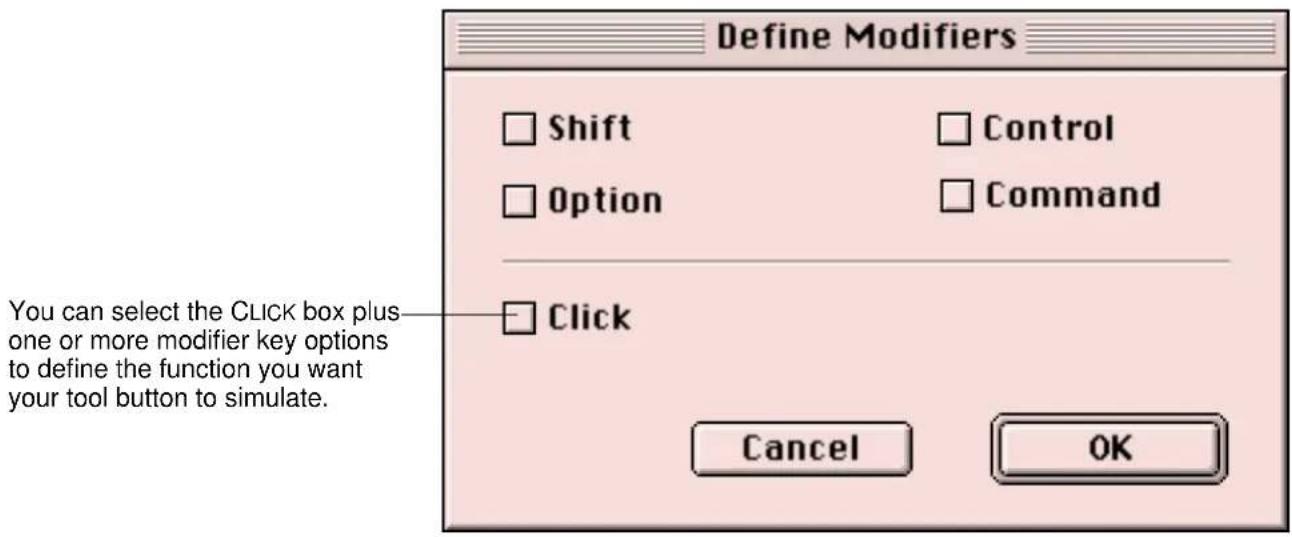
- MODIFIER.... Enables you to simulate modifier key(s) (such as SHIFT, OPTION, COMMAND, and CTRL). Many applications use modifier keys to constrain the size or placement of objects. If you select this option, the DEFINE MODIFIERS dialog box appears. There, you select the modifier key(s) to simulate.


Contents
Index

CUSTOMIZING
- MACRO.... Enables you to play a macro sequence. When you select this option, the SELECT MACRO dialog box appears. There, you can select a predefined macro to play back. After selecting a macro, click OK.

Note: Before you can add macros, you must first create them with a third-party macro application.





Contents
Index

CUSTOMIZING
- PRESSURE HOLD. (Graphire Pen only.) Sets a button so that, when pressed, the pressure is locked at the current pressure level until the button is released. For example, you can paint with pressure-sensitivity until you reach the brush size that you like. You can then press the button and continue painting with the same size brush until the button is released.
- M ODE TOGGLE. Toggles between Pen Mode and Mouse Mode.
- P OP-UP MENU. Displays a Pop-up Menu on your screen. See Customizing the Pop-up Menu for more information.
- E RASE. Default setting for the eraser. Refer to Erasing for information on using the eraser.
- I IGNORED. Disables the button function.
- Application Defined. (Graphire Cordless Mouse only.) Only the button number is reported to your application. Use this setting when using applications that have built-in support for tool buttons.
Contents
Index
CUSTOMIZING
ADJUSTING ERASER FEEL
To adjust the sensitivity of your Graphire Pen eraser, select the ERASER FEEL tab. To erase with a broad stroke or to click with a light touch, use a soft tip setting. For maximum control while erasing, use a firm eraser setting.





Contents
Index

CUSTOMIZING
TABLET TO SCREEN MAPPING
To change the relationship between tool movement on your tablet and cursor movement on the screen, select the MAPPING tab. The default POSITIONING MODE for the Graphire Pen is PEN MODE, which means that each point on the tablet maps to a corresponding point on the screen. (The default setting for the Graphire Cordless Mouse is MOUSE MODE.) In PEN MODE, the MAPPING tab looks like this:


Contents
Index

CUSTOMIZING
With MOUSE MODE selected, the MAPPING tab looks like this:
Positioning Mode. In Mouse Mode, the screen cursor moves with relative positioning. This is the default mode for the Graphire Cordless Mouse.
Select the Orientation of your tablet.





Contents
Index

CUSTOMIZING
Positioning Mode
The POSITIONING MODE controls how the screen cursor moves.
- In PEN MODE, wherever you place a Graphire tool on the tablet, the cursor jumps to the corresponding point on the screen. This is required for tracing.
- In M OUSE MODE, the screen cursor is positioned like a mouse, requiring a "pick up and roll" action to move the cursor on the screen.
By default, your Graphire Pen is set to PEN MODE for drawing, and your Graphire Cordless Mouse is set to MOUSE MODE for navigation.
Note: You can also switch between PEN MODE and MOUSE MODE by using the screen Pop-up Menu. See Customizing the Pop-up Menu for more information.


Contents Index

CUSTOMIZING
Orientation
If you are working with a tall monitor or prefer to work with the tablet in a different position, you can rotate the tablet to one of the following orientations:
• L ANDSCAPE. Tablet orientation is horizontal, with the tablet cable at the top. This is the default setting.
- P ORTRAIT. Rotate the tablet 90 degrees clockwise from landscape orientation. The tablet orientation will be vertical, with the tablet cable on the right side.
- L ANDSCAPE FLIPPED. Rotate the tablet 180 degrees from landscape orientation. The tablet will be upside down, with the tablet cable near the bottom.
- P ORTRAIT FLIPPED. Rotate the tablet 90 degrees counter-clockwise from landscape orientation. The tablet orientation will be vertical with the tablet cable on the left side.
After making changes, verify you have the correct setting for your tablet orientation. Do this by moving your tool "up" on the tablet—the cursor should move up as well.
Note: The orientation you select applies to all tools and applications.


Contents Index

CUSTOMIZING
Aspect
Aspect defines the constraints of the tablet to screen relationship. ASPECT options include:

- ONE TO ONE. Sets a 1:1 scale between the tablet and the display. Moving your tool one inch on the tablet will move the cursor one inch on the screen. A traced image appears the same size as the original image on your display screen. A screen resolution of 72 DPI is used in calculations. If your monitor is set to use a different screen resolution, a 1:1 scale will not be maintained.

natural_image
Illustration of a red apple with a green leaf on a computer monitor (no text or symbols)- PROPORTIONAL. Maintains correct vertical and horizontal proportions between the tablet and display. A traced image appears proportionally correct on your display, but may be smaller or larger than the original image.
natural_image
Illustration of a red apple on a computer monitor (no text or symbols)- To Fit. Correct scale or proportions are not maintained. The selected tablet area is mapped to the selected display area. A traced image may appear stretched, and may be smaller or larger than the original image. This is the default setting for all tools.

natural_image
Illustration of a red apple with a green leaf on a computer monitor (no text or symbols)



Contents
Index

CUSTOMIZING
Tablet Area
These settings allow you to define the tablet area that will be mapped to the display area.
Uses the entire active area of the tablet for tablet to display mapping. This is the default setting.
Displays the PORTION OF TABLET dialog box where you can select a portion of the tablet's active area for tablet to display mapping.


Contents
Index

CUSTOMIZING
Enter coordinates to select the tablet area.
- Select UNITS of measure for the displayed values. A count equals one line of tablet resolution.
- Enter values for the TOP, LEFT, BOTTOM, and RIGHT boundary of the tablet area. Values are measured from the top left corner of the tablet's active area.
Drag corners of the foreground graphic to select the tablet area. The background graphic represents the entire active tablet area. Values in the ENTER COORDINATES text boxes change accordingly.
Use your tool on the tablet to select the tablet area.
- Select the CLICK TO DEFINE TABLET AREA button.
- Follow the MESSAGE prompts to set the portion of your tablet that will be used for mapping.

Note: As you define PORTION OF TABLET, be sure to review the MESSAGE prompts that may appear.


Contents Index

CUSTOMIZING
Display Area
The DISPLAY AREA options allow you to define which portion of the display screen your tablet will map to.
- ENTIRE DISPLAY. Select this option to access the entire display. This is the default setting. If more than one monitor is in use, a pull-down menu is displayed with options for selecting ALL MONITORS or individual monitors.
- PORTION OF DISPLAY.... This option allows you to select a portion of the display for tablet to screen mapping. Selecting PORTION OF DISPLAY... brings up the PORTION OF DISPLAY dialog box.
Enter coordinates to select the screen area.
- Select UNITS of measure for the displayed values.
- Enter values for the TOP, LEFT, BOTTOM, and RIGHT boundary of the display screen area. Values are measured from the top left corner of the display.
Drag corners of the foreground graphic to select the screen area. The background graphic represents the entire screen area. Values in the ENTER COORDINATES text boxes will change accordingly.
Move the screen cursor to select the screen area.
- Select the CLICK TO DEFINE SCREEN AREA button.
- Follow the MESSAGE prompts to set the portion of your display screen that will be used for mapping.

Note: As you define PORTION OF DISPLAY, be sure to review the MESSAGE prompts that may appear.


Contents
Index

CUSTOMIZING
CUSTOMIZING THE GRAPHIRE CORDLESS MOUSE
To modify your Graphire Cordless Mouse button settings, select the TOOL BUTTONS tab.

As with the Graphire Pen, you can select a function to perform for each button from the button pull-down menus. Refer to Button Functions for a description of the available options.
The Graphire Cordless Mouse buttons are chordable; you can press two or more buttons simultaneously and the functions will occur. For example, if you program one button to simulate the SHIFT key and another to simulate a click function, when you press both buttons a SHIFT+CLICK is simulated.


Contents
Index

CUSTOMIZING
CUSTOMIZING THE CORDLESS MOUSE FINGERWHEEL
To customize your Graphire Cordless Mouse fingerwheel, choose the FINGERWHEEL tab.
Sets the fingerwheel to scroll the selected number of lines for each notch of fingerwheel movement (in most applications). Enter a value (1 to 15) to set the amount of movement. Roll the fingerwheel forward to scroll up, and back to scroll down.
Disables the fingerwheel function.

When checked, the — functions assigned for the forward and backward direction of the fingerwheel are exchanged.
Sets the fingerwheel to scroll one screen for each notch of fingerwheel movement.


Contents
Index

CUSTOMIZING
CUSTOMIZING THE POP-UP MENU
Select the POP-UP MENU tab to customize the available functions on the Pop-up Menu list. The Pop-up Menu list may include predefined macros, keystroke functions, and mapping options.
To display the Pop-up Menu, set one of your tool buttons to the POP-UP MENU function. Whenever you push that button, the Pop-up Menu is displayed. Select items in the Pop-up Menu by clicking on them. To close the Pop-up Menu without making a selection, just click outside the Pop-up Menu.


Contents
Index

CUSTOMIZING
ADD MACROS
To add a macro to the Pop-up Menu, click on the ADD MACRO... button. A dialog box will appear where you can select the name of a macro function to add. You can also set different macros for different applications. See Working with Application-Specific Settings for more information.
Note: Before you can add screen macros, you must first create them with a third-party macro application.
ADD KEYSTROKES
To add a keystroke definition to the Pop-up Menu, click on the ADD KEYSTROKE... button. A dialog box will appear where you can specify and name the keystroke function. You can also create different keystroke functions for different applications. See Working with Application-Specific Settings for more information.
ADD MAPPING OPTIONS
When you click on the ADD MAPPING OPTIONS button, the following mapping options can be added to the Pop-up Menu list: Pen Mode and Mouse Mode.
REMOVING POP-UP MENU OPTIONS
To remove mapping option(s), macro(s), or keystroke function(s) from the Pop-up Menu list, select the function(s) you wish to remove and click the REMOVE button. Mapping options must be added or removed as a single item.


Contents
Index

CUSTOMIZING
WORKING WITH GRAPHIRE TOOLS
The Wacom control panel is designed to help you customize and keep track of your Graphire tool settings. The tool you use to open the control panel is automatically selected, and the appropriate tabs for that tool are displayed.




Contents
Index

CUSTOMIZING
ADDING A TOOL
When you place a Graphire Pen or Cordless Mouse on the tablet, it is automatically added to the control panel's TOOL LIST and will function with its default settings. You can customize a tool by opening the Wacom control panel and changing the tab settings. When you select a tool from the TOOL LIST, the appropriate tab settings for that tool are displayed. Any changes you make to the tab settings will then apply to that tool. Your changes are permanently saved when you close the control panel.


Contents
Index

CUSTOMIZING
WORKING WITH APPLICATION-SPECIFIC SETTINGS
You may wish to have different tool settings for a particular application. The APPLICATION LIST lets you customize your Graphire tablet and tool settings for individual applications.
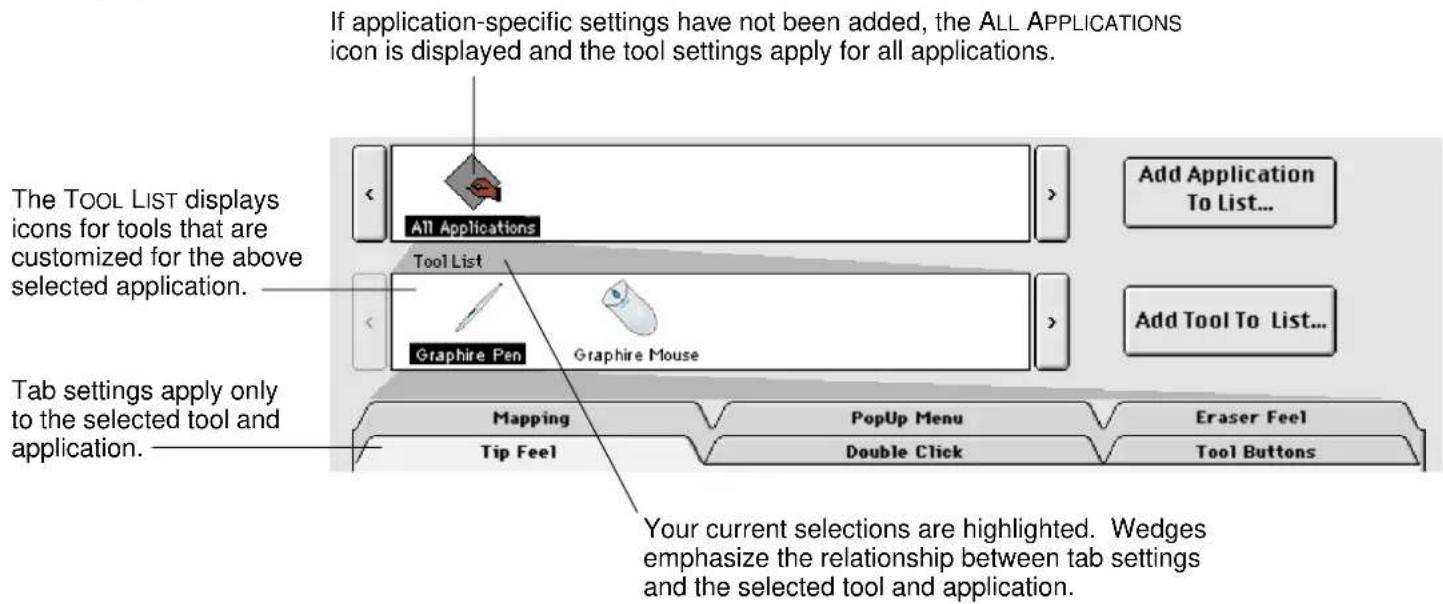
The APPLICATION LIST displays icons for applications with customized settings.
The TOOL LIST displays icons for tools that are customized for the above selected application. —
Tab settings apply only to the selected tool and application.
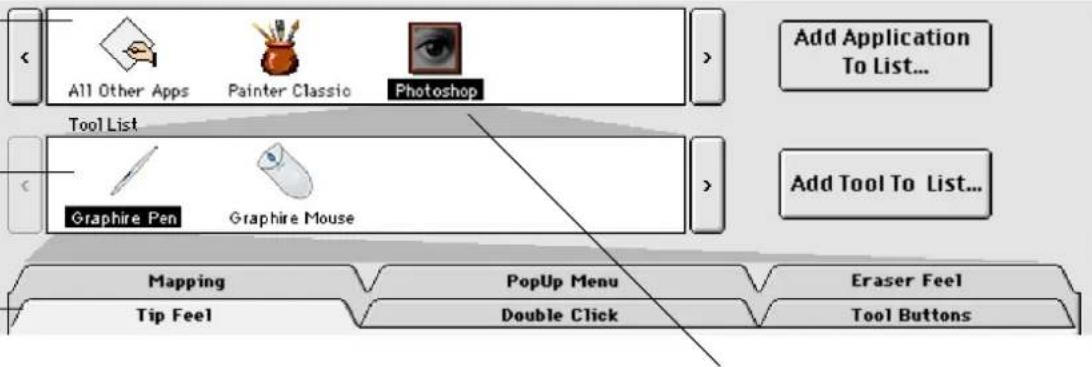
Your current selections are highlighted. Wedges emphasize the relationship between tab settings and the selected tool and application.




Contents
Index

CUSTOMIZING
If application-specific settings have not been created, a single icon labeled ALL APPLICATIONS is displayed in the APPLICATION LIST, and the tool settings displayed in the tabs are applied to all applications.
When a second application is added to the APPLICATION LIST, the ALL APPLICATIONS icon changes to ALL OTHER APPS, and a new icon is displayed for the new application settings.
If you select the ALL OTHER APPS icon and make changes to the tab settings, your changes will apply to all applications except the specific one(s) you have added to the list. If you select the icon for a specific application and make changes to the tab settings, your changes will apply to only that application.
When ALL APPLICATIONS or ALL OTHER APPS is selected in the APPLICATION LIST, the TOOL LIST displays icons for the Graphire Pen and Cordless Mouse. When an icon for a specific application is selected from the APPLICATION LIST, the TOOL LIST only displays the Graphire tools that you have added for the selected application. When you create an application-specific setting, you are, in a sense, creating a separate TOOL LIST for the application.




Contents Index

CUSTOMIZING
CREATING AN APPLICATION-SPECIFIC SETTING
To create an application-specific setting, click on the ADD APPLICATION TO LIST... button or select APPLICATIONS FOR CUSTOM SETTINGS... from the ADD pull-down menu. The ADD APPLICATION FOR CUSTOM SETTINGS dialog box appears.

Note: First customize settings for one application. When you feel comfortable with using application-specific settings, you can create more application-specific settings.


Contents Index

CUSTOMIZING
If you have used both the Graphire Pen and Cordless Mouse on the tablet, the ADD TOOL TO APPLICATION dialog box is displayed. Choose one or both tools to add to the TOOL LIST for this application. By default, the tool in your hand is selected. Click OK to confirm your selection.

After you have added an application, its icon appears in the APPLICATION LIST. When you select the application icon, the TOOL LIST displays only the tool(s) that have application-specific settings for the application. If a tool does not appear in the TOOL LIST for the application, it will use the settings for ALL OTHER APPS. In the TOOL LIST you can select a tool and then use the tabs to change the tool settings.


Contents Index

CUSTOMIZING Page 68
ADDING A TOOL TO AN APPLICATION'S TOOL LIST
To add a tool to an application's TOOL LIST, click on the ADD TOOL TO LIST... button or select TOOL TO CUSTOMIZE... from the ADD pull-down menu. The ADD TOOL TO CUSTOMIZE dialog box appears. Choose the application and tool to create settings for. Click OK to confirm your selection. The dialog box will close, and the tool will appear in the TOOL LIST for the chosen application.


Contents
Index

CUSTOMIZING
CHANGING SETTINGS FOR A SPECIFIC APPLICATION AND TOOL
To change settings for a specific application and tool combination, from the APPLICATION LIST choose the application you want to change tool settings for. From the TOOL LIST, choose the tool you want to customize. Change the tab settings for the selected application and tool combination.
REMOVING APPLICATION-SPECIFIC SETTINGS
To remove application-specific settings:
- Open the REMOVE menu and select CUSTOM SETTINGS FOR APPLICATION....
- In the R EMOVE CUSTOM SETTINGS FOR APPLICATION dialog box, select the application(s) for which you want to remove the custom settings and click OK.
To remove application-specific settings for a tool:
- Select C USTOMIZED TOOL... from the REMOVE pull-down menu.
- In the R EMOVE CUSTOMIZED TOOL dialog box, select the tool to remove. Then click on the REMOVE FROM radio button and select the application that you want to remove the tool from.
- Click OK to confirm your selections.




Contents Index

CUSTOMIZING
PULL-DOWN MENUS
Use the pull-down menus to access additional custom settings options, a language selection menu, and online documentation. Help is available for most dialog boxes that appear when you make a menu selection—just click on the dialog box button for detailed information on settings and options.


File Edit Add Remove Language Help
FILE
The File menu contains the following options:
• SUMMARY.... Provides a summary of your current settings.
- CLOSE. Closes the control panel and saves any changes.
• QUIT. Closes the control panel and saves any changes.
EDIT
The EDIT menu contains the following options:
- COPY SETTINGS To... Opens a dialog box where you can copy your customized settings to another tool or application. You can also access this dialog box by clicking on the COPY SETTINGS To... tab button.
- RESET SETTINGS.... Opens a dialog box where you can reset your customized settings to their factory default values.
- RENAME TOOL.... Opens a dialog box where you can assign custom names to your tools.
- PREFERENCES.... Opens a dialog box where you can change general Graphire operating preferences.


Contents
Index

CUSTOMIZING
ADD
The ADD menu contains the following options:
- TABLET.... Opens a dialog box where you can add one or more tablets. Refer to Installing Multiple Tablets for information on adding multiple tablets.
- APPLICATION FOR CUSTOM SETTINGS.... Opens a dialog box where you can add an application to the APPLICATION LIST. This is also accessed by clicking on the ADD APPLICATION TO LIST... button. Refer to Working with Application-Specific Settings for more information.
- TOOL TO CUSTOMIZE.... Opens a dialog box where you can add a tool to the control panel TOOL LIST. This is also accessed by clicking on the ADD TOOL TO LIST... button. Refer to Adding a Tool for more information.
REMOVE
The REMOVE menu contains the following options:
• TABLET.... Opens a dialog box where you can remove one or more tablets from the control panel driver.
- CUSTOM SETTINGS FOR APPLICATION.... Opens a dialog box where you can remove custom tool settings from an application.
- CUSTOMIZED TOOL.... Opens a dialog box where you can remove customized tools.
Note: If only one item is available for a particular REMOVE menu option, the option will be dimmed. For example, if you have only one tool the CUSTOMIZED TOOL... option will be dim.


Contents Index

CUSTOMIZING Page 72
LANGUAGE
The LANGUAGE menu allows you to switch between English and other installed languages. Typically, the language of the operating system is installed when you install the driver, but other languages can be specified during a custom install.
HELP
The HELP menu contains the following options:
- HELP.... Displays online Help.
• USER'S MANUAL.... Displays the Graphire User's Manual for Macintosh.
• GETTING STARTED.... Displays an overview of the control panel.
• DIAGNOSTICS.... Displays diagnostics information for your Graphire tablet and tools.


Contents Index

CUSTOMIZING
ADVANCED FEATURES
You can use advanced features to further customize your Graphire pen and mouse set for the way you like to work.
ADVANCED TIP PRESSURE SETTINGS ADVANCED ERASER PRESSURE SETTINGS COPYING SETTINGS


Contents
Index
ADVANCED FEATURES
ADVANCED TIP PRESSURE SETTINGS
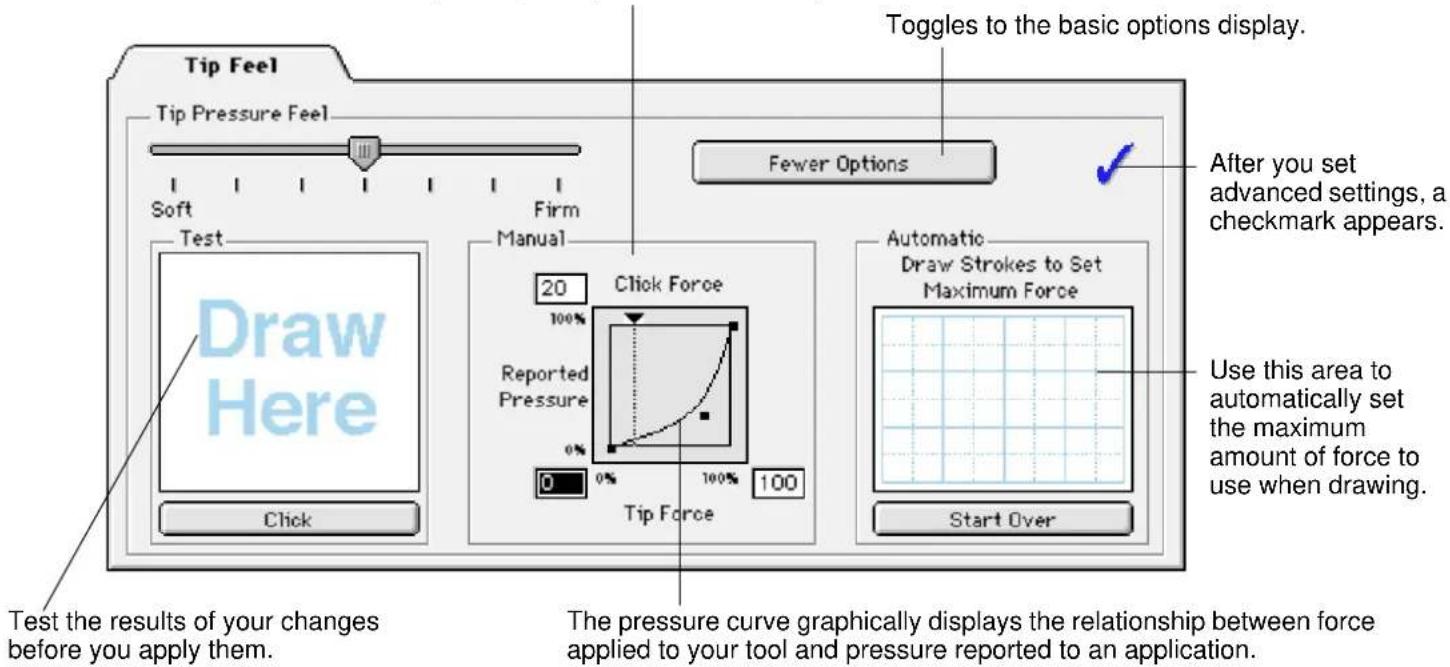
To customize advanced tip pressure settings, from the TIP FEEL tab select MORE OPTIONS. The advanced options enable you to change the click pressure and pressure curve settings independently. (In the basic options display, these settings are adjusted simultaneously with the TIP PRESSURE FEEL slider.)
Important: The TIP PRESSURE FEEL slider overrides the advanced pressure settings. If you customize advanced settings, then drag the TIP PRESSURE FEEL slider, your advanced settings will be removed.
Use these controls to manually change the pressure curve shape.


Contents
Index

ADVANCED FEATURES
CLICK FORCE ADJUSTMENT
The click force setting adjusts the amount of force required to generate a button click.

Note: For optimal performance in graphics applications, set the click force and minimum tip force to the same value.


Contents
Index

ADVANCED FEATURES
PRESSURE CURVE ADJUSTMENT
Changing the shape of the pressure curve will change the feel of the pen tip. A pressure curve that increases quickly makes the tip feel more sensitive to changes in force.
The control points at each end of the pressure curve set the minimum and maximum amount of force your pen will respond to. If you have a soft touch and want to achieve full pressure without having to apply full force to your pen, decrease the maximum force level. You can apply less force to your pen and still have the effects of full pressure. The default for maximum force is 100%.
To change curve shape, drag the control point to a new position.
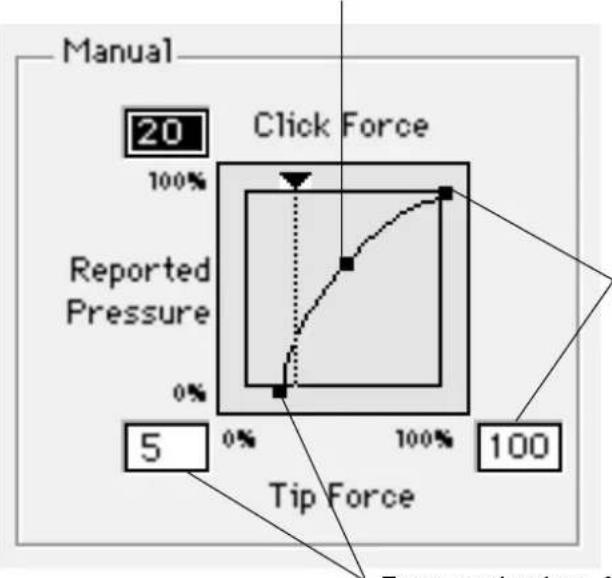
Enter a value from 20 to 100%, or drag the MAXIMUM TIP FORCE control to set the maximum force your pen tip will respond to.
Enter a value from 0 to 80%, or drag the MINIMUM TIP FORCE control to set the minimum force that will register pressure.


Contents Index

ADVANCED FEATURES
To automatically set the maximum force for the way you draw, click the START OVER button and draw in the scratch pad area. As you draw, the MAXIMUM TIP FORCE control moves, and the value in the edit box changes to reflect the peak pressure registered by your hand movements. To start over, click the START OVER button and begin a new drawing.

While applying normal pressure to the pen tip, draw several strokes here to automatically set the maximum force value.
Click here to reset maximum force value to the start value for this test.


Contents
Index

ADVANCED FEATURES
ADVANCED ERASER PRESSURE SETTINGS
To customize advanced eraser pressure settings, select the ERASER FEEL tab and click on the MORE OPTIONS button. You work with the advanced eraser settings in the same manner as with the Advanced Tip Pressure Settings.
Important: The ERASER PRESSURE FEEL slider overrides the advanced pressure settings. If you customize advanced settings, then drag the ERASER PRESSURE FEEL slider, your advanced settings will be removed.


Contents
Index

ADVANCED FEATURES
COPYING SETTINGS
To copy settings between tools or to another application, choose the COPY SETTINGS TO... option from the EDIT menu or click on the COPY SETTINGS TO... button. A dialog box is displayed where you can copy settings from one tool to another within the same application or between different applications.
Note: If you copy settings between the Graphire Pen and Cordless Mouse, only those settings common to both tools (such as mapping settings) can be copied.


Contents
Index

ADVANCED FEATURES
HAVING TROUBLE?
Most of the time your tablet will work flawlessly. But if you are having trouble, Wacom recommends you do the following:
- Refer to the troubleshooting procedures described in this chapter.
- Look in the troubleshooting tables. Your problem may be described there and you can try the solution offered.
- Open the Graphire Read Me file for late-breaking information.
- If you are having a compatibility conflict between Graphire and a new hardware or software product, it may be helpful to download a new Wacom tablet software driver. Wacom periodically updates the software driver to maintain compatibility with new products. See Who to Call for your region.
- Check the FAQs (Frequently Asked Questions) on the Wacom web site for your region. See Who to Call.
- If you have tried the suggestions in this manual and still cannot resolve the problem, then contact Wacom for Technical Support.
TROUBLESHOOTING TROUBLESHOOTING TABLES CONTACTING TECHNICAL SUPPORT


Contents Index
HAVING TROUBLE?
TROUBLESHOOTING
If the Wacom Tablet driver failed to load properly, first perform the recommended action in the error message on your screen. If that does not solve the problem, perform the following tests for your tablet or tool(s) to determine whether the source of the problem is the tablet hardware or a software conflict.
TESTING USB TABLETS
RESOLVING SOFTWARE CONFLICTS
TESTING YOUR GRAPHIRE TOOLS
TESTING USB TABLETS
Make sure your computer is turned on, the operating system has finished loading, and Graphire is properly connected to an active USB port. Then try the following tests:
-
Check power to the tablet. The tablet's orange status LED will light whenever Graphire is properly connected and your computer has registered it as a USB device. If the LED is on, continue with step 2. If the LED is off:
-
Make sure the USB cable is securely connected to an active USB port.
- If you are connecting the tablet to a USB hub (or hub device such as a keyboard with USB ports), be sure the USB hub is properly connected to your computer and is active.
- Connect Graphire into a different USB port or try connecting to the USB port on another computer.
- If the tablet's status LED does not illuminate after your computer is on and has finished booting up, your USB port may be inactive. See Verifying Your Macintosh is USB Ready.





Contents
Index

HAVING TROUBLE?
- Check the pen. Move your Graphire Pen across the active area of the tablet; the screen cursor should move in the corresponding direction on your monitor. Press the pen tip against the tablet surface. The status LED on the tablet should turn from orange to green. Now, without applying pressure to the pen tip, press the side switch. The status LED should again change from orange to green. Turn the pen over and press the eraser against the surface of the tablet; the status LED should change from orange to green. If not, you may have a defective pen or tablet. See ContactingTechnical Support.
Verifying Your Macintosh is USB Ready
If the tablet LED does not light, your computer may not have the necessary USB software installed, or may not be configured properly.
- If you have an iMac, you will need Macintosh OS 8.5 and Mac OS ROM 1.2.1. Refer to the i Mac Requirements for information on running the iMac Update software located on the Graphire CD.
- If you added a USB interface card you must also install system software to support the USB card.
- Otherwise, if your computer came from the factory with a USB port installed, it should be USB ready.
- Plug in another USB device to verify that the USB port is functional.




Contents
Index

HAVING TROUBLE?
RESOLVING SOFTWARE CONFLICTS
If you are troubleshooting and found no problems with the tablet hardware, or if the WACOM TABLET icon appears with a red X through it when starting your computer, follow the steps below to locate a possible software conflict. (A red X through the WACOM TABLET icon means the Wacom tablet driver failed to load properly.)
Using the Extensions Manager
To use the Extensions Manager to resolve a software conflict:
- Restart your computer with the SHIFT key held down. When the system has fully booted, release the SHIFT key. Then from the Apple menu choose CONTROL PANELS and EXTENSIONS MANAGER.
- From the S ELECTED SET drop-down menu, select the SYSTEM BASE extension set.
- Place a checkmark next to the WACOM TABLET driver in the list of CONTROL PANELS. You will be prompted to create a duplicate set. Give the set a name, such as "test". Then again select the WACOM TABLET item and restart your computer.
- If the system starts up successfully with the W ACOM TABLET item active, open the Extensions Manager. Turn on three of the disabled items and restart. Repeat this process until all items are on or until the system crashes.
- If the system crashes again, restart the computer with the spacebar held down (this will bring up the EXTENSIONS MANAGER). The conflicting item is most likely one of the most recently enabled items.
- Now turn off one or two of the items that appear to be the problem.
- Repeat this process as necessary until you find the offending INIT. If the conflicting item is not required, leave it disabled. Otherwise, check if an updated version is available or contact Wacom Technical Support.


Contents
Index

HAVING TROUBLE?
TESTING YOUR GRAPHIRE TOOLS
From the Wacom control panel's HELP menu, select DIAGNOSTICS... to open the DIAGNOSTICS dialog box. The tablet driver version, tablet hardware and connection, and pointing device information is shown.
TESTING THE GRAPHIRE PEN
TESTING THE GRAPHIRE CORDLESS MOUSE
Testing the Graphire Pen
- While observing the POINTING DEVICE INFO column, bring your Graphire Pen within proximity of the tablet. A value for proximity, the device name, and device type should be displayed.
- Move the pen along the tablet surface. The X and Y DATA values should change to reflect the tool position.
-
Test your Graphire Pen buttons. The tablet's status LED should change color from orange to green each time you click with the pen tip, press the side switch, or press the pen's eraser to the tablet.
-
Click on the tablet surface with the pen tip—the S WITCHES state and PRESSURE value should change. (PRESSURE should change from approximately 0% with no pressure applied to approximately 100% when full pressure is applied.)
- Next, press the side switch without pressing the tip to the tablet—the S WITCHES state should change. (Do this for both positions of the DuoSwitch.)
Tip = Tip, DuoSwitch (lower position) = b1, DuoSwitch (upper position) = b2, Eraser = Eraser
- Then press the pen's eraser to the tablet—the S WITCHES state and PRESSURE value will change. (PRESSURE should change from approximately 0% with no pressure applied to approximately 100% when full pressure is applied.)
- When you are done, click on the C LOSE button to exit the dialog box.


Contents
Index

HAVING TROUBLE?
Testing the Graphire Cordless Mouse
- Test the buttons on your Graphire Cordless Mouse by clicking each button. The tablet's status LED should change color, and the SWITCHES state should change for each button you click.

Graphire Cordless Mouse
- When the D IAGNOSTICS dialog box is first opened the WHEEL status should be 0. Move the fingerwheel backward. The WHEEL status should change from 0 to +1.
- Move the fingerwheel forward. The WHEEL status should change to -1.
- When you are done, click on the C LOSE button to exit the dialog box.


Contents
Index

HAVING TROUBLE?
TROUBLESHOOTING TABLES
If you encounter problems with your Graphire tools or tablet, refer to the following tables. Your problem may be described here, and you can try the solution offered. Be sure you refer to the Read Me file for the latest troubleshooting information.
USB TABLET PROBLEMS
GENERAL PROBLEMS
USB TABLET PROBLEMS
| The computer does not have an available USB port. | Check if there is an available USB port on a USB hub device. If none are available you will need to add a USB hub. |
| The tablet status LED is off. Verify that your tablet's USB cable is properly connected to an active USB port. If you are connecting to a USB hub device, make sure the hub is connected to an active USB port and that the hub is active. Refer to Testing USB Tablets for instructions. | |
| Graphire Pen only works in mouse mode and pressure does not function. | If you are using an iMac, install the iMac Firmware Update and iMac Update 1.1 located on the Graphire CD. Then install the Graphire software.If the driver failed to load, see Resolving Software Conflicts. If it was not installed, double-click on the INSTALL icon (located on the Graphire Tablet CD), and complete the software installation. |


Contents
Index

HAVING TROUBLE?
GENERAL PROBLEMS
| At startup, a dialog box appears telling you that either the driver failed to load or the tablet preferences have not yet been created. | The tablet was not detected at startup. Make sure all cables are securely connected and that the status LED on the tablet is orange. If this does not correct the problem, see Troubleshooting. |
| Double-clicking is difficult. Be sure you are quickly tapping the tablet twice in the same place on the tablet's active area.Wacom recommends using the side switch to double-click (review the techniques in Clicking).Try increasing the DOUBLE-CLICK DISTANCE or reducing the double-click speed (see Adjusting Double-Click).Try using a lighter Tip PRESSURE FEEL (see Adjusting Tip Feel). | |
| The Graphire Pen selects everything, will not stop drawing. | Open the Wacom control panel and go to the tool's Tip FEEL tab.Move the Tip PRESSURE FEEL slider toward FIRM, or select the MORE OPTIONS button and increase the CLICK FORCE setting. |
| The eraser selects everything or will not stop erasing. | Open the Wacom control panel and go to the ERASER FEEL tab.Move the ERASER PRESSURE FEEL slider toward FIRM, or select the MORE OPTIONS button and increase the CLICK FORCE setting. |


Contents
Index

HAVING TROUBLE?
| You have to press hard with the Graphire Pen when clicking or drawing. | Open the Wacom control panel and go to the tool's TIP FEEL tab.Move the TIP PRESSURE FEEL slider toward SOFT, or select the MORE OPTIONS button and decrease the CLICK FORCE setting. |
| The Graphire Pen tip does not function. | Make sure the status LED changes from orange to green when the tip is pressed. If it does not, you may have defective hardware (see Troubleshooting).Check the control panel's TOOL BUTTONS tab and verify that the tip is assigned to a CLICK function. |
| The side switch does not work. | Be sure you press the side switch when the pen tip is in proximity—do this without pressing down on the pen tip.From the Wacom control panel, verify that the side switch is set to the proper function for the application and tool that you are using.Make sure the tablet status LED changes from orange to green when you press the side switch. If it does not, you may have defective hardware (see Troubleshooting). |
| Changing the function settings for the Graphire tools has no effect. | Make sure that you change the settings for the tool and the application that you are using. See Working with Graphire Tools and Working with Application-Specific Settings. |
| The screen cursor jumps back when using your regular mouse or trackball. | Do not place the Graphire Pen or Cordless Mouse on the tablet when using another pointing device. Leaving your tool on the tablet may interfere with screen cursor positioning when using other input devices. |





Contents
Index

HAVING TROUBLE?
| Cannot move the cursor where you want to on the screen, or the line you are drawing does not line up with the location of the pointer in paint applications. | Open the Wacom control panel and go to the MAPPING tab. Verify that PEN MODE is selected. If this does not help, the Wacom preferences file may be corrupted. Click on the RESET TAB TO DEFAULTS button to reestablish tablet to screen mapping.If this does not work, from the SYSTEM FOLDER open the PREFERENCES and TABLET folders. From the TABLET folder, drag the TABLET PREFERENCES file into the trash. Then restart your computer. When the tablet driver loads, it will create a new preferences file with the factory default settings. |
| You notice a screen delay at the beginning of pen strokes. | In the Wacom control panel, try decreasing the DOUBLE-CLICK DISTANCE or increasing the double-click speed (seeAdjusting Double-Click). If that does not work, try unchecking the DOUBLE-CLICK ASSIST checkbox. |
| Within a graphics application, you have to press hard before the pen will start to draw. | In the Wacom control panel, select the Tip Feel tab and drag the Tip FEEL slider to the SOFT position. |


Contents
Index

HAVING TROUBLE?
CONTACTING TECHNICAL SUPPORT
If you have a problem with your Wacom tablet, first check Installation and Having Trouble? to be sure the tablet is installed correctly. If you cannot find the answer in this manual, you may find updated information about your problem in the Read Me file located on the Graphire Tablet CD. For information on accessing Wacom's 24-hour automated online support and for a directory of Wacom Technical Support numbers, see Who to Call for your region.
LINKING TO THE WEB PAGE
Answers to frequently asked questions and troubleshooting tips can be found on the appropriate web site for your area in Who to Call.
PRE-CONTACT CHECKLIST
You might want to print a copy of this page for reference. When you call, you should be at your computer with the following information available:
□ This manual.
☐ Tablet serial and model number. (Look on the bottom of the tablet.)
☐ Driver version number. (See the ABOUT WACOM CONTROL PANEL... or Diagnostics dialog box.)
☐ The make and model of your computer, and operating system version.
☐ A list of peripheral devices attached to your computer.
☐ The exact wording of any error message that appeared on your screen.
☐ What happened and what you were doing when the problem occurred.
□ How you tried to solve the problem.


Contents
Index

HAVING TROUBLE?
WHO TO CALL
If you think your Wacom tablet is not working properly, contact the Wacom support staff for the area where your product was purchased. If you have a modem, you can download the latest software drivers from the Internet.
USA, CANADA, CENTRAL AND SOUTH AMERICA
EUROPE, MIDDLE EAST AND AFRICA
JAPAN
ASIA PACIFIC (ENGLISH)




Contents
Index

HAVING TROUBLE?
USA, Canada, Central and South America
Contact your local distributor, or:
Worldwide Web: http://www.wacom.com/productsupport 24-hour Technical Support information:
FAQs—Frequently Asked Questions and answers.
Software updates.
Email support.
Anonymous FTP Site: ftp.wacom.com/pub/drivers Software updates.
Phone: ++1-360-896-9833 Technical Support. (English)
(Normal business hours, Pacific Time)
FAX: ++1-360-896-9724 Technical Support. (English)
Internet Email: support@wacom.com Automated mailback support. (English)
Fast FAX: 1-800-922-7590 (USA and Canada) Automated support and sales information.
(English)
To purchase parts and accessories, call toll-free: 1-888-884-1870 (USA and Canada only) or visit Wacom's web site at http://www.wacom.com/wacomdirect/ (USA only). Outside of the USA and Canada, please contact your local dealer or distributor.


Contents
Index

HAVING TROUBLE?
Europe, Middle East and Africa
Contact your local distributor, or:
Worldwide Web: http://www.wacom.de Software updates, Online support database.
Anonymous FTP Site: ftp.wacom.de/pub Software updates.
Phone (Austria): ++43-(0)1-790 825 550 Technical Support.
Phone (Belgium): ++32-(0)2-275 0691 Technical Support.
Phone (France): ++33-(0)1-7020 0070 Technical Support.
Phone (Germany): ++49-(0)69-6630 8200 Technical Support.
Phone (Italy): ++39-(0)2-45 28 7050 Technical Support.
Phone (Netherlands): ++31-(0)20-517 4705 Technical Support.
Phone (Switzerland): ++41-(0)1-212 2818 Technical Support.
Phone (United Kingdom): ++44-(0)207-744 0831 Technical Support.
Phone (other countries): ++49-(0)180-500 4397 Technical Support.
FAX: ++49-(0)180-500 4398 Technical Support.
Internet Email: support@wacom.de Technical Support.
To purchase parts and accessories, please contact your local dealer or distributor. You can also contact Technical Support using the appropriate number for your region.


Contents
Index

HAVING TROUBLE?
Japan
Contact your local distributor, or:
Worldwide Web: http://tablet.wacom.co.jp Software updates and information. (Japanese)
Phone: ++81-(0)47-380-8877 Technical Support. (Japanese)
FAX: ++81-(0)47-380-8711 Technical Support. (Japanese)
Internet Email: tablet@wacom.co.jp Technical Support and sales. (Japanese)
To purchase parts and accessories, please contact your local dealer or distributor.
Asia Pacific (English)
Contact your local distributor, or:
Worldwide Web: http://tablet.wacom.co.jp/asia-pacific Software updates and information. (English)
Phone: ++81-(0)3-3371-1595 Technical Support. (English)
FAX: ++81-(0)3-3371-1468 Technical Support. (English)
Internet Email: asia-pacific@wacom.co.jp Technical Support and sales. (English)
To purchase parts and accessories, please contact your local dealer or distributor.




Contents Index

HAVING TROUBLE?
APPENDICES
This section contains information on working with multiple tablets. You will also find product specifications, a listing of available parts and accessories, and license and warranty information.
INSTALLING MULTIPLE TABLETS
PRODUCT SPECIFICATIONS
PARTS AND ACCESSORIES
LICENSE AND WARRANTIES
LICENSE AND WARRANTIES (EUROPE)


Contents
Index
APPENDICES
INSTALLING MULTIPLE TABLETS
If multiple Wacom tablets are installed on a single computer when the Wacom control panel is opened, a TABLET LIST is displayed above the APPLICATION LIST. The TABLET LIST contains an icon for each installed tablet, and allows you to select the tablet for which your changes will apply.
Select a tablet icon for which to customize application and tool settings.


- To add an additional USB tablet, connect it to a USB port. When the new tablet is found, it is automatically initialized.
• To add an ADB tablet, shut down your computer and plug the tablet into an ADB port. After restarting your computer, the tablet will function. - If you are adding a serial tablet, shut down your computer and plug the tablet into a serial port. Start your computer and open the Wacom control panel. From the ADD menu, choose TABLET.... Then click the ADD SERIAL... button and follow the prompts.
- If multiple tablets are installed, the tablet used to open the Wacom control panel is selected as the default tablet.


Contents Index

APPENDICES
PRODUCT SPECIFICATIONS
GRAPHIRE TABLET (MODEL ET-0405-U)
Active area (W x D) 127.6 x 92.8 mm (5.02 x 3.65 in)
Physical size (W x D x H) 209.0 x 214.0 x 9.3 mm (8.23 x 8.43 x 0.37 in)
Cable length 1.5 m (4.9 ft)
Weight 341 g (0.75 lb)
Power consumption 0.2 watts
Coordinate resolution 40 lpmm (1015 lpi)
Accuracy +/- 0.5 mm (0.02 in)
Maximum report rate 100 points per second
Communication interface USB
Connector USB A
Power requirements DC 5V, 40 mA, from USB port
Operating temperature 5 to 40 degrees C (41 to 104 degrees F)
Storage temperature -10 to +60 degrees C (14 to 140 degrees F)
Operating relative humidity 20% to 80% noncondensing
Storage relative humidity 20% to 90% noncondensing
Certification FCC class B
Compliance VCCI Class B, CE




Contents
Index

APPENDICES
GRAPHIRE PEN (MODEL EP-100E)
Physical size (L x D) 145 x 12.5 mm (5.71 x 0.49 in)
Pressure levels 512 levels
Pen tip travel 0.1 mm (0.004 in) or less
Eraser tip travel 0.1 mm (0.004 in) or less
Weight 11 g (0.02 lb), approximately
Tip refill type Polyacetal (Part No. PSI-A007)
GRAPHIRE CORDLESS MOUSE (MODEL EC-100)
Physical size (L x W x H) 125 x 65 x 39 mm (4.92 x 2.56 x 1.54 in)
Weight 90 g (0.20 lb), approximately
Fingerwheel type Continuous rotation, 24 clicks per turn
GRAPHIRE INKING PEN (MODEL EP-200, OPTIONAL)
Pen tip travel 0.1 mm (0.04 in) or less
Pressure levels 512 levels
Physical size (L x D) 151 x 12.5 mm (5.94 x 0.49 in)
Weight 12 g (0.42 oz), approximately
Tip refill types Polyacetal (Part No. PSI-A011)
Ink refill, black (Part No. PSI-A023)


Contents
Index

APPENDICES
PARTS AND ACCESSORIES
Description
Part Numbers
| Graphire USB Tablet | Slate Blue Tangerine Strawberry Grape Blueberry Lime Graphite | ||||||
| ET-0405-U ET-0405-U0T ET-0405-U0G ET-0405-U0B ET-0405-U0L ET-0405-U0H | |||||||
| Graphire Pen | EP-100E | EP-100E-0T-00 | EP-100E-0S-00 | EP-100E-0G-00 | EP-100E-0B-00 | EP-100E-0L-00 | EP-100E-0H |
| Graphire Cordless Mouse | EC-100 | EC-100-0T-00 | EC-100-0S-00 | EC-100-0G-00 | EC-100-0B-00 | EC-100-0L-00 | EC-100-0H |
| Overlay Sheet | PSH-A174-01 | PSH-A174-05 | |||||
| Pen Stand | PST-A023 | PST-A023-0T | PST-A023-0S | PST-A023-0G | PST-A023-0B | PST-A023-0L | PST-A023-0H |
| Replacement Tips for Pen (EP-100E models) | PSI-A007 | ||||||
| Pen Tether | FUZ-A089 | ||||||
| Graphire Inking Pen | EP-200-00-01 | ||||||
ORDERING PARTS AND ACCESSORIES
To purchase parts and accessories, see who to call for your region:
USA, CANADA, CENTRAL AND SOUTH AMERICA
EUROPE, MIDDLE EAST AND AFRICA
JAPAN
ASIA PACIFIC (ENGLISH)


Contents
Index

APPENDICES
LICENSE AND WARRANTIES
(WORLDWIDE, EXCEPT FOR EUROPE, AFRICA AND MIDDLE EAST)
SOFTWARE LICENSE
This legal document is an agreement between you, the end-user, and Wacom Technology Corporation (Wacom).
- Grant of License. The enclosed product includes computer programs embedded in firmware and accompanying diskette or CD-ROM (the "Software"). The Software is licensed, not sold, to you for use only with Wacom products upon the terms of this license, and Wacom reserves any rights not expressly granted to you. Wacom grants to you a non-exclusive right to use this copy of the Software in conjunction with a Wacom product at a single location.
- Ownership of Software. Although you may own the product in which the Software is originally recorded, Wacom retains ownership of the Software itself. You acknowledge that the Software is Wacom's property, and contains valuable confidential, unpublished information developed or acquired by Wacom at great expense, including data processing algorithms, innovations and concepts. The Software is protected by copyright and other federal and state laws. You agree to use your reasonable best efforts to protect the Software from unauthorized reproduction, distribution, disclosure, use, or publication.
- Copy Restrictions. Unauthorized copying of the Software is expressly forbidden.
- Use Restrictions. You may not decompile, reverse assemble, disassemble or reverse engineer the Software.
- Termination. This License is effective until terminated. This License will terminate automatically without notice from Wacom if you fail to comply with any provisions of the License.
- Miscellaneous. This License is governed by the laws of the United States of America and the state of California except in Asia Pacific and by the laws of Japan for Asia Pacific.





Contents
Index

APPENDICES
Page 101
LIMITED WARRANTY
Wacom warrants the product, except for the Software, to be free from defects in materials and workmanship under normal use and service for a period of one (1) year from the date of original retail purchase, as evidenced by a copy of the receipt and a registration card that has been returned to Wacom within 30 days of purchase.
The Software is licensed “as is.” Wacom makes no warranty with respect to its quality or performance. Wacom cannot guarantee you uninterrupted service or the correction of any errors.
Upon discovery of a defect in the product, except in the Software, within the Warranty Period, you should contact Wacom Technical Support via telephone to obtain an RMA (Return Merchandise Authorization) number and instructions for shipping the product to a service location designated by Wacom. You should send the product, shipping charges prepaid, to the designated service location, accompanied by the return authorization number, your name, address and telephone number, proof of purchase date, and a description of the defect. Wacom will pay for return shipping by United Parcel Service or by an equivalent service as chosen by Wacom.
Wacom's sole obligation and entire liability under this warranty shall be, at Wacom's option, either the repair or replacement of the defective product or parts thereof of which Wacom is notified during the Warranty Period; provided, however, that you are responsible for (i) the cost of transportation of the product to the designated service location and (ii) any loss or damage to the product resulting from such transportation.
Wacom shall have no responsibility to repair or replace the product if the failure of the product has resulted from accident, abuse, misuse, negligence, or unauthorized modification or repair, or if it has been handled or stored other than in accordance with Wacom's storage instructions.
Any descriptions, drawings, specifications, samples, models, bulletins, or similar material, used in connection with the sale of the product, shall not be construed as an express warranty that the product will conform or comply with your requirements.





Contents
Index

APPENDICES
EXCEPT FOR THE LIMITED WARRANTY DESCRIBED ABOVE, THERE ARE NO OTHER WARRANTIES MADE BY WACOM ON THIS PRODUCT. NO ORAL OR WRITTEN INFORMATION OR ADVICE GIVEN BY WACOM, ITS DEALERS, DISTRIBUTORS, AGENTS, OR EMPLOYEES SHALL CREATE A WARRANTY OR IN ANY WAY INCREASE THE SCOPE OF THIS WARRANTY, AND YOU MAY NOT RELY ON ANY SUCH INFORMATION OR ADVICE. THIS WARRANTY GIVES YOU SPECIFIC LEGAL RIGHTS, WHICH VARY FROM STATE TO STATE.
WACOM LIMITS THE DURATION OF ANY LEGALLY IMPLIED WARRANTIES INCLUDING IMPLIED WARRANTIES OF MERCHANTABILITY OR FITNESS FOR A PARTICULAR PURPOSE, TO THE DURATION OF WACOM'S EXPRESS WARRANTY. SOME STATES DO NOT ALLOW LIMITATIONS ON HOW LONG AN IMPLIED WARRANTY LASTS. SO THE ABOVE LIMITATION MAY NOT APPLY TO YOU.
NEITHER WACOM NOR ANYONE ELSE WHO HAS BEEN INVOLVED IN THE CREATION, PRODUCTION, OR DELIVERY OF THIS PRODUCT SHALL BE LIABLE FOR ANY DIRECT, CONSEQUENTIAL, OR INCIDENTAL DAMAGES (INCLUDING DAMAGES FOR LOSS OF BUSINESS PROFITS, BUSINESS INTERRUPTION, LOSS OF BUSINESS INFORMATION AND THE LIKE) ARISING OUT OF THE USE OF OR INABILITY TO USE SUCH PRODUCT, EVEN IF WACOM HAS BEEN ADVISED OF THE POSSIBILITY OF SUCH DAMAGES. BECAUSE SOME STATES DO NOT ALLOW THE EXCLUSION OR LIMITATION OF LIABILITY FOR CONSEQUENTIAL DAMAGES, THE ABOVE LIMITATION MAY NOT APPLY TO YOU.
In the event that any of the above limitations are held unenforceable, Wacom's liability for any damages to you or any party shall not exceed the purchase price you paid, regardless of the form of any claim.
This Limited Warranty is governed by the laws of the United States of America and the state of California.
This Limited Warranty is valid for and only applies to products purchased and used inside the United States (and its territories or possessions) and Canada.


Contents
Index

APPENDICES
Page 103
WARRANTY ON SALES OUTSIDE OF U.S. AND CANADA
For products purchased or used outside of the United States and Canada, upon discovery of a defect in the product, except in the Software, within the Warranty Period you should notify your local dealer or distributor. In all other respects the terms of the warranty as set forth above apply to such sales.
Should you have any questions about this Agreement, or if you desire to contact Wacom for any reason, please contact in writing:
In North and South America contact: In Asia and Asia Pacific contact:
Wacom Technology Corporation WACOM Co., Ltd.
1311 S.E. Cardinal Court 2-510-1 Toyonodai
Vancouver, Washington 98683 Otone-Machi, Kitasaitama-Gun
U.S.A. Saitama, 349-1148
Japan


Contents
Index

APPENDICES
Page 104
LICENSE AND WARRANTIES (EUROPE)
(EUROPE, AFRICA AND MIDDLE EAST)
SOFTWARE LICENSE AGREEMENT
Important Notice to Customers
This product contains copyrighted computer programs (“software”) which are the inalienable intellectual property of WACOM Europe GmbH (“WACOM”). This software is both integrated within the product and also contained on the accompanying data carrier. The purchase of this product from your dealer does not include WACOM's software and the associated rights of usage. WACOM grants you, the user, the right to use the software solely in accordance with the conditions of this software license agreement. By purchasing this product you agree to the terms of this license.
Entitlement to Use the Software
WACOM grants the customer a personal, non-exclusive license to use the software solely in combination with this product and for the proper operation of this product. This license may be transferred only in connection with this product.
The use of this software includes solely the permanent or temporary, complete or partial copying of the software by means of loading, displaying, executing, transmitting or saving for the purpose of executing the commands and data it contains or of observing, examining or testing the functions of the software.
The customer may not license, lease or loan the software to a third party, nor allow a third party to access the software in any other way. The customer may not without prior written authorization from WACOM copy, modify, transmit or edit the software, apart from the actions of copying necessary to create a backup copy and for the purposes outlined in section 2 above. The customer may not decompile the software; if the software contains interfaces to software which is not supplied by WACOM, WACOM shall make the necessary information available to the customer upon request, provided that the customer can prove his/her entitlement to use the software and that he/she agrees to pay the copying and postage costs.


Contents
Index

APPENDICES
Page 105
LIMITED WARRANTY AND LIABILITY
WACOM warrants to you as the original end-user that the product hardware is free from defects in materials and workmanship under normal use and service for a period of TWO (2) YEARS after the date of purchase, provided that they are unused at the time of such purchase. WACOM further warrants to you the accompanying diskettes against defects in materials and workmanship for a period of SIX (6) MONTHS after the date of purchase.
The Software is licensed and distributed “AS IS”. WACOM makes no warranties, expressed or implied, with respect to its quality, performance, merchantability and fitness for a particular purpose (including related manuals and documentation). WACOM cannot guarantee you uninterrupted service or the correction of any errors.
Upon discovery of a defect in the product, except in the Software, within the applicable Warranty Period, you should return them in the original packaging to the place of your original purchase, together with your name, address, telephone number, a description of the problem and a copy of the original invoice. You are responsible for any loss or damage to the product resulting from such transportation. WACOM's sole obligation and entire liability under this warranty shall be, at WACOM's option, either the repair or the replacement of product or parts thereof that prove defective and that were returned within the applicable Warranty Period.
WACOM shall have no responsibility to repair or replace the product if (a), in the opinion of WACOM, the failure of the product has resulted from accident, abuse, misuse, negligence, misapplication, or unauthorized modification or repair, or (b) the product has been handled or stored other than in accordance with WACOM's storage instructions, or (c) the failure is due to normal wear and tear, or (d) you fail to fulfill your obligations as described above. In case that any claim presented under warranty is found upon investigation to be either outside the duration or the scope of this warranty, or in case that the product is found to be not defective, then the cost of such investigation and repair shall be borne by you.
Any descriptions, drawings, specifications, samples, models, bulletins, or similar material, used in connection with the sale of the product, shall not be construed as an express warranty that the product will conform or comply with your requirements.


Contents Index

APPENDICES Page 106
LIABILITY OF WACOM
WACOM and its employees or representatives shall not be liable for any damages, on any legal grounds, unless these damages (a) may be attributed to intent or to gross negligence or (b) result from the culpable infringement of an essential contractual obligation (cardinal obligation) in a way which may endanger the achievement of the contractual purpose or (c) result from the absence of a guaranteed feature or (d) are covered by product liability law. If WACOM is liable for the culpable infringement of cardinal obligations, in the absence of intent or gross negligence, WACOM's total liability shall be limited to those damages and to that range of damages of which the occurrence could typically have been foreseen by WACOM under the circumstances known to it at the time the agreement was concluded.
In the event that any of the above limitations are held unenforceable, WACOM's aggregate liability for any damages to you or any party shall not exceed the purchase price of the defective, damaged or undelivered product as determined by the net invoiced price, regardless of the form of any claim. Claims must be reported to WACOM in writing within no more than (1) month after the damage occurred. Upon failure to do so, any claims to the payment of damages will be void. Reseller indemnifies WACOM from any claims by third parties for damages resulting from or connected to resellers fault.
The rights and limitations set forth in this statement do not limit or exclude certain statutory rights that may be applicable in the country of your purchase. If any of the provisions of this statement are declared void, such provisions shall be considered separate from this statement and the statement shall otherwise remain in full force and effect.
This Limited Warranty and Liability is governed by the laws of the Federal Republic of Germany.
Should you have any questions about this Agreement, or if you desire to contact WACOM for any reason, please contact in writing:
WACOM Europe GmbH
Active area. The drawing area of the tablet where your Graphire tools are detected.
Application-specific settings. Graphire tool and tablet settings that have been customized for individual applications. The control panel enables you to program a tool to behave uniquely in different applications. Your application-specific settings are in effect whenever you use the application.
Aspect. The ratio between the vertical and horizontal dimension of the tablet or display. The ASPECT setting is located on the MAPPING tab, and defines how the tablet area is mapped to the display area. This setting determines if the aspect of the tablet and display are the same. It also determines if a 1:1 scale will be maintained between the tablet and display.
Click force. The amount of force you must apply to your Graphire Pen tip for a click to occur.
Double-click assist. A control panel option that makes it easier to double-click. When selected, you can customize the double-click speed and distance.
Double-click distance. The maximum distance (in screen pixels) that the cursor can move between clicks and still be accepted as a double-click. Increasing the double-click distance makes double-clicking easier, but may cause a delay in brush strokes in some graphics applications.





Contents Index
GLOSSARY
Page 108
Double-click speed. The maximum time that can pass between clicks and still be accepted as a double-click. Increasing the double-click time makes double-clicking easier.
Eraser-aware application. A software application that has built-in support for the Graphire eraser. These applications take advantage of the eraser in different ways, depending on what makes sense for the application.
Fingerwheel. The control wheel on the Graphire Cordless Mouse.
Landscape. A tablet ORIENTATION setting. In landscape orientation, the tablet cable is at the top. See also portrait.
Mapping. The relationship between your Graphire tool position on the tablet and the cursor position on the monitor screen.
Modifier. Modifier keys include SHIFT, CTRL, COMMAND, and OPTION. You can customize your Graphire tool to simulate a modifier key.
Mouse Mode. A method for positioning the screen cursor. When you place a Graphire tool on the tablet, you can navigate the screen cursor like a mouse. This is known as relative positioning, and is the default setting for the Graphire Cordless Mouse. See also Pen Mode.





Contents Index

GLOSSARY Page 109
Nib. The replaceable tip of the Graphire Pen.
Pen Mode. A method of positioning the screen cursor. Wherever you place your Graphire tool on the tablet, the screen cursor will be at that same corresponding point on the screen. This is known as absolute positioning, and is the default setting for the Graphire Pen. Absolute positioning (Pen Mode) allows you to position the screen cursor without having to first find it and then move it with a “pick up and roll” action. See also Mouse Mode.
Pixel. The smallest unit of measure on your monitor screen.
Pop-up Menu. A window that displays a list of macros, keystroke functions, and mapping options. You can customize the tool buttons of your Graphire Pen and Cordless Mouse to display this menu.
Portrait. A tablet ORIENTATION setting. In portrait orientation, the tablet cable is on the side. See also landscape.
Pressure sensitive. A quality of the Graphire Pen tip and eraser that senses the amount of pressure being applied. This is used to create natural-looking pen, brush, and eraser strokes in applications that are pressure-sensitive.
Pressure-sensitive application. Any application that supports pressure-sensitive input.
Proximity. The height above the tablet's active area where the Graphire tools are detected. Refer also to the Proximity section.


Contents Index

GLOSSARY Page 110
Screen cursor. The pointer on the display screen. Screen cursors come in different shapes (such as an I-beam, arrow, or box), depending on which application you are running.
Tracking speed. A setting that allows you to adjust the speed at which your screen cursor moves when your Graphire tool is in Mouse Mode.
USB. Universal Serial Bus. A hardware interface standard for connecting computer peripheral devices. USB ports support hot-plugging, which allows you to connect or disconnect a USB device without turning off your computer.


Contents Index

GLOSSARY Page 111
INDEX
About the manual 8
Accessories and parts 100
ordering 100
Add menu 72
Adding a tool 64
Advanced
eraser pressure, customizing 79
tip pressure, customizing 75
Application-specific settings
creating 67
working with 65
Aspect 55
Button functions 45
Care, for tools and tablet 32
Checklist, pre-contact 91
Click force adjustment 76
Clicking, with pen 23
Control panel
buttons
features 36
lists
opening 35
tabs
Copying settings
Customizing
advanced
eraser pressure 79
tip pressure 75
click force 76
double-click 43
eraser feel 50
Graphire Cordless Mouse
buttons 59
fingerwheel 60
tabs 41
Graphire Pen tabs 41
Pop-up Menu 61
pressure curve 77
tablet to screen mapping 51
tip feel 42
tool buttons 44
tools 41
Diagnostics 85
Display area 58
Double-click, customizing 43
Double-clicking, how to 23
Drawing with pressure 27
Edit menu 71





Contents
Index
INDEX
Page 112
Environmental conditions 32
Eraser feel, customizing 50
Erasing, with pen 28
Eye-hand coordination exercise 29
Features 16
control panel 36
Graphire tools 17
tablet 16
File menu 71
Fingerwheel
customizing 60
using 31
Functions, button 45
General problems, troubleshooting 88
Graphire Cordless Mouse
buttons, customizing 59
tabs, customizing 41
testing
using 30
fingerwheel
Graphire Pen
clicking
clicking with
double-clicking with
drawing
with pressure 27
erasing with
holding
pointing
replacing the tip 33
tabs, customizing 41
testing 85
using 21
Help menu 73
Holding the pen 21
Information, product 14
Installation 11
USB tablet 12
Installing multiple tablets 97
Keystrokes, adding to Pop-up Menu 62
Language menu 73
License and Warranties 101
License and Warranties (Europe) 105
Macros, adding to Pop-up Menu 62
Manual, about 8
Mapping options, adding to Pop-up Menu 62
Menus 71
Add 72
Edit 71
File 71
Help 73
Language 73
Remove 72
Multiple tablets, installing 97
Nib, replacing 33
Ordering parts and accessories 100
Orientation 54


Contents
Index

INDEX
Page 113
Parts and accessories 100
ordering 100
Pointing, with pen 22
Pop-up Menu, customizing 61
Positioning mode 53
Pressure curve adjustment 77
Pressure, drawing with 27
Product information 14
Proximity 26
Registration, mailing 14
Remove menu 72
Removing
keystrokes from Pop-up Menu 62
macros from Pop-up Menu 62
mapping options from Pop-up Menu
settings
Settings
changing for specific application and tool
copying 80
removing
Software
driver, downloading the latest
resolving conflicts 84
uninstalling 14
Specifications, product 98
Graphire Cordless Mouse 99
Graphire Inking Pen 99
Graphire Pen 99
tablet 98
Tablet
area 56
storing 32
working with 20
Tablet to screen mapping, customizing 51
Technical Support
contacting 91
linking to web page 91
numbers
for Africa 94
for Asia Pacific 95
for Canada 93
for Central America 93
for Europe 94
for Japan 95
for Middle East 94
for South America 93
for USA 93
pre-contact checklist 91
who to call 92
Testing
Graphire Cordless Mouse 86
Graphire Pen 85
Tip feel, customizing 42
Tip, replacing 33
Tool buttons, customizing 44
Tool List, adding tools to 69
Tool, adding 64


Contents
Index

INDEX
Page 114
Tools
adding to Tool List 69
customizing 41
testing 85
Troubleshooting 82
general problems 88
Graphire tools 85
software 84
USB
tablet problems 87
tablets 82
Uninstalling software 14
USB
tablet
problems, troubleshooting 87
testing 82
WACOM International Offices 116
Warranties and License 101
Warranties and License (Europe)
Web page, linking to
Work area, setting up 19
WACOM INTERNATIONAL OFFICES
WACOM Technology Corporation WACOM Europe GmbH
1311 S.E. Cardinal Court Europark Fichtenhain A9
Vancouver, WA 98683 47807 Krefeld
U.S.A. Germany
Telephone Telephone
General: ++1-360-896-9833 General: ++49-(0)2151-3614-0
Fax: ++1-360-896-9724 Fax: ++49-(0)2151-3614-111
WACOM Co., Ltd.
2-510-1 Toyonodai
Otone-Machi, Kitasaitama-Gun
Saitama, 349-1148
Japan
Telephone
General: ++81-(0)480-78-1213
Fax: ++81-(0)480-78-1217


Contents
Index


- VACOM graphire USER'S MANUAL
- USER'S MANUAL FOR MACINTOSH®
- TRADEMARKS
- RADIO AND TELEVISION INTERFERENCE
- FCC NOTICE
- CE DECLARATION
- TABLE OF CONTENTS
- ADVANCED FEATURES
- HAVING TROUBLE? 81
- APPENDICES 96
- ABOUT THE MANUAL
- NAVIGATING THE MANUAL
- INSTALLATION
- GRAPHIRE TABLET INSTALLATION
- iMAC REQUIREMENTS
- UNINSTALLING THE SOFTWARE
- REGISTRATION
- PRODUCT INFORMATION
- USING GRAPHIRE
- APPEARANCE AND FEATURES
- GRAPHIRE TABLET
- GRAPHIRE TOOLS
- SETTING UP YOUR WORK AREA
- WORKING WITH THE TABLET
- USING THE GRAPHIRE PEN
- HOLDING THE PEN
- POINTING
- CLICKING
- USING THE SIDE SWITCH
- DRAGGING
- PROXIMITY
- DRAWING WITH PRESSURE
- ERASING
- EYE-HAND COORDINATION EXERCISE
- USING THE GRAPHIRE CORDLESS MOUSE
- CARING FOR YOUR TOOLS AND TABLET
- REPLACING THE PEN TIP
- CUSTOMIZING
- OPENING THE CONTROL PANEL
- CONTROL PANEL FEATURES
- File Edit Add Remove Language Help
- TABS
- CONTROL PANEL LISTS
- CONTROL PANEL BUTTONS
- CUSTOMIZING YOUR PEN AND CORDLESS MOUSE
- GRAPHIRE PEN TABS
- GRAPHIRE CORDLESS MOUSE TABS
- ADJUSTING TIP FEEL
- ADJUSTING DOUBLE-CLICK
- CUSTOMIZING TOOL BUTTONS
- Button Functions
- ADJUSTING ERASER FEEL
- TABLET TO SCREEN MAPPING
- Positioning Mode
- Orientation
- Aspect
- Tablet Area
- Display Area
- CUSTOMIZING THE GRAPHIRE CORDLESS MOUSE
- CUSTOMIZING THE CORDLESS MOUSE FINGERWHEEL
- CUSTOMIZING THE POP-UP MENU
- ADD MACROS
- ADD KEYSTROKES
- ADD MAPPING OPTIONS
- REMOVING POP-UP MENU OPTIONS
- WORKING WITH GRAPHIRE TOOLS
- ADDING A TOOL
- WORKING WITH APPLICATION-SPECIFIC SETTINGS
- CREATING AN APPLICATION-SPECIFIC SETTING
- ADDING A TOOL TO AN APPLICATION'S TOOL LIST
- CHANGING SETTINGS FOR A SPECIFIC APPLICATION AND TOOL
- REMOVING APPLICATION-SPECIFIC SETTINGS
- PULL-DOWN MENUS
- FILE
- EDIT
- ADD
- REMOVE
- LANGUAGE
- HELP
- ADVANCED TIP PRESSURE SETTINGS
- CLICK FORCE ADJUSTMENT
- PRESSURE CURVE ADJUSTMENT
- ADVANCED ERASER PRESSURE SETTINGS
- COPYING SETTINGS
- HAVING TROUBLE?
- TROUBLESHOOTING
- TESTING USB TABLETS
- RESOLVING SOFTWARE CONFLICTS
- TESTING YOUR GRAPHIRE TOOLS
- Verifying Your Macintosh is USB Ready
- Using the Extensions Manager
- TESTING THE GRAPHIRE PEN
- TESTING THE GRAPHIRE CORDLESS MOUSE
- TROUBLESHOOTING TABLES
- USB TABLET PROBLEMS
- GENERAL PROBLEMS
- CONTACTING TECHNICAL SUPPORT
- LINKING TO THE WEB PAGE
- PRE-CONTACT CHECKLIST
- WHO TO CALL
- USA, Canada, Central and South America
- Europe, Middle East and Africa
- Japan
- Asia Pacific (English)
- APPENDICES
- INSTALLING MULTIPLE TABLETS
- PRODUCT SPECIFICATIONS
- GRAPHIRE TABLET (MODEL ET-0405-U)
- GRAPHIRE PEN (MODEL EP-100E)
- GRAPHIRE CORDLESS MOUSE (MODEL EC-100)
- GRAPHIRE INKING PEN (MODEL EP-200, OPTIONAL)
- PARTS AND ACCESSORIES
- ORDERING PARTS AND ACCESSORIES
- LICENSE AND WARRANTIES
- SOFTWARE LICENSE
- LIMITED WARRANTY
- WARRANTY ON SALES OUTSIDE OF U.S. AND CANADA
- In North and South America contact: In Asia and Asia Pacific contact:
- LICENSE AND WARRANTIES (EUROPE)
- SOFTWARE LICENSE AGREEMENT
- Important Notice to Customers
- Entitlement to Use the Software
- LIMITED WARRANTY AND LIABILITY
- LIABILITY OF WACOM
- INDEX
- Tools
- Troubleshooting 82
- Uninstalling software 14
- USB
- WACOM International Offices 116
- Warranties and License (Europe)
- WACOM INTERNATIONAL OFFICES
- WACOM Technology Corporation WACOM Europe GmbH
- WACOM Co., Ltd.
Brand : WACOM
Model : Graphire Windows
Category : Graphic tablet