Ultra NVR616D-64-4KS2 - Network video recorder Dahua Technology - Free user manual and instructions
Find the device manual for free Ultra NVR616D-64-4KS2 Dahua Technology in PDF.

User questions about Ultra NVR616D-64-4KS2 Dahua Technology
0 question about this device. Answer the ones you know or ask your own.
Ask a new question about this device
Download the instructions for your Network video recorder in PDF format for free! Find your manual Ultra NVR616D-64-4KS2 - Dahua Technology and take your electronic device back in hand. On this page are published all the documents necessary for the use of your device. Ultra NVR616D-64-4KS2 by Dahua Technology.
USER MANUAL Ultra NVR616D-64-4KS2 Dahua Technology
NVR Series Quick Start Guide
V5.2.0
Table of Contents
1 INSTALLATION AND CONNECTIONS 1
1.1 Check Unpacked NVR
1.2 Front Panel
1.2.1 Super 3U NVR / Super 4K 3U NVR/ Super 4K S2 3U NVR Series.... I
1.2.2 Super 4K 2U NVR/ Super 4K S2 2U NVR Series 2
1.2.3 Super 4U NVR Series 6
1.3 Rear Panel 7
1.3.1 Super 3U NVR Series 7
1.3.2 Super 4K 2U/Super 4K S2 2U NVR Series....8
1.3.3 Super 4K 3U NVR Series 9
1.3.4 Super 4K S2 3U NVR Series 10
1.3.5 Super 4U NVR Series 12
2 OVERVIEW OF NAVIGATION AND CONTROLS....14
2.1 Boot up....14
2.7 Shutdown 28
3 WEB OPERATION 30
Welcome
Thank you for purchasing our NVR!
This quick start guide is designed to be a reference tool for the installation and operation of your system.
Before installation and operation please read the following safeguards and warnings carefully!
Please keep it for future reference!
Important Safeguards and Warnings
1. Electrical safety
All installation and operation here should conform to your local electrical safety codes.
The product must be grounded to reduce the risk of electric shock.
We assume no liability or responsibility for all the fires or electrical shock caused by improper handling or installation.
2. Transportation security
Heavy stress, violent vibration or water splash are not allowed during transportation, storage and installation.
3. Installation
Keep upwards. Handle with care.
Do not apply power to the NVR before completing installation.
Do not place objects on the NVR.
4. Qualified engineers needed
All the examination and repair work should be done by the qualified service engineers. We are not liable for any problems caused by unauthorized modifications or attempted repair.
5. Environment
The NVR should be installed in a cool, dry place away from direct sunlight, inflammable, explosive substances and etc.
This series product shall be transported, storage and used in the specified environments.
- The function of the ITE being investigated to IEC 60950-1 is considered not likely to require connection to an Ethernet network with outside plant routing, including campus environment.
- The installation instructions clearly state that the ITE is to be connected only to PoE networks without routing to the outside plant.
6. Lithium battery
Improper battery use may result in fire, explosion, or personal injury!
When replace the battery, please make sure you are using the same model!
CAUTION
RISK OF EXPLOSION IF BATTERY IS REPLACED BY AN INCORRECT TYPE.
DISPOSE OF USED BATTERIES ACCORDING TO THE INSTRUCTIONS.
7. Accessories
Be sure to use all the accessories recommended by manufacturer.
Before installation, please open the package and check all the components are included.
Contact your local retailer ASAP if something is broken in your package.
1 Installation and Connections
Note: All the installation and operations here should conform to your local electric safety rules.
1.1 Check Unpacked NVR
When you receive the NVR from the forwarding agent, please check whether there is any visible damage. The protective materials used for the package of the NVR can protect most accidental clashes during transportation. Then you can open the box to check the accessories. Please check the items in accordance with the list. Finally you can remove the protective film of the NVR.
1.2 Front Panel
1.2.1 Super 3U NVR / Super 4K 3U NVR/ Super 4K S2 3U NVR Series
For the product of LCD, the front panel of super 3U NVR/super 4K 3U NVR is shown as below. See Figure 1-1.
text_image
1 2 3 4 5 6Figure 1-1
Please refer to the following sheet for front panel button information.
| SN | Name | Function |
| 1 | Power button | Press it once to turn on the device.Press it for a long time to turn off the device. (Usually we do not recommend).Press power button for a long time or pull out the power cable may result in device auto restart. |
| 2 | System HDD Indicator light | The blue light becomes on after system booted up properly.In the system HDD, there are device important configuration file, factory default configuration file, and device initial boot up data. |
| 3 | Alarm indicator light | The alarm indicator light becomes on once an alarm occurred. It becomes on via the software detection. The indicator light becomes on when there is a local alarm. |
| 4 | Networkindicator light | The blue network indicator light is on after you connected the deviceto the network. |
| 5 | USB port | Connect to USB device, mouse, burner and etc. |
| 6 | Front panel lock | Secure it to lock the panel. It has the dustproof function. It can reduce the risk of the HDD stealing or mistakenly remove operation. |
For general super 3U NVR/super 4K 3U NVR series, the front panel is shown as in Figure 1-2.

text_image
1~4 5~8 9~12 13~16 13 14 15 16Figure 1-2
After you remove the front panel, you can see there are 16 HDDs. From the left to the right and from the top to the bottom, it ranges from 1\~4, 5\~8, 9\~12, 13\~16.
You can see there are two indicator lights on the HDD bracket.
- The power indicator light is at the top. The light is yellow after you connected the device to the power.
- The read-write indicator light is at the bottom. The blue light flashes when system is reading or writing the data.
1.2.2 Super 4K 2U NVR/ Super 4K S2 2U NVR Series
The super 4K 2U 64/128-channel NVR front panel is shown as in Figure 1-3.

text_image
Front panel of a network equipment rack with labeled ports, buttons, and indicator lightsFigure 1-3
Please refer to the following sheet for detailed information.
| Name | Icon | Function |
| Power button | Power button, press this button for three seconds to boot up or shut down NVR. | |
| Number button | 0-9 and etc | Input Arabic numberSwitch channel |
| Record | REC | Manually stop/start recording, working with direction keys or numeral keys to select the recording channel. |
| Input number more than 10 | -/-- | If you want to input a number more than 10, please click this button and then input. |
| ESC | ESC | Go to previous menu, or cancel current operation. |
| When playback, click it to restore real-time monitor mode. | ||
| Assistant | Fn | One-window monitor mode, click this button to display assistant function: PTZ control and image color. |
| Backspace function: in numeral control or text control, press it for 1.5seconds to delete the previous character before the cursor. | ||
| In motion detection setup, working with Fn and direction keys to realize setup. | ||
| In text mode, click it to switch between numeral, English character(small/capitalized) and etc. | ||
| In HDD management interface, you can click it to switch HDD record information and other information (Menu prompt) | ||
| Realize other special functions. | ||
| Window switch | Mult | Click it to switch one-window/multiple-window. |
| Shift | ↑ | In textbox, click this button to switch between numeral, English(Small/Capitalized),donation and etc. |
| Enable or disable tour. | ||
| Up/Down | ▲▼ | Activate current control, modify setup, and then move up and down. |
| Increase/decrease numeral. | ||
| Assistant function such as PTZ menu. | ||
| Left/Right | ◀▶ | Shift current activated control, and then move left and right. |
| When playback, click these buttons to control playback bar. | ||
| Slow play | ▶ | Multiple slow play speeds or normal playback. |
| Fast play | ▶ | Various fast speeds and normal playback. |
| Play previous | ◀ | In playback mode, playback the previous video. |
| Reverse/Pause | II ◀ | In normal playback or pause mode, click this button to reverse playbackIn reverse playback, click this button to pause playback. |
| Play Next | ▶ | In playback mode, playback the next video |
| Play/Pause | ▶ II | In normal playback click this button to pause playback.In pause mode, click this button to resume playback.In backward playback or pause mode, click this button to resume normal playback.In real-time monitor mode, click this button to go to the search menu. |
| Enter | ENTER | Confirm current operation |
| Go to default button | ||
| Go to menu | ||
| Shuttle(outer ring) |  | In real-time monitor mode it works as left/right direction key.Playback mode, counter clockwise to forward and clock wise to backward. |
| Jog(inner dial) | Up/down direction key.Playback mode, turn the inner dial to realized frame by frame playback. (Only applies to some special versions.) | |
| USB port |  | To connect USB storage device, USB mouse and etc. |
| Channel indicator light | 1-16 | It becomes on when system is recording. |
| IR Receiver | IR | It is to receive the signal from the remote control. |
| Power indicator light | POWER | Power indicator light. |
| Remote control indicator light | ACT | Remote control indicator light. |
| Status indicator light | STATUS | If there is Fn indicator light, current status indicator light is null. |
| HDD abnormal indicator light | HDD | The indicator light is on when there is no HDD, HDD error occurred or HDD capacity is below specified threshold value. |
The super 4K 2U 32-channel/ super 4K S2 2U 32-channel NVR front panel is shown as in Figure 1-4.

text_image
NVR STATUS HDD NET POWERFigure 1-4
Please refer to the following sheet for front panel button information.
| Icon | Name | Function |
| STATUS | Status indicator light | The blue light is on when the device is working properly. |
| HDD | HDD status indicator light | The blue light is on when the HDD is malfunction. |
| NET | Network status indicator light | The blue light is on when the network connection is abnormal. |
| POWER | Power status indicator light | The blue light is on when the power connection is OK. |
| USB2.0 port | Connect to peripheral USB 2.0 storage device, mouse, burner and etc. |
The super 4K S2 2U 64/128-channel NVR front panel is shown as in Figure 1-5.

text_image
7 2 3 4 6 0 0 0 0 5Figure 1-5
Please refer to the following sheet for front panel button information.
| SN | Icon | Function | SN | Icon | Function |
| 1 | Status | Status indicator light | 2 | HDD | HDD indicator light |
| 3 | NET | Network indicator light | 4 | Power | Power indicator light |
| 5 | USB port | 6 | Power on-off button | ||
| 7 | ALARM | Alarm indicator light | - | - |
1.2.3 Super 4U NVR Series
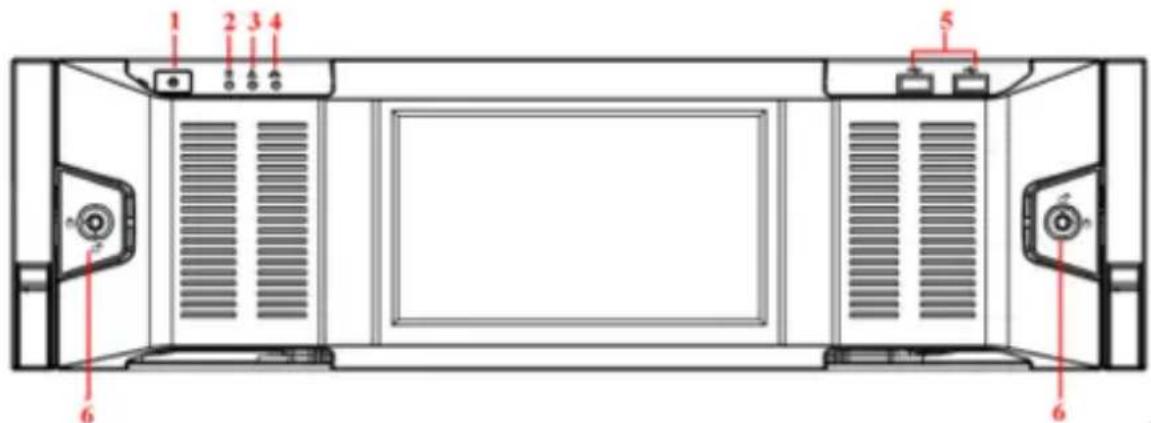
For the product of the LCD screen, the front panel is shown as in Figure 1-6.

text_image
1 2 3 4 5 6 1Figure 1-6
| SN | Icon | Name | Function |
| 1 |  | Front panel lock | Secure it to lock the panel. It has the dustproof function. It can reduce the risk of the HDD stealing or mistakenly remove operation. |
| 2 |  | USB port | Connect to USB device, mouse, burner and etc. |
| 3 |  | Network indicator light | The network indicator light is blue and it flashes when you connect the device to the network. |
| 4 | [BATV] | Alarm indicator light | The alarm indicator light becomes on once an alarm occurred. It becomes on via the software detection. The alarm includes local alarm, no disk and etc. |
| 5 |  | System HDD Indicator light | The blue light becomes on when system is reading or writing the system HDD.In the system HDD, there are device important configuration file, factory default configuration file, device initial boot up data. |
| 6 |  | Power button | Press it once to turn on the device.Press it for a long time to turn off the device (Usually we do not recommend).Press power button for a long time or pull out the power cable may result in device auto restart. |
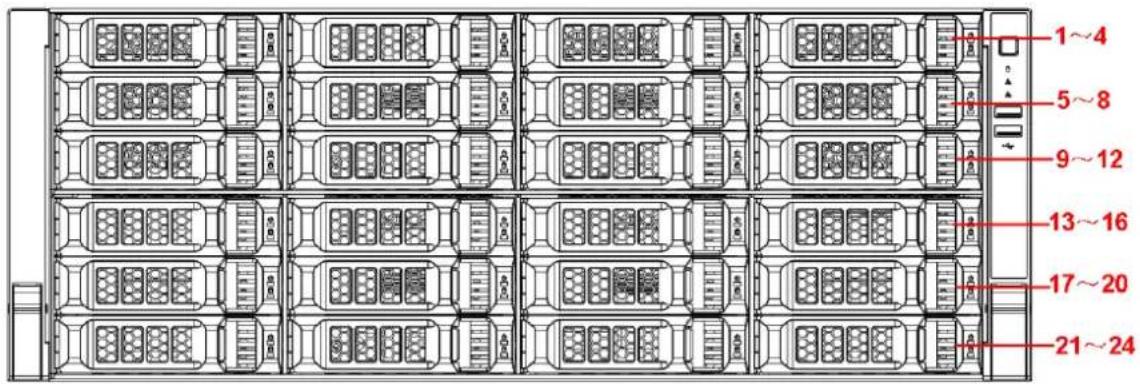
After you remove the front panel, you can see there are 24 HDDs. From the left to the right and
from the top to the bottom, it ranges from 1\~4, 5\~8, 9\~12, 13\~16, 17\~20, 21\~24. See Figure 1-7.
You can see there are two indicator lights on the HDD bracket.
● ☐: The power indicator light is at the top. The light is yellow after you connected the device to the power.
● : The read-write indicator light is at the bottom. The blue light flashes when system is reading or writing the data.
The general series rear panel of super 3U NVR is shown as in Figure 1-8.
text_image
1 2 3 4 5 6 7 8 9 10Figure 1-8
The redundant power series rear panel of super 3U NVR is shown as in Figure 1-9.
text_image
1 2 3 4 5 6 7 8 9 10 1Figure 1-9
Please refer to the following sheet for rear detailed information.
| SN | Function | SN | Function |
| 1 | Power socket | 2 | Audio Input |
| 3 | Audio output | 4 | Bidirectional talk input |
| 5 | Network port | 6 | Video VGA output |
| 7 | eSATA port | 8 | USB port |
| 9 | HDMI port | 10 | Alarm input/alarm output/RS485 port. |
Important
Right now, system does not support audio input port. System supports HDMI1/HDMI2 port by default. You need to purchase HDMI interface board if you want to use HDMI3-HDMI6 port.
1.3.2 Super 4K 2U/Super 4K S2 2U NVR Series
The super 4K 32-channel 2U/ super 4K S2 32-channel 2U series rear panel is shown as in Figure 1-10.

text_image
1 2 3 4 12 11 10 9 8 7 6 5 R6332 VGAFigure 1-10
The super 4K 64-channel 2U/ super 4K 128-channel 2U/ super 4K S2 64-channel 2U/super 4K S2 128-channel 2U general series rear panel is shown as in Figure 1-11.

text_image
1 2 3 4 11 10 9 8 7 6 5Figure 1-11
The super 4K 64-channel 2U/super 4K 128-channel 2U/ super 4K S2 64-channel 2U/super 4K S2
128-channel 2U redundant power series rear panel is shown as in Figure 1-12.

text_image
1 1 2 3 4 11 10 9 8 7 6 5 VBAFigure 1-12
Please refer to the following sheet for detailed information.
| SN | Function | SN | Function |
| 1 | Power socket | 2 | Alarm input/alarm output/RS485 port. |
| 2 | RS232 port | 4 | Audio output |
| 5 | Audio input | 6 | VGA port |
| 7 | Network port | 8 | HDMI port |
| 9 | ● Super 4K : USB 2.0 port● Super 4KS2 : USB 3.0 port | 10 | USB 3.0 port |
| 11 | eSATA port |
1.3.3 Super 4K 3U NVR Series
The general series rear panel of super 4K 3U is shown as in Figure 1-13.
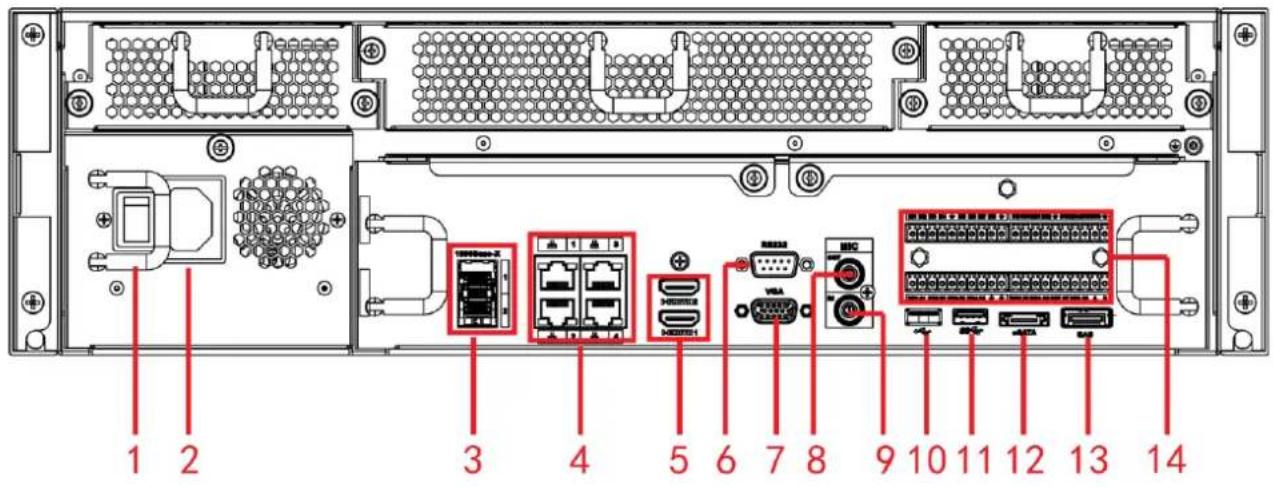
text_image
1 2 3 4 5 6 7 8 9 10 11 12 13 14Figure 1-13
The redundant power series rear panel of super 4K 3U is shown as in Figure 1-14.
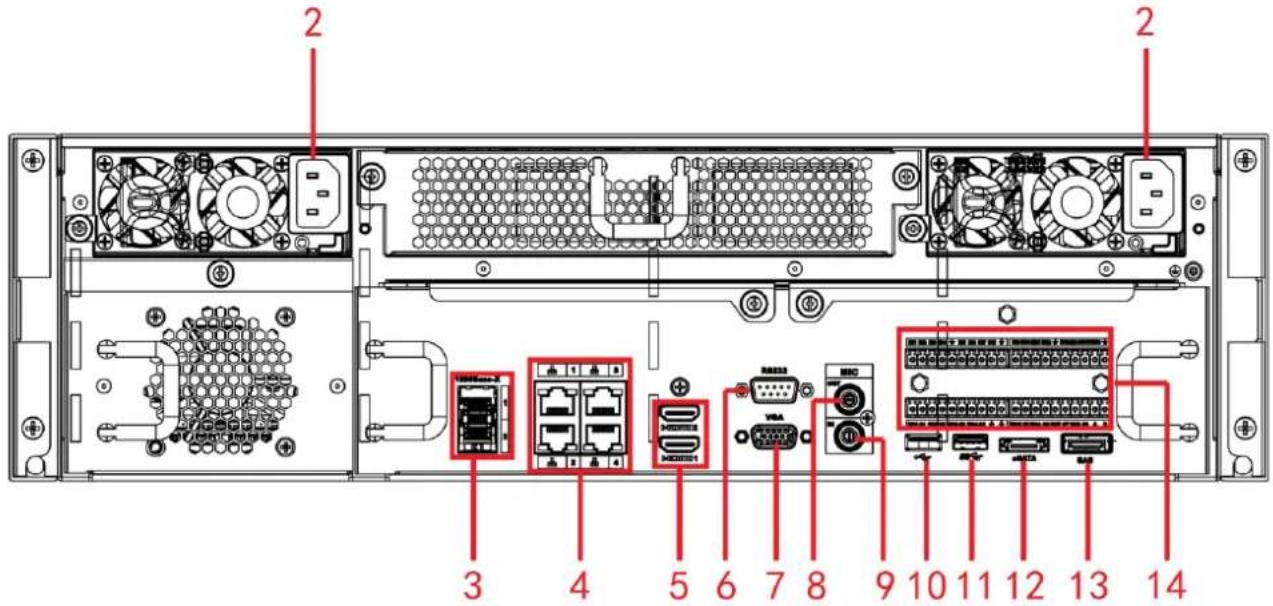
text_image
Diagram of a server rack with labeled ports and connectors, showing internal components like drive, network, and I/O interfaces.Figure 1-14
Please refer to the following sheet for rear detailed information.
| SN | Name | SN | Name |
| 1 | Power on-off button | 2 | Power socket |
| 3 | 1000M fiber port | 4 | Network port |
| 5 | HDMI port | 6 | RS232 port |
| 7 | Video VGA output | 8 | Audio output |
| 9 | Audio input | 10 | USB2.0 port |
| 11 | USB3.0 port | 12 | eSATA port |
| 13 | SAS extension port | 14 | Alarm input/output/RS485 port |
1.3.4 Super 4K S2 3U NVR Series
The general series rear panel of super 4K S2 3U is shown as in Figure 1-5.

text_image
15 1 2 3 4 5 6 7 8 9 10 11 12 13 14Figure 1-15
The redundant power series rear panel of super 4K S2 3U is shown as in Figure 1-16.

text_image
2 15 2 3 4 5 6 7 8 9 10 11 12 13 14Figure 1-16
Please refer to the following sheet for rear detailed information.
| SN | Name | SN | Name |
| 1 | Power on-off button | 2 | Power socket |
| 3 | 1000M fiber port | 4 | Network port |
| 5 | HDMI port | 6 | RS232 port |
| 7 | Video VGA output | 8 | Audio output |
| 9 | Audio input | 10 | USB3.0 port |
| 11 | USB3.0 port | 12 | eSATA port |
| 13 | SAS extension port | 14 | Alarm input/output/RS485 port |
| 15 | HDMI port HDMI port (The HDdecode card is not the default accessory. Please purchase if you want to use) |
1.3.5 Super 4U NVR Series
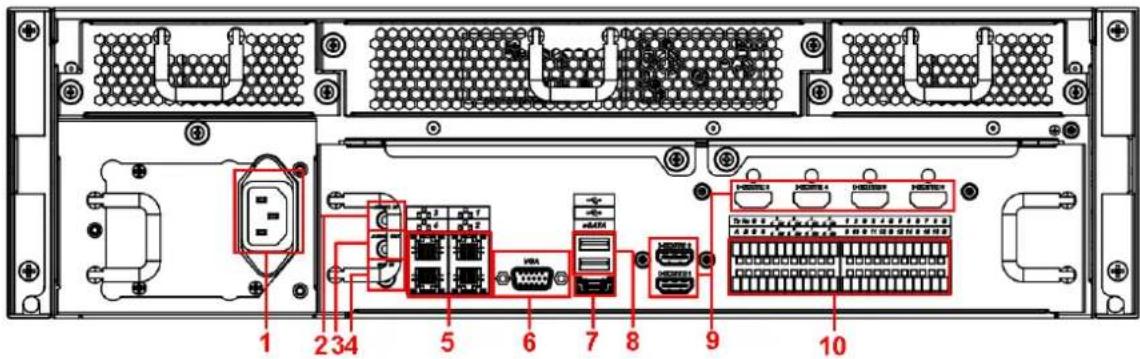
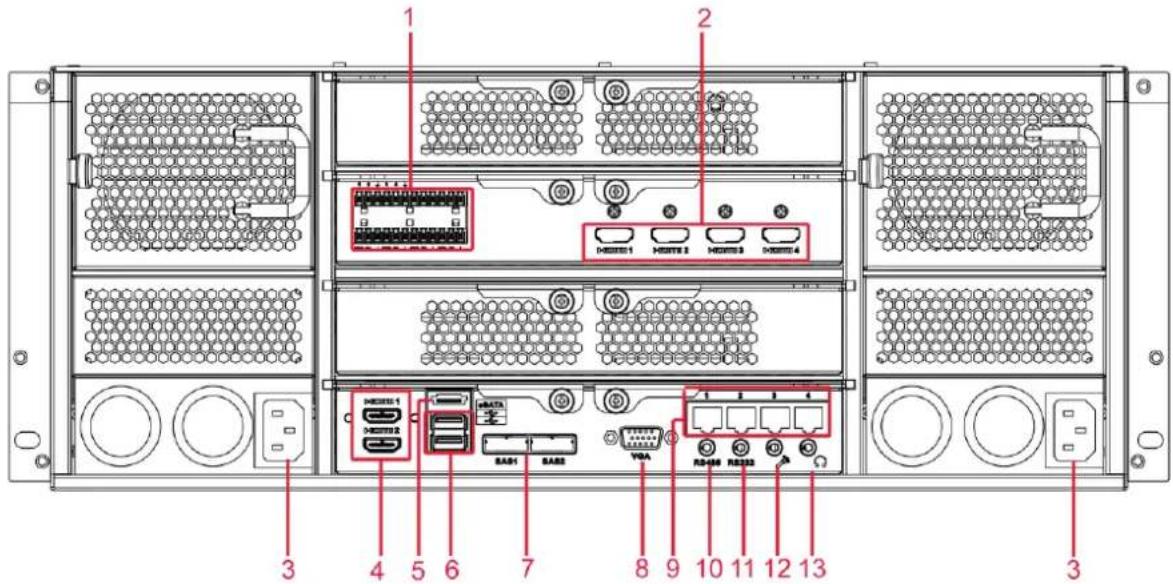
The general rear panel is shown as in Figure 1-17.

text_image
Diagram of a server rack with labeled ports and connectors, showing internal hardware layout and port assignments.Figure 1-17
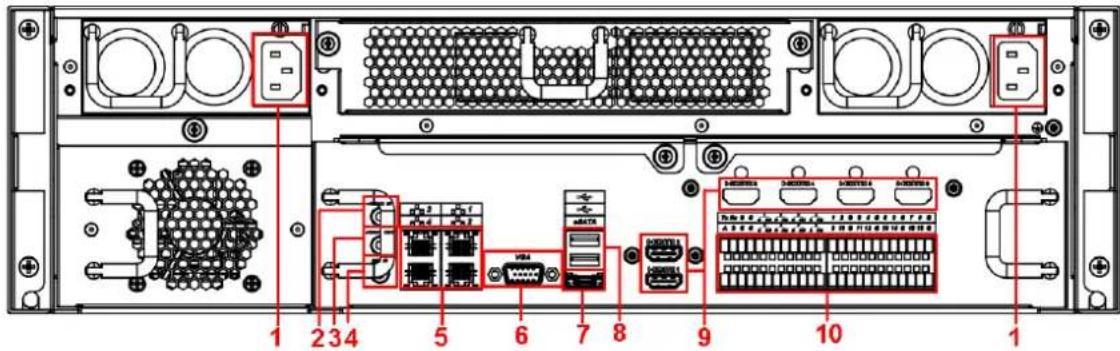
The redundant power series rear panel is shown as in Figure 1-18.
text_image
1 2 H0351 H0352 H0353 H0354 H0351 H0352 H0353 H0354 H0355 H0356 H0357 H0358 H0359 H0360 H0361 H0362 H0363 H0364 H0365 H0366 H0367 H0368 H0369 H0370 H0371 H0372 H0373 H0374 H0375 H0376 H0377 H0378 H0379 H0380 H0381 H0382 H0383 H0384 H0385 H0386 H0387 H0388 H0389 H0390 H0391 H0392 H0393 H0394 H0395 H0396 H0397 H0398 H0399 H0400 H0401 H0402 H0403 H0404 H0405 H0406 H0407 H0408 H0409 H0410 H0411 H0412 H0413 H0414 H0415 H0416 H0417 H0418 H0419 H0420 H0421 H0422 H0423 H0424 H0425 H0426 H0427 H0428 H0429 H0430 H0431 H0432 H0433 H0434 H0435 H0436 H0437 H0438 H0439 H0440Figure 1-18
Please refer to the following sheet for detailed information.
| SN | Name | SN | Name |
| 1 | Alarm input/alarm output | 2 | HDMI port (Reserved port. Right now system does not support HD decode card.) |
| 3 | Power port | 4 | HDMI port |
| 5 | eSATA port | 6 | USB port |
| 7 | SAS port | 8 | Video VGA output |
| 9 | Network port | 10 | RS485 port |
| 11 | RS232 port | 12 | Audio input port |
| 13 | Audio output port |
2 Overview of Navigation and Controls
2.1 Boot up

Before operation, please make sure:
● You have properly installed HDD and all the cable connections.
● The provided input power and the device power are matched.
● Always use the stable current, if necessary UPS is a best alternative measure.
Please follow the steps listed below to boot up the device.
- Connect the device to the monitor and then connect a mouse.
- Connect power cable.
- Click the power button at the front or rear panel and then boot up the device. After device booted up, the system is in multiple-channel display mode by default.
2.2 Login & Change Password
2.2.1 Login
After system booted up, system pops up the startup wizard interface. See Figure 2-1.
Please refer to the user's manual for detailed startup wizard operation information.
Tips
Check the box Startup button here, system goes to startup wizard again when it boots up the next time.
Cancel the Startup button, system goes to the login interface directly when it boots up the next
System consists of four accounts:
- Username: admin. Password: admin. (administrator, local and network)
- Username: 888888. Password: 888888. (administrator, local only)
- Username: 666666. Password: 666666(Lower authority user who can only monitor, playback, backup and etc.)
- Username: default. Password: default(hidden user)
You can use USB mouse, front panel, remote control (not included in the accessory bag) or
keyboard to input. About input method: Click 123 to switch between numeral, English character (small/capitalized) and denotation.
Note:
For security reason, please modify password after you first login.
Continuous three times login failure will result in system alarm and five times login failure will result in account lock!
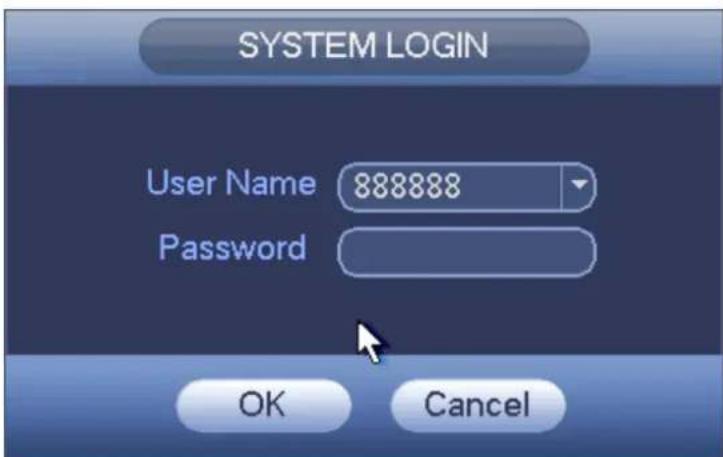
text_image
SYSTEM LOGIN User Name 888888 Password OK CancelFigure 2-2
2.2.2 Change Password
For your own safety, please change your administrator default password after your first login.
After system booted up, you can see the following interface if it is your first login or you have restored default setup. See Figure 2-3. Please input old password and then input new password twice to confirm the change.
● The default administrator user name is admin and the password is admin.
- You can set security questions here to reset the password in case you forgot. System supports customized setup. Please note you need to set two security questions at the same time. When you reset the password, you need to answer these two security questions too.
- For reset information, please refer to chapter 3.2.2 of the user's manual.

text_image
ADMINISTRATOR User Name admin Old Password New Password Confirm Password Secure Questions (Optional) Question 1 What's your favorite pet? Answer Question 2 What's your first car model? Answer OK CancelFigure 2-3
Click Cancel button, system pops up the following interface for you to confirm. See Figure 2-4. Check the box here, system will not pop up the change password interface the next time.
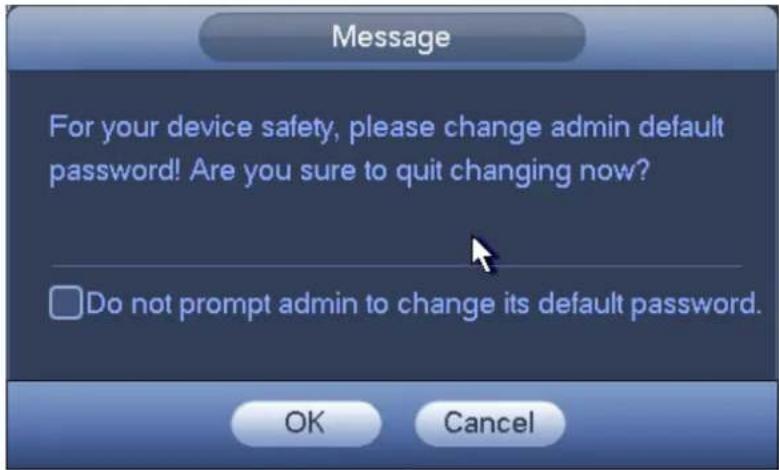
text_image
Message For your device safety, please change admin default password! Are you sure to quit changing now? Do not prompt admin to change its default password. OK CancelFigure 2-4
2.3 Preview
2.3.1 Preview Interface
After you logged in, the system is in live viewing mode by default. You can see system date, time and channel name. If you want to change system date and time, you can refer to general settings (Main Menu->Setting->System->General). If you want to modify the channel name, please refer to the display settings (Main Menu->Setting->Camera->CAM Name)
| 1 | Current channel pops up this icon when it is | 3 | Current channel pops up this icon when video loss alarm occurs. |
recording.
Current channel pops up this icon when motion detect alarm occurs.
Current channel pops up this icon when it is in monitor lock status.
System exceeds
5 decoded channel amount.
Tips
- Preview drag: If you want to change position of channel 1 and channel 4 when you are previewing, you can left click mouse in the channel 1 and then drag to channel 4, release mouse you can switch channel 1 and channel 4 positions.
2.3.2 Preview Control Bar
Move you mouse to the top centre of the video of current channel, you can see system pops up the preview control interface. See Figure 2-5. If your mouse stays in this area for more than 6 seconds and has no operation, the control bar automatically hides.
1 2 3 4 5 6
Figure 2-5
You can refer to the following sheet for detailed information.
| SN | Name |
| 1 | Realtime playback |
| 2 | Digital zoom |
| 3 | Instant backup function |
| 4 | Snapshot |
| 5 | Bidirectional talk |
| 6 | Remote device |
2.4 Search & Playback
Click search button in the main menu, or right click mouse and then select Search button when you are previewing, search interface is shown as below. See Figure 2-6.
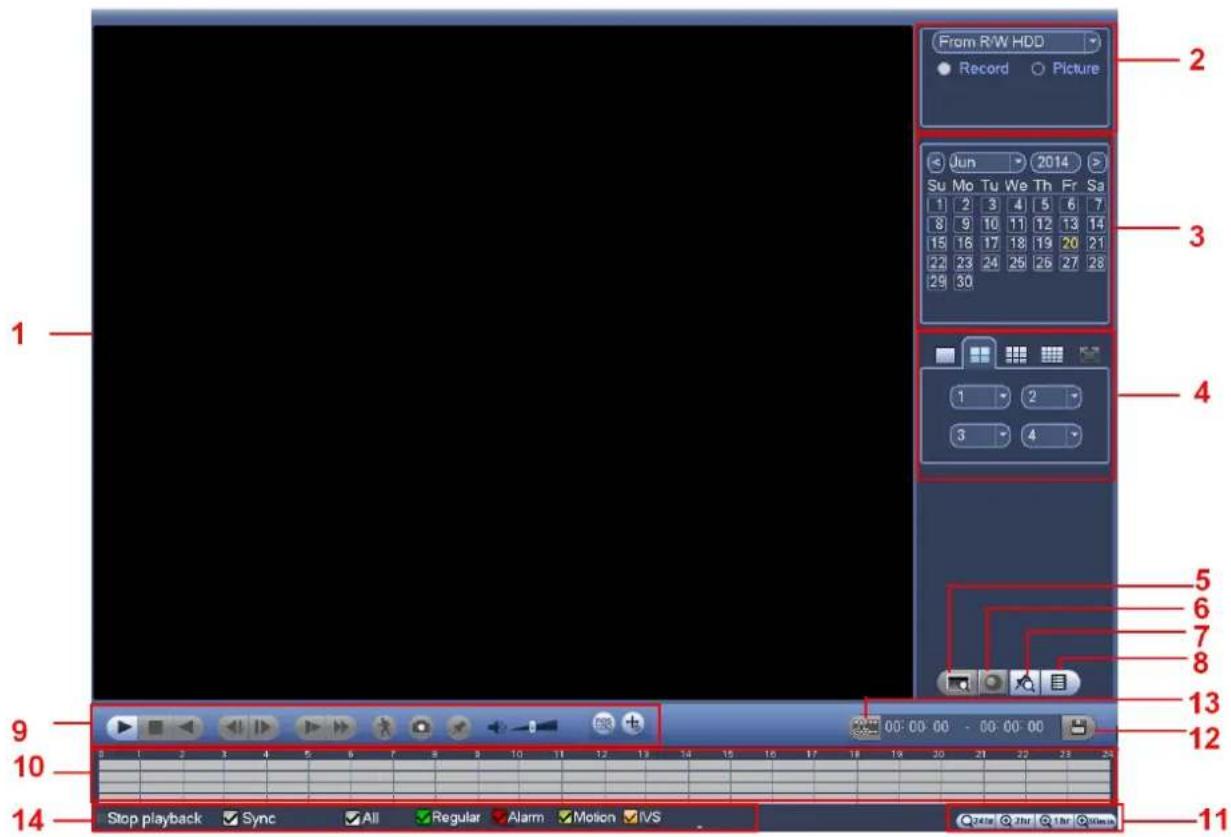
text_image
From R/W HDD Record Picture Jun 2014 Su Mo Tu We Th Fr Sa 1 2 3 4 5 6 7 8 9 10 11 12 13 14 15 16 17 18 19 20 21 22 23 24 25 26 27 28 29 30 1 2 3 4 5 6 7 8 13 12 Stop playback Sync All Regular Alarm Motion IVS 14Figure 2-6
Please refer to the following sheet for more information.
| SN | Name | Function | |
| 1 | Display window | ●Here is to display the searched picture or file.●Support 1/4/9/16-window playback. | |
| 2 | Search type | ●Here you can select to search the picture or the recorded file.●You can select to play from the read-write HDD, from peripheral device or from redundancy HDD.●Before you select to play from the peripheral device, please connect the corresponding peripheral device. You can view all record files of the root directory of the peripheral device. Click the Browse button; you can select the file you want to play. | |
| 3 | Calendar | ●The blue highlighted date means there is picture or file. Otherwise, there is no picture or file.●In any play mode, click the date you want to see, you can see the corresponding record file trace in the time bar. | |
| 4 | Playback mode and channel selection | ●Playback mode: 1/4/9/16. (It may vary due to different series.)✧ In 1-window playback mode: you can select 1-X channels (X depends on the product channel amount).✧ In 4-window playback mode: you can select 4 channels according to your requirement. | |
| pane. | ✧ In 9-window playback mode, you can switch between 1-8, 9-16 and etc channels.✧ In 16-window playback mode, you can switch between1-16, 17-32 and etc channels.●The time bar will change once you modify the playback mode or the channel option. | ||
| 5 | POS search | In 1-channel playback mode, click it you can set advanced setup. | |
| 6 | Fisheye dewarp | In 1-channel playback mode, click it; you can see fisheye setup interface on the right pane. You can set fisheye installation mode and display mode to de-warp the record. | |
| 7 | Mark file list button | Click it to go to mark file list interface. You can view all mark information of current channel by time. Please note only the product of this icon supports mark function. | |
| 8 | File list switch button | ●Double click it, you can view the picture/record file list of current day.●The file list is to display the first channel of the record file.●The system can display max 128 files in one time. Click Play button to view the file. Select one item, and then click the mouse or click the Play button to playback.●You can input the period in the following interface to begin accurate search.●File type: R—regular record; A—external alarm record; M—Motion detect record. ●Lock file. Click the file you want to lock and click the button ●Lock file. Click the file you want to lock and click the button  lock. The file you locked will not be overwritten.●Search locked file: Click the button to view the locked file. lock. The file you locked will not be overwritten.●Search locked file: Click the button to view the locked file. tem goes back to the calendar and channel setup interface.Please note:●For the file that is writing or overwriting, it can not be locked. tem goes back to the calendar and channel setup interface.Please note:●For the file that is writing or overwriting, it can not be locked. | |
| 9 | Playback control pane. | ▶/II | Play/PauseThere are three ways for you to begin playback.● The play button● Double click the valid period of the time bar.● Double click the item in the file list.In slow play mode, click it to switch between play/pause. |
| ■ | Stop | ||
| ◀ | Backward playIn normal play mode, left click the button, the file begins backward play.Click it again to pause current play.In backward play mode, click ▶/II to restore normal play. | ||
 | In playback mode, click it to play the next or the previous section. You can click continuously when you are watching the files from the same channel. In normal play mode, when you pause current play, you can click ◀| and |▶ to begin frame by frame playback. In frame by frame playback mode, click ▶/II to restore normal playback. | ||
| ▶ | Slow play In playback mode, click it to realize various slow play modes such as slow play 1, slow play 2, and etc. | ||
| ▶ | Fast forward In playback mode, click to realize various fast play modes such as fast play 1, fast play 2 and etc. | ||
| Note: The actual play speed has relationship with the software version. | |||
 | Smart search | ||
 | The volume of the playback | ||
 | Click the snapshot button in the full-screen mode, the system can snapshot 1 picture. System supports custom snap picture saved path. Please connect the peripheral device first, click snap button on the full-screen mode, you can select or create path. Click Start button, the snapshot picture can be saved to the specified path. | ||
 | Mark button. Please note this function is for some series product only. Please make sure there is a mark button in the playback control pane. | ||
 | In 1-window playback mode, click it to overlay POS information. | ||
 | In 1-window playback mode, click it to overlay IVS rule information. | ||
| 10 | Time bar | ●It is to display the record type and its period in current search criteria. ●In 4-window playback mode, there are corresponding four time bars. In other playback mode, there is only one time bar. ●Use the mouse to click one point of the color zone in the time bar, system begins playback. ●The time bar is beginning with 0 o'clock when you are setting the configuration. The time bar zooms in the period of the current playback time when you are playing the file. ●The green color stands for the regular record file. The red color stands for the external alarm record file. The yellow stands for the motion detect record file. | |
| 11 | Time bar unit | ●The option includes: 24H, 12H, 1H and 30M. The smaller the unit, the larger the zoom rate. You can accurately set the time in the time bar to playback the record. ●The time bar is beginning with 0 o'clock when you are setting the configuration. | |
| The time bar zooms in the period of the current playback time when you are playing the file. | |||
| 12 | Backup | Select the file(s) you want to backup from the file list. You can check from the list. Then click the backup button, now you can see the backup menu. System supports customized path setup. After select or create new folder, click the Start button to begin the backup operation. The record file(s) will be saved in the specified folder.Check the file again you can cancel current selection. System max supports to display 32 files from one channel.After you clip on record file, click Backup button you can save it.For one device, if there is a backup in process, you can not start a new backup operation. | |
| 13 | Clip | It is to edit the file.Please play the file you want to edit and then click this button when you want to edit. You can see the corresponding slide bars in the time bar of the corresponding channel. You can adjust the slide bar or input the accurate time to set the file end time.After you set, you can click Clip button again to edit the second period. You can see the slide bar restore its previous position.Click Backup button after clip, you can save current contents in a new file.You can clip for one channel or multiple-channel. The multiple-channel click operation is similar with the one-channel operation.Please note:System max supports 1024 files backup at the same time.You can not operate clip operation if there is any file has been checked in the file list. | |
| 14 | Record type | In any play mode, the time bar will change once you modify the search type. | |
| Other Functions | |||
| 15 | Smart motion detect search | When system is playing, you can select a zone in the window to begin smart search. Click the motion detect button to begin play.Once the motion detect play has begun, click button again will terminate current motion detect file play.There is no motion detect zone by default.If you select to play other file in the file list, system switches to motion detect play of other file.During the motion detect play process, you can not implement operations such as change time bar, begin backward playback or frame by frame playback. | |
| 16 | Sync | In pane 14 of Figure 2-6, click Sync button, you can playback the files of different channels occurred at the same time. | |
| 17 | Other channelsynchronizationswitch to playwhen playback | When playing the file, click the number button, system can switch to the same period of the corresponding channel to play. | |
| 18 | Digital zoom | When the system is in full-screen playback mode, left click the mouse in the screen. Drag your mouse in the screen to select a section and then left click mouse to realize digital zoom. You can right click mouse to exit. | |
Note:
All the operations here (such as playback speed, channel, time and progress) have relationship with hardware version. Some series DVRs do not support some functions or playback speeds.
2.5 Network
From main menu->Setting->Network->TCP/IP, the interface is shown as in Figure 2-7.
IP Version: There are two options: IPv4 and IPv6. Right now, system supports these two IP address format and you can access via them.
Preferred DNS server: DNS server IP address.
Alternate DNS server: DNS server alternate address.
Default card: It is to set default network card.
LAN download: System can process the downloaded data first if you enable this function. The download speed is 1.5X or 2.0X of the normal speed.
Important
For the IP address of IPv6 version, default gateway, preferred DNS and alternate DNS, the input value shall be 128-digit. It shall not be left in blank.

text_image
SETTING CAMERA NETWORK EVENT STORAGE SETTING TCP/IP CONNECTION PPPoE DDNS UPnP IP FILTER EMAIL FTP SNMP MULTICAST ALARM CENTER REGISTER CLUSTER IP Ethernet Card IP Address Net Mode NIC Member Edit Unbond Network Card1 172.11.3.8 Single NIC 1 Network Card2 192.168.1.106 Single NIC 2 Network Card3 192.168.1.105 Single NIC 3 Network Card4 192.168.1.104 Single NIC 4 Fiber Card5 192.168.1.103 Single NIC 5 Fiber Card6 192.168.1.102 Single NIC 6 IP Address: 172.11.3.8 Default Gateway: 172.11.0.1 MTU: 1600 MAC Address: 14:09:12:16:06:00 Subnet Mask: 255.255.0.0_Mode: STATIC IP Version IPv4 Preferred DNS 8 . 8 . 8 . 8 Alternate DNS 8 . 8 . 4 . 4 Default Card Network Card1 LAN Download Default OK Cancel ApplyFigure 2-7
Click Edit button, you can go to the following interface. See Figure 2-8.
- Network mode:
Single NIC: eth1/eth2/ eth3/eth4 operate separately. You can use the services such as HTTP, RTP service via eth1/eth2/ eth3/eth4. Usually you need to set one default card (default setup is eth1) to request the auto network service from the device-end such as DHCP, email, FTP and etc. In multiple-address mode, system network status is shown as offline once one card is offline.
Network fault-tolerance: In this mode, device uses bond0 to communicate with the external devices. You can focus on one host IP address. At the same time, you need to set one master card. Usually there is only one running card (master card). System can enable alternate card when the master card is malfunction. The system is shown as offline once these cards are offline.
Load balance: In this mode, device uses bond0 to communicate with the external device. The eth1/eth2/ eth3/eth4 are working now and bearing the network load. Their network load are general the same. The system is shown as offline once all cards are offline.
Note: Some series product has only eth1 and eth2.
- NIC member: You can check the box here to select the bind cards.
This mode is for fault-tolerance or load balance mode only.
The network cards number shall be equal to or more than 2.
The different types of cards such as fiber card or the Ethernet card can not binding together.
- IP Version: There are two options: IPv4 and IPv6. Right now, system supports these two IP address format and you can access via them.
- MAC address: The host in the LAN can get a unique MAC address. It is for you to access in the LAN. It is read-only.
- IP address: Here you can use up/down button (▲▼) or input the corresponding number to input IP address. Then you can set the corresponding subnet mask the default gateway.
- Default gateway: Here you can input the default gateway. Please note system needs to check the validity of all IPv6 addresses. The IP address and the default gateway shall be in the same IP section. That is to say, the specified length of the subnet prefix shall have the same string.
- DHCP: It is to auto search IP. When enable DHCP function, you can not modify IP/Subnet mask /Gateway. These values are from DHCP function. If you have not enabled DHCP function, IP/Subnet mask/Gateway display as zero. You need to disable DHCP function to view current IP information. Besides, when PPPoE is operating, you can not modify IP/Subnet mask /Gateway.
- MTU: It is to set MTU value of the network adapter. The value ranges from 1280-7200 bytes. The default setup is 1500 bytes. Please note MTU modification may result in network adapter reboot and network becomes off. That is to say, MTU modification can affect current network service. System may pop up dialog box for you to confirm setup when you want to change MTU setup. Click OK button to confirm current reboot, or you can click Cancel button to terminate current modification. Before the modification, you can check the MTU of the gateway; the MTU of the DVR shall be the same as or is lower than the MTU of the gateway. In this way, you can reduce packets and enhance network transmission efficiency. Right now, the value here is for read-only.
The following MTU value is for reference only.
1500: Ethernet information packet max value and it is also the default value. It is the typical setup when there is no PPPoE or VPN. It is the default setup of some router, switch or the network adapter.
✦ 1492: Recommend value for PPPoE.
✦ 1468: Recommend value for DHCP.
After completing all the setups please click OK button.
Tips
Click button to cancel card binding.

text_image
Edit Ethernet Card Network Card1 Net Mode Single NIC Fault-tolerance Load Balance NIC Member Network Card2 Network Card3 Network Card4 IP Version Pvt MAC Address 14.09.12.16.06.08 IP Address 172 11 3 3 Subnet Mask 258 256 0 0 Default Gateway 172 11 0 1 MTU 1600 DHCP OK CancelFigure 2-8
2.6 Remote Device
From Main menu->Setting->Camera->Remote->Remote or right click mouse on the preview interface and then select remote item, you can see the following interface. See Figure 2-9.

text_image
CAMERA NETWORK EVENT STORAGE SYSTEM REMOTE IMAGE ENCODE CAM NAME Remote Status Firmware Upgrade IP Address Search 47 Modify IP Address Port Type MAC Address 1 192.158.1.12 37777 IPC-EBW8500 4c:11:bf.blt 2 10.15.8.22 80 3 0.0.0.0 37777 PC-NVR 00:FF:7C:C0 4 10.15.5.232 37777 RV-IPC62Z30-PRO 90:02:a9:23: 5 10.15.6.208 37777 DVR 90:02:a9:da: 6 10.15.8.14 37777 IPC-HFW8286 90:02:a9:0b: Device Search Add Manual Add Modify IP Filter Null Added Device Channel Modify Delete Status IP Address Port Device Name 1 / × 10.15.8.18 40007 PFC4GZ007W 2 / × 10.15.221.5 37777 IF00806YAZOK Delete Import Export OK Cancel ApplyFigure 2-9
Search remote device
Click Device search button, you can view the searched IP addresses at the top pane of the interface.
Note
● You can use IP address or MAC address to search device. System supports fuzzy search.
- For the device in the added device list, you can not see it at the top pane of the interface
Double click an IP address or check one or more IP address (es) at the same time and then click Add button, you can add current device to the added devices at the bottom pane of the interface. System supports batch add function.
Add remote device
Click Manual Add button, you can add a device directly. Here you can set TCP/UPD/auto connection mode. The default setup is TCP. See Figure 2-10.
● Manufacturer: Select the manufacture from the dropdown list.
- IP address: Input remote IP address.
- TCP port: Input TCP port value.
- User name: Input the user name you login the remote device.
- Password: Input the password you login the remote device.
- Remote channel amount: The channel mount of the remote device.
- Channel amount: It is to display channel total amount. Click Set button to set remote device channel so that you can control remotely.
- Channel: The channel mount of current device. It is the channel amount you want to view the remote device.
- Decode buffer: Please select from the dropdown list: default/realtime/fluency.
Important
Please note the manual add function is for Dahua, Panasonic, Sony, Dynacolor, Samsung, AXIS, Arecont, ONVIF and Custom. When the type is the custom, you can just input URL address, user name and password connect to the network camera without considering network camera manufacture. Please contact your network camera manufacturer for the URL address.

text_image
Manual Add Manufacturer Private IP Address 192.168.0.0 TCP Port 37777 User Name admin Password Connect Channel No. 1 Set Remote Channel No. 1 Channel 5 Decode Buffer Default OK CancelFigure 2-10
Change IP address
On the searched devices list, check one or more device(s) at the same time. Click Modify IP button, you can see the following interface. See Figure 2-11.
- DHCP: Check the box here, system can auto allocate the IP address. The IP address, subnet mask, default gateway are reference only.
- Static: Check the box here, you can set IP address, subnet mask, default gateway manually.
- IP address/subnet mask/default gateway: You can input corresponding information here.
- User name/password: The account you login the remote device. Please input here to password verification to change the remote device password.
- Incremental value: When you want to change several IP addresses, once you input the IP address of the first device, the IP address of the next device will increase accordingly. For example, when the incremental value is 1, if the IP address of the first device is 172.10.3.128, the IP address of the second device will auto be set as 172.10.2.129.
Note
- For the static IP address, system will alert you if there is any IP conflict. If you are changing several IP addresses at the same time, system auto skip the conflicted IP and auto allocate again according to the incremental value you set.

text_image
IP Setting Checked Device No.: 1 DHCP User Name admin STATIC Password IP Address 172 . 11 . 4 . 170 Incremental Value 1 Subnet Mask 255 . 255 . 0 . 0 Default Gateway 172 . 11 . 0 . 1 1 IP Address 1 172.11.4.170 OK CancelFigure 2-11
2.7 Shutdown
From main menu->operation, double click shutdown button, system pops up a dialogue box for you to select. See Figure 2-12.
- Shutdown: System shuts down and turns off power.
- Logout: Log out menu. You need to input password when you login the next time.
- Restart: Reboot device.
If you shut down the device, you can see system begins saving data and then shut down.
Please note, you can view the corresponding dialogue box if you have no right to turn off the device.

text_image
SHUTDOWN Shutdown Logout RebootFigure 2-12
3 WEB OPERATION
1) Open IE and input NVR address in the address column. For example, if your NVR IP is 10.10.3.16, then please input http://10.10.3.16 in IE address column.
2) System pops up warning information to ask you whether install webrec.cab control or not. Please click yes button. If you can't download the ActiveX file, please modify your IE security setup. After installation, the interface is shown as below. See Figure 3-1.

text_image
WEB SERVICE User ID: 12345 Password: 010-89 Type: 10.0 URL: 010-89 Access: 010-89Figure 3-1
3) Please input your user name and password. Default factory name is admin and password