
Tourer 413 LM - Gps NAVMAN - Free user manual and instructions
Find the device manual for free Tourer 413 LM NAVMAN in PDF.


| Product Type | GPS Navigation Device |
| Brand | Navman |
| Model | Tourer 413 LM |
| Display | Touch screen |
| Battery | Internal lithium-ion, non-replaceable |
| Charging | In-car charger, USB cable, optional home charger |
| GPS Receiver | Internal GPS antenna |
| Traffic Information | Built-in TMC receiver via in-car charger (antenna), optional TMC accessory kit |
| Map Updates | Via NavDesk software on computer, lifetime map update service available |
| Memory | Internal (exact capacity not specified) |
| Languages | Multiple on-screen languages and voice options |
| Safety Features | Safety camera alerts, speed limit warnings, speed limit display |
| Mounting | Windshield mount (suction cup), alternative mounting options |
| Audio | Built-in speaker, voice guidance, adjustable volume |
| Connectivity | USB for data transfer and charging, TMC via charger |
| Operating System | Navman Spirit (proprietary) |
| Weight | Approx. 150 g (estimated) |
| Dimensions | Approx. 120 x 80 x 20 mm (estimated) |
| Cleaning | Soft, lint-free cloth; avoid paper towels and harsh chemicals |
| Reset | Hardware reset button (use a small object like a paperclip) |
Frequently Asked Questions - Tourer 413 LM NAVMAN
User questions about Tourer 413 LM NAVMAN
0 question about this device. Answer the ones you know or ask your own.
Ask a new question about this device
Download the instructions for your Gps in PDF format for free! Find your manual Tourer 413 LM - NAVMAN and take your electronic device back in hand. On this page are published all the documents necessary for the use of your device. Tourer 413 LM by NAVMAN.
USER MANUAL Tourer 413 LM NAVMAN
Important safety information
PLEASE READ CAREFULLY BEFORE INSTALLING PRODUCT IN VEHICLE
 | This is the safety alert symbol. It is used to alert you to potential personal injury hazards. Obey all safety messages that follow this symbol to avoid possible injury or death. |
 | WARNING indicates a potentially hazardous situation which, if not avoided, could result in death or serious injury. |
 | CAUTION indicates a potentially hazardous situation which, if not avoided, may result in minor or moderate injury. |
 | CAUTION used without the safety alert symbol indicates a potentially hazardous situation which, if not avoided, may result in property damage. |
WARNING
Removing original equipment, adding accessories or modifying your vehicle could affect the vehicle's safety or make it illegal to operate in some jurisdictions.
Follow all product instructions and all instructions in your vehicle owner's manual regarding accessories or modifications.
Consult your country's and/or state's laws regarding operation of a vehicle with any accessories or modifications.
It is your sole responsibility to place, secure and use your Navman in a manner that will not cause accidents, personal injury or property damage. Always observe safe driving practices.
Do not mount your Navman in a way that may interfere with the safe operation of the vehicle, the deployment of air bags or other safety equipment.
Do not operate your Navman while driving.
Before you use your Navman for the first time, familiarize yourself with your device and its operation.
On main roads, the distance to an exit calculated by your Navman may be further than the distance shown on road signs. Road signs show the distance to the start of an exit while your Navman shows the distance to the next intersection, i.e., the end of the exit ramp or road. To prepare to exit a road, always follow distance information on road signs.
The use of information regarding safety or speed camera locations may be subject to local laws in the country of use. You are responsible for checking that you can legally use the information in your country or in the country where the information will be used.
CAUTION
Do not handle your Navman while it is hot. Let the product cool, out of direct sunlight.
At full power, prolonged listening to your Navman via headphones or earphones can damage the ear of the user.
CAUTION
Do not expose your Navman to direct sunlight in an unattended vehicle for prolonged periods. Overheating may damage the unit.
To discourage theft, do not leave your Navman, mounting bracket or any cables in plain view in an unattended vehicle.
Warning Notice to Drivers in the United States
State law may prohibit drivers in states such as Arizona, California and Minnesota from mounting objects on their windshields while driving. Please make sure you research and follow your most current State laws. An alternative mounting option may be provided in the box with your product; or see our website for additional mounting alternatives. Navman does not take any responsibility for any fines, penalties, or damages that may be incurred as a result of disregarding this notice.
Home charger-specific safety information
WARNING
To charge your Navman from the mains power, use the home charger (may be sold separately) supplied by Navman as an accessory. Using other home chargers with your Navman could result in serious injury or property damage.
Never use the charger if the plug or cord is damaged.
Do not expose the charger to moisture or water. Do not use the charger in a high moisture environment. Exposure to water may cause electrical sparks or fires.
Never touch the charger when your hands or feet are wet.
Allow adequate ventilation around the charger when using it to operate your Navman or charge the internal battery. Do not cover the charger with paper or other objects that will reduce ventilation. Do not use the charger while it is inside a carrying case or other container.
Ensure that the charger is connected to a power source with the correct fitting and voltage requirements. The voltage requirements can be found on the home charger casing and/or packaging.
Do not attempt to service the charger as this could result in personal injury. Replace the charger if it is damaged or exposed to excess moisture.
Internal battery-specific safety information
WARNING
Your Navman contains a non-replaceable internal lithium-ion battery. The battery may burst or explode if mishandled, releasing hazardous chemicals. To reduce the risk of fire or burns, do not disassemble, crush or puncture the battery.
Recycle or dispose of the battery safely and properly according to local laws and regulations. Do not dispose of the battery in fire or water.
About the battery
■ Use a specified battery in the equipment.
- CAUTION: The battery can burst or explode, releasing hazardous chemicals. To reduce the risk of fire or burns, do not disassemble, crush, puncture, or dispose of in fire or water.
■ Important instructions (for service personnel only)
■ Caution: Risk of explosion if battery is replaced by an incorrect type. Dispose of used batteries according to the instructions.
■ Replace only with the same or equivalent type recommended by the manufacturer.
■ The battery must be recycled or disposed of properly.
■ Use the battery only in the specified equipment.
CAUTION
Only use the correct home charger (may be sold separately) or in-car charger supplied by Navman to charge internal battery.
Only use your Navman internal battery with your Navman unit.
The Navman battery will stop charging when the ambient temperature is less than 0^ C ( 32^ F) or more than 40^ C ( 104^ F).
Failure to adhere to these warnings and cautions may lead to death, serious injury or pi disclaims all liability for installation or use of your Navman that causes or contributes to death, injury or property damage or that violates any law.
Compliance

WARNING: This product, its packaging and its components contain chemicals known to the State of California to cause cancer, birth defects or reproductive harm. This Notice is being provided in accordance with California's Proposition 65.

For regulatory identification purposes:
■ Navman Tourer 413 LM Series is assigned a model name of N393-4300.
■ Navman Tourer 614 LM Series is assigned a model name of N393-5000.
Marking labels located on the exterior of your Navman indicate the regulations that your model complies with. Please check the marking labels on your Navman and refer to the corresponding statements in this chapter. Some notices apply to specific models only.

Products with the CE marking comply with Radio & Telecommunication Terminal Equipment Directive (R&TTE) (1999/5/EC), the Electromagnetic Compatibility Directive (2004/108/EC) and the Low Voltage Directive (2006/95/EC) - issued by the Commission of the European Community. Compliance with these directives implies conformity to the following European Standards:
EN 301 489-1: Electronic compatibility and Radio spectrum Matters (ERM), Electromagnetic Compatibility (EMC) standard for radio equipment and services; Part 1: Common technical requirements.
EN 55022: Radio disturbance characteristics
EN 55024: Immunity characteristics
EN 61000-3-2: Limits for harmonic current emissions
EN 61000-3-3: Limitation of voltage fluctuation and flicker in low-voltage supply system
IEC 60950-1:2005: Product Safety
The manufacturer cannot be held responsible for modifications made by the User and the consequences thereof, which may alter the conformity of the product with the CE Marking.
Declaration of conformity
Hereby, Navman Technology declares that this N393-4300/N393-5000 is in compliance with the essential requirements and other relevant provisions of Directive 1999/5/EC.
WEEE
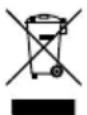
This product must not be disposed of as normal household waste, in accordance with the EU directive for waste electrical and electronic equipment (WEEE - 2002/96/EC). Instead, it should be disposed of by returning it to the point of sale, or to a municipal recycling collection point.
Important safety information 2
Home charger-specific safety information....3
Internal battery-specific safety information.... 3
Compliance 4
WEEE 4
Welcome....6
Important information for using the manual....6
Disclaimer 6
Mounting your Navman in a vehicle 8
Enabling Traffic (TMC) Reception....9
Getting to know your Navman 10
How do I turn on my Navman? 11
Using the power button....11
Resetting the device....11
How do I charge the battery? 12
How do I charge the battery in a vehicle? 12
How do I charge the battery via my computer? 12
How do I charge the battery at home or work? 13
Reference 14
What is GPS? 14
How does my Navman receive GPS signals? 14
Caring for your Navman....14
Troubleshooting....15
Thank you for purchasing this Navman. Please read this manual carefully before using your Navman for the first time. Keep this manual in a safe place and use as your first point of reference.
Important information for using the manual
It is important to understand the terms and typographical conventions used in this manual.
Formatting
The following formatting in the text identifies special information:
| Convention Type of Information | |
| Bold | Components or items displayed on screen, including buttons, headings, field names and options. |
| Italics Indicates | the name of a screen. |
Icons
The following icons are used throughout this manual:
| Icon Description | |
| Note | |
| Tip | |
| Warning |
Terms
The following terms are used throughout this manual to describe user actions.
| Term Description | |
| Press Press and | release a button quickly. |
| Tap Press and release an item displayed on the touch screen. | |
| Select Tap an item in a list or tap a command from a menu. | |
Disclaimer
Not all models are available in all regions.
Depending on the specific model purchased, the colour and look of your device and accessories may not exactly match the graphics shown in this document.
Navman operates a policy of ongoing development. Navman reserves the right to make changes and improvements to any of the products described in this document without prior notice. Navman does not warrant that this document is error-free. The screenshots and other presentations shown in this manual may differ from the actual screens and presentations generated by the actual product. All such differences are minor and the actual product will deliver the described functionality as presented in this User Manual in all material respects.
Revision: R00
(5/2012)
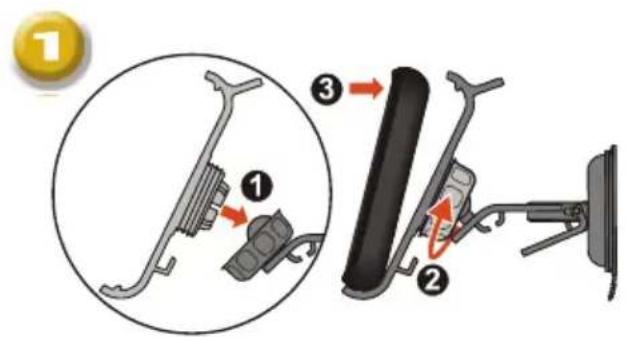
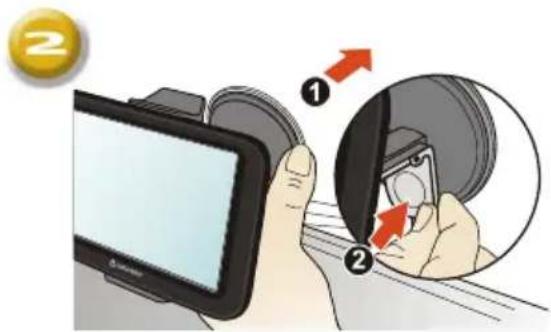
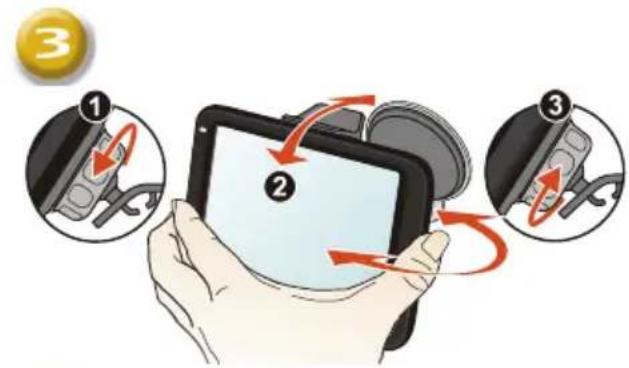
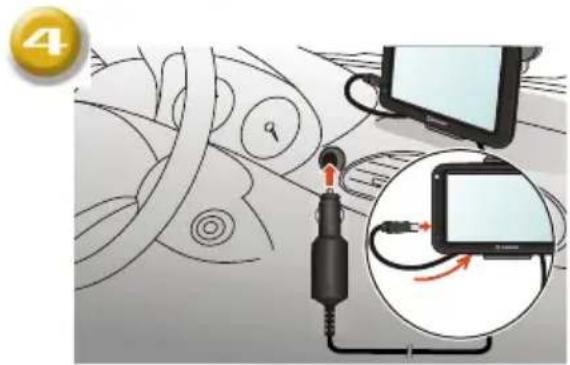
Mounting your Navman in a vehicle
CAUTION:
- Never mount your Navman where the driver's field of vision is blocked.
If the windscreen is tinted with a reflective coating, it may be athermic and impact the GPS reception. In this instance, please mount your Navman where there is a "clear area" - usually just beneath the rear-view mirror. - To protect your Navman against sudden surges in current, connect the in-car charger only after the car engine has been started.
natural_image
Illustration of connected devices and cables with a magnified inset showing cable routing (no text or symbols)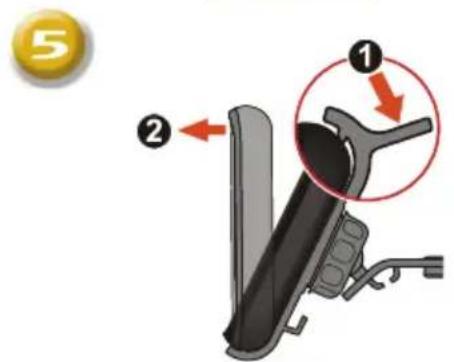
Enabling Traffic (TMC) Reception
Traffic information is available in selected models and countries only.
Depending on the model of your Navman you can receive live traffic information in one of two ways:
If your Navman has a built-in TMC receiver, you can receive live traffic information* via the in-car charger which is used as an antenna.
If your Navman does not have a built-in TMC receiver, you will need to install the TMC accessory kit (may be sold separately - see www.navman.com for details).
For information on using traffic information on your Navman, see the Software User Manual.
* Subscription may be required. See www.navman.com for more details.
Getting to know your Navman
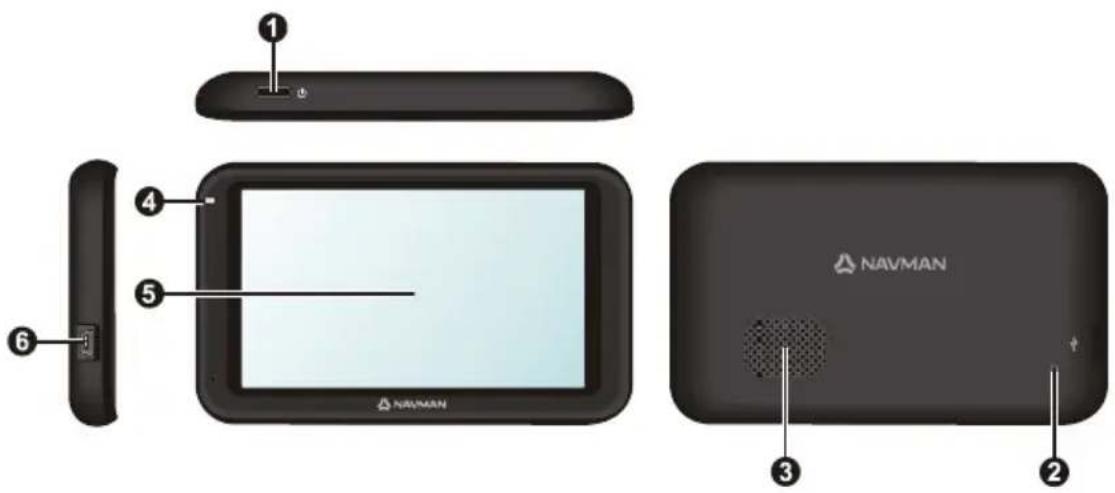
1 Power button
② Reset button
③ Speaker
4 Battery indicator
⑤ Touch screen
6 Connector for in-car charger, USB cable*, home charger* and TMC accessory kit*
*may be sold separately
How do I turn on my Navman?
Using the power button
For the initial start up, press and hold the power button for 2 seconds to turn on your device.
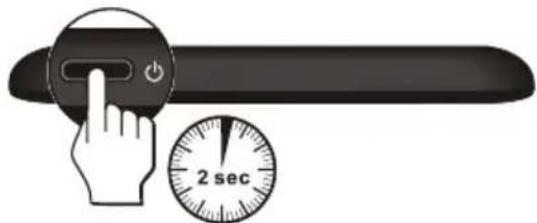
For normal operation, turn off the device by briefly pressing the power button. Your Navman will enter a suspended state. When you next briefly press the power button, your Navman will return to the Main Menu.
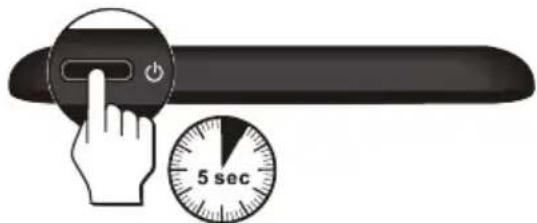
To turn off your Navman, press and hold the power button for 5 seconds.
Resetting the device
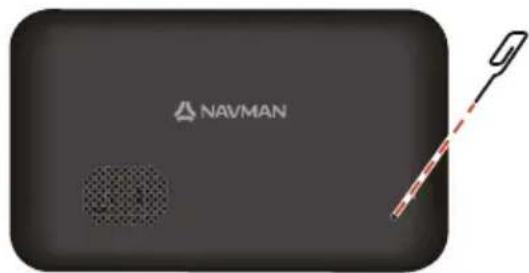
Occasionally, you may need to perform a hardware reset when your Navman stops responding; or appears to be "frozen" or "locked-up." Insert a small rod, such as a straightened paperclip, into the reset button of your device.
natural_image
Black rectangular device with 'NAVMAN' logo and a stylus pen, no visible text or symbols on the device itself.
The battery may not be fully charged when you use your Navman for the first time.
CAUTION: For optimal performance of the battery, note the following:
- Do not charge the battery when the temperature is high (e.g. in direct sunlight).
■ There is no need to fully discharge the battery before charging. - When leaving your Navman for long periods, turn off your Navman to save battery power.
The battery indicator light on your Navman indicates the level of internal battery charge:
■ Green - battery full
- Orange - battery charging
How do I charge the battery in a vehicle?
To charge your Navman in a vehicle, plug the in-car charger into 🐘 on the left side of your Navman and the other end into the vehicle power socket.
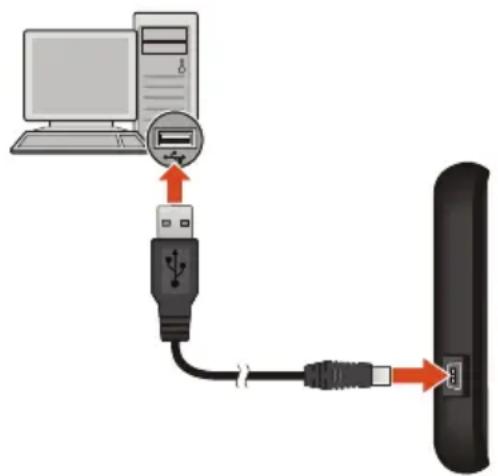
How do I charge the battery via my computer?

For optimal charging results, ensure that your Navman is turned off while connected to your computer.
- Turn on your computer.
- Plug the large end of the USB cable (may be sold separately) directly into a USB port on your computer (not a USB hub) and plug the small end into ⬆ on the left side of your Navman.
CAUTION: When your Navman is turned on and connected to a computer, it is recognized as an external mass-storage device. Do NOT delete any files that are pre-installed on your Navman. Deleting the files can cause your Navman to crash
How do I charge the battery at home or work?
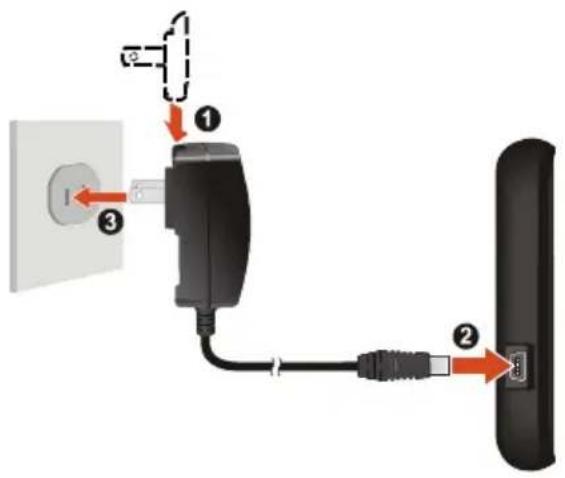
You can use an optional home charger to charge the battery.
To charge your Navman using a mains power socket, plug the home charger cable into 📧 on the left side of your Navman and the mains power charger into the power socket.

The home charger is not included with all models and may be purchased separately (see www.navman.com for details).
What is GPS?
The Global Positioning System (GPS) is available at any time, free of charge, and is accurate to within 5m (15ft). GPS navigation is made possible by a network of satellites that orbit the Earth at around 20,200km (12,552mi). Each satellite transmits a range of signals which are utilized by GPS receivers, such as your Navman, to determine an exact location. Although a GPS receiver can detect signals from up to 12 satellites at any time, only four signals are required to provide a position or "GPS fix" (latitude and longitude), for vehicle navigation systems.
How does my Navman receive GPS signals?
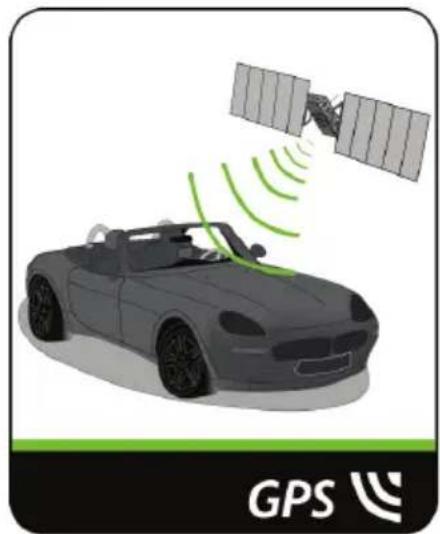
Your Navman receives GPS signals via the internal GPS antenna. To guarantee the optimum GPS signal strength, ensure your Navman is outdoors, or in a vehicle outdoors, and has an unobstructed view of the sky. GPS reception is not usually affected by weather, however, very heavy rain or snow may have a negative effect on your reception.
natural_image
Illustration of a car with signal waves projecting to a satellite (no text or symbols)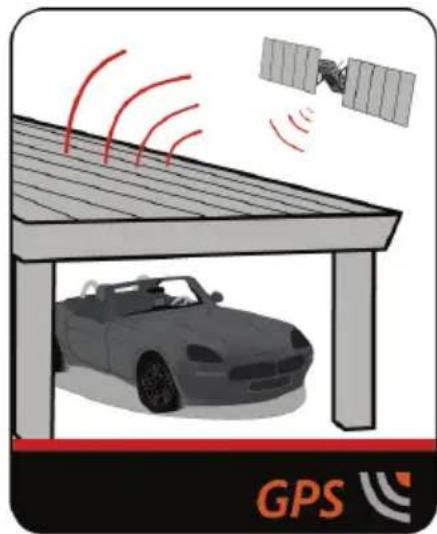
natural_image
Illustration of a car parked under a roof with signal waves and a satellite in the background (no text or symbols)Caring for your Navman
Taking good care of your Navman will ensure trouble-free operation and reduce the risk of damage to your Navman:
- Keep your Navman away from excessive moisture and extreme temperatures.
■ Avoid exposing your Navman to direct sunlight or strong ultraviolet light for extended periods of time.
■ Do not place anything on top of your Navman or drop objects on your Navman.
- Do not drop your Navman or subject it to severe shock.
- Do not subject your Navman to sudden and severe temperature changes. This could cause moisture condensation inside the unit, which could damage your Navman. In the event of moisture condensation, allow your Navman to dry out completely before use.
The screen surface can easily be scratched. Avoid touching it with sharp objects. Non-adhesive generic screen protectors designed specifically for use on portable devices with LCD panels may be used to help protect the screen from minor scratches.
■ Never clean your Navman when it is turned on. Use a soft, lint-free cloth to wipe the screen and the exterior of your Navman.
- Do not use paper towels to clean the screen.
- Never attempt to disassemble, repair or make any modifications to your Navman. Disassembly, modification or any attempt at repair could cause damage to your Navman and even bodily injury or property damage and will void any warranty.
- Do not store or carry flammable liquids, gases or explosive materials in the same compartment as your Navman, its parts or accessories.
Troubleshooting
If you encounter a problem you cannot solve, contact an authorized service centre for assistance.
| Problems Solutions | |
| Your Navman does not turn on when using battery power. | The remaining battery power may be too low to operate your Navman. Charge the battery using the in-car charger, home charger (may be sold separately) or USB cable (may be sold separately), then try again. |
| Screen responds slowly. The remaining | battery power may be too low to operate your Navman. If the problem still persists, reset your Navman. |
| Screen freezes. Reset your Navman. | |
| Screen is hard to read. Increase the screen brightness. | |
| Cannot establish a connection with a computer. | Ensure that your Navman and your computer are both turned on before trying to establish a connection.Make sure that the cable is securely plugged into the USB port on your computer and on your Navman. Connect the USB cable (may be sold separately) directly to your computer, not a USB hub.Reset your Navman before connecting the USB cable (may be sold separately). Always disconnect your Navman before you restart your computer. |
Tourer 413 LM / 614 LM
Software User Manual
Welcome....4
How do I use the touch screen? 5
Navigating on the screen 5
How do I get started? 6
Main Menu....7
How do I navigate through the menu screens? 7
How do I go from A-B? 9
How do I plan my first trip? 9
How do I preview the destination on map? 10
How do I view my route? 11
The driving map....11
How do I view my route statistics? 12
How do I adjust the volume? 12
How do I zoom in/out the map? 13
What if I miss a turn? 13
How do I search for a POI by type? 14
How do I search for a POI by keyword? 16
How do I receive current traffic information via TMC?......17
How will I know when a Traffic Event occurs? ....17
Traffic Overview screen....17
Traffic messages....20
My Places 21
How do I save a location as My Place or Home? 21
How do I navigate to a location I have saved? 21
How do I navigate to Home? 22
How do I navigate to a recent place? 22
How do I edit the name of a location in My Places? 23
How do I delete a saved location? 23
How do I import a location to My Places from Google Maps?......24
What is NEAR ME? 25
How do I search for a POI using NEAR ME? 25
What can I customise? 27
Audio....27
Screen 28
Safety....28
Maps....29
Route options 30
Language 30
Units.... 31
Device 31
Demo 32
Help....33
What is NavDesk? 34
How do I install NavDesk onto my computer? 34
NavDesk Menu 36
My Subscriptions....37
My Maps....39
Custom POIs 41
Unlock Features....44
Redeem 44
MY NAVMAN 45
For more information....48
Point of Interest categories 48
Traffic and other TMC Events 50
Online support....51
Speed Limit 51
Safety Camera POIs 51
Disclaimer 52
Copyright 52
Thank you for purchasing this Navman. This manual has been prepared to guide you through the operation of your Navman from first set-up through to continuous use. Please read this manual carefully before using your Navman for the first time. Keep this manual in a safe place and use as your first point of reference.
Important information for using the manual
It is important to understand the terms and typographical conventions used in this manual.
Formatting
The following kinds of formatting in the text identify special information:
| Convention Type of Information | |
| Bold | Navman components or items displayed on screen, including buttons, headings, field names and options. |
| Italics Indicates the name of a screen. | |
Icons
The following icons are used throughout this manual:
| Icon Description | |
 | Note |
 | Tip |
 | Warning |
How do I use the touch screen?
Navigating on the screen
To operate your Navman, touch the screen with your fingertip. You can perform the following actions:
Tap
Press and release an item displayed on the touch screen.
- Select
Tap an item in a list or tap a command from a menu.

The first time you use your Navman it may take several minutes to establish a GPS connection.
How do I turn my Navman on for the first time?
To get started for the first time, complete the following steps:
- Read the Important Safety Information
- Position your Navman in your vehicle Follow the instructions in the Quick Start Guide.
CAUTION: Ensure that your Navman does not obstruct the driver's view, or interfere with the operation of the vehicle airbags and safety devices.
- Turn your Navman on
Your Navman will turn on and display the Language screen.
- Select your preferred language
From the Select Language screen, tap your preferred language.
- You can change your preferred language while using your Navman.
- Read the warning message
The Safety Agreement screen will display after you have selected your preferred language. Read the Safety Agreement message. To confirm that you have read and understood the message, tap Accept.
- View the Tutorial
■ To move forward through the Tutorial screen, tap Next. To view the previous screen, tap
■ To skip the Tutorial screen, tap Skip.


To prevent the Tutorial from displaying on each start-up, tap the Show tutorial on start-up option to select it.
- Customise the device
Follow the onscreen instructions to select your preferred distance unit, date format, and time format.
- Set up Home
The Home setup wizard only appears on the first time you start your Navman.
- Tap OK to set up your home immediately using the address-entry wizard.
- You can tap Cancel to skip the wizard, and then select you home later in MY PLACES.
When you have finished the steps above, the Main Menu screen will display. If you have a GPS fix, you can start to use Navman to plan your trip.
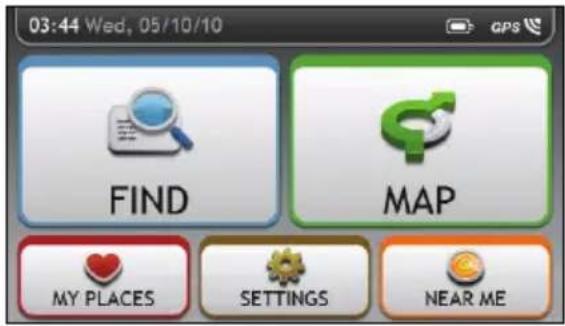
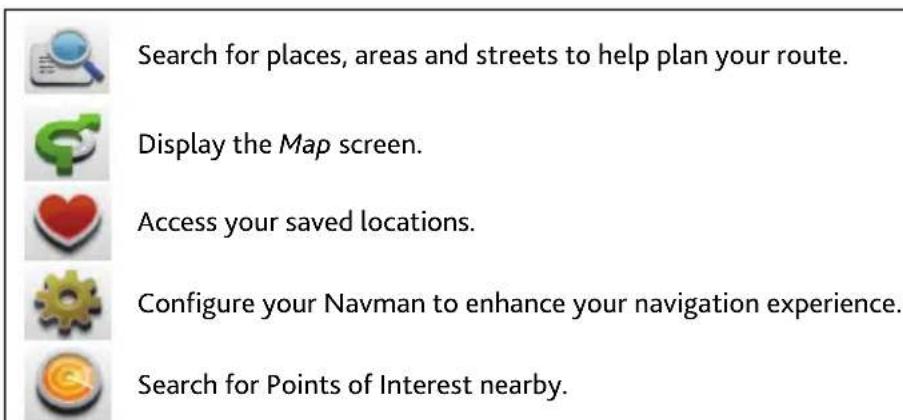
The Main Menu is your starting point for searching for a destination. The Main Menu also allows you to customise your Navman, view saved locations as My Place/Home, and search for POIs nearby.
How do I navigate through the menu screens?
How do I use the BACK button and MAIN MENU button in the title bar?
- On the Main Menu screen, tap the desired menu button to enter the menu screen.
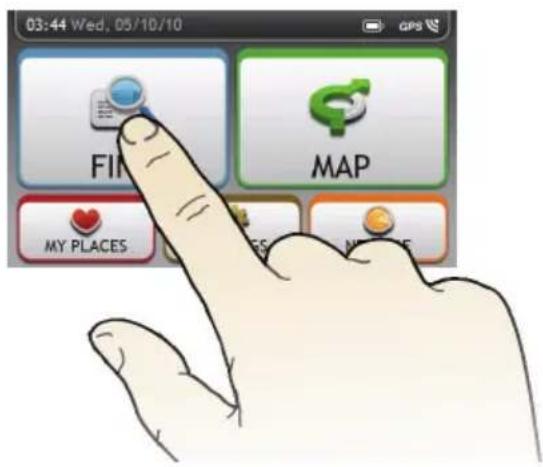
For example, tapping

will lead you to the FIND main screen.
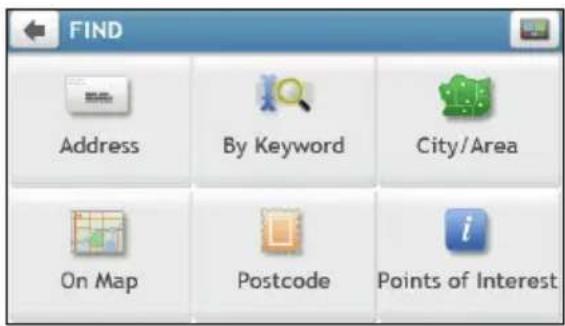
- The system provides the BACK button (←) and MAIN MENU button ( ) in the title bar of the menu screen, which allows you to navigate through the menu screens easily. You can:
■ Return to the previous screen by tapping the BACK button.
- Return to the Main Menu by tapping the MAIN MENU button.
In some menu screens, such as the Keyboard screen, the MAIN MENU button will not appear in the title bar. In this instance, you may have to tap the BACK button twice.
How do I use the tabs in the title bar?
In some menu screens, such as the map Overview screen, the system provides the tab buttons that allow you to enter the additional page in the menu screen. Simply tap the desired tab to change the view.
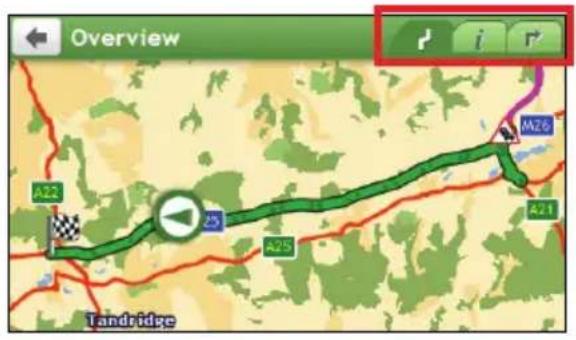
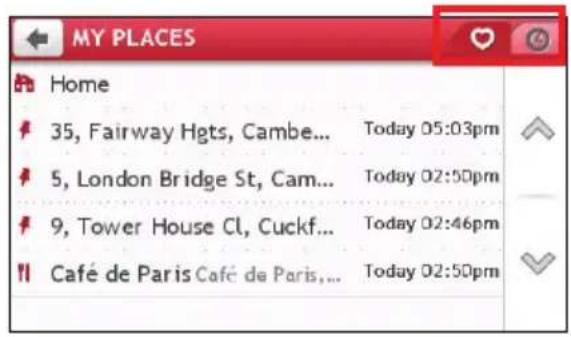

The selected tab will be highlighted as a darker-colour tab.
How do I go from A-B?
Your Navman is equipped with maps that provide street-level detail for door-to-door navigation, including Points of Interest such as accommodation, parking areas, petrol stations, railway stations and airports.
| When you ... Then ... | |
| need to search for an address | tap  then select Address to search for the address. then select Address to search for the address. |
| want to search all information on the device - city, streets, named sites, features, landmarks or venues | tap  then select By Keyword. then select By Keyword. |
| search for a Point of Interest | tap  then select Points of Interest to search for a POI. then select Points of Interest to search for a POI. |
| want to navigate to a recently visited location | tap  then select the Recent Locations tab ( then select the Recent Locations tab (  ). ). |

WARNING: For your safety, enter destination information before you start a journey. Do not enter a destination while driving.
How do I plan my first trip?
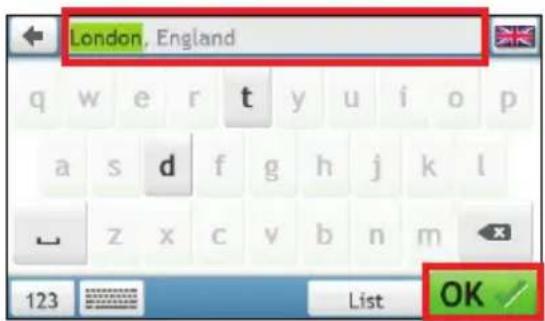
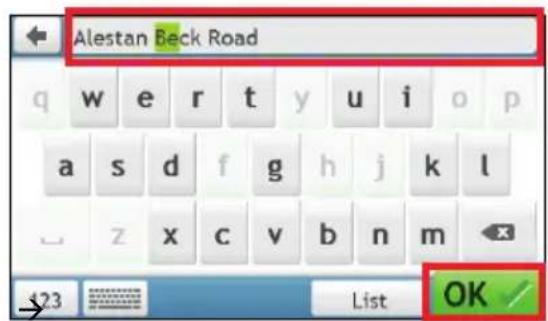
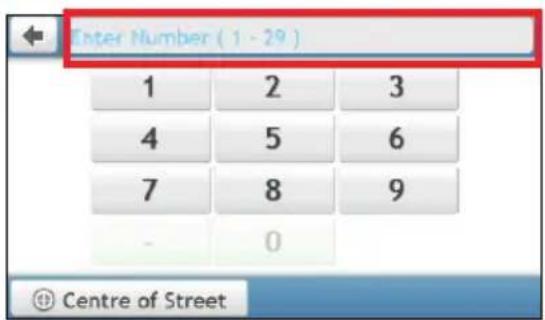
Using your Navman to plan your first trip is easy. There are several ways to select your destination. Complete the following to navigate to a street address that you know using the FIND address wizard.
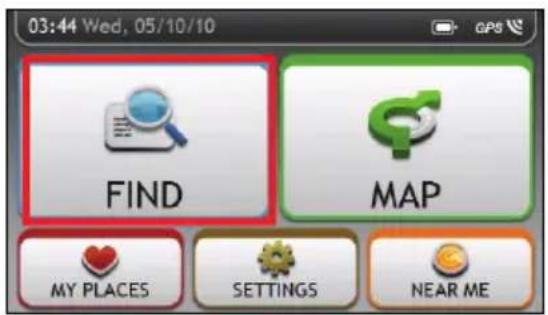
→
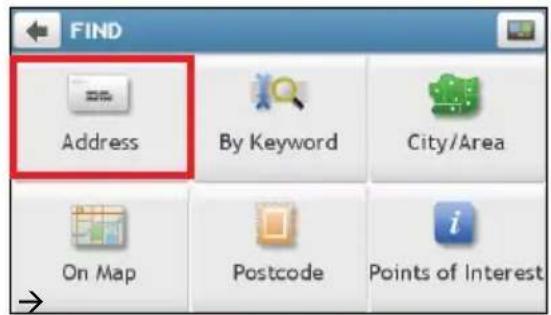
→
→
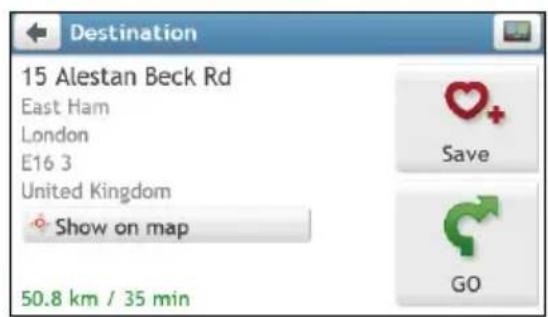
When it is the first time you use FIND wizard, the Select Country screen will appear before the FIND main screen. Select your country and then you can start searching location.
If needed, you can change the country to search location. To select the other country, tap the National Flag button (e.g. 📊) in the title bar of the Keyboard screen before you search the city.
Complete the following:
| If you want to ... Then ... | |
| calculate the route and start navigating | ▪ tap  The Map screen will display. The Map screen will display. |
| save the location as a favourite | ▪ tap  The location will be saved in My Places immediately. The location will be saved in My Places immediately. |
| save the location as Home | ▪ tap  The Edit screen will display.▪ tap Save as Home. The Edit screen will display.▪ tap Save as Home. |
| explore the map | ▪ tap Show on map. |
How do I preview the destination on map?
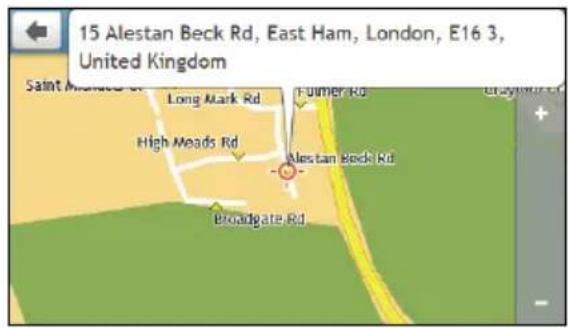
After searching an address (or a POI), you can preview the destination on map to explore the area near the location. On the Destination screen, tap the Show on map button to display the destination preview map as below.
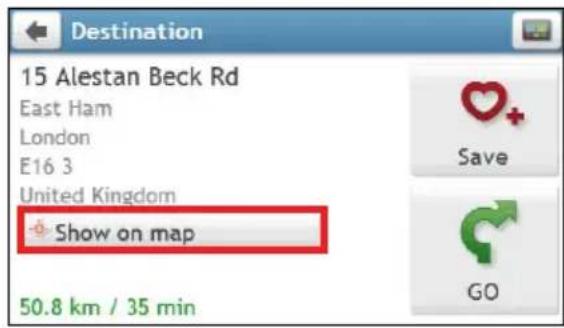
→
How do I explore the map?
On the destination preview map, you can:
■ Tap the


button to zoom in/out the map.
■ View the information of your destination that is shown at the top of the map screen.
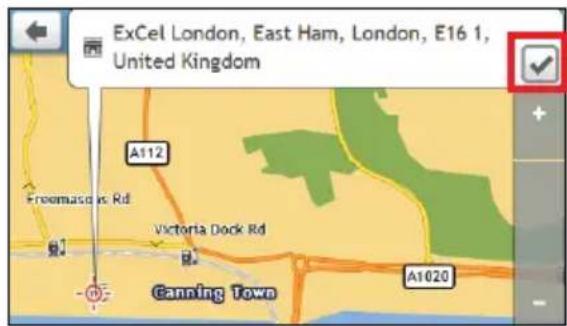
Tap on a street/area/POI to display the related information of the location near your destination.
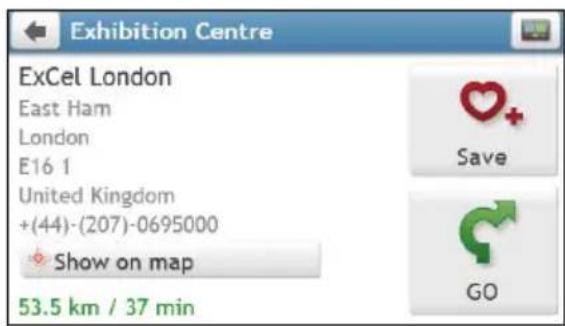
The information of the selected street/area/POI near your destination will be displayed with a check mark. Tapping the check mark will bring up the Destination screen of the selected location.
→
How do I view my route?
The driving map
When a route has been calculated, the Map screen will display. You will be directed to your destination by spoken and visual instructions.

The driving map will be displayed automatically when:
■ a route is calculated.
■ the device is reset and the user is on a route.
Alternately, you can access the map screen manually by tapping the MAP button on the Main Menu.
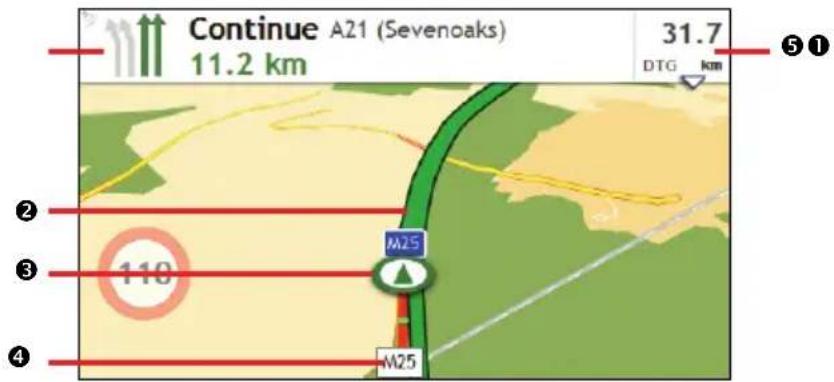
| Item | Description | |
| 1 | Direction and distance of next turn | The direction and distance to your next turn.▪ Tap 📋 to repeat the vocal instruction. |
| 2 | Current route Your current route is highlighted. | |
| 3 | Current position | Your current position is marked with ⚠. |
| 4 | Address bar The current address will be displayed in the text box at the bottom of the map screen. | |
| 5 | Distance and time information | Tap to expand and select the following options:▪ DTG (Distance to Go)▪ TTG (Time to Go)▪ km/h or mph (speed) and compass heading▪ ETA (Estimated Time of Arrival)▪ Time |

Depending on your driving route, you may see some icons that provide different information on your Map en. Please note that these icons will not be always displayed during your journeys.
For example: the Speed Limit icon (100) on the Map screen. The Speed Limit icon shows the speed limit of the current road. If greyed out, you are below this speed limit. When over set limit, you will be warned with an audible and visual warning.
How do I view my route statistics?
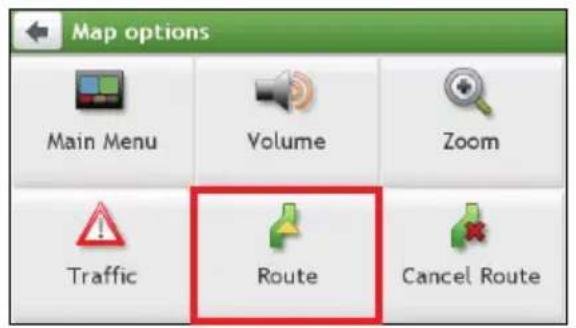
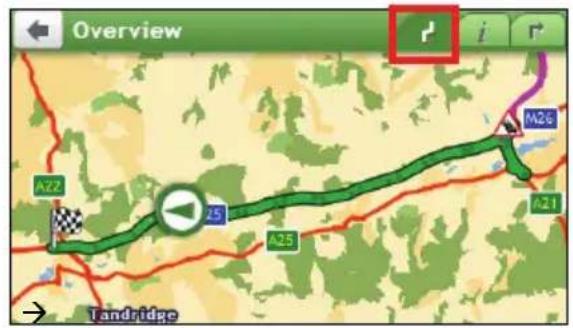
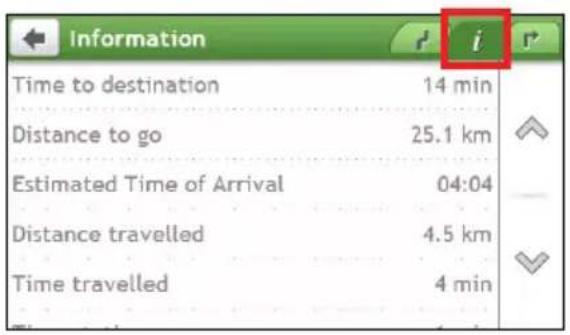
Tap anywhere on the Map screen to bring up the Map options screen. Tap the Route button to view the route statistics.
→
→
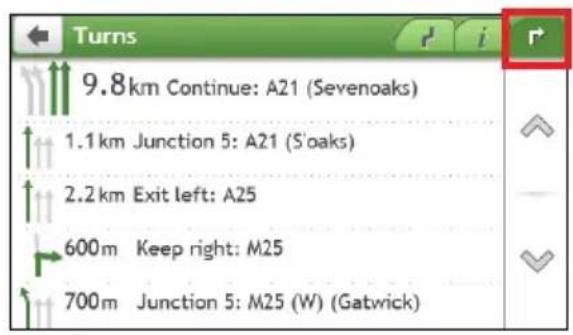
Your Navman provides information on your:
■ time to destination
- distance to go
■ estimated time of arrival
- distance travelled
■ time taken for trip
■ stationary time

Tap the tabs in the title bar to view the additional information in the different screens.
How do I adjust the volume?
From the Map options screen, tap 📄. The volume buttons will be displayed on the map screen in translucent mode.
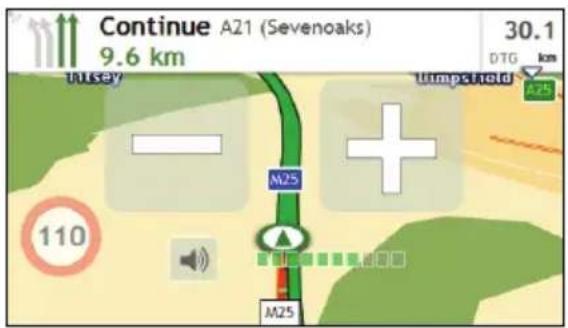
Complete the following:
| If you want to ... Then ... | |
| increase the volume | tap  ▪ The volume bar indicates the current volume level. ▪ The volume bar indicates the current volume level. |
| decrease the volume | tap  ▪ The volume bar indicates the current volume level. ▪ The volume bar indicates the current volume level. |
| mute or unmute | tap  ▪ The speaker icon indicates the status: ▪ The speaker icon indicates the status: : muted : unmuted : muted : unmuted |

The volume buttons will automatically disappear after the map is idle for 5 seconds.
How do I zoom in/out the map?
From the Map options screen, tap mode.

The zoom buttons will be displayed on the map screen in translucent
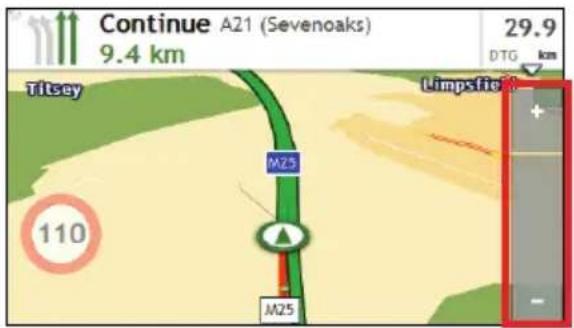
Complete the following:
| If you want to ... Then ... | ||
| zoom in the map | tap and hold | [DC86] |
| zoom out the map | tap and hold | [BYDA] |

The zoom buttons will automatically disappear after the map is idle for 5 seconds.
What if I miss a turn?
Back-On-Track™ Automatic Rerouting
You will be redirected if you make a wrong turn. A message informing you that your route is being re-calculated will display at the top of the screen.
To cancel a route re-calculation, tap

on the Map options screen. A warning will display asking you to
confirm the cancellation. If confirmed,
both the re-calculation and your current route will be cancelled.
How do I search for a POI by type?
A POI (Point of Interest) is a named site, feature, landmark or public venue which can be displayed as an icon on the map. POIs are grouped by category, such as petrol stations, parks, beaches and museums.
- Tap

- Tap

The POI Menu screen will display.
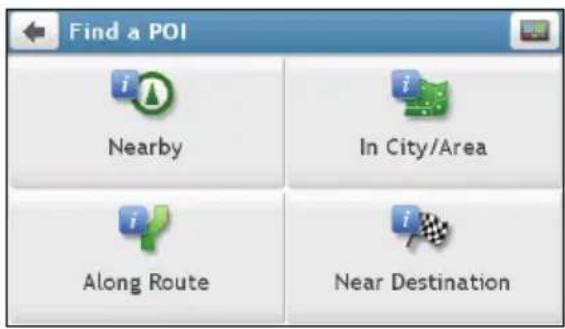
- Complete the following:
| If you want to ... Then ... | |
| search for the POIs near your current location | tap Nearby.The POI Type Selection screen will display. |
| search for the POIs in a specified city or area | ■ tap In City/Area.The Keyboard screen will display.■ after you have entered a name of a city/area, tap OK.The POI Type Selection screen will display. |
| search for the POIs on your route tap | Along Route.The POI Type Selection screen will display. |
| search for the POIs near your destination | tap Near Destination.The POI Type Selection screen will display. |
- Complete the following:
| If you want to ... Then ... | |
| search for POIs by keyword | tap By Name.The Keyboard screen will display.after you have entered a keyword, tap OK.The POI List screen will display. |
| search for petrol stations | tapThe POI List screen will display. |
| search for parking places | tapP.The POI List screen will display. |
| search for banks and ATMs | tap.The POI List screen will display. |
| search for emergency services | tap^{ }$ The POI List screen will display. }$ The POI List screen will display. |
| view more POI types | ■ tap By Type.The POI Type List screen will display.■ select a POI type.The POI List screen will display. |
5. Tap the desired item from the list.
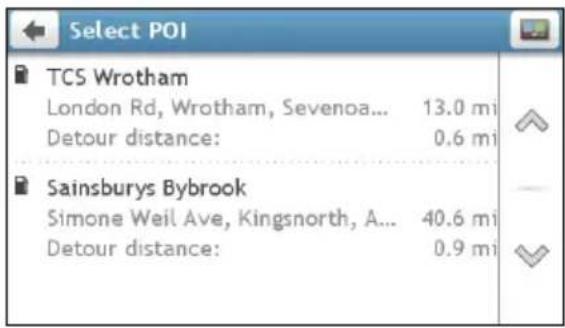
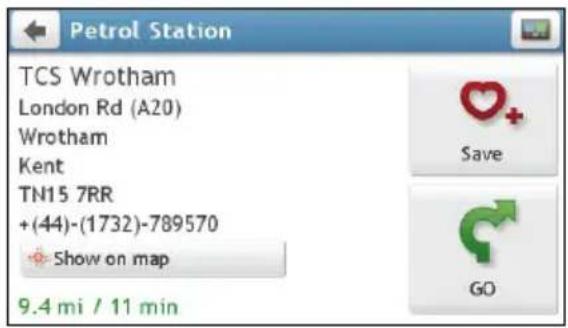
6. Complete the following:
| If you want to ... Then ... | |
| calculate the route and start navigating | tapThe Map screen will display. |
| save the location as a favourite | tapThe location will be saved in My Places immediately. |
| view the POI location on the map tap Show on map. | The Preview screen will display. |
How do I search for a POI by keyword?
Complete the following to navigate to a POI that you find by keyword.
Tap

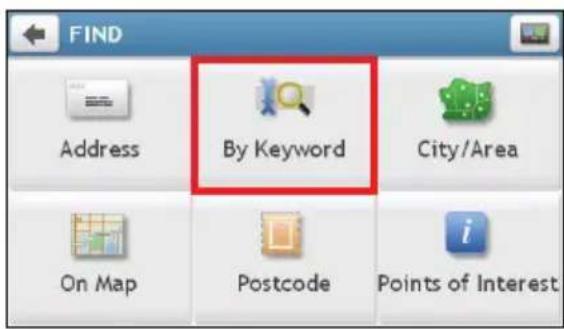
→
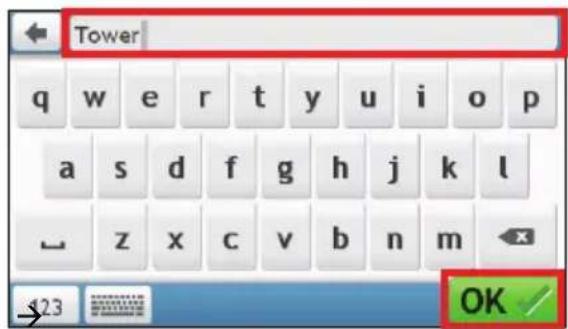
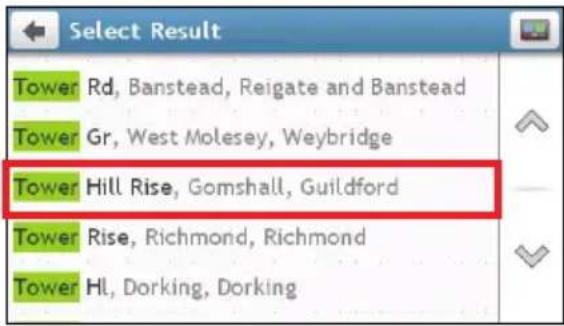
→
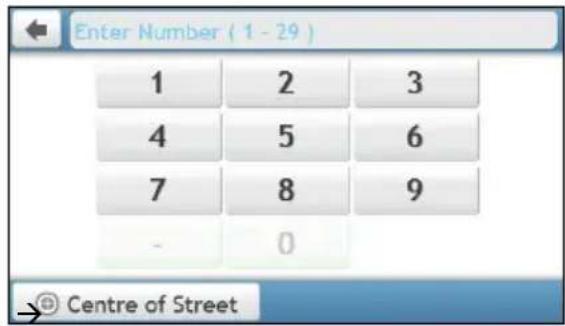
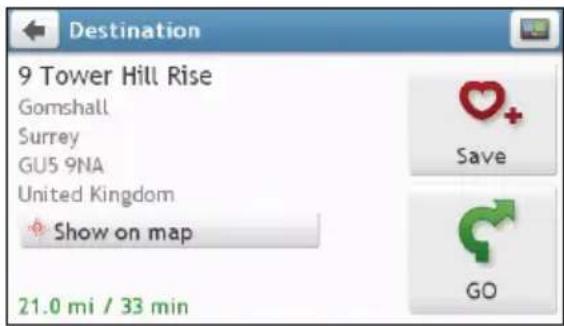
Complete the following:
| If you want to ... Then ... | |
| calculate the route and start navigating | tapThe Map screen will display. |
| save the location as a favourite | tapThe location will be saved in My Places immediately. |
| view the location on the map | tap Show on map.The Preview screen will display. |
How do I receive current traffic information via TMC?
Traffic information is not available on all models and is only available in selected countries.
Your Navman can receive current traffic information for all main roads and motorways, enabling you to avoid potential delays on your route. Event messages and traffic icons will display as they occur. If an event message obscures your current location, the map will adjust to display both the message and your location.
How does my Navman receive traffic information?
Depending on your Navman model, you may receive current traffic information on your Navman using the built-in TMC receiver or via the Navman traffic accessory kit. The traffic accessory kit may be sold separately.
The Traffic Message Channel (TMC) broadcasts real-time traffic information via the FM Radio Data System (RDS). FM radio stations transmit TMC data on a cycle of several minutes, with hundreds of events able to be broadcast to TMC receivers.
You have to pay for TMC service in some models and in some countries.
How will I know when a Traffic Event occurs?
When travelling through an area in which you can receive traffic updates, your Navman will decode these events and display them on-screen. An icon will display at the event location on the map screens, and an audible warning is given if an event is on your route. Where an event spans a specific distance, the road will be highlighted and arrows will indicate the direction affected.
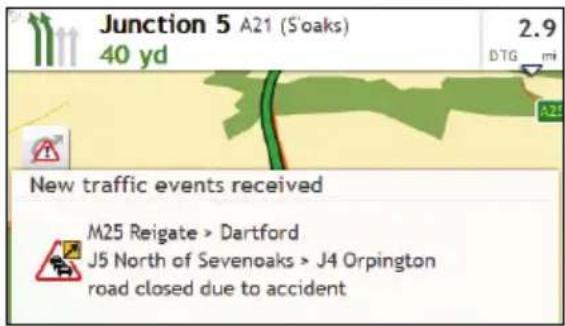
A message will display at the bottom of the screen with the road name, the section of road affected and the type of event that has occurred. The message remains on screen for 8 seconds and is added to the Event List.
Traffic Overview screen

Depending on your Navman model, traffic information may not be available, may require a subscription, or require the Traffic Accessory Kit (may be sold separately).
When you see the traffic event message on your driving map screen, you can open the Traffic Overview screen to display a general overview of the traffic situation on your route, including all events in the immediate vicinity.
Tap on the driving map to bring up the Map options screen, and then tap

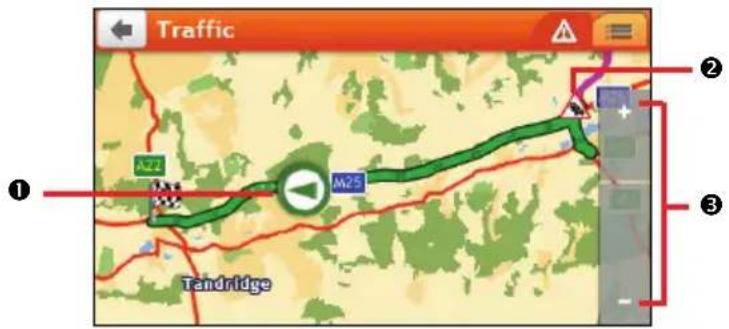
| Item | Description | |
| 1 | Current position | Your current position is marked with [IMAGE]. |
| 2 | Event icon | Displays icon to indicate type of event. |
| 3 |  | To zoom in or out, tap and hold + or - . |
How do I view a list of all events on my route?
Your Navman creates a list of events as they are received, which is displayed on the Event List screen.
From the Traffic Overview screen, tap

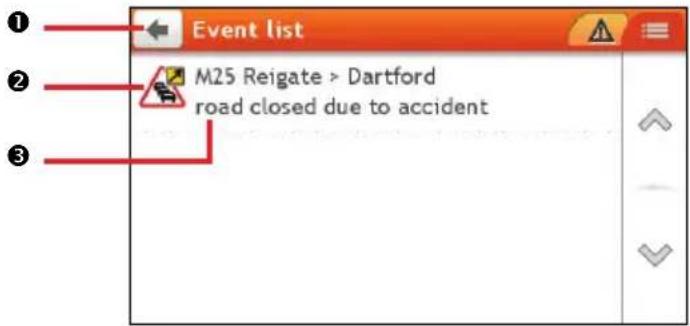
| Item Description | ||
| 1 |  | Tap to return to the previous screen. |
| 2 | Event icon Displays an icon to indicate type of event. | |
| 3 | Event description Displays details of the Event, including:Name of road and direction in which Event is taking place.Location of where Event begins and ends.> indicates an Event from a location, to a location.< > indicates an Event between locations.Type of Event. | |
How do I view traffic details?
From the Event list screen, tap the event you want to view. The Event Details screen will display.
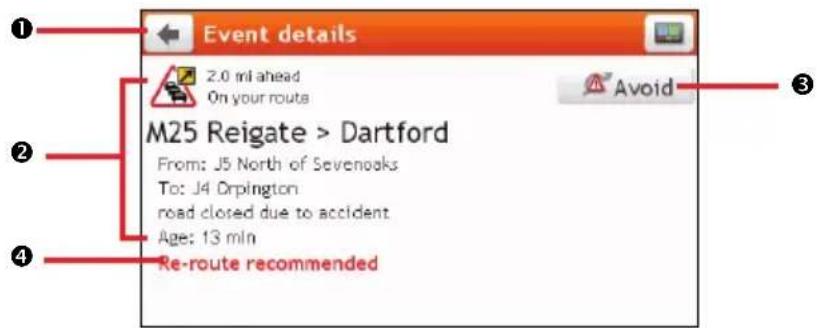
| Item Description | ||
| 1 |  | Tap to return to the previous screen. |
| 2 | Event icon and description | Displays details of the Event, including:▪ Name of road and direction in which Event is taking place.▪ Location of where Event begins and ends.○ > indicates an Event from a location, to a location.○ < > indicates an Event between locations.▪ Type of Event. |
 | Avoid Tap to initiate a new route to avoid the event.Only available if a detour or re-route is available.The Unavoid Area button is displayed when a re-route has been calculated. | |
| 4 | Detour information Displays details of detour recommendation, if any. | |
How do I know if a detour is recommended?
When a Traffic or Clearance event occurs on your route, a detour will often be recommended. The detour event message will display in the status bar on map screens.

Detours are only recommended for Traffic or Clearance Events on a calculated route.
How do I avoid an event on my route?
-
From the Event List screen, tap the event. The Event Details screen will display.
-
If a detour has been calculated to avoid an event on your route, Avoid is available; tap to accept the new route and avoid the event. The Map screen will display.
Traffic messages
The Event Details screen displays detour status information.
Detour Not Available messages
If a detour is not available, one of the following messages will display:
| Message Description | |
| This Event is not locatableThis clearance is not locatable | A specific location for the Event cannot be identified. |
| This Event does not affect your routeThis clearance does not affect your route | The Event is not on the current leg of your journey, or is behind your current position. |
| You are avoiding this EventYou have accepted this clearance | The Event is not on the current leg of your journey. |
| You are too distant to re-routeYou are too distant to accept this clearance | The Event is currently too distant to affect your journey. |
| Detour not foundClearance route not found | A detour / re-route could not be calculated. |
Detour Recommended messages
If a detour is recommended, one of the following messages will display:
| Message Description | |
| Finding detour....Recalculating route..... | Your Navman is calculating a new route. During calculation, the % complete will display.Exiting this screen before the new route is calculated will cancel the operation. |
| Detour distance.....Clearance change | A detour has been calculated.The difference between the distance of your current route and the proposed route is displayed. |
My Places has all your saved locations.
How do I save a location as My Place or Home?
- Search for an address until the Preview screen is displayed.
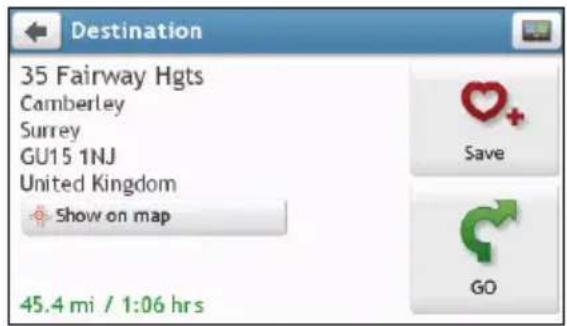
- Tap

The Save screen will display. The location has been added to My Places.
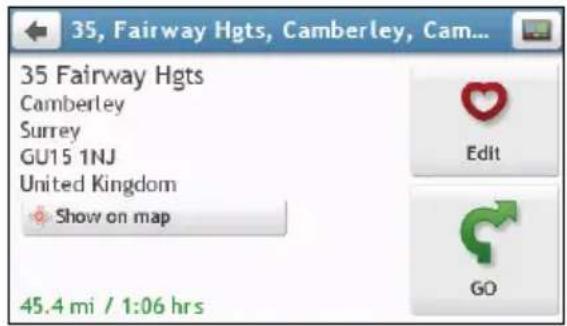
- To save the location as Home, tap The Edit screen will display.

Tap

The location has been set as Home.
How do I navigate to a location I have saved?
- Tap .

The My Places screen will display.
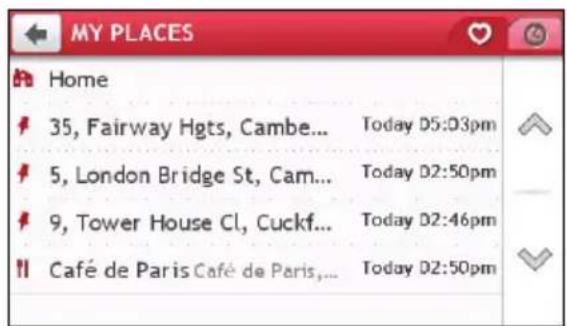
- Tap the favourite destination you want to travel to.
The Preview screen will display.
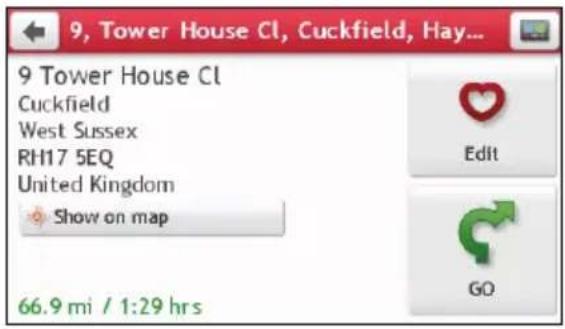
- Tap

Your Navman will calculate the route from your current location. The Map screen will display.
How do I navigate to Home?
If you have not set an address as Home, the first time you try to navigate to Home you will be prompted to search for an address using the address-entry wizard.
- Tap

The My Places screen will display.
- Tap Home ( ).
The Preview screen will display.
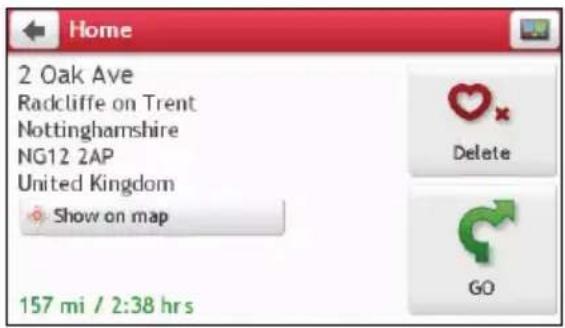
- Tap

Your Navman will calculate the route from your current location. The Map screen will display.
How do I navigate to a recent place?
To make navigating to an address easier, your Navman will automatically save all your start locations and destinations in a list of recent places.
- Tap

The My Places screen will display.
- Tap

The Recent Locations screen will display.
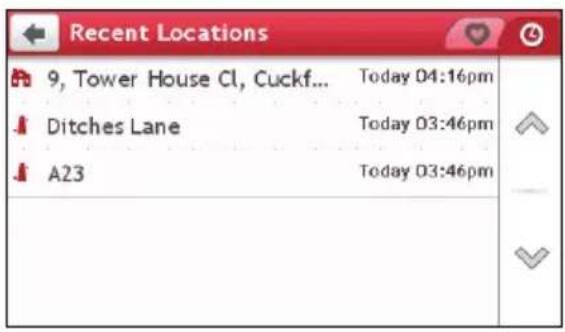
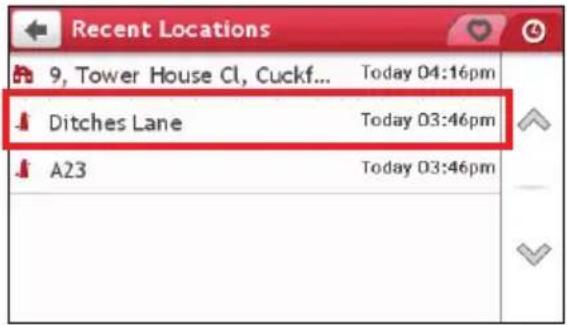
- Tap a recent place.
The Preview screen will display.

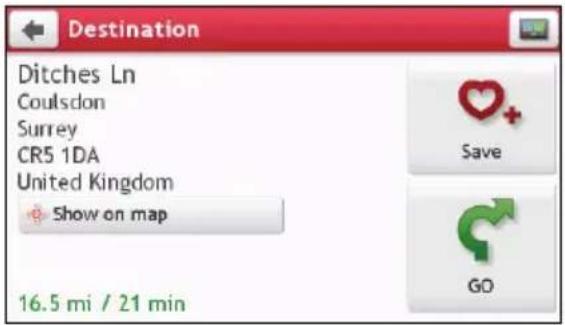
- Tap

Your Navman will calculate the route from your current location. The Map screen will display.
How do I edit the name of a location in My Places?
- Tap .

The My Places screen will display.
- Select a location to edit.
The Preview screen will display.
- Tap

The Edit screen will display.
- Tap

The Keyboard screen will display.
- After you have edited the name, tap OK.
How do I delete a saved location?
- Tap .

The My Places screen will display.
- Select the location you would like to delete.
The Preview screen will display.
- Tap

The Edit screen will display.
- Tap

The location is deleted.
How do I import a location to My Places from Google Maps?
- Make sure that NavDesk is installed on your computer, and your computer is connected to the Internet.
- Connect your Navman to your computer via the USB cable (may be sold separately).
- On your computer, go to the Google Maps website (maps.google.com).
- Search for a place located within your map set.
- Click on the top-right corner of the screen.
- On the pop-up screen, select GPS, confirm the place's name, select the proper brand name, and then click Send.
- Confirm the brand name and your model number.
- Follow the prompts to complete the process.
NEAR ME services allow you to quickly search the local area for common types of important POIs.
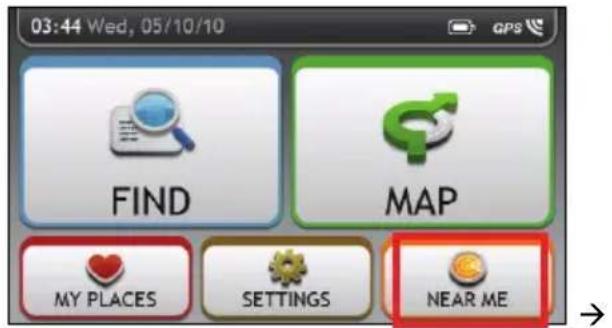
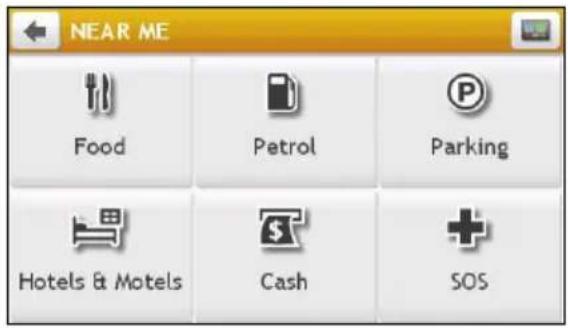
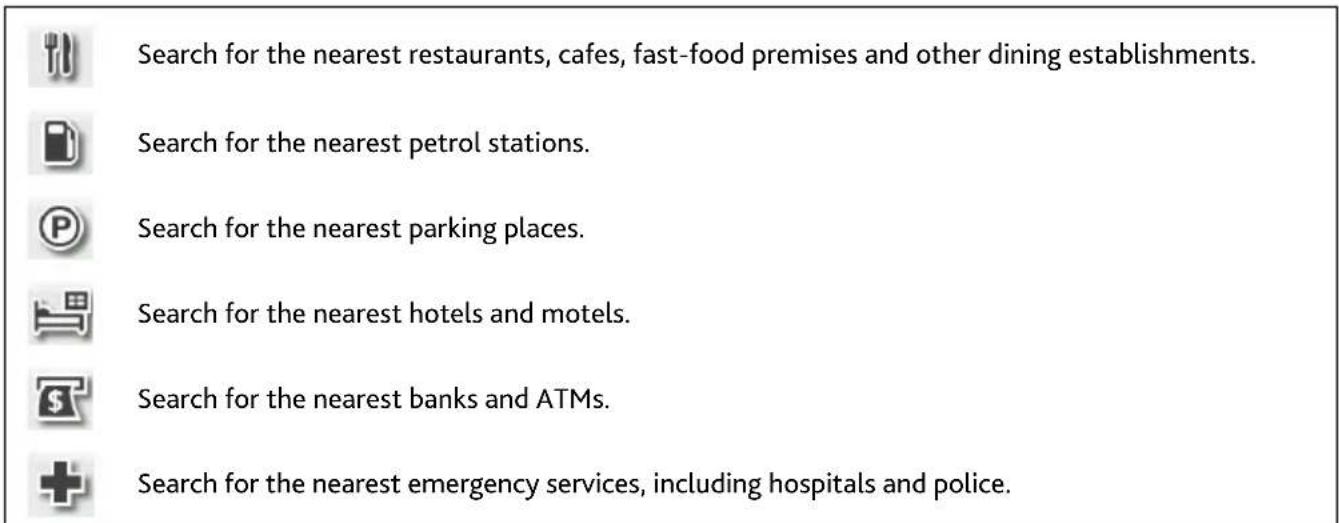
How do I search for a POI using NEAR ME?
- Tap .

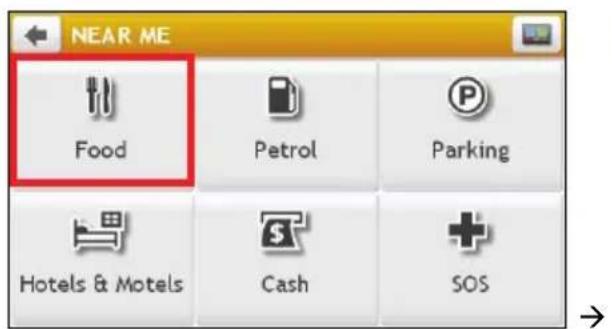
- Select the desired POI category (for example, Food). The search result will be listed in the Select POI screen.
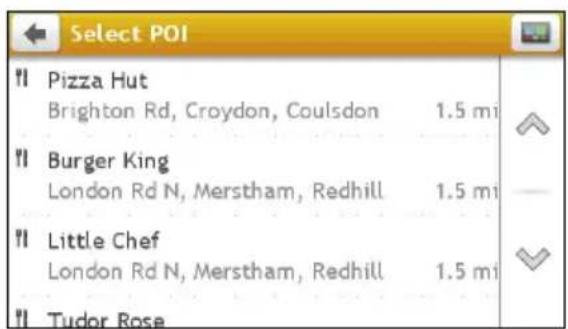
- Tap or to scroll up or down the list. Select the desired item to display the destination screen.
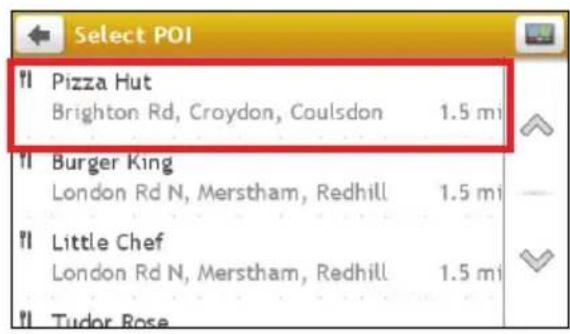
→
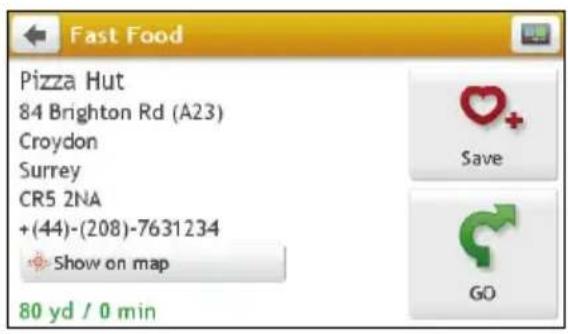
- Complete the following:
| If you want to ... Then ... | |
| calculate the route, open the Map screen and start navigating | ▪ tapThe Map screen will display. |
| save the location as a favourite | ▪ tapThe location will be saved in My Places immediately. |
| save the location as Home | ▪ tapThe Edit screen will display.▪ tap Save as Home. |
| explore the map | ▪ tap Show on map. |
What can I customise?
There are various customisation options available to enhance your navigation experience.
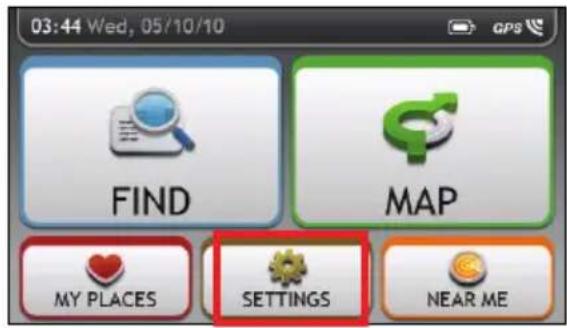
→
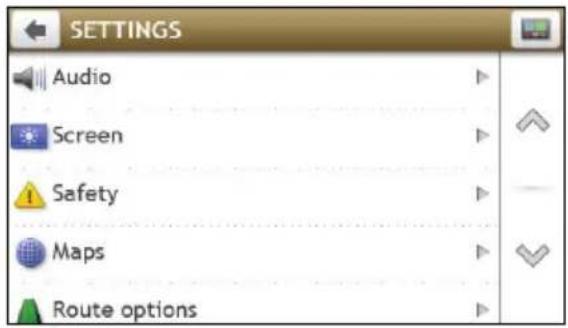
Audio
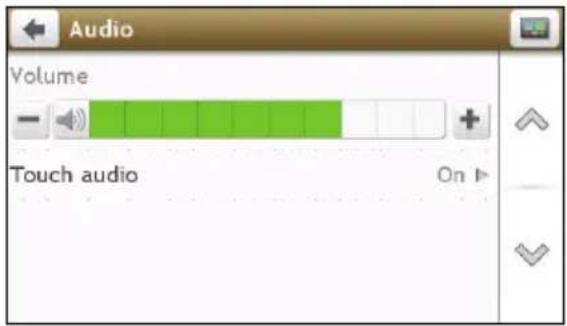
Complete the following:
| If you want to ... Then ... | |
| Increase/decrease the volume | tap  The volume bar indicates the current volume level.[DH50]You can simply tap on the Volume bar so that the volume will be set immediately at the position you tapped. The volume bar indicates the current volume level.[DH50]You can simply tap on the Volume bar so that the volume will be set immediately at the position you tapped. |
| mute or unmute |  The speaker icon indicates the status: The speaker icon indicates the status: : muted : muted  : unmuted : unmuted |
| hear which letter you have tapped when you tap the touch screen | tap the Touch audio option to turn it On or Off. |
- Your preferences are automatically saved.
Screen
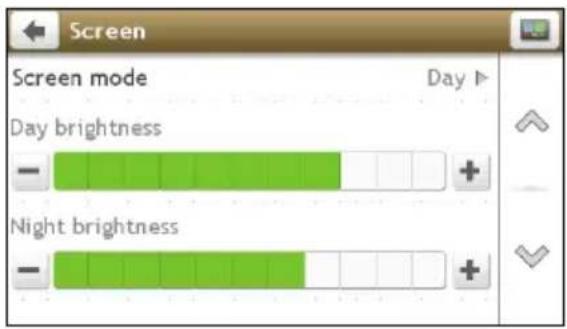
Complete the following:
| If you want to ... Then ... | |
| change the displayed screen mode tap | Screen mode and select:Auto: set to automatically change between Day and Night modes.Day: set the screen to be displayed in Day mode.Night: set the screen to be displayed in Night mode. |
| change the screen brightness in day mode | tap    The brightness bar indicates the brightness level in day mode.Warning: Your Navman can heat up when the brightness scale is set high, therefore, use lower brightness whenever acceptable. The brightness bar indicates the brightness level in day mode.Warning: Your Navman can heat up when the brightness scale is set high, therefore, use lower brightness whenever acceptable. |
| change the screen brightness in night mode | tap + / - on Night brightness barThe brightness bar indicates the brightness level in night mode.Warning: Your Navman can heat up when the brightness scale is set high, therefore, use lower brightness whenever acceptable. |
■ Your preferences are automatically saved.

You can simply tap on the brightness bar so that the screen brightness will be set immediately at the position you tapped.
Safety
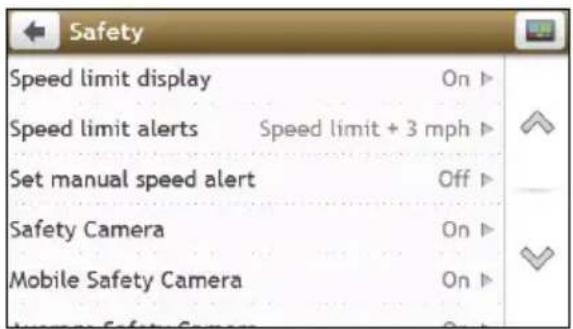
Complete the following:
| If you want to ... Then ... | |
| enable/disable speed limit alerts, which warn you of the speed limit on any given road | ■ tap the Speed limit display option to turn it On or Off.■ tap Speed limit alerts and select:○ Off: disable the speed limit alert.○ Auto: set the system to alert automatically while your speed is above the limit.○ Speed limit + 3 mph (Speed limit + 5 km/h): set the system to alert while your speed is 3mph (5 km/h) or more above the limit.○ Speed limit + 7 mph (Speed limit + 10 km/h): set the system to alert while your speed is 7mph (10 km/h) or more above the limit. |
| set the speed limit alerts manually | tap Set manual speed alert to select the speed limit or turn it off. |
| set how you want to be notified of safety cameras | tap the Safety Camera / Mobile Safety Camera / Average Safety Camera / Red Light Camera option to turn it On or Off. |
- Your preferences are automatically saved.
Maps
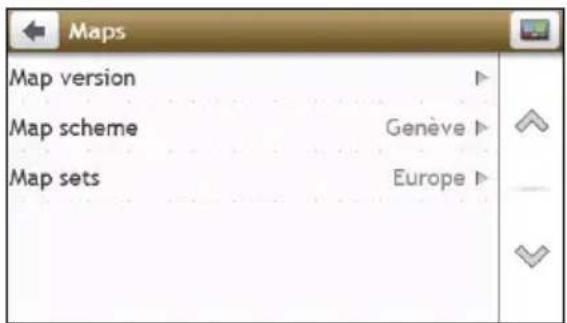
Complete the following:
| If you want to ... Then ... | |
| view the map information | tap Map Version to display a list of all maps, providing the following information:■ Name■ Date■ Version/Build number■ Coverage area |
| change the map colour scheme | tap Map scheme, then select a colour scheme from the list. |
| select a set of maps to load | tap Map sets, then select your preference from the list. |
■ Your preferences are automatically saved.
Route options
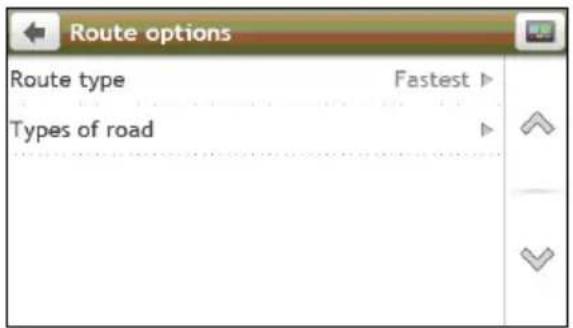
Complete the following:
| If you want to ... Then ... | |
| set route type options for your route | ■ tap Route type.TheRoute typescreen will display. Select your route type preference from the list:○Fastest– The route that should be the fastest when navigating.○Shortest– The route with the shortest physical length.○Easiest– The simplest route with the least number of turns and favours motorways where appropriate.○Economical– The route with least number of stops, turns and urban areas which should save on fuel usage. |
| set types of road options for your route | ■ tap Types of road.TheTypes of roadscreen will display. Select your road preference form the list. Avoiding ferry routes may prevent you from navigating between certain countries, even when a bridge or tunnel exists. Avoiding ferry routes may prevent you from navigating between certain countries, even when a bridge or tunnel exists. |
- Your preferences are automatically saved.
Language
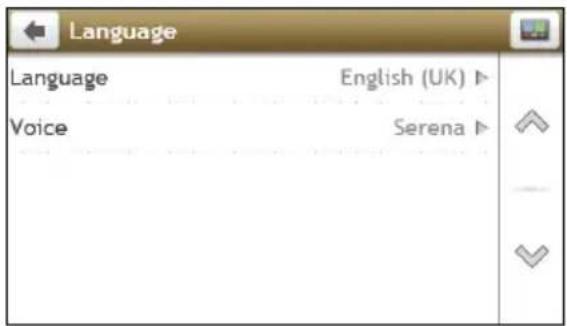
Complete the following:
| If you want to ... Then ... | |
| change the on-screen language | tap Language and select your preferred language from the list. |
| change the voice scheme | tap Voice and select your preferred voice scheme from the list. |
■ Your preferences are automatically saved.
Units
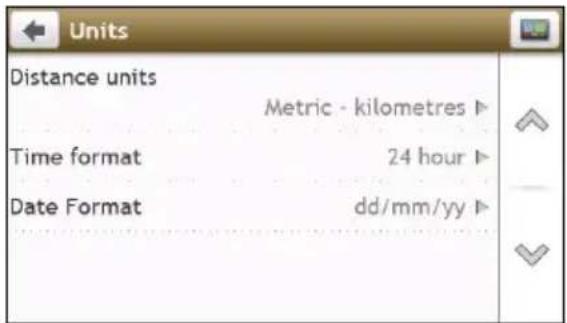
Complete the following:
| If you want to ... Then ... | |
| change the distance units | tap Distance units and then select your preferred distance unit type. |
| change the time format | tap Time format and then select your preferred time format. |
| change the date format | tap Date Format and then select your preferred date format type. |
■ Your preferences are automatically saved.
Device
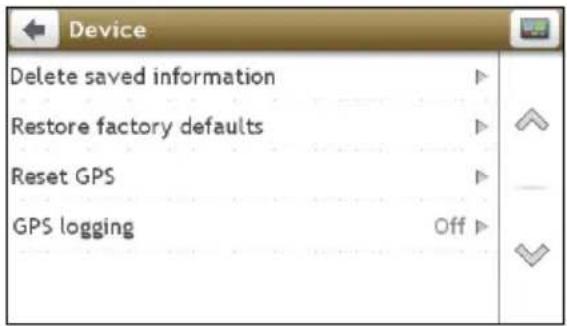
Complete the following:
| If you want to ... Then ... | |
| delete the saved information in your Navman | tap Delete saved informationTap Delete My Places and tap Yes when the warning dialog box displays. The data saved in My Places will be deleted.Tap Delete recent locations and tap Yes when the warning dialog box displays. The data of recent locations will be deleted. |
| restore factory default settings | tap Restore factory defaults. When the warning dialog box displays, tap Yes. Your Navman will restart. i The Restore factory defaults option allows you to restore default factory settings but will not delete recent locations or saved My Places destinations. |
| reset the GPS | tap Reset GPS. When the warning dialog box displays, tap Yes. i Occasionally, the GPS fix may need to be reset. This may occur if the receiver has been transported a long distance since last being used; for example, to a different country, and is still trying to establish the previous position. |
| record a GPS log of your trip | tap the GPS logging option to turn it On or Off. |
- Your preferences are automatically saved.
Demo
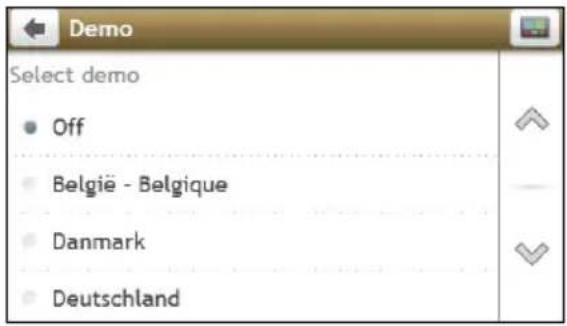
Complete the following:
| If you want to ... Then ... | |
| enable a shop demonstration of Navman Spirit to be played | select a demonstration country from the list and tap Start.Tap OK. Your Navman will restart.When your Navman is in Shop demo mode, you will see the navigation demonstration of the pre-defined route without having to set a destination. i You cannot operate your Navman properly in Shop demo mode. |
■ Your preferences are automatically saved.
Help
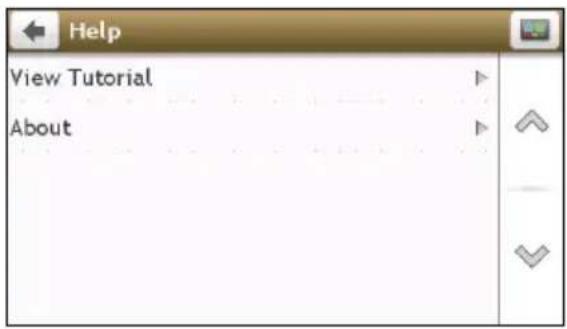
Tap About to display copyright and trademark information.
NavDesk is a suite of tools you can use to access greater functionality and product information via your computer.
NavDesk allows you to:
- obtain software updates
■ manage maps
■ manage custom POIs
■ manage safety camera subscriptions - browse the Navman website for special offers.
Can I use NavDesk with my computer?
Ensure your computer has the following minimum system requirements before installing NavDesk:
- IBM compatible PC
■ Microsoft Windows® XP x32 SP2/SP3, XP x64 SP1, Vista x32, or Windows 7
■ Internet Explorer 6 or higher
■ DVD drive
USB port - Internet connection for activation

Microsoft .NET 2.0, 3.0 and 3.5 will be installed on your computer as part of the installation of NavDesk.
How do I install NavDesk onto my computer?
Before you begin: Ensure that your computer meets the minimum system requirements for NavDesk, especially:
i. Ensure that Internet Explorer 6 or higher is installed on you computer before you install NavDesk, even if it is not your default browser.
ii. Windows XP users, ensure that Windows XP Service Pack 2 or higher has been applied before you install NavDesk.
CAUTION: When your Navman is turned on and connected to a computer, it is recognised as an external mass-storage device. Do NOT delete any files that are pre-installed on your Navman. Deleting the files can cause your Navman to crash
- Close all programs on your computer.
-
Insert the NavDesk Application Installer DVD into your computer DVD drive.
The NavDesk installer will start.
If your computer does not automatically launch the DVD, start the installation manually: Start → Run.
Type D:\Install.exe where "D" is the letter assigned to your DVD drive, then click OK. -
Select your preferred language for NavDesk.
-
Click Install Software, then Install NavDesk.
-
Follow the screen prompts to install NavDesk:
■ Review and accept the Licence Agreement for NavDesk when prompted.
- Select a destination folder for NavDesk when prompted.
- When the installation is complete, click Finish. NavDesk will open.
- If prompted to connect your Navman to your computer, complete the following:
- Plug the large end of the USB cable (may be sold separately) directly into a USB port on your computer (not a USB hub) and plug the small end into the USB Socket ( ) on your Navman.

Where possible, plug the USB cable into a USB port at the back of your computer.
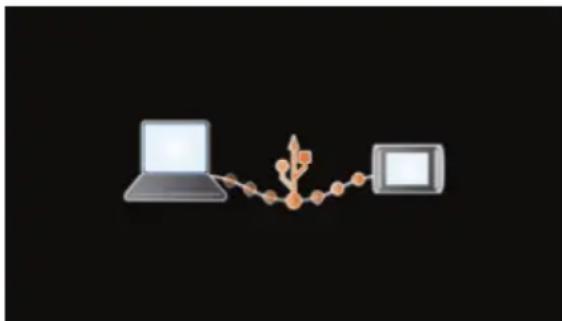
- Briefly press the power button to turn on your Navman. The following screen will display on your Navman:
natural_image
Illustration of a laptop connected to a small electronic device (no text or symbols present)- If prompted to update your Navman software, follow the on-screen prompts. You are now ready to use NavDesk for your Navman.

From now on, you can access NavDesk via: Start → All Programs → Navman → NavDesk
Depending on your Navman model, certain NavDesk Menu options may not be available.
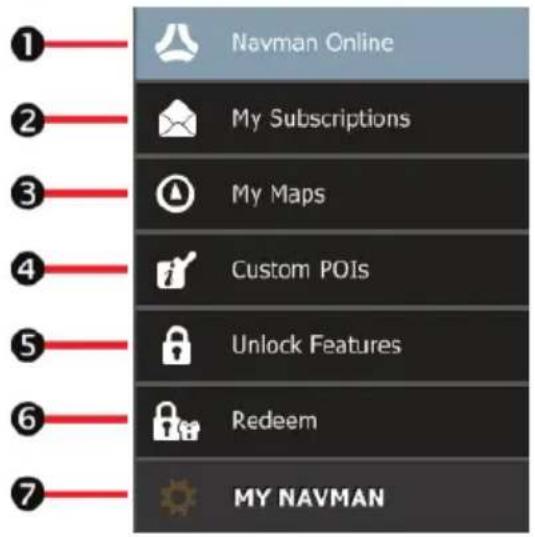
| Component Description | ||
| 1 | Navman Online | Display the Navman website, Navman Store and other online features. |
| 2 | My Subscriptions Information on your current subscriptions, including safety camera subscriptions. | |
| 3 | My Maps Install and manage maps. | |
| 4 | Custom POIs Application that allows you to import custom POIs. | |
| 5 | Unlock Features | Allow you to enter the activation key for the service you purchased. |
| 6 | Redeem | Allow you to enter the product key for lifetime map update service. |
| 7 | MY NAVMAN A collection of applications that allow you to configure NavDesk, download updates, and transfer data to and from your Navman. | |
My Subscriptions
Subscription information is not available on all models and is only available in selected countries.
Your Navman contains pre-loaded subscriptions, such as safety camera and travel book information. For the latest subscription updates, visit: www.navman.com.
NavDesk → My Subscriptions
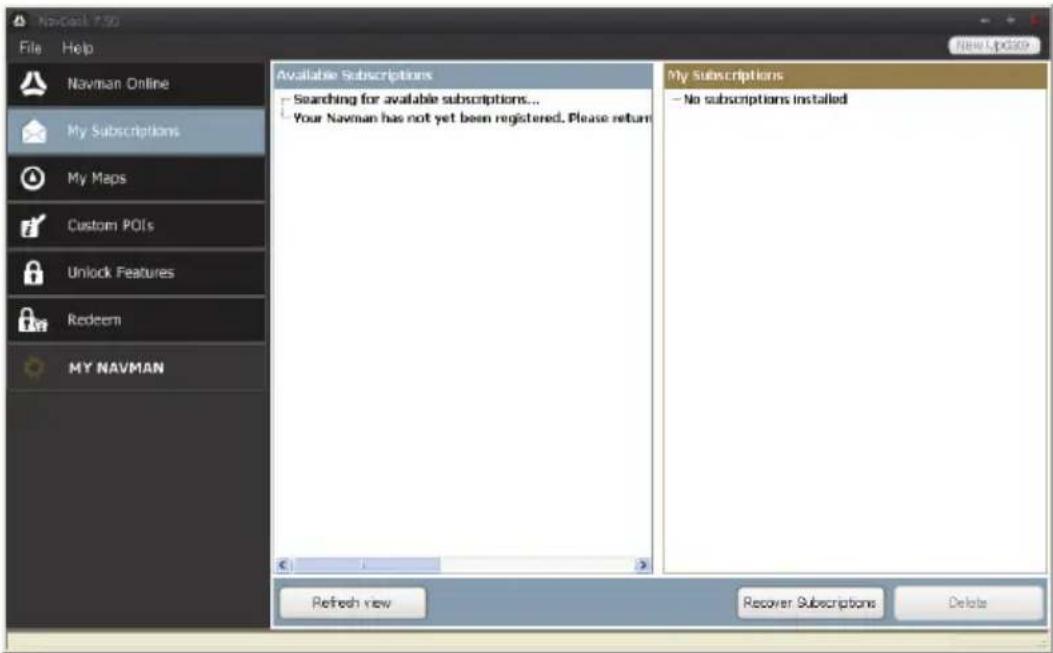

Safety Camera alerts can be set to enable a warning sound or visual warning when on your route.
How do I purchase a subscription?
- Select a type of subscription. A list of regions will display.
- Select a region. A list of available subscriptions will display.
- Select a subscription or offer, then click Purchase an activation key from the Navman store. The Navman Store website will open.
- Follow the prompts to purchase your subscription.
A product key will be sent to you via email when you have subscribed. You will need to use this product key to activate your subscription.
How do I activate my subscription?
NavDesk → Unlock Features
- Enter your product key.
- Follow the prompts to activate your subscription.
How do I update subscriptions on my Navman?
The My Subscriptions section will display a list of subscriptions already installed on your Navman:
| Icon Description | |
| Red | Expired subscriptions.▪ right click to purchase a new subscription. |
| Yellow | Available subscriptions.▪ right click to update and purchase new subscription. |
| Green | Active subscriptions. No updates are available for these subscriptions. No updates are available for these subscriptions. |
How do I recover my subscriptions?
If your subscriptions are deleted and you want to recover them, click Recover Subscriptions at the bottom-right corner in My Subscriptions to recover all subscriptions.
My Maps
My Maps allows you to install new maps, remove maps from your Navman and purchase new maps.
NavDesk → My Maps

The downloaded/purchased map (*.iso) from Navman Store website will be saved on your computer's map folder (e.g. C:\username\Documents\Maps) and then displayed in My Maps. The default map folder may vary depending on your Operating System. You can change the setting of NavDesk to locate the map folder where you save the map by clicking MY NAVMAN → Options → My Maps → Change.
NavDesk → My Maps
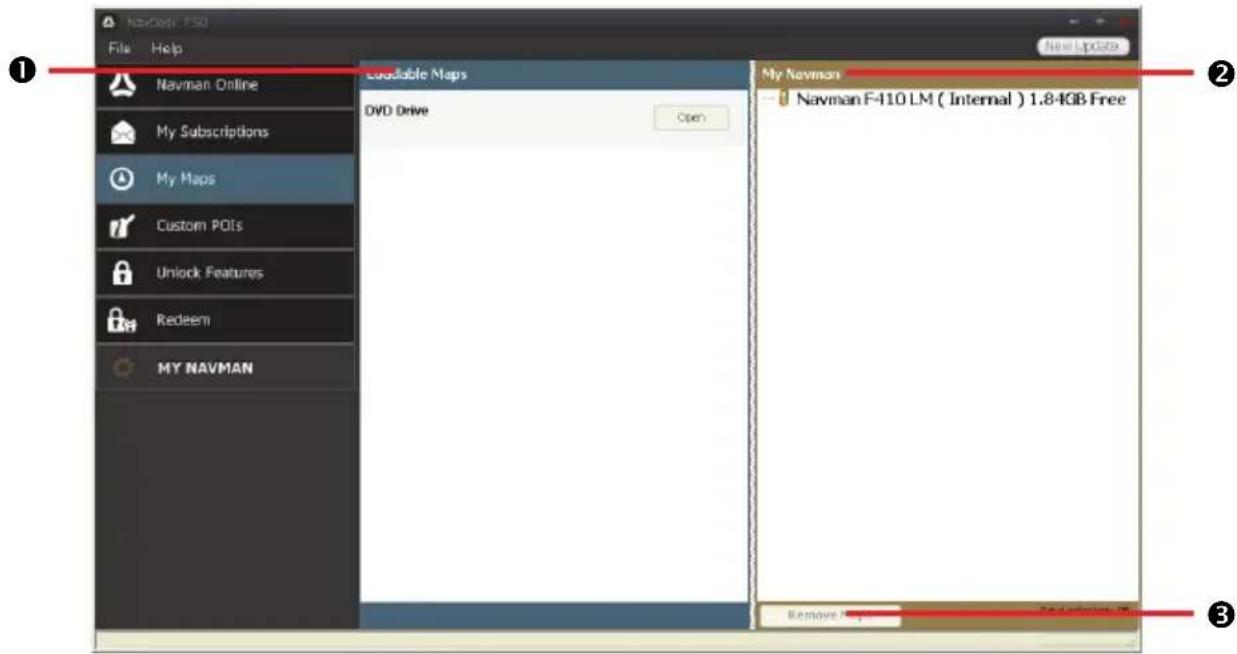
| Component Description | |
| 1 | Loadable Maps A list of maps on the DVD or available for purchase via the Navman Store website. Select a map source (e.g. DVD Drive) and then click Open to display the Map Source section.From the map Source section, click Install Maps to install the selected map to your Navman. Otherwise, click Upwards to return to the Loadable Maps section. |
| 2 | My Navman A list of maps installed on your Navman. |
| 3 | Remove Maps Click to remove the selected map from your Navman. |
How do I download a map update?
Occasionally Navman may offer you free updates, including software applications, maps, voice commands, and more. If a free map update is available and your Navman is connected to your computer, a message will display when you first start NavDesk.
- From the pop-up message window, click View to display the Device Updates screen that contains the available updates.
- Select the desired map update and click Download. NavDesk will start to download immediately.

Before downloading, you can change the download folder by clicking Change Path.
- During the download operation, you can:
■ View the download status from the downloading bar.
■ Stop the download by clicking

■ Pause the download by clicking
☐ and then resume download at a later time by clicking

- When finished, the downloaded map update will be displayed in My Maps.
How do I install maps onto my Navman?
Your Navman comes with one or more pre-activated maps. Map files take up space on your Navman's internal memory. If you do not use a map file, you can remove it to free up space. You can later reinstall it to your Navman if required.
You can install maps from the following:
■ DVD that came with your Navman,
■ The downloaded map update,
The map that you have purchased separately to a memory card (for the models with the MicroSD slot) or your Navman internal memory.

You may need to purchase a Map Product Key to activate maps on the DVD that came with your Navman.
- Open NavDesk, and then click My Maps.
- Select a map source (e.g. DVD Drive when a Map DVD has been inserted into your computer DVD drive) and then click Open to display the Map Source section.
■ The maps already installed on your Navman are green.
The maps that are unlocked and ready to be installed to your Navman are yellow.
The maps that require activation before being installed to your Navman are red.
■ The maps that are available for purchase from Navman are blue.

If your computer opens Windows Explorer when the DVD is inserted, close the Windows Explorer low.
- Complete the following:
| If the map to be installed is ... Then ... | |
| yellow go to step 6. | |
| red the map needs to be activated via the Internet before it can be installed; continue to step 4. | |
- If you connect to the Internet via a dial-up connection, connect to the Internet now.
-
Follow the prompts to activate your Map Product Key, including:
-
Enter the Map Product Key when prompted.
- Your computer will connect to the Internet and activate your Map Product Key.
-
When activation has completed, the map will change colour to yellow; continue to step 6.
-
Click the map you want to install to your Navman. The map will change colour to a brighter yellow to indicate it has been selected. To deselect a map, click the map again.

You may need to install multiple maps to cover the required geographical area.
- Complete the following:
| If you want to ... Then ... | |
| install a yellow map | go back to step 6. |
| install a red map | the map needs to be activated via the Internet before it can be installed; go back to step 4. |
| install the selected maps to your Navman | continue to step 8. |
- Select the destination media (Navman internal memory) for the selected maps, then click Install Maps. The selected maps will be installed and change colour to green.
- To use your Navman, disconnect the USB cable. You may need to manually reset your Navman.

WARNING: Do not disconnect the USB cable from the Navman USB Socket until the installed map or maps have changed colour to green.
How do I remove maps from my Navman?
- Open NavDesk, and then click My Maps.
- From the My Navman panel, select the check box next to the map you want to remove.
- Click Remove Maps to remove the selected maps.
- Confirm that you want to remove the selected map when prompted. The map is removed from your Navman. You can reinstall these maps at any time via NavDesk.
Custom POIs
Depending on your Navman model, some Custom POIs features may not be available.
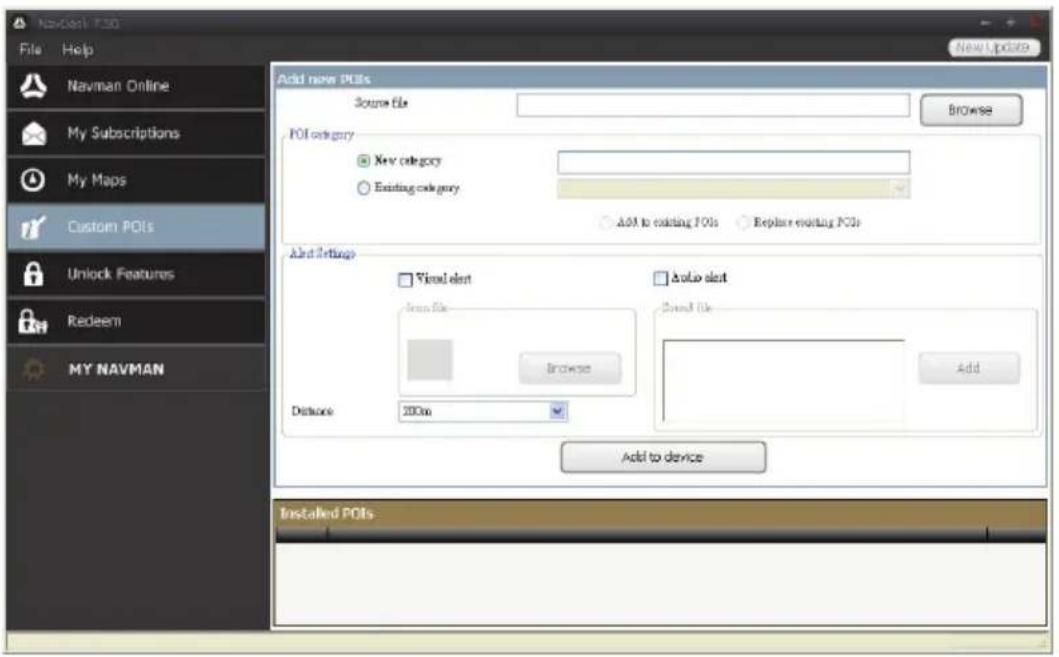
The Custom POIs (Points of Interest) application allows you to create or import your own POI files. These are called custom POIs. Unlike preinstalled POIs, custom POIs can be removed from your Navman and can have audio as well as visual alerts associated with them.
NavDesk → Custom POIs

To create your POI files, open Microsoft Excel and then enter the POI location details (including Longitude, Latitude, Name, and Description) in separate cells. Always use decimal degrees for coordinates and start a new location from a new line. When done, click File → Save As to save it as a *.csv file. Now you have successfully created a POI CSV file. The following displays the example of creating the POI file by using Microsoft Excel:
| A | B | C | D | |
| 1 | -0.29694 | 51.1076 | Horsham | A market town on the upper reaches of the River Arun in the centre of the Weald, West Sussex |
| 2 | -0.16258 | 51.14468 | Gatwick Airport | London Gatwick Airport (IATA: LGW, ICAO: EGKK) |
| 3 | ||||
| 4 |

Various POI files are available for download free or by subscription from third-party websites. Ensure that downloaded files are in .csv (Comma Separated Values) format. Navman is not responsible for the content or accuracy of the information or the reliability or availability of these websites. The use of information regarding safety camera locations may be subject to local laws in the country of use. You are responsible for checking that you can use the information in your country or in the country where the information will be used.
How do I install custom Points of Interest?
- In the Add new POIs section, click Browse to select a source file. The Open dialog box will open.
- Select the file from your local or network drive, then click Open.
- From the POI Category section:
| If you want to... Then... | |
| use an existing custom POI category | select the Existing category option, then select a type from the drop-down list. |
| replace an existing POI | select the Existing category option and a type from the drop-down list, then select Replace existing POIs.If you want to create a new POI instead, then select Add to existing POIs. |
| create a new custom POI category | select the New category option, then type a name for the POI category. |
- Set alert setting as required:
| If you want to... Then... | |
| enable a visual warning when a POI of this category is in close proximity | select the Visual alert check box. |
| select an icon to display on the Map screen for POIs of this category | Click Browse to select the icon file from your local or network drive. When you have located the icon file, select it and click Open.The icon file must be a bitmap (*.bmp or *.png) graphic with a minimum size of 6x6 pixels and a maximum size of 32x32 pixels.If you do not select a custom icon, a default icon will display. |
| select the distance from a POI of this category at which the visual warning should display or the warning chime should sound | select the distance from the Distance box.To change the units used to measure distance for this POI category, from the tools menu click on options and from the general option select Use metric units check box. |
| enable a warning sound when a POI of this category is in close proximity | select the Audio alert check box. |
| select a custom sound alert file to play when a POI of this category is in close proximity | either select a sound file from the list, orclick Add to select a sound file (.WAV format) from your local or network drive. When you have located the file, select it and click Open.If you do not select a custom sound file, a default sound alert will play. |
- Click Add to device to add the POI to your Navman.

Each file corresponds to a POI category; for example, Hotels.csv will be listed in your Navman as the ls category.
How do I delete a Custom POI file/category from my Navman?
- In the Installed POIs section, click Delete next to the file name. The file is removed from the list, but is not yet deleted.
- Accept the warning message. The selected file/category is deleted.
Unlock Features
NavDesk → Unlock Features
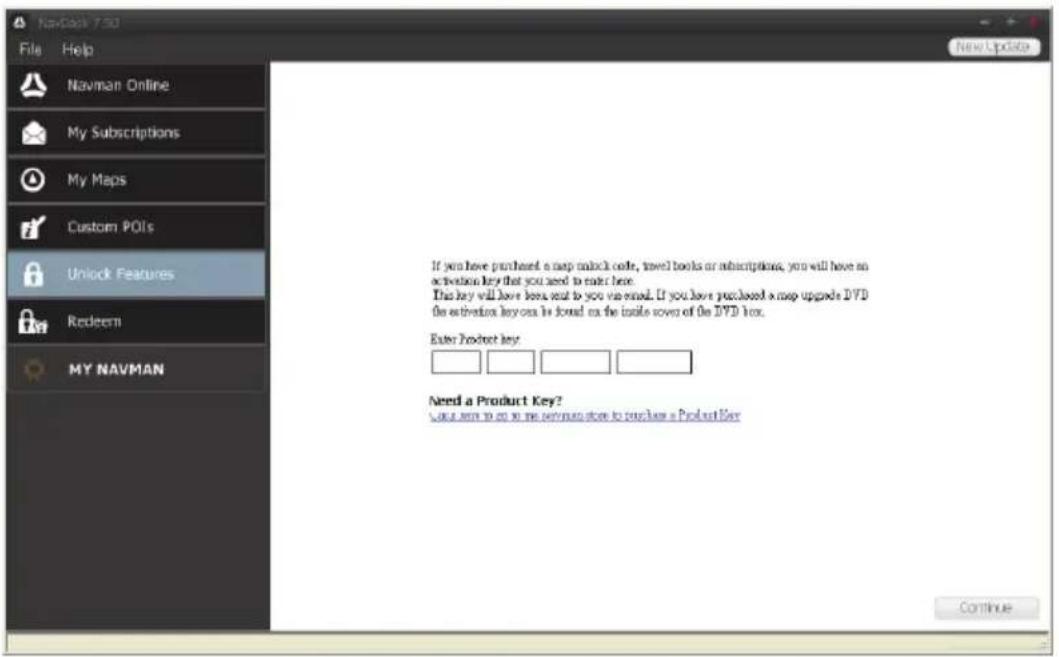
If you have purchased a map unlock code or subscriptions for your Navman, you have to enter the activation key using the Unlock Features application.

Make sure you have an active Internet connection for this feature.

The activation key will be sent to you by email, or printed on the inside cover of the box if you purchase snap update DVD. You can click the link on the screen to purchase an activation key online.
Redeem
NavDesk → Redeem
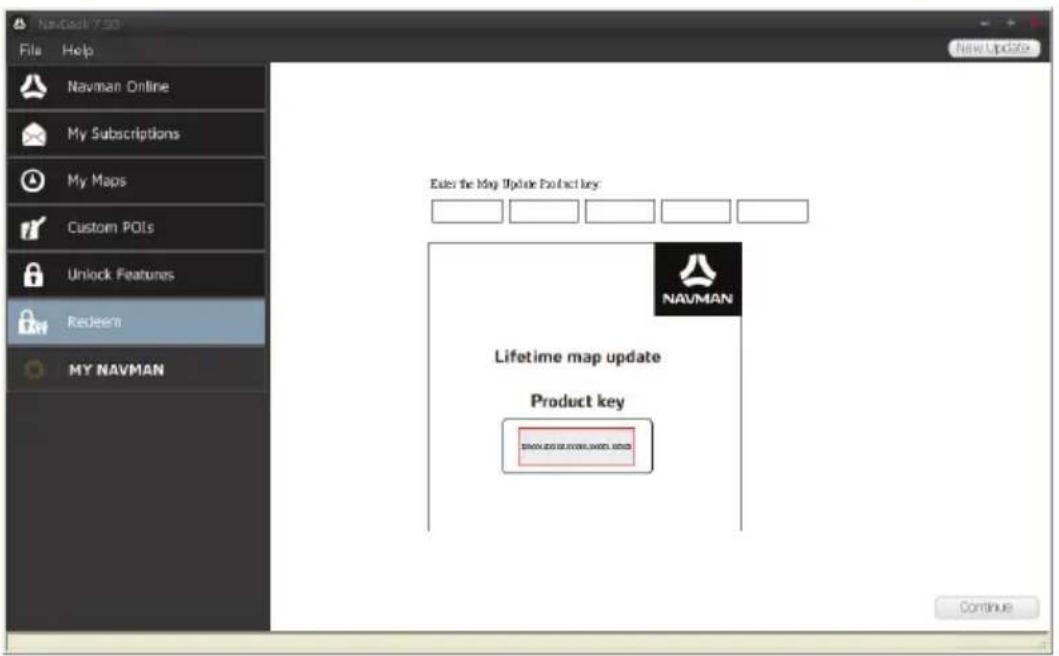
To redeem Navman's lifetime map update service, you need to enter the product key using the Redeem application. Please note that the product key can only be used once and is not transferable.

Make sure you have an active Internet connection for this feature.

The product key is printed on the flyer that is enclosed in the package.
MY NAVMAN
NavDesk → MY NAVMAN
How do I change the displayed language for NavDesk?
You can change the language for NavDesk.
-
Click Language.
-
Select your preferred language.
How do I install or remove a voice file for my Navman?
My Voices is a NavDesk application that allows you to install or remove voice files on your Navman.
-
Click My Voices.
-
Complete the following:
| If you want to ... Then ... | |
| install a voice file | in the Available voice files section, select the voice file you would like to install.▪ Click Install selected voices. |
| remove a voice file | in the Available voice files section, select the voice file you would like to remove.▪ Click Remove selected voices. |

Voice files take up space on your Navman's internal memory. If you do not use a voice file, you can remove it to free up space. You can later reinstall it to your Navman if required. The provided DVD of your Navman is needed while installing the voice file.
How do I backup and restore my Navman?
You can save backups of data from your Navman, and later restore it if required.
-
Click Backup and Restore.
-
Complete the following:
| If you want to ... Then ... | |
| backup your Navman click | Create new backup. Select the data you would like to backup. Click OK. The backup will be saved to your computer. The backup will be listed on the Backup & Restore window. |
| restore a backup to your Navman | select the backup from the list that you would like to restore. Click Restore, then click OK. The backup will be restored to your Navman. |
| delete a backup select the | backup from the list that you would like to delete. Click Delete, then click OK. The backup will be deleted. |
How do I recover maps and voice files for my Navman?
The Smart Recovery application allows you to recover all data to fix your Navman if a problem occurs during operation, including software, maps, voice files, and subscriptions.
- Click Smart Recovery.

To use the Smart Recovery application to recover data, make sure you have an active Internet connection and the Installer DVD is inserted into your computer DVD drive.
- The available data will be displayed in the Maps and Voices fields. Select the desired data and click Recover to recover the data on your Navman.
How do I manually update my Navman?
Occasionally Navman may offer you free updates, including software applications, maps, voice commands, and more. You can manually check the available updates via the Device Updates function.
- Click Device Updates. The Device Updates screen that contains the available updates will display.

You can also open the Device Updates screen by clicking the New Update button at the top-right corner of NavDesk.
- Complete the following:
| If you want to ... Then ... | |
| download the updates | select the available update from the list, and then lick Download.▪ You can view the download status from the downloading bar. |
| stop/pause the download during the download:▪ Click × to stop the download.▪ Click □ to pause the download; when paused, click ▶ to resume downloading. | |
| change the download folder click Change Path. | |
- When completed, the downloaded file will be saved to the assigned folder.
For software update, the *.exe file will be launched automatically to install the update.
- For map/voice command update, the system will display the My Maps/Voice Command screen automatically to install the update.
How do I configure NavDesk?

Depending on your Navman model, certain setting options may not be available.
- Click Options, and then select the desired setting options to configure.
- Complete the following:
| If you want to ... Then ... | |
| keep NavDesk updated | click General, and then select the Auto check for updates checkbox.▪ When you select this option, every time you open NavDesk, the available service packs and bug fixes will be downloaded from the Navman server and applied to your Navman. |
| change the units of measurement that NavDesk uses | click General, and then:select or clear the Use metric units checkbox to change between imperial and metric units.select or clear the Use decimal degrees checkbox to change between decimal degrees and latitude/longitude co-ordinates. |
| change the Mileage Reporter settings | click Mileage Reporter, and then:select or clear the Warn me when deleting all log files from my Navman checkbox.select Distance per volume or Volume per distance to change the fuel economy style. |
| change the NavPixTMLibrary location | click Photo Album, and then click Change. For more information about configuring your Photo Album, refer to the “Photo Album” section. For more information about configuring your Photo Album, refer to the “Photo Album” section. |
| change the location of where downloaded updates will be saved | click My Maps, and then click Change.Select a folder for the updates. The downloaded updates are moved to the new location. |
Point of Interest categories
| Icon Description Icon Description | |||
 | Airport |  | Amusement park |
 | Art centre |  | ATM/Cash dispenser |
 | Bank |  | Bar/Pub |
| [XZA2] | Beach |  | Breakdown service/Car repair facility |
 | Bowling centre |  | Business facility or company |
| [THYS] | Business office |  | Bus station |
 | Camping ground | [GBWA] | Car dealer/Automobile dealer |
 | Casino |  | Cemetery |
| [W68D] | Church |  | Cinema |
| [Same1] | City hall | [SMA1] | City, town or village |
| [Same7] | Coffee shop | [SAGE] | College/University |
| [SAGE] | Community centre | [SAGE] | Commuter railway station |
| [SAGE] | Courthouse | [SAGE] | Dentist |
| [SAGE] | Doctor | [SAGE] | Embassy |
| [SAGE] | Exhibition centre | [SAGE] | Ferry terminal |
| [SAGE] | Fire Brigade | [SAGE] | Golf course |
 | Government office | [SAGE] | Grocery store |
| [SAGE] | Guest house | [SAGE] | Higher education |
| [SAGE] | Hospital/Polyclinic | [SAGE] | Hotel |
| [SAGE] | Ice skating | [SAGE] | Important tourist attraction |
| [SAGE] | Information/Tourist information office | [SAGE] | Library |
| [SAGE] | Marina/Yacht basin | [SAGE] | Medical |
| [38X] | Monument |  | Motorcycle dealer |
| [40T2] | Motoring organisation office | [32X0] | Mountain pass |
| [39M3] | Museum | [3XWZ] | Music centre |
| [48WC] | Natural attraction | [5CWTZ] | Nightlife |
| [22XY] | Park and ride | [6H8Y] | Parking |
| [ATEZ] | Parking garage | [43XH] | Park/Recreation area |
| [37ZA] | Performance art/Theater | [8E9Y] | Petrol station |
 | Pharmacy | [0097] | Place of worship |
| [2AWT] | Police station | [2H5Z] | Post office |
| [0Y2R] | Public restroom/Toilet facilities |  | Public sport airport |
 | Railway crossing | [9X8Y] | Rental car agency |
| [4876] | Rest area | [16SH] | Restaurant |
 | Road accident black spot | [48YZ] | Scenic/Panoramic views |
| [0AA7] | School | [17W1] | School zone |
| [3CCY] | Shop |  | Shopping |
| [AHAAA] | Ski resort/Ski lift station |  | Speed check |
| [50WK] | Sport centre | [36ZT] | Sports hall |
| [2304] | Sports complex |  | Stadium |
| [4HTZA] | Tennis court |  | Travel agency |
 | Transport ferry | [9VZX] | Veterinarian |
 | Winery | [04A7] | Zoo |
Branded Points of Interest
Branded Points of Interest are available on some maps. These include well known restaurants, accommodation providers, tourist attractions, Petrol stations, etc. The icon will usually display the company logo.
Point of Interest categories by subscription
| Icon Description | |
 | Safety Cameras |
 | Safety Camera (Mobile) |
 | Safety Camera (Average) |
 | Red Light Camera |
My Places categories
| Icon Description | |
 | Home |
 | Saved locations |
Traffic and other TMC Events
Each TMC Event is sorted in to one of nine categories. When an Event is received, one of the following icons will display:
| Event | Avoided Event | Message Type | Event Description |
 |  | Danger | There is a dangerous situation on the route; for example, people are on the road. |
 |  | Traffic Any event | that will cause a delay on a route. |
 |  | Weather | Weather conditions are adversely affecting a route; for example, there is ice on the road. |
 |  | Warnings | There is a situation of which you should be aware on the route, but it is not serious enough to be considered a dangerous situation; for example, a minor accident has taken place. |
 | 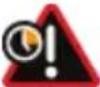 | Forecast An event is expected to occur on a route. | |
 |  | Restrictions There is a restricted flow of traffic on a route; for example, a lane has been closed on a motorway. | |
 |  | Clearance | A traffic event that has now been cleared. |
 |  | Information | All other events. |
 | 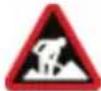 | Roadworks | Roadworks are taking place on a route. |
If a Traffic or Clearance event has a recommended detour, the following icons will display:
| Event | Avoided Event | Message Type | Event Description |
 | 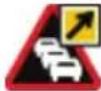 | Traffic Detour | A Traffic Event, for which a detour is recommended. |
 |  | Clearance Re-route | A Clearance Event, for which a re-route is recommended. |

Avoided Event icons will only display on the Map screen, at the event location.
Online support
For 24/7 help and support with Navman products, visit our Technical Support website at: www.navman.com
Speed Limit
Navman products are designed to be used as an aid to safer driving. Navman does not condone speeding or any other failure to comply with your local traffic laws. It is your responsibility to drive within the posted speed limit at all times and to drive in a careful manner. Navman accepts NO liability whatsoever for you receiving any speeding fines or points on your license through using this device. Navman does not guarantee the accuracy of the data contained within this database either expressed or implied. In the event you receive a fine or any other penalty for speeding or contravention of any traffic law, or are involved in an accident, Navman is not responsible for any damages of any type. In some countries the data information regarding speed limits may conflict with local law and/or regulations. It is your responsibility to make sure that your use of the data is in compliance with local laws and/or regulations. Usage is at your own risk.
Safety Camera POIs
Navman products are designed to be used as an aid to safer driving. You can receive messages to alert you to locations of safety cameras, which will enable you to monitor your speed through these areas. Navman does not warrant that all types and locations of safety camera data are available, as cameras may be removed, relocated or new cameras installed. Navman does not condone speeding or any other failure to comply with your local traffic laws. It is your responsibility to drive within the posted speed limit at all times and to drive in a careful manner. Navman accepts NO liability whatsoever for you receiving any speeding fines or points on your license through using this device. Navman does not guarantee the accuracy of the data contained within this database either expressed or implied. In the event you receive a fine or any other penalty for speeding or contravention of any traffic law, or are involved in an accident, Navman is not responsible for any damages of any type. In some countries the data information regarding safety or speed cameras may conflict with local law and/or regulations. It is your responsibility to make sure that your use of the data is in compliance with local laws and/or regulations. Usage is at your own risk.
Disclaimer
Navman operates a policy of ongoing development. Navman reserves the right to make changes and improvements to any of the products described in this document without prior notice. Navman does not warrant that this document is error-free. The screenshots and other presentations shown in this manual may differ from the actual screens and presentations generated by the actual product. All such differences are minor and the actual product will deliver the described functionality as presented in this User Manual in all material respects.
Copyright
© 2012 MiTAC International Corporation. Navman is either a registered trademark or trademark of MiTAC International Corporation and is used under licence by Navman Technology Limited. All rights reserved.
The software contains proprietary information of MiTAC International Corporation; it is provided under a licence agreement containing restrictions on use and disclosure and is also protected by copyright law. Reverse engineering of the software is prohibited.
No part of this publication may be reproduced, stored in a retrieval system, or transmitted in any form or by any means, electronic, mechanical, photocopying, recording or otherwise, without the prior written permission of Navman.
Microsoft, Windows, Windows Vista, Windows 7, and Internet Explorer are either registered trademarks or trademarks of Microsoft Corporation in the United States and/or other countries. All rights reserved.
© 2012 Microsoft Corporation. All rights reserved.
Location Identifiers © 2012 International Air Transport Association.
POI Data © 2012 InfoUSA.
The software is based in part on the work of the Independent JPEG Group.
All other trademarks and registrations are the property of their respective owners.
Revision: R00
(5/2012)
- Important safety information
- WARNING
- CAUTION
- Warning Notice to Drivers in the United States
- Home charger-specific safety information
- Internal battery-specific safety information
- About the battery
- Compliance
- Declaration of conformity
- WEEE
- Important information for using the manual
- Formatting
- Icons
- Terms
- Disclaimer
- Mounting your Navman in a vehicle
- CAUTION:
- Enabling Traffic (TMC) Reception
- Traffic information is available in selected models and countries only.
- Getting to know your Navman
- How do I turn on my Navman?
- Using the power button
- Resetting the device
- How do I charge the battery in a vehicle?
- How do I charge the battery via my computer?
- How do I charge the battery at home or work?
- What is GPS?
- How does my Navman receive GPS signals?
- Caring for your Navman
- Troubleshooting
- Tourer 413 LM / 614 LM
- Software User Manual
- How do I use the touch screen?
- Navigating on the screen
- How do I turn my Navman on for the first time?
- How do I navigate through the menu screens?
- How do I go from A-B?
- How do I plan my first trip?
- How do I preview the destination on map?
- How do I explore the map?
- How do I view my route?
- The driving map
- How do I view my route statistics?
- How do I adjust the volume?
- How do I zoom in/out the map?
- What if I miss a turn?
- Back-On-Track™ Automatic Rerouting
- How do I search for a POI by type?
- Tap the desired item from the list.
- Complete the following:
- How do I search for a POI by keyword?
- How do I receive current traffic information via TMC?
- How will I know when a Traffic Event occurs?
- Traffic Overview screen
- Traffic messages
- Detour Not Available messages
- Detour Recommended messages
- How do I save a location as My Place or Home?
- How do I navigate to a location I have saved?
- How do I navigate to Home?
- How do I navigate to a recent place?
- How do I edit the name of a location in My Places?
- How do I delete a saved location?
- How do I import a location to My Places from Google Maps?
- How do I search for a POI using NEAR ME?
- What can I customise?
- Audio
- Screen
- Safety
- Maps
- Route options
- Language
- Units
- Device
- Demo
- Help
- Can I use NavDesk with my computer?
- How do I install NavDesk onto my computer?
- My Subscriptions
- How do I purchase a subscription?
- How do I activate my subscription?
- How do I recover my subscriptions?
- My Maps
- How do I download a map update?
- How do I install maps onto my Navman?
- How do I remove maps from my Navman?
- Custom POIs
- How do I install custom Points of Interest?
- How do I delete a Custom POI file/category from my Navman?
- Unlock Features
- Redeem
- MY NAVMAN
- How do I backup and restore my Navman?
- How do I manually update my Navman?
- How do I configure NavDesk?
- Branded Points of Interest
- Traffic and other TMC Events
- Online support
- Speed Limit
- Safety Camera POIs
- Copyright
Brand : NAVMAN
Model : Tourer 413 LM
Category : Gps