Gigaset 2060 - Telephony SIEMENS - Free user manual and instructions
Find the device manual for free Gigaset 2060 SIEMENS in PDF.

User questions about Gigaset 2060 SIEMENS
0 question about this device. Answer the ones you know or ask your own.
Ask a new question about this device
Download the instructions for your Telephony in PDF format for free! Find your manual Gigaset 2060 - SIEMENS and take your electronic device back in hand. On this page are published all the documents necessary for the use of your device. Gigaset 2060 by SIEMENS.
USER MANUAL Gigaset 2060 SIEMENS
Gigaset Communications GmbH is the legal successor to Siemens Home and Office Communication Devices GmbH & Co. KG (SHC), which in turn continued the Gigaset business of Siemens AG. Any statements made by Siemens AG or SHC that are found in the user guides should therefore be understood as statements of Gigaset Communications GmbH.
We hope you enjoy your Gigaset.
Gigaset Communications GmbH is a trademark
licensee of Siemens AG
© Gigaset Communications GmbH 2008
All rights reserved.
Subject to availability. Rights of modifications reserved.
www.gigaset.com
Gigaset
CSVážení zákazníci,
natural_image
Exterior view of a gray industrial device labeled 'Gigaset 2060sdn' with ventilation grilles and ventilation slots (no additional text or symbols visible)
natural_image
Black mobile phone with keypad and display screen (no visible text or symbols)User Guide
Important:
Read this User Guide and the safety instructions before using this equipment.
8 mobile units can be connected
2 corded terminals can be connected
Direct dialing in
Multicell capability
Getting started
Getting started
Installation steps for the Gigaset 2060isdn
- Please read the safety instructions before starting ( page 8).
- Install the base station ( page 9).
- Insert the battery in the mobile unit; charge the battery if necessary (see the User Guide for your mobile unit).
- Register the mobile unit with the base station ( page 11).
Your Gigaset 2060isdn is now ready for use.
Preparations for using the ISDN functions
- Enter the multiple subscriber numbers ( page 14).
- Set the ring allocation ( page 55, page 59).
- Please read the information on ISDN connection ( page 17).
You now have the ISDN features at your disposal.
Steps for installing corded equipment
- Connect the telephone, fax machine or intercom ( page 68).
- Set the correct device type ( page 68).
Your corded equipment is now ready for use.
Overviews
Overviews
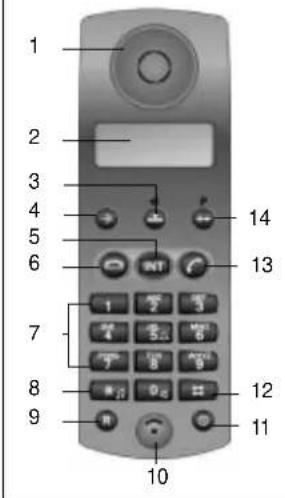
Standard mobile unit, 2000S
Front view
Rear view
Legend
- Loudspeaker
- Display
- Speed dial key
- Save key
- Internal key
- On-hook key
- Keypad
- Star key
- Signal key
- Microphone
- ON/OFF/LOCK key
- Pound key
- Off-hook key
- Number redial key
- Ringer speaker
- Battery compartment cover
Comfort mobile unit, 2000C
Front view Rear view
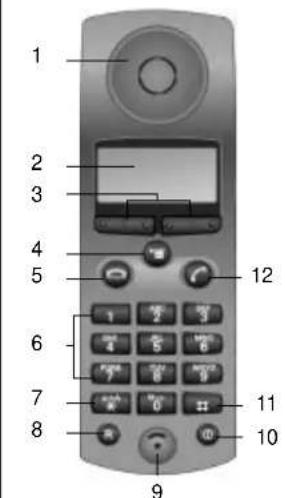
Legend
- Loudspeaker
- Display (backlit)
- Display keys
- Menu key
- On-hook key
- Keypad (alphanumeric)
- Star key
- Signal key
- Microphone
- ON/OFF/LOCK key
- Pound key
- Off-hook key
- Ringer speaker
- Battery compartment cover
Overviews
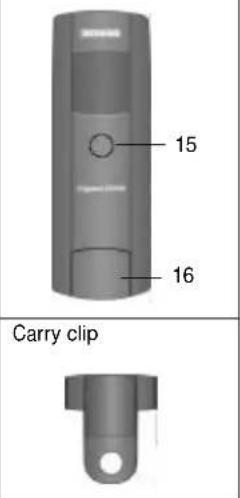
Base station, Gigaset 2060isdn
Front view
Rear view
Legend
Front Rear
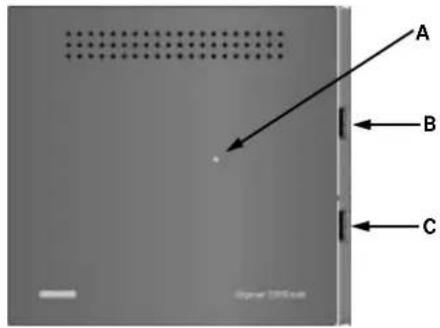
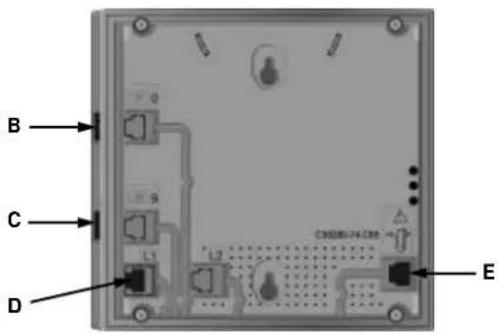
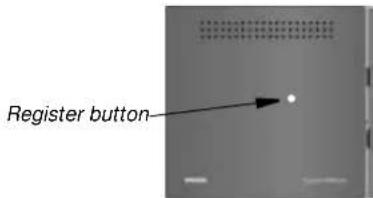
A Registration button:
For registering mobile users
- lights up to indicate base station is ready for use
- flashes while registration is in progress.
B Corded device with internal user number 0
C Corded device with internal user number 9
D Socket for Euro-ISDN basic access
E Socket for AC power adapter
C39280-Z4-C65
Lamp and registration button are identical.
Contents
Getting started 2
Overviews 3
Safety instructions 8
Installation 9
Base station 9
Registering the Gigaset 2000C comfort mobile unit 11
System code 13
Saving multiple subscriber numbers 14
Ring allocation 15
Wall-mounting the base station 15
Important information about Euro-ISDN 17
Operation with comfort mobile unit 19
Using the menus 19
Menu structure for system settings 20
Basic settings 22
Entering/changing the system code 22
Setting point-to-multipoint 23
Setting point-to-point 24
Suppressing phone-number display 25
Activating/deactivating call pickup 25
Activating/deactivating call waiting per user 26
Activating/deactivating automatic line seizure 26
Administrating the list of calls 27
Incoming calls 28
Answering/terminating a call 28
Call pickup 29
Call pickup from answering machine 30
Answering a waiting call with another call in progress 30
Tracing a call (call intercept/MCID) 31
Outgoing calls 32
Dialing external numbers with the keypad 32
Viewing/dialing from list of calls 33
Dialing internal numbers 34
Activating "Anonymous call" for a single call 35
Call in progress 36
Holding a call 36
Accessing answering machines/using telephone services 37
Mute function 38
Switching to keypad 38
Switching functions 39
Internal consultation/call transfer 39
External consultation 39
Toggling 40
Three-party conference 41
Parking an external call 42
Unparking an external call 42
Activating external call forwarding 42
Deactivating external call forwarding 43
Deactivating all external call forwarding 44
Contents
Activating internal call forwarding 44
Deactivating internal call forwarding 44
Activating external automatic callback 45
Deactivating external automatic callback 45
Call charges, call duration 46
Displaying call charges/call duration 46
Activating/deactivating display of call duration or charges/setting call charge factor 47
Locks 49
Lock for outgoing calls (system lock)/emergency phone numbers 49
Editing lock numbers/activating and deactivating call barring 49
Delete all lock numbers 50
Blocking unwanted calls 50
Setting user access rights 51
System settings 53
Setting the connection configuration for cordless internal users 53
Setting internal collective call 53
Activating/deactivating permanent DTMF dialing 54
Enabling/disabling trunk hold 54
Enabling/disabling dial * and # 54
Reinitializing the base station 55
Ring allocation for point-to-multipoint access 55
Setting/changing ring allocation for point-to-multipoint access 57
Ring allocation: setting/changing number of cycles for group call 58
Setting/changing ring allocation for point-to-point access 59
Unregistering a mobile unit 60
Operation with other mobile units 61
Gigaset 1000C 61
Gigaset 2000S (1000S) 61
Operation with supplementary devices 67
Connecting corded devices 67
Outgoing calls 69
Incoming calls 71
Switching functions 72
Operation with door intercoms 77
Ring allocation for the door intercom 79
Connection to the entrance telephone 80
Multicell system 81
Step-by-step procedure 81
Possible combinations 83
Setting multicell operation 85
Operation behind a private branch exchange 88
Enabling/disabling call transfer 89
General notes 90
Ring signals 90
System upkeep 91
Technical data 91
Troubleshooting 92
Warranty 93
Contact partners 93
Frequently asked questions 94
Glossary 98
Quick-reference guide, comfort mobile unit 101
Quick-reference guide, supplementary device 103
Special accessories 105
Index 107
Safety instructions
Safety instructions
Warning
For your personal safety and protection, never use the base station or mobile unit in the bathroom or other wet environment. The devices are not spray-proof.
- Corded devices (telephone, fax, intercom ....) with exposed metal components may carry unacceptably high voltages for short periods of time, for example during thunderstorms. Do not touch these components.
- Use only the AC power adapter with number C39280-Z4-C65 as supplied to connect the base station to the mains electricity supply.
- Always follow the safety instructions in the documentation for the mobile units and accessories.
Certification for basic access and telephone systems
This telephone system has BAPT/BZT "Federal Office for Post and Telecommunications" (Bundesamt für Post und Telekommunikation) certification. It has been certified in accordance with EU regulation 91/263/EC Telecommunication End User Devices.
No special skills are required for connecting the system to and operating it with the Euro-ISDN network and Euro-ISDN systems in Germany.
This device conforms to the requirements of EU regulations and the national amendments of Germany and France.
The conformance of this device with the above-mentioned regulations is certified by the CE symbol.


The Gigaset 2060isdn was designed for the German ISDN network. The manufacturer does not guarantee operability in other countries.
Installation
Installation
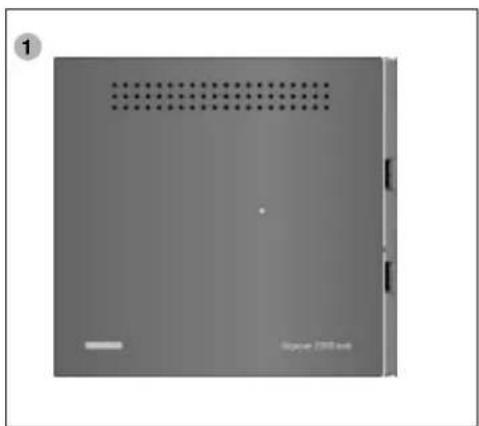
Base station
Contents of package
1 Base station
2 screw4 and wallplugs
2 ISDN cable
User Guide
3 AC power adapter
natural_image
Exterior view of a gray rectangular electronic device with ventilation slots and a small mark on the front panel (no readable text or symbols)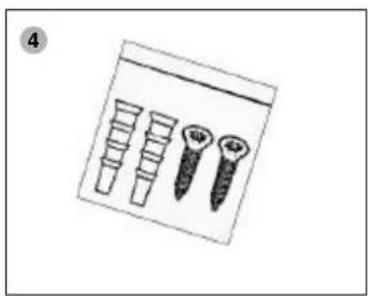
natural_image
Illustration of four different screw or screw components arranged in a row (no text or symbols)
natural_image
Coiled cable with two connectors, no visible text or symbols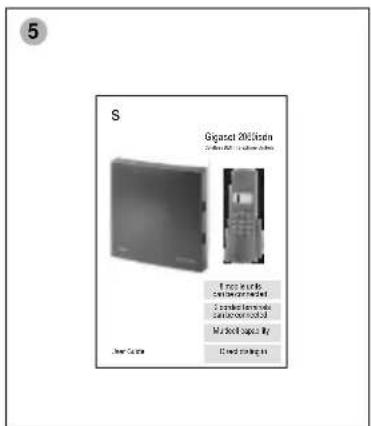
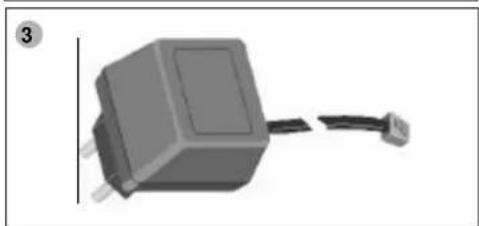
natural_image
3D rendering of a gray rectangular electronic component with a black cable extending from its side (no text or symbols visible)Installation
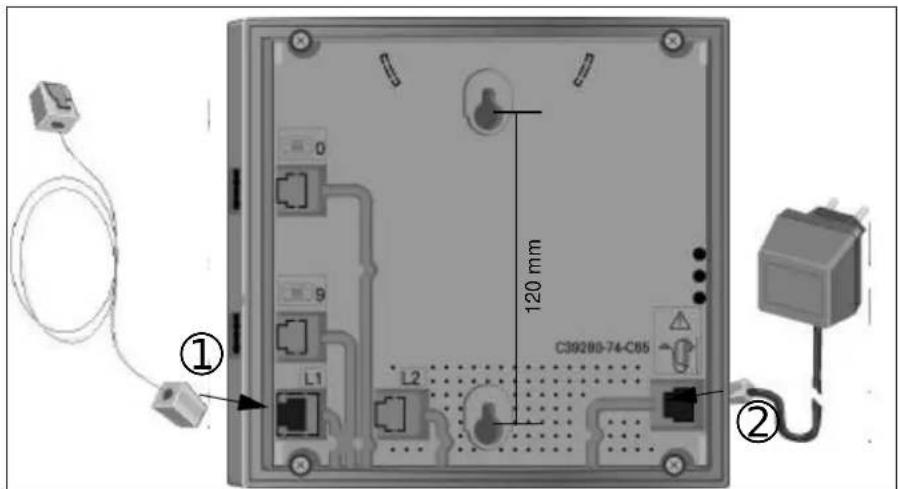
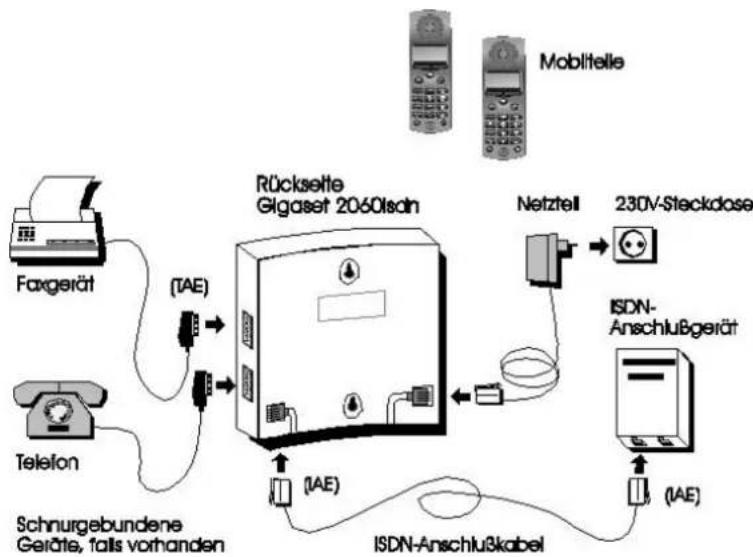
Connecting the base station
Place the base station on a convenient worktop and proceed as follows:
- Insert the Mini-Western plug of the telephone cable (ISDN cable) into the socket marked "L1" (underside of the base station, see ① in illustration below).
- Insert the Mini-Western plug of the AC power adapter cable into the socket marked “ ^1 D” (underside of base station, see ② in illustration below).
- Push the cables into their slots.
- Connect the Mini-Western plug of the telephone cable (ISDN cable) to the telephone jack (IAE).
- Plug the AC power adapter into the 220/230V mains socket.

- Your telephone system will not work if the mains power supply fails or if the AC power adapter is not plugged into the mains socket.
- Use only the AC power adapter No. C 39280-Z4-C65 supplied with the base station.
- Make sure you connect the telephone cable and the AC power adapter to the correct sockets in the base station. The base station will not work and may be damaged if you connect the cables to the wrong sockets.
Installation
Registering the Gigaset 2000C comfort mobile unit
A mobile unit has to be ready for operation before you can use it with a base station. See the section entitled “Installation” in the User Guide supplied with your Gigaset 2000C.
Each mobile unit has to be registered at the base station. The registration procedure for the Gigaset 1000C is described on the next page.
Initial registration
The following prompt is displayed if the mobile unit is not registered at a base station:


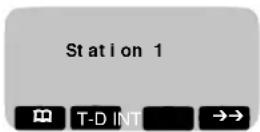
Press to confirm. Enter the 4-digit system code of the base station and confirm this entry as well (default code: "0000"). The mobile unit searches for the base station waiting to accept registration. The message "Registering with Station 1" appears on the display.
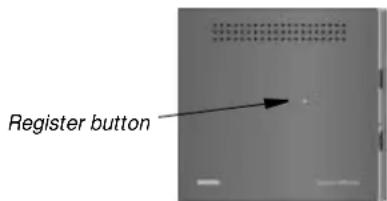
Press the Register button on the base station
Use a pointed instrument (such as a pencil or ball-point pen) to press the button. The Register button starts flashing.
The unassigned internal numbers are listed as soon as the connection between the base station and mobile unit is established.

Key in the internal number you want to assign to the mobile unit. Use ← to correct your entry if necessary.

Confirm your choice of internal number. This concludes the registration procedure and a message to this effect appears in the display, for example "Unit registered with internal No. 1".
Your mobile unit is registered and ready for use.
Installation

You can register your comfort mobile unit at a maximum of six base stations.
You can register a maximum of 8 mobile units at a base station.
If you start the registration procedure and 8 mobile units are already registered, the message "No free internal No." appears in the display when you enter the system code.
For details on the procedure for unregistering mobile units, → page 60.
Checking your own internal number

Press the Internal key to view the internal number assigned to the mobile unit.
Internal: Own No.: 1
COLL CALL
Registering at more than one base station and Gigaset 1000C
If your mobile unit was already registered at another base station, you must use the following registration procedure:
- Begin with the mobile unit:
ž
The comfort mobile unit is idle. You will be prompted to enter the system code in the course of the registration procedure (default code: "0000").

flowchart
graph LR
    A["Settings"] --> B["Register"]
    B --> C["Station 1 - 6"]
    D["Meaning: see footnote"] --> B
- Then proceed with the base station:
Use a pointed instrument (such as a pencil or ball-point pen) to press the button.
The Register button begins flashing.
Installation
3. Then back to the mobile unit

Key in the internal number you want to assign to the mobile unit.

Confirm your choice of internal number. This concludes the registration procedure and a message to this effect appears in the display, for example "Unit registered with internal No. 2".
- You can register your comfort mobile unit at a maximum of six base stations.
- You can register a maximum of 8 mobile units at a base station. If you start the registration procedure and 8 mobile units are already registered, the message "No free internal No." appears in the display when you enter the system code.
- If is advisable to have base-station number display activated if you have your mobile unit registered at more than one base station.
System code
As described in the instructions for the procedures involved, you have to enter the four-digit system code in order to initialize your base station or change settings. The default system code is "0000". You have to use this default system code when you register the first mobile unit. There is a separate mobile-unit PIN which you use to lock a particular mobile unit.

It is advisable to change the system code after you register the first mobile unit (see "Entering the PIN" in the User Guide for the mobile unit and page 22). The system code "locks" your system to prevent unauthorized access. No further mobile units can be registered or changes made to system settings without this system code.
Installation
Saving multiple subscriber numbers
If you rent a point-to-multipoint connection from your network provider you have 3 multiple subscriber numbers at your disposal (MSN, also → page 17 and Glossary, → page 98).
The procedure for saving these numbers in your Gigaset 2060isdn is described below. You can then use the ring allocation function ( page 15) to assign a multiple subscriber number (MSN) to each mobile unit or device. You can obtain a maximum of 10 multiple subscriber numbers on application from your network provider.
ž
The comfort mobile unit is idle. You will be prompted to enter the system code in the course of this procedure (default code: "0000").

flowchart
graph LR
    A["Service"] --> B["System settings"]
    B --> C["Enter MSN"]
    D["Meaning: see footnote"] --> B
The options at your disposal are as follows:

Enter a new multiple subscriber number (without national or local code). A multiple subscriber number is a string consisting of up to 10 digits.
or

View the list of multiple subscriber numbers and change individual MSNs.
The existing multiple subscriber numbers are listed.

You can select and subsequently edit a multiple subscriber number of your choice.
or

Use this function to delete a multiple subscriber number.
Installation
Ring allocation
Ring allocation is the function which enables you to define the user and MSN at which incoming calls are signalled or to which calls are directed.
Ž
The comfort mobile unit is idle. You will be prompted to enter the system code in the course of this procedure (default code: "0000").

flowchart
graph LR
    A["Service"] --> B["System settings"]
    B --> C["Line data"]
    D["Meaning: see footnote"] --> B

Select the multiple subscriber number for which you want to set ring allocation, for example MSN 1.

This is the menu for editing ring allocation. The current setting is marked "active". The options at your disposal are as follows:

Entering/changing collective call
The collective call list is displayed if you select " Collective call":
Example:
| External phone number Corresponding internal users | |
| 12345678 2, 3, 5 | |
When an external call for number 12345678 is incoming, the call is signalled simultaneously to the users having the internal numbers 2, 3 and 5.
Wall-mounting the base station
If you want to have the base station wall-mounted, proceed as follows:
- Drill two holes ( 5mm) one above the other with the centers 120 mm apart.
- Insert wallplugs of the correct size.
- Insert the two screws and tighten them until the gap between the wall and the underside of the screw heads is approx. 5 mm.
- Position the base station with the screw heads projecting into the slots in the rear and press the base station down to engage the screws.
Installation
Tips on where to install the base station
If you use corded telephones, it is advisable to space telephone and base station as far apart as possible in order to avoid the possibility of interference (due to technical reasons) on the telephone line.
Install the base station as centrally as possible in the area in which you will be using the telephones, for example:
in the hallway of your apartment,
😊 at an easily accessible point in the room, in a central room in your house, office or apartment,
not in a niche in the wall, not behind metal doors, heavy furniture or metal cabinets,
not in the cellar or roofspace, not at points where thick walls of (reinforced) concrete or metal would block radio signals.
If you are planning to use the telephone on your premises but outside the building, install the base station:
😊 at window level if possible, in a room overlooking the outdoor area.
Selecting the location
Select the best possible location, bearing the following criteria in mind:
- The telephone cable has to reach the ISDN socket.
-
The location has to be close to a mains socket for the 220/230V power supply for the base station.
-
To avoid interference, do not locate the base station in the immediate vicinity of other equipment such as a stereo, office equipment or microwave oven.
The base station is designed for use in protected indoor environments and a temperature range from 0 to +50 °C. Do not install the base unit in the bathroom, for example, a utility room or a damp cellar, or close to sources of heat such as radiators and the like. Do not install the base station where it will be exposed to direct sunlight.
Range
The range is approximately 300 meters outdoors, depending on local conditions. The maximum range indoors is 50 meters, depending on room layout and building structure.
If you move out of range of the base station you lose radio contact and the ON symbol in the display flashes. If you have activated the range warning signal function (off by default) the audible warning sounds as you approach the limit of the radio range.
Installation
Connection options: base station
The default operating mode is "point-to-multipoint access." The procedure for changing the operating mode to "point-to-point" is described on → page 24.
Important information about Euro-ISDN
Your ISDN system Gigaset 2060isdn supports two types of access.
Types of connection
- Point-to-multipoint
You can connect and operate one or more devices if you have an access of this type. You can connect other ISDN devices along with your Gigaset 2060isdn, for example an ISDN-compatible fax machine or a PC with ISDN card. If you operate a multicell system (→ page 84) you can connect up to 6 Gigaset 2060isdn base stations to a point-to-multipoint access. You can use a maximum of 10 multiple subscriber numbers on a point-to-multipoint access. All users assigned an MSN are called via this number. You can also assign all users to one MSN. The MSNs are individually programmable:
Example: MSN 1 = office MSN 2 = private MSN 3 = fax
- Point-to-point
The Gigaset 2060isdn has to be the only communication system connecting to a point-to-point access.
Users can be reached selectively by dialing the internal numbers as extension suffixes. Collective calls and group calls are not supported.
This is a particularly economical operating mode if the number of users connected to your Gigaset 2060isdn is large (e.g. 8 mobile units, 1 corded telephone, 1 fax machine).
Installation
Features
The ISDN features that you can obtain from your network provider and utilize with your Gigaset 2060isdn are listed below. See the glossary ( page 98) for more details on the individual services.
- Consultation hold
- Toggle
• Call parking (point-to-multipoint access only) - Call data display
- Call forwarding
- Call waiting
• Multiple subscriber number (point-to-multipoint access only)
- Direct dialing in (point-to-point only)
- Automatic callback
- three-party conferencing
• Transmission of own phone number
• Transmission of call partner's phone number
Operating information and error messages
Your Gigaset 2000C/2000T comfort mobile unit (or 1000C) displays operating information and sometimes error messages from the ISDN exchange, for example “subscriber busy”, “invalid directory number”, and so on.
Operation with comfort mobile unit
Operation with comfort mobile unit
Using the menus
See the Gigaset 2000C User Guide for detailed instructions on how to use the menus.
Conventions used in this User Guide
Short form
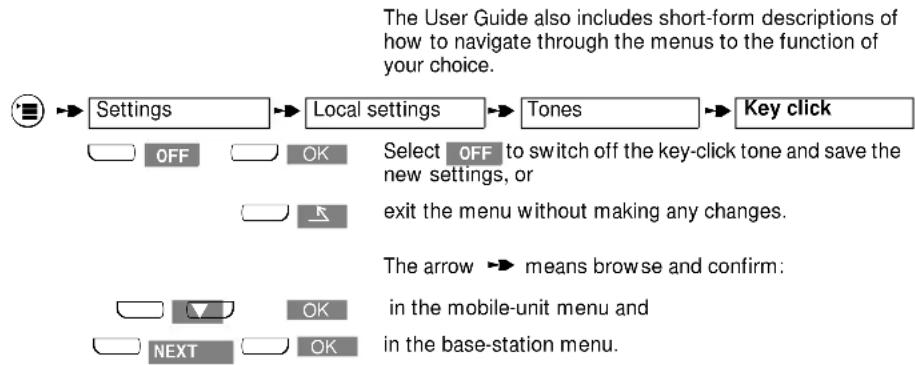
flowchart
graph LR
    A["Settings"] --> B["Local settings"]
    B --> C["Tones"]
    C --> D["Key click"]
    E["OFF"] --> F["OK"]
    G["OK"] --> H["Select OFF to switch off the key-click tone and save the new settings, or"]
    I["EXIT"] --> J["exit the menu without making any changes."]
    K["EXIT"] --> L["The arrow means browse and confirm: in the mobile-unit menu and"]
    M["OK"] --> N["in the base-station menu."]
    O["NEXT"] --> P["OK"]
Status-dependent menus
Press the ⚙ key to open menus which depend on telephone status, such as the menus for call status, internal call, external call or consultation.
Operation with comfort mobile unit
Example: "External consultation in external call"
You have an external call in progress.

Ext. consultat'n Set
up the external consultation call.

Call up the menu again and
Resume
Conference
Macro
Internal
Speaker volume
Telephone book
Keypad on

NEXT

OK
choose a function.

Resume
Select "Resume" from the menu if you want to resume your original call. On the left here you can see the short-form description of the procedure.
Menu structure for system settings
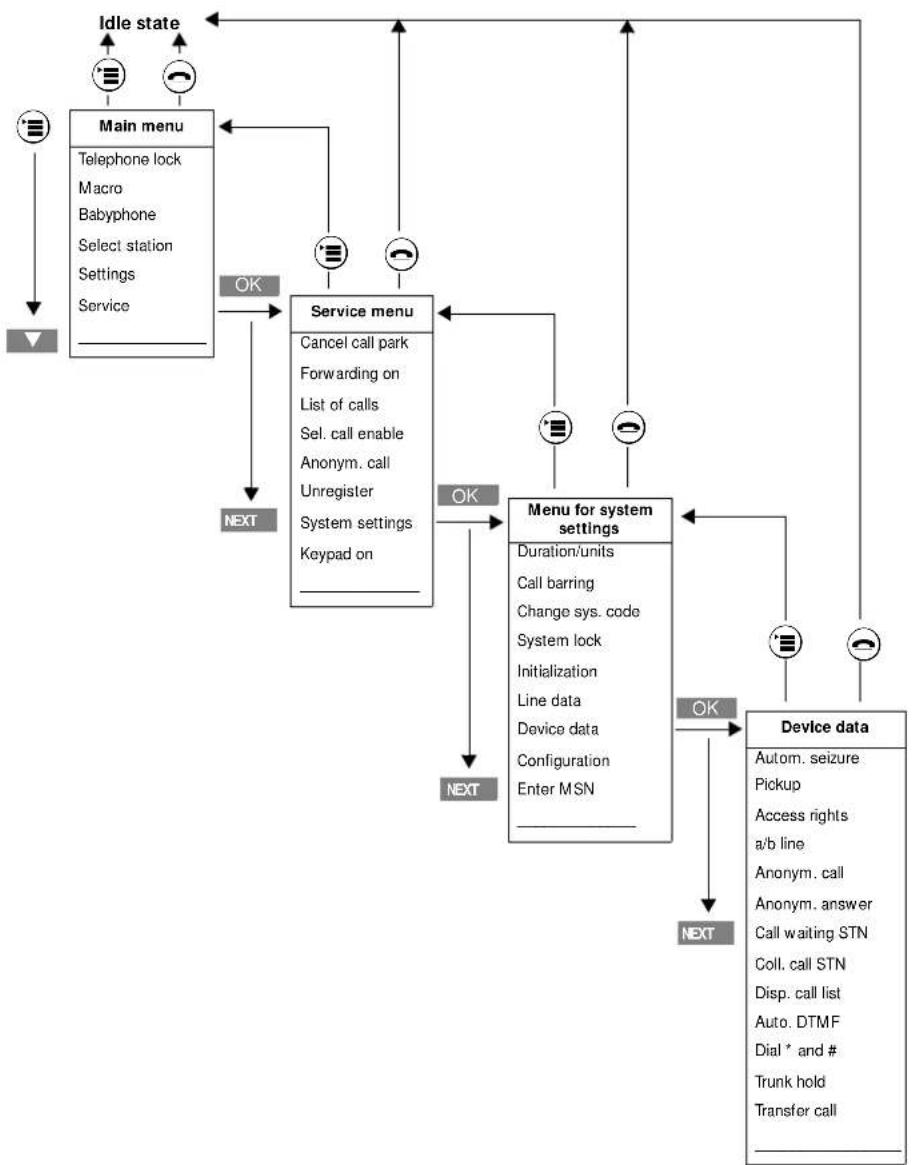
As a rule, you start from the idle state when you want to change settings. There are some additional settings that you can access in other states (see "Status-dependent menus" → page 19).
You can proceed step by step to the setting of your choice. Note that you can use the ⏻ key to move backwards through the menu levels (Main menu - Service - System settings - Device data). This is a quick way of returning from a particular menu through the hierarchy.
No matter where you are in the menu structure, if you want to cancel without making changes all you have to do is press the on-hook key ⓞ. Your comfort mobile unit will cancel automatically if you wait for more than 30 seconds without pressing a key.
Example:
If you want to activate call forwarding, you begin with the telephone idle and press the ☐ key, then proceed step by step, selecting "Service" from the main menu, and then "Forwarding on" from the "Service" menu.
The illustration on the next page outlines the menu structure for system settings:
Operation with comfort mobile unit
Example illustrating the menu hierarchy
flowchart
graph TD
    A["Idle state"] --> B["Main menu"]
    B --> C["Service menu"]
    C --> D["Menu for system settings"]
    D --> E["Device data"]
    E --> F["Device data"]
    F --> G["Device data"]
    G --> H["Device data"]
    H --> I["Device data"]
    I --> J["Device data"]
    J --> K["Device data"]
    K --> L["Device data"]
    L --> M["Device data"]
    M --> N["Device data"]
    N --> O["Device data"]
    O --> P["Device data"]
    P --> Q["Device data"]
    Q --> R["Device data"]
    R --> S["Device data"]
    S --> T["Device data"]
    T --> U["Device data"]
    U --> V["Device data"]
    V --> W["Device data"]
    W --> X["Device data"]
    X --> Y["Device data"]
    Y --> Z["Device data"]
    Z --> A
    style A fill:#f9f,stroke:#333
    style B fill:#ccf,stroke:#333
    style C fill:#cfc,stroke:#333
    style D fill:#fcc,stroke:#333
    style E fill:#cff,stroke:#333
    style F fill:#ffc,stroke:#333
    style G fill:#cfc,stroke:#333
    style H fill:#fcc,stroke:#333
    style I fill:#cfc,stroke:#333
    style J fill:#fcc,stroke:#333
    style K fill:#cfc,stroke:#333
    style L fill:#fcc,stroke:#333
    style M fill:#cfc,stroke:#333
    style N fill:#fcc,stroke:#333
    style O fill:#cfc,stroke:#333
    style P fill:#fcc,stroke:#333
    style Q fill:#cfc,stroke:#333
    style R fill:#fcc,stroke:#333
    style S fill:#cfc,stroke:#333
    style T fill:#fcc,stroke:#333
    style U fill:#cfc,stroke:#333
    style V fill:#fcc,stroke:#333
    style W fill:#cfc,stroke:#333
Basic settings
Basic settings
Entering/changing the system code
For the sake of security you should enter your own, custom, four-digit system code. This code prevents unauthorized changes to your settings and the registration of further mobile units without your permission.
You must make all your entries from a mobile unit. The default system code is "0000".

You must make all your entries from a mobile unit. When you select "System settings" from the menu you are always prompted for the system code. The default system code is "0000".
The comfort mobile unit is idle.
Meaning: see footnote


Select "System settings", enter the 4-digit system code and press "OK" to confirm.

Enter the new system code and be sure to memorize it!
Each digit you enter replaces a dash. You can use to correct your entry if necessary.


Confirm your entry.

Enter the new system code again and press "OK" to conclude the procedure.

You will hear a negative acknowledgment tone if the system code you enter is incorrect. If you forget your system code you will have to call in technical support to have the code reinitialized. Forgetting your system code is like losing a key. Contact your retailer if you forget the system code.
Basic settings
Setting point-to-multipoint
Point to multipoint is the default access mode of your Gigaset 2060isdn. Use the procedure described here to configure the point-to-multipoint mode and define operation as local or multicell (in other words mobile units configured for use with one or more base stations).
When configured in this way your Gigaset 2060isdn is compatible only with a point-to-multipoint access installed by your network provider. For more information on multicell operation, → page 81.
ž
The comfort mobile unit is idle. You will be prompted to enter the system code in the course of this procedure (default code: "0000").
Meaning: see footnote

After confirming - and thus activating - "Point to MP," select:

or

If you select multicell operation:
Enable or disable calls from and to multiple base stations.

It is not advisable to enable calls between internal users across multiple base stations unless your Gigaset 2060isdn is connected to a private branch exchange.
The PBX must support this internal traffic. For more information on point-to-multipoint operation page 17 and page 84
Basic settings
Setting point-to-point
You can use this mode with your Gigaset 2060isdn, but you must obtain the point-to-point access from your network provider, who also provides the requisite network terminator.
When configured in this way your Gigaset 2060isdn is compatible only with a point-to-point access installed by your network provider.
Ž The comfort mobile unit is idle. You will be prompted to enter the system code in the course of this procedure (default code: "0000").

flowchart
graph LR
    A["Service"] --> B["System settings"]
    B --> C["Configuration"]
    C --> D["Point to P."]
    style A fill:#f9f,stroke:#333
    style D fill:#ccf,stroke:#333
After confirming - and thus activating - "Point to P.", select:
Enter the full point-to-point phone number:

Use the OKkey to check the entries and the SAVE softkey to save the new entry or change.

The phone number cannot be more than 10 digits in length.
If you change to point-to-point you must re--initialize the base station by unplugging the AC adapter from the mains socket and then reconnecting to the power supply. For more details on point-to-point operation, → page 17 and → page 81.
Basic settings
Suppressing phone-number display
Your Gigaset 2060isdn allows you to suppress display of your phone number on the call partner's telephone in two cases. Select "Anonym. call" if you do not want your phone number displayed when you place calls. Select "Anonym. answer" if you do not want your phone number displayed when you answer incoming calls.
Ž The comfort mobile unit is idle. You will be prompted to enter the system code in the course of this procedure (default code: "0000").

flowchart
graph LR
    A["Service"] --> B["System settings"]
    B --> C["Device data"]
    D["Meaning: see footnote"] --> B
Your options for suppressing phone-number display are as follows:

Enable/disable display of your phone number on the called party's telephone when you place calls.

Enable/disable display of your phone number on the calling party's telephone when you answer calls.
Activating/deactivating call pickup
The call pickup function must be activated (default) before you can pick up calls ( page 29). Activation/deactivation of the call pickup function applies to the entire system.
Ž The comfort mobile unit is idle. You will be prompted to enter the system code in the course of this procedure (default code: "0000").


Basic settings
Activating/deactivating call waiting per user
If call waiting is activated for one or more internal users and both channels are busy, a call-waiting tone draws attention to the next incoming call. You have the choice of terminating the ongoing call and accepting the waiting call ( page 26) or rejecting the waiting call. You must obtain the corresponding service from your network provider in order to use this function.
Ž The comfort mobile unit is idle. You will be prompted to enter the system code in the course of this procedure (default code: "0000").
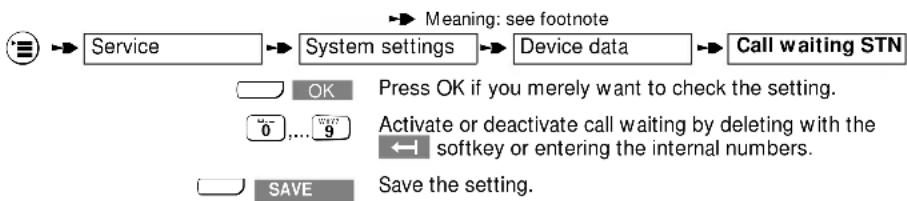
flowchart
graph LR
    A["Service"] --> B["System settings"]
    B --> C["Device data"]
    C --> D["Call waiting STN"]
    D --> E["OK"]
    E --> F["Press OK if you merely want to check the setting."]
    F --> G["Activate or deactivate call waiting by deleting with the softkey or entering the internal numbers."]
    G --> H["SAVE"]
    H --> I["Save the setting."]
Activating/deactivating automatic line seizure
You are immediately assigned an external line when you press the Line key (default). If this function is deactivated you are prompted to seize a line by pressing EXT (not in en-bloc dialing mode). MSNs are available for line seizure, if entered (→ page 14).
Ž The comfort mobile unit is idle. You will be prompted to enter the system code in the course of this procedure (default code: "0000").
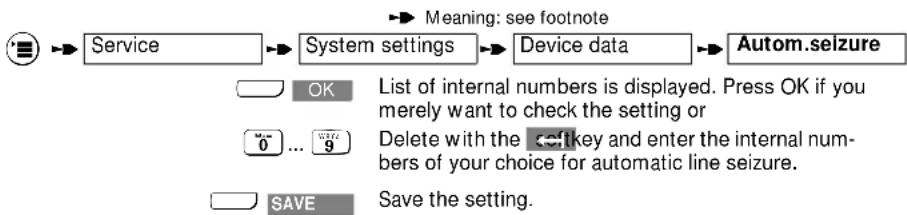
flowchart
graph LR
    A["Service"] --> B["System settings"]
    B --> C["Device data"]
    C --> D["Autom.seizure"]
    style A fill:#f9f,stroke:#333
    style D fill:#bbf,stroke:#333
    note1["Meaning: see footnote"]
    note2["OK List of internal numbers is displayed. Press OK if you merely want to check the setting or"
    note3["Delete with the <sf key and enter the internal num-
bers of your choice for automatic line seizure."
    save the setting."
    end
Basic settings
Administrating the list of calls
Calls which do not complete (no connection because busy, no answer) are automatically logged in a list of calls. The list contains up to 10 entries with phone numbers (no repeats) of calls switched via the ISDN exchange.
Activating/deactivating display
You can activate or deactivate display of the list. Display is activated by default.
ž
The comfort mobile unit is idle. You will be prompted to enter the system code in the course of this procedure (default code: "0000").

flowchart
graph LR
    A["Service"] --> B["System settings"]
    B --> C["Device data"]
    C --> D["Disp. call list"]
    D --> E["OK Press OK if you merely want to check the setting."]
    D --> F["ON Press to activate display."]
    D --> G["OFF Press to deactivate display."]
Deleting numbers from the list of calls
You can delete individual numbers or the entire list.
To delete individual numbers from the list

Press the off-hook key

flowchart
graph LR
    A["Set sys funct."] --> B["List of calls"]
    B --> C["Delete entry"]
    D["NEXT"] --> E["DELETE"]
    E --> F["Select and delete the entry of your choice."]
To delete the entire list

Press the off-hook key

flowchart
graph LR
    A["Set sys funct."] --> B["List of calls"]
    B --> C["Delete all"]
    D["YES"] --> E["Press "YES" to confirm and delete all entries in the list of calls."]

The "List of calls" is one of the items available in the "Service" menu when the mobile unit is idle.
A phone number is automatically deleted from the list when the connection is set up.
Incoming calls
Incoming calls
Answering/terminating a call
An incoming call (external, internal) is signaled audibly by the ringer and visually on the display of the mobile unit.
Deactivating the ringer

RING OFF
Press to deactivate the ringer.
With the ringer off you can still answer a call at any time when the ringer icon is visible in the display.
To answer a call
or

Either remove the mobile unit from the charging unit
Press the off-hook key if the mobile unit is not in the charging unit.
To reject a call

REJECT
Press to reject the call.
The calling party hears a busy tone if you reject the call. A caller using a Gigaset 1000C or 2000C is notified by the message "User busy" in the display and the announcement "The number you dialed cannot be reached at this time. Please call again later."
To terminate a call

Either press the on-hook key, if you do not want to return the mobile unit to the charging unit
or
Reinsert the mobile unit in the charging unit.
Incoming calls
Call pickup
Within your call group ( page 56), you can pick up a call that has not yet been switched through to your telephone. The preconditions are call pickup activated ( page 25) and group call defined as ring allocation.
Example for group call:
| Call group Internal users Meaning | ||
| Call group 1 | 1 | Called, for example, for 5 ring cycles |
| Call group 2 | 2, 3 | Ringing extended to these users, for example after 5 ring cycles |
Internal users 2 and 3 can pick up the call at any time while user No. 1's phone is ringing.
User 1 has an incoming external call ringing.
User 2(3) sees the following:
User 2(3) can pick up the call ringing at user No. 1's telephone.

Press the off-hook key
User 2(3) can pick up the call ringing for user 1.

ACCEPT
Press to pick up the call ringing for user 1.
or

Press if, instead of accepting the call, you want to set up an external call (while the incoming call is ringing for user No. 1).
Incoming calls
Call pickup from answering machine

You can pick up a call that the answering machine has already accepted if the answering machine is entered in your call group.
Press the off-hook key
Press if automatic line seizure is deactivated for this internal number ( page 26). MSNs are available for line seizure if they were entered ( page 14).

Pick up the call.
Answering a waiting call with another call in progress

Incoming calls
Tracing a call (call intercept/MCID)
You can trace a call to its source. You must obtain this service from your network provider and activate it, as otherwise the function is rejected and the message "Ident. not possible" issued.
You can use this function in the following situations:
- A call is in progress.
- Ringer sounds: you press the off-hook key but the caller has already hung up. You have 20 seconds to trace the call.
- End of call. The anonymous caller hangs up. You have 30 seconds to trace the call. (This does not work if you break the connection.)

You answer a call.

Meaning: see footnote


Intercept on

The call is traced by the network provider, who records the call along with phone number of the calling party, time and date. The listing is delivered to you later.
Outgoing calls
Outgoing calls
Dialing external numbers with the keypad
Once base station and comfort mobile unit are in operation, you can generally telephone right away with a mobile unit switched ON.

Press the off-hook key.
Key in the phone number. The user answers and you conduct your external call.
or

EXT.
Press if automatic line seizure is deactivated for this internal number ( page 26). MSNs are available for line seizure if they were entered ( page 14). Use one of the MSNs to set up the connection.
To terminate the call

Press the on-hook key or place the mobile unit in the charging unit.
ISDN trunk busy
If the ISDN trunk is in use by another Gigaset user, you hear the busy tone and the message "Network section busy" appears in the display.
Mobile unit not configured for trunk calls
If your mobile unit is not set to "trunk acc." (→ page 51), you cannot set up external calls. The message "No access rights" appears on the display.
No answer or station is busy
Return the mobile unit to the base station or charging unit. The connection is cleared down.

Clear down the connection (the equivalent of replacing the handset).

You can use the redial function if you want to try to reach this user again later. If the station is busy you also have the option of activating automatic callback ( page 45).
Outgoing calls
Viewing/dialing from list of calls
Calls which do not complete (no connection because busy, no answer) are automatically logged in a list of calls. Phone numbers are not repeated in the list; even if the user attempt a call more than once. The list enables you to call back to someone who tried to call you but failed. The preconditions are that the calls were switched via the ISDN exchange and that the function for displaying the list of calls is activated ( page 27). The list of calls can contain a maximum of 10 entries in chronological order. A phone number which you subsequently call back successfully is deleted from the list after your call.
The "List of calls" item does not appear in the menu unless the list contains at least one phone number.

Press the off-hook key

Press if automatic line seizure is deactivated for this internal number ( page 26). MSNs are available for line seizure if they were entered ( page 14).

flowchart
graph LR
    A["Start"] --> B["Set sys funct."]
    B --> C["List of calls"]
    C --> D["Display entry"]
    D --> E["Select the phone number of your connection"]
    style A fill:#f9f,stroke:#333
    style B fill:#ccf,stroke:#333
    style C fill:#cfc,stroke:#333
    style D fill:#fcc,stroke:#333
    style E fill:#ffc,stroke:#333

You can delete individual phone numbers or the entire list of calls ( page 27).
Outgoing calls
Dialing internal numbers
Calling an internal user
If your configuration consists of multiple internal users (mobile units, devices) you can make internal calls. There are no telephone charges for internal calls.

Press the “Internal” softkey and enter the number of the internal user you want to reach (0 to 9). The internal user is called.
Collective call to all mobile units/devices
If your configuration consists of multiple mobile units or devices, you can send a collective call from any mobile unit to all other registered internal users, mobile units or devices. The first internal user to answer the collective call is connected. This function presents an easy way of finding misplaced mobile units.

Press these keys in succession. All reachable mobile units and devices are called. If you prefer you can use the COLL. CALL softkey instead of pressing *.

Users 0 to 9 can be configured for your Gigaset 2060isdn.
Press the INT softkey if you want to check the internal number configured for your own mobile unit. To cancel, return the mobile unit to the charging unit or press the "on-hook" key.
Terminating an internal call
Return the mobile unit to the charging unit. The connection is cleared down.
or

Clear down the connection (the equivalent of replacing the handset).
Outgoing calls
Activating "Anonymous call" for a single call
This function enables you to prevent your phone number being displayed for a single call which you are about to make (if you have obtained the “case-by-case suppression of phone number” service from your network provider).
Ž The comfort mobile unit is idle.
Meaning: see footnote

Confirmation appears for 2 seconds, after which the line is automatically seized if automatic seizure is activated for this internal number ( page 26).
Call in progress
Call in progress
Holding a call
You can place a call on hold, for example if you want time to examine a document before proceeding.
Holding an internal call:

You are conducting an internal call.
▶ Meaning: see footnote
The call with the internal user is placed on hold.
Press the softkey
or
R
Press this key to cancel the hold and resume the call.
Placing an external call on hold

or

You are conducting an external call.
Press the softkey. The call with the external user is placed on hold.
Press the softkey
or
R

The units or call-duration counter continues to count in the background while an external call is on hold.
Call in progress
Accessing answering machines/using telephone services
Once you have set up a connection you can use the keypad of the mobile unit to access an answering machine or voice mailbox, for example, or use network-provider services such as a paging system.
Without clearing down the call, you switch the keypad to DTMF dialing ("Temp. tone") as described below. You can then use the keypad to enter the requisite information. You also have the option of permanently activating DTMF dialing for the connected state ( page 54).
When you conclude the call the temporary switch to DTMF dialing is automatically cancelled.
Meaning: see footnote

Temp. tone
The change to DTMF dialing is effective as soon as you confirm your choice.
You can now enter digits and characters for transmission.
To reset the dialing function (deactivate "Temp. tone"):

DTMF OFF
Press the softkey to reset the dialing function.
Call in progress
Mute function

If you want to prevent your call partner in an external call hearing you (for example if you want to consult someone in privacy), you can temporarily mute the mobile unit.
▶ Meaning: see footnote
The call partner can no longer hear you.
You can consult someone in privacy.
Mute off:

The call partner can hear you again. You can switch the mute function on and off as often as you wish.
Switching to keypad
If your Gigaset 2060 isdn connects to a PBX or the ISDN exchange responds to KEYPAD commands, you can activate the keypad function in order to send commands to the higher-order system.
Activating keypad with a call in progress
You are conducting an external call.

Enter the keypad information.

You can cancel the keypad function via the menu or by pressing the "KEYP.OFF" softkey.

or

Keypad is off.
Activating keypad before seizing the line


Enter the keypad information and

Seize the line.
Switching functions
Switching functions
Internal consultation/call transfer
You can use your system to conduct internal consultation calls and transfer an external call to another internal user.
Starting an internal consultation:

You are conducting an external call.

Press the softkey.
Enter the internal number of the user you want to call.


Press the star key to call all internal users at once. You hear the ringer tone and a user answers. You conduct your call with the internal user.
Call transfer:

Press this key or return the mobile unit to the charging unit.


Press one of these keys to resume the call with the external user. You conduct the external call as before.

When you dial the internal number you can "replace the handset" and thus transfer the external call immediately, even before the internal user you dialed has answered. The call is returned to you if the internal user to whom you transferred fails to answer within 30 seconds.
External consultation
Your ISDN system also enables you to conduct external consultation calls, for example with an external business partner.
Starting an external consultation:
You are conducting an external call.


Meaning: see footnote
Press one of these keys to start the external consultation.

Enter the phone number of the external user you want to call. You hear the ringer tone and the user answers. You conduct your call with this second external user.
Switching functions
Terminating the external consultation call and continuing the first external call:

Meaning: see footnote
You can continue your call with the first external user.
or

Press this key or return the mobile unit to the charging unit. You receive a recall which you answer, thus resuming the original call.

The consultation is cancelled after 30 seconds if you press the “CONSULT” softkey and do not enter a phone number within this time. You are recalled by the parked call after another 30 seconds.
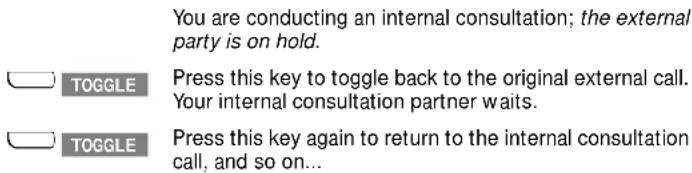
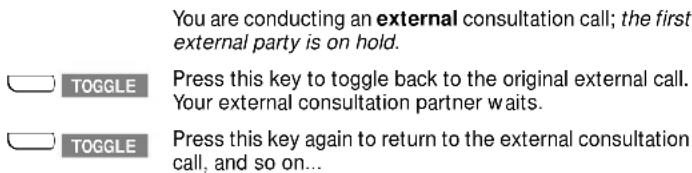
Toggling
If you have a consultation call in progress you can switch back and forth between the two calls as often as you wish.
Toggling between internal and external users:
Toggling between external users:
Switching functions
Ending toggle mode:

Meaning: see footnote
You can continue your call with the first external user.
or

Press this key or return the mobile unit to the charging unit. You receive a recall which you answer, thus resuming the original call.

You can toggle between an internal call and an external consultation call in the same way. You can also toggle between calls by selecting "Internal" from the menu and pressing the ☐ key. You can also turn a consultation call into a three-way conference.
Three-party conference
While a consultation call is in progress you have the option of setting up a three-way conference between yourself and the two other parties. Display of charge units or call duration is suppressed while this function is active.
External call with simultaneous internal/external consultation:

You are conducting an internal/external consultation call and the external partner is on hold.
Press this softkey to start a three-way conference.
Ending the three-way conference

Press either of these keys. You resume the original external call.
or
Press this key or return the mobile unit to the charging unit to disconnect from both partners.
Switching functions
Parking an external call
You can park a call under a parking code and unpark it again under the same code at another telephone, such as a mobile unit. A call can be parked for up to three minutes. If you park a call you can unpark it only at the same point-to-multipoint access (Glossary, → page 98).
If, for example, your configuration has two base stations operating via a common point-to-multipoint access, you can park an external call at one base station and unpark it at the other, which means that you do not have to break the connection. In this way you can virtually double the range of your mobile unit.
You are conducting an external call and want to continue at another mobile unit.

flowchart
graph LR
    A["Service"] --> B["Park"]
    B --> C["Meaning: see footnote"]
    D["OK"] --> E["Enter a digit: this is the or must also confirm. The ca"]
Enter a digit: this is the one-digit parking code which you must also confirm. The call is parked.
The connection is not cleared down: instead, the call is placed on hold.
Unparking an external call
You can unpark a call only at the point-to-multipoint access at which it was originally parked.
ž
The mobile unit at which you want to unpark the call is idle.

flowchart
graph LR
    A["Service"] --> B["Cancel call park"]
    B --> C["OK"]
    C --> D["Enter the o"]
Enter the original parking code and confirm your entry. The call is unparked and you can resume your conversation.
Activating external call forwarding
You can forward an external call to another external user. You can configure call forwarding for point-to-multi-point or point-to-point access. There are three types of external call forwarding (Glossary, → page 98):
- immediate (direct),
- on busy,
- timeout after no answer (after 5 rings).
The mobile unit is idle. Open the "Forwarding on" menu.
Meaning: see footnote

42
means: browse with □ or □ NEXT and press □ OK to confirm
Switching functions
Ext./direct
Ext./busy
Ext./timeout
External calls are forwarded immediately (e.g. vacation).
External calls are forwarded if user dialed is busy (e.g. to secretary's phone)
External calls are forwarded after a certain number of rings (e.g. after working hours, to private phone).
If you have a point-to-multipoint access, the list of multiple subscriber numbers appears when you select one of the above options and you can select an MSN.

Enter the external phone number to which you want the calls forwarded and confirm your setting.

When calls are forwarded you pay the call charges for the connection from your phone to the forwarding destination.
Deactivating external call forwarding
If you have a point-to-multipoint access call forwarding has to be deactivated for each applicable multiple subscriber number. If you have a point-to-point access no list of MSNs is displayed.

Press the off-hook key. The message "fnct. set. act" is displayed, indicating that a system function is set and active, in this case external call forwarding.

If you have a point-to-multipoint access, select the multiple subscriber number from the list.

Select the type of external call forwarding
- Ext./direct
- Ext./busy
- Ext./timeout
OFF
and press this key to switch it off.

Press this key if you merely want to check the current setting.
Switching functions
Deactivating all external call forwarding
The comfort mobile unit is idle.


Meaning: see footnote
The message "All forwarding canceled" appears in the display for 2 seconds by way of confirmation.
Activating internal call forwarding
You can use this function to forward external calls to another internal user. Note that you can forward a call only to an internal user who does not have call forwarding activated.

The mobile unit is idle.


▶ Meaning: see footnote

to internal 2 Select the internal user, for example user 2

new : 1 cycle Set number of ring cycles: e.g. 1 (default: 3 cycles)
Deactivating internal call forwarding

Press the off-hook key. The message "fnct. set. act" is displayed, indicating that a system function is set and active, in this case internal call forwarding.


flowchart
graph TD
    A["Set sys funct."] --> B["Int. forwarding"]
    B --> C{OK}
    B --> D{OFF}
    C --> E["Press this key if you merely want to check the current setting."]
    D --> F["Press this key to switch off internal call forwarding."]
Switching functions
Activating external automatic callback
If you attempt to place an external call but the party you call is busy, you can activate “automatic callback” and replace the handset. You will be called back automatically as soon as the number you dialed is free.
The .callback appears automatically if the automatic callback service is available from your network provider.

You want to place an external call, but the party you call is busy.

CALLBCK
Press this softkey to activate automatic callback. The message "Callback to ext activated" is displayed for 2 seconds by way of confirmation.

Replace the handset.

Callback is cancelled automatically as soon as the call is successfully conducted.
Deactivating external automatic callback

Press the off-hook key. The message "fnct. set. act" is displayed, indicating that a system function is set and active, in this case automatic callback.

Meaning: see footnote

Set sys funct.

callback


Press this key to switch off automatic callback.
Press this key if you merely want to check the current setting.
Call charges, call duration
Call charges, call duration
Displaying call charges/call duration
You can check the total accrued call charges and the charge for the most recent call at each mobile unit. The total accrued charge is the sum of the charges for calls placed from the mobile unit in question. For details on setting the call charge factor, page 47.
You set the parameters for all mobile units and devices at the mobile units, the parameters being for call duration, units and charges. You can also decide whether or not to have the running total for accrued charges or units displayed before each call commences.
You can also reset the totals per mobile unit or device and the total for all devices with the aid of the mobile units.
Display units

Charge factor = 0 Units remain visible for approx. 4 seconds after termination of the call.
Display call charges in currency units
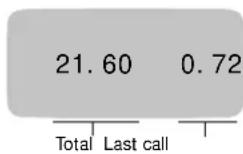
Charge factor > 0 Call charges remain visible for approx. 4 seconds after termination of the call.
Display call duration
If the call timer is activated it starts as soon as the connection is set up.
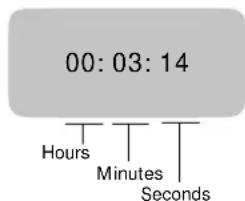
The timer stops when the connection is cleared down; the call duration remains visible for approx. 4 seconds after termination of the call.
Call charges, call duration
Activating/deactivating display of call duration or charges/setting call charge factor
Your Gigaset 2060isdn can display either the telephone time units or call charges or the duration of the call. Call-duration display is active by default.
If you need call charges displayed or logged, you must obtain the appropriate call data logging function from your network provider. Bear in mind, however, that for billing purposes the units counter of the network provider is always binding.
The display mode you select is valid for all mobile units.
ž
The comfort mobile unit is idle. You will be prompted to enter the system code in the course of this procedure (default code: "0000").
Meaning: see footnote

This is the menu for choosing display of call duration or call charges. The options at your disposal are as follows:

Activate/deactivate display of call duration
This is a toggle: by activating call-duration display you automatically deactivate display of call charges.

Activate/deactivate display of charge units
This is a toggle: by activating charge-unit display you automatically deactivate display of call duration.

Select charge factor with decimal point
Every time you change the charge factor the charge totals are reset to zero.
Consequently, you should change the factor only at the end of an accounting period.

Select charge factor without decimal point
Every time you change the charge factor the charge totals are reset to zero.
Consequently, you should change the factor only at the end of an accounting period.
This is the mode for displaying charges in foreign currency units.
Call charges, call duration
→ Charge redisplay
Activate/deactivate display of charge for most recent call
(Call-charge display must be activated.)
If this function is activated the charge for the most recent call is displayed as soon as the trunk is seized for a call. Practical in the catering trade, for example, because the charge for a call placed by a guest can be checked right away. See “Deleting total” for instructions on resetting the call charge display.
Total
Check charge totals per multiple subscriber number or delete per MSN.
Use "NEXT" to browse through the individual multiple subscriber numbers.
The last value in the list is the grand total for the base station.
Total per unit
Check charge totals per registered mobile unit or connected device, i.e. per internal user, and delete single totals.

All running totals are deleted when you re-enter or change the charge factor.
If you want to reactivate call-units display, enter "0.00" as the new charge factor.
The charge factor is programmable in the range 9.99 to 999: the setting is valid for all users.
Locks
Locks
Lock for outgoing calls (system lock)/emergency phone numbers
You can use the system lock to prevent your base station being used for outgoing calls. Incoming calls can be answered.
Exception: Emergency phone numbers can be called even when the system lock is active. You can define and save a maximum of four emergency phone numbers, each consisting of up to 16 digits.
Ž The comfort mobile unit is idle. You will be prompted to enter the system code in the course of this procedure (default code: "0000").

flowchart
graph LR
    A["Service"] --> B["System settings"]
    B --> C["System lock"]
    D["Meaning: see footnote"] --> B
The options at your disposal are as follows:
→ Lock on
Activate/deactivate lock
Phone No. list
Check/change the emergency phone numbers.
You can select emergency phone numbers from the list and change them as applicable.
New entry
Add a new emergency phone number.
→ Delete phone No.
Delete individual emergency phone numbers.

Dialing is not possible if you have system lock with emergency phone numbers activated at the same time as telephone lock with direct station selection. Exception: the DSS number is also the emergency phone number.
Editing lock numbers/activating and deactivating call barring
Lock numbers enable you to bar entire sets of destinations - phone numbers beginning with these lock numbers cannot be dialed. If, for example, you define "00" as a lock number, your system cannot be used to place international calls. You can save a maximum of three lock numbers (each consisting of between 1 and 8 digits) for each mobile unit.
Ž The comfort mobile unit is idle. You will be prompted to enter the system code in the course of this procedure (default code: "0000").

→ means: browse with □ or □ NEXT and press □ OK to confirm
Locks
Lock int2
Select the internal user (for example "Lock int2") to whom the function will apply.
→ Lock on
This is the menu for defining lock numbers. The options at your disposal are as follows:
Lock No. list
Activate/deactivate call barring by lock numbers.
When you select "Lock on", the message "call barr. Nos. for int2 activated" is displayed briefly.
New entry
Check/change lock numbers.
Once you have selected a lock number you can check or change it.
→ Delete lock No.
Add a new lock number.
Delete individual lock numbers. Select an entry: the lock number you select is deleted when you confirm your choice.
Delete all lock numbers
Use this function to delete all lock numbers at once.
Ž The comfort mobile unit is idle. You will be prompted to enter the system code in the course of this procedure (default code: "0000").

flowchart
graph LR
    A["Service"] --> B["System settings"]
    B --> C["Call barring"]
    C --> D["Delete all"]
    style A fill:#f9f,stroke:#333
    style D fill:#f9f,stroke:#333
All lock numbers for all internal users are deleted at once. The “Entries deleted” messages appears for 2 seconds by way of confirmation.
Blocking unwanted calls
You can enter up to three phone numbers, each up to 16 digits long, to determine which users can reach you. Calls from users with phone numbers other than these numbers are not put through to you.
A message indicating that this lock is activated appears on the mobile-unit display.
This lock can be circumvented if the calling party has suppressed transmission of the phone number to you (Glossary, → page 98), or if the call is from a non-ISDN user. It is advisable to activate phone number display as a better way of checking the origin of incoming calls.
Locks
ž
The comfort mobile unit is idle.
▶ Meaning: see footnote

Service
Sel. call enable
This is the menu for blocking unwanted calls. The options at your disposal are as follows:

Enable ring
Activate/deactivate unwanted call blocking.
All incoming calls are blocked if you do not define a number.

Phone No. list
Check/change phone numbers for wanted calls.

New entry
Add new phone number for wanted calls.

Delete phone No
Delete individual phone number as origin of wanted calls.
Deactivating unwanted calls blocking
You do not have to go through the Service menu in order to deactivate unwanted calls blocking.

Press the off-hook key

Set sys funct.
Sel. call enable

OFF
Press this key to deactivate unwanted calls blocking.
Setting user access rights
By defining access rights for each registered mobile unit you determine which internal users can place external, charged calls.
All devices have unrestricted trunk access by default.
- Unrestricted trunk access (= default)
The device can be used to conduct incoming and outgoing external calls.
- Incoming-only access
The device can be used only to answer incoming calls. All external dialing options are disabled.
- Internal-only access
The device can be used only to conduct internal calls. All external dialing options are disabled. You can conduct a consultation call with a user with internal-only authorization, but you cannot transfer the call to this user. You will be recalled if you attempt to do so.
Meaning: see footnote
Locks
Ž The comfort mobile unit is idle. You will be prompted to enter the system code in the course of this procedure (default code: "0000").

flowchart
graph LR
    A["Service"] --> B["System settings"]
    B --> C["Device data"]
    C --> D["Access rights"]
    E["Internal user"] --> F["Select the internal user for whom you want to define access rights."]
System settings
System settings
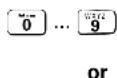
Setting the connection configuration for cordless internal users
You can define the types of device that can be used on the system's subscriber line circuits.
Cordless terminating devices can be mobile units or cordless devices such as the Gigaset 1000TAE. The default setting for users of this type is "mobile unit".
ž
The comfort mobile unit is idle. You will be prompted to enter the system code in the course of this procedure (default code: "0000").
flowchart
graph LR
    A["Service"] --> B["System settings"]
    B --> C["Device data"]
    C --> D["a/b line"]
    E["Internal 1"] --> F["Next"]
    G["SAVE"] --> H["Select a device type from the "Device type" menu and confirm your choice. For example, select "Fax" for a fax machine connected to a Gigaset 1000TAE."]
    style A fill:#f9f,stroke:#333
    style B fill:#f9f,stroke:#333
    style C fill:#f9f,stroke:#333
    style D fill:#f9f,stroke:#333
    style E fill:#ccc,stroke:#333
    style F fill:#ccc,stroke:#333
    style G fill:#ccc,stroke:#333
    style H fill:#ccc,stroke:#333
Setting internal collective call
You can exclude registered mobile units or devices from internal collective calls and cancel this exclusion. By default, all registered users are included for collective calls.
ž
The comfort mobile unit is idle. You will be prompted to enter the system code in the course of this procedure (default code: "0000").
flowchart
graph LR
    A["Service"] --> B["System settings"]
    B --> C["Device data"]
    C --> D["Coll. call STN"]
    D --> E["OK or OR"]
    E --> F["Press this key if you merely want to check the setting."]
    F --> G["Delete the internal number of your choice from the list or re-include a number (0–9) deleted beforehand."]
    G --> H["SAVE"]
    H --> I["Save the list complete with your changes."]
System settings
Activating/deactivating permanent DTMF dialing
You can permanently activate tone dialing on connection in order to avoid the necessity of switching temporarily to DTMF for using telephone services or accessing answering machines ( page 37).
Ž The comfort mobile unit is idle. You will be prompted to enter the system code in the course of this procedure (default code: "0000").

flowchart
graph LR
    A["Service"] --> B["System settings"]
    B --> C["Device data"]
    C --> D["Auto. DTMF"]
    style A fill:#fff,stroke:#000
    style B fill:#fff,stroke:#000
    style C fill:#fff,stroke:#000
    style D fill:#fff,stroke:#000
    note1["Meaning: see footnote"]
    note2["NEXT" --> note3["OK"]
    note3 --> note4["Toggle to "enabled" or "disabled" (default is "enabled") and confirm your choice."]
Enabling/disabling trunk hold
Trunk hold is enabled by default.
Ž The comfort mobile unit is idle. You will be prompted to enter the system code in the course of this procedure (default code: "0000").

flowchart
graph LR
    A["Service"] --> B["System settings"]
    B --> C["Device data"]
    C --> D["Trunk hold"]
    E["NEXT"] --> F["OK"]
    F --> G["Toggle to "enabled" or "disabled" and confirm your choice."]
Enabling/disabling dial \* and #
The use of “*” and “#” is enabled by default.
Ž The comfort mobile unit is idle. You will be prompted to enter the system code in the course of this procedure (default code: "0000").

flowchart
graph LR
    A["Service"] --> B["System settings"]
    B --> C["Device data"]
    C --> D["Dial * and #"]
    E["NEXT"] --> F["OK"]
    F --> G["Toggle to "enabled" or "disabled" and confirm your choice."]
System settings
Reinitializing the base station
You can reinitialize the base station - restore default settings, in other words - for example if you are no longer sure precisely which changes have been made. For the sake of simplicity, however, not all system parameters are reset when you reinitialize. The effects are as follows:
| Reset Deleted Not changed | ||
| SettingsConfiguration | Units/charges accruedEmergency phone numbersLock numbers for call barringPoint-to multipoint/point numbers | System codeMobile unit registrationsRing allocation |
Ž The comfort mobile unit is idle. You will be prompted to enter the system code in the course of this procedure (default code: "0000").

flowchart
graph LR
    A["Service"] --> B["System settings"]
    B --> C["Initialization"]
The message “Initialisation completed” is displayed for 2 seconds when you confirm your choice.
Ring allocation for point-to-multipoint access
By setting ring allocation you determine:
- The mobile units and devices and their multiple subscriber number (external phone number) at which an external call will be signaled.
- The multiple subscriber number (external phone number) under which you conduct an outgoing external call (important for call data recording and phone number display).
Ring allocation enables you to assign one or more internal numbers to a multiple subscriber number. Conversely, one or more multiple subscriber numbers can be assigned to an internal number.
If you have assigned multiple external phone numbers to an internal user (for example for receiving business calls and private calls), the first external phone number in the list is the one used by call data recording for outgoing calls.
You define ring allocation by entering the internal number in the list of the collective call group or the group lists for extended ring no answer.
System settings
The access rights defined for internal users who receive external calls must be “incoming only” or higher ( page 51). You can enter a maximum of 10 users, of which 8 can be mobile units, in the list for collective call or the group list for call forwarding no answer.
A user conducting an internal or external call receives the call waiting tone (also page 26).
Collective call
- Collective call to all internal users is the default. Internal users are automatically included in the collective call group when they are registered for the first time. Subsequent changes are possible.
- An incoming external call is signalled at all registered mobile units and devices and can be answered at any mobile unit or device.
- You can have all incoming calls directed to a specific internal user by entering only one internal number in the collective call list.
- Group of users who participate in collective call.
Example:
| External phone numbers | Internal users corresponding to these numbers |
| 78901234 | 1 |
| 45678901 | 2, 3, 4 |
Group call with extended ring no answer
An incoming external call is initially signaled to the users in the first group, each of whom can answer the call. If no-one in group 1 answers, ringing is automatically extended to the members of group 2.
Example:
| External phone Nos. | Corresponding internal users | Extended ring on no answer at | |
| Group 1 Group 2 | |||
| 78901234 | 2, 3 | 6, 7 | 2, 3, 6, 7 |
| 456789001 | 1 | 4, 6 | 1, 4, 6 |
System settings
Setting/changing ring allocation for point-to-multipoint access
If you have a point-to-multipoint access, you have to save external phone numbers (multiple subscribe numbers, MSNs, → page 14) before you proceed to ring allocation.
If your configuration incorporates more than 6 cordless users, the phone number is not displayed on the called party's telephone if the calling party is cordless user 6, 7 or 8 as defined by the order in which the cordless users were registered.
Ž
The comfort mobile unit is idle. You will be prompted to enter the system code in the course of this procedure (default code: "0000").

flowchart
graph LR
    A["Service"] --> B["System settings"]
    B --> C["Line data"]
    D["Meaning: see footnote"] --> B

Select the multiple subscriber number for which you want to set ring allocation, for example MSN 1.

This is the menu for setting ring allocation. The current setting is marked "active". The options at your disposal are as follows:

Enter/change collective call
The collective call list is displayed if you select "collective call".
Example:
| External phone No. Corresponding internal users12345678 2, 3, 5 |
When an external call is incoming for MSN 12345678, the users with internal numbers 2, 3 and 5 are called simultaneously.

Enter/change group calls
The call list of group 1 is displayed, followed by that of group 2, if you select "group call".
System settings
Example:
| External phone No. Call group 1 Call group 212345678 2, 3, 5 1, 7 |
When an external call is incoming for MSN 12345678, the users with internal numbers 2, 3 and 5 are called simultaneously, before signalling is extended to the users with internal numbers 2, 3, 5, 1 and 7.
Ring allocation: setting/changing number of cycles for group call
You can define the number of ring cycles for calling group 1 before ringing is extended to group 2. The default is 3 ring cycles. You can change this value to a setting between 1 and 9 cycles.
ž
The comfort mobile unit is idle. You will be prompted to enter the system code in the course of this procedure (default code: "0000").

flowchart
graph LR
    A["Service"] --> B["System settings"]
    B --> C["Line data"]
    D["Meaning: see footnote"] --> B

Select the multiple subscriber number for which you want to set the number of ring cycles, for example MSN 1.


The current setting is displayed, for example "Set number of ring cycles 5":

Press this key if you merely want to check the setting.

Press the appropriate digit key to change the number of ring cycles, for example 2.
Press this key to save your change.
Example:
| External phone No. Call group 1 Call group 212345678 2, 3, 5 1, 7 |
When an external call is incoming for MSN 12345678, the users with internal numbers 2, 3 and 5 are called simultaneously for two ring cycles, before signalling is extended to the users with internal numbers 2, 3, 5, 1 and 7.
System settings
Setting/changing ring allocation for point-to-point access
If you have a point-to-point access ring allocation is set automatically when you assign the internal user numbers to the system number.
You may be unavailable under certain circumstances, for example if your mobile unit is temporarily out of range of the base station, so you can use call forwarding to determine who will be called. You can choose between internal call forwarding with collective call or group call.
Meaning: see footnote

flowchart
graph LR
    A["Service"] --> B["System settings"]
    B --> C["Configuration"]
    C --> D["Point to P."]
    E["Diversion dest."] --> F["Terminal"]
Set call forwarding with collective call:
→ Collective div.
Select "Collective div."
Enter the internal numbers of the users to be called, for example 1 and 2
Set call forwarding with group call:
→ Group diversion

Select "Group diversion".
You can define two groups of internal users; these groups will be called one after the other. Confirm your changes.

Enter the number of ring cycles after which calls will be forwarded to the second group.

Press this key to save your changes.
System settings
Unregistering a mobile unit
You can unregister each mobile unit using either the mobile unit itself or any other mobile unit.
Ž The comfort mobile unit is idle. You will be prompted to enter the system code in the course of this procedure (default code: "0000").

The list of internal numbers of the registered internal users is displayed.
Mark the internal number of the user you want to unregister by keying in the number in question, for example 2. Press 2 again to undo your selection, i.e. if you decide not to unregister user No. 2.
Press "Save" to confirm your choice and unregister the user you marked, in this case No. 2.


Registering mobile units, → page 11.
Operation with other mobile units
Operation with other mobile units
Gigaset 1000C
All the Gigaset 2060isdn functions are at your disposal with the Gigaset 1000C, except for those listed below.
Procedures that cannot be used with Gigaset 1000C:
- Display name
- Copy contents of telephone book from mobile unit to mobile unit
There are also some differences between the keypad layouts that you should bear in mind, although these differences have no major effect on use:
Differences between the keypads
| Key Gigaset 1000 C Gigaset 2000C | ||
| Line seize key a | or | |
| Menu key F | ||
| Internal key | INT | INT softkey |
Gigaset 2000S (1000S)
All the Gigaset 2060isdn functions are at your disposal with the Gigaset 2000S (1000S), except for that stated below.
Procedure that cannot be used with Gigaset 2000S (1000S):
- List of calls
There are also some differences between the keypad layouts that you should bear in mind, although these differences have no major effect on use:
Differences between the keypads
| Key Gigaset 1000S Gigaset 2000S | ||
| Line seize key a | or | |
All the procedures you can use with Gigaset 2000S (1000S) are outlined below (short-form descriptions). Please consult the various sections of the Gigaset 2000C comfort mobile unit User Guide if you require more detailed information.
Operation with other mobile units
Basic settings
| Register mobile unit | Mobile unit Ⓑ (off) Ⓑ (on) andtogether SC^-1 ⏻ |
| Save multiple subscriber number (MSN) | ⇨ ⏻ 1 SC^*1 → ⏻ ⏻ |
| Set point-to-multipoint (local operation) | ⇨ ⏻ 1 SC^*1 → ⏻ *, 1 0/ 1 |
| Set point-to-point | ⇨ ⏻ 1 SC^-1 → ⏻ *, 2 |
| Ring allocation, point-to-multipointSet collective callSet group callSet ring cycles for call forwarding | ⇨ ⏻ 1 SC^*1 → *, 2 →1⇨ ⏻ 1 SC^*1 → *, 2 →2⇨ ⏻ 1 SC^-1 → *, 6 →→ |
| Ring allocation, point-to-pointSet collective callSet group call | ⇨ ⏻ 1 SC^-1 → ⏻ 4 1⇨ ⏻ 1 SC^-1 → ⏻ 4 2⇨ |
| Enter/change system code | ⇨ ⏻ 8 *, SC-1 new SC new SC |
| Suppress phone-number transmissionActivate/deactivate anonymous callActivate/deactivate anonymous answerActivate/deactivate call pickupActivate/deactivate call waiting per userActivate/deactivate automatic line seizure per user | ⇨ ⏻ 1 SC^-1 → ⏻ 3 0/ 1⇨ ⏻ 1 SC^-1 → ⏻ 2 0/ 1⇨ ⏻ 1 SC^-1 → *, 7 0/ 1⇨ ⏻ 1 SC^-1 → ⏻ 11 / 0⇨ ⏻ 1 SC^-1 → ⏻ 31 / 0 |
^* SC = system code of the base station (default code: "0000")
Operation with other mobile units
Incoming calls
| Answer call/terminate call | Ext. ring ☑ conduct call... terminate by pressing ☑ |
| Call pickup | External ring ☑ ☑ R |
| Call pickup from answering machine | Answering machine is a - at mobile unit: ☑ ☑ R |
| Answer call waiting | Call... ☑ R |
| Reject call waiting | Call... ☑ # 9 2 ☑ |
| Trace call (intercept/MCID) | External call... ☑ # 4 9 ☑ |
Outgoing calls
| Dial external number | |
| Dial internal numberINT | |
| Dial internal collective call | INT * |
| Anonymous call for next call. | Idle: ➕ 4 6 ➕ (your phone number is not displayed for this call) |
Call in progress
| Terminate call Call... | |
| Hold call and resume call (mute) | Call... INT hold ... R (resume) call... |
| Temporary DTMF dialing | External call ... ✉ |
| Switch to KEYPAD | External call... ✉ you can also activatebefore the connection is set up |
Operation with other mobile units
Switching functions
| Internal consultation/call transfer | Ext. call... [INT] <INT No.> consultation call ➕ transfer or press Ⓡ to resume |
| External consultation | Call... Ⓡ <INT No.> consultation call press Ⓡ to resume |
| Toggle | Consultation call... [INT] ➕ call... [INT] ➕ consultation call..... press ➕ to terminate |
| Three-party conference | Consultation call... ➕ Ⓡ press Ⓡ to disconnect 2nd party or press ➕ to terminate |
| External call forwarding, point-to-multipoint direct (immediate)on busyring no answerdelete | |
| External call forwarding, point-to-point direct (immediate)on busyring no answerdelete | |
| Activate/deactivate internal call forwarding | ➕ Ⓡ 9 1 <INT No.> <ring cycles> ➕ |
| Park | External call... ➕ Ⓡ 4 2 <park code> ➕ |
| Unpark | Idle ➕ 4 3 |
| Activate/deactivate external automatic call-back | Ring, partner is busy ➕ Ⓡ 4 8 ➕ ➕ |
Operation with other mobile units
Call charges, call duration
| Call charge and call duration display offcall duration on / call charge on | |
| Set charge factor | |
| Display/delete charge totals | |
| Activate/deactivate call charge display online seizure |
^* SC = system code of the base station (default code: "0000")
Locks
| Activate/deactivate system lock | ∅ ⊥ 2 4 SC*1 1 / 0.1 ∘ |
| Set access rights: trunk/incoming only/internal only | ∅ ⊥ 1 SC*1 → *2 1 0.1 / 1 / 2 ∘ |
| Lock numbers for call barring | |
| Activate/deactivate | ∅ ⊥ 8 4 SC*1 <INT No.> 1 / 0.1 ∘ |
| Program (3 lock numbers, max. 8 digits per number) | ∅ ⊥ 8 5 SC*1 <INT No.> ↗ <lock No.> ∘ |
| Delete all | ∅ ⊥ 8 7 SC*1 <INT No.> ∘ |
| Emergency phone numbers | |
| Program (4 phone numbers, max. 16 digits per number) | ∅ ⊥ 2 5→ |
| Delete all | ∅ ⊥ 2 7 ∘ |
| Block unwanted calls | |
| Program (3 phone numbers, max. 16 digits per number) | ∅ ⊥ 4 5→ |
| Activate/deactivate | ∅ ⊥ 4 4 1 / 0.1 ∘ |
• SC = system code of the base station (default code: "0000")
Operation with other mobile units
System settings
| Set device typeCordless user (1-8)Corded user (0)Corded user (9) |  device type (1,2,3,4,6,7)** device type (1,2,3,4,6,7)**  |
| Set internal collective call |  |
| Activate/deactivate dialing of * / # |  |
| Activate/deactivate trunk hold(2-channel three-party conference, point-to-multipoint) |  |
| Activate/deactivate call transfer behind PBX |  |
| Activate/deactivate permanent DTM F during connect |  |
| Unregister mobile unit |  |
^* SC = system code of the base station (default code: "0000")
0 no function, 1 mobile unit, 2 telephone, 3 modem, 4 fax, 5 intercom, 6 neutral, 7 answering machine
Operation with door intercom (int. No. 9)
| Set ring allocation | |
| Answer call and operate door opener | Ring from doorconverse with party at door...INT(door opener for 3 seconds.) |
| Answer call-waiting signal from door | Call...R |
^* SC = system code of the base station (default code: "0000")
Multicell operation
| Set multicell operation (all base stations)(with basic access/behind PBX) | |
| Permit handover | |
| Automatic handover | |
| Display base-station number | |
| Roaming when idle automatic | |
| Roaming when call in progress | Ext. call base station 1... # ext. call base station 2... |
* SC = system code of the base station (default code: "0000")
Operation with supplementary devices
Operation with supplementary devices
Connecting corded devices
Sockets (see illustration, → page 17)
The Gigaset 2060isdn base station has two telephone sockets (B and C) for connecting corded devices. The sockets are automatically assigned internal numbers:
- Socket B (top) is assigned internal number 0
- Socket C (bottom) is assigned internal number 9
The cables of the supplementary devices must be fitted with TAE connectors. The coding of the sockets in the Gigaset 2060isdn is F/N.
| Connectable devices | Socket | Internal number | Registered in system as |
| Telephones | B or C | 0 or 9 | Telephone |
| Answering machines | B or C | 0 or 9 | Answering machine |
| Fax machines B 0 Fax or “neutral” | |||
| Modems B 0 Modem | |||
| T-Online (videotex) decoders | B 0 Modem | ||
| External ringer | B or C | 0 or 9 | Telephone |
| Door intercom C 9 Door intercom | |||
| No device | B or C | 0 or 9 | No function |
Do not connect other than approved corded devices to the base station.
Operation with supplementary devices
Setting the device type
"Telephone" is the default device type for corded supplementary devices. You should connect a modem or fax machine to socket 0 by preference, and if you connect a door intercom you must use socket 9.
Ž The comfort mobile unit is idle. You will be prompted to enter the system code in the course of this procedure (default code: "0000").
flowchart
graph TD
    A["Service"] --> B["System settings"]
    B --> C["Device data"]
    C --> D["a/b line"]
    E["a/b line 0"] --> F["Next"]
    G["SAVE"] --> H["Select a device type from the "Device type" menu and save your choice. The current setting is marked "active"."]
    style A fill:#f9f,stroke:#333
    style B fill:#f9f,stroke:#333
    style C fill:#f9f,stroke:#333
    style D fill:#f9f,stroke:#333
    style E fill:#ccf,stroke:#333
    style F fill:#cfc,stroke:#333
    style G fill:#fcc,stroke:#333
    style H fill:#cff,stroke:#333
Connecting telephones
You can connect a telephone to either of these lines and begin using it right away - no settings are necessary. It is not necessary to register the telephone or other corded device at the base station.
Deactivate “automatic line seizure” ( page 26) if you have a corded telephone connected to the base station.
The dialing method (pulse or tone dialing) is recognized automatically. It is not possible to set up two connections simultaneously using two corded devices.
The Signal key of a telephone connected to Gigaset 2060isdn has no function (exception: DTMF telephones).
Call charges are not displayed on the telephone. The call charges incurred, however, are registered by the system. The call-charge totals per user and multiple subscriber number can be viewed and deleted with the aid of a mobile unit registered at the base station.
Connecting corded devices (other than telephones)
You can use a mobile unit registered at the base station to enter the requisite settings for the supplementary device. Activate “automatic line seizure” ( page 26) if you have a fax and/or modem connected to the base station.
You can define the device you connect to the base station as a fax machine, modem, videotex decoder, door intercom or answering machine ( page 68).
You can also set other user-specific parameters such as access rights, ring allocation and so on for each supplementary device with the aid of a mobile unit.
A fax machine connected to a Gigaset 2060isdn must be configured for operation with a private branch exchange (see the User Guide for your fax machine).
The maximum data-transfer rates you can use with the a/b lines are as follows:
- Socket B (top), internal number 0: max. 28 800 baud
Operation with supplementary devices
- Socket C (bottom), internal number 9: max. 9 600 baud
Outgoing calls
General
The procedures described below apply to a corded telephone connected to the base station. You can operate other supplementary devices such as a fax machine, videotex decoder or modem in the same way, provided they have a handset or a line seize key and a keypad for dialing.
You should press the keys in quick succession when you use the supplementary device so as to ensure that the connection to the dialer is not cleared.
The ☐ entry as stated in some procedures is not necessary in the case of telephones with pulse dialing.
Dialing an external number using the keypad
A corded telephone connected to the base station is ready for use as soon as the base station itself is operational.
C
Lift the handset. The internal dial tone is audible.
0 Press this key to seize the trunk line (automatic line seizure must be switched off for this supplementary device, → page 26).
O Dial the external number. The user answers and you conduct your external call.

The busy tone is audible if the ISDN line is in use by another internal user. You cannot selectively seize a multiple subscriber number if one is entered.
Dialing an internal number to reach a mobile unit or other supplementary device
C
Lift the handset.
9
Press this key.
0 ...9
Enter the user's internal number.
or
c 6
Lift the handset and press 6 if you want to call all internal users at once.
The first internal user to answer takes the call.

If 2 external calls are in progress at the same time, it is not possible to set up a connection from or to user 0.
Operation with supplementary devices
Activating "anonymous call" for a single call
This function enables you to prevent your phone number being displayed for a single call which you are about to make (if you have obtained the "case-by-case suppression of phone number" service from your network provider).
C
7 4 6 7
Lift the handset.
0
Press these keys in succession. Your phone number will not be displayed when you place the next call.
Press to seize the trunk line.
0
Dial the external number. Your phone number is not displayed to the called party.
Controlling answering machines/using telephone services
Once you have set up a connection you can use the keypad of the telephone to access an answering machine or voice mailbox, for example, or use network-provider services.
Without clearing down the call, you switch the keypad to DTMF dialing (“Temp. tone”) as described below. You can then use the keypad to enter the requisite information. You also have the option of permanently activating DTMF dialing in the connected state for the base station ( page 54).
When you conclude the call the temporary switch to DTMF dialing is automatically cancelled.
b
You have set up an external connection.
7 1 7
Press these keys in succession. The change to DTMF dialing is effective.
a
Replace the handset to terminate the call and reset the dialing function.
Operation with supplementary devices
Incoming calls
Call pickup/pickup from answering machine
You can pick up an external ringing call even if the call has not been signaled at your telephone or has already been answered by the answering machine. This situation can occur in the case of a group call, for example, when the call is ringing at the members of the first group ( page 58). The precondition is that your telephone/answering machine belongs to the call group of the user being called and that call pickup is activated (default).
a
The supplementary device is idle.
c 7 8
An external call is ringing at another telephone in the call group or the answering machine has answered the call.
Lift the handset. Press these keys in succession to pick up the external call.
Answering call waiting
The call-waiting tone notifies you of an external call incoming while another call is in progress. Accepting the external call automatically terminates an internal call. You can activate or deactivate the call-waiting function with a mobile unit ( page 26).
If you answer an external waiting call with another external call in progress, the first external call is placed on hold.
You hear the call-waiting tone while conducting a call.
R 7 8
Press these keys in succession to accept the external call immediately.
or

Replace the handset to terminate the call in progress. You hear the ringer and can answer the incoming external call.
Operation with supplementary devices
Switching functions
Setting internal call forwarding
C
7 9 1
0 ...9
1 ...9
a
You can forward external calls intended for you to another internal user. You can forward calls only to a user who does not have call forwarding active.
Lift the handset.
Press these keys in succession to activate internal call forwarding.
Press a key to enter the internal number of the user to whom your calls will be forwarded.
Press a key to enter the number of ring cycles after which calls will be forwarded.
Replace the handset. Internal call forwarding is active.
Cancelling internal call forwarding
C
7 9 1
a
Lift the handset.
Press these keys in succession to cancel internal call forwarding.
Replace the handset. Internal call forwarding is cancelled.
Placing a call on hold
b
R 9
or
R 8
or
You can place a call in progress on hold, for example if you want to consult someone in privacy.
An internal or external call is in progress.
Press these keys in succession to place the call on hold.
Press these keys in succession to cancel the hold and resume the call.

You can use other switching functions while a call is on hold, for example:
- conduct a confidential consultation call ( page 73) or
- transfer the call on hold to the consultation partner (→ page 73) or
- toggle back and forth between the call on hold and the consultation call (toggling, page 74) or
- set up a three-party conference ( page 75).
Operation with supplementary devices
Consultation call/call transfer
As well as internal consultations, your ISDN system also enables you to conduct external consultation calls, for example with an external business partner.
Invariably, you press the keys ☐ 9 9 in succession to start an internal consultation call and the keys ☐ 9 0 to start an external consultation call.
Starting an internal consultation call:
b
You are conducting an external call.
R 9 9
Press these keys in succession to place the call on hold.
0 ...9
Enter the internal number of the user you want to call.
or
R 9 6
Press these keys to call all internal users at once. You hear the ringer tone and a user answers. You conduct your call with the internal user.
Terminating an internal consultation call:
R 8
Press. The external user is reconnected and you can resume your conversation.
or
Call transfer without consultation:
a
Replace the handset
The call is returned to you if the internal user to whom you transferred fails to answer within 30 seconds.
Operation with supplementary devices
Starting an external consultation call:
b You are conducting an external call.
R 9 0 Press these keys in succession to place the call on hold and seize the ISDN trunk line.
Enter the phone number of the external user. The user answers. You conduct your call with the external user.
Terminating an external consultation call
8 Press. The original user is reconnected. You resume your external call.
or
a Replace the handset.
The call is returned to you if the user to whom you transferred fails to answer within 30 seconds.

Automatic recall is forced if you do not dial a number within 30 seconds of pressing the 9 sequence.
Toggling
If you have a consultation call in progress you can switch back and forth between the two calls as often as you wish.
Toggling with a telephone set to pulse dialing
b You are conducting a consultation call.
R 5 Press to toggle back to the original call.
5 Press again to toggle back to the consultation call, and so on.
a Replace the handset to disconnected partner. You are automatically recalled. You can resume your original call.
Operation with supplementary devices
Toggling with a telephone set to DTMF dialing
b
You are conducting a consultation call.
R 5
Press to toggle to the original call.
R
Press to toggle back to the consultation call.
R
Press to toggle back to the original call, and so on.
a
Replace the handset to disconnect from the consultation partner.
You are automatically recalled.
You can resume your original call.
Three-party conference
You have the option, when toggling, of setting up a three-party conference between yourself and the two partners.
You are conducting a consultation call (internal/external).
R 7
Press to set up a three-party conference.
R 8
Press to terminate the three-party conference.
You resume the original call.
or terminate the three-party conference:
a
Replace the handset.
All calls are terminated.
Activating external automatic callback
If you attempt to place an external call but the party you call is busy, you can activate "automatic callback" and replace the handset. You will be called back automatically as soon as the number you dialed is free. You must obtain the ISDN feature "automatic callback" from your network provider in order to use this function.
b
You dial an external user, but receive the busy tone.
R 7 4 8 7
Press these keys in succession to set external automatic callback.
a
Replace the handset.
External automatic callback is active.

Callback is cancelled automatically as soon as the call is successfully conducted.
Operation with supplementary devices
Deactivating external automatic callback
c 7 4 8 7 a
Automatic callback is active.
Lift the handset.
Press these keys in succession and replace the handset.
External automatic callback is deactivated.
Parking an external connection
R 7 4 2
You can park a call under a parking code and unpark it again under the same code at another telephone, such as a mobile unit. A call can be parked for up to three minutes. If you park a call you can unpark it only at the same point-to-multipoint access (see also Glossary → page 98).
0 ...9
You are conducting an external call.
Press these keys in succession to initiate call parking.
Press a key to assign a one-digit parking code.
7
Press to park the call.
a
Replace the handset.
The connection is parked under the parking code you assigned.
Unparking the external call
7 4 3 0 ...9 7
You can unpark a call only at the point-to-multipoint access at which it was originally parked.
Lift the handset.
Press these keys in succession to initiate unparking of the call.
Press the key corresponding to the parking code you originally entered.
Press to unpark the call.
You can now resume the call you parked beforehand.
Operation with door intercoms
Operation with door intercoms
Examples of how to connect door intercoms via TFE
This example illustrates how the Gigaset 2060isdn can be connected to various types of entrance telephone via door interfaces with the aid of the Siemens door-intercom adapter (TFE). Door-intercom adapters are available from retailers.
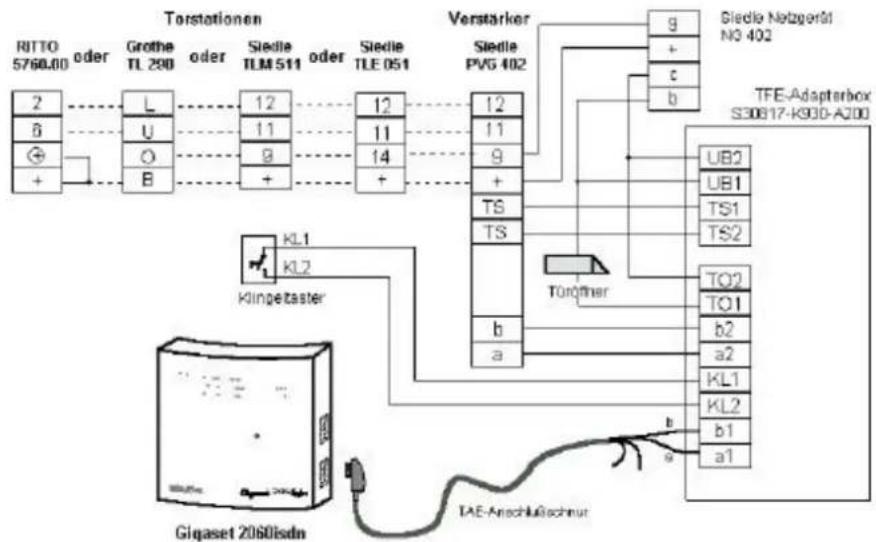
flowchart
graph TD
    A["Torstationen"] --> B["2"]
    A --> C["L"]
    A --> D["U"]
    A --> E["O"]
    A --> F["B"]
    A --> G["12"]
    A --> H["11"]
    A --> I["9"]
    A --> J["14"]
    A --> K["12"]
    A --> L["11"]
    A --> M["9"]
    A --> N["+"]
    A --> O["TSE"]
    A --> P["TS"]
    A --> Q["TS"]
    A --> R["12"]
    A --> S["11"]
    A --> T["9"]
    A --> U["+"]
    A --> V["TOROTHER"]
    V --> W["TFE-Adapterbox S30817-K930-A200"]
    W --> X["UB2"]
    W --> Y["UB1"]
    W --> Z["TS1"]
    W --> AA["TS2"]
    W --> AB["TO2"]
    W --> AC["TO1"]
    W --> AD["b2"]
    W --> AE["a2"]
    W --> AF["KL1"]
    W --> AG["KL2"]
    W --> AH["b1"]
    W --> AI["a1"]
    J --> AJ["Verstärker"]
    AJ --> AK["Siedle PVG 402"]
    AK --> AL["g"]
    AK --> AM["+"]
    AK --> AN["c"]
    AK --> AO["b"]
    AJ --> AP["Siedle Netzgerät NO 402"]
    AP --> AQ["TFE-Adapterbox S30817-K930-A200"]
    AQ --> AR["UB2"]
    AQ --> AS["UB1"]
    AQ --> AT["TS1"]
    AQ --> AU["TS2"]
    AQ --> AV["TO2"]
    AQ --> AW["TO1"]
    AQ --> AX["b2"]
    AQ --> AY["a2"]
    AQ --> AZ["KL1"]
    AQ --> BA["KL2"]
    AQ --> BB["b1"]
    AQ --> BC["a1"]
Terminals of the TFE adapter box
a1/b1 = Terminals for the voice cables to the Gigaset 2060isdn
TO1/TO2 = Terminals for the door opener
KL1/KL2 = Terminals for the door push-button
a2/b2 = Terminals for the voice cables to the door intercom
TS1/TS2 = Actuator contacts for the speaker amplifier
UB1/UB2 = Terminals for the bell transform-er
Operation with door intercoms

For details of ring allocation of the door intercom, → page 79.
For details of connection to the door intercom, → page 80.
Examples of how to connect door intercoms via TFE
This example illustrates how the Gigaset 2060isdn can be connected to various types of entrance telephone with the aid of the Siemens door-intercom adapter (TFE/V).

Recommendation:
Use this circuit if line-borne noise is a problem.
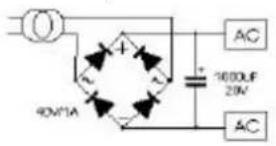
Notes on the entrance-telephone adapter (TFE/V):
- Set the potentiometer to maximum volume (turn fully clockwise).
• Do not tamper with jumper X1. - Positions of jumper X2:
Operation with door intercoms
SIEDLE TLM 511
RITTO 5760
Grothe TS 6216


There are also certain changes which apply to the various entrance telephones:
Entrance telephone Changes in intercom
SIEDLE TLM 511/01
Open jumpers 1, 3 and 4.
Disconnect loudspeaker wire from pin "bl" and connect to "12".
RITTO 5760 Grothe No change
Move the yellow jumper from "B" to "0"
Ring allocation for the door intercom
If you want to install a door intercom you can decide which internal users can be reached from the entrance telephone. The internal users you define in this way can also operate the door opener.
ž
The comfort mobile unit is idle. You will be prompted to enter the system code in the course of this procedure (default code: "0000").

flowchart
graph LR
    A["Service"] --> B["System settings"]
    B --> C["Device data"]
    C --> D["a/b line"]

Select "a/b line 9" as the line for the supplementary device.
Select “Door station” from the “Device type” menu and confirm your choice. A list of the current internal numbers is displayed:
"Door call to 1 2 _"


Add a single-digit internal number, for example 4, to the list. Use the set key to correct your entry if necessary.

Save your entry to activate the new ring allocation, in this example
"Door call to 1 2 4 _."
Operation with door intercoms
Connection to the entrance telephone
The entrance telephone must be connected to the supplementary-device socket assigned internal number 9, otherwise it will not work. Note that only those internal users who are entered in ring allocation for the door intercom ( page 79) can use this function.
Connection to comfort mobile unit

A call from the entrance telephone rings (3 short tones).
Press the off-hook key. You are connected to the entrance telephone. The message "internal connection with door station" appears in the display.

OP DOOR
Press the softkey to open the door. The door opener is actuated for 3 seconds.
By way of confirmation, the message "Internal door open" is displayed for 2 seconds.
The connection to the entrance telephone is automatically terminated after this three-second period.
Connection to supplementary device

A call from the entrance telephone rings (3 short tones). Lift the handset. You are connected to the entrance telephone.

Press to open the door. The door opener is actuated for 3 seconds.
The connection to the entrance telephone is automatically terminated after this three-second period.
Multicell system
Multicell system
Step-by-step procedure
Follow the procedure described below step by step in order to incorporate your Gigaset 2060isdn in a multicell system.
Preparations
- Read the general remarks ( page 82).
- Connect multiple base stations to a common point-to-multipoint access ( page 10).
- Register the mobile units at the other base stations, using the same internal numbers in each case ( page 11)
- Set the same ring allocation at all base stations (assign internal numbers to the same MSN) ( page 14)
Configure base stations for multicell operation
- Set all base stations for multicell operation ( page 85)
- Set "Allow base station switch during call" at all base stations (→ page 87)
- Activate display of base station numbers on 2000S mobile units (→ page 66)
- Set automatic base station selection (→ page 86)
The multicell functions are now available.
At all base stations you can:
- be reached under the same external number (MSN).
- conduct calls under the same external number (MSN).
- manually switch from base station to base station with an external call in progress.
Internal connections are possible only at the same base station, in other words you cannot set up an internal connection across base stations.
Multicell system
General remarks
When the Gigaset 2060isdn is incorporated in a multicell system you can use your mobile unit at any of several base stations. By positioning the Gigaset 2060isdn base stations strategically you can extend the area in which you can use your mobile unit.
- You can register and use your mobile unit at a maximum of six Gigaset 2060isdn base stations.
- You can register a maximum of 8 mobile units at each Gigaset 2060isdn base station.
- You can use a mobile unit under the same external number (MSN) at each base station.
- Your mobile unit can be reached under the same external number (MSN) at any base station.
- You can change from base station to base station while a call is in progress (external call).
Organization of base stations and mobile units
It is advisable to organize the multicell system as follows:
• Number the base stations consecutively, i.e. assign the numbers 1 to 6.
- Determine the internal numbers for the mobile units to be operated at a base station (see "Registering comfort mobile units at multiple base stations", → page 84).
- Register each mobile unit at base station No. 2 under the same number as at base station No. 1.
- Register the mobile units at base stations Nos. 3 to 6, if applicable, again using the same numbers in each case.
- Activate display of base-station numbers in each mobile unit (not necessary in the case of comfort mobile units).
If your multicell system is behind a PBX with various lines:
- Set collective call in the PBX so that a mobile unit can be reached at the various lines.
Notes on use
- At any given time, the mobile unit is in radio connection with the base station shown on the display. Incoming and outgoing calls can be conducted only via this base station (even if the radio footprints of neighboring base stations overlap).
Internal calls care possible only within the radio range of the current base station. You cannot conduct an internal call with a user in radio connection with another base station in the multicell system. - When the mobile unit moves into the radio footprint of another base station the radio connect to the original base station is broken and a connection to the new base station is set up automatically (see "Setting automatic base station selection," → page 86).
You can deactivate automatic base station selection and manually define the base station with which the mobile unit maintains contact (see the User Guide for your mobile unit). This is important in the areas in which two or more radio cells overlap, because it enables you to define the base station from which your mobile unit will receive calls.
Possible combinations
You can combine base stations in a variety of ways, choosing the arrangement best suited to the number of base stations and the desired range.
Bear in mind that if you have a point-to-multipoint access, the maximum permissible distance between the first and last base stations is 150 meters.
Multicell system
If you set up a multicell Gigaset 2060isdn system you can use your mobile unit at any base station in the system.
You can register and operate your mobile units at a maximum of six Gigaset 2060isdn base stations.
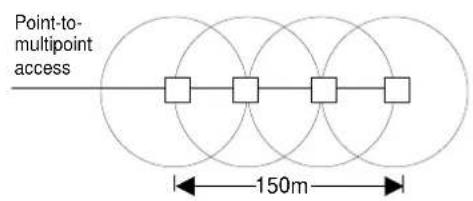

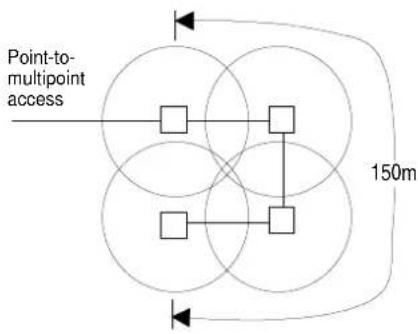
flowchart
graph TD
    A["Point-to-multipoint access"] --> B["Square"]
    B --> C["Square"]
    C --> D["Square"]
    D --> E["Square"]
    E --> F["Square"]
    F --> G["Square"]
    G --> H["Square"]
    H --> I["Square"]
    I --> J["Square"]
    J --> K["Square"]
    K --> L["Square"]
    L --> M["Square"]
    M --> N["Square"]
    N --> O["Square"]
    O --> P["Square"]
    P --> Q["Square"]
    Q --> R["Square"]
    R --> S["Square"]
    S --> T["Square"]
    T --> U["Square"]
    U --> V["Square"]
    V --> W["Square"]
    W --> X["Square"]
    X --> Y["Square"]
    Y --> Z["Square"]
    Z --> AA["Square"]
    AA --> AB["Square"]
    AB --> AC["Square"]
    AC --> AD["Square"]
    AD --> AE["Square"]
    AE --> AF["Square"]
    AF --> AG["Square"]
    AG --> AH["Square"]
    AH --> AI["Square"]
    AI --> AJ["Square"]
    AJ --> AK["Square"]
    AK --> AL["Square"]
    AL --> AM["Square"]
    AM --> AN["Square"]
    AN --> AO["Square"]
    AO --> AP["Square"]
    AP --> AQ["Square"]
    AQ --> AR["Square"]
    AR --> AS["Square"]
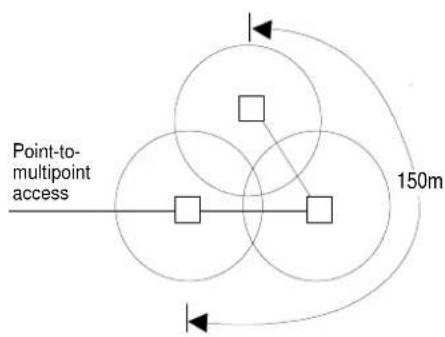
flowchart
graph TD
    A["Point-to-multipoint access"] --> B["Square"]
    B --> C["Square"]
    C --> D["Square"]
    D --> E["Square"]
    E --> F["Square"]
    F --> G["Square"]
    G --> H["Square"]
    H --> I["Square"]
    I --> J["Square"]
    J --> K["Square"]
    K --> L["Square"]
    L --> M["Square"]
    M --> N["Square"]
    N --> O["Square"]
    O --> P["Square"]
    P --> Q["Square"]
    Q --> R["Square"]
    R --> S["Square"]
    S --> T["Square"]
    T --> U["Square"]
    U --> V["Square"]
    V --> W["Square"]
    W --> X["Square"]
    X --> Y["Square"]
    Y --> Z["Square"]
    Z --> A
    style A fill:#f9f,stroke:#333
    style B fill:#ccf,stroke:#333
    style C fill:#ccf,stroke:#333
    style D fill:#ccf,stroke:#333
    style E fill:#ccf,stroke:#333
    style F fill:#ccf,stroke:#333
    style G fill:#ccf,stroke:#333
    style H fill:#ccf,stroke:#333
    style I fill:#ccf,stroke:#333
    style J fill:#ccf,stroke:#333
    style K fill:#ccf,stroke:#333
    style L fill:#ccf,stroke:#333
    style M fill:#ccf,stroke:#333
    style N fill:#ccf,stroke:#333
    style O fill:#ccf,stroke:#333
    style P fill:#ccf,stroke:#333
    style Q fill:#ccf,stroke:#333
    style R fill:#ccf,stroke:#333
    style S fill:#ccf,stroke:#333
    style T fill:#ccf,stroke:#333
    style U fill:#ccf,stroke:#333
    style V fill:#ccf,stroke:#333
    style W fill:#ccf,stroke:#333
    style X fill:#ccf,stroke:#333
    style Y fill:#ccf,stroke:#333
    style Z fill:#ccf,stroke:#333
Multicell system
Example: multicell system with point-to-multipoint access
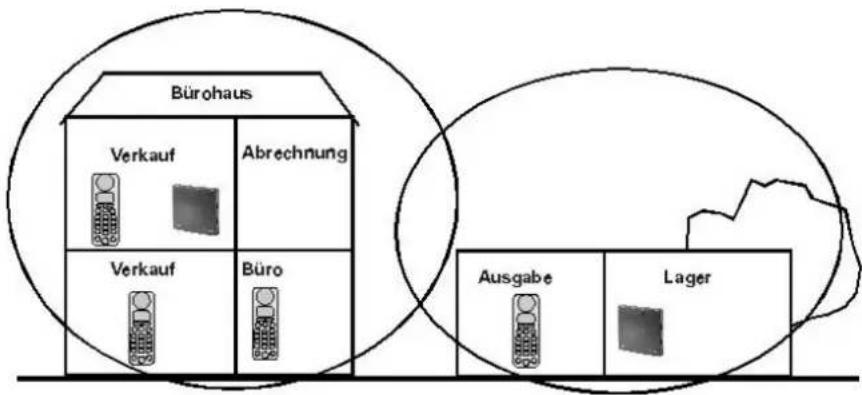
• Install base stations 1 and 2
• Install and register the mobile units
| Register at base station 1 | Register at base station 2 | |
| Mobile unit 1 | MSN 1 and internal number 1 | MSN 1 and internal number 1 |
| Mobile unit 2 | MSN 2 and internal number 2 | MSN 2 and internal number 2 |
| : | : | : |
| Mobile unit 4 | MSN 4 and internal number 4 | MSN 4 and internal number 4 |
Each mobile unit is reachable under a single MSN for incoming external calls, irrespective of the radio cell in which it is currently operating. Each mobile unit can be used anywhere in the radio footprint of the two base stations to conduct external calls.
You can move from base station to base station while conducting an external call without interrupting your call.
This virtually doubles the area in which you can use your mobile unit.
Registering comfort mobile units at multiple base stations
register your mobile unit at the other base stations as described in the section entitled "Installation" (→ page 11). Remember to register your mobile unit under the same internal number at all base stations, because this is important with regard to the organization of the multicell system.
Multicell system
Setting multicell operation
ž
The comfort mobile unit is idle. You will be prompted to enter the system code in the course of this procedure (default code: "0000").
Meaning: see footnote

Service
System settings
Configuration
Point to MP
After selecting and then confirming "Point to MP" and thus activating this setting, select:

multicell op
For operation with multiple base stations.

OK
The message "internal connec. via \$0 bus disabled" appears on the display.
Press this softkey if you want to use the multicell system with trunk access.
or

ENABLE
Press this softkey if you want to use the multicell system behind a private branch exchange.

If your telephone is set for multicell operation, the CHANGE softkey appears automatically in the display when an external call is in progress.
Multicell system
Setting automatic base station selection
If you have a configuration with more than one base station you can determine the base station to which your mobile unit connects. You need automatic base station selection for multicell operation.
ž
The comfort mobile unit is idle.
Meaning: see footnote


Once you have set this option the station name is preceded by a star (*) in the display.
You must set automatic base station selection for each base station in your multicell system.
You can configure a multicell system with up to six base stations operating via a point-to-multipoint access.

- You can operate only registered mobile units at a base station.
- The text “* Station 1” flashes if radio contact to the base station is lost and while the mobile unit is searching for a base station.
- You can be reached via the base station at which your mobile unit is registered.
Multicell system
Enable/disable base station change with call in progress
You can register and operate the mobile units at different base stations from the Siemens Gigaset family, including non-ISDN base stations.
In order to prevent a call being switched to a non-ISDN base station, you must define the base stations to which switching is permitted.
The comfort mobile unit is idle.
Meaning: see footnote


Select the station you want to define as "park-compatible" and open the submenu.


Set the station you selected to "Parking active" (i.e. calls can be switched to this base station).
or

Set the station you selected to "Parking inactive" (i.e. calls cannot be switched to this base station).
Press if you want to cancel.
A "P" indicates a base station from which or to which calls can be switched.
Switching to another base station while conducting a call
If you have configured a multicell system consisting of at least two ISDN base stations, you can switch from the radio area of one base station to the other while an external call is in progress without having to terminate the call.
If you move to the limit of the radio footprint of one base station and want to move to the next base station, notify your partner that you are going to interrupt the call briefly in order to switch base stations. Then proceed as described below in order to resume the call via the other base station.
You are conducting an external call.
Press this softkey to change from the radio footprint of one base station to that of the other base station.
Resume your external call.

Operation behind a private branch exchange
Operation behind a private branch exchange
General remarks
You can connect your Gigaset 2060isdn to and operate it via private branch exchanges connecting to Euro-ISDN accesses with DSS1 protocol.
As a rule, point-to-multipoint is the access mode of preference at the subscriber accesses of the private branch exchanges.
You should ascertain which PBX-specific features and ISDN services are available at the subscriber circuits of the private branch exchange before you use the Gigaset 2060isdn.
Activating PBX features
Your Gigaset 2060isdn can utilize the scope of features offered by the higher-order PBX. The features you can use include consultation, call switching, toggling, three-way conferencing, call forwarding, automatic callback and so on. Always consult the operating instructions for the higher-order PBX.
Example: setting up a consultation call
You can set up a consultation call to a PBX user while conducting a call. See the operating instructions for the PBX.
You are conducting an external call.

® Press to initiate the external consultation call.
Enter the phone number of the extension you want to call, for example 1 2 3 4 5. Conduct your consultation call.
Terminate the consultation call
Meaning: see footnote

Press this key to terminate the consultation call and resume the call with the external user.
or switch the call
Press the on-hook key or return the mobile unit to the charging unit.
Operation behind a private branch exchange
Enabling/disabling call transfer
Call transfer is enabled by default.
Ž The comfort mobile unit is idle. You will be prompted to enter the system code in the course of this procedure (default code: "0000").

flowchart
graph LR
    A["Service"] --> B["System settings"]
    B --> C["Device data"]
    C --> D["Transfer call"]
    D --> E["NEXT"]
    E --> F["OK"]
    F --> G["Disable or enable the function, as applicable, and confirm your choice."]
    style A fill:#fff,stroke:#000
    style B fill:#fff,stroke:#000
    style C fill:#fff,stroke:#000
    style D fill:#fff,stroke:#000
    style E fill:#fff,stroke:#000
    style F fill:#fff,stroke:#000
    style G fill:#fff,stroke:#000
Other Euro-ISDN features
Many Euro-ISDN PBXs support a range of Euro-ISDN features comparable to that available at a public point-to-multipoint access. You can activate these ISDN features at your Gigaset in precisely the same way as described elsewhere in this User Guide.
Examples:
• Multiple subscriber numbers (MSNs)
• Display phone number to partner
• Display partner's phone number
- Call waiting
• Call forwarding within higher-order PBX
Consult the operating instructions for the PBX for more information on the ISDN functionality available at the subscriber circuits of the private branch exchange.
General notes
General notes
Ring signals
External call

0.8s tone 4s pause
Internal call

0.5s tone 0.5s tone
0.8s pause 4.2s pause
Call from the entrance telephone

3 x 0.3s tone and 0.3s pause
Recall/callback

0.8s tone 0.8s pause
Acoustic signals
Call tone

0.8s tone 2s pause
Dial tone, internal

3 x 0.2s tone and 0.3s pause, repeated after 0.5s pause
Busy tone, internal

Warning tone (leaving operating range) and negative acknowledgment tone
4 x short tone
Acknowledgment tone (positive acknowledgment tone)
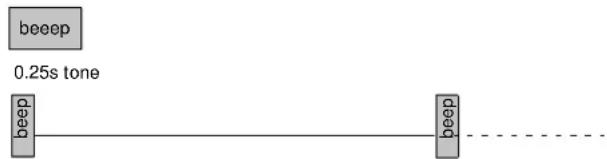
flowchart
graph LR
    A["beep"] --> B["0.25s tone"]
    B --> C["beep"]
0.1s tone 10s pause
Call-waiting tone

0.3s tone 5s pause
General notes
System upkeep
Wipe the mobile units and base station clean with a damp cloth or antistatic cloth. Never use a dry cloth (risk of electrostatic buildup).
Technical data
Standards I-CTR3, CTR 6, CTR 10
Number of channels 120 duplex channels
Frequencies
1.88 GHz to 1.90 GHz
Duplexing
time duplexing with 10 ms frame length
Channel raster 1728 kHz
Bit rate
1152 kbit / s
Modulation GFSK
Voice encoding
32 - kbit (ADPCM)
Transmit power
10 mW mean power; 250 mW peak power
Range outdoors
indoors approx. 300 m approx. 50 m
Base station
Dimensions (L x W x H)
approx. 175 x 182 x 35 mm (H x W x D)
Mounting for wall mounting
Weight without AC adapter approx. 460 g
AC power supply
220/230 V \~ /50 Hz (lug-in AC adapter) 22.2 V\~ / 275 mA
Permissible ambient conditions
+0^ C to +55^ C
for operation (maximum)
20% to 75% relative humidity
Permissible storage temperature
-10°C to +60°C
Trunk line
Euro-ISDN basic connection (IAE)
Internal a/b connections
Protocol DSS1
Channels 2B+D
2 x 64 kbit and 1 x 16 kbit
Transmission rate
192 kbit/sec
Frame frequency
4 kHz
Connector type
TAE 6, F/N coding
Dialing
DTMF/DPS (auto-sensing)
Range
approx. 200 m
Data transmission rate
socket 0 28 000 bit/sec
socket 9
9 600 bit/sec
General notes
Troubleshooting
A problem is not necessarily caused by a technical defect. You can save yourself time and money by tackling some of the simpler problems yourself.
This troubleshooting chart will help you do just that.
| Problem Possible cause Remedy | ||
| Display is blank Mobile unit not | switched onBattery discharged | Press ON/OFF keyInstall reserve battery or re-charge battery |
| Line is not seized, no dial tone | Cable not correctly connected | Check that cable is correctly connected to base station and telephone socket; if necessary unplug and reconnect |
| Power supply cord not correctly connected | Check connection between base station and 230V mains socket; if necessary unplug and reconnect | |
| Display shows“Fault” | ISDN trunk defectiveISDN cable not connected | Notify exchangeCheck ISDN connection |
| Display shows“External line seized” | ISDN channels are in use by other Gigaset users | Wait until a channel is free |
| Display shows“Network section busy” | ISDN channels are in use by other ISDN users | Wait until a channel si free |
| No radio connection to base station, On symbol flashes or display shows“Searching for station” | Base station not switched onorbase station setting incorrectormobile unit not registered | Check connection between base station and 230V mains socket; if necessary unplug and reconnectSet station selectionRegister mobile unit |
| Call forwarding cannot be programmed | No multiple subscriber numbers (MSN) programmed | Enter multiple subscriber numbers (system settings) |
| Mobile unit does not ring Ringer | volume set too lowRing allocation incorrect | Adjust ringer volumeSet ring allocation correctly |
| No incoming calls Call forwarding | is onorCall blocking for unwanted calls is active | Switch off call forwarding, if applicableSwitch off call blocking, if applicable |
General notes
Warranty
Siemens AG guarantees this device for 6 months as of the date of purchase from the retailer. Keep your receipts as proof of purchase.
Under the terms of this warranty Siemens AG shall, at no cost, rectify all defects resulting from material flaws or manufacturing defects. Siemens AG shall, at its own discretion, repair or replace the defective device.
This warranty expressly excludes damage due to incorrect usage, wear or unauthorized changes. The warranty does not cover consumables and defects which detract only marginally from the value or usability of the device.
The Siemens product you have purchased is in compliance with the technical requirements for connection to the public telephone network in Germany.
Address your warranty claims directly to Siemens Service.
Contact partners
If your telephone is defective, please contact
Siemens Service:
Telephone in Germany: 0180 5333 222
Service hours Monday to Friday 8 am - 7 pm
Saturday 9 am - 2 pm

- We hope you will appreciate that Siemens Service can accept only calls relating to technical defects.
- Please contact your retailer if you have any questions about usage.
- Please contact your network provider if you have any questions about your telephone connection.
Frequently asked questions
Frequently asked questions
1. Setting the multiple subscriber number (MSN) for outgoing calls
Can I set a specific multiple subscriber number (MSN) for outgoing calls?
- Yes, when you program ring allocation. Ring allocation starts with MSN 1 and goes through to MSN 10. Once an internal number is assigned an MSN for the first time in ring allocation, this MSN is subsequently used for outgoing calls.
Example
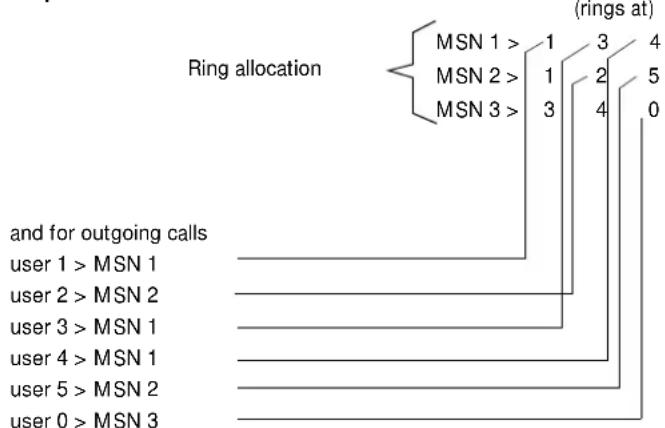
flowchart
graph TD
    A["MSN 1 >"] --> B["1"]
    C["MSN 2 >"] --> D["1"]
    E["MSN 3 >"] --> F["3"]
    G["(rings at)"] --> H["4"]
    I["user 1 > MSN 1"] --> J
    K["user 2 > MSN 2"] --> L
    M["user 3 > MSN 1"] --> N
    O["user 4 > MSN 1"] --> P
    Q["user 5 > MSN 2"] --> R
    S["user 0 > MSN 3"] --> T
    U["and for outgoing calls"] --> V
    W["(rings at)"] --> X["0"]
2. Call charge/totals management
How can I check the running totals per user?
- Call charges per MSN and user, if tariff information is obtained as a service from the network provider. You can view the totals at any mobile unit.
- Call charges during call: the tariff-information service must be obtained from the network provider. Bear in mind that because of the way you hold a mobile unit, you cannot see the display when you are telephoning.
- Call-charge data recording and billing per MSN; you must obtain itemized billing as a service from the network provider.
3. Suppressing transmission of phone number
How does suppression of phone-number transmission work?
- Suppression of phone-number display is possible only when expressly requested as a service from the network provider. The Gigaset 2060isdn signals each request for implementation of the feature to the network provider; no acknowledgment is returned.
4. Intercept
What does intercept mean?
Frequently asked questions
- The intercept function enables you to trace callers who have suppressed display of their phone number, malicious callers, etc. You can set up an intercept while that call is in progress or up to 40 seconds after the call has been terminated, but the need for an intercept must be verifiable on the part of the network provider.
You receive a printout from the network provider detailing the traced call, complete with phone number, time and date.
5. Anonymous answer
What does anonymous answer mean?
- Anonymous answering means answering an incoming call without transmitting your own phone number. Remember, however, that suppression of the own phone number is a service that has to be obtained from the network provider. The Gigaset 2060isdn signals each request for implementation of the feature to the network provider; no acknowledgment is returned.
6. Selective call enable
What does selective call enable mean?
- Once you activate this feature all calls from phones having numbers other than those you enter in a list (up to three numbers) are rejected. An ISDN user who places a rejected call is notified to the effect that the user cannot be reached. You can administrate the list from any mobile unit, provided you know the PIN code.
7. Callback on BUSY
How does this feature work and do any restrictions apply?
- The number you dial is busy, so you start this function by pressing the CALLBCK softkey. When the number you dialed goes free you receive an automatic callback, which you accept and at this point the original number is redialed. This is a standard-package feature which you start as necessary. At this time it is supported only by digital exchanges.
- Callback on busy (CCBS)
8. Device type ID
What is the point of a device type ID?
- ISDN calls include device type IDs which make it possible to use MSNs selectively, with a distinction drawn between individual services.
- Voice telephony: Gigaset 2060isdn setting = telephone/mobile unit
- a/b services (analog devices): Gigaset 2060isdn setting = neutral (neutral is suitable for telephone, fax and modem operation)
- If you set a special ISDN ID such as modem/fax/telephone in the a/b line menu, restrictions may apply when you dial digital connections.
9. Modem/fax
Do restrictions apply?
- The maximum data transmission rate for the top socket (permanently assigned internal number 0) is 28.8 kb/s, while the bottom socket (permanently assigned internal number 9) has a maximum data rate of 9.6 kb/s. Note ID 0 for ISDN access and ID 9 for internal traffic at circuits 0 and 9. ISDN features are available, subject to restriction.
Dial pause: It is advisable, but not absolutely necessary, to program ID 0 for devices which
Frequently asked questions
support a dial pause.
Dial tone: Devices which recognize a dial tone are usually set for a continuous tone (Deutsche Telekom). Private branch exchanges, however, use another tone (intermittent tone) to distinguish between external and internal dialing. If this causes problems, particularly with fax machines, the device's dial-tone detector must be switched off. Most devices support a “behind PBX” option to allow for this situation. You should choose this setting if it is supported by your fax machine.
- Ringer frequency of the Gigaset 2060isdn: 25 Hz, square-wave voltage, must be recognized by the connected device.
- If you encounter sporadic transmission problems, it is advisable to set the device type ID to "NEUTRAL" (→ page 95)
10. Answering machines
Can I transfer a call away from the analog port (0 or 9)?
- No provision is made for this function.
11. Music on hold
Can I suppress music on hold?
- No, the audio signal is provided by the network provider "please hold the line" and cannot be suppressed.
- Point-to-multipoint access, music on hold and announcement are from the network provider.
- Point-to-point access, and melody for hold come from Gigaset.
12. Parking (call transfer on bus)
Each ISDN connection can be parked free. The parked user hears music on hold (see above). When you park a call you must enter a one-digit or two-digit code as suffix. This code is the authorization that will subsequently enable you to unpark the call.
Each ISDN user at any registered mobile unit can unpark the call, in other words enter the code and answer the call. This mode of call transfer on the S_0 bus is free. A call can be parked for a maximum of 3 minutes. The connection is cleared down if the call is not unparked within this three-minute period.
- You can use this mode, for example, to transfer a call from a mobile unit to an ISDN telephone.
- Deutsche Telekom calls this feature "transfer on bus".
13. Private branch exchange behind Gigaset 2060isdn
What restrictions apply if I connect an analog PBX behind the Gigaset 2060isdn?
- Broadly speaking, a PBX should always be considered as a telephone circuit. Systems of this nature must have a flash for external connections (e.g. ANIS call) or else they can be used only with pulse dialing. Another restriction is that dial-tone detection must be switched off, → page 95.
There should be no restrictions with regard to incoming calls, but the piggyback solution described above imposes restrictions on outgoing functionality. The Gigaset 2060isdn was not designed as a subsystem-compatible unit.
Frequently asked questions
- Once the voice-call connection has been set up the subsequent characters are sent via the D channel unless temporary DTMF dialing is activated, in which case the digits are sent as DTMF characters in the B channel. This switchover is required for accessing external devices such as answering machines, etc.
14. Gigaset 2060isdn behind a PBX
What are the important points with regard to operating a Gigaset 2060isdn on the S_0 bus of a private branch exchange?
- Behind a PBX, the Gigaset 2060isdn can access only the features supported by the PBX. In contrast to the network provider, PBXs must sometimes interrupt the D channel (signaling channel) so that features can be implemented by the PBX itself. The Gigaset 2060isdn transmits only the protocol elements defined in the Euro-ISDN set, in other words it does not transmit PBX-specific signaling in the D channel.
- Example - conference feature: initiation of a conference is always interpreted as an internal conference by the PBX, whereas the Gigaset 2060isdn acts as if it were connected to a circuit provided by the network provider.
- Example - call forwarding: in the point-to-point mode PBXs usually implement call forwarding themselves with a second B channel. These PBXs usually have multiple ISDN basic accesses at their disposal. This arrangement is practical because call forwarding in the exchange always applies to the entire access, irrespective of the number of B channels affected. Call forwarding with the Gigaset 2060isdn behind PBXs works only when the PBX interprets the protocol correctly.
15. Roaming
Roaming means searching for a user across all base stations of a multicell system. If a caller dials the multiple subscriber number (MSN) of the mobile unit, all base stations are automatically searched for the user in question. Only the base station at which the mobile unit is currently registered switches the connection.
The Gigaset 2060isdn supports roaming.
16. Handover
Handover is the automatic/semi-automatic transfer of existing external calls from one base station to the next. This function ensures that mobile users can move freely throughout the entire radio-coverage area of a multicell system, using their mobile units as they go.
The Gigaset 2060isdn supports handover as follows: If multicell operation is configured a range warning tone sounds automatically as the user approaches the limit of a radio cell. The menu offers the "CHANGE" function. The user has to confirm this function and the call is parked until the mobile unit has registered with the new base station. The call is then handed over automatically to the new station.
Glossary
Glossary
Access rights By setting access rights you determine whether your telephone can be used
- for outgoing and incoming external and internal calls (full trunk access rights),
- for incoming external calls and internal calls only (incoming-only access rights),
- for internal calls only (internal-only access rights).
ADPCM Adaptive Delta Pulse Code Modulation
Digital transmission procedure; an analog signal is mapped in digital values and the difference between these values is transmitted.
Automatic call back (feature with point-to-multipoint access)
If the party you attempt to call is busy you can activate automatic callback so that you will be called as soon as the line is free.
Call-charge information/call-data information
(feature common to all types of access)
- During a call in progress and following connection cleardown
- When the connection is cleared down
Call forwarding (feature common to all types of access)
- Immediate call forwarding (direct)
- Timeout call forwarding (15 seconds delay). You have time to decide whether to answer the call or let it be forwarded automatically after 15 seconds,
- Call forwarding on busy
Call waiting (point-to-multipoint access feature)
The call-waiting tone draws your attention to an incoming call while you are conducting a call. The calling party's phone number may be displayed. You have the choice of answering or rejecting the second call. If you reject it the caller hears the busy tone.
Consultation call (feature with point-to-multipoint access)
You can interrupt a call in progress (the connection is not cleared down) and make another call, for example to consult with a colleague. You then resume the interrupted first call.
CTR
Common Technical Regulation; European certification regulation
DDI Direct dialing in; system with extension numbers for ISDN point-to-point acces
DECT Digital European Cordless Telephone standard
Glossary
DPS Pulse dialing; slow analog dialing procedure. The individual digits are dialed by means of pulses
DSS1 Digital Signaling System No. 1 for the Euro ISN protocol
DTMF Dual tone multifrequency dialing; fast analog dialing procedure. The individual digits are dialed by means of dual tones
Emergency phone number You can save a maximum of four emergency phone numbers in the Gigaset 2060isdn. Emergency phone numbers can be dialed even if the Gigaset 2060isdn is locked.
En-bloc dialing The phone number you key in is not dialed until you press the Line seize key
Euro-ISDN Integrated Services Digital Network for Europe
Extension number (feature with point-to-point access) The network provider assigns a PBX number with a block of extension numbers from 00 to 99, so in theory you can have up to 100 extension numbers. The Gigaset 2060isdn automatically combines the basic call number with the internal numbers (max. 10 users), which means that each user can have his or her own telephone number. Since the basic number and the internal numbers are combined automatically by the Gigaset 2060isdn, number assignment is not necessary.
GAP Generic Access Profile; European standard for radio telephony
GFSK Gaussian Frequency Shift Key; medallion procedure for cellular communication
IAE ISDN connector; standard European ISDN connector
LCD Liquid Crystal Display (mobile-unit display)
LED Light-emitting diode (register lamp in the base station)
Multiple Subscriber Number (MSN) (feature with point-to-multipoint access) Up to 3 MSNs: feature of standard and comfort access. Additional MSNs are available on application (maximum of 7 additional MSNs. You can have different phone numbers for each telephone you connect. The MSN is an external phone number without national or local code.
Network provider Operator of a public telecommunications network.
Parking (unparking) a call (feature with point-to-multipoint access) You want to interrupt your call briefly (connection is not cleared down), for example because
- you will be absent for a short time
- you want to resume the call at another telephone connected to the same point-to-multipoint access.
Glossary
| You can park a call for a maximum of 3 minutes. | |
| PBX Private Branch Exchange | |
| PCM Pulse Code Modulation; | Digital transmission procedure; an analog signal is mapped onto digital values. |
| PIN Personal identification Number in the mobile unit,for locking the mobile unit and protecting your custom settings. | |
| System code | Base station identification number,for locking the base station and protecting system set-tings. |
| TAE Teilnehmer Anschlußeinheit (subscriber access unit);standard analog connector in Germany | |
| TBR Technical Basis for Regulations; | European certification regulations; the preliminary to CTR in the certification process. |
| Three-party conference | (feature with point-to-multipoint access)You and two external partners can converse simulta-neously (three-party conference). |
| Toggle (feature with point-to-multipoint access) | |
| Transmission of own phone number | (feature common to all types of access)Your phone number is transmitted to the calling or called partyGeneral and case-by-case suppression of transmis-sion (must be obtained as a service) |
| Transmission of partner's phone number | (feature common to all types of access)The phone number of your partner is transmittedGeneral suppression of transmission (must be ob-tained as a service) |
| User All persons using a Gigaset 2060isdn by means of mobile units or corded equipment | |
Quick-reference guide, comfort mobile unit
Switch mobile unit ON/OFF/LOCKED

Mobile unit is:
ON
Action
press and hold:
press and release:
Mobile unit is:
OFF
LOCKED
OFF press and hold: ON
LOCKED press and hold:
press and release:
OFF
ON
Register mobile unit ^*

Press Register button (LED) in base station. Follow the prompts on the display.
Set multiple subscriber number (MSN) ^*

(System code required.) Follow the prompts on the display.
Define ring allocation\*)

(System code required.) Select an MSN and follow the prompts on the display.
External call forwarding\*)

Follow the prompts on the display.
Activate/deactivate display of calls list\*)

(System code required.) Activate or deactivate display.
Answer call

Press off-hook key or remove mobile unit from charging unit.
Dial external phone number

Press off-hook key and enter the phone number.
Dial internal phone number\*)

Quick-reference guide, comfort mobile unit
Redial (last external number dialed)


Press softkeys in succession. The phone number is automatically redialed.
View callback list/dial from list\*)


Set sys funct.

Call list

Display entry
Select the number you want to call back and set up the connection.
Park an external call ^*
You are conducting an external call.

Service

→


OK
Enter a digit as the single-digit parking code and confirm. The call is parked.
Unpark a call\*)
ž

Service

Unpark

OK
Enter the parking code you assigned beforehand and confirm. The call is unparked and you can resume your conversation.
Quick-reference guide, supplementary device
| Dial external phone number | ||
| c 0 o | Lift the handset, seize the external trunk line and enter the phone number. | |
| Dial internal phone number | ||
| c 9 o | Lift the handset, press digit for internal dial and enter the internal number. | |
| Internal collective call | ||
| c 6 | Lift the handset. All internal uses are called. | |
| Activating external automatic callback | ||
| 7 4 8 7 | External user was busy: press these keys in succession to activate automatic callback. | |
| Internal consultation during external call | ||
| R9 9o | Press these keys in succession. Dial the internal number. Conduct the consultation call. | |
| R8 | Press these keys in succession. Resume the external call. | |
| External consultation during external call | ||
| R9 0o | Press these keys in succession. Dial the external number. Conduct the consultation call. | |
| R8 | Press these keys in succession. Resume the first external call. | |
| Transfer external call to internal user | ||
| R9 9o | Press these keys in succession. Dial the internal number. Replace the handset. | |
| a | ||
| Answer call waiting | ||
| R7 8 | With call in progress press these keys in succession to answer the waiting call. | |
| Toggle (telephone with pulse dialing) | ||
| 5 .... 5 | Press this key as often as necessary to switch back and forth between the two calls. | |
| Quick-reference guide, supplementary device
Toggle (telephone with DTMF dialing)
R 5
R .... R
Press these keys in succession.
Press this key as often as necessary to switch back and forth between the two calls.
Three-party conference
R 7
If two connections are set up press these keys in succession to initiate a three-party conference.
Anonymous call (suppress display of own phone number for call about to be made)
| 7 | 4 | 6 | 7 | Press these keys in succession before dialing the phone number. Your phone number is not displayed on the called party's telephone for this call. |
| 0 | o | Seize the line and enter the phone number. |
Park external call
| R | 7 | 4 | 2 | Press these keys in succession to initiate parking of an external call in progress. |
| 0 | .... | 9 | a | Press a key to assign a single-digit parking code to the call.Replace the handset. The connection is parked under the parking code you assigned. |
Unpark a call
| c | 7 | 4 | 3 | Lift the handset and press these keys in succession to initiate unparking. |
| 0 | .... | 97 | Press the key corresponding to the parking code.Press this key to unpark and resume the call. |
Special accessories
Special accessories
Gigaset 2000C
All the accessories described below are available from your retailer.
The Gigaset 2000C has an easily readable 4-line display for excellent user guidance. Features which boost user convenience include:
- Telephone book for approx. 100 entries of names and phone numbers.
- Backlit display/babyphone
• Redial last 5 different phone numbers.
The Gigaset 2000S and 2000C mobile units are available in the colors graphite gray, pastel gray, algarve green and terracotta red.
Gigaset 2000H

natural_image
Close-up of a black mechanical device with curved arms and a circular base (no visible text or symbols)The Gigaset 2000H headset is for handsfree telephoning and open listening in conjunction with the Gigaset 2000C. The headset is available from your retailer or from:
SIEMENS AG
Abt. ANL TDE 35
Tübingerstr. 1-5
D-80686 München
Phone + 49 89/9221-6605 Fax: + 49 89/9221-6603
Gigaset 2000L
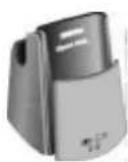
If your configuration includes multiple mobile units it is advisable to provide a corresponding number of charging units to ensure that the mobile units are ready for use at all times.
Two reserve batteries can be charged in the charging unit along with the mobile unit. Colors: graphite gray or pastel gray.
Special accessories
Gigaset 2000T

natural_image
Black office telephone with keypad and screen (no visible text or symbols)The Gigaset 2000T is a cordless desktop telephone. It has the same features as the Gigaset 2000C, plus the emergency call function.
Color: graphite gray
Gigaset 1000TAE
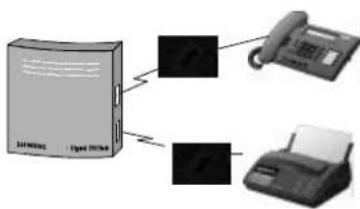
flowchart
graph TD
    A["Solutions"] --> B["Phone"]
    A --> C["Printer"]
The cordless adapter for operating corded devices via base stations of the Gigaset 1000/2000 family. Each Gigaset base station of the 1000/2000 family can be used in this way for cordless connection of corded terminal devices such as telephone, fax machine, modem (max. 9600 bit/s), answering machine or decoder (set-top box) for digital television instead of additional mobile units.
Another advantage is that the internal features of the Gigaset base station are available, for example internal traffic. Color: basalt gray
Index
A
a/b services 95
AC supply base station 91
access 51
operating mode 17
point-to-multipoint 17
point-to-point 17
access rights 51
none 51
unrestricted trunk access 51
accessories 105
acoustic signaling 90
address book 105
anonymous
answer 25
call 25,35
call, supplementary device 70
anonymous answer 95
answering machine 96
accessing 37
accessing (supplementary device) ..... 70
automatic callback (supplementary device) .. 75
automatic callback, external 45, 98
automatic line seizure 26
B
base station
connecting 10
connection options 17
location 16
power supply 16
wall mounting 15
base station change 87
base station selection 86
basic settings 22
block
unwanted calls 50
C
call
answering 28
external 32
external (supplementary device) 69
holding 36,72
incoming 28
internal 34
internal (supplementary device) 69
outgoing 32
parking, unparking 42
recall 39
rejecting 28
switching 39,73
terminating 28,34
tracing 31
transfer (supplementary device) .....73
transfer internal 39
transfer internally 74
call charge factor 48
call charges 46, 48
base station 48
MSN 48
multiple subscriber numbers ....48
per user 48
call charges, call duration 46
call duration 46
call forwarding 18
external 42
internal 44
setting, supplementary device ....72
call in progress 36
call park
external call 18
call pickup
supplementary device, answering machine 71
call transfer 29
call transfer, enabling ....54
call waiting
answering 30
answering (supplementary device) .....71
enabling 26
callback on BUSY 95
call-charge management 94
call-charge recording, network provider .....94
charges during call 94
collective call 15, 56, 57
(internal) 53
collective diversion 59
connecting corded devices ....68
connection
operating mode 17
telephones 68
connector
TAE 67
consultation
external 39,74
internal, supplementary device .....73
consultation hold 18
D
DECT 98
device type ID 95
dial * and #, enabling ....54
dialing
external 32
external (supplementary device) 69
internal (supplementary device) ......69
dialing method 91
dialing procedure 99
Index
dial-tone detector 96
direct dialing in 18,98
display
LED 11, 12, 99
phone number 18, 100
display call duration 46
DTMF dialing 91, 99
DTMF, permanent 54
E
emergency phone numbers 49
enable base station change 87
entrance telephone 79
connection 80
Euro-ISDN features 89
external call 32
external consultation 74
F
fax 95
features 18
frequently asked questions 94
G
glossary 98,100
group call 56, 57
group diversion 59
H
handover 97
hold 72
hotline 93
|
IAE access 17
IAE connection 91
ID 95
incoming calls 28
incoming only 51
initialization
initializing base station 55
internal
consultation 39
consultation (supplementary device) ..... 73
internal call 34
internal-only access 51
K
keypad, switching to 38
L
LED 11, 12, 99
line seizure, automatic 26
list of calls
administrating 27
viewing 33
lock numbers 49
locks 49
M
menu
conventions 19
key 20
short form 19
structure 20
system settings ......20
missed calls 27
mobile unit ....3
PIN 13,100
registering 11
registering at multiple base stations .....84
searching 34
unregistering 60
MSN (multiple subscriber number) ..... 14, 99
multicell operation
setting 85
multicell system
combinations ....83
example 84
multiple subscriber number (MSN) ..... 18, 99
setting 94
music on hold 96
mute 38
N
negative acknowledgment tone 90
0
operating mode 17
operation
behind PBX 88
with multiple base stations .....84
operation with
Gigaset 1000C 61
Gigaset 1000S ....61
Gigaset 2000S 61
operational radio range 16
outgoing call 32
P
park
call 42
parking
external call, supplementary device .....76
PBX behind Gigaset 96
permanent DTMF 54
PIN 13
PIN, mobile unit 100
plug-in AC adapter 91
point-to-multipoint 17
point-to-point 17
positive acknowledgment tone 90
Index
private branch exchange 88
R
radio cell 84
radio range 91
range 16,91
range warning tone 90
recall 73, 74
register button 11
registering
at multiple base stations 84
rejecting, call 28
ring allocation
collective call 15, 57
door intercom 79
group call 15, 57, 59
point-to-multipoint 55
ring cycles 58
ring cycles 58
ring signals 90
ringer frequency 96
roaming 97
S
safety instructions 8
searching, mobile unit 34
selective call enable 95
settings, system 53
Siemens service 93
small address book 105
special accessories 105
supplementary device, corded 67
suppressing phone number transmission ..... 94
switching base stations, call in progress ..... 87
switching functions 39, 72
system code 13, 22, 100
system settings 53
system upkeep 91
T
TAE connection 91
TAE connection options 17
TAE connector 67
technical data 91
telephone
connecting 68
telephone services 37, 70
temperature range 16,91
temporary DTMF dialing 37
three-party conference 18, 41, 99
three-party conference, supplementary device 75
toggle 18,40
toggling, supplementary device 74
total 48
tracing calls 31
troubleshooting 92
trunk hold, enabling/disabling ....54
U
unregistering, mobile unit 60
unrestricted trunk access 51
user
busy 32
no answer 32
W
warranty 93
Issued by
Private Communication Systems Group
© Siemens AG 1997. All rights reserved.
Subject to availability.
Right of modification reserved.
Siemens Aktiengesellschaft
Reference No.: A30853-X210-B101-1-7619
Printed in the Federal Republic of Germany 10/97
