
116K - Hot plate AEG - Free user manual and instructions
Find the device manual for free 116K AEG in PDF.


| Product Type | Electric Built-In Hob |
| Brand | AEG |
| Model | 116K |
| Overall Dimensions (W x D x H) | 580 x 500 x 88 mm |
| Cut Out Dimensions (W x D) | 550 x 470 mm |
| Total Power Rating | 6270 W |
| Number of Cooking Zones | 4 (2 rapid, 2 normal) |
| Front Left Rapid Hotplate (Ø 180 mm) | 2090 W |
| Back Left Rapid Hotplate (Ø 145 mm) | 1570 W |
| Back Right Normal Hotplate (Ø 180 mm) | 1570 W |
| Front Right Normal Hotplate (Ø 145 mm) | 1040 W |
| Power Supply | 230-240 V ~ 50 Hz |
| Control Type | Rotary knobs (settings 0-3) |
| Pilot Lamp | Yes (illuminates when any zone is on) |
| Material | Stainless steel top with spill rings |
| Weight (approx.) | 12 kg |
| Guarantee | 12 months parts and labour |
| Spare Parts Availability | Yes, via authorised Service Force Centre |
| Safety Compliance | CE marked, Class Y appliance |
| Cleaning Recommendations | Warm water with mild detergent; avoid abrasives |
Frequently Asked Questions - 116K AEG
User questions about 116K AEG
0 question about this device. Answer the ones you know or ask your own.
Ask a new question about this device
Download the instructions for your Hot plate in PDF format for free! Find your manual 116K - AEG and take your electronic device back in hand. On this page are published all the documents necessary for the use of your device. 116K by AEG.
USER MANUAL 116K AEG
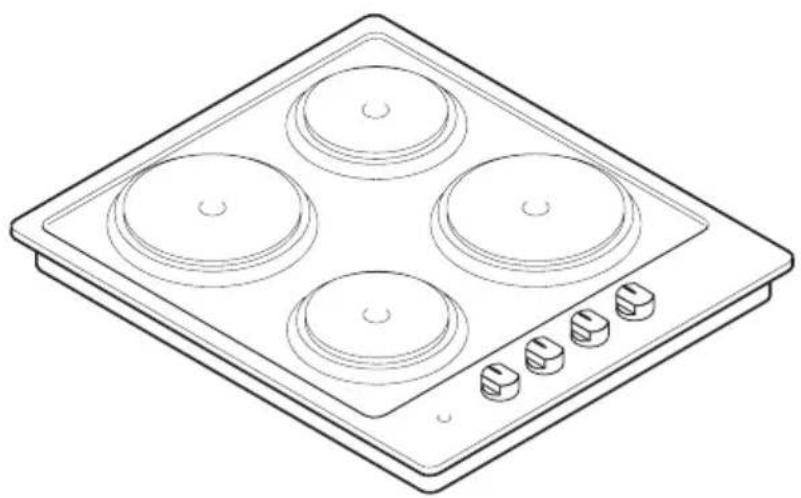
Electric Built-In Hob
Operating Instructions
natural_image
Line drawing of a four-tier electric stove with four circular burners and control knobs (no text or symbols)
Important Safety Information
You MUST read these warnings carefully before installing or using the hob. If you need assistance, contact our Customer Care Department on 08705 350350
Installation
- This hob must be installed by qualified personnel, according to the manufacturer's instructions and to the relevant British Standards.
- Any gas installation must be carried out by a registered CORGI installer.
- Remove all packaging before using the hob.
- Ensure that the gas and electrical supply complies with the type stated on the rating plate, located near the gas supply pipe.
- Do not attempt to modify the hob in any way.
Child Safety
- This hob is designed to be operated by adults. Do not allow children to play near or with the hob.
- The hob gets hot when it is in use. Children should be kept away until it has cooled.
- Children can also injure themselves by pulling pans or pots off the hob.
During Use
- This hob is intended for domestic cooking only. It is not designed for commercial or industrial purposes.
- It is important to note that the plate may smoke a little and produce a slightly unpleasant odour when used for the first time. This is quite normal and will disappear after a few minutes.
- Take care when frying food in hot oil or fat, as the overheated splashes could easily ignite.
- Never leave the plates on without a pan on them or with an empty pan on them.
-
Never use the hob as a worktop.
-
Never attempt to repair the hob! Repairs carried out by unexperienced persons can cause damage or injuries. This hob should only be repaired or serviced by an authorised Service Engineer and only genuine approved spare parts should be used.
- This hob can be built-in in furniture units placed near higher walls or units, provided that one of the sides is adjacent to an unit with the same height.
- Do not use this hob if it is in contact with water. Do not operate the hob with wet hands.
- Ensure the control knobs are in the 'OFF' position when not in use.
- When using other electrical appliances, ensure the cable does not come into contact with the hot surfaces of the cooking appliance.
- Unstable or misshapen pans should not be used on the hob as unstable pans can cause an accident by tipping or spillage.
- Never leave the hob unattended when cooking with oil and fats.
- Never use plastic or aluminium foil dishes on the hob.
- Perishable food, plastic items and areosols may be affected by heat and should not be stored above or below the hob unit.
Service
- This hob should only be repaired or serviced by an authorised Service Engineer and only genuine approved spare parts should be used.

Environmental Information
- After installation, please dispose of the packaging with due regard to safety and the environment.
- When disposing of an old appliance, make it unusable, by cutting off the cable.
Keep this instruction book for future reference and ensure it is passed on to any new owner.
These instructions are only valid for countries whose identification symbols are shown on the cover of this instruction booklet and on the appliance itself.
Contents
For the user
Important Safety Information 3
Description of the Hob 6
Operation 7
Hints and Tips 9
Maintenance and Cleaning 10
Something Not Working? 11
Service and Spare Parts 12
Customer Care 12
Guarantee Conditions 13
For the installer
Instructions for the Installer 14
Important safety requirements 14
Installation 15
Cut Out Size 15
Electrical connections 17
Wiring diagram 18
Guide to Use the instructions
The following symbols will be found in the text to guide you throughout the Instructions:

Safety Instructions

Step by step instructions for an operation

Hints and Tips

Environmental information

This appliance is manufactured according to the following EEC directives:
73/23 EEC - 90/683 EEC - 93/68 EEC -
89/336 EEC - 90/396 EEC,
current edition.
Description of the Hob

INSTALLATION

The hob must be installed according to the instructions supplied.
The hob must be installed by qualified personnel to the relevant British Standards.
Please, ensure that, once the hob is installed, it is easily accessible for the engineer in the event of a breakdown.
WHEN THE HOB IS FIRST INSTALLED
Once the hob has been installed, it is important to remove any protective materials, which were put on in the factory.
Operation
Electric Hotplates
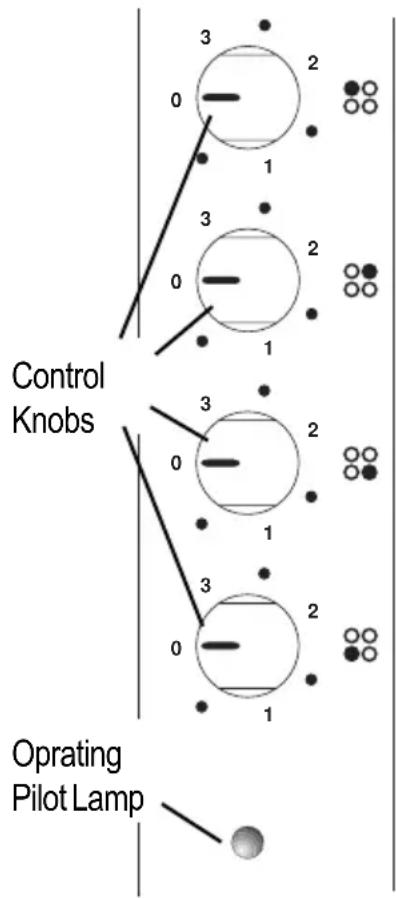
To switch on a hotplate, turn the relevant control knob anticlockwise to the required heat setting.
The control knob is numbered 1 - 3
0 - OFF
1 - Minimum
3 - Maximum.

The hob has two rapid hotplates. The rapid hotplates are indicated by a red dot, and will heat up more quickly than a normal plate. As the red dots are painted on the plate, they may deteriorate during use and even disappear completely after a period of time. This will not affect the performance of the hob.
It is important to note that the plate may smoke and produce a slightly unpleasant odour when used for the first time. This is quite normal and will disappear after a short while.
Operating Pilot Lamp
This lamp comes on each time a cooking zone is switched on.
For best cooking zone regulation, refer to the following table.
Boiling
To parboil, select setting 3 and bring the water to the boil and then turn back to 1 to finish for boiling; use higher or lower settings as required.
Frying
Heat up the fat/oil on setting 3, then insert food to be fried and turn back to 2; use higher or lower settings as required.
Suggestions for the correct setting of the plates are given in the following table.
OFF 0
Very Gentle • To keep food warm - To melt butter and chocolate
Gentle 1 To prepare cream-sauces, stews and milk puddings or to fry eggs
Slow • Dried vegetables, frozen food, fruit, boiling water or milk
Medium 2 Boiled potatoes, fresh vegetables, pâtés, soups, broths, pancakes or fish
High • Larger stews, meat roll, fish, omelettes, steaks
Fast 3 Steaks, escalopes and frying.

Hints and Tips
Saucepans for use on solid plates should have several characteristics:
• They should be fairly heavy duty
- They should fit the heat area exactly, or be slightly larger for efficient use, NEVER smaller.
- They should have a flat base to ensure good contact with the plate.
This is particularly important when using pans for high temperature frying or pressure cooking.
As soon as liquid starts boiling, turn down the plate control knob so that it will barely keep the liquid simmering.
You can switch off the plate a short while before you finish cooking, and the final stage will be completed on the accumulated heat. Similarly, stews etc. cooked in well covered saucepans cook at lower temperature which is more economical.
Ensure pans are large enough to avoid liquids being split onto the plates.
Never leave the plates on without a pan on them or with an empty pan on them.

natural_image
Simple line drawing of a beaker with bubbles and liquid, no text or symbols present
natural_image
Simple line drawing of a beaker with a triangular warning symbol crossed out by two crossed lines (no text or labels)
natural_image
Simple line drawing of a beaker with bubbles and two crossed-out arrows indicating resistance or prohibition (no text or symbols)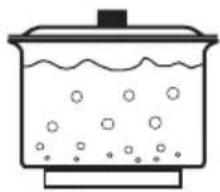
natural_image
Simple line drawing of a cooking pot with liquid and bubbles (no text or symbols)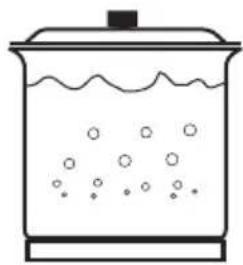
natural_image
Simple line drawing of a beaker with liquid and bubbles (no text or symbols)
natural_image
Simple line drawing of a beaker with steam rising, crossed by diagonal lines (no text or symbols)
Take care never to lean or reach over a hot electric plate. Always point pan handles inward or over the work surface next to the hob to avoid accidentally knocking over a pan as you pass by.

Take care when frying food in hot oil or fat, as the overheated splashes could easily ignite. If the control knobs become difficult to turn, please contact your local Service Force Centre.
Maintenance and Cleaning

Before any maintenance or cleaning can be carried out, you must DISCONNECT the hob from the electricity supply.
The hob is best cleaned whilst it is still warm, as spillage can be removed more easily than if it is left to cool.
The Hob Top
Regularly wipe over the hob top using a soft cloth well wrung out in warm water to which a little washing up liquid has been added. Avoid the use of the following:
- household detergent and bleaches;
- impregnated pads unsuitable for non-stick saucepans;
- steel wool pads;
- bath/sink stain removers.
Should the hob top become heavily soiled, the following products are recommended:
- For stainless steel hobs use a proprietary stainless steel cleaner.
- For other hob use Hob Brite or Bar Keepers Friend.
The Hotplates
Spills onto the actual plate should be removed using warm water and a soft brush, nylon or plastic scourer. To keep the plates looking as new, hotplate conditioner can be purchased from most hardware stores, e.g. "4 Hob" by HomeCare Products (follow the manufacturer's instruction for use).

Alternatively, wipe the plates with a drop of olive oil on a kitchen towel to avoid rust. It is important to note that the plate will smoke a little and produce a slightly unpleasant odour when next used.
Failure to clean and condition hotplates may lead to rust and corrosion forming on the surface.
Stainless steel parts: the stainless steel spill rings may become straw coloured with use. Use a proprietary stainless steel cleaner to remove this straw discolouration. This also applies to the area around the hotplates on stainless steel hobs.
Something Not Working?
If the hob is not working correctly, please carry out the following checks before contacting your local AEG Service Force Centre.
| SYMPTOM | SOLUTION |
| ■ The plate does not heat up. | ◆ Check that the unit is plugged in and the electrical supply is switched on◆ Check that the RCCB has not tripped (if fitted)◆ Check the mains fuse has not failed◆ Check the correct control knob has been turned. |
| ■ The plate is not giving satisfactory results | ◆ Check the plate is clean and dry◆ Check the cooking pan is the correct size for the plate.◆ Check the cooking pan has a flat bottom◆ Check the setting is correct for the type of cooking. |
If after all these checks, your hob still does not operate correctly, contact your local AEG Service Force Centre.
Please note that it will be necessary to provide proof of purchase for any in-guarantee service calls.
In-guarantee customers should ensure that the above checks have been made as the engineer will make a charge if the fault is not a mechanical or electrical breakdown.
Service and Spare Parts
If you require spare parts or an engineer contact your local Service Force Centre by telephoning:
0870 5 929 929
Your call will be routed to your local Service Force Centre.
For the address of your local Service Force Centre and further information about Service Force, please visit the website at www.serviceforce.co.uk
When you contact the Service Centre, they will need the following information:
- Your name, address and post code.
- Your telephone number
- Clear and concise details of the fault
- The model and the serial number (see rating label on the back of this instruction booklet)
- Date of purchase
CUSTOMER CARE
For general enquiries concerning your AEG appliance and for further information on AEG products, contact our Customer Care Department by letter or telephone at the address below or visit our website at www.aeg.co.uk
Customer Care Department
AEG Domestic Appliances
55 - 77 High Street
Slough
Berkshire
SL1 1DZ
Tel : 08705 350350*
* calls to this number may be recorded for training purposes.
Guarantee Conditions
Standard guarantee conditions
We, AEG, undertake that if within 12 months of the date of the purchase this AEG appliance or any part thereof is proved to be defective by reason only of faulty workmanship or materials, we will, at our discretion repair or replace the same FREE OF CHARGE for labour, materials or carriage on condition that:
- The appliance has been correctly installed and used only on the electricity or gas supply stated on the rating plate.
- The appliance has been used for normal domestic purposes only, and in accordance with the manufacturer's operating and maintenance instructions.
- The appliance has not been serviced, maintained, repaired, taken apart or tampered with by any person not authorised by us.
- All service work under this guarantee must be undertaken by a Service Force Centre. Any appliance or defective part replaced shall become the Company's property.
- This guarantee is in addition to your statutory and other legal rights.
- Home visits are made between 8.30am and 5.30pm Monday to Friday. Visits may be available outside these hours in which case a premium will be charged.
Exclusions
This guarantee does not cover:
- Damage or calls resulting from transportation, improper use or neglect, the replacement of any light bulbs or removable parts of glass or plastic.
- Costs incurred for calls to put right an appliance which is improperly installed or calls to appliances outside the United Kingdom.
- Appliances found to be in use within a commercial environment, plus those which are subject to rental agreements.
- Products of AEG manufacture which are not marketed by AEG.
European Guarantee
If you should move to another country within Europe then your guarantee moves with you to your new home subject to the following qualifications:
- The guarantee starts from the date you first purchased your product.
- The guarantee is for the same period and to the same extent for labour and parts as exists in the new country of use for this brand or range of products.
- This guarantee relates to you and cannot be transferred to another user.
- Your new home is within the European Community (EC) or European Free Trade Area.
- The product is installed and used in accordance with our instructions and is only used domestically, i.e. a normal household.
- The product is installed taking into account regulations in your new country.
Before you move, please contact your nearest Customer Care centre, listed below, to give them details of your new home. They will then ensure that the local Service Organisation is aware of your move and able to look after you and your appliances.
France Senlis +33 (0)3 44 62 29 29
Germany Nürnberg +49 (0)800 234 7378
Italy Pordenone +39(0)800 117511
Sweden Stockholm +46 (0)8 672 53 60
U K Slough +44 (0)1753 219899
Instructions for the Installer
Engineers technical data
OVERALL DIMENSIONS Width: 580 mm
Depth: 500 mm
Height: 88 mm
CUT OUT DIMENSIONS Width: 550 mm
Depth: 470 mm
SUPPLY CONNECTIONS Electric:
230-240V 50Hz supply.
HEATING ELEMENTS RATING
Rapid Front Left Hotplate ∅ 180 mm. 2090 W
Rapid Back Left Hotplate ∅ 145 mm. 1570 W
Normal Back Right Hotplate ∅ 180 mm.
1570 W
Normal Front Right Hotplate ∅ 145 mm. 1040 W
Total Rating 6270 W
Important safety requirements
This hob must be installed in accordance with the IEE Wiring Regulations (Current Edition).
Detailed recommendations are contained in the following British Standards Codes Of Practice:
B.S. 6172/ B.S. 5440, Par. 2 and B.S. 6891 Current Editions.
Location
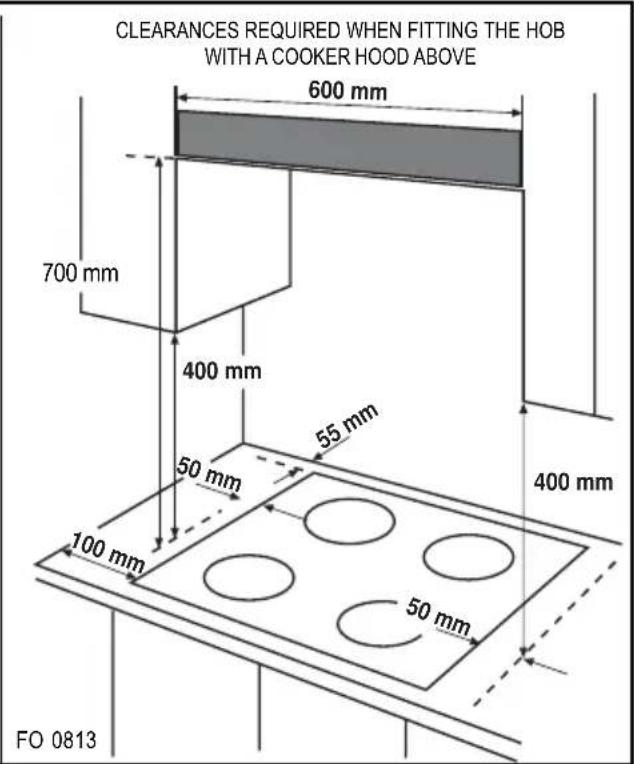
This hob has been registered as a "Class Y" appliance according to Fire Risk Regulations. Minimum distances detailed below must be observed.
The hob may be located in a kitchen, a kitchen/diner or bed sitting room, but not in a bathroom or shower room.
Before making the cut out in the worktop ensure that there is a minimum distance of 55 mm between the rear edge of the hob and the wall. A minimum distance of 100 mm must be left between the side edges of the hob and any adjacent cabinets or walls.
The minimum distance combustible material can be fitted above the hob in line with the edges of the hob is 400 mm. If it is fitted below 400 mm a space of 50 mm must be allowed from the edges of the hob. The minimum distance combustible material can be fitted directly above the hob is 700 mm.

Installation

IMPORTANT
This hob must be installed by qualified personnel to the relevant British Standards. The manufacturer will not accept liability, should the above instructions or any of the other safety instructions incorporated in this book be ignored.
Cut Out Size
The dimensions of the cut-out are given in the diagram.

Building over a cupboard or drawer
If the hob is to be installed above a cupboard or drawer it will be necessary to fit a heat resistant board below the base of the hob on the underside of the work surface.
It is also recommended to carry out the electrical connection to the hob as shown in diagrams 1 and 2.


Building over a kitchen unit with door
Proper arrangements must be taken in designing the furniture unit, in order to avoid any contact with the bottom of the hob which can be heated when it is operated. The recommended solution is shown in diagram 3.
The panel fitted under the hob ("a") should be easily removable to allow easy access if technical assistance is needed. The space behind the kitchen unit ("b") can be used for connections.

Fitting the hob to the worktop
Before fitting the hob into the cut out, a sealing gasket supplied with the hob must be fitted to the edge of the cut out. It is essential that no gaps are left in this seal in order to prevent spillage near the hob seeping into the cabinet below.

1) Place the sealing gasket all around the edge of the cut out.
2) Place the hob into the cut out and secure it by means of the relevant fixing clamps and screws, as shown in the diagram.
3) Remove the excess seal
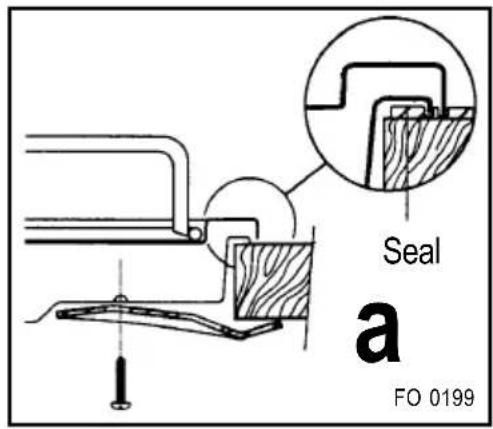
The edge of the hob forms a double seal which prevents the ingress of liquids.
Electrical connections

Any electrical work required to install this hob should be carried out by a qualified electrician or competent person, in accordance with the current regulations.
THIS HOB MUST BE EARTHED.
The manufacturer declines any liability should these safety measures not be observed.
This hob is designed to be connected to a 230-240V 50Hz AC electrical supply.
Before switching on, make sure the electricity supply voltage is the same as that indicated on the hob rating plate. The rating plate is located on the bottom of the hob. A copy is attached on the back cover of this book.
The hob is supplied without supply cord. A 3 core flexible supply cord must be fitted, in accordance with the specification given in the relevant tables.
1) Remove the mains terminal cover plate from the underside of the hob, to expose the mains terminal block.
2) Loosen the two cable clamp screws and lift the top section of the clamp enough to allow the cable to be passed through.
3) Connect the red (live) wire to the terminal which is marked with the number 1.
4) Connect the black (neutral) wire to the terminal which is marked with the number 4.
5) After fitting a green or yellow/green sleeve over the bare copper wire (earth wire), connect the exposed end to the terminal which is marked with the earth symbol or with the number 5.
NOTE: The earth wire should be about 2 cm. longer than the live and neutral wires.
6) Secure the cable by means of the clamp screws and refit the terminal block cover.

natural_image
Electrical connector diagram showing pin arrangement and wiring (no text labels or symbols)Permanent Connection
In the case of a permanent connection, it is necessary that you install a double pole switch between the hob and the electricity supply (mains), with a minimum gap of 3 mm. between the switch contacts and of a type suitable for the required load in compliance with the current electric regulations.

The switch must not break the yellow and green earth cable at any point.
Ensure that the hob supply cord does not come into contact with surfaces with temperatures higher than 50 deg. C.
Supply Cable Specifications
For Uk use only
| Connection Min. size Cable / flex Fuse via Cable/flex type | |||
| • Cooker 6 mm Control twin and Circuit earth | 2 | PVC/PVC 30 A | |
For Europe use only
| Min. size Cable/flex Cable / flex type Fuse | ||
| 2.5 mm ^2 | H05 RR-F 30 A | |
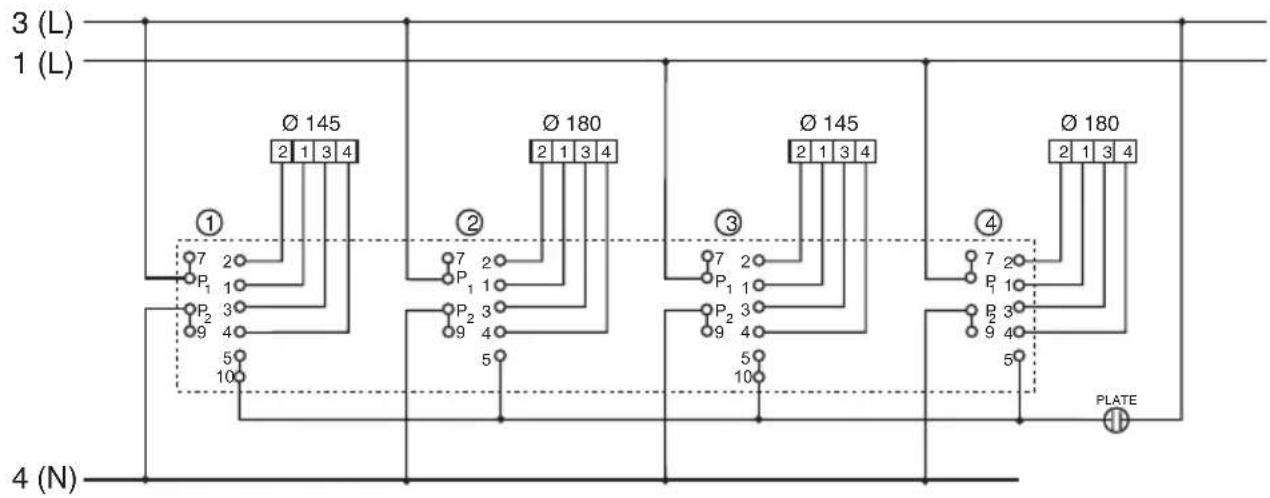
Wiring diagram
AEG Hausgeräte GmbH
Postfach 1036
D-90327 Nürnberg
© Electrolux plc 2003
From the Electrolux Group. The world's No.1 choice.
The Electrolux Group is the world's largest producer of powered appliances for kitchen, cleaning and outdoor use. More than 55 million Electrolux Group products (such as refrigerators, cookers, washing machines, vacuum cleaners, chain saws and lawn mowers) are sold each year to a value of approx. USD 14 billion in more than 150 countries around the world.
- Electric Built-In Hob
- Operating Instructions
- Important Safety Information
- Installation
- Child Safety
- During Use
- Service
- Environmental Information
- Contents
- For the user
- For the installer
- Guide to Use the instructions
- Description of the Hob
- WHEN THE HOB IS FIRST INSTALLED
- Operation
- Electric Hotplates
- Operating Pilot Lamp
- Boiling
- Frying
- OFF 0
- Hints and Tips
- Maintenance and Cleaning
- The Hob Top
- The Hotplates
- Something Not Working?
- Service and Spare Parts
- 5 929 929
- CUSTOMER CARE
- Guarantee Conditions
- Standard guarantee conditions
- Exclusions
- This guarantee does not cover:
- European Guarantee
- Instructions for the Installer
- Engineers technical data
- Important safety requirements
- Location
- IMPORTANT
- Cut Out Size
- Building over a cupboard or drawer
- Building over a kitchen unit with door
- Fitting the hob to the worktop
- Electrical connections
- Permanent Connection
- Supply Cable Specifications
- Wiring diagram
- From the Electrolux Group. The world's No.1 choice.
Brand : AEG
Model : 116K
Category : Hot plate