MG 4320 X NAT - Stove Meireles - Free user manual and instructions
Find the device manual for free MG 4320 X NAT Meireles in PDF.

User questions about MG 4320 X NAT Meireles
0 question about this device. Answer the ones you know or ask your own.
Ask a new question about this device
Download the instructions for your Stove in PDF format for free! Find your manual MG 4320 X NAT - Meireles and take your electronic device back in hand. On this page are published all the documents necessary for the use of your device. MG 4320 X NAT by Meireles.
USER MANUAL MG 4320 X NAT Meireles
Thank you for choosing our appliance. Before using the appliance, please read the warnings and instructions in this manual. This will make it easier to operate and also prolong its service life. Keep this booklet for further reference.
INDEX
Safety information....1
Models....2
Gas connection....3
Instruction for use....3-4
Cleaning and maintaining....5-6
Installation....7-8
Installation instructions....9-10
Using the hob correctly....11
Important Safety Information....12
Child Safety....13
Child Safety
- This hob is designed to be operated by adults. Do not allow children to play near or with the hob.
- This appliance is not intended for use by children or other persons whose physical, sensory or mental capabilities or lack of experience and knowledge prevents them from using the appliance safely without supervision or instruction by a responsible person to ensure that they can use the appliance safely.
- The hob gets hot when it is in use. Children should be kept away until it has cooled.
- Children can also injure themselves by pulling pans or pots off the hob.
During Use
- This hob is intended for domestic cooking only. It is not designed for commercial or industrial purposes.
- This appliance is not connected to a combustion products evacuation device. It must be installed and connected in accordance with current installation regulations. Particular attention shall be given to the relevant requirements regarding ventilation.
- When in use a gas cooking hob will produce heat and moisture in the room in which it has been installed. Ensure there is a continuous air supply, keeping air vents in good condition or installing a cooker hood with a venting hose.
- Ensure a good ventilation around the appliance. A poor air supply could cause lack of oxygen.
When using the hob for a long period time, the ventilation should be improved, by opening a window or increasing the extractor speed.
- Do not use this hob if it is in contact with water. Do not operate the hob with wet hands Ensure the control knobs are in the 'OFF' position when not in use.
- When using other electrical appliances, ensure the cable does not come into contact with the hot surfaces of the cooking appliance.
- Unstable or misshapen pans should not be used on the hob as unstable pans can cause an accident by tipping or spillage.
- Never leave the hob unattended when cooking with oil and fats.
- Never use plastic or aluminium foil dishes on the hob.
- Perishable food, plastic items and areosols may be affected by heat and should not be stored above or below the hob unit.
- This appliance cannot be cleaned with steam or with a steam cleaning machine.
Important Safety Information
You MUST read these warnings carefully before installing or using the hob.

Installation
This appliance must be installed and serviced by a competent person as stated in the Gas Safety (Installation and Use) Regulations Current Editions and the IEE Wiring Regulations.
- For appliances installed in the Republic of Ireland please refer to NSAIDomestic Gas Installations I.S.813 Current Editions and the ETCI Rules for Electrical Installations.
- Remove all packaging before using the hob.
- Ensure that the gas and electrical supply complies with the type stated on the rating plate, located near the gas supply pipe.
- Do not attempt to modify the hob in any way.competent person, and in accordance with existing rules and regulations.
The relevant instructions are to be found in the second section of this manual. Please, ensure that, once the hob is installed, it is easily accessible for the engineer in the event of a breakdown.
WHEN THE HOB IS FIRST INSTALLED
Once the hob has been installed, it is important to remove any protective materials, which were put on in the factory.
The manufacturer will not accept liability, should the above instructions or any of the other safety instructions incorporated in this book be ignored.
Environmental Information
After installation, please dispose of the packaging with due regard to safety and the environment.
- When disposing of an old appliance, make it unusable, by cutting off the cable.
- The symbol ☐ on the product or on its packaging indicates that this product may not be treated as household waste. Instead it shall be handed over to the applicable collection point for the recycling of electrical and electronic equipment. By ensuring this product is disposed of correctly you will help prevent potential negative consequences for the environment and human health, which could otherwise be caused by inappropriate waste handling of this product. For more detailed information about recycling of this product, please contact your local city office, your household waste disposal service or the shop where you purchased the product.
Safety information
a) The appliance is preset to 230 volt.
b) Because of the fact that the appliance of the plug is earthed plug, you have to use an earthed socket too.
c) Pay attention to move the cable away from the hot surfaces.
d) Make sure that the gas pipe is conformable to standards of your country and pay attention to move the gas pipe away from the hot surfaces and to use soapsuds to check whether there is a leakage of gas.
e) After clamping gas pipe with nozzle, fix it with pipe clip. Use soapsuds again to check if there is a leakage of gas.
f) Make sure that LPG gas regulator that you will use for your appliance is conformable to output pressure is 300mmHg (30mbar).
g) Natural gas pressure is 250mmHg (25mbar).
To convert your appliance to natural gas, please contact the technical service.
h) Make your fixture of appliance in the shortest and most air tight form. For your safety, gas pipe must be shorter than 120 cm. A new additional ventilation might be required depending on overuse. For this you use can use air conditioning system like a suction device or admit fresh air into the room.
i) services can deal with it in return for a very little amount of payment when the natural gas transformation is required for your appliance.
j) Contact us when you have any difficulty in using appliance. When the feeder cable is damaged, this cable must be replaced with a special cable or a set of cables which is provided from the manufacturer or the service
Note: Even if, it is normal or durable, change your gas pipe in every 4-5 years.
- Do not expose the gas pipe to extra overweight and exposure strokes.
- Do not strike pan to the burner.
- Use pans whose diameter is proportional in size to that of burners. Use small based pan for small diameter burner, use large based pan for large diameter burner.
- Do not leave sharp materials on hob.
- Pay attention that dropping the pan.
Note: You can regulate the flame by turning the button between large flame and low flame.
- Use 12-18 cm diameter of pan for auxiliary gas burner.
- Use 24-28 cm diameter of to pan for powerful gas burner.
- Do not use a pan that convey excess heat directly glass surface.
• Fix the pan on the centre of burner. - Do not put sharp materials on the hob.
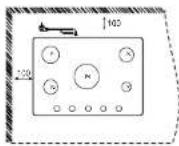
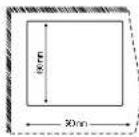
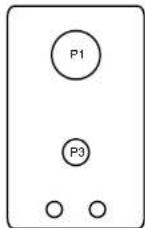
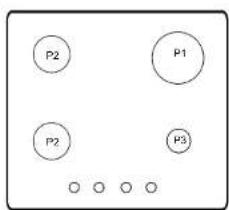
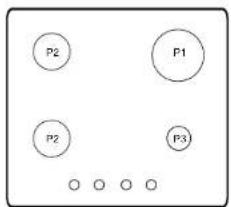
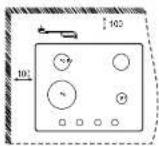
Models
30 cm
text_image
P2 P1 P2 P360 cm inox
text_image
P2 P1 P2 P360 cm Glass

text_image
P1 P2 P3 P470 cm inox

text_image
P6 P1 P2 P360 cm Glass

text_image
P2 P8 P1 P2 P370 cm Glass
To ensure maximum burner efficiency, it is strongly recommended that you use only pots and pans with a flat bottom fitting the size of the burner used so that flame will not spread beyond the bottom of the vessel.
i As soon as a liquid starts boiling, turn down the flame so that it will barely keep the liquid simmering.
Use only pans or pots with flat bottom.
If you use a saucepan which is smaller than the recommended size, the flame will spread beyond the bottom of the vessel, causing the handle to overheat.
i Carefully supervise cooking with fat or oil, since these types of foodstuff can result in a fire, if over-heated.
The stainless steel can become tarnished if excessively heated. Therefore prolonged cooking with potstones, earthenware pans or cast-iron plates is inadvisable. Also, do not use aluminium foil to protect the top during use.
Make sure pots do not protrude over the edges of the cooktop and that they are centrally positioned on the rings in order to obtain lower gas consumption.
Do not place unstable or deformed pots on the rings: they could tip over or spill their contents, causing accidents.
⚠️ Pots must not enter the control zone.
Before any maintenance or cleaning can be carried out, you must DISCONNECT the hob from the electricity supply.
The hob is best cleaned whilst it is still warm, as spillage can be removed more easily than if it is left to cool.
Installation Instructions
Electrical connection
Make sure value of voltage and power cable is coherent with the label, before making electrical connection.
- If appliance will be connected directly to the mains, appropriate switch which has 3mm contact distance, up to standards and appliance load, must be used. Don't use an adaptor and a switch to prevent overheating and fire.
- Use earthed socket for feeder cable.
The manufacturer declines all liability for damage or injury resulting from: incorrect installation, improper, incorrect or unreasonable use.
If the cable needs to be replace, you must use the cable, which is forbearing to heat and must be forbearing to charge of appliance and must by all means as the cable, which is used by manufacturer 'scompany(T90°C). You can ensure this cable from authorized service. Also on the power cable's peak, which is connected to the appliance must be occur yellow-green ground connection, which is larger 20mm than the others.
General Technical Properties
| Category | II 2H 3B/P | 220 - 230V AC - 50Hz |
| Nominal Pressure LPG, 30mbar | ||
| Rapid Burner | 3.0 (kw) | 224 gr/h |
| Semi-rapid Burner | 1.75 (kw) | 130 gr/h |
| Auxiliary Burner | 1.00 (kw) | 71 gr/h |
| Big Triple Burner | 3.8 (kw) | 230 gr/h |
Gas Connetion
Before montage, make sure the system of local gas supply compatible with appliance. In order to do this, you can profit from the label of appliance and board on the operating manual. Bearing in mind asset norms, gas connection must be made by specialized clerk. If it is used metal pipe for connection, make sure it doesn't get in touch with active pieses or will not come under impackts. Connection procedure ....
Gas connection's cock is G 1/2 sprocket.
After making connection, in order to check lible gas leakage you must wash with saponated water.
Instruction for use
Security gas burner
Some models of these devices automatically shuts off the gas supply in the event one of the burners goes out accidentally as a result of a sudden draught, a pot spilling over, or an interruption in the gas delivery.
Usage of gas burner:
For better use of the burners and more efficient gas consumption, use pans whose diameter is proportional in size to that of burners. Ensure that flames do not extend beyond the edge of pans.
WARNING:
- Do not use the system of ignition more than 15 seconds. If the burner doesn't blaze, wait a minute for this period.
Take the ignition knob to "maximum gas delivery" position. Keep the knob pressed down for 4 or 5 seconds in order to allow the sparks to ignite the Gas as it exits through the flame-spreader crown and release the knob and turn it anti-clockwise to adjust the flame to the desired setting.
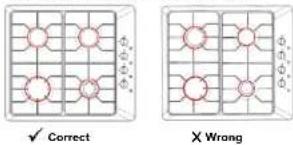
Usage of grid;
Make sure that the grid position right. Check the rubber protection under the grid.
Correct Placement of the Grid
text_image
✓ Correct X WrongInstruction for use
Gas Crowns
Turn the chosen control knob to ignition the gas as it exist through the flame spread crown. Modifying symbols of models are written on appliance or control panel.
□ Square : tap closed;
□ large flame : maximum gas delivery;
□ small flame : minimum gas delivery.
Igniting the burners
If the ignition is not automatic or there is a power outage Keep the knob pressed down And release the knob and turn it anti-clockwise to adjust the flame to the desired setting. Adjusting the flame must be between large flame and small flame. Turn the knob clockwise to close down the flame.
Automatic ignition
Keep the knob pressed down and release the knob and turn it anti-clockwise until □ symbol.
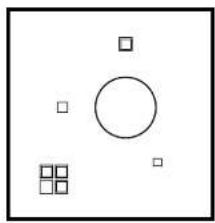
natural_image
Simple geometric diagram with circles, squares, and a grid of squares inside a square frame (no text or symbols)Figure 21
Installation Instructions
Assembly line room and discharge of combustion fumes.
Make sure that adequate air flow as current prescribed by standards. The oxygen necessary for combustion is 2 m for 1kW energy (gas).
Installation Area;
Keep the room well-ventilated for sufficient combustion. Air current, the size of the Ventilation opening has to be 100 cm ^2 working section for exterior wall to provide air Current.
If there is no gas safety system, this section must be at least 200 cm ^2 . Ventilation opening musn't be closed both surface of the wall. It should be near the floor. Ventilation of the room can be provide by other rooms.
Discharge of combustion fumes:
Use hood fume to discharge of combustion fumes. If hood fume doesn't been used, electrical ventilation system can be alternative.
A: ventilation opening
E: electrical fan
C: hood fume

text_image
E C AFigure 23
Installation
These procedures must be carried out exclusively by a qualified technician. Appliance must be install right way as law at it stands. Type of gas for this appliance is LPG.
Positioning the hob in the worktop
Any kind of worktop which is stabilized the temperature of 90^ C can be used.
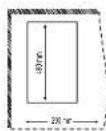
Dimensions of figures are shown at page of 8.
- If the hob will install without an oven under it, panel should be used to separate the subdivision of hob and surface of worktop with distance at least 10mm .
- If the hob will install onto an oven, distance should be 15 mm and instructions for use should be followed. Electricity connection should
be done stand-alone to assemble and take down of the wiring in all cases.
Place the hob into worktop:
Follow the instructions as follows;
- Cement insulation band, which is given with the product, around of hob hole on worktop
to prevent foreign substance come in between hob and worktop.
• Hob should be placed centre assembly hole carefully.
• Assembly metal sheet can be used to fix the hob.
After-sales Service:
In order to learn that nearest application agent, you can call upon application agent's list.
If your list is older than 1-2 year, call to learn up-to-date service place and for your problem answer;
Please take into consideration below precaution.
- When you buy product, approve guarantee bond to recognized dealer.
- You should use the product to manual.
- If you have aggregate demand, call upon our telephone number.
- Ask technician identification card of technician when he comes for service.
- Do not forget to ask bill of service after finishing act. This bill may help you in the future if there is a problem your product.
- Physical life:10 years.( In order to acting as the product, this is the time spare money's provide time.)
Cleaning and maintaining
This appliance cannot be cleaned with steam or with a steam cleaning machine.
The Hob Top
Regularly wipe over the hob top using a soft cloth well wrung out in warm water to which a little wasing up liquid has been added. Avoid the use of the following:
- household detergent and bleaches;
- Impregnated pads unsuitable for non-stick saucepans;
- steel wool pads;
- bath/sink stain removers.
Should the hob top become heavily soiled, the following products are recommended:
- For stainless steel hobs use a proprietary stainless steel cleaner.
- For other hobs use Hob Brite or Bar Keepers Friend.
Do not leave acid or alkaline substances (e.g. vinegar, salt, lemon juice, etc.) On the cooktop.
Please follow up the rules below, before cleaning.
a) Please close the regulator as precautionary measure. If your edvice is adjusted yo natural gas, close natural gas valve.
b) Please disconnect the plug from the power supply
c) If the hob is hot, please wait till it get's cool
d) Please clean and dry the controlling pane, the burners and the other enamelled parts.
e) Wash the plates on the burners with water. Clean and dry the gas canaks an the plates with a tender brush. You should be sure that the plates are put again on the right places.
f) You should not using acid, thinner, gasolin and this kind of substances for cleaning.
g) While you are cleaning your device, do not use dusty cleaning material to clean the logo and marks on the controllig panel.
h) For glas of cleaning should you use acceptable cleaning agent.
i) Do not use overwhelming cleaning agent, stain remover, plotter detergent, scourer, wash cloth.
j) Do not to heat pan, which is empty, cause this will damage your glass surface.
k) When surface is hot, do not pour cold fluid, this will damage glass surface and flammable part.
To best defend your hob, after each usage wait it get cold and clean regularly.
While cleaning, by no means do not displace control knob.
Enameled pieces
You must clean all enameled pieces with soapy water and acceptable cleaning agent by wash cloth. After cleaning must be dried greatly.
Stainless Steel Surface
Stainless Steel Surface should be cleaned with cleaning cloth and specific element which is used for steel's cleaning.
Grill
Enameled grill can be cleaned with dish washer.
Gas Burner
Gas Burner should be cleaned with acceptable cleaning agent.
After cleaning Gas Burners must be dried and put carefully.
Always in electronic ignition model 's " E" electrode must be clean.
In models with reliable ventilation "T" please clean to continue its process regularly.
After cleaning put in carefully. Do not use electronic ignition system, while burner is not its place in order to not damage to ignition system.

Figure 22
Installation
Figures below are the procedures to be followed for the install;
Prepare the cut-out in the worktop as per the measurements shown in Figures. Please call authorized service centre after making worktop cut-out to start guarantee period and prim the hob.(measure the thickness of bench Max.40)
30 cm Inox-Glass

60 cm Glass-inox
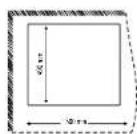
70 cm Inox