DA-662-I-16-LX - Network switch Moxa - Free user manual and instructions
Find the device manual for free DA-662-I-16-LX Moxa in PDF.

User questions about DA-662-I-16-LX Moxa
0 question about this device. Answer the ones you know or ask your own.
Ask a new question about this device
Download the instructions for your Network switch in PDF format for free! Find your manual DA-662-I-16-LX - Moxa and take your electronic device back in hand. On this page are published all the documents necessary for the use of your device. DA-662-I-16-LX by Moxa.
USER MANUAL DA-662-I-16-LX Moxa
MOXA Device Manager User's Guide
First Edition, January 2007
www.moxa.com/product
MOXA®
Moxa Systems Co., Ltd.
Tel: +886-2-8919-1711
Fax:+886-2-8919-1722
Web: www.moxa.com
MOXA Technical Support
Worldwide: support@moxa.com
The Americas support@usa.moxa.com
MOXA Device Manager User's Guide
The software described in this manual is furnished under a license agreement and may be used only in accordance with the terms of that agreement.
Copyright Notice
Copyright © 2007 Moxa Systems Co., Ltd. All rights reserved. Reproduction without permission is prohibited.
Trademarks
MOXA is a registered trademark of The Moxa Group. All other trademarks or registered marks in this manual belong to their respective manufacturers.
Disclaimer
Information in this document is subject to change without notice and does not represent a commitment on the part of MOXA.
MOXA provides this document “as is,” without warranty of any kind, either expressed or implied, including, but not limited to, its particular purpose. MOXA reserves the right to make improvements and/or changes to this manual, or to the products and/or the programs described in this manual, at any time.
Information provided in this manual is intended to be accurate and reliable. However, Moxa Systems assumes no responsibility for its use, or for any infringements on the rights of third parties that may result from its use.
This product might include unintentional technical or typographical errors. Changes are periodically made to the information herein to correct such errors, and these changes are incorporated into new editions of the publication.
Table of Contents
Chapter 1 Introduction and Installation....1-1
Overview....1-2
Installing the MDM Tool 1-2
Installing an MDM Agent 1-4
Chapter 2 MDM Operation....2-1
Launching the MDM Tool 2-2
Uploading Files to Multiple Computers.... 2-3
Upgrading the Firmware....2-5
Logging in to the MDM Agent 2-7
Managing a Computer....2-8
Managing the System Time and RTC Time 2-8
Managing and Transferring Files 2-9
Dual-panel File Manager 2-9
Running a Program on the Embedded Computer 2-10
Configuring a Program to Launch on Bootup 2-11
Managing Users and User Groups 2-12
Adding or Deleting a User Group.... 2-12
Changing a User's Username and Password 2-13
Assigning Auto Launch Programs 2-13
Monitoring Processes....2-14
Monitoring and Controlling Services.... 2-15
Configuring Networking Settings 2-16
Configuring Serial Ports 2-18
Appendix A Service Information......A-1
MOXA Internet Services.... A-2
Problem Report Form A-3
Product Return Procedure....A-4
MOXA Device Manager (referred to in this manual as MDM) is an easy-to-use remote management tool for managing MOXA's ready-to-run embedded computers on a local area network (LAN). MOXA's embedded computers make excellent front-end computers for onsite data acquisition and industrial control applications, but they are often located at a remote site. MDM was designed to make it easy for system administrators to manage their remote embedded computers.
The following topics are covered in this chapter:
Overview
□ Installing the MDM Tool
□ Installing an MDM Agent
Overview
One of the key benefits of this tool is that management tasks, such as configuring network or serial ports, managing and/or transmitting text and binary files, and monitoring and controlling processes, can handled easily using a Windows-based user interface. In addition, MDM can be used to manage different models of embedded computer, and embedded computers that use different operating systems, all from a single computer. As long as the individual embedded computers are pre-installed with an MDM agent, they can be recognized and managed by the unified MDM tool from your PC. The following figure shows a sample management system addressed by this tool.
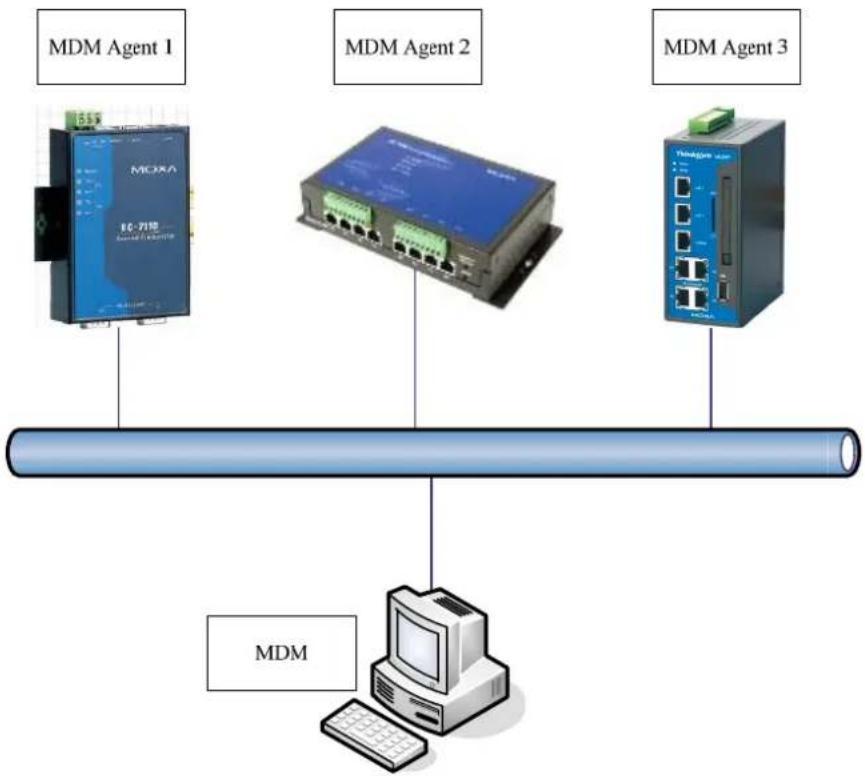
flowchart
graph TD
    A["MDM Agent 1"] --> B["MC-718"]
    C["MDM Agent 2"] --> D["Mobile Device"]
    E["MDM Agent 3"] --> F["Mobile Device"]
    B --> G["Computer"]
    D --> G
    F --> G
    G --> H["MDM"]
In addition to controlling heterogeneous computer systems, the traffic between the MDM tool and any of the MDM agents is encrypted. This feature protects data transmitted from the system.
To obtain the unified MDM tool and the associated MDM agent, please go to the download center on MOXA's website (http://web4.moxa.com/support/download_center.asp). You need to download two installation files under "Driver and Software Downloads." The files are MDM Tool and an associated file named MDM Agent-xxx (the "xxx" represents the model of embedded computer you are using.)
Installing the MDM Tool
The MDM tool is a Windows-based program that must be installed on a PC running Windows XP or Windows 2000. Use the following steps to install the software.
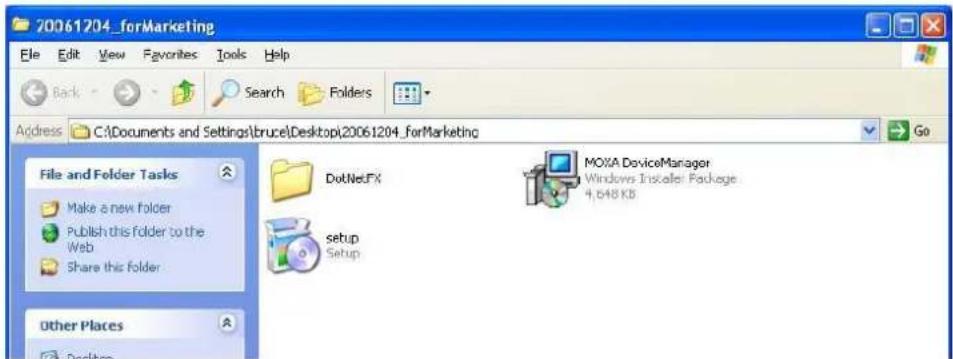
- Download the MDM installation file, named MDM.zip, and save it to your PC's hard drive. Unzip this file to an empty folder, and then double click setup.exe to install the tool.
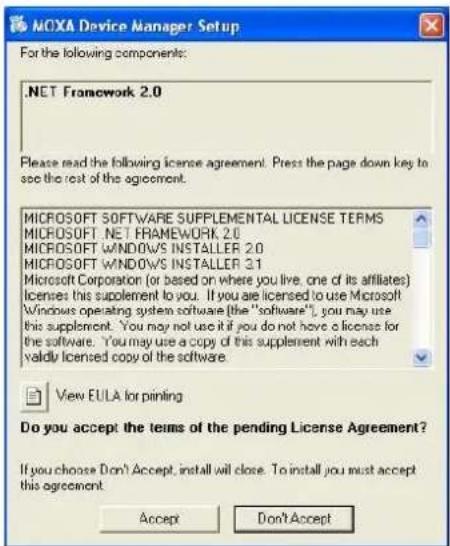
- If the window shown below appears, click the Accept button to install .NET Framework 2.0.
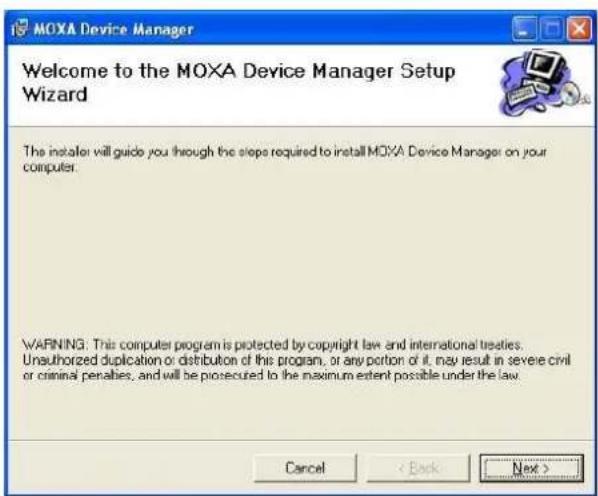
- After installing .NET Framework 2.0 (or if it is already installed), click Next to install the MDM tool.
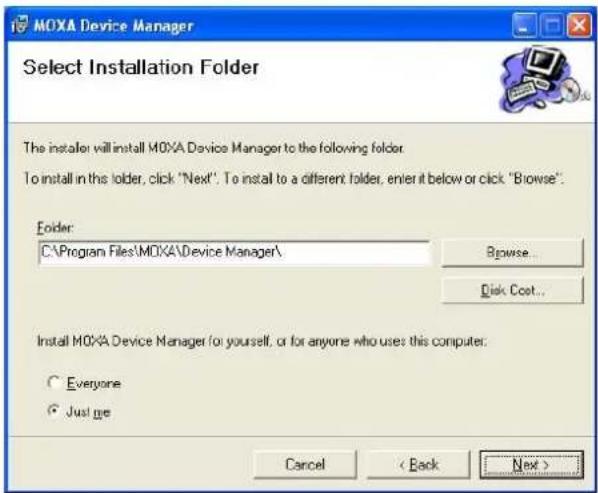
- Select an installation folder, click the Just me radio button, and then click Next.
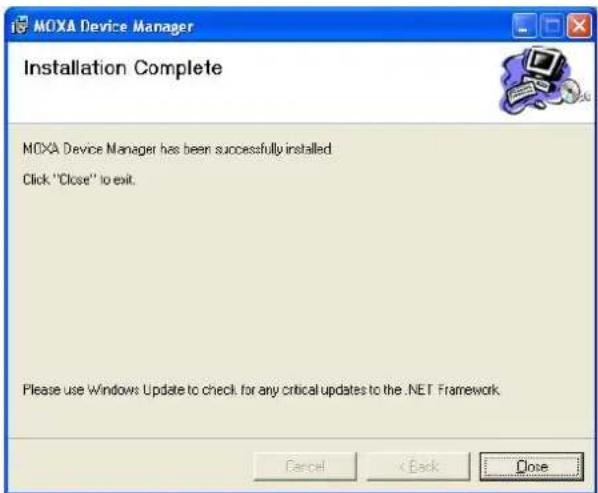
- When the Installation Complete window opens, click Close.
Installing an MDM Agent
An MDM agent is a program that runs on a MOXA embedded computer. MOXA's embedded computers come in different models, and run different operating systems. For this reason, be sure to download the correct software for installing an MDM agent on your embedded computer. To obtain the unified MDM tool and the associated MDM agent, please go to the download center on MOXA's website (http://web4.moxa.com/support/download_center.asp). You need to download two installation files under "Driver and Software Downloads." The files are MDM Tool and an associated file named MDM Agent-xxx (the "xxx" represents the model of embedded computer you are using).
- The MDM agent is stored in a zip file called MDMAgent-xxx.zip. Download the file to your PC, and unzip it to extract the file MDMAgent.exe.
- Log on to your embedded computer. For Linux models, create the directory /home/MDM. For WinCE models, create the directory \norflash.
- Upload the agent program, MDMAgent.exe, to the directory you just created.
Before using the MDM tool on your PC to manage embedded computers, you must run the MDM agent on the embedded computers that you want to manage.
Log on to your embedded computer over a Telnet client or a serial console client, and then run the MDM agent program by typing the following command at the prompt:
MDMAgent.exe
Note: For Linux models, MDMAgent.exe will be set as a daemon after running the agent for the first time. This means that some scripts will be added to the rc.local file (usually located in the /etc/rc.c directory) to cause MDMAgent.exe to launch automatically. You can remove these scripts if you do not want MDMAgent.exe to launch automatically.
Because different embedded computers may be running different operating systems, the MDM agent programs may provide different sets of management operations. For example, the MDM agent for the UC-7110-LX does not support user management. However, other embedded computers allow the administrator to create users and user groups.
In this chapter, we describe how to use the MDM tool, provided that the target embedded computer is a WinCE computer, such as UC-7420-CE. Differences in operation that result from the differences between embedded computer models will be pointed out in the explanations.
The following topics are covered in this chapter:
□ Launching the MDM Tool
□ Uploading Files to Multiple Computers
□ Upgrading the Firmware
☐ Logging in to the MDM Agent
□ Managing a Computer
☐ Managing the System Time and RTC Time
□ Managing and Transferring Files
Dual-panel File Manager
➢ Running a Program on the Embedded Computer
➢ Configuring a Program to Launch on Bootup
□ Managing Users and User Groups
➢ Adding or Deleting a User Group
Changing a User's Username and Password
☐ Assigning Auto Launch Programs
□ Monitoring Processes
□ Monitoring and Controlling Services
□ Configuring Networking Settings
□ Configuring Serial Ports
Launching the MDM Tool
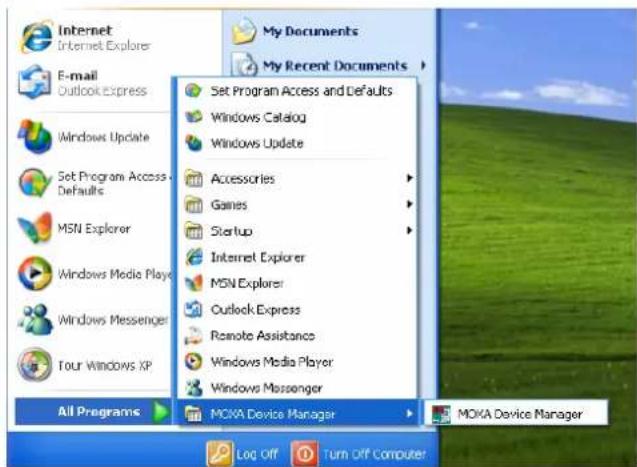
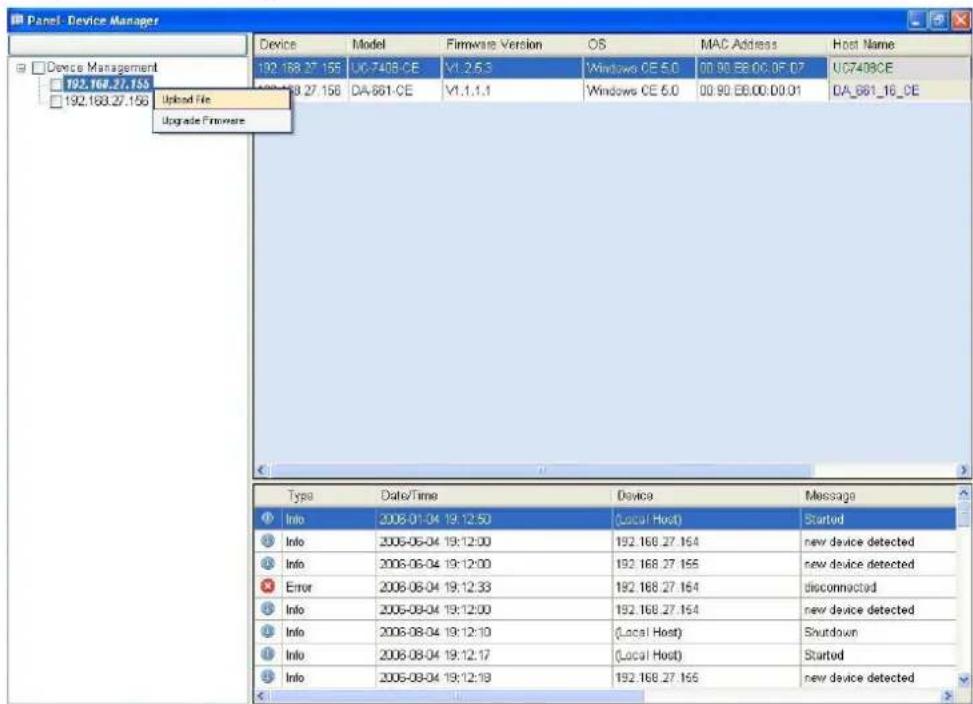
To launch the MDM Tool on your PC, click Start → All Programs → MOXA Device Manager → MOXA Device Manager.
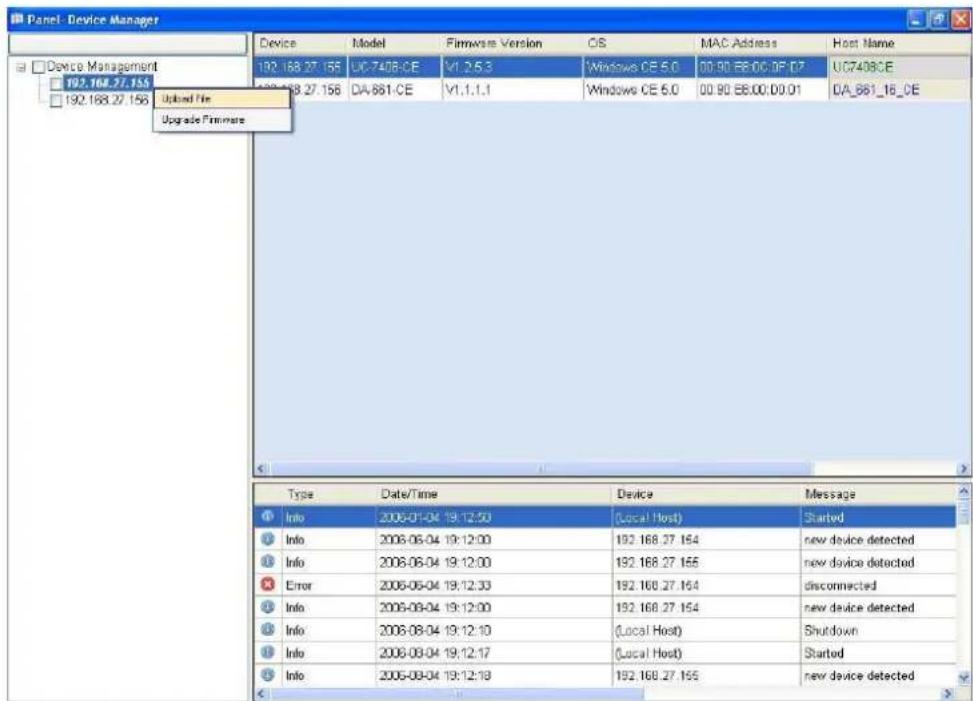
The MDM interface window is divided into three panels as shown below.
| Device Search | Device | Model | Firmware Version | OS | MAC Address | Host Name |
| Device Management 192.168.27.22 192.168.27.22 192.168.27.113 192.168.27.155 | 192.168.27.22 | DA-662-CE | V1.1.1.1 | Windows CE 6.0 | 00:30:E8.00:D0:B1 | DA_662_18_CE |
| 192.168.27.11B | UC-7420-CE | V1.2.5.3 | Windows CE 5.0 | 00:30:E8.00:42:5F | UC7420CE | |
| 192.168.27.155 | UC-7420-CE | V1.2.5.3 | Windows CE 5.0 | 00:30:E8.00:07:E8 | UC7420CE | |
| Type Date/Time Device Message | ||||||
| ① Info 2006-36-21 14:12:39 (Local Host) Started | ||||||
| ② Info 2006-36-21 14:12:43 192.168.27.156 new device detected | ||||||
| ③ Info 2005-36-21 14:12:43 MATS new device detected | ||||||
| ④ Info 2005-36-21 14:12:45 192.168.27.118 new device detected | ||||||
| ⑤ Info 2006-36-21 14:12:45 MATS new device detected | ||||||
| ⑥ Info 2006-36-21 14:12:45 192.168.27.155 new device detected | ||||||
| ⑦ Info 2008-40-21 14:12:30 192.168.27.155 farm opened | ||||||
| ⑧ Info 2006-40-21 14:12:40 192.168.27.155 farm closed | ||||||
Left Panel
The left panel shows a list of MDM agents and computers that were located by the MDM tool. The
list is updated automatically every 3 minutes as MDM agents are connected to or disconnected from the local area network. You may also search at any time by clicking on the Device Search bar.
Upper Right Panel
The panel in the upper right part of the window lists basic information of the connected computers. Each row gives the ID, model, firmware version, MAC address, and host name of one of the embedded computers. The host name column can be edited to give a brief description of the computer.
Lower Right Panel
The panel in the lower right part of the window is an event viewer. It records important events that the tool has handled. Events could include system start, shutdown, connect, disconnect, etc. The information is stored in a log file named MoxaDeviceManager.xml, which is located in the installation directory (by default, the installation directory is c:\Program Files\MOXA Device Manager). Note that the log file is limited to 50,000 records (about 10 MB).
Uploading Files to Multiple Computers
This feature is useful for uploading a program or a configuration file to computers of the same model that are connected to the local area network.
- In the upper right panel select one or more computers of the same model listed under Device Management. Computers are selected by clicking in the box to the left of the IP address to checkmark the box. Right-click on any of these computers and select Upload File.
- Choose a file to upload from the popup window.
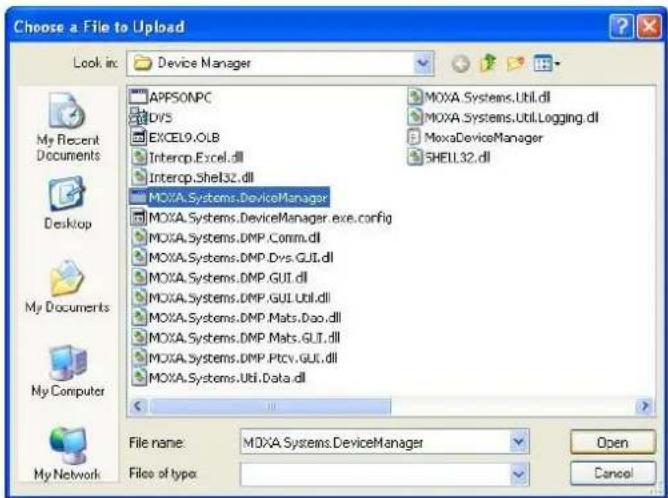
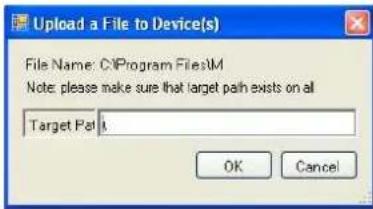
- Input the path name of the directory to which the file will be copied. Note that the directory must exist on each of the embedded computers that were selected above in Step 1.Click OK to start the upload.
Upgrading the Firmware
Multiple computers can be upgraded at the same time, but the computers must be of the same model. The computers will be restarted after the upgrade process is completed.
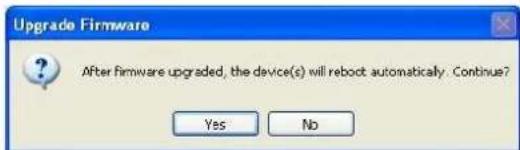
- In the upper left Device Management panel, select one or several computers of the same model by clicking on the check boxes to the left of the IP address. Right-click on any of these computers and select upgrade firmware.
- When the Upgrade Firmware message box pops up, click Yes to continue upgrading.
- Choose the firmware file to upload from the upload window, and then click Open.
![Choose the Firmware to Upload Look in: Local Disk [C:\] My Recent Documents Desktop My Documents My Computer My Network Documents and Settings Program Files WINDOWS Windows_XP_Crack tab1 UC7408CE_V1253 File name: UC7408CE_V1253 Files of type: Open Cancel](/content/2026/06/1185941/images/5ead736458328fbe1f82a3f2a38395f8b5990c896f42bfc1974ed66bfb590c05.jpg)
- While the firmware is being upgraded, a popup window will show the progress of the upgrade process. Do not shut down the MDM tool before the upgrade process is completed, since doing so could damage the computer. The following figure illustrates upgrading the firmware for the UC-7420-CE embedded computer.
![[192.168.27.155] Upgrade firmware starting... It may take several minutes. DO NOT interrupt the operation from now on. [192.168.27.155] 1.3.6.1.4.1.8691.13.7408](/content/2026/06/1185941/images/0fbbb1d28226dd93cc94ccc72d17a8a6f10596983ffb470821bcecf1052bc2ad.jpg)
- When the upgrade process is finished, the system will reboot automatically. The following figure illustrates upgrading the firmware for the UC-7420-CE embedded computer.
![[192.168.27.155] LAN1 Interface Configuration: [192.168.27.155] IP Address: 192.168.27.155 [192.168.27.155] SubNet Mask: 255.255.255.0 [192.168.27.155] Gateway: 1.1.1.1 [192.168.27.155] DNS: [192.168.27.155] WINS: [192.168.27.155] LAN2 Interface Configuration: [192.168.27.155] IP Address: 192.168.4.127 [192.168.27.155] SubNet Mask: 255.255.255.0 [192.168.27.155] Gateway: [192.168.27.155] DNS: [192.168.27.155] WINS: [192.168.27.155] Do you want to keep the current network settings on the next boot (Y/N)?Reboot now? (Y/N) [192.168.27.155] Upgrade completed. System will reboot in 5 seconds. [192.168.27.155] 5... [192.168.27.155] 4... [192.168.27.155] 3... [192.168.27.155] 2... [192.168.27.155] 1... [192.168.27.155] 0...](/content/2026/06/1185941/images/afa80a0905b9389fbf7e3a7fca05f75ad542e8835934095f315bf5e3d5dea529.jpg)
Logging in to the MDM Agent
For embedded computers such as the WinCE series and UC-7400-LX that control access right, you will need to log in to the MDM agent to manage it. Note that the user name and password that you use to log in to the MDM agent are the same as the Telnet user name and password.
On the MDM user interface, double click on a computer listed in the top left panel under Device Management. When the login window pops up, input the User name and Password and then click OK.
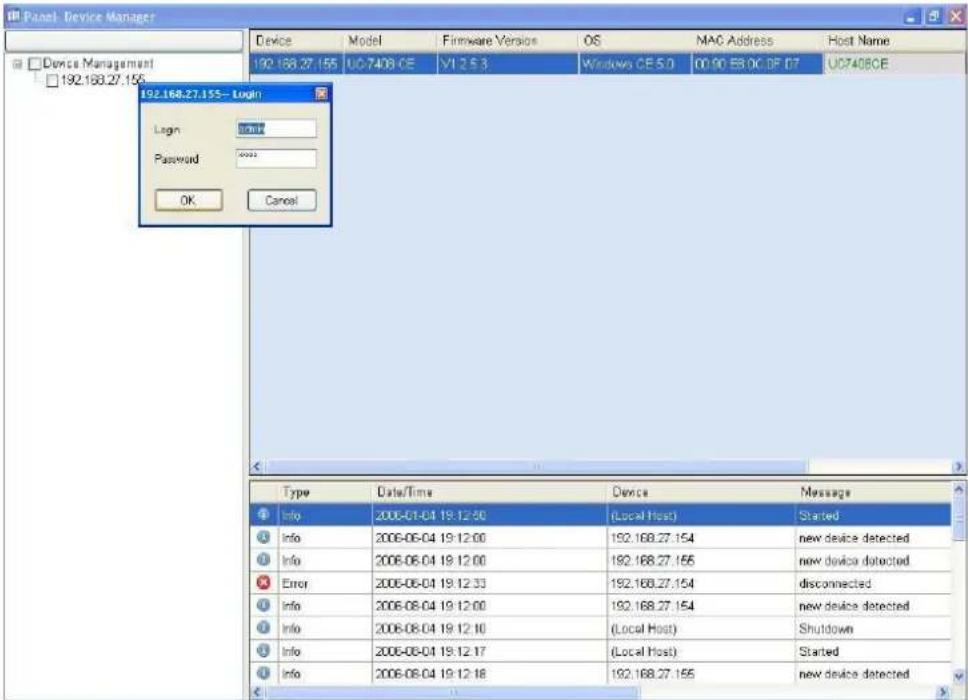
Note that after 3 incorrect logins, the connection between the MDM agent and the MDM tool will be lost, and the IP address of the MDM agent will disappear from the device list. A new connection will be re-established automatically within 3 minutes, at which time the IP address of the agent will reappear in the device list. To regain the connection immediately, click on the Device Search bar to initiate another search.
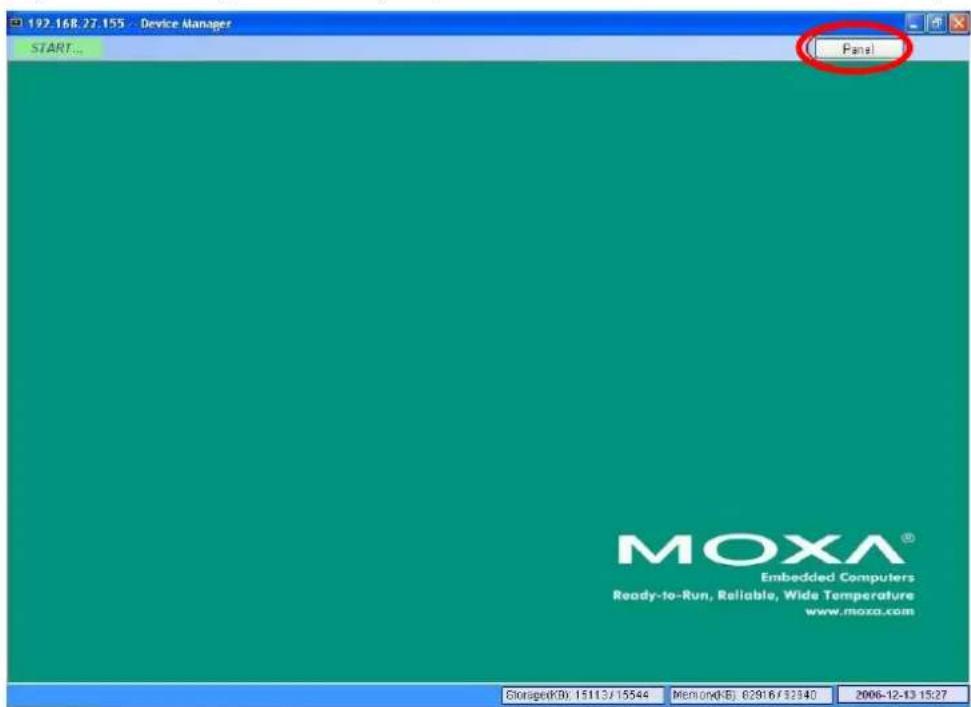
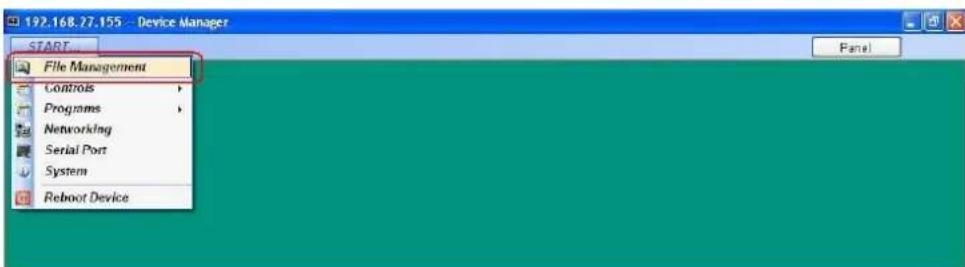
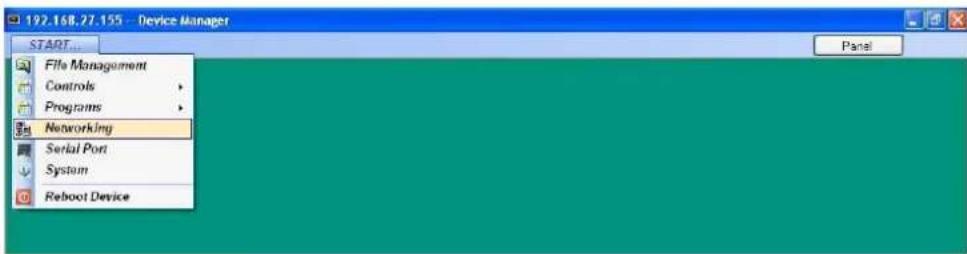
Managing a Computer
After logging in to the embedded computer from the MDM login window, the “device manager” interface window of the selected computer will appear. The top menu bar includes a START button and a Panel button. The bottom menu bar displays three information blocks—memory usage, disk usage, and system time. The information is refreshed every minute.
If you need to manage another computer, click on the Panel button to return to the main panel.
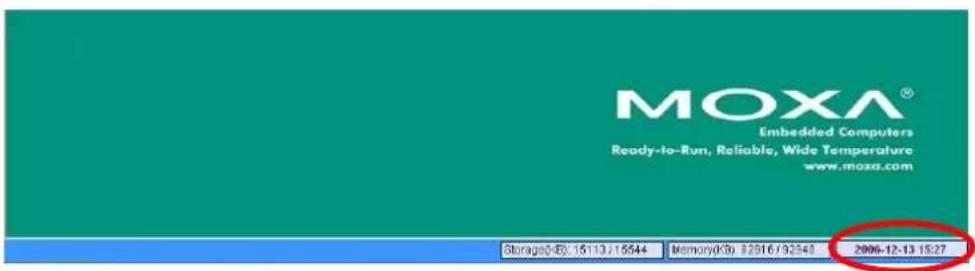
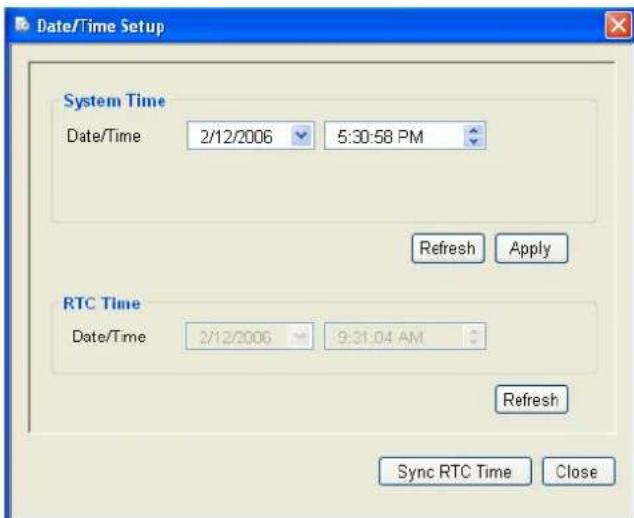
Managing the System Time and RTC Time
- To manage the system time and RTC time, double click the clock area in the bottom right of the device manager interface window.
- Modify the values in the "System Time" area, and click Apply to update the system time of the computer.
Click Refresh to query the current system time.
Click Refresh in the "RTC Time" area to query the current RTC time.
Click Sync RTC Time to synchronize the RTC time with the system time of the computer.
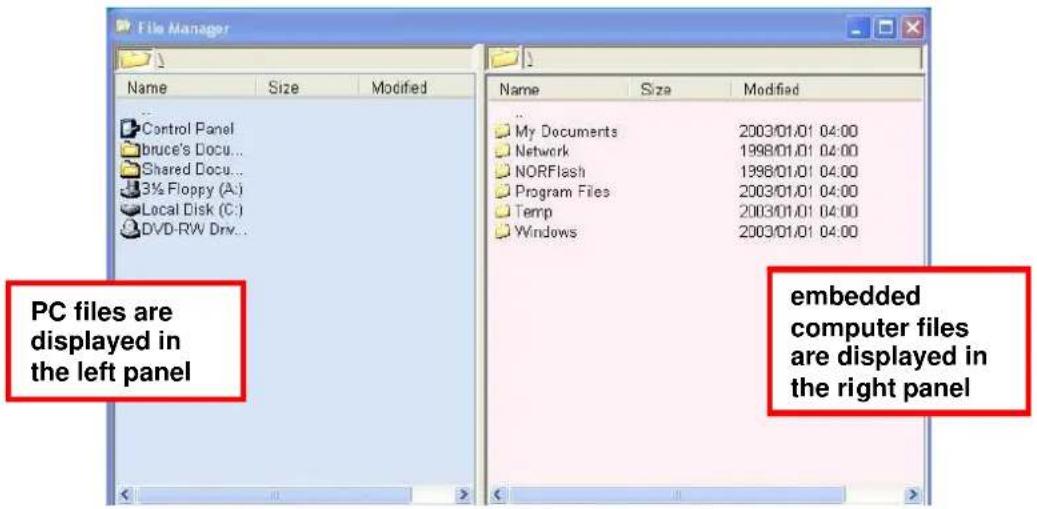
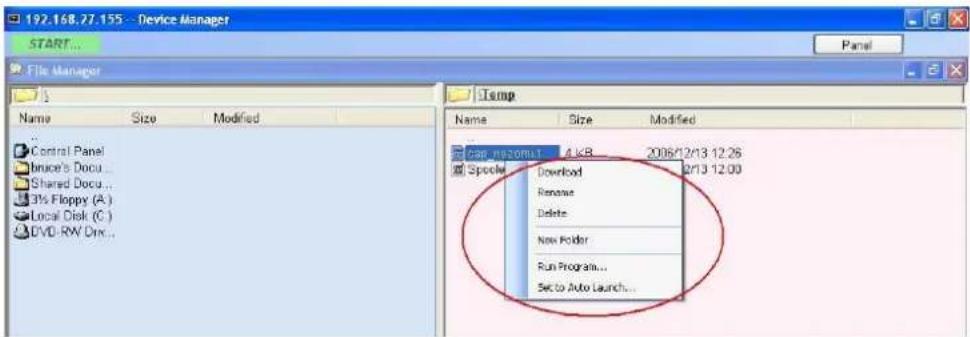
Managing and Transferring Files
Dual-panel File Manager
To mange and/or transfer files, click START in the top menu bar and select File Management to open the dual-panel file manager window.
The left panel is a file manager for your PC. The right panel is a file manager for the embedded computer. To transfer files between the PC and embedded computer, simply drag the file from one file manager pane to the other. For example, to transfer a file from the PC to the embedded computer, drag the file from the left pane to the right pane.
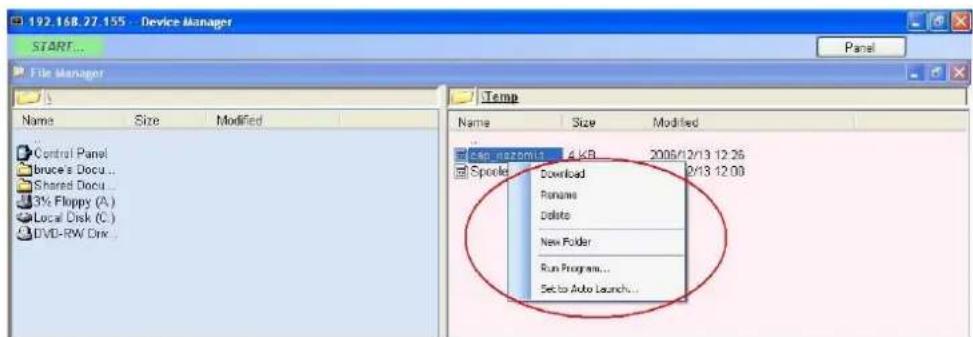
Running a Program on the Embedded Computer
Take the following steps to run a program on the embedded computer
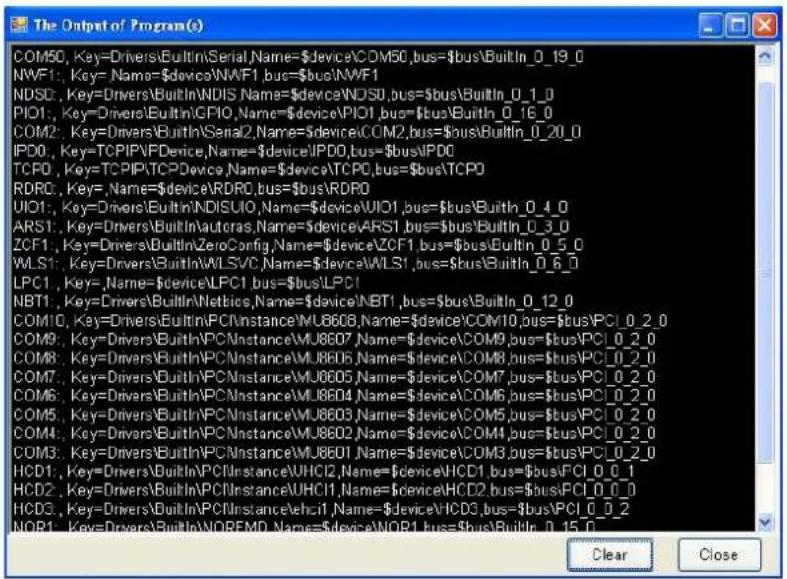
- Right click on the name of the program name in the right panel of the dual-panel file manager, and then select the Run Program... option.
- Input the arguments for the program in the Run Program window and then click OK.
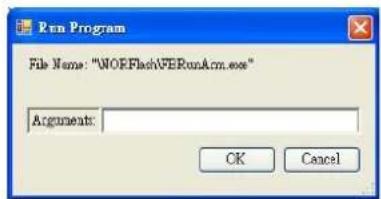
- The output for the program will appear in a popup window, as shown below.
Configuring a Program to Launch on Bootup
Follow these steps to configure a program to launch when the embedded computer boots up.
- To configure a program to run automatically when the system boots up, right click on the program name in the right panel of the dual-panel file manager, and then select Set to Auto Launch....
- Input the arguments for the program in the Set to Auto Launch window, and then click OK to add the program to the auto launch list.
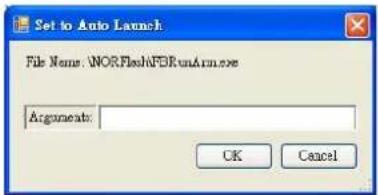
NOTE
We recommend adding the MDM agent program to the auto launch list. Doing so will make it easier to control large numbers of embedded computers, and embedded computers that are located at remote locations.
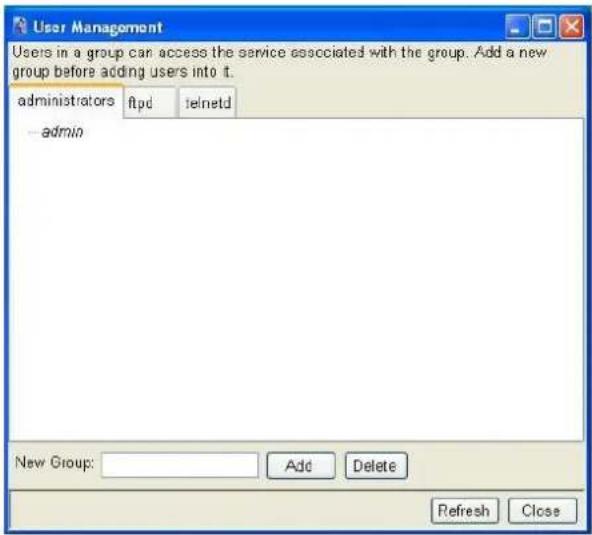
Managing Users and User Groups
Adding or Deleting a User Group
MDM gives administrators the ability to manage users and user groups.
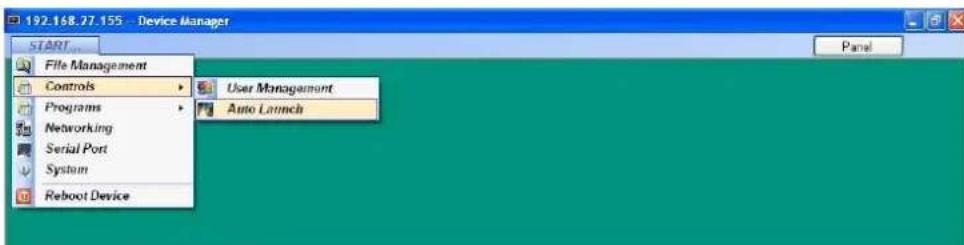
- Click START on the top menu bar and select Controls → User Management.
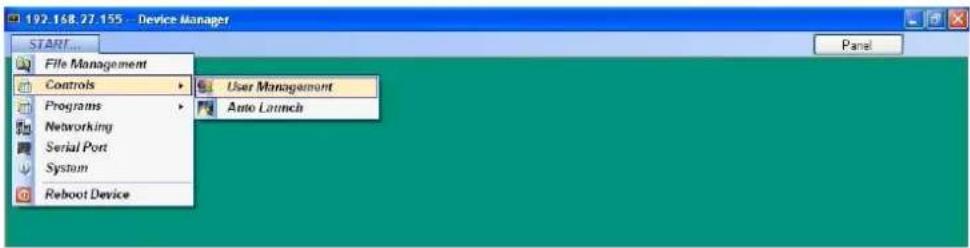
- When the User Management interface window opens, click on the administrators tab. To create a new group, type the name of the group in the New Group input box, and then click the Add button. Click Delete to delete an existing user group.
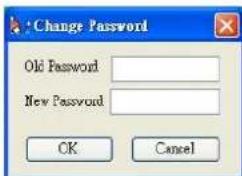
Changing a User's Username and Password
Follow these steps to change a user's username and password.
- To change the password of a user, right click on the user and select Change Password from the menu of commands.
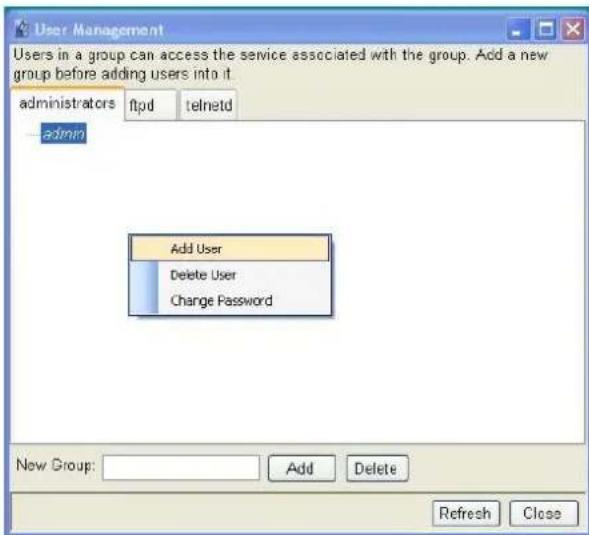
- Type in the Old Password and New Password and then click OK.
Assigning Auto Launch Programs
- To assign auto launch programs, click START on the top menu bar and select Controls → Auto Launch.
- In the Auto Launch List window, click on a program and then click the up and down arrows as needed to change the launch sequence of the programs in the auto launch list. Click Apply to activate the new list.
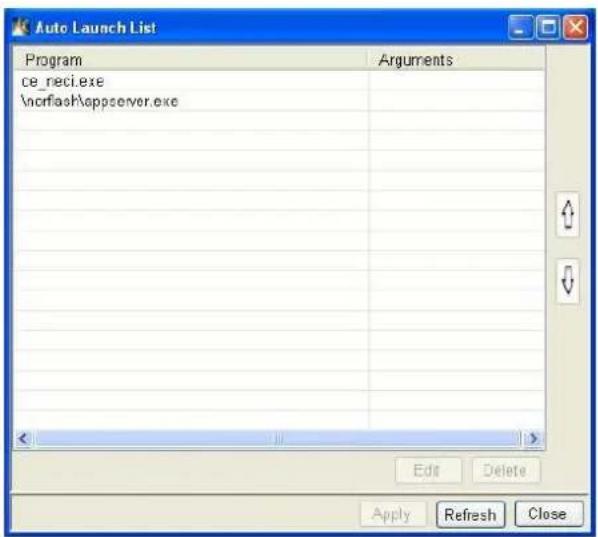
To delete a program from the list, select the program and then click Delete in the lower right corner.
To edit a program's argument list, select the program and then click Edit in the lower right corner, and then edit the list of arguments in the popup window.
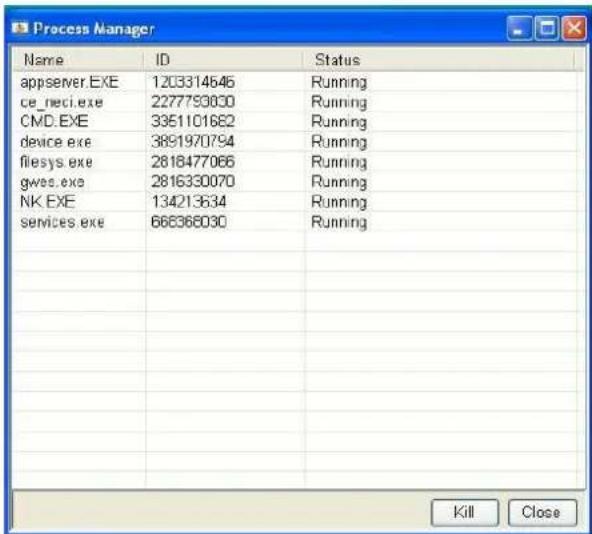
Monitoring Processes
- Click START on the top menu bar and select Programs → Processes to open the Process Manager.
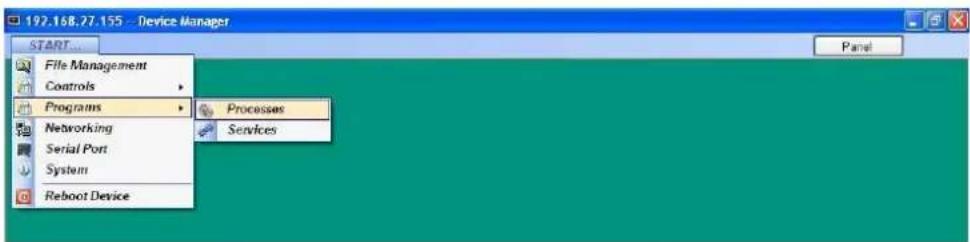
- The Process Manager lists the applications that are currently running. To stop an application, click on the application name to highlight it, and then click the Kill button in the lower right corner of the window.
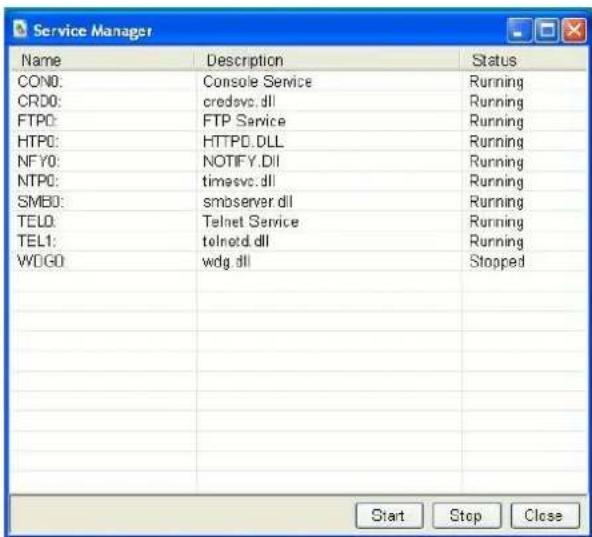
Monitoring and Controlling Services
- Click START on the top menu bar and select Programs → Services to open the Service Manager.
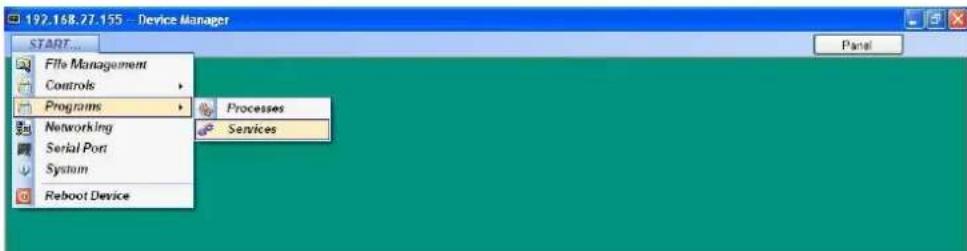
- The Service Manager lists the status (Running or Stopped) of all services installed on the embedded computer. To start an application, click on the application name to highlight it, and then click the Start button in the lower right corner of the window. To stop an application, click on the application name to highlight it, and then click the Stop button in the lower right corner of the window.
Configuring Networking Settings
- Click START on the top menu bar and select Networking.
- If your computer obtains IPs from a DHCP server, click the DHCP Enabled button.
Otherwise, click the Using Fixed IP button and edit the IP address, Submask, and Gateway (if applicable). Click Apply to activate the new settings.
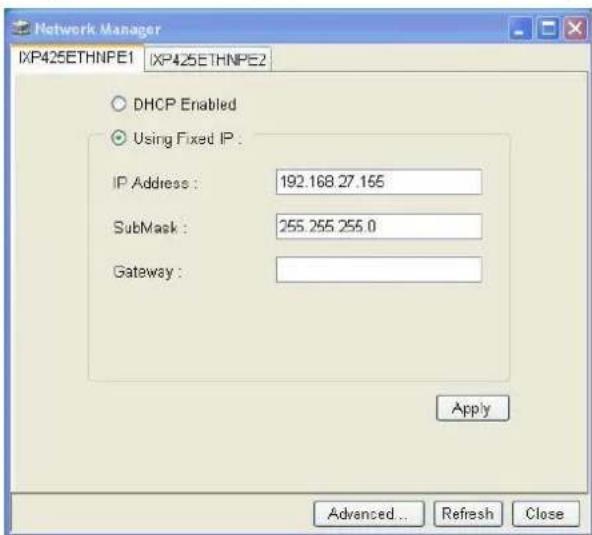
-
Click the Advanced... button to configure domain name servers.
-
In the Networking – Advanced Settings popup window, select a network port to examine the domain name servers.
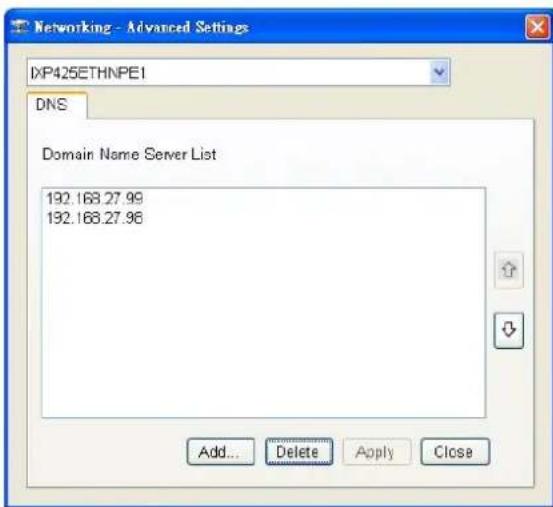
To add a server to the list, click Add...and then type the IP address of the server in the popup window. Click OK.

To delete a server from the list, click the server's IP address to highlight it, and then click Delete.
- Click Apply to activate the changes.
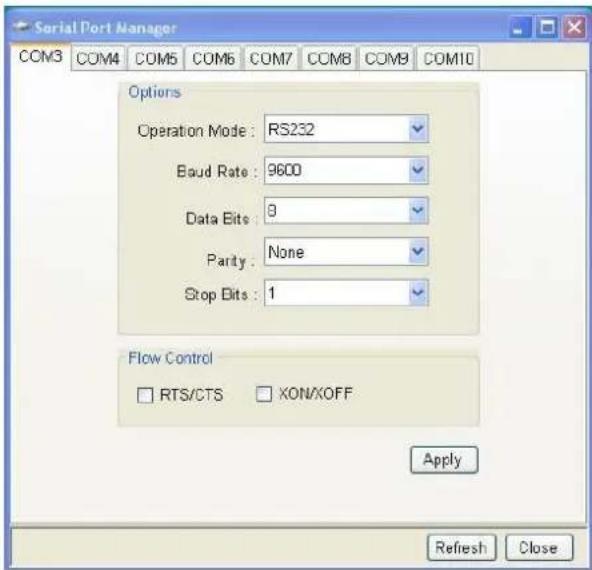
Configuring Serial Ports
- Click START on the top menu bar and select Serial Port to open the Serial Port Manager window.

- Click on one of the COM port numbers listed near the top of the window, and then modify the serial port settings, as needed. Click Apply to activate the configurations. Click Refresh to display the new configuration onscreen.
This appendix shows you how to contact MOXA for information about this and other products, and how to report problems.
The following topics are covered in this appendix.
MOXA Internet Services
□ Problem Report Form
□ Product Return Procedure
MOXA Internet Services
Customer satisfaction is our primary concern. To ensure that customers receive the full benefit of our products, MOXA Internet Services has been set up to provide technical support, driver updates, product information, and user's manual updates.
The following services are provided
E-mail for technical support....support@moxa.com
Website for product information:
http://www.moxa.com
Problem Report Form
MOXA Embedded Computer Series
| Customer name: | |
| Company: | |
| Tel: | Fax: |
| Email: | Date: |
- MOXA Product: ____
- Serial Number: ____
Problem Description: Please describe the symptoms of the problem as clearly as possible, including any error messages you see. A clearly written description of the problem will allow us to reproduce the symptoms, and expedite the repair of your product.
Product Return Procedure
For product repair, exchange, or refund, the customer must:
◆ Provide evidence of original purchase.
♦ Obtain a Product Return Agreement (PRA) from the sales representative or dealer.
◆ Fill out the Problem Report Form (PRF). Include as much detail as possible for a shorter product repair time.
◆ Carefully pack the product in an anti-static package, and send it, pre-paid, to the dealer. The PRA should be visible on the outside of the package, and include a description of the problem, along with the return address and telephone number of a technical contact.