JC-199APB - Monitor Hanns.G - Free user manual and instructions
Find the device manual for free JC-199APB Hanns.G in PDF.

User questions about JC-199APB Hanns.G
0 question about this device. Answer the ones you know or ask your own.
Ask a new question about this device
Download the instructions for your Monitor in PDF format for free! Find your manual JC-199APB - Hanns.G and take your electronic device back in hand. On this page are published all the documents necessary for the use of your device. JC-199APB by Hanns.G.
USER MANUAL JC-199APB Hanns.G
Congratulations!
The display you have just purchased carries the TCO'03 Displays label. This means that your display is designed, manufactured and tested according to some of the strictest quality and environmental requirements in the world. This makes for a high performance product, designed with the user in focus that also minimizes the impact on our natural environment.
Some of the features of the TCO'03 Display requirements:
Ergonomics
Good visual ergonomics and image quality in order to improve the working environment for the user and to reduce sight and strain problems. Important parameters are luminance, contrast, resolution, reflectance, colour rendition and image stability.
Energy
• Energy-saving mode after a certain time - beneficial both for the user and the environment
- Electrical safety
Emissions
• Electromagnetic fields
- Noise emissions
Ecology
- The product must be prepared for recycling and the manufacturer must have a certified environmental management system such as EMAS or ISO 14000
- Restrictions on
a. chlorinated and brominated flame retardants and polymers
b. heavy metals such as cadmium, mercury and lead.
The requirements included in this label have been developed by TCO Development in co-operation with scientists, experts, users as well as manufacturers all over the world. Since the end of the 1980s TCO has been involved in influencing the development of IT equipment in a more user-friendly direction. Our labelling system started with displays in 1992 and is now requested by users and IT-manufacturers all over the world.
For more information, please visit www.tcodevelopment.com
Recycling Information
We, the HannStar Display Corp. care very much about our environment protection strategy and firmly believe that it helps us have healthier earth via appropriate treatment and recycling of industrial technology devices at the end-of-life. These devices contain recyclable materials, which can be redecomposed and re-integrated into brand-new marvels. On the contrary, other material can be classified to hazardous and poisoned substances. We strongly encourage you to contact the provided information to recycle this product.
United State : http://newyork.earth911.org/
Asia : http://recycle.epa.gov.tw/public/public4_2.htm
Europe :
Ireland
Company : McGrath Environmental Consultants Ltd.
Contact Person : Ms. McGrath Clodagh
Address: 20 Lower John Street, Cork, Ireland.
Tel: 021 4554833 Fax: 021 4505805
Norway :
Company : Bergfald & Co as Contact Person : Mr. Solevåg ∅ystein
Address : Solavågsvegen 90, EIDSNES, NORWAY ,Post Code : N-6037
Tel : +47 40 23 47 05 Fax : +47 70 19 40 17
Web Site : http://www.bergfald.no/bergfald_english.html
United Kingdom :
Company : ARENA Network Contact Person : Dr. Tillotson Allen
Address : Bank Buildings Treforest Estate, Pontypridd, Rhondda Cynon Taff, Kindom Post Code :
CF37 5UR
Tel : 01443 844001 Fax : 01443 844002
Web Site : http://www.arenanetwork.org
Operation Instructions
Thank you for purchasing this monitor, a high-resolution multi-scan color monitor.
Please read this guide thoroughly before installation.
FCC RADIO FREQUENCY INTERFERENCE STATEMENT WARNING: (FOR FCC CERTIFIED MODELS)
This monitor has been tested and found compliant with the limits for a Class B digital device, pursuant to part 15 of the FCC Rules. These limits are designed to provide proper protection against harmful interference to a residential installation. This monitor generates, uses, and can radiate radio frequency energy. Harmful interference to radio communication may be led as a result if it's not properly installed and used. However, there is no guarantee that interference will not occur in a particular installation. If this monitor does cause serious interference to radio or television reception, resetting the monitor may determine it. Moreover, users are encouraged to correct interference by doing one or more of the following:
● Reorient or relocate the receiving antenna.
- Move the monitor and the receiver further away from each other.
- Connect the monitor into an outlet on a circuit different from that to which the receiver is connected.
- Consult your local dealer or an qualified technician
FCC Warning:
To assure a continued FCC compliance, a user must use a grounded power supply cord and the provided shielded video interface cable with bonded ferrite cores. Also, any unauthorized changes or modifications to this monitor would void the user's authority to operate this device.
Note: If necessary, shielded interface cables and AC power cord must be used to meet the emission level limits.
Content
Safety Precautions....1
First Setup 2
Quick Installation....2
Front View of the Product ....3
Rear View of the Product....3
Using On Screen Display (OSD) Functions ....4
Supporting Timing Modes 7
Technical Information......8
Care and Maintenance....9
Troubleshooting 9
Safety Precautions
This monitor is manufactured and tested on a ground principle that a user's safety comes first. However, improper use or installation may result danger to the monitor as well as to the user. Carefully go over the following WARNINGS before installation and keep this guide handy.
WARNINGS:
This monitor should be operated only at the correct power sources indicated on the label on the rear end of the monitor. If you're unsure of the power supply in your residence, consult your local dealer or power company.
Do not try to repair the monitor yourself as it contains no user-serviceable parts. The monitor should only be repaired by a qualified technician.
Do not remove the monitor cabinet. There is high-voltage parts inside that may cause electric shock to human bodies, even when the power cord is disconnected.
◆ Stop using the monitor if the cabinet is damaged. Have it checked by a service technician.
◆ Put your monitor only in a clean, dry environment. Unplug the monitor immediately if gets wet and consult your service technician.
◆ Always unplug the monitor before cleaning it. Clean the cabinet with a clean, dry cloth. Apply non-ammonia based cleaner onto the cloth, not directly onto the glass screen.
◆ Keep the monitor away from magnetic objects, motors, TV sets, and transformer.
◆ Do not place heavy objects on the cable or power cord.
◆ For PLUG CABLE EQUIPMENT, the Socket-outlet shall be installed near the equipment and shall be easily accessible.
First Setup
Congratulations for purchasing this monitor of high performance!
This monitor comes with the following accessories :
- Power cable.
● D-Sub cable (15 pin) - Audio cable.
- User guide.
Quick Installation
1. Connect video cable (D-Sub cable)
Make sure both monitor and computer are powered OFF. Connect the video cable (D-Sub cable) to the computer, then to the monitor.
2. Connect power cord
Connect the power cord to a properly grounded AC outlet, then to the monitor.
3. Power-ON computer and monitor
Power-ON the computer, then Power-ON the monitor.
4. Windows users: Setting the Timing Mode (Resolution and Refresh Rate)
Example: 1280 x 1024 @ 60 Hz
Resolution Right-click on the Windows desktop > Properties > Settings > "Desktop Area". Set the resolution.
Refresh Rate (vertical frequency) See your graphic card's user guide for instructions.
Example:

Front View of the Product
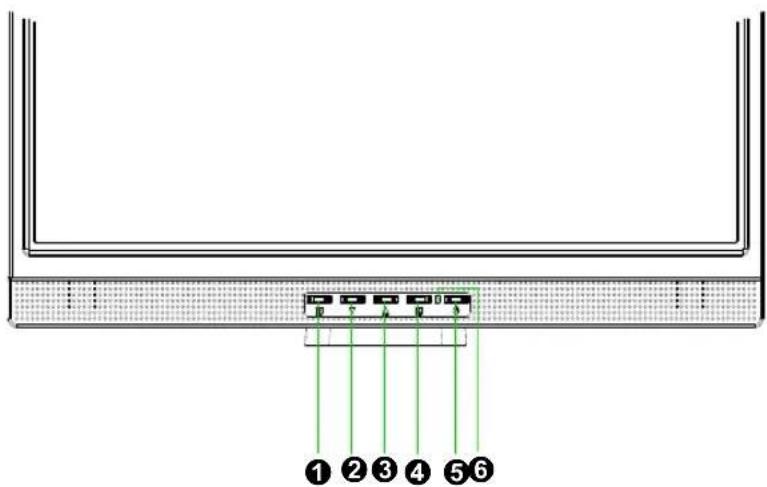
① OSD TURN ON/OFF ④ CONFIRM SELECTION
② SCROLL DOWN/DECREASE ⑤ POWER ON/OFF
③ SCROLL UP/INCREASE ⑥ LED INDICATOR
Rear View of the Product
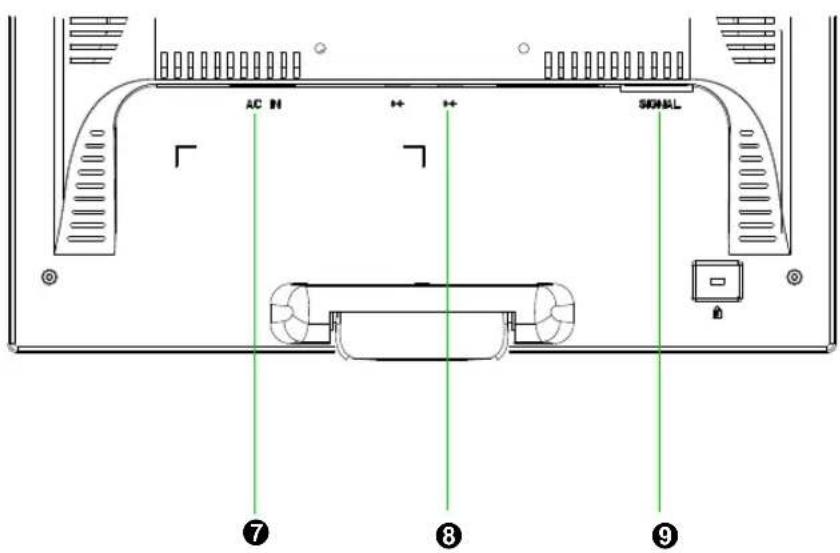
⑦ POWER INPUT ⑨
VGA INPUT (D-SUB 15 PIN)
⑧ AUDIO INPUT
Using On Screen Display (OSD) Functions
| Display main menu. 1 | |
| Exit from OSD menu. | |
| Auto adjust the image when not in main menu. 2 | |
| Confirm the selection. | |
| ▲ or ▼ | Select the desired item when in OSD menu. |
| When not in OSD menu, it is to immediately activate Contrast/ Brightness. It should be change to Contrast/ Brightness by pressing button 2. | |
| ▼ + ▲ | Recall both of Contrast and Brightness. |
| 1 + ▼ | Power Lock (when not in OSD menu) |
| 1 + ▲ | OSD Lock (when not in OSD menu) |
Main Menu
Main Menu
AUTO SET


Auto Adjust
Contrast/Brightness
Color Adjust
Information
Image Adjust
Setup Menu
Memory Recall
Audio Menu
1 : Exit
②: Select
Short Cuts Function from the button(s)

Auto Adjust : To auto adjust Horizontal Position, Vertical Position, Phase (Fine Tune) and Clock (H. Size) of the screen.

Contrast : To adjust the foreground white level of screen image.
▲ : increase contrast, ▼: decrease contrast.

Brightness : To adjust the luminance of the video.
▲ : increase brightness, ▼ : decrease brightness.

Color Adjust : To select the color for improving brightness and color saturation between cool, normal, warm, and User Color.
Cool : Adds blue to screen image for cooler white.
Normal : Adds red to screen image for warmer white and richer red.
Warm : Adds green to screen image for a darker color.
User Color : Individual adjustments for red (R), green (G), blue (B).
-
Press button 2 to select the desired color.
-
Press ▼ or ▲ button to adjust selected color.

Information : To display the information, regarding the current input signal coming from the graphic card in your computer.
Note: See your graphic card user guide for more information about changing the resolution and refresh rate.

Image Adjust : To manually adjust the Horizontal/ Vertical position, H. Size, Fine Tune and Sharpness.

H./V. Position : To adjust the horizontal and vertical position of the video.
H. Position : ▲ : move screen to the right, ▼ : move screen to the left.
V. Position : ▲ : move screen up, ▼ : move screen down.

H. Size : To adjust the width of the screen image.
▼ : decrease the width of screen image, ▲ : increase the width of screen image.

Fine Tune : To adjust the delay time of data and clock.
Press ▼ or ▲ to adjust to your preference.

Sharpness : To adjust the clarity of a non-SXGA (1280x1024) signal with
▼ or ▲ button.

Setup Menu : To set up Language Select, Resolution Notice, OSD Position, OSD Time Out.

Language Select : To allow users to choose from available languages.

Resolution Notice : Resolution Notice is to remind you set the best quality for the image.
- Choose “Enable”: Every 30 seconds, it will show a window “For best picture quality change resolution to 1280 x 1024” to remind you set the best quality for the image.
- Choose "Disable": It will not show a window to remind you set the best quality for the image if the resolution is lower than 1280 x 1024.

OSD Position : Press 2 button to select between horizontal and vertical OSD Position adjustment.
Horizontal OSD Position : To horizontally adjust the OSD position.
▲ : move OSD to the right, ▼ : move OSD to the left.
Vertical OSD Position : To vertically adjust the OSD position.
▲ : move OSD up, ▼ : move OSD down.

OSD Time Out : To automatically turn off On Screen Display(OSD)after a preset period of time.

Memory Recall : To recall factory settings for Video & Audio controls. Press button 2 to select the Memory Recall menu option.

Audio Menu : To adjust the audio functions.
Volume : To adjust the volume of speaker output.
Mute : To turn the Mute ON/OFF.
Supporting Timing Modes
| VGA | 720 x 400 @ 70Hz |
| VGA | 640 x 480 @ 60Hz |
| MAC | 640 x 480 @ 67Hz |
| VESA | 640 x 480 @ 75Hz |
| VESA | 800 x 600 @ 56Hz |
| VESA | 800 x 600 @ 60Hz |
| VESA | 800 x 600 @ 72Hz |
| VESA | 800 x 600 @ 75Hz |
| MAC | 832 x 624 @ 75Hz |
| VESA | 1024 x 768 @ 60Hz |
| VESA | 1024 x 768 @ 70Hz |
| VESA | 1024 x 768 @ 75Hz |
| VESA | 1280 x 1024 @ 60Hz |
| VESA | 1280 x 1024 @ 75Hz |
Warning : Do not set the graphic card in your computer to exceed these maximum refresh rates. Doing so may result in permanent damage to your monitor.
Technical Information
Technical Specification
| LCD Panel 19.0” TFT | |
| Power Management | Energy Star compliant VESADPMS compatible< 2 W |
| Displayable Resolution | SXGA 1280 x 1024 max. Vertical Frequency 75Hz max. |
| Pixel Dimension 0.294 x 0.294 mm | |
| LCD Display Color 16.2M (6 bits + FRC/ color) | |
| Tilt 0°~20° | |
| Active Display Area 376 mm x 301mm | |
| Temperature Operating: 0°C ~ +40°CStorage: -20°C ~ + 60°C | |
| Compliance | UL, TUV/GS, CE, FCC-B, 3C,BSMI,TUV/Ergo, TCO03 |
| Power Input Voltage AC100-240 V | |
| Speaker 1W x 2 |
Care and Maintenance
Care
- Avoid exposing your monitor directly to sunlight or other heat source. Place your monitor away from the sun to reduce glare.
● Put your monitor in a well ventilated area. - Do not place any heavy things on top of your monitor.
● Make certain your monitor is installed in a clean and moisture-free area. - Keep your monitor away from magnets, motors, transformers, speakers, and TV sets.
Note
- Move the LCD out of the package and take off the plastic bag and Polystyrene Foam.
- Pull the base from Parallel versus Panel to Vertical.
- Adjust the Panel within 0 degree leaning forward and 20 degree leaning backward. You must bend harder to exceed 20 degree backward but this range is for packing the unit to a small size for storage only.
Safety Tips
- If smoke, abnormal noise or odor came out from your monitor, caution you should remove the power cord immediately and call your service center.
● Never remove the rear cover of your monitor cabinet. The display unit inside contains high-voltage parts and may cause electric shock to human bodies. - Never try to repair your monitor yourself. Always call your service center or a qualified technician to fix it.
Troubleshooting
No power
- Make sure A/C power cord is securely connected to the power adapter and the power supply is firmly connected to the monitor.
- Plug another electrical device into the power outlet to verify that the outlet is supplying proper voltage.
● Make sure all signal cables are installed.
Power on but no screen image
- Make sure the video cable supplied with the monitor is tightly secured to the video output port on back of the computer. If not, tightly secure it.
- Adjust brightness.
Wrong or abnormal colors
- If any colors (red, green, blue) are missing, check the video cable to make sure it is securely connected. Loose or broken pins in the cable connector could cause an improper connection.
- Connect the monitor to another computer.
According to WEEE regulation, this monitor can't be handled as normal trash in Europe when it is out of usage. Please refer to the recycle information from our website to handle it.