GME229B - Power strip IOGEAR - Free user manual and instructions
Find the device manual for free GME229B IOGEAR in PDF.

User questions about GME229B IOGEAR
0 question about this device. Answer the ones you know or ask your own.
Ask a new question about this device
Download the instructions for your Power strip in PDF format for free! Find your manual GME229B - IOGEAR and take your electronic device back in hand. On this page are published all the documents necessary for the use of your device. GME229B by IOGEAR.
USER MANUAL GME229B IOGEAR
1 Bluetooth® Wireless Tilt Wheel Laser Mouse
1 USB battery charging cable
1 Carrying pouch
1 Quick start guide
System Requirements
- Computer/Laptop must be Bluetooth-enabled and support the HID profile
- Operating System:
Windows 2000/XP/Vista
Mac OS X v10.3.5 or later
If the computer/laptop is currently not Bluetooth-enabled, a Bluetooth® USB adapter will be required. Refer to IOGEAR part number GBU221, GBU241W6, GBU341W6, and GBU421.
Specifications
Resolution: 400/800/1200/1600 adjustable
Mouse Report Rate: 230 report/sec
Frequency Band: 2.4 \~ 2.4835 GHz ISM Band
Interface: Bluetooth 2.0, Class II
Battery Type: Built-in 3.7V 400mA Li-Polymer Rechargeable Battery
Operating Range: 33 ft. (10m)
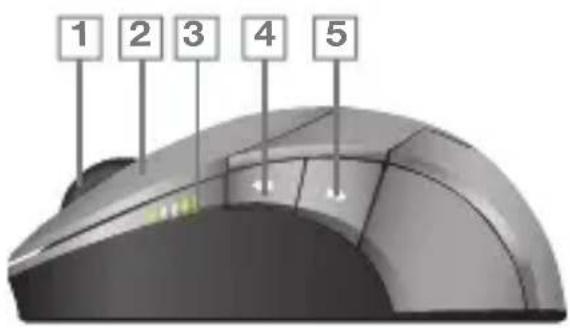
Pictorial Introduction
Start Here!
- Tilt scroll wheel
- Left click button
- Battery low/charging/DPI indicator
- Previous/Backward button
- Next/Forward button
-
DPI switch button
-
Right click button
- Connect button
- Battery charging connection
- Power on/off switch
- Laser sensor
text_image
1 2 3 4 5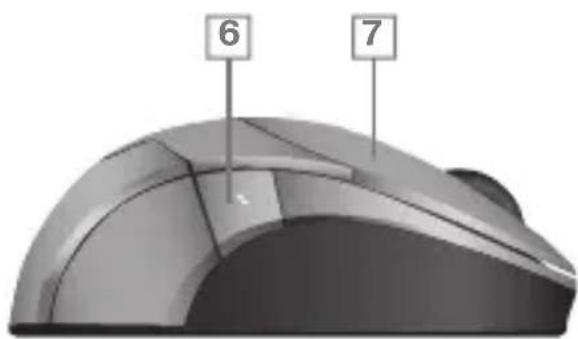
text_image
6 7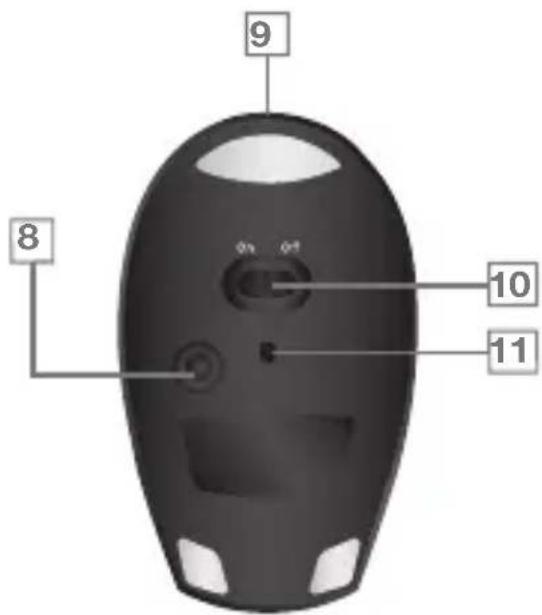
text_image
8 9 10 11Charge Battery
Plug the USB cable into the mouse and the available USB port of the computer, it will start charging. We do recommend that users charge the battery for 10 hours before using the mouse in the first time.
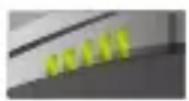
During charging, all 5 battery charging indicators will blink. Once the battery is fully charged, all indicators will turn off.
Note: To continuously charge the mouse via the USB cable, user's computer must be turned on or in standby mode.
Installation
- Make sure the mouse is turned on. When you are on the go, turn the mouse off to preserve battery life.
- To make the mouse discoverable by the computer, press the connect button on the bottom of the mouse. The blue LED will flash at the sensor hole. It means the mouse is under pairing mode.
- Make sure that your computer is enabled for a Bluetooth device. If there is a wireless switch on the computer, be sure it is turned on.
- Open the Bluetooth program and run the wizard to add a Bluetooth device. On most computers, the Bluetooth is found either in Control Panel or on the Start menu. Examples:
a. Some notebook computers: Start > Control Panel > Bluetooth Devices.
b. Other notebook computers: Start > All Programs > Bluetooth > Bluetooth Settings.
c. Toshiba: Start > All Programs > Toshiba > Bluetooth > Bluetooth Settings.
d. Macintosh: Apple > System Preferences > Bluetooth > Set Up New Device
If you are prompted for a passkey, enter "0000" (for added security), or choose no passkey. This mouse will not work with any other passkey.
Function Keys
- DPI Switch: Users can change the mouse resolution by pressing DPI switch. GME229B supports 400,800,1200 & 1600 DPI. The LED indicator will show different positions to indicate the DPI value when a user presses DPI switch.
- Page up, Page down: To press Page up/down button to change page of document when you are surfing website.
- Tilt Wheel: No need to install any driver/software to activate the tilt wheel function. Once the connection has been set up, users can enjoy the convenience from tilt wheel.
LED indicator
There are 5 LEDs to indicate the battery capacity when power on. 5 pcs of LED all light on means battery full and 1pcs of LED light on means battery low. The LEDs will blink when charging and off when charge complete.
The LEDs show different positions to indicate the DPI you select when press DPI switch. LED1:400 dpi, LED2:800 dpi, LED3:1200 dpi, LED4:1600 dpi.
Low Battery
If the LED indicator only light on 1 LED, it means battery low. Please plug charging cable to charge.
Charging Battery
LEDs will blink when charging battery. All LEDs will turn off and stop blinking when the battery is fully charged. It will take about 2 hrs to fully charge the battery.
Indicator
Battery Full

400dpi

Battery Low

800dpi

1200dpi

1600dpi
Warranty
WE'RE HERE TO HELP YOU! NEED ASSISTANCE SETTING UP THIS PRODUCT?
Make sure you:
- Use the live chat at www.iogear.com to try and solve any issues you may be having with the product
- Visit the Tech Info Library/FAQ on www.iogear.com (under the Support tab)
- Call the 24/7 tech support line at 1-866-946-4327 (U.S. only) or 949-453-8782
Warranty Information
This product carries a 1 Year Limited Warranty. For the terms and conditions of this warranty, please go to http://www.iogear.com/support/warranty or call 1-866-946-4327
Register online at http://www.iogear.com/register
Important Product Information
Product Model Serial Number
Contact
Address: 23 Hubble, Irvine, CA 92618 USA
Toll Free: 866-9-IOGEAR
Phone: 949-453-8782
Web site: www.iogear.com
Email: support@iogear.com

natural_image
Cartoon character with green leaf-shaped head and limbs, standing on a solid green background (no text or symbols)About sAbout Us
FUN
IOGEAR offers connectivity solutions that are innovative, fun, and stylish, helping people enjoy daily life using our high technology products.
GREEN
IOGEAR is an environmentally conscious company that emphasizes the importance of conserving natural resources. The use of our technology solutions helps reduce electronic waste.
HEALTH
IOGEAR supports healthy and fit lifestyles. By integrating products with the latest scientific developments, IOGEAR's solutions enhance the life of end-users.