RXL20K3V1B - Uncategorized DAIKIN - Free user manual and instructions
Find the device manual for free RXL20K3V1B DAIKIN in PDF.

| Product Type | Split Air Conditioner |
| Brand | Daikin |
| Model | RXL20K3V1B |
| Cooling Capacity | 2.0 kW |
| Heating Capacity | 2.5 kW |
| Energy Efficiency Class | A+ |
| Refrigerant | R32 |
| Indoor Unit Dimensions (HxWxD) | 285 x 770 x 225 mm |
| Outdoor Unit Dimensions (HxWxD) | 550 x 720 x 285 mm |
| Indoor Unit Weight | 8.5 kg |
| Outdoor Unit Weight | 35 kg |
| Power Supply | 230V / 50Hz |
| Operating Temperature Range | -15°C to 46°C |
| Airflow Rate | 10.5 m³/min |
| Sound Level Indoor (Low) | 22 dB(A) |
| Sound Level Outdoor | 48 dB(A) |
| Functions | Cooling, Heating, Fan, Dehumidifier |
| Maintenance | Clean air filter every 2 weeks |
| Safety Features | Auto restart, child lock |
| Spare Parts | Available from Daikin service centers |
Frequently Asked Questions - RXL20K3V1B DAIKIN
User questions about RXL20K3V1B DAIKIN
0 question about this device. Answer the ones you know or ask your own.
Ask a new question about this device
Download the instructions for your Uncategorized in PDF format for free! Find your manual RXL20K3V1B - DAIKIN and take your electronic device back in hand. On this page are published all the documents necessary for the use of your device. RXL20K3V1B by DAIKIN.
USER MANUAL RXL20K3V1B DAIKIN
natural_image
Illustration of a rectangular industrial air conditioner unit with ventilation grilles and cooling fins (no text or symbols)| CE - DECLARATION-OF-CONFORMITY | CE - DECLARATION-DE-CONFORMIDAD | CE - DECLARAÇÃO-DE-CONFORMIDADE | CE - ERKLÆRING OM-SAMSVAR | CE - IZJAVA-O-USKLADENOSTI | CE - IZJAVA O SKLADNOSTI | CE - ATITIKTIES-DEKLARACIJA |
| CE - CONFORMITÄTÄSERKLÄRUNG | CE - DICHIARAZIONE-DI-CONFORMITA | CE - ZARBIENEHE-O-COOTBETCTBIII | CE - ILMOITUS-YHDENMUKAISUUDESTA | CE - MEGFELELOŠEGI-NYILATKOZAT | CE - VASTAVUSDEKLARATSIOUN | CE - ATIBLSTÍBAS-DEKLARÁCIJA |
| CE - DECLARATION-DE-CONFORMITE | CE - ΔΗΛΩΣΗ ΣΥΜΜΟΡΦΩΣΗΣ | CE - OVERENSTEMMELSESERKLÆRING | CE - PROHLASENI-O-SHODĚ | CE - DEKLARACJA-ZGODNOŚCI | CE - ДЕКЛАРАЦИЯ-ЗА-СЪОТВЕТСТВИЕ | CE - VYHLASENIE-ZHODY |
| CE - CONFORMITEITSVERKLARING | CE - FÖRSÄKRAN-OM-ÖVERENSTÄMMELSE | CE - DECLARAȚIE-DE-CONFORMITATE | CE - UYGUNLUK-BEYANI |
Daikin Industries Czech Republic s.r.o.
RXLG25L2V1B, RXLG35L2V1B, RXLG50L2V1B,
| 01are in conformity with the following standard(s) or other normative document(s), provided that these are used in accordance with our instructions:02derden folgenden Norm(en) oder einem anderen Normdokument oder -documenten entspricht/entsprechen, unter der Vorausselzung, daß sie gemäß unseren Anweisungen eingesetzt worden:03sont conformes à la/aux norme(s) ou autre(s) document(s) normatif(s), pour autant qu'ils soient utilisés conformément à nos instructions:04conform de volgende norm(en) of één of meer andere bindende documenten zijn, op voonwaarde dat ze worden gebruikt overeenkomstig onze instructies:05astán en conformidad con la(s) sigulenta(s) norma(s) u otro(s) documento(s) normativo(s), siempre que sean utilizados de acuerdo con nuestras instrucciones:06sono conformi ali(?) seguiente(i) standard(s) o aliro(i) documento(i) a carattere normativo, a patto che vengano usati in conformità alle nostre istruzioni:07eiva cújupuovo με το(α) ακόκυδο(α) προτυτο(α) ή έλιο έγγραφο(α) κανονσμών, υπό την προύμόθεση οη χρησμοτροσούντα σύμφωνα με τις οξηγες μος; | 08estão em conformidade com a(s) seguinte(s) norma(s) ou outro(s) documento(s) normativo(s), desde que estes sejam utilizados de acordo com as nossas instruções:09сотаєстрают следующим стандартам или други нормативным документам, при условии их использования согласно нашим инструкции:10overholder folgende standard(er) eller andestrandre rebningsgivende dokument(er), foruisat at disse anvendos i henhold til vore instrukser:11respektiva utrustning är utförd i överensstämmelse med och följer följanda standard(er) eller andra normgivende dokument, under förutsättning att användning sker i överensstämmelse med våra instruktioner:12respektiva utstyr er i overensstemmelse med folgende standard(er) eller andre normgivende dokument(er), under förutssetting av at disse brukes i henhold til våre instrukser:13vastaavat seursaren standardien ja muden ohjeellisten dokumentten vaatimuksa odelyttaen, että niitä käytetään ohjeidemme mukaisesti:14za predpoklacu, że jsou vužívány v souladu s našlim pokyny, odpovićají násiedujícím normám nebo normativním dokumentům:15u sikladu sa siljedećm standardom(ma) ili drugim normativním dokumentom(ja), uz uvjet da se cni koriste u sikladu s našlim uputama: | 16 megfelehek az alábbi szatvány(ck)nak vagy egyéb irányedó dokumentum(ck)nak, ha azoket előřínás szerint használjíc:17 spěniaja wymogi następujących norm i innych dokumentów normalizacyjnych, pod warunkiem že używare są zgodnie z naszymi instrukcijami:18 sunt in conformitate cu umrátorul (umátorale) standard(e) sau alt(e) document(e) normativ(e), cu conditja ca acestaa sä fie utilizate în conformitate cu instrucjunile noastre:19 skladni z naslednjiimi standardi in drugimi normativ., pod popojem, da se uporabljajo v skladu z našmi navodii:20 on vastavuses jágnis(ja standardi)tega vők taiste normativlissete dokumentidega, kul neld kasutatikse vastavalt meia juhenditeka:21 cъответстват на следните стандарти или други нормативи документи, при условие, че се изпоразат съгласно нашите инструкции:22 allitinka žemlau nurocytius standardus ir (arba) kitus nominius dokumentus su salyga, kad yra naucojami pagal műsú nurodymus:23 tad, ja lietoči albistosi ražotája norádíjumiem, atabilst sekojcišiem standardiem un obem normativiem dokumentiem:24 sú v zhode s nasledovncu(ýrn) normou(aml) alebo lýrn(í) normalivnymi) dokumentom(aml), za predpokladu, že sa používaju v súlade s našlim návodom:25 urünin, talimatlanmiza göre kullanılması koşulyla aşagidaki standartlar ve nom beirten belgelerle uyumudur: |
| Machinery 2006/42/EC**Electromagnetic Compatibility 2004/108/EC *Low Voltage 2006/95/EC | ||||||||
| 01 Directives, as amended. | ||||||||
| 02 Direktiven, gemäß Änderung. | ||||||||
| 03 Directives, telles que modifiées. | ||||||||
| 04 Richtlijnen, zoals geamendeerd. | ||||||||
| 05 Directivas, según lo enmendado. | ||||||||
| 06 Direttive, come da modifica. | ||||||||
| 07 Öbnyöv. ótnos čyouw tropotomjed. | ||||||||
| 08 Directivas, conforme alteração em. | ||||||||
| 09 Direktivs co всеми справками. | ||||||||
| 10 Direktivser, cu amendamentele respective. | ||||||||
| 01 Note * | as set cut in <A> and judged positively by <B> according to the Certificate <C>. | 06 Nota * | dellnesto nel <A> a giudicato positivamente da <B> secondo il Certificato <C>. | 11 Information * | enligt <A> och godiânts av <B> enligt Certifikatet <C>. | 16 Meglegyzés * | a(z) <A> alapán, a(z) <B> igazolta a megáveést aíz) <C> tanúštvány szerint. | 21 Забелекха * |
| 02 Hlmweis * | wie In <A> aufgeführt und von <B> positiv beurtefti gamás Sertifikat <C>. | 07 Šnysiuwrn * | ótmos koboričetis oto <A> kan križena betkod attó to <B> opuyla je to Piototomjtkó <C>. | 12 Merk * | som det fremkonimer i <A> og glennom positiv bedemmeise av <B> falge Sertifikat <C>. | 17 Uwaga * | zgodnie z dokumentacja <A>, pozytywną spinlą <B> I Swiadectwem <C>. | 22 Pastaba * |
| 03 Remarque * | tel que défin dans <A> et évalué positivement par <B> conformément au Certificat <C>. | 08 Nota * | tal como estabelecido em <A> e com o parecer positivo de <B> de acordo com o Certificado <C>. | 13 Huom * | jolka on esifelty asiakrijassa <A> ja jolka <B> on hyväksymt Sertifikaitin <C> mukaisesti. | 18 Notá * | aşa cum este stablit in <A> y apreciat pozív de <B> in conformitate cu Certificatul <C>. | 23 Piezīmes * |
| 04 Bemerk * | zoas vermeld in <A> en positiv' beoorbeid door <B> overeenkomstig Certificaat <C>. | 09 Примечание * | kav uyaizna o <A> i v contraststami sloponitelným peisikovilacno | 14 Poznámka * | jak lybo uvedeno v <A> a pozitlné zjštěno <B> v souladu s osvédžanim <C>. | 19 Opomba * | kot je določeno v <A> in odobreno s strani <B> v skladu s certifikatom <C>. | 24 Poznámka * |
| 05 Nota * | conc se establece en <A> y es valorado positivamente por <B> de acuerdo con el Certificado <C>. | 10 Bemark * | Свидетельстай <C> som anfest i <A> og positivi vurdarat af <B> l'horhold li Certifikat <C>. | 15 Napomena * | kako je izloženo u <A> i pozitivno ocijenjero od strana <B> prema Certifikatu <C>. | 20 Márkus * | napu on nádiatud dokumentis <A> ja heaks kidistud <B> járgi vastevall sertifikaaide <C>. | 25 Not * <A> 'da beirtilději gibv< C> Sertifikasina göre <B> tatarfindan olumu olarak değerlenirdildi gibli. |
| 01 ** DICZ*** is authorised to compile the Technical Construction File. | 07 ** H DICZ*** civan ošpuvološonjučyn va ouvrídzo na Toxviko fáxcko kotokocuńç. | 13 ** DICZ*** on valluteltu laatimaa Tekrisen asiakrijan. | 19 ** DICZ*** je pooblašćen za sestavo datoleke s tehnično mapo. | |||||
| 02 ** DICZ*** hat die Berechtigung die Technische Konstruktionsaktie zusammenzusstellen. | 08 ** A DICZ*** está autorizada a compilar a documentačio técnica de fabrio. | 14 ** Společnost DICZ*** má oprávnění ke komplaci soutoru technické konstrukce. | 20 ** DICZ*** on voillatut kooslama tehnilist dokumentalsiconi. | |||||
| 03 ** DICZ*** est autorise à compiler le Dossier de Construction Technique. | 09 ** Kompania DICZ*** уполномочена составить Комплект технический документации. | 15 ** DICZ*** je cvlašten za zracu Datoteke o tehničkoj konstrukcij. | 21 ** DICZ*** e ortopiraipana da cyčstavı Acta za техническа конструкция. | |||||
| 04 ** DICZ*** is bevoegd om het Technisch Constructiedossier samen te stellen. | 10 ** DICZ*** er autorsereti til al udarbejde te tekniske konstrukionsdata. | 16 ** A DICZ*** ogosul a mízsaiki konstruktios dokumentació osszealilitasára. | 22 ** DICZ*** yra igajlica sudaryti šj techninés konstrukcijos fata. | |||||
| 05 ** DICZ*** está autorizado a compiler el Archive de Construcción Técnica. | 11 ** DICZ*** ár bemyndigade att sammanstália den tekniska konstruktionsfilen. | 17 ** DICZ*** na upowažnienie do zbierania i opracowynania dokumentagji konstrukcyoj. | 23 ** DICZ*** ir autorizēs sastádit teknisko dokumentáciju. | |||||
| 06 ** DICZ*** è autorizzata a redigere il File Tecnico di Costruzione. | 12 ** DICZ*** har tillateise til á kompleare den Tekniske konstruksonsfilan. | 18 ** DICZ*** este autorizat să compileze Dosarul tehnic de construcije. | 24 ** Společnost DICZ*** je oprávenaná vytvoit sábor technické konstrukcie. | |||||
| ***DICZ = Daikin Industries Czech Republic s.r.o. | 25 ** DICZ*** Teknik Yapi Dosyasini derlemeye yetkilidir. | |||||||
DAIKIN INDUSTRIES CZECH REPUBLIC s.r.o.
U Nové Hospody 1/1155, 301 00 Plzeň Skvrňany,
Czech Republic
Takayuki Fujii
Managing Director
Daikin Industries Czech Republic s.r.o.
RXL35K2V1B, RXL42K2V1B, RXL50K2V1B,
| 01 are in conformity with the following standard(s) or other normative document(s), provided that these are used in accordance with our instructions:02derden folgenden Norm(en) oder einem anderen Nomdkument oder -dokumenten entspricht/entsprechen, unter der Voraussetzung, daß sie gamäß unseren Anweisungen eingesetzt worden:03sont conformes à la/aux norm(s) ou autre(s) document(s) normatif(s), pour autant qu'is soient utilisés conformément à nos instructions:04conform de volgende norm(en) de één de meer andere bincende documenten zijn, op voorwaarde dat ze worden gebruikt overeenkomstig onze instructions:05están en conformidad con la(s) siguiema(s) norma(s) u otro(s) documento(s) normativo(s), siempre que sean utilizados de acuerdo con nuestras instrucciones:06sono conformi al(?) seguente(i) standard(s) o altro(i) documento(i) a carattere normativo, a patto che vengano usati in conformità alle nostre istruzione:07eva cõjärnuo με το(α) ακόκουδο(α) πρόμπο(α) η εἰλο ἐγγραφο(α) κανονομών, υπό την προύπόξεση οι χρηματονούντα σύμμων με τις οδηγές μες:EN60335-2-40,01 following the provisions of:10under lagttageise af bestammelseme i11enligt villkoren i20vastavait rõutele:21sneḍaikin olayukne ha:22laikantn nuostatu, pateikiamu:23levērojot prasības, kas noteiktas:24odžavejuč ustanovenia:25bunun kosullanna uygun olarak:19ob upoštevanju doκοδɔ:Machinery 2006/42/EC**Electromagnetic Compatibility 2004/108/EC *Low Voltage 2006/95/E01 Directives, gem ämanded.02 Direktiven, gemäß Änderung.03 Directives, telles que modifiées.04 Rcvitljen, zoals geamendeerd.05 Directivas, segün lo emmendado.06 Direttive, come da modifica.07 Obnytów, ômów čysuw trøptonorθείδ.08 Directivas, conforme alteração em.09 Direktivs co всеми поправками.10 Direktiver, med senere ændringar.11 Direktiv, med forelagna ændringar.12 Direktiver, med foretatte endringer.13 Direktivjė, sellasina kuin ne ovat mutuleuina.14 v platnem zněri.15 Smjernoe, kako je izmjenjeno.16 irányeljski y és módosításak randelkezéset.17 z pźniejszymi poprawkami.18 Directivelor, cu amendamentele respective.19Direktive z vsemi spremambami.20Direktivid kocs muutastiega.21Direktevien, с техните изменения.22Directyrose su papitýmals.23Direktivās un to papitidnýjumos.24Smermie, v platnom zneni.25Değistrimis halteriyle Yönetmelikler. | |||
| 01 Note * as set aut in <A> and judged positively by <B> according to the Certificate <C>.02 Hinweis * we in A> aufgeführt und von <B> positiv beurleti gamāś Zertifikat <C>.03 Remarque * tel que défini dans <A> et évalué positivement par <B> conformément au Certificat <C>.04 Bemerk * zoza vermeld in A> en posité boorebeeld door <B> ovenenkonslig Certificaat <C>.05 Nota * como se establece en <A> y es valorado positivamente por <B> de acuerdo con el Certificado <C>.10 Bemark *11Information * enligt <A> och godiāns av <B> enligt Certifikat <C>.12 Merk * som det frekomminer i <A> og gjennom positiv bodemmeise av <B> falge Sertifikat <C>.13 Huom * jobka on estilty asiakrijassa <A> ja joka <B> on hyväksnyvt Sertifikaitin <C>.14 Poznámka * jak lybo uvedenc v <A> a pozitlivné zjštěno <B> v souladu s osvédčanim <C>.15 Napomena * kako je izoženo u <A> poživno ocjenjero od srane <B> prema Certifikatu <C>.16 Meglegyzás * a(j)<A> alapján, a(j)<B> igazalla a megfeveést azj) <C> tanustivany szerint.17 Uwaga * zgodnie z dokumentacija <A>, pozytywraą oplnia <B> i Šwiadectwem <C>.18 Notá * aṣa cum este stabil in <A> și apreciat pozliv de <B> in conformitate cu Certificatul <C>.19 Opomba * kol je izoloženo v <A> in odbrano s strari <B> v skladu s certifikatom <C>.20 Markus * nagu on nádiatc dokumendis <A> ja heaks kidsted <B> jārgi vastavili sertifikaadile <C>.21 Забелекка * како е капленко в <A> и сценено πολοκοπλοο το <B> cystacco Sertifikatata <C>.22 Pastaba * kalp rustatýs <A> i kalp teiglamai huspresta <B> pagal Sertifikatą <C>.23 Piezímes * kā norāfils <A> un albistosi <B> pozitivajam věřiljumam ssskarja av sertifikatu <C>.24 Poznámka * ako bob uvedene v <A> a pozitlivne zistané <B> v sillade s osvédčanim <C>.25 Not * da beitidij bi go ve< C>. Sertifikasina göre <B> taraíndan olumu olarak değerlenditijgi gbi. | |||
| 01 ** DICZ*** is authorised to compile the Technical Construction File.02 ** DICZ*** hat die Berechtigung die Technische Konstruktionsskie zusammenzustellen.03 ** DICZ*** est autorisé à compiler le Dossier de Construction Technique.04 ** DICZ*** is bevegd om hel Technisch Constructiedossier samen le stellen.05 ** DICZ*** est autorizado a compiler al Archivo de Construcción Técnica.06 ** DICZ*** è autorizzata a redigere il Filio Tecnico di Costruzione.***DIC= Daikin Industries Czech Republic s.r.o. | 07 ** H DICZ*** āvni efpuoločiongėvn ya ouvića na nov Tekniko pokko kotokozurjć.08 ** A DICZ*** está autorizada a compilar a documentação técnica de fabrico.09 ** Kompania DICZ*** yponiomochena составby komplet technickos'kodymenții.10 ** DICZ*** er autoriserel ili udutarbejde de tekniske konstruktiondata.11 ** DICZ*** är bemyndigade att sammanställa den tekniska konstruktionssfilien.12 ** DICZ*** har tillateise til å komplero dan Tekniske konstrukçonsfilien. | 13 ** DICZ*** on valluulellu laatimsan Tekvisen asliakvirjan.14 ** Společnosli DICZ*** má opravněni ke kompiličo scuboru technické konstrukce.15 ** DICZ*** je ovlasten za zraču Datoteke o tehničkoj konstrukcji.16 ** A DICZ*** pogosull a můszaki konstrukciós dokumentació osszealillasára.17 ** DICZ*** ma upowažmenie do zbierania i opracowyxania dokumentacji konstrukcyjnej.18 ** DICZ*** este autorizat să compileze Dosarul tehnic de construcije. | 19 ** DICZ*** je pooblaščen za seslavo datoleke s tehnično mapo.20 ** DICZ*** on volitatud koostama tehnilist dokumentaisiconi.21 ** DICZ*** e ortopyrihrana da cystavu Arva na texničesca konstruŋdia.22 ** DICZ*** yra igalicla sudarbyi ši lectinies konstrukcijos fali.23 ** DICZ*** ir autoriztes sastádit tehniško dokumentáčiju.24 ** Společnosci DICZ*** je opravnava vytvorit sátor technickoj konstrukce.25 ** DICZ*** Teknik Yapi Dosyasını detemeye yetkilidir. |

U Nové Hospody 1/1155, 301 00 Plzeň Skvrňany,
Czech Republic
DAIKIN INDUSTRIES CZECH REPUBLIC s.r.o.
| CE - DECLARATION-OF-CONFORMITY | CE - DECLARATION-DE-CONFORMIDAD | CE - DECLARAÇÃO-DE-CONFORMIDADE | CE - ERKLÆRING OM-SAMSVAR | CE - IZJAVA-O-USKLADENOSTI | CE - IZJAVA O SKLADNOSTI | CE - ATITIKTIES-DEKLARACIJA |
| CE - CONFORMITÄTÄSERKLÄRUNG | CE - DICHIARAZIONE-DI-CONFORMITA | CE - ZARBIENEHE-O-COOTBETCTBIII | CE - ILMOITUS-YHDENMUKAISUUDESTA | CE - MEGFELELOŠEGI-NYILATKOZAT | CE - VASTAVUSDEKLARATSIOUN | CE - ATIBLSTÍBAS-DEKLARÁCIJA |
| CE - DECLARATION-DE-CONFORMITE | CE - ΔΗΛΩΣΗ ΣΥΜΜΟΡΦΩΣΗΣ | CE - OVERENSTEMMELSESERKLÆRING | CE - PROHLASENI-O-SHODĚ | CE - DEKLARACJA-ZGODNOŚCI | CE - ДЕКЛАРАЦИЯ-ЗА-СЪОТВЕТСТВИЕ | CE - VYHLASENIE-ZHODY |
| CE - CONFORMITEITSVERKLARING | CE - FÖRSÄKRAN-OM-ÖVERENSTÄMMELSE | CE - DECLARAȚIE-DE-CONFORMITATE | CE - UYGUNLUK-BEYANI |
Daikin Industries Czech Republic s.r.o.
17 (PL) deklaruje na własną i wyłączną odpowiedzialność, że modele klimatyzatorów, których dotyczy niniejsza deklaracja:
18 (RO) declarą pe proprie răspundere că aparalele de aer condijional la care se referă această declaraje:
19 (SL) z vso odgovomostio izjavla, da so modeli klimatskih naprav, na katere se izjava nanaša:
20 (ESI) kinnitat oma täelikul vastutusel, et käesoleva deklaratsicori alla kuuluvad klimaseadmele nudelid:
21 (BG) декларира на своя отворност, че иODElite климатична инстагация, за които се отнася тази декларация:
22 (LT) visiška savo atsakomybe skeblia, kad cro kondicionevimo prietaisu modelai. kuriems yra talkoma ši deklaracija:
23 (LY) ar pilnu atbildibu apiecina, ka täläk uzskarilfo modelu gaisa kondicionėtāji, uz kuriem atiecas ši deklaracija:
24 SK vyhlasuje na vlastnú zofpovednost, že leto klimalizáčné modely, na ktoré sa vzťahuje toto vyhlásenie: 25 TR tamamen kendi sorumluluğunda olmak üzere bu bildirinin igili olduğu klima modellerinin asağıdaki gibi olduğunu beyan eder:
RXL25J3V1B, RXL35J3V1B, RXLG25K3V1B, RXLG35K3V1B, RXL20K3V1B, RXL25K3V1B,
| 01 are in conformity with the following standard(s) or other normative document(s), provided that these are used in accordance with our instructions:02derden folgenden Norm(en) oder einem anderen Nomdkument oder -documenten entspricht/entsprechen, unter der Voraussetzung, daß sie gemäß unseren Anweisungen eingesetzt werden:03sont conformes à la/aux norme(s) ou autre(s) document(s) normatif(s), pour autant qu'ils soient utilisés conformément à nos instructions:04conform de volgende norm(en) of één of meer andere bincende documenten zijn, op voorwaarde dat ze worden gebruikt overeenkomstig onze instructions:05están en conformidad con la(s) sigliema(s) norma(s) u otro(s) documento(s) normativo(s), siempre que sean utilizados de acuerdo con nuestras instrucciones:06sono conformi al(i) seguente(i) standard(s) o altro(i) documento(y) a carattere normativo, a patto che vengano usati in conformità alle nostre istruzione:07eva cujmuwo με το(α) ακόκουδο(α) πρότυτο(α) η ελλο έγγραφο(α) κανονσμών, υπό την προύπόθεση οι χρημοτονούντα σύμμων με τις οδηγές μος:EN60335-2-40,01 following the provisions of:10under lagtagelise af bestammelseme i11enligt villkoren i20vastavalt nõutele:21sredaakiv otaysisne ha:22laikantis nuostatu, pateiklamy:23ievērojot prasības, kas noteiktas:24odžavejuč ustanovenia:25bunun kosullanna uygun olarak:19ub upoštevanju določb:Machinery 2006/42/EC**Electromagnetic Compatibility 2004/108/EC *Low Voltage 2006/95/ECMachinery 2006/42/EC **Electromagnetic Compatibility 2004/108/EC *Low Voltage 2006/95/E01 Directives, as amended.02 Direktiven gemäß Änderung.03 Directives, telles que modifiées.04 Ricitiljen, zoals geamendeerd.05 Directivas, segün lo emmendado.06 Directive, come da modifica.07 Öbynäov, ótmos Žcγομ προτοποιηβεί.08 Directivas, conforme alteração em.09 Директив со всеми προσίκαι.01 Directiver, med senere aandringar.11 Direktiv, med företagna ändringar.12 Direktiver, med forstate endringer.13 Direkliveja, sellasira kün ne ovat mutetuina.14 v platném zněni.15 Smjernioe, kako je izmijenjeno.16 irányšvýjki és módostášaik randekeztset.17 z pźdnisjczymi poprawkami.18 Directiveor, cu amendamentele respective.19Direktive z vsemí spremembami.20Direktivid kocs muutatustega.21 Direktiv, i temyte inizienėnie.22Direktiyose su papildymais.23Direktivās un to papildinājumos.24Smernioe, v platnom zneni.25Dejęstrimii haloriyle Yönetmelikler.01 Note *as set out in <A> and judged positively by <B>06 Nota *according to the Certificate <C>.07 Enjuicorn *étmx koelyúčno oto <A> kan krička Betkó ató to <B> ojujruva με το Πιστοποητικό <C>.08 Nota *.tel que défini dans <A> et évalué positivement par <B> conformément au Certificat <C>.09 Примечание *kai uwasan v <A> v correspondramid sponoknitely nam pešimbalacnoСавцепency stray <C>.10 Bemærk *som anterti <A> og positiv vurdaret af <B> i herhold lii Certifikat <C>.11 Information *enligt <A> och godičnis av <B>enligt Certifikat <C>.12 Merk *som det fremkomner i <A> og gjennom positiv bodemnièse av <B> falge Sertifikat <C>.13 Huom *jolka on estility asiakrijassa <A> ja jolka <B> on hyväksyny! Sertifikaitin <C>.mukaisesti.14 Poznámka *jak lylo uvedeno v <A> a pozitlná zjštěnc <B> v souladu s osvédčanim <C>.15 Napomena *.kako je izloženo u <A> pozitino ocojinjero od strane <B> prema Certifikatu <C>.16 Megjegyzés *a(z) <A> alapján, a(z) <B> igazdila a megfeieést a(z) <C> tanúsibvány szerint.17 Uwaga *zgodrie z dokumentacia <A>, pozytywną opinią <B> i Świadectwem <C>.18 Nota *asa cum este stabilt in <A> si apreciat pozív de <B> in conformitate cu Certifikatu <C>.19 Opomba *kot je doloženo v <A> in odbtrano s strani <B> v skladu s certifikatom <C>.20 Markus *napu on nádiatu dokumendis <A> ja heaks kidstud <B> járgi vastavall sertifikaalile <C>.21 Забелекка *.kaco e kapsencé w <A> i czenno polokometlno ot <B> seltasno Certifikatata <C>.22 Pastaba *.kalp rustatyla <A> i kalp teigismal nuspresla <B> pagal Sertifikat <C>.23 Piezimes *.ká norádili <A> un albistosi <B> pozifivajam věrlējumam sakrápi ar sertifikátu <C>.24 Poznámka *.ako bolu uvesené v <A> a požitlne zistené <B> v sálade s osvedčanim <C>.25 Not *.da beirtidāgi gib ve <C> Sertifikasina göre <B> tarafindan olumu olatak degarfenditāgī gibl. | |||
| 01 ** DICZ*** is authorised to compile the Technical Construction File.02 ** DICZ*** hat die Berechtigung die Technische Konstruktionsskie zusammenzustellen.03 ** DICZ*** est autorisé à compiler le Dossier de Construction Technique.04 ** DICZ*** is bewegd on hel Technisch Constructiedossier samen le stellen.05 ** DICZ*** est autorizado a compilar el Archivo de Construcción Técnica.06 ** DICZ*** è autorizzata a redigere il Filio Tecnico di Costruzione.***DIC= Daikin Industries Czech Republic s.r.o. | 07 ** H DICZ*** āvni zepuoiðonigučný viu ouvića za nov Tegykko pókko koionoučujíc.08 ** A DICZ*** está autorizada a compilar a documentação činica de fabrio.09 ** Kompania DICZ*** υπολιοχονα составить Комплект техникахов документации.10 ** DICZ*** er autoriserel til al udarejde de tekniske konstruktiondata.11 ** DICZ*** är bemyndigade att sammanstália den tekniska konstruktionfilkan.12 ** DICZ*** har tiliateise til å kompliero den Tekniska konstrukşonsfilken. | 13 ** DICZ*** on vallulettu laitimsan Texnisen aslaivrjan.14 ** Společnost DICZ*** má opravněni ke komplaidi scoboru technické konstrukce.15 ** DICZ*** je cvlašten za zraču Daloteke o tehničkoj konstrukcji.16 ** A DICZ*** gposull a műszaki konstrukcics dokumentáció összeállására.17 ** DICZ*** ma upovažnienie do zbierania i opracowywania dokumentagi konstrukcynej.18 ** DICZ*** este autorizat să compileze Dosarul tahnic de construcție. | 19 ** DICZ*** je pooblašćen za sestavo dotoleke s tehnično mapo.20 ** DICZ*** on voitaturk koostama lehnlist dokumentatisconi.21 ** DICZ*** o ortorizirana da systava Akta za техническа конструкция.22 ** DICZ*** yra igalicta sudaryl ši technišnes konstrukcijos falá.23 ** DICZ*** ir autorizitis sastádit tehniško dokumentáclju.24 ** Společnost* DICZ*** je opradená vytvorit sítbor technickej konstrukce.25 ** DICZ*** Teknik Yapi Dosyasını deterreye yetkilidir. |

DAIKIN INDUSTRIES CZECH REPUBLIC s.r.o.
U Nové Hospody 1/1155, 301 00 Plzeň Skvrňany,
Czech Republic
Takayuki Fujii Managing Director 1st of Nov. 2012

Safety Precautions
- The precautions described herein are classified as WARNING and CAUTION. They both contain important information regarding safety. Be sure to observe all precautions without fail.
- Meaning of WARNING and CAUTION notices
WARNING.....Failure to follow these instructions properly may result in personal injury or loss of life.
CAUTION.....Failure to observe these instructions properly may result in property damage or personal injury, which may be serious depending on the circumstances.
- The safety marks shown in this manual have the following meanings:
| ! Be sure to follow the instructions. | ! Be sure to establish an earth connection. | No Never attempt. |
• After completing installation, conduct a trial operation to check for faults and explain to the customer how to operate the air conditioner and take care of it with the aid of the operation manual.
- The English text is the original instruction. Other languages are translations of the original instructions.
WARNING
| ·Ask your dealer or qualified personnel to carry out installation work.Do not attempt to install the air conditioner yourself. Improper installation may result in water leakage, electric shocks or fire. |
| ·Install the air conditioner in accordance with the instructions in this installation manual.Improper installation may result in water leakage, electric shocks or fire. |
| ·Be sure to use only the specified accessories and parts for installation work.Failure to use the specified parts may result in the unit falling, water leakage, electric shocks or fire. |
| ·Install the air conditioner on a foundation strong enough to withstand the weight of the unit.A foundation of insufficient strength may result in the equipment falling and causing injury. |
| ·Electrical work must be performed in accordance with relevant local and national regulations and with instructions in this installation manual. Be sure to use a dedicated power supply circuit only.Insufficiency of power circuit capacity and improper workmanship may result in electric shocks or fire. |
| ·Use a cable of suitable length.Do not use tapped wires or an extension lead, as this may cause overheating, electric shocks or fire. |
| ·Make sure that all wiring is secured, the specified wires are used, and that there is no strain on the terminal connections or wires.Improper connections or securing of wires may result in abnormal heat build-up or fire. |
| ·When wiring the power supply and connecting the wiring between the indoor and outdoor units, position the wires so that the control box lid can be securely fastened.Improper positioning of the control box lid may result in electric shocks, fire or over heating terminals. |
| ·If refrigerant gas leaks during installation, ventilate the area immediately.Toxic gas may be produced if the refrigerant comes into contact with fire. |
| ·After completing installation, check for refrigerant gas leakage. Toxic gas may be produced if the refrigerant gas leaks into the room and comes into contact with a source of fire, such as a fan heater, stove or cooker. |
| ·When installing or relocating the air conditioner, be sure to bleed the refrigerant circuit to ensure it is free of air, and use only the specified refrigerant (R410A).The presence of air or other foreign matter in the refrigerant circuit causes abnormal pressure rise, which may result in equipment damage and even injury. |
| ·During installation, attach the refrigerant piping securely before running the compressor.If the compressor is not attached and the stop valve is open when the compressor is run, air will be sucked in, causing abnormal pressure in the refrigeration cycle, which may result in equipment damage and even injury. |
| ·During pump-down, stop the compressor before removing the refrigerant piping.If the compressor is still running and the stop valve is open during pump-down, air will be sucked in when the refrigerant piping is removed, causing abnormal pressure in the refrigeration cycle, which may result in equipment damage and even injury. |
| ·Be sure to earth the air conditioner. Do not earth the unit to a utility pipe, lightning conductor or telephone earth lead.Imperfect earthing may result in electric shocks. |
| ·Be sure to install an earth leakage breaker.Failure to install an earth leakage breaker may result in electric shocks or fire. |
CAUTION
| Do not install the air conditioner at any place where there is a danger of flammable gas leakage.In the event of a gas leakage, build-up of gas near the air conditioner may cause a fire to break out. |
| While following the instructions in this installation manual, install drain piping to ensure proper drainage andinsulate piping to prevent condensation.Improper drain piping may result in indoor water leakage and property damage. |
| Tighten the flare nut according to the specified method such as with a torque wrench.If the flare nut is too tight, it may crack after prolonged use, causing refrigerant leakage. |
| Make sure to provide for adequate measures in order to prevent that the outdoor unit be used as a shelter by small animals.Small animals making contact with electrical parts can cause malfunctions, smoke or fire. Please instruct the customer to keep the area around the unit clean. |
| This appliance is intended to be used by expert or trained users in shops, in light industry and on farms, or for commercial and household use by lay persons. |
| Sound pressure level is less than 70 dB(A). |
Accessories
Accessories supplied with the outdoor unit:
| (A) Installation Manual | 1 | (B) Refrigerant charge label | 1 |
 | |||
| (C) Multilingual fluorinated greenhouse gases label | 1 | ||
Precautions for Selecting the Location
1) Choose a place solid enough to bear the weight and vibration of the unit, where the operation noise will not be amplified.
2) Choose a location where the hot air discharged from the unit or the operation noise will not cause a nuisance to the neighbors of the user.
3) Avoid places near a bedroom and the like, so that the operation noise will cause no trouble.
4) There must be sufficient spaces for carrying the unit into and out of the site.
5) There must be sufficient space for air passage and no obstructions around the air inlet and the air outlet.
6) The site must be free from the possibility of flammable gas leakage in a nearby place.
7) Install units, power cords and inter-unit cables at least 3 meter away from television and radio sets. This is to prevent interference to images and sounds. (Noises may be heard even if they are more than 3 meter away depending on radio wave conditions.)
8) In coastal areas or other places with salty atmosphere of sulfate gas, corrosion may shorten the life of the air conditioner.
9) Since drain flows out of the outdoor unit, do not place under the unit anything which must be kept away from moisture.
NOTE
Cannot be installed hanging from ceiling or stacked.

CAUTION
When operating the air conditioner in a low outdoor ambient temperature, be sure to follow the instructions described below.
1) To prevent exposure to wind, install the outdoor unit with its suction side facing the wall.
2) Never install the outdoor unit at a site where the suction side may be exposed directly to wind.
3) To prevent exposure to wind, it is recommended to install a baffle plate on the air discharge side of the outdoor unit.
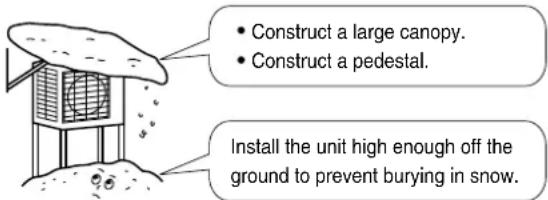
4) In heavy snowfall areas, select an installation site where the snow will not affect the unit.
text_image
• Construct a large canopy. • Construct a pedestal. Install the unit high enough off the ground to prevent burying in snow.Outdoor Unit Installation Drawings
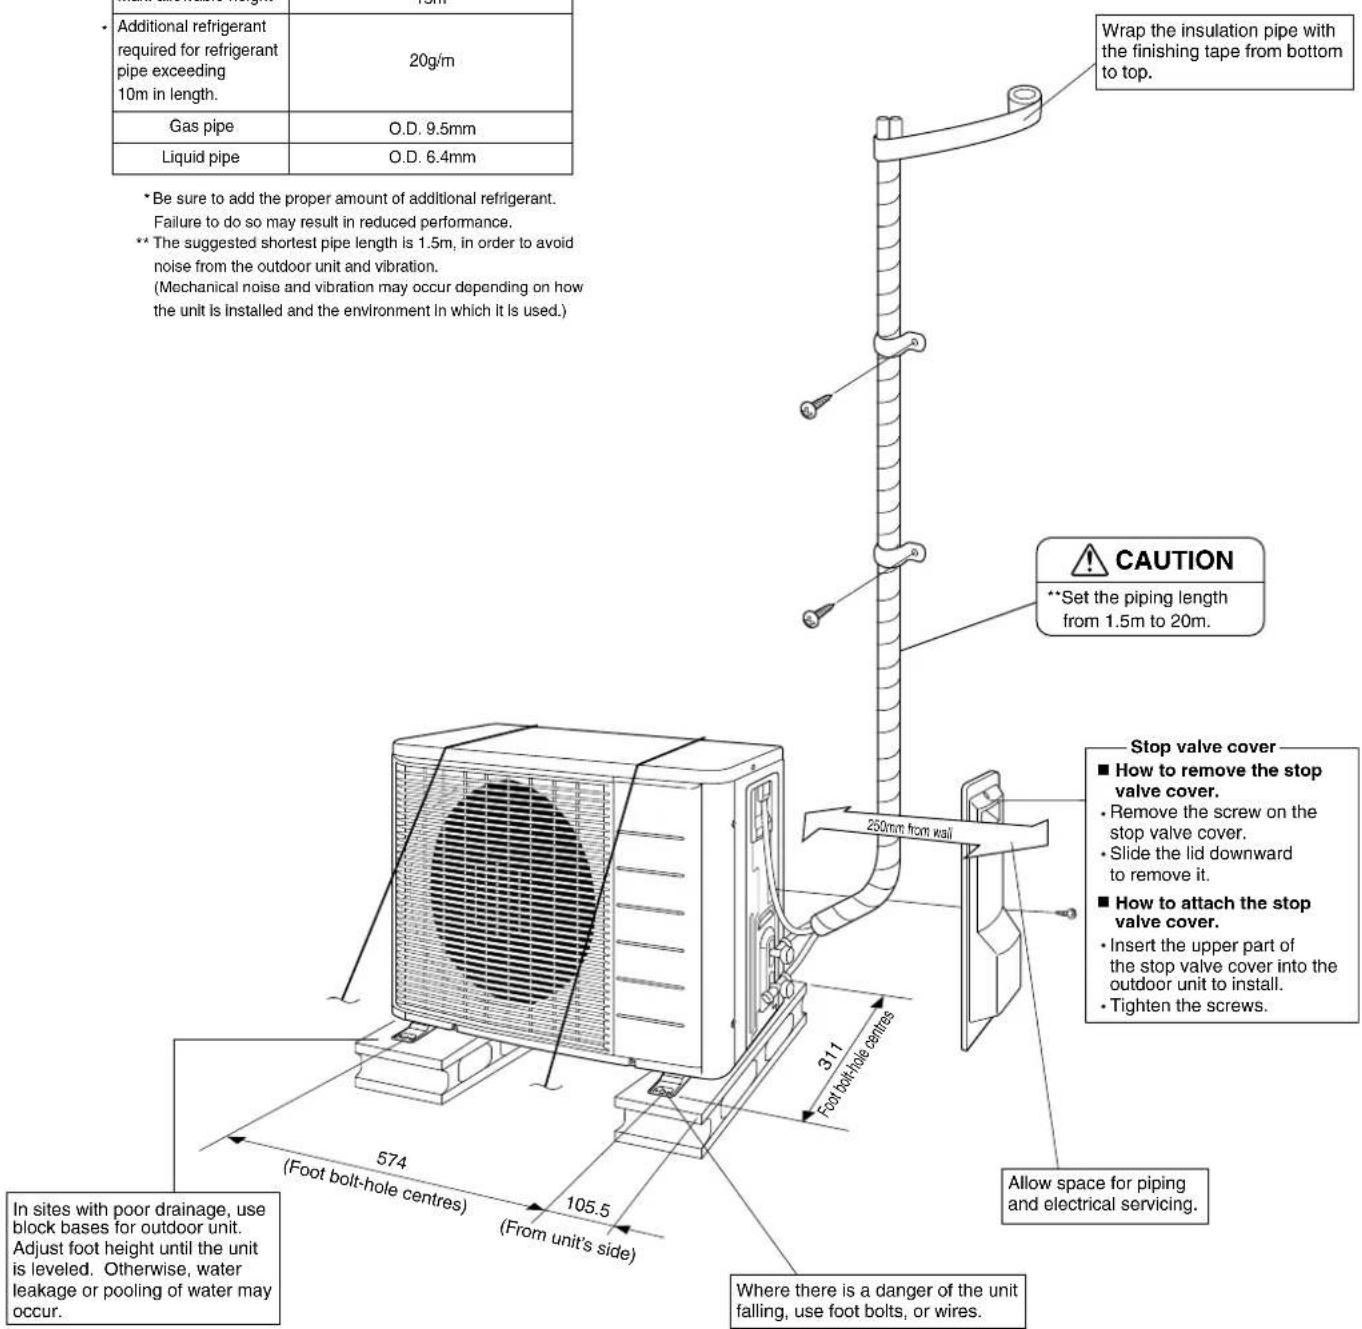
| 20mMax. allowable length | |
| 1.5mMin. allowable length | |
| Max. allowable height | 15m |
| Additional refrigerant required for refrigerant pipe exceeding 10m in length. | 20g/m |
| Gas pipe | O.D. 9.5mm |
| Liquid pipe | O.D. 6.4mm |
* Be sure to add the proper amount of additional refrigerant. Failure to do so may result in reduced performance.
** The suggested shortest pipe length is 1.5m, in order to avoid noise from the outdoor unit and vibration.
(Mechanical noise and vibration may occur depending on how the unit is installed and the environment in which it is used.)
text_image
Additional refrigerant required for refrigerant pipe exceeding 10m in length. 20g/m Gas pipe O.D. 9.5mm Liquid pipe O.D. 6.4mm *Be sure to add the proper amount of additional refrigerant. Failure to do so may result in reduced performance. ** The suggested shortest pipe length is 1.5m, in order to avoid noise from the outdoor unit and vibration. (Mechanical noise and vibration may occur depending on how the unit is installed and the environment in which it is used.) Wrap the insulation pipe with the finishing tape from bottom to top. CAUTION **Set the piping length from 1.5m to 20m. Stop valve cover ■ How to remove the stop valve cover. ■ Remove the screw on the stop valve cover. ■ Slide the lid downward to remove it. ■ How to attach the stop valve cover. ■ Insert the upper part of the stop valve cover into the outdoor unit to install. ■ Tighten the screws. Allow space for piping and electrical servicing. Where there is a danger of the unit falling, use foot bolts, or wires. In sites with poor drainage, use block bases for outdoor unit. Adjust foot height until the unit is leveled. Otherwise, water leakage or pooling of water may occur. 574 (Foot bolt-hole centres) 105.5 (From unit's side) 311 Foot bolt-hole centresunit: mm
Installation Guidelines
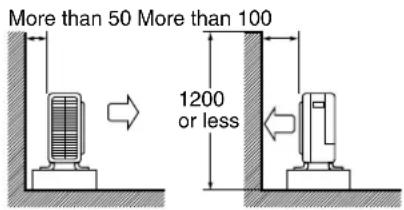
- Where a wall or other obstacle is in the path of outdoor unit's intake or exhaust airflow, follow the installation guidelines below.
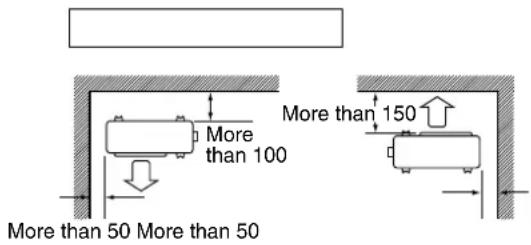
- For any of the following installation patterns, the wall height on the exhaust side should be 1200mm or less.
Wall facing one side Walls facing two sides
text_image
More than 50 More than 100 1200 or lessSide view
text_image
More than 100 More than 50 More than 50 More than 150Top view
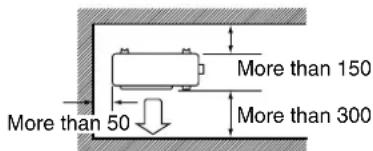
Walls facing three sides
text_image
More than 150 More than 50 More than 300Top view
Unit: mm
Precautions on Installation
- Check the strength and level of the installation ground so that the unit will not cause any operating vibration or noise after installed.
- In accordance with the foundation drawing, fix the unit securely by means of the foundation bolts. (Prepare four sets of M8 or M10 foundation bolts, nuts and washers each which are available on the market.)
- It is best to screw in the foundation bolts until their length are 20mm from the foundation surface.

Outdoor Unit Installation
1. Installing outdoor unit.
1) When installing the outdoor unit, refer to "Precautions for Selecting the Location" and the "Outdoor Unit Installation Drawings."
Outdoor Unit Installation
2. Flaring the pipe end.
1) Cut the pipe end with a pipe cutter.
2) Remove burrs with the cut surface facing downward so that the chips do not enter the pipe.
3) Put the flare nut on the pipe.
4) Flare the pipe.
5) Check that the flaring is properly made.
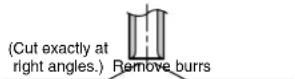
Flaring
| Set exactly at the position shown below. | |||
| Flare tool for R410A | Conventional flare tool | ||
| Clutch-type | Clutch-type (Rigid-type) | Wing-nut type (Imperial-type) | |
| A 0-0.5mm | 1.0-1.5mm | 1.5-2.0mm | |

text_image
Check Flare's inner surface must be flaw-free. The pipe end must be evenly flared in a perfect circle. Make sure that the flare nut is fitted.
WARNING
1) Do not use mineral oil on flared part.
2) Prevent mineral oil from getting into the system as this would reduce the lifetime of the units.
3) Never use piping which has been used for previous installations. Only use parts which are delivered with the unit.
4) Never install a dryer to this R410A unit in order to guarantee its lifetime.
5) The drying material may dissolve and damage the system.
6) Incomplete flaring may cause refrigerant gas leakage.
3. Refrigerant piping.

CAUTION
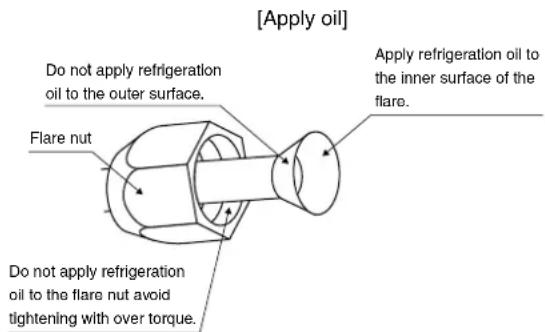
1) Use the flare nut fixed to the main unit. (To prevent cracking of the flare nut by aged deterioration.)
2) To prevent gas leakage, apply refrigeration oil only to the inner surface of the flare. (Use refrigeration oil for R410A.)
3) Use torque wrenches when tightening the flare nuts to prevent damage to the flare nuts and gas leakage.
Align the centres of both flares and tighten the flare nuts 3 or 4 turns by hand. Then tighten them fully with the torque wrenches.
text_image
[Apply oil] Do not apply refrigeration oil to the outer surface. Flare nut Apply refrigeration oil to the inner surface of the flare. Do not apply refrigeration oil to the flare nut avoid tightening with over torque.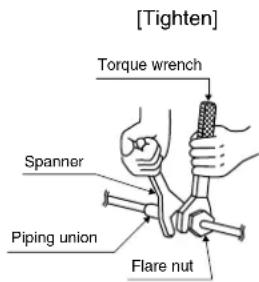
text_image
[Tighten] Torque wrench Spanner Piping union Flare nut| Flare nut tightening torque | |
| Gas side Liquid side | |
| 3/8 inch 1/4 inch | |
| 32.7-39.9N • m 14(333-407kgf • cm) | 2-17.2N • m(144-175kgf • cm) |
| Valve cap tightening torque | |
| Gas side Liquid side | |
| 3/8 inch 1/4 inch | |
| 21.6-27.4N • m(220-280kgf • cm) | 21.6-27.4N • m(220-280kgf • cm) |
| Service port cap tightening torque (110-150kgf • cm) | 10.8-14.7N • m |
Outdoor Unit Installation
4. Evacuating the air with a vacuum pump and checking gas leakage
- When piping work is completed, it is necessary to evacuate the air with a vacuum pump and check for gas leakage.

WARNING
1) Do not mix any substance other than the specified refrigerant (R410A) into the refrigeration cycle.
2) When refrigerant gas leaks occur, ventilate the room as soon and as much as possible.
3) R410A, as well as other refrigerants, should always be recovered and never be released directly into the environment.
4) Use a vacuum pump for R410A exclusively. Using the same vacuum pump for different refrigerants may damage the vacuum pump or the unit.
- If using additional refrigerant, perform air evacuating from the refrigerant pipes and indoor unit using a vacuum pump, then charge additional refrigerant.
- Use a hexagonal wrench (4mm) to operate the stop valve rod.
- All refrigerant pipe joints should be tightened with a torque wrench at the specified tightening torque.
text_image
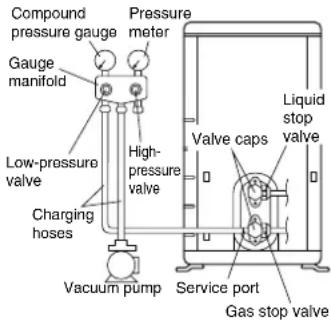
Compound pressure gauge Gauge manifold Low-pressure valve Charging hoses Vacuum pump Pressure meter High- pressure valve Service port Gas stop valve Valve caps Liquid stop valve1) Connect projection side of charging hose (which comes from gauge manifold) to gas stop valve's service port.

2) Fully open gauge manifold's low-pressure valve (Lo) and completely close its high-pressure valve (Hi). (High-pressure valve subsequently requires no operation.)

3) Do vacuum pumping and make sure that the compound pressure gauge reads -0.1MPa (-76cmHg)^*1

4) Close gauge manifold's low-pressure valve (Lo) and stop vacuum pump. (Keep this state for a few minutes to make sure that the compound pressure gauge pointer does not swing back.)*2.

5) Remove caps from liquid stop valve and gas stop valve.

6) Turn the liquid stop valve's rod 90 degrees counterclockwise with a hexagonal wrench to open valve. Close it after 5 seconds, and check for gas leakage. Using soapy water, check for gas leakage from indoor unit's flare and outdoor unit's flare and valve rods. After the check is complete, wipe all soapy water off.

7) Disconnect charging hose from gas stop valve's service port, then fully open liquid and gas stop valves. (Do not attempt to turn valve rod beyond its stop.)

8) Tighten valve caps and service port caps for the liquid and gas stop valves with a torque wrench at the specified torques.
*1. Pipe length vs. vacuum pump run time.
| Pipe length Up to 15 metres More than 15 metres | |
| Run time Not less than 10 min. Not less than 15 min. |
*2. If the compound pressure gauge pointer swings back, refrigerant may have water content or a loose pipe joint may exist. Check all pipe joints and retighten nuts as needed, then repeat steps 2) through 4).
Outdoor Unit Installation
5. Refilling the refrigerant.
Check the type of refrigerant to be used on the machine nameplate.
Precautions when adding R410A
Fill from the liquid pipe in liquid form.
It is a mixed refrigerant, so adding it in gas form may cause the refrigerant composition to change, preventing normal operation.
1) Before filling, check whether the cylinder has a siphon attached or not. (It should have something like "liquid filling siphon attached" displayed on it.)
Filling a cylinder with an attached siphon

Stand the cylinder upright when filling.
There is a siphon pipe inside, so the cylinder need not be upside-down to fill with liquid.
Filling other cylinders
Turn the cylinder upside-down when filling.
- Be sure to use the R410A tools to ensure pressure and to prevent foreign objects entering.
Important information regarding the refrigerant used
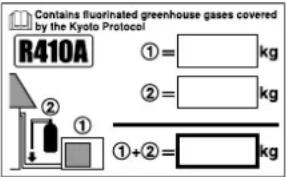
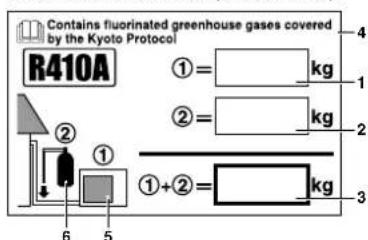
This product contains fluorinated greenhouse gases covered by the Kyoto Protocol. Do not vent gases into the atmosphere.
Refrigerant type: R410A
GWP ^(1) value: 1975
(1)GWP = global warming potential
Please fill in with indelible ink,
■① the factory refrigerant charge of the product,
■② the additional refrigerant amount charged in the field and
■①+② the total refrigerant charge
on the refrigerant charge label supplied with the product.
The filled out label must be adhered in the proximity of the product charging port (e.g. onto the inside of the stop valve cover).
text_image
Contains fluorinated greenhouse gases covered by the Kyoto Protocol R410A ①= kg ②= kg ①+②= kg 6 51 factory refrigerant charge of the product: see unit name plate
2 additional refrigerant amount charged in the field
3 total refrigerant charge
4 Contains fluorinated greenhouse gases covered by the Kyoto Protocol
5 outdoor unit
6 refrigerant cylinder and manifold for charging
NOTE
National implementation of EU regulation on certain fluorinated greenhouse gases may require to provide the appropriate official national language on the unit. Therefore an additional multilingual fluorinated greenhouse gases label is supplied with the unit. Sticking instructions are illustrated on the backside of that label.
6. Refrigerant piping work.
6-1 Cautions on pipe handling.
1) Protect the open end of the pipe against dust and moisture.
2) All pipe bends should be as gentle as possible. Use a pipe bender for bending.
6-2 Selection of copper and heat insulation materials.
When using commercial copper pipes and fittings, observe the following:
1) Insulation material: Polyethylene foam
Heat transfer rate: 0.041 to 0.052W/mK (0.035 to 0.045kcal/(mh·°C))
Refrigerant gas pipe's surface temperature reaches 110°C max.
Choose heat insulation materials that will withstand this temperature.
2) Be sure to insulate both the gas and liquid piping and to provide insulation dimensions as below.
| Gas side Liquid side | Gas pipe thermal insulation | Liquid pipe thermal insulation | |
| O.D. 9.5mm | O.D. 6.4mm | I.D. 12-15mm | I.D. 8-10mm |
| Minimum bend radius | Thickness 10mm Min.30mm or | ||
| Thickness 0.8mm (C1220T-O) | |||
text_image
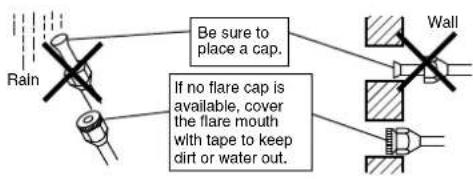
Be sure to place a cap. If no flare cap is available, cover the flare mouth with tape to keep dirt or water out. Wall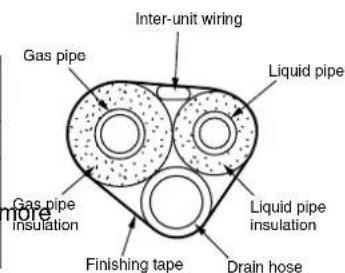
text_image
Inter-unit wiring Gas pipe Liquid pipe Gas pipe insulation Liquid pipe insulation Finishing tape Drain hose more3) Use separate thermal insulation for gas and liquid refrigerant pipes.
Standby Electricity Saving
The standby electricity saving function turns OFF power supply to the outdoor unit and sets the indoor unit into standby electricity saving mode, thus reducing the power consumption of the air conditioner.
The standby electricity saving function works on the following indoor units.
FTXL20G2V1B

CAUTION
The standby electricity saving function cannot be used for models other than the specified ones.
■ Procedure for turning ON standby electricity saving function
1) Check that the main power supply is turned OFF. Turn it OFF if has not been turned OFF.
2) Remove the stop valve cover.
3) Disconnect the selective connector for standby electricity saving.
4) Turn ON the main power supply.
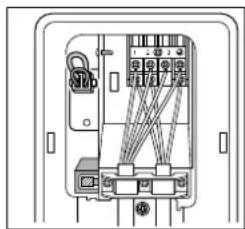
natural_image
Interior view of an electrical enclosure showing wiring connections (no text or symbols visible)Standby electricity saving function OFF.
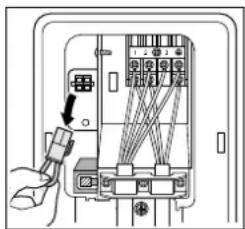
text_image
Diagram of an electrical control panel with labeled components and a hand pointing to a cable or connector.Standby electricity saving function ON.
The standby electricity saving function is turned OFF before shipping.

CAUTION
1) Before connecting or disconnecting the selective connector for standby electricity saving, make sure that the main power supply is turned OFF.
2) The selective connector for standby electricity saving is required if an indoor unit other than the above applicable ones is connected.
Pump Down Operation
In order to protect the environment, be sure to pump down when relocating or disposing of the unit.
1) Remove the valve cap from liquid stop valve and gas stop valve.
2) Carry out forced cooling operation.
3) After five to ten minutes, close the liquid stop valve with a hexagonal wrench.
4) After two to three minutes, close the gas stop valve and stop forced cooling operation.
Forced cooling operation
■ Using the indoor unit ON/OFF button
Press the indoor unit ON/OFF button for at least 5 seconds. (Operation will start.)
- Forced cooling operation will stop automatically after about 15 minutes. To force a trial operation to stop, press the indoor unit ON/OFF button.
■ Using the main unit's remote controller
1) Press the "ON/OFF" button. (Operation will start.)
2) Press the "TEMP" button and the "MODE" button at the same time.
3) Press the "MODE" button twice.
("T" will be displayed and the unit will enter trial operation.)
4) Press the "MODE" button to return the operation mode to cooling.
Trial operation will stop automatically after about 30 minutes. To force a trial operation to stop, press the "ON/OFF" button.
■ Using the outdoor unit forced cooling operation switch (with standby electricity saving function turned OFF)
1) Push on "with a screwdriver. The unit will start operating.
2) The forced cooling mode is selected, and terminates in approx. 15 minutes.
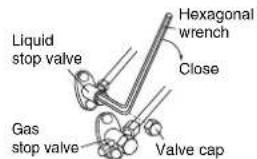
text_image
Liquid stop valve Gas stop valve Hexagonal wrench Close Valve cap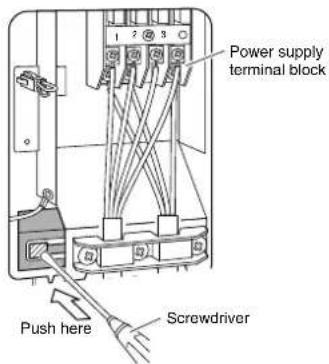
text_image
Power supply terminal block Push here ScrewdriverThe selective connector for standby electricity saving in use (with standby electricity saving function turned OFF)

CAUTION
1) When pressing the switch, do not touch the terminal block. It has a high voltage, so doing so may cause electric shock.
2) After closing the liquid stop valve, close the gas stop valve within three minutes, then stop the forced operation.
Facility Setting (RXL25/35J3V1B+RXL20/25K3V1B+RXL35K2V1B only) (cooling at low outdoor temperature)
This function is designed for facilities such as equipment or computer rooms. It is never to be used in a residence or office where people occupy the space.
1) Cutting jumper 4 (J4) on the circuit board will expand the operation range down to -15^ . However it will stop if the outdoor temperature drops below -20^ and start back up once the temperature rises again.
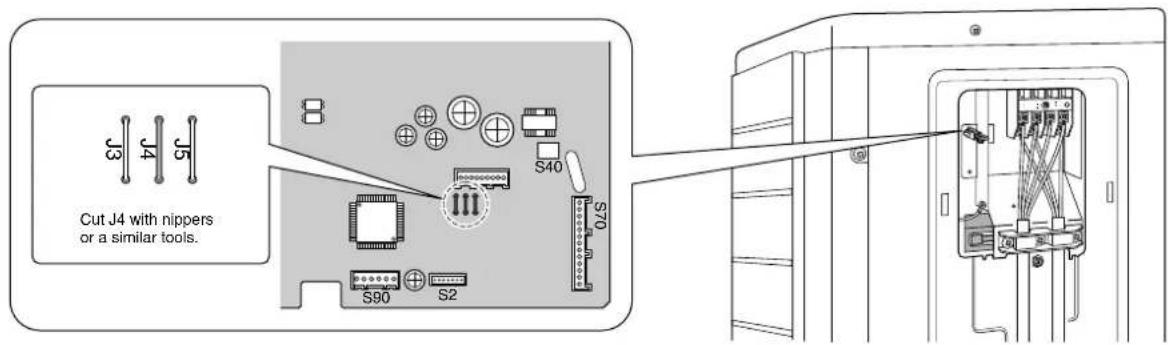
text_image
J3 J4 J5 Cut J4 with nippers or a similar tools. S40 S70 S90 S2
CAUTION
1) If the outdoor unit is installed where the heat exchanger of the unit is exposed to direct wind, provide a windbreak wall.
2) Intermittent noises may be produced by the indoor unit due to the outdoor fan turning on and off when using facility settings.
3) Do not place humidifiers or other items which might raise the humidity in rooms where facility settings are being used. A humidifier might cause dew jumping from the indoor unit outlet vent.
4) Cutting jumper 4 (J4) sets the indoor fan tap to the highest position. Notify the user about this.
Wiring

WARNING
1) Do not use tapped wires, stranded wires, extension cords, or starburst connections, as they may cause overheating, electrical shock, or fire.
2) Do not use locally purchased electrical parts inside the product. (Do not branch the power for the drain pump, etc., from the terminal block.) Doing so may cause electric shock or fire.
3) Be sure to install an earth leakage breaker. (One that can handle higher harmonics.) (This unit uses an inverter, which means that an earth leak detector capable of handling higher harmonics must be used, in order to prevent malfunctioning of the earth leakage breaker itself.)
4) Use an all-pole disconnection type breaker with at least 3mm between the contact point gaps.
5) Do not connect the power wire to the indoor unit. Doing so may cause electric shock or fire.
- Do not turn ON the power supply until all work is completed.
1) Strip the insulation from the wire (20mm).
2) Connect the inter-unit wirings between the indoor and outdoor units so that the terminal numbers match. Tighten the terminal screws securely. We recommend a flathead screwdriver be used to tighten the screws. The screws are packed with the terminal board.
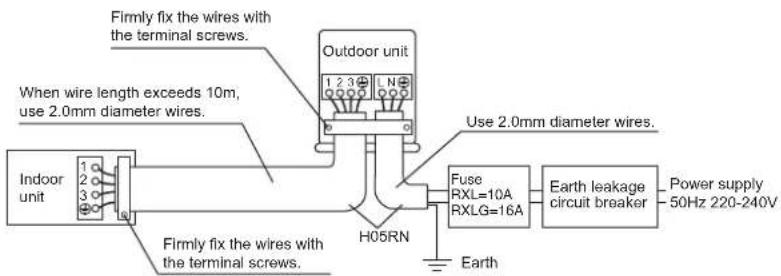
text_image
Firmly fix the wires with the terminal screws. When wire length exceeds 10m, use 2.0mm diameter wires. Outdoor unit Use 2.0mm diameter wires. Indoor unit 1 2 3 H05RN Firmly fix the wires with the terminal screws. Use RXL=10A RXLG=16A Earth leakage circuit breaker Power supply 50Hz 220-240V Earth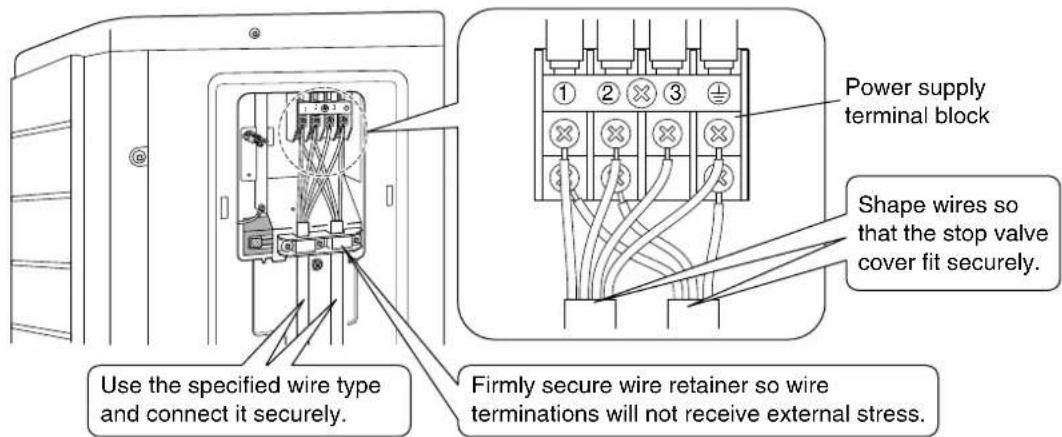
text_image
Use the specified wire type and connect it securely. Firmly secure wire retainer so wire terminations will not receive external stress. Power supply terminal block Shape wires so that the stop valve cover fit securely.Observe the notes mentioned below when wiring to the power supply terminal board.
Precautions to be taken for power supply wiring.
Use a round crimp-style terminal for connection to the power supply terminal board. In case it cannot be used due to unavoidable reasons, be sure to observe the following instruction.
Place the round crimp-style terminals on the wires up to the covered part and secure in place.
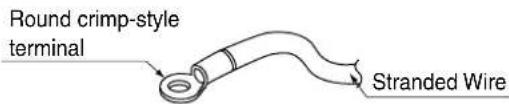
text_image
Round crimp-style terminal Stranded Wire
CAUTION
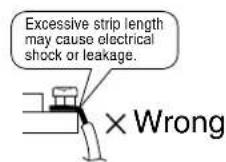
When connecting the inter-unit wirings to the terminal board using a single core wire, be sure to perform curling. Problems with the work may cause heat and fires.

text_image
Diagram showing a mechanical or electrical component with four circular components and a hook, indicating assembly or connection.Stripping wire at terminal block

text_image
Diagram showing a sequence of four identical electrical connectors with an arrow pointing to a connector and a cross symbol indicating failure or failure.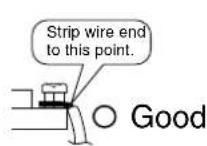
3) Pull the wire and make sure that it does not disconnect. Then fix the wire in place with a wire stop.
Wiring
Wiring diagram
□□□
: Terminal strip : Field wiring
[NO TEXT]
: Connector : Relay connector
-
: Refer to the nameplate for power requirements.
: IN CASE OF COOLING ONLY TYPE
: INDOOR
: OUTDOOR
: CONDENSER
: DISCHARGE
: DRAIN PAN HEATER
In case of cooling only type
Indoor
Outdoor
Condenser
Discharge
Drain pan heater
Wiring diagram parts table
C5,C6,C119 ...... Capacitor
DB1,DB2,DB3...... Diode bridge
E1H....Heater
FU1, FU2, FU3,
FU4, FU5 ...... Fuse
FU6 Field fuse
IPM1, IPM2...... Intelligent power module
L......Live
L1....Coil
L1R .... Reactor
M1C ...... Compressor motor
M1F....Fan motor
MRCW,MR30,
MRM10, MRM20..... Magnetic relay
N Neutral
Q1L....Overload protector
PCB1,PCB2,
PCB3.....Printed circuit board
S10,S11,S20,S40,
S50,S70,S80,S90,
S100,S110,HL3,
HN3,X11A,X12A..... Connector
R1T,R2T,R3T ..... Thermistor
S1T ....Thermostat
SA1 ...... Surge arrester
Q1DI....Earth leak detector
SW1......Forced operation switch
V1,V2,V3......Varistor
X1M Terminal strip
Y1E ...... Electronic expansion valve coil
Y1R......Reversing solenoid valve coil
Z1C,Z2C,Z3C.....Ferrite core
± Protective earth
Test Run and Final Check
1. Trial operation and testing.
1-1 Measure the supply voltage and make sure that it falls in the specified range.
1-2 Trial operation should be carried out in either cooling or heating mode.
- In cooling mode, select the lowest programmable temperature; in heating mode, select the highest programmable temperature.
1) Trial operation may be disabled in either mode depending on the room temperature.
2) After trial operation is complete, set the temperature to a normal level ( 26^ C to 28^ C in cooling mode, 20^ C to 24^ C in heating mode).
3) For protection, the system disables restart operation for 3 minutes after it is turned off.
1-3 Carry out the test operation in accordance with the operation manual to ensure that all functions and parts, such as louver movement, are working properly.
- The air conditioner requires a small amount of power in its standby mode. If the system is not to be used for some time after installation, shut off the circuit breaker to eliminate unnecessary power consumption.
- If the circuit breaker trips to shut off the power to the air conditioner, the system will restore the original operation mode when the circuit breaker is opened again.
2. Test items.
| Test items Symptom Check | ||
| Indoor and outdoor units are installed properly on solid bases. Fall, vibration, | noise | |
| No refrigerant gas leaks. | Incomplete cooling/heating function | |
| Refrigerant gas and liquid pipes and indoor drain hose extension are thermally insulated. | Water leakage | |
| Draining line is properly installed. Water leakage | ||
| System is properly earthed. Electrical leakage | ||
| The specified wires are used for interconnecting wire connections. | Inoperative or burn damage | |
| Indoor or outdoor unit's air intake or exhaust has clear path of air. Stop valves are opened. | Incomplete cooling/heating function | |
| Indoor unit properly receives remote control commands. Inoperative |

natural_image
Blank grid paper with no text, numbers, or symbols

natural_image
Blank grid paper with no text, numbers, or symbols

natural_image
Blank grid paper with no text, numbers, or symbolsDAIKIN INDUSTRIES CZECH REPUBLIC s.r.o.
U Nové Hospody 1/1155, 301 00 Plzeň Skvrňany, Czech Republic