SF37010ON - Oven SWAN - Free user manual and instructions
Find the device manual for free SF37010ON SWAN in PDF.

User questions about SF37010ON SWAN
0 question about this device. Answer the ones you know or ask your own.
Ask a new question about this device
Download the instructions for your Oven in PDF format for free! Find your manual SF37010ON - SWAN and take your electronic device back in hand. On this page are published all the documents necessary for the use of your device. SF37010ON by SWAN.
USER MANUAL SF37010ON SWAN

IMPORTANT SAFEGUARDS
- Read all instructions
- Do not touch hot surfaces. Always use handles or knobs.
- Close supervision is necessary when any appliance is used by or near children.
- To protect against electric shock, do not immerse cord, plug or any parts of the oven in water or any other liquids.
- Do not let cord hang over edge of table or counter, or touch hot surfaces.
- Do not operate appliance with damaged cord or plug or after the appliance malfunctions or has been damage in any manner. Return appliance to the nearest authorized service facility for examination, repair or adjustment.
- The use of accessory attachments not recommended by the appliance manufacturer may cause hazard or injury.
- Do not place on or near a hot gas or electric burner.
- The rear side of the oven must be against the wall.
- Unplug from outlet when not in use and before cleaning. Allow to cool before putting on or taking off parts, and before cleaning.
- To disconnect, turn the time control to OFF, then remove the plug. Always hold the plug, and never pull the cord.
- Extreme caution must be used when moving a drip pan containing hot oil or other hot liquids.
- Do not cover any part of the oven with metal foil. This may cause the oven to overheat.
- Use extreme caution when removing the tray, racks or disposing of hot grease or other hot liquids.
- Do not clean the inside of the oven with metal scouring pads, pieces can break off the pad and touch electrical parts, creating
a risk of electric shock.
- Oversized foods or metal utensils must not be inserted in the electric oven as they may create a fire or risk of electric shock risk.
- A fire may occur if the oven is covered or touching flammable material, including the curtains, draperies, walls, and the like, when in operation. Do not store any item on top of the appliance when in operation.
- Extreme cautions should be exercised when using cooking or baking containers constructed of anything other than metal or ovenproof glass.
- Be sure that nothing touches the top or bottom elements of the oven.
- Do not place any of the following materials in the oven: cardboard, plastic, paper, or anything similar.
- Do not store any materials other than manufacturer's recommended accessories in this oven when not in use.
- Always wear protective, insulated oven gloves when inserting or removing items from the hot oven.
- This appliance has a tempered, safety glass door. The glass in stronger than ordinary glass and more resistant to breakage. Tempered glass can still break around edges. Avoid scratching door surface or nicking edges.
- This appliance is OFF when the Timer Control button is in the "OFF" position.
- Do not use outdoors.
- Do not use appliance for other than intended use.
- Surfaces are liable to get hot during use
- The door or the outer surface may get hot when the appliance is


IMPORTANT SAFEGUARDS
operating
- Appliances are not intended to be operated by means of an external timer or separate remote-control system.
- This appliance can be used by children aged from 8 years and above and persons with reduced physical, sensory or mental capabilities or lack of experience and knowledge if they have been given supervision or instruction concerning use of the appliance in a safe way and understand the hazards involved.
- Children shall not play with the appliance. Cleaning and user maintenance shall not be made by children unless they are older than 8 and supervised.
- Keep the appliance and its cord out of reach of children less than 8 years.
- If the supply cord is damaged, it must be replaced by the manufacturer or its service agent or a similarly qualified person in order to avoid a hazard.
PLEASE SAVE THESE INSTRUCTIONS. FOR HOUSEHOLD USE ONLY
Details on how to clean surfaces in contact with food.
- Remove the plug from the wall socket and allow the appliance to cool down completely.
- Use warm water with a small amount of washing-up liquid to clean the baking tray, the grille, the roasting spit and the removal tool. Rinse the items with plenty of water and dry them thoroughly.
- Use a damp cloth to clean the interior and exterior of the oven and the door. Dry them thoroughly.
- Place all the items back in the oven and store the oven.
- ALLOWING FAT/FOOD RESIDUE TO BUILD UP WITHOUT CLEANING POSES A SIGNIFICANT FIRE RISK. ALWAYS CLEAN AFTER EACH USE
SPECIFICATIONS
Capacity: 23L,
Power: 1500 Watts
Input voltage: 220-240V \~ 50/60Hz

WARNING
HOT SURFACES
3
©


GETTING TO KNOW YOUR OVEN
natural_image
Technical line drawing of a rectangular tray with internal grid lines and a labeled point M (no text or symbols beyond label)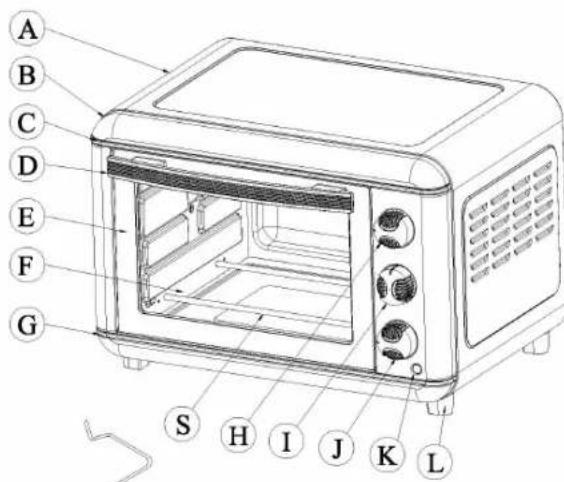
A: Housing
B: Front Plate
C: Upper Decoration strip
D: Door Handle
E: Door Frame
F: Glass Door
G: Lower Decoration strip
H: Temperature Control Knob
I: Function Control Knob
J: Timer Control Knob
K: Indicator Cover
L: Foot
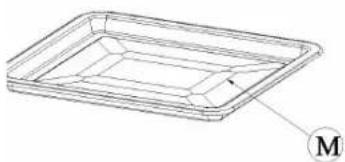
M: Bake Tray
N: Crumb Tray (optional)
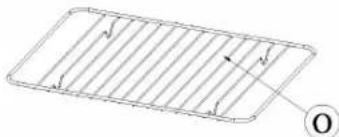
O: Wire Rack
P: Tray Handle (optional)
Q: Rotisserie handle
R: Rotisserie fork
S: Heating element
T: Rotisserie Shaft
If ordering spares, quote model number followed by
letter. Eg for Bake Tray, quote: SF37010-M
natural_image
Simple line drawing of a rectangular grid with vertical lines and an arrow pointing to the center (no text or symbols)
natural_image
Diagram of a rectangular plate with a curved internal structure and a compass needle labeled 'N' (no text or symbols on the diagram itself)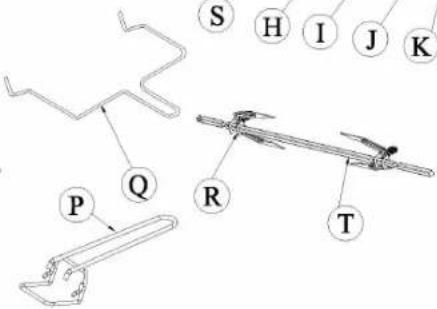


HOW TO USE YOUR OVEN
Before using your electric oven with convection for the first time, be sure to:
- Remove all packaging
- Read all of the instruction included in this manual.
- Make sure that the oven is unplugged and the Time control is in the "OFF" position.
- Wash all the accessories in hot, soapy water or in the dishwasher.
- Thoroughly dry all accessories and re-assemble in oven, plug oven into outlet and you are ready to use your new electric oven.
- After re-assembling your oven, we recommend that you run it at the highest temperature (230C) on the toast function for approximately 15 minutes to eliminate any packing residue that may remain after shipping. This will also remove all traces of odour initially present.
Please Note: Initial start-up operation may result in minimal smell and smoke (about 15 minutes). This is normal and harmless. It is due to evaporation of the protective substance applied to the heating elements in the factory.
USING YOUR CONVECTION & ROTISSERIE OVEN
About Convection Cooking
Convection cooking combines hot air movement by means of a fan with the regular features [broil, bake and toast]. Convection cooking provides faster cooking in many cases than regular radiant types electric oven. The fan gently sends air to every area of the food, quickly browning, crisping and sealing in moisture and flavour. It produces more even temperature all around the food by air movement, so that food cooks/bakes/broils evenly versus the normal ovens hot and cold spots. The convection feature allows cooking/baking at lower temperatures, which saves energy and helps keep the kitchen cooler. Convection air is superheated and it circulates around the food so it cooks food significantly faster than conventional ovens.
5
©


HOW TO USE YOUR OVEN

1
Please familiarize yourself with the following oven functions and accessories prior to first use:
- Temperature Control[H]: choose the desired temperature from 100C to 230C for baking broiling or toasting.
• Function Control (left): this oven is equipped with 5 positions for a variety of cooking needs

2
Six stage oven setting selector (see diagram on left):
- Off.
- For broiling fish, steak, poultry, pork chops, etc.[top + bottom heating + convection]
- For cakes, pies, cookies, poultry, beef, pork, etc. (top heating + convection)
- For bread, muffins, frozen waffles, pizza, etc. [top heating + bottom only]
- For roast or chicken, etc. [top heating + rotisserie]
- For roast or chicken, etc. (top + bottom heating + rotisserie + convection)

3

4
Time Control (J): when you turn to activate the timer segment of the control, turn to the right (clockwise) to toast or use as a timer. This function also has a bell rings at the end of the programmed time.

5
Convection fan: The convection fan works automatically with function switch. When the desired temperature and Function is chosen, set the timer at the desired position. The convection fan will start operating.
- Power "ON" neon light: It's illuminated whenever the oven is turned on.
- Bake Tray[M]: For use in broiling and roasting meat, poultry, fish and various other foods. Also to be used when using the rotisserie handle to catch the drippings.
- Wire Rack(O): For toasting, baking, and general cooking in casserole dishes and standard pans.

6
6
©


HOW TO USE YOUR OVEN
CAUTION
TO AVOID RISK OF INJURY OR BURNS, DO NOT TOUCH HOT SURFACES WHEN OVEN IS IN USE. ALWAYS USE OVEN MITTS.
CAUTION
Always use extreme care when removing bake tray, wire rack or a any hot container from a hot oven. Always use the rack handle, or an oven mitt when removing hot items from the oven.
ROTISSERIE COOKING
We recommend that you do not cook a roast larger than 4-5 lbs (2.2kg), on the rotisserie skewer. Chicken should be bound in a string to prevent the chicken legs or wings from unraveling during roasting and so that rotisserie assembly will rotate smoothly. For best results we recommend that you preheat the oven for 15 minutes on 230C.
Operation
• Set the temperature control to 230C
- Insert the meat or poultry that you are going to cook onto the rotisserie skewer making sure that the meat or poultry is secured tightly onto the skewer with the skewer clamps and thumbscrews. Make sure that the
meat or poultry is centered onto the skewer.
- Insert the pointed end of the rotisserie skewer into the drive socket located on the right hand side of the oven wall. Make sure that the square end of the rotisserie skewer rests on the rotisserie skewer support located on the left hand side of the oven wall.
- Slide the bake tray onto the lowest position to catch the food drippings. DO NOT LEAVE THE BAKE TRAY OUT
- Turn function control to one of the rotisserie settings.
- Turn the time control to the "ON" position for the desired cooking time. TIP: with this type of timer, it is best to turn the timer slightly PAST your desired setting, then turn it BACK to the desired setting.
- When the cooking is completed, the time control knob will return to the "OFF" position and make a bell sound.
- Remove the rotisserie skewer from the oven by placing the hooks of the rotisserie handle under the grooves on either side of the rotisserie skewer, lift the left side of the rotisserie skewer first by lifting it up and out. Then pull the rotisserie skewer out of the drive socket and carefully remove the roast from the oven.
• Take the meat or poultry off the rotisserie skewer and place on a cutting board or platter.


HOW TO USE YOUR OVEN
ROTISSERIE GUIDE (cont.)
Cooking Time Guide (times will vary depending on cut of meat etc).
Always ensure food is piping hot and thoroughly cooked before consuming. Switch off oven, open door. Using oven glove, pierce meat to centre with a metal skewer and remove. If the juice that runs out is clear, it is a good indicator that the meat is cooked.
| MEAT TEMP Time per 500g | |
| BEEF 200C 30-35 MIN | |
| PORK 200C 40-45 MIN | |
| HAM 200C 40-45 MIN | |
| CHICKEN 200C 30-40 MIN | |
| TURKEY 200C 30-40 MIN |
For other meats, follow the cooking guide that came with the food but be aware that cooking time is usually shorter due to convection feature and small size of the oven. Keep checking after 60% of cooking time has elapsed
ROASTING GUIDE
Roast your favorite cut of meat to perfection. The oven can cook up to a 4kg chicken or turkey and up to a 2.5kg roast. A guide has been provided below to assist you with roasting times. However, we suggest that you periodically check the cooking progress with a meat thermometer. For best results we recommend that you preheat the oven for 15 minutes on 230C. We do not recommend the use of oven roasting bags or glass containers in the oven.. Never use plastic cardboard, paper or anything similar in the oven.
Operation
- Place the wire rack in the oven at the lowest position.
- Place food to be cooked in any roasting pan. If you wish to use the bake tray (broil/drip pan), then you do not need to insert the wire rack because the bake tray supports itself on the oven support guides. Select setting 2
- Set the temperature control knob to the desired temperature.
- Turn the time control to the "ON" position for the desired cooking time. TIP: with this type of timer, it is best to turn the timer slightly PAST your desired setting, then turn it BACK to the desired setting.
- To check or remove roast, use the tray handle provided to help you slide the roast in and out.
- When cooking is complete, turn the time control knob to the


HOW TO USE YOUR OVEN
"OFF" position.
| MEAT TEMP Time per 500g | |
| BEEF 230C 30-35 MIN | |
| PORK 230C 40-45 MIN | |
| HAM 230C 30-40 MIN | |
| CHICKEN 230C 25-30 MIN | |
| TURKEY 230C 25-30 MIN |
For other meats, follow the cooking guide that came with the food but be aware that cooking time is usually shorter due to convection feature and small size of the oven. Keep checking after 60% of cooking time has elapsed
BROIL (setting 4)
For best results, it is recommended that you preheat the oven for 15 minutes on 230C
Operation
• Set the temperature Control Knob to 230C
• Turn function control to BROIL (3) and Preheat the oven.
- Place the wire rack on the bake tray.
- Place food on the wire rack and slide into the top rack.
- Food should be placed as close as possible to the top heating element without touching it.
- Set temperature control to appropriate temperature. Brush food with sauces or oil, as desired.
• Turn time control to "ON".
• It is advisable to leave the door slightly ajar - Turn food over midway through the prescribed cooking time.
- When broiling is complete, turn the time control to "OFF".
| MEAT TEMP Estimated Time | |
| RIB STEAK 230C 25-30 MIN | |
| T-BONE STEAK 230C 25-30 MIN | |
| HAMBURGER 230C 25-28 MIN | |
| PORK CHOP 230C 40-45 MIN | |
| LAMB CHOP 230C 30-40 MIN | |
| CHICKEN LEGS 230C 30-35 MIN | |
| FISH FILLETS 200C 20-25 MIN | |
| SALMON STEAKS 200C 20-25 MIN |
All broiling times are based on meats at refrigerator temperature. Frozen meats may take considerably longer. Therefore, use of a meat thermometer is highly recommended.


HOW TO USE YOUR OVEN
TOASTING
Please note that the TOAST function uses both the heating elements. Large capacity oven allows for toasting 4 to 6 slices of bread, 6 muffins, frozen waffles or frozen pancakes. When toasting only 1 or 2 items, place food on the bake rack in the center of the oven.
Operation
• Set the Temperature Control Knob to 230C
• Turn the function control knob to SETTING 5.
- Place food to be toasted on the wire rack.
• Turn the time control knob to desired time
• Bell will ring to signal the end of the toast cycle.
• Note: Wire Rack should be positioned in the middle of the oven with the indentations pointing down.
BAKING
Use setting 2 For best results, preheat the oven for 15 minutes on 200C
Operation
- Set the temperature Control Knob to 200C.
- Place the wire rack on the lowest or middle rack support guide
- Place food on the wire rack and slide into the rack. Food should be placed as close as possible to the lower heating element without touching it.
- Set temperature control to appropriate temperature.
• Brush food with sauces or oil, as desired.
• Turn time control to desired position
When BAKE is complete, turn the time control to "OFF".
Positioning of the Wire Racks for Baking
Cookies - Use bottom and middle Support Guides.
Layer Cakes - Use bottom Support Guide only (bake one at a time).
Pies - Use bottom and middle Support Guides.
10


WEEE Directive
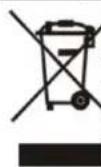
Disposal of Unit
Disposal instructions for Swan items in accordance with the WEEE directive. Appliances bearing the symbol shown here may not be disposed of in domestic rubbish. You are required to dispose of old electrical and electronic appliances like this separately. Please visit www.recyclemore.co.uk, or www.recyclenow.co.uk for access to information about the recycling of electrical items. The WEEE directive, introduced in August 2006, states that all electrical items must be recycled, rather than taken to landfill. Please arrange to take this appliance to your local Civic Amenity site for recycling, once it has reached the end of its life.

Warranty
This product is guaranteed for 2 years from the date of original purchase. If any defect arises due to faulty materials of workmanship the faulty products must be returned to the place of purchase. Refunds or replacement is at the discretion of the store.
The following conditions apply:
The product must be returned to the retailer with proof of purchase. The product must be installed and used in accordance with the instructions contained in this instruction guide. It must be used only for domestic purposes. It does not cover wear and tear, damage, misuse or consumable parts. Swan Products Ltd has limited liability for incidental or consequential loss or damage. This guarantee is valid in the UK and Eire Only.

BS Plug Wiring
The wires in the mains lead are coloured in accordance with the following code:
BLUE
NEUTRAL
BROWN
LIVE
GREEN/YELLOW EARTH
As the colours of the wire in the mains lead of this appliance may not correspond with the colour markings identifying the terminals on your plug, proceed as follows:
The wire which is coloured BLUE must be connected to the terminal which is marked with the letter N or coloured black. The wire which is coloured BROWN must be connected to the terminal which is marked with the letter L or coloured red. The wire which is coloured GREEN/YELLOW must be connected to the terminal which is marked with the letter E or (earth symbol) and is coloured GREEN or GREEN/YELLOW.
WARNING: THIS APPLIANCE MUST BE EARTHED
11
©


natural_image
Stylized white swan logo on black background, no text or symbols presentwww.swan-brand.co.uk

Scan this QR code
to hear about
our story

We love
what we do

we're proud
of our quality

Find us on Facebook
Copyright © 2013
Swan Products Ltd. PO Box 3117, Stoke-on-Trent ST4 9GD
