
Allied TW2T76100VQ - Wristwatch TIMEX - Free user manual and instructions
Find the device manual for free Allied TW2T76100VQ TIMEX in PDF.


| Product Type | Wristwatch |
| Brand | Timex |
| Model | Allied TW2T76100VQ |
| Power Source | Button cell battery (type indicated on case), quartz movement |
| Main Functions | Time, date, day, INDIGLO night-light, Easy Set alarm (12h and hourly), perpetual calendar (depending on model), elapsed time bezel, tachymeter, compass (depending on model) |
| Water Resistance | Up to 100 meters (depending on model, check on case) |
| Shock Resistance | Compliant with ISO standard, avoid impacts to glass |
| Maintenance and Cleaning | Clean with a soft cloth, rinse with fresh water after contact with seawater |
| Safety | Do not press buttons or pull crowns underwater (except 200m models). Keep batteries out of reach of children. |
| Spare Parts and Repairability | Rechargeable or non-rechargeable battery, interchangeable straps. For battery replacement, contact an authorized dealer or Timex. |
| General Information | Lifetime warranty covering free battery replacement (shipping costs extra). Manual available in several languages. |
Frequently Asked Questions - Allied TW2T76100VQ TIMEX
User questions about Allied TW2T76100VQ TIMEX
0 question about this device. Answer the ones you know or ask your own.
Ask a new question about this device
Download the instructions for your Wristwatch in PDF format for free! Find your manual Allied TW2T76100VQ - TIMEX and take your electronic device back in hand. On this page are published all the documents necessary for the use of your device. Allied TW2T76100VQ by TIMEX.
USER MANUAL Allied TW2T76100VQ TIMEX
Register your product at https://www.timex.com/product-registration.html
Congratulations on purchasing your TIMEX® watch. Please read these instructions carefully to understand how to operate your Timex timepiece.
Your watch may not have all of the features described in this booklet. For more information, please visit: www.timex.com
HOW TO START YOUR WATCH
Quartz Movement: To start your watch remove the plastic guard from under the crown, then press the crown in against the case. The second hand will begin advancing in one-second intervals.
Some deep-depth water-resistant watches require the setting crown to be screwed in to secure water-resistance. If your watch case has a protrusion with screw threads, the crown must be screwed in after setting the watch.
To screw in, push the crown firmly against the threaded protrusion and hold in while turning the crown clockwise. Continue to screw in the crown until it is tight. You will need to unscrew the crown (counter-clockwise) before pulling it out the next time you want to set your watch.
Solar Movement: The watch includes a solar cell that charges its battery. Expose the watch in direct sunlight, sunlight through a window, or artificial (indoor) lighting to charge the battery prior to use. When fully charged, the watch may function without additional charging for up to 2 months.
To start your watch, remove the plastic guard from under the crown, then press the crown in against the case. The second hand will begin advancing in one-second intervals.
Charging happens faster while in direct sunlight and slower when indoors. A depleted battery may be charged by exposing the dial to sunlight for several days. Wear watch so that the sleeve does not cover all or part of the dial and impede charging. Store watch where it will be exposed to light or the battery will run down and require a full charge. See the table below for more information.
WARNING: Leaving the watch in direct sunlight or close to a lamp may cause the watch to become hot. Handle with care.
After many years of use, if the battery becomes unable to charge fully, it may be replaced with a new rechargeable battery of the same type. Please see BATTERY section for details.
| Illumination (Lx) | Light Source | Environment | Full Charge from Empty | Charge for One Day's Operation |
| 700 | Fluorescent Light | Office Lighting N/A | 100 Minutes | |
| 3,000 | Incandescent Light | 150W Lamp (8" / 20cm distance) | 60 Hours 25 | Minutes |
| 10,000 Sunlight | Cloudy Weather | 20 Hours 8 | Minutes | |
| 100,000 Sunlight Clear Weather | 5 Hours 2 Minutes | |||
Hand-wind Movement: To start your watch remove the plastic guard from under the crown, set the Time and Date (if applies) then press the crown in against the case. Slowly turn the crown clock-wise until you feel resistance. You should hear the watch "ticking" and the second hand will begin to move. If the watch stops in the next 24 hours, you should increase the amount of clock-wise turns of the crown during the winding process until you find the watch will work for 24 hours without stopping. You should wind the watch each 24-hour period at approximately the same time of day to ensure the watch does not become fully un-wound and stops. If the watch stops, follow the instructions to set the Time and Date (if applies), and wind to start the watch again.
WATER AND SHOCK RESISTANCE
If your watch is water-resistant, meter marking or ( ≈ ) is indicated.
| Water-Resistance Depth p.s.i.a. * Water Pressure Below Surface | |
| 30m /98ft 60 | |
| 50m /164ft 86 | |
| 100m /328ft 160 | |
| 200m /656ft 284 | |
*pounds per square inch absolute
WARNING: TO MAINTAIN WATER-RESISTANCE, DO NOT PRESS ANY BUTTONS OR PULL OUT THE CROWN UNDER WATER UNLESS YOUR WATCH IS INDICATED AS 200 METER WATER-RESISTANT.
- Watch is water-resistant only as long as lens, push buttons and case remain intact.
- Watch is not a diver watch and should not be used for diving.
- Rinse watch with fresh water after exposure to salt water.
- Shock-resistance will be indicated on watch face or caseback. Watches are designed to pass ISO test for shock-resistance. However, care should be taken to avoid damaging crystal/lens.
Press button or crown to activate light. Electroluminescent technology used in the INDIGLO ® night-light illuminates entire watch face at night and in low light conditions.

DATE MODELS
TO SET TIME:
- PULL crown all the way out and turn to correct time.
- Push crown in to restart. For screw-in setting crown, push crown in while turning CLOCKWISE to tighten.
Watches with date: Note correct time of day (A.M or P.M.) for proper date function.
TO SET DAY:
- PULL crown to "middle" position and turn CLOCKWISE until correct day appears. If day does not change, pull crown to "out" position and turn CLOCKWISE or COUNTERCLOCKWISE through necessary number of 24 hour periods until correct day appears.
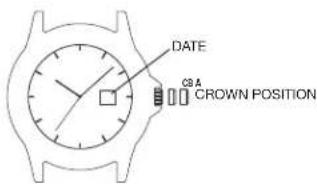
TO SET "QUICKDATE®" FEATURE:
3-POSITION CROWN:
- Pull crown to "Middle" position and turn CLOCKWISE or COUNTERCLOCKWISE until correct date appears.
2-POSITION CROWN:
- Pull crown to "OUT" position and turn CLOCKWISE until date changes. Repeat until correct date appears. Adjust date when month has less than 31 days. Push crown in when finished.
Caution: Wearing or storing the watch with the crown in the "middle" position will cause damage to the movement. Always return the crown to the normal position, or if you wish to save the battery life while storing the watch, leave the crown in the "out" position.
TIMEX
The date function advances the date between the hours of 10 PM and 2 AM. Avoid setting the date during this timeframe. If you attempt to set the date during this time period, rotate the crown at a very slow rate to avoid damaging the watch.
DAY / DATE MODELS
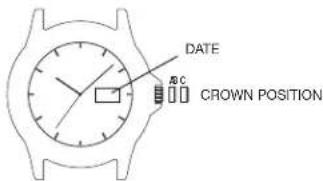
TO SET THE TIME:
- PULL the crown out to the "C" position.
- TURN the crown either way to the correct time.
- PUSH in the crown to the "A" position.
TO SET THE DATE:
- PULL the crown out to the "B" position.
- TURN the crown either way to the correct date.
- PUSH in the crown to the "A" position.
TO SET THE DAY:
- PULL the crown out to the "C" position.
- TURN the crown either way for full 24 hour cycle to set day.
- PUSH the crown in to the "A" position.
TO SET THE BILINGUAL DATE:
If your watch is equipped with a bilingual day display, you may select the desired language by advancing the day display.
- PULL the crown out to the "C" position.
- Repeatedly move the time back to 11pm and forward to 4am until you see the current day displayed in the desired language.
- PUSH the crown in to the "A" position.
EASY SET ALARM

EASY SET ALARM WITH DATE & INDIGLO® NIGHT-LIGHT
- From the "A" position, PUSH the TIMEKEEPING CROWN in (towards the watch case) to activate the INDIGLO® Night-Light and illuminate the watch dial.
EASY SET ALARM DATE & TIME SETTINGS
TO SET THE DATE:
- With the TIMEKEEPING CROWN in the "B" position TURN the TIMEKEEPING CROWN or TURNING RING in either direction to set the date.
TO SET THE TIME:
- With the TIMEKEEPING CROWN in the "C" position TURN the TIMEKEEPING CROWN or TURNING RING in either direction to set the time.
EASY SET ALARM SETTINGS
- Your easy set alarm watch is equipped with two types of alarms:
- 12-Hour Alarm: rings OR vibrates twice per day at the desired hour and minute as long as the alarm is activated. (Alarm crown must be in "E" position.)
- Hourly Alarm: rings OR vibrates every hour at the desired minute if activated. (Alarm crown must be in "F" position.)
TO SET THE 12-HOUR ALARM:
- With the ALARM CROWN in the "D" position, TURN the ALARM CROWN or TURNING RING in either direction to set the hour and minute alarm markers. To activate the alarm to ring or vibrate at the desired time, PULL the ALARM CROWN out to the "E" position. A single beep sound and flash, OR a vibration will indicate that the 12-Hour Alarm is activated.
- The alarm will sound and the dial will flash OR vibrate at the desired time (hour and minute) and will repeat every twelve hours unless the alarm is deactivated.
NOTE: Alarm is deactivated when the ALARM CROWN is in the "D" position. If the alarm is not deactivated it will automatically stop ringing after 20 beeps and flashes OR stop vibrating, and will resume in 12 hours at the indicated time.
TO SET THE HOURLY ALARM:
- With the ALARM CROWN in the "D" position, TURN the ALARM CROWN or TURNING RING in either direction to set the minute alarm marker.
- To activate the alarm to ring or vibrate at the desired minute, PULL the ALARM CROWN out to the "F" position. Three beops sound and flash OR a vibration indicates the Hourly Alarm is activated.
- The alarm will sound and the dial will flash OR vibrate at the desired minute and will repeat every hour on the specified minute unless the alarm is deactivated.
NOTE: Alarm is deactivated when the ALARM CROWN is in the "D" position.
If the alarm is not deactivated it will automatically stop ringing after 20 beeps and flashes OR stop vibrating, and will resume again in one hour at the indicated minute.
PERPETUAL CALENDAR
Your Perpetual Calendar watch accurately keeps track of how many days are in each month. It also adjusts for leap years. The date on your watch (including the month and year) was preset at the factory to Eastern Standard Time, Greenwich Mean Time or Hong Kong Standard Time (depending on where you purchased your watch). You only need to adjust the time.

TO SET TIME
To set time, simply pull crown all the way out and turn. Day and date change automatically when time is adjusted past midnight; there is no additional step for setting day or date. Push crown in when done.
After setting, if date changes at noon, time needs to be adjusted ahead or back 12 hours.
If crown is accidentally put in MIDDLE position and turned, date display will change temporarily, but date setting is unaffected. Simply pull crown all the way out and set time. Proper date display will resume.
PERPETUAL CALENDAR WATCH
FREE LIFETIME BATTERY REPLACEMENT\*\*
If the battery needs to be changed, we recommend that only TIMEX replace it. Your watch will need to be recalibrated to correct time and date after changing the battery. To return your watch to Timex, visit the retailer where you purchased your watch or go to http://www.timex.com/product/Warranty.html for information on contacting Timex.
** Shipping & handling charges apply.
NEVER INCLUDE A SPECIAL WATCHBAND OR ANY OTHER ARTICLE OF PERSONAL VALUE IN YOUR SHIPMENT.
TIMEX
ELAPSED TIME RING
If your watch is equipped with a rotatable outer ring on the face, with numbers corresponding to minutes, you can use this Elapsed Time Ring to time an activity from the start, or to mark the ending time for the duration of an activity.
TO TIME AN ACTIVITY FROM THE START:
Set the Start/Stop triangle at the time (hour or minute) when you start the activity (As shown on the left in the illustration shown below). At completion, you can see how long the activity took.

TO MEASURE THE TIME REMAINING:
Set the triangle to the hour or minute position when you wish to complete the activity, and check the watch periodically for progress towards that goal.
In the illustration shown on the previous page on the right you can stop when the minute hand reaches the 20 minutes past the hour position.
TACHYMETER RING
The tachymeter feature can be used to measure speed in miles per hour (MPH), nautical miles per hour (knots) or kilometers per hour (KPH) using the sweep second hand and the scale on the wall above the watch face. You need to know the actual distance you are covering in miles or km.
Start the chronograph with the second hand at zero (the twelve o'clock position). Within the first minute, the second hand will point to the rate for a one-mile (or one kilometer) course: if it takes 45 seconds, the hand will point to 80 at that position - 80 MPH or 80 KPH.
If within the first minute, a distance greater than one mile or kilometer is covered, multiply the tachymeter number by the distance to get the actual rate: if you went 1.2 miles in 45 seconds, multiply the 80 by 1.2–96 MPH.
COMPASS RING
If your watch is equipped with a movable ring around the dial marked at the letters "N", "E", "W", "S" (for the four compass directions) or compass degrees, you can use this feature to find an approximate compass directionalreading.
- Lay the watch on a flat surface, or hold it so that the face is parallel to the ground.
- Locate the sun and point the hour hand at the sun.
- In the A.M., rotate the ring until the "S" (south) marker is halfway between the hour hand and 12:00 (after the hour hand or within the shortest distance between the hour hand and 12:00).
- In the P.M., rotate the ring until "S" is before the hour hand and halfway between the hour hand and 12:00.

HOW TO ADJUST BRACELET
(Variations of the following bracelet sections apply to all watch models).
SLIDING CLASP BRACELET
- Open locking plate.
- Move clasp to desired bracelet length.
- Exert pressure while holding locking plate and slide clasp back and forth until it engages in grooves on underside of bracelet.
- Press locking plate down until it snaps closed. Clasp can be damaged if excessive force is used.

FOLDOVER CLASP BRACELET
- Find spring bar that connects bracelet to clasp.
- Using a pointed tool, push in spring bar and gently twist bracelet to disengage.
- Determine wrist size, then insert spring bar in correct bottom hole.
- Push down on spring bar, align with top hole and release to lock in place.

FIG. 1 FIG. 2 FIG. 3
BRACELET LINK REMOVAL
REMOVING LINKS:
- Place bracelet upright and insert pointed tool in opening of link.
- Push pin forcefully in direction of arrow until link is detached (pins are designed to be difficult to remove).
- Repeat until desired number of links are removed.

RE-ASSEMBLY:
- Rejoin bracelet parts.
- Push pin back into link in opposite direction of arrow.
- Press pin down securely into bracelet until it is flush.

BATTERY
Timex strongly recommends that a retailer or jeweler replace battery. Battery type is on watch back. If present, push/short internal reset switch after replacing battery. Battery life estimates are based on certain assumptions regarding usage; battery life may vary depending on actual usage.
DO NOT DISPOSE OF BATTERY IN FIRE. DO NOT RECHARGE. KEEP LOOSE BATTERIES AWAY FROM CHILDREN.
TIMEX INTERNATIONAL WARRANTY
http://www.timex.com/productWarranty.html
©2019 Timex Group USA, Inc. TIMEX, INDIGLO and QUICKDATE are registered trademarks of Timex Group B.V. and its subsidiaries.
TIMEX
Luz nocturna INDIGLO®
MODELOS CON FECHA
PARA FIJAR LA HORA:
CÓMO AJUSTAR LA PULSERA
PULSERA CON BROCHE PLEGABLE
FIG. 1 FIG. 2 FIG. 3
PILA
MODÈLES AVEC AFFICHAGE DE LA DATE POUR RÉGLER L'HEURE :
COMMENT AJUSTER LE BRACELET
BRACELET À FERMOIR DÉPLIANT
FIG. 1 FIG. 2 FIG. 3
DÉMONTAGE DE MAILLONS DU BRACELET DÉMONTAGE DE MAILLONS :
PILE
LUZ NOTURNA INDIGLO®
MODELOS COM DATA PARA CONFIGURAR A HORA:
COMO AJUSTAR A PULSEIRA
PULSEIRA DE FIVELA DOBRÁVEL
FIG. 1 FIG. 2 FIG. 3
RETIRADA DOS ELOS DA PULSEIRA RETIRADA DOS ELOS:
BATERIA
MODELLI CON DATA PER IMPOSTARE L'ORA
COME REGOLARE IL BRACCIALE
BRACCIALE CON FERMAGLIO RIPIEGABILE
FIG. 1 FIG. 2 FIG. 3
BATTERIA
www.timex.it/it_IT/productWarranty.html
*pounds per square inch absolute
DATUMSMODELLE
ANPASSEN DER ARMBÄNDER
ARMBAND MIT FALTVERSCHLUSS
TIMEX
DEUTSCH 990-095926-05
BATTERIE
MODELLEN MET DATUM
DE TIJD INSTELLEN:
ARMBAND AFSTELLEN
ARMBAND MET KLAPSLUITING
FIG. 1 FIG. 2 FIG. 3
TIMEX
NEDERLANDS 990-095926-05
BATTERIJ
日期显示型手表
时间设置:
如何调整表带
翻扣式表带
图1 图2 图3
拆卸表带环扣
拆卸环扣:
电池
日付のモデル
時間の設定

ブレスレットの調整
折り重ね式留め金ブレスレット
電池
www.timexwatch.jp/fs/timex/c/guide#returns
БАТАРЕЯ

NASTAVENÍ ŘEMÍNKU
ŘEMÍNEK SE SKLÁDACÍ SPONOU
BATERIE
DÁTUM MODELLEK
IDÖBEÁLLÍTÁS:
HOGYAN LEHET BEÁLLÍTANI A KARKÖTŐ ÓRASZÍJAT
ÁTHAJTÓ CSATOS KARKÖTŐ
- ÁBRA 2. ÁBRA 3. ÁBRA
ELEM
USTAWIANIE DATY W DWÓCH JĘZYKACH:
DZWONEK UPŁYWU CZASU

RYS.1 RYS.2 RYS.3
ODŁĄCZANIE OGNIW OD BRANSOLETKI ODŁĄCZANIE OGNIW:
BATERIA
LUMINA NOCTURNĂ INDIGLO®
MODELE DE DATA
PENTRU A SETA ORA:
INELUL PENTRU BUSOLĂ
CUM SĂ REGLATI BRĂTARA
BRĂȚARĂ CU CATARAMĂ PLIABILĂ
FIG. 1 FIG. 2 FIG. 3
SCOATEREA UNEI VERIGI DIN BRĂȚARĂ PENTRU A SCOATE O VERIGĂ:
BATERIE
TARİH MODELLERİ
SAATI AYARLAMAK IÇIN:

SAATİN AYARLANMASI
GÜN, TARIH
KORDONUN AYARLANMASI
KATLANAN TOKALI KORDON
ŞEKİL 1 ŞEKİL 2 ŞEKİL 3
KORDON BAKLASININ ÇIKARTILMASI BAKLALARIN ÇIKARTILMASI:
PIL
- HOW TO START YOUR WATCH
- WATER AND SHOCK RESISTANCE
- WARNING: TO MAINTAIN WATER-RESISTANCE, DO NOT PRESS ANY BUTTONS OR PULL OUT THE CROWN UNDER WATER UNLESS YOUR WATCH IS INDICATED AS 200 METER WATER-RESISTANT
- DATE MODELS
- TO SET TIME
- TO SET DAY
- TO SET "QUICKDATE®" FEATURE
- 3-POSITION CROWN
- 2-POSITION CROWN
- TIMEX
- DAY / DATE MODELS
- TO SET THE TIME
- TO SET THE DATE
- TO SET THE DAY
- TO SET THE BILINGUAL DATE
- EASY SET ALARM WITH DATE & INDIGLO® NIGHT-LIGHT
- EASY SET ALARM DATE & TIME SETTINGS
- EASY SET ALARM SETTINGS
- TO SET THE 12-HOUR ALARM
- TO SET THE HOURLY ALARM
- PERPETUAL CALENDAR
- PERPETUAL CALENDAR WATCH
- FREE LIFETIME BATTERY REPLACEMENT
- ELAPSED TIME RING
- TO TIME AN ACTIVITY FROM THE START
- TO MEASURE THE TIME REMAINING
- TACHYMETER RING
- COMPASS RING
- HOW TO ADJUST BRACELET
- SLIDING CLASP BRACELET
- FOLDOVER CLASP BRACELET
- BRACELET LINK REMOVAL
- REMOVING LINKS
- RE-ASSEMBLY
- BATTERY
- DO NOT DISPOSE OF BATTERY IN FIRE. DO NOT RECHARGE. KEEP LOOSE BATTERIES AWAY FROM CHILDREN
- TIMEX INTERNATIONAL WARRANTY
- LUZ NOCTURNA INDIGLO®
- MODELOS CON FECHA
- PARA FIJAR LA HORA
- CÓMO AJUSTAR LA PULSERA
- PULSERA CON BROCHE PLEGABLE
- PILA
- MODÈLES AVEC AFFICHAGE DE LA DATE POUR RÉGLER L'HEURE
- COMMENT AJUSTER LE BRACELET
- BRACELET À FERMOIR DÉPLIANT
- DÉMONTAGE DE MAILLONS DU BRACELET DÉMONTAGE DE MAILLONS
- PILE
- LUZ NOTURNA INDIGLO®
- MODELOS COM DATA PARA CONFIGURAR A HORA
- COMO AJUSTAR A PULSEIRA
- PULSEIRA DE FIVELA DOBRÁVEL
- RETIRADA DOS ELOS DA PULSEIRA RETIRADA DOS ELOS
- BATERIA
- MODELLI CON DATA PER IMPOSTARE L'ORA
- COME REGOLARE IL BRACCIALE
- BRACCIALE CON FERMAGLIO RIPIEGABILE
- BATTERIA
- DATUMSMODELLE
- ANPASSEN DER ARMBÄNDER
- ARMBAND MIT FALTVERSCHLUSS
- BATTERIE
- MODELLEN MET DATUM
- DE TIJD INSTELLEN
- ARMBAND AFSTELLEN
- ARMBAND MET KLAPSLUITING
- BATTERIJ
- 日期显示型手表
- 时间设置:
- 如何调整表带
- 翻扣式表带
- 拆卸表带环扣
- 拆卸环扣:
- 电池
- 日付のモデル
- 時間の設定
- ブレスレットの調整
- 折り重ね式留め金ブレスレット
- 電池
- БАТАРЕЯ
- NASTAVENÍ ŘEMÍNKU
- ŘEMÍNEK SE SKLÁDACÍ SPONOU
- BATERIE
- DÁTUM MODELLEK
- IDÖBEÁLLÍTÁS
- HOGYAN LEHET BEÁLLÍTANI A KARKÖTŐ ÓRASZÍJAT
- ÁTHAJTÓ CSATOS KARKÖTŐ
- ELEM
- USTAWIANIE DATY W DWÓCH JĘZYKACH
- DZWONEK UPŁYWU CZASU
- ODŁĄCZANIE OGNIW OD BRANSOLETKI ODŁĄCZANIE OGNIW
- LUMINA NOCTURNĂ INDIGLO®
- MODELE DE DATA
- PENTRU A SETA ORA
- INELUL PENTRU BUSOLĂ
- CUM SĂ REGLATI BRĂTARA
- BRĂȚARĂ CU CATARAMĂ PLIABILĂ
- SCOATEREA UNEI VERIGI DIN BRĂȚARĂ PENTRU A SCOATE O VERIGĂ
- TARİH MODELLERİ
- SAATI AYARLAMAK IÇIN
- KORDONUN AYARLANMASI
- KATLANAN TOKALI KORDON
- KORDON BAKLASININ ÇIKARTILMASI BAKLALARIN ÇIKARTILMASI
- PIL
Brand : TIMEX
Model : Allied TW2T76100VQ
Category : Wristwatch