
SN1050U - Dishwasher Oliveri - Free user manual and instructions
Find the device manual for free SN1050U Oliveri in PDF.


| Product Type | Freestanding Dishwasher |
| Brand | Oliveri |
| Model | SN1050U |
| Width | 60 cm (23.6 inches) |
| Height | 85 cm (33.5 inches) |
| Depth | 60 cm (23.6 inches) |
| Weight | 50 kg (110 lbs) |
| Power Supply | 220-240 V / 50 Hz / 10 A |
| Power Consumption | 1800-2200 W |
| Water Connection | Cold water only, 3/4" thread |
| Number of Place Settings | 12 |
| Noise Level | 44 dB(A) |
| Energy Efficiency Class | A+ |
| Wash Programs | Eco 50°C, Intensive 70°C, Normal 60°C, Quick 30min, Rinse |
| Additional Functions | Half load, Delay start up to 24h, Extra dry |
| Drying System | Condensation drying |
| Safety Features | Child lock, Anti-flood system, Overheat protection |
| Maintenance | Clean filters regularly, spray arms, and door seals |
| Spare Parts Availability | Filters, spray arms, detergent dispenser, racks available |
| Repairability Index | 7.5/10 |
| Manufacturing Year | 2020 |
Frequently Asked Questions - SN1050U Oliveri
User questions about SN1050U Oliveri
0 question about this device. Answer the ones you know or ask your own.
Ask a new question about this device
Download the instructions for your Dishwasher in PDF format for free! Find your manual SN1050U - Oliveri and take your electronic device back in hand. On this page are published all the documents necessary for the use of your device. SN1050U by Oliveri.
USER MANUAL SN1050U Oliveri
REMOVE EXCESS SEALANT AND MASKING
Excess sealant must be removed promptly with a suitable clean-up solvent recommended for use on both the counter/benchtop and stainless steel to ensure damage does not occur.
PLUMBING & TAPWARE
IMPORTANT - Connections to plumbing should always be done by a licensed plumber. Fit supplied basket wastes to sink bowls. Install tapware according to manufacturers instructions.
If 2 or more individual basins/bowls are under-mounted, a minimum distance of 3 12 (90mm) is required between the basins/bowls. The counter/benchtop supplier is to determine the support method required.
It is essential that the installation is waterproof and carried out in accordance with these instructions. Tasman Sinkware will not be held responsible for any damage caused by leakage or faulty installation.
CARE INSTRUCTIONS FOR YOUR OLIVERI STAINLESS STEEL SINK
AVOID CONTACT WITH ROUGH OR DIRTY SURFACES as new polished stainless steel will show scratches!

DO's
• Clean with soap & water (towel dry)
• Clean along the grain of the Stainless Stee
• Use a soft brush or sponge (old tooth brush)
- wipe over with a glass cleaner (windex is very good)
- Polish with a metal polish paste (Autocel / Bracec)
- Polish with a metal polish paste (Autosol / Brasso)
- Use a Liquid cleaner (Bon Ami or Jiff)
- Use a liquid cleaner (Bun-Ami or Shi)
• Use a granulated stainless steel cleaner (Essteele)

DO NOT's
- Do not use bleaches (White Ring, Domestos, Clorox)
• NEVER use Steel wool
• Beware of harsh liquid cleaners
• Beware of grit within cloths and mineral deposits within water
- Avoid prolonged exposure to acids from Fruit, Fruit juices, Salts, Spirits, Bleach, Tea-bags
- Avoid prolonged contact with ordinary steel which can rust Tin Cans, Steelwool
- Do not keep harsh (acids or chlorine) chemicals under sink / laundry tub
• Do not leave chlorine/chloride chemicals on stainless steel surface
• Do not leave liquid soaps & cleaners to dry on stainless steel
AUSTRALIA
Head Office &
Manufacturing Plant
Tasman Sinkware Pty Ltd
Regency Park SA
Phone: +61 8 8348 6444
Fax: +61 8 8348 6495
Email: sinkware@tasbuildpro.com.au
www.oliverisinks.com
Tasman Sinkware
is a division of
Fletcher Building
NORTH AMERICA
Sales Office
Tasman Sinkware North America
Corona CA
Email: northamerica@oliverisinks.com
UNITED KINGDOM DISTRIBUTOR
A.C. Toon Ltd
Phone: 01246 223900
Email: sales@actoon.co.uk
ASIA PACIFIC DISTRIBUTORS
New Zealand - Dux Industries Ltd
Phone: 0800 367 389
Singapore - Sim Siang Choon
Phone: 6266 6632
Hong Kong - Deacon & Co Ltd
Phone: 2369 6111

Fletcher Building
INSTALLER - PLEASE READ & FOLLOW THESE INSTALLATION INSTRUCTIONS
FOR UNDERMOUNT SINKS
Please retain for consumer as care instructions are included

CHECK MODEL
The model number on the sink packaging must match the model of sink the customer ordered. Do not install if incorrect.

CHECK THE CONDITION
Inspect the sink for any visible defects. Do not install the sink if defects are found. Contact your sink retailer / point of purchase.

AVOID CUTS
The perimeter and punch-outs on the sink may contain sharp edges. Handle the sink carefully to avoid personal injury.

AVOID SCRATCHES
Stainless steel can be scratched if proper care is not taken during installation.
IT IS HIGHLY RECOMMENDED THE ACTUAL SINK BE PRESENT AT TIME OF CUTTING
MATERIALS FOR FITTING THE UNDERMOUNT SINK:
- Oliveri sink includes mounting clips, basket wastes and other accessories (depending on model).
• These Installation Instructions
• Level to check counter/benchtop & sink is installed level
• Flat head screwdriver (large - to tighten basket wastes) - Suitable sealant and fastening materials (neutral-cure silicone sealant and structural epoxy or hardware)
- Masking material to protect counter/benchtop and sink from excess sealant
- Clamping Mechanism (such as threaded rod and timber bearers)
- Additional Mounting Hardware if fitting into thinner material. The instructions for bolting the sink require a minimum counter/benchtop thickness of 25mm / 1". Different hardware or packing materials will be needed for thin counters/benchtops.
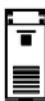

Download cutout template files
(PDF, DWG & DXF)
from our website.
Any advice, recommendation, information, assistance or service provided by Tasman Sinkware in relation to goods manufactured by it or their use and installation, is given in good faith and is believed by Tasman Sinkware to be appropriate and reliable. However, any advice, recommendation, information, assistance or service is provided by Tasman Sinkware without responsibility or liability.
© Tasman Sinkware
TF 45c August 2013
Oliveri
FOLLOW THESE STEPS TO INSTALL THE OLIVERI UNDERMOUNT SINK
IF COUNTER / BENCHTOP IS SUPPLIED WITH CUT-OUT, SKIP STEPS MARKED WITH*

CHECK SPACE
Ensure there is adequate space for tapware (including a splashback if specified). Check space for installation (underneath) and operation (above). Particular care must be taken when a thick splash back is used (it may interfere with tapware location and operation). Ensure the cabinet will not foul the sink mounting flange or basins.
TEMPLATE \*
Cut out templates for your Oliveri sink are available online at oliverisinks.com. Use the product model number to find the template. Some sink templates apply to both left-hand and right-hand modelssinks. Ensure template is correct way around for your model.
MARK CUT OUT \*
Carefully mark out the template (or follow drawing instructions) making allowance for any additional polishing back that is required after cutting. NOTE: THE TEMPLATE IS THE EXACT FINISHED CUT-OUT SIZE REQUIRED.

natural_image
Illustration of three hand tools: a pencil, a saw, and a notepad (no text or symbols)CUT & FINISH HOLE \*
Drill pilot holes to accept an appropriate cutting tool for the counter/ benchtop material (wear suitable personal protection equipment). Cut inside the mark, allowing sufficient room for any polishing back. Note: Accuracy is essential to ensure the bowl / basin and accessories fit correctly.
TRIAL FIT THE SINK
Carefully position the sink against counter/benchtop to make sure it fits the cut-out correctly. If the fit is not correct, remove the sink and proceed with remedial work. Perform another trial fit after corrections have been made.
MASKING
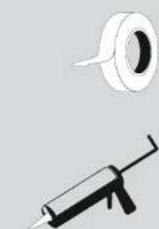
To prevent sealant overrun, it is recommended that both the inside edge of the basin and the edge of the cut-out is covered with a suitable masking tape.
APPLY SEALANT
Apply suitable sealant recommended for both the counter/benchtop material being used and for stainless steel. Neutral-cure sealant will not damage stainless steel. It may be easier to apply sealant after preparing your clamping equipment. Do not allow the sealant to dry before the sink is clamped to the counter/benchtop.

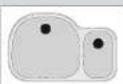
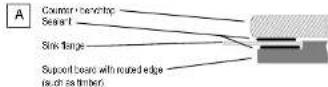
Above shows sandwich method where sink is clamped between a lower support board (with routed edge) and the upper counter / benchtop using method A.

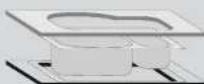
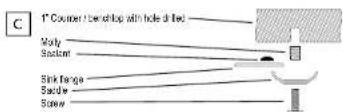
Above shows how threaded rod and timber bearers may be used to clamp the sink in place while fastening to the counter / benchtop using methods B and C.
Do not overlighten as this may damage the sink.
ADDITIONAL FASTENING
The sealant alone may appear to bond the sink to the counter/benchtop. However, when installing your Oliveri undermount sink, it is important to always use methods A, B or C (below) to locate the sink securely in the counter/bench top in conjunction with the sealant manufacturer's instructions.
FITTING THE SINK
Position and align the sink correctly in the cutout (some threaded rod and timber bearers will help to clamp the sink in place) and either
'A' Sandwich Method: RECOMMENDED FOR BOTH THIN AND THICK COUNTER/BENCHTOP. Firmly fix a support board into / over the cabinet and cut the sink hole so that the sink flange will sit above the edge of the board. Slightly rout the edge so that the sink flange will sit flush with the top surface. Test for fit. Install sink and seal between flange and support board. Apply sealant to the underside edge of the cutout on counter/benchtop material and position it over the support board to sandwich the sink in place. Fasten the counter/benchtop securely.
'B' Bond: For minimum 1" / 25mm thick material. Bond it to the underside of the counter/benchtop with a structural high strength epoxy compound. NOT RECOMMENDED TO BE USED WHEN FITTING SINK TO THINNER COUNTER/BENCHTOPS.

"C' Bolt: For minimum 1" / 25mm thick material. Bolt it to the counter / benchtop using "molly" assemblies. Care must be taken during drilling and tightening to avoid cracking. NOT RECOMMENDED TO BE USED WHEN FITTING SINK TO THINNER COUNTER/BENCHTOPS."
If you have any doubts, confirm the correct mounting method for your material by consulting the counter/benchtop supplier.
- REMOVE EXCESS SEALANT AND MASKING
- PLUMBING & TAPWARE
- CARE INSTRUCTIONS FOR YOUR OLIVERI STAINLESS STEEL SINK
- AVOID CONTACT WITH ROUGH OR DIRTY SURFACES as new polished stainless steel will show scratches!
- AUSTRALIA
- NORTH AMERICA
- Sales Office
- UNITED KINGDOM DISTRIBUTOR
- ASIA PACIFIC DISTRIBUTORS
- INSTALLER - PLEASE READ & FOLLOW THESE INSTALLATION INSTRUCTIONS
- FOR UNDERMOUNT SINKS
- CHECK MODEL
- CHECK THE CONDITION
- AVOID CUTS
- AVOID SCRATCHES
- IT IS HIGHLY RECOMMENDED THE ACTUAL SINK BE PRESENT AT TIME OF CUTTING
- MATERIALS FOR FITTING THE UNDERMOUNT SINK:
- FOLLOW THESE STEPS TO INSTALL THE OLIVERI UNDERMOUNT SINK
- CHECK SPACE
- TEMPLATE \*
- MARK CUT OUT \*
- CUT & FINISH HOLE \*
- TRIAL FIT THE SINK
- MASKING
- APPLY SEALANT
- ADDITIONAL FASTENING
- FITTING THE SINK
Brand : Oliveri
Model : SN1050U
Category : Dishwasher