
ST-BL1584U - Kitchen sink Oliveri - Free user manual and instructions
Find the device manual for free ST-BL1584U Oliveri in PDF.


| Product Type | Farmhouse Undermount Kitchen Sink |
| Brand | Oliveri |
| Model | ST-BL1584U |
| Material Composition | 80% granite, 20% quartz and resin |
| Dimensions (Approx.) | 1584 x 648 x 240 mm (L x D x H) |
| Weight (Empty) | Approx. 25 kg |
| Installation Type | Undermount only |
| Minimum Cabinet Width | 900 mm |
| Front Options | Reversible: sharp 18mm radius or round 40mm radius |
| Resistance | Scratch, heat (up to 280°C), and stain resistant |
| Top Edge Width (Sharp Front) | 32 mm |
| Top Edge Width (Round Front) | 40 mm |
| Drain Hole Size | Standard 90 mm (fits basket strainer) |
| Included Accessories | Strainer and drain assembly |
| Care Instructions | Clean with soft cloth and warm soapy water; avoid abrasive cleaners |
| Warranty | Lifetime to original purchaser (see terms) |
| Installation Requirement | Professional installation recommended; support structure needed for weight |
Frequently Asked Questions - ST-BL1584U Oliveri
User questions about ST-BL1584U Oliveri
0 question about this device. Answer the ones you know or ask your own.
Ask a new question about this device
Download the instructions for your Kitchen sink in PDF format for free! Find your manual ST-BL1584U - Oliveri and take your electronic device back in hand. On this page are published all the documents necessary for the use of your device. ST-BL1584U by Oliveri.
USER MANUAL ST-BL1584U Oliveri
Installation Instructions
ST-BL1584U
Farmhouse Undermount Sink

natural_image
Modern kitchen sink with black interior and marble countertop, featuring a stainless steel faucet and wooden cup (no text or symbols visible)
THIS PRODUCT MUST BE INSTALLED BY A QUALIFIED TRADESPERSON
The latest technological advances are used in the manufacturing process of our sinks which are tested a number of times during the production process to ensure they comply with rigorous quality standards.
Manufactured from 80% granite and 20% quartz and resin, the sink is scratch, heat and stain resistant.
This sink can be installed on virtually any type of benchtop, including wood, plastic, marble, etc.
Correct and proper use of your sink will ensure its long-lasting life. Consult the Care and Maintenance section of this manual for advice on cleaning and regular maintenance.
PLEASE NOTE
If a washing machine or dishwasher is going to be installed beneath the sink, proceed as follows:
- To prevent overheating, which may result in the deformation of the sink, adjust the feet on the washing machine / dishwasher so there is sufficient ventilation between the appliance and the sink.
- To facilitate air circulation and cooling, we recommend providing the cabinet base with ventilation slots.
STOP AND READ CAREFULLY
PRE-INSTALLATION CHECKS

Unpack & check the item is correct and no damage has occurred during transit.

If there are any visible defects, DO NOT PROCEED WITH THE INSTALLATION and please contact the place of purchase immediately.

ANY CLAIMS FOR DAMAGE WILL NOT BE ACCEPTED AFTER INSTALLATION.

Protect your sink before and during installation. Scratches, cracks or other surface damage sustained during or after the installation are NOT COVERED BY WARRANTY.

Installation must be in accordance with building regulations and any local authority requirements.

CAUTION: Composite Sinks are HEAVY, be sure to get help when lifting or moving.

CAUTION
Risk of personal injury. Composite sinks are heavy. Get help when lifting or moving. Be sure to use proper tools and always wear personal safety devices for your protection.
Tools needed for installation

natural_image
Collection of nine different mechanical and electrical component illustrations (no text or symbols)SINK ASSEMBLY
You MUST check the sink is NOT DAMAGED before proceeding with installation.

natural_image
3D rendering of a rectangular sink with circular drain and central sink (no text or symbols)Fit the strainer into the hole from the top, and then place the drain under the hole.

natural_image
Mechanical assembly diagram showing a screw being inserted into a housing with a curved tool (no text or symbols)Fasten the strainer to the drain using the screw provided. Do not overtighten.

Drain Parts
INSTALLATION STEPS
We recommend that only professional and expert installers carry out the installation. As a bespoke artisan installation is required, no cut-out pattern is provided.
We strongly recommend that you provide your installer with the actual sink before the manufacture or modification of a cabinet. To modify a standard cabinet so that it can accommodate and support the weight of the farmhouse sink, a reinforcement must be built inside it, by inserting a reinforced support surface.
When the sink is positioned on the support structure, make sure that the top of the sink reaches the bottom of the benchtop.
ATTENTION: check that the support structure is suitable for this type of sink as its weight, including that of the water it could contain, could exceed 70 kg. Reinforce the support structure if needed. Minimum cabinet width 900mm.
natural_image
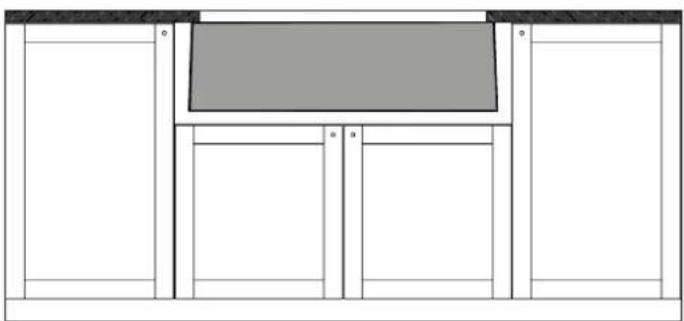
Architectural floor plan showing room layouts and structural elements (no text or labels)The Farmhouse Sink is for UNDERMOUNT ONLY.
Step 1 Prepare the Sink Cabinet
To support the weight of the sink, prepare an internal support shelf or a support structure.
Drill the drain hole on the support shelf (A), taking into account the presence of the basket waste fitting. Prepare a hole in the rear area for the water supply pipes (B).

INSTALLATION STEPS
Step 2 Cut out the Cabinet Front
Cut the front of the cabinet using the dimensions shown below.

The front of the cabinet needs to be cut-out allowing the sink to protrude.
NOTE
Measurement "C" must be greater than the height of the sink. (240mm).
Step 3 Cut and Install the Benchtop
Reversible Fronts The Farmhouse Sink has the peculiarity of having two different fronts: one front has 'sharp' corners, with a radius of 18mm and a 32mm top edge to suit the style of modern and contemporary environments. The opposite front has more rounded corners with a 40mm radius, and a wider top edge of 40mm. These softer lines are the ideal combination for country kitchens, or those kitchens with a more classic or retro design.
Before cutting the benchtop opening, choose the direction the sink will face.
The following diagrams show the measurements to be used to cut the benchtop hole, according to the direction chosen.
INSTALL WITH 40mm FRONT EDGE (ROUND)

INSTALL WITH 32mm FRONT EDGE (SHARP)
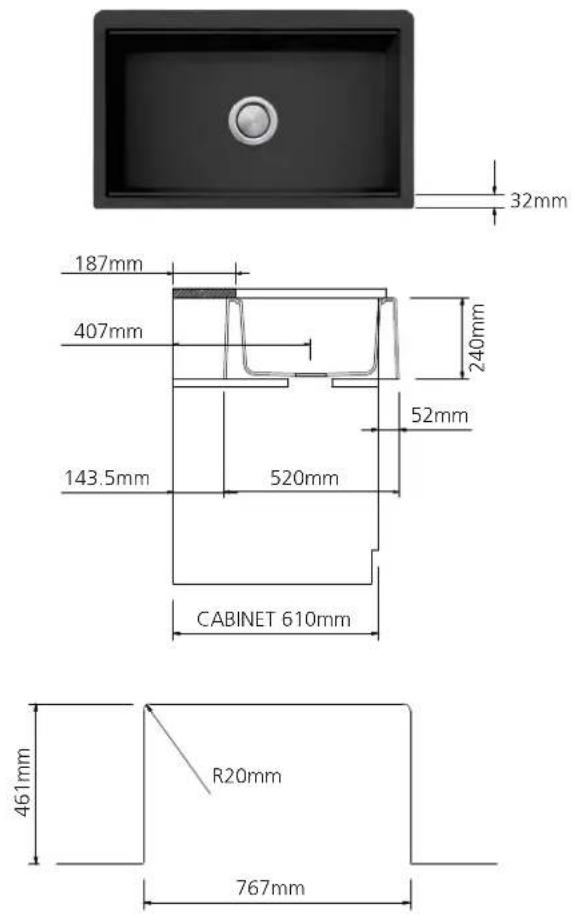
NB: Cut dimensions are intended for standard depth benchtops (648mm).
Step 4 Seal the Sink with the Benchtop
Apply a thin bead of only 'neutral cure' silicone sealant where the sink meets the benchtop and cabinet. Use of an 'acetic cure' silicone can irreparably damage the sink. Immediately wipe away excess sealant.
CARE & MAINTENANCE
- Avoid placing pots, pans or other hot objects in excess of 280^ C on the surface of the sink (CAUTION! The bottom of a pot or pan just removed from the burner can reach temperatures of over 600^ C). Pots, pans and other hot objects must be placed on appropriate potholders (made of wood, rubber, etc.).
- Avoid causing excessive thermal shock due to the presence of very hot and very cold objects on the sink at the same time.
- Do not use the sink as a cutting surface: rather, use a cutting board made of bamboo or high-pressure laminate, which can be purchased together with the sink.
- Do not use abrasive detergents or metal cleaning pads to clean the sink because they could scratch the surface, making it susceptible to stains.
- Sink can be damaged by dropping heavy or pointed objects on to its surfaces.
- Scratches and chips on the surface of the sink can be removed using very fine wet & dry paper (used wet) and then polish.
- CAUTION! Do not pour alcohol, gasoline, trichloroacetic acid or any solvents in general into or onto the sink because they could react with the chemical structure of the composite material and damage it beyond repair.
How to clean the sink
- Clean the sink regularly using a soft cloth with warm soapy water and clean the sink after each use.
• Normal stains should be removed immediately. -
Cleaning powders and creams which are even slightly abrasive should not be used, nor chemically aggressive detergents.
-
Marks caused by foods or liquid which stain easily (tea, coffee, fruit juice, etc.), must be removed immediately with very hot water and a cleaning product.
- Special stains, such as those caused by Indian ink, other inks, oil-based stains or paints, etc., must be removed immediately. If these stains are difficult to remove, use a cloth dampened with denatured alcohol.
- For organic stains which are especially difficult to remove, it is recommended that you fill the sink with a highly diluted organic cleaner such as bleach and let stand overnight. The next morning, rinse with warm water and a soft cloth.
- Lines caused by contact between a pot or fork and the surface of the sink should be removed with a cloth or sponge and liquid detergent.
- Daily use will result in lime buildup, especially on the bottom of the sink, which will progressively increase in thickness.
This layer of lime buildup is very porous and easily stained. The presence of stains on the bottom of the sink basin is attributable to this buildup. The formation of lime buildup must be prevented by removing any buildup at least twice a week.
- To remove lime buildup (which is very visible on sinks which are dark in colour), we recommend the following procedure:
1) Cover the bottom of the sink with a solution of vinegar and water (or a product specifically designed to fight lime buildup and let stand for a few hours.
2) Then, rub the bottom of the sink vigorously with the stiff side of a sponge until the lime, dirt and stains have been removed.
3) Rinse thoroughly with water.
WARRANTY
Oliveri Solutions Pty Ltd ABN 12 007 551 886, of 51 Naweena Rd Regency Park SA 5010 warrants to the original purchaser that the product is free from manufacturing defects for the duration of ownership.
Subject to the terms contained in the full warranty information available at https://oliveri.com.au/service-and-warranty, where a genuine manufacturing defect arises within the warranty period Oliveri will, at its election, repair the defect or replace the product.
Our goods come with guarantees that cannot be excluded under the Australian Consumer Law. You are entitled to a replacement or refund for a major failure and compensation for any other reasonably foreseeable loss or damage. You are also entitled to have the goods repaired or replaced if the goods fail to be of acceptable quality and the failure does not amount to a major failure.
To make a warranty claim, please contact Oliveri's nominated Warranty Service Agent by phone on (07) 5596 0738 or email oliveri@t2services.com.au
Oliveri is not liable for expenses you incur making a warranty claim including the removal or replacement of a defective product.
IMPORTANT NOTICE
This unit must be THOROUGHLY INSPECTED for manufacturing or other defects BEFORE INSTALLATION may commence.
If a fault or damage is found, the unit MUST NOT UNDER ANY CIRCUMSTANCES be installed but must be RETURNED TO THE PLACE OF PURCHASE for replacement.

ANY CLAIMS FOR DAMAGE WILL NOT BE ACCEPTED AFTER INSTALLATION.
This warranty has exclusions and does not cover scratching, discolouration, or normal wear and tear.
For full warranty information, visit:
https://oliveri.com.au/service-and-warranty
SERVICE
Initially, please contact your sink Installer to confirm that the sink has been installed correctly, the benchtop is level, the cut-out is correct and the sink is secure and supported. If the installer is satisfied that the problem is not due to poor installation, please contact Oliveri's nominated Warranty Service Agent.
For details visit: https://oliveri.com.au/service-and-warranty
PLEASE NOTE
If the Warranty Service Agent finds that the sink is not faulty, they reserve the right to pass on any call-out fee to the householder.



- Installation Instructions
- ST-BL1584U
- Farmhouse Undermount Sink
- THIS PRODUCT MUST BE INSTALLED BY A QUALIFIED TRADESPERSON
- PLEASE NOTE
- STOP AND READ CAREFULLY
- PRE-INSTALLATION CHECKS
- CAUTION
- SINK ASSEMBLY
- INSTALLATION STEPS
- Step 1 Prepare the Sink Cabinet
- Step 2 Cut out the Cabinet Front
- NOTE
- Step 3 Cut and Install the Benchtop
- Step 4 Seal the Sink with the Benchtop
- CARE & MAINTENANCE
- How to clean the sink
- WARRANTY
- IMPORTANT NOTICE
- SERVICE
Brand : Oliveri
Model : ST-BL1584U
Category : Kitchen sink