SG400III - Flash GODOX - Free user manual and instructions
Find the device manual for free SG400III GODOX in PDF.

User questions about SG400III GODOX
0 question about this device. Answer the ones you know or ask your own.
Ask a new question about this device
Download the instructions for your Flash in PDF format for free! Find your manual SG400III - GODOX and take your electronic device back in hand. On this page are published all the documents necessary for the use of your device. SG400III by GODOX.
USER MANUAL SG400III GODOX
natural_image
Line drawing of a SG400 II V lens with control panel and tripod (no text or symbols on device)
Official Account
GODOX Photo Equipment Co., Ltd.
Add., Building 2, Yaochuan Industrial Zone, Tangwei Community, Fuhai Street, Bao'an District, Shenzhen 518103, China Tel: +86-755-29609320(8062) Fax: +86-755-25723423 Email: godox@godox.com
www.godox.com
Made in China | 705-SG42V0-00

SG400Ⅱ
Note: Reflector is not included.
Compact Studio Flash
Instruction Manual
Important Safety Instructions
This product is a professional photographic equipment, to be operated by professional personnel only.
The following basic safety precautions must be followed when using this product: All transport protective materials and packaging on the product must be removed before use.
- Carefully read and fully understand the instruction manual before use and strictly follow the safety instructions. Failure to do so may result in death, serious injury, damage to the product, or other property damage.
- This device (studio flash) must be connected to a grounded outlet.
- High voltage exists when the flash is powered on. Internal capacitors will remain charged for some time after power off.
- This product is a professional lighting fixture, children are prohibited from using it. Children must be closely supervised by adults when approaching the fixture, to prevent collisions with the fixture or unauthorized use that could cause personal injury.
- This is not an ordinary lighting fixture and must not be used for general illumination. Anyone with a history of eye damage or sensitivity should avoid using this fixture or looking directly at it.
- Extreme caution must be exercised when using it, do not touch high-temperature parts such as flash tubes to avoid burns.
- Do not point the flash directly at the eyes (especially baby's eyes) under any circumstances, as this could impair vision in a short time. Turn off immediately if discomfort occurs, stop using, and seek medical attention promptly.
- When using an on-camera flash with a reflector at a focal length of 14mm, it is strictly prohibited to use the 1/1 power setting for an extended period of time. After reaching the maximum heat protection limit, a 10-minute pause is required before continuing to use the flash.
- If the flash tube is damaged, stop using it immediately and contact the manufacturer, service agent, or qualified repair personnel for a replacement to prevent accidents.
- Dot not use damaged equipment or accessories. Allow professional repair technicians to inspect and confirm normal operation before continuing use after repairs.
- Disconnect power source or remove batteries (if it has one) before replacing flash
tube, protective glass, or fuses. Allowing 10 minutes to cool before replacing flash tube, and wear insulated or heat resistant gloves when operating.
- Turn off power before connecting or disconnecting plugs from outlets. Ensure plugs are fully inserted when connecting.
- Stop using immediately if the product shell is cracked due to falling, squeezing, or strong impact, to avoid touching the internal electronic components and getting an electric shock.
- If an extension cord is needed, use the original extension cord or choose one with a rated current equal to or greater than the device. Using an extension cord with a smaller rated current may overheat and catch fire.
- Some products have long power cords, please place them properly to avoid contact with heat sources or tripping others. It is recommended to use the original power cord. Damage caused by non-original cords is not covered by the warranty.
- The power plug of the studio flash can serve as a power-off switch, it should always be easily operable. Please disconnect the power when not in use.
- Unplug the equipment power plug from the power socket before cleaning or maintenance. Do not pull the power cord forcibly, use both hands to hold the plug end and pull it out.
- This device is not waterproof. Keep it dry and avoid immersing it in water or other liquids. It should be installed in a ventilated and dry location and avoid using in rainy, humid, dusty, or overheated environments. Do not place items above the device or allow liquids to flow into it to prevent danger.
- Do not disassemble without authorization. If the product malfunctions, it must be inspected and repaired by our company or authorized repair personnel.
- Before storing the device, ensure it has completely cooled down and the power cord is unplugged, then put it in the protective case or a ventilated dry location.
- Do not place the device near alcohol, gasoline, or other flammable volatile solvents or gases such as methane and ethane.
- Do not use or store this device in potentially explosive environments.
- Maintain at least 1 meter distance between the lamp head and the user, other people, and heat-sensitive or flammable items during and after use.
- Do not cover the heat dissipation port!
- Do not use accessories not been approved by our company, as this may cause fire, electric shock or personal injury.
-
Clean gently with a dry cloth. Do not use a wet cloth as it may damage the device.
-
Some products are equipped with protective covers that must be removed before use.
- This instruction manual is based on rigorous testing. Changes in design and specifications are subject to change without notice. Check official website for latest instruction manual and product updates.
- Use only specified charger and follow proper usage instructions for certain products with built-in lithium batteries, within the rated voltage and temperature range.
- Some products are powered by lithium batteries. These lithium-ion batteries have a limited lifespan and gradually lose their storage capacity, which is irreversible. As the battery ages, the product's battery life will decrease. The estimated lifespan of a lithium-ion battery is 2 to 3 years. Please regularly check the battery's condition, and if the charging time significantly increases or the battery life significantly decreases, consider replacing it with a new battery.
- Some products are equipped with lithium batteries. The recommended storage guidelines are as follows: Before storage, charge the battery to approximately 50% capacity. Charge it to about 50% at least every six months. If the battery is removable, store it separately. The storage temperature should be within the range of 0^ C to 40^ C.
- Some products are powered by lithium batteries. Please note:
- Do not disassemble, crush, or puncture the battery;
- Avoid short-circuiting the battery contacts;
- Do not expose the battery to fire or water;
- Do not expose the battery to temperatures above 60°C.
- Keep out of reach of children;
- Protect the battery from excessive shock or vibration;
• Do not use a damaged battery.
• If the battery leaks, avoid contact with the leaking fluid;
• If the battery fluid comes into contact with your eyes, immediately rinse with water for at least 15 minutes. Lift your eyelids until there are no signs of fluid and seek medical attention promptly. - Some products are powered by alkaline batteries. Please note:
- Use only the batteries or power sources specified in the instruction manual;
- Keep batteries and other small accessories out of the reach of children and infants. If a battery or small accessory is accidentally swallowed, seek medical attention immediately;
- If the battery leaks, changes color, deforms, smokes or emits an unusual smell, remove the battery immediately. Be careful during operation to avoid burns.
Continued use may cause fire, electric shock, or skin burns;
- Do not use any deformed or modified batteries;
- Do not disassemble or modify the product or battery;
- Avoid heating, welding, exposing the battery to fire or water;
- Avoid strong impacts on the battery;
- Do not mismatch positive and negative terminals of the battery, or mix old and new or different types of batteries.
- Confirm and comply with all relevant local laws and regulations when handling any batteries.
- The warranty period for this device as a whole is one year. Consumables (such as batteries), adapters, power cords, and other accessories are not covered by the warranty.
- Unauthorized repairs will void the warranty and will incur charges.
- Please check the status and power of the lithium battery upon receipt. If there are any quality issues, please contact Godox or our authorized dealer within the warranty period.
- Failures from improper operation is not covered under warranty.
Foreword
Thanks for choosing compact studio flash SG400IV. It is a lightweight, compact and durable flash with complete functions. Design for shooting studio portrait and e-commerce product. This product is suitable for head shot, waist shoot, and certificate photography, as well as product shooting, etc. It can also offer high light, background light, or hair light in large studios and workshops. The SG400IV flash offers:
• Built-in Godox 2.4G wireless X system
- Precise output displayed on LCD panel, 40 steps from 1/16 to 1/1 (or 6.0 to 10.0)
- Use optional XPro, X1, X2, XT16 or FT-16 trigger to control the flash power ratio, modeling lamp and buzzer, as well as flash triggering
- Compact and lightweight body with Bowens mount to add almost any studio light shapers
• 10W modeling lamp adjusts in 5% to 100% power levels
- Outstanding output stability, no more than 2% shifts when under the same output
- Anti-preflash function enables synchronization with cameras that have a one-preflash firing system
• Auto memory and recovery of adjusted panel settings
Warning
As this product adopts make and break device, please keep it easy to be used.
No touching the heating parts of this product.
▲ Please turn off the power and wear insulated gloves before installing and connecting accessories. When replacing the tube or modeling lamp, please make sure that the tube is cool and wear insulated gloves to prevent burns.
⚠️ Disconnect from the power supply when it will not be used for an extended period.
After 30 continuous flashes at full power, the flash should be cooled down for about 3 minutes. Overheating will occur if it is used continuously without cooling down.
Do not keep using the modeling lamp for a long time; otherwise flammable accessories attaching to flash head, e.g. softbox will get burnt. A 10-minute time is recommended in this case. After 10 minutes, cool it down for 1 minute.
When using a snot, do not keep the modeling lamp on for a long time or fire too frequently (not over six times for one minute). Overheating will result in damages for strobe housing and/or studio light.
Avoid sudden impacts as this can damage the flash tube and/or modeling lamp.
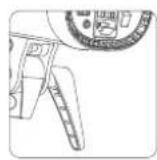
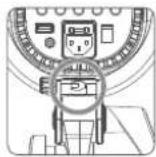
Name of Parts
Body

text_image
Labeled diagram of a camera or watch with numbered parts for identification- AC Power Socket
- Sync Cord Jack
- Power Switch Button
- Test Button
Modeling Lamp Button Optical Model Button Group/Channel Button - BUZZ Button
- Wireless Control Port
-
LCD Display
-
Light Sensor
- Modeling Lamp Indicator
- Test Indicator
- SET Dial
- Fuse
- Mounting Bracket
- Umbrella Input
- Direction Adjusting Handle
- Fixing Mount Pusher
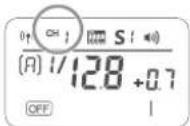
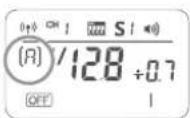
LCD Panel
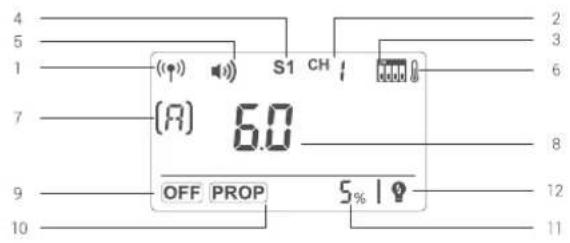
text_image
(A) 6.0 OFF PROP 5% I- Built-in 2.4G Wireless Transmission
- Built-in Wireless Channel
- Built-in Wireless Channel Dial
- Optical Model Indicator
- Beep
- Temperature Alarm Display
-
Built-in Wireless Group
-
Flash Output
- Modeling Lamp is off
- Modeling Lamp is in the PROP mode
- Modeling Lamp shows the power in percentage
- Modeling Lamp is off when triggering the flash
Accessories
- Power Cord
- Lamp Cover
- Instruction Manual


Separately Sold Accessories
The product can be used in combination with the following accessories sold separately, so as to achieve best photography effects: X1, X2, XPRO, XT16 or FT-16 remote control, Power Inverter, Softbox, Photographic Umbrella, Light Stand, Barndoor, Snoot, etc.

natural_image
Collection of nine line-drawn icons representing various household appliances and objects (no text or symbols)-07-
Operations
Flash Preparation
Attach the flash unit onto an appropriate light stand. Adjust the mounting bracket for a good angle and make sure it is tightened and fixed. Use the direction adjusting handle to adjust the flash to a desired direction. Umbrella input is for different photo umbrellas to put in.
Power Connection
Use the power cord to connect the flash to an AC power source and press the power switch button to power on and off.
Modeling Lamp
Short press the
- When
is displayed, the modeling light is off. - When
is displayed, the modeling light is in auto status and its power changes with the flash's power. - When percentage is displayed, the brightness of modeling light can be adjusted from 5% to 100%. Short press the SET Dial and the percentage value is blinking, turn the SET Dial to adjust the brightness and short press to exit.
When the modeling light is on, long press the
Safety Setting: Modeling lamp will be off automatically after lighting for 4 hours, avoiding overheat due to long-time lighting when the user is not nearby.

When there is flammable accessory on the flash unit, do not keep the modeling lamp on for a long time. It is recommended to cool it down for one minute after 10 minutes' working.
-08-
Power Output Control
SET dial decides different power output, satisfying light requirements in different environment. The power is adjustable freely from 1/16 to 1/1 which will be accordingly shown on the LCD display. “---” on the display indicates that the flash triggering function is turned off. Press the Test button to discharge power when the flash output is adjusted from high to low.
Test Button
To fire the flash without taking a picture, press the test button. It can also help adjust the flash brightness when combined with the select dial.
Tip: Press the SET dial and turn on the flash to view its version,
Sync Triggering
The sync cord jack (2) is a 3.5mm plug. Insert a trigger plug here and the flash will be fired synchronously with the camera shutter.
Group/Channel Button
Short press the
Optical Trigger Model
Three optical triggering models are available and can be set by pressing
◆No optical control: S1 or S2 is not displayed on the LCD panel, indicating the optical triggering function is shut down.
◆Optic S1 Secondary Unit Setting: In M manual flash mode, press
◆Optic S2 Secondary Unit Setting: Press
Buzz Function
The sound button is used for deciding whether there is sound reminder for ready flash after recharging. Short press the BUZZ button, when the buzz indicator is on the LCD panel, the buzz function is working; when it is disappear, the buzz function is not working. A "BI" sound will be heard when it's fully charged.
Key Combination
Synchronously press the
Alarm Display
| Display | Warning |
| E0 | The temperature sensor is not connected. |
| E1 | When charging, the capacitance and voltage are not rising within 1 second. |
| E2 | The fastest heating-up component is over the extra temperature. |
| E3 | Discharged capacitance and voltage >rating +10% |
Alarm sounds, BIBI, ringing per 0.5 second. Press SET dial to stop alarming.
Memory Function
The device is equipped with memory function for the panel setting. It will help remember the panel setting 3 seconds after you set it. When starting up the flash next time, the panel setting will be the same as that before powering it off.
Wireless Control Function
The flash unit has built-in 2.4G wireless transmission, which can be used together with X1 and XT16 flash trigger.
Synchronously press the
Setting the Communication Channel

1 Long press the
2 Turn the SET Dial to choose the channel from 1 to 32.

3 Press the
Setting the Communication Group

1 Short presa the
2 Turn the SET Dial to choose the group from 0 to E.

3 Press the
The flash unit is built in with a Wireless Control Port so that you can wirelessly adjust the power level of the flash and the flash triggering.
To control the flash wirelessly, you need a FT-16 remote control set (on-camera and on-flash). Insert its receive end into the Wireless Control Port on the flash and insert the transmit end into the camera hot shoe.
Settings made on the hotshoe-mounted transmit and receive ends will be wirelessly communicated to the flash. Then you can press the camera shutter release button to trigger the flash. You can also hold the transmit end at hand to control your off-camera flash.
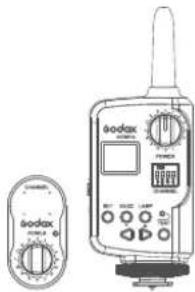
text_image
Technical line drawing of a Kodax digital device with control panel and display screen
For full instructions on the use of FT series remote control, see its user manual.
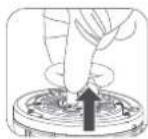
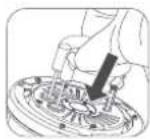
Tube Replacement
Shut down the power and remove the power cord before replacing the flash tube. Wear insulated gloves to loosen the iron wire on the tube, keep a balanced hold on the two feet of the flash tube and pull out the old tube gently. Take down the feet casing from the old tube and put it on the new one. Hold two feet of the new tube, and target directly towards the two copper outlets, then push them slightly in. Twine the iron wire on the stainless steel sheet to fix the flash tube.


Technical Data
| Model | SG400IV |
| Max Power (Ws) | 400Ws |
| Guide Number(m ISO 100) | 65 |
| Color Temperature | 5700±200K |
| Operating Voltage | AC220V-240V~50Hz |
| Power Output Control | 6.0~10.0(1/16~1/1) |
| Modeling Lamp (W) | 10W |
| Modeling Lamp Level | 5%~100% |
| Recycle Time | 0.1~1.5s |
| Triggering Method | Sync cord, Test button, Optical triggering, Wireless control port |
| Flash Duration | 1/2000~1/800s |
| Parameters output from the sync cord jack | 5V |
| Parameters output from the USB port | 5V/200mA (only for Godox receiver) |
| Fuse | AC220V-240V~50Hz: 5A |
| Dimension | Flash diameterΦ12.7cm,height of flash with handle 23.5cmlength of flash with lamp cover 39.4cm |
| Net Weight | Approx.2.2kg |
Maintenance
Shut down the device immediately when it works abnormally and find out the reason.
Avoid sudden impacts and the lamp should be dedusted regularly.
It is normal for the lamp to be warm when in use. Avoid continuous flashes if unnecessary.
Maintenance of the flash must be performed by our authorized maintenance department which can provide original accessories. The flash-tube and the modeling lamp are user-replaceable. Replacement tubes and lamps can be obtained from the manufacturer.
This product, except consumables e.g. flash tube and modeling lamp, is supported with a one-year warranty.
Unauthorized service will void the warranty.
If the product had failures or was wetted, do not use it until it is repaired by professional.
Disconnect the power when cleaning the flash or when changing the flashtube / modeling lamp.
Changes made to the specifications or designs may not be reflected in this manual.
Warranty
Dear customers, as this warranty card is an important certificate to apply for our maintenance service, please fill in the following form in coordination with the seller and safe-keep it. Thank you!
| Product Information | Model | Product Code Number |
| Customer Information | Name | Contact Number |
| Address | ||
| Seller Information | Name | |
| Contact Number | ||
| Address | ||
| Date of Sale | ||
| Note: | ||
Note: This form shall be sealed by the seller.
Applicable Products
The document applies to the products listed on the Product Maintenance Information (see below for further information). Other products or accessories (e.g. promotional items, giveaways and additional accessories attached, etc.) are not included in this warranty scope.
Warranty Period
The warranty period of products and accessories is implemented according to the relevant Product Maintenance Information. The warranty period is calculated from the day(purchase date) when the product is bought for the first time, And the purchase date is considered as the date registered on the warranty card when buying the product.
How to Get the Maintenance Service
If maintenance service is needed, you can directly contact the product distributor or authorized service institutions. You can also contact the Godox after-sale service call and we will offer you service. When applying for maintenance service, you should provide valid warranty card. If you cannot provide valid warranty card, we may offer you maintenance service once confirmed that the product or accessory is involved in the maintenance scope, but that shall not be considered as our obligation.
Inapplicable Cases
The guarantee and service offered by this document are not applicable in the following cases: ①. The product or accessory has expired its warranty period; ②. Breakage or damage caused by inappropriate usage, maintenance or preservation, such as improper packing, improper usage, improper plugging in/out external equipment, falling off or squeezing by external force, contacting or exposing to the improper temperature, solvent, acid, base, flooding and damp environments, etc; ③. Breakage or damage caused by non-authorized institution or staff in the process of installation, maintenance, alternation, addition and detachment; ④. The original identifying information of product or accessory is modified, alternated, or removed; ⑤. No valid warranty card; ⑥. Breakage or damage caused by using illegally authorized, nonstandard or non-public released software; ⑦. Breakage or damage caused by force majeure or accident; ⑧. Breakage or damage that could not be attributed to the product itself. Once met these situations above, you should seek solutions from the related responsible parties and Godox assumes no responsibility. The damage caused by parts, accessories and software that beyond the warranty period or scope is not included in our maintenance scope. The normal discoloration, abrasion and consumption are not the breakage within the maintenance scope.
Maintenance and Service Support Information
The warranty period and service types of products are implemented according to the following Product Maintenance Information:
| Product Type | Name | Maintenance Period(month) | Warranty Service Type |
| Parts | Circuit Board | 12 | Customer sends the product to designated site |
| Battery | 3 | Customer sends the product to designated site | |
| Electrical parts e.g.battery charger, power cord, sync cable, etc. | 12 | Customer sends the product to designated site | |
| Other Items | Flash tube, modeling lamp, lamp body, lamp cover, locking device, package, etc. | No | Without warranty |
Godox After-sale Service Call 0755-29609320-8062