JKC-R18U - Rice cooker Tiger - Free user manual and instructions
Find the device manual for free JKC-R18U Tiger in PDF.

| Product Type | Rice Cooker |
| Brand | Tiger |
| Model | JKC-R18U |
| Capacity | 1.8 L (10 cups uncooked rice) |
| Dimensions (Approx.) | 290 x 280 x 260 mm |
| Weight (Approx.) | 3.5 kg |
| Power Consumption | 750 W |
| Voltage / Frequency | 220-240 V, 50/60 Hz |
| Inner Pot Material | Non-stick coated aluminum |
| Main Functions | White rice, brown rice, sushi rice, porridge, soup, steam, quick cook |
| Timer | 24-hour preset timer |
| Keep Warm | Automatic keep warm up to 12 hours |
| Accessories Included | Measuring cup, rice paddle, steaming basket |
| Cleaning & Maintenance | Removable inner lid for easy cleaning; washable steam vent |
| Safety Features | Auto shut-off, overheat protection, steam release control |
| Spare Parts Availability | Inner pot, lid gasket, rice paddle, measuring cup |
| Country of Manufacture | Japan |
Frequently Asked Questions - JKC-R18U Tiger
User questions about JKC-R18U Tiger
0 question about this device. Answer the ones you know or ask your own.
Ask a new question about this device
Download the instructions for your Rice cooker in PDF format for free! Find your manual JKC-R18U - Tiger and take your electronic device back in hand. On this page are published all the documents necessary for the use of your device. JKC-R18U by Tiger.
USER MANUAL JKC-R18U Tiger
Declaration of Conformity
Model Number: JKC-R10U, JKC-R18U
Trade Name: TIGER
Responsible party: Japan Tiger Corporation of U.S.A
Address: 2730 Monterey Street Suite 105 Torrance, CA 90503
Telephone number: (310) 787-1985
The device complies with part 18 of the FCC Rules
PARTS & SERVICE SUPPORT
For United States
Japan Tiger Corporation of U.S.A.
2730 Monterey Street, Suite 105
Torrance, CA 90503
Toll Free Number: 1-866-55-TIGER (84437)
Phone Number: (310) 787-1985
Monday-Friday 9AM-6PM PST
EMAIL: info@japantigercorp.com
For All Other Countries
Please contact nearest Tiger Customer Service in your area,
or the dealer where original purchase was made.

TIGER
TIGER CORPORATION
TIGER CORPORATION
Head Office: 3-1 Hayamicho, Kadoma City, Osaka 571-8571. Japan
JKC-R10U
JKC-R18U
JKC-R10W
JKC-R18W

JKC-R

烧きて
For household use
IH Microcomputer controlled Rice Cooker/Warmer
USER MANUAL
Before using the Rice Conker, read all these instructions through to the end.
After reading these instructions, keep them in a hardy location for future reference.
家庭用
IH 炊飯電子鍋
使用說明書
When using electrical appliances, basic safety precautions should always be followed including the following:
- Read all instructions.
- Do not touch hot surfaces. Use handles or knobs.
- To protect against electrical shock, do not immerse cord or plugs in water or other liquid.
- Close supervision is necessary when any appliance is used by or near children
- Unplug from outlet when not in use and before cleaning. Allow to cool before putting on or taking off parts.
- Do not operate any appliance with a damaged cord or plug or after the appliance malfunctions or has been damaged in any manner. Return appliance to the nearest authorized service facility for examination, repair, or adjustment.
- The use of accessory attachments not recommended by the appliance manufacturer may cause injuries.
B. Do not use outdoors. - Do not let cord hang over edge of table or counter, or touch hot surfaces.
- Do not place the rice cooker on or near a hot gas or electric burner, or in a heated oven.
- Extreme caution must be used when moving an appliance containing hot oil or other hot liquids.
- Always attach plug to the rice cooker first, then plug cord into the wall outlet.
To disconnect, turn any control to "off", then remove plug from wall outlet. - Do not use the rice cooker for other than intended use.
SAVE THESE INSTRUCTIONS
Servicing should be performed by an authorized service representative. This rice cooker is intended for household use.
A short power supply cord is provided to reduce the risk of becoming entangled in or tripping over a longer cord. Longer detachable power supply cords or extension cords are available and may be used if care is exercised in their use. If longer detachable power supply cords or extension cords are to be used: (1) the marked electrical rating of the extension cord should be at least as great as the electrical rating of the appliance; (2) if the appliance is of the grounded type, the extension cord should be a grounding-type 3-wire cord; and (3) the cord should be arranged so that it will not grape over the countertop or tabletop where it can be pulled down by children or tripped over accidentally.
The following instructions are applicable to 120V only:
This appliance has a polarized plug (one blade is wider than the other). To reduce the risk of electrical shock, this plug is intended to fit into a polarized outlet in only one way. If the plug does not fit fully into the outlet, reverse the plug. If it still does not fit, contact a qualified electrician. Do not attempt to defeat this safety feature.
The appliance is not intended for use by young children or disabled persons without supervision. Ensure that young children do not play with the rice cooker.
English
Contents
1 SAFETY INSTRUCTIONS 3
2 NAMES AND FUNCTIONS OF COMPONENT PARTS ..... 6
Tips for cooking 7
3 BEFORE COOKING RICE 8
4 HOW TO COOK RICE 9
5 SETTING THE TIMER 11
6 SETTING THE SOAK TIMER 13
7 WHEN RICE IS COOKED 15
8 KEEPING THE RICE WARM 16
9 REHEATING 17
10 IF RICE DOES NOT COOK PROPERLY 18
11 SLOW COOKING 19
12 BAKING BREAD 21
13 IF FOODS OR BREADS DO NOT COOK PROPERLY ..... 26
14 CLEANING AND MAINTENANCE 27
15 TROUBLESHOOTING 30
If these indications appear....31
Menu Guide 32
Setting current time 36
Specifications 37
In case of power failure 37
Wear and tear 37

SAFETY INSTRUCTIONS
Read all warnings and instructions before using the rice cooker.
- Observe the following safety instructions in order to prevent injury.
- Do not remove the caution label from the product.
- Keep this manual for further reference.
This manual uses the following two symbols to indicate the degree of damage and/or harm caused by misuse of the rice cooker

WARNING
Indicates the risk of death or serious injury if the instructions are ignored or if the product is used Improperly.

CAUTION
Indicates the risk of slight injury or physical damage if the instructions are ignored or if the product is used improperly.


(Never disassemble)
This symbol indicates a mandatory action or instruction.

(Mandatory action or instruction)

(Unplugging)

WARNING

Use the product at local voltage only. Using the product at another voltage may result in fire or electrical shock.

Use an AC outlet of 15 A or higher exclusively for the product. Connecting other appliances to the same AC outlet may cause the socket to overheat, resulting in fire.

Do not damage the power cord. Do not use a damaged power cord. Do not modify, bend, pull, twist or bundle the cord. Do not expose it to heat. Do not rest anything heavy on the power cord. Do not clip it onto anything. Noncompliance with these instructions may result in fire or electrical shock.

Clean the plug if it is dirty. A dirty plug may cause a fire.

Connect the plug so that the prongs are fully inserted into the outlet. Noncompliance with these instructions may result in electrical shock, short-circuiting, smoke, or fire.

Do not use the cooker if there is any damage to the power cord or the wall outlet, or if the plug cannot be fully inserted into the outlet. Noncompliance with this instruction may result in electrical shock, short-circuiting, or fire.

Do not connect or disconnect the plug with wet hands. Handling the AC power cord with wet hands may result in electrical shock or injury.

Never open the lid while cooking rice.* Opening the lid may result in burns.

Do not place your face and hands near the steam vent. Touching the steam vent may result in burns. Keep out of reach of children and infants.

Do not allow children alone to use the rice cooker. Keep it out of reach of infants. Noncompliance with this instruction may result in burns, electrical shock, or injury.
"cooking rice" includes cooking foods, loavesing bread, and baking bread

WARNING

Do not immerse the rice cooker in water or splash it with water. Immersing or splashing may result in short-circuiting or electrical shock.

Do not modify the rice cooker. Disassembly or repairs should only be performed by qualified service representatives. Noncompliance with this instruction may result in fire, electrical shock, or injury.

Do not insert pins, needles, or other metal objects into the air intake, steam vent, or gaps between parts. Inserting such objects may result in electric shock or injury due to malfunction.


CAUTION

Do not use the rice cooker on an unstable surface or on a carpet easily affected by heat. Doing so may result in a fire.

Do not use the rice cooker near walls or furniture. Steam or heat will cause damage, discoloration and/or deformation. Use the rice cooker at least 11.81 inch/30 cm or more away from walls or furniture. Be careful to not allow the countertop to become steamy when using the rice cooker on a kitchen counter.

Do not use the rice cooker near a heat source or where it may be splashed with water. Heat or water may cause short-circuiting, leakage, deformation of the rice cooker, fire, or malfunction.

Use the inner pan made exclusively for this rice cooker. Using any other inner pans may result in overheating or malfunction.

Do not touch hot parts while or immediately after cooking rice. Touching hot parts may result in burns.

Unplug the AC cord when the rice cooker is not in use. Leaving the AC cord plugged in may degrade insulation, resulting in injury, burns, electrical shock, leakage, or fire.

Be sure to hold the plug when disconnecting the AC cord from the AC outlet.
Noncompliance with this instruction may result in electrical shock or short-circuiting, resulting in fire.


Persons with pacemakers should consult with a physician about any adverse affects on their pacemaker that may result from using this rice cooker. When operated, this rice cooker may affect pacemakers.

SAFETY INSTRUCTIONS

CAUTION

Handle the rice cooker only after it has cooled down.
Touching a hot part may result in bums.

Do not touch the hook button when carrying the rice cooker.
Touching the hook key may cause the lid to open, resulting in injury or burns.
NOTICE
- Handle with care.
Dropping the rice cooker or applying a strong shock may cause injury to self or malfunction of the rice cooker. - Be careful of the escaping steam when opening the lid.
Exposure to steam may result in burns. - Do not plug in several electrical appliances to a single AC outlet. Doing so may result in fire.
- Do not move the rice cooker while cooking rice*.
Doing so may cause scald or hot water may boll over. -
Do not wash the entire rice cooker.
Do not wash the entire rice cooker or pour water into the cooker or its bottom. Doing so may result in short-circuiting or electrical shock. -
Do not use this rice cooker where the air intake or steam vent is blocked or where the surrounding temperature is high.
Do not place the rice cooker on carpets, plastic bags, etc. This can result in electrical shock, current leaks, or fire. - Magnetic waves are emitted from the rice cooker, therefore keep anything that is susceptible to magnetism away from the rice cooker.
Interference may occur with TVs, radios, and other electronic equipment.
Information on credit cards, video tapes, and the like may be lost or damaged. - When using the rice cooker, do not touch the heating coil.
Wear oven mitts or otherwise protect hands against heat when handling the inner pan handle.
Do not handle with
bare hands.
Touching hot parts
may result in burns
Heating
cell
Inner pan

handle
Be sure to observe the following instructions when using the rice cooker.
- Remove burned rice and grains of rice. If rice is burned or grains of rice are left in the pen, steam may leak or hot water may boil over, resulting in malfunction or failure to cook rice properly.
- Do not cover the rice cooker with a towel while cooking rice ^4 . Otherwise, the rice cooker body or lid may deform or discolor.
- The hole on the cooker is designed to maintain its functions and performance. In very rare cases, dust or insects may enter the hole. If there is a problem with the appearance or function, contact the store where the rice cooker was purchased.
-
If the inner pan is deformed or corroded, contact the store where the rice cooker was purchased.
-
Strictly observe the following instructions to avoid blistering or removing the fluorocarbon resin from the surface of the inner pan.
- Do not put the inner pan over a gas fire or an electromagnetic cooker. Do not heat it in a microwave oven.
- Use the heat-retention function only for polished rice and rinse-free rice.
• Do not use vinegar on the inner pan.
• Use the supplied spatula or wooden spatulas only. - Do not use hard utensils such as metal ladies, spoons, or whisks.
- Do not place a basket in the inner pen.
- Do not place tableware and other hard utensils in the inner pan.
- Do not clean the rice cooker with hard materials such as metal spatulas or nylon brushes.
5
"Cooking tea" includes cooking foods, cooking bread, and baking bread


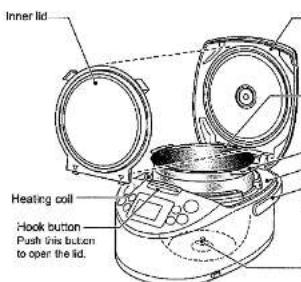
NAMES AND FUNCTIONS OF COMPONENT PARTS
text_image
Inner lid Heating coil Hook button Push glass button to open the lid.-Inner pan
Rice can be rinse
in the next post.
Inner pan handle
Upper casing
Carrying handle
Use this handle to carry the rice cooker.

Operation Panel *Press the operating key until a clicking sound is heard.

text_image
Keep warm lamp (Keep Warm/Temp sell key) Monu key Cancel key Okgo key Display unit The reliefs on the Start/Rinse-free / Cancel keys ( @ https) are for persons with visual impairments. Start lamp Start/Rinse-free key Timer lamp Timer key Hour Min keysChecking Accessories
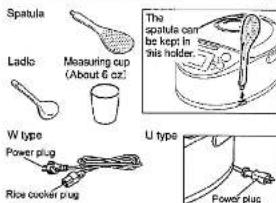
text_image
Spatula Ladic Measuring cup (About 6 oz.) The spatula can be kept in this holder. W type Power plug Rice cooker plug U type Power plugSounds emitted by the rice cooker
Sounds emitted by the rice cooker while cooking, keeping warm, or reheating rice do not indicate that something is wrong.
• Humming (Sound of the fan rotating)
- Buzzing or twittering (Sound of IH operation)
Checking Time
The time is displayed in the 24-hour format. It has been properly adjusted before shipment. If it is incorrect, adjust the current time. (See page 36.)
Lithium battery
The rice cooker has a built-in lithium battery and stores the current time and preset time even after the AG power cord is unplugged.
- The lithium battery has a four-to-five-year life expectancy, provided that the power cord is unplugged.
- When the lithium battery runs out, 10:00J binks on the display unit when the power cord is plugged in. It is ready for normal rice cooking but the memory for current time and elapsed warming time is not displayed when the power cord is unplugged.
NOTE
Do not replace lithium batteries yourself. Doing so may cause damage to the rice cooker or an accident.
To replace the batteries, contact the store where the rice cooker was purchased.
"cooking rice" includes cooking foods, leavening bread, and baking bread
6
Tips for cooking

For preparation, refer to page 8. For cooking procedures, refer to page 9-14.
Choose high quality rice and store it in a cool place.
Choose freshly polished, glossy rice of the same grain size. Store it in a cool, dark, well-ventilated place.

Carefully measure rice with the supplied cup.
(A cup equals approximately 6 oz.) Use the supplied cup for Rinse-free rice as well. A special cup is not needed for this type of rice as the cooker will accommodate rinse-free rice.

Quickly rinse the rice
Use a generous amount of water, then pour out the water. Repeat this process until the water runs dear.

To cook lightly polished rice, Haiga/rice with embryo buds, or barley and rice, select the "Plain rice" program.
To cook rinse-free rice
- Add the rinse-free rice and water to the inner pan, then thoroughly stir the rice from the bottom so that all grains are immersed in water. (Simply pouring water on top of the rice from above does not submerge all of the rice and can prevent the rice from cooking properly.)
- if the water clouds up when added to the rice, it is recommended to rinse the rice 1 or 2 times. (The clouding is caused by the starch, not the bran. Rice that cooks in cloudy water can burn or not cook properly, and the water can boil over.)

Adjust the
volume of water according to the type of rice and personal preferences.

●Guidelines for fine adjustment of water
| Menu | Deadline letter (see the box in line for home run) |
| Plain rice | Use the soars for 'Box feed' and adjust according to personal preference. |
| Urine | Use the soil feed [Urine] and will apply according to personal preference. |
| Quick | Use the soil for [Urine] and adjust according to personal preference. |
| Mixed Rice | Use the soil for [Urine] and adjust according to personal preference. |
| Sweet rice (Roasted rice and plant-based rice) | Adjust to the middle of [Plain rice] and [Brook rice] (Use more wheat for [Brook rice]). |
| Sweet rice (Rutiful rice) | Use the soil for [Brook rice] and adjust according to personal preference. |
| Plantage | Use the soil for 'Brook soil' and 'Pinegris land' to use and fold some, add to soil for the house to be used up. |
| Brown rice | Use the soil for [Brook rice]. |
| Grain-fed brown rice | Use the soil for [Main rice] and adjust according to personal preference. |
- Water levels in the above table are the same for rinse-free rice.
- When adding or removing water based on the water level marks, do not charge the water level by more than 1/3 of a mark.
- For rice with embryo buds or barley and rice, add slightly more water than the "Plain rice" water level mark.
Adding vegetables or meat
Add a maximum of 2.5 ounces of vegetables or meat to a cup of rice. Fully stir the water with the added seasonings and place the vegetables or meat on the rice. If cooking rice with other ingredients, observe the rice levels in the following table.

| Menu | 1.0 L type | 1.8 L type |
| Mixed rice | 4 cup (0.72 L) or less | 7 cup (1.26 L) or less |
| Shawed rice | 3 cup (0.54 L) or less | 6 cup (1.08 L) or less |
| Pomegranate | 1 cup (0.13 L) or less | 2 cup (0.36 L) or less |
| Brown rice | 3 cup (0.54 L) or less | 6 cup (0.9 L) or less |
Cooking Sweet rice
Rinse the rice and soak it in water for at least 30 minutes. Level off the surface of the rice and be sure it is fully covered by water. The cooked rice will be hard if the soaking time is short, while soft if the soaking time is long.

7

Before Cooking Rice


Measure rice and put it into the inner pan.
Use the measuring cup supplied with the rice cooker. (One level cup of rice is about 6 oz.)

Use the supplied cup for rinse-free rice as well.
<Ca


NOTE
Follow the specified volume of rice (see the specifications on page 37) or the rice may not cook properly. In particular, failure to observe the maximum volume may cause the rice to boil over or to cook improperly. (A cup equals approximately 0.18 liters.) See the specification on Page 7 when you cook "Mixed rice".

Rinse rice by hand.
(Rice can be rinsed in the inner pan.) •Rinsa-free rice does not need rinsing. (See p.

NOTE
Rinse rice well. Do not use hot water (over 95°F/35°C) to rinse rice.

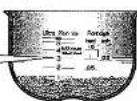
Place the inner pan on a level surface and adjust the water level to the scale on the inside of the inner pan.

Check the type of rice and the menu. Adjust the water volume according to personal preference. (See the guidelines on page 7.)


Wipe off water drops, rice grains, etc. from the outer surface and brim of the inner pan.
Heating coil Center sensor Rubber gasket Inner lid Upper casing Stock button
NOTE
Remove any adhering rice or other material from the upper casing, heating coil, and around the hook sutter. Achering material can prevent the casing from closing and cause it to open while the rice is cocking.

Place the inner pan in the rice cooker.
② Close the

Inner pan handle
NOTE
Check that the inner gasket is not out of place. A displaced gasket is a primary reason for rice not cooking property. If the gasket is out of place, put it ring detach, then reattach the parts


Plug the AC power cord to the AC outlet
• In addition, insert the rice cooker plug into the rice cooker receptacle (only in W type).
U type
Blinks


NOTE
(Sound)
If the Keep warm lamp is on, press the (Cancel) key, and the lamp will shut off.
If the StartFinsp-fms key or
Keep WarmTemp set]key is pressed
without setting the inner par, an alarm sounds.
8

HOW TO COOK RICE

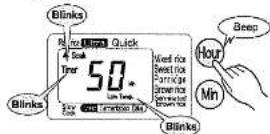
Press the Menu key to select a menu.
Every press of the Menu key changes the menu in the order shown below.


For crispy aromatic rice (Okoge), press the Okoge key.
This key can only be used with the "Plain rice", "Vixed rice" menus.

text_image
Blinks Blinks Quick 9:35 Read for Blinks Brep Quick Blink Blink Blink Blink Blink Blink Blink Blink Blink Blink Blink Blink Blink Blink Blink Blink Blink Blink Blink Blink Blink Blink Blink Blink Blink Blink Blink Blink Blink Blink Blink Blink Blink Blink• To cancel "Okoge", press the Okoge key again
- In the scorched rice cooking mode, the cooked rice becomes scorched to a brown color, offering a savory, spicy taste.
- With some types of rice grains, achieving scorched rice may be difficult.
- To enjoy the aroma of the "Okoge", promptly serve the rice after cooking.

The "Okoge" can be hard, be careful when chewing so as to not hurt your teeth.

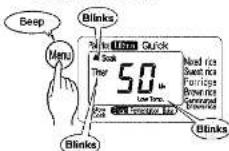
Press the
|Keep Warm/Temp.set| key to select warming.
This key can only be used with the "Plain rice", "Ultra" or "Quick" menus.
Every time the key is pressed, the warming mode changes.

*For the warning mode, see p. 16.

If the Keep WarmTemp SE key is pressed and held for 1 second or more, the Keep warm lamp lights up and the rice cooker charges to the warming mode. To continue making selections, press the Cancel key.

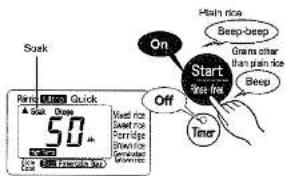
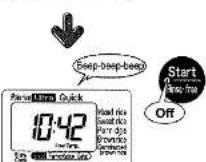
press the Start/Rinse-free
(Press the key twice to cook Rinse-free rice. This key cannot only be used with the "Sweet rice", "Brown rice", "Germinated brown rice" menus.)
The rice starts cooking.

text_image
On Start Rinse-free Plain rice Beep-beep Grains other than plain rice Beep Rinse-free Quick 0:35 Now not Keep rice Prepare Stronger Sensory rice Rinse-free- To cancel "Rinse-free", press the Start/Rinse-free key once, then again within 20 sec.

STANDARD COOKING TIMES
| Size\Menu | Plain rice | Ultra | Quick | Mixed rice |
| 1.0L type | 46 - 26 minutes | 85 - 75 minutes | 17 - 37 minutes | 42 - 57 minutes |
| 1.9L type | 46 - 28 minutes | 67 - 77 minutes | 19 - 44 minutes | 42 - 57 minutes |
| Menu | ||||
| Size | Sweet rice | Pondige | Brown rice | Geminated brown rice |
| 1.0L type | 21 - 31 minutes | 57 - 62 minutes | 58 - 88 min./tea | 45 - 60 minutes |
| 1.8L type | 23 - 33 minutes | 59 - 65 minutes | 01 - 71 minutes | 47 - 62 minutes |
• The above indicates the time from pressing the 'Start' button to the end of steaming after cocking (at a voltage of W type: 220V / U type: 120V, at a room water temperature of 68°F/20°C centigrade, and at standard water level)
- When set for Rinse-free rice, cooking takes from 1 to 5 minutes longer than menu times.
- When set to "Okoge", cooking "Plain rice" menu items takes from 1 to 5 minutes longer than above times, but the "Mixed rice" menu items vary little.
* The cooking time varies according to the volume and type of rice, volume and type of vegetable, meat, room temperature, water temperature, volume of water, voltage, and whether the timer is used. There is a minimum cooking amount for the each menu (see the specifications on page 3/).


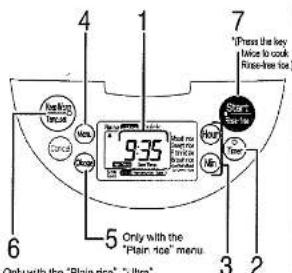
5 SETTING THE TIMER
text_image
4 1 7 'Thras the key Mize to cook Rise-free rice' 9:35 5 Only with the "Plain rice" menu 6 3 2 Only with the "Plain rice" - "litre"Only with the "Plain rice", "Ultra", and "Quick" menus.

About the "TIMER 1" and "TIMER 2" settings.
The time may be preset to finish cooking.
- The time can be preset to "TIMER 1" and "TIMER 2".
• Both preset times can be stored, - The rice cooker stores the preset time even if the AC power cord is unplugged.
For example: When "TIMER 1" is preset at 13:30 (1:30 PM), cooking will be finished at 13:30.
1 Check the current time.
*See page 36 for setting the current time.

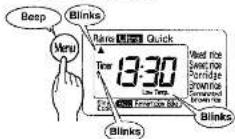
2 Press the Timer key to select either "Timer 1" or "Timer 2".
Each time the key is pressed, the selection changes in this order: "Timer 1" → "Timer 2" → "Soak".
*For the soak timer, see p. 13.

NOTE
- Timer-controlled cooking does not apply to the following cases:
• Time other than the below-shown time
| Menu | Non-presetable time |
| Plain rice | Less than 1 hour and 6 minutes |
| Plain rice (Ocage) | Less than 1 hour and 10 minutes |
| Ultra | Less than 1 hour and 30 minutes |
| Quick | Less than 40 minutes |
| Pomidge | Less than 1 hour and 15 minutes |
| Brown rice | Less than 1 hour and 20 minutes |
| Carminated brown rice | Less than 1 hour and 10 minutes |
• "Mixed rice" and "Sweet rice", "Slow cook", "Bread".
- When "0:00" is blinking on the display unit
• If the inner pan has not been set in the ice cooker.
- Press the (Canal) key. If the Keep warm lamp is lit, press the (Cancel) key first. The cooking timer cannot be used when the Keep warm lamp is lit.
((Sound))
- If the rice cooker is not operated within about 30 seconds of pressing the timer key, a beeping sound is omitted to notify the user.
- If the timer or Start/Rise-tree key is pressed when the rice cooker is at a setting where the timer cannot be used for cocking, a beeping sound is emitted to notify the user.

3 Press the Hour and Min keys to set the time to finish cooking.

- Each press on the Hour key changes hourly, whereas each Min key changes in 10-minute intervals.
- Holding down the Hour or Min keys changes hours or minutes rapidly.
NOTE Do not set the preset time in excess of 12 hours. Preset times that are too long may result in spoiled rice.
4 Press the Menu key to select a menu.
5 To burn rice to an aromatic crisp (Okoge), press the Okoge key.
This key can only be used with the "Plain rice" menu.

6 Press the Keep Warm/Temp.set key to select warming.
This key can only be used with the "Plain rice", "Ultra", and "Quick" menus.
Each time the key is pressed, the warming mode changes.
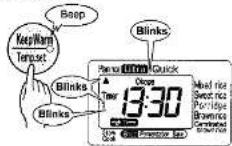
* For the warming mode, see p.16.
7 Press the Start/Rinse-free key once.
(Press the key twice to cook rinse-free rice.)
This key can only be used with the "Plain rice", "Ullie", "Ourk", and "Porridge" means.
This completes timer setting.

text_image
Beep-beep Grains other than skin not Beep On Start Keep free Timer Take 13:30 Time 1:00 For 2450 times faster (in)
SETTING THE SOAK TIMER
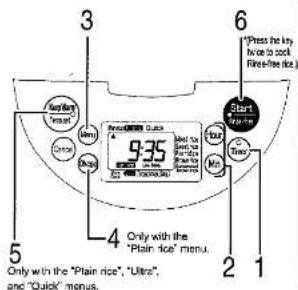
text_image
Press the key twice to cook Rine-free (ic) 9:35 Start Enter Buy Stop Time Main Only with the "Plain rice" menu. Only with the "Plain rice", "Ultra", and "Quick" menus.
About the soak timer.
The soak timer sets how long the rice soaks in the water before cooking starts. This allows for natural absorption.
- After the inner pan has been set in the rice cooker, select "Soak" and set the soak time. Cooking starts when the sat time elapses.
- Soak time can be set in 10-minute intervals from 10 to 60 min.
For example: If a soak time of 50 minutes is set, cooking starts when 50 minutes has elapsed.
1 Press the Timer key to select "Soak".
Each time the key is pressed, the selection changes in this order: "Timer 1" → "Timer 2" → "Soak".
* For more on "Timer 1" and "Timer 2", see p. 11

text_image
Blinks Press LPS Quick 30 min Blinks Blink Blink Blink Blink Blink Blink Blink Blink Blink Blink Blink Blink Blink Blink Blink Blink Blink Blink Blink Blink Blink Blink Blink Blink Blink Blink Blink Blink Blink Blink Blink Blink Blink BlinkNOTE
- The soak timer cannot be used in the following situations:
- "Mixed rice", "Sweet rice", "Slow Cook", and "Breed"
- When '0:00' is blinking on the display unit
- If the inner pan has not been set in the rice cocker
- Press the Timer key. If the Keep warm lamp is lit, press the Cancel key first. The soak timer cannot be used when the Keep warm lamp is lit.
((Sound)
- If the nice cooker is not operated within about: 30 seconds of pressing the time key, a beeping sound is emitted to notify the user.
- If the timer or StartRise-free key is pressed when the rice cooker is at a setting where the timer cannot be used for cooking, a beeping sound is emitted to notify the user.
2 Press the Hour and Min keys to set the amount of time to soak the rice in the water.
- Soak time can be set in 10-minute intervals from 10 to 60 min.
• Each time the Hour key is pressed, the soak time increases by 10 minutes. Each time the Min key is pressed, the soak time decreases by 10 minutes.
3 Press the Menu key to select a menu.
4 For crispy aromatic rice (Okoge), press the Okoge key.
This key can only be used with the "Plain rice" menu.


5 Press the Keep Warm/Temp.set key to select warming. This key can only be used with the "Plain rice", "Ultra" and "Quick" menus.
Each time the key is pressed, the warming mode changes.

* For the warning mode, see p. 16.
6 Press the Start/Rinse-free key once. (Press the key twice to cook rinse-free rice.) This key can only be used with the "Plain rice", "Ultra", "Quick", and "Porridge" menus.
This completes soak timer setting.
text_image
Sask Rimic Quick 50% Up Down 50% Up Down High rice Beep-beep Gram other than pain rice Start Free rice Beep Off Timer


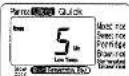
7 WHEN RICE IS COOKED
1 Steaming cooked rice
The time remaining before completion of steaming is displayed in 1-minute intervals on the display unit.
• The steaming time differs with the menus,

2 When cooking is completed
The cooker automatically switches to the keep-warm function when rice is cooked.
"High Temp." warning

"Low Temp." warning

- When "Mixed rice", "Sweet rice", "Porridge", "Brown rice", or "Geminated brown rice" is selected, current time is shown on the display unit.
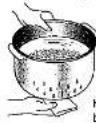
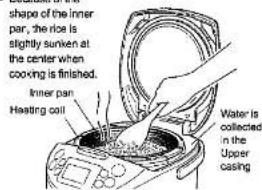
3 Stir and loosen the cooked rice.
When cooking is completed, be sure to stir and loosen the rice immediately.
- Because of the
text_image
shape of the inner pan, the rice is slightly sunken at the center when cooking is finished. Inner pan Heating coil Water is collected in the Upper casingNOTE
If hot water drops into the groove or on the outer surface of the cooker when opening the lid immediately after cooking or while warming, wipe it off.
After Using Cooker/Warmer
1 Press the Cancel key.

2 Unplug the power cord.
- In addition, pull the rice cooker plug out from the rice cooker receptacle (only in W type)
3 Clean the cooker. (See p. 27-29)
Q KEEPING THE RICE WARM
Keep Warm is up to 12 hours only. (only "High Temp." warming)
Keep the taste and gloss of plain rice (and Rinse-free rice). When cooking is completed, the rice cooker automatically begins to keep cooked rice warm. It does not keep Porridge warm.
The Keep warm lamp blinks while keeping the rice warm. (For how to select the keeping rice warm, see p. 9,12,14).
Selecting "High Temp." warming
"High Temp." warning
(Approximately 158°F/70°C—172°F/78°C)*
This "High Temp." warming mode maintains the same hot temperature for 3 hours as when the rice has immediately cooked. It is especially useful when planning to serve all, shortly after the rice is done.
After the 3 hours has elapsed, the temperature lowers slightly and the rice is kept at that new temperature.
■When cooking finishes
"Oh" appears on the display. While the rice cooker is keeping the rice warm, the Keep warm lamp stays lit.
■Display of elapsed time when keeping rice warm When the Hour key is pressed and held under Keep Warm mode, the elapsed Keep warm time will be displayed. The elapsed keep warm time changes in hour units, and the illuminated time is shown up to 12 hours(12h). When the Keep Warm time exceeds 12 hours, the display will blink.

Selecting "Low Temp." warming
"Low Tempo." warning
(Aproximately 158°F/70°C—165°F/74°C)*
The rice is kept at a temperature slightly lower than normal serving temperature. This prevents the rice from yellowing or drying out, keeping plain (rins-free) rice moist and tasty. This mode is useful for keeping rice worm for a long period of time such as when cooking rice in the evening and eating it the next morning.
■When cooking is finished
Current time appears on the display. While the rice cooker is keeping the rice warm, the Keep warm lamp stays lit.
■Display of elapsed time when keeping rice warm The time steaming cooked rice is displayed in 1-hour intervals on the display unit. When the "Hot" key is pressed under the Keep Warm mode, the elapsed Keep Warm time is displayed when the key is pressed and held. The elapsed Keep Warm time changes in hour units and the illuminated time display is displayed up to 24 hours (24 h). When the time exceeds 24 hours, the "24" blinks.
How to stop keeping warm
Press the Cancel key to stop keeping warm. The Keep warm lamp turns off.
How to Keep Small Quantity of Slice Mears
Press the (Keep warm/Temp set) key to restart keeping warm. The Keep warm lamp turns cn.


How to Keep Small Quantity of Rice Warm
Gather the rice to the center of the inner pan when keeping errall quantity of rice warm. Serve as soon as possible.

NOTE
■ Lifting the inner pan while warming cancels the warming function.
- Avoid the following, which may cause unusual odors, dryness, discoloration, decomposition of rice and corrosion of the inner pot:
- Warming cold rice
- Adding cold rice to rice that is warming - Placing a Spaluta in the loner pan while warming
- Warning when the power cord is unplanned
• "High Temp." warming for more than 12 hours
- 'Low Temp.' Warming for more than 24 hours - Minimum amounts of rice heat can be kept within, 5.5 -cup rice cooker is 1 cup, 10 -cup rice cooker is 2 cups. - Warning types of rice other than plain and rinse-free rice
- Always makes sure to remove adhering roes. (Top of Inner pan, gaskets, radiation board ring) It may cause dryness, discoloration, odors, and sticking.
- When making "Porridge", press the Cancel key and remove the rice from the inner pan as soon as it is done. If left in the inner pan, the rice becomes pasty and condensation adhering to the inner lid can drip into the rice making it sticky. Therefore eat the rice soon after it is finished cooking.
- If the environment is harsh (cold climate or high ambient temperature), eat the rice as soon as possible.
* a: a voltage of W type:220V/U type:120V, at room temperature of 68°F/20°C, and when the volume of rice in is at the maximum.

REHEATING
When reheating rice that is kept warm, the rice temperature becomes hot as just cooked.
NOTE
- When more than half of the inner pan is filled with rice, there is too much rice and it cannot be sufficiently reheated.
- Rice reheated in any of the following conditions becomes dry:
- Rice that has just been cooked and is hot
- The rice quantity is less than the lower limit (1.0 L type
rice cooker: 0.18 L, 1.8 L type rice cooker: 0.36 L) Rice that is reheated three or more times in a row
1 Stir and loosen the rice that is kept warm.
2 Sprinkle one or two large spoons of water evenly on the rice.

Sprinkling water prevents the rice from getting dry and makes it soft.
3 Make sure that the Keep warm lamp is on.

- Rice cannot reheat unless the Keep warm lamp is on. If the Keep warm lamp is off, press and hold the (Keep WarmTemp.set) key for about 1 second. (See p. 16)

text_image
4 Press the Start/Rinse-free key. Heap Off Start Rise free Peri-Start Quick 10:35 Live Temp. Start/Reuse FreeThe remaining reheal time is displayed when it reaches 5 minutes.
• To cancel reheating, press the Cancel key.
(Sound)
When rice is cold (below about 131°F/55°C), IT CANNOT BE REHEATED. In such a case, the rice cooker generates a "beep-beep-beep" alarm, indicating that the rice cannot be reheated.
5 Stir and loosen reheated rice evenly.

17
10 IF RICE DOES NOT COOK PROPERLY
Troubleshooting
| Sample | Check point | Quantity of rice, ingredients, or water is not correct. | Wrong menu is selected. | Burns, rice grains, or water drops are or slice of inner pan, heater plate, or center service. | Inner pan is deformed. |
| Cooked rice | Ice hard | ● | ● | ● | ● |
| Ice soft | ● | ● | ● | ● | |
| Not cooked completely | ● | ● | ● | ● | |
| Ice hard corner | ● | ● | ● | ● | |
| Burned | ● | ● | ● | ● | |
| Burning rice | Steam risks | ● | ● | ● | |
| Boils over | ● | ● | ● | ||
| Cooking time is too long | ● | ● | ● | ● | |
| Refer to page | 7-8-27 | 5-14 | 8-27-29 | — |
| Symptom | Check point | Power was cut off for an extended period. | Rice was not aimed and loosened properly. | Burned rice or uncooked rice is shock to the rubber packet edge of the liner can, heating can, etc. |
| Cooked rice | Too hard | ● | ● | |
| Too soft | ● | ● | ||
| During cooking time | Steep bales | ● | ||
| Etsis ever | ● | |||
| Cooking time is too long | ● | ● | ||
| Refer to page | 37 | 15 | 8 · 27 ~ 29 |
| Symptom | Check pain | Rice was not rinsed thoroughly, (excluding Rinse-free rice) | Rice water (gas 80/120°C) was used in rice rice for adjust water level | Rice was soaked in water for a long time after rinsing. | The Id is not slightly closed. | Choose the burned rice cooking mode. | Insufficient care. |
| Cooked rice | Too hard | ● | ● | ||||
| Too soft | ● | ● | |||||
| Not cooked completely | ● | ||||||
| Has hard center | ● | ● | |||||
| Burned | ● | ● | ● | ● | ● | ||
| Grades like rice bran | ● | ||||||
| Dining cooking | Stream leak | ● | ● | ||||
| Built over | ● | ● | |||||
| Refer to page | 7·8 | 7·8 | - | 8·27~29 | 9·12~14 | 27~29 |
| Symptom | Check point | Quantity of rice, ingredients, or water is not correct. | Burns, nooks, or water drops are on sides of tree pas, heater parts, or center part for | Heaver was cut off for an extended period. | Rice was not dried and boomed properly. | Burn or nice grains are on packing or inner pain from. | Rice was not dried (throughly including branches) |
| Milk | Smilk | ● | ● | ● | ● | ● | |
| Discoorced | ● | ● | ● | ● | |||
| Dry | ● | ● | ● | ● | |||
| Reheated rice is dry | ● | ● | |||||
| Refer to page | 7-10-37 | 8-27~29 | 37 | 15 | 8-27~29 | 7-10 | |
| Symptom | Check point | Rice was repeated 3 or more times. | Pretest time exceeds 12 hours. | "High Temp." warning for more than 12 hours. | "Low Temp." warning for more than 24 hours. | Rice other than polished rice is kept warm. | Rice less than lower limit is kept warm or repressed. |
| Munking | Smills | ● | ● | ● | ● | ● | |
| Fingerboard | ● | ● | ● | ● | ● | ||
| Dry | ● | ● | ● | ● | ● | ||
| Repeated rice is cry | ● | ● | |||||
| Refer to page | 17 | 11-12 | 18 | 16 | 15 | 16-17 | |
| Symptom | Check point | Small quantity of rice was boiled out from the center and kept warm. | Cold rice was added. | Rice is kept warm with spatuate inside. | Insufficient care | Just-packed hot rice was reheated. | Unimaging food stores after cooking or leaving bread were not nutritional. |
| Non-fera | Smells | ● | ● | ● | |||
| Disinjured | ● | ● | ● | ||||
| Dry | ● | ● | ● | ||||
| Renested rice is cry | ● | ||||||
| Refer to page | 16 | 16 | 16 | 27 ~ 29 | 17 | 25 - 29 | |
18

text_image
11 SLOW COOKINGThe food is first brought to a near boil, then it is lowered to about 190°F/93°C and left to simmer. The temperature is then lowered even further to about 190°F/88°C and simmering continues. By gradually lowering the heating temperature, the favors are enhanced. Even after heating for a long period of time, there is no worry about liquids boiling down.
This process is ideal for slowly simmering large quantities of food for long periods of time such as stews.
Menu example
Beef Stew with Vegetables, Oden (Hodgepodge)

For "Beef Stew with Vegetables" or "Ordan" recipes, see p. 34 of the Menu Guide.
NOTE
- Foods other than those described in the Menu Guide may bolt over, therefore use with caution.
- Stir foods well to prevent seasonings from selling at the bottom of the inner pan.
• To simmer foods in broth, cool the broth before starting the cooking process.
• To thicken with starch, add the starch at the very end of the cooking process. - Kneaded foods such as fish sausage and fish paste swell when heated, therefore be careful how much is used.

sic cooking procedure
1 Prepare the ingredients.
2 Add ingredients to the inner pan and cover with the lid.
NOTE
Use the "Plain rice" level marks on the inside of the inner pan as a reference. Using more than the maximum allowed amount (see the table below) can prevent proper boiling or cause foods to boil over. Also, using less than the minimum required amount can cause foods to boil over.
| Plain rice' level marks | |||
| 4.0 L type | 1.8 L type | ||
| Max. | Min. | Max. | Min. |
| 5.5 or less | 3 or more | 8 or less | 4 or more |
3 Plug the cord into an electrical outlet
4 Press the Menu key to select "Slow Cook".
5 Set the cooking time.
Set the cooking time using the Hour and Min keys.
Cooking time can be set in 5-minute intervals from 5 to 180 minutes.
- Each time the Hnr key is pressed, the cooking time increases by 5 minutes. Each time the Mn key is pressed, the cooking time decreases by 5 minutes.

6 Press the Start/Rinse-free key once.
The food starts cooking.

NOTE Do not open the lid while the food is still cooking.
7 Once ready
The Keep warm lamp lights up and "Oh" appears on the display.

- If the food is still not cooked and the Keep warm lamp is lit, press the (Hour) key, set the additional cooking time and press the (StarRise-free) key. (A maximum of 30 minutes extra cooking time can be added.)
IMPORTANT NOTE
If the food is still not cooked, do not press the Cancel key to add more cooking time. The Keep warm lamp goes out and the food cannot be cooked further. If pressed by accident, the food can be further cooked as follows:
(1) Remove the inner pan and set it on a wet kitchen 'towe'
(2) Leave the rice cooker lid open for about 10 minutes and cool the rice cooker and the inner pan.
(3) Set the inner pan back in the rice cooker.
(4) Cook following step 4 on p. 19.
• To heat up food to serving temperature, press the (StarRiceFree) key while the Keep warm lamp is lit. The food will start reheating. The remaining heating time appears on the display for the last 5 minutes and there are three beeping sounds when the food has been completely reheated. After reheating, the Keep warm lamp lights up and the warming time remains on the display.

en cooking is finished ...
1 Press the Cancel key. Pressing the Cancel key turns off the Keep warm lamp.

2 Remove odors as explained on p. 29.
- If the Cancel key is not pressed at the end of cooking, warming continues and the warming time is displayed every hour from 1 hour to 6 hours. After 6 hours, the "6" starts flashing.
- Some foods lose their taste if warming is allowed to continue.

text_image
12 BAKING BREADNOTE
- To ensure that the bread comes out as expected, use only the recipes in the Menu Guide. - Use only dry yeast to leaven the bread.
■ Ingredients
(Use ingredients in the listed quantities.)
| 1.0 L type (2 to 3 servings) | |
| Enriched flour .....7.05 oz/200 g | |
| Dry yeast .....0.11 oz/3 g (Slightly less than 1 teaspoon) | |
| Sugar .....0.16 oz/5 g (1/2 teaspoons) | |
| Salt .....0.07 oz/2 g (1/3 teaspoon) | |
| Butter .....0.53 oz/15 g | |
| Skim milk .....0.28 oz/8 g (1 tablespoon and 1 teaspoon) | |
| Warm water (Approx. 89°F/30°C) .. 4.4 oz | |
| 1.5 L type (3 to 4 servings) | |
| Enriched flour .....10.58 oz/300 g | |
| Dry yeast .....0.16 oz/4.5 g (1/2 teaspoons) | |
| Sugar .....0.26 oz/7.5 g (3 teaspoons) | |
| Salt .....0.11 oz/3 g (1/2 teaspoon) | |
| Butter .....0.79 oz/22.5 g | |
| Skim milk .....0.42 oz/12 g (2 tablespoons) | |
| Warm water (Approx. 88°F/30°C) .. 6.8 oz |
1 Put all of the ingredients into a mixing bowl and roll into a ball.
① Sift the enriched flour; soften the butter by warming it up at room temperature.
② Add the enriched flour to a bowl, then add skim milk, sugar and dry yeast in the given order. Add salt in so that it does not directly contact with dry yeast.
③ Add the butter and pour the warm water over the dry yeast.
④Mix everything together with a wooden spatula, and roll into a ball by hand.

2 Place the dough on a counter and knead for about 20 minutes.
Stretch the dough out and fold it over several times. When the dough is smooth on the outside and can be stretched without tearing, it has been sufficiently kneaded.
3 Roll the dough into a ball and place in the center of the inner pan.
4 Set the inner pan in the rice cooker.
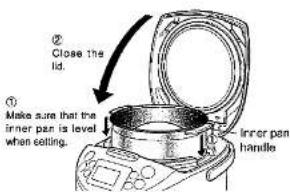
text_image
② Close the lid. ① Make sure that the inner pan is level when setting. Inner pan handle5 Plug the cord into an electrical outlet.
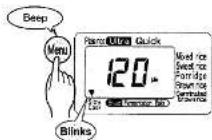
6 Leaven for 40 minutes. (First rise)
① Press the [Menu] key to select "Fermentation".
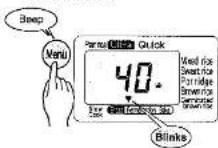
② Press the Star/Rinse-free key.

text_image
Ris itc Ultra Quick 40 gm Pay ( $100 Million Only ) Made rice Sweet rice Forn rice Brown rice Green rice Beep ON Start Rose-free Beep• To leaven for more or less than 40 minutes, after selecting "Farmentation", set the leaven time with the Hour and Min keys, and press the Stillfire-free key. (Each time the Hour key is pressed, the cooking time increases by 5 minutes. Each time the Min key is pressed, the cooking time decreases by 5 minutes.)
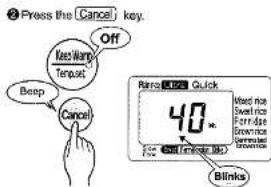
7 After the dough rises the first time ...
The Keep warm lamp and the "0" on the display start to flash.
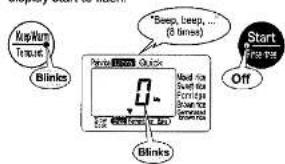
text_image
MapNum Tempur Blinks "Beep, Leep, ... (2 times) "Start FIS P5 Off Blinks Quick Made in Swell for Forming Brown ice Grennical Brown ice① Open the lid and check that the dough has risen. In the first rise, the dough grows from 2 to 2.5 times its original size. Cost a finger with enriched flour and press the center of the dough. If a hole remains, the first rise is done.

- If the hole disappears, the dough has not yet risen enough, therefore press the Hour key with the Keep warm lamp flashing, set additional rise time and press the Start-Rise free key. (A maximum of 15 minutes extra rise time can be added.)
text_image
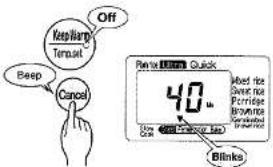
② Press the Cancel key. No Parking Tenout Off Beep Cancel Range Quick 40 x Used nice Sweet rice Ertrude Brown rice Grannese Brink OK (OK) OK Blinks12
BAKING BREAD
8 Gently press on the dough to release any trapped gas.

natural_image
Line drawing of a cooking pot with a spoon inside, no text or symbols present9 Roll the dough back into a neatly shaped ball, place in the center of the inner pan, and close the lid.

natural_image
Line drawing of a portable food appliance with open lid and circular opening (no text or symbols)When the second rise is done, the dough will have grown from 1.5 to 2 times in size, therefore remember this size.
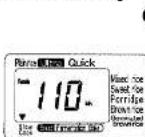
10 Leaven for 40 minutes. (Second rise)
- Select "Fermentation" and check that the display reads 40 minutes.

②Press the Start/Rinse-free key.

text_image
Purter Stool Quick 40 gm Mixed rice Sweet rice Purridge Brown rice Reminced rice Start Rose-free Beep ON11 After the dough rises a second time ...
The Keep warm lamp and the "0" on the display start flashing.

flowchart
graph TD
    A["Start Free Now"] --> B["Blinks"]
    B --> C{Quick}
    C -->|Yes| D["Read Now\nShare For\nParades\nShow Now\nUnread Now\nBack Now"]
    C -->|No| E["Start Free Now"]
    D --> F["Blinks"]
    E --> G["Start Free Now"]
    F --> H[""Blinks (Next)" (8 times)"]
    G --> I[""Blinks (Next)" (8 times)"]
①Open the lid and check that the dough has grown from 1.5 to 2 times after releasing the gas as explained in step 9.
② Close the lid and press the Cancel key.
text_image
Keep/Harp Termostat Off Beep Cancel Pens to 1000s Quick 40 μm Mixed rice Sweet nor Peerridge Brown rice Perkinetic Blinks12 Bake the dough for 40 minutes.
① Press the Menu key to select "Bake".
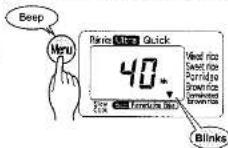
② Press the Start/Rinse-free key.

text_image
Before Quick 40° Cook Made nice Sweet nice Fornice Brownice Greenice Sweet nice Start Rise free On Boep- To bake for more or less than 40 minutes, after selecting "Bake", set the bake time with the (Heur) and (Mn) keys, and press the StartRise-free key. (Each time the (Kur) key is pressed, the cooking time increases by 1 minute. Each time the (Mn) key is pressed, the cooking time decreases by 1 minute.)
23
24
12
BAKING BREAD
13
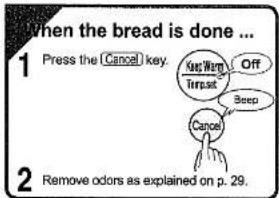
When the bread is done ...
The Keep warm lamp and the "0" on the display start flashing.

text_image
Keep We Temped Blinks "Deep, Keep, ... (8 times) Next New-Pre Quick Read the Ever to Permitage over time Continued Blinks Start New-Pre Off① Open the lid and poke the center of the bread with a bamboo skewer.
(If the bamboo skewer comes out clean, it is baked on the inside.)
If dough sticks to the bamboo skewer, press the Hour key, set the additional bake time and press the Single-Phase-free key. (A maximum of 15 minutes extra baking time can be added.)
NOTE
Do not press the Cancel key to darken the bread crust. The Keep warm lamp goes out and the bread cannot be baked further. If pressed by accident, the bread can resume baking as follows:
(1) Remove the inner pan and set it on top of a wet kitchen towel.
(2) Leave the rice cooker lid open for about 10 minutes and cool the rice cooker and the inner pan.
(3) See the inner pan book in the rice cooker.
(4) Select "Bake", set the additional bake time and bake the bread.
② Remove the inner
pen, turn it over,
and take out the
bread.
NOTE
- Wear oven mitts when removing the inner pan. Be careful not to touch it with bare hands. The inner pan is hot and may cause burn.
• Take the bread cut as soon as it is done. If left in the rice cooker, condensation on the inner lid will drip onto it.

14
To darken the crust, turn the bread over and bake for 10 more minutes.
① Face the unbaked side of the bread downward when placing it in the inner pan.
NOTE
Wear oven mits. Be careful not to touch it with bare hands. The bread is hot and may cause bums.
② Set the inner pan back in the rice cooker.
③ Press the Hour key with the Keep warm lamp flashing, and set the bake time to 10 minutes.

④ Press the Start/Hinse-free
key


- When done, take the bread cut as explained in step 13.
text_image
When the bread is done ... 1 Press the [Cancel] key. Kut/Wang Turnst Off Beep Cancel Remove odors as explained on p. 29.13
IF FOODS OR BREADS DO NOT COOK PROPERLY
Check the following for improperly cooked foods, leavened bread, or baked bread.
| Check point | |||||||
| Symptom | The wrong ingredients or proportions were saved | More ingredients were added than the maximum amount allowed | Less ingredients were added than the maximum amount required | Ingredients were not increased well. | The wrong times time was set. | The dough did not rise enough."1 | |
| Slow Case menu | Does not bel | ||||||
| Balls over | |||||||
| Balls down | |||||||
| Bread menu | Loneed high | Does not rise (a) but not enough | ● | ● | ● | ||
| Rise to improve | ● | ● | |||||
| Is risky | ● | ● | |||||
| Bread bread | Small and red | ● | ● | ● | |||
| Coarse grain and dry | ● | ● | |||||
| Inside is sticky (b) but not improved.) | ● | ● | |||||
| Socks to wear it (Rose too much) | ● | ||||||
| Suits | ● | ||||||
| Smelts | ● | ||||||
| Refer to page | 18 - 21 | 19 | 21 | 22 - 23 | 21 - 23 | ||
| Symptom | Check point | The dough was too much. *2 | The dough was not obtained immediately.(It was placed in a refrigerator. The temperature was covered.) | Cooking time or bake time was too short. | Cooking time or bake time was too long. | Only one side was baked. | The bread was left in the rice cooker when slow rather than taken out immediately. | |
| Screw menu | Does not boil | ● | ||||||
| Bells over | ||||||||
| Bells open | ● | |||||||
| Bread menu | Lasered bag | Does not run that can does enough | ● | |||||
| Have too much | ● | |||||||
| Baked bread | Coarse grain and dry | ● | ||||||
| Braces a sticky (breads a pickled) Sticks to inner lid (Close too much) | ● | |||||||
| ● | ||||||||
| Skirt | ● | |||||||
| Baked bread | Does not burn on outside | ● | ||||||
| Smoke | ● | |||||||
| Wrinkel | ● | ● | ||||||
| Sticky on sides | ● | |||||||
| Refer to page | 21 - 23 | - | 20 - 24 - 25 | 25 | ||||
| Symptom | Check point | Burns, rice grains, or water drops are on inside of inner pan, heater place, or cattle stover. | The inner pan is deformed. | Burned rice or uncooked rice is stuck to the after-gasht edge of the inner pan, baking cat, etc. | The lid is not lightly dashed. | Power was last during use. | |
| Slow Crack feed | Does not soil | ● | ● | ● | |||
| Bread feed | Lunged bag | Cries not has baked rice enough a sticky | ● | ● | |||
| Baked bread | made a sticky bread is uncoiled | ● | ● | ● | |||
| Barit | ● | ● | |||||
| Does not brown on outdoors | ● | ● | ● | ||||
| Wrinked | ● | ||||||
| Uneven drawing on outdoors | ● | ||||||
| Before break | 8 · 27 ~ 29 | - | 8 · 27 ~ 29 | 8 · 27 ~ 29 | 37 | ||
*1 Dough does not rise enough if the temperature of the cough is low, if the wrong ingredients or proportions are used, or if
*2 Dough rises too much if the temperature of the dough is high, if the wrong Ingredients or proportions are used, or if leaven time is too long.
14 CLEANING AND MAINTENANCE
Any other servicing should be performed by an authorized service representative.
- Clean the rice cooker the same day it is used to maintain cleanliness.
Thoroughly clean the rice cooker regularly.
- Food odors can linger after rice cooking or baking bread, therefore remove odors the same day after using the rice cooker.
- Unplug the power cord and allow the rice cooker to cool down before cleaning. Use a soft sponge or cloth.
- Use kitchen detergent (for tableware and kitchen utensils) only.
| Parts to wash after every use | Inner pan Inner lidMeasuring cup Ladle Spentula | 1Wash with water or lukewarm water using asoft sponge.2Wipe water with a dry cloth and completelydry the components.NOTEDo not put dishes in the inner pan and use the pan as adishoan. Also, do not put theinner pan on a dish rack todry the pan.Doing to will cause blisteringor removal of the fluorocarbonrain on the surface of the inner pan. |
| Steam cap Lid(The steam cap can bedissassented rice tweparts. See p. 20.) | These parts can be washed under running water.1Wash with water or lukewarm water using asoft sponge.2Wipe water with a dry cloth and completelydry the components.NOTEDo not wash parts in the following runners as I can cause deformations.Washing in hot water + Soiling + Vesting the hot inner pan immediately aftercooking rice.Always wash the steam cap after cooling mist (menarths etc.). The capmay dieg and prevent the lid from opening, resulting in improperly cookedfoods. | |
| Parts to wash when dry | Upper casingHeating coilHook buttonMain bodyCenter sensorW type Power cordU type Power cordPower plugRice cooker plugPower plug | Wipe the outer and inner surfaces with adamp cloth.Wipe the power plug (rice cooker plug) andpower cord with a dry cloth.Remove any burnt rice from the heating coil orthe center sensor.If dust is hard to remove, apply commerciallyavailable sandpaper (around #320), and wipeit off with a damp cloth.Remove any burned rice, uncooked rice, orother matter from the upper casing, heating coil,and around the hook button.NOTEDo not allow water to come into contact with themechanism inside the body. |
NOTE
- After washing the inner lid, check that the rubber gasket is not displaced. If displaced, reattach it. (See page 78.)
• Always keep the inner pan, the lid, and the inner lid clean to prevent corrosion and odors. - Use kitchen distorgent (for tableware and kitchen utensils) only. Do not use thinner, cleanser, bleach, disposable cloths, wire wool, or plastic kitchen sponges.
- Remove the components and then wash them.
- After washing the lid or the steam cap, immediately wipe it off with a dry cloth. Otherwise, waterdrop stains will remain on it.
- Do not use a dishwasher as a pipe. This may cause deformations.
27
Detaching and installing the inner lid
■Pull toward yourself to detach the inner lid. Inner lid

■ Installing the inner lid
Set the inner lid securely in the lid as shown in the figure below.

NOTE
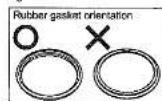
A properly installed rubber gasket is essential to cooking rice properly. Always ensure that the rubber gasket is not off from the inner lid. If the rubber gasket is displaced, carefully pull the ring and rubber gasket to remove them, and reinstall them following the procedure described on the right.

NOTE
Check that the rubber gasket is not displaced. If displaced, reattach it. When mounting the inner lid, ensure that the inner lid sealing ring contacts the inner side of the inner lid edge (see the illustration below).


② Run fingers around


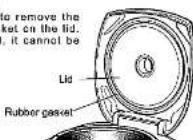
Removing and attaching the Lid
To remove the Lid, oper fully and pull it upwards.
* To attach, insert the lid from on top.

NOTE
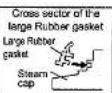
Do not try to remove the Rubber gasket on the lid. If detached, it cannot be reattached
28


14
CLEANING AND MAINTENANCE
Removing and attaching the Steam cap
Insert a finger into the hole and lift the cap upwards.
• To attach, push the cap down.
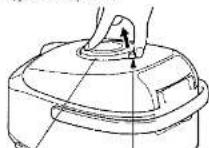
Steam cap
A finger can be placed
in the rear to help grip.

- If the gasket on the Steam cap becomes loose, mount it tightly in the right direction. - Do not use the rice cooker without the Rubber gaskets properly set. Otherwise steam may escape and the rice may not cook properly.
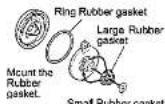
Small Rubber gasket
■Removing and attaching the Steam cap
The steam cap can be disassembled into A and B as shown below
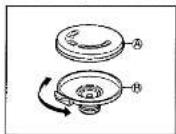
(To remove)

text_image
① Loosen ② RemoveNOTE
If the pressure control cap and bowl become separated or displaced, reassemble them. Unless properly set, foods may not cook properly.
Lending edge Pressure control bowl Square socket
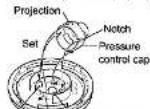
(To attach)

text_image
Noch Hole Ring gasket Tab ① interlock the hole with the projection and the notch with tab Ring gasket ② TightenProjection
How to Deodorize (When the rice cooker has odors)
Pour hot water into the inner pan until 3/4 full. Keep it warm for a couple of hours in the normal warming mode.
After cooking foods, baking breads, or if the odors are better some, adding a little citric acid (approx. 0.71 oz/20 g) to hot water removes odors better.
② Wash the inner pan, the inner lid, and the steam cap with kitchen detergent, then fully rinse with water.
③ Dry the rice cocker body and all other parts in a well-ventilated location.
29
[Non-Text]


15 TROUBLESHOOTING
Check the following before requesting repair service. If the problem persists, contact the store where the rice cooker was purchased.
| Symptom | Check point | Action | See page |
| Rice has not cooked by the preset time. | Rice has not cooked by the preset time. | Correctly set the current time. | 36 |
| See "Cooking time is too long" on page 18. | |||
| Impossible to set the timer. | Rice has not cooked by the preset time. | Correctly set the current time. | 36 |
| Does '0:00' blink? | Correctly set the current time. | 36 | |
| Did you select [Mixed rice], [Sweet rice], [Slow Cook], or the [Bread] menu? | [Mixed rice],[Sweet rice],[Slow Cook], or [Bread] cannot be cooked using the timer. | 11-12 | |
| Was an inapplicable time set? | Set time suitable to timer-controlled cooking. | ||
| Impossible to set the soak timer. | Did you select the [Mixed rice], [Sweet rice], [Slow Cook], or [Bread] menu? | [Mixed rice],[Sweet rice],[Slow Cook], or [Bread] cannot be cooked using the soak timer. | 13-14 |
| Display unit blurs. | Are burns and rice grains stuck to the gasket or brim of the inner pan? | Remove them entirely. | 6-27-29 |
| Is the outer surface of the inner pan wet? | Wipe the wet surface with a dry cloth. | ||
| Impossible to reheat. | There is a "beeping alarm" when the [Star/Rise-free] key is pressed. | Rice is odd. Rice of below about: 55°C cannot be reheated. | 17 |
| Is the Keep warm lamp off? | Press the [Koo Warm Temp set] key, then press the [Star/Rise-free] key. | ||
| Sound is heard during cooking, steaming, warming or reheating rice.* | Humming | Fan rotating sound. This is not a defect. | 6 |
| Buzzing or twittering | IH operation sound. This is not a defect. | ||
| A noise quite different from the above is heard. | Contact the store where the rice cooker was purchased. | - | |
| There is a "beeping alarm" when the [Star/Rise-free] or [Keep Warm Temp set] key are pressed. | Is the inner pan correctly set? | Correctly set the inner pan. | 8 |
| There is a "beeping alarm" when presetting time for timer or soak timer cooking. | The beeps are generated if no keys are pressed with in 30 seconds after the [Timer] key is pressed. | Set time immediately after pressing the [Timer] key. | 11-14 |
| Water or rice has entered the rice cooker body. | Water or rice may cause problems. Contact the store where the rice cooker was purchased. | - | |
| Pressing the [Hour] or [Min] keys does not go to the time setting mode. | The time setting mode cannot be done during cooking*, warm keeping, timer setting, or reheating. | 36 | |
"booding rice" includes cooking foods, laundering bread, and taking bread
15
TROUBLESHOOTING
| Symptom | Check point | Action | See page | |
| The Keep warm lamp is lit. | Was the [Porridge] or [Breed] menu selected? | If left in the inner pan, the rice or bread becomes pasty, therefore eat the rice soon after it is finished cooking. | 16·25 | |
| When [Hout] key is pressed during the warming mode, "12" blinks. | Was the "High Temp." kept warming for more than 12 hours? | If the elapsed Keep Warm time is more than 12 hours, "12" starts blinking. | 16 | |
| When [Hout] key is pressed during the warming mode, "24" blinks. | Was the "Low Temp." kept warming for more than 24 hours? | If the elapsed Keep Warm time is more than 24 hours, "24" starts blinking. | 16 | |
| The stored current time, preset time, and elapsed warm keeping time are lost when the power plug (or the rice cooker plug) is pulled out. | Does "0:00" blink when the power plug (and the rice cooker plug) is (are) inserted? | The lithium battery is dead. Contact the store where the rice cooker was purchased. | 6 | |
| The lid does not open or it opens during cooking. | Is burned rice, uncooked rice, or other material stuck to the upper casing healing coil, or around the hook button? | Clean the rice cooker. | 8·27 | |
| Pressing a key causes no reaction in the rice cooker. | W type | Are the power plug and the rice cooker plug properly inserted into the AC outlet and the rice cooker receptacle respectively? | Be sure to properly insert the power plug and the rice cooker plug into the AC outlet and the rice cooker receptacle respectively. | 3·8 |
| U type | Is the AC cord plugged into the AC outlet? | Securely plug the AC cord into the AC outlet. | 3·8 | |
| Is the Keep warm lamp on? | Press the (Cassel) key to cancel warm keeping. Then, retry operation. | 8 | ||
| Smells of resin. | Is this the first time that the rice cooker is being used? Such smells will vanish as the rice cooker gets used. | - | ||
| Plastic parts have stripes or waves. | Such stripes and waves are produced when forming resin. They cause no harm and do not affect the use of the rice cooker. | - | ||
If these indications appear
| Display | Action | See page |
| "Err" appears when "Brown rice" is selected. | If the rice cooker is paved or a carpet or other soft surface,or used where the surrounding temperature is high,the air intake or steam vent can be blocked, causing the temperature inside to rise. In this case, the rice cooker does not respond to key operations.Therefore,do the following:1 Unplug the cord.2 Move the rice cooker to where the air intake and steam vent are not blocked and the surrounding temperature is low.3 Plug the cord into an electrical outlet and operate the keys.* If the rice cooker still does not work, there is something wrong with it. Unplug the cord and contact the store where the rice cooker was purchased. | 5 |
| "Err" appears, a menu other than "Brown rice" is selected, and a long continuous beep or repeated beeps are emitted. | There is something wrong with the rice cooker. Unplug the cord and contact the store where the rice cooker was purchased. | - |
Menu Guide
Plump freshly cooked rice with seasonal vegetables

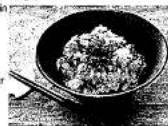
Sushi rice with toppings

natural_image
Black-and-white photo of a bowl containing a dish with visible ingredients (no text or symbols)■ Ingredients (4 servings)
- Sushi rice
(3 cups rice, 1 square x 9 cm² help, 1 1/2 tablespoons shake)
• Source (For mixing with rice)
(1/2 root burdock, 1.06 oz/30 g carrot,
0.71 oz/20 g chad fish fry, Birden 1 cup stock,
- double-blind (common no.)
• Vegetables (For osmish)
8 small prawn, 4 small dried snitake mushrooms
Dried shillake mushroom broth (1 cup water, 1/2 cup broth, 1
tacklespoon soy sauce, 1.2 tablespoons sugar;
1.41 0240 g family sliced to date 103
1 1/2 tablespoons sugar, 1/2 tablespoon salt
Egg strips (2 eggs, 1/3 teaspoon sugar, Pinch bell)
- Other
8 buds (Kape blossom, Boiled bamboo shoot, Pickled ginger,
BIC

Simmar the sauce separately
and let cool in the pot.

Reduce the sauc to a good
consistency and stir into the
化
■ How to make
- Rinse the rice in the inner pan, and add sava and water up to the third "Plain rice" level mark. Top with the kelp and cook using the "Plain rice" program.
② Mix the vinegar, sugar, and salt in a bowl to make the seasoned vinegar
③ Transfer the cooked rice to a mixing bowl and sprinkle with the seasoned vinegar made in step ②. Mix with a spatula and fan to cool.
④ Shave the burdock and dice the carrot into 1.57 inch/4 cm pieces, and boil the sauce. Once boiled, add the dried fish fry and bring to a boil. Cool and drain.
Split the grilled conger sel down the middle and dice into 0.19 inch/5 mm blles. Reconstitute the shiitake mushrooms and boil in broth.
⑥ Gut the prawns, boil in salted water, and remove the shells.
⑦ Session, whisk, and fry the eggs in a thin layer, then cut into strips. Prepare gerrish (slightly season and boil bamboo shoots, etc.)
② Post and soil the lotus root, then drain and sock in sweet vinegar.
② Mix ④ and ⑤ into the sushi nice, and separate into bowls, Garnish with ⑥, ⑦, ⑧, buds, and pickled ginger.
a 1850 for join with a new wet kitchen layer
Note - Type the 100 gm of a semi-wet kitchen towel. - Dampen the mixing bowl with water containing some vinegar.
- Do not directly add vinegar to the rice in the inner pan.
A delicate balance of toppings and rice

Rice with chicken and vegetables


■Ingredients (4 servings)
- 3 cups
- 1 square x 3.86 in ^2 /25 cm ^2 help
- Seasoning (2 tablespoons soy sauce, 2 tablespoons sake,
1/2 teaspoon salt)
• 2.82 oz/80 g chicken thigh
• 1/2 black deep-fried tofu
• 1,76 oz/50 g carrol
• 1/2 root burdock
• 1/4 Block konyaleu
• 2-dried smoke mushrooms
• 80688
• To taste bake, Boy sauce, salt, vinegar - Small amount should be taken
■How to make
① Dice the chicken into 0.39 inch/1 cm cubes and sprinkle
with sake, soy sauce, etc
Drain the excess oil from the deep-fried tofu, cut in half
lengthwise, then slice into strips.
③ Peel the carrots and dice to a length of 1.18 inch/3 cm.
⑤ Scrapo the skin off the burdock using the beck edge of a
knife, shave and soak in water with vinegar.
⑥ Boi the konyaki for 4 or 5 minutes in water, rinse with water and dice like the carrots


Menu Guide
⑥ Soak the dried snitake mushrooms in water until soft, out off the hard part of the stems and dice.
① Pull the strings off the peas and blanch the peas in salted water. Transfer to ice water to stop the cooking, then die
① Rinse the rice in the inner pen, season, add water to the third "Ultra" level mark, and mix well. Cover with the keip and toppings, except the peas, and cook using the "Mixed rice" or "Mixed rice (Okoge)" program.
② Once cooked, take out the kelp and mix in the peas. Serve in a bowl topped with shredded lever.

- Reduce the amount of water to account for the toppings.
- Keep the initially added toppings to about 45% or loss of the amount of rice. If there is too much
topp ro, the rice may not cook properly.
(2.47oz/70 g or less per cup)

Taiwanese-style Glutinous Rice

natural_image
Close-up of a dark, textured circular object with a small triangular shape on the left side (no visible text or symbols)■ Ingredients (4 to 6 servings)
- 3 cups sweet rice (must seek in water for 3 hours, and drain it)
• 8 oz finely chopped park skin
- 3 tablespoons small dried shrimp (Soak in water before use, and grain it).
- 4 oz dried squid (soak in water till soft, and drain it then julienne)
- 1 cup mixed fried on pine shallots
- 5 pieces dried shiltake mushrooms (soak in water till soft, and dry it then leaves)
• 3 tablespoons vegetable oil
• 1 tablespoon sesama oil
• 2 tablespoons no wine
• 4 tablespoons no wine
• 4 tablespoons soy sauce paste
- White pepper news
• Chopped fresh cilantro (gemish)
How to make
On a large skillet, saute pork skin, dried shrimps, dried squid, mushrooms with 2 tbsp of vegetable oil, then add fried onions, ground pork until clone, then add sesame oil, rice wine, sugar, white pepper powder, 2 tbsp of soy sauce, and 2 tbsp of soy sauce paste. On the inner pan, add rice and water up to level 3 mark of "Sweet rice" column sauce, then add 2 tbsp of soy sauce, 2 tbsp of soy sauce paste, and mix it altogether. Then add only half amount of sauteed ingredients evenly on top of the rice (do not mix). Select "Sweet rice" menu, then press (Sister/Rise-free). Once is done, add the rest of sauteed ingredients, mixed evenly and serve it hot with silentro as gaman.

Coconut Sticky Rice with Fresh Mangoes and ice cream
■ Ingredients(3 to 6 servings) "take amount of ingredients for 1&L type
- Cup sweet nice (sticky) no
cooking - 10oz (295ml) coconut milk
4 subsepoids of sugar
1 npe diced mango Coconut ice cream
8) "twice amount of inglers for 1BL type

■ How to make
Wash the snowt rice in the inner pan, drain 1, then add water up to level 1 work of "flour seed" return only of the inlet pan. Since the inlet pan on
the rice cooker, select "Spare rice" many than once. (Spare rice / rice)
On the separate pan, warm up coconut milk and sugar, then add the
cooked sweet rice and mix it evenly. Serve the sweet rice hot with coconut
Ice cream (or solar and music) and also diesel diesel starch on top.

Porridge with Beef and Potato
■ Ingredients (2 to 3 servings)
- 1 cup white rice short gre
- 1582,443 m/10000 brota
- 1/4 lbs of ground beef
- 1 small potato or 1 red
potato diced
• I may cropped genic of a pinch of pads set.
• 1 green price finely
chopped
- Salt and pepper - Water of broth o
■ How to make
Wash the rice then add chicken broth up to level 1 mark of "Pomidge" Column scale of the inner part; add the rest with water if not enough to fill to the level. Add ground beef, diced potatoes, garlic, salt and pepper. Do not mix the ingredients before cooking. Select "Pomidge" menu and press (Star-Hinge-Tree). Once is done, mix and serve by adding green onions as garnish.
Calcium-rich healthy food

Brown rice mixed with riedd sardine
Ingredients
(4 servings)
• 3 cups brown rice
.4a azing
died sandie
• 0.35 oz/10 g
salted kelp
• 2 (100% of the 50%)
• 2 teaspoons
soy sauce

■How to make
① Rinse the brown rice in the inner pan, season, add water up to the third "Brown rice" level mark and mix.
⑦ Cut off the heads and gut the ridd sandines, lay the nest over the brown die and each the die using the Broux rock crease.
② When the rice is done, add the salted kelp and gently mix

- Seeking brown rice in water for 1 or 2 hours makes
- If excessively passaged with any cause, mind or
other spiso, the rice may not cook properly.

Delicious meals made easy with 「炊きたて」
Easy-to-make authentic dishes
that bring out the flavor of
ingredients.

• Stir foods well to prevent seasonings from settling to
that Exclam in the inner part.
- To similar foods in broth, cook the broth before starting the cooking process.
• To thicken with starch, add the starch at the very
end of the cooling process.
• Kneeded foods such as fish sausage and fish paste
well when hatched, thereon
- Remove cooking odors after cooking. (See "How to
Deodorne" on p. 29.)
- If the food is not cooked, do not press the Cancel
key to further cook the food. The Keep warm lamp
goes out and the food cannot be cooked further. (If
praised by cosmetic, to have the other pen and gel
4.51 a week made flower, leave the 100 socket in open for about 10 minutes and coal the rice papeke
and the inner pan. Then, set the inner pan back in
the rice cooker and start cooking again.)
Under "Slow Cook", the food is first brought to a near boil, then it is lowered to about 190°F/83°C and left to simmer. The temperature is then lowered even further to about 190°F/86°C and simmering continues. By gradually lowering the heat, flavors seep in well. Even after heating for a long period of time, there is no worry about tvuda boiling down. This process is ideal for slowly simmering large quantities of food for long periods of time such as stew or oden (hodgepodge)

With stewed foods, flavors soap in better it
the food is first heated and then kept warm for a while.
Oden (Hodgepodge)

■ Ingredients (4 servings)
| 1.0 L type (3 servings) | 1.6 L type (4 servings) | ||
| Japanese radish | 5.30 oz/150 g | 7.05 oz/200 g | |
| Potato | 3 small | 4 small | |
| Taro | 3 | 4 | |
| Fried tofu | 1 1⁄2 | 2 | |
| Fish sausage | 1 1⁄2 | 2 | |
| Fried bean curd mixed with vegetables | 3 small | 4 small | |
| Kurryasu | 1/2 block | 1/2 block | |
| Bolked octopus | 3 | 4 | |
| Coiled egg | 3 | 4 | |
| Brush | Stock | 3 cups | 4 cups |
| Mini | 2 1⁄2 tablespoons | 3 tablespoons | |
| Soy sauce | 2 1⁄2 tablespoons | 3 tablespoons | |
■How to make
① Peel the Japanese redish deeply, cut into 1.00 inch/2.5 cm rounds, and boil in the water left over after rinsing the rice. Drain then soak in room temperature water. Parball the laros separately in the same way.
Peel the primes and cank in water.
① Cut the legs off the boiled octopus. Rinse the fried tofu and fried bean curd mixed with vegetables in hot water to remove excess oil. Cut the konnyaku into triangles and blanch.
③ Feel the boiled eggs. Cut the fish sausage diagonally into equal halves.
④ Add the ingredients and broth to the inner pan and heat for 120 minutes using the "Slow Cook" program.

Beef Stew with Vegetables
■Ingredients (4 to 5 servings)
• 1lb short rib beef cut in cubes
• Medium: Steel, Chilled in 50% does
- 2 medium carrots cut in big dices
-4 red potatoes cut in big does -5 tablecassava Chivurel Hardlava
parte sauce
• 1 tablespoon Worcestershire sauce
- 3 f. oz water
Put short the, carrots, potatoes, and sweet seeds on the bed in the inner pan, and add sauces and water, then set "Snow Cook" menu and press. Sun/Prope-Red is raw it for 3 hours. At the time left 30 minutes, open the cooker (Don't press cancel), and stir it.

34
33


Menu Guide

Delicious fresh baked bread
* The following table gives the largest bread of each type that can be made at a time. To make the maximum amount of bread in the 1.8 L type, use 1.5 times more of each ingredient.
| Type of bread | Max | |
| 1.0 L type | 1.8 L type | |
| Raisin and walnut breadGerminated brown rice bread | Enriched flour 7.05 oz/200g | Enriched flour 10.58 oz/300 g |
| Panecone | Enriched flour 6.35 oz/180g | Enriched flour 9.93 oz/270 g |
| Melon shaped bread | Enriched flour 6.25 oz/150g | Enriched flour 7.94 oz/225 g |

text_image
Germinated brown rice bread Panetone
For bread recipes, see p. 21 \~ 25.

Panettone
■ Ingredients (2 to 3 servings)
- 6.35 oz/180 g enriched flour
- 0.71 oz/20 g all purpose four
- 1 teaspoon dry yeast
- 6 tablespoons sugar
• 1/2 teaspoon salt
• 1.76 oz/50 g shortening
- 2 tablespoons and * teaspoon skim milk
- 100 ml. warm water (Approx. 86°F/30°C)
- 1 egg
• 1.76 oz/50 g dried fruit
• To taste vanilla essence
How to make
Put all of the ingredients into a mixing bowl, mix, and roll into a ball by hand. Place the dough on a counter and knead for about 20 minutes.
Tip
If the dough is too soft to knead, knead it in a mixing bowl using a spatula.
① Roll the kneaded dough into a ball and place in the center of the inner pan. Set the inner pan in the rice cooker and leavan for about 60 minutes (first rise).
- Release any trapped gas and bake in the same way as bread
Variation of butter roll bread
Raisin and walnut bread
■ ingredients
(2 to 3 servings)
- 7.05 oz/200 g enriched
Tour
- Slightly less than 1
teaspoon dry yeast
• 1 tablespoon and 1
Свердост swim ти
• 2 tabespoons sugs
- 1/2 teaspoon san: + 1.00 oz/30 a. y defc
- 100 ml, warm water
(Accra, 85°F/30°C)
+1/2 500
+1.41 oz/40 g raisrs
- 1.41 oz/40 g walnuts
(Coarsely crushed)

■ How to make
① Mix the ingredients except for the raisins and walnuts, and roll into a ball by hand. Place the dough on a counter and knead for about 20 minutes.
② Add the raisins and walnuts to the kneaded dough, roll into a ball and leaven for 40 minutes (first rise).
③ After the first rise, release any trapped gases and divide into 6 evenly sized pieces. Roll the individual pieces into balls and arrange along the edge of the inner pan. Set the inner pan in the rice cooker and leaven for 40 minutes (second rise).
The image is too blurry to recognize any text content.
Cut the dough with a knife or scraper to divide it rather than pulling and tearing.
④ Bake in the same way as bread.
Melon-shaped bread
■ Ingredients (2 to 3 servings)
Top on-st touch
1.17 cp80a
all purpose four
+1.41 oz/40 g sugar
• Pinch lemon zest (Grated)
• As needed granulated sugar
• 1/3 teaspoon baking powder
• 1/2 egg
- 0.71 oz/20 g butter

BreadJough
- 5.29 oz/150 g enriched flour - 2/3 teaspoon dry yeast
- 1 tablespoon sugar - 1/4 teaspoon salt
• 0.68 oz/25 g butter • 1 tablespoon skim milk - 75 mL warm water (Approx. 86°F,30°C) +1/2 egg
■ How to make
Too crust: dough
① Mix and sift the all purpose flour and baking powder.
② Add the sugar and lemon zest to the softened butter and
cREAM together in a mixing bowl until frothy white.
③ Slowly fed the beaten egg to 2 and mix.
④ Add ① to ② mix and ran into a ball. Cover with flatie
- Add ① Ib ②, Fix, and Fall into a ball. Cover with plastic wrap and chill in the refrigerator for about 30 minutes.
and
Breadough
Put all of the bread dough ingredients into a mixing bowl, mix, and roll into a ball by hand. Close the touch on a square and
and ran into a ball by hands. Place the dough on a counter and knead for about 20 minutes.
② After the first rise, release any trapped gas, in the same way
- Take the first ball, release only to a instant ball. It is then as bread and then roll the bread dough back into a ball
Flatten the chilled topping into a circle and place over the bread dough. Cut a checkerboard into the surface and sprinkle with granulated sugar.
- Place the dough in the center of the inner pan with face the checkerboard side up. Set the inner pan in the rice cooker and oven for 40 minutes. (second rise).
Bake in the same way as bread
Germinated brown rice bread
■ Ingredients (2 to 3 servings)
• 7.05 oz/200 g enriched flour
• 1 teaspoon dry year
- 1 tablespoon sugar
+ 1/2 teaspoon salt
- 0.42 oz/12 g shortening
- 1 tablespoon skim milk
- 120 mL, warm water (Approx. 86°F/30°C)
• 1.4' oz/40 g germinated brown rice
■ How to make
Soak the germinated brown rice in water (not the warm water mentioned on the ingredients list) for 3 or 4 hours until 60, then pour off water.
② Put all of the ingredients except the germinated brown rice into a mixing bowl and mix. Add the germinated brown rice and roll into a ball by hand. Place the cough on a counter and knead for about 20 minutes.
⑤ After the first rise, bake in the same way as bread.
SETTING CURRENT TIME
Time is displayed in 24-hour format.
※ The time cannot be set during cooking, keeping the rice warm, or timer-controlled cooking.

Insert the AC power cord into the AC outlet.

Press the Hour or Min keys to display the time setting mode.
④ is displayed
The clock mark disappears and time setting is disabled if no key is touched in about 5 seconds after pressing the (Hour) or (Run) keys.
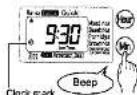

Set the time with the Hour and Min keys.
- Set hours with the Hour key. Set minutes with the Min key
• To change the hour or minute rapidly, hold down on the Hour or Min keys. - The clock mark disappears and time setting is completed about five seconds after setting the time.
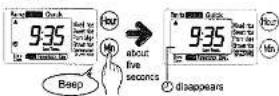
Specifications
| Size | 1.0 L type | 1.8 L type | |
| Power source | W type: 220V 50Hz / U type: 120V 60Hz | ||
| Power consumption | Cooking | 1210W | 1400W |
| Warm temperature (power consumption) | 25W | 28W | |
| Cooling capacity (cap) | Plant rice | 0.16 = 1.01 (top 0.16 L) to 0.5 sup (0.99 L) | 0.38 = 1.61 (top 0.34 L) to 10 sup (0.6 L) |
| Lime | 0.16 = 1.01 (top 0.16 L) to 0.5 sup (0.99 L) | 0.38 = 1.61 (top 0.34 L) to 10 sup (0.6 L) | |
| Cakes | 0.16 = 1.01 (top 0.16 L) to 0.5 sup (0.99 L) | 0.38 = 1.61 (top 0.34 L) to 10 sup (0.6 L) | |
| Mixed rice | 0.16 = 0.72 (top 0.16 L) to 0.4 sup (0.72 L) | 0.38 = 1.20 (top 0.30 L) to 7 sup (1.35 L) | |
| Sweet rice | 0.16 = 0.74 (top 0.16 L) to 0.4 sup (0.64 L) | 0.38 = 1.04 (top 0.36 L) to 8 sup (1.04 L) | |
| Porkridge | 0.29 = 0.37 (top 0.39 L) to 1.5 sup (0.27 L) | 0.28 = 0.42 (top 0.35 sup (0.001 L) to 2.5 sup (0.45 L) | |
| Hard portridge | 0.01 = 0.5 sup (0.00 L) | 0.28 = 0.27 (top 0.5 sup (0.09 L) to 1.5 sup (0.27 L) | |
| Brown rice | 0.18 = 0.63 (top 0.18 L) to 2.5 sup (0.83 L) | 0.38 = 1.00 (top 0.36 L) to 10 sup (1.08 L) | |
| Generated brown rice | 0.16 = 1.01 (top 0.16 L) to 5.5 sup (0.38 L) | 0.38 = 1.8 (top 0.36 L) to 10 sup (0.6 L) | |
| Baking level capacity | Equivalent to strong four 7.05 oz/200 g | Equivalent to strong five 10.50 m3/200 g | |
| Outside dimensions (Approximate values in inch/m2) | Width | 10.2 / 26 | 11.3 / 26.7 |
| Depth | 14.0 / 35.5 | 15.1 / 28.3 | |
| Height | 8.6 / 20.3 | 9.4 / 23.3 | |
| Weight (Approximate values in inch/m2) | 8.3 / 4.3 | 11.7 / 3.3 | |
| Cord length (Approximate values in inches/meter) | W type: 55.1 / 1.4 / U type: 63.1 / 1.5 | ||
- The power consumption during warming indicates the average consumption at a voltage of W type: 220V / U type: 120V, at a room temperature of 68°F/20°C, and when the volume of rice in ("Low Temp." worms) is at the maximum.
- This clock may not always display the correct time, depending on room temperature and condition of usage. - One level cup is about 0.18 L (about 5.29 oz/150 g).
In case of power failure
If the electric current is cut off, the rice cooker resumes its normal functions after power is restored.
| Condition where current is cut off | When power is restored |
| When setting the timer | The timer works without troubles. (If power failure lasts a long time and the preset time has passed, the rice cooker begins to cook rice immediately.) |
| When cooking• (or reheating) rice | The rice cooker continues cooking (or reheating) rice. |
| During normal warm keeping | The rice cooker continues normal (or molar) warming. |
Wear and tear
| • The rubber gasket wears down over time. Though this will vary according to conditions of use, the rubber gasket wears down as it is used.For stubborn dirt, odors or serious damage, contact the store where the rice cooker was purchased.• The fluoride coating on the inner pan wears off as it is used, and may eventually peel.For replacement parts, contact the store where the rice cooker was purchased. |
中文
目錄
1 安全注意事項 39
2 各部名稱及用途 42
美味可口的煮飯技巧 43
3 煮飯前的準備 44
4 煮飯方法 45
text_image
Before Click Quick 110 Mixed rice Sweet rice Porridge Brown rice Brown rice Start Face-free 降请注意 热调过程中不要打倒调整。
text_image
Start Next 1ms 開樂 嗯嗯嗯 …(第8次) Next Time Quick Next Time Next Time Start Next Time 開樂 Next Time Next Time Next Time Next Time Next Time Next Time Next Time Next Time Next Time Next Time Next Time Next Time Next Time Next Time Next Time Next Time Next Time Next Time Next Time Next Time Next Time Next Time Next Time Next Time Next Time Next Time Next Time Next Time Next Time Next Time Next Time Next Time Next Time Next Timenatural_image
Line drawing of a hand placing a large cylindrical object into a container (no text or symbols)text_image
Keep Warm Tenset 熄滅 Cancel Hold Rain to 11000 Quick 40. Made the Sweet rice Potridge Brown rice Potatoes Rain to 11000 Quick 40.0 2nd Street: New York, NY 闪爆12
方形麵包的做法
8 輕壓麵團的整體,排出氣體。
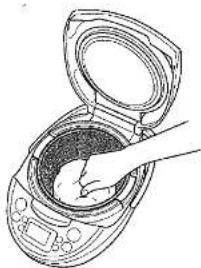
natural_image
Line drawing of a hand pouring liquid into a container with an open lid (no text or symbols)natural_image
Line drawing of an open cylindrical device with a central hole and internal components (no text or symbols)text_image
Pain-UTR Quick 40. New risk Sweet risk Forridge Brown risk Greenish Brown risk Start Press-free11 第2次發酵結束後…
保温燈和顯示窗上的「0」閃爍。
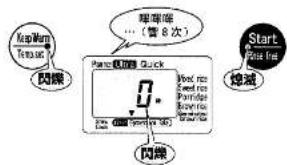
text_image
Map Mom Tens at 閃爍 眼單端 …(第8次) Pamn 頭門 Quick Wind rns Seed rns Partridge Bicycle rns Partridge rns Start Rise Ins 燈滅 閃爍text_image
Keep/Warp Terpeat 熄滅 π Cancel Peris/Butter Quick 40° Mead nice Sweet nice Perridge Brown nice Generated Blended 閃爍12 烤40分鐘
text_image
Next One Quick 40 New Back On Sweet On Ferr On Brown On Densated On Start New-On 嗯natural_image
Close-up of a bowl containing a textured food item, possibly a dish or pastry (no visible text or symbols)■原料(4人份)
·各司米
natural_image
Close-up of a dark, bowl-shaped dish with food items (no visible text or symbols)■原料(4人份)
·大米……1杯
· 流带……5cm 四方形 1 片
natural_image
Black-and-white photo of a bowl containing a textured food item, with a small white object nearby (no visible text or symbols)■梨粉(4-6人泡)
natural_image
Black-and-white photo of a bowl filled with various food items, including beans, mushrooms, and dried fruit (no visible text or labels)■原料(4人份)
text_image
방짓기가 시작됩니다. Start Start 9:35 Wireless Quick Wireless Wireless Wireless Wireless Wireless Wireless Wireless Wireless Wireless Wireless Wireless Wireless Wireless Wireless Wireless Wireless Wireless Wireless Wireless Wireless Wireless Wireless Wireless Wireless Wireless Wireless Wireless Wireless Wireless Wireless Wireless Wireless Wireless Wirelesstext_image
Polar Quick Quick Time 13:30 Mixed rice Sweet rice Fair rice Brown rice Green rice Start Free Time EEC (ECEC, EEC) End Time EEC (ECEC, EEC)84
6
예약 흡수 타이머로 밥짓는 법
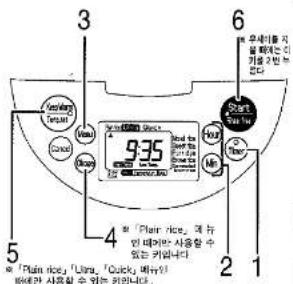
text_image
9:35 Plain rice, 4.2 Plain rice, 4.1 Plain rice, 4.0 Plain rice, 4.1 Plain rice, 4.0 Plain rice, 4.1 Plain rice, 4.0 Plain rice, 4.1 Plain rice, 4.0 Plain rice, 4.1 Plain rice, 4.0 Plain rice, 4.1 Plain rice, 4.0 Plain rice, 4.1 Plain rice, 4.0 Plain rice, Plain rice, 4.1 Plain rice, 4.0 Plain rice, 4.1 Plain rice, 4.0 Plain rice, 4.1 Plain rice, 4.0 Plain rice, 4.1 Plain rice, 4.0 Plain rice, 4.1 Plain rice, 4.0 Plain rice, 4.1 Plain rice, 4.0 Plain rice,4.1 Plain rice, 4.0 Plain rice, 4.1 Plain rice, 4.0 Plain rice, 4.1 Plain rice, 4.0 Plain rice, 4.1 Plain rice, 4.0 Plain rice, 4.1 Plain rice, 4.0 Plain rice, 4.1 Plain rice, 4.0 Plain rice, 4.1text_image
Rue 15:00 Quick Slow Timer 30.0s Low Time Mood rice Sweet rice Fortridge Brown rice Sweet rice Brown rice Non-mg Timer F
예약 흔수 타이머에 대하여
text_image
4 Start/Rinse-free 키를 누른다 Start Start/Rinse-free 10:35 Quick Start Start 2000 Quick 5 Next Time Next Time Next Time Next Time Next Time Next Time Next Time Next Time Next Time Next Time Next Time Next Time Next Time Next Time Next Time Next Time Next Time Next Time Next Time Next Time Next Time Next Time Next Time Next Time Next Time Next Time Next Time Next Time Next Time Next Time Next Time Next Time Next Time Next Time
text_image
Energy Temp 감증 0-42 Start Price for Pressure Quick Impact on Guarative Purposes Bonds Purposes Start Price for 0-42 Prior Price Prior Price Prior Price Prior Price Prior Price Prior Price Prior Price Prior Price Prior Price Prior Price Prior Price Prior Price Prior Price Prior Price Prior Price Prior Price Prior Price Prior Price Prior Price Prior Price Prior Price Prior Price Prior Price Prior Price Prior Price Prior Price Prior Price Prior Price Prior Price Prior Price Prior Price Prior Price Prior Price Prior Pricetext_image
Start Face free Chipid 40 Made it's Sweet it's Forkage Brown it's Greenish Brown it'snatural_image
Line drawing of a hand placing food into a microwave oven (no text or symbols)natural_image
Line drawing of a hand stirring a container with food inside an open appliance (no text or symbols)natural_image
Line drawing of an open portable electronic device with a circular vent and control panel (no text or symbols)text_image
Penter Quick Quick 40 Mixed rice Sweet rice Fornidge Brown rice Green rice Start Rose-free 파 전파 Post-Red Backtext_image
Kan Wang Tang set 지역 파파파… (이번 은러다) End is New Quick Head like Start new Pam-ups Pam-ups Pam-ups Start New Start New 0 Start New 0 0 0 0 0 0 0 0 0 0 0 0 0 0 0 0 0 0 0 0 0 0 0 0 0 0 0 0 0 0 0 0 0 0 0 0 0 0 0 0 0 0 0 0 0 0 0 0 0 0 Start New Inc.text_image
No. Wamp Tempset Close Close Close Close Close Close Close Close Close Close Close Close Close Close Close Close Close Close Close Close Close Close Close Close Close Close Close Close Close Close Close Close Close Close Close Close Close Close Close Close Close Close Close Close Close Close Close Close Close Close Cancet 40 km 40 km 40 km 40 km 40 km 40 km 40 km 40 km 40 km 40 km 40 km 40 km 40 km 40 km 40 km 40 km 40 km12 40 분간 굽는다
text_image
Quick 40° Need rice Sweet rice Forn rice Bread rice Green rice Brown rice Start Rose-free Buy Sell Tensake (Red) Buy Sell Tensake (Red)text_image
Peris(Rinse-free) Quick 10* Most free used free and more more more More More More More More More More More More More More More More More More More More More More More More More More More More More More More More More More More More More More More More More More More More More More More More More More More More More Main Start Rinse-free) 40000000000000000000000000000000000000000000000000000000000000000000000000000000000000000000000000000natural_image
Black-and-white photo of a bowl of food with visible ingredients (no text or symbols)■저式(4인문)
-초발동 빛
( album,다시마...3cm각1장,출...11/2출)
-버층초
natural_image
Close-up of a dark, textured food item in a bowl (no visible text or symbols)■재료 (4인분)
natural_image
Black-and-white photo of a dark, textured object partially enclosed in an oval frame, with a small white object nearby (no visible text or symbols)■제료(4-6인본)
natural_image
Black-and-white photo of a bowl containing various food items, including eggs and nuts (no visible text or labels)■제료 (4 업문)
text_image
点滅 Pasta Quick 9:35 View for Sweet nor Painpier Brown or Brown or Close Close 点滅text_image
点滅 Place Quick Quick 30° Low Temp. Mixed Ice Sweet Ice Fridge Brown Ice Restricted Swimming 点滅 点滅 比 Timerご注意
text_image
理が始まります。 Raner/Ulline Quick 110* 2nd 3rd 4th 5th 6th 7th 8th 9th Start Fiss-free 点灯 ビーご注意 途中でふたを開けない。
natural_image
Line drawing of a hand placing a lid into a microwave oven (no text or symbols)text_image
Close Close Close Close Close Close Close Close Close Close Close Close Close Close Close Close Close Close Close Close Close Close Close Close Close Close Close Close Close Close Close Close Close Close Close Close Close Close Close Close Close Close Close Close Close Close Close Close Close Close Close130
129
12
natural_image
Line drawing of a hand stirring a container with a spoon inside an open lid (no text or symbols)natural_image
Line drawing of a closed mechanical device with lid open, showing internal components (no text or symbols)text_image
Rishe Ulang Quick 40°C Mixed rice Sweet rice Forridge Sweet rice Green rice Green rice Start Rose-free 点灯 ピ-natural_image
Close-up of a bowl containing a cooked dish with visible ingredients (no text or symbols)■材料(4人分)
- すしめし
natural_image
Close-up of a bowl containing a textured food item, possibly a dessert or sauce, with a small white object nearby (no visible text or symbols)■材料(4\~6人分)
・もち米……3カップ