
CRW-2100SX - CD Player / Burner YAMAHA - Free user manual and instructions
Find the device manual for free CRW-2100SX YAMAHA in PDF.


| Product Type | External SCSI CD-RW Drive |
| Brand | Yamaha |
| Model | CRW-2100SX |
| Dimensions (W x H x D) | 200 mm x 50 mm x 250 mm |
| Weight | 2.0 kg |
| Power Supply | External AC adapter, 12V DC |
| Interface | SCSI-2 |
| Write Speed | Up to 16x (CD-R), 10x (CD-RW) |
| Read Speed | Up to 40x |
| Buffer Memory | 2 MB |
| Supported Disc Formats | CD-ROM, CD-R, CD-RW, Audio CD, Video CD |
| Loading Mechanism | Tray loading |
| Supported Software | Windows 95/98/ME/2000/XP, Mac OS |
| Main Functions | Burning, rewriting, reading CDs, audio extraction |
| Maintenance & Cleaning | Use a lens cleaning disc; avoid dust and liquids |
| Safety Precautions | Do not open case; avoid shocks; use only supplied power adapter |
| Spare Parts & Repairability | Limited availability; contact Yamaha authorized service centers |
| General Information | External SCSI CD-RW drive with high-speed writing capabilities |
Frequently Asked Questions - CRW-2100SX YAMAHA
User questions about CRW-2100SX YAMAHA
0 question about this device. Answer the ones you know or ask your own.
Ask a new question about this device
Download the instructions for your CD Player / Burner in PDF format for free! Find your manual CRW-2100SX - YAMAHA and take your electronic device back in hand. On this page are published all the documents necessary for the use of your device. CRW-2100SX by YAMAHA.
USER MANUAL CRW-2100SX YAMAHA
(DECLARATION OF CONFORMITY PROCEDURE)
Responsible Party: Yamaha Corporation of America
Address: 6600 Orangethorpe Ave.
Buena Park, CA 90620
Telephone: 714-522-9011
Fax: 714-228-3913
Type of Equipment: CD Recordable/Rewritable Drive
Model Name: CRW2100SX
This device complies with Part 15 of the FCC Rules.
Operation is subject to the following conditions:
1) this device may not cause harmful interference, and
2) this device must accept any interference received including interference that may cause undesired operation.
See user manual instructions if interference to radio reception is suspected.
FCC INFORMATION (U.S.A.)
- IMPORTANT NOTICE: DO NOT MODIFY THIS UNIT!
This product, when installed as indicated in the instructions contained in this manual, meets FCC requirements. Modifications not expressly approved by Yamaha may void your authority, granted by the FCC, to use the product.
- IMPORTANT: When connecting this product to accessories and/or another product use only high quality shielded cables. Cable/s supplied with this product MUST be used. Follow all installation instructions. Failure to follow instructions could void your FCC authorization to use this product in the USA.
- NOTE: This product has been tested and found to comply with the requirements listed in FCC Regulations, Part 15 for Class "B" digital devices. Compliance with these requirements provides a reasonable level of assurance that your use of this product in a residential environment will not result in harmful interference with other electronic devices. This equipment generates/uses radio frequencies and, if not installed and used according to the instructions found in the users manual, may cause interference harmful to the operation of other electronic devices. Compliance with FCC regulations does not guarantee that interference will not occur in all installations. If this product is found to be the source of interference, which can be determined by turning the product "OFF" and "ON", please try to eliminate the problem by using one of the following measures:
Relocate either this product or the device that is being affected by the interference.
Utilize power outlets that are on different branch (circuit breaker or fuse) circuits or install AC line filter/s.
In the case of radio or TV interference, relocate/reorient the antenna. If the antenna lead-in is 300 ohm ribbon lead, change the lead-in to coaxial type cable.
If these corrective measures do not produce satisfactory results, please contact the local retailer authorized to distribute this type of product. If you can not locate the appropriate retailer, please contact Yamaha Corporation of America, 6600 Orangethorpe Avenue, Buena Park, CA 90620 U.S.A.
LASER INFORMATION
Laser Product Class: Class 1
Laser Diode Properties
Wavelength: 780-787 nm
Pulse Durations and Max. Output
at the lens of the Laser Pickup Unit
Read Mode: 0.7mW (Continuous)
Write Mode: Max. 38mW
(for 166ns, Min. Cycle 86.6ns)
CAUTION
Use of controls or adjustments or performance of procedures other than those specified herein may result in hazardous radiation exposure.
ACHTUNG

OWNER'S MANUAL
SAFETY PRECAUTIONS
PLEASE READ CAREFULLY BEFORE PROCEEDING
These precautions explain how to use the device correctly and safely, thereby preventing injury to yourself or to others. This section has been sub-divided into a WARNING section and a CAUTION section, according to the likelihood and nature of any potential injuries or damage inflicted. They relate to your personal safety, and also help you minimize the risk of damaging the device. Please read these sections carefully before proceeding.

WARNING
Always follow the basic precautions listed below to avoid the possibility of serious injury or even death from electrical shock, short-circuiting, damages, fire or other hazards. These precautions include, but are not limited to, the following:
- Do not open the device or attempt to disassemble or modify it.
Otherwise, there is an increased risk of electrical shock or fire. The device contains no user-serviceable parts. If it appears to be malfunctioning, have it inspected by qualified service personnel. - Do not look inside the device.
If you expose your eyes to the laser inside the device, you risk damage or loss of your vision. - Do not insert fingers or foreign objects into the device.
Otherwise, there is an increased risk of personal injury, electrical shock, damage to the device or fire. Please take particular care if small children are present. - Do not expose the device to rain, use it near water or in damp or wet conditions or place containers on it that contain liquids which might spill into any openings.
Otherwise, there is an increased risk of electrical shock, fire or personal injury. - Follow the Owner's Manual carefully.
Otherwise, there is an increased risk of personal injury, electrical shock, fire or damage to the unit. Follow the correct procedure when setting up the device. - If unusual smells, sounds or smoke emanate from the device or if liquids enter the device, switch the computer off immediately and unplug it from the power outlet.
Otherwise, there is an increased risk of electrical shock, fire or damage to the device. Return the device immediately to the store at which it was purchased or alternatively, to the nearest Yamaha dealer (listed at the back of this manual). - Make sure the computer is electrically grounded
Otherwise, there is an increased risk of electrical shock. - When opening up the computer, always unplug the computer from the electrical outlet. Do not touch the plug with wet hands.
Otherwise, there is an increased risk of electrical shock. - When used in a fan-cooled system, the drive should not be exposed to temperatures outside the range 5 \~ 35°C (41 \~ 95°F).
Always follow the basic precautions listed below to avoid the possibility of physical injury to yourself or others, or damage to the instrument or other property. These precautions include, but are not limited to, the following:
- Always unplug the computer from the electrical outlet if it will not be used for a prolonged period of time or if there is a risk of lightning.
Otherwise, there is an increased risk of electrical shock, short-circuiting or fire.
- Do not expose the device to excessive heat or vibrations such as in direct sunlight or near a heater. Also avoid placing it in extreme cold or much dust.
Otherwise, the front panel may become disfigured or the internal components may be damaged.
- Do not use the device near other electrical products such as televisions, radios or speakers. Otherwise, this may cause interference which can affect the proper operation of those other products.
- Do not place the device in an unstable position.
Otherwise, it may accidentally fall down and be damaged or cause personal injury.
- Mount the device horizontally.
Otherwise, written data may be destroyed. Set the device up according to the instructions in the Owner's Manual.
- Always remove the disc from the tray before transporting the device.
Otherwise, written data may be destroyed.
- When cleaning the device, never use benzene, paint thinners, detergents or chemical-impregnated wiping cloths. Also, do not place vinyl, plastic or rubber objects on the device.
Otherwise, the device may be damaged or its front panel may become discolored. Use a soft, dry cloth to wipe the device.
- Do not rest your weight on or place heavy objects on the device and do not use excessive force on the buttons, switches or connectors.
Otherwise, there is an increased risk of damage to the device or personal injury.
- Do not listen to audio with headphones at high volume and for prolonged periods of time.
Otherwise, there is an increased risk of hearing loss.
- Before using the device, set the volume dial to its lowest setting.
Otherwise, sudden bursts of sound can cause hearing loss.
- Do not place the device near sources of magnetic interference, such as computer displays.
Magnetic interference can affect the operation and stability of the device.
- Have the device serviced regularly.
Otherwise, dust can build up inside the device, increasing the risk of fire or damage. For information about servicing charges, contact the store at which the device was purchased or alternatively, the nearest Yamaha dealer (listed at the back of this manual). The device should be serviced about once a year.
■ About CD-R/RW discs
Please read the following regarding the handling of CD-R/RW discs.
- Do not expose discs to excessive heat such as in direct sunlight or near a heater. Also avoid keeping them in a humid place.
- Do not touch disc surfaces. When handling a disc, hold it by its edges.
- Remove dust and dirt from disc surfaces. Use air-based dust removers. The surfaces may be scratched if wiped with a dry cloth.
- Do not stick labels on disc surfaces.
- Do not write on disc surfaces except where indicated.
- Do not clean discs with chemicals or detergents.
-
Do not bend or drop discs.
-
The information contained in this manual is subject to change without prior notice.
- All trademarks contained in this manual belong to their respective owners.
- Yamaha does not bear any responsibility for any outcome as a result of using this device.
- Reproduction of this manual, either in part or in full, is expressly forbidden.
■ Precautions for Transportation
Before transporting the device, always put it in its original box. If the device is transported without adequate packing, the internal components may be damaged and cause the device to malfunction.
■ Copyrights
When writing to CD-R/RW, make sure that you are not infringing any copyrights. It is illegal to copy audio CDs for non-personal use. When backing up software, please make sure that you are not infringing any software copyrights for that product.
■ WARRANTY
YAMAHA AND SUPPLIERS ACCEPT NO LIABILITY FOR THE LOSS OF ANY DATA OR ANY PROBLEMS CAUSED AS A RESULT. AS A PRECAUTION, IT IS RECOMMENDED THAT THE DISCS BE TESTED AFTER THEY HAVE BEEN WRITTEN TO. FURTHERMORE, UNDER NO CIRCUMSTANCES DOES YAMAHA AND SUPPLIERS GUARANTEE THE RELIABILITY OF THE DISCS.
Introduction ...... 1
Features of the CRW2100SX Drive .... 1
Before Use 3
System Requirements .... 3
Supported Discs 5
Tools 6
Front and Rear of Unit 7
Front Panel 7
Rear Panel 8
Setup Flowchart 9
Windows Users 9
Macintosh Users 10
Setup Procedures 11
Serial Number 11
SCSI Settings 11
Setting Up The CRW2100SX Drive 14
Operation 24
Loading a Disc 24
Ejecting a Disc 24
Ejecting a Disc in an Emergency.... 25
Troubleshooting 26
Appendix 29
Writing Modes 29
About the firmware 31
LED Indicator Messages 32
CRW2100SX Specifications 33
Index 36
©2000 YAMAHA CORPORATION. All Rights Reserved.
This document may not, in whole or in part, be copied, photocopied, reproduced, translated, transmitted or reduced to any electronic medium of machine readable form without prior consent in writing from Yamaha.
Windows is a registered trademark of Microsoft Corporation.
Macintosh is a registered trademark of Apple Computer, Inc.
All other trademarks are the property of their respective companies.
Features of the CRW2100SX Drive
High speed
The CRW2100SX drive supports up to 16X speed writing of a CD-R disc, and up to 10X speed writing of a CD-RW disc. For example, an audio CD (79 minutes/700MB) can be created in approximately 5 minutes. With newly adopted Partial CAV writing method (See the following column), you can write a disc by directly transferring content data from a 32X-speed or faster CD-ROM drive. Data reading at up to 40X speed is supported.
CD TEXT support
The CRW2100SX drive is compatible to CD TEXT format. Information such as the song name or artist name can be recorded using writing software. The text data on the disc you create can be displayed by a CD player that is compatible with CD TEXT.
Wide compatibility
Compatibility assurance data obtained through exchange of technical data with major disc manufacturers ensures compatibility with discs from a very wide range of manufacturers. 700MB discs are also supported.
High-fidelity audio
The CRW2100SX supports extracting digital audio data at up to 40X speed, as well as recording digital sound with complete fidelity even when writing at 16X speed.
Reliable writing
Yamaha's proprietary Pure-Phase Laser System 1 improves jitter values 2 to allow the signal to be recorded accurately. In addition, the 8MB buffer memory and Running OPC*3 technology further enhance reliability.
Optimum speed
The CRW2100SX drive can write at an optimum speed *4 if the CD-R disc does not allow 12X- or 16X-speed writing.
*1 Pure-Phase Laser System (patent applied for) Technology that reduces phase interference of the laser beam, so that it shines accurately on the disc.
*2 Jitter value
An important measure of recording quality. This has been improved 25% compared with Yamaha models not using this technology.
*3 Running OPC (Optimum Power Control)
CD-R/RW discs vary by manufacturer in their recording characteristics, and the laser output required to write data differs by disc. Running OPC is technology that solves this problem by automatically adjusting the output of the laser according to the material of the disc on which data is being written.
*4 If you attempt to write at 16X or 12X speed but the CRW2100SX drive detects that the quality of a target CD-R disc and other things are inappropriate for such speeds, the drive will automatically slow down the writing speed optimally for the disc.
About Partial CAV (Constant Angular Velocity)
Writing to a CD-R disc is normally done using CLV (Constant Linear Velocity) method. In this method, the disc rotation speed will be so adjusted as to keep a constant data transfer rate at any portion of the disc. In other words, the disc rotation speed will vary in CLV writing.
In contrast, CAV (Constant Angular Velocity) method uses a constant disc rotation speed at any portion of the disc whereas the data transfer rate will vary. Because CAV method has an advantage to largely increase the data transfer rate with a minimum load to the drive's mechanism (compared to CLV's rotation speed adjustment), many of current CD-ROM drives use CAV method.
CD formats define the constant linear density of written data (data should be written onto the disc track in the constant pitch) so that amount of recorded data per disc rotation will increase as the writing point moves from the inner to the outer. In other words, in CAV writing the outer portion has an increased data transfer rate.
The CRW2100SX drive uses CAV method in the inner portions as well as CLV method in the outer portions (Partial CAV) in order to enable up to 16X-speed writing. The drive will control the disc rotation speed to start writing at 12X speed in the inner portions, gradually accelerating up to 16X speed and maintaining 16X speed in the outer portions.
System Requirements
In order to use the CRW2100SX drive, your computer system will need to meet the following set of requirements.
NOTE The CRW2100SX drive may not write at a maximum speed depending on your computer's system configuration.
PC/AT-Compatible Computer
CPU: Pentium II-class or higher, 300MHz or faster.
RAM: 32MB memory (64MB or more recommended).
NOTE If you are using Windows 2000 operating system, you need 64MB or more memory.
A spare PCI expansion slot for a SCSI card (if one hasn't been installed yet).
A SCSI card to connect SCSI devices (including the CRW2100SX drive) to your computer. Make sure it has an internal bus connector. Yamaha recommends any of Adaptec's AHA-2940-series cards (PCI slot).
NOTE For details about how to install the SCSI card, refer to the documentation that came with it.
Operating System (OS)
Windows 95, Windows 98, Windows 98 Second Edition, Windows NT4.0 with Service Pack 3 or later, Windows 2000.
CD Writing Software
The CRW2100SX drive requires CD writing software to write onto a CD-R/RW disc. When you use the CD writing software, make sure that it supports the CRW2100SX drive.
NOTE For details about how to install and use the software, refer to the documentation that came with it.
For Macintosh computers
OS: Mac OS 8 or later.
CPU: PowerPC G3, 300MHz or faster.
RAM: 32MB (64MB or more recommended).
CD-ROM drive.
NOTE Many Apple Macintosh computers have built-in SCSI connectors. However, if your Macintosh does not have a built-in SCSI connector, you will need to purchase a PCI bus SCSI card. (Yamaha recommends Adaptec's PowerDomain 2930U card.)
NOTE For details about how to install the SCSI card, refer to the documentation that came with it.
NOTE When you use the CD writing software, make sure that it supports the CRW2100SX drive.
Hard Drive Space
When writing to a CD-R/RW disc, you will need a working area (50 to 100MB free space) on the hard drive. When creating an image file for all data to write to a CD-R/RW disc, in addition to the working area, you will need as much hard drive space as that data (up to 900MB in total). However, such hard drive space for the image file is not needed when you are directly writing from a hard drive, CD-ROM drive or so on (on-the-fly writing).
NOTE You can collect data files into a single disk image file for a CD-R/RW disc. That image file can then be simply transferred and written onto a disc, avoiding writing errors related to buffer underrun (a condition where writing is disabled due to underperformance of the data transfer rate to the writing speed). Also, note that the image file is useful to write multiple discs with the same content.
Supported Discs
The CRW2100SX drive can write to discs that carry the following logos.
 | CD-R discs*1The CRW2100SX drive can write to these discs at 1X, 2X, 4X, 8X, 12X, or 16X speed. These discs can be played back in a CD-ROM drive or a CD player.NOTE16X-speed writing is enabled with Partial CAV method. (P. 2)NNOTEWhen writing at 8X or faster speeds, use “high-speed writing capable” discs. |
 | CD-RW discs*2There are two types of CD-RW discs: those that support write/rewrite speeds of 1X, 2X, and 4X, and those that support only 2X. The CRW2100SX drive can write/rewrite at 2X or 4X speed on the first type of disc and at 2X on the second type of disc. These discs can be read/played on a device (e.g., CD-ROM drive) that supports “CD-RW.” |
 | High Speed CD-RW discs*3These discs allow writing/rewriting at 4X to 10X speeds. The CRW2100SX drive can write/rewrite these discs at 4X, 8X, or 10X speed. These discs can be read/played by a CD-RW drive that bears the High Speed CD-RW logo, or by a device (e.g., CD-ROM drive) that supports “CD-RW.”NOTE10X-speed writing is enabled with Full CAV method. In order to write, erase, or read these discs using a CD-R/RW drive, a drive bearing the High Speed CD-RW logo must be used. When using a CD-ROM drive to read these discs, the drive must be capable of reading CD-RW discs.If these discs are used in a CD-R/RW drive not bearing the High Speed CD-RW logo, the discs may not be recognized, resulting in the computer not operating correctly or other malfunctions occurring.Refer to the page at the URL below before attempting to read these discs on a Yamaha CD-R/RW drive not bearing the High Speed CD-RW logo.URL: http://www.yamaha.co.jp/english/product/computer/ In order to write, erase, or read these discs using a CD-R/RW drive, a drive bearing the High Speed CD-RW logo must be used. When using a CD-ROM drive to read these discs, the drive must be capable of reading CD-RW discs.If these discs are used in a CD-R/RW drive not bearing the High Speed CD-RW logo, the discs may not be recognized, resulting in the computer not operating correctly or other malfunctions occurring.Refer to the page at the URL below before attempting to read these discs on a Yamaha CD-R/RW drive not bearing the High Speed CD-RW logo.URL: http://www.yamaha.co.jp/english/product/computer/ |
*1 Compatible with Orange Book Part 2.
*2 Compatible with Orange Book Part 3 Vol. 1.
*3 Compatible with Orange Book Part 3 Vol. 2.
NOTE The Orange Book standard defines how all recordable discs (including CD-R and CD-RW) are written. Part 2 of the Orange Book standard relates to CD-R discs, and Part 3 to CD-RW discs. The standard was named after the color of the book's pages.
About CD-ROM
A CD-ROM disc is a compact disc containing high-density read-only data. It has many applications, including the playback of music and video, the archiving of data, as well as on-line documentation. The following are descriptions of each CD-ROM format:
CD-DA: Up to 79 minutes of stereo audio is written in 16-bit resolution at a sampling rate of 44.1kHz for a 79 minutes disc.
Data CD: Up to 700 megabytes of computer data is stored in standard ISO9660 format for a 700MB disc.
Video CD: These hold movies in which the video and audio data has been compressed using MPEG-1 technology.
Tools
Phillips Screwdriver
You will need to use this when removing the cover of your computer and installing a SCSI card.

NOTE Make sure your screwdriver's head is the correct size for the screws you need to remove.
Front Panel
The CRW2100SX drive's front panel features the following:

Rear Panel
The CRW2100SX drive's rear panel features the following:

These flowcharts show the procedure for setting up the CRW2100SX drive. For easy cross-referencing, the relevant pages in this manual are also given.
Windows Users
![graph TD A["STEP 1 Do you have a SCSI card?"] -->|YES| B["STEP 2 Check that the SCSI card is recognized correctly (P.22)"] A -->|NO| C["STEP 1-1 Purchase a SCSI card Recommended models: Adaptec AHA-2940-series (PCI)"] B --> D["STEP 3 Set up the CRW2100SX drive"] D --> E["STEP 4 Check that the CRW210…](/content/2026/06/1175223/images/78de9e35e380d5eb28a7cd1930e64c64664ba5a152904f3c8d1458bc75a9a876.jpg)
Macintosh Users
![graph TD A["STEP 1 Does your Macintosh have a built-in SCSI connector?"] -->|YES| B["STEP 2 Set up the CRW2100SX drive"] B -->|NO| C["STEP 1-1 Purchase a SCSI card\nRecommended model: Adaptec PowerDomain 2930U (PCI)"] C --> D["STEP 1-2 Install the SCSI card\nRead this manual and insert the SCSI card…](/content/2026/06/1175223/images/304f96203377595035793b64008c10d3992b3b42f5515306cff527e824e4875b.jpg)
Serial Number
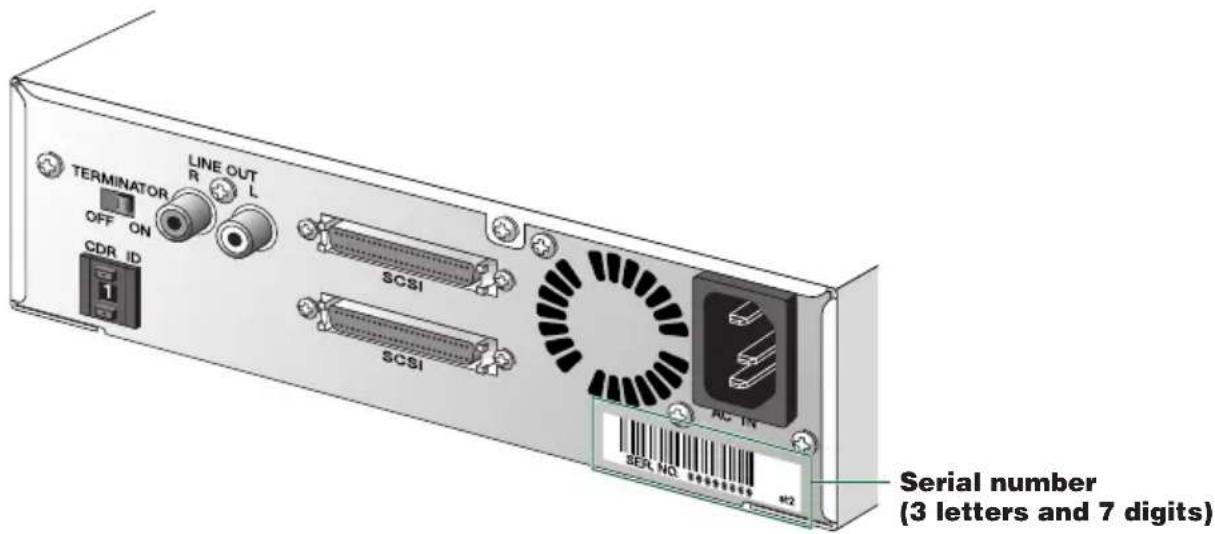
Once you have taken the CRW2100SX drive out of its packaging, you should immediately note down the serial number found at the rear of the drive under the bar code. You may need to refer to this number when requesting Customer Support services. In the box below the following diagram, write down the 10-character serial number (consisting of 3 letters followed by 7 digits).
| Serial No. |
SCSI Settings
Before connecting your CRW2100SX drive to your computer, you need to set up the drive using the switches located at the rear of the unit. You'll need to set the following:
- SCSI ID number
- Termination
① SCSI ID number
Each of the SCSI devices connected to the computer is identified by its SCSI ID number. You need to assign a number from “0” to “7” for each SCSI device. Commonly, ID number “7” is reserved for the computer’s SCSI card itself. Therefore, your CRW2100SX drive can actually be assigned an ID number from “0” to “6.” Press the top or bottom button of the CDR ID selector switch to decrement or increment the SCSI ID number, as shown below.

NOTE The SCSI ID number for each device on the chain must be unique. Make sure the CRW2100SX drive's SCSI ID number is not the same as that of any other device on the chain. By factory default, the CRW2100SX is assigned ID number "1" but this can be changed.
② Termination
Terminators prevent SCSI signals from being reflected off the last device in the chain. The SCSI terminator switch should be set to “ON” if your CRW2100SX drive is the last device on the SCSI chain. If it is not the last device on the chain, the TERMINATOR switch should be set to “OFF.”

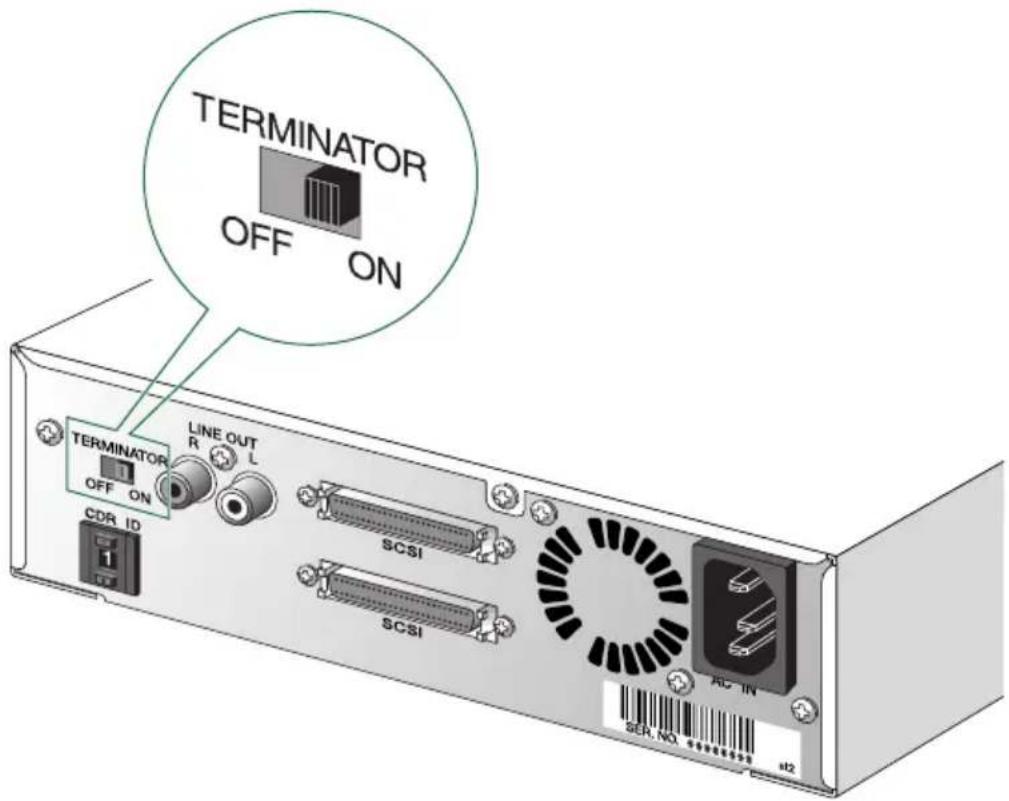
NOTE By factory default, the Terminator switch is set to "ON."
Setting Up The CRW2100SX Drive
There are three stages to setting up your CRW2100SX drive.
- Installing a SCSI card
You will need to open the casing of your computer and insert a SCSI card (sold separately) if one has not been installed already.
NOTE You will need a Phillips screwdriver to open the casing of the computer and to secure the SCSI card in its slot.
NOTE For details about how to install the SCSI card, refer to the documentation that came with it and your computer.
- Connecting the drive
You will need to connect your CRW2100SX drive to your computer's SCSI card using a SCSI cable. You will also need to connect the included power cable between the drive and an electrical outlet.
- Verifying the Hardware Installation
Before you can begin using your CRW2100SX drive, you need to verify that it has been installed and recognized correctly.
Installing a SCSI Card
①Power down your computer and unplug it from the AC outlet.


If you proceed without doing this, you run the risk of receiving an electric shock and/or short-circuiting and damaging components including the CRW2100SX drive.
②Remove the outer casing of the computer. If you need to remove screws in the process, make sure you don't lose them.

NOTE The method for removing the casing can vary depending on the manufacturer. For details, refer to the documentation that came with your computer.
③ Touch a metal part of the computer's chassis or power supply unit to drain any static charge that may have built up inside your body.


You can permanently damage equipment if you touch it while there is any static charge in your body.
4 Locate a free slot for the SCSI card and use a Phillips screwdriver to remove the screw holding the slot's blanking plate.

5 Insert your SCSI card into the slot using both hands. Make sure it is seated firmly in the slot. Then secure the card by replacing the screw used for the blanking plate.
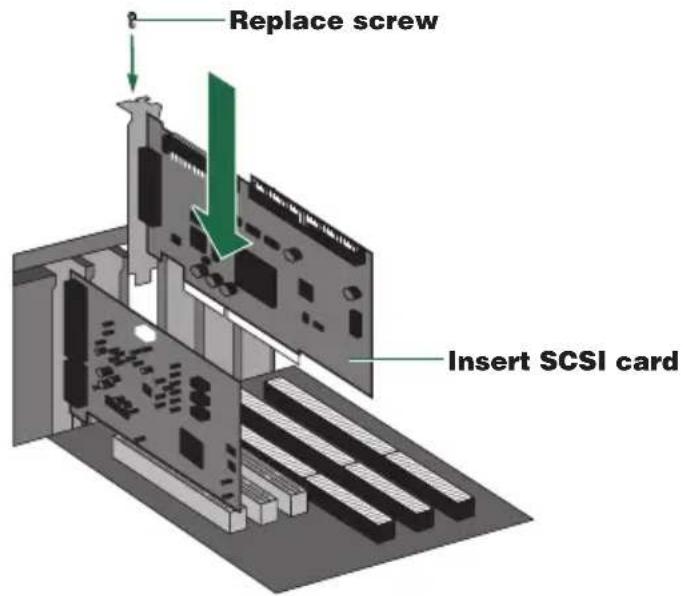
⑥ Attach the outer casing of the computer and any screws that were removed. Then reconnect the computer to the electrical outlet but do not power it up yet.

Connecting the Drive
①Connect one end of the SCSI cable to your SCSI card.
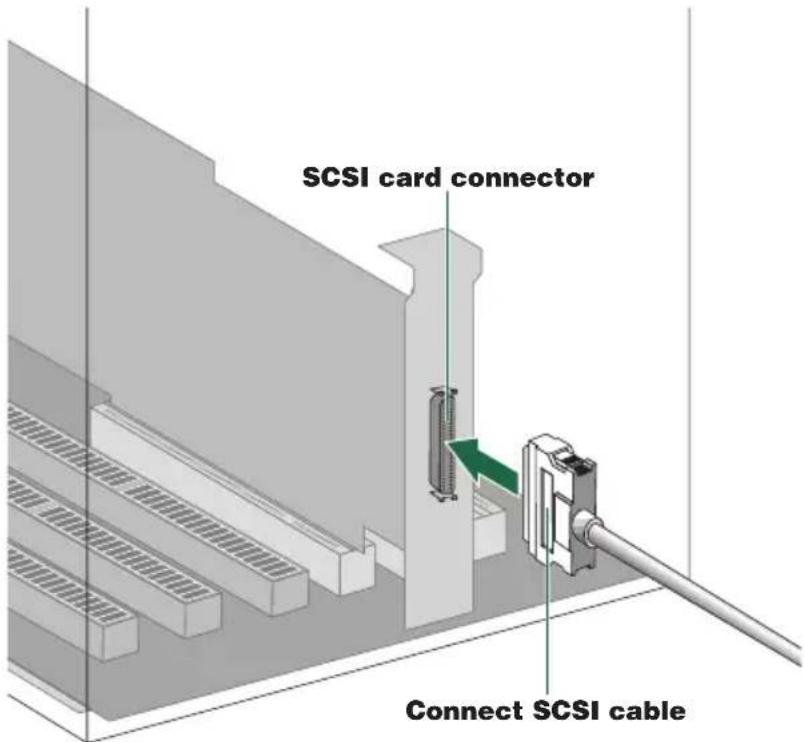
The CRW2100SX drive requires a D-sub half-pitch 50-pin pin-type connector. The connector of your SCSI card may vary. You will need to purchase a SCSI cable with connectors suitable for both your drive and your SCSI card. The following are the most common types of SCSI connector:
D-sub half-pitch 50-pin pin-type (as found on CRW2100SX)
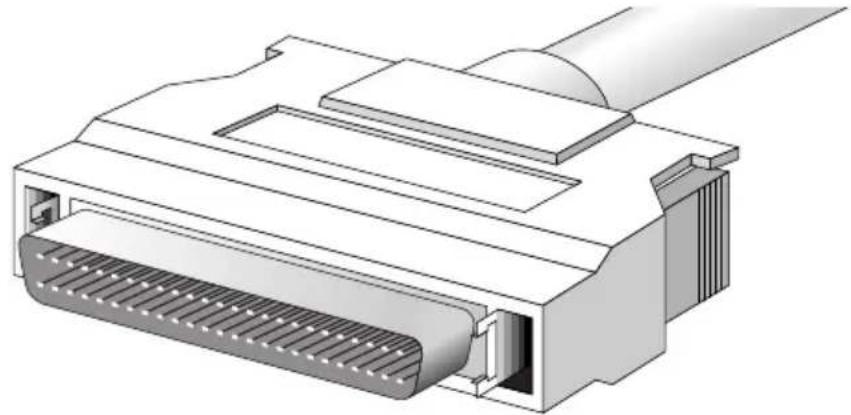
Half-pitch 50-pin Centronics

②Connect the other end of the SCSI cable to the rear of your CRW2100SX drive. Either SCSI connector may be used.
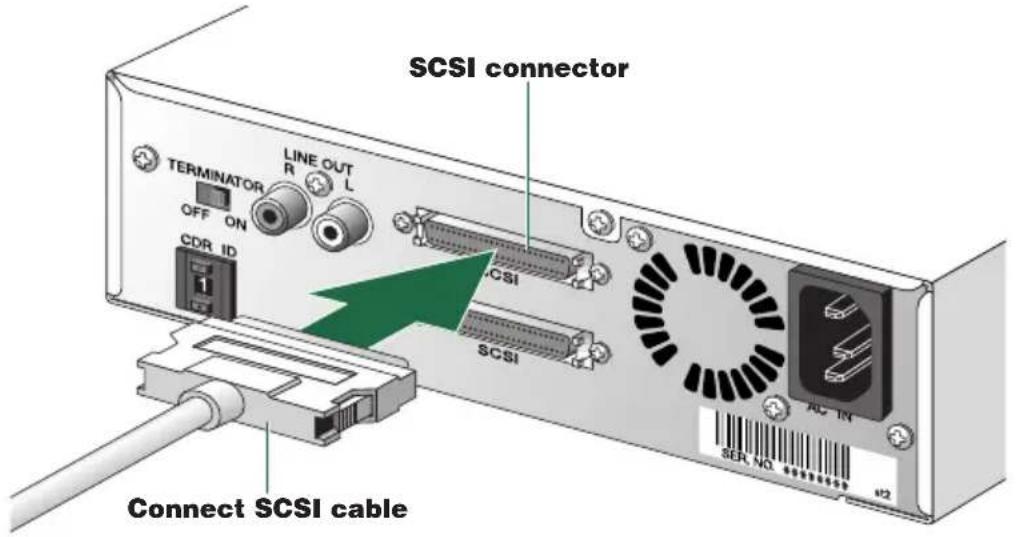
3Connect the D-shaped end of the included power cable to the AC IN socket at the rear of your CRW2100SX drive. Connect the other end of the cable to an electrical outlet.

Electrical plugs/sockets vary according to country/region.
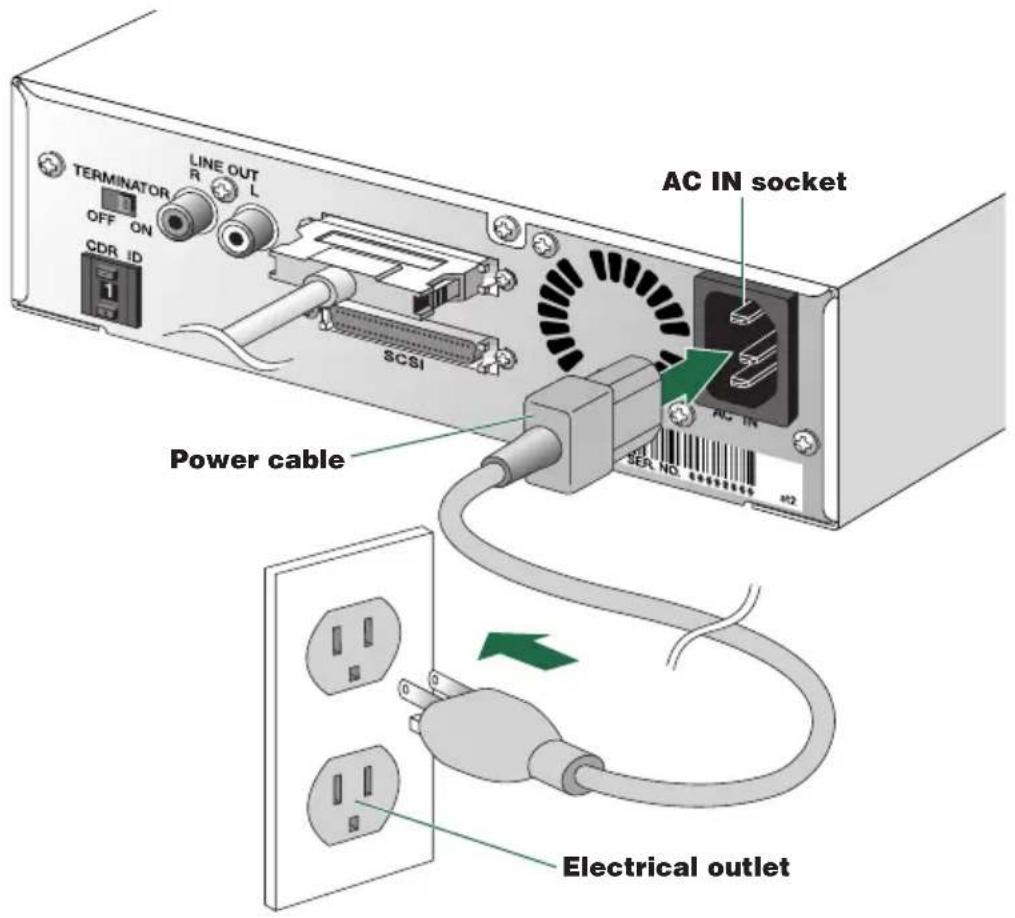
4 Power up your CRW2100SX drive first, then your computer.
NOTE When you power up the CRW2100SX, make sure the LED on the front panel blinks in green attempting reading disc information. (P. 32)


Always power up the devices in your SCSI chain before powering up your computer. This will ensure that they are recognized by the computer's operating system.

Do not disconnect any devices in your SCSI chain while the computer is on.
Verifying the Hardware Installation
Windows Users
When the computer's operating system is loading, your SCSI card will be recognized and you will be prompted to install the drivers for it. Follow the on-screen instructions and choose to reboot your computer at the end of the driver installation procedure.
NOTE For details about installing the drivers for your SCSI card, refer to the documentation that came with it. Also refer to the documentation that came with your computer's operating system.
2 After the computer's operating system (Windows 95/98/98 Second Edition) has loaded, open the "Control Panel" and double-click on the "System" icon. Select the "Device Manager" tab and double-click on "CDROM." If the drive has been correctly installed, it should be listed as shown below. Similarly, double-click on "SCSI controllers" and the SCSI card should be listed as shown below if it has been properly installed.
NOTE For details about how to use the operating system, refer to the documentation that came with it.
NOTE If there is a or mark etc. next to the icon for the CRW2100SX drive or the SCSI card, this means that it has not been installed correctly.
NOTE When using Windows NT, you can verify by opening the "Control Panel," double-clicking on "SCSI Adapter" and clicking the "Devices" tab.
NOTE For Windows 2000, double-click "System" in the "Control Panel," select the "Hardware" tab, and click the "Device Manager" button in "System Properties."

* This is a screen shown in the Windows 98 Second Edition environment.
3Double-click “YAMAHA CRW2100S” listed under “CDROM” (in Windows 95/98/98 Second Edition) and click the Settings tab. Check the “Sync data transfer” checkbox. With “Sync data transfer” enabled, the data transfer between your CRW2100SX drive and your computer is synchronized, meaning that the maximum possible data transfer rate can be achieved.
NOTE For details, refer to the documentation that came with your SCSI card.
NOTE When using Windows NT/2000, "Sync data transfer" will automatically be selected if the SCSI card supports this feature. You will not need to change this setting.

* This is a screen shown in the Windows 98 Second Edition environment.
④ Install the CD writing software.
NOTE For details about how to install and use the software, refer to the documentation that came with it.
Macintosh Users
To check that the CRW2100SX drive is recognized correctly, you will need to use the Apple System Profiler.
When your CRW2100SX drive and computer have powered up, install the CD writing software.
NOTE The installer simplifies the installation process. For details about how to install the software, refer to the documentation that came with it.
② Restart your computer.
③Start your CD writing software.
④Check that the CRW2100SX drive is recognized correctly.
NOTE For details about how to use the software, refer to the documentation that came with it.

Operation
This section explains how to operate the CRW2100SX drive after you have installed it. You can load and eject a disc (as described below) only when the CRW2100SX is powered on.
Loading a Disc
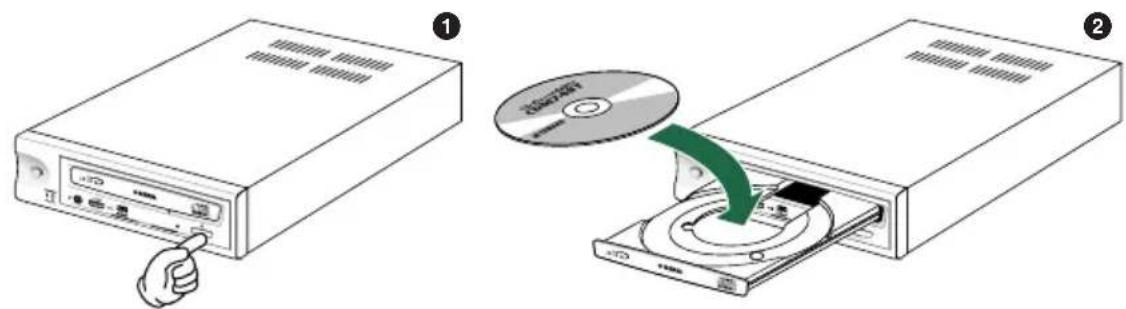
①Open the tray by pressing the Eject button on the CRW2100SX drive's front panel.
② Place the disc onto the tray with its label or printing facing upward.
③Press the Eject button to close the tray.
NOTE Do not push or pull the tray using excessive force. Doing so can damage the drive or the disc. Instead, always use the Eject button to open or close the tray.
Ejecting a Disc

①Open the tray by pressing the Eject button on the CRW2100SX drive's front panel.
②Remove the disc from the tray.
③Press the Eject button to close the tray.
NOTE It may not be possible to eject the disc tray while a disc is being read or in other situations, depending on the SCSI command.
NOTE Only remove the disc after the disc tray has opened fully. Otherwise, you risk damaging the drive or the disc.
Ejecting a Disc in an Emergency
If the disc tray fails to open for some reason, such as a power outage, you can open it manually.

Paper clip

You should attempt to eject a disc manually only as a last resort. Malfunctions may occur if you do this too frequently.
①Power down the computer and the CRW2100SX drive.
② Find a pin-like tool with a diameter of 2mm or less to fit through the Manual Eject hole on the drive's front panel.
NOTE A straightened large paper clip is ideal for this purpose.
③Push the tool gently into the Manual Eject hole until the spring-loaded mechanism ejects the tray and disc.
Please also refer to the YAMAHA CD-R/RW Drives web site for more information.
YAMAHA CD-R/RW Drives web site URL:
http://www.yamaha.co.jp/english/product/computer/
Europe: http://www.yamaha-yste.com/
The drive does not power up.
- Make sure that the drive is properly connected to a “live” AC outlet using the supplied power cable. If necessary, reconnect the cable.
- Make sure that the front panel POWER switch is depressed. As long as the LED on the front panel lights up or blinks in green or orange, the drive is successfully turned on. There may be no hardware trouble (P. 28). If you cannot see the LED activity, consult your nearest Yamaha dealer for repair.
The computer does not start up.
- Is the SCSI card installed correctly? Please read the documentation that came with your SCSI card for details.
The CRW2100SX drive is not recognized.
- Is the drive's power cable attached correctly, and does the drive power up? Also, is the SCSI cable connected correctly?
If the system has started up normally, you will be able to see the CRW2100SX drive and SCSI card listed in Control Panel | System | Device Manager tab. The drive will be listed as “Yamaha CRW2100S” when you double-click on CDROM and the SCSI card will be listed when you double-click on SCSI controllers. (→P. 22)
When you power up your computer, you can access the machine's hardware SCSI BIOS settings before Windows is loaded. You can set your computer to recognize the SCSI card and CRW2100SX drive in the BIOS.
NOTE Generally, the BIOS (Basic Input / Output System) is a small program that resides on a ROM chip on the computer's motherboard as well as on some expansion cards. It checks the system and its devices (such as serial ports and hard disk controllers) before loading the operating system (OS).
- Are you using the correct SCSI driver (mini-port driver)?
If the SCSI card has not been installed correctly under Windows 95/98/98 Second Edition/NT/2000, make sure that you have installed the most recent SCSI driver supplied by the SCSI card manufacturer.
For information about the latest version of driver, please contact the respective SCSI card manufacturer.
Troubleshooting
- Is the SCSI card recognized correctly by the operating system (OS)?
The SCSI driver for your SCSI card may be incorrect. For more details, contact the SCSI card manufacturer. - Is the drive's SCSI ID number the same as that of another device on the SCSI chain? (→P. 12)
- Are the pins and holes on the SCSI connectors straight and not deformed?
Check the connectors. - Is the terminator on the CRW2100SX drive set correctly?
It should be set to ON only if it is the last device on the SCSI chain. Otherwise, it should be set to OFF. ( → P. 13) - To write to CD-R/RW discs, your CD writing software must support the CRW2100SX drive.
To find out if it does, contact the manufacturer of your CD writing software.
The disc tray does not come out.
- Is the CRW2100SX drive powered up?
- Some CD writing applications will lock the disc tray once loaded.
In which case, use the eject command from within the application. Alternatively, read the manual that came with the application.
The disc keeps being ejected.
- Has the disc been placed on the disc tray correctly?
The drive does not operate correctly.
- Is the disc compatible with the CRW2100SX drive?
NOTE Even if the disc is of a type compatible with the CRW2100SX drive, some varieties of discs can still be unreadable on it.
- Is there dust on the disc tray or on the disc itself?
- Is the terminator of the last device in the SCSI chain set to “ON.” Or if it has no built-in termination, has a terminator been attached?
- Does your computer have several different CD writing applications installed?
If you use more than one CD writing application simultaneously, the behavior of the drive can become unpredictable.
The drive ejects or fails to read the disc, or the LED on the front panel remains lit in orange after the disc has been loaded (meaning that the disc has not been recognized). ( → P. 32)
- Power down the computer. Then disconnect the SCSI cable from your drive but leave the power cable connected. Now try loading the disc.
- There may be problems with the disc itself. If the drive fails to recognize a variety of discs including audio CDs, CD-ROMs and blank CD-R/RW discs (the LED on the front panel remains lit in orange after any discs have been inserted), you should contact your nearest Yamaha dealer.
Errors occur when writing a disc at a high speed directly from a separate CD-ROM drive to the CRW2100SX drive.
- A possible reason is that the CD-ROM drive is not suitable. Please use a high-speed CD-ROM drive. However, for various possible reasons, you may still encounter errors even if you are using a 32X-speed or faster CD-ROM drive. Therefore, before attempting high-speed writing directly from another CD-ROM drive, you should check that it is possible to do so by choosing to test before writing.
The “Buffer Underrun” error message is displayed.
- Try the following:
- Lower the writing speed setting.
- Create an image file of the CD on the computer's hard disk.
- Defragment the hard disk.
- Turn hard disk power management off.
- Deactivate the Active Desktop (if you are using Internet Explorer 4 or 5).
- Disable network access.
- Close other applications (including screen savers, task schedulers, etc.).
NOTE Errors can occur if you knock the CRW2100SX drive while it is writing to disc.
NOTE When using packet writing on a CD-RW disc, the actual data capacity is 100MB less than that stated on the cover of the disc. The difference in capacity is dependent on the writing mode.
No sound is audible when playing back CD-DA (audio CD) discs.
- Check that the LINE OUT (L/R) connector of the CRW2100SX is connected correctly to your sound card or amplified speakers.
Writing Modes
Disc-at-Once (DAO)
This mode is used when writing a complete disc in a single pass without pausing. Data cannot be added later, even if the full capacity of the blank disc has not been used.
Example: General CD-ROM

Example: Audio CD

NOTE The lead-in and lead-out areas signify the beginning and end points of a session. They are not part of the data but contain information about the session itself. Basically, a session consists of a lead-in, data, and a lead-out.
Track-at-Once (TAO)
This mode is used when writing data to a disc one track at a time. More tracks can be added later if there is enough space left on the disc. This is why Track-at-Once mode is sometimes referred to as Multisession.

NOTE Only the first session of a multisession disc can be played back on a conventional audio CD player. Single session discs can be played back completely.
Session-at-Once (SAO)
As a writing method that combines the advantages of the above-mentioned “Disc-at-Once” and “Track-at-Once,” you can combine multiple tracks into one session and write them, and then add additional data.
For example, this is the writing method used to create a CD EXTRA format CD.
The music tracks will be recorded in the first session, and the data will be recorded in the second session.
Example: CD EXTRA

Packet Writing
This mode is used when writing to a track of a disc using small blocks of data called “packets,” in a manner similar to a floppy disk. This mode is useful when making small incremental backups of data. You will need to use software that specifically supports packet writing, such as Adaptec’s Direct CD.

NOTE Discs must be formatted before they can be used for packet writing. With CD-RW, erased data can be overwritten until the disc is completely full.
With CD-R, the space used by the erased data cannot be reused and is “masked” so that it is no longer visible. This can be done up to 100 times.
About the firmware
Firmware is a small piece of software built into the CRW2100SX drive, and is used to operate the drive. Since it resides in flash memory, it can be overwritten and updated. To ensure more reliable operations and enhanced performance of the drive, updates to the firmware will be made available. You can find information about the most recent firmware for the drive on YAMAHA CD-R/RW Drives web site.
URL for YAMAHA CD-R/RW Drives web sites: http://www.yamaha.co.jp/english/product/computer/Europe: http://www.yamaha-yste.com/
The most recent user support information, including firmware updates, can be found in the YAMAHA CD-R/RW Drives web site. Please check this information regularly.
Determining the firmware version of the CRW2100SX drive (in Windows 95/98/98 Second Edition)
Go to Control Panel | System | Device Manager tab, double-click on CDROM, then double-click on YAMAHA CRW2100S.

NOTE When using Windows NT, you can verify by opening the "Control Panel," double-clicking on "SCSI Adapter" and clicking the "Devices" tab. Then right-click on "YAMAHA CRW2100S" and select "Properties."
NOTE On Windows 2000, the firmware version will not be displayed. Use your writing software to check the firmware version.
Macintosh Users
Use your CD writing software to check the firmware version of your CRW2100SX drive. For details about how to use the software, refer to the documentation that came with it.
LED Indicator Messages
The following LED messages while the CRW2100SX drive is turned on.

| Status | Indicator Messages | LED Color |
| Ready (with disc) | Lit | Green |
| Ready (no disc) | Lit | Orange |
| Tray operation (opening/closing) | Blinking (constant) | Green |
| Tray fully opened | Out | — |
| Reading disc information (TOC) | Blinking (constant) | Green |
| Initial access in writing | Blinking (constant) | Orange |
| Writing (test mode) | Blinking (constant) | Orange |
| Writing | Blinking Fast (constant) | Orange |
| Reading | Flashing (inconstant) | Green |
| Playing | Blinking Fast (constant) | Green |
| Power saving (combined with the computer's power saving) | Out | — |
| Failure | Flashing (inconstant) | Orange |
CRW2100SX Specifications
Supported Formats
| Write Read Play | |||
| CD-DA | ● | ● | ● (*4) |
| CD-G | ● | ● | |
| CD TEXT | ● | ● | ● |
| CD-ROM (*1) | ● | ● | ● |
| Mixed Mode CD-ROM (CD-ROM+CD-DA) | ● | ● | ● (*4) |
| CD-ROM XA (*1) | ● | ● | ● (*4) |
| Photo CD (*1) | ● (*2)(*3) | ● | ● (*4) |
| Video CD | ● | ● | ● (*4) |
| CD-i | ● | ● (*3) | |
| CD EXTRA (*1) | ● | ● | ● (*4) |
*1: includes multisession *2: suitable disc required
*3: suitable application software required
*4: suitable application software required for playback
Note) Excludes ADPCM Encode/Decode & Video Encode/Decode functions.
| Writing Methods Disc-at-Once (DAO) | |
| Session-at-Once (SAO)Track-at-Once (TAO)Packet Writing | |
| Writing/Reading Speed Writing CD-R 1X, 2X, 4X, 8X, 12X (CLV)16X (12X ~ 16X Partial CAV)CD-RW 2X, 4X, 8X (CLV)10X (4X ~ 10X Full CAV) | |
| Reading 40X (max.) Full CAVNote) • DATA: 40X (max.)• CD-DA: 40X (max.) in audio extraction• CD-DA: 1X only in audio play• Video CD: 10X (max.)• Session closed disc: 40X (max.)• Session unclosed disc: 12X (max.) | |
| CD-R 1X, 2X, 4X, 8X, 12X, 16X (12X ~ 16X Partial CAV) writing:Write Once discs specified in Orange Book Part II Ver. 3.1.Note) Use a “high-speed writing” compatible CD-R disc for 8X or faster writing. | |
| CD-RW • 2X writing/rewriting: Rewritable discs specified in Orange Book Part III Volume 1 Version 1.0.• 2X or 4X writing/rewriting: Rewritable discs specified in Orange Book Part III Volume 1 Version 2.0.• 4X, 8X, 10X (4X ~ 10X Full CAV) writing/rewriting:Rewritable discs specified in Orange Book Part III Volume 2 Version 1.0. | |
| Data Capacity 700MB (79 min.) | |
| 650MB (74 min.)550MB (63 min.) | |
| Data Transfer Rate (Mode 1) 1X: 150KB/sec. 12X: 1,800KB/sec.2X: 300KB/sec. 16X: 2,400KB/sec.4X: 600KB/sec. 24X: 3,600KB/sec.8X: 1,200KB/sec. 32X: 4,800KB/sec.10X: 1,500KB/sec. 40X: 6,000KB/sec. | |
| Burst Transfer Rate 5MB/sec. (max, asynchronous)20MB/sec. (max, synchronous) | |
| Data Buffer Size 8MB (3,224 sectors) | |
| Average Random Access Time 160 msec. (reading) | |
| Sector Size 2,048 ~ 2,352 bytes | |
| Interface SCSI-3 (Ultra SCSI) | |
| Installing style Horizontal | |
| Disc Loading Type Front auto-loading tray loading | |
| Audio Out Line OutFrequency Range: 20 ~ 20,000HzOutput Level: 700m Vrms | |
| Voltage Rating 100 ~ 240V ±10% AC | |
| Current Draw 0.4 A | |
| Power Consumption | 20W (when writing or reading)10W (standby - during disc spindown)7W (sleep - combined with the computer's power saving) |
| Operating Environment | Temperature +5 ~ +35°CHumidity 25 ~ 80% RH (no condensation) |
| Dimension(includes projection) | Width: 193.2 mmHeight: 61.9 mmDepth: 265.1 mm |
| Weight | 2.4 kg |

The CRW2100SX series complies with the following specifications
| Country / Region | Compliance Specifications | Details | ||
| Category | Item | Standards | ||
| USA | Safety | Electrical | UL1950 | Information Technology Equipment |
| Laser | 21CFR1040.10 FDA Chapter 1, Subchapter J | Class 1 Laser Product | ||
| EMC | Emission | 47CFR15 FCC Part 15, Subpart B | Class B Computing Device | |
| Canada | Safety | Electrical | CSA C22.2 No. 950 | Information Technology Equipment |
| EMC | Emission | ICES-003 | Class B Computing Device | |
| EU | Safety | Electrical | EN60950 | Information Technology Equipment |
| Laser | EN60825 | Class 1 Laser Product | ||
| EMC | Emission | EN55022 | Class B Information Technology Equipment | |
| Immunity | EN55024 EN61000-3-2 EN61000-3-3 | Information Technology Equipment | ||
| Australia New Zealand | EMC | Emission | AS/NZ 3548 | Class B Equipment |
| Singapore Hong Kong South Africa Eastern Europe | Safety | Electrical | IEC60950 | Information Technology Equipment |
| Laser | IEC60825 | Class 1 Laser Product | ||
| Japan | Safety | Electrical | Japan's Legal Requirements for Electrical Appliances and Materials | Conform to the Technical Standard Appendix 8 |
| EMC | Emission | VCCI | Class B Equipment | |
Index
A
AC IN socket 8,20
Active Desktop 28
B
BIOS 26
Buffer Underrun....4, 28
C
CD TEXT 1
CD-DA 6
CD-R discs 5
CD-RW discs 5
CDR ID selector switch 8, 12
D
Data CD 6
Device Manager 22
Disc tray 7,24
Disc-at-Once (DAO) 29
E
Eject button 7,24
Ejecting a Disc in an Emergency ...... 25
Ejecting the Disc 24
extracting digital audio data ....1
F
firmware 31
Front Panel 7
H
Headphone jack ....7
Headphone volume control.... 7
High Speed CD-RW disc 5
J
jitter value....1, 2
L
lead-in 29
lead-out 29
LED 7,32
LED Indicator 32
LINE OUT (L/R) 8
Loading a Disc 24
M
Manual Eject hole 7,25
Multisession 29
P
packet 30
Packet Writing 30
paper clip.... 25
Partial CAV 2
Phillips Screwdriver 6
Power switch 7
Pure-Phase Laser System 1,2
R
Rear Panel 8
Running OPC 1,2
S
SCSI card 17
SCSI driver 26
SCSI ID number.... 12
SCSI connectors 8,20
serial number 8,11
Session-at-Once (SAO) 30
Setup Flowchart (Macintosh Users).....10
Setup Flowchart (Windows Users) ...... 9
static charge 16
T
Termination ....13
TERMINATOR switch 8, 13
Track-at-Once (TAO) 29
V
Video CD 6
If you have any questions, please contact your dealer or one of the following companies.
Yamaha Systems Technology EUROPE
Siemensstrasse 22-34,
D-25462 Rellingen, GERMANY
URL: http://www.yamaha-yste.com/
TEL: +80092624222
(AUSTRIA, BELGIUM, DENMARK, FINLAND, FRANCE, GERMANY, HUNGARY, ICELAND, IRELAND, ITALY, LUXEMBOURG, NETHERLANDS, NORWAY, PORTUGAL, SPAIN, SWEDEN, SWITZERLAND, UNITED KINGDOM)
TEL: +80093067 (MONACO)
If you are calling from outside the countries mentioned above, or if you can't get through on the Yamaha toll-free number, use the following number instead:
TEL: +3214400793
U.S.A.
Yamaha Corporation of America
Consumer Products Division
6600 Orangethorpe Ave. Buena Park, CA 90620, U.S.A.
TEL: +1 714 522 9011
FAX: +1 714 228 3913
URL: http://www.yamaha.com/
CANADA
Yamaha Canada Music Ltd.
135 Milner Avenue, Scarborough,
Ontario M1S 3R1, CANADA
TEL: +1 416 298 1331
FAX: +1 416 292 0732
URL: http://www.yamaha.ca/
AUSTRALIA
Yamaha Music Australia Pty., Ltd.
Level 1, 99 Queensbridge Street
Southbank, Victoria 3006
AUSTRALIA
TEL: +61 3 9693 5111
FAX: +61 3 9699 2332
SINGAPORE, MALAYSIA, THAILAND, PHILIPPINES, INDIA, VIETNAM, CAMBODIA, MYANMAR, INDONESIA and IRAN
Yamaha Electronics Asia Pte Ltd.
138 Cecil Street
05-02/03 Cecil Court, Singapore 069538
SINGAPORE
TEL: +65 223 3992
FAX: +65 223 9810
TAIWAN
Yamaha KHS Music Co., Ltd.
11F, No.150, Tun Hua North Rd.
Taipei, TAIWAN R.O.C.
TEL: +886 2 2713 8999
FAX: +886 2 2713 8666
URL: http://www.yamahakhs.com/
JAPAN
Yamaha Corporation
AV & IT Business Group
IT Sales & Marketing Division
203 Matsunokijima, Toyooka-mura, Iwata-gun,
Shizuoka-ken, 438-0192 JAPAN
TEL: +81 539 62 6558
FAX: +81 539 62 5346
URL: http://www.yamaha.co.jp/english/

YAMAHA
- FCC INFORMATION (U.S.A.)
- LASER INFORMATION
- CAUTION
- ACHTUNG
- OWNER'S MANUAL
- SAFETY PRECAUTIONS
- PLEASE READ CAREFULLY BEFORE PROCEEDING
- WARNING
- ABOUT CD-R/RW DISCS
- PRECAUTIONS FOR TRANSPORTATION
- COPYRIGHTS
- WARRANTY
- INTRODUCTION ...... 1
- BEFORE USE 3
- FRONT AND REAR OF UNIT 7
- SETUP FLOWCHART 9
- SETUP PROCEDURES 11
- OPERATION 24
- TROUBLESHOOTING 26
- APPENDIX 29
- FEATURES OF THE CRW2100SX DRIVE
- HIGH SPEED
- CD TEXT SUPPORT
- WIDE COMPATIBILITY
- HIGH-FIDELITY AUDIO
- RELIABLE WRITING
- OPTIMUM SPEED
- ABOUT PARTIAL CAV (CONSTANT ANGULAR VELOCITY)
- SYSTEM REQUIREMENTS
- PC/AT-COMPATIBLE COMPUTER
- OPERATING SYSTEM (OS)
- CD WRITING SOFTWARE
- FOR MACINTOSH COMPUTERS
- HARD DRIVE SPACE
- SUPPORTED DISCS
- ABOUT CD-ROM
- TOOLS
- PHILLIPS SCREWDRIVER
- FRONT PANEL
- REAR PANEL
- WINDOWS USERS
- MACINTOSH USERS
- SERIAL NUMBER
- SCSI SETTINGS
- ① SCSI ID NUMBER
- ② TERMINATION
- SETTING UP THE CRW2100SX DRIVE
- INSTALLING A SCSI CARD
- CONNECTING THE DRIVE
- VERIFYING THE HARDWARE INSTALLATION
- OPERATION
- LOADING A DISC
- EJECTING A DISC
- EJECTING A DISC IN AN EMERGENCY
- THE DRIVE DOES NOT POWER UP
- THE COMPUTER DOES NOT START UP
- THE CRW2100SX DRIVE IS NOT RECOGNIZED
- TROUBLESHOOTING
- THE DISC TRAY DOES NOT COME OUT
- THE DISC KEEPS BEING EJECTED
- THE DRIVE DOES NOT OPERATE CORRECTLY
- THE DRIVE EJECTS OR FAILS TO READ THE DISC, OR THE LED ON THE FRONT PANEL REMAINS LIT IN ORANGE AFTER THE DISC HAS BEEN LOADED (MEANING THAT THE DISC HAS NOT BEEN RECOGNIZED). ( → P. 32)
- ERRORS OCCUR WHEN WRITING A DISC AT A HIGH SPEED DIRECTLY FROM A SEPARATE CD-ROM DRIVE TO THE CRW2100SX DRIVE
- THE “BUFFER UNDERRUN” ERROR MESSAGE IS DISPLAYED
- NO SOUND IS AUDIBLE WHEN PLAYING BACK CD-DA (AUDIO CD) DISCS
- WRITING MODES
- DISC-AT-ONCE (DAO)
- TRACK-AT-ONCE (TAO)
- SESSION-AT-ONCE (SAO)
- PACKET WRITING
- ABOUT THE FIRMWARE
- DETERMINING THE FIRMWARE VERSION OF THE CRW2100SX DRIVE (IN WINDOWS 95/98/98 SECOND EDITION)
- LED INDICATOR MESSAGES
- CRW2100SX SPECIFICATIONS
- INDEX
- A
- B
- C
- D
- E
- F
- H
- J
- L
- M
- P
- R
- S
- T
- V
- U.S.A
- CANADA
- AUSTRALIA
- SINGAPORE, MALAYSIA, THAILAND, PHILIPPINES, INDIA, VIETNAM, CAMBODIA, MYANMAR, INDONESIA AND IRAN
- 05-02/03 CECIL COURT, SINGAPORE 069538
- TAIWAN
- JAPAN
- YAMAHA
Brand : YAMAHA
Model : CRW-2100SX
Category : CD Player / Burner