49022 - Microwave oven Creda - Free user manual and instructions
Find the device manual for free 49022 Creda in PDF.

User questions about 49022 Creda
0 question about this device. Answer the ones you know or ask your own.
Ask a new question about this device
Download the instructions for your Microwave oven in PDF format for free! Find your manual 49022 - Creda and take your electronic device back in hand. On this page are published all the documents necessary for the use of your device. 49022 by Creda.
USER MANUAL 49022 Creda
natural_image
Front view of a black electronic device with indicator lights and ports (no visible text or symbols)39031 29032 35062 49034 49032 18064 49031
User's Instructions
Microwave Oven
Rapide Electronic
Contents
| Introduction | 3 |
| Feature Diagram | 4 |
| Electrical Requirements | 5-6 |
| Installation | 5 |
| Safety | 6-7 |
| Cookware | 7-8 |
| Control Panel | 8-9 |
| Operating Instructions | 10-18 |
| Automatic Defrosting | 15-16 |
| Operating Precatuitions | 19 |
| Cooking Precatuitions | 20 |
| Cleaning and Maintenance | 21-22 |
| Repairs and Service | 23/25/27 |
| Specifications | 24 |
Introduction
In the following pages you will find the information needed to install and operate your Creda microwave oven.
In order to obtain the best results and greatest satisfaction from your new microwave oven, please read this booklet carefully before use.
Enclosed with your new microwave oven you will find the Creda
us 1 cooking, reheating and defrosting charts. An explanation of how microwaves cook, helpful advice on suitable utensils and their use, menus
and time saving tips will be found in the introduction to the cookbook.
May we wish you many years of carefree, successful cooking, and
remember our Home Economics Department is always available to you for advice if you write to:—
The Home Economist
Creda Limited PO Box 5
Creda Works Rytho Bridge
Stoke-on-Trent
England. ST11 9LJ
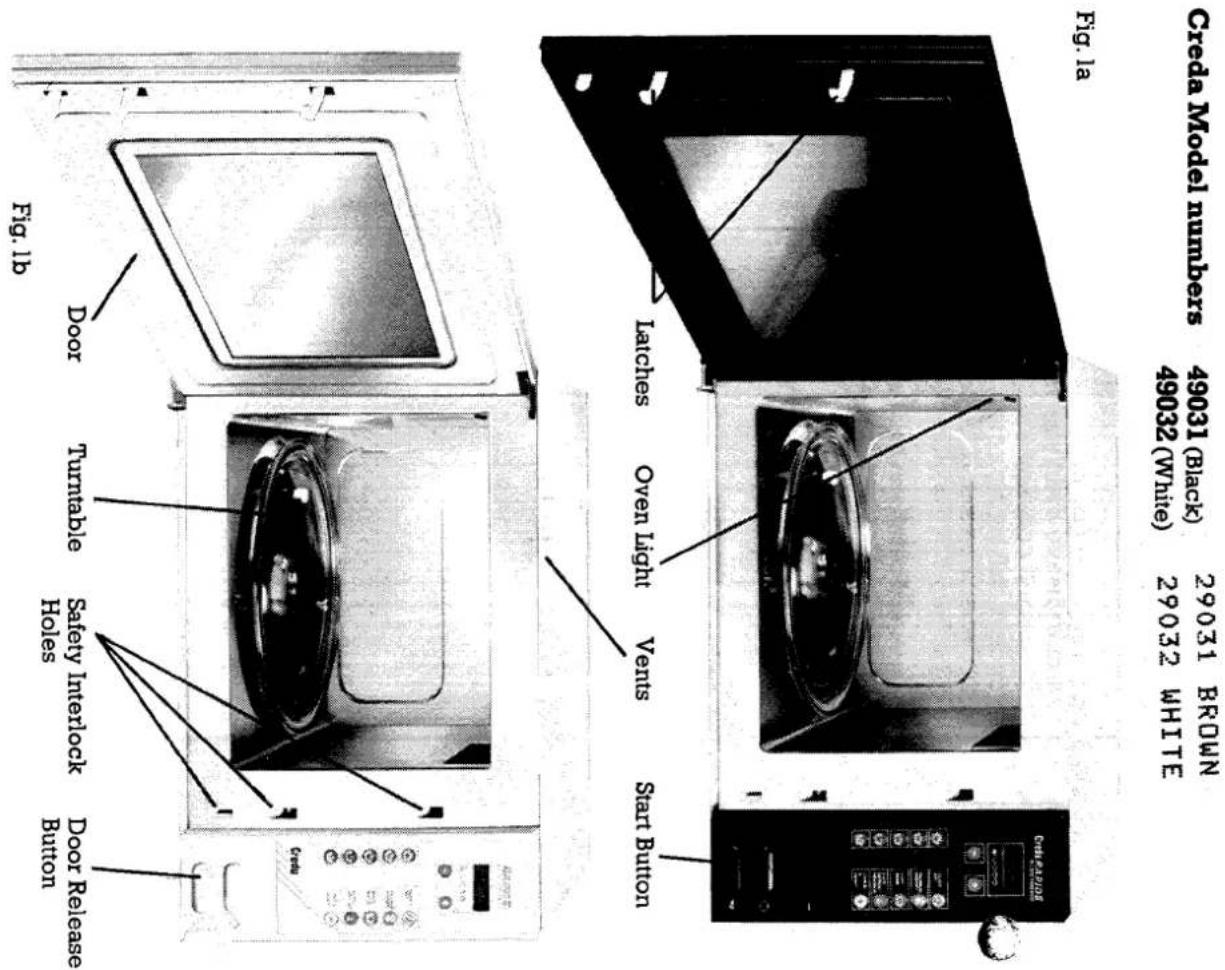
Know Your Machine
Specifications
Power Source Refer to rating plate.
Power Consumption 1150W
Outer Dimensions
Depth 417mm
(1)
Interior Dimensions
Depth 350mm Height 240mm
Net Weight 23kg
Microwave Frequency 2450MHz
Should the mains lead ever require replacement, it is dangerous for anyone other than a service technician trained by the manufacturer to perform a repair service. N.B. We recommend the use of good quality plugs and wall sockets that can be switched off when the machine is not in use.
qualified electrician.
When wiring the plug, ensure that all strands of wire are securely retained in each terminal. Do not forget to tighten the mains lead clamp on the plug. If your electricity supply point has only two pin socket outlets, or if you are in doubt, consult a
marked with the letter L or coloured red.
The wire which is coloured brown must be connected to the terminal which is
The wire which is coloured blue must be connected to the terminal which is marked with the letter N or coloured black.
The wire which is coloured green and yellow must be connected to the terminal in the plug which is marked with the letter E or by the earth symbol 12 or coloured green or green and yellow.
The colours of the wires in the mains lead of this appliance may not correspond with the coloured markings identifying the terminals in your plug, proceed as follows:—
BROWN — LIVE
BLUE — NEUTRAL
IMPORTANT: The wires in the mains lead fitted to this appliance are coloured in accordance with the following code:
WARNING — THIS APPLIANCE MUST BE EARTHED. REFER TO RATING PLATE FOR VOLTAGE.
Electrical Requirements
Electrical Requirements
Note: Socket outlets are not permitted in bathrooms, neither should any provision be made for connecting moveable electrical appliances. No stationary appliance is to be installed within reach of a person using bath or shower. This appliance conforms to B.S. 800: 1983 and EEC directive 82/499 regarding suppression of radio and television reception interference.
Installation

DO NOT use an extension cord. Before connecting to the electricity supply, ensure that all packaging materials have been removed from the oven. Place the oven in the location of your choice, which should have a stable and level surface. Allow at least 5cm (2") clearance at the top, rear, right and lefthand sides to ensure proper ventilation. Avoid placing the oven near a cooker or other heat generating equipment.
Safety
Your new microwave oven has been carefully designed and thoroughly tested. However, to ensure maximum performance and safety, it is important for you to observe certain precautions when using the oven.
microwave energy, the precautions below are important. PRECAUTIONS TO AVOID POSSIBLE EXPOSURE TO EXCESSIVE MICRO ENERGY.
Do not tamper with or attempt to defeat the safety interlocks which are operated L, the door mechanism, or to make any irregular attempt to cause the oven to operate with the door open. Do not place any object between the oven front face and the door, or allow soil or cleaner residue to accumulate on sealing surfaces.
Repairs and Service
Details of service cover are outlined in the guarantee registration card supplied with your oven. It is advisable to have the door sealing checked periodically, this check can be carried out by the authorised service agent or your local Department of Health officer may have such a facility.
coming familiar with any new appliance takes a little time. If you experience any the problems listed below, try our solutions. They may save you the time and inconvenience of an unnecessary service call. 1. Food is not cooked at all.
- Have you set the cooking time and power level and pushed start button?
- Is the door closed?
- Have you overloaded the circuit and caused a fuse to blow?
-
Food is overcooked or undercooked.
-
Did you select the proper power level?
-
Sparks and crackling within oven interior (arcing).
-
Have you left a fork or other metal utensil or foil close to interior walls?
-
Condensation on door inside or interior walls.
-
Condensation on door inside or interior walls. This is normal, especially with high moisture foods.
-
Air movement around door. This is normal. The door is not meant to be air-tight.
-
Light reflection around door or outer case. This is normal.
-
Steam or vapour escaping from around door or vent. This is normal.
-
TV, radio interference.
Even if slight interference might be observed while operating oven, it does not indicate a problem with your oven. Place far enough from radio, TV aerial and connecting cable.
Cleaning and Maintenance
The control panel and trim are best wiped with a damp cloth, and then wiped immediately with a dry cloth. The door window's outer panel is plastic. Use a damp cloth to wipe clean. Do not use Petroleum spirit, thinners or any kind of chemical solvent to clean the oven door or control panel. Do not use scouring pads, or abrasive powder.
Storage
If you must store your microwave oven, choose a dry, dust-free place. Dust and dampness can affect the oven's working parts.
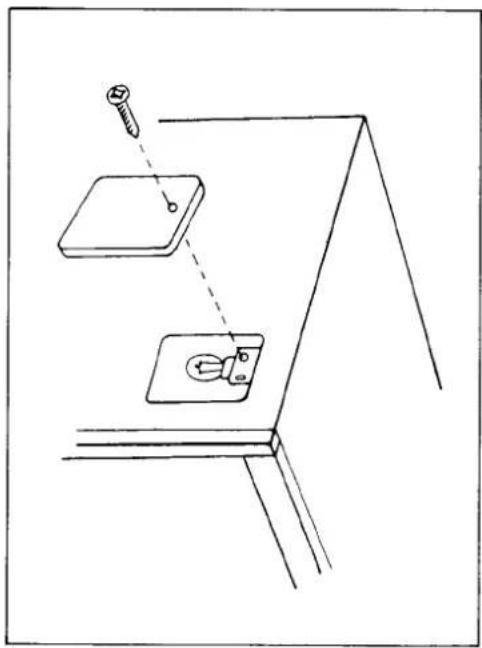
Oven Lamp Replacement
- Remove the panel and unscrew the defective lamp.
- Screw in the new lamp and refit the access panel.
Creda Limited
NOTE: The correct type of lamp may be obtained from:—
Creda Works
ST11 9LN
Blythe Bridge
Stoke-on-Trent
Please state the serial number and date of purchase of your oven when ordering replacements.
natural_image
Simple line drawing of a wall-mounted electrical switch with a screw inserted, no text or symbols presentBrowning dishes are suitable for use in your microwave oven. Leave the turntable in place and pre-heat exactly as long as the dish instructions require. Under no circumstances should a browning dish be heated any longer than the instructions indicate.
Some foods should be cooked in covered glass dishes to speed up cooking, to prevent spattering or to retain their large water content. Instead of a glass cover, use plastic film for the same purpose. Be particularly careful when removing glass covers and plastic wrap film from cooking dishes. Steam can build up during cooking and cause a steam burn to fingers, hands, and arms, if caution is not
Use white paper towels when paper towels are called for.
that might be easily broken by sudden heating or cooling. Plastic is seldom heated by microwaves. However, the heat of the food may cause some types of plastics to warp and become discoloured. Melamine or Urea plastic should never be used since it absorbs heat.
You can use any heat-resistant cookware. However, be careful about delicate glass
You can use all kinds of ceramics (China, glass ceramics and oven-proof clear glass utensils) unless they are coated with gold, silver or platinum. It is also wise to avoid using cracked ceramics.
Microwaves heat only the food, so you can serve on the same plate on which you cook. The plate will only be slightly warm from the heat of the food.
Cookware
(b) Under no circumstances should the outer case be removed except by a service technician trained by the manufacturer.
PRECAUTIONS TO AVOID POSSIBLE ELECTRIC SHOCK (a), if a new plug is fitted, ensure that it is correctly wired.
It is dangerous for anyone other than a service technician trained by the manufacturer to perform repair service. Unauthorised service may make the guarantee void.
It is particularly important that the door closes properly, and that there is no damage to the door, hinges and latches, door seals and door seal areas. If these areas are damaged, the appliance should not be operated until it has been repaired by a service technician trained by the manufacturer.
Safety
Cookware
To test if a dish (except browning) is suitable for use in your microwave oven, place the dish with a glass of water onto the turntable. Switch the oven on for 1 12 minutes on HIGH. If the water gets hot and the dish stays cool, the dish is suitable. If the reverse is found the dish must not be used in your microwave oven. Should you find that both the dish and the water are warm, this means that the dish is absorbing some microwave energy and although it could be used, being less efficient, the cooking or heating times will be longer. For further information, see your microwave cookbook.
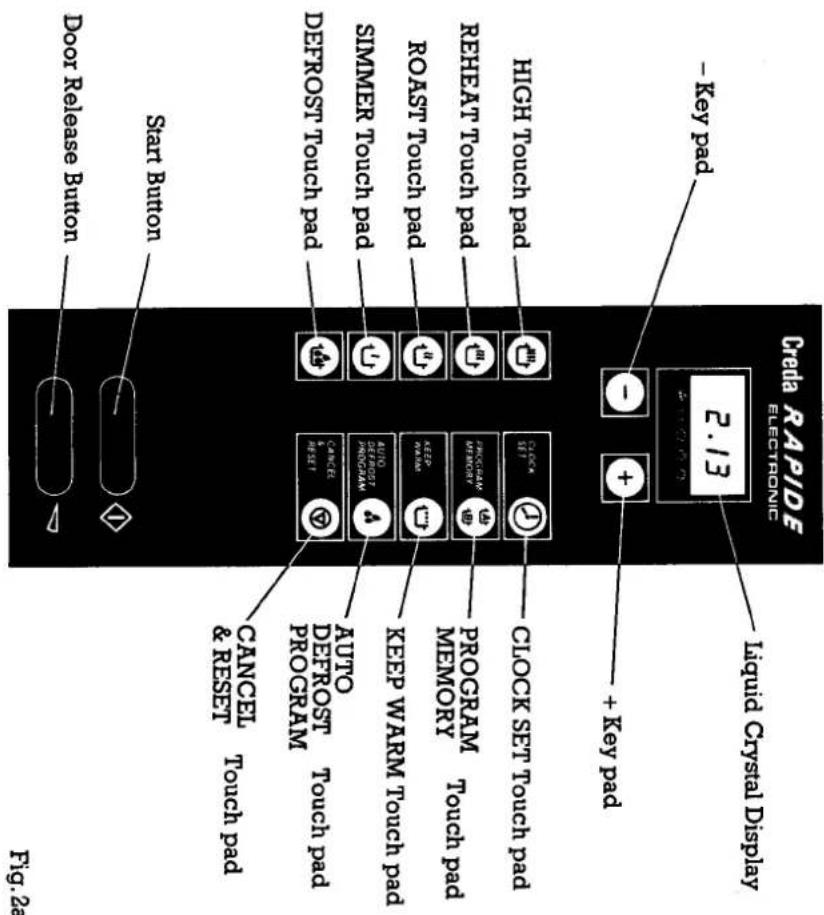
Control Panel

Interior
Switch Off and remove plug from socket. It is easier to clean the microwave oven than a conventional cooker as oven surfaces are flat and cool. The daily cleaning procedure is as follows: Make sure the oven is turned off before cleaning any part.
Cleaning
It is easier to clean the microwave oven than a conventional cooker as oven surfaces are flat and cool. The daily cleaning procedure is as follows: Make sure the oven is turned off before cleaning any part.
1 do not allow grease, soil and spatter to build up. A build up of grease or food particles on the oven interior can result in damage to the oven as well as loss of cooking power.
- Use only a mild detergent, water and a soft cloth to clean the door surface and interior. DO NOT use scouring pads, powder or other abrasive materials.
-
To loosen stubborn food particles, place a measuring cup filled with water on the turntable. Operate the oven until the water boils, the steam will loosen any stubborn particles.
-
Odours can be eliminated from the inside of the oven by boiling a solution of one cup of water and several tablespoons of lemon juice in the oven for 5-7 minutes.
-
Ensure that the oven door seal and front rim of the oven are kept clean and free from soil. These areas should be inspected regularly for damage.
-
Wipe excess moisture from the inside of the oven, including the door and door seal, AFTER EACH USE. Note: The moisture on the inside of your microwave oven is normal, and nothing to worry about. It is caused by the steam from the cooking food coming into
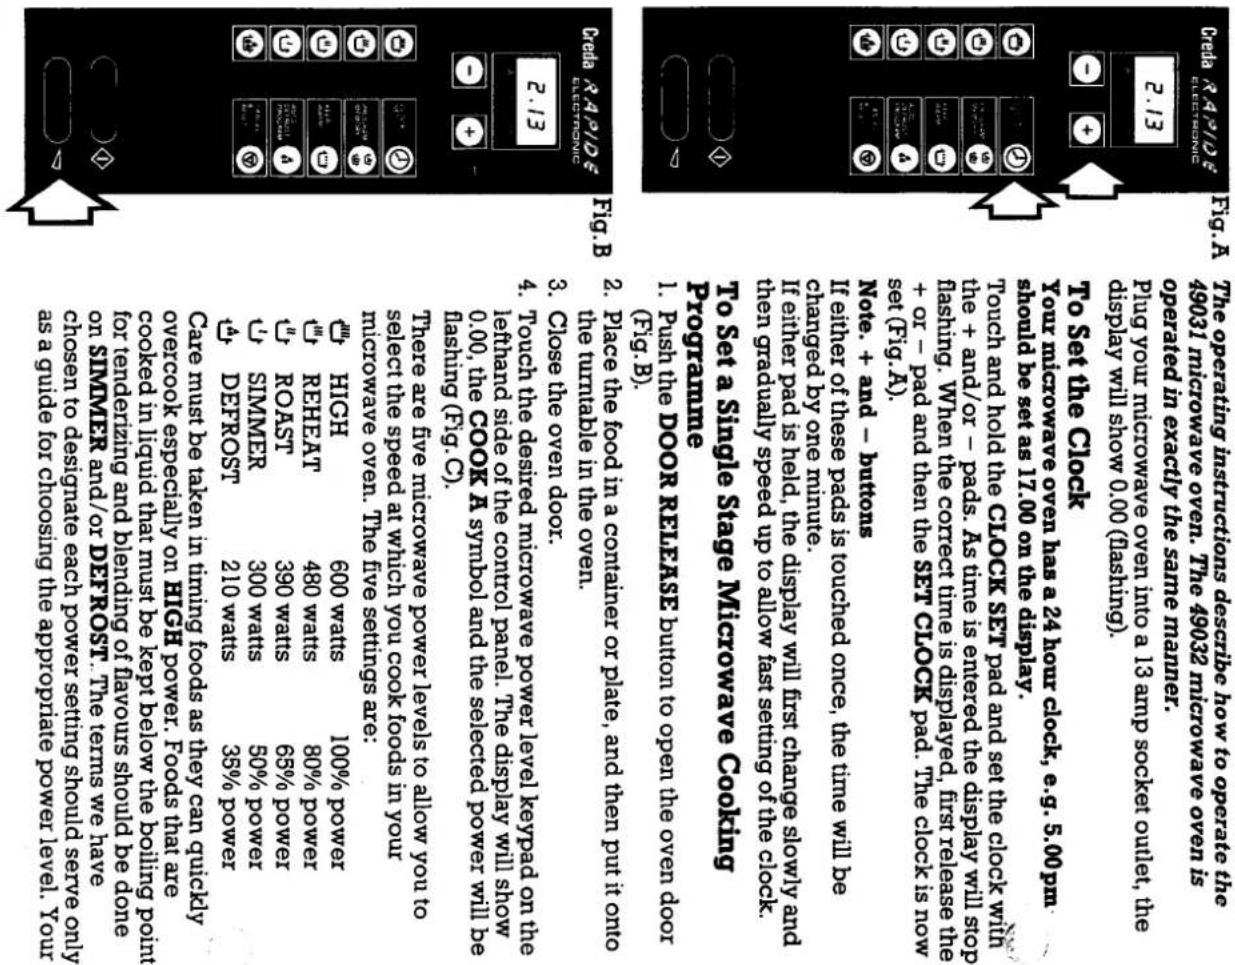
The START button, below the touch sensitive keyboard, when pressed both initiates the microwave programme and locks the oven door.
Pressing the DOOR RELEASE button gently stops the microwave programme. If the DOOR RELEASE is pressed hard this both stops the microwave programme and opens the oven door.
The turntable is removable. To clean spins, remove and wash in sink of dishwasher. Periodic cleaning under the turntable may be required. Never try to rapidly cool the turntable (or other cookware) in water while it is still hot. If the turntable is used successively for a long time, it will be heated up to a high temperature. Never dip it into cold water or wipe with a cold dish cloth. Such rapid cooling will possibly cause the turntable to crack or break.
Exterior
T outer cabinet is painted. Clean with a cloth or sponge, moistened in a mild detergent solution, and then dry with a clean cloth. Avoid spilling water into the vents. Do not use Petroleum spirit, thinners or any kind of chemical solvent to clean the outer cabinet.
Cooking Precautions
Do not use metal cookware or dinnerware with metal trims. Arcing can occur damaging oven and dish.
Do not leave any metal such as a fork or metal skewers in the oven. Do not place capped bottles, food in vacuum-tight containers or sealed jars in the
explode when heated.
Do not wrap foods in aluminium foil for cooking. Microwaves cannot penetrate metal, therefore, no cooking will take place. Small amounts of foil may be used to shield food areas from overcooking when called for in some recipes.
Never try to heat up oil alone. If a container of oil is heated for a long time, the temperature of the oil becomes very high, possibly causing the turntable to crack or break.
Never cook eggs in their shells. Microwave cooking is so fast that pressure will build up inside the shell and cause it to explode.
Pierce the skins of potatoes, tomatoes and other such foods before cooking. Pierce holes in plastic wrap when using it to cover containers. This allows st
escape.
Do not use wire twist-ties on paper and plastic bags. They become hot and can cause a fire. Replace them with string or a strip of plastic.
Do not pop popcorn in the microwave oven.
Check the food periodically until you become familiar with this modern way of
and because the food itself will vary in weight, tenderness and shape.
When food is removed from the oven, it continues to cook for a short period of time. To avoid over-cooking remove food slightly before it is done and allow for standing time to complete cooking.
Due to the speed and efficiency of Microwave Cooking, foods and liquids reach
high temperature very quickly, it is not uncommon for the vessels holding these hot foods/drinks to remain relatively cool to the touch. Therefore you should exercise
water by microwave, care should be exercised in removing the vessel from the
oven as the water may boil suddenly when disturbed.
Do not sterilise baby feeding bottles/utensils in microwave ovens, as air bubbles may get trapped causing incomplete sterilisation. Sterilising solutions should not
heated in microwave ovens.
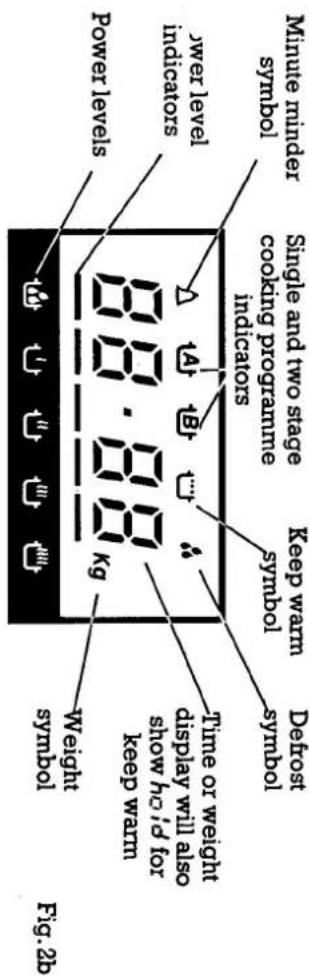
LIQUID CRYSTAL DISPLAY
Control Panel
Operating Instructions
Operating Precuations
Use only special microwave thermometers in the oven during cooling, do not use a convolutional meal thermometer while cooling. Instead, stop the oven, remove the food and check the temperature. Remove the thermometer before resuming cooling. Do not place more than 10 pounds on the turbable and attempt to operate the oven. The turbatable will not turn. not dry wet newspaper in the microwave oven, or use newspaper in the “twelve oven to cook on.” twelve paper could catch fire. Do not use recycled paper products in the microwave oven. Some recycled paper may contain metal particles which could cause arcing or a fire. Do not revolve the turbable by hand.
Operating Instructions
Operating Instructions
Operating Instructions
Operating Instructions
Operating Instructions
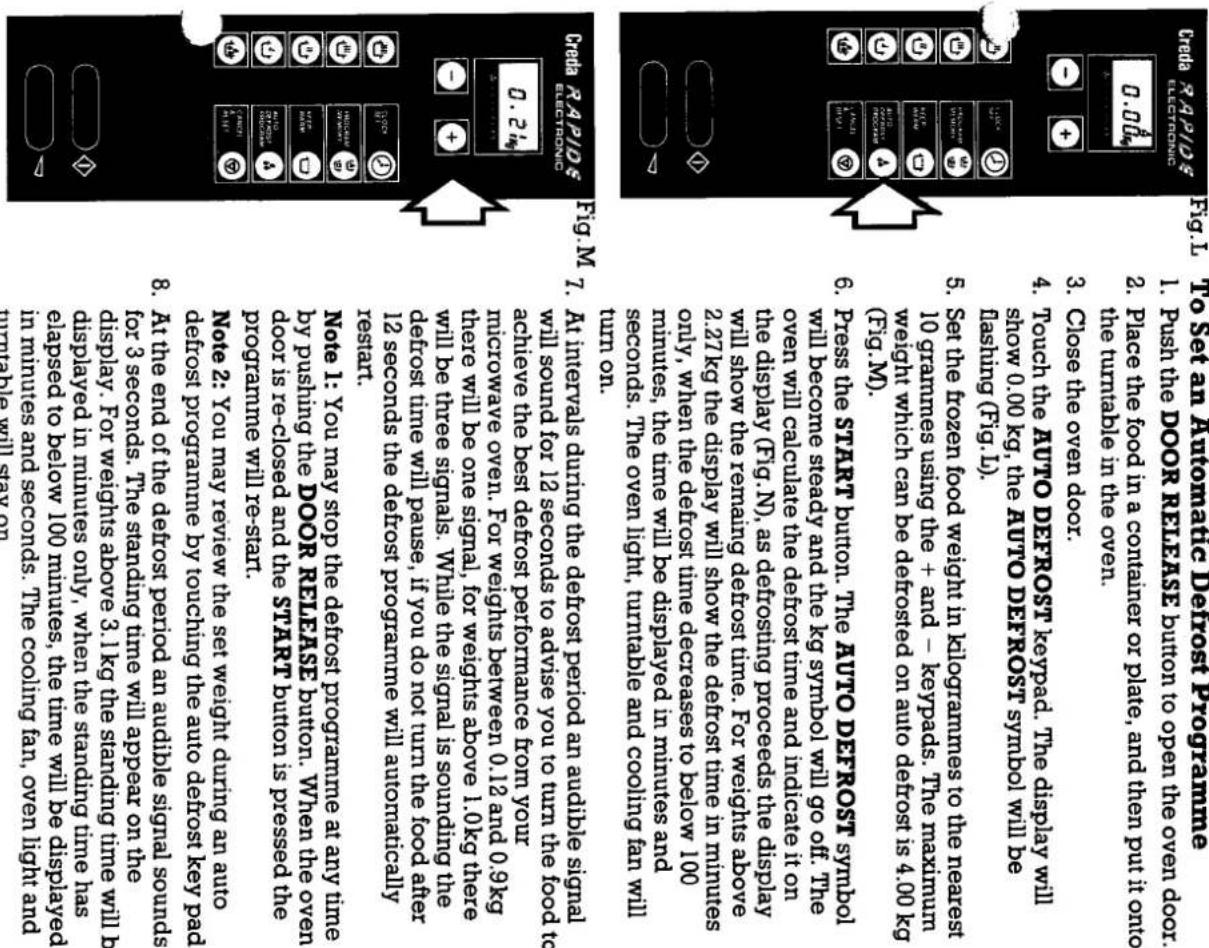
Defrosting sausages, chops, etc.
Place the meat in a suitable container with a lid, or cover with plastic wrap film.
Place the container onto the turntable in the microwave oven and set the auto d
programme as described below.
When the audible signal is heard during the defrosting time, divide and turn the pieces of meat to ensure even defrosting.
Defrosting poultry
Remove the bird from its wrapping, place in a roastabag and then place into a dish.
Metal wire ties should not be used for sealing the roastabag.
Place the dish onto the turntable in the microwave oven and set the auto defrost programme as described below.
When the audible signal is heard during the defrost time, turn the bird over. On the
second turn it may be necessary to shield the wing tips, top of the breast and leg tips with small pieces of foil to protect them from over defrosting. For very small birds it
may be necessary to shield these parts on the first turn. Make sure that the foil does
not touch the sides of the oven as the food rotates, as this will cause arcing.
The giblets should be removed as soon as possible, generally they will not remove until the second or third turn.
At the end of the standing time remove the giblets, if not already removed, wash the bird well in cold water and cook immediately.
Defrosting joints of meat
Remove the meat from its wrapping, place in a roastabag and then place into a dish.
Metal wire ties should not be used for sealing the roastabag.
Place the dish onto the turntable in the microwave oven and set the auto defrost programme as described below.
When the audible signal is heard during the defrost time, turn the joint over.
During defrosting it may be necessary to shield the ends of the joint or any exposed
bones with small pieces of foil.
Operating Instructions
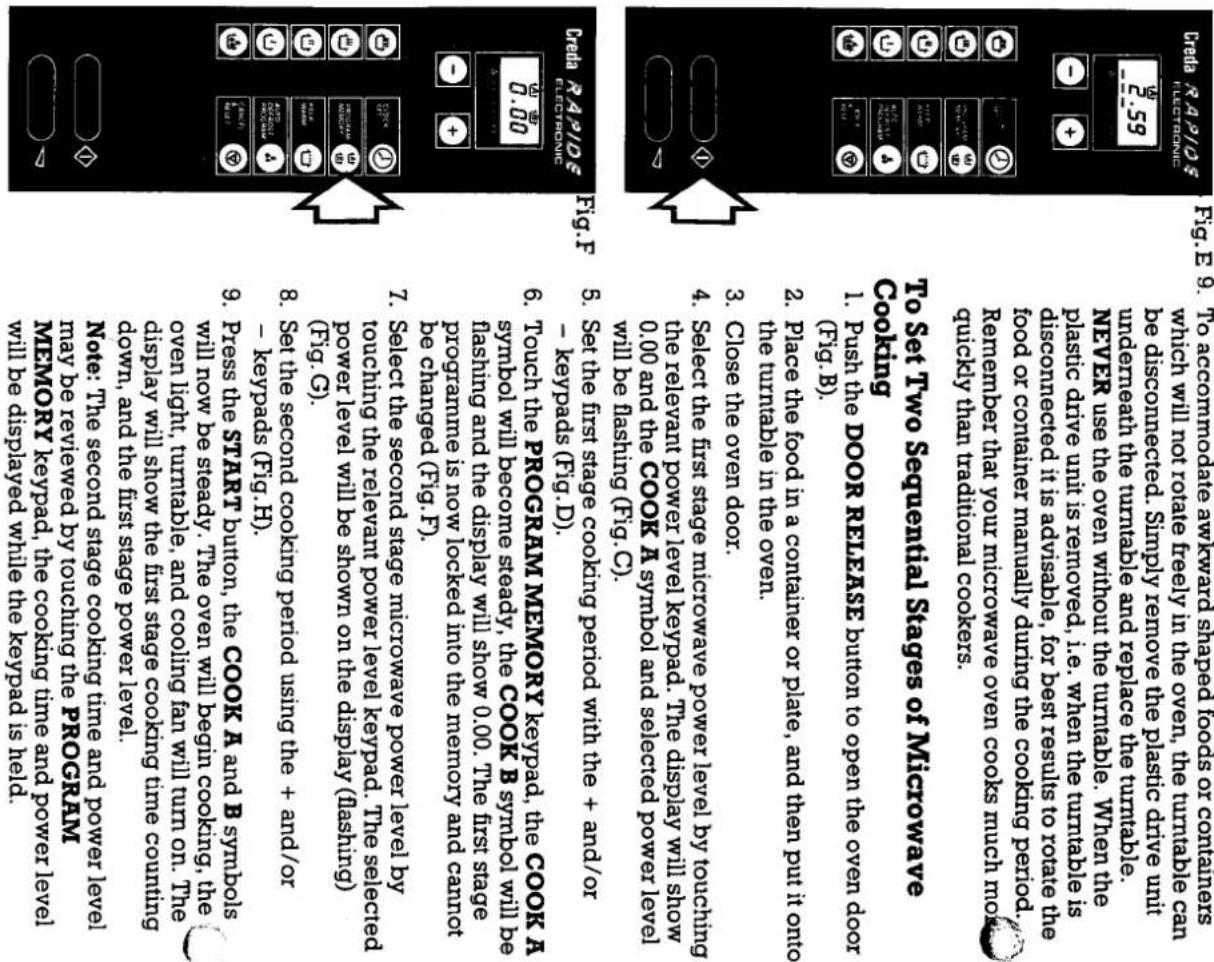
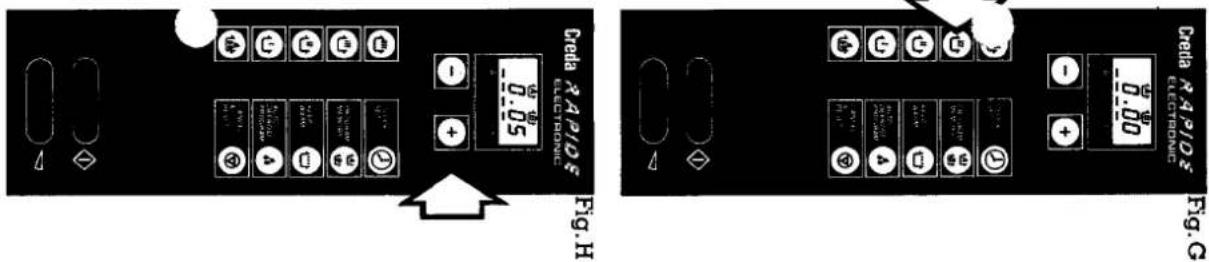
Fig. G
and power level.
At the end of the audible signal the oven will begin
cooking period will be counting down on the display.
When the second cooking period is completed, an
audible signal will sound for 3 seconds, the oven will switch off and the clock will return to the display.
Push the DOOR RELEASE button to open the ove
and take the food out.
To Change a Single Stage Microwave
Programme
-
Stop cooking by pushing the DOOR RELEASE button gently, the cooling time on the display will freeze
-
Adjust the cooling time using the + and/or - keymads if
desired.
- Adjust the microwave power by touching the desired power level keypad. The new power level and COOK A
symbol will be flashing on the display.
- Press the START button. The oven will begin cooking on
the new programme.
To Change a Two Stage Microwave Programme
-
Push the DOOR RELEASE button gently to stop cooking.
-
To change the first stage cooking programme, fo
instructions above for a single stage microwave
programme.
- To change the second cooking stage, touch PROGR MEMORY the display will show the second cooling
MEMORY the display v period and power level.
period and power level.
- You may now change the cooking time using the + and/or - keymads
and/or - keypads. 5. Change the second
- Change the second power level required by teaching the revelant power level keypad. The new power level
and COOK B symbol will be flashing.
- Press the START button to restart cooking.
Note: If the first cooking stage has finished, the second
RELEASE gently to stop cooking, and entering a new
RELEASE gently to stop cooking, and entering a new
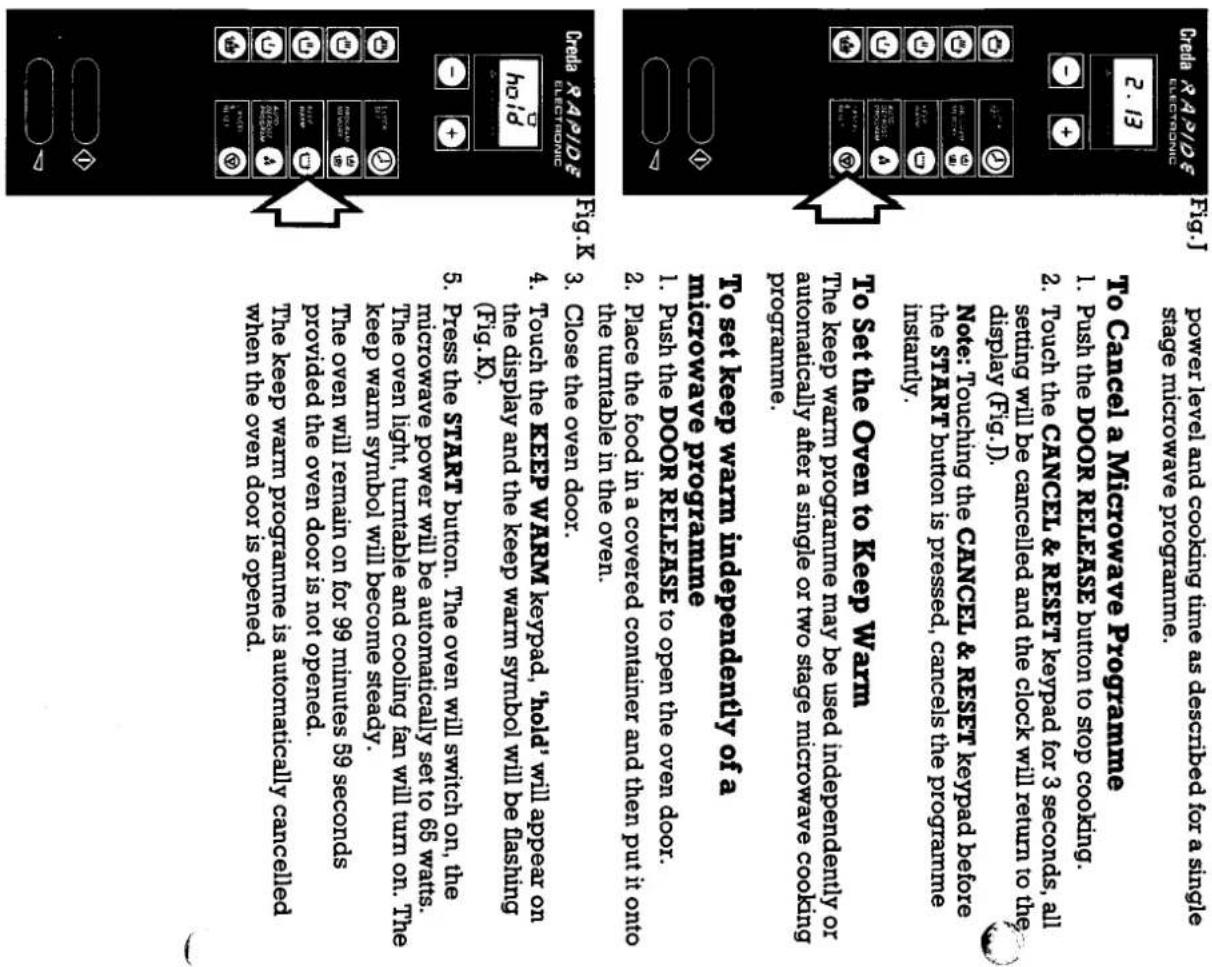
Operating Instructions
Operating Instructions
To set keep warm to come on after a microwave programme 1. Set a microwave cooking programme as described above. 2. Touch the KEEP WARM keypad, the KEEP WARM symbol will be flashing, the microwave cooking programme will remain on the presidency, hold, will not appear on the presidency. 3. Press the START button. The oven will begin cooking, the cooling fan, oven light and turntable will turn on. At the end of microwave cooking, an adjustable signal will sound for 3 seconds, the oven will automatically go into the keep warm mode, hold, will appear on the presidency. You microwave oven has a special microwave programme for detrosting frozen meet, poultry and fish. This particular feature is designed to reduce the possibility of over defrosting which can occur on simpler microwave ovens producing cooked areas in the food being defosted. This programme also eliminates any errors in calculating the detrost time as you are only required to enter the frozen weight of the food to be detrosted, the oven will automatically calculate the detrost and standing times required. You must allow the auto derost programme to completely finish before removing the food from the oven, i.e. allow the food to remain in the oven for the standing time indicated on the display. To achieve the best detrost performance from your microwave oven, you are advised to follow out defrosting recommendations below. Since the defrosting result will depend on the initial starting temperature of the food, you are advised to check that the food has completely defosted before it is cooked. Defrosting stimuli cuts of meat, e.g. minice, stewing steak, etc. When the audible signal is heard during the detrost time, break up the pieces of meat, this will ensure that the meat is evenly defosted. Place the container onto the turntable in the microwave oven. When the audible signal is heard during the detrost time, break up the pieces of cover with plastic wrap film. Cover with plastic wrap film. For every derost programme as described below. When this will ensure that the meat is evenly defosted.
THE SERVICE CENTRE
Key Contacts
After Sales Service
Over 1100 trained specialists, directly employed by us, ensure that you have complete confidence in both the appliances and services we offer.
Repair Service
UK: 08709 066 066
(Open 8 to 8 Mon - Fri, 8 to 6 Sat & 10 to 4 Sun)
www.theservicecentre.co.uk
Republic of Ireland: 1850 302 200
Note: Our Service Operators will require the following information:
Model Number
Serial Number
Extended Warranties
UK: 08709 088 088
(Open 8 to 6 Mon - Fri)
www.theservicecentre.co.uk
Republic of Ireland: 1850 502 200
Genuine Parts and Accessories
UK: 08709 077 077
(Open 8-30 to 5-30 Mon - Fri, 8-30 to 12 Sat)
www.theservicecentre.co.uk
Republic of Ireland: (01) 842 6836