EPAC41CPK - Air-conditioner Esatto - Free user manual and instructions
Find the device manual for free EPAC41CPK Esatto in PDF.


| Model | EPAC41CPK |
| Product Type | Portable Air Conditioner |
| Cooling Capacity | Approximately 12000 BTU (estimated) |
| Heating Capacity | Not available (cooling only) |
| Dehumidification | Yes (DRY mode) |
| Fan Speeds | Auto, Low, Med, High |
| Remote Control | Included |
| Timer | 24-hour programmable (ON/OFF) |
| Sleep Mode | Yes |
| Swing (Louver) | Yes |
| Ionizer | Yes |
| Follow Me | Yes (temperature sensing at remote) |
| ECO Mode | Yes (in Cool mode) |
| Power Supply | 230V ~ 50Hz (estimated, Australia standard) |
| Refrigerant | R290 (estimated, typical for portable ACs) |
| Dimensions (HxWxD) | Approximately 70 x 38 x 35 cm (estimated) |
| Weight | Approximately 25 kg (estimated) |
| Noise Level | Approximately 52 dB (estimated) |
| Air Filter | Washable mesh filter |
| Warranty | Refer to warranty card at rear of manual |
| Compliance | FCC Part 15, ICES-003 |
Frequently Asked Questions - EPAC41CPK Esatto
User questions about EPAC41CPK Esatto
0 question about this device. Answer the ones you know or ask your own.
Ask a new question about this device
Download the instructions for your Air-conditioner in PDF format for free! Find your manual EPAC41CPK - Esatto and take your electronic device back in hand. On this page are published all the documents necessary for the use of your device. EPAC41CPK by Esatto.
USER MANUAL EPAC41CPK Esatto
Exactly what you need
Online:
esatto.house
Esatto
User Manual
Welcome
Residentia Group
Head Office
165 Barkly Avenue
Burnley Victoria
Australia 3121
ACN
600 546 656
Online
residentia.group
Postage
PO Box 6077
Collingwood North
VIC Australia 3066
Telephone
1300 11 4357
support@residentia.group
Congratulations on purchasing your air conditioner. The Esatto brand is proudly distributed within Australia by Residentia Group Pty Ltd.
Please refer to the warranty card at the rear of this manual for information regarding your product's parts and labour warranty, or visit us online at: www.residentiagroup.com.au
At Residentia Group, we are customer obsessed and our Support Team are there to ensure you get the most out of your appliance. Should you want to learn more about your unit such as the various temperature guides or importantly taking care of the appliance, our Support Team are here to help.
You can use our online Support Centre at anytime by visiting:
→ http://support.residentiagroup.com.au
Or you can contact us via phone by dialling: 1300 11 HELP (4357).
It is important that you read through the following use and care manual thoroughly to familiarise yourself with the installation and operation requirements of your appliance to ensure optimum performance.
Again, thank you for choosing an Esatto appliance and we look forward to being of service to you.
Kind Regards,
The Residentia Team
esatto.house
Esatto
Contents
Page 5
Specifications
Page 6
Your Remote
Control
Page 8
LED Display
Page 9
Remote Operation
Esatto
User Manual
This page is intentionally left blank
Specifications
| Model | RG57H(B)/BG(C)E; RG57H1(B)/BG(C)E; RG57H2(B)/BG(C)EF; RG57H3(B)/BG(C)EFU1; RG57H3(B)/BG(C)EF; RG57H1(B)/BG(C)E-M; RG57H(B)/BG(C)EU1; RG57H4(B)/BG(C)EFU1; RG57H(B)/BG(C)E-M; RG57H(B)/BG(C)EU1-M; RG57H3(B)/BG(C)EFU1-M; RG57H1(B)/BG(C)EU1-M; RG57H5(B)/BG(C)CEU1; RG57H5(B)/BG(C)CE; RG57H1(B)/BG(C)EU1; RG57H2(B)/BG(C)EFU1; RG57H3(B)/BG(C)EF; RG57H4(B)/BG(C)EF; RG57H2(B)/BG(C)EF-M; RG57H2(B)/BG(C)EFU1-M; RG57H4(B)/BG(C)EFU-B; RG57H4(B)/BGCEF-B; RG57J2(B)/BGCE(U1) |
| Rated Voltage | 3.0V(Dry batteries R03/LR03×2) |
| Signal Receiving Range | 8m |
| Environment | -5°C~60 C(23 F~140 F) |
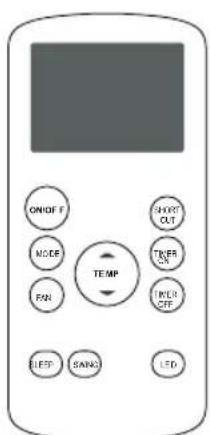
RG57H(B)/BG(C)E
RG57H(B)/BG(C)EU1
RG57H(B)/BG(C)EU1-M
RG57H(B)/BG(C)E-M
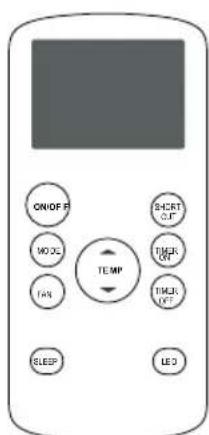
RG57H1(B)/BG(C)E;
RG57H1(B)/BG(C)E-M
RG57H1(B)/BG(C)EU1-M
RG57H1(B)/BG(C)EU1
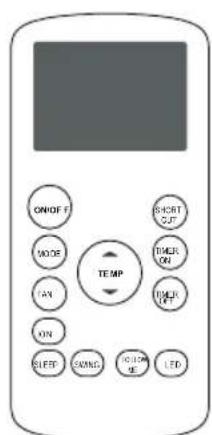
RG57H2(B)/BG(C)EF
RG57H2(B)/BG(C)EF-M
RG57H2(B)/BG(C)EFU1
RG57H2(B)/BG(C)EFU1-M
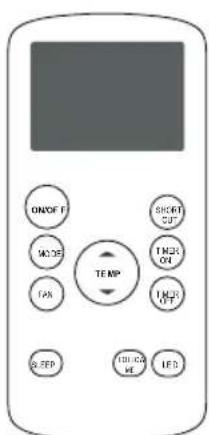
RG57H3(B)/BG(C)EF
RG57H3(B)/BG(C)EFU1
RG57H3(B)/BG(C)EFU1-M
RG57H3(B)/BG(C)EF-M
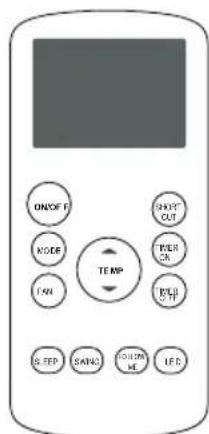
RG57H4(B)/BG(C)EFU1
RG57H4(B)/BG(C)EF
RG57H4(B)/BG(C)EFU1-B
RG57H4(B)/BG(C)EF-B
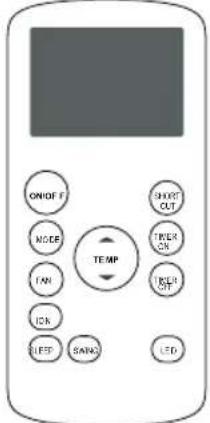
RG57H5(B)/BG(C)E
RG57H5(B)/BG(C)EU1
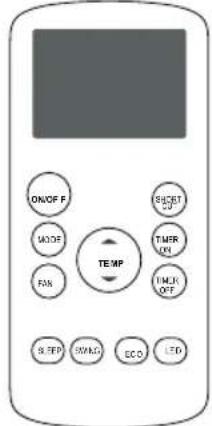
RG57J2(B)/BGCEU1
RG57J2(B)/BGCE
Your Remote Control
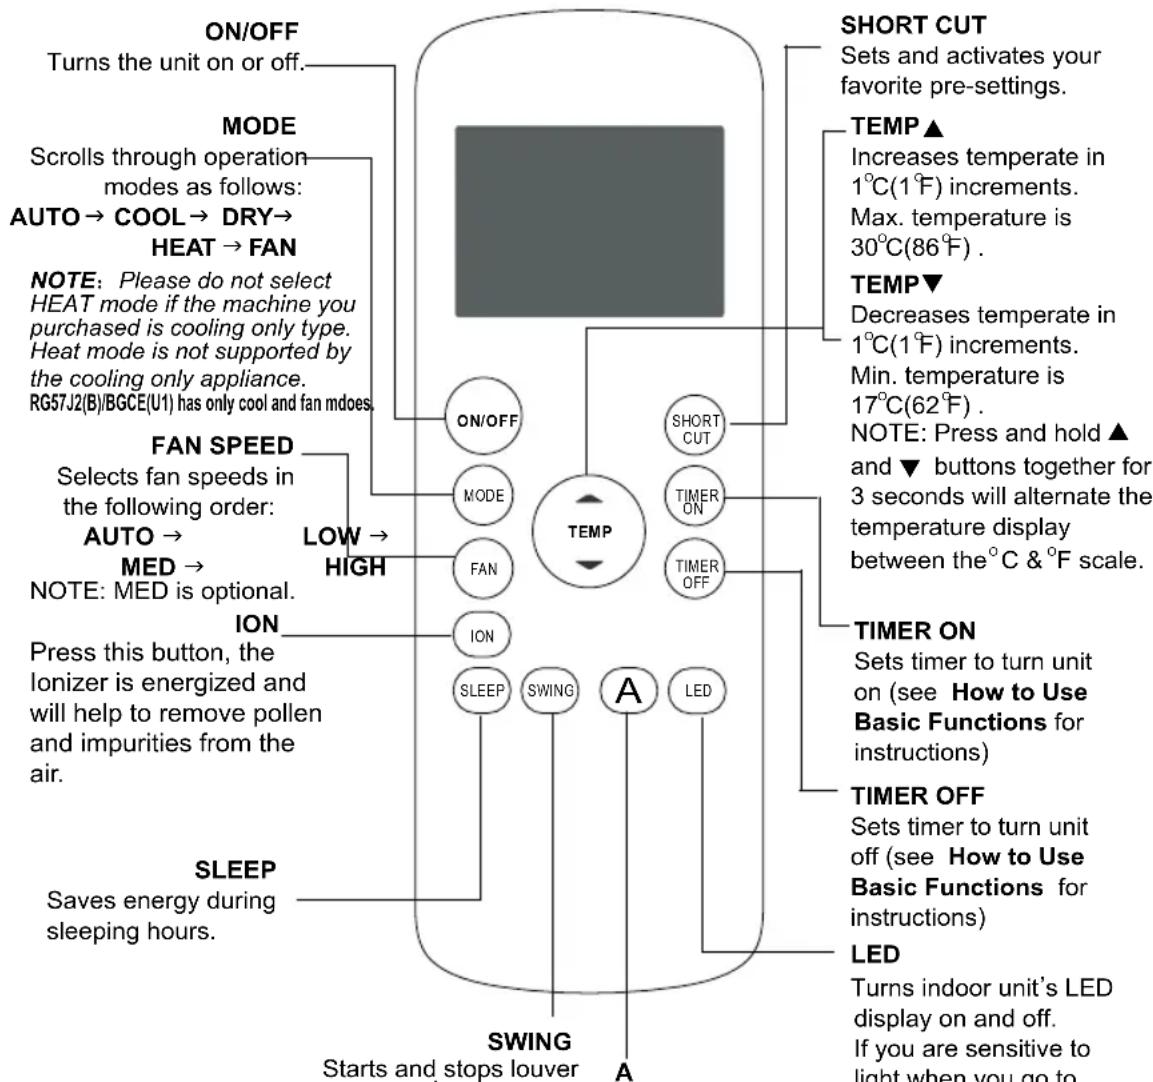
Before you begin using your new air conditioner, make sure to familiarize yourself with its remote control. The following is a brief introduction to the remote control itself. For instructions on how to operate your air conditioner, refer to the How to Use Basic Functions section of this manual.
flowchart
graph TD
    A["ON/OFF"] --> B["Short CUT"]
    B --> C["TIME ▲"]
    C --> D["TEMP ▲"]
    D --> E["MAX. temperature is 30°C(86°F) ."]
    E --> F["TEMP ▼"]
    F --> G["Decreases temperate in 1°C(1°F) increments. Min. temperature is 17°C(62°F) ."]
    G --> H["TIMER ON"]
    H --> I["TIMER OFF"]
    I --> J["LED"]
    J --> K["Turns indoor unit's LED display on and off. If you are sensitive to light when you go to"]
    A --> L["MODE"]
    L --> M["OFF Turns the unit on or off."]
    M --> N["MODE"]
    N --> O["Scrolls through operation modes as follows: AUTO → COOL → DRY → HEAT → FAN"]
    O --> P["NOTE: Please do not select HEAT mode if the machine you purchased is cooling only type. Heat mode is not supported by the cooling only appliance. RG57J2(B)/BGCE(U1) has only cool and fan mdoes."]
    P --> Q["FAN SPEED"]
    Q --> R["Selects fan speeds in the following order: AUTO → MED → NOTE: MED is optional."]
    R --> S["LOW → HIGH"]
    S --> T["ION"]
    T --> U["Press this button, the lonizer is energized and will help to remove pollen and impurities from the air."]
    U --> V["SLEEP"]
    V --> W["Saves energy during sleeping hours."]
    W --> X["SWING"]
    X --> Y["Starts and stops louver"]
A: FOLLOW ME
Temperature sensing and room temperature display button.
A: ECO
Used to enter the energy efficient mode. This feature is available under cool mode only.
SHORT CUT
Sets and activates your favorite pre-settings.
TEMP ▲
Increases temperate in 1^ C( 1^ F) increments. Max. temperature is 30^ C( 86^ F).
TEMP▼
Decreases temperate in 1^ C( 1^ F) increments. Min. temperature is 17^ C( 62^ F). NOTE: Press and hold ▲ and ▼ buttons together for 3 seconds will alternate the temperature display between the ^ C & ^ F scale.
TIMER ON
Sets timer to turn unit on (see How to Use Basic Functions for instructions)
TIMER OFF
Sets timer to turn unit off (see How to Use Basic Functions for instructions)
LED
Turns indoor unit's LED display on and off. If you are sensitive to light when you go to sleep, you can press the LED button to turn off the LED display on the unit. Press the button again to turn it back on.
NOTE:
Swing, Ion, Follow me, ECO and Med fan speed features are optional.
NOT SURE WHAT A FUNCTION DOES?
Refer to the How to Use Basic Functions and How to Use Advanced Functions sections of this manual for a detailed description of how to use your air conditioner.
SPECIAL NOTE
- Button designs on your unit may differ slightly from the example shown.
- If the unit does not have a particular function, pressing that function's button on the remote control will have no effect.
- When there are wide differences between "Remote control Illustration" and "USER'S MANUAL" on function description, the description of "USER'S MANUAL" shall prevail.
Inserting and Replacing Batteries
Your air conditioning unit comes with two AAA batteries. Put the batteries in the remote control before use.
- Slide the back cover from the remote Control downward, exposing the battery compartment.
- Insert the batteries, paying attention to match up the (+) and (-) ends of the batteries with the symbols inside the battery compartment.
- Slide the battery cover back into place.

BATTERY NOTES
For optimum product performance:
- Do not mix old and new batteries, or batteries of different types.
- Do not leave batteries in the remote control if you don't plan on using the device for more than 2 months.

BATTERY DISPOSAL
Do not dispose of batteries as unsorted municipal waste. Refer to local laws for proper disposal of batteries.
- The remote control must be used within 8 meters of the unit.
- The unit will beep when remote signal is received.
- Curtains, other materials and direct sunlight can interfere with the infrared signal receiver.
- Remove batteries if the remote will not be used more than 2 months.
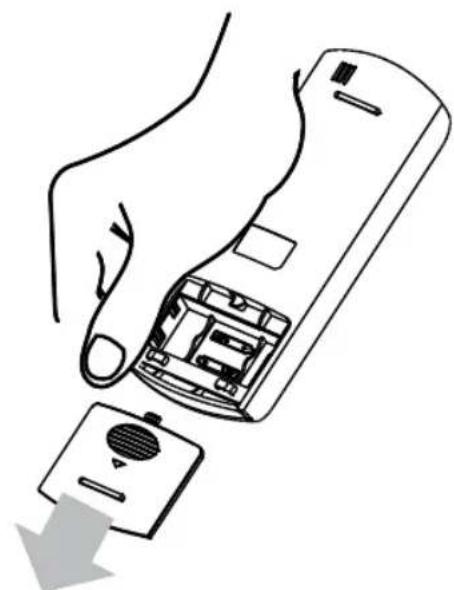
natural_image
Line drawing of a hand holding a remote control device with a button and arrow indicating action (no text or symbols)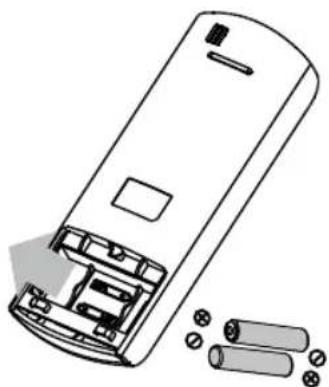
natural_image
Line drawing of a remote control casing with battery pack and external components (no text or symbols)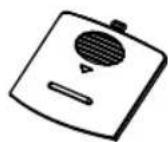
LED Display
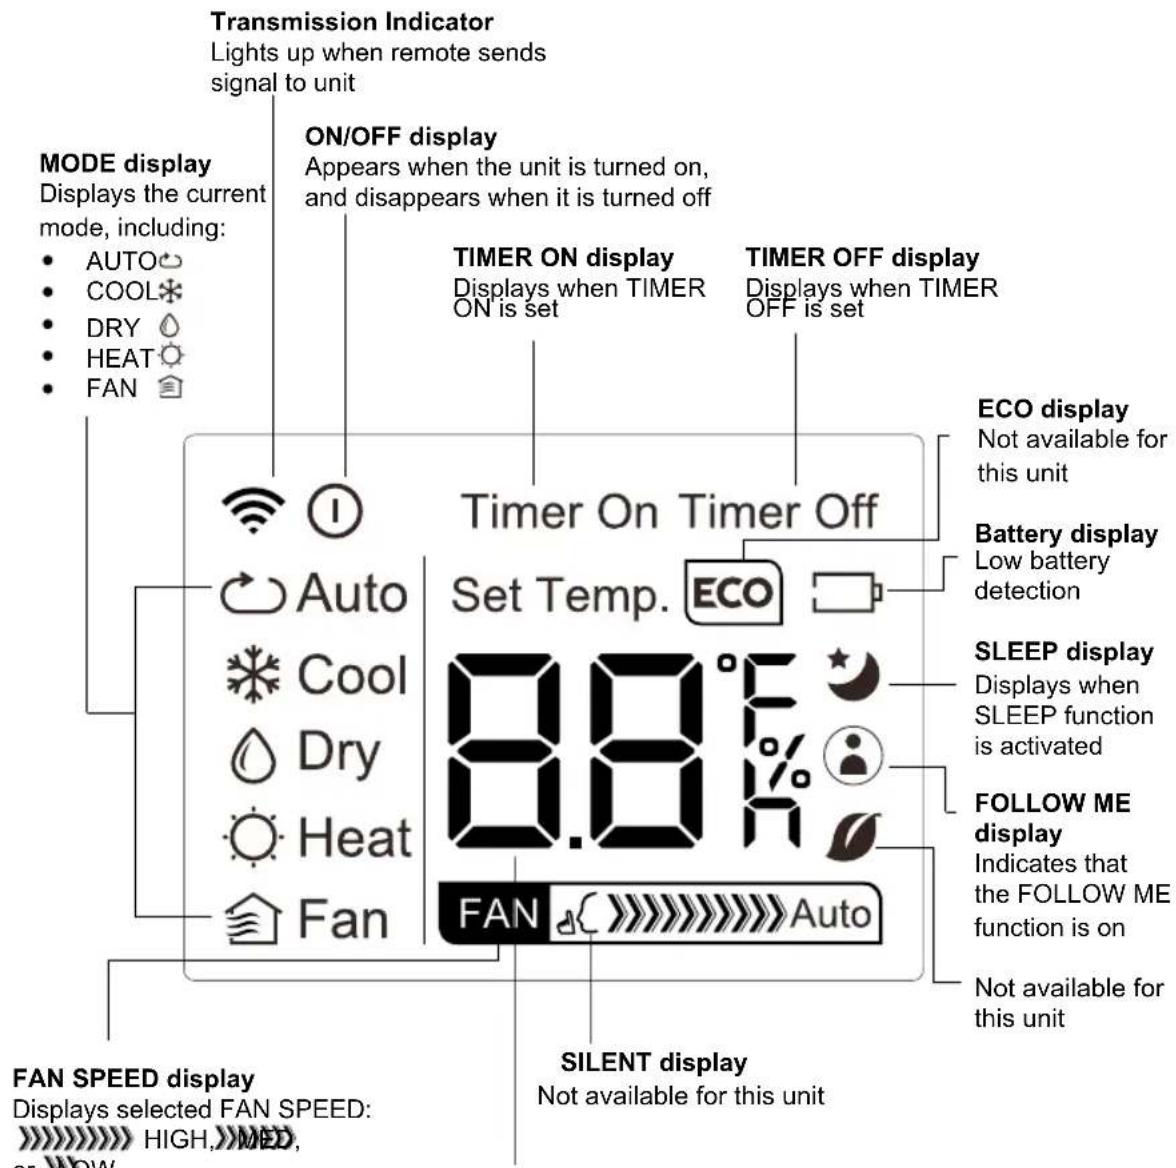
Temperature/Timer display
Displays the set temperature by default, or timer setting when using TIMER ON/OFF functions
• Temperature range: 17-30°C(62 F-86 F)
• Timer setting range: 0-24 hours
This display is blank when operating in FAN mode.
Remote Operation
flowchart
graph TD
    A["3 ON/OFF MODE"] --> B["TEMP"]
    C["1"] --> B
    B --> D["SHORT CUT"]
    B --> E["TIMER ON"]
    B --> F["TIMER OFF"]
    B --> G["ION"]
    B --> H["SLEEP"]
    B --> I["SWING"]
    B --> J["FOLLOW ME"]
    B --> K["LED"]
SETTING TEMPERATURE
The operating temperature range for units is 17-30 ^ C(62 F-86 F). You can increase or decrease the set tmeperature in 1 C(1 F) ^ increments.
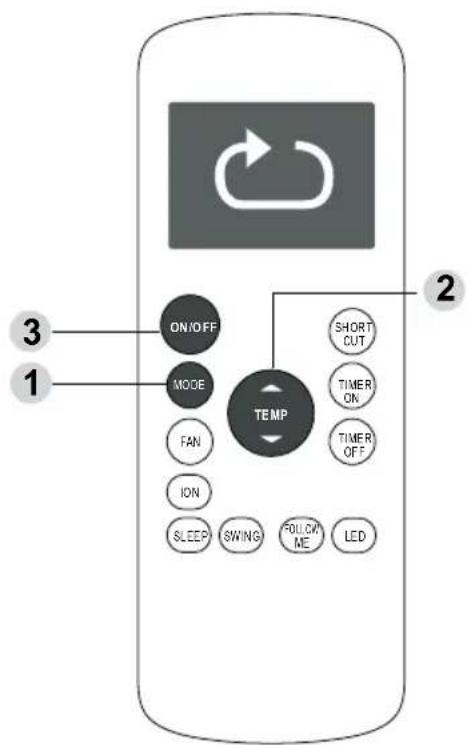
AUTO operation
In AUTO mode, the unit will automatically select the COOL, FAN, HEAT or DRY mode based on the set temperature.
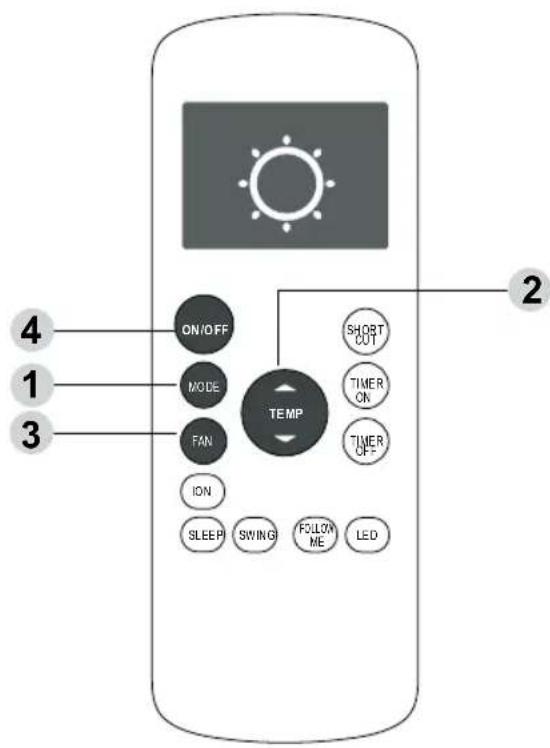
- Press the MODE button to select Auto mode.
- Set your desired temperature using the
Temp ▲ or Temp ▼ button. - Press the ON/OFF button to start the unit.
NOTE: FAN SPEED can t be set in Auto mode.
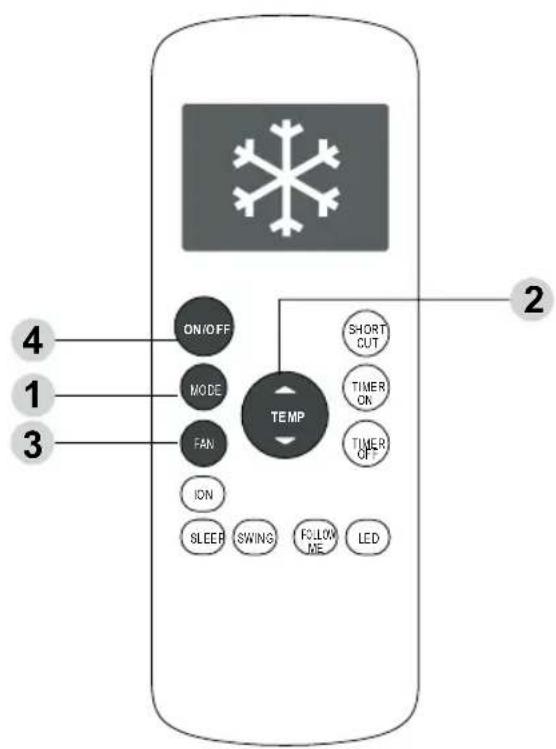
COOL operation
- Press the MODE button to select COOL mode.
- Set your desired temperature using the Temp ▲ or Temp ▼ button.
- Press the FAN button to select the fan speed: AUTO, LOW, MED, or HIGH.
- Press the ON/OFF button to start the unit.
Remote Operation (Continued)
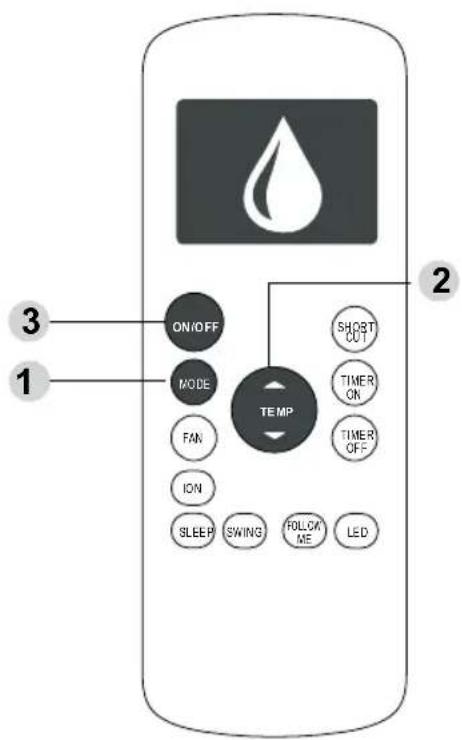
DRY operation(dehumidifying)
- Press the MODE button to select DRY mode.
- Set your desired temperature using the Temp ▲ or Temp ▼ button.
- Press the ON/OFFbutton to start the unit.
NOTE: FAN SPEED can t'be changed in DRY mode.
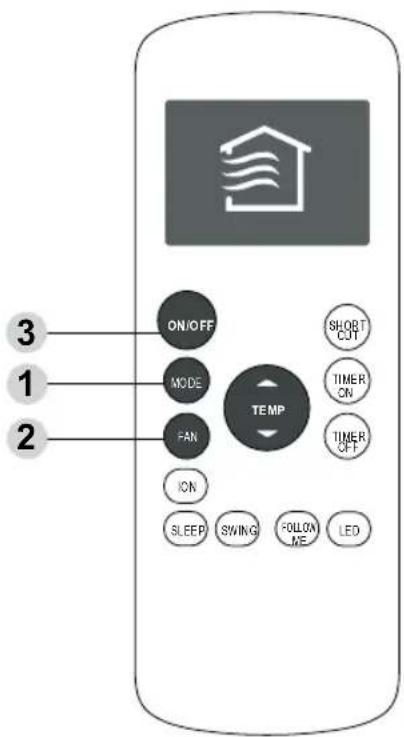
FAN operation
- Press the MODE button to select FAN mode.
- Press FAN button to select the fan speed: AUTO, LOW, MED or HIGH.
- Press the ON/OFFbutton to start the unit.
NOTE: You can't set temperature in FAN mode. As a result, your remote control s LCD screen will not display temperature.
HEAT operation
- Press the MODE button to select HEAT mode.
- Set your desired temperature using the Temp ▲ or Temp ▼button.
- Press the FAN button to select the fan speed: AUTO, LOW, MED, or HIGH.
- Press the ON/OFF button to start the unit.
NOTE: As outdoor temperature drops, the performance of your unit's HEAT function may be affected. In such instances, we recommend using this air conditioner in conjunction with other heating appliance.
Remote Operation (Continued)
Your air conditioning unit has two timer-related functions:
TIMER ON- sets the amount of timer after which the unit will automatically turn on. TIMER OFF- sets the amount of time after which the unit will automatically turn off.
TIMER ON function
The TIMER ON function allows you to set a period of time after which the unit will automatically turn on, such as when you come home from work.
-
Press the TIMER ON button. By default, the last time period that you set and an "h" (indicating hours) will appear on the display. Note: This number indicates the amount of time after the current time that you want the unit to turn on. For example, if you set TIMER ON for 2 hours, "will appear on the screen, and the unit will turn on after 2 hours.
-
Press the TIMER ON button repeatedly to set the time when you want the unit to turn on.
- Wait 2 seconds, then the TIMER ON function will be activated. The digital display on your remote control will then return to the temperature display.
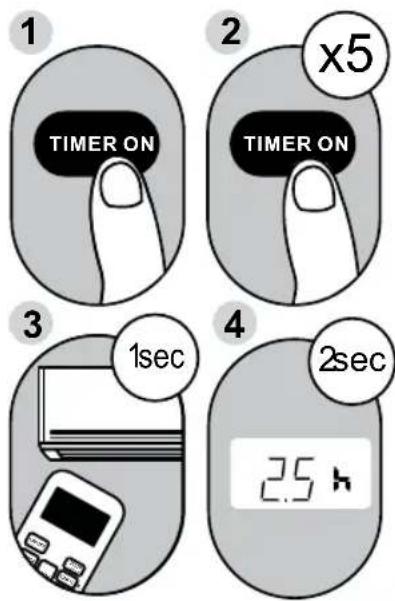
Example: Setting unit to turn on after 2.5 hours.
TIMER OFF function
The TIMER OFF function allows you to set a period of time after which the unit will automatically turn off, such as when you wake up.
-
Press the TIMER OFF button. By default, the last time period that you set and an "h" (indicating hours) will appear on the display. Note: This number indicates the amount of time after the current time that you want the unit to turn off. For example, if you set TIMER OFF for 2 hours, "will appear on the screen, and the unit will turn off after 2 hours.
-
Press the TIMER OFF button repeatedly to set the time when you want the unit to turn off.
- Wait 2 seconds, then the TIMER OFF function will be activated. The digital display on your remote control will then return to the temperature display.
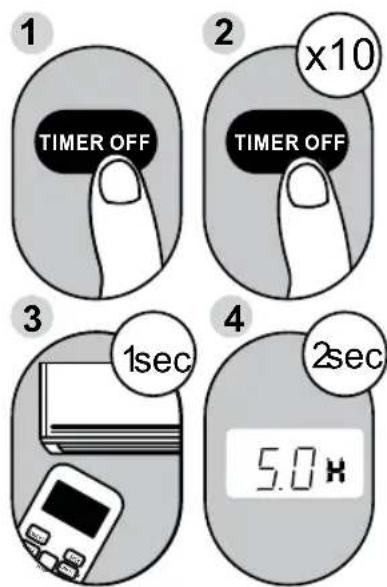
Example: Setting unit to turn off after 5 hours.
NOTE: When setting the TIMER ON or TIMER OFF functions, up to 10 hours, the time will increase in 30 minute increments with each press. After 10 hours and up to 24, it will increase in 1 hour increments. The timer will revert to zero after 24 hours.
You can turn off either function by setting its timer to "0.0h"
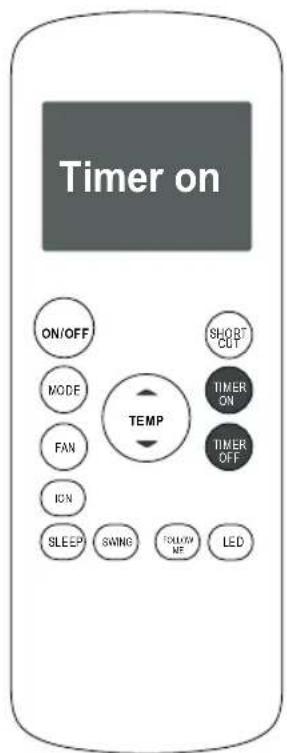
Continue to press TIMER ON or TIMER OFF until desired time is reached.
Remote Operation (Continued)
Setting both TIMER ON and TIMER OFF at the same time
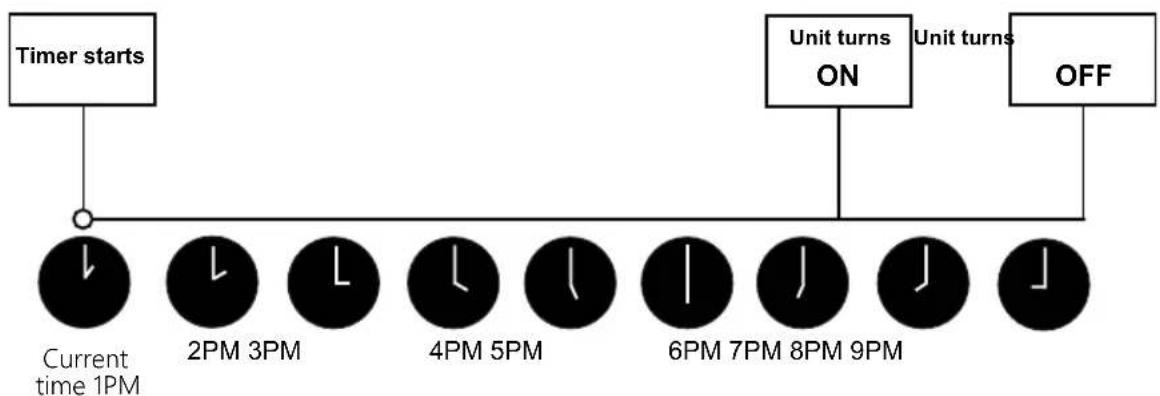
Keep in mind that the time periods you set for both functions refer to hours after the current time. For example, say that the current time is 1:00 PM, and you want the unit to turn on automatically at 7:00 PM. You want it to operate for 2 hours, then automatically turn off at 9:00 PM.
Do the following:
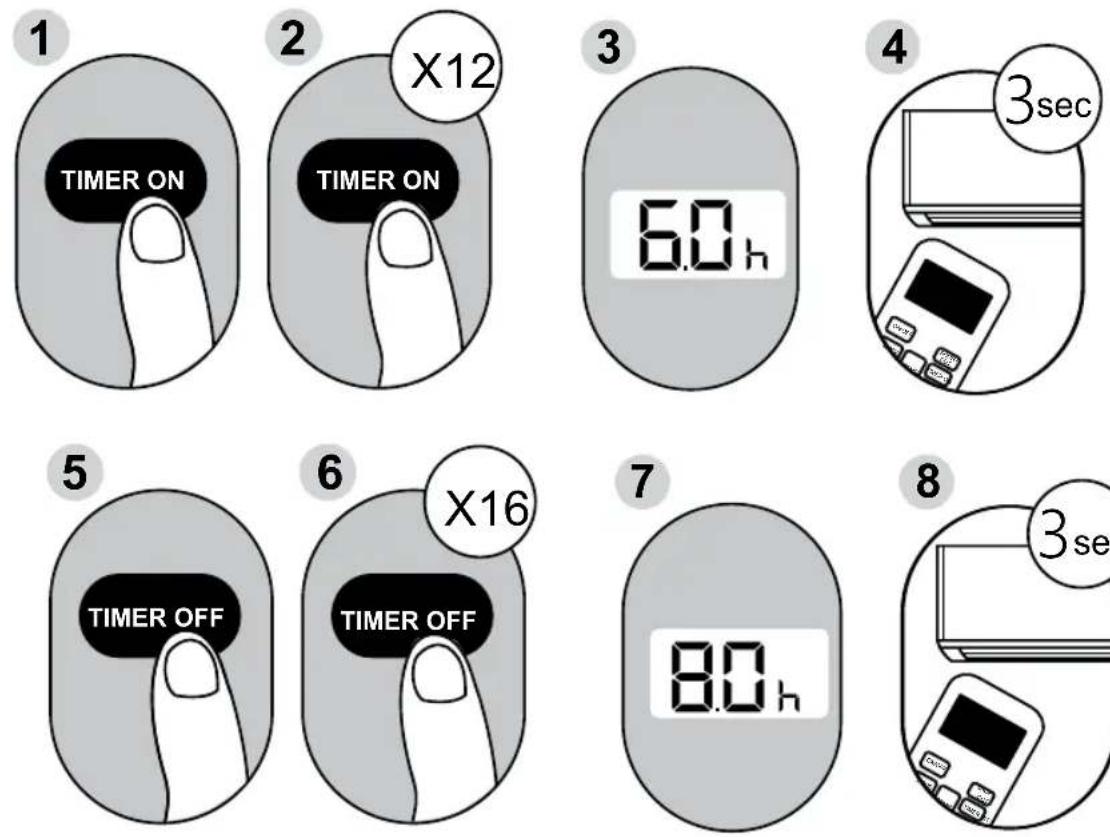
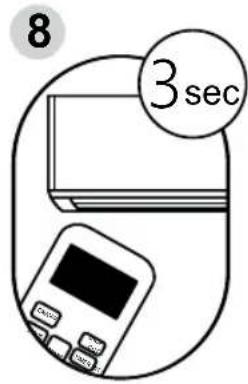
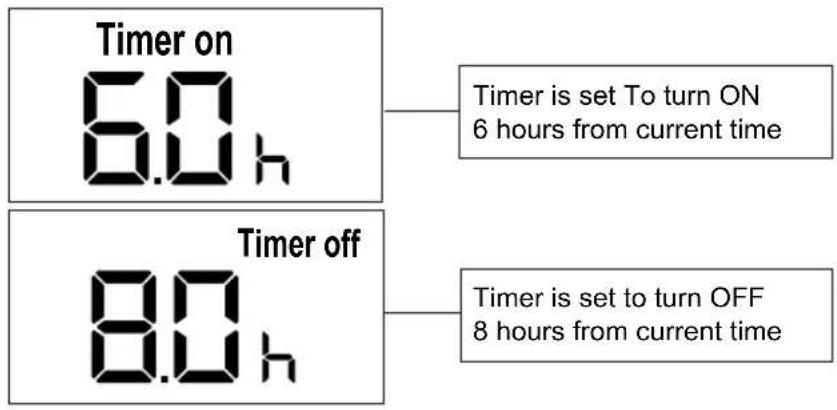
Example: Setting the unit to turn on after 6 hours, operate for 2 hours, then turn off (see the figure below)
Your remote display
flowchart
graph TD
    A["Timer starts"] --> B["Current time 1PM"]
    B --> C["2PM 3PM"]
    C --> D["4PM 5PM"]
    D --> E["6PM 7PM 8PM 9PM"]
    E --> F["OFF"]
    C --> G["Unit turns ON"]
    G --> H["Unit turns OFF"]

Remote Operation (Continued)
flowchart
graph TD
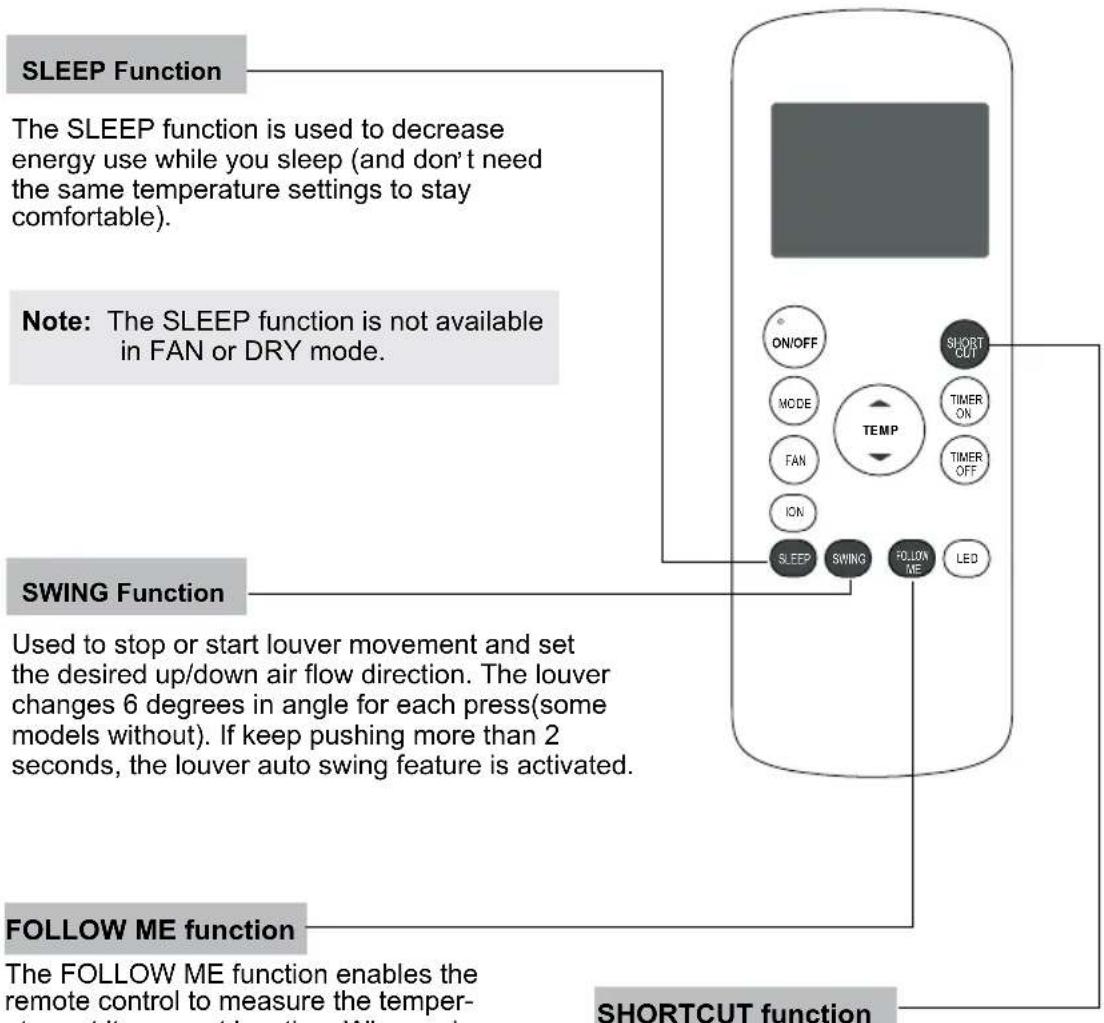
    A["SLEEP Function"] --> B["The SLEEP function is used to decrease energy use while you sleep (and don't need the same temperature settings to stay comfortable)."]
    C["Note: The SLEEP function is not available in FAN or DRY mode."] --> B
    D["SWING Function"] --> E["Used to stop or start louver movement and set the desired up/down air flow direction. The louver changes 6 degrees in angle for each press(some models without). If keep pushing more than 2 seconds, the louver auto swing feature is activated."]
    F["FOLLOW ME function"] --> G["The FOLLOW ME function enables the remote control to measure the temperature at room temperature. Where swing is allowed"]
ature at its current location. When using AUTO, COOL, or HEAT functions, measuring ambient temperature from the remote control (instead of from the indoor unit itself) will enable the air conditioner to optimize the temperature around you and ensure maximum comfort.
- Press FOLLOW ME button to activate function. The remote control will send temperature signal to the unit every three minutes.
-
Press FOLLOW ME button again to turn off this function.
-
Used to restore the current settings or resume previous settings.
- Push this button when remote controller is on, the system will automatically revert back to the previous settings including operating mode, setting temperature, fan speed level and sleep feature (if activated).
- If pushing more than 2 seconds, the system will automatically restore the current operation settings including operating mode, setting temperature, fan speed level and sleep feature(if activated).
NOTE:
-Buttons design is based on typical model and might be slightly different from the actual one you purchased, the actual shape shall prevail.
-All the functions described are accomplished by the unit, if the unit has no this feature, there is no corresponding operation happened when press the relative button on the remote controller.
-When there are wide differences between Remote controller Illustration and "USERS MANUAL" on function description, the description on USERS MANUAL shall prevail.
-The device could comply with the local national regulations. In Canada, it should comply with CAN ICES-3(B)/NMB-3(B). In USA, this device complies with part 15 of the FCC Rules. Operation is subject to the following two conditions: (1) This device may not cause harmful interference, and (2) this device must accept any interference received, including interference that may cause undesired operation.
-This equipment has been tested and found to comply with the limits for a Class B digital device, pursuant to part 15 of the FCC Rules. These limits are designed to provide reasonable protection against harmful interference in a residential installation. This equipment generates, uses and can radiate radio frequency energy and, if not installed and used in accordance with the instructions, may cause harmful interference to radio communications. However, there is no guarantee that interference will not occur in a particular installation. If this equipment does cause harmful interference to radio or television reception, which can be determined by turning the equipment off and on, the user is encouraged to try to correct the interference by one or more of the following measures:
- Reorient or relocate the receiving antenna.
- Increase the separation between the equipment and receiver.
- Connect the equipment into an outlet on a circuit different from that to which the receiver is connected.
- Consult the dealer or an experienced radio/TV technician for help. Changes or modifications not approved by the party responsible for compliance could void suers authority to operate the equipment.
NOTE:

Esatto
User Manual
This page is intentionally left blank
esatto.house
Esatto
This page is intentionally left blank
Esatto Appliances Exactly what you need
- Exactly what you need
- Esatto
- User Manual
- Welcome
- Residentia Group
- Head Office
- ACN
- Online
- Postage
- Telephone
- Contents
- Page 5
- Specifications
- Page 6
- Your Remote
- Control
- Page 8
- LED Display
- Page 9
- Remote Operation
- Your Remote Control
- A: FOLLOW ME
- A: ECO
- SHORT CUT
- TEMP ▲
- TEMP▼
- TIMER ON
- TIMER OFF
- LED
- NOT SURE WHAT A FUNCTION DOES?
- SPECIAL NOTE
- Inserting and Replacing Batteries
- BATTERY NOTES
- BATTERY DISPOSAL
- Temperature/Timer display
- SETTING TEMPERATURE
- AUTO operation
- COOL operation
- Remote Operation (Continued)
- DRY operation(dehumidifying)
- FAN operation
- HEAT operation
- TIMER ON function
- TIMER OFF function
- Setting both TIMER ON and TIMER OFF at the same time
- NOTE:
- This page is intentionally left blank
- Esatto Appliances Exactly what you need
Brand : Esatto
Model : EPAC41CPK
Category : Air-conditioner