DL550F - Screen BENQ - Free user manual and instructions
Find the device manual for free DL550F BENQ in PDF.

User questions about DL550F BENQ
0 question about this device. Answer the ones you know or ask your own.
Ask a new question about this device
Download the instructions for your Screen in PDF format for free! Find your manual DL550F - BENQ and take your electronic device back in hand. On this page are published all the documents necessary for the use of your device. DL550F by BENQ.
USER MANUAL DL550F BENQ
Double Sided Display
User Manual

natural_image
Abstract grayscale pattern with concentric dotted lines forming a wave-like structure (no text or symbols)Disclaimer
BenQ Corporation makes no representations or warranties, either expressed or implied, with respect to the contents of this document. BenQ Corporation reserves the right to revise this publication and to make changes from time to time in the contents thereof without obligation to notify any person of such revision or changes.
Copyright
Copyright 2015 BenQ Corporation. All rights reserved. No part of this publication may be reproduced, transmitted, transcribed, stored in a retrieval system or translated into any language or computer language, in any form or by any means, electronic, mechanical, magnetic, optical, chemical, manual or otherwise, without the prior written permission of BenQ Corporation.
Table of Contents
Disclaimer.... 2
Copyright.... 2
Important safety instructions.... 4
Safety precautions and maintenance 4
Usage 6
Package content 9
Unpacking....9
Packing list.... 10
Overview...... 11
Setting up the display 13
Putting the display front side up.... 13
Removing I/O covers at the sides.... 14
Removing the downside cover 15
Connecting power box to the display 16
Connecting HDMI cables and connectors.... 17
Putting back the downside cover and I/O covers 18
Connecting the power cord.... 19
Using the remote control.... 20
OSD menu 21
Troubleshooting 25
Specifications.... 26
Product Dimensions.... 27
Important safety instructions
Safety precautions and maintenance

Use of control, adjustments, or procedures other than those specified in this documentation may result in exposure to shock, electrical hazards and/or mechanical hazards.
Read and follow these instructions when connecting and using your display:
Operation
- Keep the display out of direct sunlight and away from stoves or any other heat sources.
- Remove any object that could fall into ventilation holes of power box or prevent proper cooling of the display's electronics.
- Don't block the ventilation holes on the power box.
- When positioning the display, make sure the power plug and outlet are easily accessible.
- When turning off the display by disconnecting the power cord, wait 6 seconds or more before reconnecting the power cord for normal operation.
- Ensure the use of an approved power cord provided by BenQ at all times. If your power cord is missing, please contact your local service center.
- Don't subject the display to severe vibration or high impact conditions during operation.
- Don't knock or drop the display during operation or transportation.
- Provide an earthing connection before the mains plug is connected to the mains. And, when disconnecting the earthing connection, be sure to disconnect after pulling out the mains plug from the mains.
Maintenance
- To protect your display from possible damage, do not put excessive pressure on the display.
- Unplug the display if you are not going to use it for an extensive period of time.
- Unplug the display if you need to clean it with a slightly damp cloth. The screen may be wiped with a dry cloth when the power is off. However, never use organic solvent, such as, alcohol, or ammonia-based liquids to clean your display.
- To avoid the risk of shock or permanent damage to the set, do not expose the display to dust, rain, water, or an excessively moist environment.
- If your display becomes wet, wipe it with dry cloth as soon as possible.
- If a foreign substance or water gets in your display, turn the power off immediately and disconnect the power cord. Then remove the foreign substance or water.
- Don't store or use the display in locations exposed to heat, direct sunlight, or extreme cold.
Read and follow these instructions when connecting and using your display
- Unplug the display if you are not going to use it for an extensive period of time.
- Unplug the display if you need to clean it with a slightly damp cloth. The screen may be wiped with a dry cloth when the power is off. However, never use alcohol, solvents or ammonia-based liquids.
- Keep the display out of direct sunlight and away from stoves or any other heat sources.
- Remove any object that could fall into the vents or prevent proper cooling of the display's electronics.
- Don't block the ventilation holes on the power box.
- Keep the display dry. To avoid electric shock, do not expose it to rain or excessive moisture.
- When turning off the display by disconnecting the power cable or DC power cord, wait for 6 seconds before reconnecting the power cable or DC power cord for normal operation.
- When positioning the display, make sure the power plug and outlet are easily accessible.
- Consult a service technician if the display does not operate normally after having followed the instructions in this manual.
Usage
- Don't turn the ventilation hole of power box upside down as shown below.
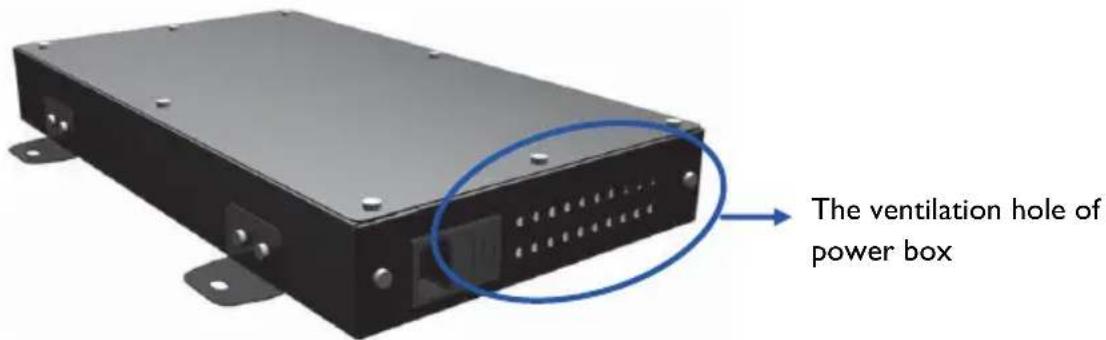
text_image
The ventilation hole of power box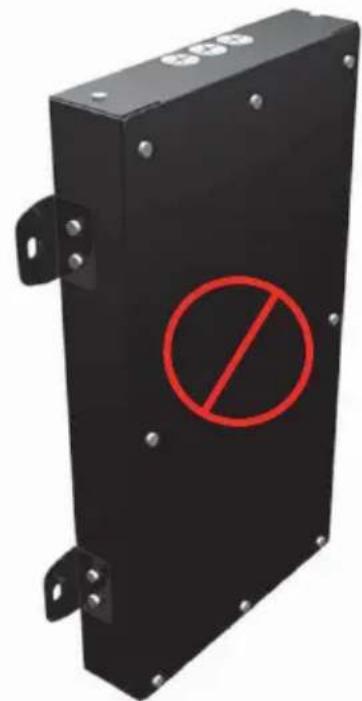
text_image
Black electrical enclosure with red prohibition symbol and mounting brackets, indicating no protection or anti-protection.It is prohibited to turn the ventilation hole of Power Box upside down.
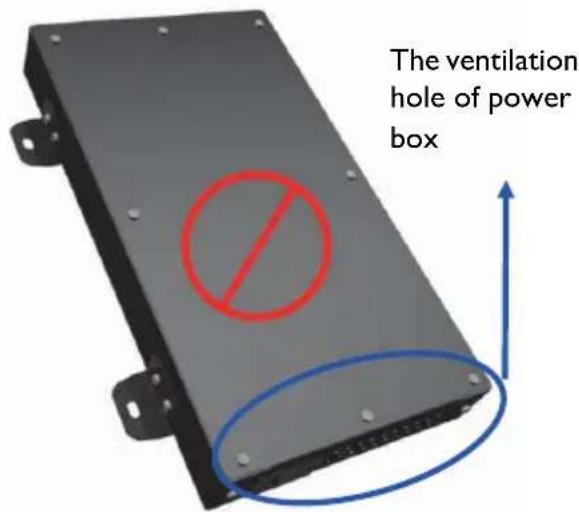
text_image
The ventilation hole of power boxIt is prohibited to place tilt
- When the display is in use, as shown below, please do not open the cover of "bottom side" I/O ports.
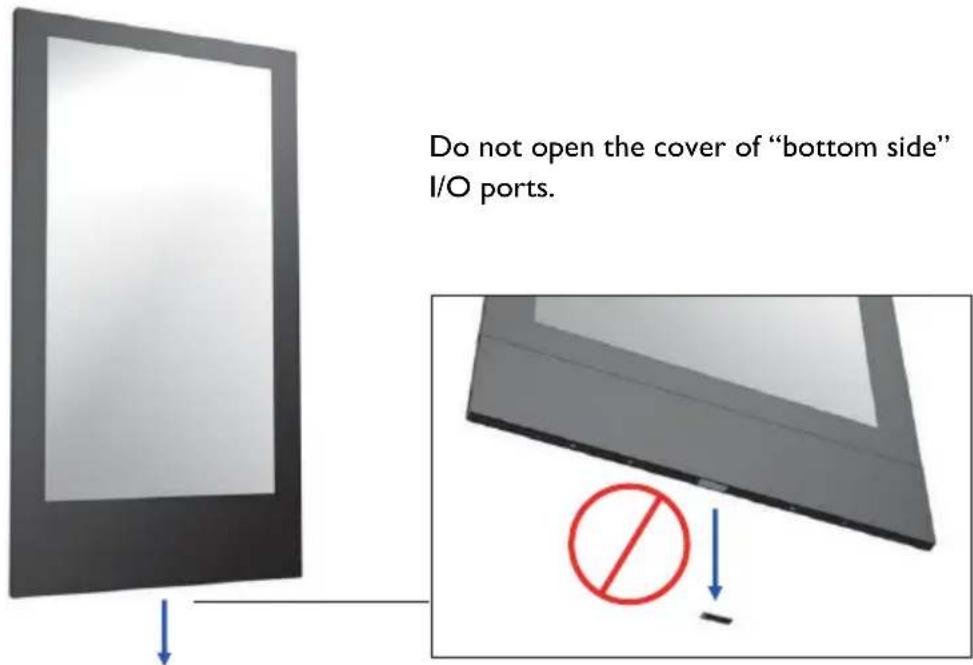
text_image
Do not open the cover of "bottom side" I/O ports.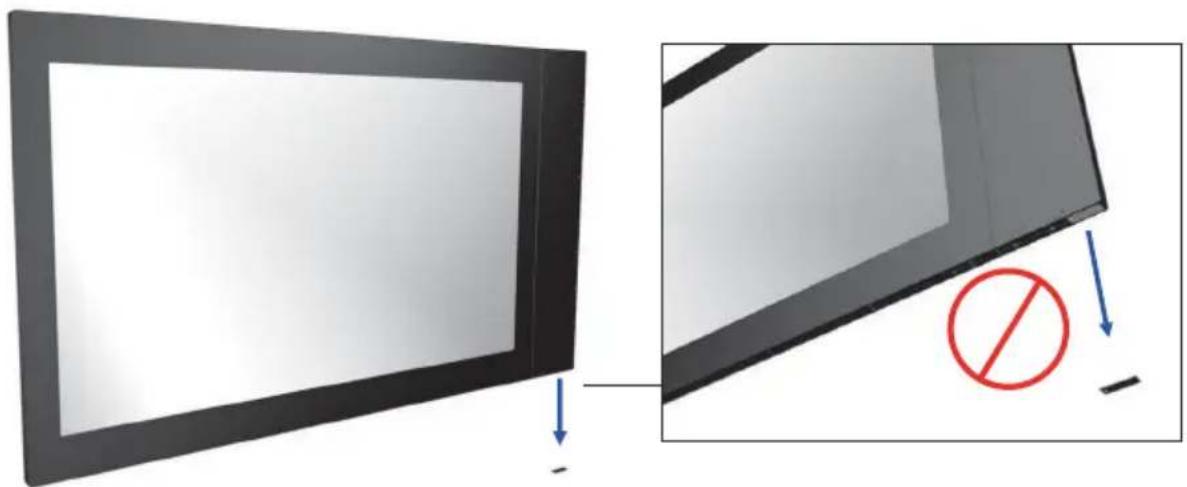
natural_image
Diagram showing a monitor with a blank screen and a magnified view of its side panel, including a red prohibition symbol (no text or labels present)Remote controller precautions
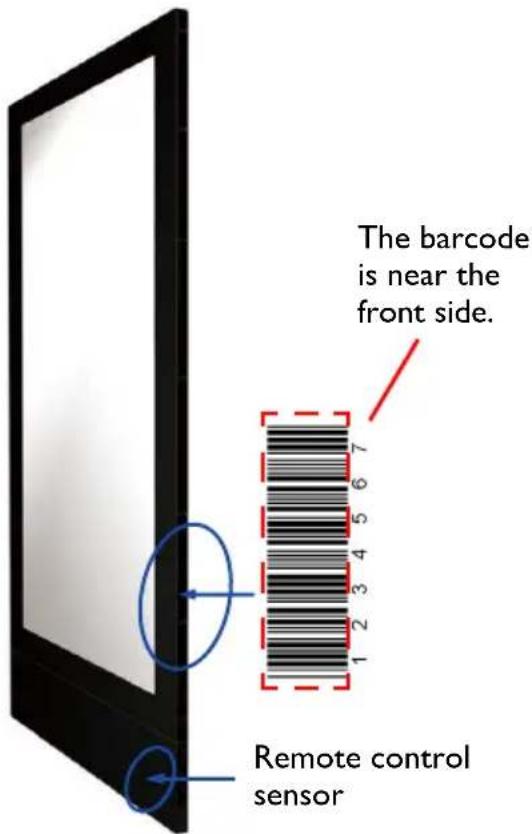
- Power function of the remote controller works only when pointing to the front side of the display; the other functions work at either side.
• To differentiate between the front and the back side, check the side label of a barcode. The barcode is near the front side, while the series number is near the back side.

The naming of the barcode below is just an example.
Front Side Back Side
text_image
The barcode is near the front side. Remote control sensor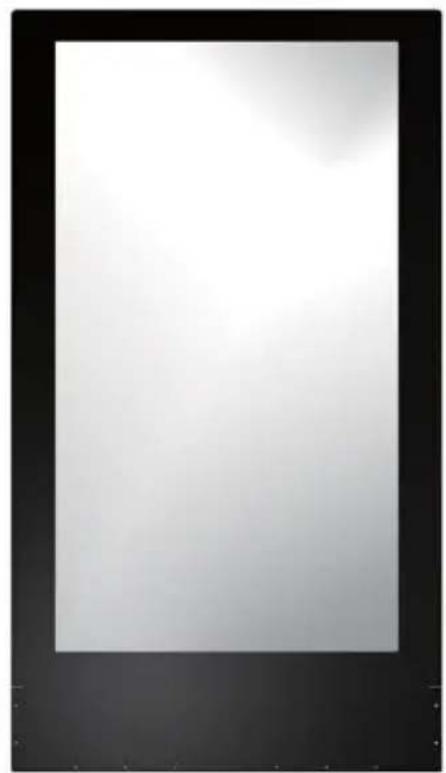
natural_image
Blank white image with black border, no visible text or symbolsPower connection to the device
- The display shall be installed nearby the sockets for easy access to the power.
Package content
Unpacking
- This product is packed in a carton together with its standard accessories.
- Due to the size and weight of this display, it is recommended to move it with at least two persons.
• After opening the carton, ensure that the contents are complete and in good condition.
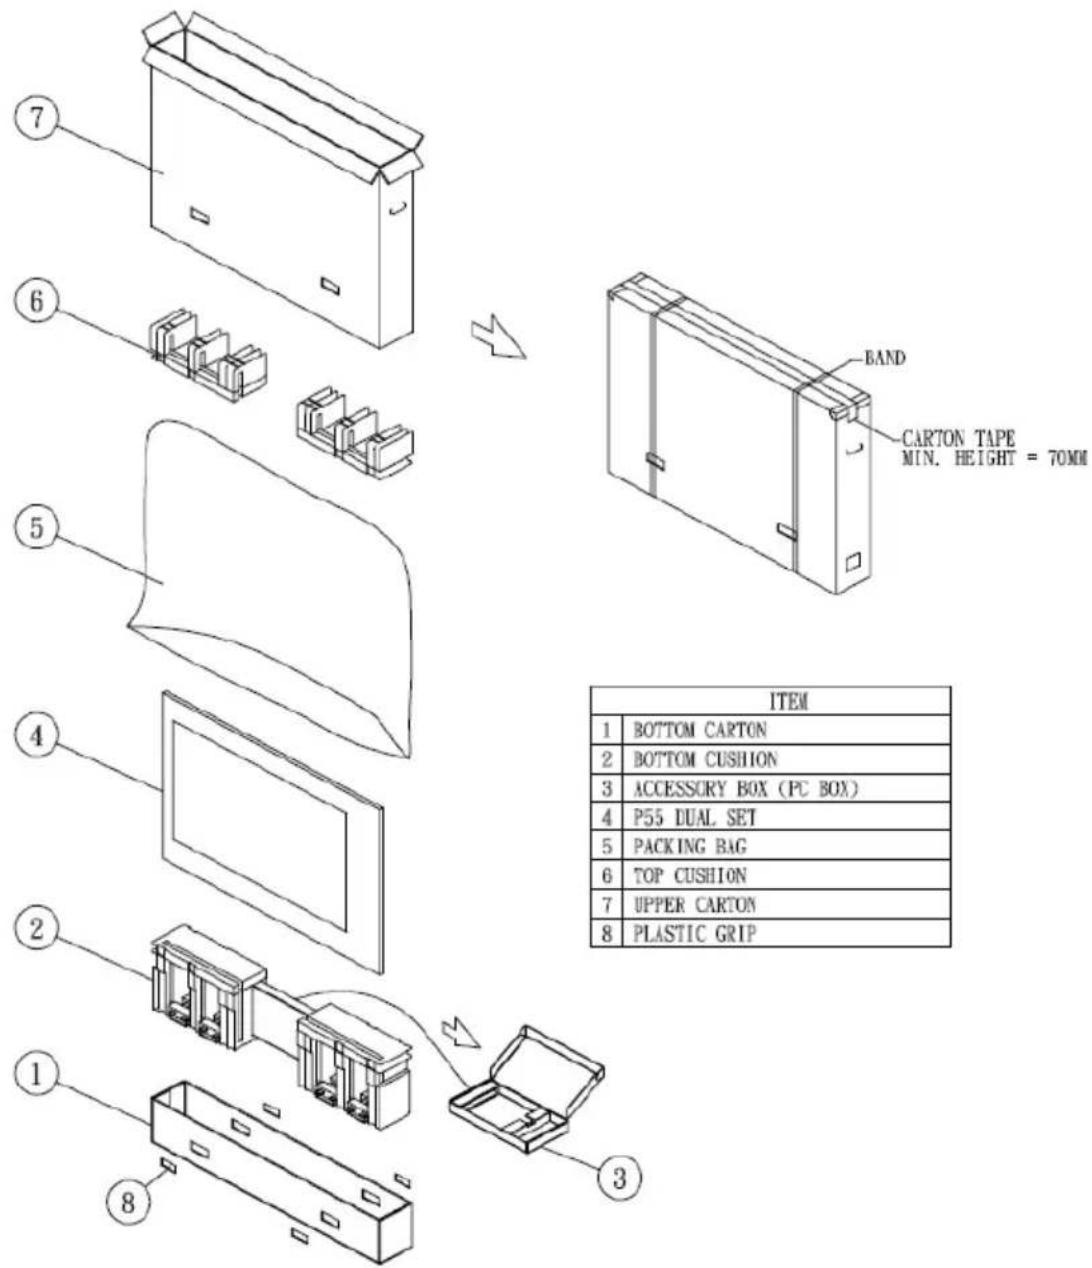
text_image
7 6 5 4 2 1 8 BAND CARTON TAPE MIN. HEIGHT = 70MM ITEM 1 BOTTOM CARTON 2 BOTTOM CUSHION 3 ACCESSORY BOX (PC BOX) 4 P55 DUAL SET 5 PACKING BAG 6 TOP CUSHION 7 UPPER CARTON 8 PLASTIC GRIP| ITEM | |
| 1 | BOTTOM CARTON |
| 2 | BOTTOM CUSHION |
| 3 | ACCESSORY BOX (PC BOX) |
| 4 | P55 DUAL SET |
| 5 | PACKING BAG |
| 6 | TOP CUSHION |
| 7 | UPPER CARTON |
| 8 | PLASTIC GRIP |
Packing list
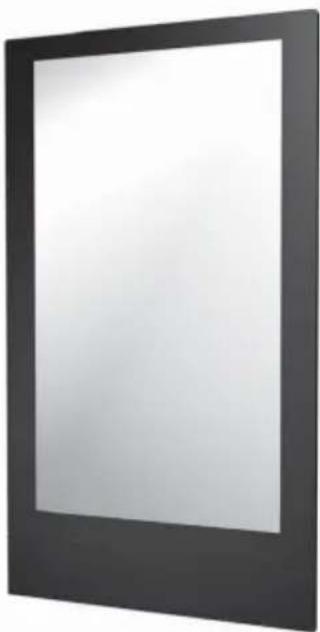
natural_image
Black rectangular frame with a white inner square, no text or symbols visibleDouble sided display x1
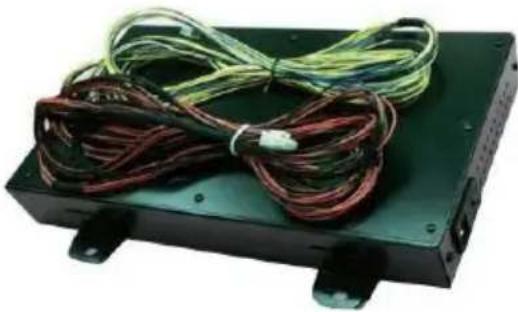
natural_image
Electronic device with coiled wires and connectors on a black base (no visible text or symbols)Power box x1 (with 24V &12V line)

natural_image
Black cable with two terminal plugs, no visible text or symbolsPower cord x1

text_image
POWER 12 MERC 34 TENERS ROTTER 200V 4 CSD 6 7 8 MCCS 0 RICHEN + - LEFT MENU SOURCE HSG F1 F2 F3 F4Remote controller x1 (Battery: CR 2025 3V)
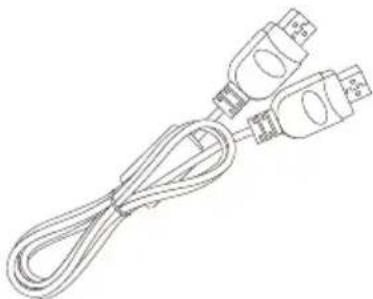
natural_image
Line drawing of a cord with two connected plug connectors (no text or symbols)HDMI cable x2
Overview
Top view
Diagonal view Front view
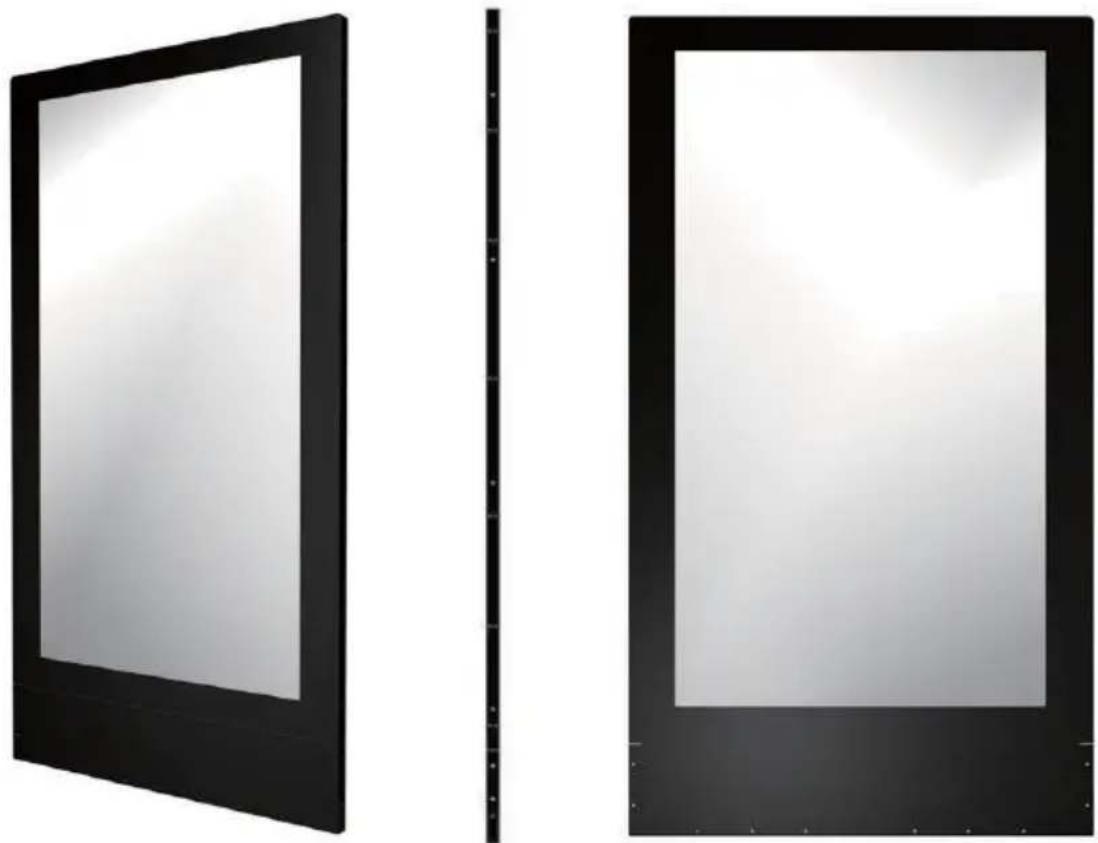
Side view
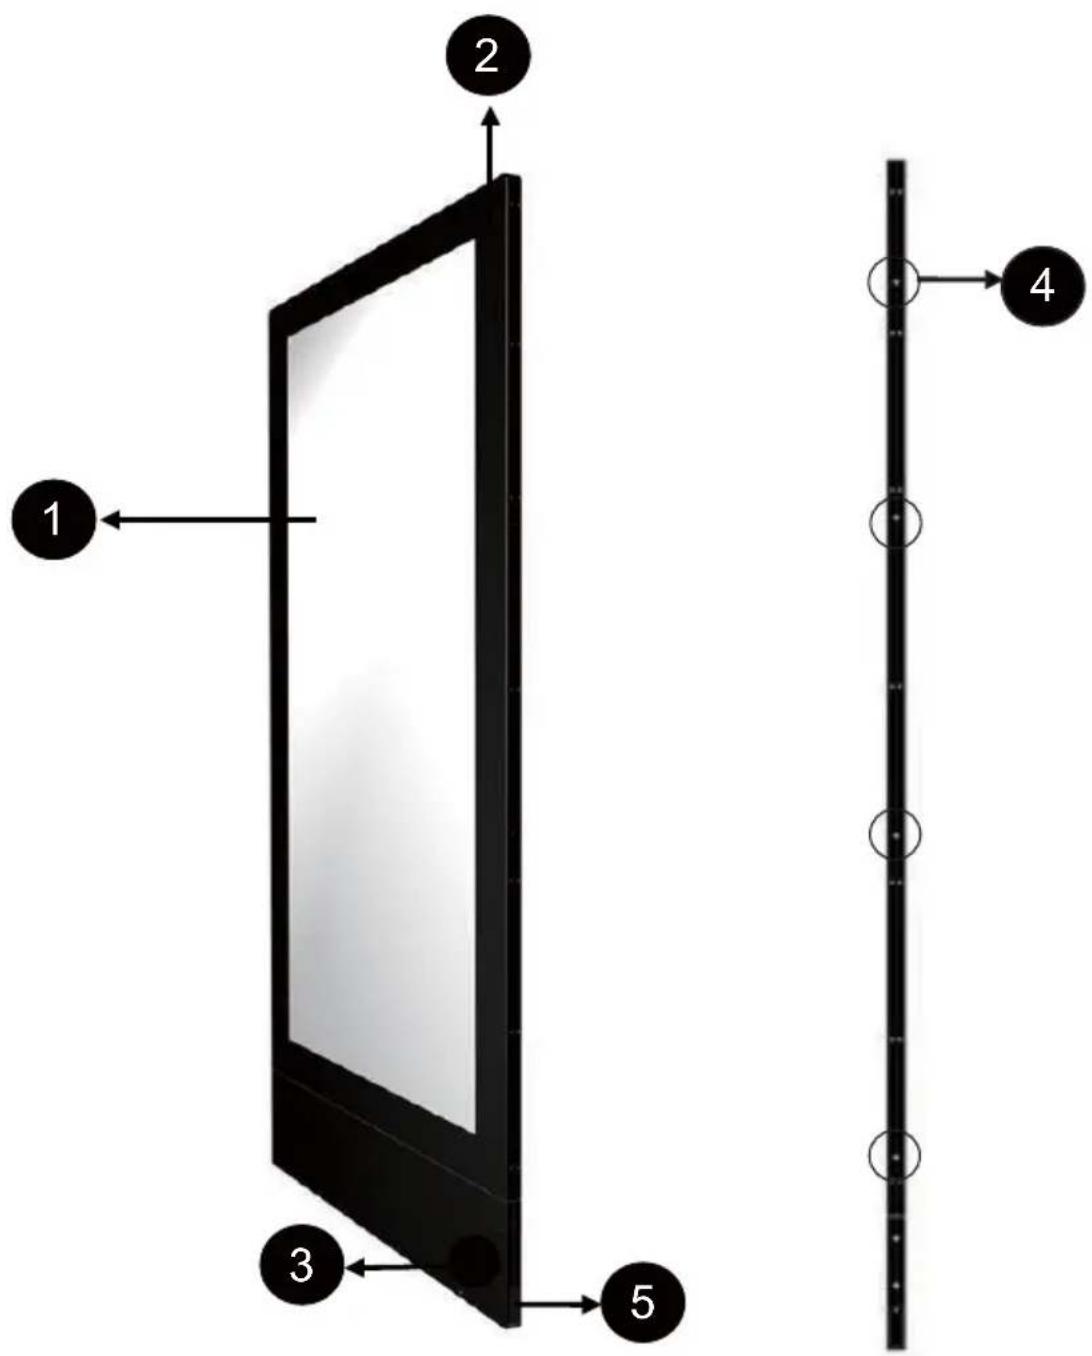
text_image
1 2 3 4 5No. Name
1
Double sided display
2
Display Set
3
Double sided remote control sensor
4
Use hole x 8 (4 at each side)
5
I/O cover x 3
Setting up the display
Putting the display front side up
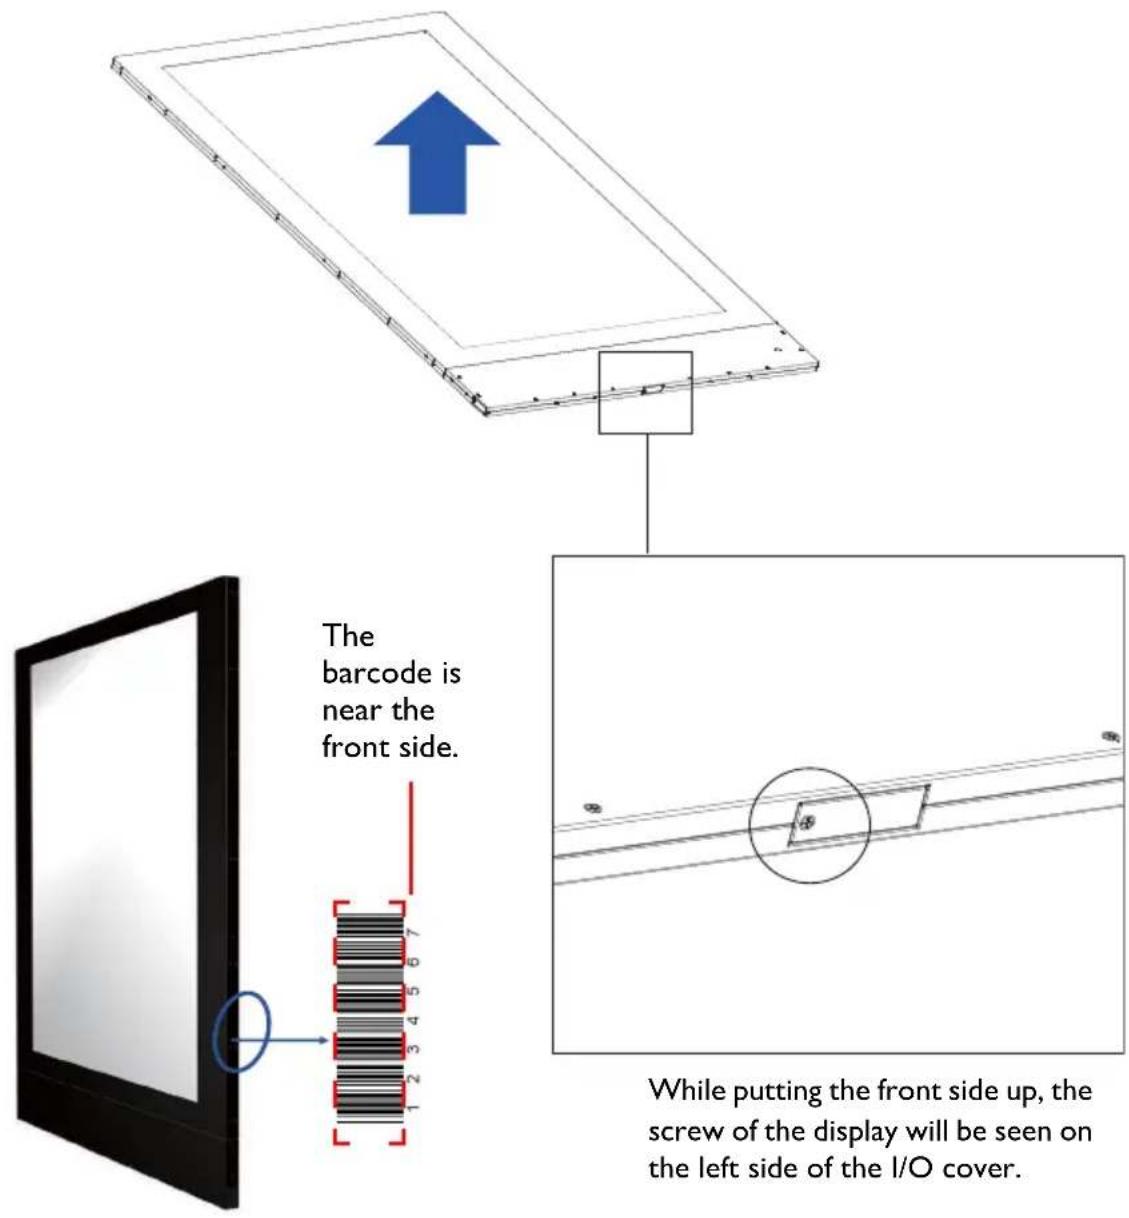
While putting the front side up, the screw of the display will be seen on the left side of the I/O cover.

Refer to Remote controller precautions on page 8 for more information on how to differentiate the front and the back side.
Removing I/O covers at the sides

text_image
Remove I/O covers by loosening 3 screws (M3x6mm).Remove I/O covers by loosening 3 screws (M3x6mm).
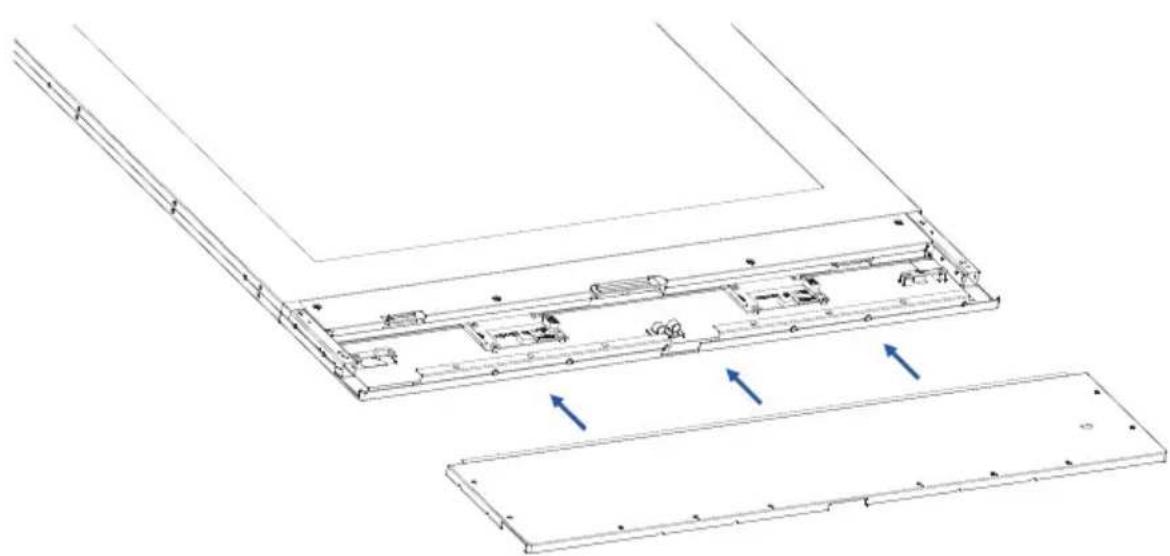
Removing the downside cover
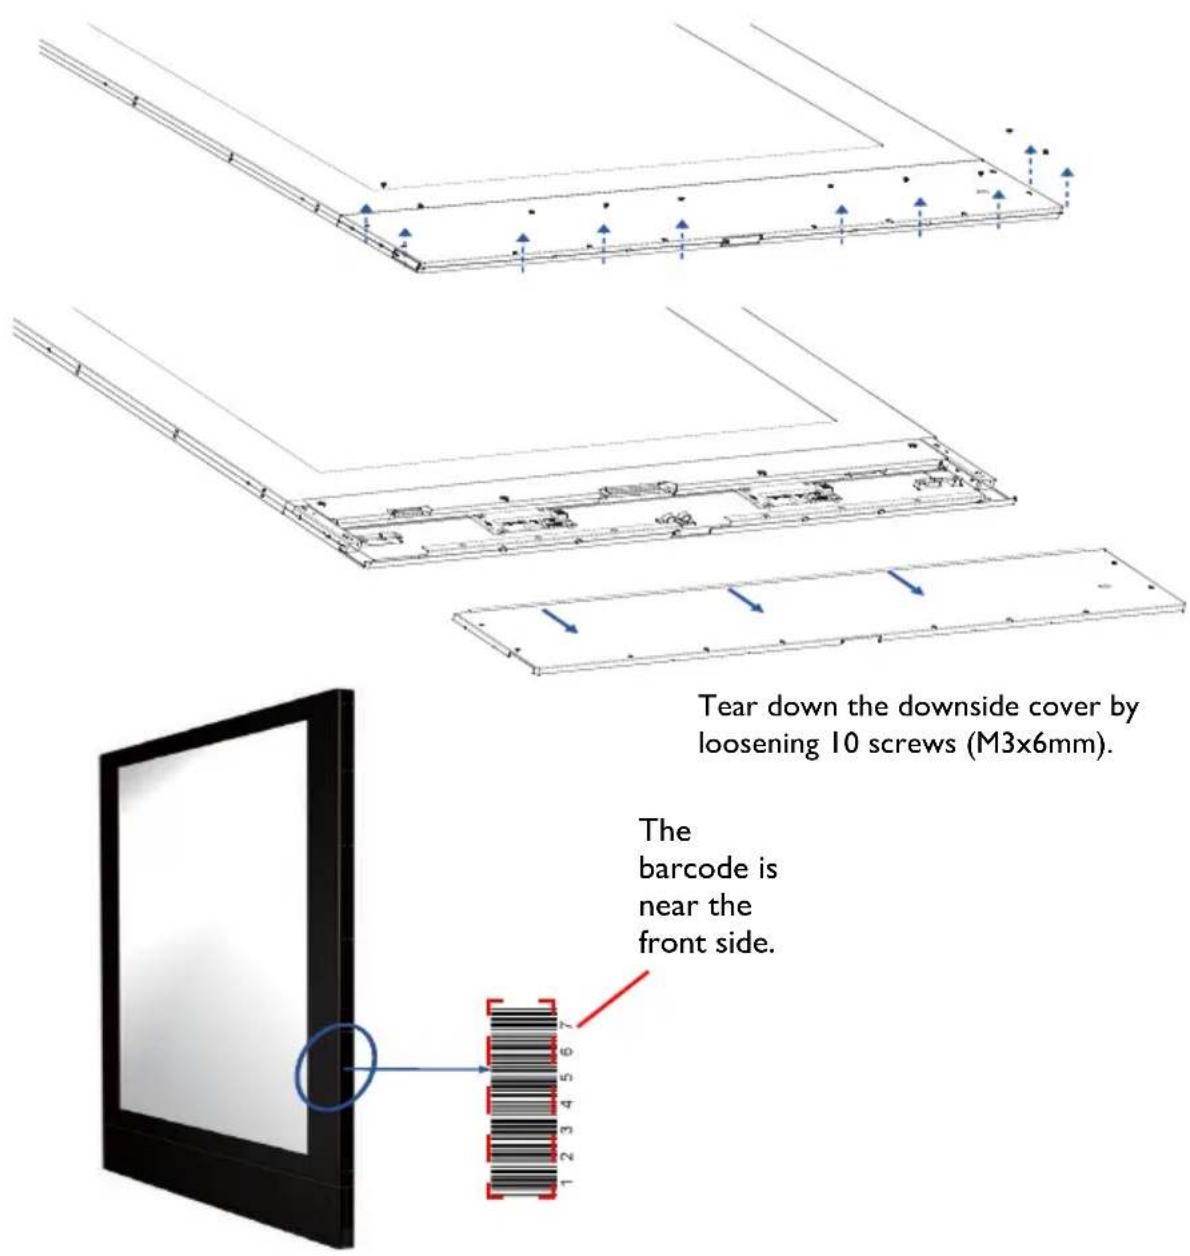
text_image
Tear down the downside cover by loosening 10 screws (M3x6mm). The barcode is near the front side.
Refer to Remote controller precautions on page 8 for more information on how to differentiate the front and the back side.
Connecting power box to the display
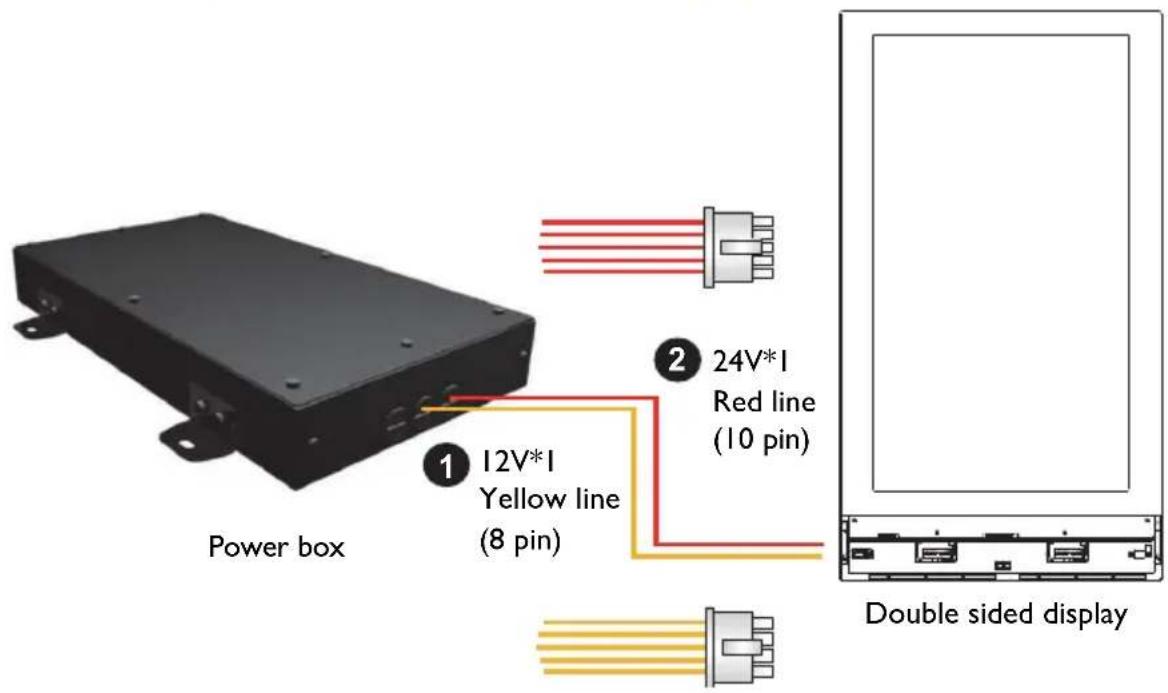
text_image
Power box 1 12V*1 Yellow line (8 pin) 2 24V*1 Red line (10 pin) Double sided display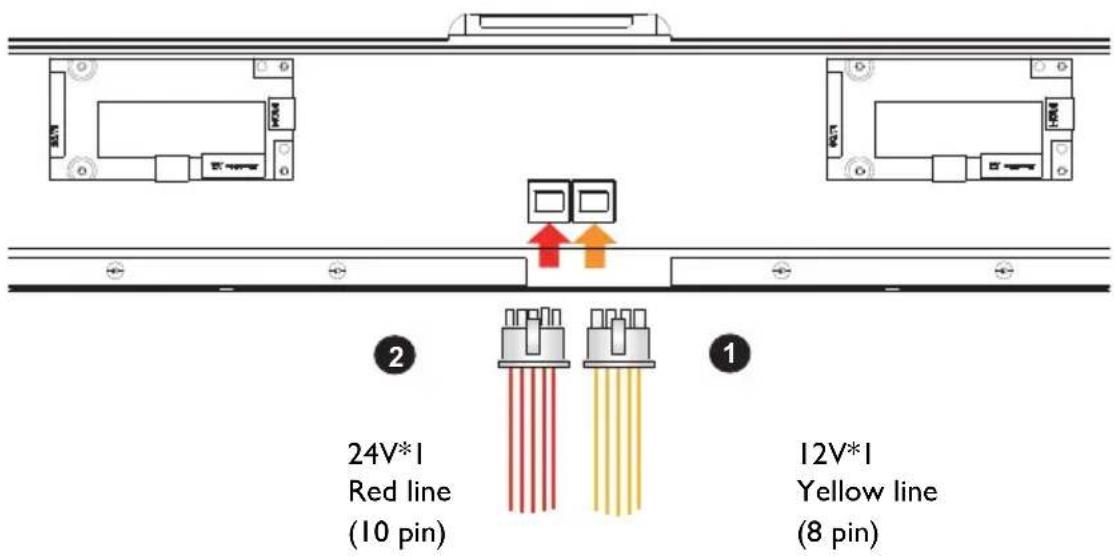
text_image
24V*1 Red line (10 pin) 12V*1 Yellow line (8 pin)No. Name
1 Connect the I2V (8 pin) power line
2 Connect the 24V (10 pin) power line
Connecting HDMI cables and connectors
Plug two HDMI cables into the cabinet, and ensure that all cable plugs are firmly fitted into the jacks.
The main signal input source is HDMI 1. Make sure HDMI 1 is well connected before establishing HDMI 2 connection.
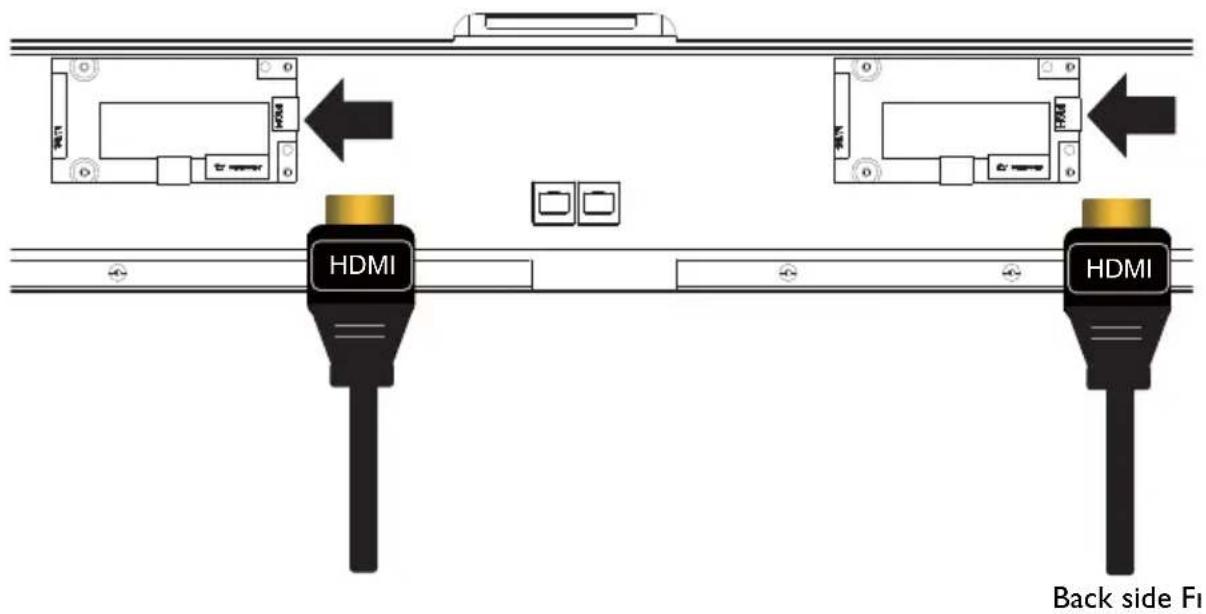
text_image
HDMI HDMI Back side FiPutting back the downside cover and I/O covers
- Putting back the downside cover and tightening with 10 screws (M6x30mm).
- Putting back other I/O covers not use with tightening screws.
natural_image
Technical line drawing of a laptop chassis showing front and side views with no text or symbols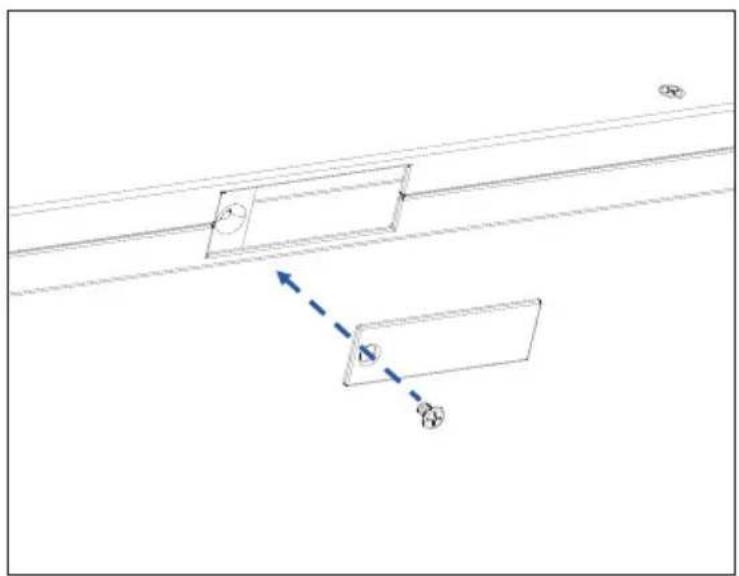
natural_image
Pure technical diagram showing two rectangular components with directional arrows, no text or symbols presentConnecting the power cord
Plug in the power cable and turn on the AC power switch.
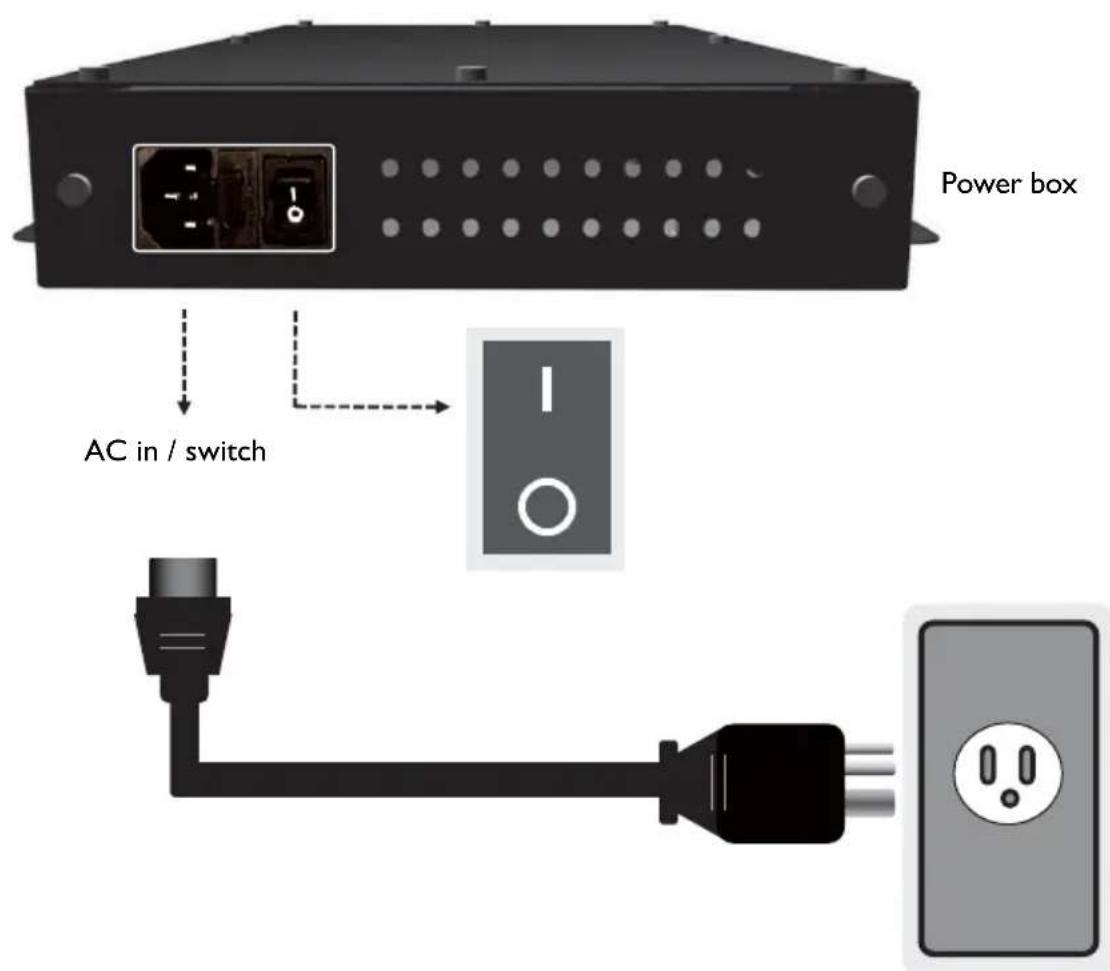
text_image
Power box AC in / switchUsing the remote control

text_image
POWER PHOTO 1 18:9/4:3 5 OSD 9 MUSIC MOVIE 2 3 ROTATE 6 ZOOM 7 SALO MUSIC 0 ENTER SIDE SHOW EXIT MENU SOURCE VOL F1 F2 F3 F4 NOTE OK 3 4 5 2No Name Description
1 Power Press to turn power on/off.
2 MENU Press to enter OSD setting menu.
3 ▲ Press to move up in OSD setting menu.
4 ▼ Press to move down in OSD setting menu.
5 EXIT Press to exit menu/selection.

Buttons not specified above are idle from remote control operations.
OSD menu
Press MENU to pop up the OSD setting menu, and then press “▲” or “▼” to select the item. Press MENU to enter submenu. Press EXIT to exit.
Luminance menu
Press MENU to select one of the following, and then press “▲” or “▼” to select the desired level. Press EXIT when done.
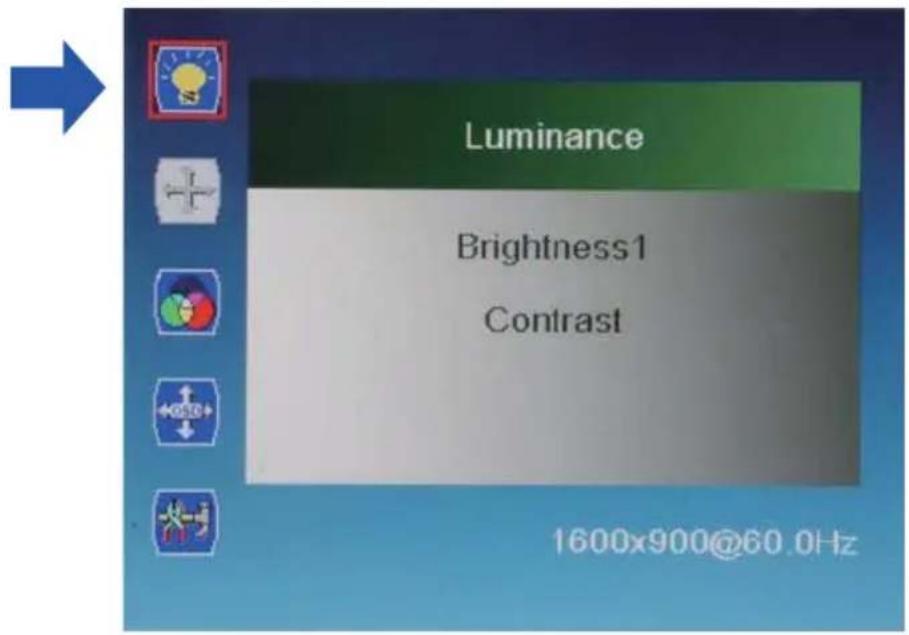
text_image
Luminance Brightness1 Contrast 1600x900@60.0HzItem Description
Brightness1 Range: 0\~100.
Contrast Range: 0\~100.
Color menu
Press MENU to select one of the following, and then press “▲” or “▼” to select the desired level. Press EXIT when done.
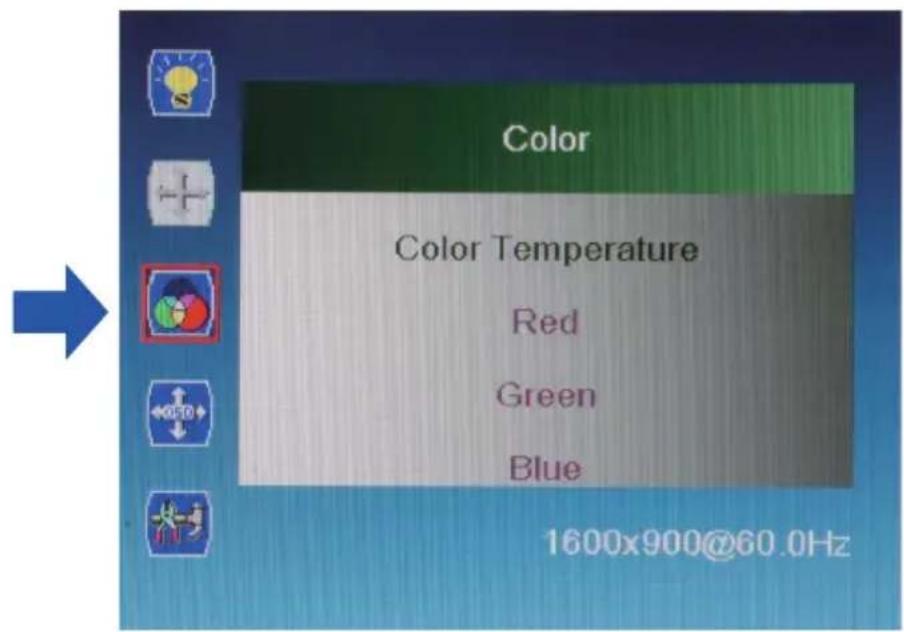
text_image
Color Color Temperature Red Green Blue 1600x900@60.0Hz| Name Description | |
| Color Temperature | Range: 6500K, 9300K, 11500K, User Define. |
| If you chooseUser Define,gains and offsets of red, green, and blue are adjustable. | |
| Red 0~100 | |
| Green 0~100 | |
| Blue 0~100 | |
OSD setting menu
Press MENU to select one of the following, and then press “▲” or “▼” to select the desired level. Press EXIT when done.
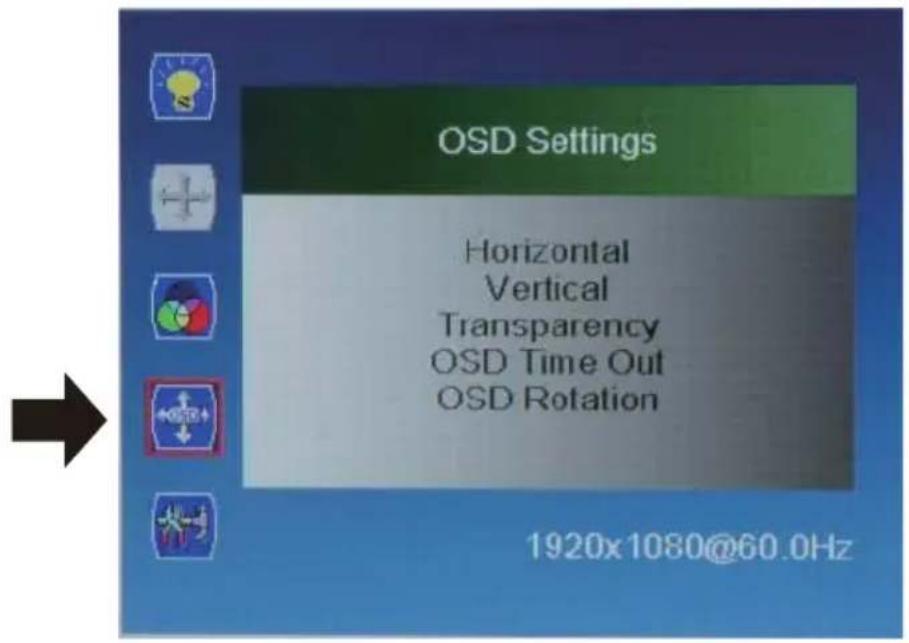
text_image
OSD Settings Horizontal Vertical Transparency OSD Time Out OSD Rotation 1920x1080@60.0Hz| Name Description | |
| Horizontal Default: 50 | |
| Vertical Default: 50 | |
| Transparency Default: 0 | |
| OSD Time Out Default: 50 | |
| OSD Rotation | 0(0°), 1(90°), 2(270°), 3(360°) |
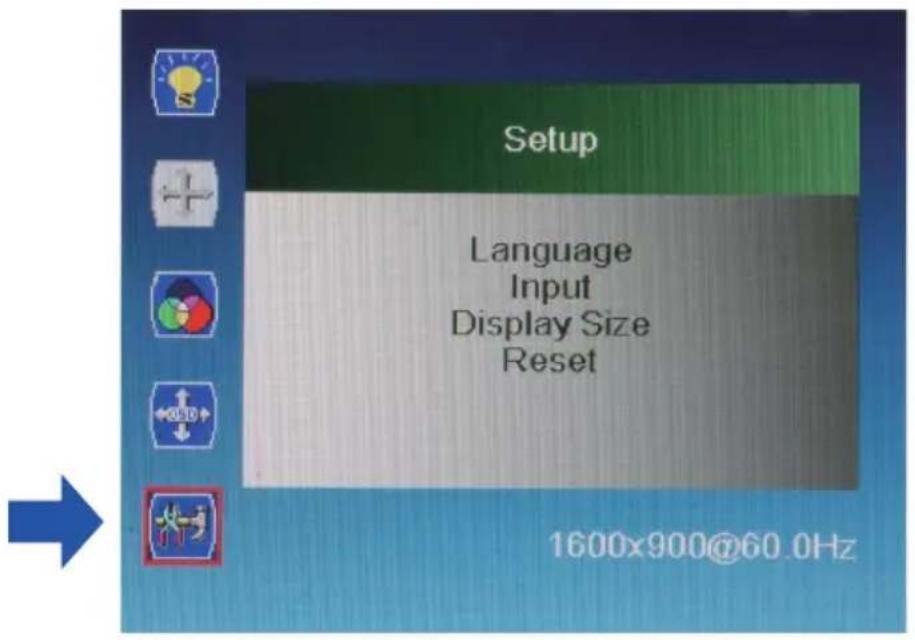
Setup menu
Press MENU to select one of the following, and then press “▲” or “▼” to select the desired level. Press EXIT when done.
text_image
Setup Language Input Display Size Reset 1600x900@60.0Hz| Name Description | |||
| Language English/Espanol/Français/Deutsche/Italiano/Português/Русский/简体中文/日本語/繁體中文 | |||
| Input HDMI1/HDMI2 | |||
| Display Size Full Screen / Smart Fit / 4:3 / Smart4:3 | |||
| Reset: | N | o | / Y |
Troubleshooting
| Symptom Possible | Cause Remedy | |
| No picture is displayed. 1. | The power cord is disconnected.2. The main power switch on the back of the display is not switched on.3. The selected input has no connection.4. The display is in standby mode. | Plug in the power cord.Make sure the power switch is switched on.Connect a signal connection to the display. |
| Interference displayed on the display or audible noise is heard. | Caused by surrounding electrical appliances or fluorescent lights | Move the display to another location to see if the interference is reduced. |
| Color is abnormal. The signal cable is not connected properly. | Make sure the signal cable is attached firmly to the jack on the display. | |
| Picture is distorted with abnormal patterns. | 1. The signal cable is not connected properly.2. The input signal is beyond the capabilities of the display. | 1. Make sure the signal cable is attached firmly.2. Check the video signal source to see if it is beyond the range of the display.Please verify input signal specifications. |
| After-Images can still be seen on the display after the display is powered off. | A still picture is displayed for an excessive period of time. | Do not display a still image for an excessive period of time since this can cause a permanent after-image remaining on the display. |
Specifications
| Item Specifications | ||||
| LCD Display 55” | Model name DH551F DH550F DL550F | |||
| Screen size 55 inch (diagonal) | ||||
| Resolution 1920 x1080 (Pixel) | ||||
| Display Area 1209.6(H) x 680.4(V) | ||||
| Contrast Ratio 3000:1 | ||||
| Brightness | 700 nits / 700 nits | 450 nits / 700 nits | 450 nits / 450 nits | |
| View angle 178° (H); 178° (V) | ||||
| Color Gamut 72 (%) | ||||
| Surface Treatment Haze 11%,3H | ||||
| Input Connectivity | HDMI*2 | |||
| SET | Dimension 1515.9 x 856.8 x 23.4 mm | |||
| Weight 45.5 KG | ||||
| Material SECC | ||||
| Surface Treatment | Painting in Black color | |||
| Power | Input | AC100-240V, 50-60Hz, 2.7A | ||
| Power Consumption | 230 W (typ.) | |||
| Light source | LED | |||
| Dimension | 600 x 370 x 42mm | |||
| Weight | 4 KG | |||
| Packing | Dimension | 1618 x 970 x 249 mm | ||
| Weight 56.5 KG | ||||
| Environmental Conditions | Operating Temp. | 0 ~ 40°C | ||
| Operating Humidity | 20% ~ 80% | |||
| Option | IPC | |||
Product Dimensions

text_image
1278.00 (User Hole) 1115.00 (User Hole) 705.00 (User Hole) 300.00 (User Hole) 1515.90 ± 2.00 (Outline) (239.10) 1212.60 ± 1.00 (Opening) (170.70) 64.20 86.70 683.40 (Opening) 86.70 856.80 ± 2.00 (Outline) 23.40 ± 1.00 155.50 300.00 (User Hole) 705.00 (User Hole) 1115.00 (User Hole) 1278.00 (User Hole)A,B,C: I/O covers