
Prosciutto 300 - Slicer ADE - Free user manual and instructions
Find the device manual for free Prosciutto 300 ADE in PDF.

| Product Type | Manual flywheel slicing machine |
| Brand | ADE |
| Model | Prosciutto 300 |
| Dimensions (W x D x H) | 570 x 775 x 680 mm |
| Dead Weight | 44.5 kg |
| Blade Diameter | 300 mm |
| Cutting Thickness Range | 0 - 2 mm |
| Cutting Area | 240 x 210 mm |
| Cutting Capacity Diameter | 210 mm |
| Carriage Movement | 255 mm |
| Storage Space (W x D) | 310 x 465 mm |
| Base (Optional) | Height 850 mm, approx. 50 kg |
| Power Supply | Manual (no electrical connection required) |
| Operation Type | Manual flywheel |
| Blade Drive | Chain transmission from flywheel |
| Slice Thickness Adjustment | Mechanical graduated handwheel |
| Food Plate | Sliding overplate with food press (height adjustable) |
| Safety Features | Rigid blade cover, safety instructions in manual, protective gloves required for cleaning |
| Suitable Products | Boiled, smoke-dried, raw sausage, meat without bones, cheese, bread (temperature ≥ +3°C) |
| Not Suitable Products | Frozen or deep-frozen products, meat with bones, pip fruit, vegetables |
| Cleaning | Disassemble parts, wash with hot water (min. +30°C) and biodegradable detergent (pH 7-8), use soft brush; no dishwasher or pressure jets |
| Maintenance | Blade sharpening (periodic), lubrication of guide bars and overplate (weekly) with white vaseline oil |
| Warranty | 1 year from date of delivery (material and workmanship defects), consumables excluded |
Frequently Asked Questions - Prosciutto 300 ADE
User questions about Prosciutto 300 ADE
0 question about this device. Answer the ones you know or ask your own.
Ask a new question about this device
Download the instructions for your Slicer in PDF format for free! Find your manual Prosciutto 300 - ADE and take your electronic device back in hand. On this page are published all the documents necessary for the use of your device. Prosciutto 300 by ADE.
USER MANUAL Prosciutto 300 ADE
natural_image
Vintage black-and-white industrial machine with a circular base and mechanical components (no visible text or symbols)PROS9IUTTO300
Prosciutto300-210928-Rev007-UM-en
T67LEtOFt9ONTENTSt
t
1.t INTRODUCTION....2t
1.1t Purpose of the manual 2t
1.2t General description of the machine....2t
1.3t Usage of the machine 2t
2.t COMMISSIONING 3t
2.1t Unpacking....3t
2.2t Installation 4t
3.t SAFETY INSTRUCTIONS 4t
3.1t General safety regulations ....4t
3.2t Mechanical cutouts....5t
3.3t Acceptance inspection ....5t
4.t USAGE AND CLEANING....6t
4.1t Overview....6t
4.2t Functionality 7t
4.3t Loading the goods....7t
4.4t Cutting the goods 8t
4.5t Cleaning the slicing machine....8t
5.t MAINTENANCE AND REPAIRS....9t
5.1t Sharpening the blade 9t
5.2t Lubricating the guide bars and overplate....10t
6.t COURSE OF INSTRUCTION 10t
7.t STORAGE, TERMS OF TRANSPORT AND SCRAPPING 10
7.1t Storage and terms of transport....10t
7.2t Scrapping 10t
8.t WARRANTY....11t
9.t TECHNICAL SPECIFICATIONS....12t
10.t CE-LABELING AND DECLARATION OF CONFORMITY 13
11.t EXPLODED VIEW....14t
t
t
t
1
1. INTRODUCTION

This symbol means: "Consult operating instructions". Read the instructions for use carefully before use and follow all instructions provided therein. Keep the instructions for use for future reference.
1.1 Purpose of the manual
This publication contains all the information necessary for the installation, use and maintenance of the manual flywheel slicing machines to be used for food, with circular blade.
The purpose of this manual is to allow the user, above all the direct user, to take every precaution and arrange all human and material means necessary for a safe and lengthy use of these machines.
The slicing machines are subject to continuous improvements, which do not restrain the current instructions in this handbook.
This manual must be given to the person who will use and maintain the machines and this person will keep the manual in a safe and dry place, ready to be used. We recommend that a copy is being kept on file.
The manual must be kept for the entire life of the machine and in case of need (ex. any damage to even a part of the manual that makes consulting it difficult) the user must acquire a new copy exclusively from the manufacturer. The user must let the manufacturer know the address of any new owner of the machine.
For any correspondence with the manufacturer or authorized personnel, please refer to the information on the plate and the machine serial number.
1.2 General description of the machine
The slicing machine has been designed and made to offer maximum safety when in use, during cleaning and ordinary maintenance; maximum hygiene from the use of inoxidisable materials or adequately protected against oxidation together with an attentive design of all the parts that come into contact with food; maximum cutting precision and capacity together with sturdiness and reliability of the structure.
The machine is essentially made up of a base that holds a circular blade that is vertically mounted and a sliding carriage on bars, parallel to the cutting edge of the blade, which in turn holds a food plate.
The food plate is made up of a base plate and an overplate which slides at right angles to the edge of the blade for slicing the food; the overplate also has an appropriate self-stopping device, which can be regulated in height, to keep the product in its proper place during cutting operations (food press).
Carriage movement and blade rotation are completely manual; by activating rotation of the flywheel with the special handle, the carriage is put into motion and the blade is turns at the same time with a chain transmission.
The product is cut during the forward movement of the carriage, parallel to the blade; the thickness of the slice is regulated by a mechanical device which is automatically started every time the carriage comes back, making the sliding overplate transversally towards the blade, with a value which is pre-determined by the graduated handwheel.
All the components of the machine are made of a light aluminium alloy, in stainless steel and plastic for food products as according to the sanitary regulations in force.
The machine has a sharpener which is extremely easy and safe to use. The food plate, sharpener and blade cover can be removed for cleaning.
1.3 Usage of the machine
The manual flywheel slicer of the series PROSCIUTTO serves the slicing of boiled, smoke-dried and raw sausage products, warm and cold (temperature not less than +3°C) meat without bones, cheese and bread.
The cutting thickness ranges from 0 to 2 mm for Prosciutto300.
The machine may only be used in original condition respectively with genuine parts. The removal of protective devices is not allowed, moreover, plates may not be removed, covered or changed. In case of damage, the machine needs to be put out of operation and 6DE needs to be informed in order to replace parts.
The manufacturer declines all responsibility derived from an improper use or use by personnel who has not read and fully understood the contents of this manual1 changes and/or repairs carried out on one's own1 the use of spare parts that are not original or not specific for the type of machine.

The slicing machines may not be used for slicing frozen or deep-frozen products, meat or sausage products with bones or pip fruit and vegetables. Cutting samples cannot be recommended as well. Disregarding this advice can seriously damage the slicer and can further lead to revoke the existing warranty claim.
2. COMMISSIONING
Please check that packaging is unopened and free of damage. Otherwise, immediately inform the forwarding agent or area agent.
2.1 Unpacking
- 9ut and remove the plastic straps1
- Open the carton and take the operating instructions1
- Remove the polyurethane protection first.
- 9arefully lift the machine and put it in its place of installation1
• 9ontrol the goods that are included in the delivery

natural_image
Technical line drawings of two cardboard boxes with internal components, showing upward movement (no text or symbols)Included in delivery:
- Machine
- instruction manual
- Place the machine in its intended position.
- Examine if there is anything that could interfere the movement of the flywheel, the carriage or the loading of food
Delivery including 7ase (optional):
- Move the base to its designated place, the rounded side of the machine has to be on the operator's counterside
- Position the machine on its base.

The packaging components (e.g. plastic straps, cardboard) can be thrown away with normal solid waste, so there aren't any difficulties to dispose them. However, it is advisable to dispose products separately in conformity with the regulations in force for adequate recycling.
DO NOT DISCARD THE PACKAGING PRODUCTS IN THE ENVIRONMENT!
2.2 Installation
If the base (optional) is not used, install the manual flywheel slicer on an even, smooth and vibration-free surface. Enough stability should be offered in order to ensure safety due to the deadweight of the machine plus the food to be sliced.
The operating elements (manoeuvring flywheel and regulating knob for slice thickness) are pointed towards the user.
All around the slicing machine enough free space must be ensured to guarantee smoothly usage, cleaning and maintenance.
3. SAFETY INSTRUCTIONS
3.1 General safety regulations
The slicing machine must be used only by personnel who has carefully read the contents of this manual. The operators must be over 18 years of age, in perfect mental and physical conditions, have the right attitude and capacity (with the necessary knowledge for manoeuvring and normal maintenance of simple mechanical and electrical components).
For a safe use of the machine follow instructions below:
• Install the machine according to the instructions in the paragraph 'Installation';
• Install the machine in a safe distance to people who must not use it, especially children;
- Do not be distracted while using the machine;
- Do not wear loose clothing or open sleeves, if necessary use headgear to keep hair out of the way
- Do not let anyone come close to the machine while in use;
- Do not remove, cover or change the plates that are on the machine and, if they are damaged, replace them immediately
- Do not remove the protective devices and do not change or exclude the mechanical protective devices
- Only slice permitted products; do not try to slice any products that are not allowed
- The area around the machine where the food is laid and the floor where the operator works must always be kept clean and dry
- Do not use the machine as a support surface and do not place any object on it that does not pertain to normal cutting operations
- Immediately stop the machine and call technical assistance service in case of anomalous function, suspect of breakages, incorrect movements, unusual noises, etc.
- Always use gloves that are resistant to cutting and tearing for the cleaning and maintenance operations.
- The goods to be cut are to be placed on and removed from the sliding overplate only when the plate is completely retracted (far from the blade) and the carriage all the way towards the operator
• No cutting accessories are allowed unless supplied by the manufacturer
- For any extraordinary intervention (belt replacement, blade replacement etc.) please contact the manufacturer or authorized assistance personnel.
3.2 Mechanical cutouts
- The cutter blade is secured by a rigidly embattled cover except for the cutting area.
- 7efore using you have to shift the cover of knife protection.
- 6ll cutouts are firmly mounted on the machine and may not be removed. Scrapping or unauthorized modifications may lead to dangerous situations. In this case, the manufacturer cannot be held liable for such accidents or damages.
3.3 Acceptance inspection
- Examine if all components of the flywheel slice rare mounted correctly.
- Examine if flywheel is mounted correctly.
- Examine the sliding movement.
- Examine the grinder.
- Examine the function of slice thickness
4. USAGE AND CLEANING
4.1 Overview
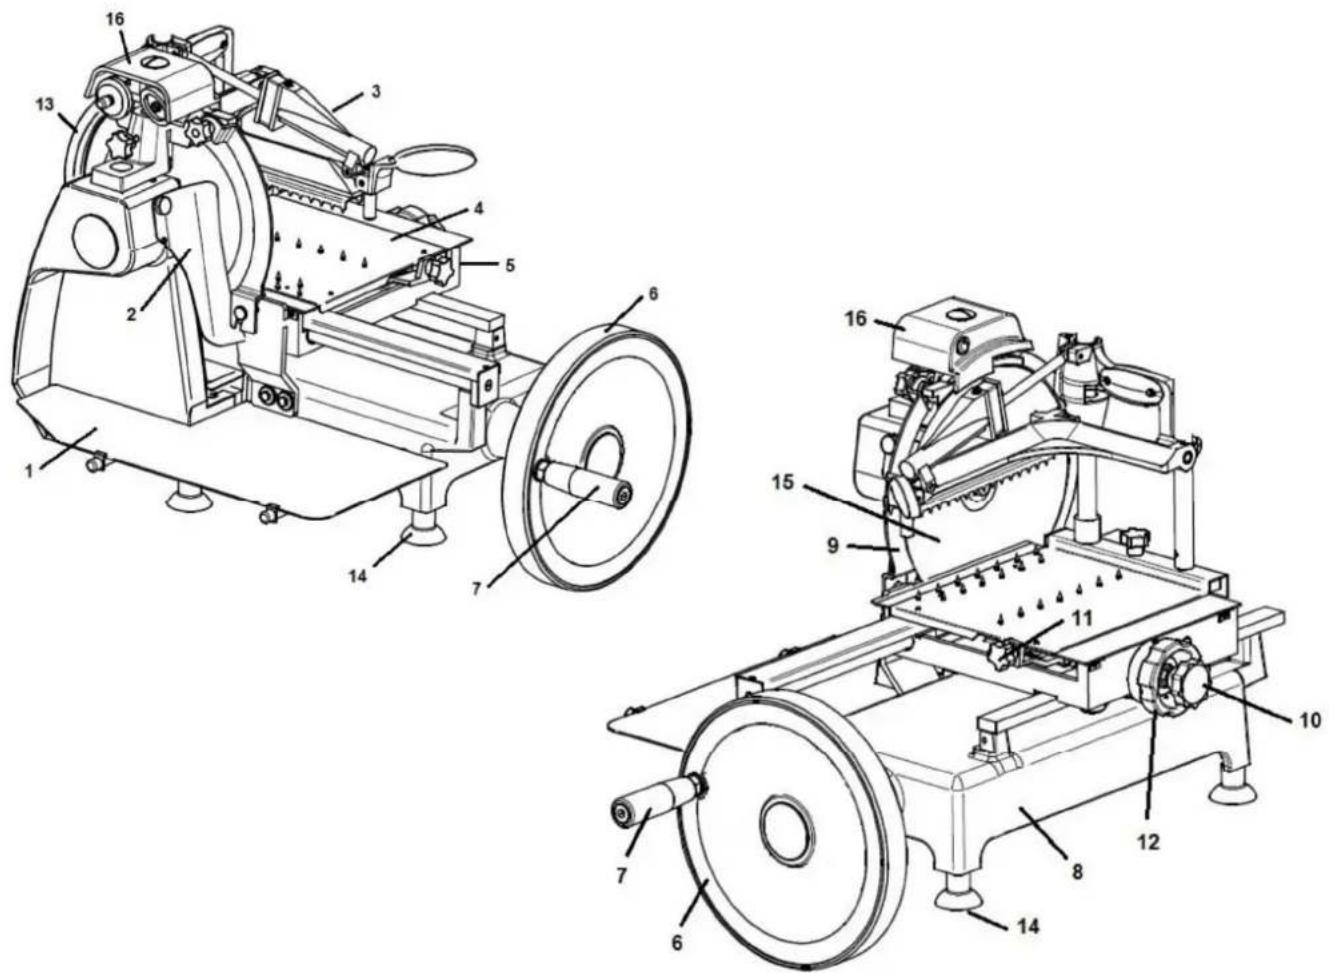
| NR. 9ESCHREI9UNG | |
| 1 | Food plate |
| 2 | Slice deflector |
| 3 | Food press |
| + | Sliding overplate |
| 5 | Carriage |
| 6 | Flywheel |
| 7 | Flywheel manoevring handle |
| 8 | Base |
| 9 | Blade protection |
| 10 | Handwheel overplate advance |
| 11 | Rapid overplate advance lever (P370) |
| 12 | Regulating knob for slice thickness |
| 13 | Blade cover |
| 1+ | Foot |
| 15 | Blade, ∅ 330mm |
| 16 | Sharpener |
4.2 Functionality
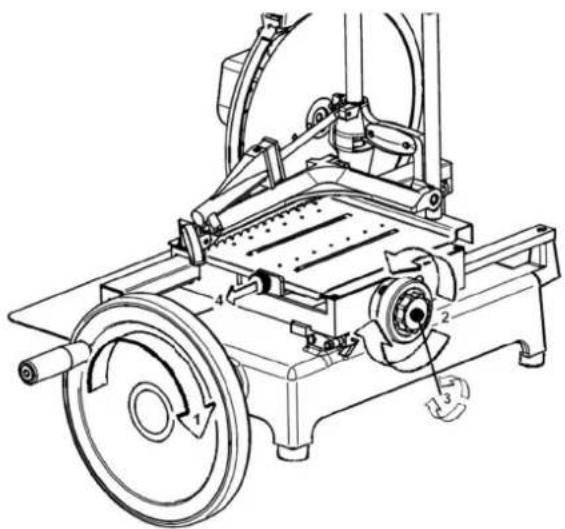
Manoeuvring flywheel: The flywheel (1) turned clockwise allows the carriage to be moved with the food plate with simultaneous blade rotation
Regulating knob for slice thickness: The thickness of the slice is regulated by turning the graduated scale knob (2).
Overplate advance handwheel: The handwheel (3) allows the overplate with the product to be brought quickly near to the blade after loading it or taken away from the blade after cutting or for small regulations
Overplate rapid advance lever: Pulling the toggle (+) allows rapid movement of the overplate, towards the blade or away from it after cutting. This operation is much quicker than the handwheel (3).
4.3 Loading the goods
- By using the flywheel (1), the carriage (2) is brought to the front towards the operator.
- Pull back the sliding overplate (3) completely by using the handwheel (+) or the rapid advance lever (5).
- Place the food to be sliced on the overplate and block it with the food press (6) regulating the height as well.
- Regulate the thickness of the slice by pulling and rotating the knob (7).
- Bring the overplate with the goods towards the blade by using the rapid advance lever or the handwheel.
natural_image
Technical line drawing of a mechanical assembly with labeled components (no text or symbols present)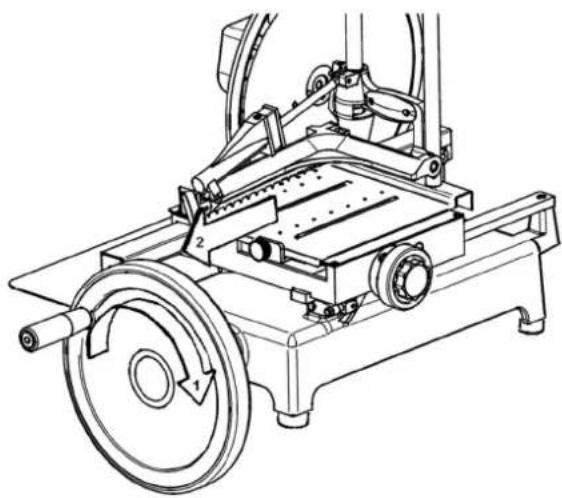
natural_image
Technical line drawing of a mechanical assembly with gears and levers (no text or symbols)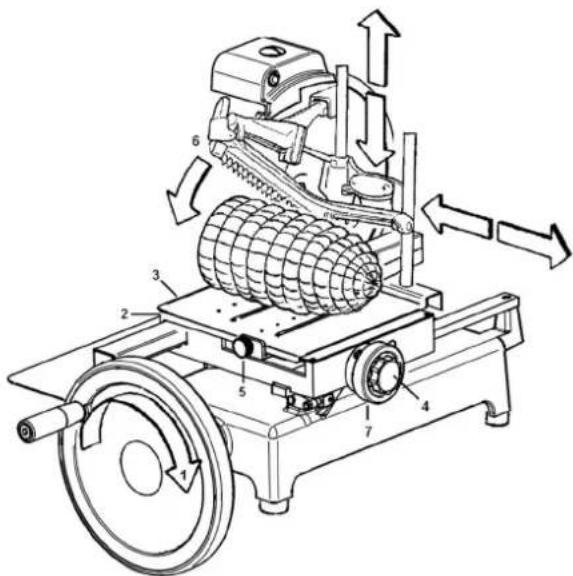
4.4 Cutting the goods
- Turn the flywheel clockwise.

Do not turn the flywheel counter clockwise since it could seriously damage the machine.
- During the forward movement of the carriage (towards the operator) the goods will go into the blade and the slice, which is guided by the slice deflector, will fall onto the plate below.
- During the return movement of the carriage (towards the operator) the mechanical device, which moves the overplate advance transversally towards the blade, will be put in motion.
4.5 Cleaning the slicing machine
Due to hygienic reasons the slicing machine must be properly cleaned on a regular basis. The machine needs to be dismantled and cleaned at the end of each working day, moreover, cleaning should take place if different kind of goods are sliced.

Also clean the machine, if it has not been used for a longer period of time.
General instructions:
- While cleaning the machine, use protective gloves that are resistant to cutting and tearing.
- Parts of the machine that come into contact with the sliced goods need to be cleaned by a brush with semi-stiff nylon bristles.
- The body of the machine needs to be cleaned with a soft and moist sponge.
- Only use products with a PH 7-8 degree of acidity and clear water.
- It is strictly forbidden to use cleaning material that may harm the operator's health or the machine.
- Only use clear water to rinse and wipe the machine.
- 9leaning the machine is limited to authorized personnel.
- Be aware of the cutter blade.
- Moving the machine needs to be done by two persons, taking the four legs as reference point.
Steps for cleaning the machine:
- Open the slice deflector.
• Take out the container. - Loosen the knob and lift the sliding overplate with its food press arm.
- Remove the front blade cover by using the locking screws.
- Remove the knife sharpener, raise it using the knob on the top.
- Clean all the disassembled parts and the machine body by using hot water (min. +30°C) and a biodegradable foaming detergent with a PH 7-8 degree if acidity. Use a soft, spongy cloth for the sharper parts.

The machine may not be cleaned with by running jets of water or steam or similar methods.

Neither the machine, nor the single parts may be cleaned in the dishwasher.
• After cleaning, the machine needs to be assembled in reverse order.
5. MAINTENANCE AND REPAIRS
The operator is allowed to carry out the following maintenance:
- Blade sharpening (periodically); the interval and length of the sharpening obviously depend on the use of the machine (working time and type of product sliced)
- Lubrication of the carriage guide bars and overplate (weekly)
Maintenance to be carried out exclusively by authorized personnel:
- Replacing the blade
- Replacing the sharpener grindstones
- Replacing the chain
- Repairing the structural parts, repairing and/or replacing components underneath the base
5.1 Sharpening the blade
Proceed as follows as soon as it is noticed that there is less cutting capacity:
- Open the slice deflector
- Clean the blade with denatured alcohol or hot water
- Raise the cover of the sharpener, turn it 180^ and lower it again
- Start the machine (only blade rotation)
- Carefully push the grindstone button to the right and persevere about 10-15 seconds. Afterwards release the button to bring him back in position.
- Burring of the blade. Carefully push the button to the left (Prosciutto300: press) and persevere about 3 seconds to remove the sharpening burr.

Avoid longer burring procedures in order to prevent a deformation of the blade.
- Stop the blade movement. Raise the cover again, turn it 180° and put it back to its original position
- Clean the blade and the machine

Sharpening the blade may only be performed by authorized personnel
Never clean the blade while machine is running.
The blade cannot be sharpened if attrition of blade diameter is higher than 6mm.
5.2 Lubricating the guide bars and overplate
6fter each cleaning operation of the machine put a few drops of oil along the sliding bar (3) of the carriage.
Turn the flywheel briefly.

Only use white vaseline oil! Never use plant oil!

natural_image
Line drawing of a hand operating a tool on a mechanical component (no text or symbols)6. COURSE OF INSTRUCTION
During the installation of the slicing machine, the operator of legal age must be trained and instructed regarding usage, cleaning, maintenance and blade sharpening. Especially the danger resulting from inappropriate usage must be considered.
The course of instruction must be performed by that person, who was entrusted with the installation and who is aware of sufficient knowledge regarding E9 standards and engineering.
7. STORAGE, TERMS OF TRANSPORT AND SCRAPPING
7.1 Storage and terms of transport
Please preserve all parts of the packaging for a possible shipment in order to avoid potential transport damage.
7.2 Scrapping
The machine consists of:
- 6 structure in aluminum - magnesium alloy
- Insets and parts are made of stainless steel
- Plastic materials
In case you hand off the dismantling and scrapping to a third party, only specialized companies that can handle the disposal may be assigned. If you want to scrap your machines within your company, the different materials must be separated and must be assigned to authorized companies for disposal.
In any case, every country has its own guidelines and regulations that need to be considered.

Always contact the manufacturer or authorized personnel regarding the removal of the circular blade and cutting edge in order to dispose parts riskless.
The owner is responsible for disposal and storage of dismantled parts.
8. WARRANTY
6DE will repair or replace this product within a period of 1 year from date of delivery applying to defects occurred due to poor material or workmanship (invoice is necessary).
6ll moveable parts are excluded. The warranty does not include natural ear, damages caused by incorrect or negligent handling, overuse or unsuitable or improper storage.
The manufacturer refuses each direct or indirect responsibility of the following circumstances:
- Disregarding of instruction
- Usage by untrained personnel that is not familiar with the instruction
- Usage that does not correspond to the valid prescriptions
- Non authorized modification or repair
- Usage of equipment and accessories that is not from manufacturer's origin
The legal rights of the customer are not hindered by the agreement of this warranty.
In case of registering a complaint, contact the dealer that has sold the product.
9. TECHNICAL SPECIFICATIONS
Model PROSCIUTTO 300
Blade ∅ 300 mm
9utting thickness 0-2 mm
9utting area 2+0 x 210 mm
9utting capacity ∅ 210 mm
9arriage movement 255 mm
Storage space 310 x +65 mm
Dimensions 570 x 775 x 680 mm
Dead weight ++,5 kg
Base (optional)
Height 850 mm
Dead weight approx. 50 kg
10. CE - LA9ELING AND DECLARATION OF CONFORMITY
CE
Declaration of conformity by the manufacturer
This machine has been manufactured in accordance with the harmonised European standards. They conform to the regulations of the E9-directives listed below:
– Machinery Directive 2006/+2/E9
in the valid version.
This declaration loses its validity if modifications are made to the scale without our approval.
Hamburg, September 2021
ADE Germany GmbH
Neuer Höltigbaum 15
D-221+3 Hamburg
Manufacturer: ADE Germany GmbH
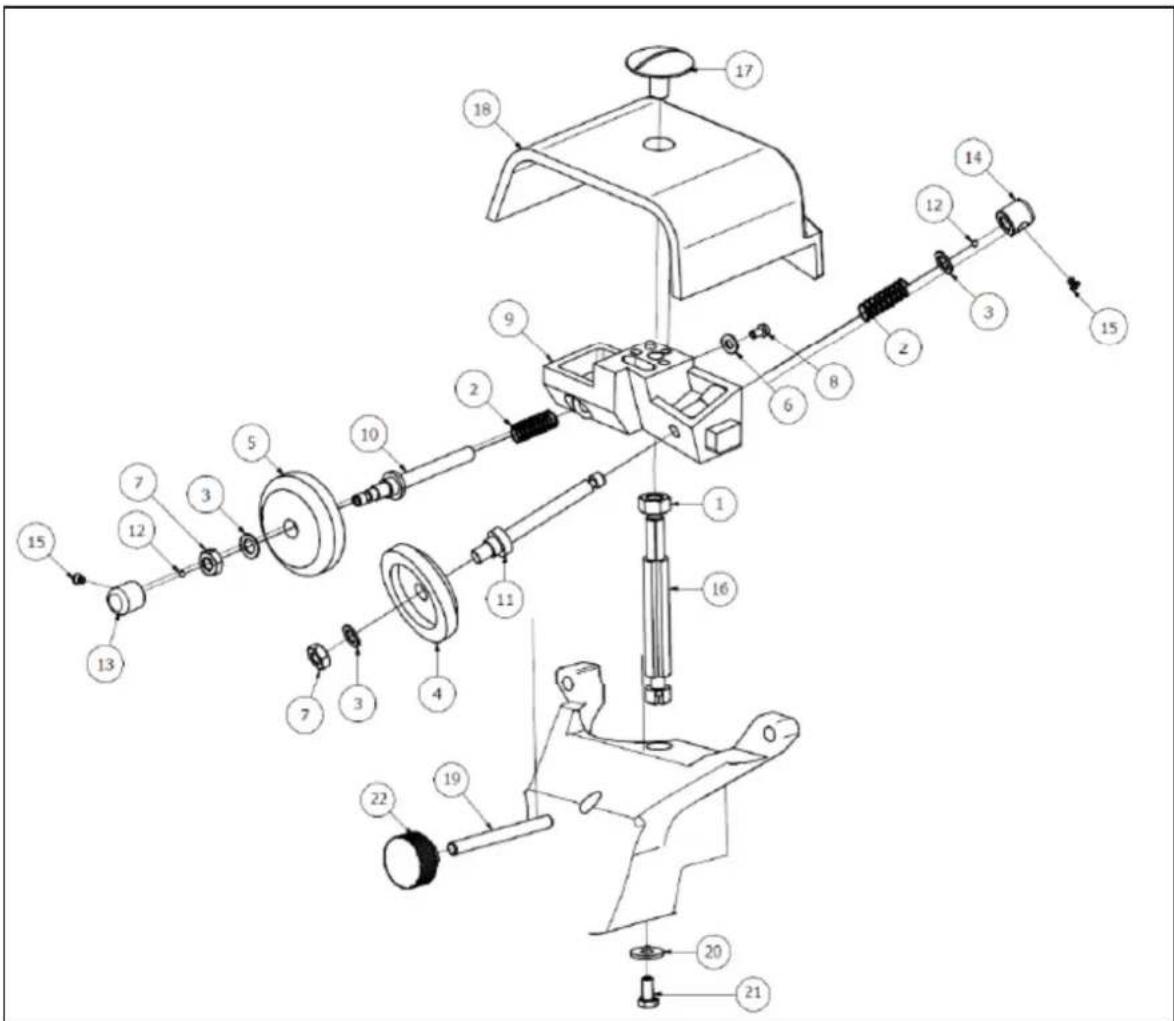
PROS9IUTTO 300 – Detail Transmission
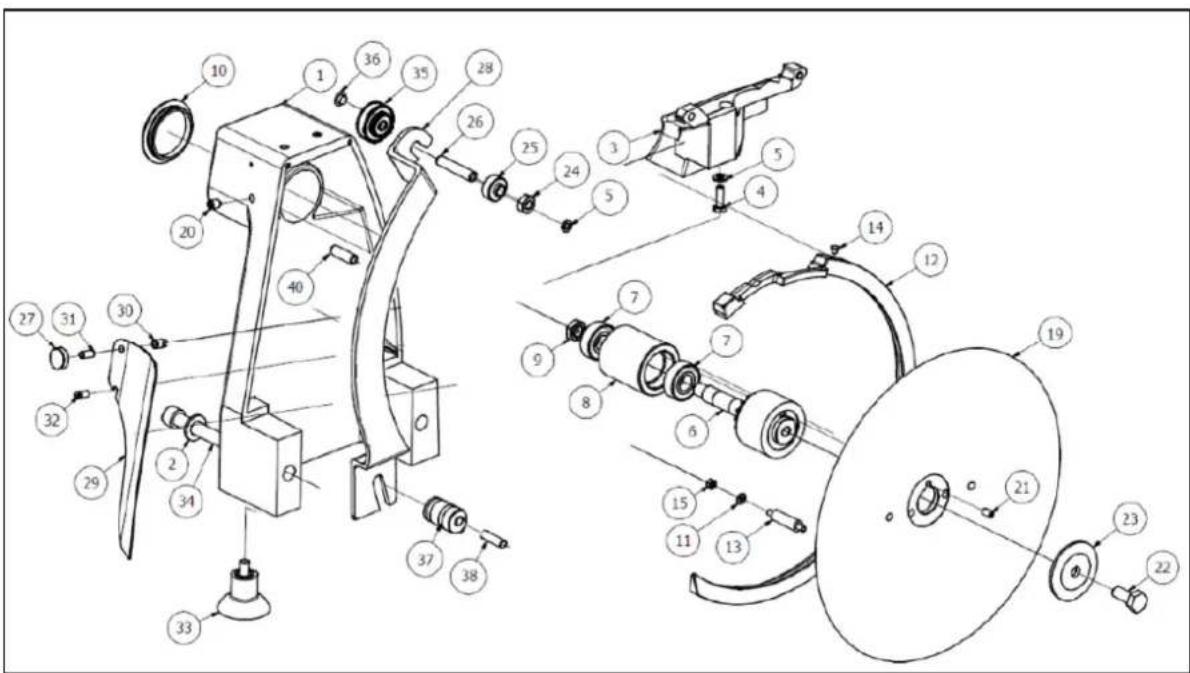
PROS9IUTTO 300 – Detail Guards

PROS9IUTTO 300 – Detail Sliding Plate

PROS9IUTTO 300 – Detail 9arriage
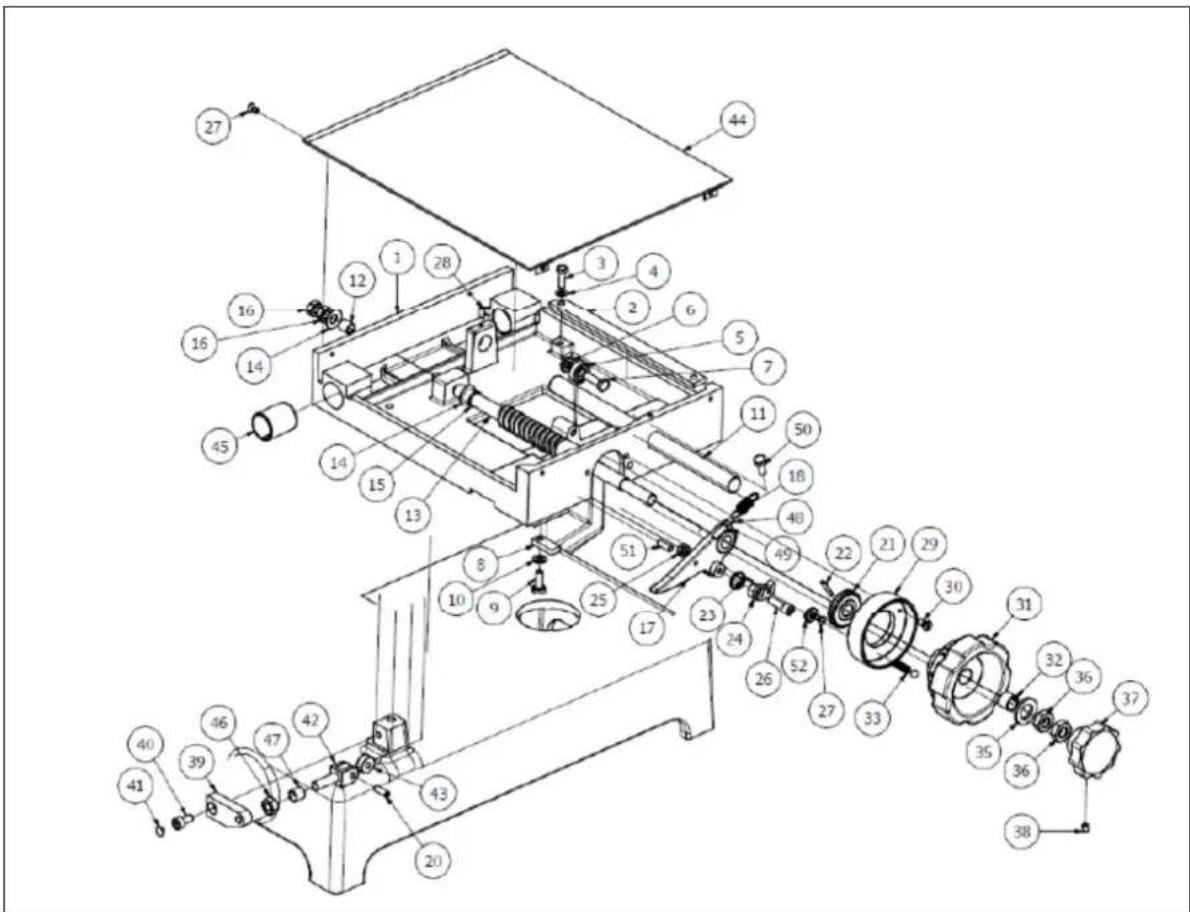
PROS9IUTTO 300 – Detail Feeding carriage
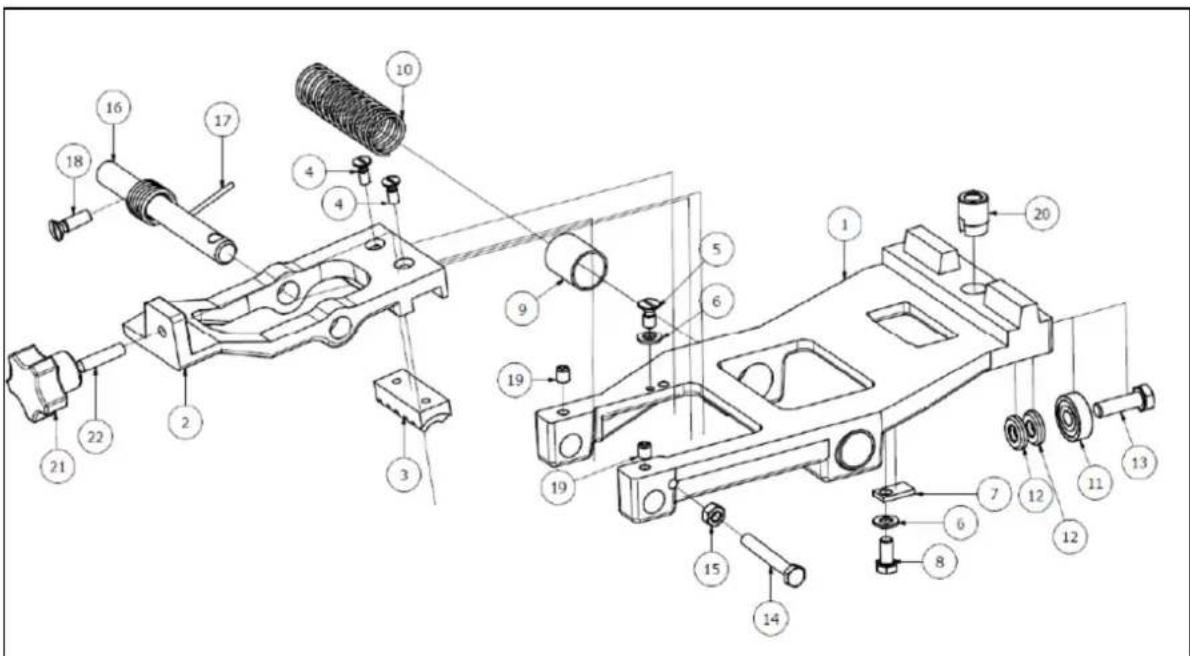
PROS9IUTTO 300 – Detail Sharpener
tt t
t
Distributor:
t
t
- T67LEtOFt9ONTENTSt
- INTRODUCTION
- Purpose of the manual
- General description of the machine
- Usage of the machine
- COMMISSIONING
- Unpacking
- Installation
- SAFETY INSTRUCTIONS
- General safety regulations
- Mechanical cutouts
- Acceptance inspection
- USAGE AND CLEANING
- Overview
- Functionality
- Loading the goods
- Cutting the goods
- Do not turn the flywheel counter clockwise since it could seriously damage the machine.
- Cleaning the slicing machine
- Also clean the machine, if it has not been used for a longer period of time.
- General instructions:
- Steps for cleaning the machine:
- MAINTENANCE AND REPAIRS
- Sharpening the blade
- Lubricating the guide bars and overplate
- COURSE OF INSTRUCTION
- STORAGE, TERMS OF TRANSPORT AND SCRAPPING
- Storage and terms of transport
- Scrapping
- WARRANTY
- TECHNICAL SPECIFICATIONS
- Model PROSCIUTTO 300
- CE - LA9ELING AND DECLARATION OF CONFORMITY
- CE
- Declaration of conformity by the manufacturer
- ADE Germany GmbH
Brand : ADE
Model : Prosciutto 300
Category : Slicer