53 SQ MAE - Lawn mower STIGA - Free user manual and instructions
Find the device manual for free 53 SQ MAE STIGA in PDF.

| Product Type | Lawn mower |
| Brand | STIGA |
| Model | 53 SQ MAE |
| Cutting Width | 53 cm |
| Engine Type | 4-stroke petrol engine |
| Engine Displacement | 190 cc |
| Power Output | 4.5 kW |
| Drive System | Self-propelled, rear wheel drive |
| Cutting Height Adjustment | Central, 25-75 mm, 6 positions |
| Collection Bag Capacity | 70 L |
| Start Type | Recoil start |
| Wheel Size | Front: 200 mm, Rear: 280 mm |
| Weight | 32 kg |
| Dimensions (L x W x H) | 1450 x 580 x 1050 mm |
| Fuel Tank Capacity | 1.5 L |
| Oil Capacity | 0.6 L |
| Grass Collection | Rear bag or mulching plug (optional) |
| Noise Level (LWA) | 95 dB(A) |
| Vibration Level | 5.2 m/s² |
| Safety Features | Operator presence control, blade brake |
| Maintenance Interval | Oil change every 25 hours, air filter every 50 hours |
Frequently Asked Questions - 53 SQ MAE STIGA
User questions about 53 SQ MAE STIGA
0 question about this device. Answer the ones you know or ask your own.
Ask a new question about this device
Download the instructions for your Lawn mower in PDF format for free! Find your manual 53 SQ MAE - STIGA and take your electronic device back in hand. On this page are published all the documents necessary for the use of your device. 53 SQ MAE by STIGA.
USER MANUAL 53 SQ MAE STIGA
1.1 HOW TO READ THE MANUAL
Some paragraphs in the manual contain important information regarding safety and operation and are emphasized in this manner:
The symbol highlights danger. Failure to observe the warning can lead to the risk of injury to oneself and others and/or damage.
This tool is not intended for use by persons with reduced ability to understand (including children), or by persons with little experience or not sufficiently instructed in the use of the device, unless they are supervised or have received the necessary instructions by a person responsible for their safety. Children should be supervised to ensure that they do not play with the tool.
2. SAFETY SIGNS
The identification label holds the following data (fig. 1):
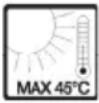 | Do not expose the accumulator to sunlight when the temperature is higher than 45°C. |
 | Do not immerse the accumulator in water and do not expose it to humidity. |
 | Do not throw batteries into a fire. EXPLOSION HAZARD! |
 | Class II Dual insulation |
 | For indoor use only |
 | Read the instructions before charging. |
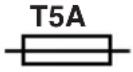 | Fuse |
| CE | CE conformity marking |
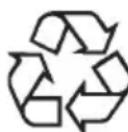
 | Do not dispose of this product with domestic waste. |
3. BATTERY
SPECIFICATIONS
BT 60 Li 4.0
Battery: 60V Max., 216Wh
Cell voltage: 3.6V ; Number of cells: 30
Charging time: 140 min.
(using a CG 60 Li Charger)
BT 60 Li 5.0
Battery: 60V Max., 270Wh
Cell voltage: 3.6V ; Number of cells: 30
Charging time: 180 min.
(using a CG 60 Li Charger)
For proper use, maintenance and storage of the battery, it is important to read and understand the instructions provided in this manual. In order to avoid serious injuries, fire hazards, explosions and dangers from electric shocks and electric arcs:
- DO NOT probe the charger with conductive materials. The charging terminals can withstand a voltage of 120 V.
- If the battery pack case is broken or damaged, DO NOT insert it into the charger. Replace it with a new battery pack.
- DO NOT charge these battery packs using a different type of charger.
- DO NOT allow liquid to get inside the charger.
- DO NOT use the charger for other purposes than those specified in this manual.
- DO NOT attempt to short-circuit the battery pack terminals.
If chemicals in the battery come into contact with the eyes, wash them immediately with clean water for at least 15 minutes. Seek medical care immediately. Do not recharge the battery pack in rain or humid conditions. Do not immerse the tool, battery pack or charger in water or other liquids.
- Be aware that the battery pack or charger do not overheat. If they are hot, let them cool down. Charge only at room temperature.
- Do not cover the ventilation grids on the top of the charger. Do not place the charger on a soft surface such as a blanket or pillow. Keep the ventilation grids of the charger clean.
- Prevent small metal objects or materials such as steel wool, aluminium foil, or other extraneous particles from entering the charger cavities.
- Unplug the charger before cleaning or when there is no battery pack inside.
- DO NOT place the battery pack in direct sunlight or in a warm environment. Always keep it at a normal room temperature.
- DO NOT attempt to connect two chargers at the same time.
- If the battery is not charged for a long time, it should always be stored in the shade, in a cool and dry place.
- Charge the battery for 2 hours every 2 months.
- The cells in the battery pack may leak if used too much or at extreme temperatures.
- If the outer seal breaks and chemicals in the battery come into contact with the skin:
- wash immediately with soap and water,
- neutralise with lemon juice, vinegar or other mild acids.
- If chemicals contained in the battery come into contact with the eyes, follow the instructions above and seek medical assistance.
- Before use, check that the output voltage and current of the battery charger are suitable for charging the battery pack.
- If the output polarity does not match the charging polarity, DO NOT use the charger.
- For indoor use only.
- DO NOT open the cover under any circumstances. If the cover is damaged, the charger can NO longer be used.
- DO NOT charge non-rechargeable batteries.
CHECKING BATTERY CAPACITY
Press the battery capacity indicator key (1). The lights (2) will turn on depending on the capacity level of the battery. See the diagram below:
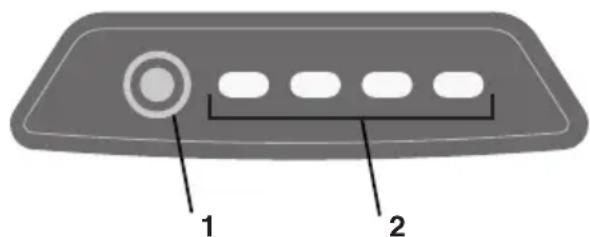
Lights Capacity
| 4 green lights | Fully charged battery |
| 3 green lights | Battery is 75% charged |
| 2 green lights | Battery is 50% charged |
| 1 green light | Battery is 25% charged and needs recharging immediately. |
| Lights are off | The battery is flat and needs recharging immediately. |
SAFETY NOTES AND PRECAUTIONS
- DO NOT disassemble the battery.
- Keep out of the reach of children.
-
This appliance can be used by children aged from 8 years and above and persons with reduced physical, sensory or mental capabilities or lack of experience and knowledge if they have been given supervision or instructions concerning use of the appliance in a safe way and understand the hazards involved. Children shall not play with the appliance. Cleaning and user maintenance shall not be made by children without supervision.
-
DO NOT expose the battery to fresh or salt water, store it in a cool and dry place.
-
DO NOT place the battery in hot places, such as near a fire, radiator, etc.,
-
DO NOT switch the negative and positive battery terminals.
-
DO NOT connect the positive and negative terminals of the battery to metal objects.
-
DO NOT hit, tap or stand on the battery.
-
DO NOT weld or drill the battery with nails or other sharp objects.
-
If the battery loses chemicals that come into contact with your eyes, do not rub them but rinse thoroughly with water.
-
Stop using the battery if it produces unusual smells, becomes hot or changes colour/shape and looks abnormal.
-
If the power cable of this tool is damaged, it must be replaced by the manufacturer or his agent or by specifically qualified personnel in order to reduce any resulting risk.
4. ECO-FRIENDLY DISPOSAL OF THE BATTERY
The following toxic and corrosive materials are found within the battery
pack used with this tool: Lithium-ion is a toxic material.
All toxic materials should be disposed of properly to prevent environmental contamination.
Before disposing of damaged or broken lithium-ion battery packs, contact your local waste disposal agency or the local Environmental Protection Agency for specific information and instructions. Dispose of batteries in a certified lithium-ion recycling and/or disposal facility.
⚠️ If the battery pack cracks or breaks, with or without chemical leakage, do not recharge or use it. Dispose of and replace it with a new battery pack.
DO NOT ATTEMPT TO REPAIR IT! In order to avoid accidents and risks of fire, explosion or electric shock and to prevent damage to the environment:
– Cover the battery terminals with strong adhesive tape.
- DO NOT attempt to remove or destroy any part of the battery pack.
- DO NOT attempt to open the battery pack.
Electrolytes released from battery pack chemical leakage are corrosive and toxic. Do NOT allow chemical substances to come into contact with eyes, skin and, above all, do not ingest them.
- DO NOT dispose of batteries with domestic waste.
- DO NOT burn.
- DO NOT place batteries where they could become part of a local waste landfill or municipal solid waste.
- Take them to an authorized recycling centre.
5. BATTERY CHARGER
SPECIFICATIONS
CG 60 Li
Input: 220-240V \~ 50/60 Hz
Output: 60V =2A
- The equipment shall not be exposed to dripping or splashing, and no liquid container, such as pots, shall be placed above the equipment.
- The charger is designed for rechargeable lithium-ion batteries. Some other types
of batteries may explode, resulting in personal injury and property damage.
- Only charge rechargeable batteries.
- The transformer external flexible cable cannot be replaced; if the cable is damaged, the whole transformer must be disposed of.
- The line voltage can be disconnected by pulling the mains socket.
- The socket must be positioned close to the tool and must be easily accessible.
CHARGING PROCEDURE
NOTE Battery is shipped not fully charged. It is recommended to charge it before use to ensure that the maximum operating time is reached. The lithium-ion battery does not have a charge memory and can be recharged at any time.
NOTE The battery is equipped with a guard that inhibits recharging if the environmental temperature is not between 0 and +45 °C.
- Connect the charger to an AC outlet (1).
- Put the battery pack (2) into the charger (3).
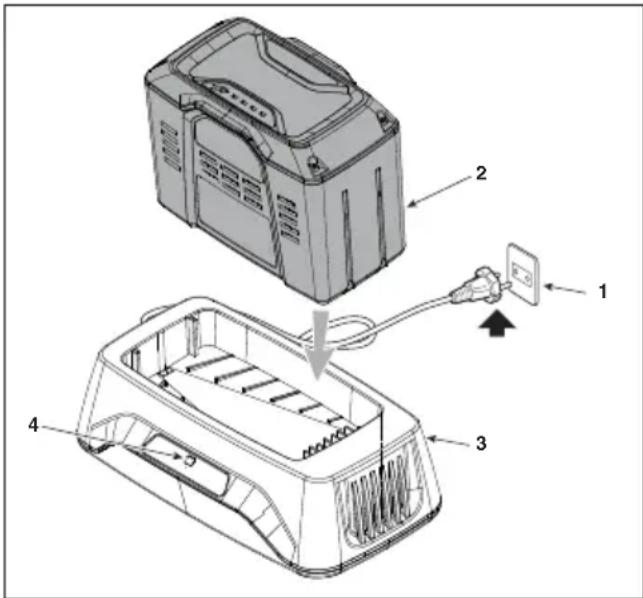
This is a diagnostic charger. The LED charger lights (4) will light in a specific order to communicate the current battery status.
| DESCRIPTION LED STATUS | ||
| No battery ○ Off | ||
| Battery charging ⚙ Flashing | green | |
| Fully charged ● Green | ||
| Overheated battery:(remove for approx.30 min. to allow itto cool down) | ● Red |
| Faulty battery(remove and replacewith a new battery) | ☀ Flashing red |
CHECKING THE CHARGER
If the battery pack does not charge properly:
- Check the output power with another tool. Make sure that the outlet is not isolated.
- Check the charger contacts against short circuit caused by debris or other materials.
If the battery is inserted into the charger when it is hot or overheated, the LED LOAD indicator light on the charger may light RED. In this case, let the battery cool down out of the charger for about 30 minutes.
NOTE If the battery and charger are not used for a long period of time, remove the battery from the charger and disconnect the AC outlet.
IMPORTANT SAFETY INSTRUCTIONS
- KEEP THESE INSTRUCTIONS DANGER: TO REDUCE THE RISK OF FIRE OR ELECTRIC SHOCK, IT IS IMPORTANT TO FOLLOW THESE INSTRUCTIONS CAREFULLY.
- Before using the charger, check the available voltage in each country.
6. CLEANING
⚠️ To avoid the risk of fire and electric shock:
- Do not use damp cloths or detergents on the battery or the battery charger.
- Always remove the battery pack before cleaning, inspecting or servicing the tool.
Clean the outside of the charger with a soft, dry cloth. Do not rinse or clean with water.
7. DISPOSAL
Do not throw electrical equipment away with domestic waste. In observance of European Directive 2012/19/EC on electrical and electronic equipment
waste and its implementation in accordance with national regulations, electrical equipment that
has reached the end of its product life must be collected separately and recycled in an ecologically compatible way. If electrical equipment is disposed of in dumps or in landfills, hazardous substances can leak into the groundwater and contaminate the food chain, damaging your health and well-being. For further information on the disposal of this product, contact your dealer or a domestic waste collection service.
Li-ion
At the end of their working life, dispose of batteries paying due attention to the environment. Batteries contain material classified as hazardous for you and the environment. They must be removed and disposed of separately at a facility that accepts lithium-ion batteries.
Separate waste collection of the products and packaging used allows the materials to be recycled and reused.
Reuse of recycled materials help to prevent environmental pollution and reduces the demand for raw materials.
8. ASSISTANCE AND REPAIRS
This manual provides all the necessary information to run the machine and for correct basic maintenance operations which can be performed by the user. Any regulations and maintenance operations not described herein must be carried out by your Dealer or Authorised Service Centre, which have the necessary knowledge and equipment to ensure that the work is carried out correctly, maintaining the correct degree of safety and the original operating conditions of the machine. Any operations performed in unauthorized centres or by unqualified persons will totally invalidate the Warranty and all obligations and responsibilities of the Manufacturer.
- Only authorized service workshops can carry out guaranteed repairs and maintenance.
• Genuine spare parts are supplied by authorised assistance workshops and dealers.
• Genuine spare parts and accessories have been designed specifically for machines. - Non-original parts and accessories are not approved; use of non-original spare parts and accessories will jeopardize the safety of the machine and relieve the Manufacturer from all obligations or liabilities. It is recommended to send the equipment once a year to an authorised service workshop for the maintenance, assistance and control of safety devices.
9. WARRANTY COVERAGE
The warranty conditions are intended for consumers only, i.e. non-professional operators. The warranty covers all material quality and manufacturing defects recognised during the warranty period by your Dealer or Authorised Service Centre.
The warranty is restricted to the repair or replacement of components recognised as faulty.
It is advisable to send your machine once a year to an authorized service workshop for servicing, assistance and safety device inspection.
The warranty only applies to machines subjected to regular maintenance.
The user must follow all the instructions provided in the accompanying documentation.
The warranty does not cover damages resulting from:
- Failure to become familiar with the documentation accompanying the machine (Instruction manuals).
• Professional use - Carelessness, negligence
- External causes (lightning, impact, presence of foreign bodies inside the machine) or incidents
- Incorrect use or assembly or prohibited by the manufacturer
- Poor maintenance
- Modification to the machine
- Use of non-genuine spare parts (adaptable parts)
- Use of accessories not supplied or approved by the manufacturer.
The warranty does not cover:
- The routine/extraordinary maintenance operations (described in the instruction manual)
• Normal wear and tear - Deterioration in the appearance of the machine due to use
• The substances, oil, petrol, grease
• Cutting means supports - Any ancillary expenses related to the enforcement of the warranty, such as costs incurred to travel to the user's location, transfer of the machine to the Dealer, rental of replacement equipment or calling of independent enterprises to perform maintenance work.
The user is protected by his or her own national legislation. The user's rights under
the national laws or his or her own country are not in any way restricted by this warranty.
Sr. VP Product Technical Division Maurizio Tursini
$$ \Lambda_ {l i} $$
| FR (Traduction alle riselle originale)Declaration CE de Conformité(Directive Machines 2006/42CE, Annex II.I. La Société2. Déclaré sous sa propre responsabilité que la machine : Chargues de bilhanteat Type / Modèle de Baseb) Mois / Année de construction(%) Sors.Eat conforme aux prescriptions des directives:4. Renvol aux Normes harmonisées5. Parsonaire habitée à stabile le DossierTechnique:a) Lieu et Data | EN (Combination of the principle instruction)EC Declaration of Conformity(Machine Directive 2006/42/CE, Annex II, part A)1. The Company2. Kerby déclarés under its own responsibility that the machine. Battery chargera) Type I (Dass Model)b) Month I Year of manufacture3) Serial number3. Conforms to directive specifications: Reference to harmonisé Standarde(n) Person authorized to create the Technical Folsér:o) Place and Data | DE (Überwaltung der Original Nonverbindlichkeiten)EG-Konformitätserkühlung(Maschinenrichtige 2006/42/EG, Anhang II.Terce)a) 1. Die Gesellschaft2. Erklärt à algene Verantwortung, dass die Machine Landerparia) Top I Baselensdeltb) Monet / Basjahr3. Oen Anforderungen der folgenden Rechniken eropériltes4. Uerburgathme auf die harmonisierten Nomineo) Zur Veräußerung der technischen Untertagen befrugie Person:o) Ort und Data | NO (Gesamtkasse des salarien (sociellenanning)EF - Summerverkierungs(Maskindisk® 2006/42/EF, Vedoglu II, del iA)1. Firmest2. Erklimer på akti anwar al markinen: Batterlaktora) Type I (Modell)b) Marod I (Byggyär)c) Betrangmuera3. Opolyber Navane Idokrivone;4. Hannavning till harmoniserte standlerdern) Person aan het palmakt in a usterige Leistro dokumentation:a) Stied og data | SV (Umsamtkasse en bewertemandring)EG-diplenzen om overwasserminder(Maskindisk® 2006/42/ES, biliga II, de la)1. Forderget2. Forstijper på akti anwar al markinen: Batterlaktora) Type I (Modell)b) Marod I (Byggyär)c) Betrangmuera4) Motor, förbränningssmotor3. Overwasserminder med forschikristome: direktiva#) Pafrika bil harmoniserte standlerdererika(ii) Lafföllöve5. Autorzerad person für upgriffstandt av den betinika dokumentationen:a) Ort och datum | DA (Overwasserminder des openskeln in genzerning)EF-overwasserminderseckliking(Maskindisk® 2006/42/EF, biliga II, del A)1. Firmest2. Einkarra på akti anwar, al markinen: Batterlaktoraa) Type I (Modell)2. CarvonskienerciereiCarernummer3. Ev overwasserminder med spezializationne bede direktivene4. Huminating til harmonisende standlerdern) Person, der het bemyntigstele uit al usterbijte dat tektelde dassena) Stied og data |
| ML, Verlag van de conservent is gebruizouwlicheid EG-verklaring van oversvermaatlemming1. Den Martin Machines 2006/42CE, Ujlage II, deel A)1. Het bedrij2. Verkaat onder zijn eigen verwijdenminder als geleld dat de machine Acculadera) Type I (Basemodel)b) Meand I (Bozijjar)c) Severuurmer3. Voldot aan de specifiziertes van de richtlijmen4. Verwijding naar de Geharmonisende normenb) Bevoemd person voor het opstiefen van het Technisch Dominierat o Plats en Datum | ES (Traduction del Manual Origin)Declarsación de Conformidad CE(Directive Maquinas 2006/42/CE, Annex II, parte A)1. La Empress2. Declará bajo eu propria responsabilidad que la marquarie. Cangelder de bebeda a) Tipo I Modelo Baseb) Mey I Ano de fabricaciónc) Altricola3. Cumple con las especificaciones de las directives:4. Referencia a las Normas ammonizadasn) Person autorizada a realizar el Manuel Tecnicoo) Logari y Facha | PT (Traduction de manual original)Declarságio CE de Conformidade(Directive de Maquinas 2006/42/CE, Annex II, parte A)1. A Empress2. Declará sob a propria responsabilidade que a marquarie. Cangelder de bebeda a) Tipo I Modelo Baseb) Mey I Ano de fabricaciónc) Altricola3. É conforme ze especificaciones das directiva:4. Referencia a las Normas ammonizadasn) Person autorizada a realizar el Manuel Tecnicoo) Logari y Facha | PT (Traduction de manual original)FY-VATNISTEMNIKRAISUSVAKUITUS(KonradiskTM 2006/42/EY, Lille II, eau A)1. Yelys2. Valuatuza emaila vorhuitan, yeti kone: Akitaikana) Type I (Parsumiti)b) Kinkanse (Valmistazuvusci) c) Sartopanume3. On yderermukahan seruvallen direktibden sealtamaten vissimaten kanaea;4. Ultihua harmonischholih standarablini) Teletimen belrijvingen luitismen verbalsliche beckloje:a) Parkia je piivarmairai | CS (Feste di plazoanterne diksoluta pruchin)EF - Protisteanti o schadi (deltrico o azo goshil zufzobich 2006/42/ES, Prioria II, Zast AI1. Spedanžant2. Protisteanti elekti odpevöldest, ža straj: Nidjedka stumistiona a) Typ I Zakladni modelb) Mice / Risk výrodyc) Výrodyd dolo3. Ve ve efektia e matrantiini amarkite;4. Držiny na Harmonizovane norenyn) Drota autotecnava pro výrohorziTechnickéke splice:a) Miete a Datum | PL (Hormonics interniaryngnja)Deklarreja zgodnikati WC:Dyrektyse naszynning 2006/42/MEZarczinte i, craste AI1. Spedla2. Deserlazca na meåna odprevedskilustici, ža mureyna: befinanziare scumististowea) Typ I (Modell postbezonyb) Miteby I (Riot produktivi)J. Numer seryny3. Spedla postbezovave vymogé nadapujavy Dystevky4. Ostmietela de Korm pharaminizovanychn) Drota upovasnama do zredagovamineDocumentarijs technicznej:e) Mitevaowcić i loata |
| FL (Mitarpack ta prepublattens van olegnivsgpros)EK-Ansprain metragopurionsB-Myers Maguiwii 2006/42/CE, Parapugnay II, oboc A)1. H Eropina2. Δπλωνη στούδυνο οι τη μμαρνή: ο2. Σροσμεροστημη μ της προσκεραργεις της θόρχην:Ανφορο στου Κενοναγισμο εναρρείνσυνης έ Σπροσκεραργεις τηρη γι της προσκεραργεις του Τροτικού Φολάθονεο ο Τροτικού και Χρόνος | TR (Orfital Talmatar na Tecramos)AT Uygunkuk Bayern(ProspezCE Makine Direktik, Ek II, bolium A)1. Sifya2. Salisi sorumluluju utindia asgudaki malaymene: pil art panhaa) Top Steord modelb) Uretinin Ay I y6c) SicI numaras3. Asgudaki direktiflorin Zeösilikerine uygun odluguana beyan omlstorid:4. Hamorange standartara atfta) Teknik Doyuga ovuplumaya yetelli kijti:c) Yor ve Tarth | MK (Trendor na orupiahale neptrotasi)Деклармия за уступленистое со ЕУ(Церкация за планики 2006/42/CE, Annex II,Фотирина)1. Команнгей2. соремуя со целями пачня одворностотраспорядят молите полите на багреваa) Top I Science parkenb) Moseu I (Godina ha производствоe) Nolettes3. Усменяло со сп visuallyщите спирддироктирумент:4. Рифронца за уступлении нормативи к пастечного рода за составуCAA и Тевеновна біршувао: мостю и датум | RU (Evoluto bezanla adriada forklase)EK-meglektelskabel nyitikritazota(2006/42/ET Apoktygaly, II melkštit 'A' rieč)1. Autikom 2. Fransikovskarakajak batutatan ojepinti, hogy az stibli glip: Akumulator stečkea) Topi e Izapitiseb) Monti Gyalsta direcC) Gyatali kianb3. Megnevi az stibli hryselek földinskäne;4. Prokiksa a harmonisität azsvörenvendsa) Monti Gyalsta az vistektskänefehuszinsat oszemily; a) Itge na ainge | RU (Pessora ojerinklaut, da nortiviridmiДепартам コонстантине екремы FC(Предитация о вышению обродукции 2006/42/ET, Программа II, втотех А)1. Погампей2. Заврат под собственнуюотвентоскимость, что михайся запрованеручаренияв телки и Top I Gestionakb) Meseu Top konsontendnisb) Iceoporie3. Соответтает требованиям следующихдиректорs:4. Сости на агроминародным нормиб) Никла, уполноменование на подготовкипереноскими документациям) Мостю и дата | HR (Felçado oljutihi h uxtai)EK-aspiu suikadnosti(Preditiva 2006/42/ET o edstevina, dodatkii II,delta1. Terga2. End vlastem odgovornotica bijedruje da jekege Janjat beranjae)a) Vasta / Geneskat imittelb) Mijesca godina privodjenje2. Atkafaya3. Antkafaya t bemejiam behijems direktiva:4. Pristeglerze za efectoide harmonizaneunennem:0. Drosos odstens za pravljente Technischeplasticae) Mjeste i datum |
www.abc.com
| SL (Provedenih revsrd)ES Izjava o skladnosti(Bredite 2004/2E5, pitlog II, diei A)(Druža)2. pod listno ogovomostko izvajla, da je stroj:Modine za akumulator3. Tip i osnovni model4. Maceu laia izdelave5. Serpaka slevika6. Sitakton je a dotectili odskiv:6. Skicavanje na uksljenne prednje7. Osoba, podlastona za ostatale technice.8. Oplice9. Rup in datum | BS IP kredal nkrakadnostiEZ Izjava o skladnosti(Dredite z o miedanima 2004/2E7, Priog II, diei A)1. Elma2. Sepa lapa pod vlasifikum odgovornostku da je matina: Pun se palenjaa) Tipi Osnovni modelb) Noged i Godra proizvodjec) Sedljiti broj3. sublindna concomin zahljivanu direktiva:4. Pezvanje na uksljenne norme5. Osoba osielena za izrada tehnolins brokumc) Hymo i data | SK (Freid prodniko nasovuna požitki)ES výršatosni o zhode(Smirstná o stryjnost zariadanlach 2004/2E5, Prioca II, čast A)2. Spojodnost3. Topi / Zakladni na vlasni zodpovednaj, ze stroj: Nabljatcaa) Topi / Zakladni modelb) Mestac i Roh výrodyc) Výrebné čise3. je za zhode a naradeniami amernica;4. Odkaz na harmonizovaní normy9. Ochba autorizované na výršnotní technického spienc;0) Mieto i Data |
| RO (Todutszen manutenu labkovantil):CE- Declarité de Conformité(Directive Kapri 2004/2CE, Anexa II, partes A)1. Sotolatea2. Declará pe oporta raspund ore cá masina: Isclarditor batorie3. Tipi / Modi de bazá4. Luna (Anul de fabricatie)5. Numlaje sersk6. Esta in conformitate cu specifacičnila direktiva:4. Raživanja la Standarde armonizate5. Pernosa autorizata st into omersceci Docanul Technicol Local sl Data | LT (Originals dinkcípi odstines)EL stiklats deklarancijaIMstiny direktyva 2004/2CE, Priog II, dlits A)1. Bendrové2. Prisima atsklimyte, iud jempinga: Akumuliatorių pakreviša3. Tipas i Bazinis Modello4. Menso i Papaminimo metalc) Sertijos numlifs5. Altinka dreštvaya preklats specifikacijas:6. Nuvoča i sudoritnas Normas7. Alfinišanas aslimo sudaryi! Technine Dokumentacijsa8. Victa ir Data | LV (polnictuči tujimna na orjedinoblava);EK atliklats deklarancija e(Directiva 2004/2CE/k par mākinim, piiskums II, dlats A)1. Uprzemus2. Uprzemius per in plmu atliklihu, parigao, ka nadita; Loktajsa)2. Tipis / Bazis modello3. Mensoi i Nazlonas godes4. Sertijos numluis5. Altinka sida dielistve pruzibám6. Atkasea ut barmonizatoren standardiem9. Plirvarotađi darlčnica, kas sagatavojta tehnistko dokumentacijsa;0) Victa i data |
| BR (Přove odnătnih upuzdali)EC aktivacija u asiglačenodi(Directive o maximina 2004/2E C, Priog II, diei A)1. Preduzao2. Dje izpana pod vlastnom ogovornostku da je masina: Punječ akumulatora) Tip i Ocnovni model3. Mesco i lodina proizvodje5. A silicatea o corvenne zahljivanne direktiva:4. Poživanje ng uksljenne norme5. Osoba osielena za sustavljanje tehnolins sprakume) Meso i data | Ba (Posse na odrjati na ihe instrupanje);EO rektaparao na įstovotatlanio(Дирустлена Мимини 2004/2E7/O, Приpoženima II, žust A)1. Дружносто2. На собстана ottoorovirest doktarjora, че малините: на зарадното управствоa) Vid i Bazaicen modelb) Mesco i porere na производtoc) Scovoni nojor3. E ve sčyštavitanie sčke snačednakta na darpravlanje;4. Bazirano na charmoživananito normipl) Liće, уплношовано да įstčasti Teknicoicata документacija;0) Mixto i data | ET (Kupularnica koutarsunich toldje)EO vastanusdeklarancije(Masinadrestliv 2004/2CE/E), Luta II, osa A)1. Elma2. Krittal emai vastučetav, at mashi: Akubasijad3. Tulpi / Piltinudel4. Kuš auga / Toothissasta5. Matkouk6. Moctor: Sleep@emianlanser3. Vystab direktlyde nývajstoj;7. Vlute unlatučno standardněle9. Telinitla Leha autoteneri fond kozstujeća0) Kolt ja Kozstdev |
Theorem 12-48-chapter
EN • The content and images in this User Manual were produced expressly for ST. S.p.A. and are protected by copyright – any unauthorised reproduction or modification to the document, either partially or in full, is prohibited.
Type: