
EasyPIX 2 - Measurement EIZO - Free user manual and instructions
Find the device manual for free EasyPIX 2 EIZO in PDF.

| Product Type | Monitor Colorimeter / Sensor |
| Brand | EIZO |
| Model | EasyPIX 2 |
| Category | Measurement |
| Dimensions (Sensor) | 93 mm × 99 mm × 33 mm (3.66" × 3.9" × 1.3") |
| Weight (Sensor) | Approx. 120 g (0.26 lbs) |
| Interface | USB |
| Power Supply | 5.0 ± 0.25 V, max. 100 mA |
| Operating Temperature | 15 °C to 35 °C |
| Storage Temperature | -10 °C to 60 °C |
| Certifications | CE, FCC Class A |
| Key Functions | Visual adjustment, paper measurement, monitor calibration (brightness, color temperature, gamma, gamut), switching between three settings |
| Package Contents | Sensor (EX2), EIZO EasyPIX Software CD-ROM, User's Manual |
| System Requirements | Windows 8/7/Vista/XP (32/64 bit) or Mac OS X 10.4.11–10.8; 1 GB RAM (Windows) or 512 MB (Mac); 24-bit color; 1680×1050 resolution; USB port |
| Compatible Monitors | EIZO monitors supporting EasyPIX Software (require USB connection for full functions) |
| Maintenance | Clean sensor with soft, dry cloth; avoid dropping or impact; store at <30°C and <70% humidity |
| Safety Warnings | Do not disassemble or modify; unplug if smoke, odor, or abnormal noise; keep away from children |
| Repair & Spare Parts | Contact dealer or EIZO; limited warranty 2 years; no user-serviceable parts |
| General Information | EIZO NANAO CORPORATION; designed for color matching between monitor and prints; periodic readjustment recommended every 2–4 weeks |
Frequently Asked Questions - EasyPIX 2 EIZO
User questions about EasyPIX 2 EIZO
0 question about this device. Answer the ones you know or ask your own.
Ask a new question about this device
Download the instructions for your Measurement in PDF format for free! Find your manual EasyPIX 2 - EIZO and take your electronic device back in hand. On this page are published all the documents necessary for the use of your device. EasyPIX 2 by EIZO.
USER MANUAL EasyPIX 2 EIZO
Please read this User's Manual carefully to familiarize yourself with safe and effective usage. Please retain this manual for future reference.
重要
If the unit begins to emit smoke, smells like something is burning, or makes strange noises, disconnect all connections immediately and contact your dealer for advice.
Attempting to use a malfunctioning unit may result in fire, electric shock, or equipment damage.
Do not disassemble or modify the unit and cable.
Not doing so may result in damage, fire or electric shock.

No part of this manual may be reproduced, stored in a retrieval system, or transmitted, in any form or by any means, electric, mechanical, or otherwise, without the prior written permission of EIZO NANAO CORPORATION.
EIZO NANAO CORPORATION is under no obligation to hold any submitted material or information confidential unless prior arrangements are made pursuant to EIZO NANAO CORPORATION's receipt of said information. Although every effort has been made to ensure that this manual provides up-to-date information, please note that this products specifications are subject to change without notice.
Windows and Windows Vista are registered trademarks of Microsoft Corporation in the United States and other countries.
Macintosh, iMac, iBook and Mac OS are registered trademarks of Apple Inc.
Adobe and Adobe AIR are registered trademarks of Adobe Systems Incorporated in the United States and other countries.
PowerPC is registered trademark of International Business Machines Corporation.
Pentium is registered trademark of Intel Corporation in the United States and other countries.
EIZO, EIZO Logo and ScreenManager are registered trademarks of EIZO NANAO CORPORATION in Japan and other countries.
EIZO EasyPIX is trademark of EIZO NANAO CORPORATION.
All other company and product names are trademarks or registered trademarks of their respective owners.
Table of Contents
PRECAUTIONS 2
Chapter 1 Introduction ----5
1-1. Features 5
1-2. Package Contents 5
Chapter 2 Setting Up 6
2-1. System Requirement 6
Windows 6
Macintosh 8
2-2. Installing EasyPIX Software----9
Windows 9
Macintosh 14
2-3. Connecting 16
Chapter 3 How to Adjust the Monitor 17
3-1. Flow Diagram 17
3-2. Setup EIZO EasyPIX Software 18
3-3. Starting EIZO EasyPIX Software 18
Windows 8 18
Windows 7 / Windows Vista / Windows XP 18
Macintosh 20
3-4. Adjusting the Monitor 21
3-5. Performing Fine Adjustment of the Monitor 31
3-6. Switching the Setting 34
Chapter 4 Periodic Monitor Adjustment 35
Chapter 5 Other Functions 37
5-1. Setting Preferences 37
Starting EIZO EasyPIX Software Automatically 38
Showing EIZO EasyPIX Software on the Taskbar (Only for Windows) 38
Choosing the Screen Design 38
Notifying when to Readjust the Monitor---- 39
Displaying the Software Version 39
Checking the Latest Software 40
5-2. Showing User's Manual 41
5-3. Exiting EIZO EasyPIX Software 41
Windows 41
Macintosh 41
5-4. Uninstalling EIZO EasyPIX Software 42
Windows 8 / Windows 7 / Windows Vista 42
Windows XP- 42
Macintosh 42
5-5. Monitor Display Area Setting Utility (Only for Windows with USB Connection) 43
Chapter 6 Troubleshooting 45
Chapter 7 Specifications of Sensor 46
LIMITED WARRANTY 48
Recycling Information 49
Chapter 1 Introduction
EIZO EasyPIX Software enables you to easily adjust or switch the display settings of your monitor, such as color and brightness, to the condition suitable for printing or viewing the photo data captured by digital cameras.
When not using the sensor, you can only use a function which enables you to adjust color and brightness by comparing the whiteness of your monitor with the printing paper.
1-1. Features
- Visual adjustment function
Enables you to adjust color and brightness by comparing the whiteness of your monitor with that of the printing paper.
- Paper measurement function*
Enables you to adjust color and brightness by measuring the printing paper with the sensor.
- Monitor status measurement and adjustment function*
Enables you to measure and adjust the status of the monitor.
- Calibration (for advanced users)*
Specifies the brightness, temperature, and gamma using values and calibrates the monitor. The gamut can be specified by some models.
- Switching between settings
Enables you to store up to three sets of adjustment results. You can switch between the monitor settings depending on the purpose with a single click on the buttons 1 to 3.
* Only available when using the sensor
1-2. Package Contents
Please contact your local dealer for assistance if any of the listed items are missing or damaged.
- Sensor (EX2)
• EIZO EasyPIX Software CD-ROM
- User's Manual (This manual)
Chapter 2 Setting Up
2-1. System Requirement
EIZO EasyPIX Software operates under the system shown below.
Windows
• PC
- OS ^*1
Microsoft Windows 8 (32bit and 64bit)
Microsoft Windows 7 (32bit and 64bit)
Microsoft Windows Vista (32bit and 64bit)
Microsoft Windows XP (32bit and 64bit)
- CPU
Pentium-compatible Processor (Pentium 4 or later recommended)
- Memory
Microsoft Windows 8: 1GB or more (32bit) / 2GB or more (64bit)
Microsoft Windows 7: 1GB or more (32bit) / 2GB or more (64bit)
Microsoft Windows Vista: 1 GB or more
Microsoft Windows XP: 512 MB or more (1GB or more recommended)
- Colors: 24 bit or more (recommended)
- Resolution: 1680 x 1050 or higher (recommended)
- USB ports
At least 2 free ports are required when using the sensor in addition to connecting the PC to the monitor by USB.
- Monitor
- EIZO EasyPIX Software-supported EIZO monitors
• EIZO USB Cable (MD-C93)
- Sensor ^*2
- EX1 / EX2
*1 Some OS may not be compatible depending on the monitor used. Check our web site (http://www.eizo.com).
^2 Only necessary when using the sensor.
Note
- If your OS is Windows 8 or Windows 7, and Windows Display Calibration is enabled, please follow the steps below to disable this setting.
- Select "Control Panel" - "Color Management" - "Advanced".
- Click "Change system defaults" and select the "Advanced" tab of the displayed dialog box.
- Uncheck the "Use Windows display calibration" check box.
- If your OS is Windows Vista, the following settings are required in a multiple monitor environment.
- Select "Control Panel" - "Appearance and Personalization" - "Personalization" - "Adjust screen resolution".
- "Display Settings" dialog box appears.
- Check the "Extend the desktop onto this monitor" check box for all monitors.
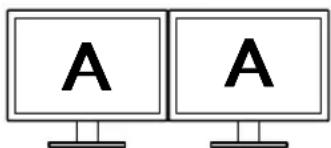
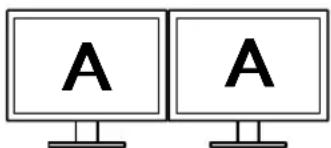
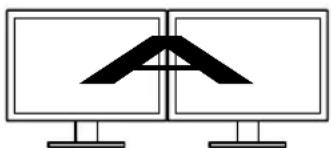
- When multiple monitors are connected, each monitor should display an independent screen. Displaying the same screen on each monitor or across multiple monitors prevents adjustment using the EIZO EasyPIX software. For details of how to change the settings, see the User's Manual of the graphics board.
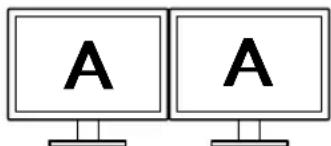
Independent screen on each monitor (OK)
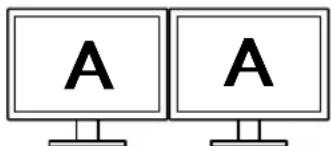
Same screen on each monitor (NG)
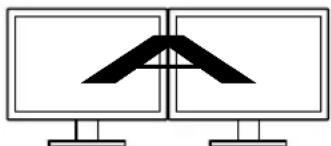
natural_image
Two computer monitors displaying abstract black geometric shapes on white background (no text or symbols)A screen over the multiple monitors (NG)
Macintosh
- Macintosh: satisfy the OS requirement (except iMac (PowerPC), iBook, iBook G4) (Built-in USB)
- OS*1
OS X 10.8, Mac OS X 10.7, 10.6, 10.5 (PowerPC, Intel CPU), 10.4.11 (PowerPC, Intel CPU)
- Memory
OS X 10.8: 2 GB or more
Mac OS X 10.7: 2 GB or more
Mac OS X 10.6: 1 GB or more
Mac OS X 10.5, 10.4.11: 512 MB or more (1GB or more recommended)
- Colors: 16.7 million or more (recommended)
- Resolution: 1680 x 1050 or higher (recommended)
- USB ports
At least 2 free ports are required when using the sensor in addition to connecting the PC to the monitor by USB.
- Monitor
- EIZO EasyPIX Software-supported EIZO monitors
• EIZO USB Cable (MD-C93)
- Sensor ^*2
- EX1 / EX2
^*1 Some OS may not be compatible depending on the monitor used. Check our web site (http://www.eizo.com).
^*2 Only necessary when using the sensor.
Note
- You cannot use EIZO EasyPIX software in the Classic environment in Mac OS X.
- When multiple monitors are connected, each monitor should display an independent screen. Displaying the same screen on each monitor or across multiple monitors prevents adjustment using the EIZO EasyPIX software. For details of how to change the settings, see the User's Manual of the graphics board.
Independent screen on each monitor (OK)
Same screen on each monitor (NG)
natural_image
Two computer monitors displaying abstract black geometric shapes on white background (no text or symbols)A screen over the multiple monitors (NG)
2-2. Installing EasyPIX Software
Note
- If your OS is Windows XP, the user account with "Administrator" privilege is required.
- Before starting the installation, exit all software running on your PC.
- When using the DisplayPort input at a touch panel monitor or a monitor not equipped with a USB port, EIZO EasyPIX cannot be used with the monitor.
- When using the HDMI input at a touch panel monitor or a monitor not equipped with a USB port, EIZO EasyPIX cannot be used with such monitor if it does not support DDC/CI. For details on the DDC/CI support for HDMI input, refer to the User's Manual of the monitor.
- When using EIZO EasyPIX Software with a touch panel monitor or monitor not equipped with a USB port, it is necessary to uninstall ScreenManager Pro for LCD (DDC/CI).
Windows
1 Prepare for installation
■ To install the software from the "EIZO EasyPIX Software" CD-ROM
After inserting the "EIZO EasyPIX Software" CD-ROM into the CD-ROM drive the startup menu will open automatically.
Click the "EIZO EasyPIX Software" button on the "Software" tab.
Click the "Install" button to start the installer.
Tips
- When the startup menu does not appear automatically, double click "Launcher.exe".
■ To download and install the software from our website
After extracting the downloaded file, click "setup.exe" to start the installer.
Tips
- If your OS is Windows 8, Windows 7, or Windows XP, the "Security Warning" dialog box may appear. ^1
Click "Run" to open the menu.
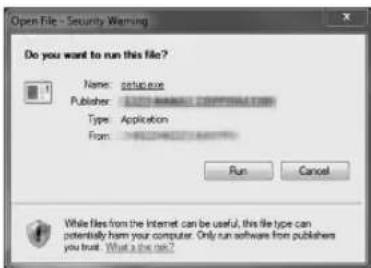
*1 The "Security Warning" dialog box does not appear depending on the setting.
- If your OS is Windows Vista, the "User Account Control" dialog box may appear. ^2
Click "Continue" to open the menu.
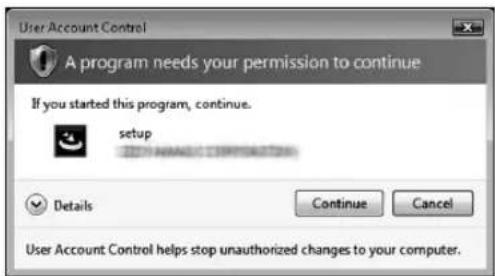
*2 The "User Account Control" dialog box does not appear depending on the setting.
Note
- If your OS does not meet the system requirements, the error message will appear and the installation will not be executed.
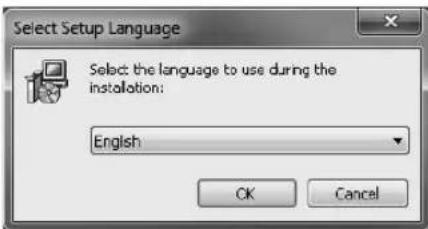
2 Select the setup language
Select a language, and click "OK".
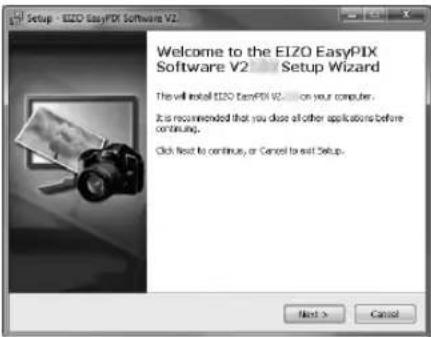
3 Click "Next"
4 When using EIZO EasyPIX Software with a touch panel monitor or monitor not equipped with a USB port, confirm the displayed notes After carefully reading their contents, click the "Next" button if you wish to use EIZO EasyPIX Software.
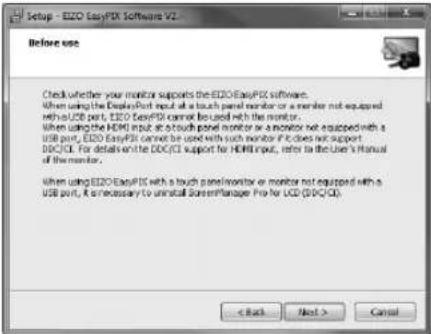
Note
- If ScreenManager Pro for LCD(DDC/CI) is installed, it will be uninstalled automatically. To cancel the EIZO EasyPIX Software installation, click the "Cancel" button.
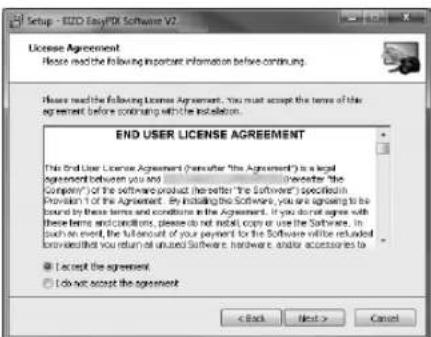
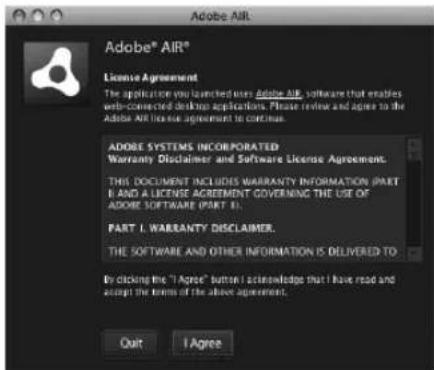
5 Confirm the software license agreement
Read the software license agreement carefully. If you agree, select "I accept the agreement" and click "Next".
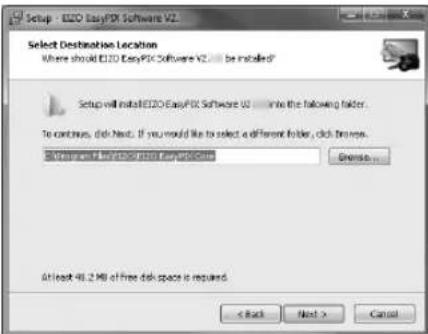
6 Specify the location to install the software
To change the folder, click "Browse", and specify the folder in which you want to install the software.
After specifying the folder, click "Next".
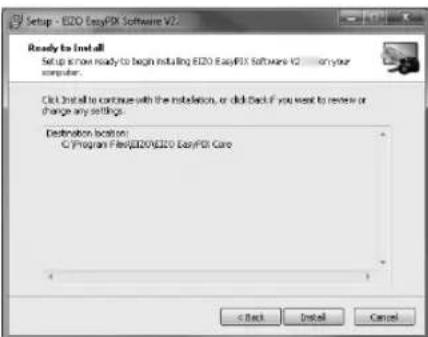
7 Start the installation Click "Install".
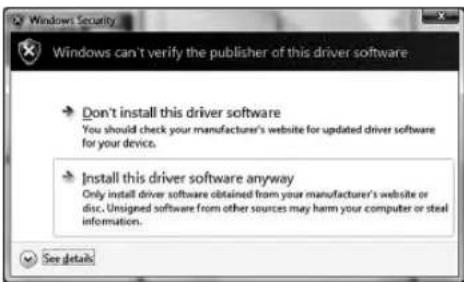
Tips
- The following dialog box may appear when you install the driver software. Click "Install this driver software anyway" (Windows 8 / Windows 7 / Windows Vista) / "Continue Anyway" (Windows XP) to install the driver software.

8 Click "Install"
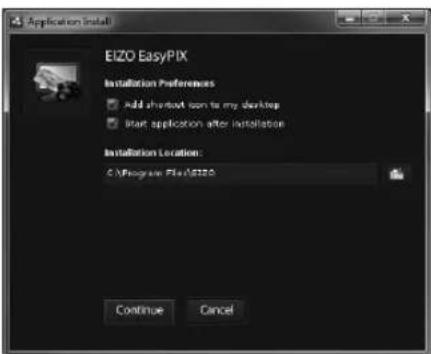
9 Set the preferences
Check or uncheck the box of "Installation Preferences" and click "Continue".
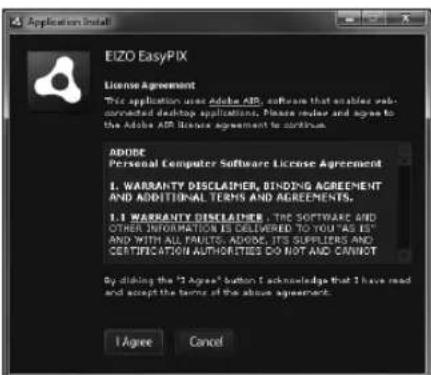
10 Confirm the software license agreement
Read the software license agreement carefully. If you agree, click "I Agree".
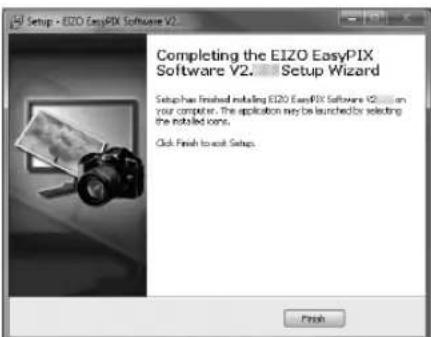
11 Finish the installation
Click "Finish".
Macintosh
Note
- If the previous version EIZO EasyPIX Software is already installed to the system, uninstall it before the new version installation.
1 Prepare for installation
■ To install the software from the "EIZO EasyPIX Software" CD-ROM
After inserting the "EIZO EasyPIX Software" CD-ROM into the CD-ROM drive the "EIZO EasyPIX Software" icon will appear on the desktop. Double click the icon to open the window.
■ To download and install the software from our website
When you double click the downloaded file, the "EIZO EasyPIX Software" icon will appear on the desktop. Double click the icon to open the window.
2 Double click "EIZO EasyPIX Software.pkg"
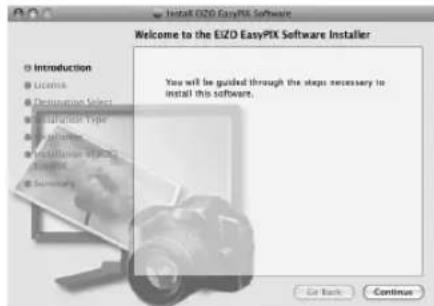
The installer starts up.
3 Click "Continue"
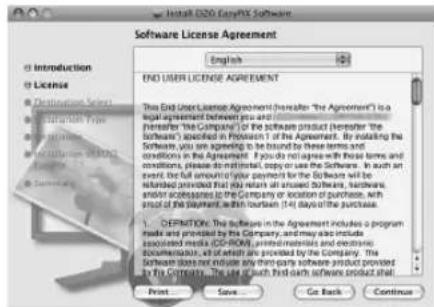
4 Confirm the software license agreement
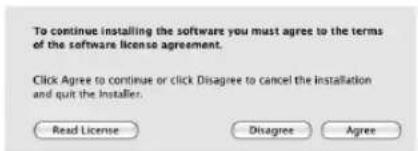
Read the software license agreement carefully. If you agree, click "Continue". Click "Agree" on the confirmation dialog box.
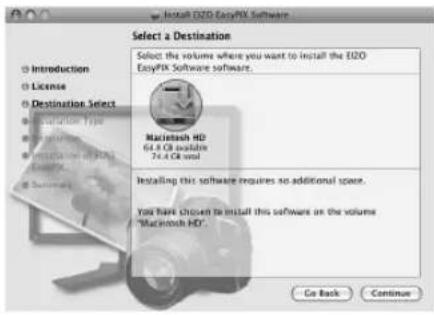
5 Specify the location to install the software Specify the location and click "Continue".
6 Start the installation Click "Install".


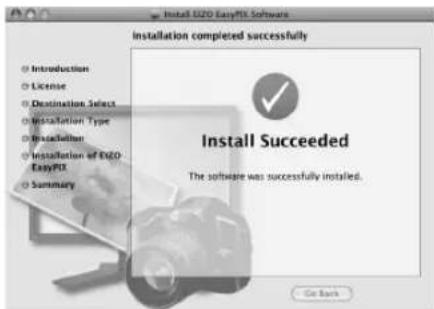
7 Finish the installation Click "Close".
8 Confirm the software license agreement Read the software license agreement carefully. If you agree, click "I Agree".
The installation is now complete.
2-3. Connecting
Note
- When using the touch panel monitor, connect to the PC the mouse and keyboard that are to be used in "Chapter 3 How to Adjust the Monitor" (page 17).
If you intend to use all of EIZO EasyPIX Software's functions, connect the sensor.
1 Connect the USB upstream port of monitor and the USB downstream port of PC with the EIZO USB Cable (MD-C93) supplied with your monitor
Note
- If your monitor is not equipped with a USB port, it is not necessary to connect the USB cable. Use a Windows OS and check if the monitor's DDC/CI communication is effective. For information on how to configure this, please refer to your monitor's user manual.
- If the monitor is not equipped with a USB port and if Mac OS X is used, the EIZO EasyPIX software cannot be used.
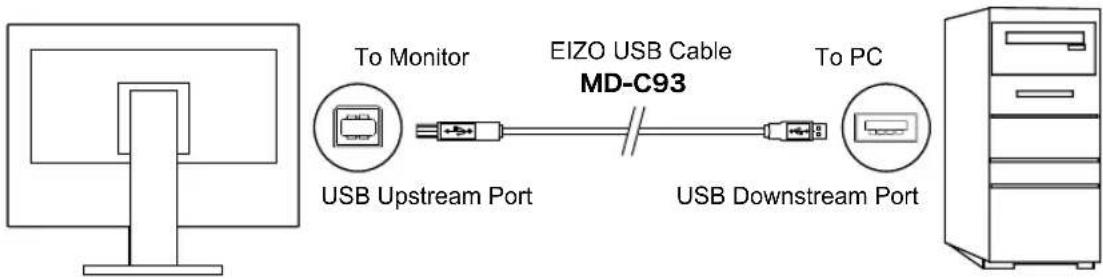
flowchart
graph LR
    A["Computer"] --> B["To Monitor"]
    B --> C["EIZO USB Cable MD-C93"]
    C --> D["USB Upstream Port"]
    C --> E["USB Downstream Port"]
    D --> F["To PC"]
    E --> F
2 Connect the sensor to the USB downstream port of PC
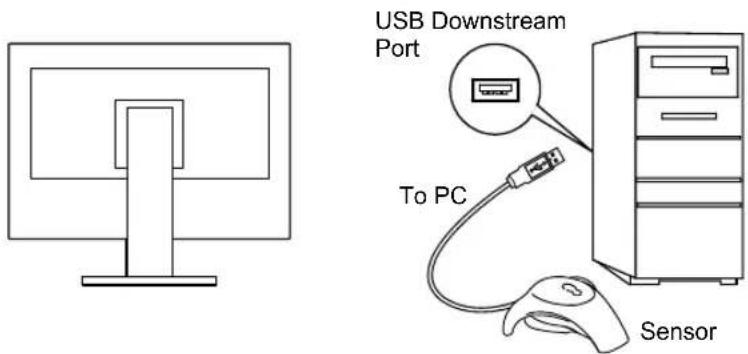
Tips
- Before connecting the sensor, it is required to install the EIZO EasyPIX Software in advance (see "2-2. Installing EasyPIX Software" (page 9)).
- If your OS is Windows, "Found New Hardware Wizard" will appear when you connect the sensor. Please carry out the driver software installation in accordance with the displayed instructions.
Chapter 3 How to Adjust the Monitor
Note
- When performing monitor adjustments with the EIZO EasyPIX software, the monitor's display mode will automatically change to Custom / User 1-3 and the adjustment results will be saved (but not copied to the other modes). If your monitor has multiple User modes, the adjustment results will be saved in the specified User mode. For information on types of display modes and how to select them, please refer to your monitor's user manual.
- After adjustment using the EIZO EasyPIX software, do not use the monitor's adjustment menu to modify the value in the mode in which the adjustment results are saved or to change the mode to another one. To do this, it is necessary to re-select the setting (button 1, 2, or 3 on the Main Window) using the EIZO EasyPIX software.
3-1. Flow Diagram
When using the sensor
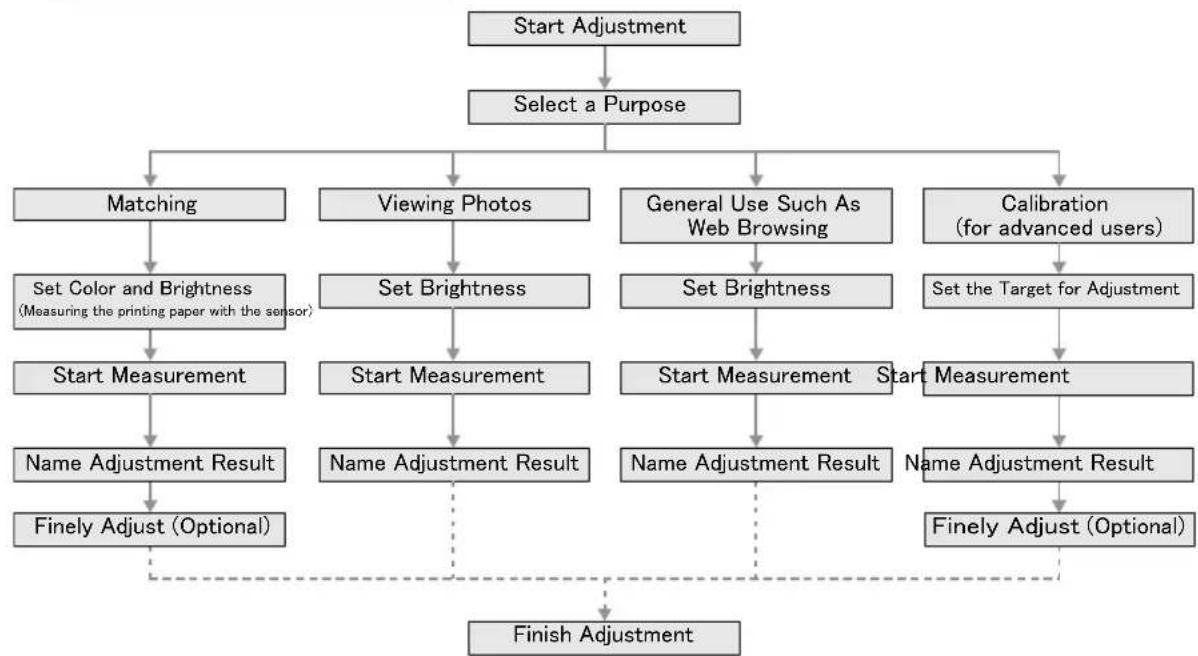
flowchart
graph TD
    A["Start Adjustment"] --> B["Select a Purpose"]
    B --> C1["Matching"]
    B --> C2["Viewing Photos"]
    B --> C3["General Use Such As Web Browsing"]
    B --> C4["Calibration (for advanced users)"]
    C1 --> D1["Set Color and Brightness (Measuring the printing paper with the sensor)"]
    D1 --> E1["Start Measurement"]
    E1 --> F1["Name Adjustment Result"]
    F1 --> G1["Finely Adjust (Optional)"]
    C2 --> H1["Set Brightness"]
    H1 --> I1["Start Measurement"]
    I1 --> J1["Name Adjustment Result"]
    J1 -.-> K["Finish Adjustment"]
    C3 --> I2["Set Brightness"]
    I2 --> J2["Start Measurement"]
    J2 --> K2["Name Adjustment Result"]
    K2 -.-> L["Finish Adjustment"]
    C4 --> I3["Set the Target for Adjustment"]
    I3 --> J3["Start Measurement"]
    J3 --> K3["Name Adjustment Result"]
    K3 -.-> L
When not using the sensor
flowchart
graph TD
    A["Start Adjustment"] --> B["Matching"]
    B --> C["Set Color and Brightness"]
    C --> D["Name Adjustment Result"]
    D --> E["Finish Adjustment"]
3-2. Setup EIZO EasyPIX Software
1 Turn on both the monitor and the PC 30 minutes before monitor adjustment (= warming up)
Disable the power management function of them so they will not be in the power save mode.
For details of the power save mode of the monitor, refer to the User's Manual of the monitor.
Note
- To obtain precise monitor adjustment results, the monitor and PC must be sufficiently warmed-up. Once the monitor goes into the power-save mode, it takes a while for the brightness and color conditions to re-stabilize.
2 Set the display resolution and colors of the PC
Set the monitor color at 16.7 million (24 bit) or more.
It is recommended that the resolution is 1680 x 1050 or higher.
3-3. Starting EIZO EasyPIX Software
Windows 8
1 Click the tile displayed as "EIZO EasyPIX" in the Start Screen (or double-click the shortcut icon on the desktop)
The EIZO EasyPIX Software icon appears in the notification area and then the main window appears.
Windows 7 / Windows Vista / Windows XP
1 Click "Start" - "All Programs" - "EIZO" - "EIZO EasyPIX" - "EIZO EasyPIX" (or double-click the shortcut icon on the desktop)
The EIZO EasyPIX Software icon appears in the notification area and then the main window appears.

Tips
- If your OS is Windows 8, Windows 7, or Windows Vista, and you are running EIZO EasyPIX Software for the first time, the following dialog box may be displayed. If displayed, please select "Yes" (Windows 8 / Windows 7) / "Continue" (Windows Vista) to run the software.
- If your OS is Windows XP, the user account with "Administrator" privilege is required.
- By its initial settings, EIZO EasyPIX Software starts automatically when you log on the PC. You can change the settings for whether or not to start EasyPIX Software automatically (page 38). When it has started up, the EIZO EasyPIX Software icon is displayed on the notification area indicating that the program is resident.
• The icons indicate the following:
 (Color) (Color) | The software is operating properly. |
 (Monochrome) (Monochrome) | Failed to detect applicable monitor. Refer to "Chapter 6 Troubleshooting" (page 45). |
 | There is a message notified by the software. |
 | Monitor adjustment software such as ColorNavigator is running. Exit any monitor adjustment software. |
Macintosh
1 Double-click "EIZO EasyPIX" in the "Applications" folder
The EIZO EasyPIX Software icon appears in the Dock and then the main window appears.
Tips
- By its initial settings, EIZO EasyPIX Software starts automatically when you log on the PC. You can change the settings for whether or not to start EasyPIX Software automatically (page 38). When it has started up, the EIZO EasyPIX Software icon is displayed on the Dock indicating that the program is resident.
• The icons indicate the following:
 | (Color) | (Color) | The software is operating properly. | |
 | (Monochrome) | (Monochrome) | Failed to detect applicable monitor. Refer to "Chapter 6 Troubleshooting" (page 45). | |
 | There is a message notified by the software. | |
 | Monitor adjustment software such as ColorNavigator is running. Exit any monitor adjustment software. | |
3-4. Adjusting the Monitor
1 On the Main Window, select a number under which the adjustment result is to be stored
Click the button 1, 2, or 3.
2 Start adjustment
Click "Adjust from the beginning".
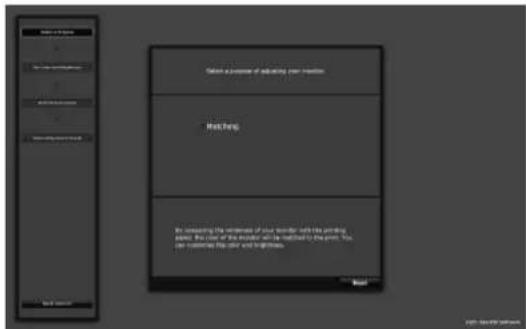
3 Select a purpose
After selecting a purpose, click "Next".
When not using the sensor, only "Matching" can be selected.
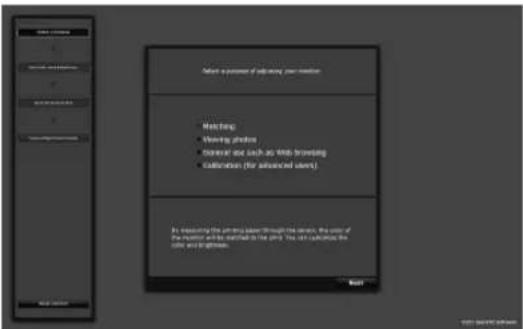
When not using the sensorWhen using the sensor
Matching
When using the sensor:
By measuring the printing paper with the sensor, the color of the monitor will be matched to the print. You can customize the color and brightness.
Go to Step 4 "When "Matching" is selected (When using the sensor)" (page 23).
When not using the sensor:
By comparing the whiteness of your monitor with the printing paper, the color of the monitor will be matched to the print. You can customize the color and brightness.
Go to Step 4 "When "Matching" is selected (When not using the sensor)" (page 25).
Viewing photos
Suits your monitor to viewing photos. You can customize the brightness.
Go to Step 4 "When "Viewing photos" is selected" (page 26).
General use such as Web browsing
Suits your monitor to general use such as Web browsing. You can customize the brightness.
Go to Step 4 "When "General use such as Web browsing" is selected" (page 27).
Calibration (for advanced users)
Calibrates the monitor. This adjustment is for advanced users. The brightness, temperature, and gamma are specified using values. The gamut can be specified by some models.
Go to Step 4 "When "Calibration (for advanced users)" is selected" (page 28).
4 Set the color and brightness ("Matching"), the brightness ("Viewing photos" or "General use such as Web browsing"), or the target for adjustment ("Calibration (for advanced users)")
When "Matching" is selected (When using the sensor)
After measuring the printing paper with the sensor, fine-tune the color and brightness.
![Measure the printing paper" button Fix the sensor at a distance of 25 cm (10 inches) from the printing paper, and click the [measure the printing paper] button. To prevent light from penetrating through the printing paper, use two sheets, one placed are top of the other. When the measurement is finished, click the [Next] button to fix the color and brightness. Measure the printing paper Back Next ISO ColorEX Software](/content/2026/06/1168406/images/008dc713404e97e54fd6ac2f58fedfe3856d6a6b32d209793fa619079c58a5e9.jpg)
Fix the sensor at a distance of 25 cm (10 inches) from the printing paper as in the illustration below, and click the "Measure the printing paper" button. To prevent light from penetrating through the printing paper, use two sheets, one placed on top of the other. You can redo the measurement any amount of times.
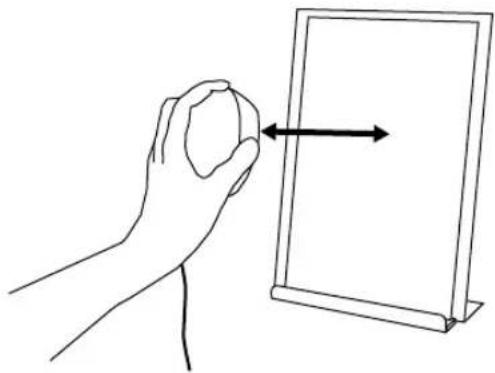
natural_image
Line drawing of a hand holding a small object next to an arrow pointing right (no text or symbols)When the measurement is finished, click the "Next" button to fine-tune the color and brightness. Changes made to the color and brightness are immediately reflected on the monitor.
- Setting the color Click inside the color adjustment target with the mouse. For fine adjustment, click the color adjustment button, or press the arrow keys (↑↓→←) on the keyboard.
- Setting the brightness Drag the slider of the brightness adjustment slide bar with the mouse. For fine adjustment, click the brightness adjustment button, or press the Page Up or Page Down key on the keyboard.
- Resetting the values Click "Reset".
After setting the color and brightness, click "Next".
Go to Step 5 (page 29).
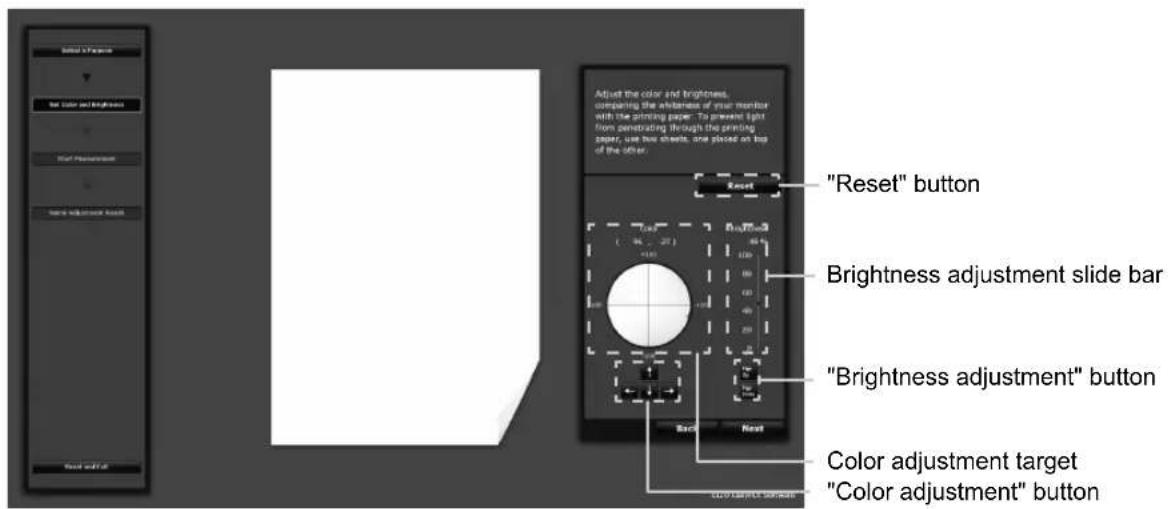
When "Matching" is selected (When not using the sensor)
Adjust the color and brightness, comparing the whiteness of your monitor with the printing paper. To prevent light from penetrating through the printing paper, use two sheets, one placed on top of the other. Changes made to the color and brightness are immediately reflected on the monitor.
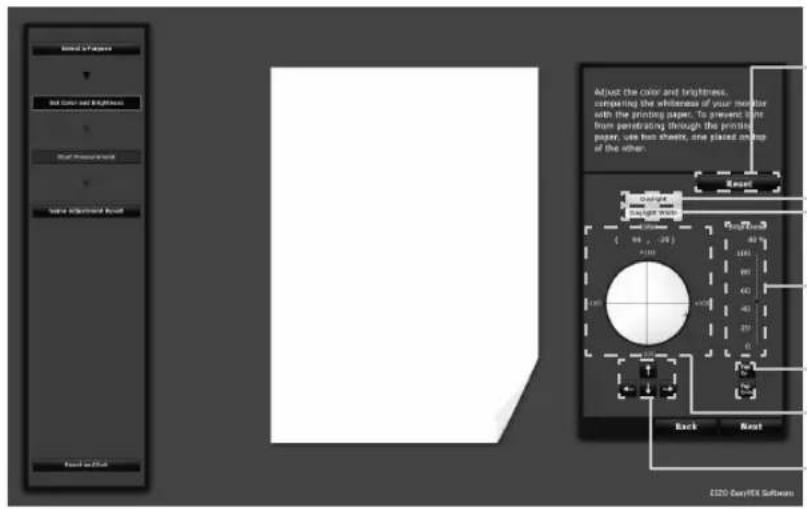
"Reset" button
A button to change the color to easily match the lighting conditions.
"Daylight" button
"Daylight White" button
Brightness adjustment slide bar
"Brightness adjustment" button
Color adjustment target
"Color adjustment" button
- Setting the color
e Color go easily match the lighting conditions
When clicking the "Daylight" button, monitor conditions will be changed to match those of daylight lighting (colors with improved whiteness).
When clicking the "Daylight White" button, monitor conditions will be changed to match those of cool daylight lighting (calm natural colors with improved whiteness).
- Adjust the color
Click inside the color adjustment target with the mouse. For fine adjustment, click the color adjustment button, or press the arrow keys ( ) on the keyboard.
- Setting the brightness
Drag the slider of the brightness adjustment slide bar with the mouse. For fine adjustment, click the brightness adjustment button, or press the Page Up or Page Down key on the keyboard.
- Resetting the values
Click "Reset".
After setting the color and brightness, click "Next".
Go to Step 6 (page 30).
When "Viewing photos" is selected
Adjust the brightness to be suitable for displaying photographs. Change made to the brightness is immediately reflected on the monitor.
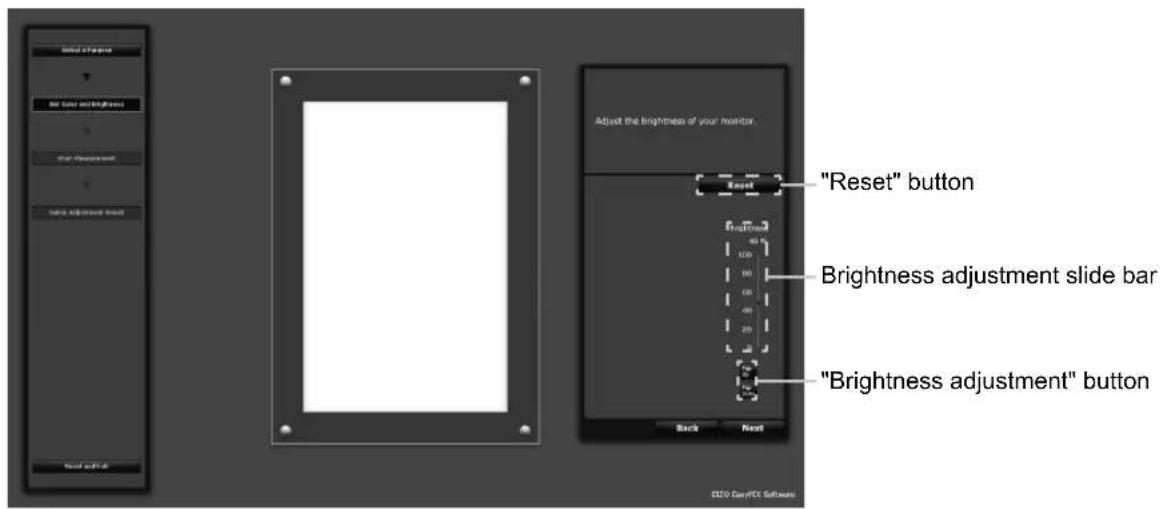
- Setting the brightness
Drag the slider of the brightness adjustment slide bar with the mouse. For fine adjustment, click the brightness adjustment button, or press the Page Up or Page Down key on the keyboard. - Resetting the values Click "Reset".
After setting the brightness, click "Next".
Go to Step 5 (page 29).
When "General use such as Web browsing" is selected
Adjust the brightness to be suitable for web browsing, etc. Change made to the brightness is immediately reflected on the monitor.
- Setting the brightness
Drag the slider of the brightness adjustment slide bar with the mouse. For fine adjustment, click the brightness adjustment button, or press the Page Up or Page Down key on the keyboard. - Resetting the values
Click "Reset".
After setting the brightness, click "Next".
Go to Step 5 (page 29).
When "Calibration (for advanced users)" is selected
Specify the brightness, temperature, gamut, and gamma to set the target for adjustment.
The item and value to be specified differ depending on the model.
- Specifying the adjustment targets that fit your use
Select the adjustment targets for your use from the list of "Preset adjustment target" in the selection region.
- Specifying the brightness
Drag the slider of the "Brightness" slide bar with the mouse.
- Specifying the temperature
Drag the slider of the "Temperature" slide bar with the mouse. The specified temperature will be displayed in the chromaticity diagram.
- Specifying the gamut
Click the "Gamut" radio button.
The specified gamut will be displayed in the chromaticity diagram.
- Specifying the gamma
Drag the slider of the "Gamma" slide bar with the mouse.
The specified gamma will be displayed in the gamma graph.
- Resetting the values
Click "Reset".
After setting the adjustment targets, click "Next".
Go to Step 5 (page 29).
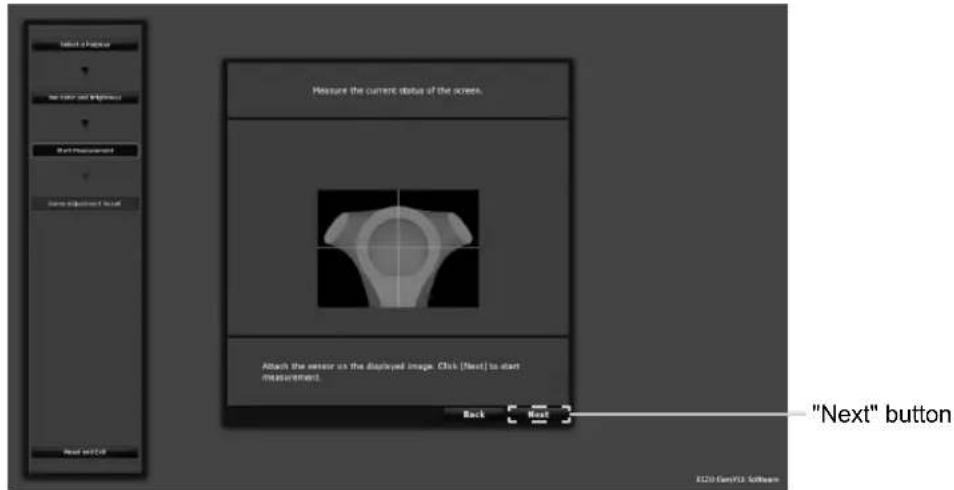
5 Start measurement
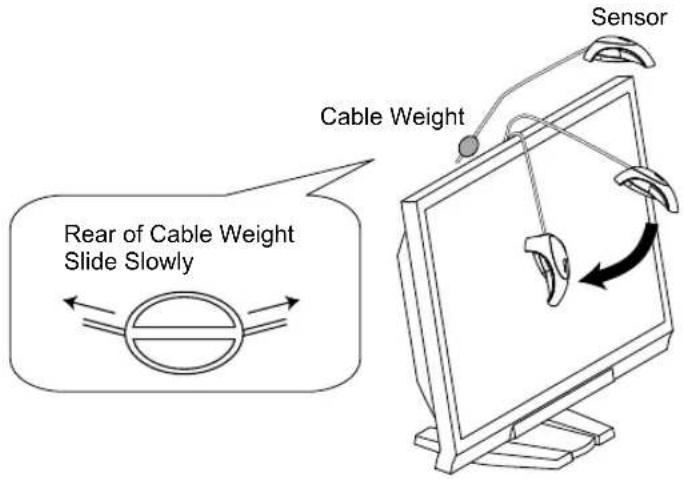
Tilt the LCD panel up slightly and attach the sensor on the displayed image. If the sensor is unstable, slide the cable weight slowly to achieve appropriate balance.
Click "Next".
During measurement, the progress indicator is displayed. It takes approximately one to three minutes.
![Measure the current status of the screen. Attach the sensor on the displayed image. Click [Next] to start measurement. Back Next "Next" button E220 GeoFIS Software](/content/2026/06/1168406/images/c3834bf4e4788d74724bb7e77a17254d4c8056cd4be40785dcbb3ae2517047be.jpg)
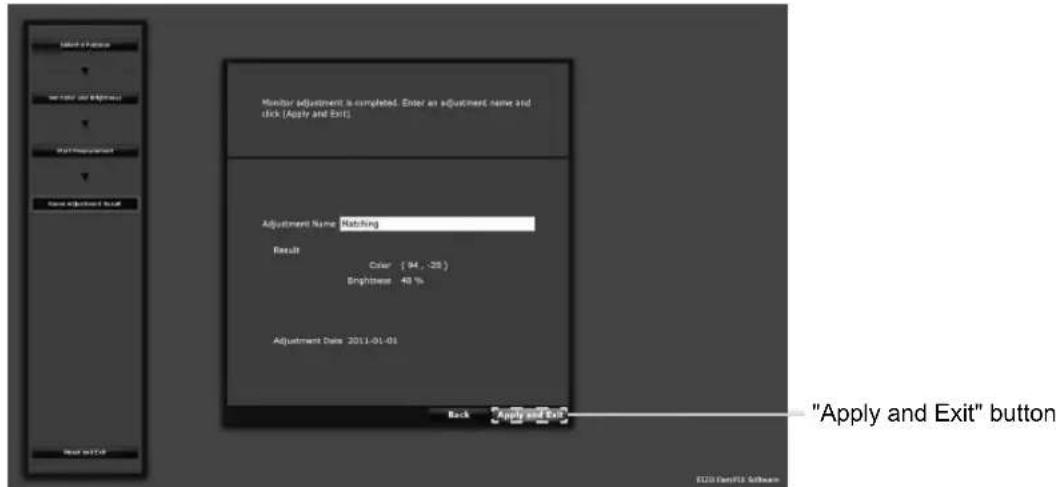
6 Specify the adjustment name
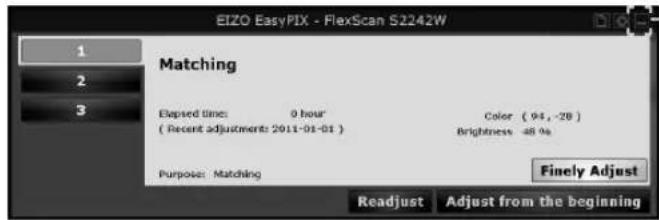
The "Name Adjustment Result" window is displayed. Confirm the adjustment result, decide an adjustment name, and click "Apply and Exit" (initially a display name related to the selected mode of use will be displayed).
![Monitor adjustment is completed. Enter an adjustment name and click (Apply and Exit) Adjustment Name: Matching Result Color [ 94, -25 ] Brightness 48 % Adjustment Date: 2011-01-01 Back Apply and Exit "Apply and Exit" button ECON GenPFX Software](/content/2026/06/1168406/images/847edf93aa53c22f2b4299d8dbb9b71b42a54e91d9922ab539ff2b2a18bdac80.jpg)
Example of when "Matching" is selected
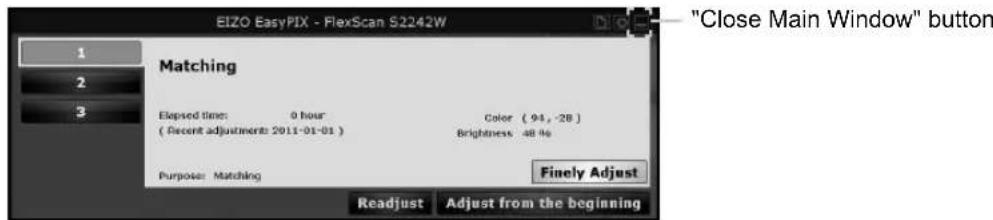
7 The adjustment result is stored and reflected to the Main Window
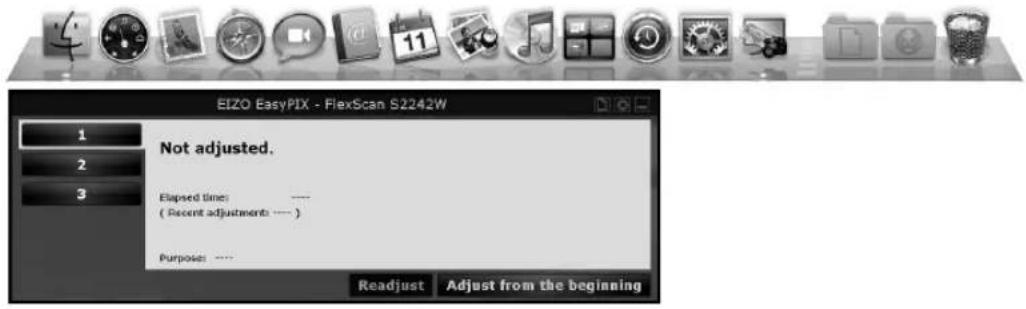
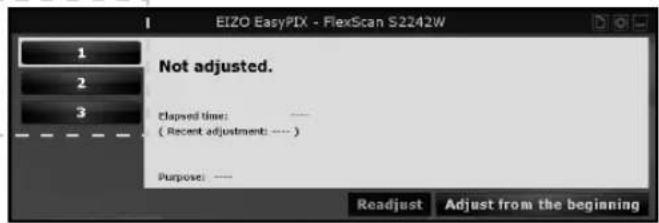
Monitor adjustment is complete now.
Follow the procedure described above to store adjustment results for other purposes. Use the monitor after selecting the adjustment results according to your purpose.
If you are using the monitor with multi-monitor setting, perform adjustment for each monitor.
When clicking on a number of a finished adjustment, the recorded adjustment result will be displayed.
8 Click the "Close Main Window" button to close the Main Window
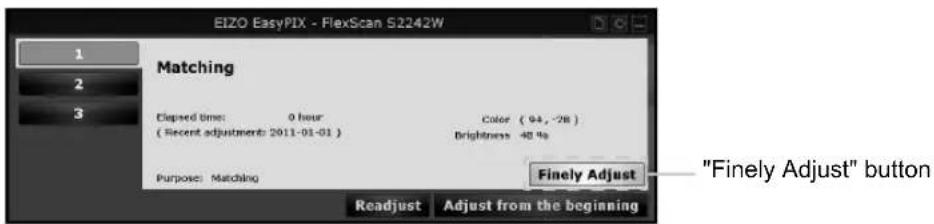
3-5. Performing Fine Adjustment of the Monitor
The monitor can be finely adjusted when you are using the sensor and have made adjustments by selecting either "Matching" or "Calibration (for advanced users)".
1 Click the "Finely Adjust" button of the Main Window
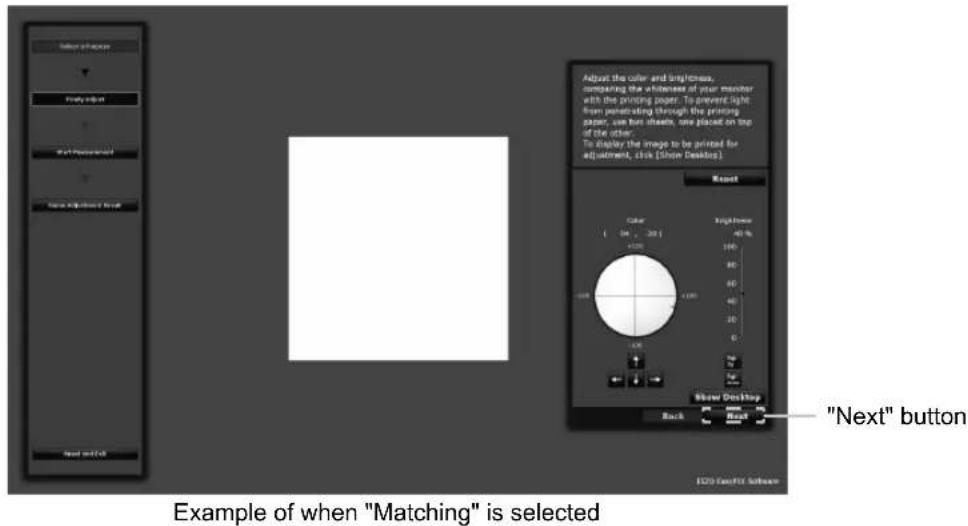
2 Finely adjust the color and brightness.
Adjust the color and brightness, comparing the whiteness of your monitor with the printing paper. To prevent light from penetrating through the printing paper, use two sheets, one placed on top of the other.
![Select of Options Find it off Next Generation Name Adjustment Tool Reset Adjust the color and brightness, consering the brightness of your monitor with the printing paper. To prevent light from penetrating through the printing paper, one box sheet, one placed on top of the other. To display the image to be printed for adjustment, click [Show Desktop] Reset Color (04 - 20) Height 40 % 100 80 60 40 20 0 Show Desktop Back Next "Show Desktop" button "Next" button E220 CamPT3 Software](/content/2026/06/1168406/images/8b28fd99bdf588e27cd0654c0caeccac0f885268ce875e5b7c0cc99b67137c10.jpg)
Example of when "Matching" is selected
After setting the color and brightness, click "Next".
Go to Step 3 (page 33).
To display the image to be printed for adjustment, click "Show Desktop".
Adjust the color and brightness, displaying the photo for printing on your monitor. Adjust the color and brightness with reference to the low-intensity areas (gray or beige areas) in the picture.
If the high-intensity areas are used as a reference, the picture's overall colors may not be properly matched.
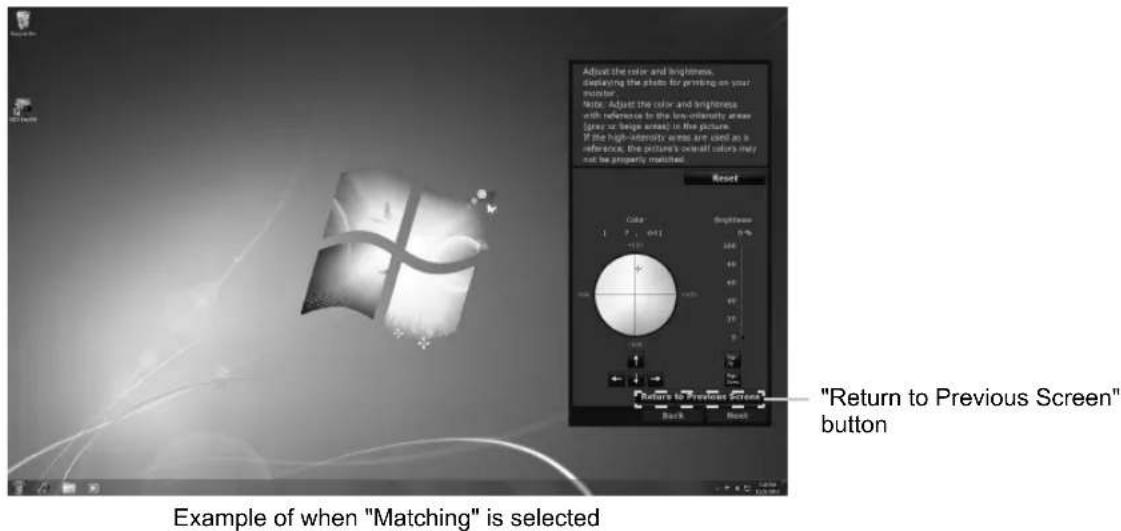
After setting the color and brightness, click "Return to Previous Screen".
Click "Next".
3 Start measurement
Tilt the LCD panel up slightly and attach the sensor on the displayed image. If the sensor is unstable, slide the cable weight slowly to achieve appropriate balance.
Click "Next".
During measurement, the progress indicator is displayed. It takes approximately one to three minutes.
![Measure the current status of the screen. Attach the sensor on the displayed image. Click [Next] to start measurement. Back "Next" "Next" button X220 AutoFX Software](/content/2026/06/1168406/images/ce843327f4d277b775d265b97c1e0d82d9d05de2a8a6042978e5cf88693a9aad.jpg)
4 Specify the adjustment name
When measurement is finished, the "Name Adjustment Result" window is displayed. Confirm the adjustment result, decide an adjustment name, and click "Apply and Exit" (the previously set adjustment name will be displayed).
![Monitor adjustment is completed. Enter an adjustment name and click (Apply and Exit) Adjustment Name: Matching Result Color: [94, 25] Brightness: 48 % Adjustment Date: 2011-01-01 Back Apply and Exit "Apply and Exit" button E220 CamFX Software](/content/2026/06/1168406/images/79027d2da6d76d209b79a5f70e995d6a709b8f9a1adaacd2d69bca00ce321131.jpg)
Example of when "Matching" is selected
5 The adjustment result is stored and reflected to the Main Window Monitor readjustment is now complete.
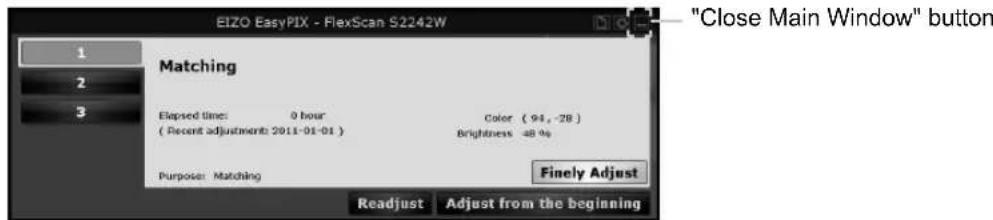
6 Click the "Close Main Window" button to close the Main Window
"Close Main Window" button
3-6. Switching the Setting
1 Click the button 1, 2, or 3 on the Main Window The monitor display switches to the selected status.

Chapter 4 Periodic Monitor Adjustment
The monitor brightness and color gradually alter. To compensate for changes, adjusting once every 2-4 weeks is recommended.
The monitor should be readjusted if the system configuration changes as below.
- Changing the PC or graphics board
- Changing the connector on the monitor (ex. from SIGNAL1 to SIGNAL2) to the PC or graphics board
- Changing the monitor resolution or color
- Changing the monitor location
- Replacing the room light
Tips
- When not using the sensor, the "Readjust" button cannot be clicked.
1 Click the "Readjust" button of the Main Window

2 Start measurement
Tilt the LCD panel up slightly and attach the sensor on the displayed image. If the sensor is unstable, slide the cable weight slowly to achieve appropriate balance.

Click "Next".
During measurement, the progress indicator is displayed. It takes approximately one to three minutes.
3 Specify the adjustment name
When measurement is finished, the "Name Adjustment Result" window is displayed. Confirm the adjustment result, decide an adjustment name, and click "Apply and Exit" (the previously set adjustment name will be displayed).
Example of when "Matching" is selected
4 The adjustment result is stored and reflected to the Main Window Monitor readjustment is now complete.
5 Click the "Close Main Window" button to close the Main Window
Chapter 5 Other Functions
5-1. Setting Preferences
You can confirm and change the preferences for EIZO EasyPIX Software.
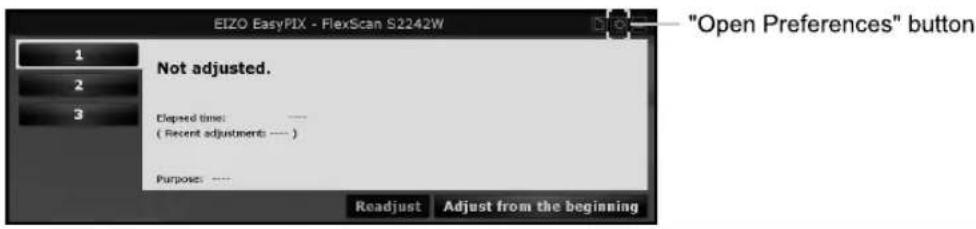
1 Open Preferences
Click the "Open Preferences" button of the Main Window.
Tips
Alternatively, you can to open "Preferences" with the following procedure.
Windows
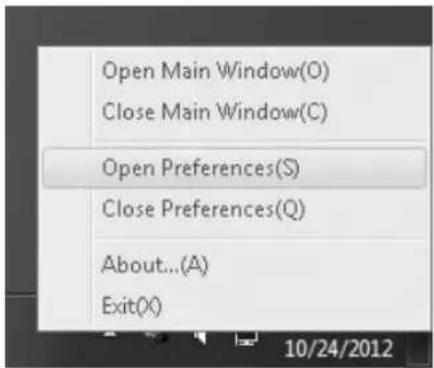
Right-click the EIZO EasyPIX Software icon on the notification area, and click "Open Preferences" in the menu.
Macintosh
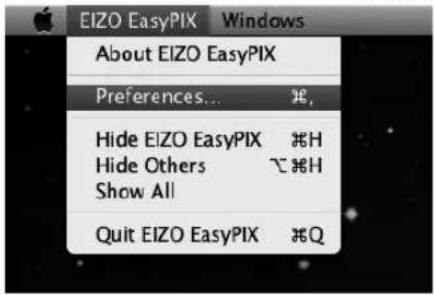
Click the EIZO EasyPIX menu bar, and click "Preferences" in the menu.
2 Confirm or change settings
Starting EIZO EasyPIX Software Automatically
You can set whether or not to start EIZO EasyPIX Software automatically when logging on the PC.
In the "General" tab, check or uncheck the box of "Start automatically when you log on the PC"
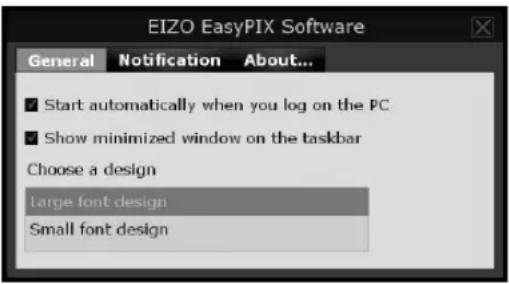
Showing EIZO EasyPIX Software on the Taskbar (Only for Windows)
You can set whether or not to show EIZO EasyPIX Software on the taskbar.
In the "General" tab, check or uncheck the box of "Show minimized panel on the taskbar"
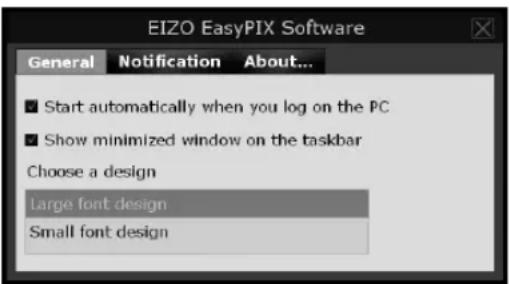
Choosing the Screen Design
You can change the screen design for EIZO EasyPIX Software.
In the "General" tab, select "Large font design" or "Small font design" from "Choose a design"
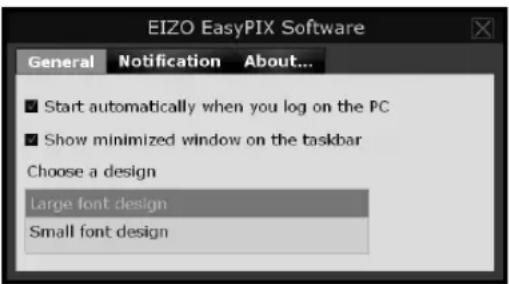
Tips
- The screen design is set to "Large font design" at the time of purchase.
Notifying when to Readjust the Monitor
Setting a timer displays messages on the screen a few hours after the monitor adjustment.
In the "Notification" tab, check or uncheck the box of "Notify the readjustment after" If you check the box, enter the time for the timer

Tips
- The timer for readjustment notification is set to 100 hours (recommended) at the time of purchase.
Displaying the Software Version
You can display the version of EIZO EasyPIX Software.
Click the "About..." tab (for Windows) or "About EIZO EasyPIX" tab (for Macintosh)

Checking the Latest Software
You can install the latest software.
-
Click the "About..." tab (for Windows) or "About EIZO EasyPIX" tab (for Macintosh)
-
Select "Check for update"
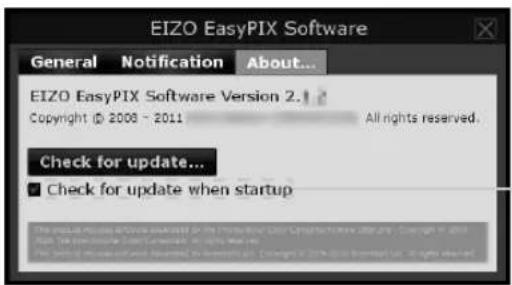
When the box is checked, the availability of an update is checked during EIZO EasyPIX Software startup.
When an update is available, a notification window appears.
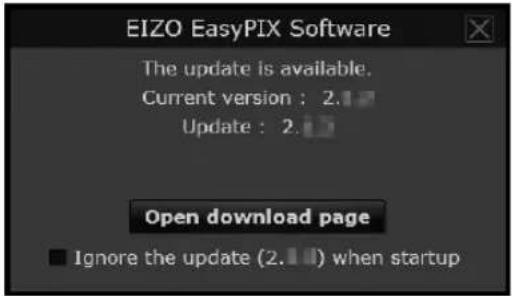
-
Click the "Open download page" to open the download page
-
Download the latest software and install it referring to "2-2. Installing EasyPIX Software" (page 9)
Tips
- When you check the box of "Ignore the update x.x.x when startup", the update notification window doesn't appear after startup. The windows will appear again when the next version of the software is available.
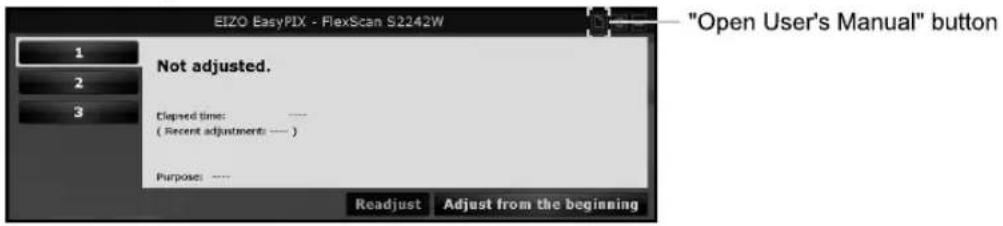
5-2. Showing User's Manual
You can refer to the EIZO EasyPIX User's Manual (this manual).
1 Click the "Open User's Manual" button of the Main Window
5-3. Exiting EIZO EasyPIX Software
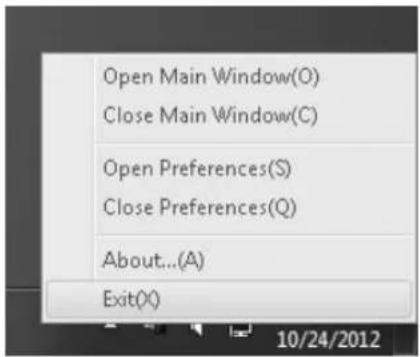
Windows
1 Right-click the EIZO EasyPIX Software icon on the notification area to open the menu
2 Click "Exit"
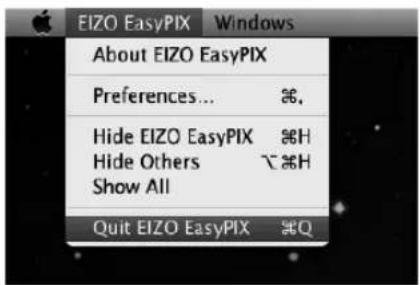
Macintosh
1 Click the EIZO EasyPIX menu bar to display the menu
2 Click "Quit EIZO EasyPIX"
5-4. Uninstalling EIZO EasyPIX Software
Windows 8 / Windows 7 / Windows Vista
1 Select "Control Panel" - "Uninstall a program"
2 Select "EIZO EasyPIX Core" from the list and click "Uninstall"
Tips
- When "EIZO EasyPIX Core" is uninstalled, "EIZO EasyPIX" will be automatically removed.
Windows XP
1 Select "Control Panel" - "Add or Remove Programs"
2 Select "EIZO EasyPIX Core" from the list and click "Remove" to remove the software
Tips
- When "EIZO EasyPIX Core" is uninstalled, "EIZO EasyPIX" will be automatically removed.
Macintosh
1 Double-click the "/Library/Application Support/EIZO/EIZO EasyPIX/EIZO EasyPIX Uninstaller" icon
5-5. Monitor Display Area Setting Utility (Only for Windows with USB Connection)
Monitor Display Area Setting Utility enables you to specify the display area of EIZO monitor manually when it is not detected automatically. Use this utility software if the Main Window does not open when the monitor is connected to the PC.
1 Click "Start" - "All Programs" - "EIZO" - "EIZO EasyPIX" - "DisplayAreaSettingUtility"
If your OS is Windows 8, click the tile displayed as "DisplayAreaSettingUtility" in the Start Screen.
2 Monitor Display Area Setting Utility starts
The list includes all of EIZO monitors connected to your PC by USB, but supported software of ours differ depending on the monitor.
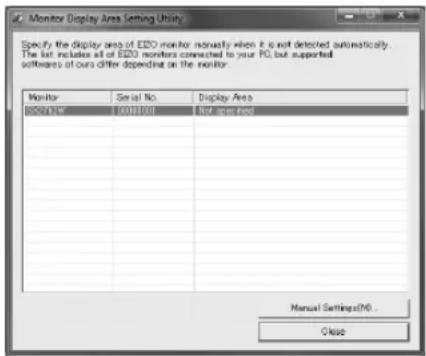
3 Select the monitor for which you want to specify the display area Select the monitor for which "Not specified" is displayed in the display area, and click "Manual Settings".
4 Follow the instructions on the screen to specify the display area Click "Next".
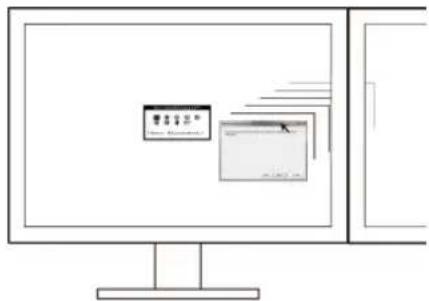
5 Specify the monitor for which you want to specify the display area
Drag the "Display Area Manual Setting" window to the screen where the "ScreenManager" main menu or "Information" is displayed, and click "Next".
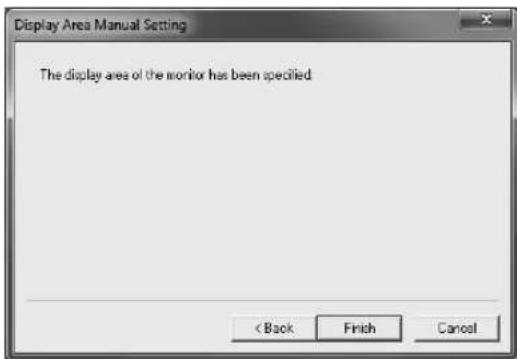
6 Finish specifying the display area
When the window indicating that the display area setting is complete appears, click "Finish".
Note
- Resetting of the display area may be necessary when the monitor configuration has been changed in multiple monitor environment.
Chapter 6 Troubleshooting
| Symptom Possible cause and remedy | |
| The "The display setting of your monitor has been changed." message appears although the display setting has not been changed. | Turn off the Auto FineContrast function of ScreenManager Pro for LCD. For details, refer to the User's Manual of ScreenManager Pro for LCD. |
| The "Failed to detect applicable monitor." message appears. | Make sure that the USB cable is connected properly.When using Windows with USB connection, specify the display area using the Monitor Display Area Setting Utility (page 43).When using a touch panel monitor or monitor not equipped with a USB port with Mac OS X, EIZO EasyPIX Software cannot be used.If your monitor is a touch panel monitor or not equipped with a USB port, the graphics board compatible with DDC/CI communication is required. For compatibility of graphics board, see our web site (http://www.eizo.com).When using the DisplayPort input at a touch panel monitor or a monitor not equipped with a USB port, EIZO EasyPIX cannot be used with the monitor.When using the HDMI input at a touch panel monitor or a monitor not equipped with a USB port, EIZO EasyPIX cannot be used with such monitor if it does not support DDC/CI. For details on the DDC/CI support for HDMI input, refer to the User's Manual of the monitor.Check our web site (http://www.eizo.com) to upgrade the software to the latest version. |
| Main Window does not open. | Make sure that the USB cable is connected properly.When using Windows with USB connection, specify the display area using the Monitor Display Area Setting Utility (page 43). |
| Nothing is displayed. | Restart your PC.Refer to the User's Manual of the monitor. |
| Display is unstable. | When certain software is used with the EIZO EasyPIX software, the display may be unstable. In such a case, exit the EIZO EasyPIX software. |
| Display color has been changed. | Readjust the monitor (page 35).Turn off the Auto EcoView (BrightRegulator) function, the EcoView Optimizer function, the ContrastEnhancer function, the Smart Resolution function and the Smart Insight function of the monitor. For details, refer to the User's Manual of the monitor.If other company's monitor adjustment software is running, exit the software. |
| Display color does not match the color on the paper. | Be sure to use white paper. To prevent color or light from penetrating through the printing paper, use two sheets, one placed on top of the other.Adjust the brightness first, and then color.Use the light with high color rendering properties, such as a fluorescent tube. |
| The "Windows display calibration is enabled." message appears. | The monitor display calibration for Windows 8 or Windows 7 is active. The function does not operate with the EIZO EasyPIX software. Change the setting to invalid (page 7). |
| Sensor's rear light does not come on. | The rear light of the sensor (EX1 / EX2) does not light. The light is not broken. |
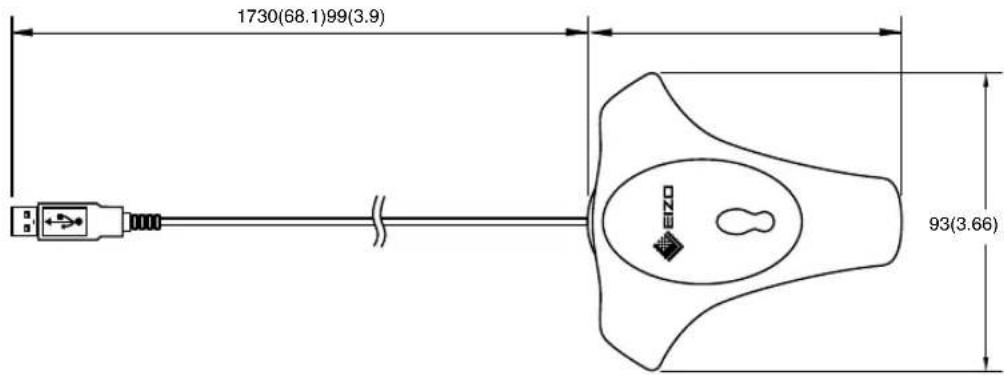
Chapter 7 Specifications of Sensor
| Interface USB | ||
| Enviromental Specifications Temperature | 15 °C - 35 °CStorage: -10 °C - 60 °C | |
| Power Supply 5.0 ± 0.25 V max.100 mA | ||
| Mass Approx.120 g (0.26 lbs.) | ||
| Dimensions 93mm (W) × 99mm (H) × 33mm (D) | (3.66" (W) × 3.9" (H) × 1.3"(D)) | |
| Certifications and Standards CE, FCC-A | ||
Note
• Take care that the sensor does not suffer impact by dropping or other means, or it may affect the accuracy of the measurement. Storing or using the sensor at a temperature of under 30^ C and a humidity of under 70% is recommended (avoid storing or using the sensor where it may be exposed to direct sunlight).
Dimensions
Unit: mm (inch)

For U.S.A, Canada, etc. (rated 100-120 Vac) Only
This equipment has been tested and found to comply with the limits for a Class A digital device, pursuant to Part 15 of the FCC Rules. These limits are designed to provide reasonable protection against harmful interference when the equipment is operated in a commercial environment. This equipment generates, uses, and can radiate radio frequency energy and if not installed and used in accordance with the instruction manual, may cause harmful interference to radio communications. Operation of this equipment in a residential area is likely to cause harmful interference in which case the user will required to correct the interference at his own expense. Changes or modifications not expressly approved by the party responsible for compliance could void the user's authority to operate the equipment.
Canadian Notice
For Europe, etc. (rated 200-240 Vac) Only
Warning
This is a Class A product. In a domestic environment this product may cause radio interference in which case the user may be required to take adequate measures.
Warnung
EIZO NANAO CORPORATION (hereinafter referred to as "EIZO") and distributors authorized by EIZO (hereinafter referred to as the "Distributors") warrant, subject to and in accordance with the terms of this limited warranty (hereinafter referred to as the "Warranty"), to the original purchaser (hereinafter referred to as the "Original Purchaser") who purchased the product specified in this document (hereinafter referred to as the "Product") from EIZO or Distributors, that Product shall be free from defects in material and workmanship for a period of two (2) years from the date of purchase.
EIZO and Distributors will cease to hold or store any parts of the Product upon expiration of five (5) years after the production of such parts is discontinued.
This warranty is valid only in the countries or territories where the Distributors are located.
In the event of malfunction of the Product during the warranty period attributable directly to defective material and/or workmanship, EIZO and Distributors will, at their option, either repair or replace the defective product.
Notwithstanding any other provision of this Warranty, EIZO and Distributors shall have no obligation under this Warranty whatsoever in any of the cases as set forth below:
(a) Any defect of the Product caused by freight damage, modification, alteration, abuse, misuse, accident, incorrect installation, disaster, faulty maintenance and/or improper repair by third party other than EIZO and Distributors;
(b) Any incompatibility of the Product due to possible technical innovations and/or regulations;
(c) Any deterioration of the sensor;
(d) Any defect of the Product caused by external equipment;
(e) Any defect of the Product on which the original serial number has been altered or removed;
(f) Any normal deterioration of the Product, particularly that of consumables, accessories, and/or attachments (e.g. buttons, rotating parts, cables, User's Manual, etc.); and
(g) Any deformation, discoloration, and/or warp of the exterior of the Product including that of the surface of the LCD panel.
To obtain service under the Warranty, the Original Purchaser must deliver the Product, freight prepaid, in its original package or other adequate package affording an equal degree of protection, assuming the risk of damage and/or loss in transit, to the local Distributor. The Original Purchaser must present proof of purchase of the Product and the date of such purchase when requesting services under the Warranty.
The Warranty Period for any replaced and/or repaired product under this Warranty shall expire at the end of the original Warranty Period.
EIZO OR DISTRIBUTORS ARE NOT RESPONSIBLE FOR ANY DAMAGE TO, OR LOSS OF, DATA OR OTHER INFORMATION STORED IN ANY MEDIA OR ANY PART OF ANY PRODUCT RETURNED TO EIZO OR EIZO'S AUTHORIZED DISTRIBUTORS FOR REPAIR.
EIZO AND DISTRIBUTORS MAKE NO FURTHER WARRANTIES, EXPRESSED OR IMPLIED, WITH RESPECT TO THE PRODUCT AND ITS QUALITY, PERFORMANCE, MERCHANTABILITY OR FITNESS FOR ANY PARTICULAR USE. IN NO EVENT SHALL EIZO OR DISTRIBUTORS BE LIABLE FOR ANY INCIDENTAL, INDIRECT, SPECIAL, CONSEQUENTIAL OR OTHER DAMAGE WHATSOEVER (INCLUDING, WITHOUT LIMITATION, DAMAGES FOR LOSS OF PROFIT, BUSINESS INTERRUPTION, LOSS OF BUSINESS INFORMATION, OR ANY OTHER PECUNIARY LOSS) ARISING OUT OF THE USE OR INABILITY TO USE THE PRODUCT OR IN ANY CONNECTION WITH THE PRODUCTS, WHETHER BASED ON CONTRACT, TORT, NEGLIGENCE, STRICT LIABILITY OR OTHERWISE, EVEN IF EIZO OR DISTRIBUTORS HAVE BEEN ADVISED OF THE POSSIBILITY OF SUCH DAMAGES. THIS EXCLUSION ALSO INCLUDES ANY LIABILITY WHICH MAY ARISE OUT OF THIRD PARTY CLAIMS AGAINST THE ORIGINAL PURCHASER. THE ESSENCE OF THE PROVISION IS TO LIMIT THE POTENTIAL LIABILITY OF EIZO AND DISTRIBUTERS ARISING OUT OF THIS LIMITED WARRANTY AND/OR SALES.
Recycling Information
Recycling Information
This product, when disposed of, is supposed to be collected and recycled according to your country's legislation to reduce environmental burden. When you dispose of this product, please contact a distributor or an affiliate in your country.
The contact addressees are listed on the EIZO website below.
http://www.eizo.com
For recycling information for customers in Switzerland, please refer to the following website.
http://www.swico.ch
Copyright © 2008-2012 EIZO NANAO CORPORATION All rights reserved.

PRINTED WITH SOYINK
Printed in Japan.12th Edi
00N0L458M1
(U.M-EASYPIX-AL)
- 重要
- Table of Contents
- PRECAUTIONS 2
- Chapter 1 Introduction ----5
- Chapter 2 Setting Up 6
- Chapter 3 How to Adjust the Monitor 17
- Chapter 4 Periodic Monitor Adjustment 35
- Chapter 5 Other Functions 37
- Chapter 1 Introduction
- 1-1. Features
- 1-2. Package Contents
- Chapter 2 Setting Up
- 2-1. System Requirement
- Windows
- Note
- Macintosh
- 2-2. Installing EasyPIX Software
- Prepare for installation
- ■ To install the software from the "EIZO EasyPIX Software" CD-ROM
- Tips
- ■ To download and install the software from our website
- Select the setup language
- Click "Next"
- Confirm the software license agreement
- Specify the location to install the software
- Start the installation Click "Install".
- Click "Install"
- Set the preferences
- Confirm the software license agreement
- Finish the installation
- Double click "EIZO EasyPIX Software.pkg"
- Click "Continue"
- Confirm the software license agreement
- 2-3. Connecting
- Connect the USB upstream port of monitor and the USB downstream port of PC with the EIZO USB Cable (MD-C93) supplied with your monitor
- Connect the sensor to the USB downstream port of PC
- Chapter 3 How to Adjust the Monitor
- 3-1. Flow Diagram
- 3-2. Setup EIZO EasyPIX Software
- Turn on both the monitor and the PC 30 minutes before monitor adjustment (= warming up)
- Set the display resolution and colors of the PC
- 3-3. Starting EIZO EasyPIX Software
- Windows 8
- Click the tile displayed as "EIZO EasyPIX" in the Start Screen (or double-click the shortcut icon on the desktop)
- Windows 7 / Windows Vista / Windows XP
- Click "Start" - "All Programs" - "EIZO" - "EIZO EasyPIX" - "EIZO EasyPIX" (or double-click the shortcut icon on the desktop)
- Double-click "EIZO EasyPIX" in the "Applications" folder
- 3-4. Adjusting the Monitor
- On the Main Window, select a number under which the adjustment result is to be stored
- Start adjustment
- Select a purpose
- Matching
- Viewing photos
- General use such as Web browsing
- Calibration (for advanced users)
- When "Matching" is selected (When using the sensor)
- When "Matching" is selected (When not using the sensor)
- When "Viewing photos" is selected
- When "General use such as Web browsing" is selected
- When "Calibration (for advanced users)" is selected
- Start measurement
- Specify the adjustment name
- The adjustment result is stored and reflected to the Main Window
- Click the "Close Main Window" button to close the Main Window
- 3-5. Performing Fine Adjustment of the Monitor
- Click the "Finely Adjust" button of the Main Window
- Finely adjust the color and brightness.
- Go to Step 3 (page 33).
- Start measurement
- Specify the adjustment name
- 3-6. Switching the Setting
- Chapter 4 Periodic Monitor Adjustment
- Click the "Readjust" button of the Main Window
- Start measurement
- Specify the adjustment name
- Chapter 5 Other Functions
- 5-1. Setting Preferences
- Open Preferences
- Confirm or change settings
- Starting EIZO EasyPIX Software Automatically
- Showing EIZO EasyPIX Software on the Taskbar (Only for Windows)
- Choosing the Screen Design
- Notifying when to Readjust the Monitor
- Displaying the Software Version
- Checking the Latest Software
- 5-2. Showing User's Manual
- 5-3. Exiting EIZO EasyPIX Software
- 5-4. Uninstalling EIZO EasyPIX Software
- Windows 8 / Windows 7 / Windows Vista
- Windows XP
- 5-5. Monitor Display Area Setting Utility (Only for Windows with USB Connection)
- Click "Start" - "All Programs" - "EIZO" - "EIZO EasyPIX" - "DisplayAreaSettingUtility"
- Monitor Display Area Setting Utility starts
- Specify the monitor for which you want to specify the display area
- Finish specifying the display area
- Chapter 7 Specifications of Sensor
- Dimensions
- For U.S.A, Canada, etc. (rated 100-120 Vac) Only
- Canadian Notice
- For Europe, etc. (rated 200-240 Vac) Only
- Warning
- Warnung
- Recycling Information
Brand : EIZO
Model : EasyPIX 2
Category : Measurement